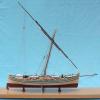
Blackie Posted May 11, 2013 Share #1 Posted May 11, 2013 I started this AL kit Harvey some 12 years after 2 other kit builds - Mercury and Panart Saint Lucia, a tartan. The build progressed very slowly and I abandoned it about 8 years ago due to work and other interests. Finally in mid last year I was able to get back to it and I finished the hull planking just before Christmas. However, about then I began a lot of research into Baltimore clippers and I realised that the Harvey kit is "not true to form". My version of the kit materials-wise does seem to be quite good compared to those that I have read about so perhaps the kit has deteriorated over the past decade. Anyway, I now see that the deck layout could not be as shown in the kit and I have decided to scratch build my deck fittings to a new layout and I have almost completed a scratch build of the jolly boat for the stern davits. The deck fittings are made but not attached and I am also building new cannon carriages about half the size of the kit parts - this is the correct size as far as I can determine using the same brass cannon in the kit which seem to be 4 pounders. I must admit that I have been a bit distracted by other things and doing some research on the rigging but hope to get going again now on the build. I welcome any comments. Gabek, tasmanian, Gahm and 12 others 15 Quote Current build: Amati Shamrock V 1:80 Past Builds: Kits: Schooner for Port Jackson, MSY and St Lucia (Tartane), Panart, Modified Harvey, AL Scratch: Captain Cook III Pilot Steamer, Kookaburra II motor launch, Sydney Heritage Fleet Steam Tug Waratah Link to comment Share on other sites More sharing options...
russ Posted May 11, 2013 Share #2 Posted May 11, 2013 This is a nice looking model. Your planking is well done. Russ Quote T'aint a hobby if you hurry Completed projects Cross section model by Russ 1/48 scale Biloxi schooner model restoration 1/24 scale Biloxi oyster skiff 1/24 scale Biloxi schooner 1/48 scale POB Current project Biloxi lugger Captain Roy 1/48 scale POB Link to comment Share on other sites More sharing options...
fnkershner Posted May 12, 2013 Share #3 Posted May 12, 2013 (edited) Very nice work! Boy I would like to work next to you on that planking. Very clean and it looks so good! I really like what you did with the boat. Ok Now lets talk about the deck furniture arrangement. I agree about moving the pumps aft. You want to be able to reach the deepest point of the bilge. From what I have read that is very near the base of the main mast. I would like to see more of what you did for the cabin. I still haven't decided what to do there. Also I moved the 2 cannons furthest aft forward. The weight of those cannons should be supported by the buoyancy of the bow. Very nice work on the windlass. I also like what you did with the main hatch. Is that a stove pipe aft of the forward Hatch? Don't you need gratings to get air below? I can't wait to see more! 1820 is getting to the very end of the Baltimore clippers life. They were small and fast, but they didn't carry much. With the end of the war of 1812. They quickly started to die out. I am aiming for a time period of about 10 to 15 yrs. earlier. What do you plan to do about the cannon shot? Inquiring minds want to know! Edited May 12, 2013 by Floyd Kershner EricWilliamMarshall 1 Quote Current Builds - 18th Century Longboat, MS Syren Completed Builds - MS Bluenose, Panart BatteStation Cross section, Endevour J Boat Half Hull, Windego Half Hull, R/C T37 Breezing Along, R/C Victoria 32, SolCat 18 On the shelf - Panart San Felipe, Euromodel Ajax, C.Mamoli America, Its a sailor's Life for me! Link to comment Share on other sites More sharing options...
Blackie Posted May 12, 2013 Author Share #4 Posted May 12, 2013 (edited) Hi Floyd and Russ Thanks for comments. Floyd, now to try and answer your queries. The planking was a long time in the making. I divided the hull into 4 and then used a flexible tape and proportional dividers to determine each plank width at each bulkhead/frame. I agree with you about the pump location. It must be as far aft as possible to get into the lowest depth of the bilge and just behind the main mast seems the correct location for the Harvey model. I have attached shots of the binnacle, cabin, pump and galley stove pipe. The binnacle is from Karl Heinz Marquardt's book The Global Schooner p201. It is 3 compartments, each with vertical sliding panels; the centre section is for a light and so the ring on top is the "chimney", the outer sections had compasses in them. Charles Davis in The Built-Up Ship Model also shows a box-type binnacle. The cabin is my version as I did not like the clumsy kit one. I believe that the companionway covering/hatch would be better integrated with the companion light. I do not have any gratings though I did make them from the kit and have retired them to the "extras" box. I don't believe that a single deck vessel such as the Baltimore clipper with low freeboard would be fitted with gratings over the hatches even if they could be covered and battened - why not just fit solid hatch covers to keep the hold reasonably dry, which can be removed relatively easily at anytime for ventilation compared to canvas covers and battens? Yes, it is a stove pipe and a small hatch ahead of it to get some air in over the stove. Cannon shot will be fitted into racks alongside the main hatch. I have bought some smaller shot (2mm balls) to fit better with my idea that the cannon are 4 pounders. I agree with your comment about moving the aftmost cannon forward. Its a pity that when I built the bulwarks a few years ago, I did not know as much about Baltimore clippers as I think I do now. I am thinking about cutting in cannon port up forward about inline with the foremast or perhaps just forward of the foremast channels. Finally, my date of 1820 was a bit of guesswork based on Howard Chapelle's The Baltimore Clipper Its Origin and Development in which he talks about the design being used by slavers after the 1812 war as it was very fast and could sometimes outrun the Royal Navy cruisers. On reflection my deck layout might be a bit influenced by Chapelle's comments on slavers which went for unencumbered decks with smaller and fewer openings. That said Chapelle's book has a number of drawings of clippers and similar vessels which all show few deck fittings and dates of 1811, 1815, 1816, 1817, or so. Hmmm. these fittings look OK in real-life but a bit rough under the macro lens. Edited May 12, 2013 by Blackie Gahm, EricWilliamMarshall, Salty Sea Dog and 9 others 12 Quote Current build: Amati Shamrock V 1:80 Past Builds: Kits: Schooner for Port Jackson, MSY and St Lucia (Tartane), Panart, Modified Harvey, AL Scratch: Captain Cook III Pilot Steamer, Kookaburra II motor launch, Sydney Heritage Fleet Steam Tug Waratah Link to comment Share on other sites More sharing options...
fnkershner Posted May 12, 2013 Share #5 Posted May 12, 2013 (edited) I very much like your pump a huge improvement from the kit. I also like your Binnacle. Have you thought about the Ship's bell? I am going to mount my bell on the binnacle similar to what Chuck did in the Syren. Your companion way looks very much like Chuck's Syren. Are you going to blacken the stove pipe? If there are no gratings how does the crew get air? I would suggest that If she is a slaver then she definitely needs more gratings. Also if she is a slaver she doesn't need cannons. Those 4 lb balls will only *iss off the Royal Navy. I am aiming for the period of 1800 to 1817 so there is a need for fire power. And I expect I will have a busier deck. But if I had done such a nice job planking the deck I would probably be less inclined to cover it up. My last question is would a ship of this type use both a Windlass and a Capstan? I am guessing but the windlass would require fewer crew and could also handle the sail trimming duties if the lines were led forward. I wouldn't worry about the macro lens. It is almost as critical as we are. Thanks for all the ideas I think you have helped to complete my deck furniture at least in my mind. Edited May 12, 2013 by Floyd Kershner Quote Current Builds - 18th Century Longboat, MS Syren Completed Builds - MS Bluenose, Panart BatteStation Cross section, Endevour J Boat Half Hull, Windego Half Hull, R/C T37 Breezing Along, R/C Victoria 32, SolCat 18 On the shelf - Panart San Felipe, Euromodel Ajax, C.Mamoli America, Its a sailor's Life for me! Link to comment Share on other sites More sharing options...
Blackie Posted May 14, 2013 Author Share #6 Posted May 14, 2013 (edited) Floyd I do some volunteer modelling work for the local Heritage Fleet and so asked some questions about my version and the replies were: Gratings - vessels this size would not have them. Too risky re shipping water and the crew just made do for ventilation. That is what happens with the Sydney Heritage Fleet's James Craig when at sea and it is a much bigger vessel (3 masted barque) with a lot of free-board. I am going to move my main hatch aft to be more central between the masts. Capstan vs windlass - if you must lose one of them, then keep the capstan. Certainly nearly all of the drawings in Chapelle's book show capstans and no windlass. The windlass is more of a fitting for merchant ships and as some of the Baltimore Clipper vessels of the 1812 war came from "civilian" use vessels, it does not seem inappropriate to have a windlass as well as the capstan. I have to think about this some more but no matter which way i go, I am keeping the capstan. Cannon locations: 4 pounders are OK size with 9-12 pound max and as I do not want a slaver, and I have the kit cannons I will retain the cannons as they are in size. However, the aft cannon should be moved forward to fire between the forward shrouds. Only have aft location if the vessel had 6 to 8 cannons on each side. That means I need to cut another gun port and plan to separate the shrouds slightly. Brass stove pipe: I will not paint it black as all of my metal will stay brass - I am not painting the model to be "real". In past years I used a copper sulphate solution (I think) to blacken the brass and it gave the metal a nice dull black/very dark grey colour which is better than paint. Nowadays I can't remember the formula or where I bought the copper sulphate from. I will revise my deck plan and repost it for anyone who might view this log. Next job is to re plan the rigging, both standing and running as I don't believe that the kit shows it correctly. Edited May 15, 2013 by Blackie Quote Current build: Amati Shamrock V 1:80 Past Builds: Kits: Schooner for Port Jackson, MSY and St Lucia (Tartane), Panart, Modified Harvey, AL Scratch: Captain Cook III Pilot Steamer, Kookaburra II motor launch, Sydney Heritage Fleet Steam Tug Waratah Link to comment Share on other sites More sharing options...
fnkershner Posted May 14, 2013 Share #7 Posted May 14, 2013 Thanks for the responses. This is helping me decide what I want as well. I am eager to see your final deck plan and even more interested to see what you do with the rigging. This is another area I have not yet tackled. I agree it needs improvement. Quote Current Builds - 18th Century Longboat, MS Syren Completed Builds - MS Bluenose, Panart BatteStation Cross section, Endevour J Boat Half Hull, Windego Half Hull, R/C T37 Breezing Along, R/C Victoria 32, SolCat 18 On the shelf - Panart San Felipe, Euromodel Ajax, C.Mamoli America, Its a sailor's Life for me! Link to comment Share on other sites More sharing options...
Blackie Posted May 17, 2013 Author Share #8 Posted May 17, 2013 (edited) Attached is my latest deck plan which shows changes as follows: - aft cannon moved forward to be positioned between two of the shrouds - two small ladder way hatches for crew located aft and forward of the main area below deck and main hatch more central between the masts - stove pipe and hatch aft of the foremast - retention of the windlass. Note that this could be deleted as the capstan can be used to retrieve the anchor using a continuous messenger run along the deck between hawse holes and capstan I am now looking into revising the AL kit rigging. Edited May 17, 2013 by Blackie Quote Current build: Amati Shamrock V 1:80 Past Builds: Kits: Schooner for Port Jackson, MSY and St Lucia (Tartane), Panart, Modified Harvey, AL Scratch: Captain Cook III Pilot Steamer, Kookaburra II motor launch, Sydney Heritage Fleet Steam Tug Waratah Link to comment Share on other sites More sharing options...
fnkershner Posted May 17, 2013 Share #9 Posted May 17, 2013 (edited) I like it. I must confess I chickened out on the location of the forward set of cannons. I just moved then slightly further forward just so I didn't have to mess with the shrouds. I am sure your way is much more accurate. Oh well. One more suggestion - I believe the anchor cable was stowed near the bow. I would not lead it aft of the foremast. And finally a question - Since the Capstan is primarily used for managing the sails. wouldn't it be found between the masts? With the bars stowed it would not get in the way of the main hatch. Personally I would enlarge the cabin. This is officer country! Give them some room. Edited May 21, 2013 by Floyd Kershner Quote Current Builds - 18th Century Longboat, MS Syren Completed Builds - MS Bluenose, Panart BatteStation Cross section, Endevour J Boat Half Hull, Windego Half Hull, R/C T37 Breezing Along, R/C Victoria 32, SolCat 18 On the shelf - Panart San Felipe, Euromodel Ajax, C.Mamoli America, Its a sailor's Life for me! Link to comment Share on other sites More sharing options...
Blackie Posted May 21, 2013 Author Share #10 Posted May 21, 2013 Hi Floyd I am OK with the cable going aft which is where the weight can be carried and there is room below, especially on this single deck vessel to stow it away from the crew in the forecastle around the foremast. From what I am reading it was usual to take it aft through and below the main hatch and if it came aboard dirty it could be washed and the water ran aft to the pumps just aft of the main mast. In Chapelle's book, his drawings all show the capstan aft of the main mast except for one plan in which case I guess one can place it between the masts In my other book on schooners, if a capstan is shown it is nearly always shown aft of the main mast. Again not in every case and in a few the windlass is sometimes shown aft of the foremast. So there can be found examples of just about anywhere you want to place these fittings - up to you and me. I now have an idea of the rigging and will post sketches soon. Generally I am going with 3 shrouds and one back stay fitted to channels with a running back stay also on each mast. I will delete the kit's upper ratlines (from trees upwards) on the main mast and I will rejig some of the connections to better show reality. I am also going to recut some of the jib sails to get the sheet to pull evenly on the leech and foot and tie at the logical pin. fnkershner 1 Quote Current build: Amati Shamrock V 1:80 Past Builds: Kits: Schooner for Port Jackson, MSY and St Lucia (Tartane), Panart, Modified Harvey, AL Scratch: Captain Cook III Pilot Steamer, Kookaburra II motor launch, Sydney Heritage Fleet Steam Tug Waratah Link to comment Share on other sites More sharing options...
fnkershner Posted May 21, 2013 Share #11 Posted May 21, 2013 Blackie - Thanks for the responses. I am going to take a look at my deck plan and make some changes. We move to our new home this week, so it may be another week before I can get back to the model. Are you planning to have her with full sails? What reference did you use for the Rigging? I was just today looking at a picture of the Baltimore Clipper II under full sail. I see that as you mentioned she has 3 shrouds and a backstay. I think you have this part correct. I am going to enjoy watching your rigging. Are you going to add the stun sail booms? I see them on the BC II. Quote Current Builds - 18th Century Longboat, MS Syren Completed Builds - MS Bluenose, Panart BatteStation Cross section, Endevour J Boat Half Hull, Windego Half Hull, R/C T37 Breezing Along, R/C Victoria 32, SolCat 18 On the shelf - Panart San Felipe, Euromodel Ajax, C.Mamoli America, Its a sailor's Life for me! Link to comment Share on other sites More sharing options...
Blackie Posted May 30, 2013 Author Share #12 Posted May 30, 2013 (edited) A bit more reading and so some more tinkering. Now I must get down to doing some work on it. I have thought about Floyd's comment re positioning the forward cannon forward of the shrouds and think that I also will do this - Easier to build but also shown on images of Baltimore Clippers in books that I have been reading and the cannon fire is further away from the shrouds. Spars: I am starting with the foremast and don't like the look of the masthead - it looks too short in the kit drawings. Again using my library for reference, Charles Davis in his book Ship Model Builder's Assistant p52-53 discusses the masthead length and states that up to about 1800 the masthead was quite short and about 1/6 of the mast length. After 1800 or so the masthead began to lengthen but he still has a BC masthead at 1/6 of mast. I have lengthened masthead on the Harvey model to 55mm which is about 1/7 and looks about right. I also show how I will taper the foremast and the changes in shape that I hope to achieve. I have changed the mast top to shorten the cross trees and move them - perhaps I will add a third cross tree forward of the top mast but other two as shown. I have yet to decide about the stunsail booms. Rigging: I am definitely going with 3 shrouds on the lower mast and 2 shrouds on the top mast plus a standing backstay and a running backstay. I am almost set for the bowsprit and jib boom rigging as shown in my sketch - perhaps the martingale fixing to the hull will slide a bit. I am yet to decide on where the various forestays attach to the foremasts but will go with only 3 foresails not the 4 shown in the kit drawings. Edited May 30, 2013 by Blackie harvey1847 1 Quote Current build: Amati Shamrock V 1:80 Past Builds: Kits: Schooner for Port Jackson, MSY and St Lucia (Tartane), Panart, Modified Harvey, AL Scratch: Captain Cook III Pilot Steamer, Kookaburra II motor launch, Sydney Heritage Fleet Steam Tug Waratah Link to comment Share on other sites More sharing options...
fnkershner Posted May 30, 2013 Share #13 Posted May 30, 2013 I like the changes you have made in the bow sprit. The kit calls for the martingale to go thru the bow sprit and act as a flag staff. This is totally wrong. First it weakens a critical spar at just the wrong point. I believe the model was designed by someone who has never seen a true sailing ship. Also the kit calls for lots of chain. Again this would have been very heavy at the wrong point and very expensive for the time period. I can't wait to finish unpacking and check the lengths of my masts etc. Quote Current Builds - 18th Century Longboat, MS Syren Completed Builds - MS Bluenose, Panart BatteStation Cross section, Endevour J Boat Half Hull, Windego Half Hull, R/C T37 Breezing Along, R/C Victoria 32, SolCat 18 On the shelf - Panart San Felipe, Euromodel Ajax, C.Mamoli America, Its a sailor's Life for me! Link to comment Share on other sites More sharing options...
Blackie Posted May 31, 2013 Author Share #14 Posted May 31, 2013 Hi Floyd Yes I agree about the chains - BC in 1810-1815 would surely have had rope martingales and bowsprit shrouds, especially when you consider where they were built. I also agree about the flag staff - why would a privateer/letter of marque vessel have one, especially on the bow sprit where it would interfere with the foresails. I am setting the bowsprit cap vertical with the dolphin striker also vertical and attached to the forward face of the cap. Davis says this is the American way but some of the images of the BC show them slightly off vertical. When you are unpacked and have a chance to get at the kit, please let me know what you intend to do with your masts re length, shape and tops and any other configuration of the bow rigging. With the martingales and bowsprit shrouds, I am trying to stay clear of the anchor cable as it trails from hawse hole to cathead, which I have also changed to be the "angled" type over rather than through the bulwark. The type on the kit appears to be the type used when there is little or no bulwark to get in the way of the men attempting to secure the anchor. Quote Current build: Amati Shamrock V 1:80 Past Builds: Kits: Schooner for Port Jackson, MSY and St Lucia (Tartane), Panart, Modified Harvey, AL Scratch: Captain Cook III Pilot Steamer, Kookaburra II motor launch, Sydney Heritage Fleet Steam Tug Waratah Link to comment Share on other sites More sharing options...
fnkershner Posted May 31, 2013 Share #15 Posted May 31, 2013 Will do Blackie. I think it will be another week. Quote Current Builds - 18th Century Longboat, MS Syren Completed Builds - MS Bluenose, Panart BatteStation Cross section, Endevour J Boat Half Hull, Windego Half Hull, R/C T37 Breezing Along, R/C Victoria 32, SolCat 18 On the shelf - Panart San Felipe, Euromodel Ajax, C.Mamoli America, Its a sailor's Life for me! Link to comment Share on other sites More sharing options...
Blackie Posted June 7, 2013 Author Share #16 Posted June 7, 2013 HI Floyd When you get time, another query of mine relates to the rake of the masts. I said above that I was staying with the kit angles but since then I have been re-reading my book about the two Pride of Baltimore vessels. The book shows sail plans of both vessels and writes about the mast angles for PoBI. It implies that for PoBI the mast angles were: main 17o off the vertical and 2.5-3o less for the foremast. The drawings measure at: PoBI main mast 17o, foremast 14o. For PoBII: main mast 16o and foremast 14o. Meanwhile the kit has the masts at main mast 9o and foremast 8o. Can you shed any light on how to proceed? Quote Current build: Amati Shamrock V 1:80 Past Builds: Kits: Schooner for Port Jackson, MSY and St Lucia (Tartane), Panart, Modified Harvey, AL Scratch: Captain Cook III Pilot Steamer, Kookaburra II motor launch, Sydney Heritage Fleet Steam Tug Waratah Link to comment Share on other sites More sharing options...
fnkershner Posted June 8, 2013 Share #17 Posted June 8, 2013 All I can say is good eye! That is quite a rake for PoBII. No wonder they lost most of their rigging when the bow sprit broke off France a few years ago. I may have mentioned that this model has been with me for more than 10 yrs. Actually closer to 20. it has now been thru at least 2 moves. There was a time when I was a new to this hobby that I stated the build just following the plans. Now that I am a more experienced beginner I am looking at the build more critically. I mention this because I had already shaped and assembled the masts. I even drilled the holes for the masts. So I am not sure what I will do. I can tell you that in my new house my build table is right here next to the computer and she is calling to me. She sits in the vice ready for me to finish the 2nd layer of planking. Now all I need to do is find the Dremel. Quote Current Builds - 18th Century Longboat, MS Syren Completed Builds - MS Bluenose, Panart BatteStation Cross section, Endevour J Boat Half Hull, Windego Half Hull, R/C T37 Breezing Along, R/C Victoria 32, SolCat 18 On the shelf - Panart San Felipe, Euromodel Ajax, C.Mamoli America, Its a sailor's Life for me! Link to comment Share on other sites More sharing options...
Blackie Posted June 9, 2013 Author Share #18 Posted June 9, 2013 Thanks Floyd and good luck with the Dremel and the planking. As long as you haven't fitted the masts there is still time to fiddle with them. There is a MSW forum about masts and the advice was to oversize the opening in the deck and fit wedges after you have found the angle of the rake that best suits you. I think that I will go with that advice (Aussie spelling) after I have formed and assembled the masts. Cheers Quote Current build: Amati Shamrock V 1:80 Past Builds: Kits: Schooner for Port Jackson, MSY and St Lucia (Tartane), Panart, Modified Harvey, AL Scratch: Captain Cook III Pilot Steamer, Kookaburra II motor launch, Sydney Heritage Fleet Steam Tug Waratah Link to comment Share on other sites More sharing options...
Blackie Posted July 26, 2013 Author Share #19 Posted July 26, 2013 I am now working on the masts. The bowsprit, jib boom, foremast and fore topmast are advanced with assorted bits for support all fitted with blu-tack so far as shown in the images. I am a little puzzled by the way to attach blocks and stays to the mast cap. I have made a strap to fit around the mast cap with tabs to which the fittings will be attached. However, I am unsure if this is correct. Perhaps a few eyebolts is what should be fitted. Any comments? I also made a rudder and tiller rather than use the kit versions - images are attached. tasmanian, harvey1847, maso and 1 other 4 Quote Current build: Amati Shamrock V 1:80 Past Builds: Kits: Schooner for Port Jackson, MSY and St Lucia (Tartane), Panart, Modified Harvey, AL Scratch: Captain Cook III Pilot Steamer, Kookaburra II motor launch, Sydney Heritage Fleet Steam Tug Waratah Link to comment Share on other sites More sharing options...
ZyXuz Posted July 26, 2013 Share #20 Posted July 26, 2013 very nice work, Blackie! I love especially the rudder tiller Quote Visit My Blog! http://malaysiamodelship.blogspot.com/ Previous Build: HMS Race Horse (Sergal) Current Build: HMS Unicorn (Corel) Link to comment Share on other sites More sharing options...
fnkershner Posted July 26, 2013 Share #21 Posted July 26, 2013 Blackie - Just a few comments. First I love what you have done with the Rudder & Tiller. But do you think that even 2 Quartermasters could handle this tiller for a ship of this size? I suggest there would have been more to it. I also like your work on the masts. Do you intend to blacken the eyes? I also have wondered about the attachment of the rigging for this period. I will keep an eye out for the results of your query. Quote Current Builds - 18th Century Longboat, MS Syren Completed Builds - MS Bluenose, Panart BatteStation Cross section, Endevour J Boat Half Hull, Windego Half Hull, R/C T37 Breezing Along, R/C Victoria 32, SolCat 18 On the shelf - Panart San Felipe, Euromodel Ajax, C.Mamoli America, Its a sailor's Life for me! Link to comment Share on other sites More sharing options...
Blackie Posted July 30, 2013 Author Share #22 Posted July 30, 2013 Hi Floyd Thanks for the comments. Every source that I have show these vessels with tillers rather than wheels. The tillers appear to be about 7 to 9 feet long. Pride of Baltimore I had a tiller. However, I take your point and I believe that only the smaller vessels would have been steered by hand. So I will be adding steering tackle from the tiller to blocks on the deck or bulwarks which would add purchase to the operation of the tiller. I also intend to add two rudder pendants when the rudder is fitted permanently. I am unsure what you mean by "blacken the eyes". Mostly this model will be clear finished timber and unpainted brass for the metalwork. I am now thinking of removing the metal band around the mast cap and adding eyebolts to take the various blocks, etc. Quote Current build: Amati Shamrock V 1:80 Past Builds: Kits: Schooner for Port Jackson, MSY and St Lucia (Tartane), Panart, Modified Harvey, AL Scratch: Captain Cook III Pilot Steamer, Kookaburra II motor launch, Sydney Heritage Fleet Steam Tug Waratah Link to comment Share on other sites More sharing options...
harvey1847 Posted September 10, 2013 Share #23 Posted September 10, 2013 Hi Blackie! Love the work on the rudder and the entire work you´ve done so far. This ship was the first I did years ago. Took me 1516 hours during a year and a halve. In the top mast you should put a chock all across the top mast or just two pieces of wood on each side of the mast. It´s a nice detail. I´ll try to put a pic of it but my Harvey is all dusty and in not very good conditions. It´s the bad thing of not having a glass case to protect it. Shame on me. Best wishes and keep going! Daniel. Quote In the shipyard: HMS Triton 1773. POF. 1:48. Daniel On the computer: R.A. Principe de La Paz. POF. 1:48. Daniel Link to comment Share on other sites More sharing options...
Blackie Posted September 11, 2013 Author Share #24 Posted September 11, 2013 (edited) Thanks Daniel for the comments. Do you mean the fid? A square or rectangular section of timber that passes through the mast to rest on the trestletrees. If so it is in the photos. If that is not it, can you explain further what you mean. Since taking the photos I have also fitted a sheave to take the lift of the lower yard. I can't add any pictures just now as I am travelling but will try to remember when I return home in October and have started on the yards. Blackie Edited September 11, 2013 by Blackie Quote Current build: Amati Shamrock V 1:80 Past Builds: Kits: Schooner for Port Jackson, MSY and St Lucia (Tartane), Panart, Modified Harvey, AL Scratch: Captain Cook III Pilot Steamer, Kookaburra II motor launch, Sydney Heritage Fleet Steam Tug Waratah Link to comment Share on other sites More sharing options...
harvey1847 Posted September 11, 2013 Share #25 Posted September 11, 2013 (edited) Exactly, the fid, the one that passed through the top mast. Sorry if I have not been able to see it on the pics attached. < I can see it now > Here are some photos of mine. I´ve attached some other pics of the details I put on her years ago. Ther we go... This is the fid, I did it in two pieces, one in both sides. This is the rudder rigging. and this is a detail of the standing rigging of the masts. I´ll try to clean the ship and put lots of pics in the finished gallery. Regards. Daniel. Edited September 11, 2013 by harvey1847 Quote In the shipyard: HMS Triton 1773. POF. 1:48. Daniel On the computer: R.A. Principe de La Paz. POF. 1:48. Daniel Link to comment Share on other sites More sharing options...
Blackie Posted October 13, 2013 Author Share #26 Posted October 13, 2013 I am back home and slowly getting back to the model. I still have lots to do and am jumping around a bit but one of the things I am looking at is the fixing for the sheet for the mainmast gaff sail. I do not like the model option of a ring bolt in the transom rail - it seems too flimsy to take the force. Drawings and a replica built in Tasmania for a 19th C schooner use a horse. I my case this would be about 800mm above the deck and say 1000mm wide to clear over the tiller. Does anyone know what else could be used? I can think of say fixing a timber across the transom frames to take the load of a central ring bolt. The Pride of Baltimore 1 had a ring bolt fitted to two transom frames on both sides of the boat but in the Harvey this would mean the sheet rubs on the bulwark. Should I put this on another forum? Blackie Quote Current build: Amati Shamrock V 1:80 Past Builds: Kits: Schooner for Port Jackson, MSY and St Lucia (Tartane), Panart, Modified Harvey, AL Scratch: Captain Cook III Pilot Steamer, Kookaburra II motor launch, Sydney Heritage Fleet Steam Tug Waratah Link to comment Share on other sites More sharing options...
Blackie Posted November 10, 2013 Author Share #27 Posted November 10, 2013 I am just adding an image of some of the fittings that I have been working on. The rigging will be the bobstays and they were made by twisting copper wire to form a strand of the required diameter and then serving the strand with cotton thread. The yard is the lower foremast yard. All comments are welcome. tasmanian and fnkershner 2 Quote Current build: Amati Shamrock V 1:80 Past Builds: Kits: Schooner for Port Jackson, MSY and St Lucia (Tartane), Panart, Modified Harvey, AL Scratch: Captain Cook III Pilot Steamer, Kookaburra II motor launch, Sydney Heritage Fleet Steam Tug Waratah Link to comment Share on other sites More sharing options...
ASAT Posted November 11, 2013 Share #28 Posted November 11, 2013 Very nice, excellent metal work on that mast, glad you are back to your harvey, I have been stealing some of your ideas on mine and I am starting to rig mine as well. Keep those pictures coming! Lou Quote Lou, In Pleasant View Harvey by ASAT- AL Scale 1:50 - Kitbash Fair American by ASAT - LSS Craftsman Plus https://modelshipworld.com/topic/23121-revenge-1577-by-asat-amati-164/ Link to comment Share on other sites More sharing options...
Blackie Posted November 13, 2013 Author Share #29 Posted November 13, 2013 (edited) Lou You are welcome to anything. Attached are some revised sketches of what I am doing (thinking?) They are updates of the earlier versions and are more accurate re length of spars and where I think the rigging is going. Note the saddle between the bowsprit and cutwater to allow the gammon lashing to get through the gap. It is important to tighten the gammon as it takes so much strain and the saddle will also support the bowsprit, especially side to side. I also have a spreadsheet of rigging sizes plus hearts, blocks and dead eye sizes that I am using if you are interested. Edited November 14, 2013 by Blackie Quote Current build: Amati Shamrock V 1:80 Past Builds: Kits: Schooner for Port Jackson, MSY and St Lucia (Tartane), Panart, Modified Harvey, AL Scratch: Captain Cook III Pilot Steamer, Kookaburra II motor launch, Sydney Heritage Fleet Steam Tug Waratah Link to comment Share on other sites More sharing options...
ASAT Posted November 13, 2013 Share #30 Posted November 13, 2013 Wow Blackie, those drawings are great! I see what you mean about the bowsprit needing a saddle, I will incorporate that as well. Is the yoke affixed (wrapped) to the sprit with a line? I think now that I see the drawing, your picture looks like you chamfered a groove to accept the line, at first glance I thought it was a plywood piece from your kit..... I may have to re do that on mine - I did not see it before attaching to the sprit. I will have to re make my jibboom collars as well but thats not a big deal. Do you have any revised drawings for the Fore and Mainmasts? The kit I have shows a fighting top on the foremast and I did not think that was correct so I built it like the main with crosstrees and trestletrees instead and there is no real rigging plan just a single side view with the sails covering most of the rigging... very poor. As you can probably tell, I am not very well versed at rigging, I can follow plans and instructions but my knowledge on it is minimal. I am in awe of the amount of talent and willingness to share that is available on this site. I would love to have the spreadsheet you offered, I will PM you my email.... are you drawing plans for anything else? I am looking for a good scratchbuild project and your plans are a lot better than some I have been looking at.... You know, maybe a 1/64 Ardent Class or something easy like that... :) Thank you again, between you and Kruginmi, I have been able to turn this kit into a fair rendition of the genre Lou Quote Lou, In Pleasant View Harvey by ASAT- AL Scale 1:50 - Kitbash Fair American by ASAT - LSS Craftsman Plus https://modelshipworld.com/topic/23121-revenge-1577-by-asat-amati-164/ Link to comment Share on other sites More sharing options...

Recommended Posts
Join the conversation
You can post now and register later. If you have an account, sign in now to post with your account.