Sumner Posted February 23, 2013 Share #1 Posted February 23, 2013 This is a reconstruction of the build log for my first wooden ship build, which I started in July 2011. Most of the construction on this model took place through the second half of 2011, before I took on a new role at work during early 2012 and moved to a new city. I can't overstate how important MSW has been to me throughout this build. The MSW forums are a great resource and an ongoing source of inspiration for me, and I doubt whether I would have been able to get as far as I have with this model without this site and the community here. Like many, I was disappointed when v1.0 of the site crashed and everything was lost. But I've been impressed by the speed with which moderators and other members have come together to rebuild the site and reconstruct the wealth of information that existed in v1.0. Given how much I owe to the MSW community of builders, I wanted to make my own small contribution to the reconstruction efforts and will document the course of my build here. Instead of re-creating every post, my aim is to post as many pictures as possible to chronicle the course of my build and highlight some of the things I learned along the way. Hopefully this will help future builders just as the many Sherbourne logs on MSW v1.0 helped and inspired me. Now that we've gotten that out of the way, let's get back to the shipyard. To start, the title of this build log is not a typo. Caldercraft sells this model as HMC Sherbourne but the name on the 1763 NMM plans is HMC Sherborne, so that's what I've decided to call it. (Edit: After writing this post, I noticed that one of the admins changed the title of this topic back to "Sherbourne" instead of "Sherborne," which is fine.) I chose the model as my first kit for a couple of reasons. First, I've always liked how cutters look. Second, the model seemed like a good starting point, with only a handful of cannons and relatively modest rigging. I wanted my build to be historically accurate, within the limits of my own skill and the available resources, so I purchased copies of all the Sherborne plans in the NMM collection. They weren't cheap, but I highly recommend them. The plans highlight the many small differences between the Caldercraft kit and what the actual Sherborne probably looked like. My aim is to bash the Caldercraft kit to more closely resemble the NMM plans. Early on, I made the decision to give my model a clinker (or lapstrake) hull. This was the type of hull construction used for most cutters during the last half of the 18th century. By the early 19th century, cutters were largely built using carvel planking. Suffice it to say there has been much debate about whether or not the Sherborne was built using clinker or carvel construction. I haven't seen any conclusive evidence one way or the other. I decided on a clinker hull because I think they look cool, and that style of planking seemed to me more typical of cutters built during this period. Best, Sumner Quote ________ Current build: HMC Sherborne, kitbashed to more closely resemble the 1763 NMM plans Link to comment Share on other sites More sharing options...
Jim Lad Posted February 23, 2013 Share #2 Posted February 23, 2013 Nice to see your build back, Sumner! John Quote Link to comment Share on other sites More sharing options...
Sumner Posted February 23, 2013 Author Share #3 Posted February 23, 2013 Thanks, John! It's great to be back, and I'm pleased to see the new site growing so quickly. Best, Sumner Quote ________ Current build: HMC Sherborne, kitbashed to more closely resemble the 1763 NMM plans Link to comment Share on other sites More sharing options...
Sumner Posted February 23, 2013 Author Share #4 Posted February 23, 2013 My first impression of the kit was good. Caldercraft kits have a good reputation (one of the factors I considered when choosing this kit) and they lived up to it. Before getting started, I dry fit the bulkheads (which I had numbered to help me keep them straight later on) with the keel. Everything looked pretty good. The bulkheads will need to be beveled, but that happens a bit later in the build. One of the key tips that I picked up from some of the earlier Sherbourne build logs was to drill three small holes in the stempost (I think that's what this is called) for the forestay. If you go by the instructions, these holes are meant to be drilled much later on. It's a lot easier to drill them now. So I did. Next step was to glue the stem and keelson to the keel. In some builds logs (such as the excellent build by Daniel, which I hope gets reposted), these aren't glued until after the planking is complete. I'm not sure that it really makes much of a difference. The key thing -- which I did not do -- is to create a rabbet at this point to ensure the smooth fit of the planks later on in the build. In hindsight, I wish I'd done that, and you'll see why in subsequent posts. The difference wasn't huge, but it's one of those additions that can help make the difference between a good build and a great one. Fortunately, I did sand in a bearding line, which you can just make out at the aft end of the keel. This also helps to ensure the planks fit well, and makes a significant difference in a build like this with two layers of planking. More to come. Best, Sumner Quote ________ Current build: HMC Sherborne, kitbashed to more closely resemble the 1763 NMM plans Link to comment Share on other sites More sharing options...
tkay11 Posted February 23, 2013 Share #5 Posted February 23, 2013 (edited) It's great that you decided to repost, Sumner. I was missing that log. It's been such a great help with my own build. Looking forward to the rest. At the moment I'm trying to build a ship's boat for it -- which has been another fun learning experience. Oh, I forgot to add. I saw after I posted this message that you've got much better tags than I. Very good idea to have the different spellings of Sherborn in light of the different names for the plans. Tony Edited February 23, 2013 by tkay11 Quote === First build: Caldercraft HM Cutter Sherbourne 1763 FINISHED 2nd build: Triton cross-section COMPLETED 3rd build: La Chaloupe Armée / 42ft Armed Longboat of 1834 by tkay11 – scale 1:36, plans by M. Delacroix COMPLETED 4th build: Allège d’Arles 1833 (Ancre) POB by tkay11 – scale 1:100, plans by F. Fissore COMPLETED Working on La Jacinthe 1:96 POB (ANCRE publications) Link to comment Share on other sites More sharing options...
Stockholm tar Posted February 23, 2013 Share #6 Posted February 23, 2013 As another Sherbourne builder, I'm looking forward to seeing your progress. Btw, I clinker planked mine as well. Quote Kester Current builds: Sherbourne (Caldercraft) scale – 1/64th; Statsraad Lehmkuhl (half model) 1/8th" – 1'. Victory Bow Section (Panart/Mantua) scale – 1/78th (on hold). Previous build: Bluenose ll (Billings) scale – 1/100th. Link to comment Share on other sites More sharing options...
tkay11 Posted February 23, 2013 Share #7 Posted February 23, 2013 Hello Kester! I was wondering if you're going to post pictures of your Sherbourne. You've been so helpful on a lot of builds, I definitely would like to see yours. I think you used to have the title 'Sherbourne - So far so good'. But of course that link has gone with MSW 1.0. Tony Jakub Gamrat 1 Quote === First build: Caldercraft HM Cutter Sherbourne 1763 FINISHED 2nd build: Triton cross-section COMPLETED 3rd build: La Chaloupe Armée / 42ft Armed Longboat of 1834 by tkay11 – scale 1:36, plans by M. Delacroix COMPLETED 4th build: Allège d’Arles 1833 (Ancre) POB by tkay11 – scale 1:100, plans by F. Fissore COMPLETED Working on La Jacinthe 1:96 POB (ANCRE publications) Link to comment Share on other sites More sharing options...
Sumner Posted February 24, 2013 Author Share #8 Posted February 24, 2013 Thanks for the kind note, Tony! I've likewise been pleased to see your build log renewed on MSW v2.0, and I look forward to following your progress. I've really been inspired by all the modifications/enhancements you've made to the kit. Keep up the great work! Best, Sumner Quote ________ Current build: HMC Sherborne, kitbashed to more closely resemble the 1763 NMM plans Link to comment Share on other sites More sharing options...
Sumner Posted February 24, 2013 Author Share #9 Posted February 24, 2013 Dirk: Thanks for the note! Glad to see you've restored your build log, too. Your Sherbourne is a real work of art! Kester: I know your very build well -- it's one of the inspirations (along with Daniel's build) for me to try a clinker hull. I share Tony's hope that you'll post pictures on MSW 2.0 soon. Best, Sumner Siegfried 1 Quote ________ Current build: HMC Sherborne, kitbashed to more closely resemble the 1763 NMM plans Link to comment Share on other sites More sharing options...
Sumner Posted February 24, 2013 Author Share #10 Posted February 24, 2013 After finishing the keelson and stem, the next step was to glue the bulkheads to the keel. After doing that, I filled the spaces between the fore and aft bulkheads with balsa and then started to bevel/shape the bulkheads and filler blocks using sandpaper. Next, I glued on the deck. I should add that I've used only PVA glue to this point. I know some builders prefer CA, but PVA can be easily debonded using isopropyl alcohol. PVA takes longer to set than CA, but the ability to correct and fix mistakes more than makes up for this difference. By this point, I'd already experienced one seemingly major setback when drilling the forestay holes in the stempost (shown in an earlier post). When doing that, I managed to crack the stempost. It looked like a major setback but was easily fixed with PVA glue. That was the first point where I began to appreciate how forgiving and flexible wood can be as a building material -- an important confidence builder for any novice builder. As a result, I wasn't very concerned when I cracked off a piece of the deck (as you can see in the picture below) when gluing it to the keel and bulkheads. I was using heavy duty rubber bands to glue the deck to the bulkheads and ensure it had the correct shape and camber. The damaged portion of the deck didn't have enough support for the rubber bands, and a small piece broke off. This was easily fixed. I glued the broken piece to a larger support that was glued to the bottom of the deck. I probably could have skipped fixing this since it wouldn't make much difference to the build and would not be visible in the completed model. But it was good practice to fix this, and felt sloppy to leave it as is. The end result was pretty good. Next, I started to build the transom... The next step was to paint all bulkheads and spacer blocks black below where the gratings and hatches will eventually be. This will hopefully create a better illusion of depth when the model is finished. More to come. Best, Sumner billpickup 1 Quote ________ Current build: HMC Sherborne, kitbashed to more closely resemble the 1763 NMM plans Link to comment Share on other sites More sharing options...
Timmo Posted April 20, 2013 Share #11 Posted April 20, 2013 Looking good so far and can't wait to see more. I've also built a Sherbourne and like you I got a huge amount of help from other posters at MSW. Every contribution like this helps bring it back to better than before. Quote Current build Enterprise class 28-gun frigate 1774 - scratchbuild 1:36 RC Completed builds Cruizer class brig - scratchbuild 1:36 RC HM Bomb Vessel Granado - Caldercraft HM Cutter Sherbourne - Caldercraft Link to comment Share on other sites More sharing options...
Sumner Posted September 8, 2013 Author Share #12 Posted September 8, 2013 It's been a while since I posted any materials from my old build log. Seeing so many new Sherbourne builds underway has been a real inspiration for me to finish rebuilding my log. So, here we go ... After installing and fairing the bulkheads, the next step was to install the gunport patterns. Before installing them, I soaked them in hot water for 10 minutes and then clipped them to a glass where the patterns would need to meet the curve of the bow. I let them dry in this position overnight. Next up, I glued the gunport patterns to the model using PVA glue and a bunch of clips. At about this point in my build (August 2011), I managed to crack and break the top of the bow post, where earlier I had drilled three holes for the forestay. At the time, it felt pretty serious -- as if I'd managed to ruin the model before I'd even got started. In reality, this was easily fixed using PVA and a couple of pins (visible in the pictures below) that I used to prevent the glue from blocking up the holes I'd earlier drilled. I felt this was an important milestone to mention because every first-time builder will eventually reach the point where you'll need to correct a mistake or fix a shortcoming in the kit. These moments are great confidence builders and help us to grow and improve our skills. The end result turned out pretty well. The key to this part of the build was to make sure the gunports lined up on both sides. It's important to make sure the patterns aren't too low, as they can interfere with the cannons. To test this, I assembled one of the cannons to test the height. Although I don't have a picture of the test itself, everything seemed okay and the top of the pattern was not too close to the cannon. With the bulkheads faired and the gunport patterns installed, I was ready for the dreaded first attempt at planking. Quote ________ Current build: HMC Sherborne, kitbashed to more closely resemble the 1763 NMM plans Link to comment Share on other sites More sharing options...
Sumner Posted September 8, 2013 Author Share #13 Posted September 8, 2013 Thanks, Timmo. Your Sherbourne looks awesome. I hope that mine will look as good when finished. Best, Sumner Quote ________ Current build: HMC Sherborne, kitbashed to more closely resemble the 1763 NMM plans Link to comment Share on other sites More sharing options...
Sumner Posted September 8, 2013 Author Share #14 Posted September 8, 2013 Before I started the first layer of planking, I decided to install the stern counter and this became my first introduction to isopropyl alcohol, and a clear understanding of why it's a very good idea to use PVA instead of CA. After I installed the counter, I realized that I'd jumped ahead too far. I decided that I'd rather wait to put the counter on when I was sure it wouldn't interfere with planking. It was also a good opportunity to try out the ability of isopropyl alcohol to dissolve PVA glue. As you can see in the pictures below, this was really easy. After about 30 seconds, the wood pieces were easily pried apart using a model knife. Excess glue was also easy to remove. After re-attaching the two counter knees (in part to avoid losing them), I was ready to start planking. Quote ________ Current build: HMC Sherborne, kitbashed to more closely resemble the 1763 NMM plans Link to comment Share on other sites More sharing options...
CAd My Fingers Posted September 8, 2013 Share #15 Posted September 8, 2013 Sumner, thanks for re-posting your build log--looking forward to following your progress and learning from you! Jay Quote Current Build: Link to comment Share on other sites More sharing options...
Sumner Posted September 8, 2013 Author Share #16 Posted September 8, 2013 Thanks for following along, Jay. I just took a look at your build log and see you're just getting started. The Sherbourne is a great model and a lot of fun to build. I look forward to following your progress as I'm sure that I will learn a lot. MSW has been an invaluable resource for me in that regard. Like you, I went with a clinker hull and got to within 5 planks of completing the second planking below the wales. At that point, work became too busy for me to continue. However, once I've caught up on my build log I would like to get some work on the model. Besides finishing the planking, I'm planning to rework the stern and counter so the deck more closely resembles the NMM plans -- or at least my amateur interpretation of them! Best, Sumner Quote ________ Current build: HMC Sherborne, kitbashed to more closely resemble the 1763 NMM plans Link to comment Share on other sites More sharing options...
Sumner Posted September 8, 2013 Author Share #17 Posted September 8, 2013 Before I started my first attempt at planking, I spent a lot of time looking at other build logs and reading the MSW planking guide. While the first layer of planking is hidden by the second, I wanted to do a reasonably correct job in order to learn as much as I could. I attempted to plot out the number and size of planks needed, using a combination of tape and battens. It didn't work out so well, The measurements I took were too imprecise and I didn't have a very clear understanding of what I was trying to accomplish. It wasn't very useful. However, the exercise did give me a *rough* idea of how the planks should lay on the hull. For a first attempt at planking a model, I think things went pretty well with the first planking. If nothing else, the experience gave me a deep appreciation of those modelers who excel at planking. Slowly but surely, my model started to look more and more like a cutter, and I could clearly see the Sherbourne's lines start to emerge. Quote ________ Current build: HMC Sherborne, kitbashed to more closely resemble the 1763 NMM plans Link to comment Share on other sites More sharing options...
CAd My Fingers Posted September 8, 2013 Share #18 Posted September 8, 2013 Overall so far, I've liked the kit--esp. since it was fashioned by CNC instead of being cut by laser. Haven't done much in the way of building yet; mainly just research and thinking through a few aspects of the build (the thinking through part is from lessons learned on my 1st builds--lol ). I'll look forward to seeing your interpretations of the NMM plans. I'm guessing the set I ordered won't arrive for awhile (then, will need to get data into a drawing program). Sounds like we're going to take a similar approach to our builds in this respect. I didn't realize the kit's stern and counter differ from the plans, so will take a closer look at those areas once I have the plans in hand and can see the details better. Glad work has eased off for you and that you can now get some work in--looking forward to seeing your approach to the planking! Saw some of your planking pictures go up as I was writing this--thanks for sharing the pics and wholly agree with what you said about those that excel at it! Cheers, Jay Quote Current Build: Link to comment Share on other sites More sharing options...
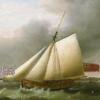
Sumner Posted September 9, 2013 Author Share #19 Posted September 9, 2013 (edited) Hi Jay, When you get your plans, take a look at the stern area in the plans. Also, take a look at the stern deck area on period cutter models or paintings of the cutter Alert: http://www.bbc.co.uk/arts/yourpaintings/paintings/cutter-alert-179885 I think you'll find the counter knees in the Sherbourne kit are way overbuilt and out of scale. I believe it's done this way for a good reason, giving modelers such as ourselves a solid structure to construct the stern and counter, and bend the respective pieces to their correct shapes. I'd like to find a way to do this with counter knees that are more in scale, and I have a few ideas in mind that I'd like to try when I get to that point. Of course, that means rebuilding the stern on my model but that's half the fun, right? I suspect that solving this puzzle will resolve the issue of where/how to place the tiller behind the companionway. I think the overbuilt counter knees give the appearance that this area is too crowded for the tiller, and hope to fix that with a structure that's more in scale. Let me know what you think when you receive your plans. I'd be interested to hear your thoughts. Best, Sumner Edited September 9, 2013 by Sumner Quote ________ Current build: HMC Sherborne, kitbashed to more closely resemble the 1763 NMM plans Link to comment Share on other sites More sharing options...
CAd My Fingers Posted September 9, 2013 Share #20 Posted September 9, 2013 Hi Sumner, Thanks for posting the Alert links--very nice! After reading Gregor's post in my log and yours, I'm holding off on doing much building until I can get lines off the plans. I'm guessing it'll be at least a couple of weeks before I have plans and the lines taken off of them, but I'll definitely post what I find out. Not sure if you saw my log post about the Fly's plans at the NMM, but the plans show the tiller position (http://prints.rmg.co.uk/art/491174/Fly_1763) in relation to the companionway. I bet you're right about the knees--Gregor also mentioned there were issues with the stern, too. Lol about re-building! I learned the hard way from my early builds to not use CA--it's a bear when it comes to tearing apart something that needs to be rebuilt... Cheers, Jay Quote Current Build: Link to comment Share on other sites More sharing options...
Sumner Posted September 9, 2013 Author Share #21 Posted September 9, 2013 Hi Jay, Yes, I think the position of the tiller on the Fly plans probably comes close to what the tiller on the Sherbourne may have looked like, which means the companionway entrance was probably to port or starboard, with the tiller just aft of the companionway and the aft-most scuttle just ahead of it. It's a real pleasure seeing so much interest in the Sherbourne these days. There are a couple of really cool builds going on these days, and I'm sure yours will add an additional level of detail as I haven't yet seen anyone try to re-draw the Sherbourne plans. I'm looking forward to seeing what you come up with. Best, Sumner CAd My Fingers, Gregor and tkay11 3 Quote ________ Current build: HMC Sherborne, kitbashed to more closely resemble the 1763 NMM plans Link to comment Share on other sites More sharing options...
Sumner Posted September 9, 2013 Author Share #22 Posted September 9, 2013 (edited) And so the build continued, with the first layer of planking taking me about a month to complete. I actually got to enjoy this phase of the build and the routine that came with it, although I was happy to finish it. As you can tell, there was a lot of clinkering caused by my amateur planking job. This happened because I didn't shape the planks properly and therefore had to apply too much horizontal force to the planks in an effort to have them lie properly against the hull. I was able to fix this with a decent amount of sanding, using Tamiya tape to protect the keel and stem from being damaged.. In the end, I was pretty happy with the end result. I felt that I'd learned a lot and was pleased to see the sweet lines of the cutter emerge from a stack of CNC-cut plywood and basswood strips! The next step after sanding was to fill the hull and sand again to get the smoothest possible surface for the second layer of planking. At this point, I was more or less ready to start the second layer of planking. Thanks to the inspiration and encouragement of Daniel (aka Siegfried), Kester (aka Stockholm Tar) and Laerte (who seems to have disappeared or changed his name since the Great Crash), I decided to try doing a clinker hull, which was more typical of early cutters like the Sherbourne. At this point, as you may be able to tell from the picture below, I'd made a pretty serious mistake that needed to be fixed before I could begin planking: Edited September 10, 2013 by Sumner Stockholm tar and CAd My Fingers 2 Quote ________ Current build: HMC Sherborne, kitbashed to more closely resemble the 1763 NMM plans Link to comment Share on other sites More sharing options...
Sumner Posted September 10, 2013 Author Share #23 Posted September 10, 2013 The error is more clearly apparent when you compare the final picture in my previous post with this shot from the NMM plans of the Sherbourne. Note the fuller curve of the stern, compared to flatter curve on my model. In my enthusiasm to fair the bulkheads, I oversanded the aft-most bulkhead which created a much flatter curve on the stern. If not corrected at this point, the model would not look as it did in the plans. To fix this, I traced the shape of the final bulkhead using the original piece of wood that it was cut from in the kit. When I taped that piece of paper to the model, the difference was significant. The red-shaded areas in this picture clearly show where I over-faired the final bulkhead. Next, I marked out the area on the template where the sternpost will stand, and glued strips of 0.5mm walnut to the template. I then cut out the middle of the template so it would better fit the size of the stern, and glued it in place. Afterwards I filled in the gap with filler and sanded it smooth. Here's the end result: Definitely closer to the curve shown in the NMM plans, I think. After using so much filler, I was concerned that the hull might not allow the PVA used with the second planking to properly grip the hull. I'm not sure whether that concern was well founded or not. At the time, I searched on MSW 1.0 and didn't find any information that clearly stated whether that was an issue. So, I took the step of painting the hull with PVA to give the glue something to grip when I started the second planking. Whether that made a difference or not, I cannot say. But I didn't have any issues with using PVA for the second planking, as I'll show in my next post. egkb and Stockholm tar 2 Quote ________ Current build: HMC Sherborne, kitbashed to more closely resemble the 1763 NMM plans Link to comment Share on other sites More sharing options...
tkay11 Posted September 10, 2013 Share #24 Posted September 10, 2013 Very nice solution, Mobbsie! Tony Quote === First build: Caldercraft HM Cutter Sherbourne 1763 FINISHED 2nd build: Triton cross-section COMPLETED 3rd build: La Chaloupe Armée / 42ft Armed Longboat of 1834 by tkay11 – scale 1:36, plans by M. Delacroix COMPLETED 4th build: Allège d’Arles 1833 (Ancre) POB by tkay11 – scale 1:100, plans by F. Fissore COMPLETED Working on La Jacinthe 1:96 POB (ANCRE publications) Link to comment Share on other sites More sharing options...
Sumner Posted September 10, 2013 Author Share #25 Posted September 10, 2013 Very nice solution, Mobbsie! Tony Thanks, Sjors! Best, Sumner Gregor 1 Quote ________ Current build: HMC Sherborne, kitbashed to more closely resemble the 1763 NMM plans Link to comment Share on other sites More sharing options...
CAd My Fingers Posted September 11, 2013 Share #26 Posted September 11, 2013 Great catch and recovery, Sumner; your fix looks really good! I'm now really holding off with doing much on the build until I get more info. Hopefully I'll be up and running with drafting software fairly soon--I'm definitely checking that stern bulkhead piece before I do any gluing. There are a number of other things I want to get more info. on, too--particularly the stern companionway. Looking forward to seeing your 2nd planking! Jay Quote Current Build: Link to comment Share on other sites More sharing options...
tkay11 Posted September 11, 2013 Share #27 Posted September 11, 2013 Sorry about that, Sumner! I'd just been reading a post by Mobbsie and his visit with Sjors to Chatham, so my feeble brain hadn't moved on! I do know the difference, and that it was you who had made the alterations rather than Mobbsie. 'onest, Guv! Tony Quote === First build: Caldercraft HM Cutter Sherbourne 1763 FINISHED 2nd build: Triton cross-section COMPLETED 3rd build: La Chaloupe Armée / 42ft Armed Longboat of 1834 by tkay11 – scale 1:36, plans by M. Delacroix COMPLETED 4th build: Allège d’Arles 1833 (Ancre) POB by tkay11 – scale 1:100, plans by F. Fissore COMPLETED Working on La Jacinthe 1:96 POB (ANCRE publications) Link to comment Share on other sites More sharing options...
Sumner Posted September 11, 2013 Author Share #28 Posted September 11, 2013 Thanks, Jay. I was pretty happy with how this turned out. I'll put up some pictures of my second planking tomorrow, which should pretty much bring me up to date on my progress. No worries at all, Tony! CAd My Fingers 1 Quote ________ Current build: HMC Sherborne, kitbashed to more closely resemble the 1763 NMM plans Link to comment Share on other sites More sharing options...
hopeful Posted September 11, 2013 Share #29 Posted September 11, 2013 Hi Sumner, Just caught up with your build. Am going to enjoy following along. Cheers, Hopeful aka David Quote Completed Sharpie Schooner: (Midwest) Current: Sultana (MS) Current: Phantom (MS) Next: Lady Nelson (Amati Victory) Link to comment Share on other sites More sharing options...
Sumner Posted September 11, 2013 Author Share #30 Posted September 11, 2013 Thanks for stopping by, David. I see you've lined up the Lady Nelson as your next build. Will be great to have another cutter model on the ways. Seeing the excellent and precise work you've done on your Sultana, I'm sure it will be an awesome build, too. Best, Sumner Kurt Johnson 1 Quote ________ Current build: HMC Sherborne, kitbashed to more closely resemble the 1763 NMM plans Link to comment Share on other sites More sharing options...

Recommended Posts
Join the conversation
You can post now and register later. If you have an account, sign in now to post with your account.