flyer
-
Posts
1,004 -
Joined
-
Last visited
Recent Profile Visitors
2,937 profile views


-
 Dulrakk reacted to a post in a topic:
HMS Bellerophon by flyer - FINISHED - Amati/Victory Models - scale 1:72
Dulrakk reacted to a post in a topic:
HMS Bellerophon by flyer - FINISHED - Amati/Victory Models - scale 1:72
-
flyer reacted to a post in a topic:
HM Cutter Alert by flyer - Vanguard Models - scale 1:64 - naval cutter
-
Dave_E reacted to a post in a topic:
HM Cutter Alert by flyer - Vanguard Models - scale 1:64 - naval cutter
-
Thukydides reacted to a post in a topic:
HM Cutter Alert by flyer - Vanguard Models - scale 1:64 - naval cutter
-
flyer reacted to a post in a topic:
HM Cutter Alert by flyer - Vanguard Models - scale 1:64 - naval cutter
-
Knocklouder reacted to a post in a topic:
HM Cutter Alert by flyer - Vanguard Models - scale 1:64 - naval cutter
-
 The Naval Cutter Alert by flyer - Vanguard Models - scale 1:64 The next project is another step ahead in kit quality – a Vanguard Models kit. The HMS Vanguard kit itself was also a Chris Watton construction, however with his own line of products I believe he took quality one or several steps further. Although the kit looks great, there are – fortunately - still possibilities to change it to my liking or even to improve it a bit. For additional information I will count on Peter Goodwin’s ‘The Naval Cutter Alert 1777’, a book of the AOTS series. My first thoughts are: The cutter must have a boat. With the kit I ordered Vanguard Model’s 18ft cutter with the intention to shorten it to 14 or 16ft to easier find room on deck. In the meantime, Chris Watton announced that he will soon offer a printed 14ft cutter. I will consider this or – if it is still too large – perhaps commission Caldercraft’s 14ft jolly boat. Sails will be hoisted. But I will make my own as the kit’s ones are not to my liking. The rigging layout could be changed to an improved and standardised cutter rigging without spread yard and with spreaders for the shrouds. However, right now, I think the kit’s rigging scheme has its very own charm and is not only confirmed by the contemporary model of the cutter Hawke but also by contemporary paintings of Charles Brooking. Decision to be taken later. Shipping in Light Airs in the Thames Estuary by Charles Brooking 1723 – 56
-
Canute reacted to a post in a topic:
Chris Watton and Vanguard Models news and updates Volume 2
-
thibaultron reacted to a post in a topic:
Chris Watton and Vanguard Models news and updates Volume 2
-
mtaylor reacted to a post in a topic:
Chris Watton and Vanguard Models news and updates Volume 2
-
flyer reacted to a post in a topic:
Chris Watton and Vanguard Models news and updates Volume 2
-
Very nice! This seems to be a 18ft cutter. Do you also plan to offer a smaller 12ft or 14ft boat, suitable for your smaller vessels, such as Alert?
-
 Mirabell61 reacted to a post in a topic:
Pilot schooner Elbe 5 by Mirabell61 - FINISHED - scale 1:50 - about 1890 (launched 1883 in Hamburg)
Mirabell61 reacted to a post in a topic:
Pilot schooner Elbe 5 by Mirabell61 - FINISHED - scale 1:50 - about 1890 (launched 1883 in Hamburg)
-
Retired guy reacted to a post in a topic:
Steamship ERGENSTRASSE by Mirabell61 - FINISHED - 1:87
-
flyer reacted to a post in a topic:
Steamship ERGENSTRASSE by Mirabell61 - FINISHED - 1:87
-
Hi Nils As we would say in Swinglish: I pull my hat before you (ich ziehe meinen Hut vor dir). Not only have you built another unique, detailed, outstanding gem but you also finished it in about 8 months! From scratch! Without plans! Wonderful! Cheers Peter
-
 flyer reacted to a post in a topic:
Steamship ERGENSTRASSE by Mirabell61 - FINISHED - 1:87
flyer reacted to a post in a topic:
Steamship ERGENSTRASSE by Mirabell61 - FINISHED - 1:87
-
flyer reacted to a post in a topic:
HMS Bellerophon by flyer - FINISHED - Amati/Victory Models - scale 1:72
-
flyer reacted to a post in a topic:
HMS Bellerophon by flyer - FINISHED - Amati/Victory Models - scale 1:72
-
flyer reacted to a post in a topic:
PEGASUS Block placement
-
Hi Allan, And a happy new year to you too! Yes, Lees mentions '...through blocks under the fore top...' several times and the drawings show those blocks fixed at the extremes of the trestle trees - except on page 102 where a 'double block is seized to the crosstree'. I wonder if regulations in those times really went as far as to specify the exact locations of those blocks. Lees, in his introduction, mentions that his written sources mainly deal with size and dimensions. I guess that the actual run of the lines of the running rigging he shows is an average of the many but still limited number of models he studied. I'm always tempted to follow kit instructions if they are not directly contradicted by e.g. Lees. Respectable kit designers may use Lees or their own research for the rigging plans and certainly try to be as historically accurate as possible. But even somebody like Chris Watton may have to use approximations sometimes to construct a practicable and sellable kit. And then sometimes I'm just lazy and tempted to take the easy way out. Cheers Peter
-
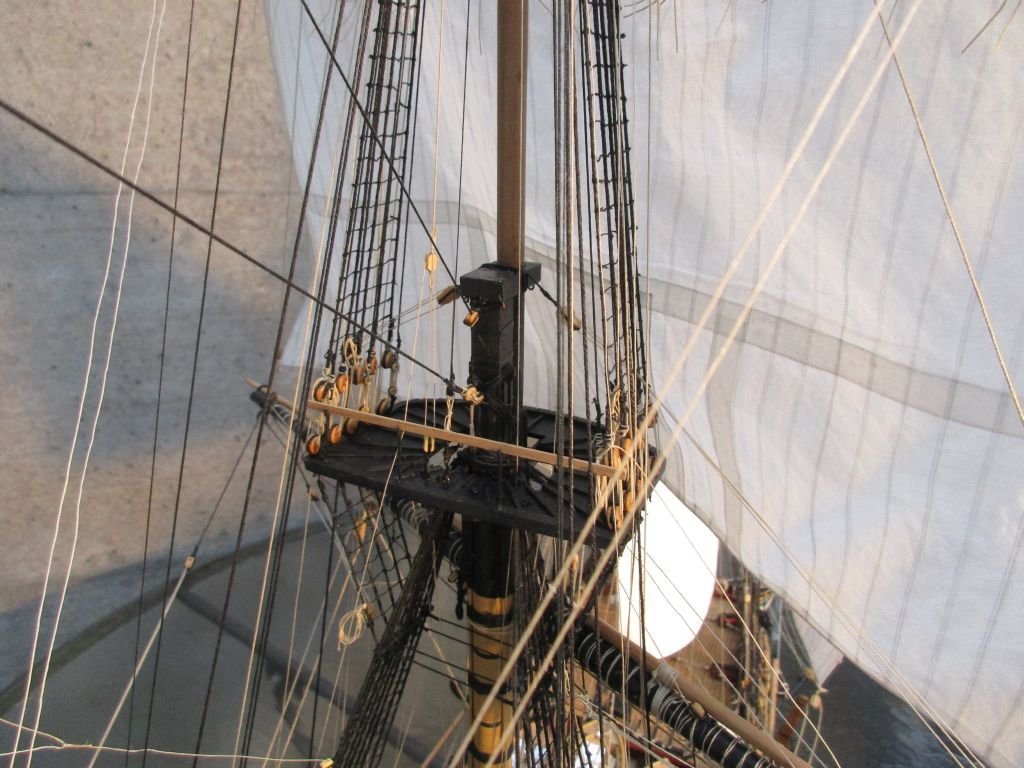
The question I tried to answer was about the green circled blocks in the 2nd picture of #1: I took those as indication of having two identical rows of blocks on the forward and aft crosstree. The lines then are going through the identical blocks on each crosstree thus leading free of and above the fore yard, perhaps to give some space to brace the yard. In Lees' book you find on page 73 top right an illustration for the buntlines, installed that way. (BTW on Bellerophon I used a similar arrangement also for the main yard.) The two outboard single block pairs were thus used for the buntlines and the inboard double block pairs I used for spritsail and sprit topsail braces. This is confirmed by Lees again on page 101 respective page 105.
-
flyer reacted to a post in a topic:
HMS Bellerophon by flyer - FINISHED - Amati/Victory Models - scale 1:72
-
flyer reacted to a post in a topic:
HMS Bellerophon by flyer - FINISHED - Amati/Victory Models - scale 1:72
-
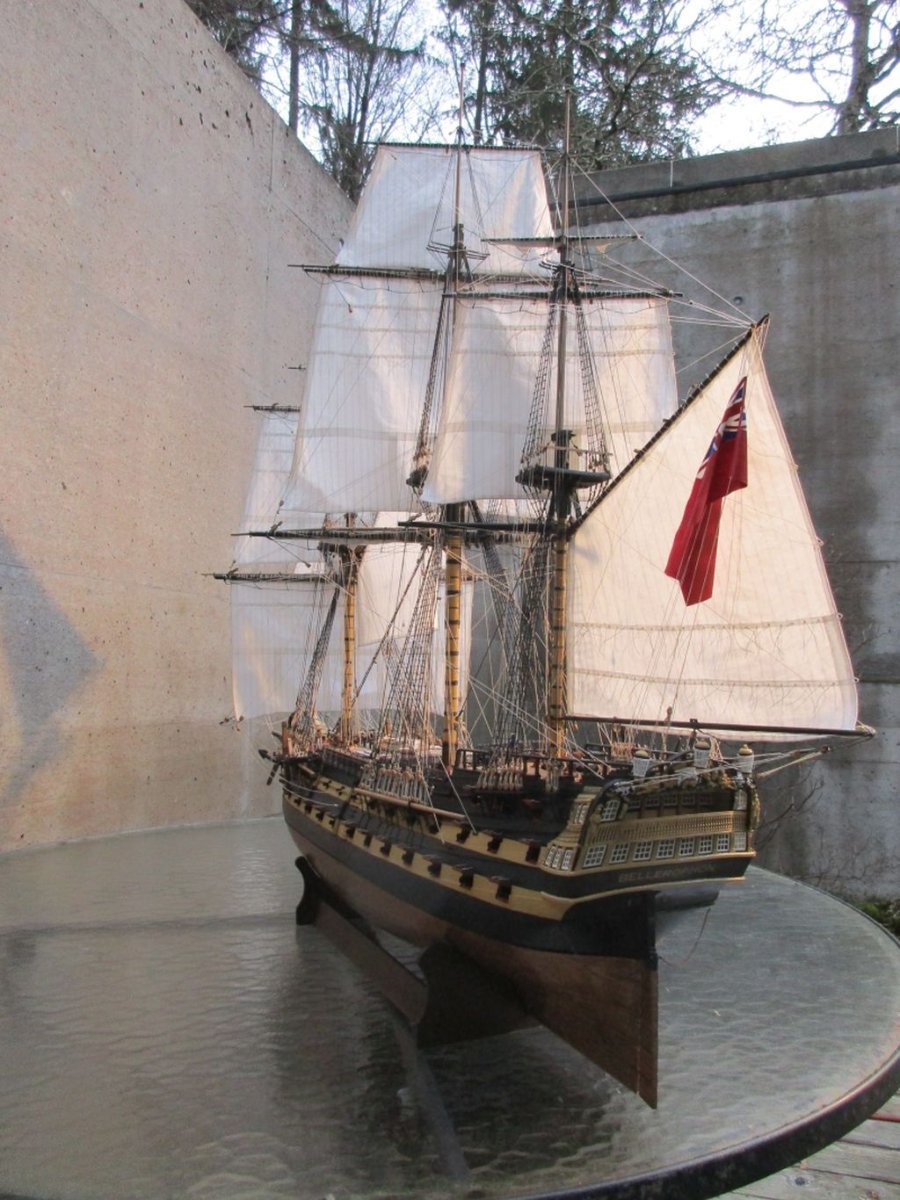
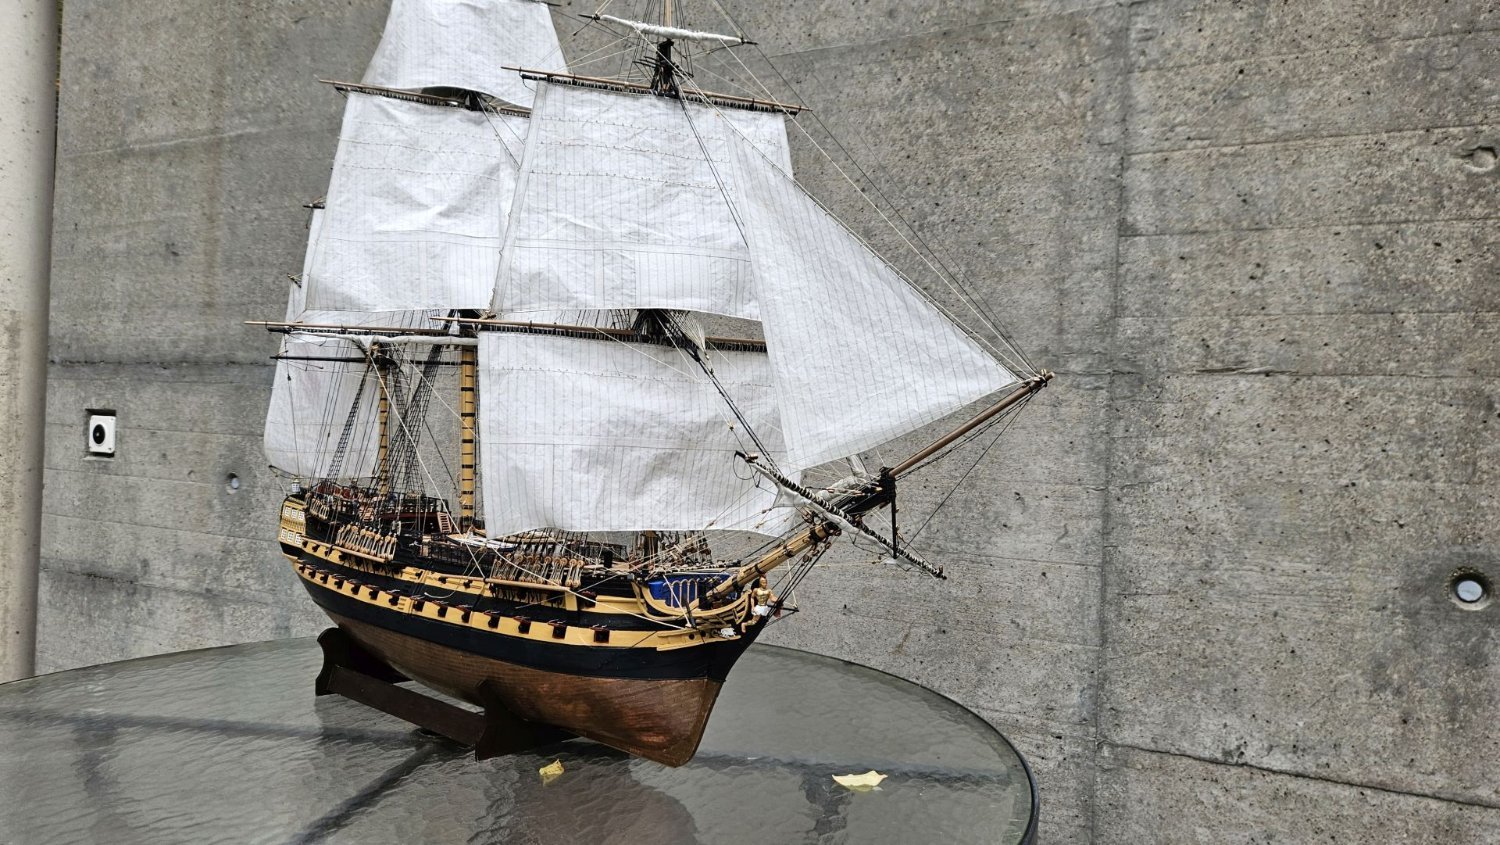
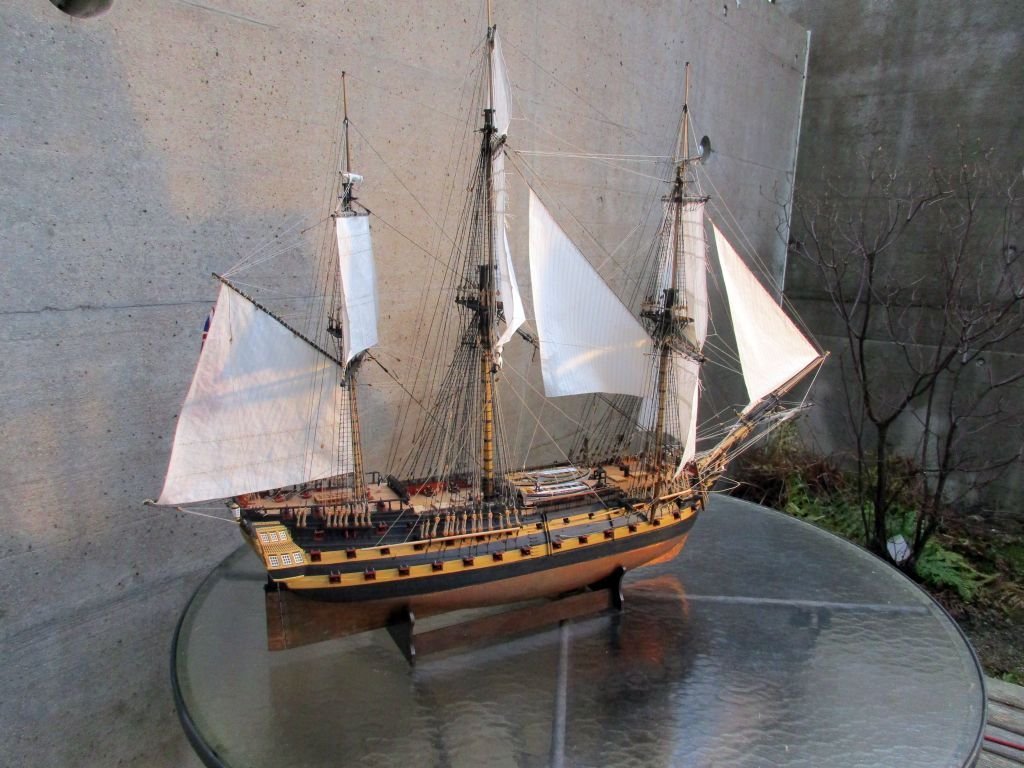
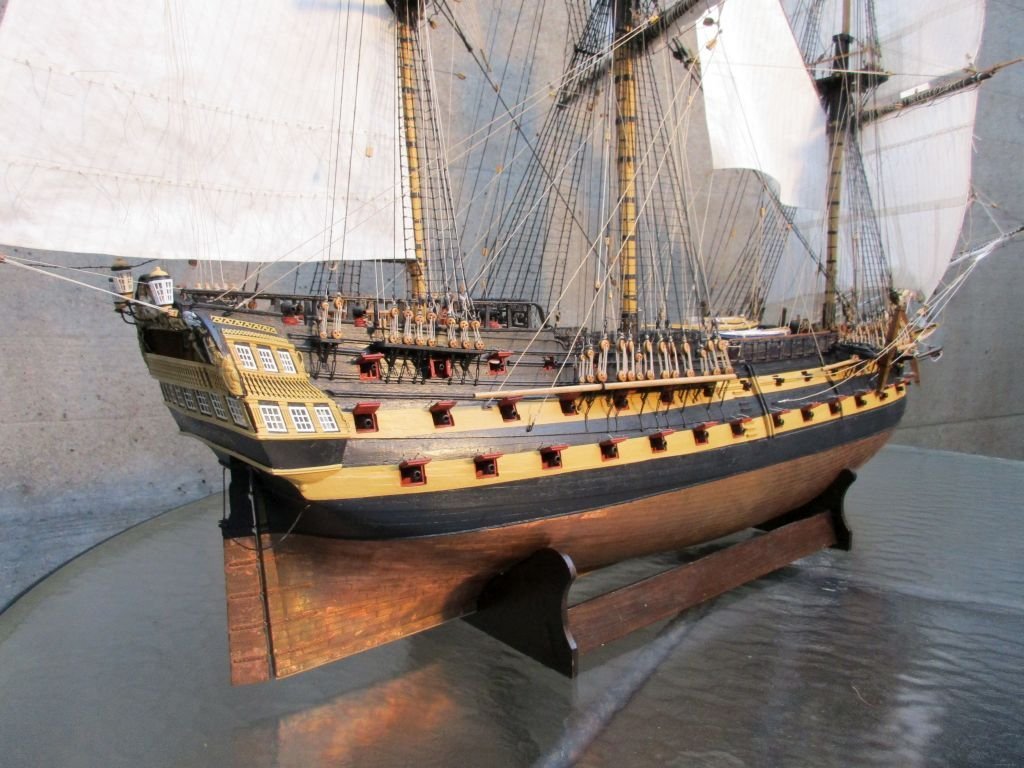
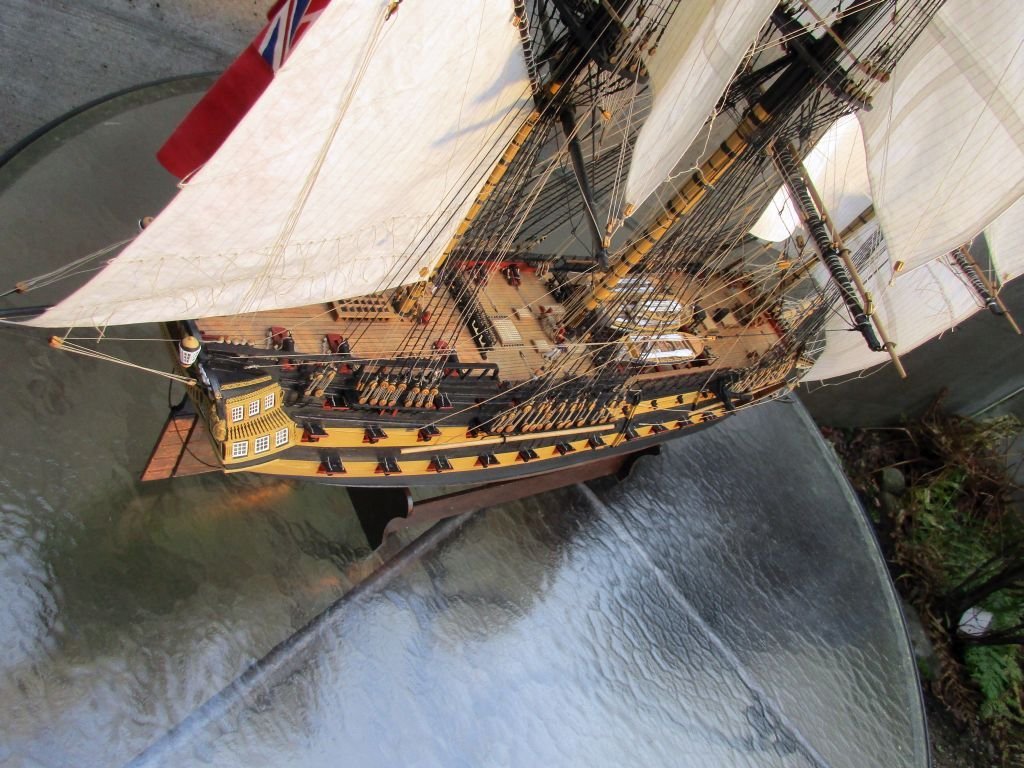
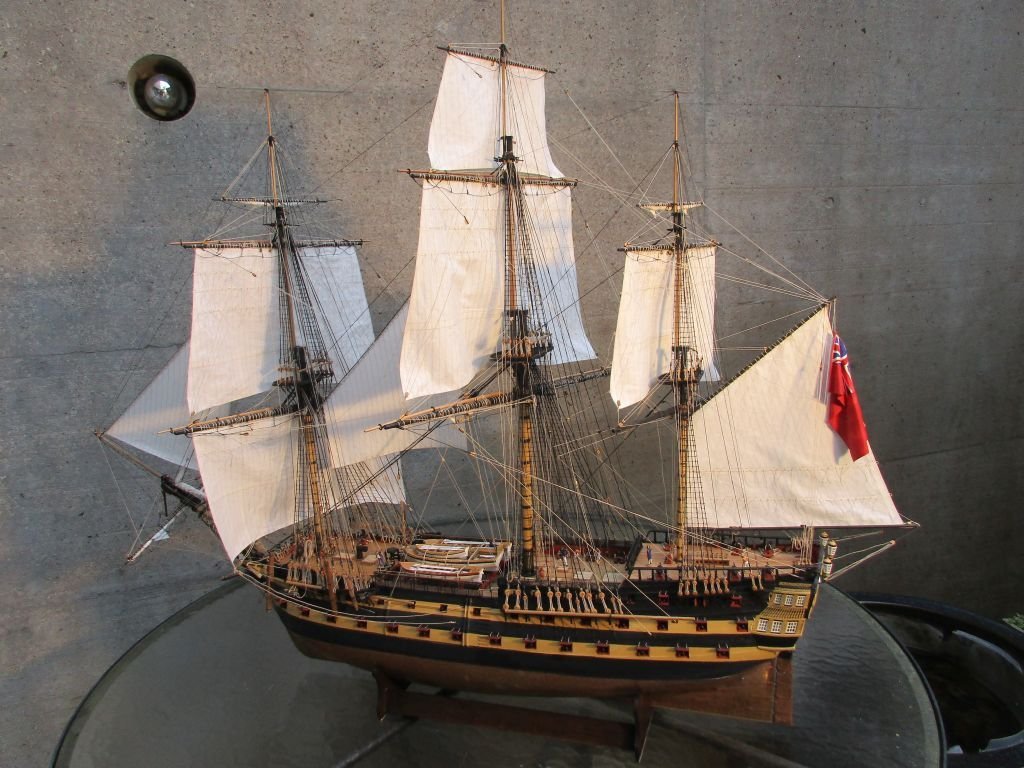
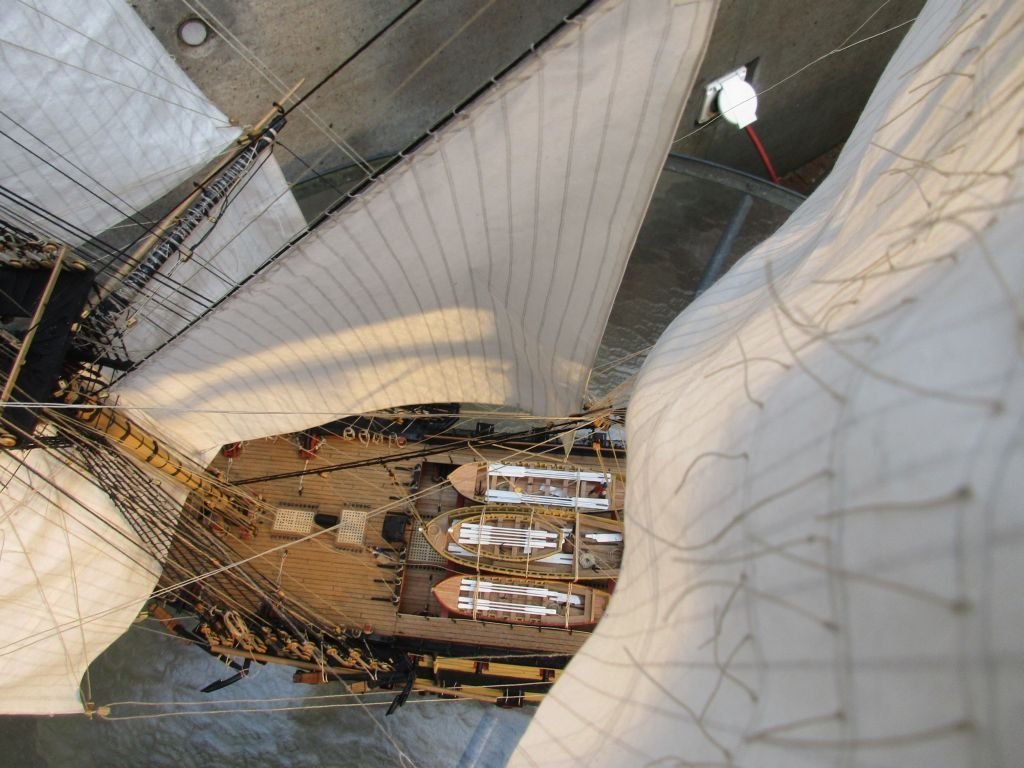
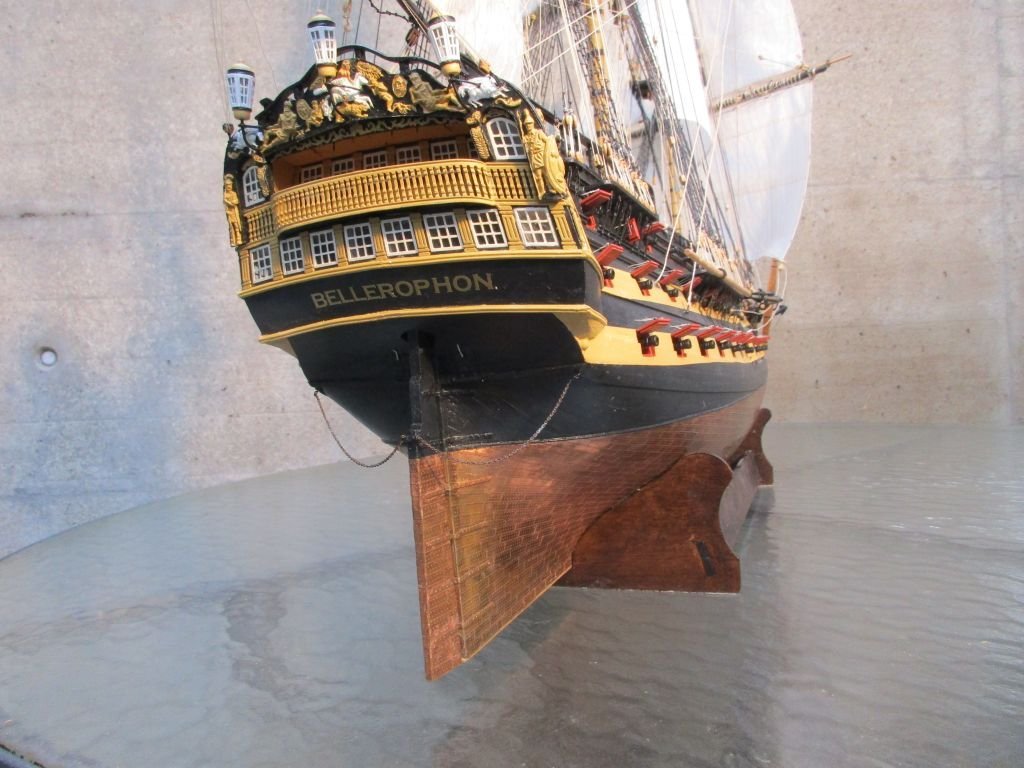
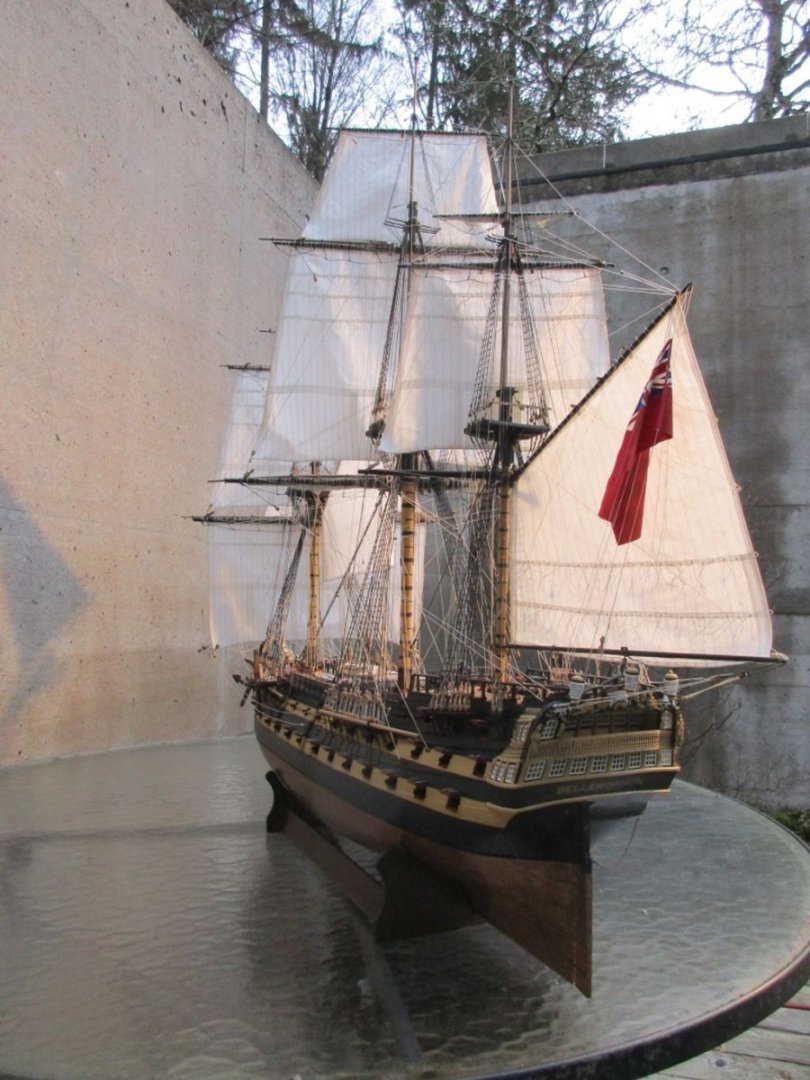
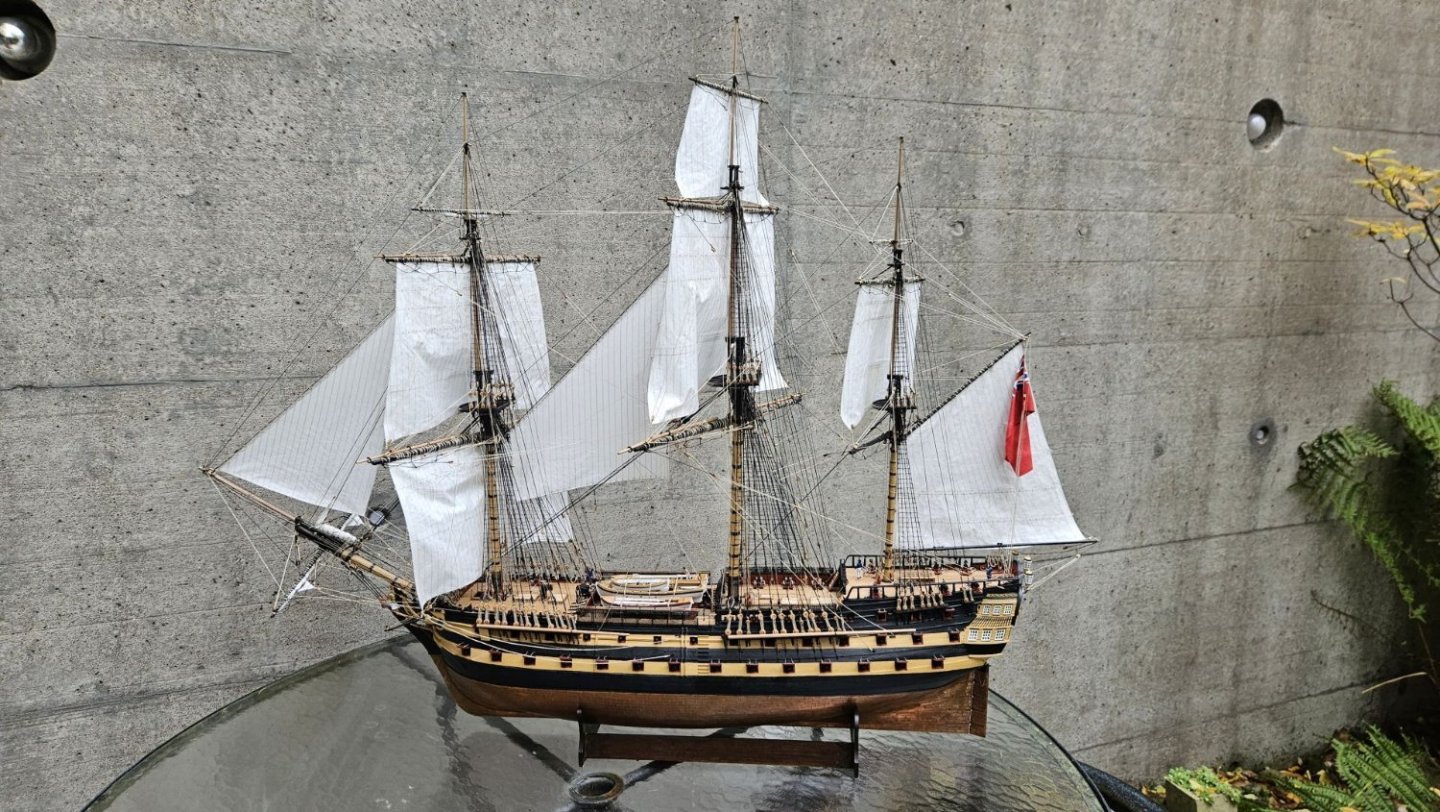
conclusion After more than 6 years, I'd say it was a rather longish journey but I really had a lot of fun along the way and it was definitely worth the effort. The outstanding quality of the kit and the possibility to build 3 different ships makes it easy to overlook a few shortcomings, such as questionable details in the rigging plan or the very questionable gun carriages. On the plus side are also things like the very detailed plans such as the sail plans, the boats or the many fine details to build bulkheads or stern and side galleries. A perfect kit where you may build just out of the box without research or rounding out with additions might be just a bit dull - I will probably find out more about that with my next project. In any case this kit enables you to build a wonderful model of a 74, the backbone of the wooden walls protecting Great Britain during the Napoleonic wars. Finding a good enough place to present the rather large end result is another story... a few final pictures.


- 364 replies
-
- 12
-
-
-
- bellerophon
- victory models
- (and 2 more)
-
Thank you all for the compliments as well as for all the support carrying me through this build. And a very happy New Year to all of you! Peter
- 364 replies
-
- 4
-
-
- bellerophon
- victory models
- (and 2 more)
-
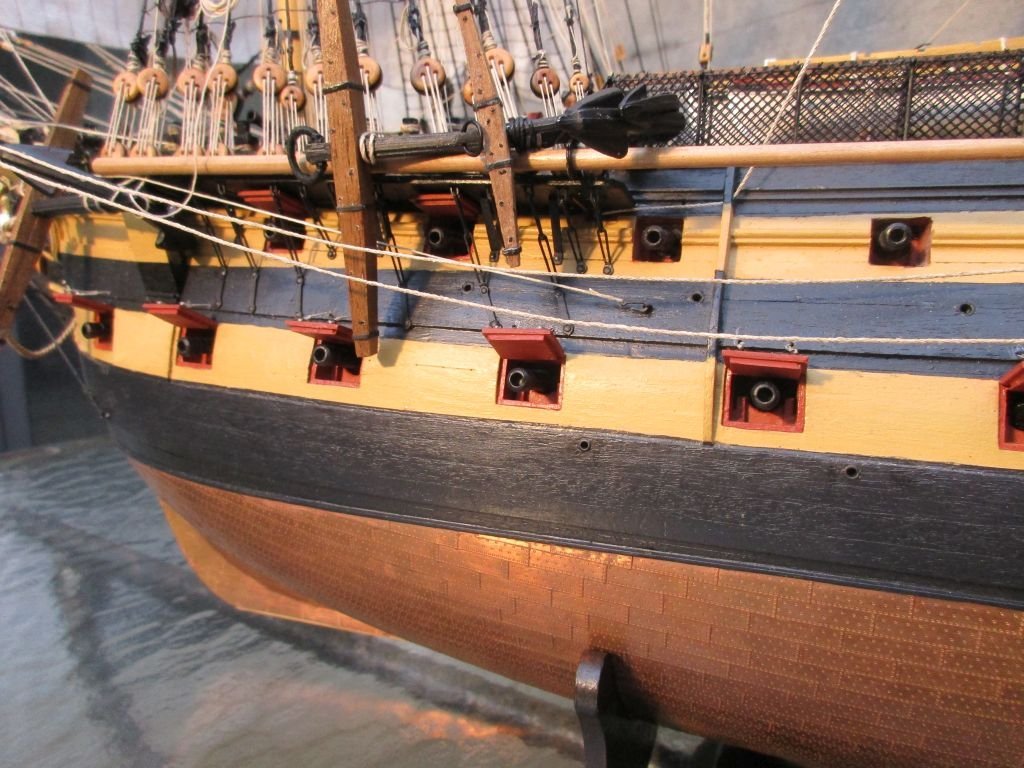
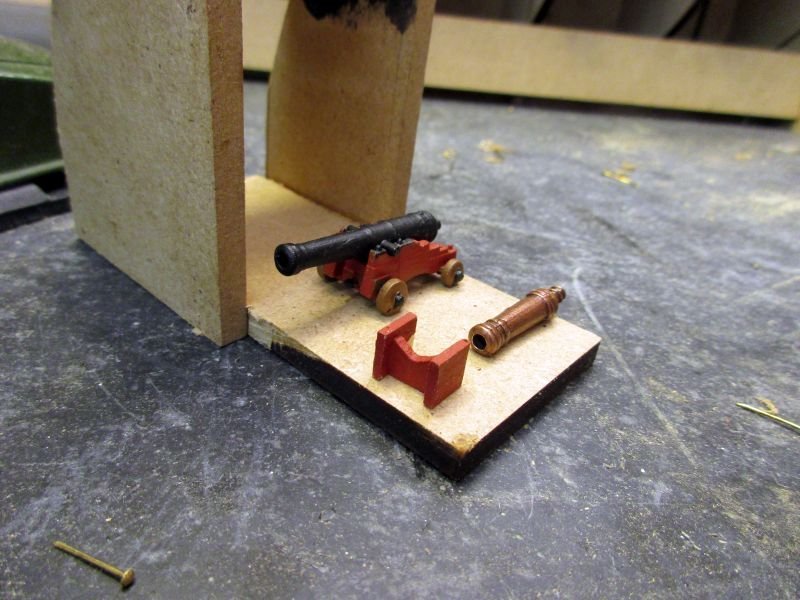
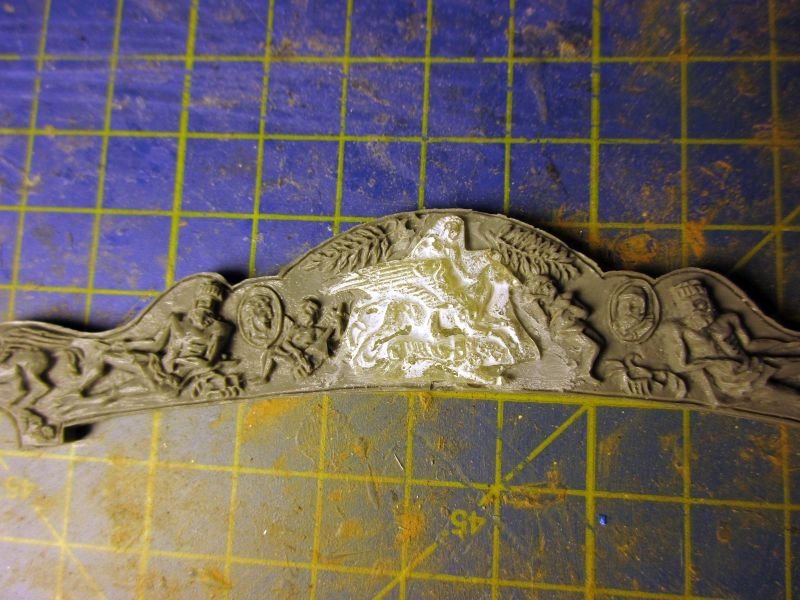
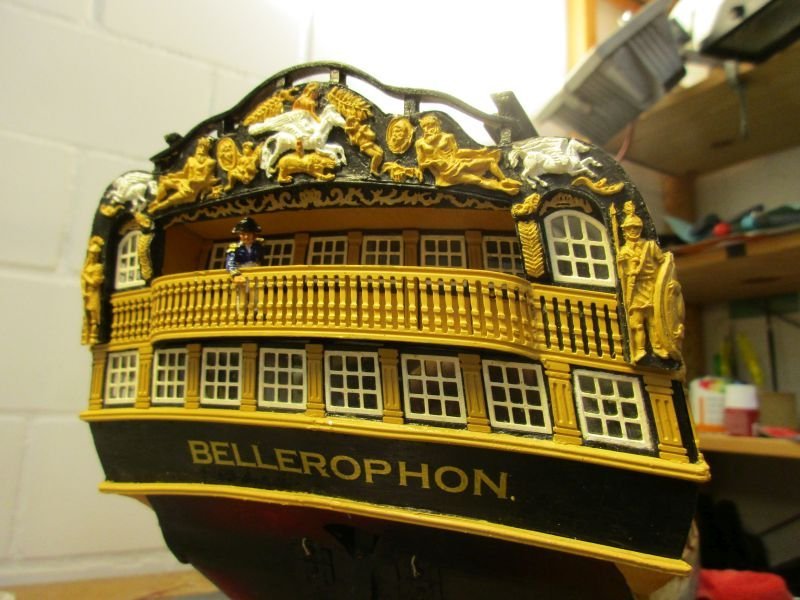
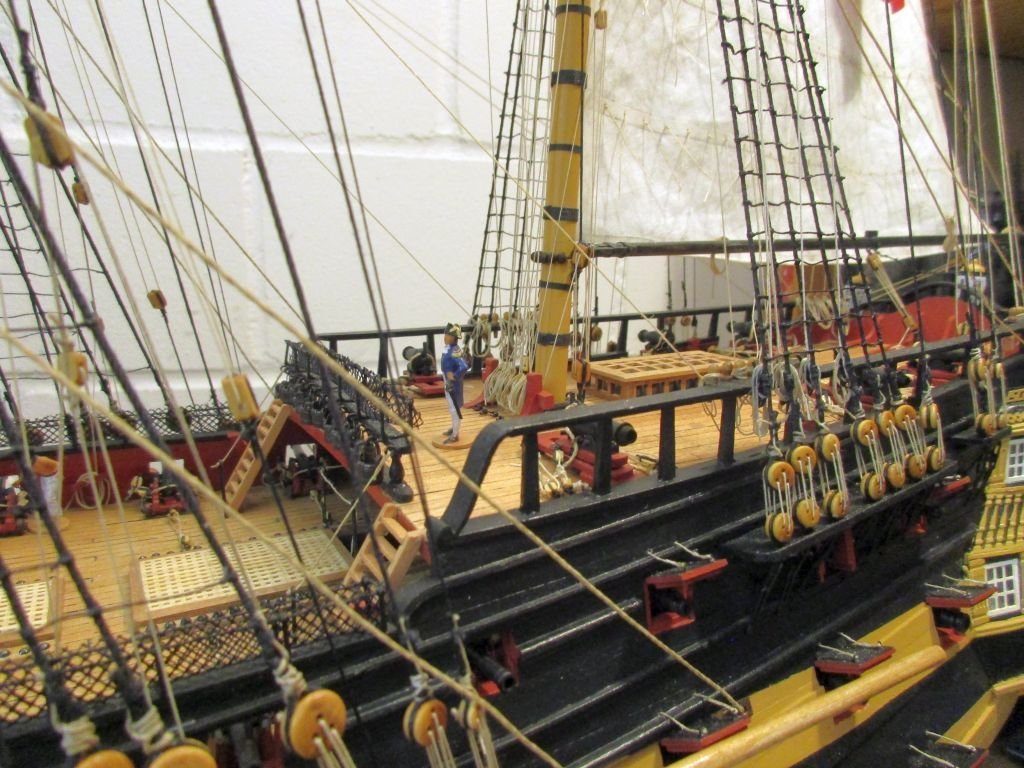
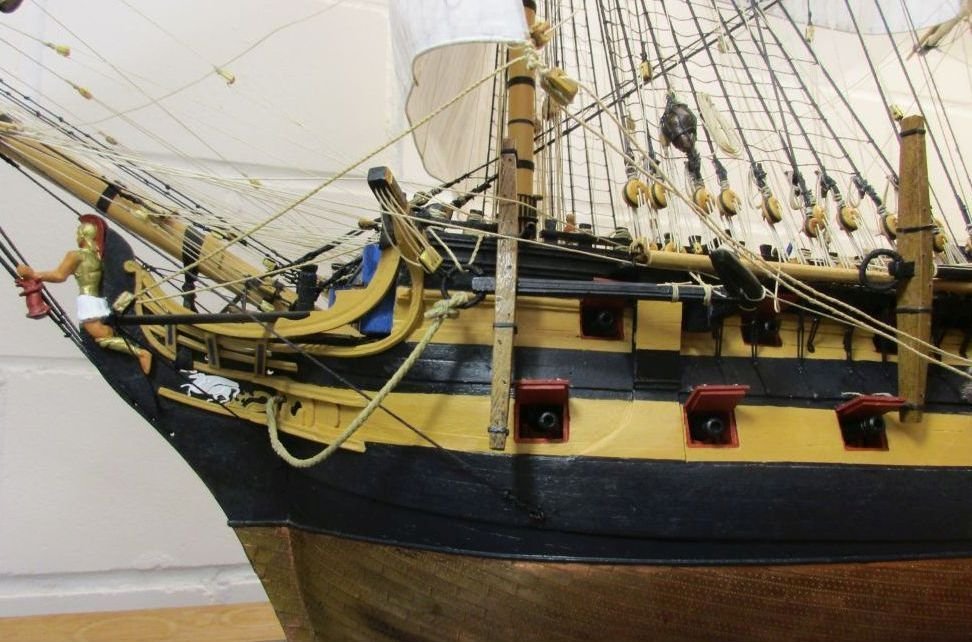
changes, amendments and mistakes The biggest changes were the dummy gun carriages on the gun deck and the cast gun carriages, the stern decoration as well as leaving of the spritsail topsail and its yard. The most rewarding improvement, in my opinion, were the dummy carriages. Thank you, Michael (md1400cs). On any kit which includes such dummy guns, installation of a sort of dummy carriage should be tried. Minor amendments were the changed curve of the stern, the scuppers, the sails fabricated my way, the flag, shot garlands, the captains skylight, the taffrail, the rudder chains, the anchor bolsters below the fore channels, the traveler on the bowsprit, anchor buoys and several minor changes. The biggest, uncorrected mistake is probably that I did set up the preventer stays above the stays, thus having to hang the staysails onto the stays themselves. slightly reworked gun carriage for the upper gun deck and dummy carriage for the lower gun port with dummy-carriage and -gun / carriage and no gun / gun and no carriage the elephant was scratched away and replaced by a epoxy-cast of Bellerophon finished transom with new rail on top spritsail without topsail and traveller on the bowsprit, holding the jib stay

- 364 replies
-
- 8
-
-
- bellerophon
- victory models
- (and 2 more)
-
Thank you, Nils. When I see what quality you achieve, scratch building your Ergenstrasse, I appreciate your compliment even more. Oh, and a very happy new year! Peter
- 364 replies
-
- 2
-
-
- bellerophon
- victory models
- (and 2 more)
-
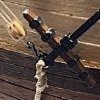
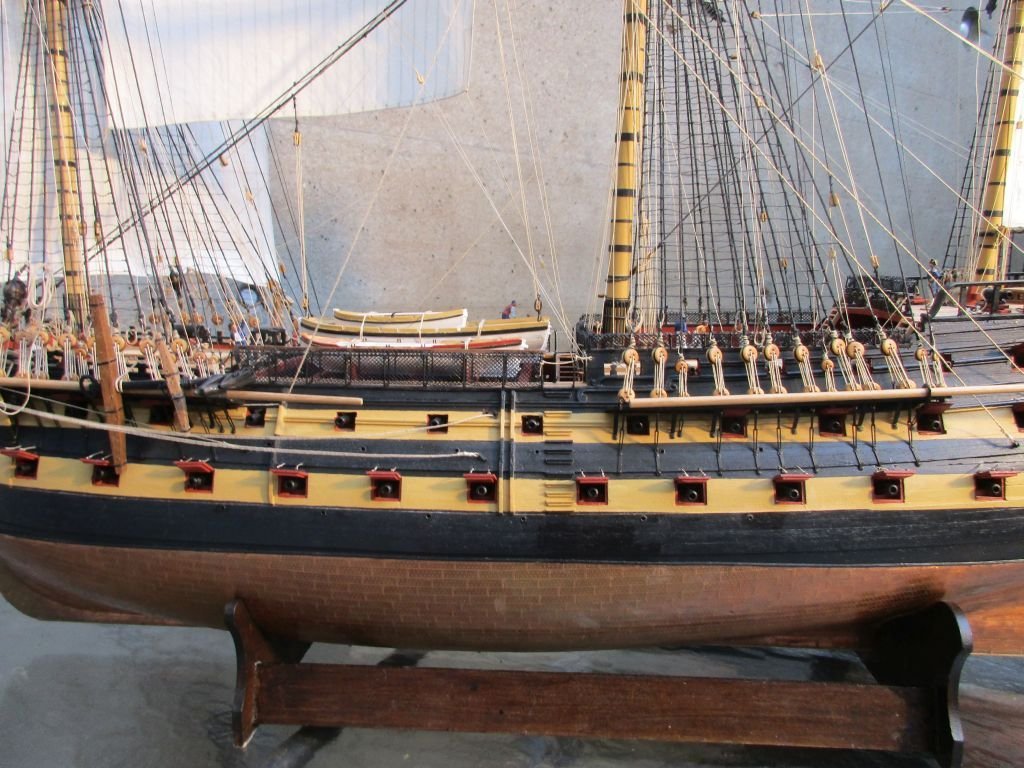
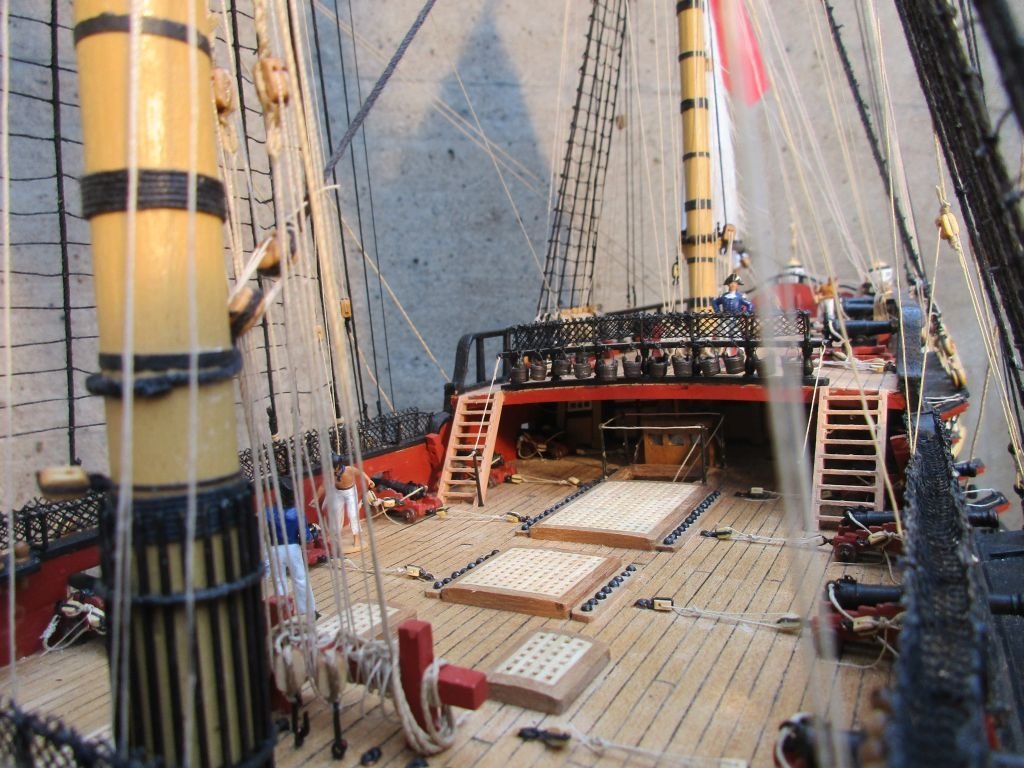
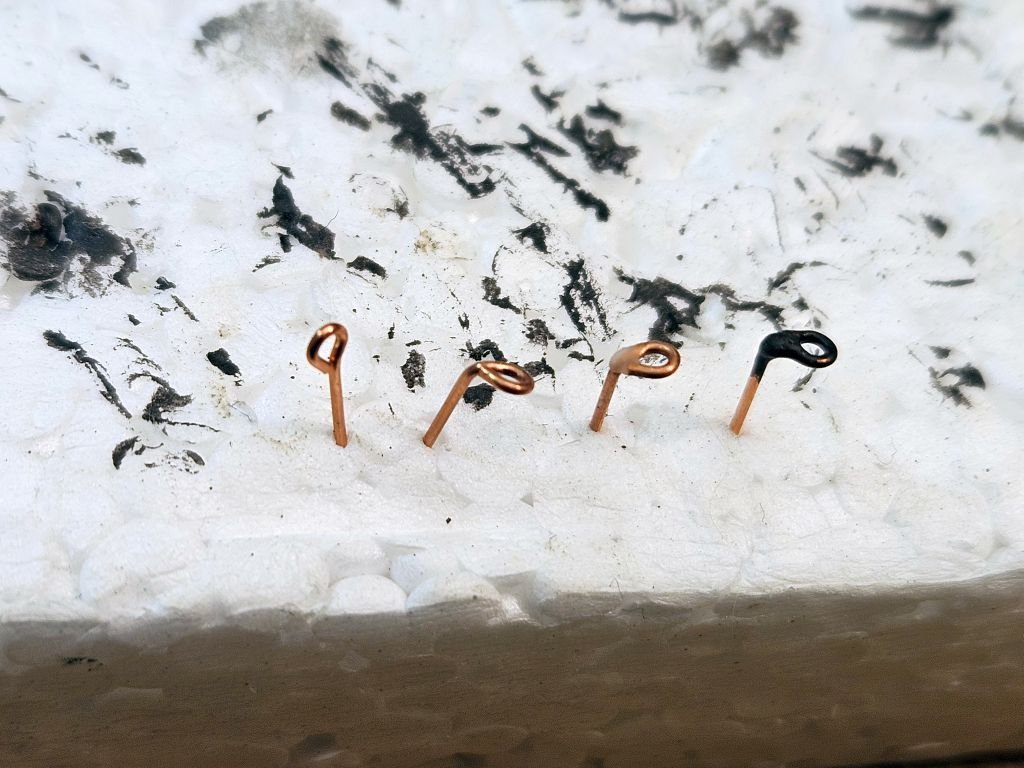
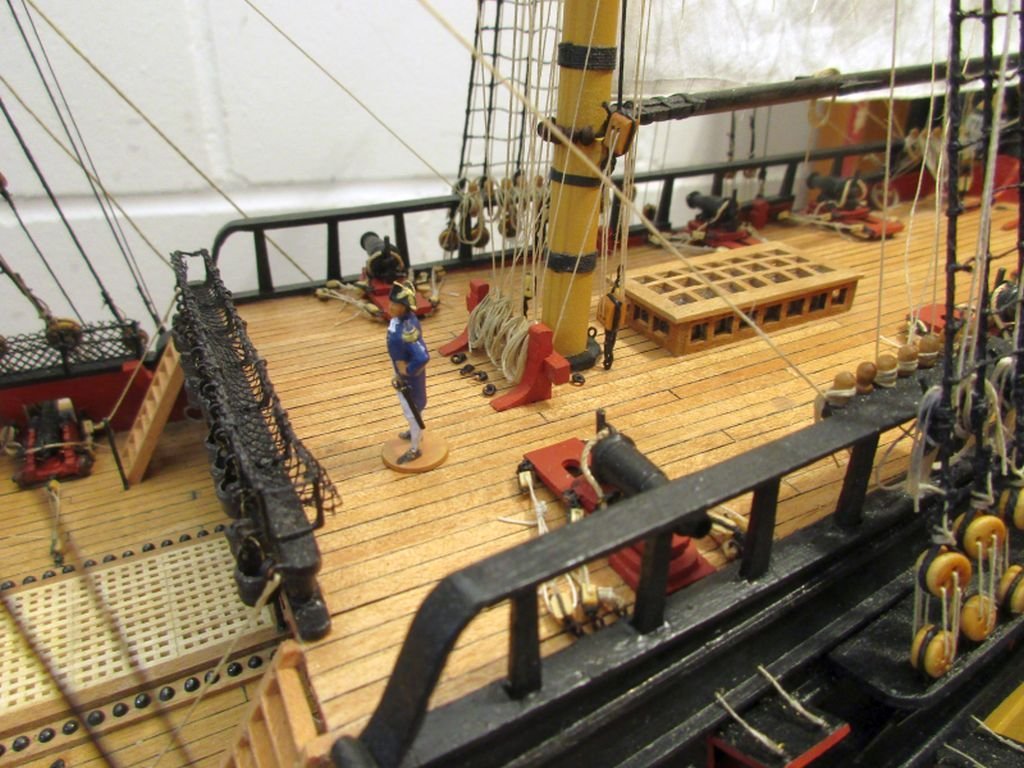
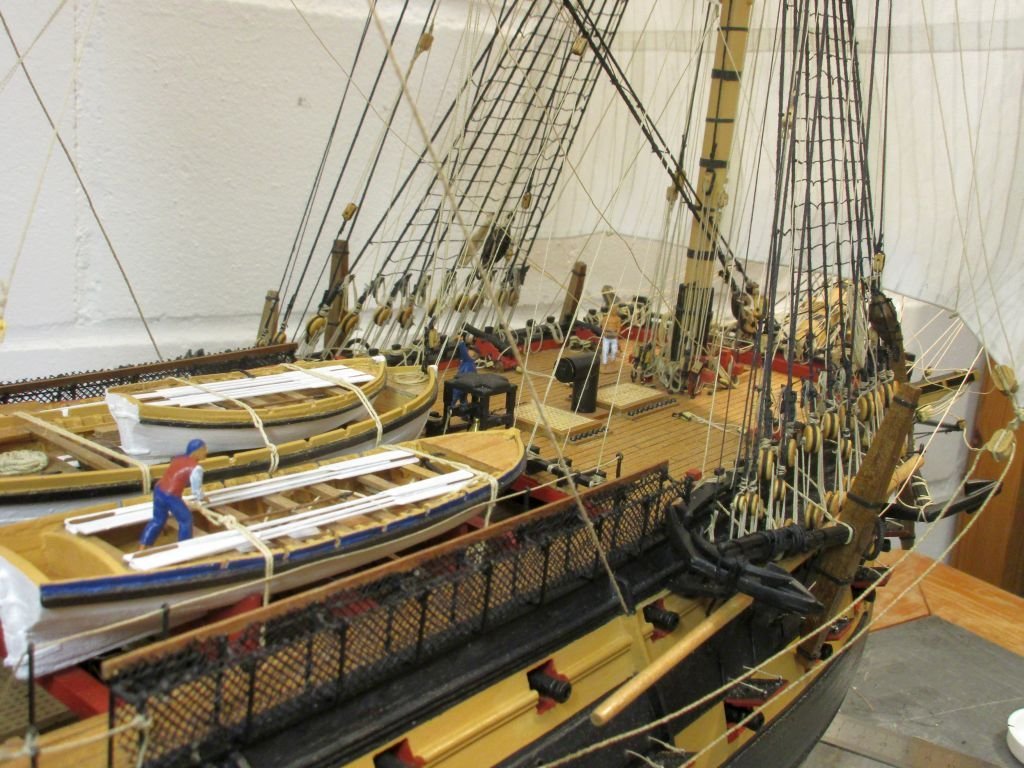
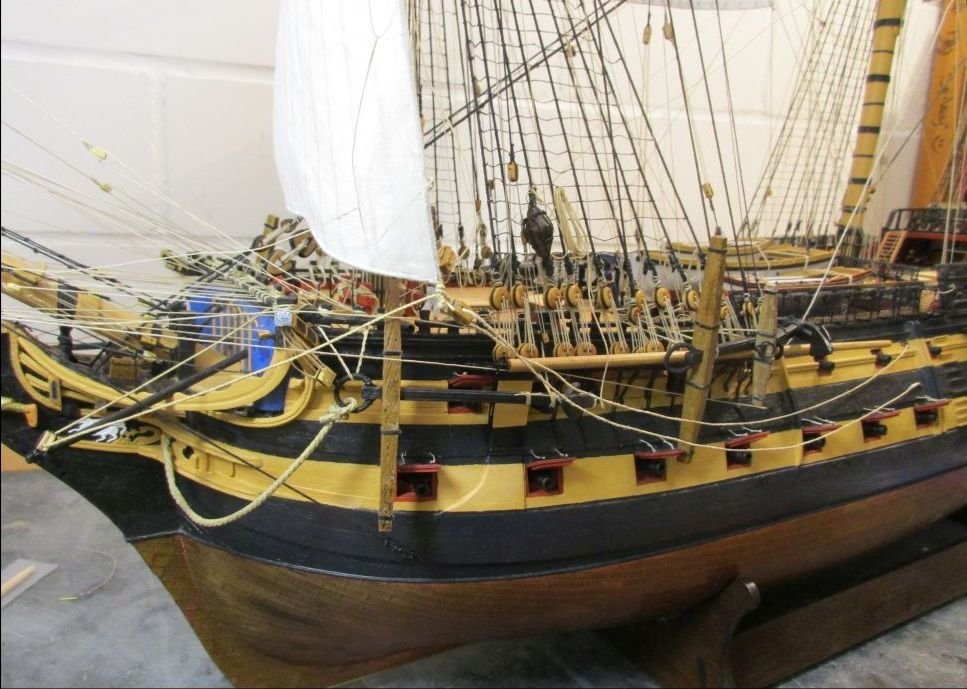
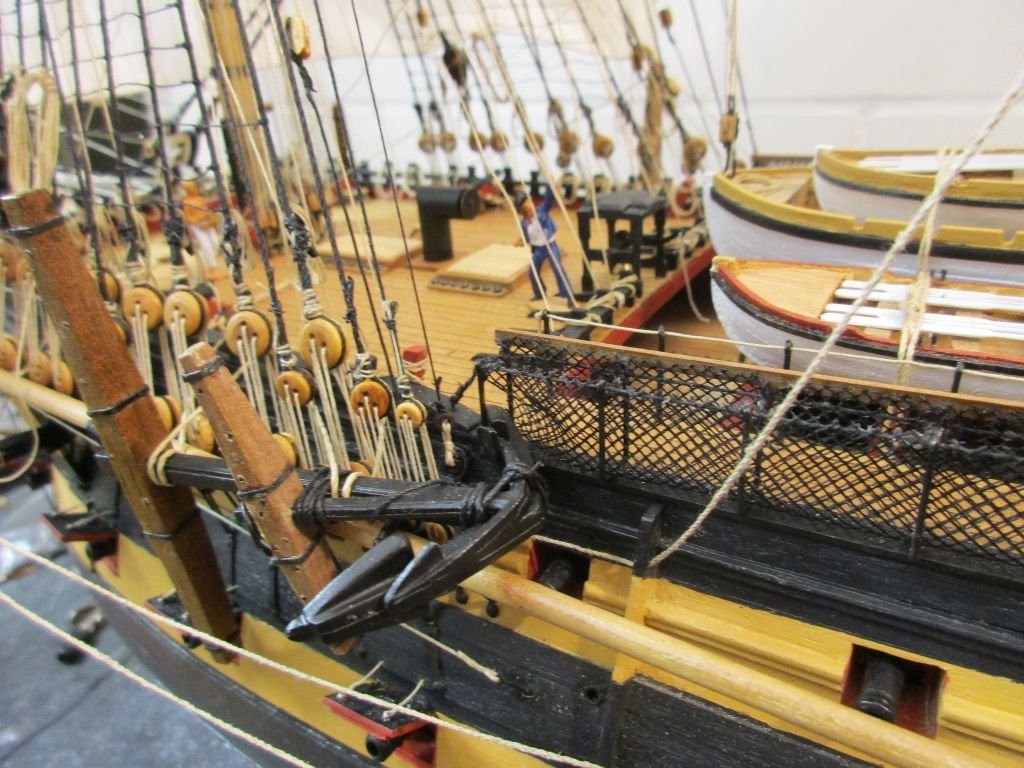
empty belaying pins and ringbolts, loose ends Despite having to overcome a shortage of usable belaying points on the forecastle there were still a few unused pin positions on the poop deck. Also unused ring or eye bolt positions around main and mizzen mast had to be filled. The kit instructions put eye bolts into those locations. However I think that ringbolts, allowed to lie flat when unused, would be more sensible when mounted on the deck. I didn't find much about that in the web but thought it would be easier to run about on deck if you wouldn't have to fear to catch your bare feet in a ring, take a tumble and break your ankle. To imitate a ringbolt with a small fixed ring which encloses the movable one tightly, I bent an eye bolt 90° and put a drop of glue onto it to simulate the fixed ring. After fixing all loose ends I could find, finally...finished! the way I fabricated the imitated ringbolts unused ringbolts around the mizzen mast foot fore mast foot with eyebolt(with tackle) to the left and one of the empty ringbolts lying flat on the deck moderately busy scene on the finished forecastle the skipper seems quite fond of his ship - and so am I...
- 364 replies
-
- 18
-
-
-
- bellerophon
- victory models
- (and 2 more)
-
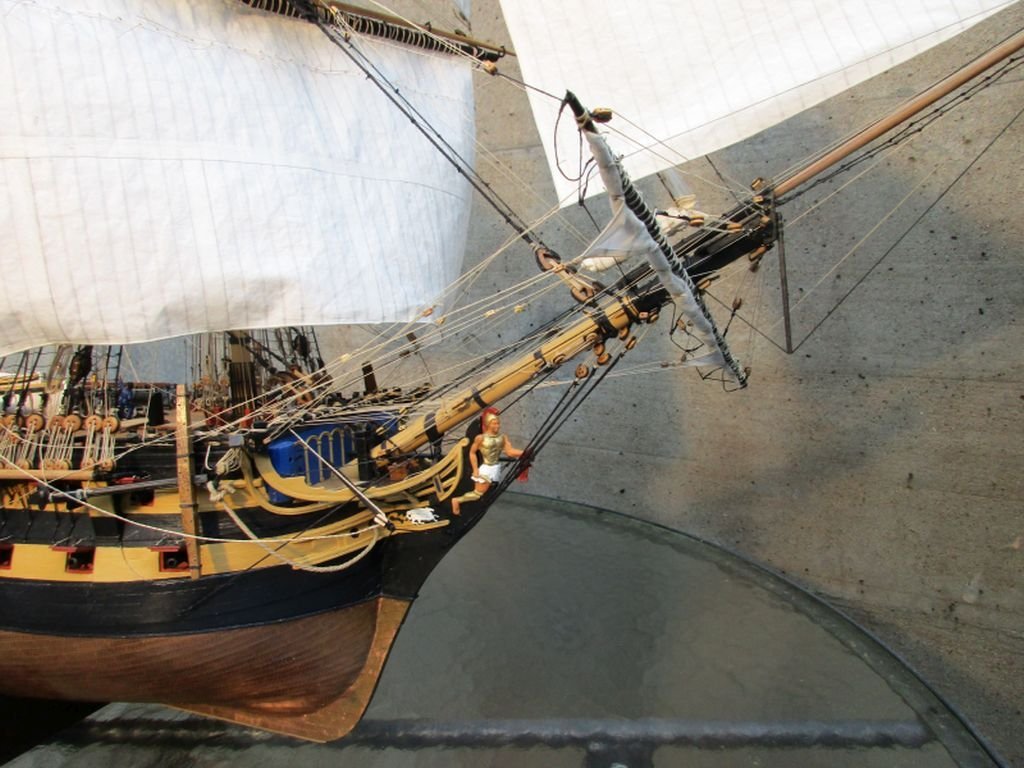
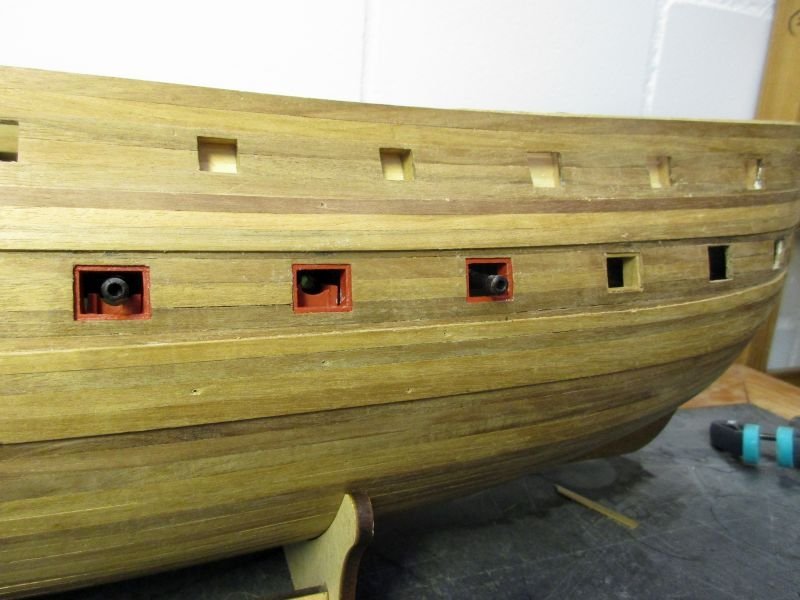
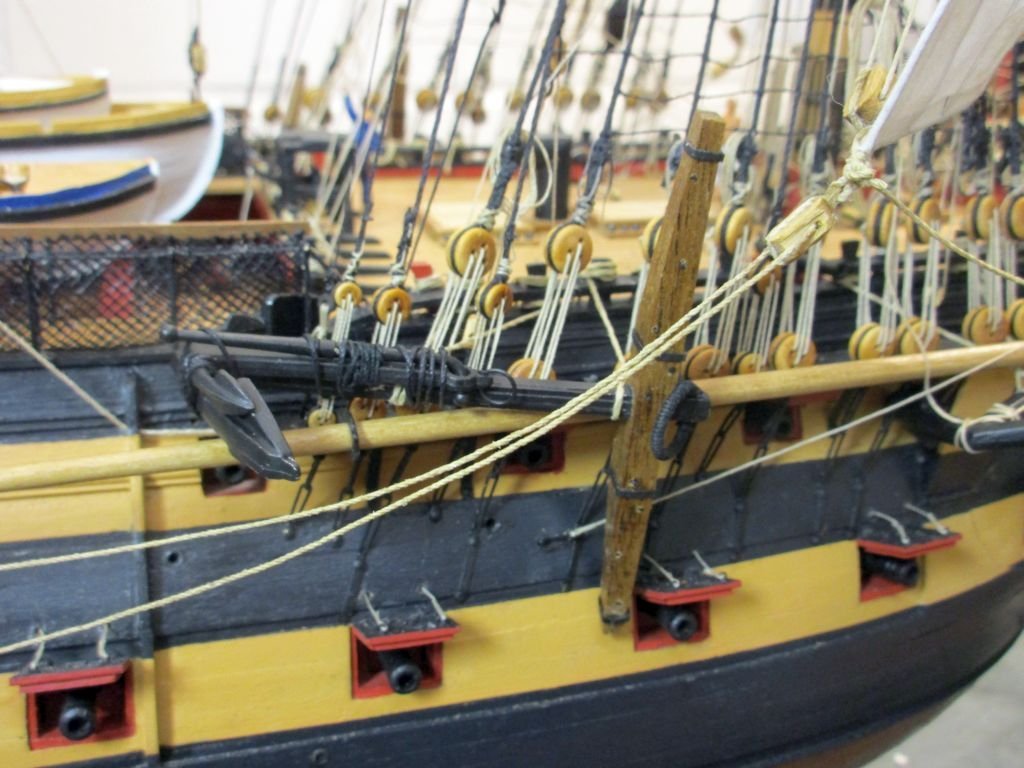
anchors A suitable stream anchor was added to the 5 anchors from the kit, all completed and stored. A conflict for space occurred between the sheet and bower anchors and the lower stun sail booms. The only way I could think of, was to place the anchors on top of the booms. Thus, to set booms you have to move them from under the anchors. Anchor buoys were formed with some 2-component putty and hung into the shrouds. As I understand anchors were buoyed and buoys should therefore be shown whenever a cable was bent to the anchor making it ready for use. For size I used information from John Harland who writes that '... the anchor buoy was in length one-quarter the length of the anchor shank, in diameter, one-eight...'. port side with sheet and bower anchors and the extra stream anchor lashed to sheet anchor stream anchor the cable is attached to the bower anchor and the cat block with tackle is hooked into the ring starboard with sheet and bower anchors and the kedge anchor lashed to the sheet anchor kedge anchor anchor buoy stowed in the fore shrouds the buoy rope lashed to the anchor
- 364 replies
-
- 9
-
-
- bellerophon
- victory models
- (and 2 more)
-
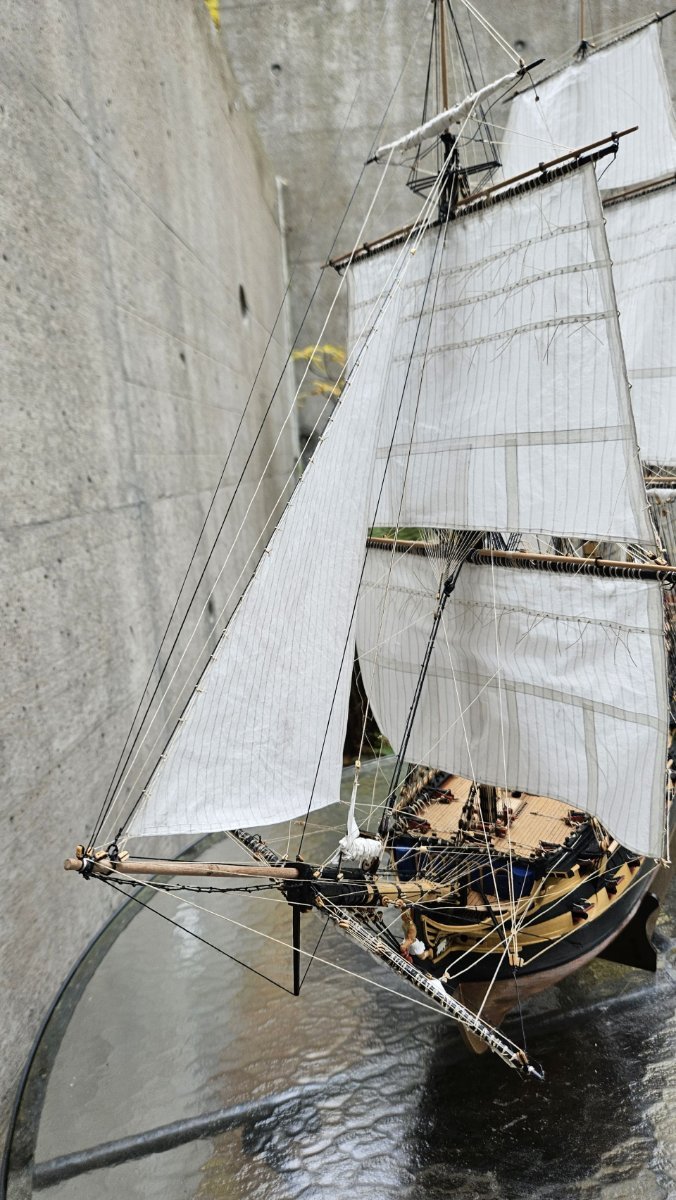
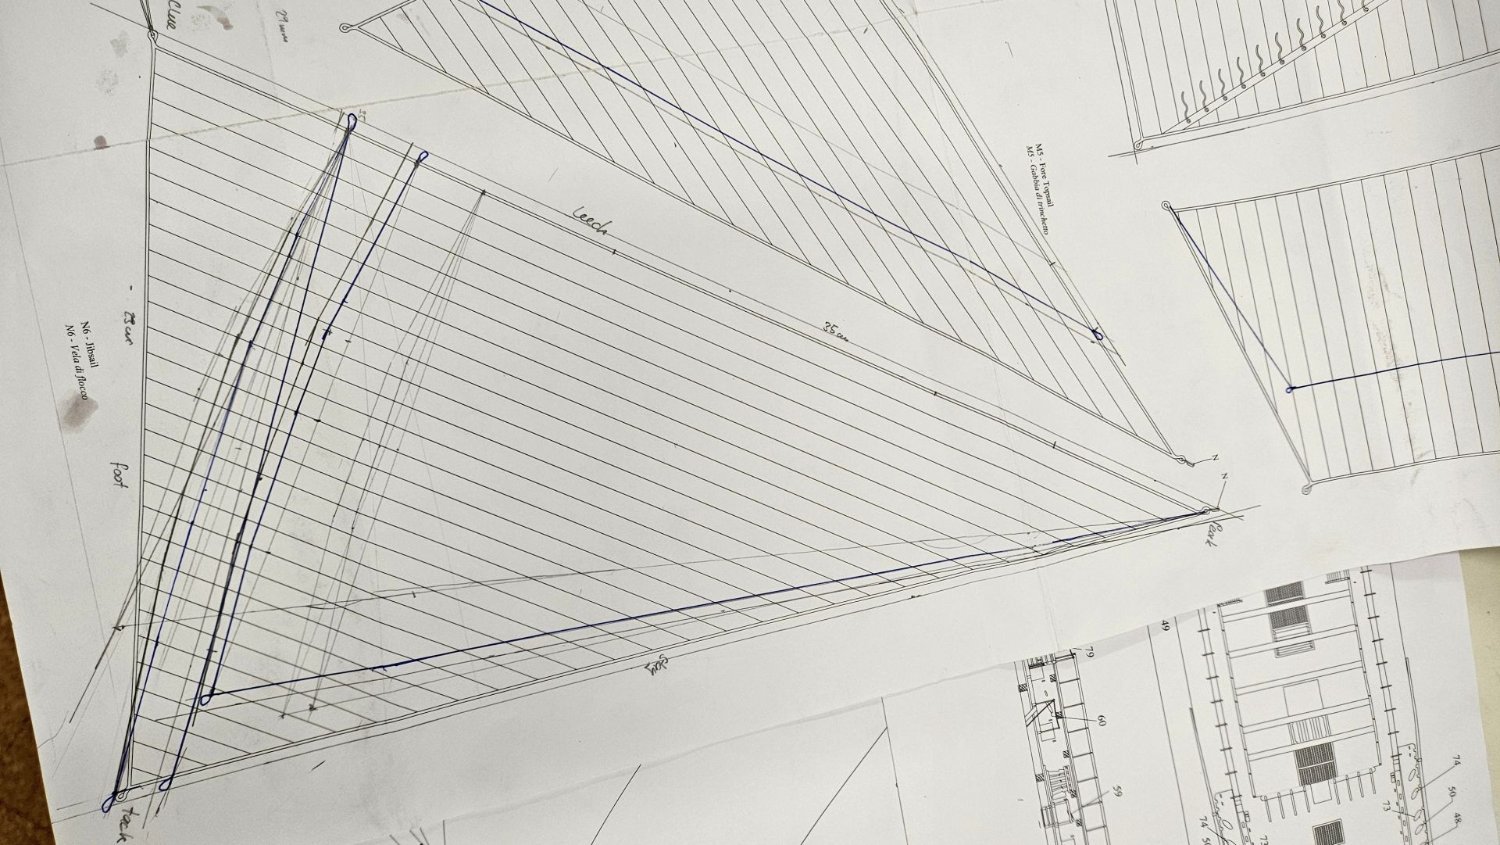
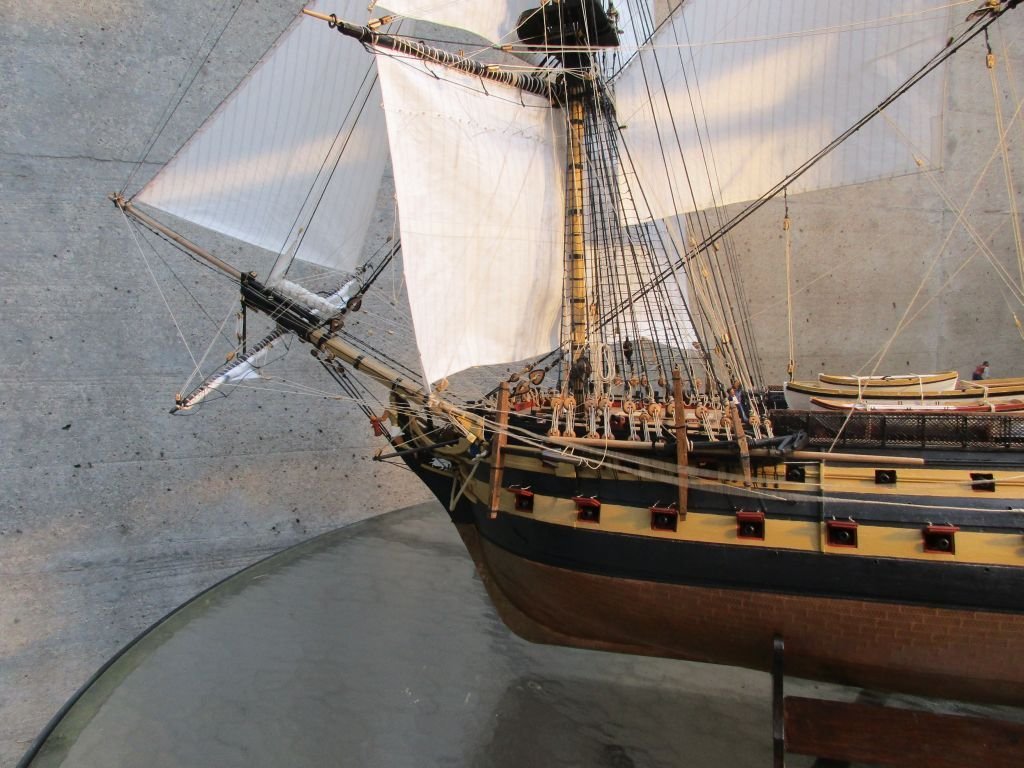
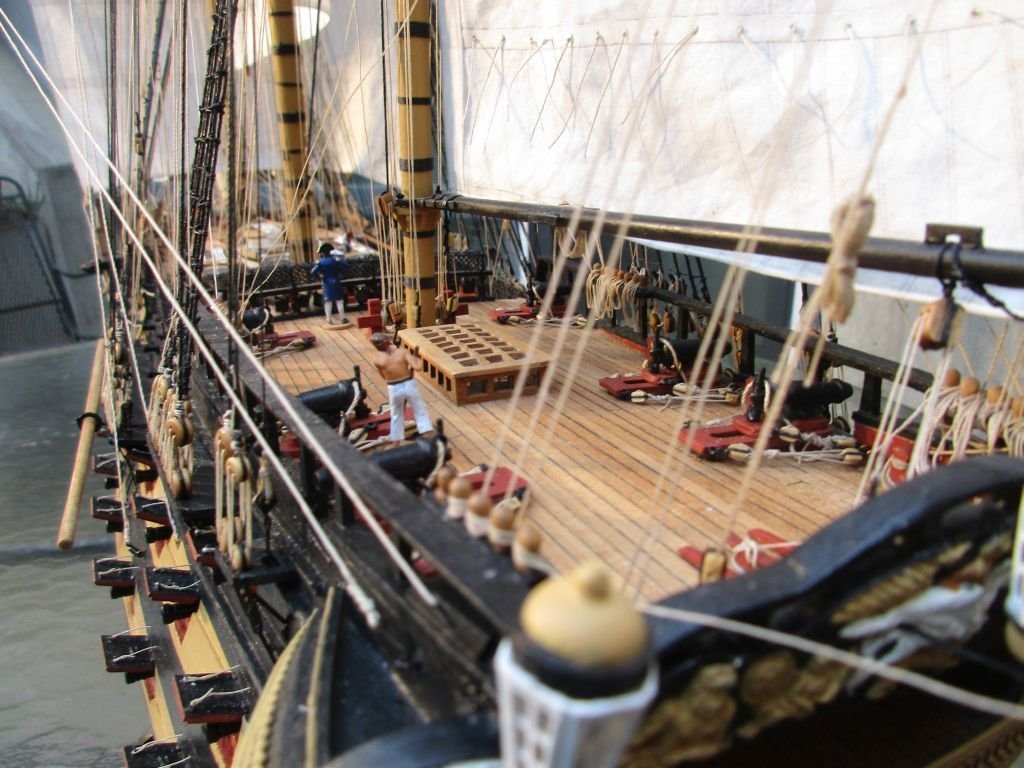
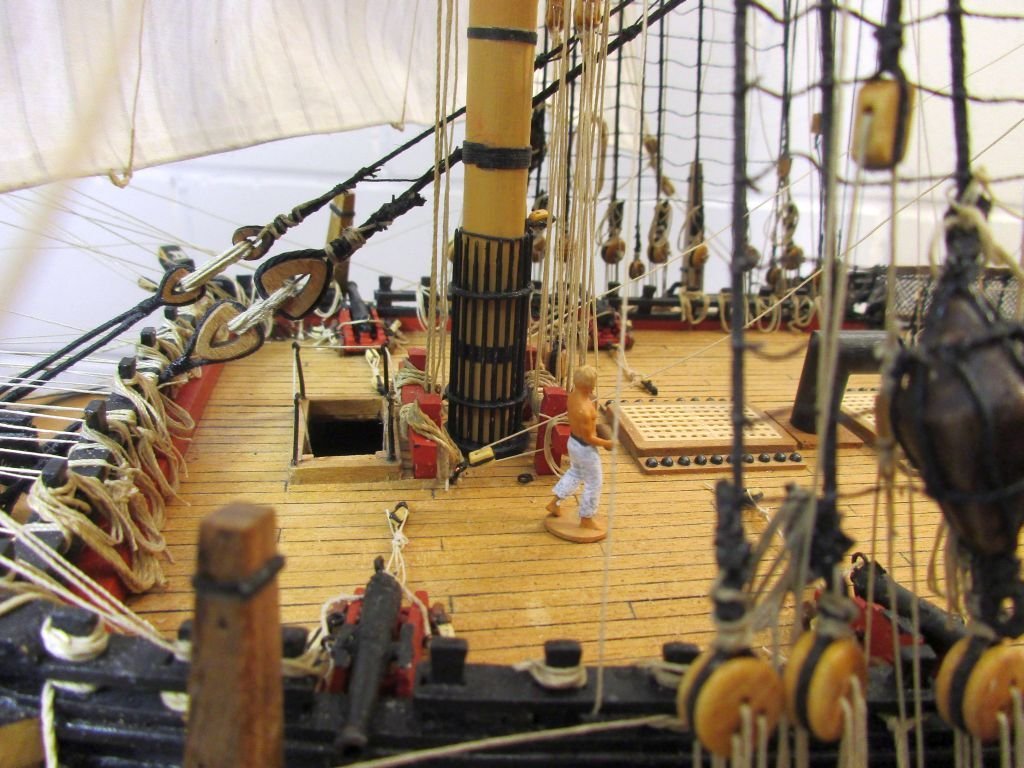
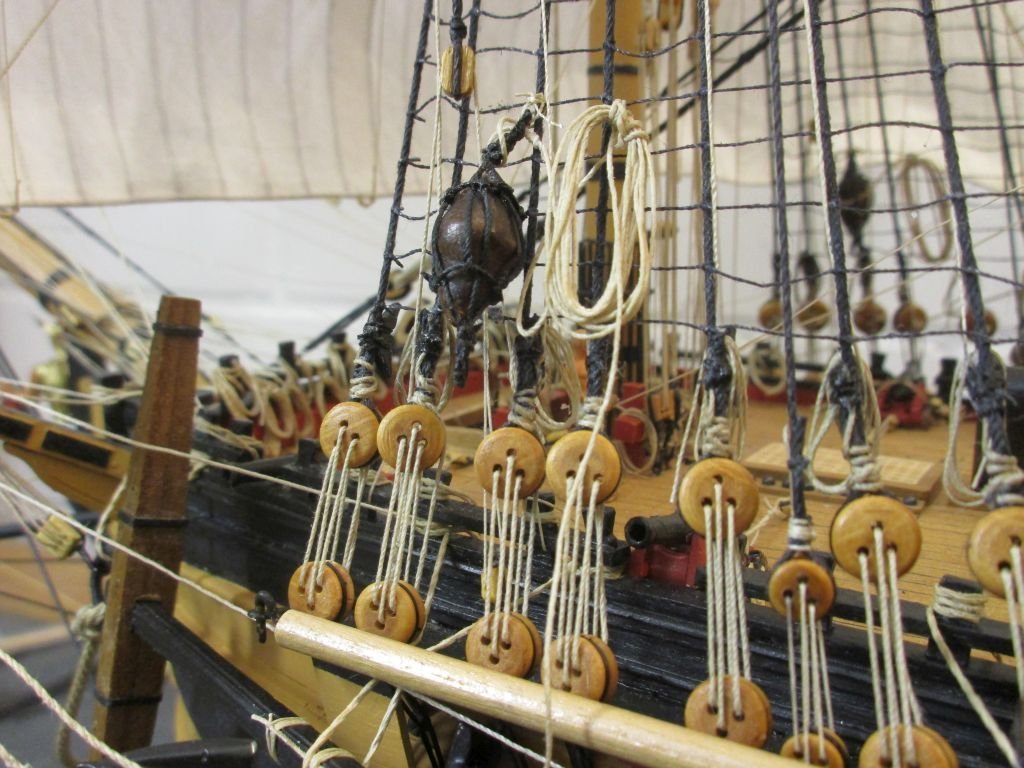
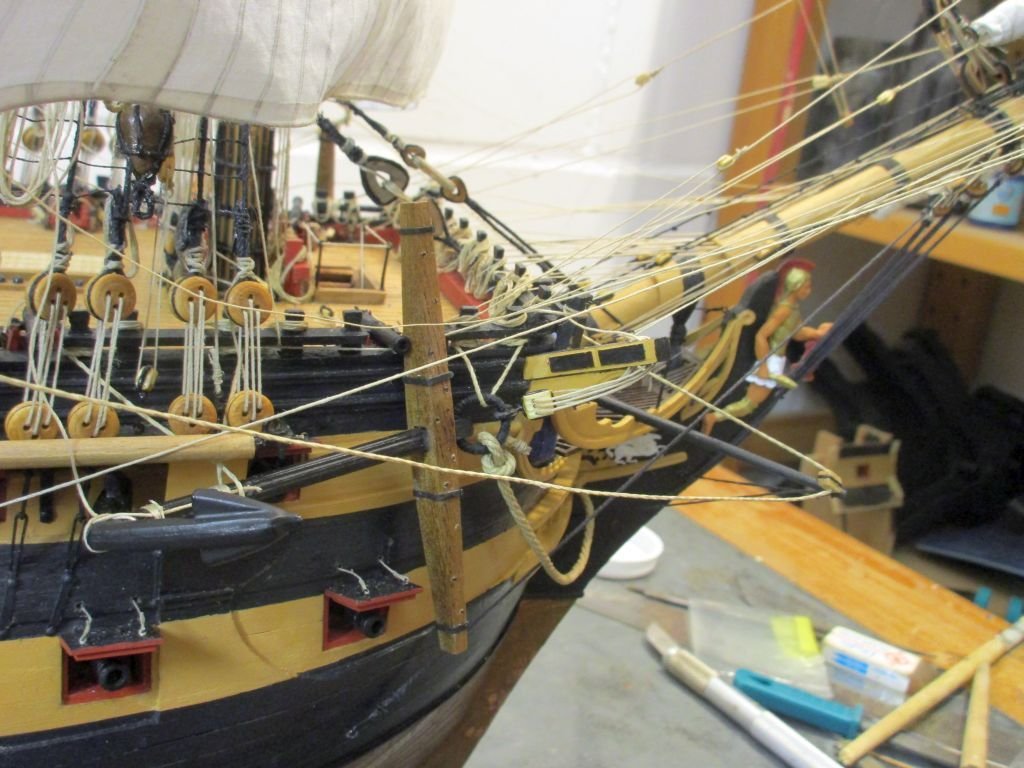
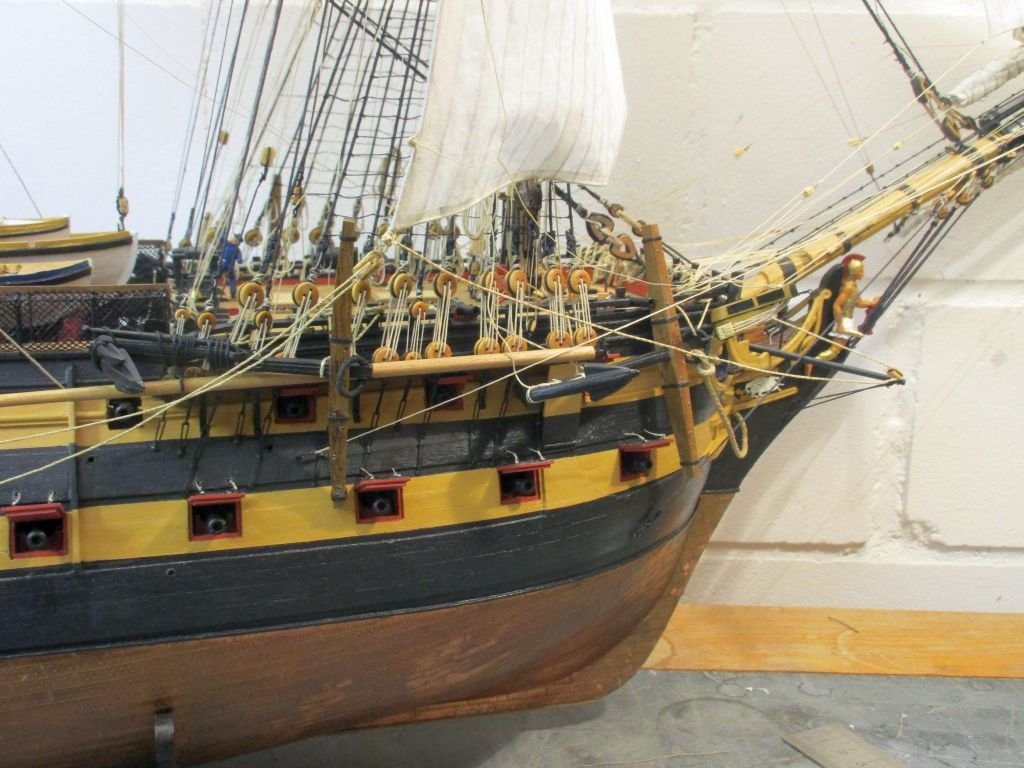
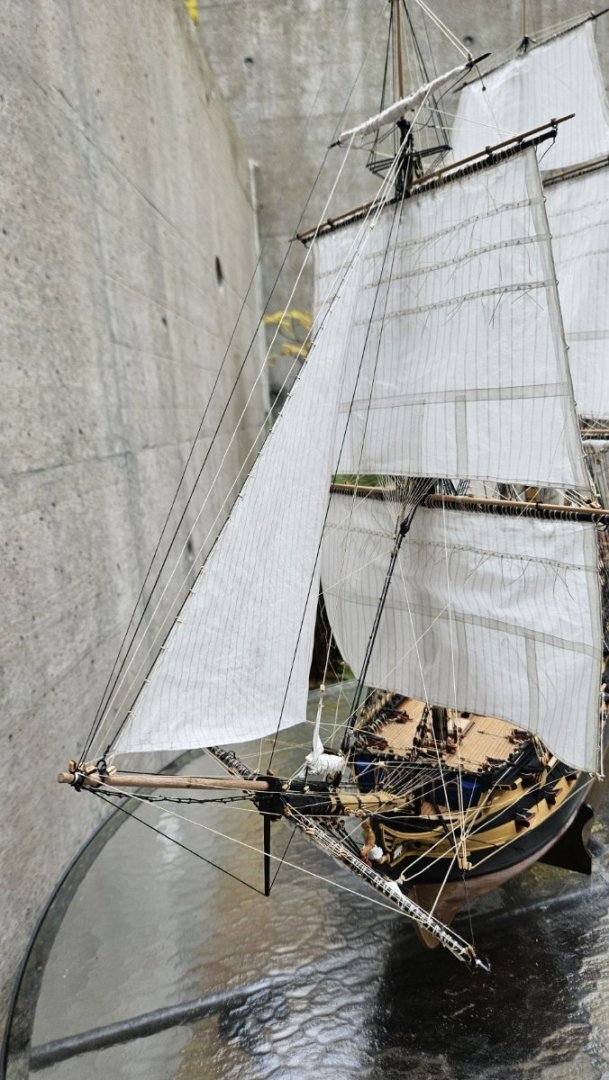
jib sail Several tries were necessary to find an adequate size for the jib sail. To me it was clear, that the kit's plan for the sail was grossly unfitting. Trying to draw one following the description in James Lees in 'Masting and Rigging of English Ships of War' was more difficult than expected. Several attempts were tested with paper templates just to prove unsatisfactory. Finally I tried to use the same proportions in regard to rigging and the other sails as Pandora's jib in the ATOS series has. Judging by eye it looked about right. To bend the jib to its stay I used again figure-of-eight robands. The tack was hooked into the traveler and the rigging set up with help of the kit plans and instructions and some clarification by Lees. Now I only have to install the anchors, to check the natural hang of all lines and to clean up everything... Oh yes, and to find a suitable berth for a rather big model... trying to find the right size - the smaller blue outline is the final one detail of the peak all sails are now installed


- 364 replies
-
- 14
-
-
-
- bellerophon
- victory models
- (and 2 more)
-
Brian Lavery in 'The Arming and Fitting of English Ships of War' also writes of using cuprous alloys. He doesn't say what kind of alloy exactly but he writes about the problems with the strength of bolts made from pure copper and the search for a suitable alloy almost as strong as iron. Comparing different copper alloys I think the solution probably was some bronze - copper and tin - as it is the strongest. What the cost of such fittings was, is another question but losing a ship because of the decay of iron bolts was certainly costlier. Peter
-
Hallo Franz Your Barbara plan seems to me a really valuable discovery. Building her with the Pickle kit seems an excellent idea. If you like you could still name her Pickle and be probably closer to the real boat as Caldercraft or me. By the way - I didn't suggest that Calcercraft was using the Adonis class plans but that I would use them to overwork their Pickle. You could further consider a contemporary painting by Robert Dodd which probably depicts Pickle in the foreground on the right. There you see a vertically stepped foremast. https://www.meisterdrucke.ie/fine-art-prints/Robert-Dodd/99918/The-Defeat-of-the-Combined-Forces-of-France-and-Spain-at-the-Battle-of-Trafalgar-in-1805-(colour-engraving).html Looking forward to your build log! Herzliche Grüsse Peter
-
Allan's advice is of course good and sound - and you really are your own skipper and use the paint you like. However to ensure a lasting joy of your build I would like you to consider something I also wrote in my present build log: (In a book, written by a professional model railroad landscape builder he explains about colour scale. By that he means that if you look at a model in scale 1/100 from a distance of 50cm it should look the same as the prototype from a distance of 50m. And from that distance colours look less bright because of the air absorbing some of the intensity. He says that's the reason that models tend to look like toys if you use original colours. He recommends to always mix in a bit of white or grey and to avoid shiny colours.) Following this advice I always mix about 15% of dull white into all paints, including black. And I use only dull colours. Some very nicely built models are in my opinion made to look like cheap toys, only because of the use of too bright and gaudy colours. Peter