Search the Community
Showing results for tags 'Esmeralda'.
Found 3 results
-
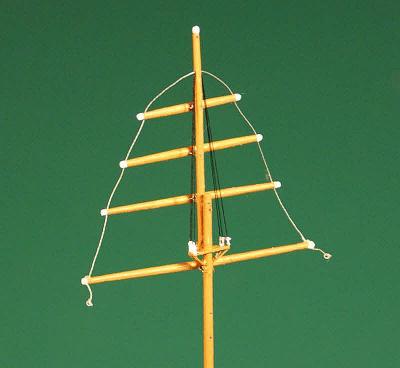
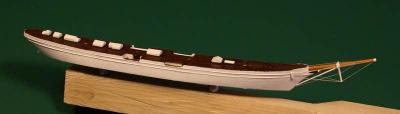
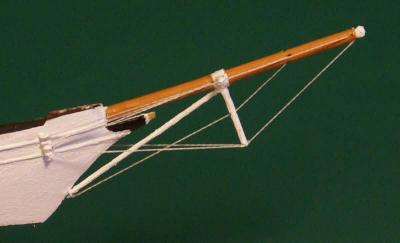
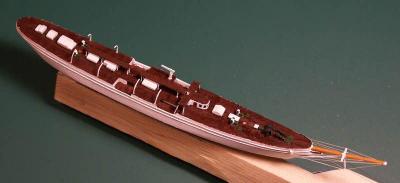
 Welcome to those passing by on my build log of the Esmeralda. I will consider this my first build of a wooden ship kit. I acquired the kit end of last year but started it only a few days ago. I hope it will be interesting for others. It will certainly be interesting for me to look at it later to see progression when I tackle new projects. As a disclaimer, my nautical vocabulary is not that extended. I do my research but I am sure I will use some wrong words. Corrections will bewelcome and highly appreciated. I didn't find much information on the ship itself on the web. So here are some facts from the manufacturer: "The topsail schooner "Esmeralda" was built in Majorca between 1916 and 1919. With an American style in terms of her figure and a most elegant line of sail. This schooner was one of the largest and most beautiful to be rigged in Majorca." I certainly agree with the words above. I find the ship very elegant and this is what made me select the kit. Below is a photo of the finished kit I took from the manufacturer's website.
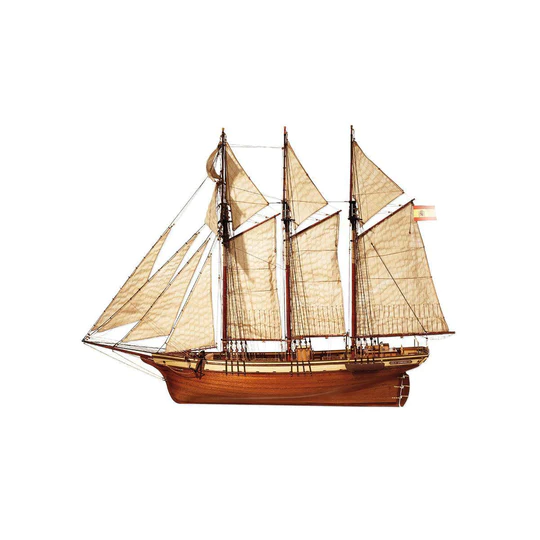
-
 Just got this kit. I haven't built anything for about two years due to arthritis in my hands, so I might not do the rigging, but I think i can still do the carpentry work. So stay tuned, and follow along. I could only find one other log on this ship by "alpayed", and his work is fantastic. Don't expect this quality from me, but i'll try.
 -
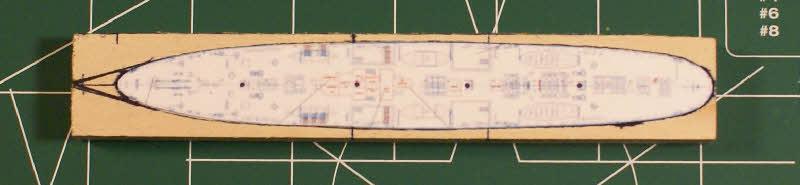
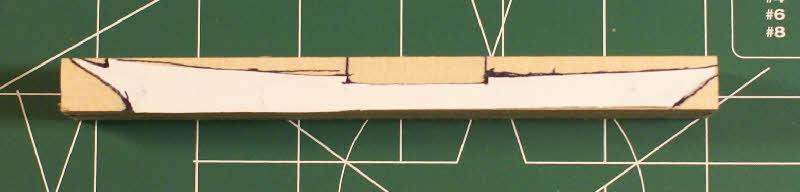
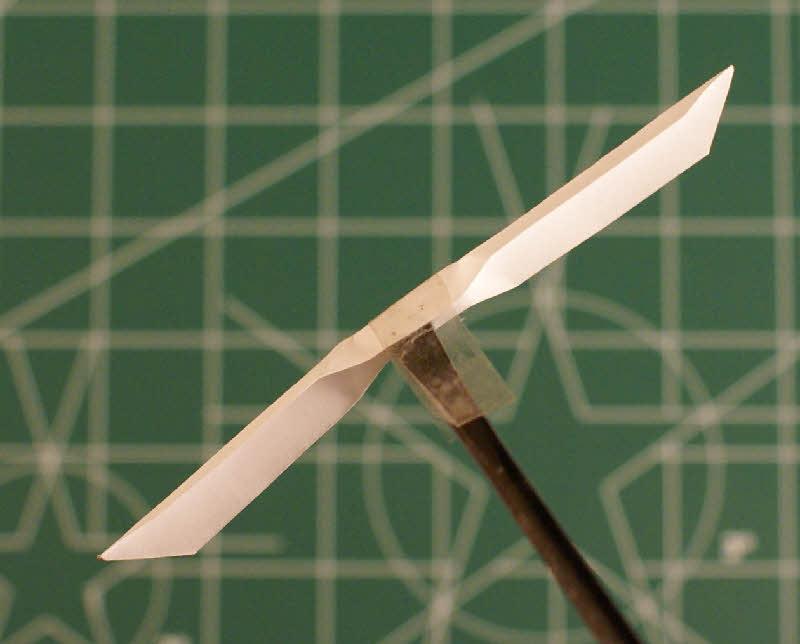
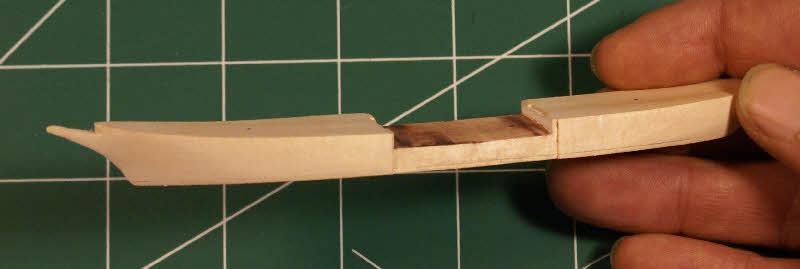
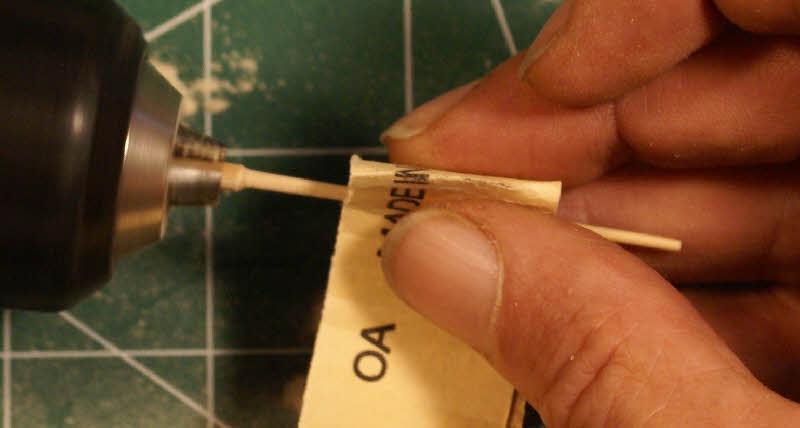
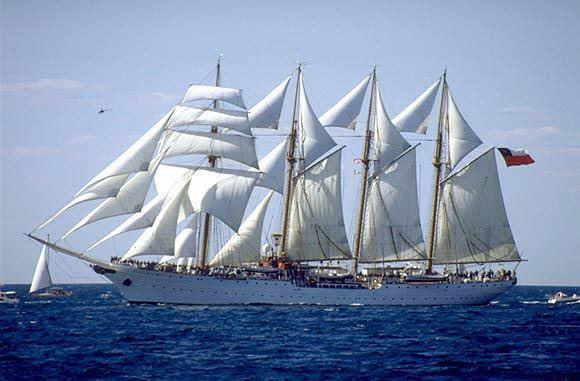
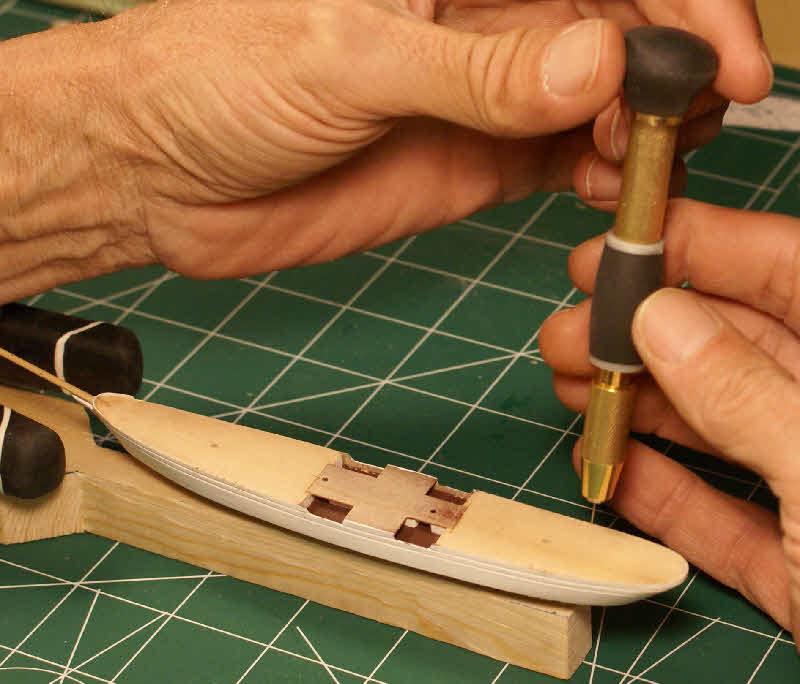
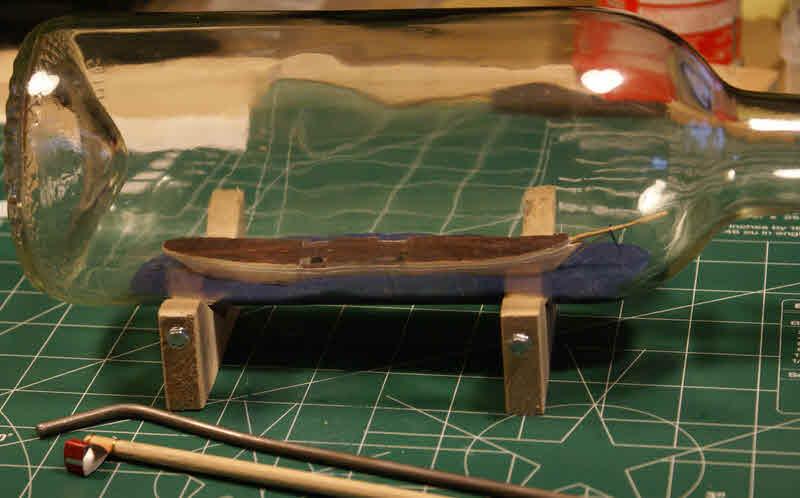
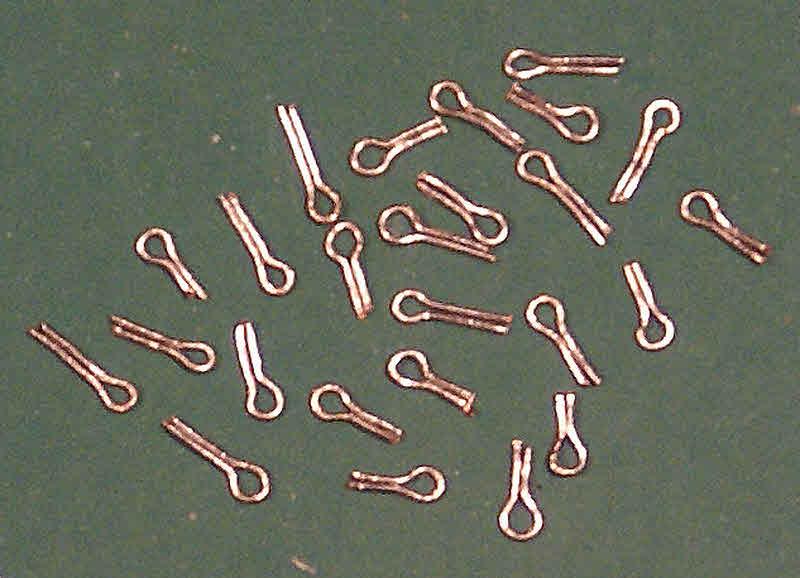
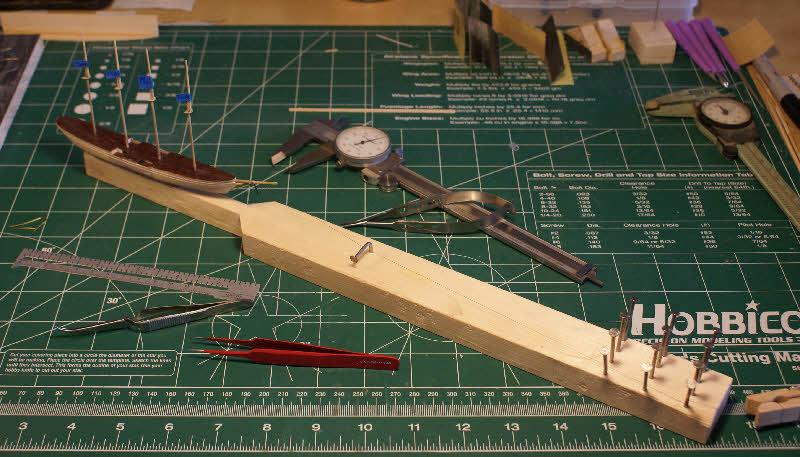
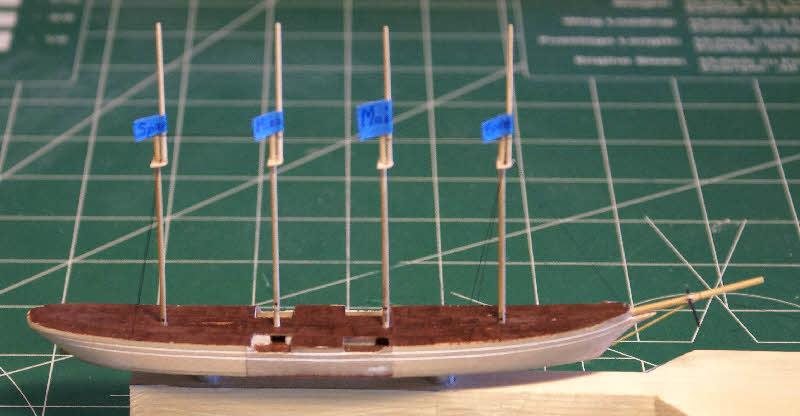
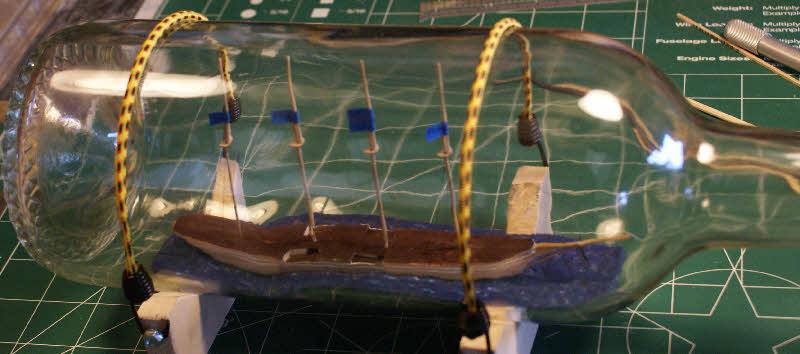
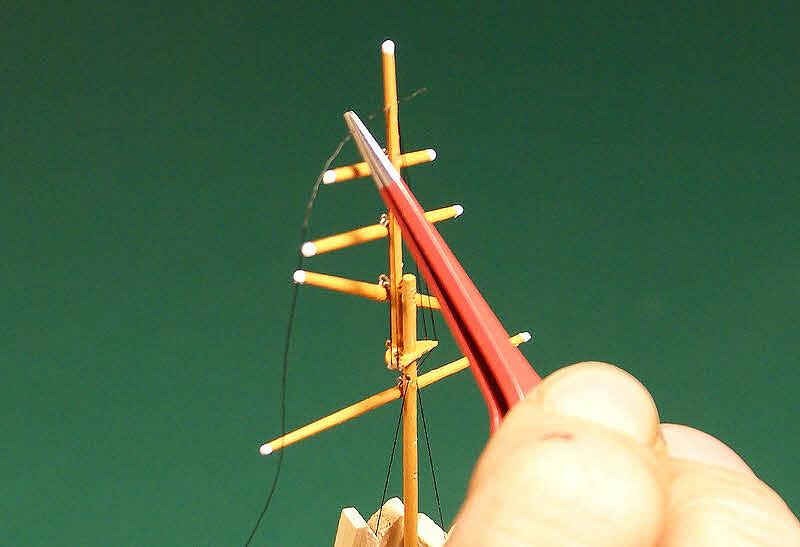
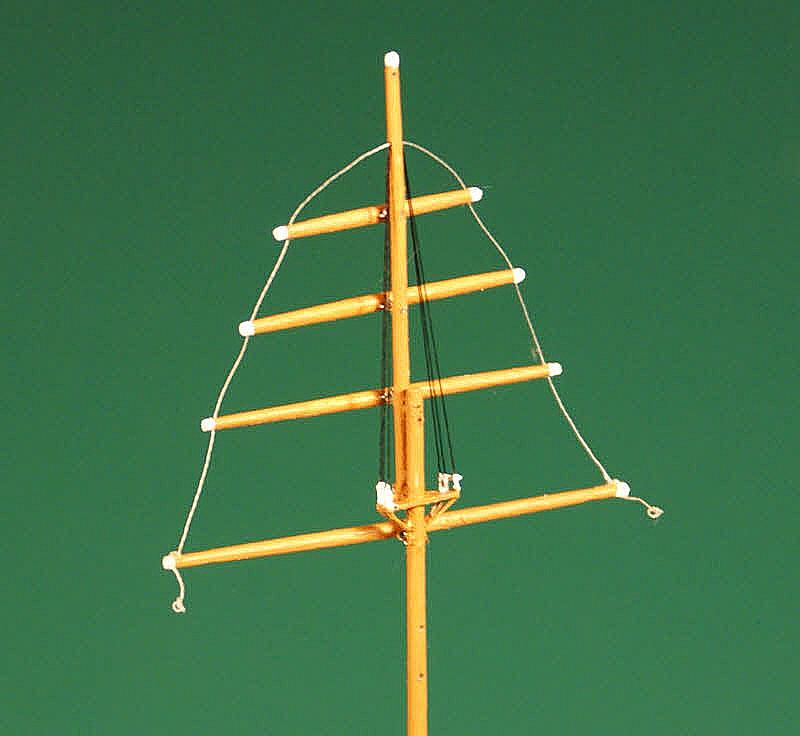
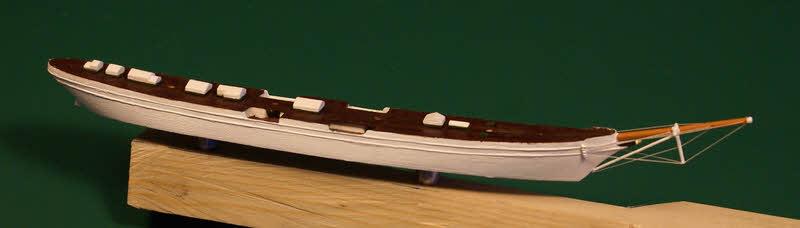
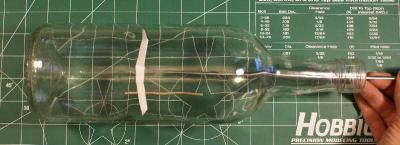
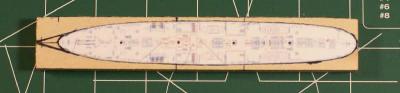
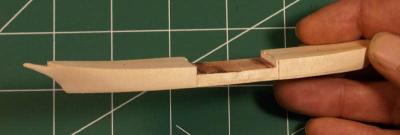
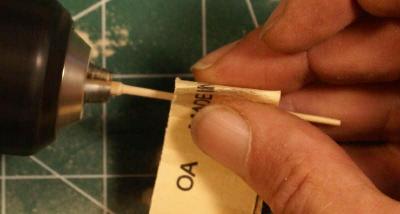
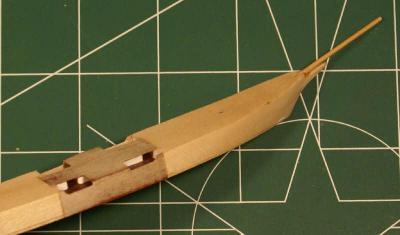
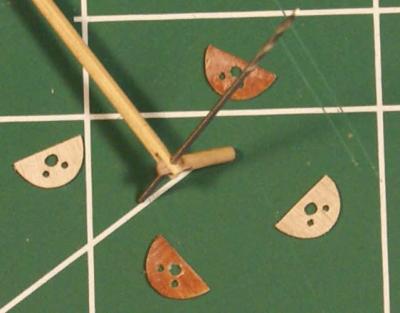
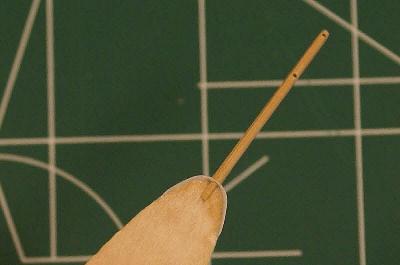
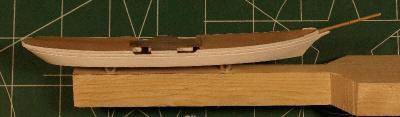
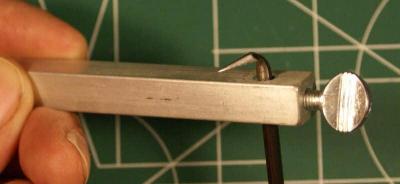
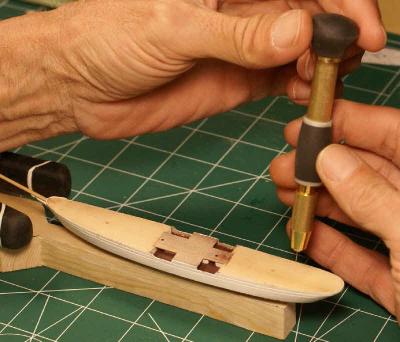
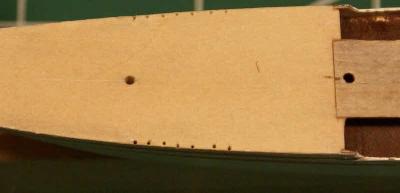
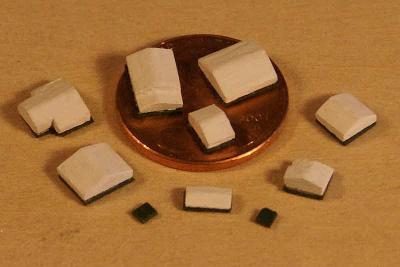
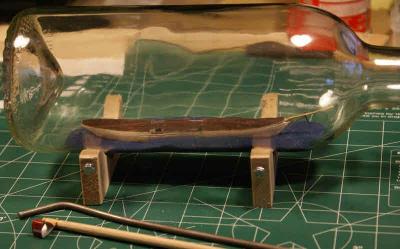
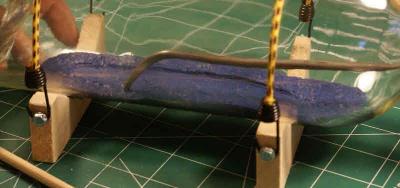
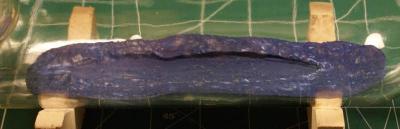
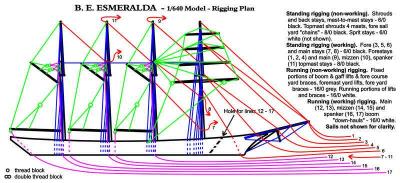
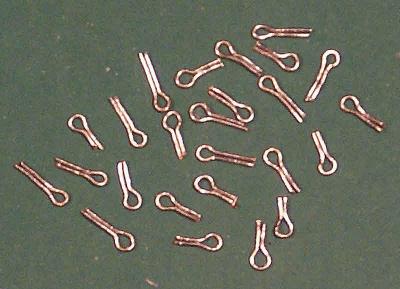
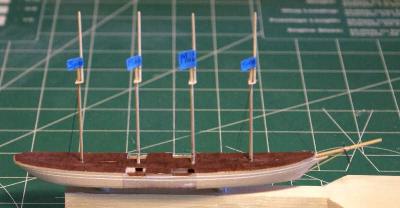
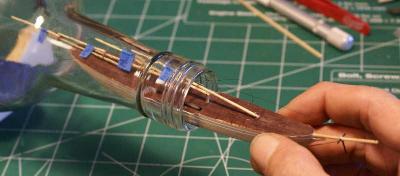
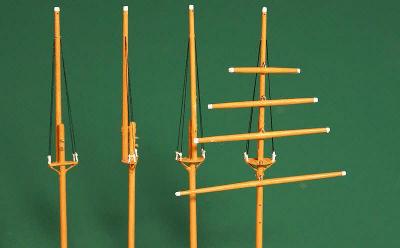
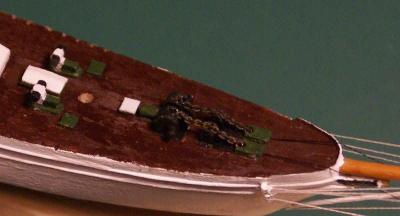
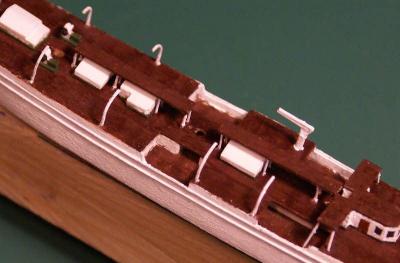
 Welcome to my reconstructed build log for ESMERALDA, the existing Chilean Navy Training Ship, built at 1/640 scale in a bottle. Recent photo of Esmeralda - "The White Lady" - under sail. History of Esmeralda Esmeralda's construction started in 1946, under a different name, by Spain as the sister ship to Juan Sebastian Elcano, Spain's current school ship. Work was halted in 1947 after she was damaged in a ship yard explosion. In 1951 Chile acquired her as partial payment for Spanish debts and was launched, as Buque Escuela (school ship) Esmeralda in 1954. In the 1970's her rig was changed from a topsail schooner to a barquentine by replacing the fore gaff sail with two main stay sails. Since her commissioning, Esmeralda has been a training ship for the Chilean Navy. She has visited more than 300 ports worldwide acting as a floating embassy for Chile. She participated in Operation Sail in New York in 1964, 1976 and 1986, and the Osaka World Sail in 1983. She also participated in International Regattas of Sail in 1964, 1976, 1982 and 1990 winning the coveted Cutty Sark Trophy in the last two participations. Esmeralda is the second longest and second tallest conventional sailing ship in the world. Characteristics Length: 113 meters Beam: 13.11 meters Mast height: 48.5 meters Sails: 21 total with a sail area of 2,870 m2 on four masts Crew: 300 crewmen and 90 midshipmen Top sail speed: 17.5 knots The Model I acquired a 1.5 liter wine bottle, emptied it (which I enjoyed very much!), then cleaned and dried it. I measured the inside dimensions using a piece of paper attached to a rod, trimming the paper until it would just touch the bottle at the narrowest point. Gauge for measuring the inside of the bottle. Gauge in use. I subtracted the planned sea thickness and clearance for the masts from the minimum inside dimension. I used that amount to determine the model length based on the ship's characteristics and printed a photo to match the model length and height then taped that photo to a rod to test how the model will look inside the bottle. Photo of Esmeralda inside the bottle. A model this size will fill the bottle very well. I also cut a strip of paper to the beam of the model to verify the bottle's neck inside diameter. This is important because most necks of long neck bottles have an inside dimension that is smaller than the mouth - something I learned the hard way years ago when I assumed the mouth of a bottle was the smallest part of the neck and my ship wouldn't fit through the neck even though it cleared the mouth easily. I then generated a deck plan and waterline hull elevation and laid out the plan and elevation on a block of basswood. Deck plan and hull elevation laid out. I used a razor saw to make a series of cuts at about 1/16th inch (1.5 mm) intervals to the profile lines on three sides of the block. After getting the rough shape by breaking off the "fins" I sanded the hull to shape. Hull cut out ready for more detailing. Esmeralda has a partially open area between the main and mizzen masts which will be detailed with two blocks for the two structures in this "waist" (for lack of a better name) and three pieces of .5 mm ply for bulwarks and deck. I also decided to make and install the bowsprit. Tapering the bowsprit with my "mini-lathe". Waist deck houses, bulwarks, weather deck over the waist and bowsprit glued in place. Esmeralda has a low bulwark (a little less than knee height) at the bow. I made this from a piece of paper slightly lapped over the hull, glued with cya to stiffen the paper then sanded to feather it in to the hull. It was trimmed to .025 inch high (approximately 15 inches to scale). Completed low bulwark at bow. Note the two holes in the bowsprit for rigging. Esmeralda has two half rounds running from the bow, along the sides and around the stern parallel to the deck. I used a scribing gauge to slightly cut grooves into the hull which were then deepened slightly with a triangular riffle. A wire or monofilament will be glued into these grooves later then painted over to replicate the half rounds. Scribing tool. Hull with scribed grooves mounted on my work board. I started work on the masts and some of the deck details. The masts have a box hinge instead of the usual piece of wire through the base of the mast bent into a "U" with the two ends glued into holes in the deck. The box hinge will be nearly invisible whereas the bent wire would be obvious. I also made the four identical tops for the masts from .5mm ply sanded to remove one layer of ply (about .015 inch thickness). The skylights were made from basswood painted white glued to a base of .5mm ply painted green. Two hatches were made from the plywood and painted green. Mast with box hinge and four tops. Drill is a #73 Skylights and hatches. I finished the rigging plan I'd been working on since making the decision to build Esmeralda. Rigging plan for the Esmeralda model. Blue and green lines represent the standing and running rigging that will be completed outside the bottle and aren't used for moving the masts and spars into position inside the bottle. Red and magenta represent the standing and running rigging that will be set up but not glued in place outside the bottle and are used for locating the masts and spars inside the bottle then glued and trimmed. I laid out the holes for the masts and rigging and started drilling them. Drilling holes at the edge of the weather deck for shrouds and back stays with a #80 (.35mm) drill. The holes at the edge of the deck need to be drilled at an angle so they don't come out the side of the hull. I had one hole out near the end of the fan tail that needed to be over 45 degrees from vertical. I didn't quite have the angle right and the hole came out the side of the hull but it was easily repaired, but redrilling the hole from the same starting hole was somewhat difficult. I also had to change to a larger diameter drill because the smaller drill wasn't long enough to drill all the way through to the bottom of the hull. Close-up of holes for fore mast shrouds and back stays. Holes for main mast shrouds and back stay are visible next to the bulwark in the "waist" at upper right. Work in general had progressed to the point that I felt getting the sea in the bottle was necessary. I used Fimo Classic modeling clay (a polymer based compound - Sculpey, Pendo and Plasticine are possible substitutes - but Fimo has a navy blue that comes very close to the color of deep water ocean). I formed it into a piece 7 inches by 2 inches by about 1/4 inch thick tapering to zero around the edges to fit into the cylidrical bottle and leave the top surface of the sea roughly level. I then put the hull on top of the clay in the position needed then pressed it firmly into the clay with a steel rod. Hull pressed into the sea to leave an impression. The steel rod is 3/16 inch diameter with the end ground, filed and sanded to a hemispherical tip then bent as needed. The gouge is a similar sized dowel with a slot cut in the end to hold a strip of aluminum soda can then wired tight. After determining the needed angle of the gouge by trial it was glued. After the hull was removed I used the gouge to remove some of the clay from inside the impression of the hull. I used the removed clay to build up a wind swell running from near the near left corner to near the far right corner (replicating the sea with a wind from about 60 to 70 degrees off the starboard bow). Using the gouge to remove clay from the hull impression. I put the hull back in the sea, pressed it down, removed it and gouged out more clay until the hull fit snugly in the depression. After that was done I used the rounded tip of the steel rod to cover the surface of the sea with little overlapping dimples except for the ship's wake which was smoothed with the tip. Sculpting the surface of the sea. I made one more check of the hull in the depression for it in the sea then added some white Fimo to simulate the agitated white water at the bow, along the sides, in the wake and for a few wind blown white caps. I placed flecks of the white (or a partial mix of blue and white) on the tip of the steel rod to transfer them to the sea then feathered them into the blue. Finished sea. I completed basic mast assembly - lower masts with hinges, tops and upper masts - and set them into the appropriate holes in the hull. Esmeralda in progress on the working board with some of the tools being used. Then I rigged her with one pair of back stays on the fore and spanker masts, a single fore stay and the mast to mast stay that connects all four masts at the mast splices. This was done in order to do a trial fit of the hull and masts to verify that the completed assembly will fit in the sea with clearance for the masts to stand erect. I calculated my dimensions very closely with about 1/16th inch clearance between the mast tips and the inside of the bottle. Esmeralda with minimal rigging. The rigging is tied off but not glued. It will be removed after the trial fit. On a previous build I neglected to do a trial fit on a ship that I had also calculated very closely. I got that ship in the bottle and in place in the sea. I had pulled up the fore mast and positioned all the fore mast yards and had glued most of the fore stays and working lines to achieve this, then moved on to the main mast. The mast tip hit the inside of the bottle before it was in its correct position. I had to cut all the glued lines to get the fore mast to fold back down so I could remove the model. Even at that two fore mast yards snapped because I could not get them arranged the way they were when I put the ship in the bottle. I NEVER omit a trial fit after that experience no matter how confident I am with my calculations. Esmeralda going into the bottle. Esmeralda in place in the sea with masts all erect. There is about 1/16th inch clearance between the mast tips and the bottle. This trial fit also gives me a chance to trouble shoot the insertion process. In this build the deep dimple in the base of the bottle prevents me from simply setting the model in place then erecting the masts. I'll have to start erecting the masts when the bowsprit is still partly in the neck of the bottle. Another good reason to do a trial fit with bare poles and minimal rigging. Now that I know my masts are all correct it's time to detail them. I made some ring bolts out of 32 gauge (.008 inch) wire by bending the wire around the tip of a needle, forming the two ends next to each other then cutting the ring bolt from the length of wire. I had so much fun doing them I made 25 of them before I realized I only needed 12. Ring bolts. I made the fore mast yards, drilled the holes needed in all the masts and yards then painted them. I decided that I could make use of the extra ring bolts by linking two of them together, eye to eye, to use to connect the yards to the fore mast. I glued one ring bolt in a hole in the center of the yard then glued the other linked ring bolt in a hole in the mast. After that I rigged the topmast shrouds, three pairs on the fore mast, two pairs on the other three topmasts. Rigging the fore topmast shrouds. Note the linked ring bolts connecting the yards to the mast. I also added an extra ring bolt to the forward edge of the top on the fore mast to use to tie off the two fore stays that start there. After rigging the topmast shrouds I glued a crossbar of thread to the shrouds about 1 mm above the top. I painted the threads from the crossbar to the top white to simulate the turnbuckles used on Esmeralda instead of deadeyes and lanyards. The futtocks were painted to match the masts. Masts with completed shrouds. I then rigged the fore mast yards with one thread through each yard end, through the mast then through the other end of each yard. The two ends terminate with a thread block - in this case a bowline tied around the point of a needle then glued - to simulate a block used in the actual rigging of Esmeralda. The only place where the thread is glued is at the course (lowest) yard which allows the yards to turn so they are nearly parallel to the mast so the assembly (with sails in place) will pass through the bottle's neck. Foremast with some of the running rigging. Note that the linked ring bolts merely locate each yard. I worked on the hull as well by gluing 28 gauge wire in the previously cut grooves in the hull, installing four ring bolts on each side of the bow and rigging the bowsprit stays. Then I gave the hull the final coat of white and glued the deck details that were ready in place. Some of the deck details installed. I then painted the figure head - an Andean Condor. Close-up of figure head and bowsprit stays. This brings us up to date on my progress reports on Esmeralda prior to the MSW shut down for the software change. In that time work continued on deck details. Davits for three of six ship's boats, crane for the zodiac, the bridge, two catwalks, four winches and the anchor windlass and associated details in place. Close-up of midship section. Davits were made from 28 gauge wire bent to shape and glued in holes in the deck. Crane made from three pieces of wood and styrene. Bridge made from a .5 mm ply base and roof, wood between, with 32 gauge wire legs at the wings. Catwalks from .5 mm ply with eight 32 gauge wire legs glued into holes in the ply and deck. Winches made from two pieces of wood on a ply base. Close-up of windlass, bits and hawser hole covers. The anchor windlass was fabricated from eleven pieces of .010 and .020 inch styrene and three pieces of wood on a base made from paper stiffened with cya glue. The windlass isn't glued down yet. That will be done inside the bottle to cover a hole through which six lines pass after they are glued and cut. You may have noticed two threads coming from under the green covers. They will be used to pull the two chain ends into place during the windlass positioning. The chain is copper, 42 links per inch, blackened with the product from Model Expo. I know it's a bit over size (by about 50%) but I could not resist putting it in. With davits on deck I need to make some boats: two longboats, two smaller boats similar to old whaling boats (pointed bow and stern, narrow beam), a zodiac and another power boat similar to a modern Boston whaler. I haven't seen this boat in any of the photos of Esmeralda I've found, I may just have to make my best guess and wing it. I can infer the length from the davits and the beam and length from Esmeralda's deck plan which shows the outline of this boat on deck but nothing more. I started with the longboats. I made a plug from basswood, dipped it in warm paraffin wax (so glue wouldn't stick to it) and wiped away the excess wax. After attaching it to the tip of an Xacto knife I covered the plug with narrow (less than 1 mm) strips of wet newsprint laid lengthwise, edge to edge, like planks. I painted a layer of thinned wood glue over that layer then added a layer of wider strips laid across the plug, again edge to edge with another coat of thinned glue over it. After the glue thoroughly dried I lightly sanded the outside of the paper hull then trimmed the overhang flush to the plug. It popped right off the plug at that point. The second longboat hull is drying now. Longboat plug and hull. Now that I'm all up to date I'll end this report. I welcome any comments and questions. Edited title of topic to reflect a change to my display name.
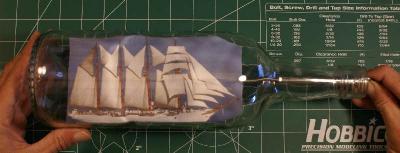


- 84 replies
-
- 7
-

-
- bottle
- training ship
- (and 1 more)