
Search the Community
Showing results for tags 'acrylic'.
Found 3 results
-
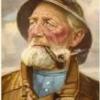
 Hello, I recently posted an extensive tutorial on how to paint cast metal ornaments for ship models. In this tutorial I will skip the basics of preparing and priming your model detailed in the previous tutorial, and instead skip straight to painting some small scale historic figures. Step 1: color block The first step after priming your model is to block in its basic colors. Simply use a fine brush and paint the elements of the figure in the color you want. I advise to use a small amount of colors as this makes it easier and results in a better looking model. Using more than 4 or 5 different colors is usually a bad idea, as it will confuse the viewer and look amateuristic. Note: For this tutorial I used a white primer because it photographs easier. Normally I would use a black primer as its easier to get good coverage. A white primer is harder to cover with colored paints, often needing two coats to get good coverage. Step 2: Wash After you have applied the colors on your model it does not look great... yet. A very easy way to bring out the details in your figure is to apply a wash. This is a specialised, watery thin ink that runs into the recesses of your model while staying clear of the raised areas (sort of). Paint manufacturers like Citadel and Vallejo have a range of these, in various colors and I can highly recommend them. The trick with washes is to be very generous in applying them. Use a larger brush and "flood" your figure, allowing the ink to run over it and into all the recesses. If a certain area is heavily flooded, use a brush to wipe it into different areas of your model until you get an even coverage. Don't be put off if it looks "too much", after drying the effect is much more subtle. In fact you could use a second layer of wash after drying to get more intense shadows. Usually one application is enough though. Washes take a long time to dry (relatively speaking for acrylic paint) so you can speed things up with a blow dryer if you want. I used Agrax Earthshade (brown) shade from Citadel on the entire figure. You could use different color washes on each section but I wanted to get this aged, slightly yellowed painting look anyway. Usually its not worth the trouble using a blue wash on blue parts etcetera unless you are aiming for a specific result. 99% of the time I use a black wash or a brown wash for everything. Step 3: Highlights Once the wash has dried your figures will look pretty good. One could stop here, if you are happy with the level of detail. However, with a bit more work the models can look even better. By adding some highlights you further bring out the details and "depth" in your models. You could argue that the natural lighting falling onto your model is already doing that, but experience learns that small figures need "a little help" to augment this lighting. We do this by adding highlights to areas of the model that would naturally "catch" light. Usually the raised areas. To make highlights simply apply a lighter color of the one underneath with a fine brush. Using acrylic paint its very easy to mix up a nice range of colors quickly. Be sure to thin down your paint a little bit wit water so it flows easily. Don't paint straight from the pot as it will give a blotchy result and often is a struggle to apply. In the picture above I added lighter browns to the raised wrinkles in the trousers. I used a beige color to touch up the shirt of the guy on the right and the flesh/face parts on both figures. You can already see the model coming to life. Let's add some more detail highlights: I mixed some lighter blue and touched on the jacket in places. Don't overdo it, just a few small fine lines here and there is all it needs. I used white to clean up parts on the left guy, his belts and ends of the jacket arms. I used a gray to highlight the black hat and boots, with a fine pure white dot on the boots to suggest "gloss". The shirt of the guy on the right was finished using some lighter beiges. Finished & Some Thoughts Here's some pictures of the finished figures, which took less than 1 hour to paint up. Some final thoughts I'd like to share on painting miniatures like this: Small scales: As you can see from the examples above, small figures like these don't hold up well when photographed up extremely close. The result can look disappointing when in reality when viewed from a normal distance they look fine/great. Keep in mind that when painting on a very small scale (these are 1:85 I believe) it is really difficult to paint each individual detail. Often the detail is simply not present in the cast model, because of its small size. Things like eyes, lips or even hands are merely "suggested" at than really sculpted. This calls for a more "suggested" style of painting too. You should aim to get an overal look of a figure, letting the shadows and highlights doing its work. By keeping things a bit vague you let our brain "fill in the blanks" often giving a much better effect than trying to paint in all details. Overdoing the highlights or trying to paint in eyes or other small details often results in a weird cartoonish look. Another couple of figures I did on this scale: Take it easy Don't worry too much about making things perfect. Even if you do a color block and 1 layer of wash, your models will already look great. Applying the small highlights is something learned with practise. I encourage you to give it a try, as you might be surprised about yourself. Even if you do it in a basic fashion it will provide awesome results. Whatever you do I assure you you can do better than just flat-coated figures with awful shiny Humbrol. Love to hear your experiences, if you paint something up using my tutorial post some pictures here for us to see!
 -
 Hi, Can anyone recommend a reasonably price source or make of paints for plastic models. I'd rather use water based, low odour if possible. But at the moment all I try seems to be like water and hardly even colours the surface. It's great for weathering. But I need something for the main colours that's opaque and comes in a decent size and range of colours. Any suggestion please oh I'm in the UK so local is best or free P&P as it ends up I'm paying more for post than the paint. Thanks Izzy
 -
 Hi everyone, I am new in this so i need help. (Questions for wooden ship) 1. Can you reccomend me what type of paint to use? Acrylic or another? 2. Which paint is the most resistant (that will not fade and will not crack)? 3. After applying paint do I need to apply varnish to protect color?. 4. Which primer to apply before applying the paint? Cheers!
