Search the Community
Showing results for tags 'beginner'.
Found 10 results
-
 Hello! I'm kinda new to building historical models my main previous focus was science fiction models like halo and gundam. I decided to try and paint a baleo class submarine for my grandfather who served on the baleo class Entemedor. Unfortunately I have the model primed for painting, but I can't find a the colors I need for it. I don't run into this problem often when I paint my other models so I figured I would go here where others might have the same experience. I was wondering if any one has painted anything from this class and knew the colors used. If it helps I normally use enamels like tamiya and a air brush, but if you have a different method any help will be grateful!
 -
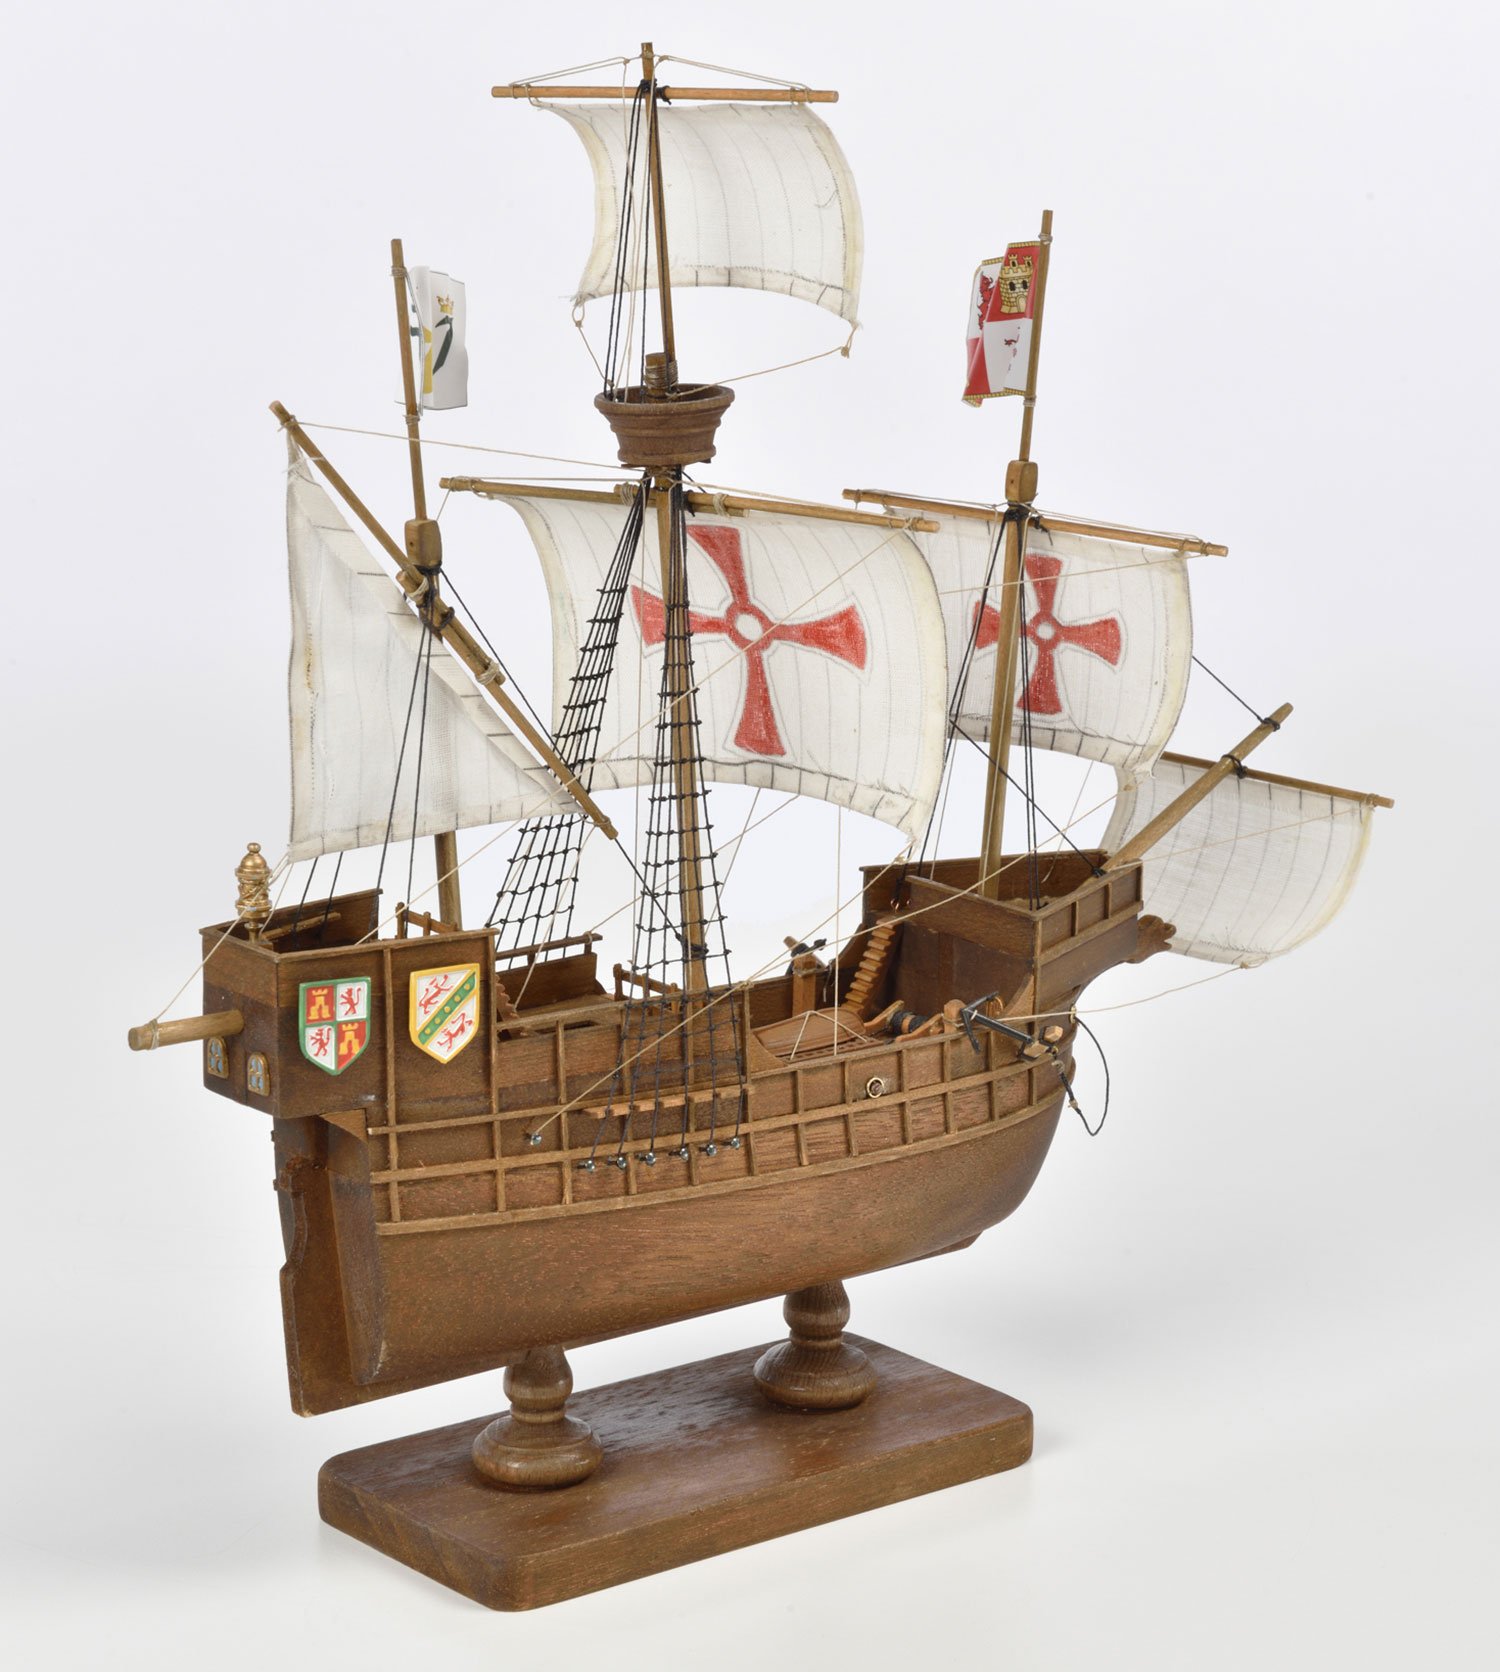
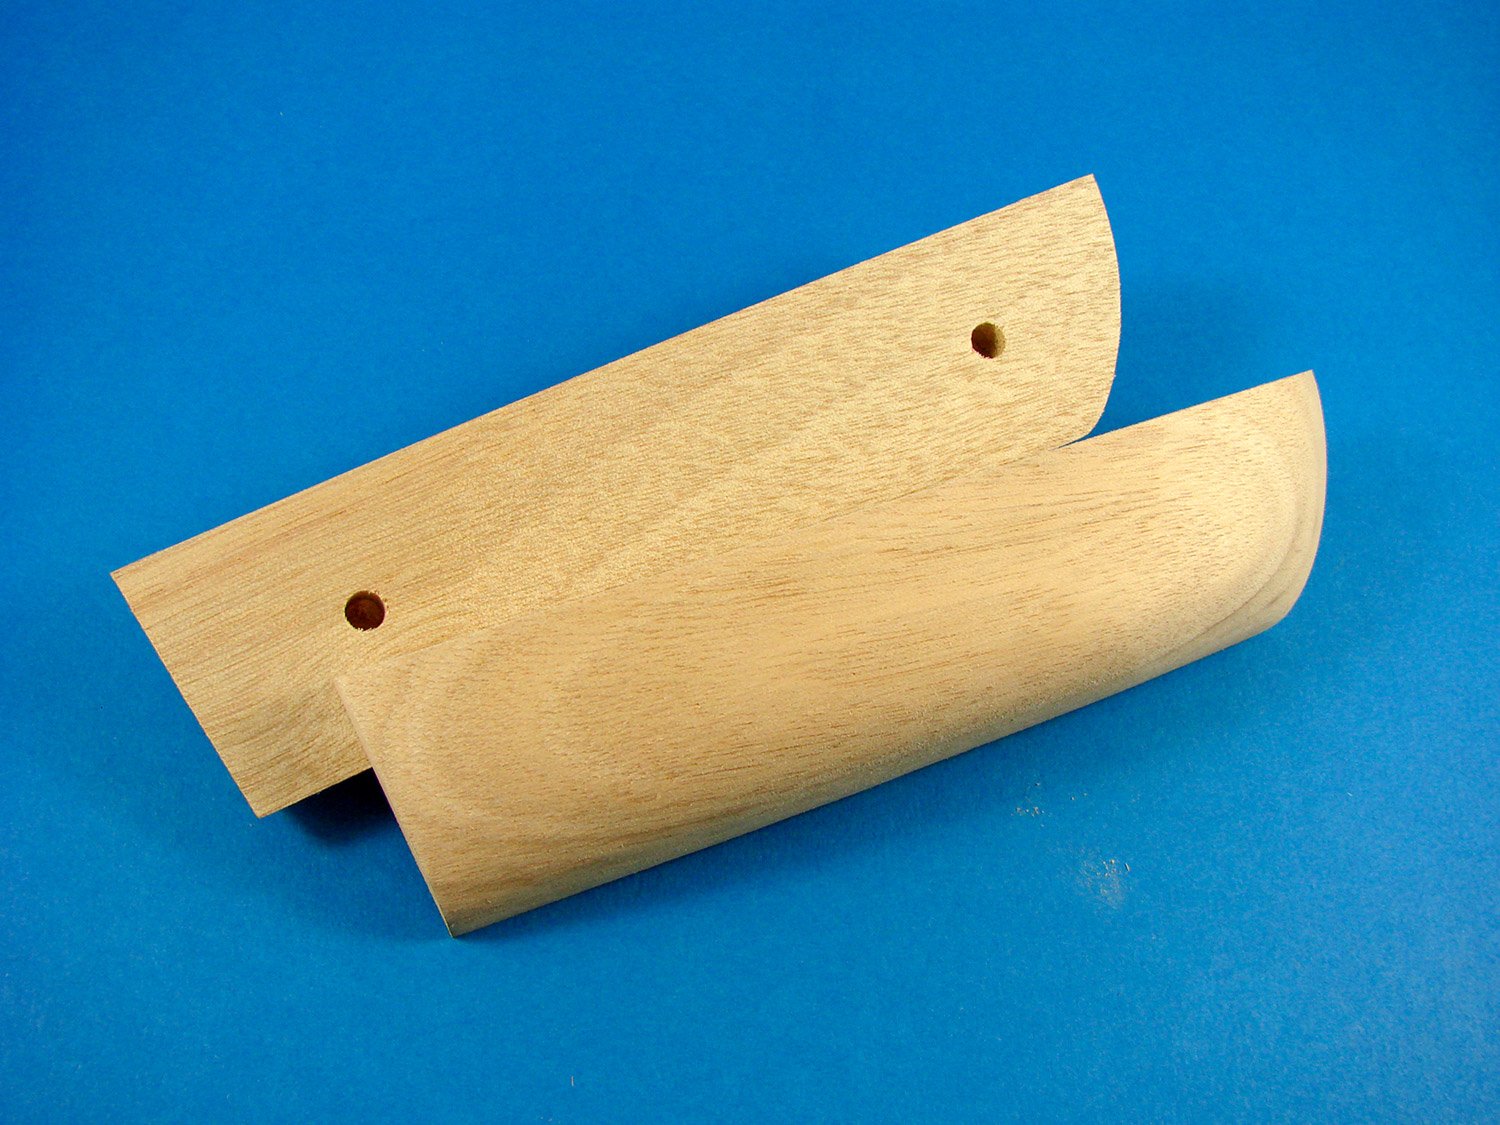
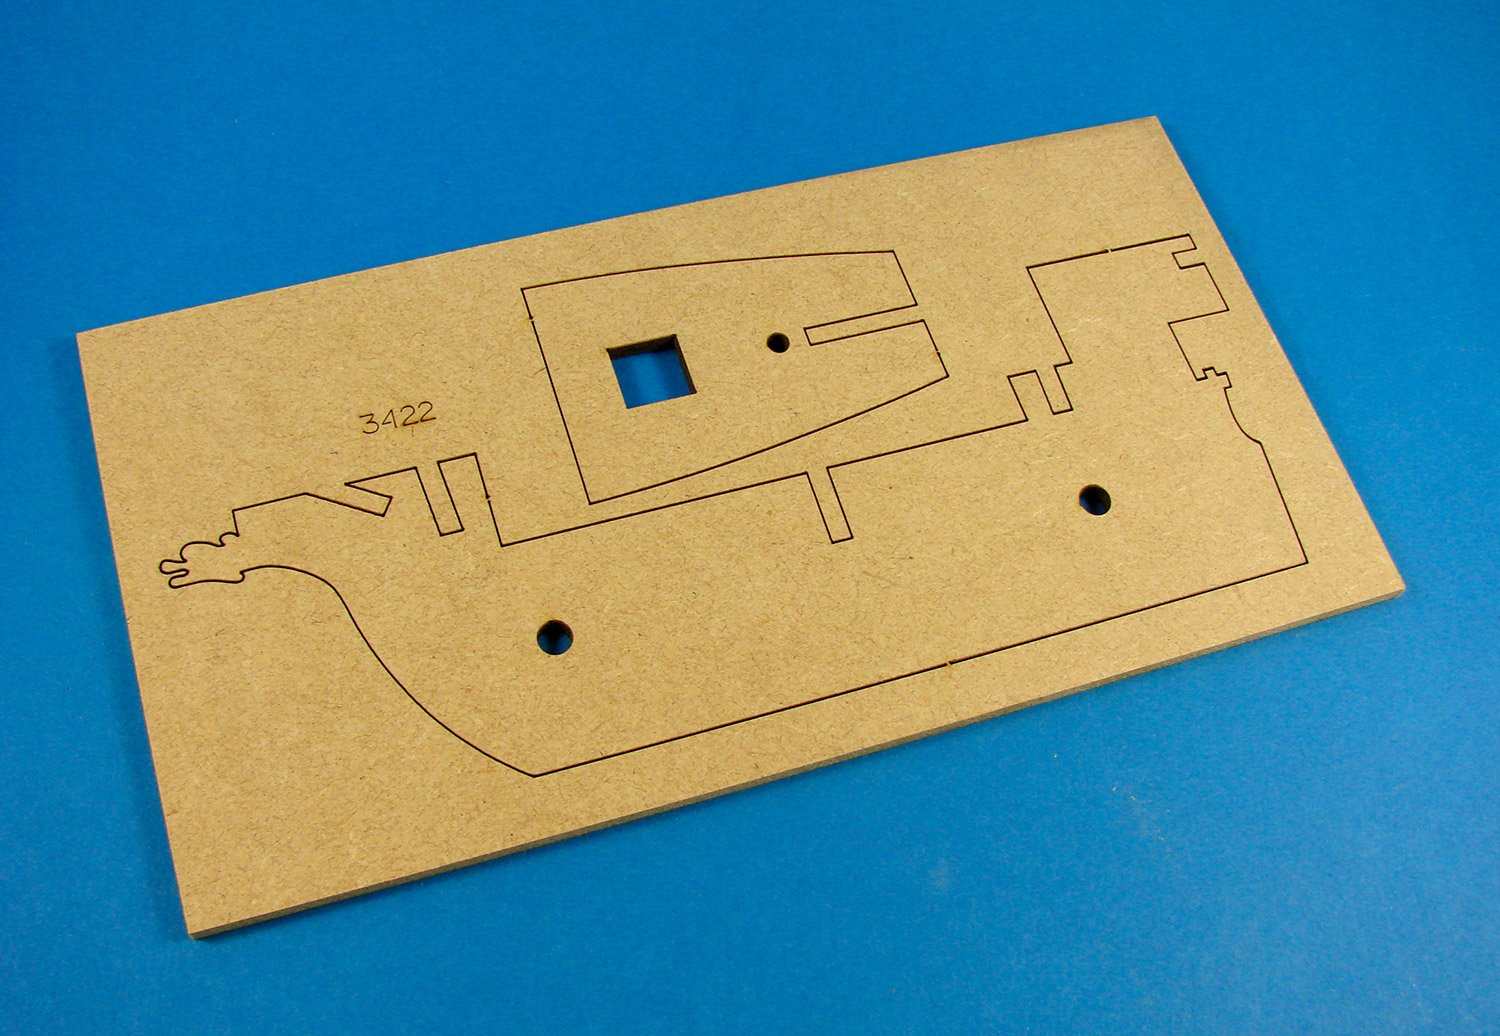
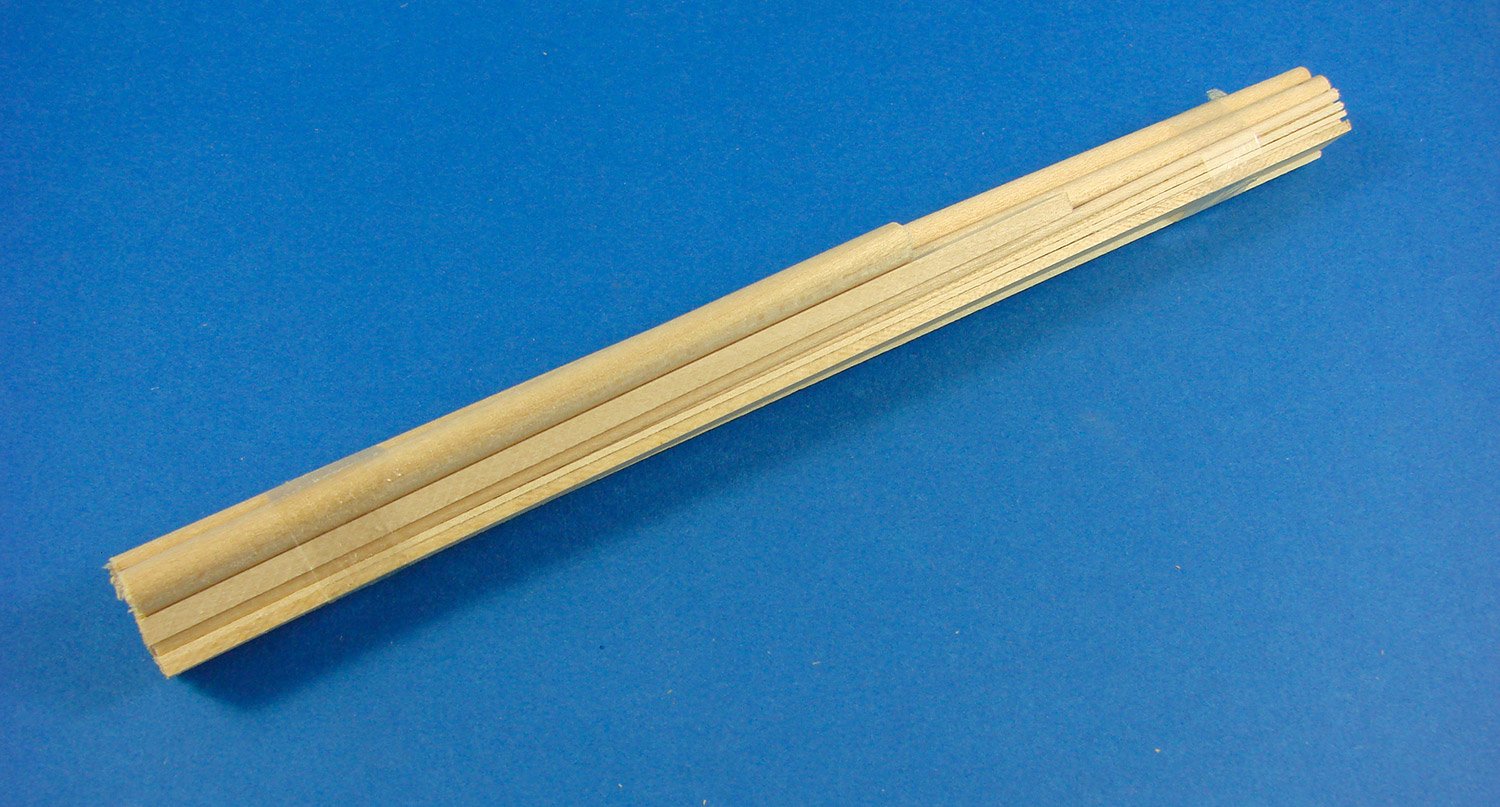
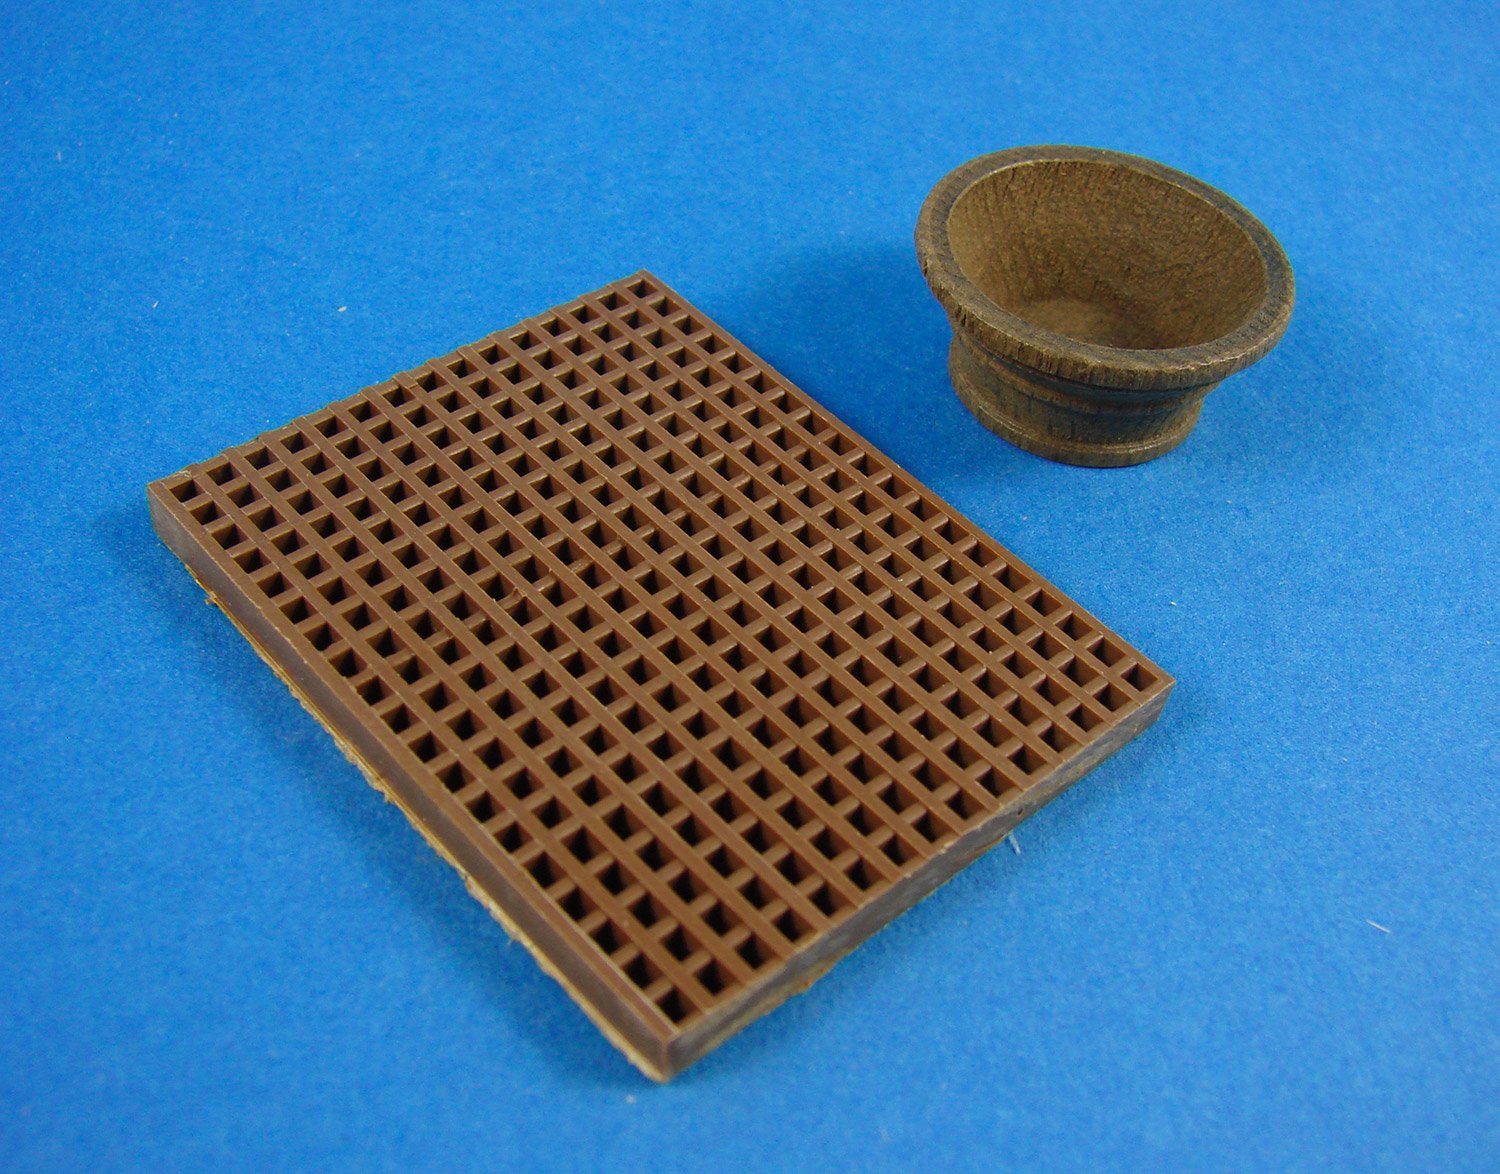
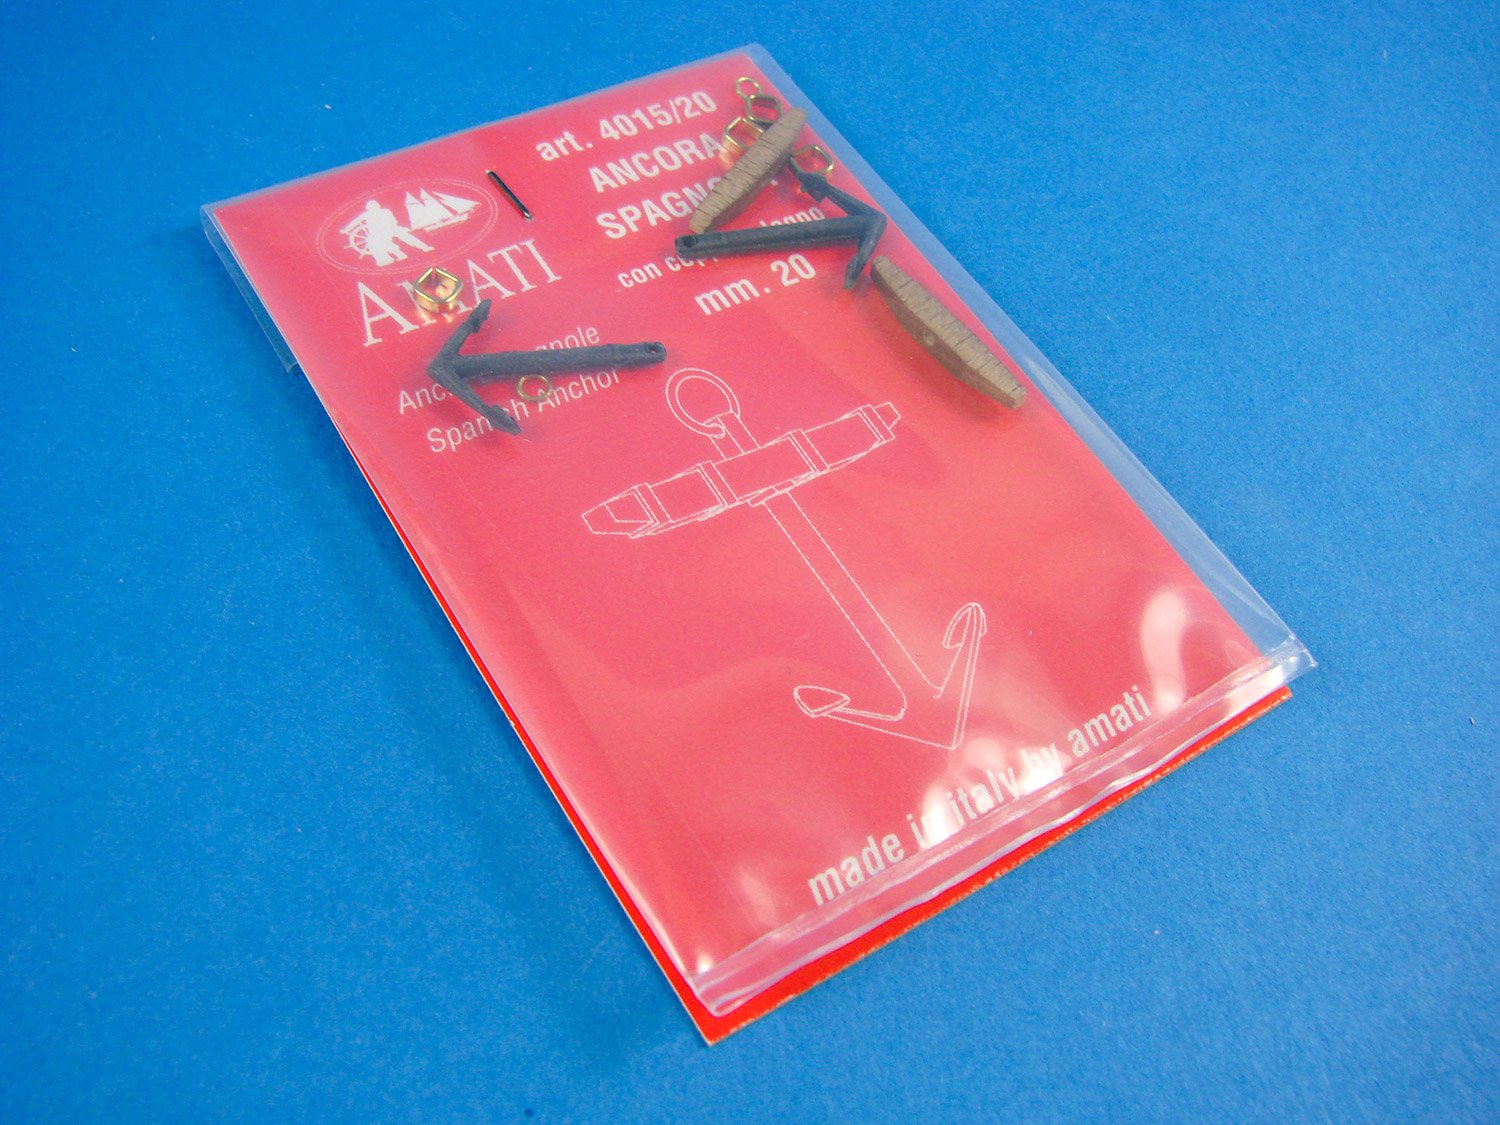
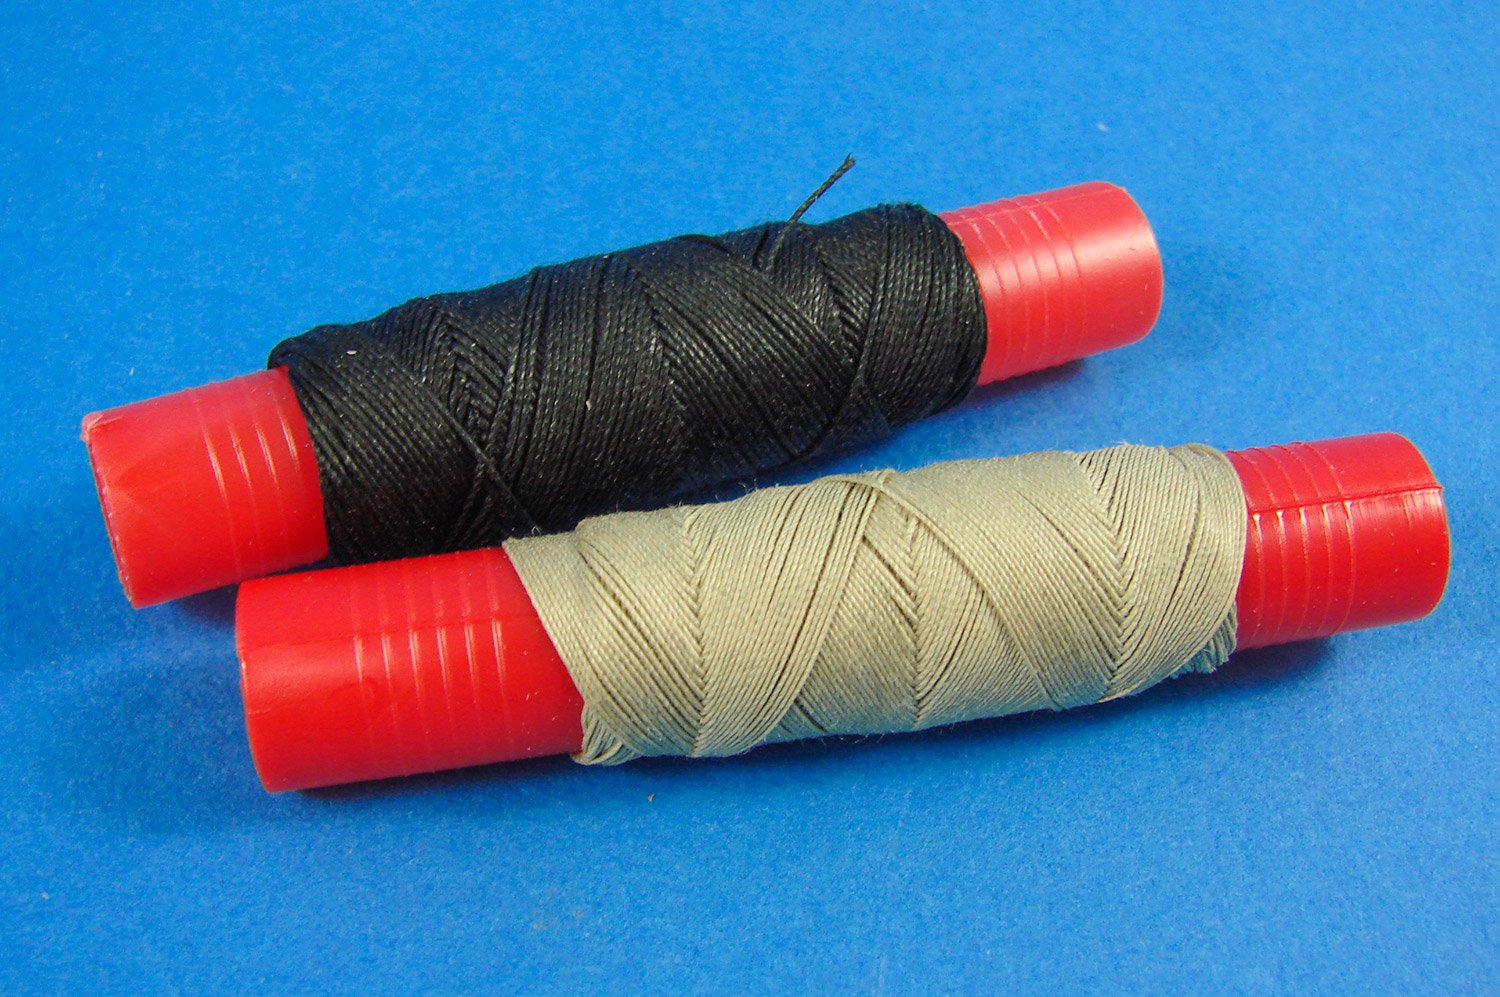
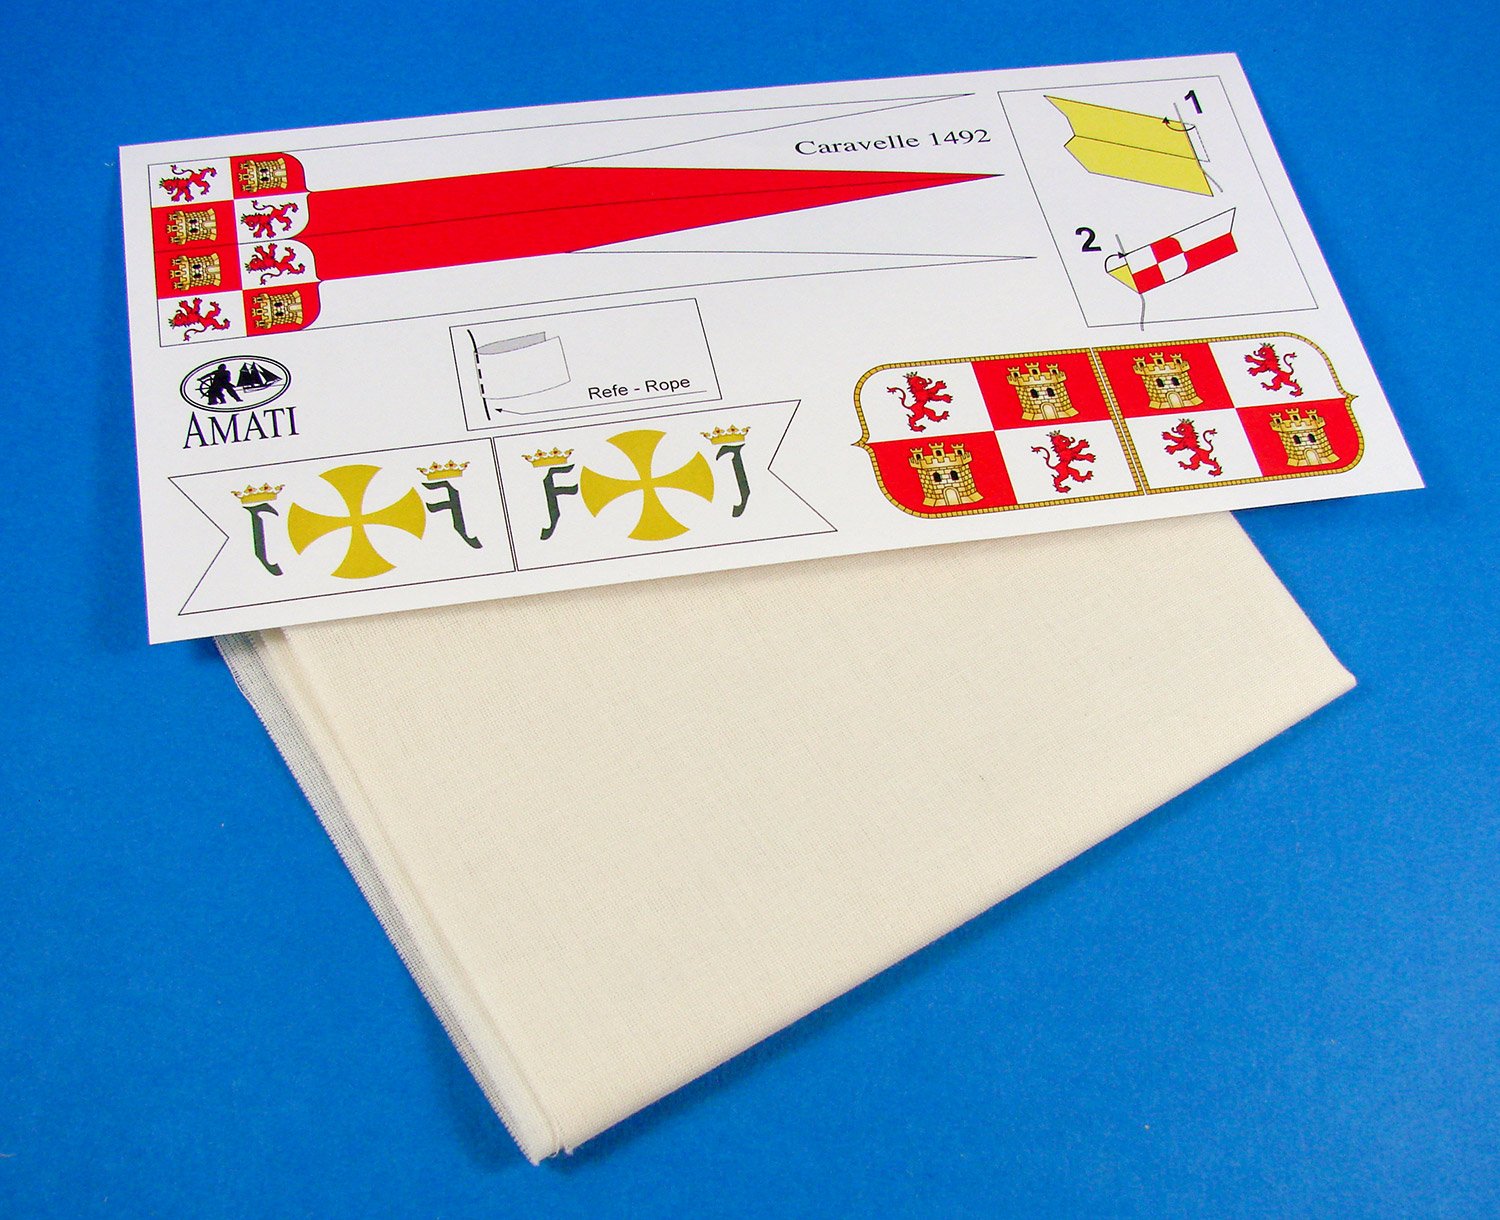
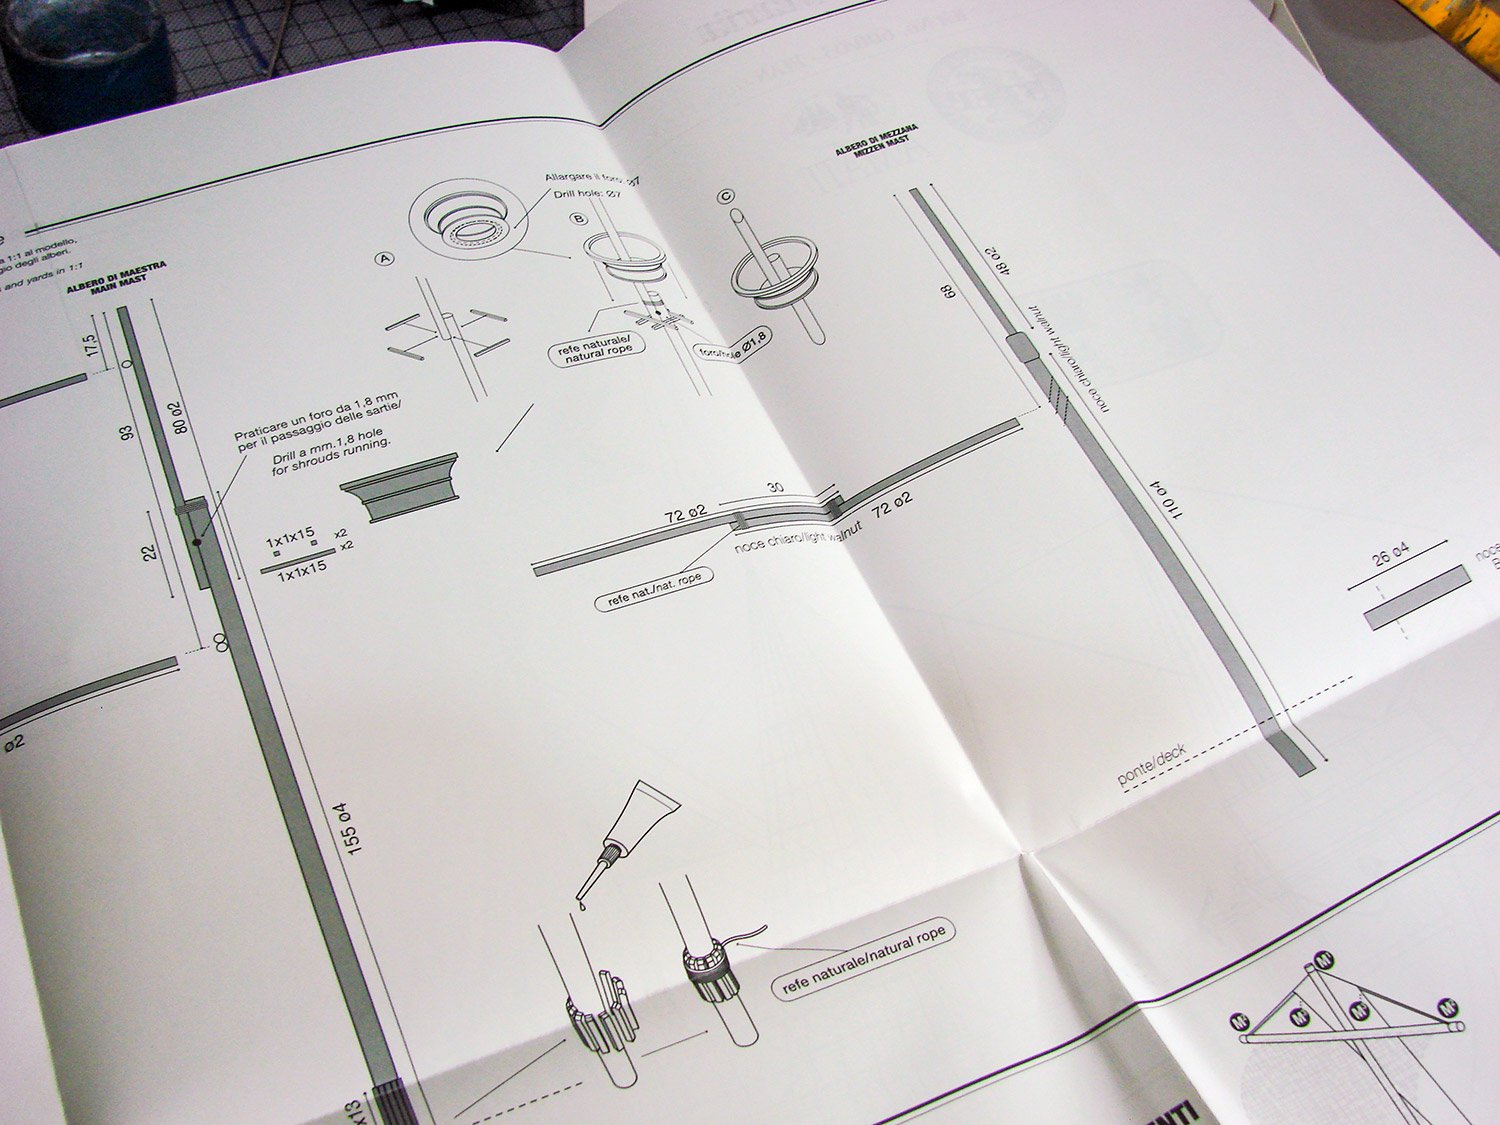
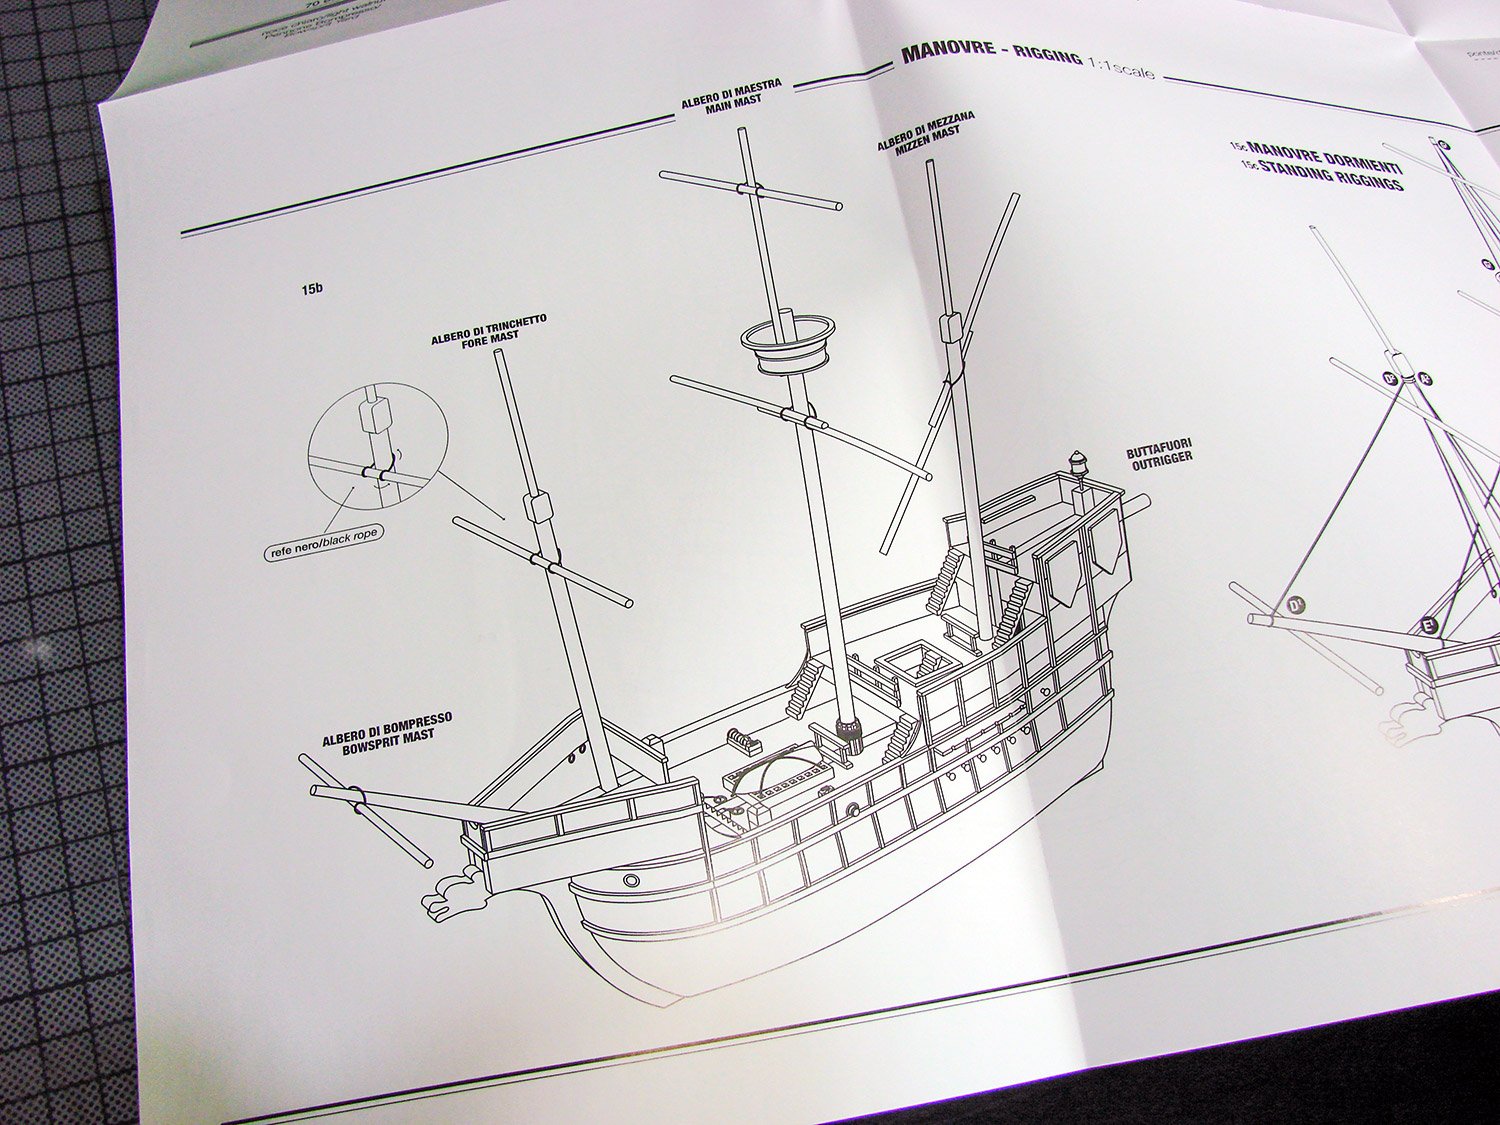
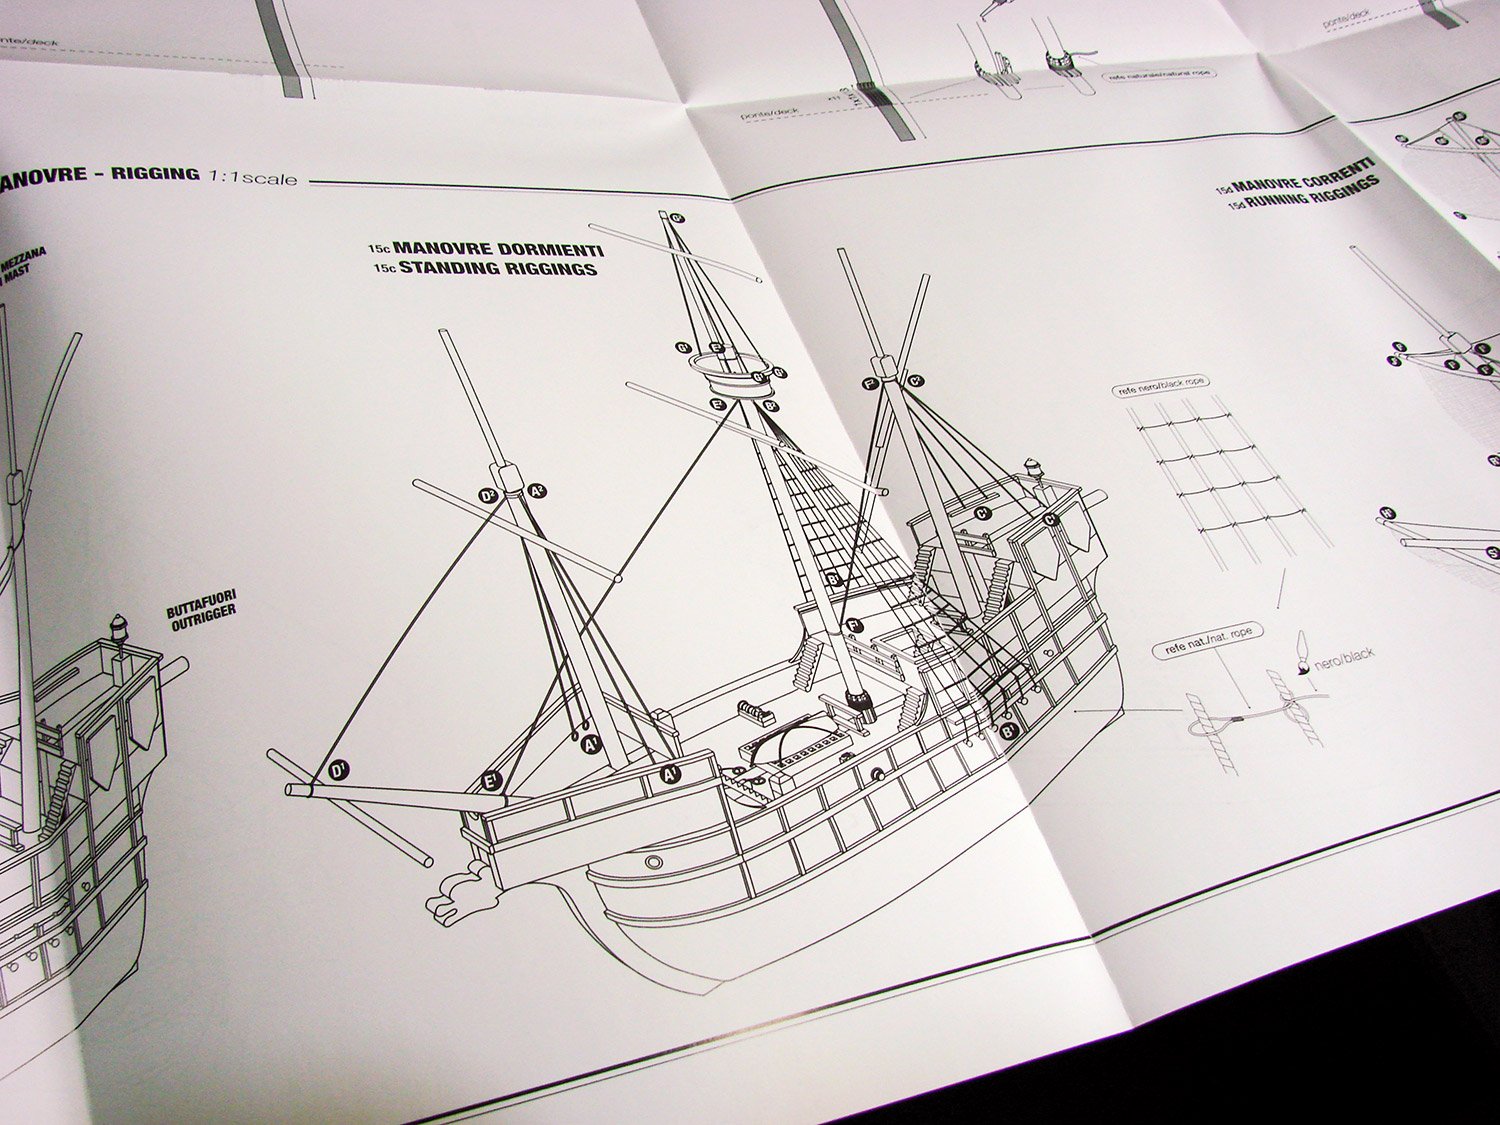
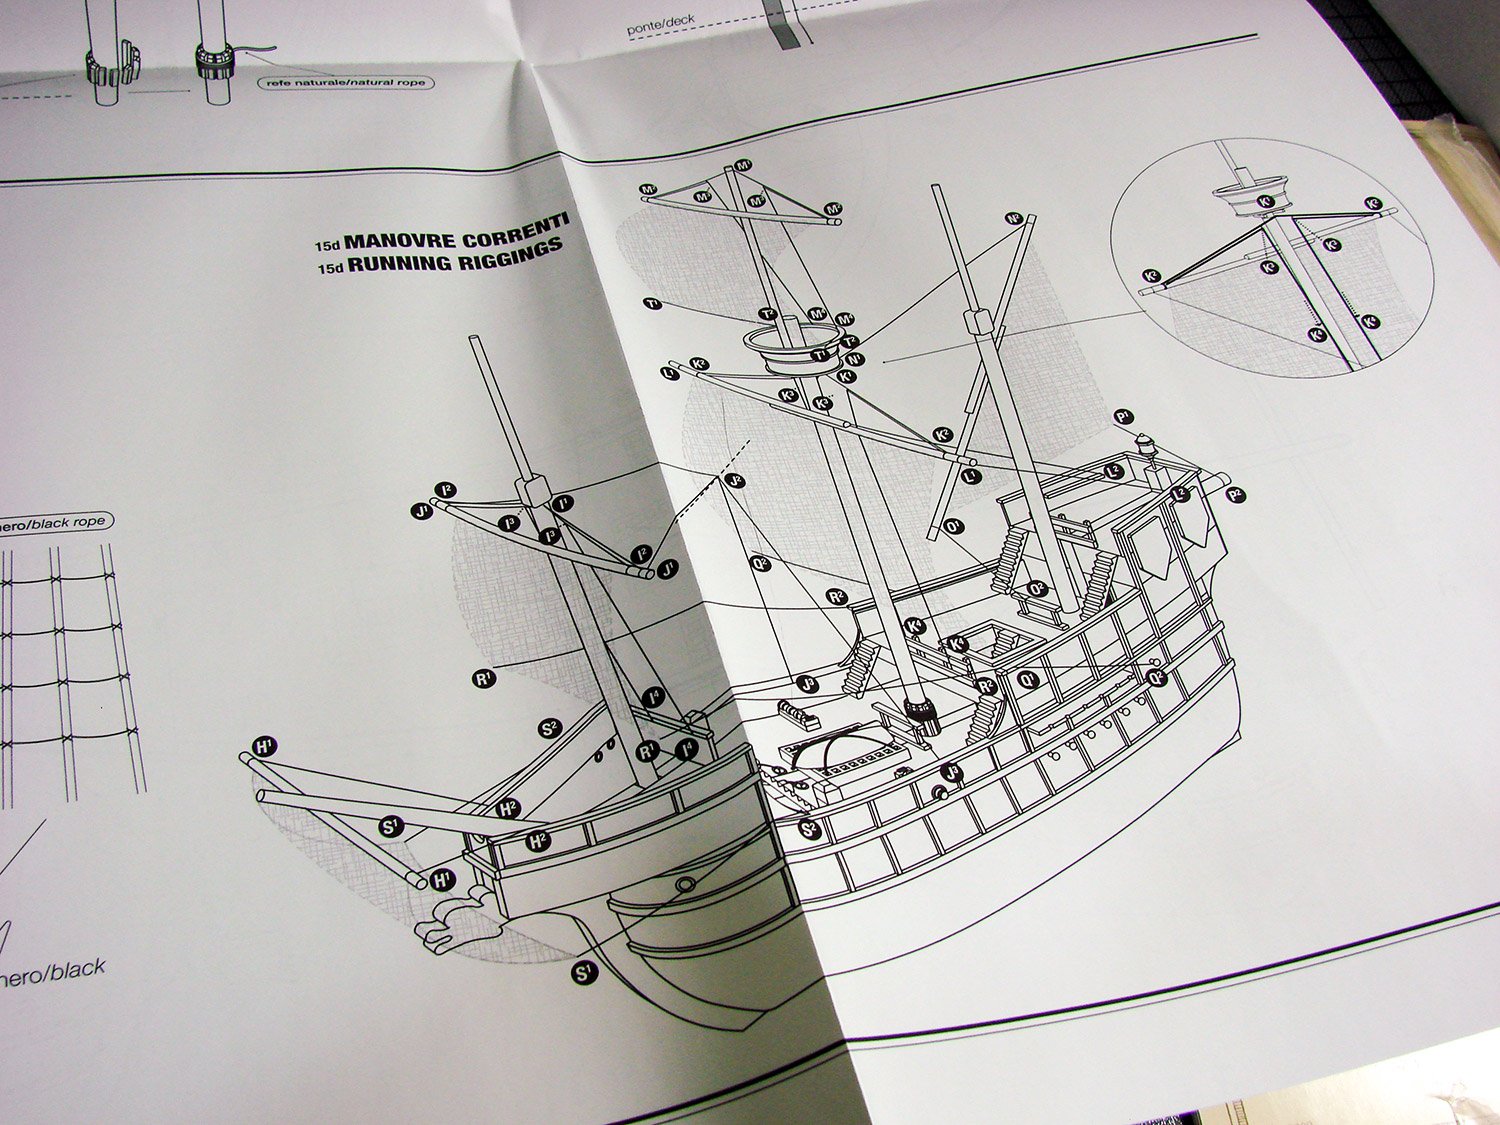
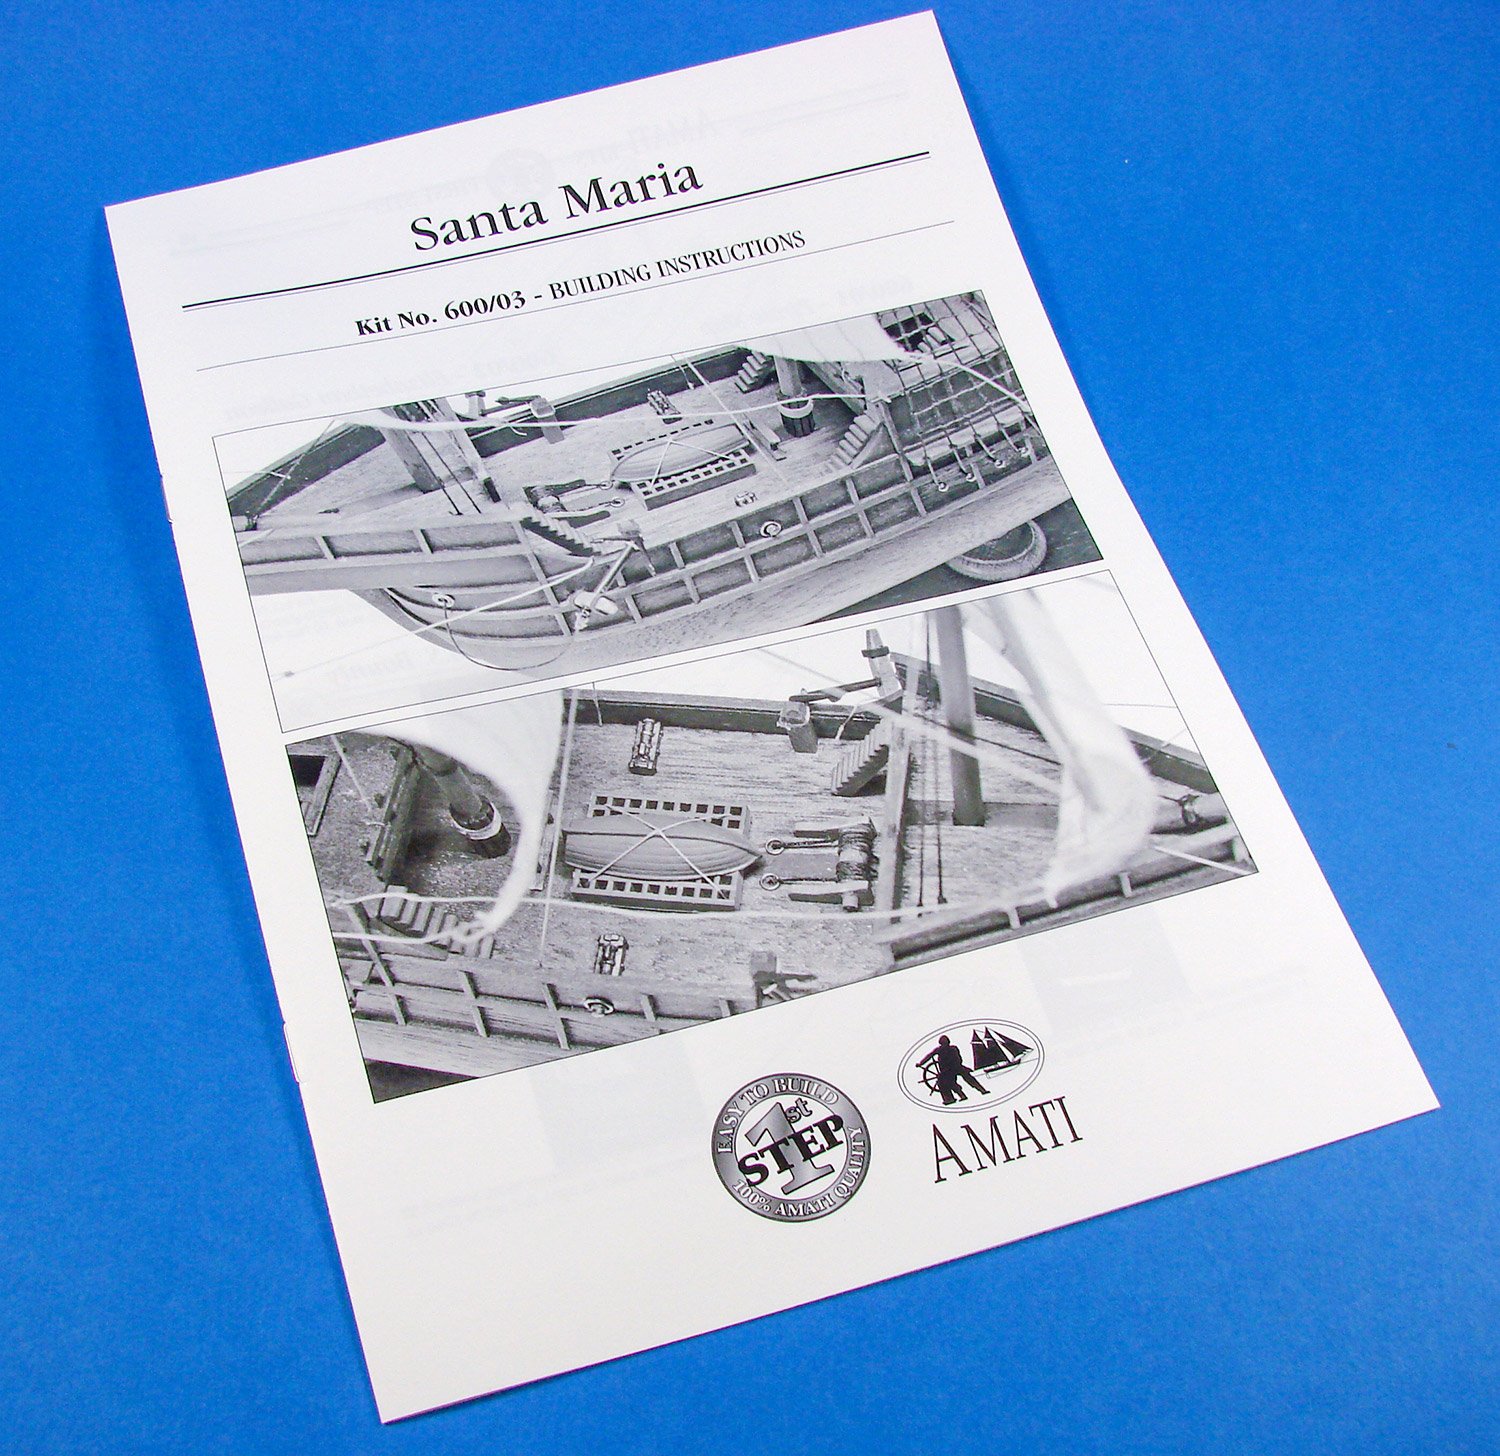
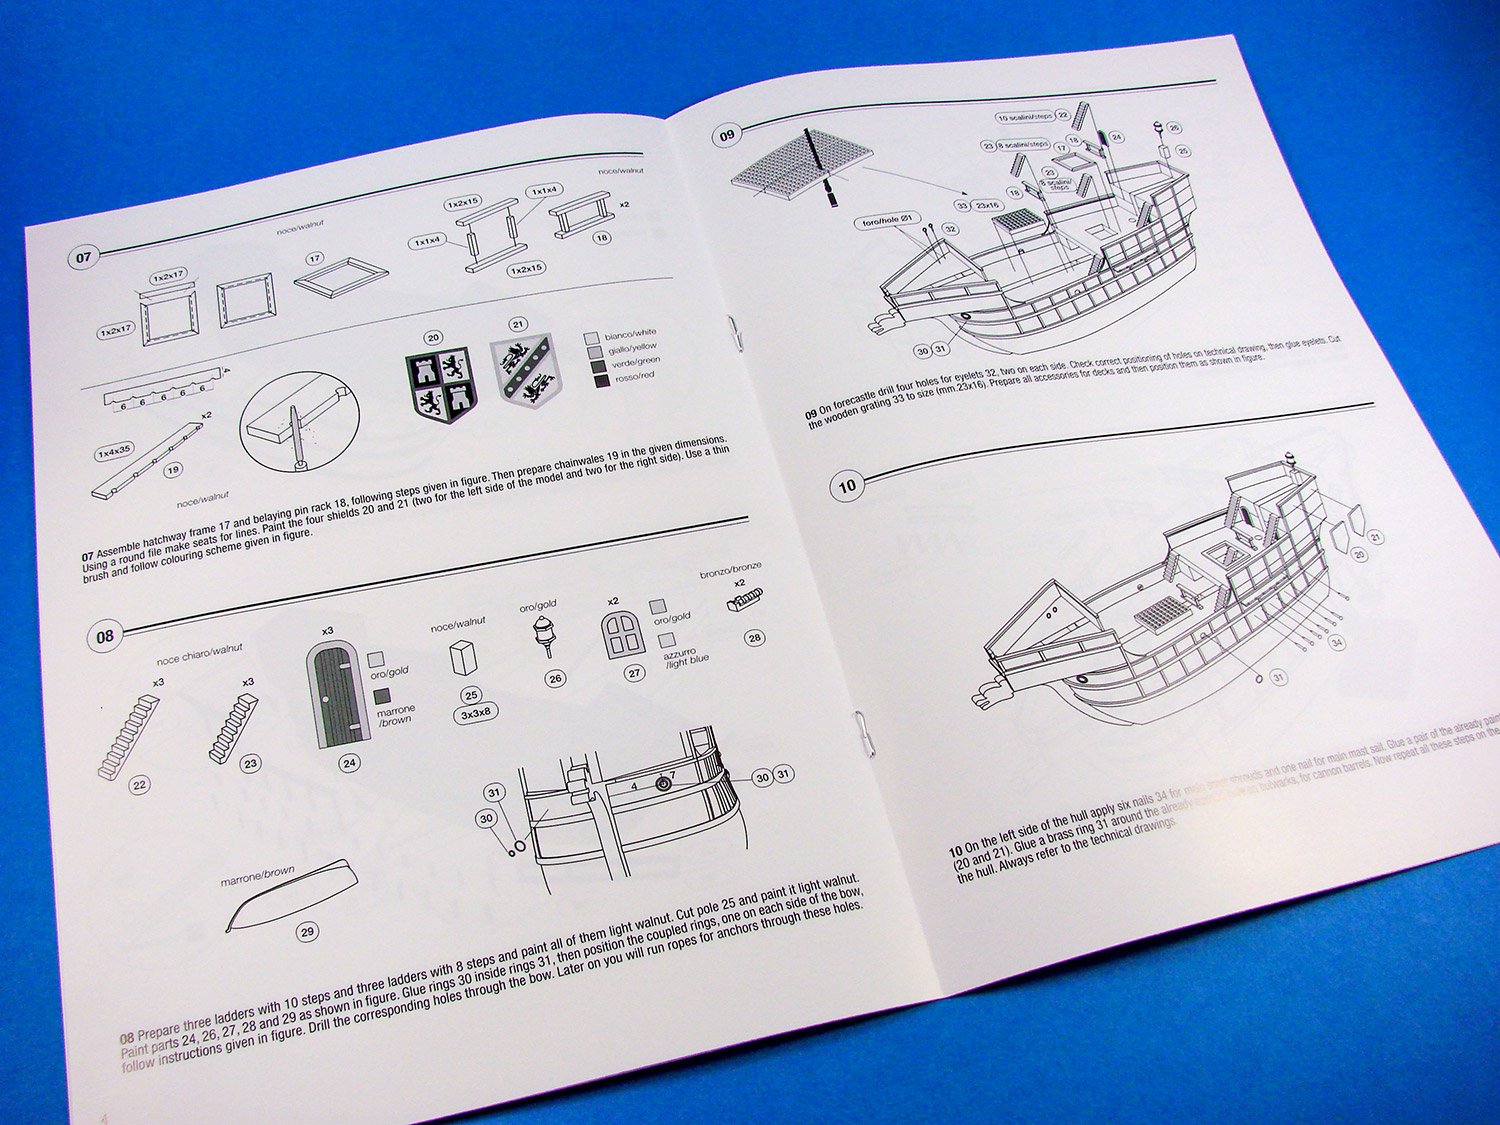
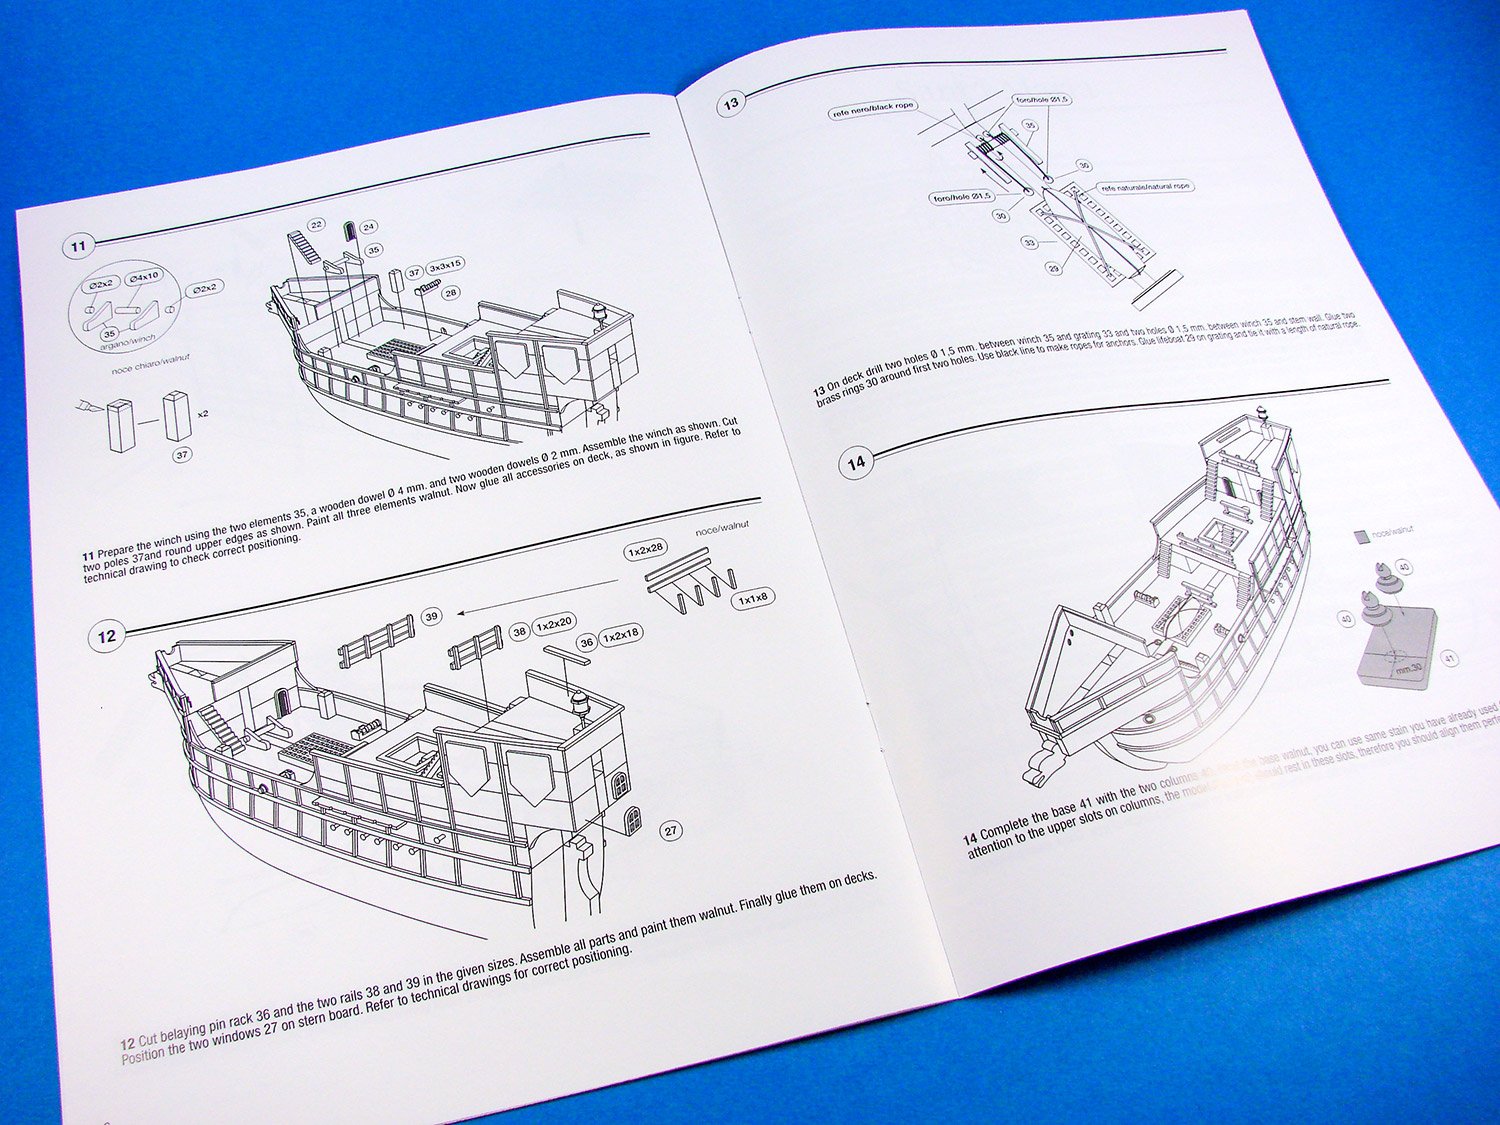
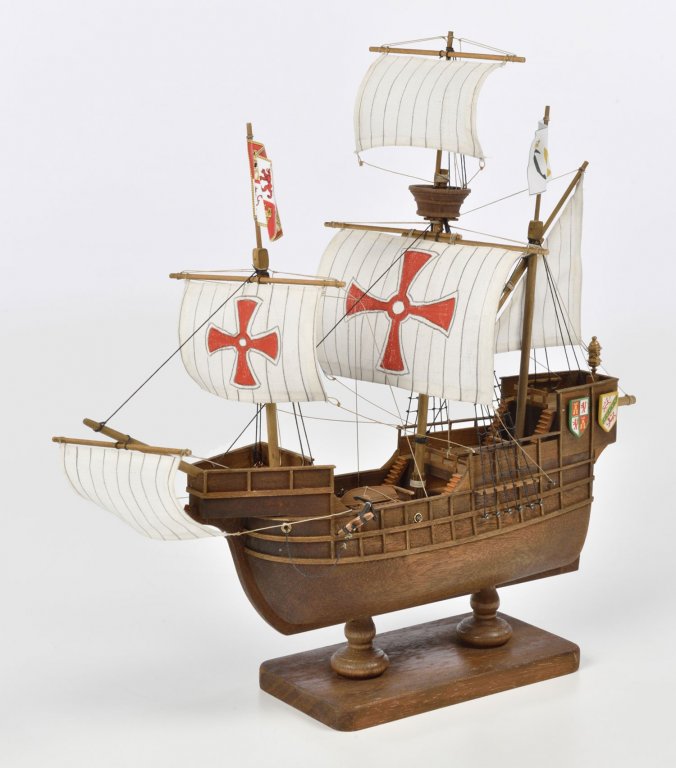
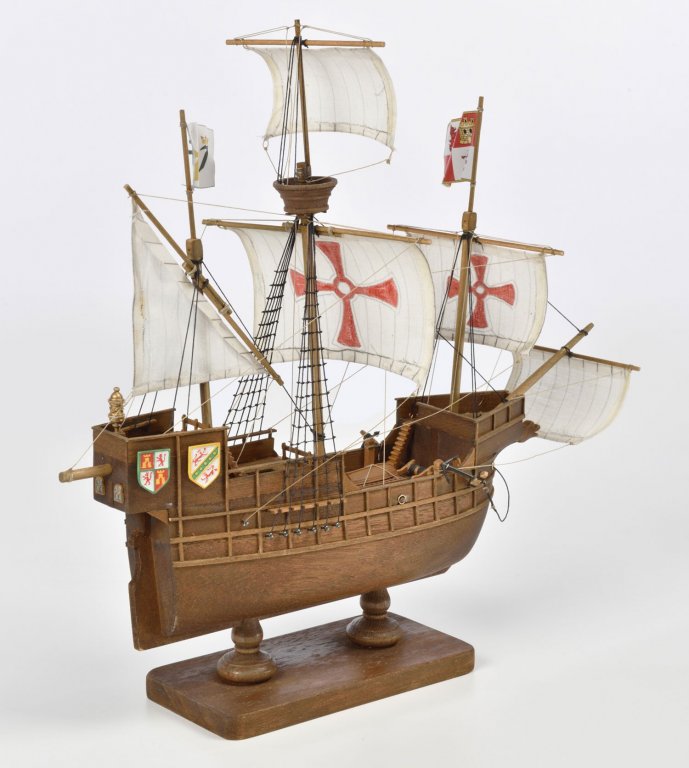
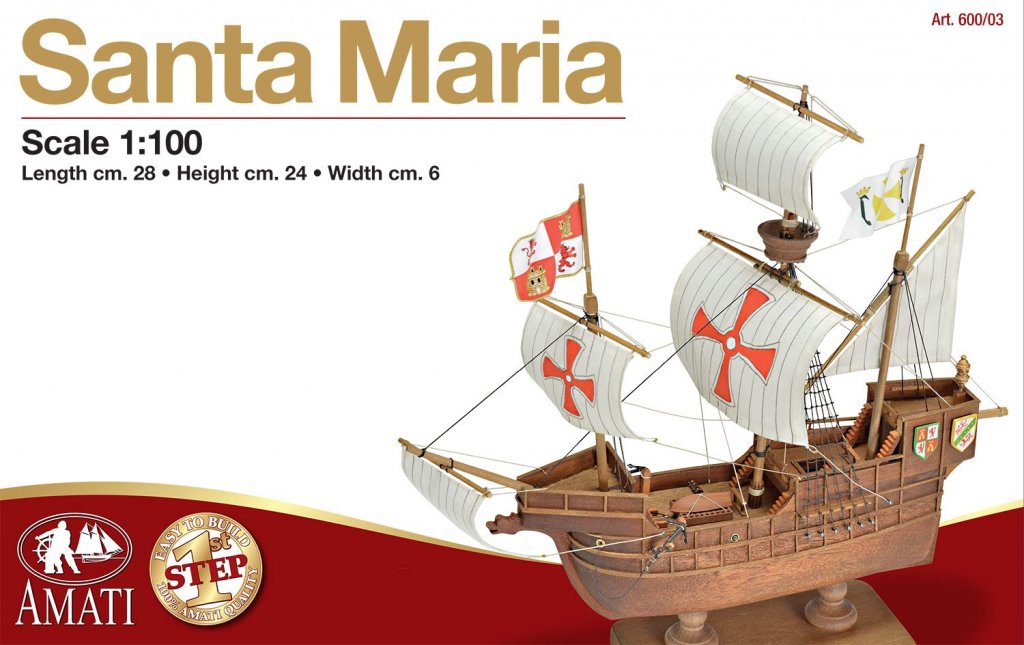
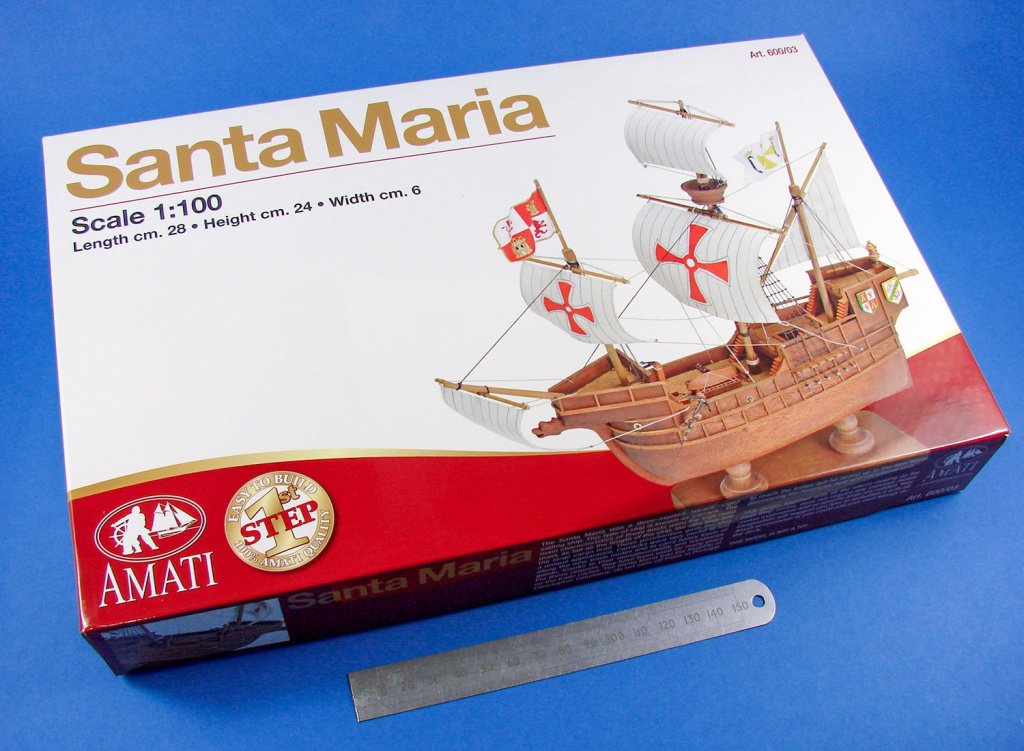
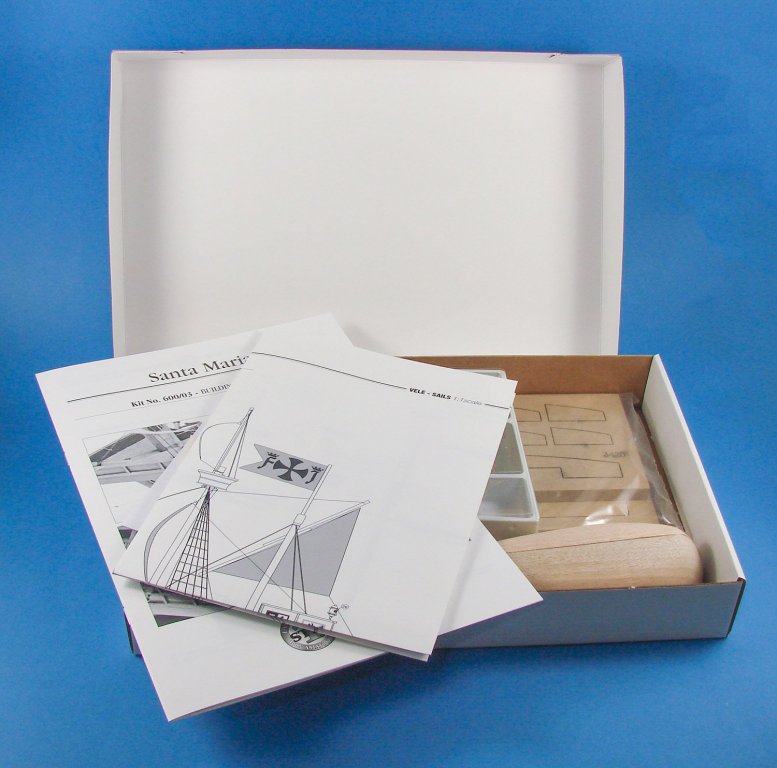
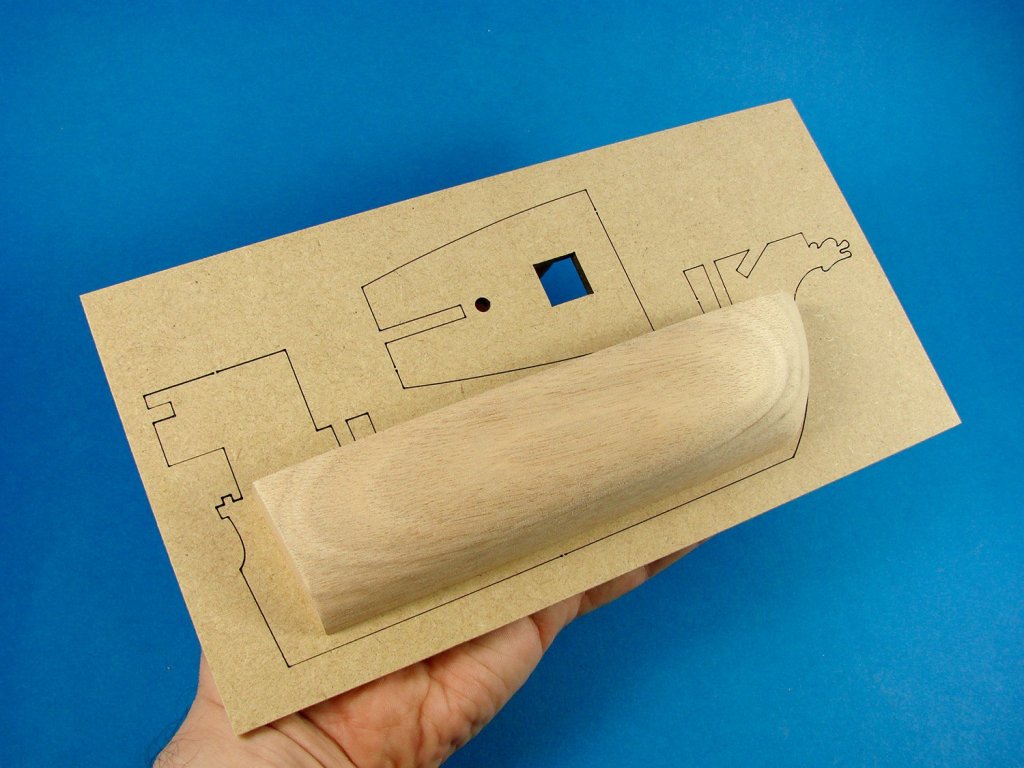
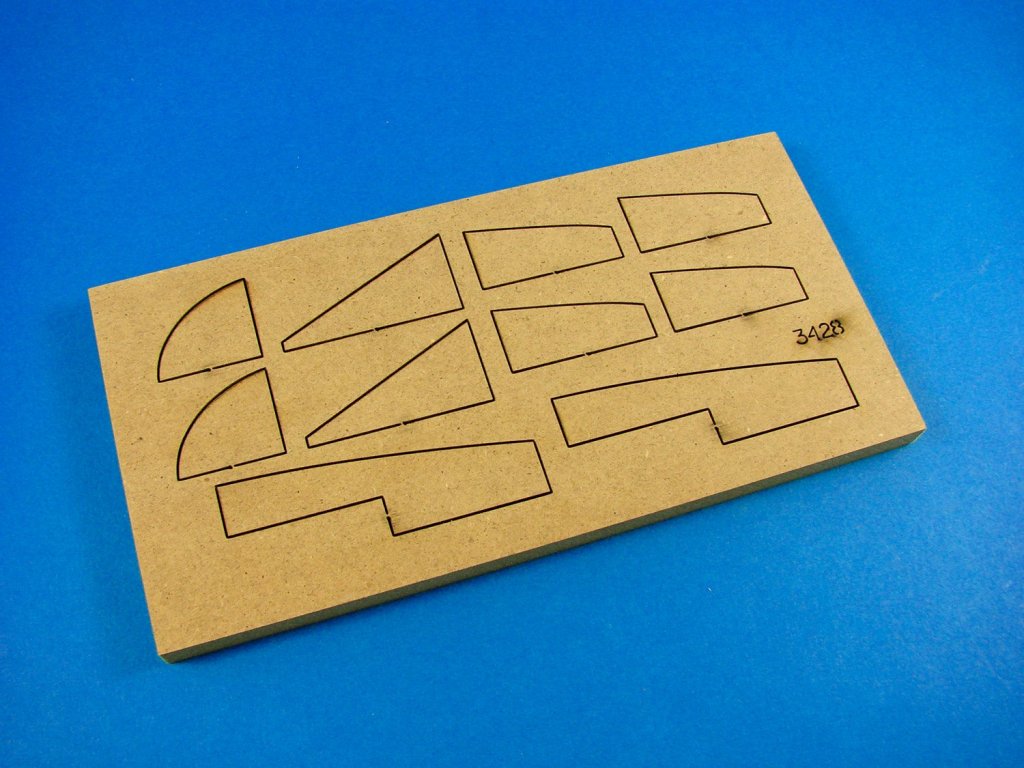
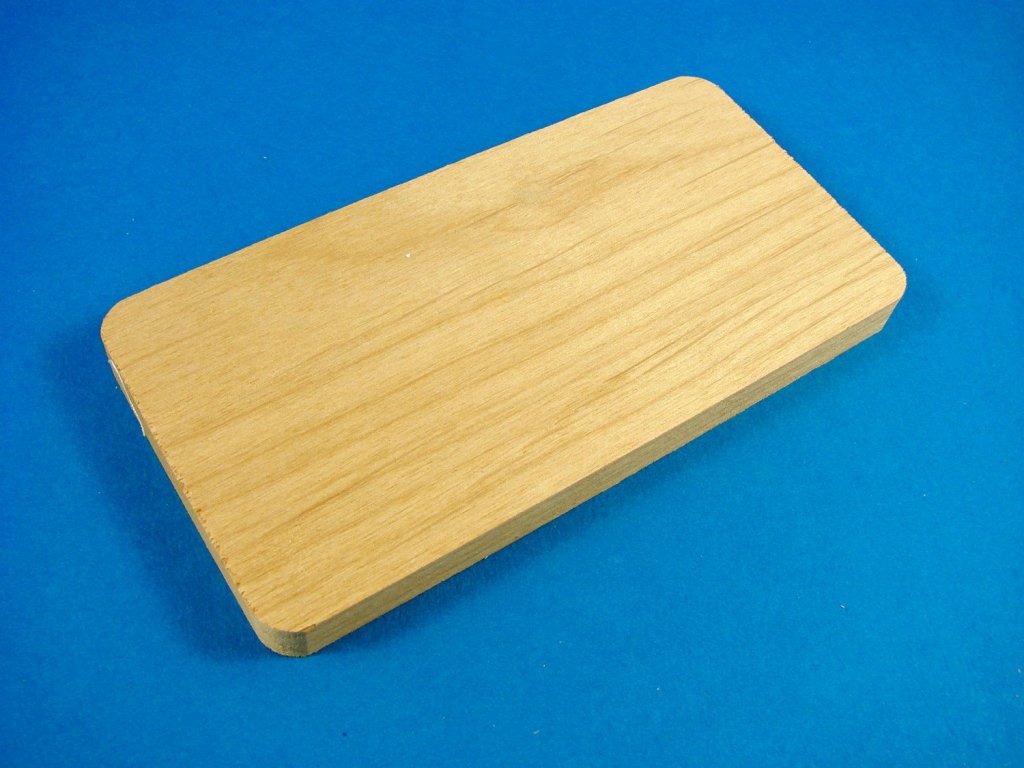
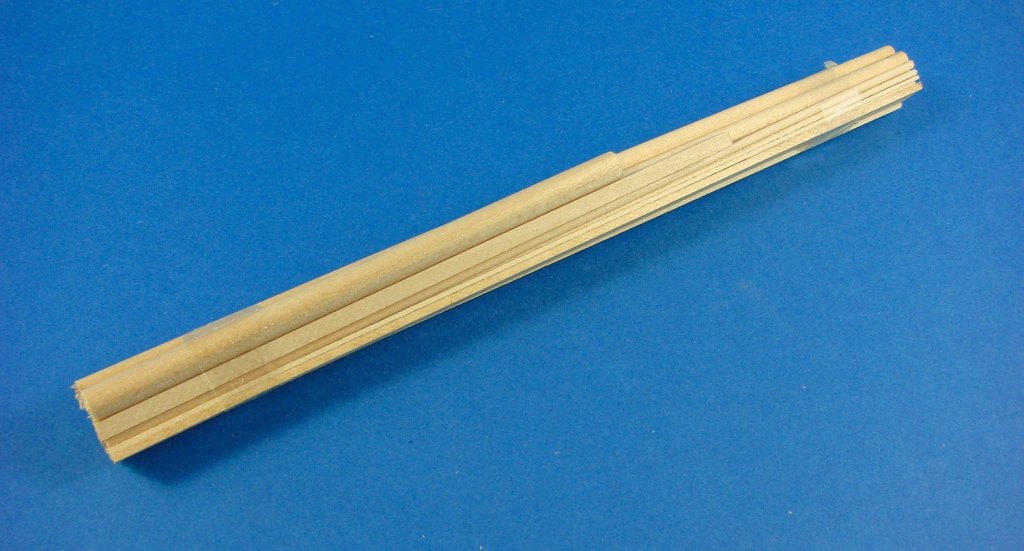
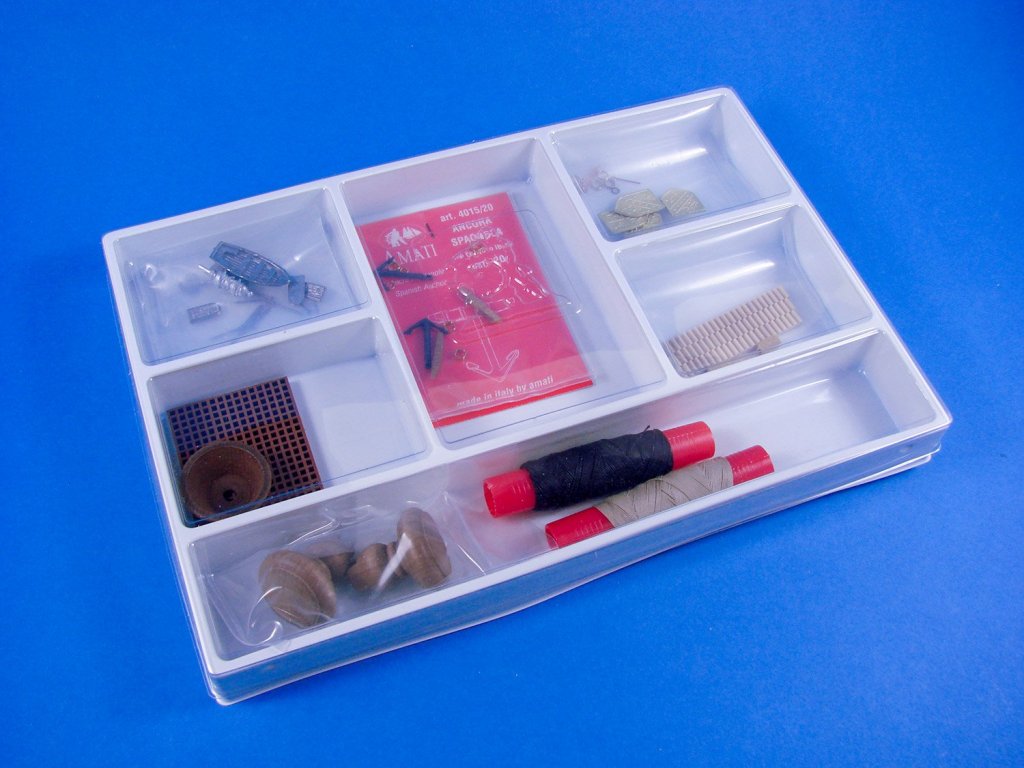
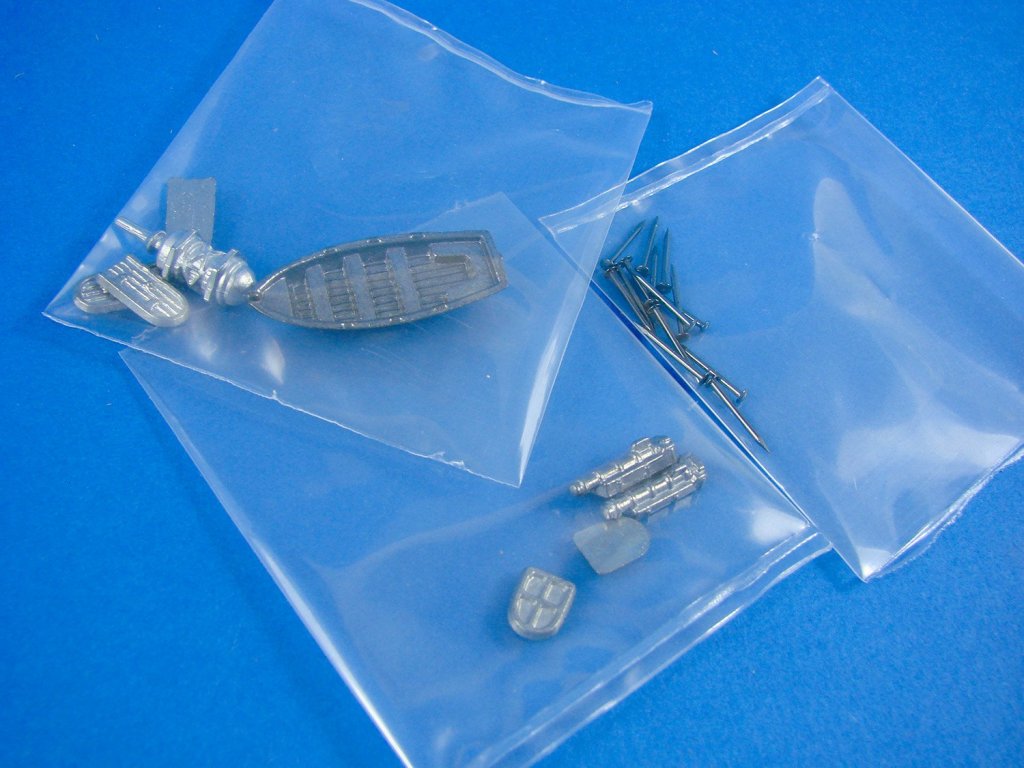
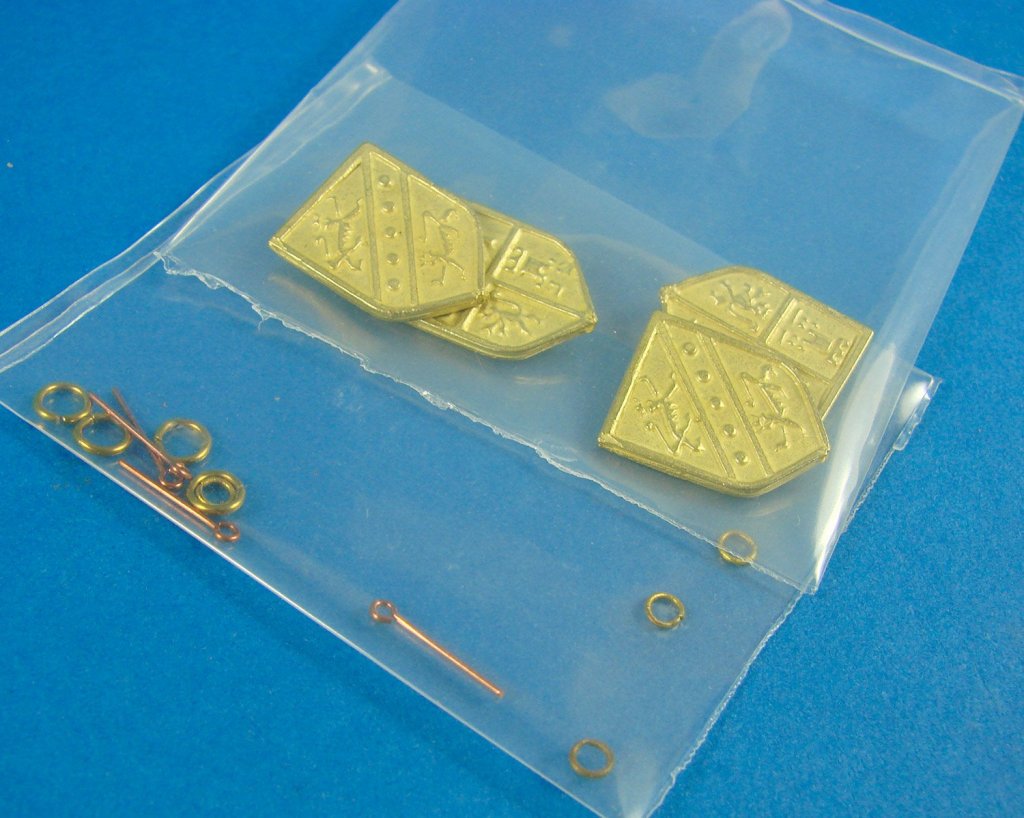
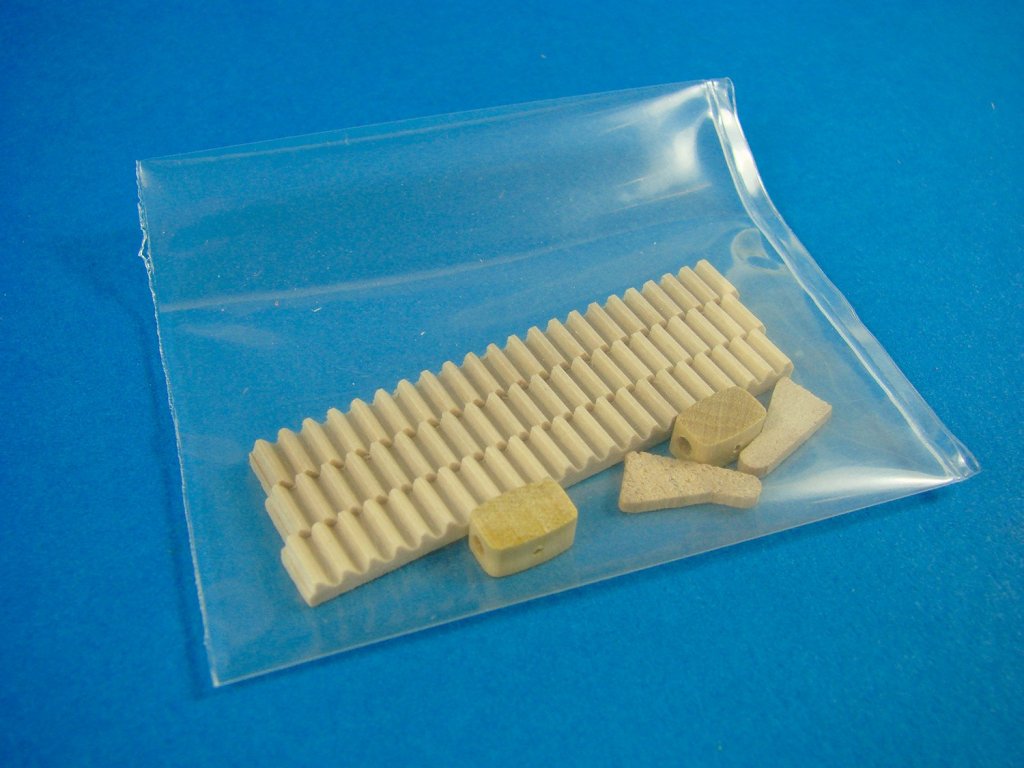
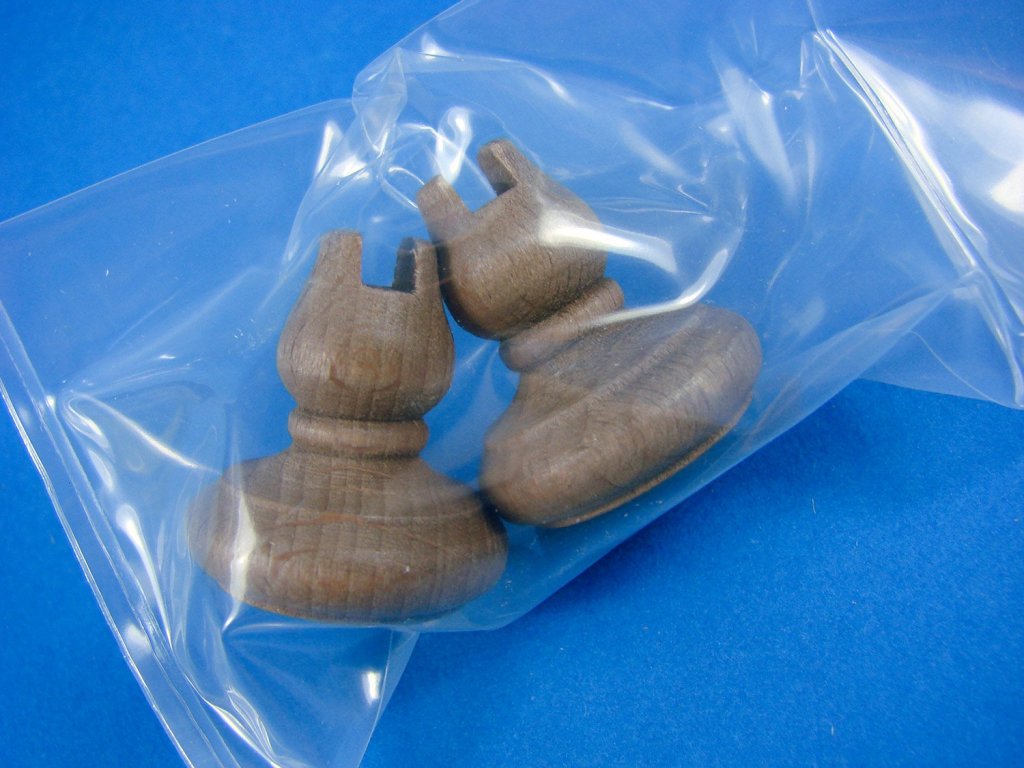
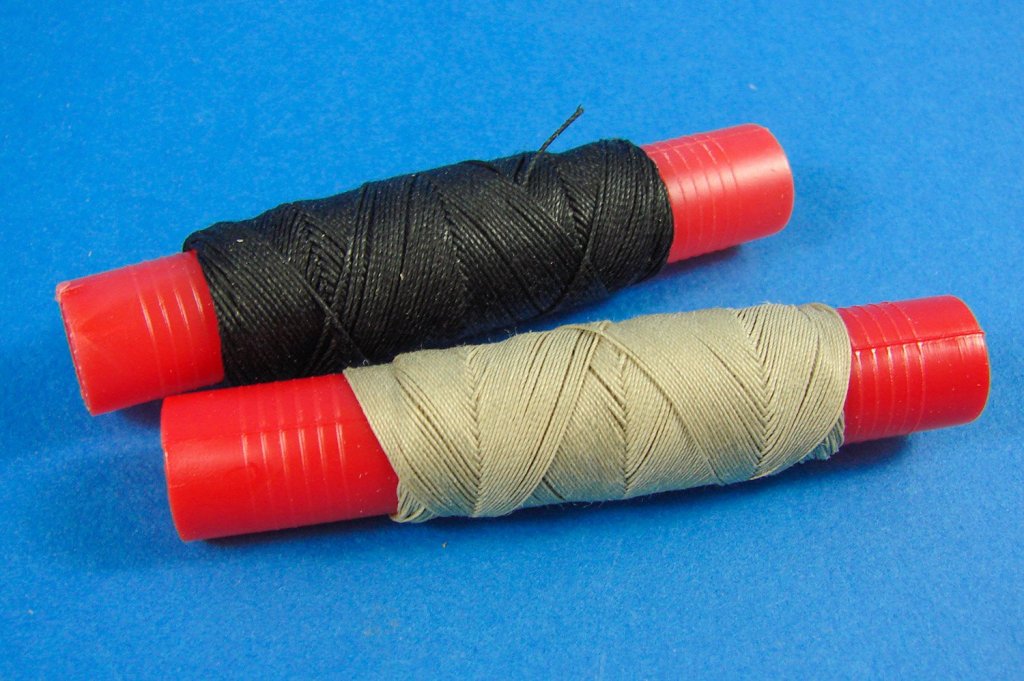
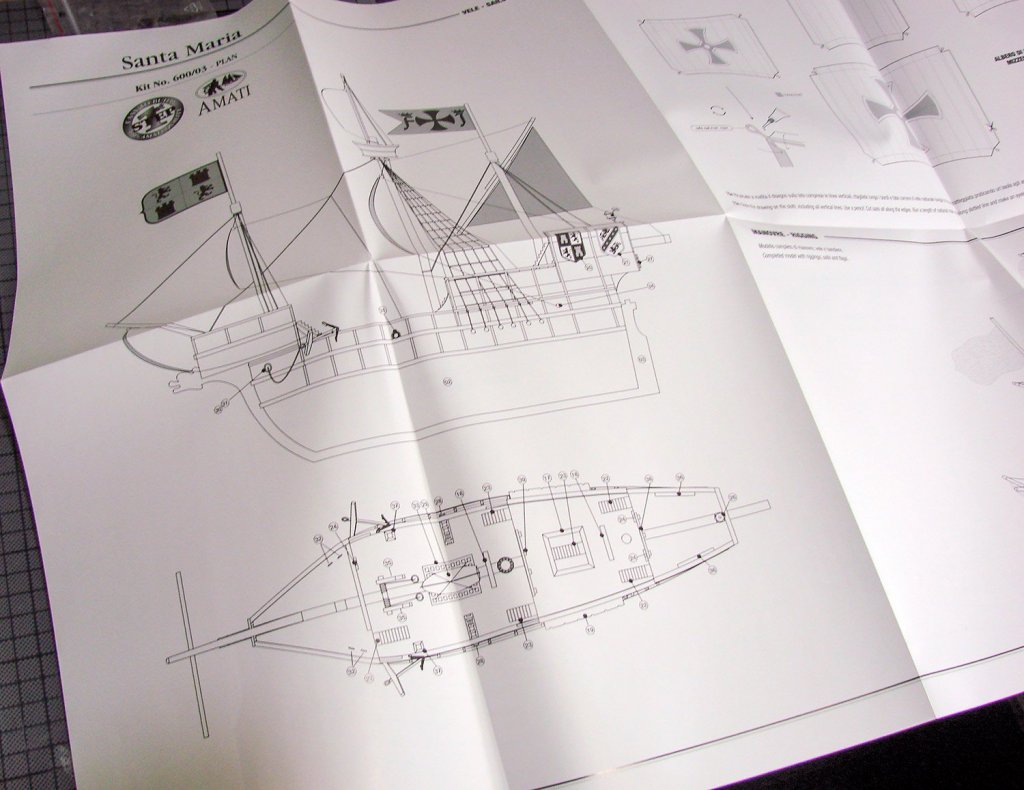
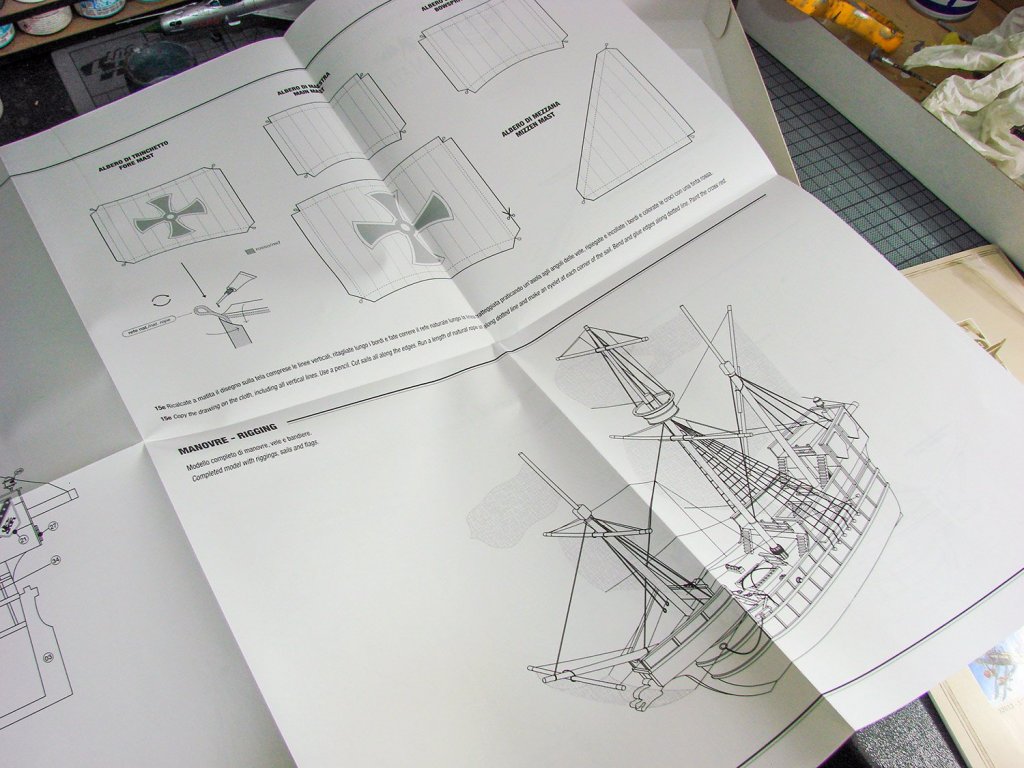
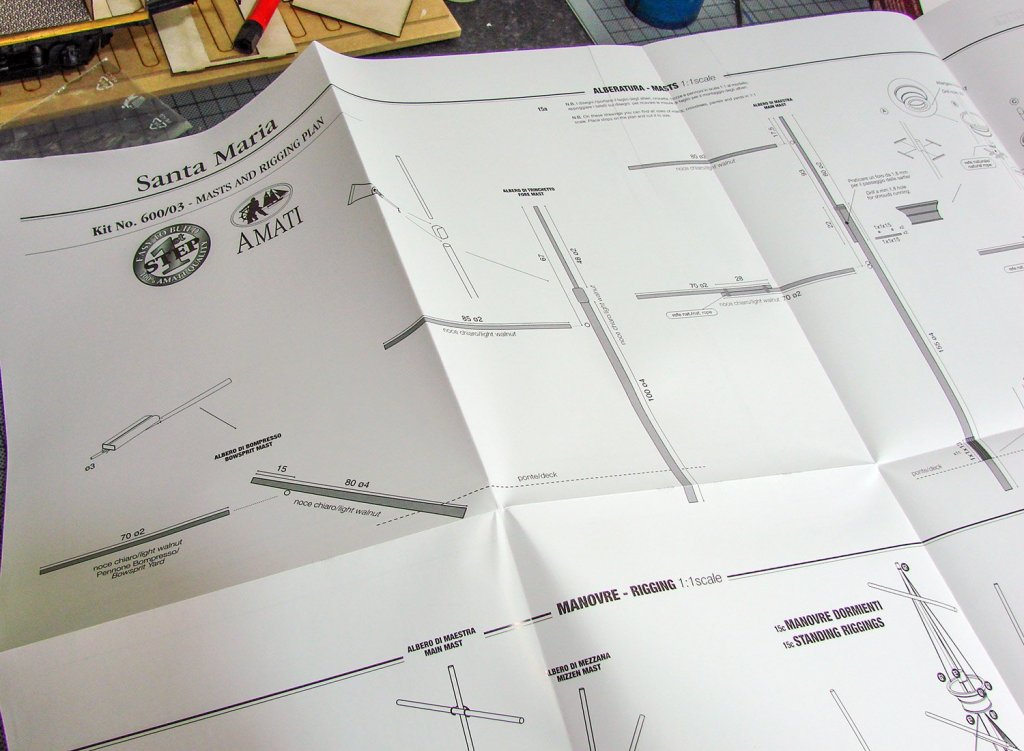
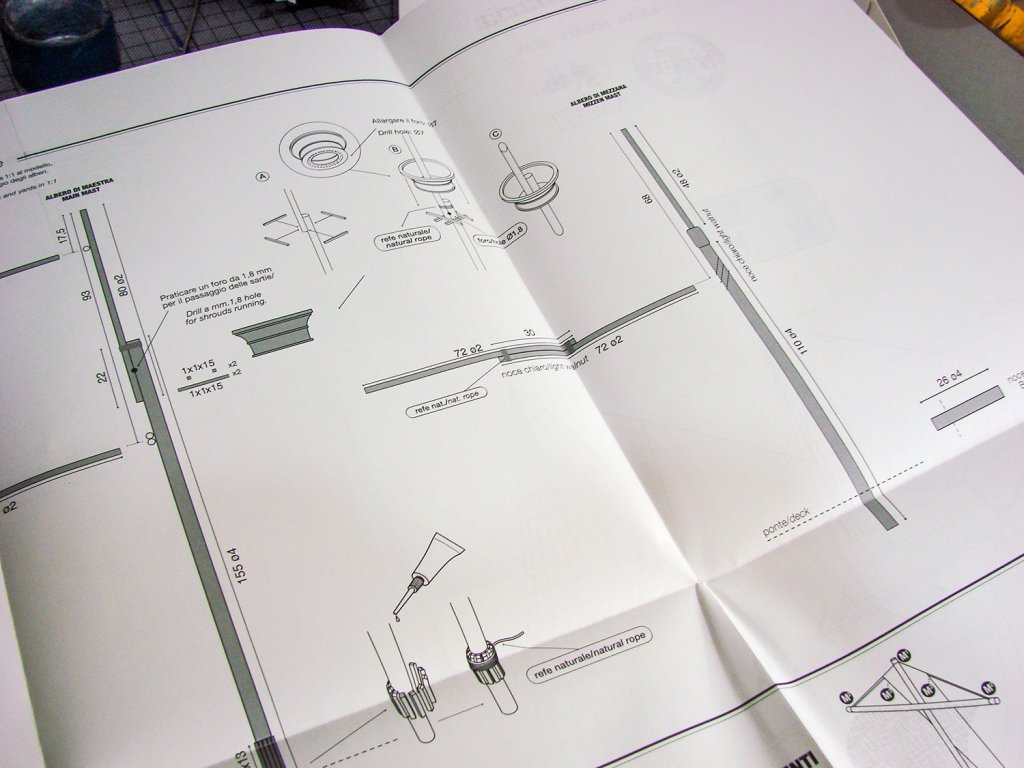
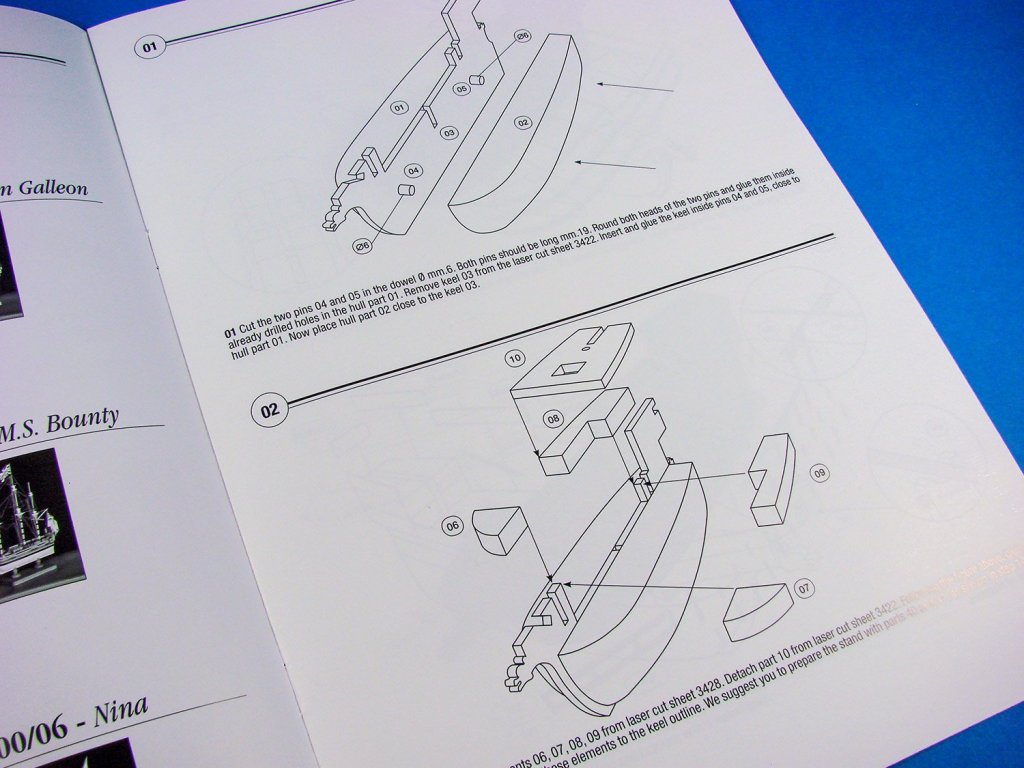
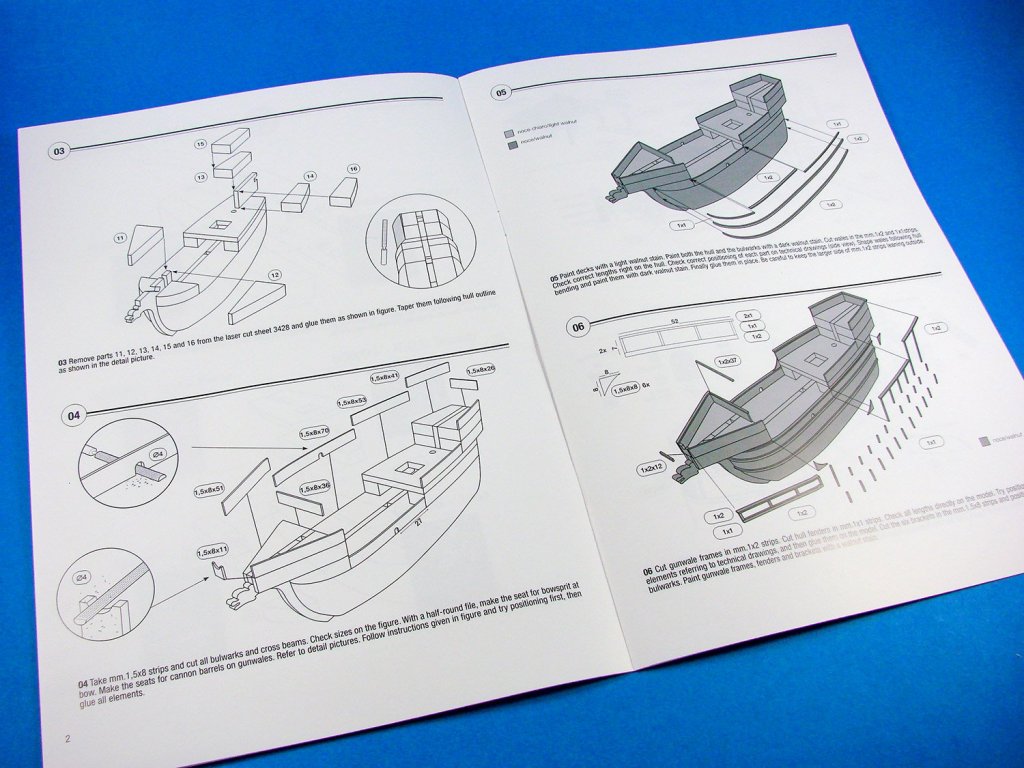
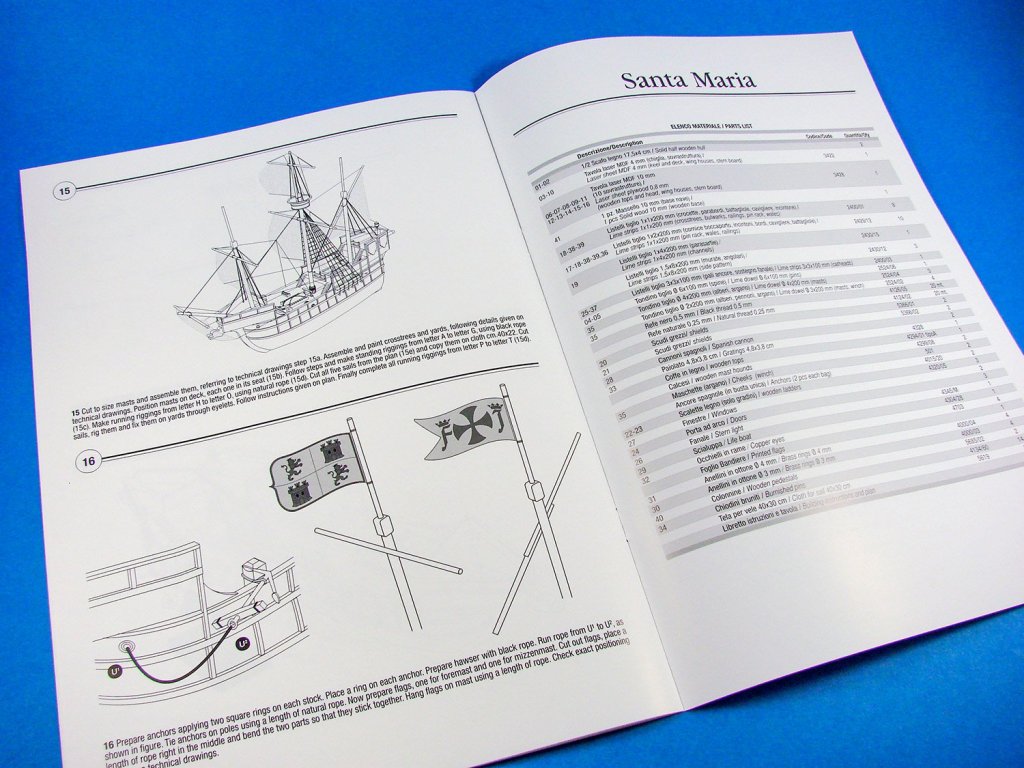
1:100 Santa Maria – First Step Amati Catalogue # 600/03 Available from Euromodels for £69.99 Santa María was built in Pontevedra, Galicia, in Spain's north-west region. She was probably a medium-sized nau (carrack), about 58 ft (17.7 m) long on deck, and according to Juan Escalante de Mendoza in 1575, Santa Maria was "very little larger than 100 toneladas" (about 100 tons, or tuns) burthen, or burden, and was used as the flagship for Columbus’ expedition. Santa María had a single deck and three small masts. She was the largest of the three ships used by Christopher Columbus in his first voyage. Her master and owner was Juan de la Cosa. Courtesy of Wikipedia The kit Everyone has to start somewhere in this hobby, and few manage to build a fully rigged Man ‘O War or clipper without at least some experience of how to work timber etc. Of course, being any sort of modeller who can think on their feet is always an advantage, but there a whole demographic who would like something just to kick-start their passion, whether they are of our generation, or a whole new generation of younger modeller who may progress to the lofty heights you see here on Model Ship World. For that latter group, Amati have their First Step range, and today we take a look at the first of three of these kits that they’ve sent to us for review. Santa Maria is packaged into a small and attractive box with an artwork of a finished model on the lid, and some vessel history on the side. As you can see from the box, this particular model has a length of 28cm, a height of 24cm, and a width of 6cm. So, it’s still a reasonable size. Lifting the lid reveals a set of plans, instruction manual, sail cloth and printed paper sheet for flags, two pre-carved wooden hull halves, a bundle of strip wood, a packet with two MDF laser-cut sheets, a wooden display base, and a whole box of fittings. Unlike your traditional model ship/boat, where you either plank over a series of bulkheads or frames, the Santa Maria comes with two pre-carved hull halves. Looking at the other kits in this range, these halves appear to be of the same shape, but it’s what you add that really makes these models look very different from each other. Note the two holes. These are used to align the halves, and also peg through a centre plate which forms the keel. Instructions will show you how to paint and stain your model when complete. Here you see the main 4mm MDF sheet that contains the main keel/profile with the alignment holes and mast sockets, plus a deck section. Parts are all laser-cut and are clean and precise. Of course, you will need to ensure that any sanding that’s to be done with these parts means you will wear a face mask. Wood dust isn’t great for the respiratory system, but MDF can be particularly bad. Important that youngsters are aware of this. The second and last sheet is also MDF, but 10mm thick. There are ten parts here, for raising up the fore and aft decks, creating the correct shape of this ship and totally transforming the shape of the basic wooden hull halves. When your model is complete, you’ll want to display it properly, and this kit includes a neat wooden base. Nicely turned pedestals are also included that will glue to this and into which the keel will slot. A small bundle of timber is included for masts, spars, wales, bulwarks etc. Timber quality is excellent, as we have come to expect from Amati. These plastic fittings boxes are very common to Amati releases, and even these First Step kits get one, stuffed with goodies to adorn and detail your model. All parts are bagged and compartmentalised, and the clear lid holds tight, keeping everything in place whilst in the kit box. Unlike other kits, this one has a brown plastic-moulded grating which you will need to cut to the required size. Note the mast top/crow’s nest is manufactured from a piece of turned walnut and is silky smooth to the finish. Some white metal parts are included too, such as doors, windows, and the ship’s launch. Casting is very nice, and with a lick of primer/paint, should look very good once installed. Remember, this is a very small model when complete, and therefore these parts are also small. We also have a packet of nails for general construction. Of course, you will also need an anchor or two. A packet of two is included with this release, complete with wooden stocks and brass ring fittings. The anchors themselves are blackened and ready for use. A couple of small packets contain the decorative shields for the upper, rear exterior bulwarks. These are designed to be painted. Also, we have some small copper and brass fittings, such as rings and eyelets. There are a few small staircases on Santa Maria, and these are cut from these pre-formed lengths of timber. Note also some parts for the windlass and rigging blocks. There are only a couple of the latter, as the model is designed to be simple to build (and rig). Here are the aforementioned turned walnut pedestals onto which you will mount your completed model. These are high quality and require no extra finishing apart from some varnish, perhaps. Only two spools of rigging cord are included, one being in black for the standing rig, and the running rig being in natural colour, as a general rule. You will need to make your own sails, but this is fully explained, and is very simple. Plenty of material is provided for this. For the flags and pennants, a sheet of colour-printed paper is included. You can also go to town with fabric paint and add the familiar Maltese cross to the main sails. Again, this is shown so you can copy from the illustration. One large plan sheet will show you everything you need to know for your build, and everything is simple to follow. Several 1:1 scale images are shown for you to measure against, including the masting diagrams. Amati’s instructions tend to be well illustrated and easy to follow, from my personal experience, with many of the very new kits having the best I’ve ever seen in any of the modelling genres. This kit also has a nicely illustrated manual that takes the construction through in a series of easy to follow steps complete with English text. I can’t see anything here that would thwart even a young modeller, with the various drawings. A handy parts list is also supplied at the end of the manual, which is handy for you to check your supplied parts against. Conclusion These kits fulfil several roles on the market. For me, the first is to introduce a young modeller to our hobby and initiate them with a number of the skills required to advance a little and create more complex results. Another is to allow a modeller who may never have used timber before, to build a very nice replica of a ship and to help them also pursue a line of attack into a more challenging project. Lastly, these could well appeal to a seasoned modeller who fancies a little fun between larger projects and may want to build something they could gift when complete. So many possibilities. The kit itself is actually a high-quality product that is well thought out and executed. There are also some classic vessels in this range too, with something that should appeal to most ship builders, or soon-to-be ship builders. Price-wise, these kits are also relatively inexpensive and will provide a good number of happy hours at the modelling bench. Wherever you are in the hobby, or whether you’re starting out, give one of these a try! I have already given this model kit to a young man who will send me some photos of his progress. I will post them here as he builds this model. My sincere thanks to Amati for the sample reviewed here. To purchase, click the link at the top of this article.


- 7 replies
-
- 5
-

-
- beginner
- santa maria
- (and 1 more)
-
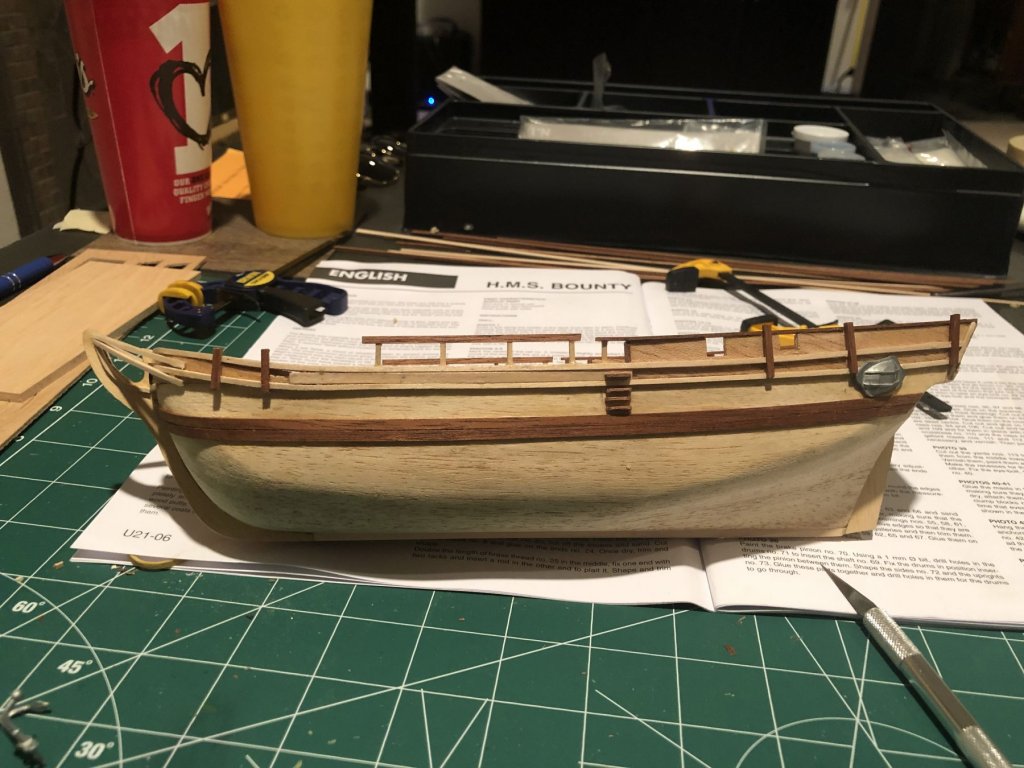
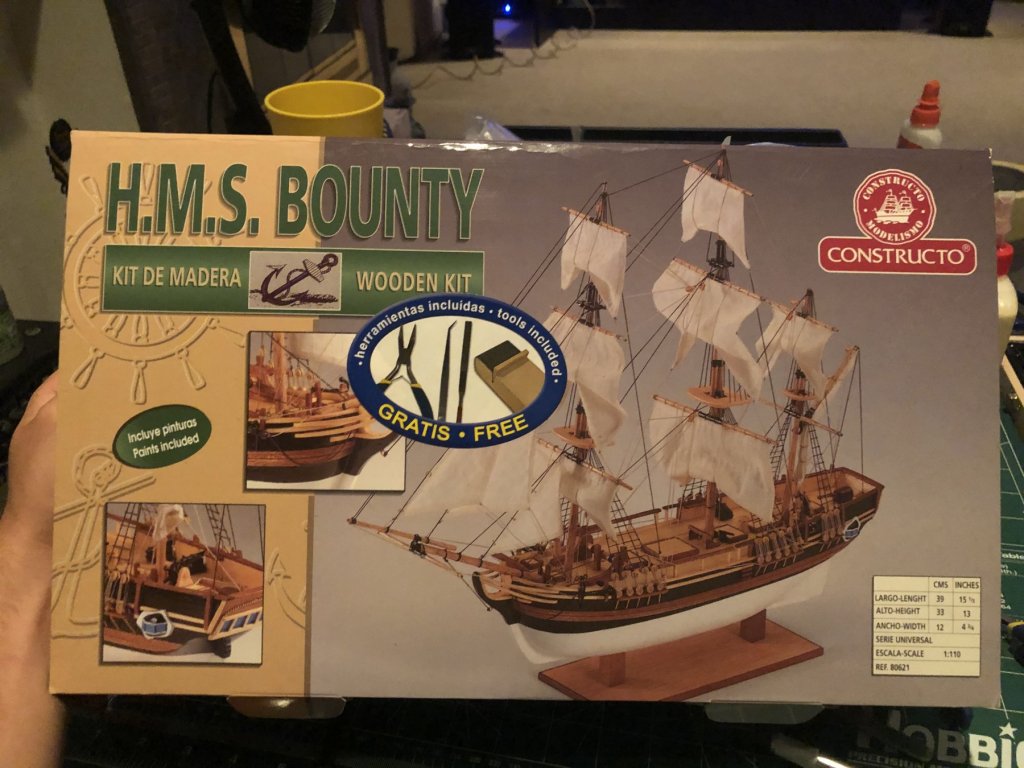
Hello, My name is Samuel and I am a 20 year old college student from Texas. I was gifted a wooden kit of the HMS Bounty 1:110 (Constructo) a few years back and never got around to building it because I was scared of messing it all up. Now as I am a little older I started it as an "end of summer project" and I think I am about 3 weeks in and the ship looks good so far. There is still a lot of work to do, and I know I will not be able to complete it before I head back to school in the fall. From reading a few posts here as well as various sources online I have come to a few conclusions. 1. The HMS Bounty is quite a famous ship because of the mutiny that occurred on board. 2. Constructo kits are not known for the best materials, instructions, or quality in general. (I'm making it work, so far so good) 3. This hobby is a very relaxing one for myself. (I love the water and I am a certified deep water diver) Attached you will see a photo or two of the ship in its current state on my makeshift drydock, as well as a photo of the box. Here is the link to my build log I just started.

- 6 replies
-
- 5
-
-
- first model
- newmember
- (and 4 more)
-
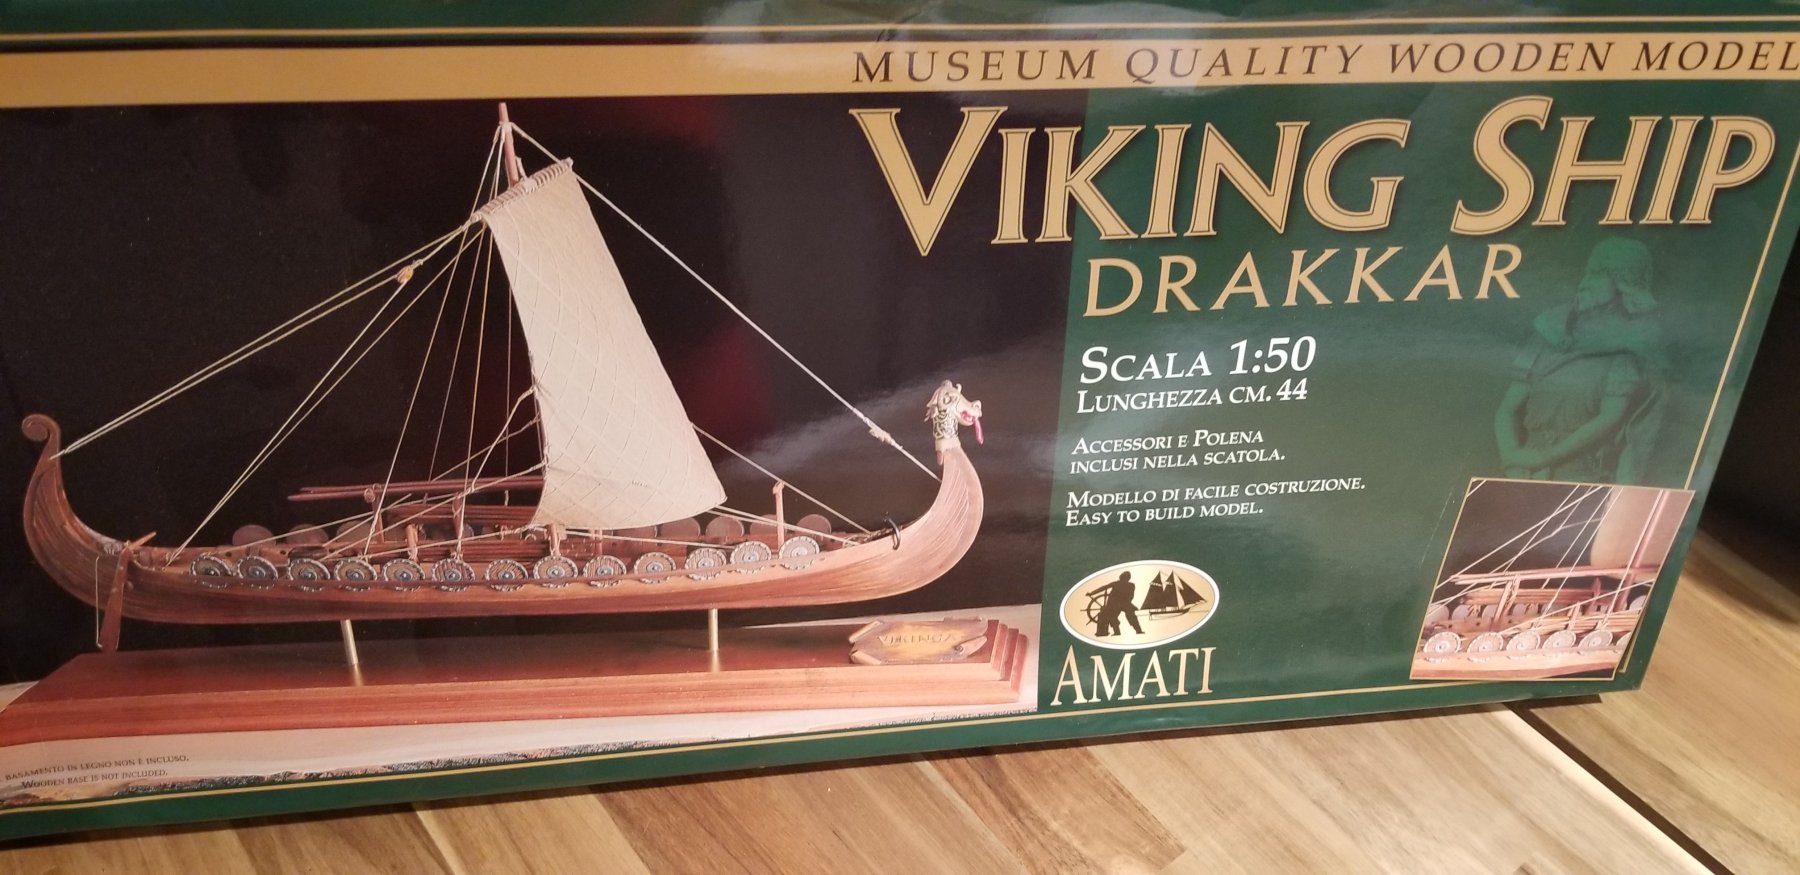
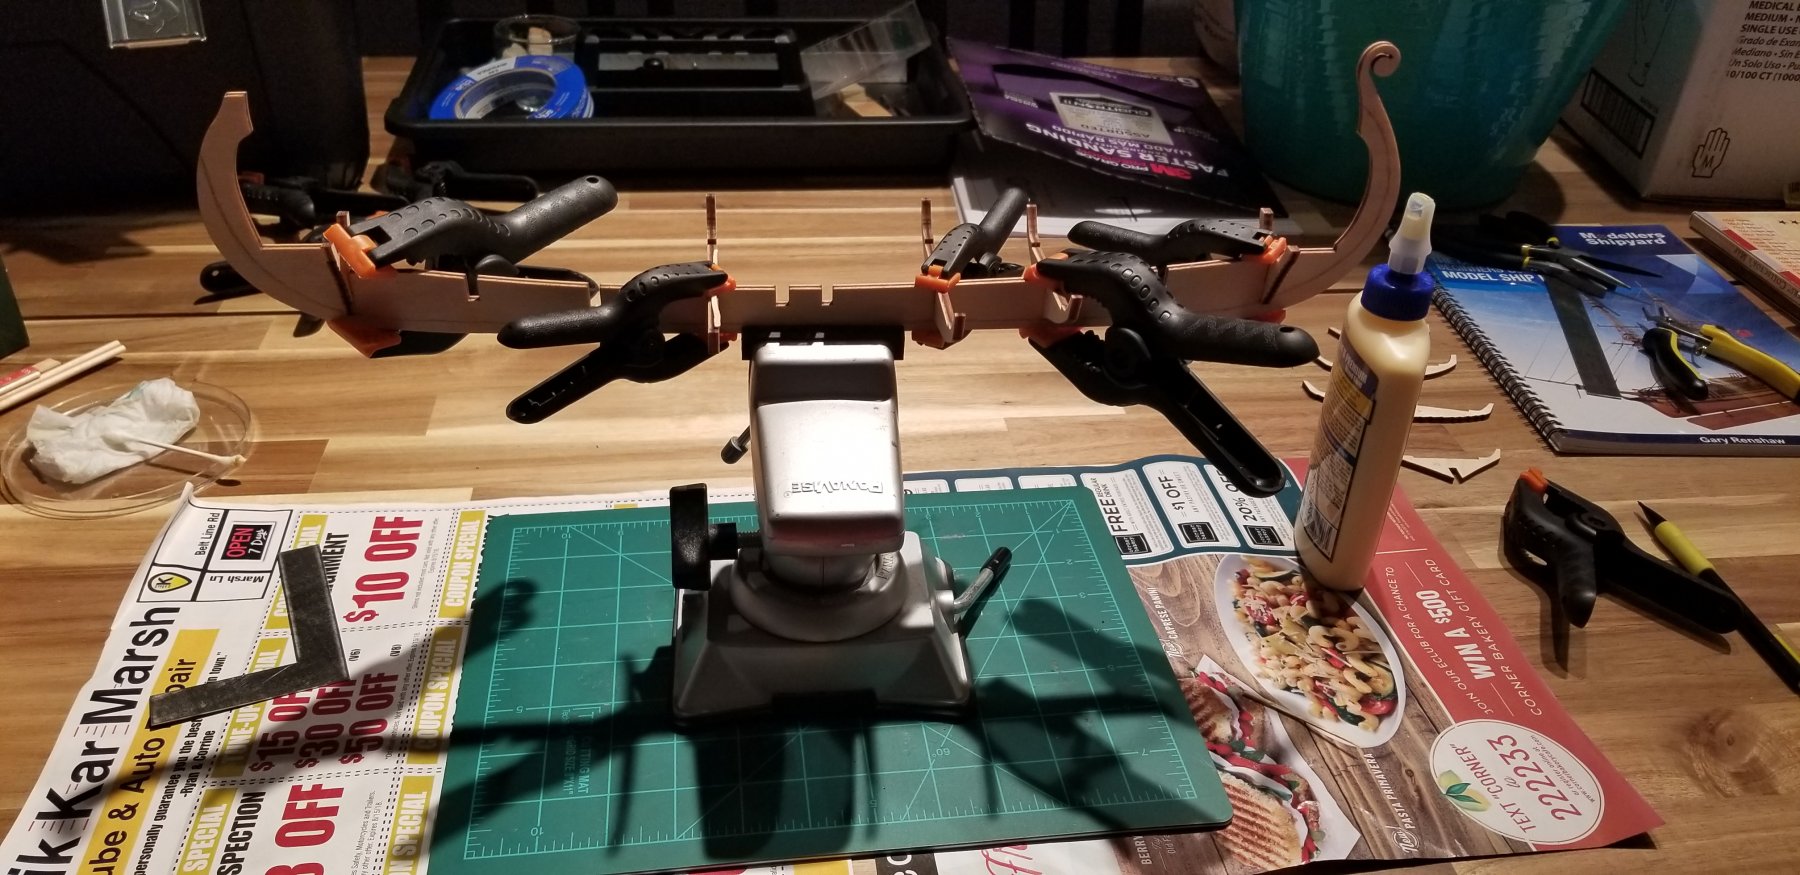
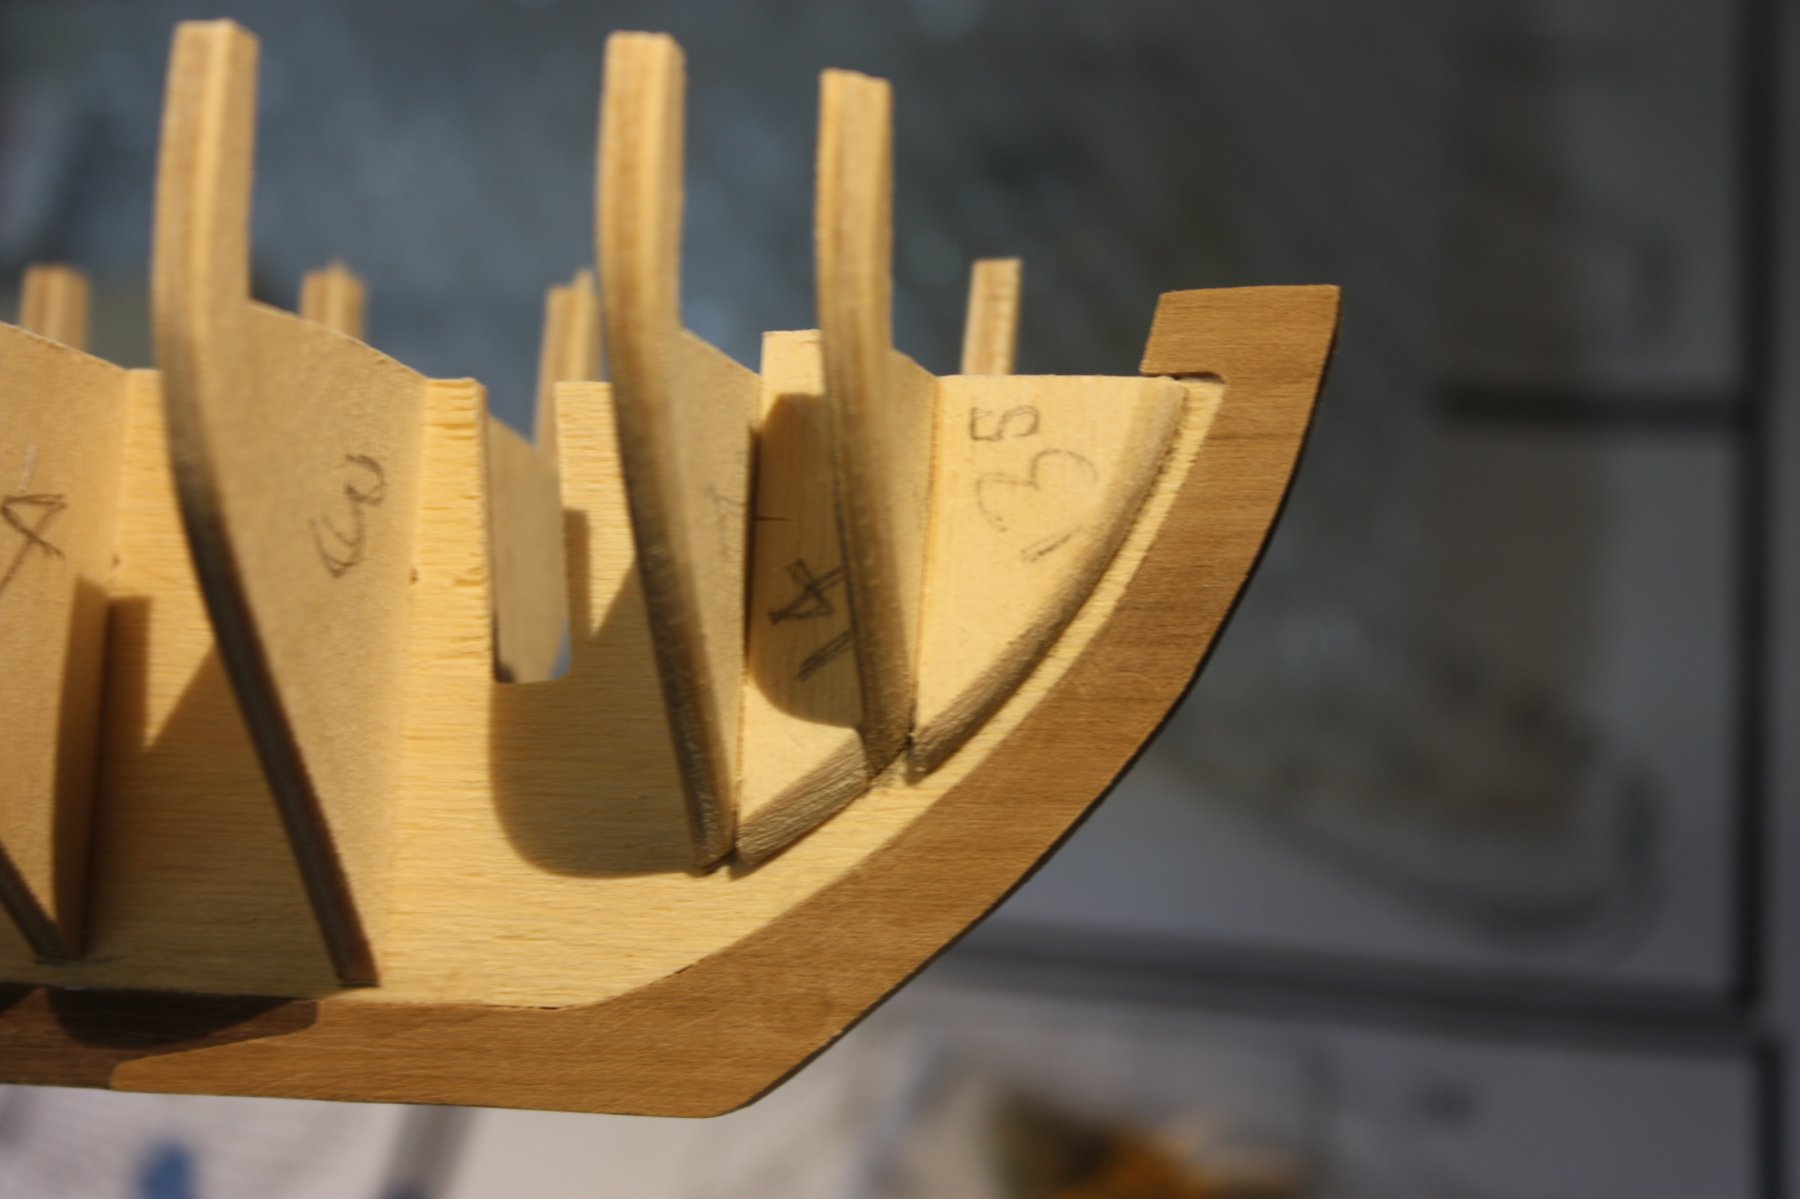
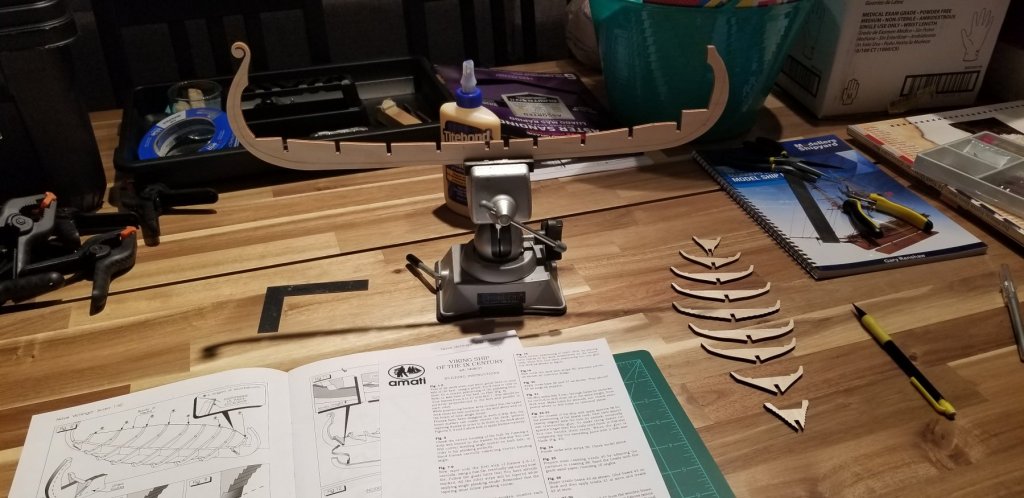
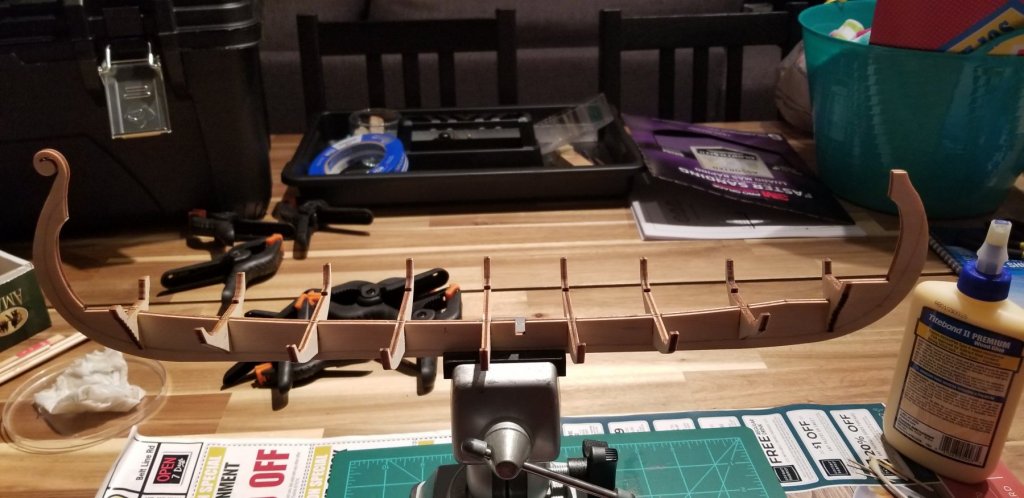
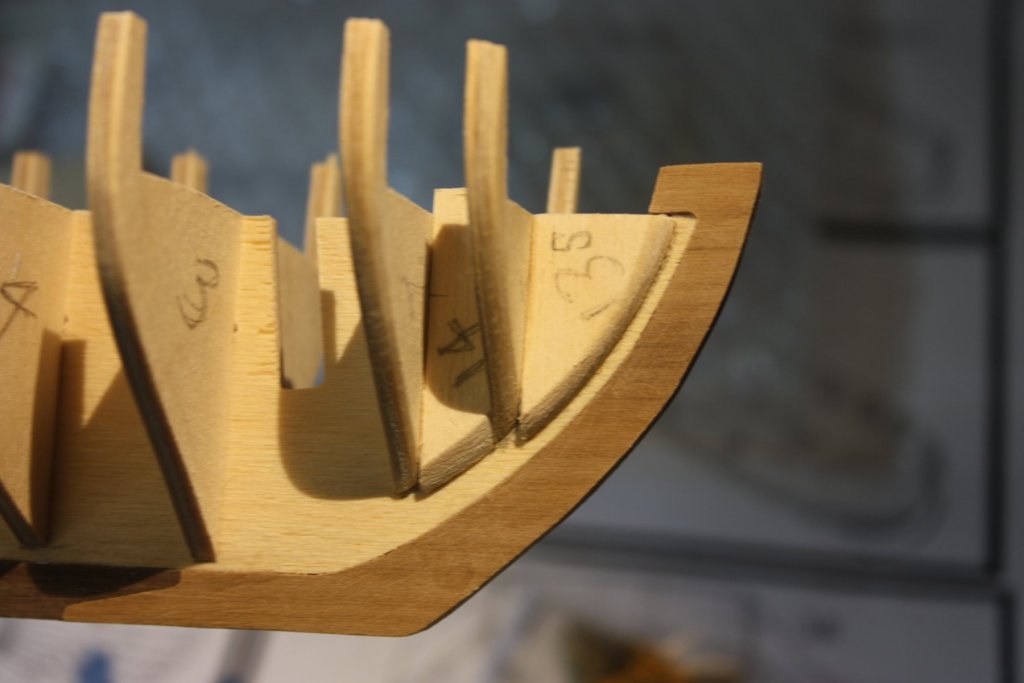
 Hello MSW! After perusing build logs for the past week, I have finally sat down to work on my own kit. A little back story for me. My great uncle recently passed and had spent many years building ships. When last I visited him in Chicago, he had at least 5 ships on display. I had spent the majority of my family's visit there talking about modeling and found my interest in the hobby. Before we left, he had given me a box to kickstart my toolbox. For my birthday that same year, my mother bought me the Amati Drakkar kit to encourage me to pursue it. Well, after almost a year of sitting in my closet out of fear for lack of space and time, I have no opened up that kit and got to work. I appreciate the advice a lot of you have given me and the build logs that are available. I have learned a lot and hope to apply at least some of that knowledge to this kit and all going forward. To start things off, I read through the parts list and skimmed the entirety of the instructions. Then I cut out of the keel and frames, dry fitted to see how much adjustment would need to be made during gluing, and got to gluing. I ended up having to shimmy the smaller frames on the bow and stern because I didn't realize the clamps had held them at an angle. They were square horizontally with the keel, but not vertically. Luckily I caught it before the glue set too much and I could get them off without any damage. I re-glued them and made sure they were held straight and let them sit.

-
 hello everybody, I've just joined this forum and have two newbie questions in regard to building the keel of the Caldercraft 1:64 HM Schooner Ballahoo. I've read one or two build logs on here where people have left these parts off the false keel until after the bearding line and rabbet has been made. Being a beginner, I haven't done this on mine and gamely followed Caldercraft's instructions and glued the 5mm walnut keel, stem, sternpost together then onto the false ply keel (I plan to paint the keel white so avert your eyes from the glue stains) without a bearding line or rabbet. So, what follows is probably fairly naïve / basic question, should I try to: a. establish the bearding line and attempt to carve the rabbet with these pieces in place; b. remove the walnut pieces and start again ( likely difficult as they seem quite solid with the glue and potentially causing other problems); c. carry on regardless (the instructions suggest to plank from the bulwarks down and dont mention the garboard plank) given it will be planked again and have a coat of white paint in the end. Presently the keel is quite straight without any warping so I'm loathe to undo everything (the bulwarks are not glued in yet). Would welcome your thoughts given this is my first wooden kit, it is double planked and I plan to paint it. The picture below shows the slight rabbet caused by the walnut keel being 1mm thicker than the ply keel - If I understand correctly the bearding line will follow the line of the bottom of each bulwark? My second question is in regard to the bow, where the plank templates (part 13 and 14 p and s) are misaligned with no. 1 and 2 b/hs. The photo below illustrates(again the bulkheads are not yet glued in and have been roughly faired). I am guessing the best thing is to glue this aligned along the bulkhead bottom (where the bearding line would be...if I had it...haha...) and sand the top flat with the deck level, but would welcome thoughts from others if I am setting myself up for trouble later on with something. thanks for reading and any tips in advance! neillydone
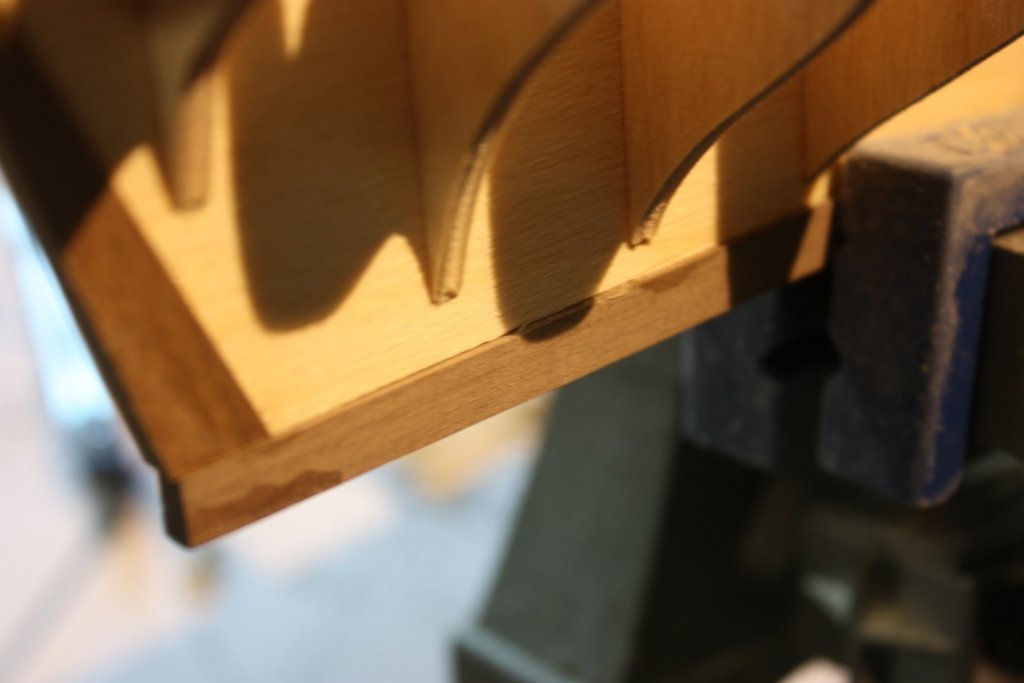
-
I just wanted to post and say hello. I am a new member in my late 20’s from the Boston area, and brand new to the ship modeling world. I have always been interested in modeling - starting at a young age with plastic car kits, and most recently gathering n-scale trains and parts for when I eventually own a home with space for a layout. That being said, model shipbuilding has (somehow) just recently caught my attention. I have ordered the 18th century longboat kit that has, from what I have seen, been built and logged on here so many times. Which is good for a beginner, I think! Lots of logs to learn from. Anyways, I ordered model shipways kit as a combo with their tool kit. I am lucky enough to have a lot of downtime at work and plenty of space and tools both at work and at home to be able to spend a lot of time with this kit. Looking forward to meeting everyone and thanks in advance for all of the advice I will probably get and questions that will be answered! EDIT: Oh, and i will definitely start a build log once i get my kit and start working on it!!
-
Hello, everyone! I've been a hobby modeler for many years now, though my focus has been building and painting scale figures. I love the look of a well done wooden ship and have always wanted to try building them. A little over 20 years ago, back when I was in high school, I purchased the Model Shipways kit, the Fair American. I had high hopes, but could see I was in way over my head and never started it. I still have the kit and want to build that ship one day, but I know I need to work up to it. I think it's past time I found a good beginner kit and started working my way up to more complex ones. I've had a look at some of the suggestions on this site and I think I'm going to start with the Grand Banks Dory from Blue Jacket. I also had my eye on the Revenue Cutter from Blue Jacket and the new 18th Century Armed Longboat from Model Shipways. But, I think the Dory is probably a better choice for the first project and perhaps I'll take on one of those others afterward. What do you all think? Is the Grand Banks Dory a good beginner kit or would you recommend something else? I saw Midwest Products mentioned in some posts. It looks like they're no longer in business but I still their kits sold here and there. I'll start a build log once I get the kit, so I can hopefully get some feedback and advice as I go. Also, I'm located in San Jose, CA. I tried to see if there were any ship modeling groups nearby. I found some up in San Francisco, but would love to find a group a little closer to home. If you know of anything active in the area, I'd love to hear about it. Oh, and in case anyone is curious, here are a couple of my recent figures projects (1, 2, 3, 4), all 1/35 scale. I'm a novice when it comes to ships, but I've got a bit of experience with figures. 😉
-
Hello from Darwin Australia, I wish to diversify from plastic modelling and have always been interested in wooden ships, an existing member thoroughly recommended this website and said it was a great resource for builds. I am keen to start building and was looking at the recommended entry level kits on the model boat yard website. The problem with living in Australia is always range and availability of products and its a major issue in Darwin as we no longer have any hobby shops - all probably driven out of business due to the competitiveness of online sellers. We have great web resources in the plastic modelling field and can get a feel for which national and international online retailers are trustworthy based on comments in the forums. I have now branched out to Japan and eastern Europe for some of my plastic modelling needs based on feedback on those forums. I would be interested to hear how other Australian members get around the range and availability issues for their wooden ship kits. Regards Richmond
-
 I am not sure if I am doing something wrong, but the first bulkhead on my model (corel scotlands) protrudes slightly more than the deck. I checked with the plans and everything seems to be fine. I'll post some pictures: The reason I am confused is because I think it's normal for the front of the frame to clear the deck but the back should be aligned. This makes shaping the frame easy: filing the only the front projection while leaving the outline of the frame intact. In my case, the front and back projection of the frame clears the deck? Any suggestions, fixes, solutions to something I'm doing wrong. I haven't glued the deck on yet. Thanks!!
 -
The HMS Lady Nelson (1799) My interest is in British Maritime explorations vessels from the late 18th century onwards. And as an Antipodean, that means ships such as the Endeavour, Beagle, Investigator and Discovery II. I want to work in 1:64 scale because all the boats I'm interested in are available in that scale. In addition to the the above there are other famous Australia related boats such as the Cutty Sark and the Bounty, Then, out of left field, because of the important support role this ship played at Trafalgar, is the Pickle. But I've decided to start with the Lady Nelson because: It had a major role in the exploration of Australia. It was built as a cutter (although rigged as a brig); so is a "relatively" good beginner project. I just love the pictures of the completed models - and, I figure, mostly this should be about passion. But: There are a two 1:64 scale wooden kits of the Lady Nelson. By Victory Models and Amati. Although, I saw one reference that said that Victory Models is a subsidiary of Amati. So are they one and the same? Or are there differences between the models? Looking through all the forums there are 6 references to Lady Nelson kits: 5 Victory and 1 Amati. But no comparison. Would be grateful if anyone can shed some light. I have already picked out a hobby desk and a spot to put it. Not that I'm eager ... much. Robert