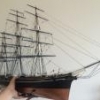
baskerbosse Posted March 31, 2015 Share #1 Posted March 31, 2015 Hi all, Just joined the forum. I have a couple of half finished things to finish off, so apologies if I'm not starting from the beginning. First up is my old Cutty Sark model, started in the eighties that was pretty near finished, but I'm now re-rigging. (Next will be my Corel Wasa, that is much less progressed) The model was nearly done, save for some rigging details on the fore mast. However, in order to take it with me to Australia, I took the whole rigging down, so I'm restarting from this point. (Added picture of model some 5 years ago, before packing and transporting to Australia) Just starting on the mizzen now: docidle, tasmanian, CaptainSteve and 2 others 5 Quote Link to comment Share on other sites More sharing options...
baskerbosse Posted April 1, 2015 Author Share #2 Posted April 1, 2015 (edited) This model has a couple of issues with accuracy, stemming from me wanting to replicate the look from the Billing Boats box art. (see attached pic of box)I will still finish it according to my initial intentions.That is, -I will not attempt to fix it. :-)For example, in the catalogue, the yards look dark blue, so the model has dark blue yards. Also all yards are in their top position.(As they would be if the sails were set)All three masts are up now.However, looks like I never rigged the foremast lower shrouds.The lower deadeyes were never installed.Lower foremast shrouds also lacks ratlines and deadeyes. The fore yards also seem to lack foot ropes and falls. There's going to be a little bit more modelling than I thought.. :-)Starting to take shape though. (Added picture; -Stropping some deadeyes. Don't like the Billing Boats block/deadeye design with brittle plastic eyelets.. :-( ) Edited April 2, 2015 by Peter Jenssen clearway 1 Quote Link to comment Share on other sites More sharing options...
baskerbosse Posted April 3, 2015 Author Share #3 Posted April 3, 2015 All masts up. Standing rigging coming along nicely: clearway, SteveLarsen, ScottRC and 1 other 4 Quote Link to comment Share on other sites More sharing options...
clearway Posted April 3, 2015 Share #4 Posted April 3, 2015 Looking nice- when i bought my billings cutty in 1995 they had moved on to wooden deadeyes and blocks. I painted my yards black as opposed to blue suggested by billings. Quote Link to comment Share on other sites More sharing options...
baskerbosse Posted April 4, 2015 Author Share #5 Posted April 4, 2015 Yes, the little plastic eyelets on the plastic blocks are the main drawback on this kit.They snap very easily, making it hard to put tension on the rigging..If one snaps once the rigging is done, it's near impossible to fix. :-(However, since this model is a bit of memorabilia, replacing them would be like wiping a bit of it.I have to try to resist improving it.Just rig/renovate/finish off.. The eighties kit, as I bought it, required you to saw out all plywood parts, decks deckhouses etc out of sheets of wood, no laser cut parts here at all! :-) clearway 1 Quote Link to comment Share on other sites More sharing options...
clearway Posted April 5, 2015 Share #6 Posted April 5, 2015 It was still like that in the 90's as well- not sure when Billings moved over to laser cutting for their Cutty Sark. Keith Quote Link to comment Share on other sites More sharing options...
NenadM Posted April 7, 2015 Share #7 Posted April 7, 2015 Hello Peter Wellcome to the CS fleet and keep on good work Be carefull with ropes and fragile masts and spars waitin for more progress I ll be glad to follow Quote In progress: CUTTY SARK - Tehnodidakta => scratch => Campbell plans http://modelshipworld.com/index.php/topic/2501-cutty-sark-by-nenad-tehnodidakta-scratched-campbells-plans/page-1#entry64653 Content of log : http://modelshipworld.com/index.php/topic/2501-cutty-sark-by-nenad-tehnodidakta-scratched-campbells-plans/page-62#entry217381 Past build: Stella, Heller kit, plastic, Santa Maria, Tehnodidakta kit, wood, Jolly Roger Heller kit, plastic Link to comment Share on other sites More sharing options...
baskerbosse Posted April 20, 2015 Author Share #8 Posted April 20, 2015 Well, delays suffered due to easter and ratline tying slowdown.Picking up speed again now. :-)Fore mast shrouds ratlines done. clearway, juleslucas, popeye the sailor and 4 others 7 Quote Link to comment Share on other sites More sharing options...
NenadM Posted April 20, 2015 Share #9 Posted April 20, 2015 Isn't She beauty? Very nice work Quote In progress: CUTTY SARK - Tehnodidakta => scratch => Campbell plans http://modelshipworld.com/index.php/topic/2501-cutty-sark-by-nenad-tehnodidakta-scratched-campbells-plans/page-1#entry64653 Content of log : http://modelshipworld.com/index.php/topic/2501-cutty-sark-by-nenad-tehnodidakta-scratched-campbells-plans/page-62#entry217381 Past build: Stella, Heller kit, plastic, Santa Maria, Tehnodidakta kit, wood, Jolly Roger Heller kit, plastic Link to comment Share on other sites More sharing options...
baskerbosse Posted April 21, 2015 Author Share #10 Posted April 21, 2015 She sure is! Thanks! I can see why I picked this ship. Just noticed the mizzen shrouds are wrong. The Billings plans are ambiguous here, so basically, the fore mizzen shroud is missing and there's an extra aft. Fingers itching to correct.. :-/ I DID decide not to start correcting errors though.. Quote Link to comment Share on other sites More sharing options...
popeye the sailor Posted April 21, 2015 Share #11 Posted April 21, 2015 looks very nice Peter Quote I yam wot I yam! finished builds: Billings Nordkap 476 / Billings Cux 87 / Billings Mary Ann / Billings AmericA - reissue Billings Regina - bashed into the Susan A / Andrea Gail 1:20 - semi scratch w/ Billing instructions M&M Fun Ship - semi scratch build / Gundalow - scratch build / Jeanne D'Arc - Heller Phylly C & Denny-Zen - the Lobsie twins - bashed & semi scratch dual build Billing T78 Norden in dry dock: Billing's Gothenborg 1:100 / Billing's Boulogne Etaples 1:20 Billing's Half Moon 1:40 - some scratch required Revell U.S.S. United States 1:96 - plastic/ wood modified / Academy Titanic 1:400 Trawler Syborn - semi scratch / Holiday Harbor dual build - semi scratch Link to comment Share on other sites More sharing options...
baskerbosse Posted April 24, 2015 Author Share #12 Posted April 24, 2015 (edited) Here we go.. :-(I'm not sure I can let this pass..The mizzen shrouds are one step too far aft.The Billing Boats rigging diagram has the mizzen shrouds in the right place: The fore mizzen shroud is parallel to the mast.Problem is, the Billings deck layout does not have a deadeye in this position.This would be on the rail, the same way as the deadeyes for the other masts, -and not on the poop deck.Billings have all the mizzen deadeyes on the poop deck.This error seems to appear on most built Billing models of Cutty Sark as far as I can tell (and some others) including the ones built by Billings themselves (Box art and catalogue) Another curiosity: there are blocks for three mainmast yard braces in this location. Billings would have you run the braces for topgallant, royal and skysail first to blocks on the mizzen mast, then down very close to the mizzen yards (potentially interfering with their movement and the billowing of the sails) and down to these blocks. (in the plans I bought on the Cutty Sark (actually onboard -at the museum), these take a seemingly more reasonable run down along the backstays to the mizzen pinrail, in the museum plans, this location has a deadeye and two single blocks for the main topsail braces that then would come from a more reasonable forward direction.Interestingly, the Billings deckplan seems to have the correct number of deadeyes on the poop deck. -They just omitted one of the topmast backstays.Suggested fix for the Billings model:Add one deadeye parallel to the mizzen mast.Move all mizzen shrouds one step forward. Add one more topmast backstay to the resulting empty deadeye.Move the run of the topgallant, royal and skysail braces to the mizzen pinrail. Move the Main topsail braces to two single blocks next this new deadeye.Has anyone else done a similar modification to a Billings Cutty Sark? thanks, Peter Edited April 24, 2015 by Peter Jenssen ScottRC and popeye the sailor 2 Quote Link to comment Share on other sites More sharing options...
popeye the sailor Posted April 24, 2015 Share #13 Posted April 24, 2015 nice to let folks know about this modification............looking really sweet, by the way Quote I yam wot I yam! finished builds: Billings Nordkap 476 / Billings Cux 87 / Billings Mary Ann / Billings AmericA - reissue Billings Regina - bashed into the Susan A / Andrea Gail 1:20 - semi scratch w/ Billing instructions M&M Fun Ship - semi scratch build / Gundalow - scratch build / Jeanne D'Arc - Heller Phylly C & Denny-Zen - the Lobsie twins - bashed & semi scratch dual build Billing T78 Norden in dry dock: Billing's Gothenborg 1:100 / Billing's Boulogne Etaples 1:20 Billing's Half Moon 1:40 - some scratch required Revell U.S.S. United States 1:96 - plastic/ wood modified / Academy Titanic 1:400 Trawler Syborn - semi scratch / Holiday Harbor dual build - semi scratch Link to comment Share on other sites More sharing options...
rfolsom Posted April 27, 2015 Share #14 Posted April 27, 2015 Hello, Peter; I too am working on the billings model (459). However, the only kit parts I've used so far have been the keel and bulkheads. My unstarted, but incomplete kit was missing the main deck, and all plans and instructions except for (gold mine!) two complete sets of G. Campbell's plans. I have been using these plans almost exclusively (along with actual photos, and help from the great masters on this site) to scratch build most of the ship over the original skeleton. All deadeyes and spacing follow these plans. Here's a picture of my mizzen deadeyes temporarily in place, followed by photos from Campbell's plans. The last deadeye (aftmost) is not in place in the photo of my model, but the hole is drilled. Also note details from Campbell... Do you have a set? The two different diameters of deadeyes (2.5 and 3.5 mm) reflect the 6.5" to 10" variance in the actual ship's. Hope this helps... Bob ScottRC 1 Quote Link to comment Share on other sites More sharing options...
rfolsom Posted April 27, 2015 Share #15 Posted April 27, 2015 Also, Peter, I do believe the topsail braces running through the single blocks is the way to go.. If you look at Lou's "Cutty Sark Picture Portfolio" on this forum, pictures cs030 and cs031 show the eyebolts for these blocks mounted on the main rail's side straddling the foremost mizzen deadeye, as per Campbell. But wait! I noticed a few months back that on picture cs030 that an additional deadeye forward to the foremost mizzen deadeye was present! It was in Lou's opinion that this was a modification added to the original design sometime after the 1950's restoration, in order to make the deteriorating ship more structurally sound. It also appears that the two single blocks were replaced by one double block for both braces in order to fit around the added deadeye and shroud. (You can see the empty eyebolt aft of the deadeye, that's aft of the added deadeye.. ) Egads! ~Bob Quote Link to comment Share on other sites More sharing options...
baskerbosse Posted April 27, 2015 Author Share #16 Posted April 27, 2015 Thanks Bob, I do have Campbell's plans, and thank you very much for the pointer to Lou's pictures. Those are very interesting.I don't know what to make of that picture of two deaeyes aft of the poop deck break?!To me, it looks like the location of Campbells foremost deadeye is somewhere between these two?At the moment, I'll stick with moving the shrouds forward one step and the following shift of the topgallant, royal and skysail braces.(Plus of course, add the missing backstay to the vacated deadeye)I'll revisit the topsail braces when I have the yards up to see how it looks.Billings seem to have replicated the lower three braces from the foremast onto the mainmast.In the middle, both between foremast and mainmast, and between mainmast and mizzen, there is a double block and a single block for the three lower braces. Something Campbell's plans do not agree with.Another interesting difference between Campbell and Billings is that the main topsail braces are made fast to the same boomkin as the the main brace block (also same as fore mast) on Billings, whereas in Campbell, they are made fast to eyebolts next to the two brace blocks. However, I may stick with the Billings rigging plan for the main lower three braces anyway, since following Campbell requires a sheave in the poop railing for the main braces.Due to the Billing hull design, it would be near impossible to rig in this way. (The railing is too low and the railing cap is too fat)(I want to minimise changes anyway, -This was supposed to be a case of 'just put the rigging back the way it was'.. :-) )Cheers, /Peter Quote Link to comment Share on other sites More sharing options...
baskerbosse Posted April 27, 2015 Author Share #17 Posted April 27, 2015 (edited) Well, This is what I had:A consequence of placing the deadeyes on the x-marks on Billing's deck plan:However, even Billing does not agree with this on their rigging plan, and places the foremost shroud parallel to the mizzen mast:Something that corresponds exactly with Campbell:(Also an interesting artefact: The two single blocks on the Campbell plan is there on the Billing plan too, except they have drawn no lines to them)Except that requires the foremost deadeye to be located here (arrow), which the Billing deck layout does not cater for..: ..-and fixed: Cheers, /Peter Edited May 11, 2015 by Peter Jenssen popeye the sailor, SteveLarsen, tasmanian and 1 other 4 Quote Link to comment Share on other sites More sharing options...
NenadM Posted April 27, 2015 Share #18 Posted April 27, 2015 I follow this with great interest, because I do not know anything about real rigging, and that stage waits for me ... Quote In progress: CUTTY SARK - Tehnodidakta => scratch => Campbell plans http://modelshipworld.com/index.php/topic/2501-cutty-sark-by-nenad-tehnodidakta-scratched-campbells-plans/page-1#entry64653 Content of log : http://modelshipworld.com/index.php/topic/2501-cutty-sark-by-nenad-tehnodidakta-scratched-campbells-plans/page-62#entry217381 Past build: Stella, Heller kit, plastic, Santa Maria, Tehnodidakta kit, wood, Jolly Roger Heller kit, plastic Link to comment Share on other sites More sharing options...
baskerbosse Posted April 29, 2015 Author Share #19 Posted April 29, 2015 (edited) Got another half hour on the model last night (haven't had much time on it lately)Cut the lanyards, made and installed the extra deadeye. Second topmast backstay lying ready to be rigged on the deck in the background.Not quite happy with Billing's run of the halliards through the shrouds, but I'm going to leave that one alone: Edited April 29, 2015 by Peter Jenssen popeye the sailor, ScottRC, SteveLarsen and 1 other 4 Quote Link to comment Share on other sites More sharing options...
baskerbosse Posted May 3, 2015 Author Share #20 Posted May 3, 2015 (edited) Rigging the bowsprit, particularly the dolphin striker.Again, Not confident about the Billings plan, since it has crossing ropes and the result is not optimal in a load bearing sense. Looked at the Campbell plans, but those do not make sense to me at all. (this has to be wrong..)Anyone had similar problems?I might just rig them as make sense to me: Two foremost ropes to the lower position on the dolphin striker and the other two on the upper position...Hard to tell in most pictures, but at least this one seems to favour my drawing?http://www.solarnavigator.net/history/explorers_history/Cutty_Sark_sailing_clipper_ship_Greenwich_October_2003.jpg Thoughts anyone? Edited May 4, 2015 by Peter Jenssen ScottRC and SteveLarsen 2 Quote Link to comment Share on other sites More sharing options...
rfolsom Posted May 5, 2015 Share #21 Posted May 5, 2015 Hello, Peter; I have not looked very closely at these areas of the plans until this point, since I have not started rigging, but upon initial inspection, everything with Campell seems to be OK. Allright; with all the forestays, (main, mizzen, etc.) their main principle is to keep the masts from falling backwards due to the tension on the backstays and shrouds, who in turn transmit the force of the wind into motion for the ship. The bowsprit will transfer some of these foremast static rigging forces, and dynamic running rigging forces, from the topmost forestays, down through the main forestays, through the bowsprit, and into the hull in a symmetrical manner. (divided by the dolphin striker.). ~bob Quote Link to comment Share on other sites More sharing options...
baskerbosse Posted May 5, 2015 Author Share #22 Posted May 5, 2015 (edited) Hi Bob, (edit; -sorry, forgot the quote)" Allright; with all the forestays, (main, mizzen, etc.) their main principle is to keep the masts from falling backwards due to the tension on the backstays and shrouds, who in turn transmit the force of the wind into motion for the ship. The bowsprit will transfer some of these foremast static rigging forces, and dynamic running rigging forces, from the topmost forestays, down through the main forestays, through the bowsprit, and into the hull in a symmetrical manner. (divided by the dolphin striker.). " Yes, that is the general idea.I agree that Campbell's plans are excellent and essentially correct as far as I could find so far.However, please have a look exactly how he proposes to run the stays across the dolphin striker.The top position goes both to port, the bottom position goes both to starboard. Does not look right to me. Cheers, /Peter Edited May 5, 2015 by Peter Jenssen Quote Link to comment Share on other sites More sharing options...
baskerbosse Posted May 5, 2015 Author Share #23 Posted May 5, 2015 Found this one:http://justsaygo.com/wp-content/uploads/2013/11/CuttySbigger.jpgI think I'll go with my sketch in the end.. :-) thanks, Peter Quote Link to comment Share on other sites More sharing options...
NenadM Posted May 5, 2015 Share #24 Posted May 5, 2015 Maybe helps? clearway 1 Quote In progress: CUTTY SARK - Tehnodidakta => scratch => Campbell plans http://modelshipworld.com/index.php/topic/2501-cutty-sark-by-nenad-tehnodidakta-scratched-campbells-plans/page-1#entry64653 Content of log : http://modelshipworld.com/index.php/topic/2501-cutty-sark-by-nenad-tehnodidakta-scratched-campbells-plans/page-62#entry217381 Past build: Stella, Heller kit, plastic, Santa Maria, Tehnodidakta kit, wood, Jolly Roger Heller kit, plastic Link to comment Share on other sites More sharing options...
baskerbosse Posted May 5, 2015 Author Share #25 Posted May 5, 2015 Yes, thanks Nenad. I think that does it. They are both wrong. The two outer stays go via the lower lead on the dolphin striker then to port and starboard. Then the two inner stays go to the upper lead on the dolphin striker, and the to port and starboard. Quote Link to comment Share on other sites More sharing options...
baskerbosse Posted May 17, 2015 Author Share #26 Posted May 17, 2015 (edited) Time for an update; I have completed the rigging of the dolphin striker.A lot of lines were never rigged at all.Added attchment points: Run of lines:(sorry about the bad lighting) Standing rigging done:But the bottom could look better.Scuff marks and a crack:This needs to be fixed before the yards go on. /Peter Edited May 17, 2015 by Peter Jenssen popeye the sailor, juleslucas and clearway 3 Quote Link to comment Share on other sites More sharing options...
baskerbosse Posted May 17, 2015 Author Share #27 Posted May 17, 2015 Oh oh, -Just noticed that the chain shrouds for the bowsprit are not rigged either and I don't think I have any more of the same chain.. :-( Quote Link to comment Share on other sites More sharing options...
clearway Posted May 18, 2015 Share #28 Posted May 18, 2015 I used chain from mantua/sergal for my cutty sark and is readily available from most model shops online Quote Link to comment Share on other sites More sharing options...
baskerbosse Posted May 19, 2015 Author Share #29 Posted May 19, 2015 Thanks, I'll have a look. Perhaps if I can't find something exact, I can swap for the halyard chains. Unfortunately (again), when checking where on the hull the bowsprit shrouds attached, I noticed that the Billings name board is WAY too short! :-( It's supposed to go past the cathead.. -Nearly to the anchor hull padding. Quote Link to comment Share on other sites More sharing options...
baskerbosse Posted May 20, 2015 Author Share #30 Posted May 20, 2015 Wow, would you look at that. I think I found the original jar of paint I used.. ..And it's still usable! clearway and popeye the sailor 2 Quote Link to comment Share on other sites More sharing options...

Recommended Posts
Join the conversation
You can post now and register later. If you have an account, sign in now to post with your account.