Kelp
-
Posts
106 -
Joined
-
Last visited
Content Type
Profiles
Forums
Gallery
Events
Everything posted by Kelp
-
Marek, A fantastic looking build. You are a true master of the ship modeling craft. Don
-
Nice work on the planking!
-
USS Constitution by mtbediz - 1:76
Kelp replied to mtbediz's topic in - Build logs for subjects built 1751 - 1800
Very nice! -
David, I agree with David G. The 1/350 Minicraft Titanic is in the size range you are looking for and is a good quality kit. You have a couple of options with this kit; the base kit, the Deluxe version, which includes photo etched railings, or, if you want more detail besides the railings, go with the Tom’s Modelworks Titanic photoetch set. Don
-
Are you thinking of building a wood or a plastic kit?
-
I have heard of rubbing alcohol also being used to clean the plastic parts. Any comments on the use of alcohol vs. dish soap?
-
Evan, What a fantastic idea to show some of the framing! Your model is the only one I have seen which has included framing. Very creative, and it looks terrific! Roger, Thanks for pointing out to me the plating detail which shows the packing pieces. This clarified my question on how this was built. Don (kelp)
-
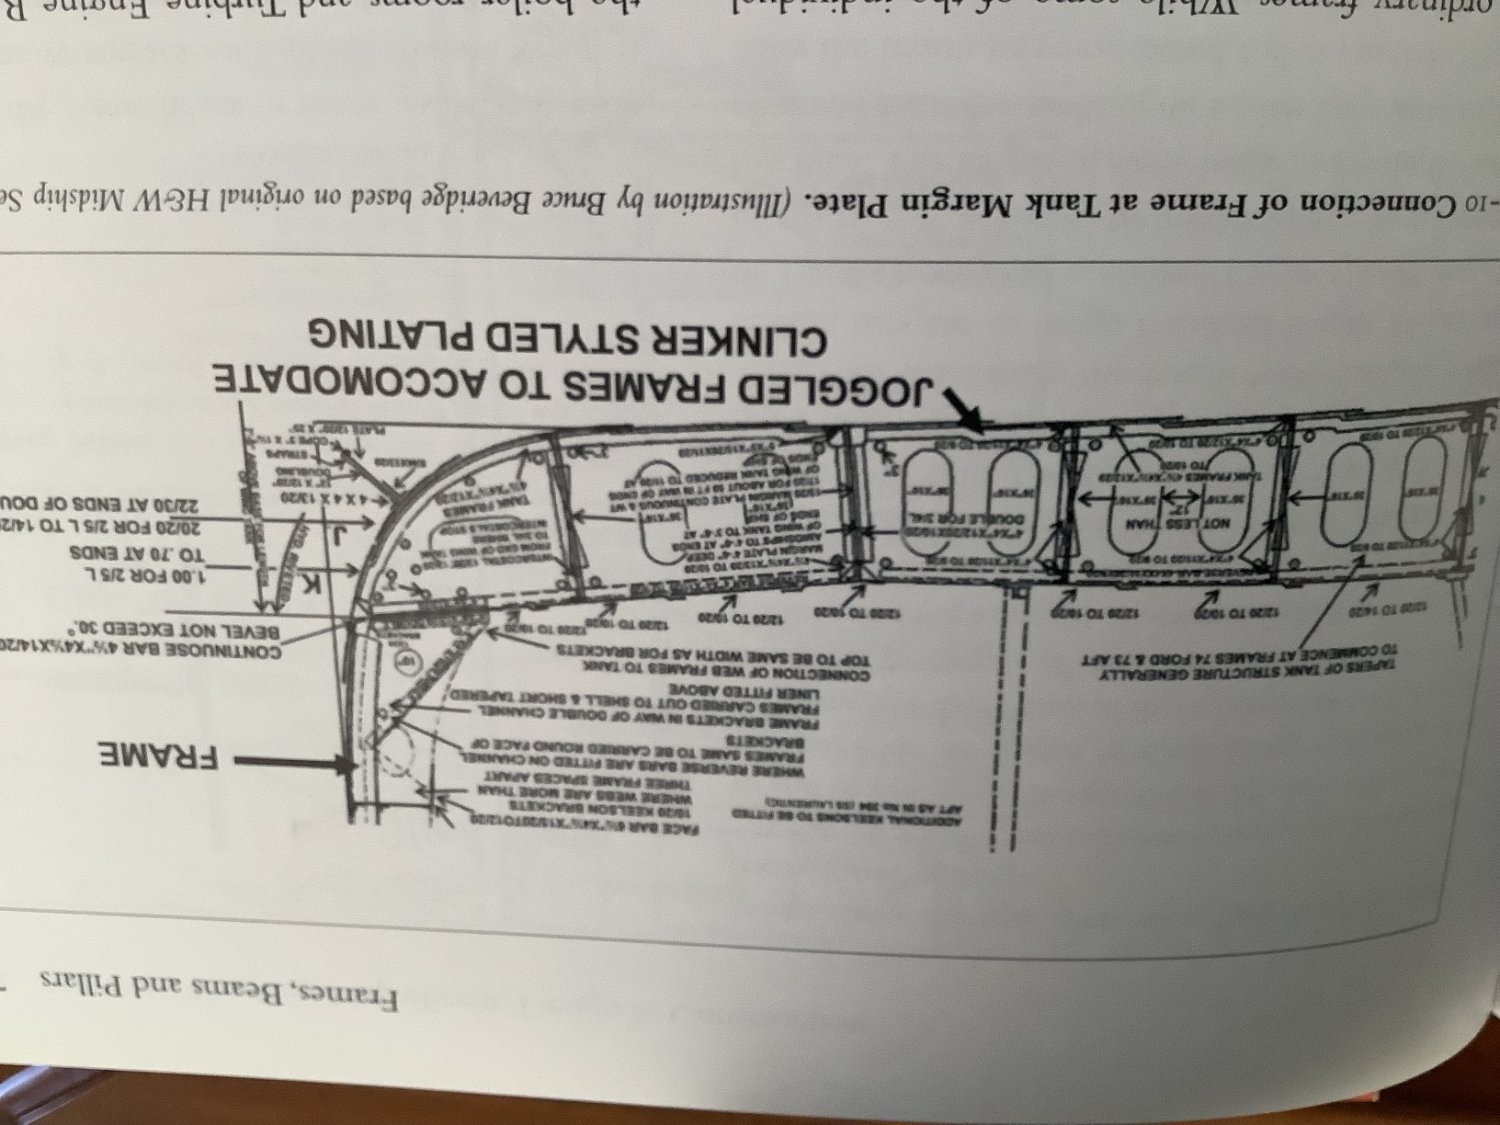
Quoting Titanic the Ship Magnificent, “ As stated previously, the bottom frames were joggled in clinker fashion. This was done to eliminate the use of the tapered packing pieces ordinarily associated with this type of plating”. I would now like to find a photo of a hull bottom with “packing pieces” so we can compare the two methods.
-
Evan, I found this drawing of the lower hull plating in the Titanic the Ship Magnificent book, Figure 4-10. Don

-
New and looking for good beginner ocean liner kits
Kelp replied to TheOnlyWayToTravel1900's topic in New member Introductions
There is a 1:570 Revell Titanic kit that is still fairly easy to find. There is also a 1:1200 scale Revell Queen Mary 2 and also a 1:570 scale kit of the Queen Mary (the older 3 funnel Queen Mary). -
Hi Evan, Thanks for taking time to show me how the fiber optic cable would look in the porthole. I am leaning towards this method. The Midwest Model Shop’s fiber optic portholes looked nice when he turned on the LEDs. Don
-
Evan, The hawse hole project is coming along nicely! I’m planning ahead for the porthole windows and will go with either the fiber optics as you have mentioned and as the Midwest Model Shop used. My other option would be to place acetate to the inside of the hull across the porthole locations. A possible problem with this method is the thickness of the hull plastic. The acetate maybe too far behind the surface of the hull to look realistic. I can’t say for sure, since I haven’t drilled out the portholes yet. Can you post a photo showing a sample of what the fiber optic porthole looks like? Nice progress on your model! Don
-
Titanic's Waterline
Kelp replied to Kelp's topic in Building, Framing, Planking and plating a ships hull and deck
Hello Wefalck, I have just looked at a model of the Titanic, and yes, what you have said is very true in Titanic’s case. The waterline on the model appears to sag on each end. Having the slight curvature would eliminate this illusion. I had always thought waterlines were perfectly horizontal, and am now seeing situations were that isn’t necessarily the case, where cargo loading and simple aesthetics come into play to want to give the waterline a curve. Thanks for your reply. Don -
Titanic's Waterline
Kelp replied to Kelp's topic in Building, Framing, Planking and plating a ships hull and deck
Roger, Thanks for your response regarding the waterline. As you mention, maybe it had to do with the cargo and loading. I’ll check into this topic a little more. Thank you, Don -
Titanic's Waterline
Kelp replied to Kelp's topic in Building, Framing, Planking and plating a ships hull and deck
Hi Henry, The article was describing the waterline, where the oxide red and black colors would have met. As Roger says in his message, it may have had to do with the loading of the cargo. I’ll do a little more research and let you know what I find out. Thanks for your reply. Don -
I have just read an article about how Titanic's waterline curved upward at a gradual slope towards the bow and stern. I've always thought waterlines were flat, so what would be the reason for having a slope in the waterline? Thanks, Don
-
Evan, You have done a fantastic job on the rudder. The scratch build was well worth doing. Thanks for sharing your construction process. Don
-
Hi Tom, What is your opinion regarding the KA upgrade set? I see it costs about the same as the model and was wondering if it is worth getting. Are the photo etch sheets an improvement over the kit photo-etch sheets? I see having the wood deck and brass masts are a definite improvement. How about the resin parts, do you need to look closely to see the improvements over the kit plastic parts, or are the improvements obvious? Thanks, Don
-
Evan, You are creating an excellent build log! The diagrams are really helpful towards explaining the work you are doing. All the Best with building this model. I’m looking forward to continuing to see your progress. Don
-
Hi Evan, I am really looking forward to having a front seat to watch your progress through this beautiful model. Yes, it’s a tragedy ship, but with the KA set, you will have the opportunity to put your modeling skills to this test to tackle a challenging model, which will give awesome looking results when completed. I’m sure your daughter will treasure this model. What a great gift! All the best with your progress! Don
-
Hi Jake, Did your Victory kit have laser cut bulkheads or did you have to cut them out with a saw? I have the old pre- laser cut version and since you mentioned your kit is about 30 years old, I’m trying to guess how old my kit is. Thanks, Don
-
Hi Spyglass, This is an old Sergal HMS Victory kit. Back from the days before laser cutting. I still have to cut more bulkheads on the scroll saw this weekend, but can then do a dry fit. I think the lower decks may help the correct the warping. If not, I’ll trace this bulkhead and cut another one. Thanks, Don