Search the Community
Showing results for tags 'revell'.
-
 Question, In the instructions it shows gluing the ship to the stand early in the build. I worry that might restrict flexibility in painting. Can/should I wait until closer to installing masts etc? David
- 62 replies
-
- 2
-

-
- Cutty Sark
- plastic
- (and 3 more)
-
 C.S.S Alabama, Revell 1:96 85-5621, is my next model now. I found it on Ebay. Two Men O' War were going to be my ladder to experience. After thinking it over, my time would be better served with a greater challenge. I can give the two other model kits away to a kid who wants to get started in ship model building. I bought these two books to get started with: CMS Alabama: Builder, Captain, and Plans by Charles Grayson Wolf of the Deep: Raphael Semmes and the Notorious Confederate Raider CSS Alabama by Stephen Fox What is the difference between CSS and CMS? So, the plan is to build three 1/96 scale plastic models after finishing Charles W. Morgan whaler. CSS Alabama, USS Constitution and then Cutty Sark before my first wooden kit.
 -
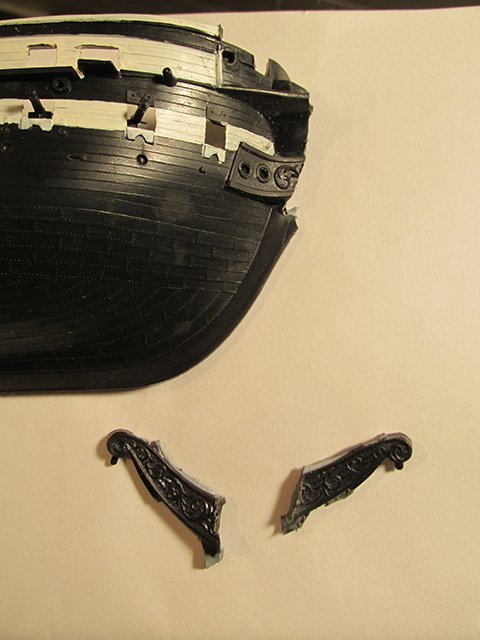
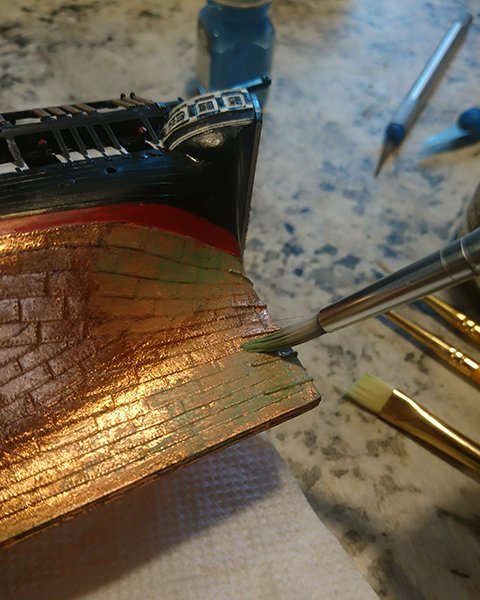
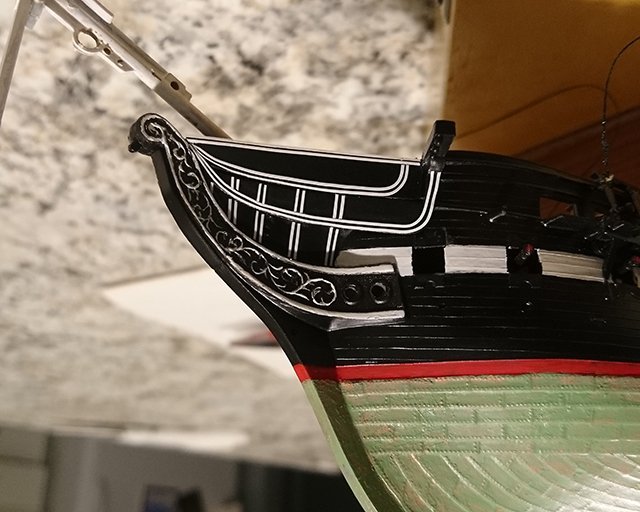
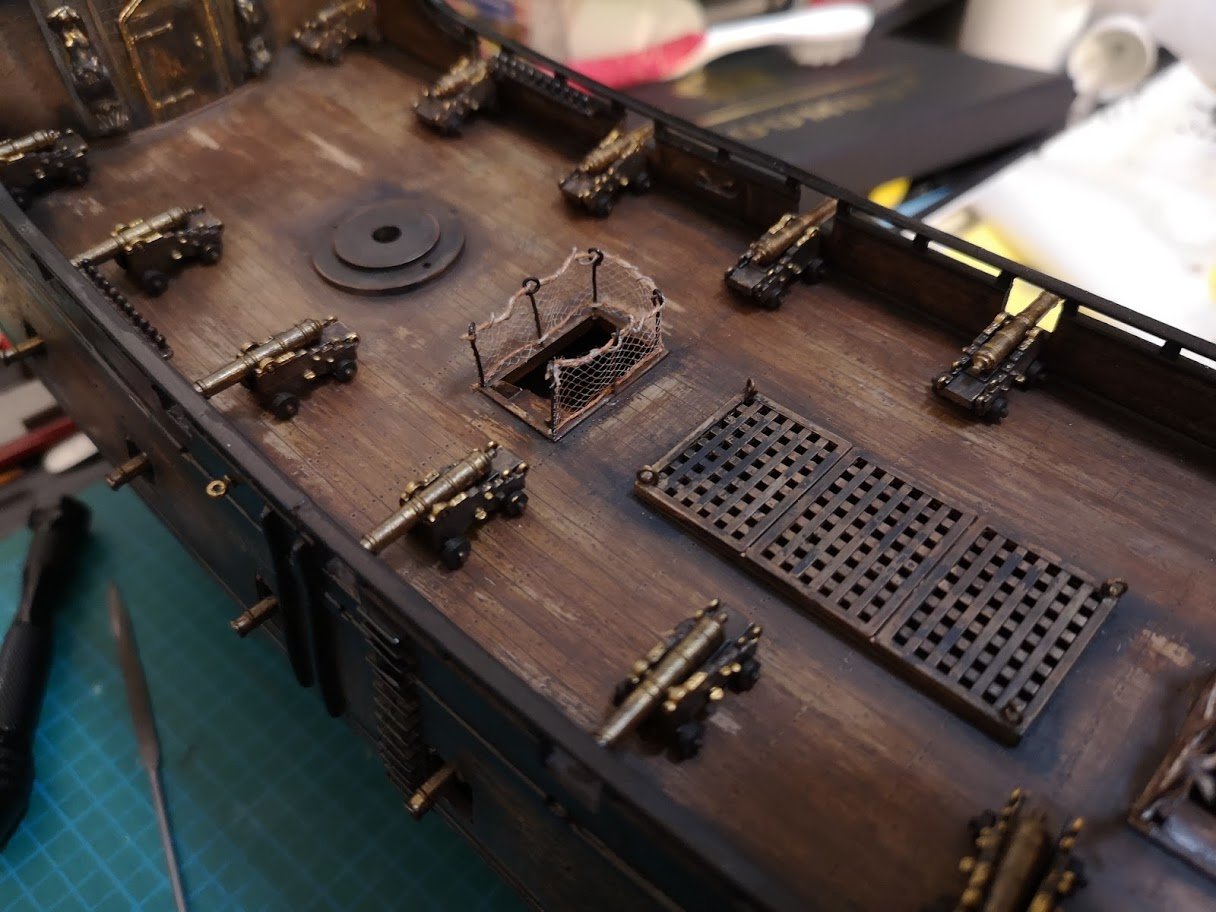
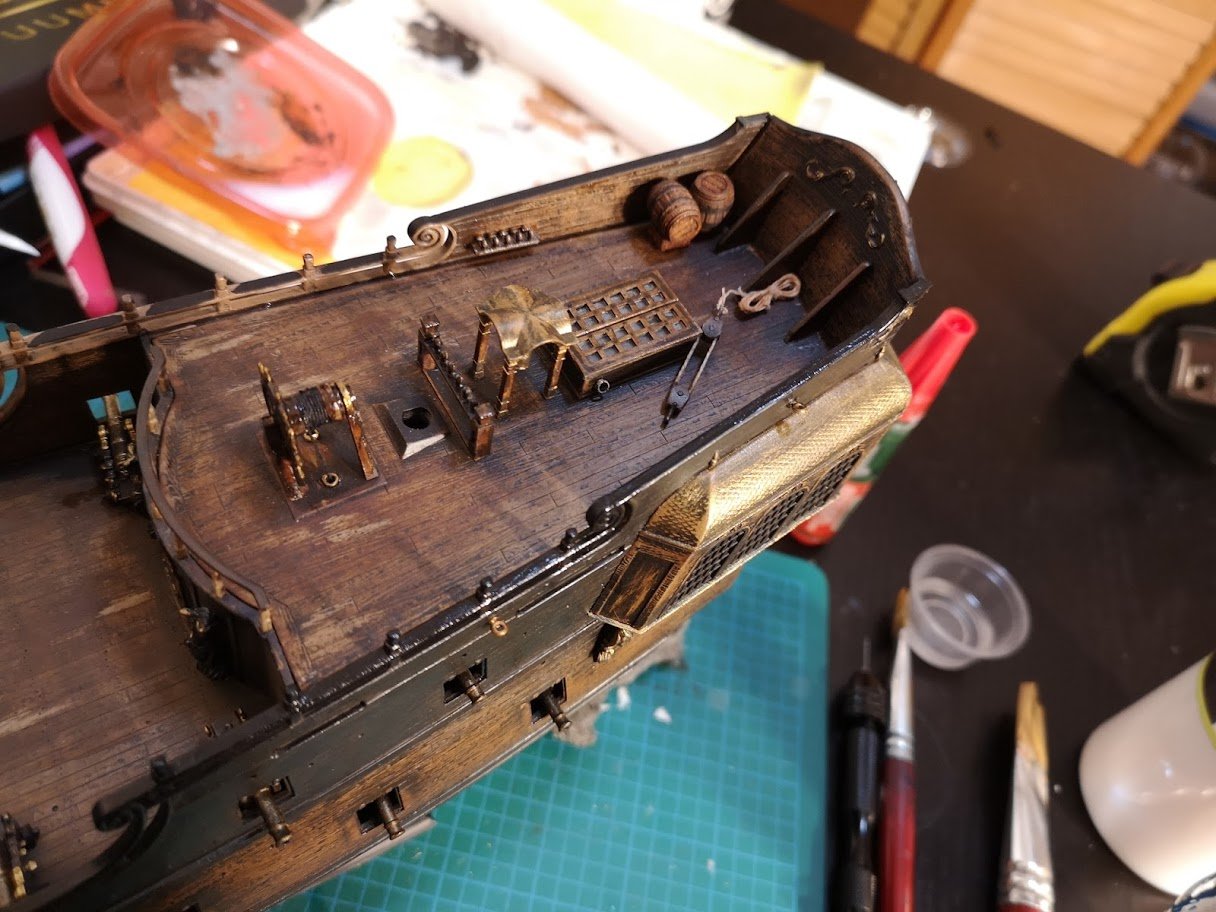
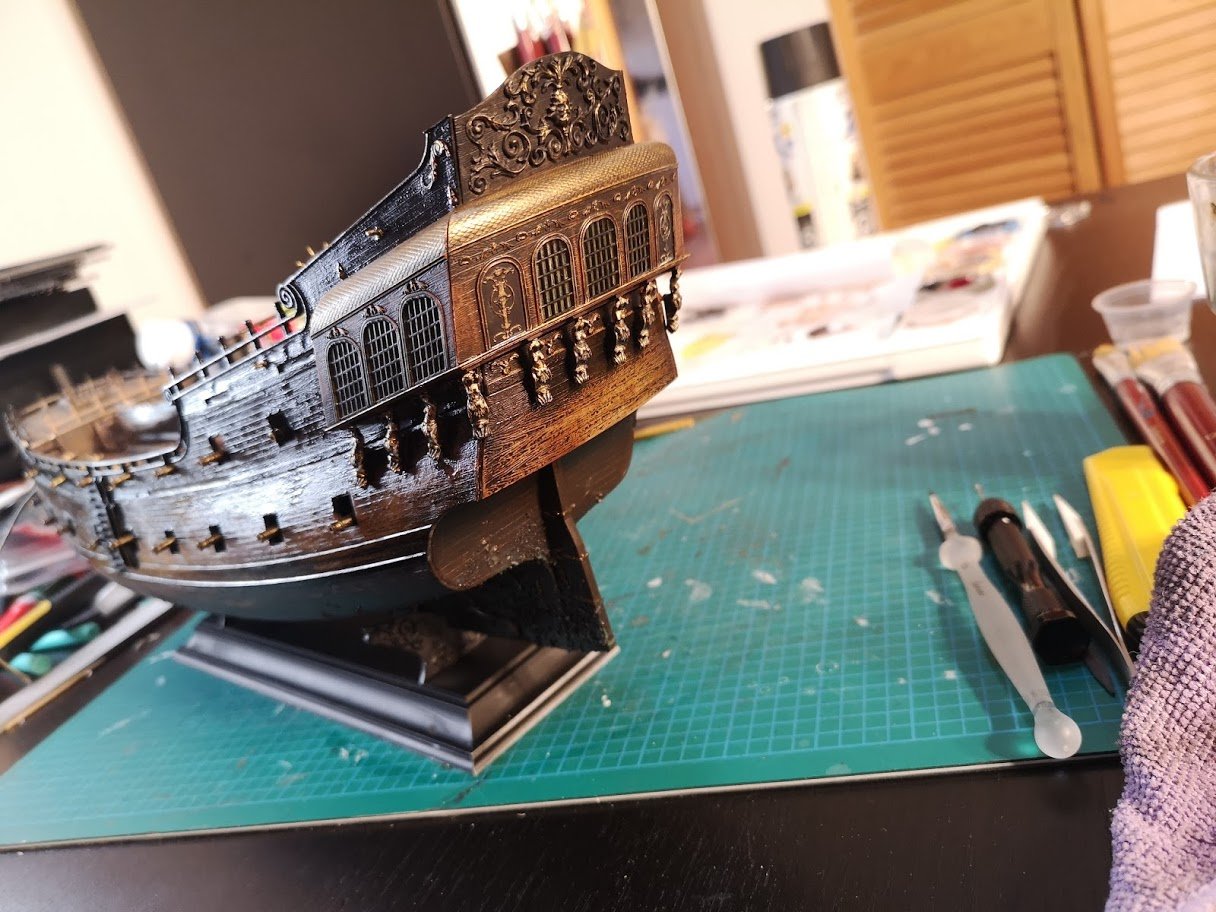
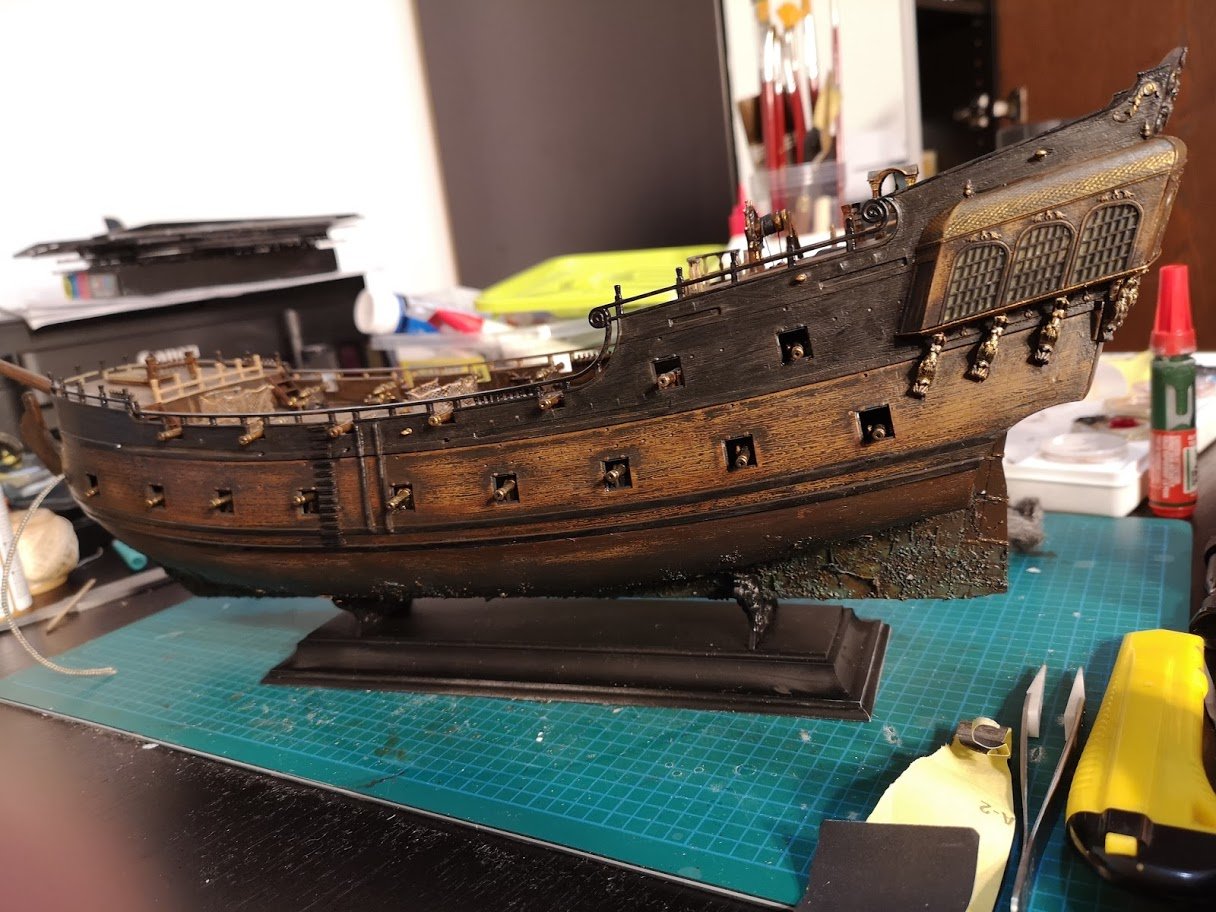
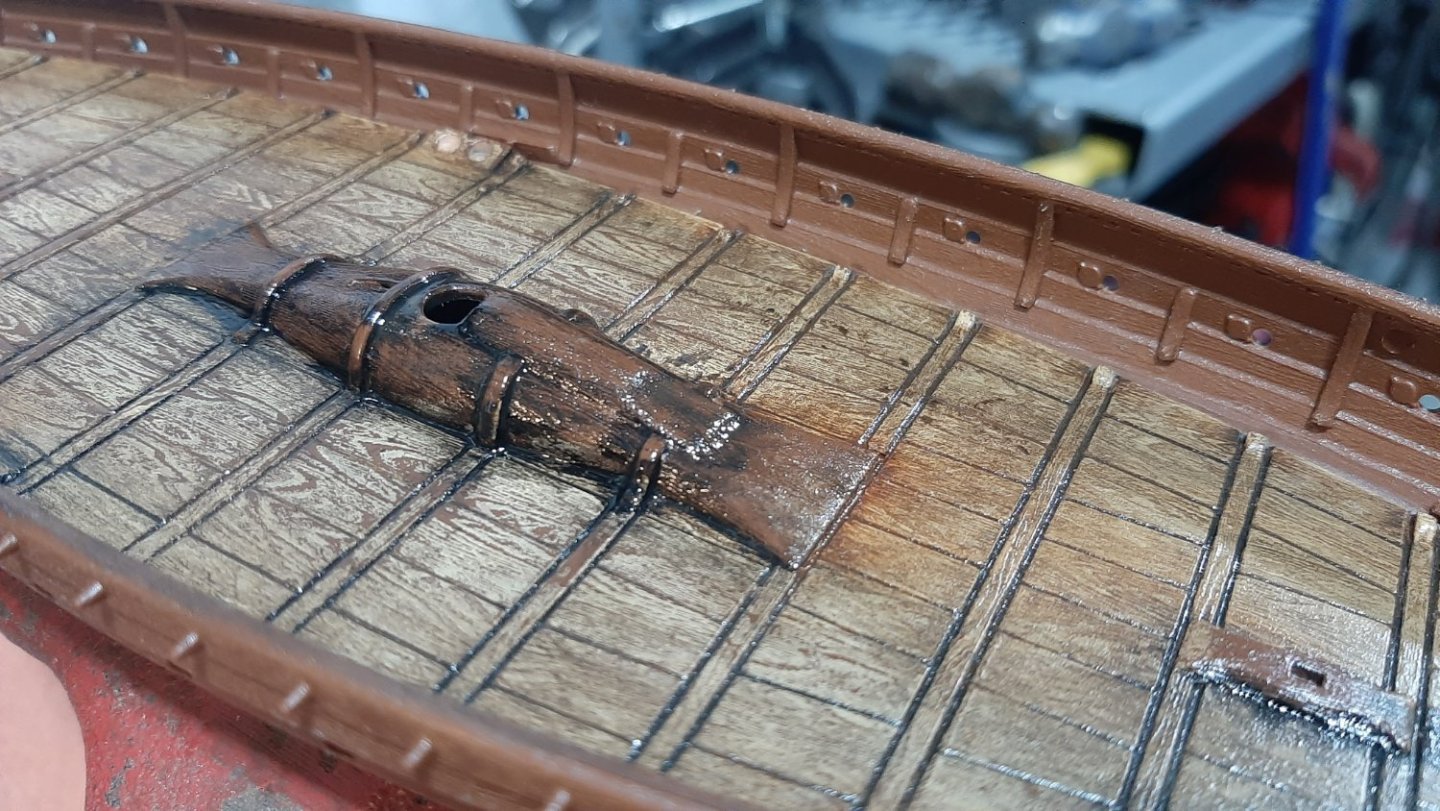
 Hello everyone. This is my first model ship and my first build log here. English is not my native language, so sorry for any mistakes. I started more than one year ago but I’ll start the log from the beginning, hoping to help other members not to do the same mistake I did. As suggested by the instructions, I started from the hull: The base coat was made by airbrush, acrylic colors (gunze and tamiya), followed by oil filters, dry pastels and oil dry brush in order to simulate the wood planking and to highlight some details. Tyre black was used for the hull, highlighted with gray. A mix of copper and gold, washed with green/blue oil were used for the Munz metal planking. Buff, desert yellow and similar tones were used the base for the wood. Burnt umber filters helped to break the uniformity and bring the wood a better look (at least I hope…) and the details were highlighted by pastels and oils (remember that the detail are raised and not recessed in this old kit). That's it for now. Hope you like it and don't be afraid to criticize!

- 397 replies
-
- 12
-
-
- cutty sark
- revell
- (and 2 more)
-
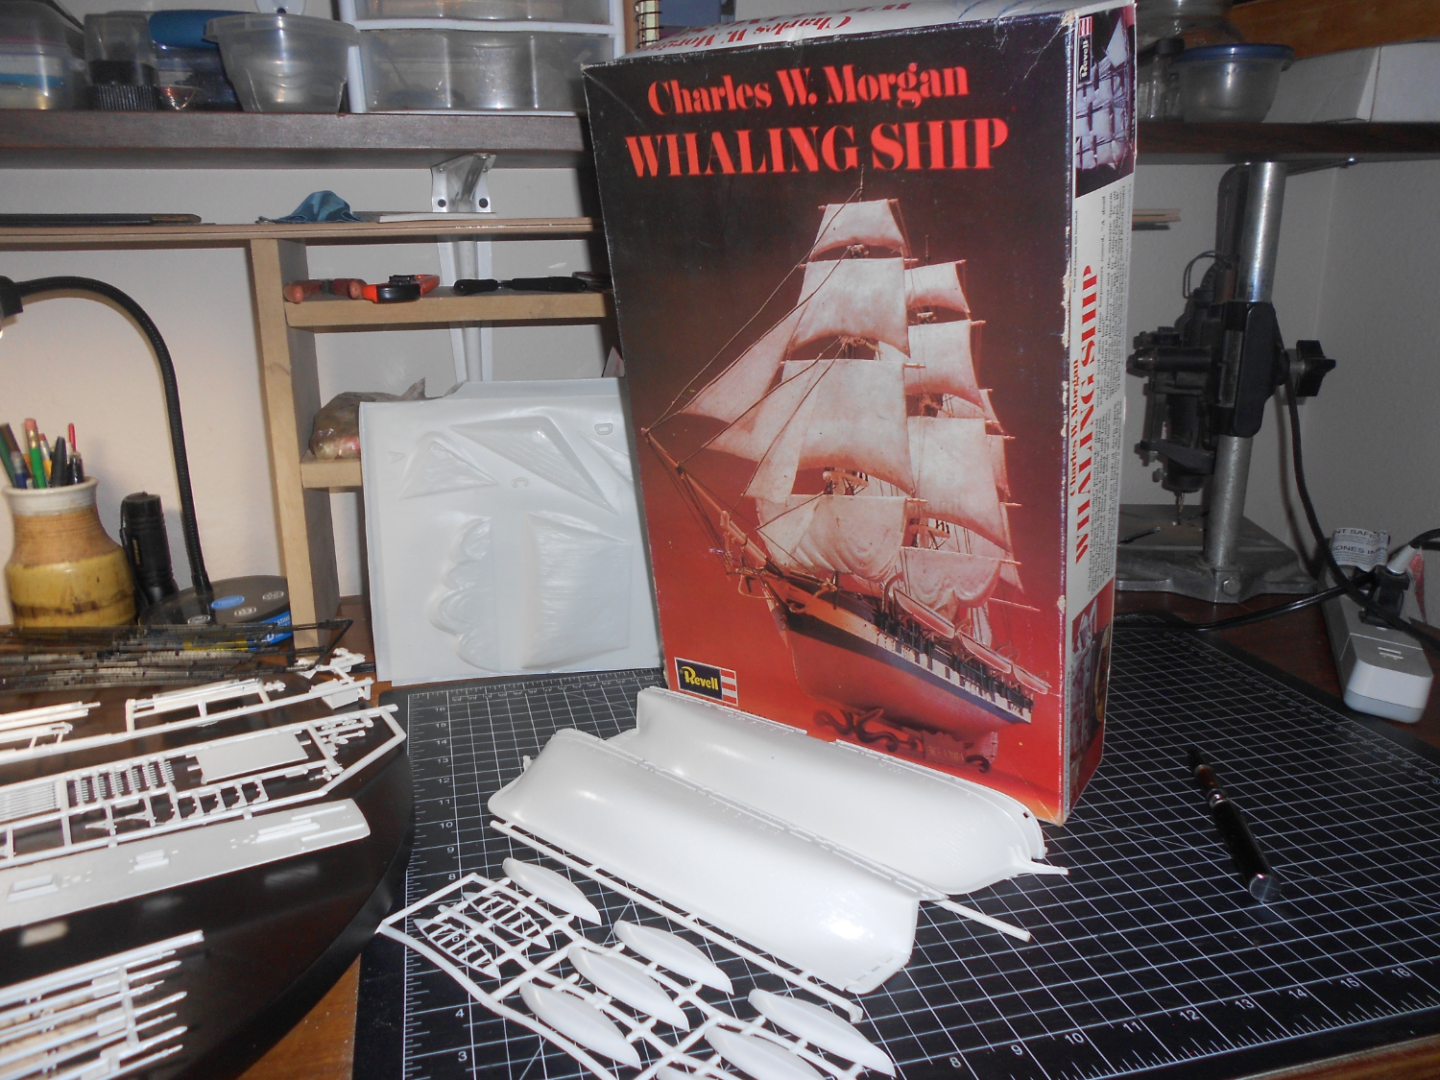
The plastic kit is H-330 1972 New box, bought off of Ebay. I washed it with Dawn dish soap and rinsed it in warm water. Debating on whether to glue the some part together before spraying Surface Primer L Gray, or, spray on the spruce first.

- 8 replies
-
- 4
-
-
- Charles W Morgan
- Revell
- (and 1 more)
-
 Hello, everyone! I've been quietly reading these forums for some time and finally decided to chime in with my own build. Others' build logs have been a huge source of information and encouragement for me during the build process, so I hope this log can be of some benefit to others. I worked on this kit for a week or so about nine years ago, and only picked it up again this year. It's my first model kit I've built as an adult and first ship of any kind (Although as a teenager, I painted the hull of the larger 1:96 kit from Revell, then immediately gave up). I also started with zero knowledge of ships, so this whole thing is a learning experience. Much of the work I've done recently has aimed to undo or improve mistakes I made when I first started. One of my biggest mistakes was choosing to modify anything at all, as this slowed the process and made me feel daunted at various points. As a beginner, I regret spending so much time tweaking this kit instead of progressing through multiple kits over the years. Still, I'll mostly focus on modifications here because that's what I've most closely documented. These first photos are from 2015, so some of this is more retrospective. My earliest record is of hastily assembling the hull and deck and painting various details. I tried replicating the paint of the real ship, which lead me to notice differences in the bow and other details. I couldn't figure out why the model had a figurehead, which lead me to research that interesting history. At this point, I should mention that I had two of these kits to work with. Both were purchased at Goodwill totaling less than $5, so I recklessly decided to sacrifice one in an effort to make the bow section more closely resemble the real ship in its current state. Even though I had already installed the boomkins and metallic anchor thread, I ripped everything apart and temporarily ruined both kits. I cut off part of the stem from the donor ship far enough down so that it would extend to roughly the correct height when reshaped and attached to the working model. A bit of jump, but here's the result. I tried filling the gaps with Tamiya putty but you can still see the seam where the two pieces meet and the decorative relief doesn't match up. The other white details were made using thin strips of masking tape for curves and covered with acrylic sealant. The whole endeavor still misses the mark for accuracy, but it makes the bow more recognizable in profile, which I count as a success. At some point, I also lined the hull with real copper leaf but didn't like the look of it and painted over it with green. I think this was because most of my reference photos showed the ship in dry dock.
- 2 replies
-
- 1
-
-
- revell
- constitution
- (and 1 more)
-
 1. Constitution - Superfrigate of the many Faces - A tribute to the Basses Years ago I got this nice book by William Bass and his wife in which they describe their findings and their reconstruction of US Frigate Constitutions "Second Phase" as they called it. The years after launch and Quasi War with France - and before the War 1812 - the times of Preble and the Barbary War. Since I saw this beautiful book which was published privatly and therefor did not get the audience it deserves, I did fall in love with this beautiful ship! The Basses based their reconstruction mainly on Felice Corné´s paintings done in 1803 (Side view) 1805 (?) and 1807 (Battle of Tripolis). This one for shure you all know very well. Its - as far as we know by today - the very first visual description of Old Ironsides - done by Felice Corné in Summer 1803 most likely. The Basses did brief investigations even on which viewing angle the artist must have had for his sketches and they could prove that Corné did do really intensive studies of his object. But isn´t the ship a beauty here? Ochre gun strike, no bulkward on foredeck, single dolphin striker, open galion and - that impressive Hercules. Nevertheless, as we will see later: this interpretation causes headaches (at least in my little brain). Here now one of the Tripolis Paintings: Source: https://www.mainememory.net/artifact/6155 You can increase the image if you click on the picture on the Maine Historical Societies Homepage (link). Look at that beautiful lines, the two yellow stripes above the gun deck - and note the position of the channels on the lower of those lines: and here the beautiful Stern of the ship in its early phase: She was a beauty in ochre and black, some white, yellow and maybe a bit gold? .. and a thrilling sight with all that guns! In my eyes the ships earlier appearance is of much more grace and elegance than in her later designs. Fortunatly the real ship is getting closer and closer to that design again with the restorations since Tyrone Martin started that process. But maybe the most beautiful sight she must have been as she was planned: with complete open bulkwards - just as Humphrey intented her to be: Nevertheless: my plan is to rework and pimp the beautiful Revell kit which is ment to show her 1812-15 configuration - but which has some "errors" in it and which does not totally fit to her 1803 appearance. And this 1803-4 appearance - before leaving to the Mediterean Sea - that is my goal. I imagine by now a situation in which the ship is about to be fitted out for sea - maybe some weeks before the above shown departure of the ship takes place. Still with only long guns on the quarder deck... This build will be the very first for me since about 35 years. I was doing a Cutty Sark 1/144 (without proper rigging and bad painting) and a very nice Spanish Men of War in 1/72 - this time with Revell instructed but fully rigging (boy was I proud !) .. So I need to re-learn during the build all the needed techniques. Oh, I was mistaken: I started some years ago the build of the Revell Charles W. Morgan - but the "rush hour of life" did stop that efforts. Now, in times of Corona and possible loss of job I believe I need a time out for some hours a week from crazy daily hectic .. and "if not now, then when?" shall I start with this beauty. I hope you join me in my efforts and I am open for any advice and hint. Thanks for watching me.
- 6 replies
-
- 5
-
-
- constitution
- revell
- (and 1 more)
-
 Part 2: Digging In This is a photo of my completed Golden Hinde. You should remember this if you've been a long-time viewer of my build logs. As I was building this model, I ended up noticing multiple historical inaccuracies. For one thing, the Golden Hinde might not have even looked like this. In Wikipedia's records, it was armed with 22 guns of different types. This ship is armed with 12 guns. In fact, the Golden Hinde was probably not even a race-built ship as is depicted here. For a 1965 kit, it holds up to scrutiny however. That being said, calling it the Golden Hinde might be a fallacy. There is also the issue of the belaying pins. Baker told me as I was well underway with the running rigging that English ships didn't start incorporating belaying pins until over a century after the Golden Hinde sailed. Plus, let's face it- with the skill and knowledge I have today, I could do a lot better on this kit. For one thing, the entirety of the shroud assemblies could be scratch-built. Secondly, the majority of the rigging and sails do not hold up to my current skillset, and the anchors and flags are the same way. I would like to significantly improve the paintwork as well. While the paint job is relatively good looking even now, I have better paints and brushes than I had then. I also have better tools and fittings. That leads me to my plan, and this build log. I will not touch the original Golden Hinde. However, I will order the Heller version of this kit and do that. I am planning on doing all my normal work on the ship, while paying special attention to the paint, sails, and rigging. I plan on making silkspan sails, putting decals on the sails, staining the rigging (something Kirill told me I should do) as well as making general improvements. This is still just a plan, and I haven't even ordered the kit yet. However, it would be nice to have some company while I work on what is hopefully going to be my best model yet. I plan on portraying this ship as a small galleon of the English fleet that went up against the Spanish Armada in 1588, and yes it is named after someone I know, but for official records, the name Queen Elizabeth comes from the English tradition of naming ships after the reigning monarch at the time. There were two ships in the Elizabethan Navy bearing her name (The Elizabeth Jonas and the Elizabeth Bonaventure) so this name is historically plausible. For now, this is a research log.
-
 Good day all, I thought I would start this log in preperation for finishing my HMS Warspite build, I have wanted to build a version of the Black Pearl for a while now, but there is no Honest company making a wood kit and only the one decent scale plastic kit, so I came up with the crazy idea of mashing my Peregrine kit into the Pearl. Most inportant Im building this for the wife as a Special request. This will take some doing as the keel pieces and ribs in the peregrine kit will all need modifying with extra pieces adding to them (I am under no illusion this will be a real trial of building skills and my first attempt at a real scratch built ship. I will have to firstly lengthen the keel section/s as the Pearl was about 30 feet longer than the Pergrine - so some additions to be added. So pull up a chair in readyness for this madness - it wont be dull. OC.
 -
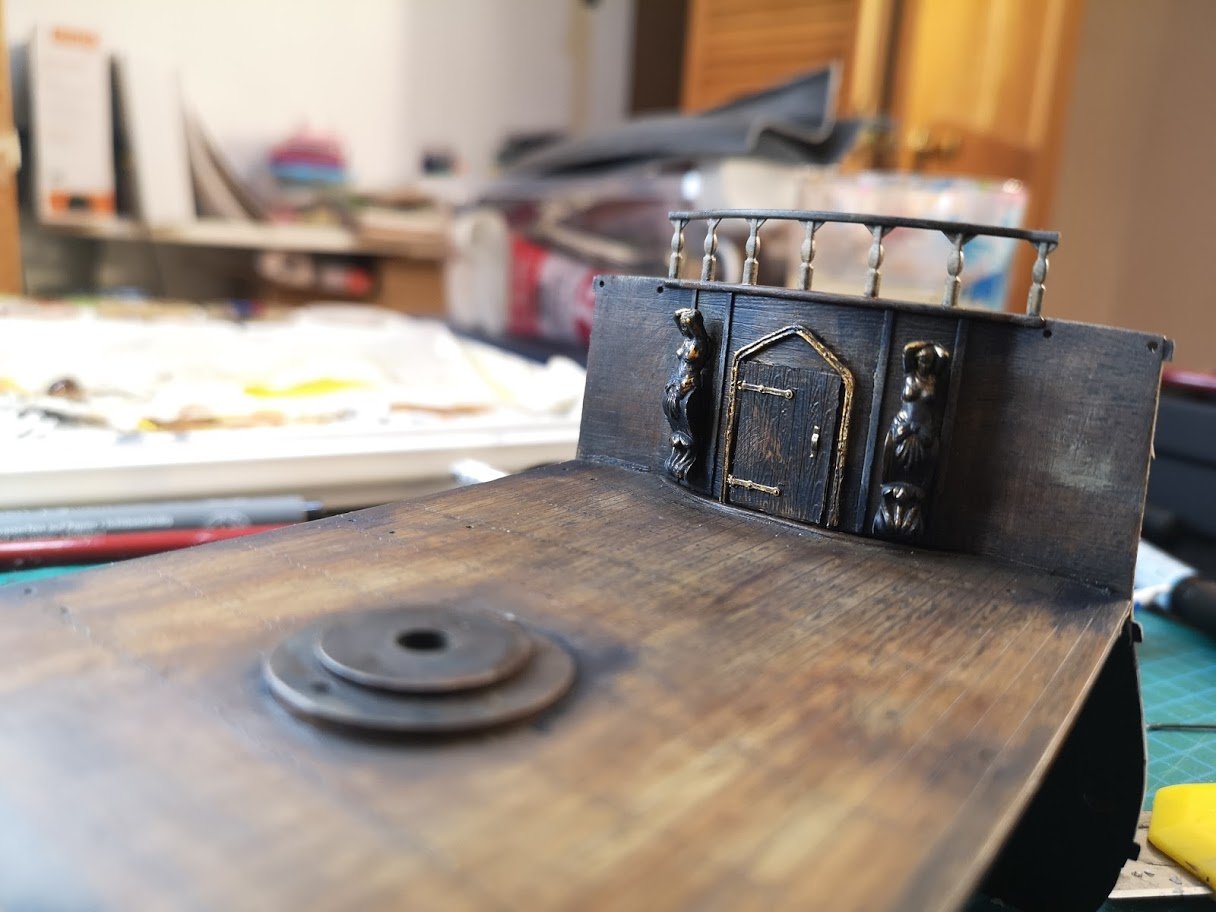
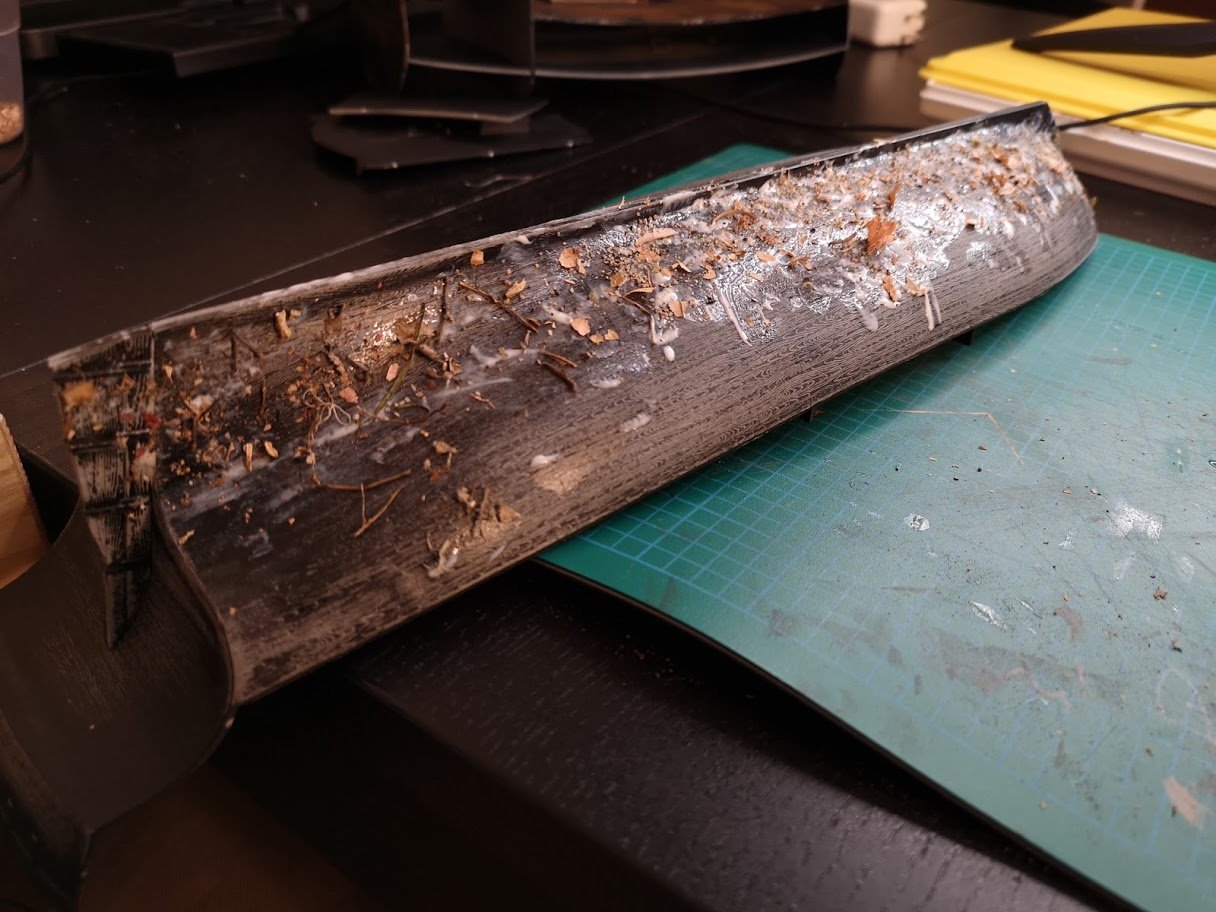
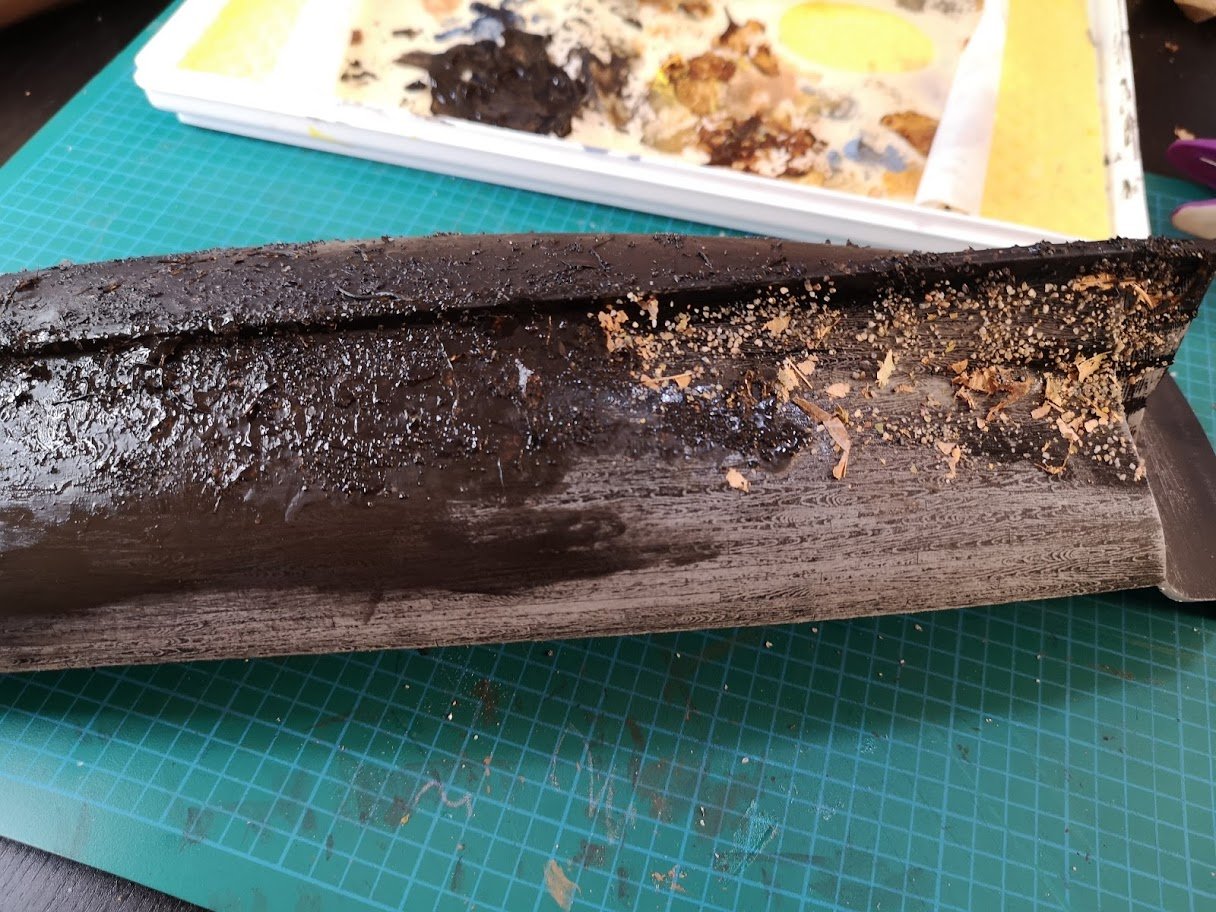
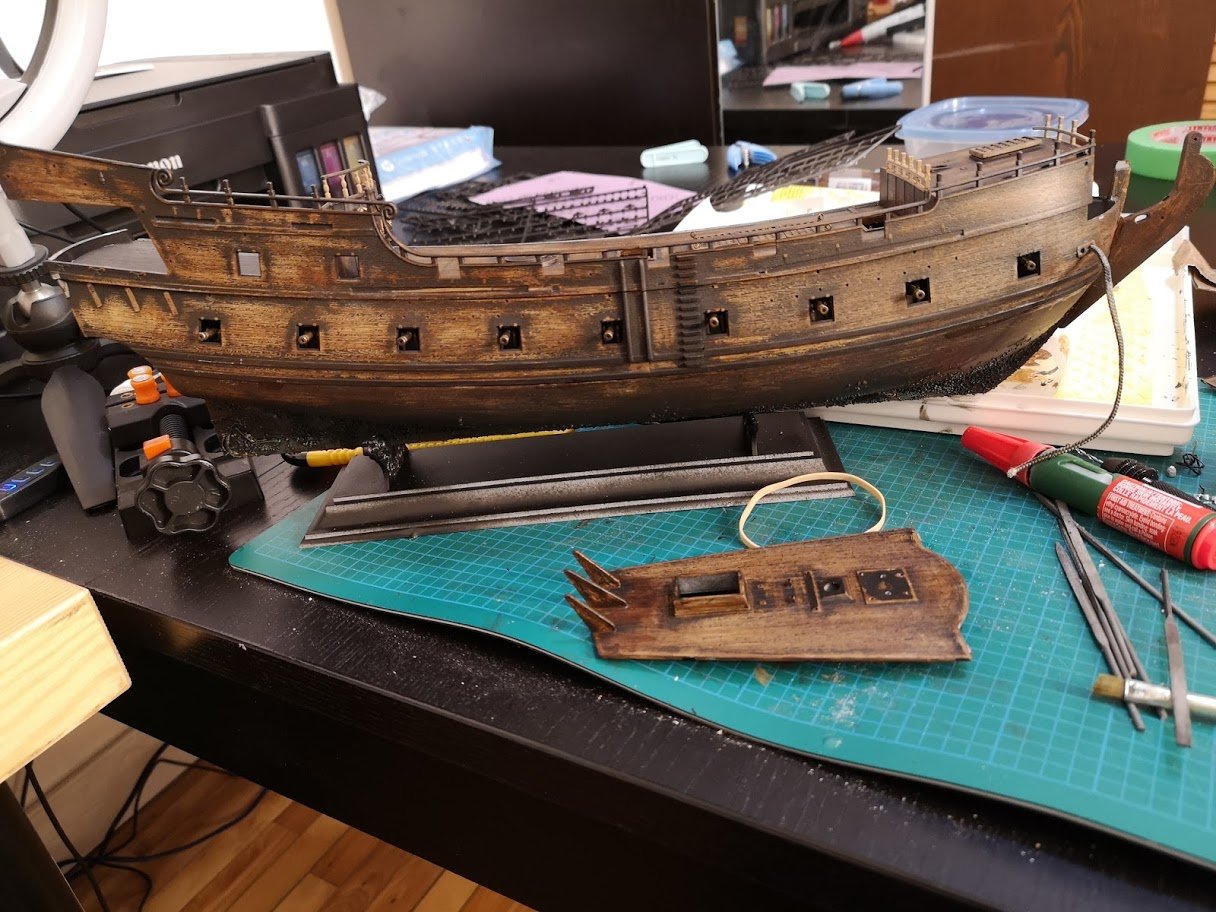
 Hi everyone , new newbie here As i mentioned in my introduction , i am pretty new to the hobby , the only model i did was an AT-ST from starwars a year ago . I really fell in love with tallship during the confinement and wanted to give it a try . Most videos , and ressources i checked were about wooden ship , and , i know myself , i would give up at planking , also i don't have the proper space and tool for that . So i decided to start slow and take a plastic model . So far so good , i am liking it , and who know one day i may find the courage to get into wooden build So i am a bit advanced in the project , that is when i realize i may need advice and help in the futur . Anyway , here is a retrospective on my build so far ( sorry for the lack of ship vocabulary , i am learning little by little) 1: my first thing was to take the statues from the base and stick those on the side of the captain door , to get a bit closer to the original look ( and also because the vanilla model was boring) also doing a frame to the door with some metal wire 2: was to get some algua/seashells on the hull , i know most ship builder like clean versions , but i do enjoy when it feels it has been used , i don't know it's like there is story telling in the model 3: almost died of boredom with those canons , god that is boring T_T , but the result is satisfying Also i didn't wanted to go full black , i like to play with texture and paint , color variations etc , so i went with wood texture . I had to sand the hull and deck as the texture overall was too strong for my liking. 4: Sanding the ..erhh wheel axis {?} to replace the plastic rope by a real one , also piercing some holes to let the rope goes down . Adding some small metal rings here and there to get a more "detailed" feel 5: Replacing the plastic folded sail of the ..erh..small boat by a custom one . adding some ropes too. 6: trying to bring a contrast in the colors with a darker upper part . 7: i was like a kid here *_* start to looks like a ship indeed 7: i wanted to remove the handrails that goes down into the hull by something custom ( a bit proud of this) new vs original , not perfect but i did fixed it later ( also i added some metal hoops on the grid thingy where the lifeboat will be attached later) Final 8: added some 3d printed barrels ( that a kind friend printed for me ) 9: mounted the upper deck canons captain quarters And that is where i am at . I have been at it for 3 weeks i think , after work at night ( when kiddo i asleep) so i am pretty satisfied with the overall velocity . Do you guys happen to know the name of this rope thing on the bowsprit so i can look up how it's made/rigged, couldn't find any info on how it's called . Not sure if it's a 8 figure or else. That was a long post Thanks


- 27 replies
-
- 5
-
-
- Black Pearl
- Zvezda
- (and 2 more)
-
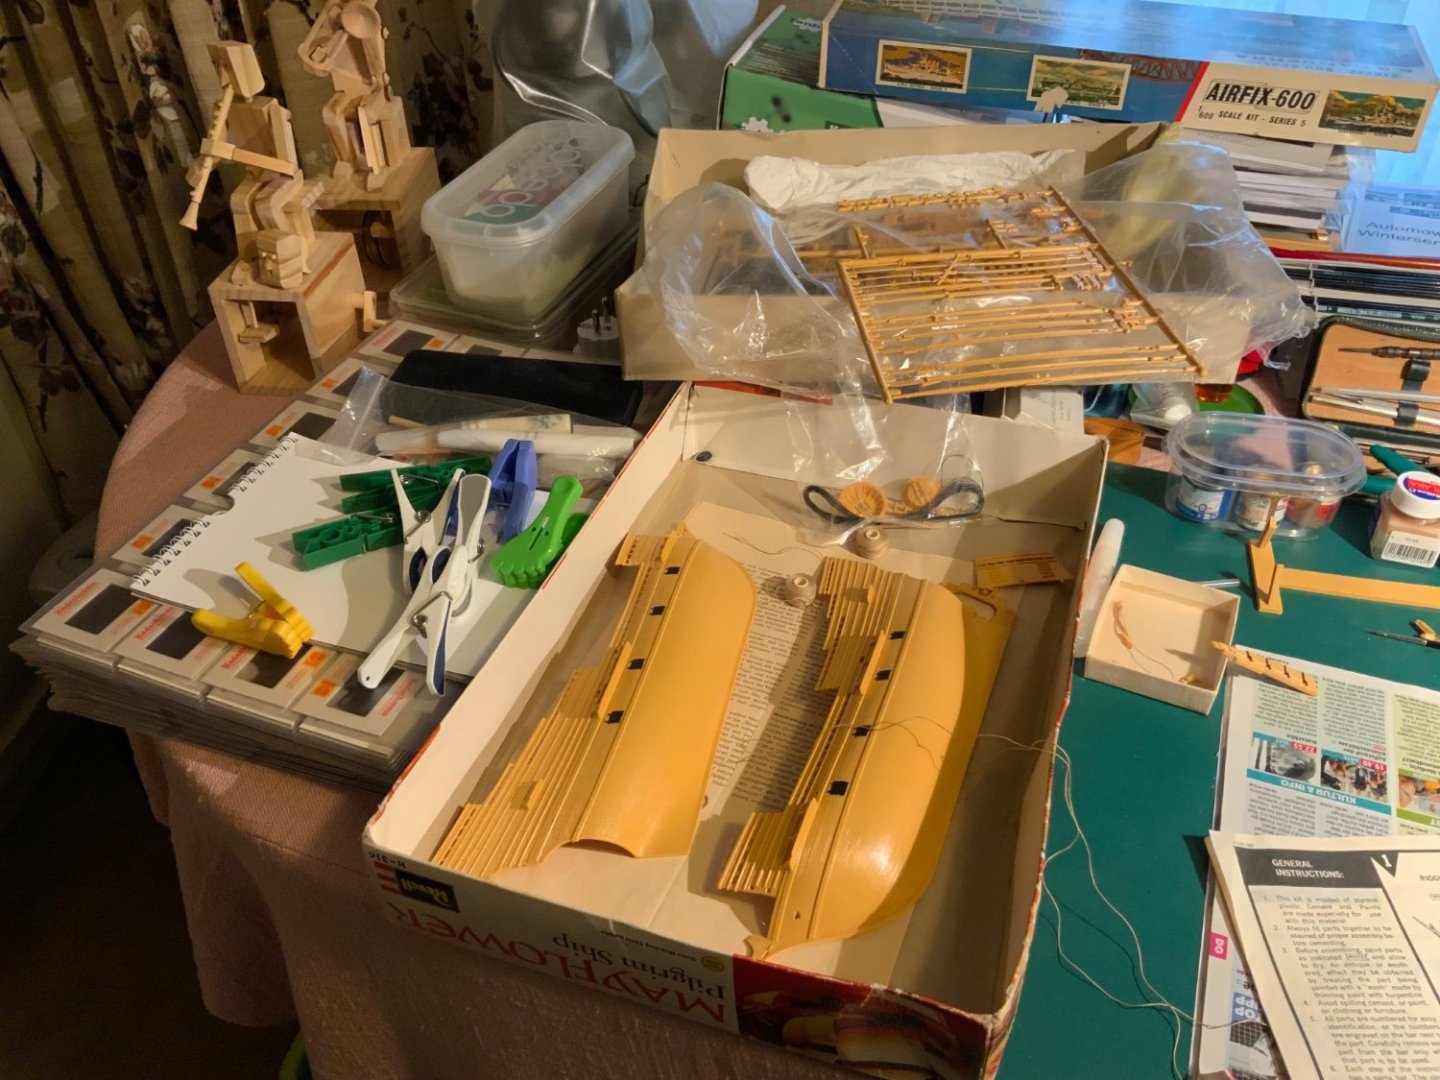
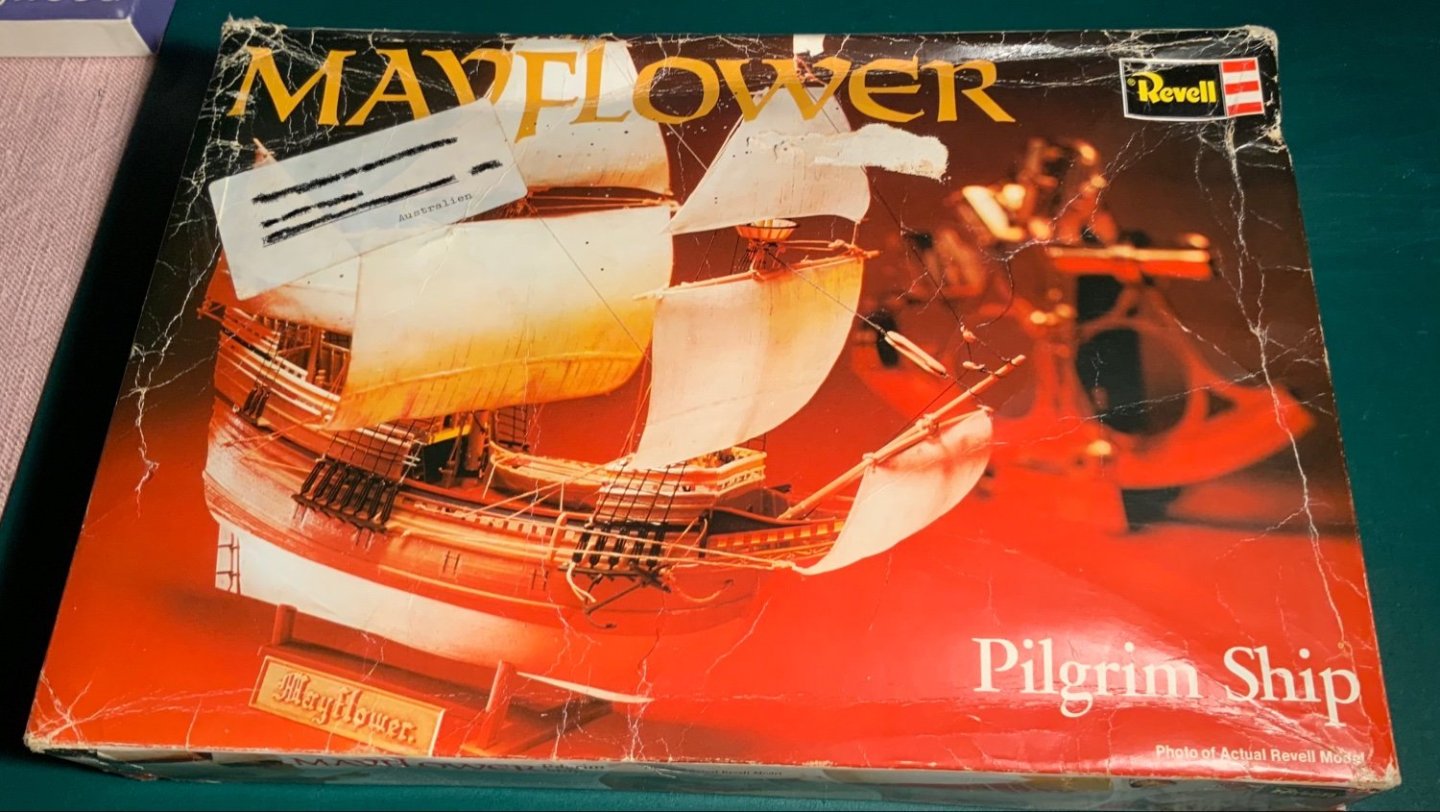
 I am 89 years old and have never built a boat before! I used to make plastic kit planes when I was a boy. In the very early 70s I was given a damaged Revell kit by mother in law who worked with an insurance company. The kit was returned as part of an insurance claim. The box was stored and resurrected this year. I took one look at it and put it away! It looked far too complicated and difficult to make! I was encouraged to try to make it as an occupational therapy project by my daughter! Only Revell pieces were used except for four hooks that I made from wire. The pictures and comments that follow document my build. I had some fine forceps and a few old dental instruments that I was given many years ago. Some pieces were damaged, the ‘sails’’ were broken and some pieces were missing.


-
 Starting my first ever ship build on the much maligned Revell 1/535 kit. Ever since visiting the Missouri 10 years ago, I wanted to have a physical memory of the visit. The lack of detail on the kit is well commented on, so I'm looking at using my visit memories and photos to bring this early plastic model up a little bit in terms of finish. Why the Revell kit? when it gets hammered on the forums? Well, the main reason if honest, is that it will fit with a current F1 LED lit display cabinet and I will be attempting to set it in an ocean diorama. So the 1/535 suits this purpose and I don't care that the underwater part of the hull is shaped like a bath tub. The Tamiya and Trumpeter kits of much higher detail but bigger scale would be too big to fit in the case... and finally, I feel like a challenge! which I may regret over time! To achieve this I'm trying the following: Getting PE at 1/500 from Toms model works Redoing all the "crucifix" 50 cals to PE Adding detail in the hull to reflect raised panel lines and rivets Real chain on anchors, not the gator teeth casting that's there at the mo, with rebored anchor Adding PE to superstructure and creating detail regarding portholes / deck items New radar and catapult PE items Added railing Reboring Smoke Stacks to have grill structures Reboring mooring chain cavity at the bow end Before starting properly, I'm wondering if anyone with ship building experience has any thoughts on whether this is a fool's errand or achievable? I've done a good bit of car and plane modelling but never ships. Also, the real parts that has me stumped are the double bofors guns. The moulds are off the chart bad , looking like legs sticking out of a box. Considering scratch building and then doing a cast resin to replicate.. don't want to blow the budget on 3d printing and there's nothing commercially available in that scale. So any pointers there would be appreciated. Anyway wish me luck and nice to join the community here.
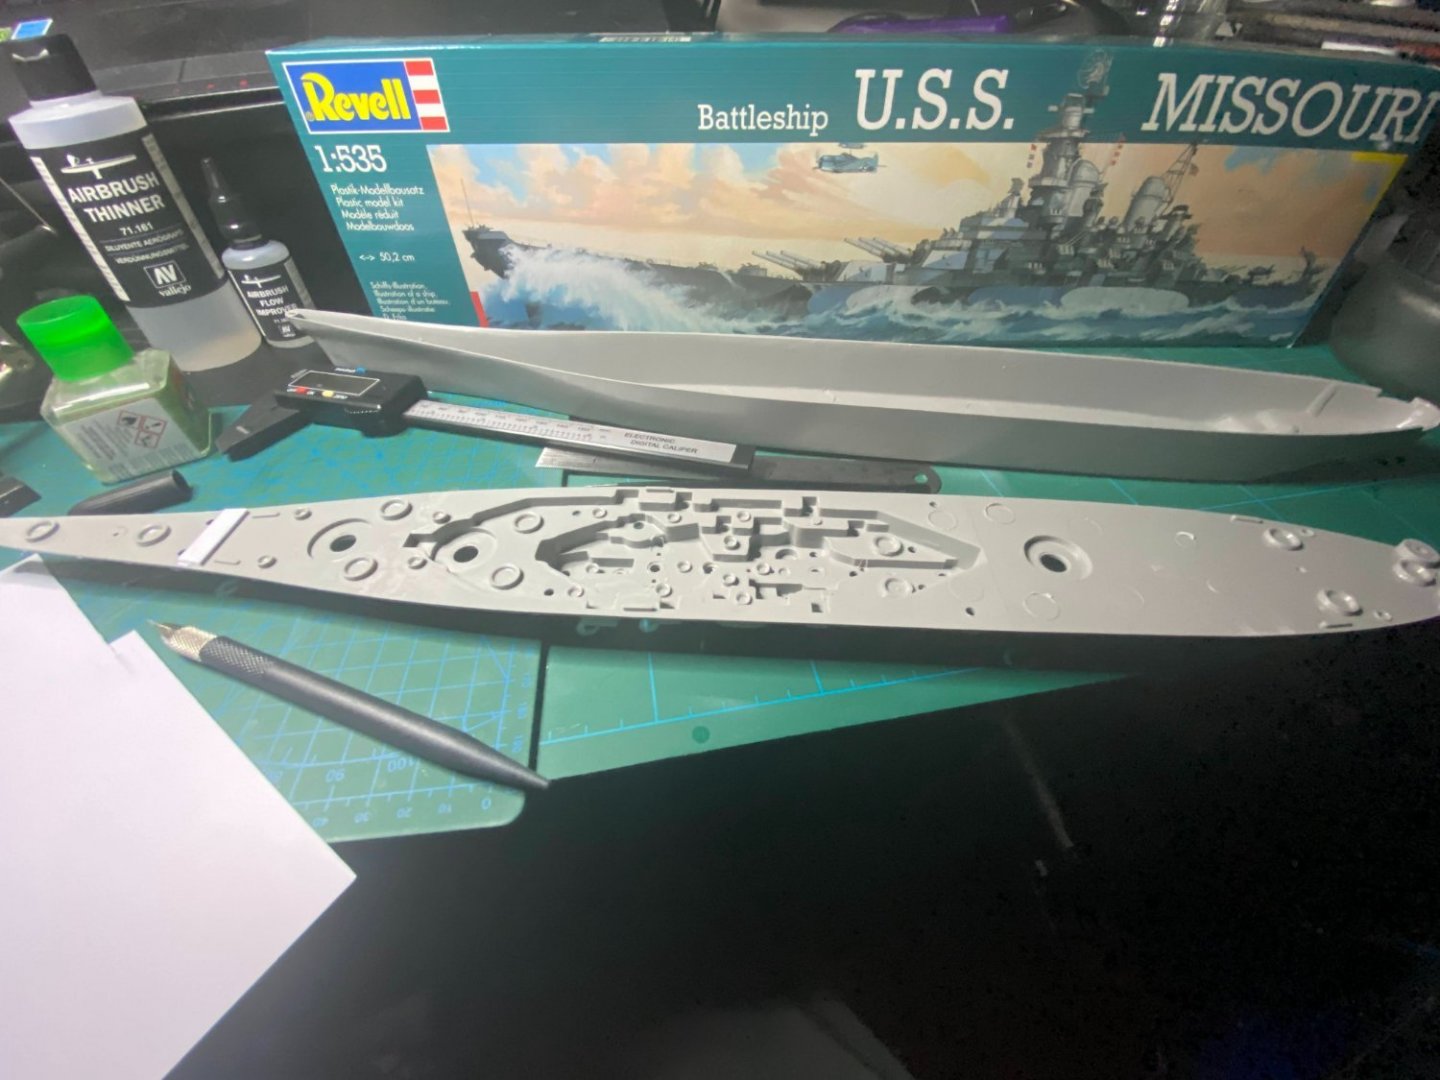
-
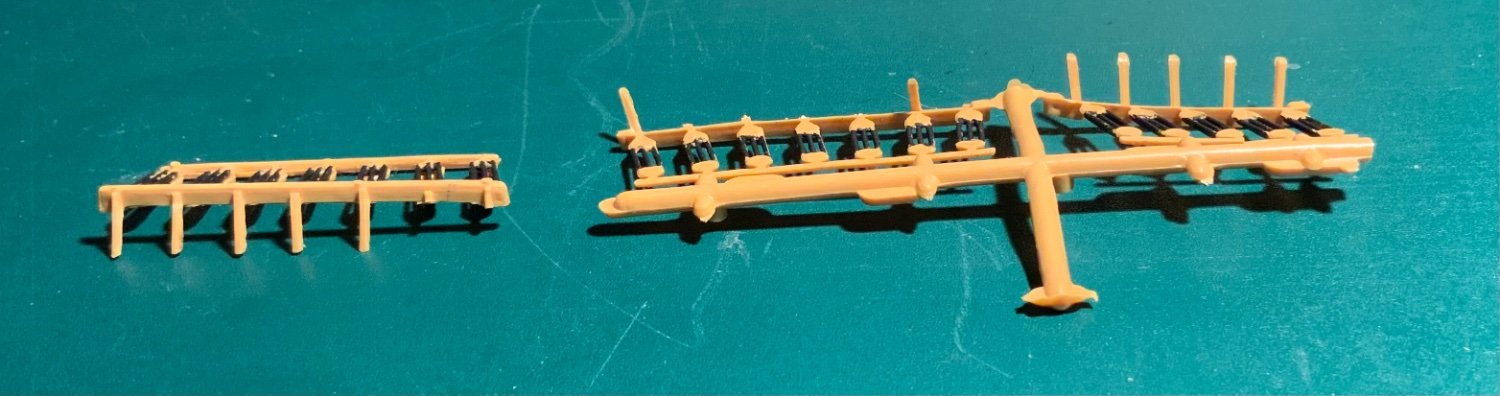
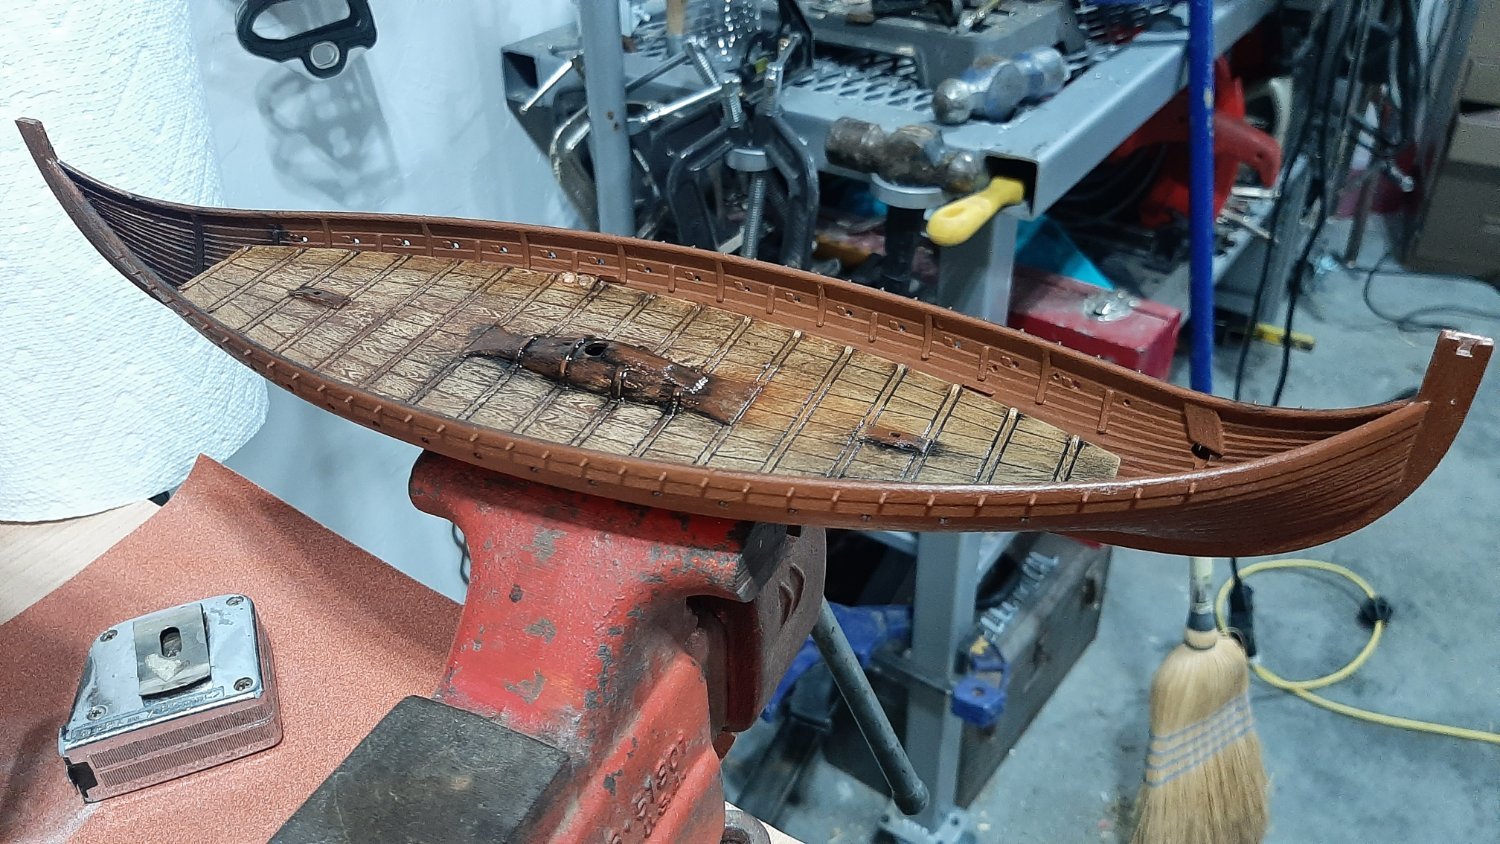
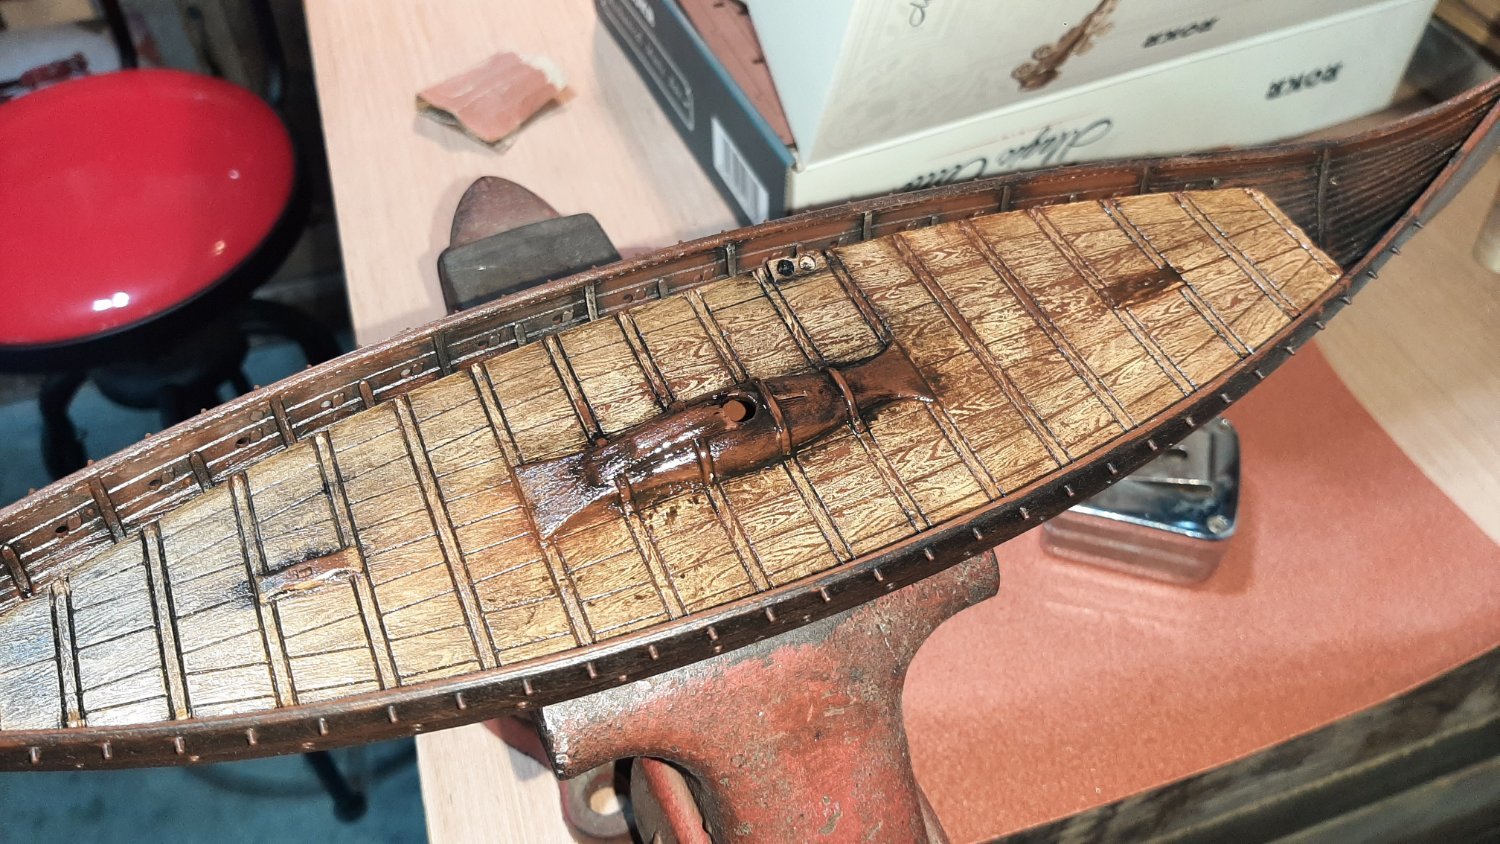
 Hello All, Yes I have another viking ship build going on here too, a vintage wooden kit. I also have this plastic kit in progress. I'm really a plastic guy...nearly all my modeling experience has been in styrene. This one presents a unique challenge because it's a material I'm most familiar with but I'm tasked with making it look like an entirely different material! This has been difficult so far, but I think I'm getting the hang of some techniques that might work. I can't claim to have thought up the methods, only that this is my own attempt. The Revell Germany kit has good...if a tad heavy...wood grain and texture molded into this kit. The base brown color is useful in some circumstances but I do wish they had mixed up the molding color a bit. I started experimenting on the main (only) deck with some Vallejo acrylics several years ago when I started the kit. It got boxed up for a couple moves until I played around with some artists oil paints on it today. I sanded the acrylic base (the color was a buff or tan of some sort) to reveal some of the darker wood grain below. Using dabs of Ivory Black, Burnt Sienna, and Titanium White, along with some linseed oil, I was able to work some color and variation into the existing acrylic base. I then just wiped it off to lighten and reveal some of the lighter graining below. I was careful to get some good darks deep into the recesses molded into the deck as well. Overall I'm pleased with the outcome thus far. Thanks for looking.

- 10 replies
-
- 5
-
-
- Viking Ship
- Revell
- (and 1 more)
-
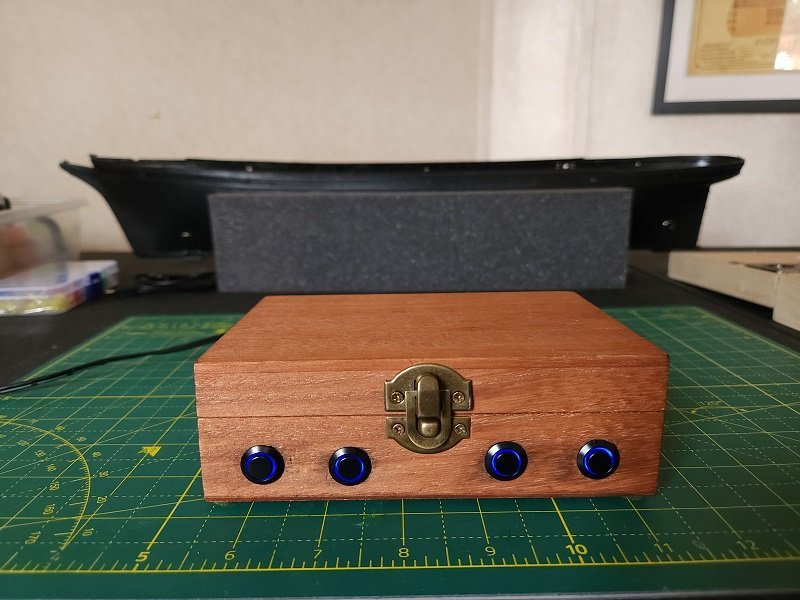
 Well, I have been lurking here and meddling in others' build logs for quite some time. Most of you know I abandoned my previous Cutty Sark build and I'm very anxious to start anew. I have the kits (one as a working kit, the other is spare) and almost all of the necessary extras. However, I'm still awaiting one more delivery consisting of a wood deck, windows, rope and a few other accessories. They're coming from Radimir at HiSModel in the Czech Republic and, though he's a bit late, I am confident they will arrive soon. Until they do, I have finished the control box for the lighting. The lighting will consist of navigation (running) lights and interior illumination of the three deck houses. Power is a 12-volt 2-amp wall wart that plugs into a socket in the back. Output voltage is currently set at 6 volts for each regulator. I haven't installed the box-to-ship connectors yet, I need to determine the pinouts and that's a tedious process. The wood is very soft so I have some tearout from the drill but not enough to make me do it over. I may make another one in hardwood at some future time. I debated with the boss over labels for the switches and she won out (she always does). They're not really necessary and detract from the aesthetic.
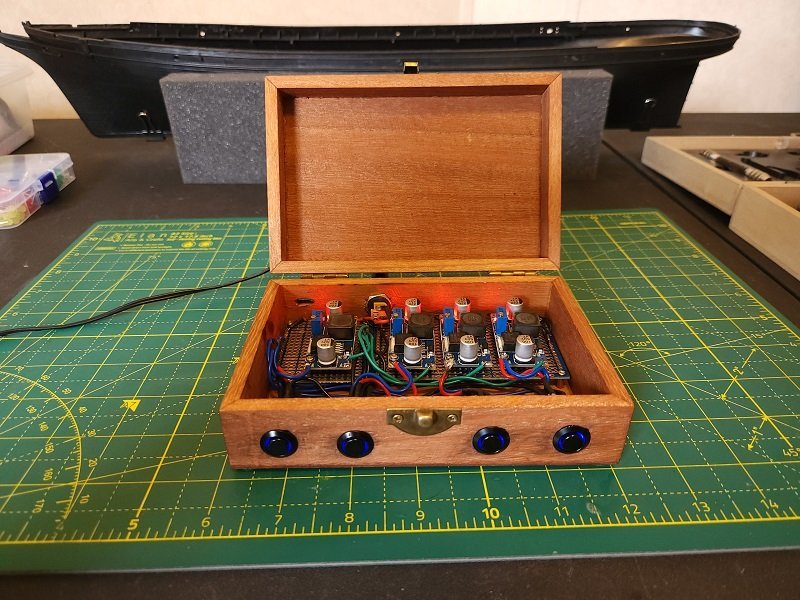
- 85 replies
-
- 5
-
-
- Cutty Sark
- Revell
- (and 2 more)
-
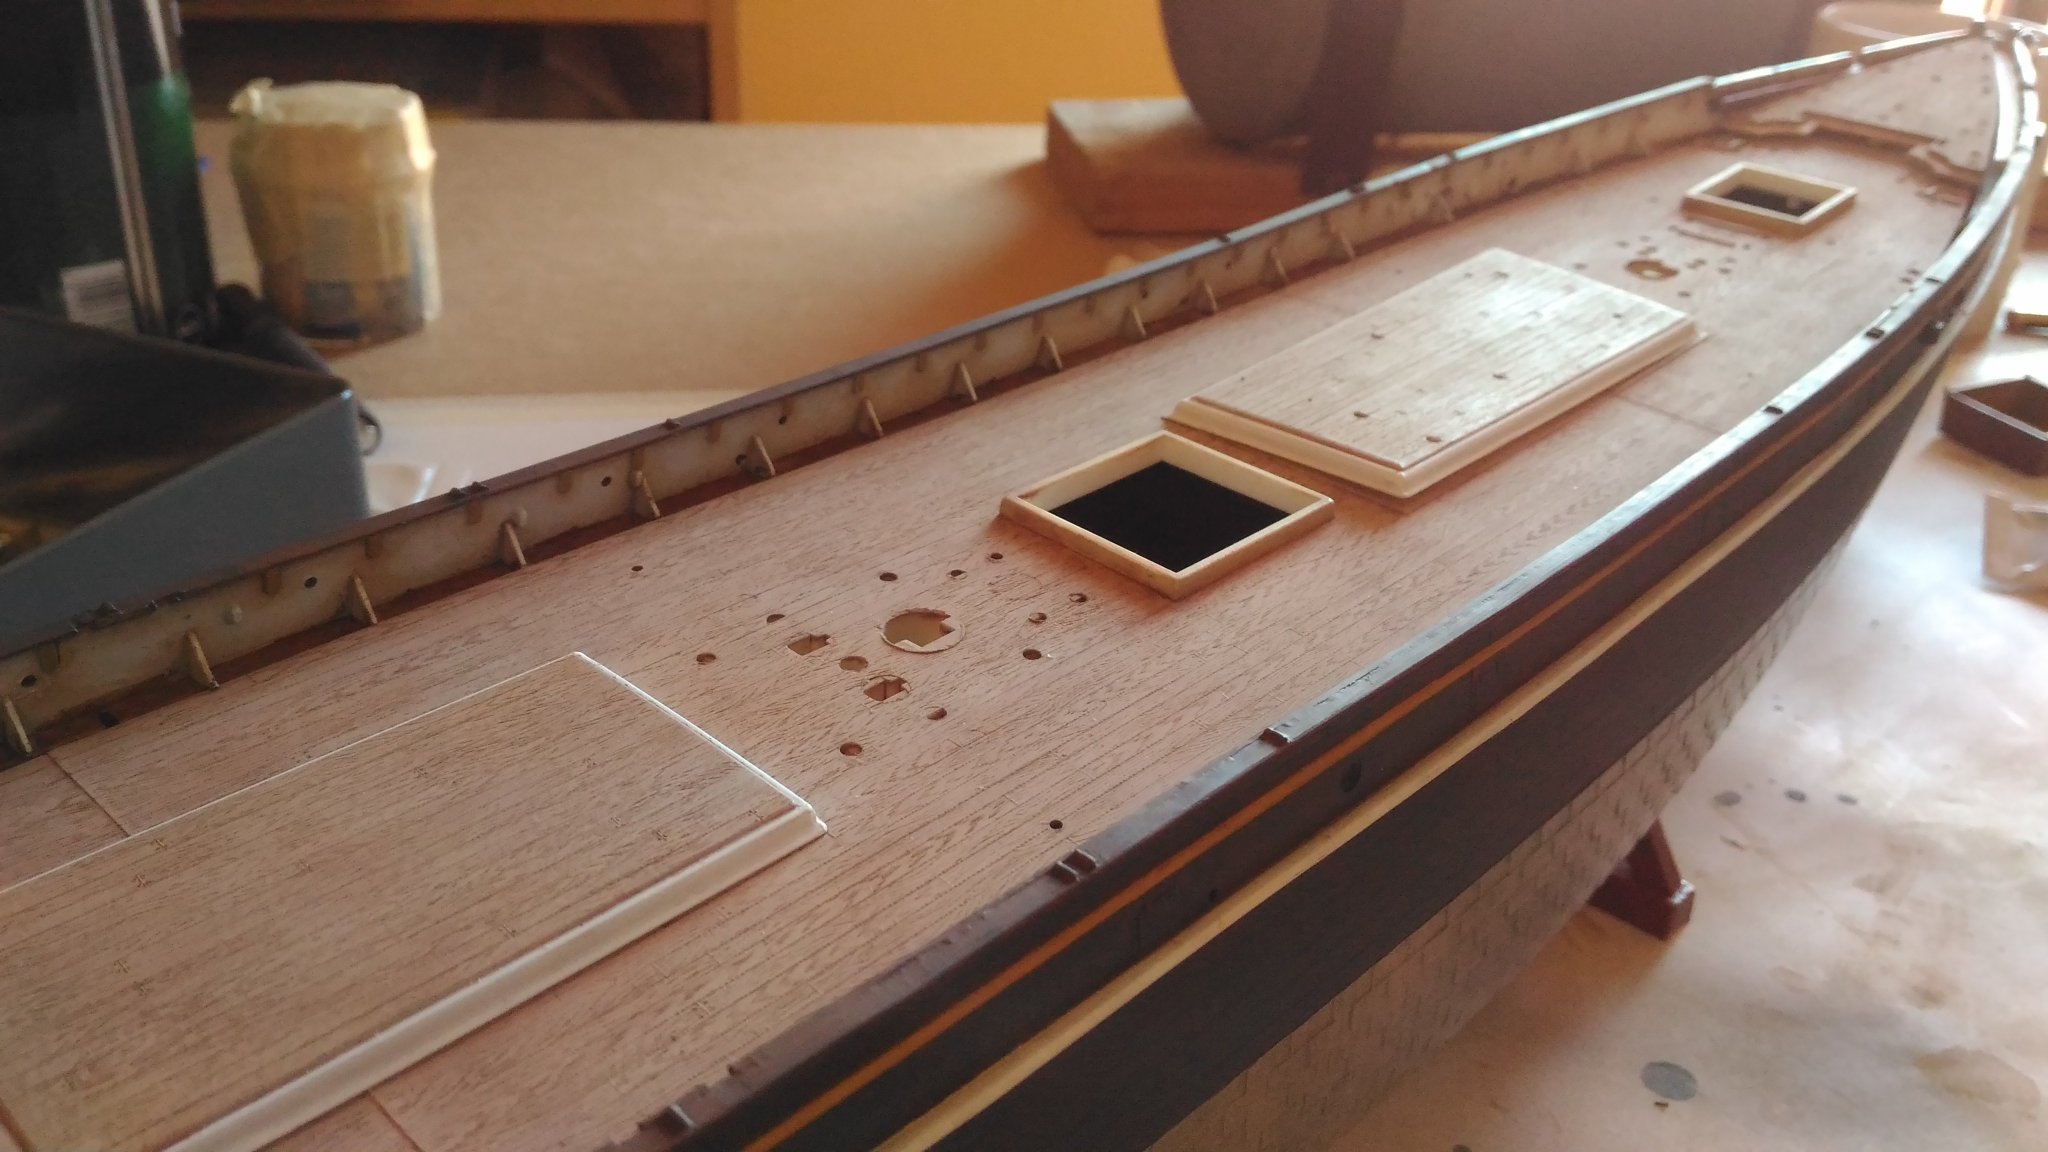
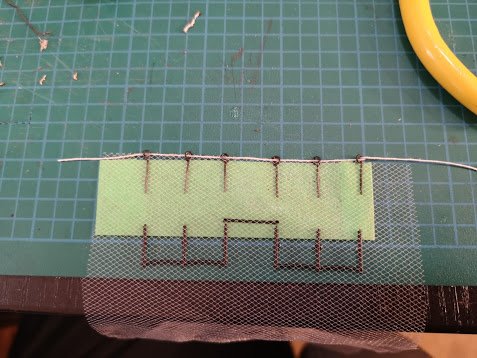
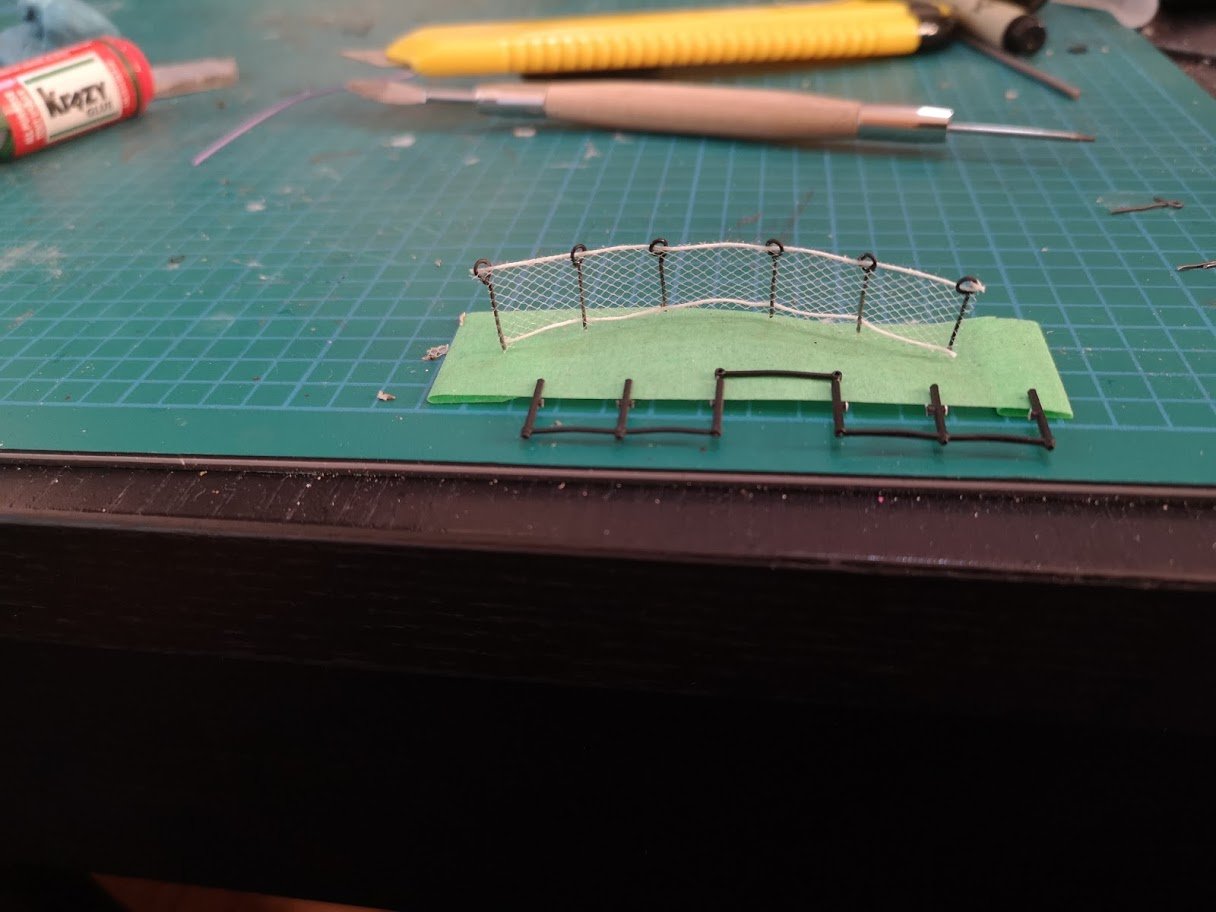
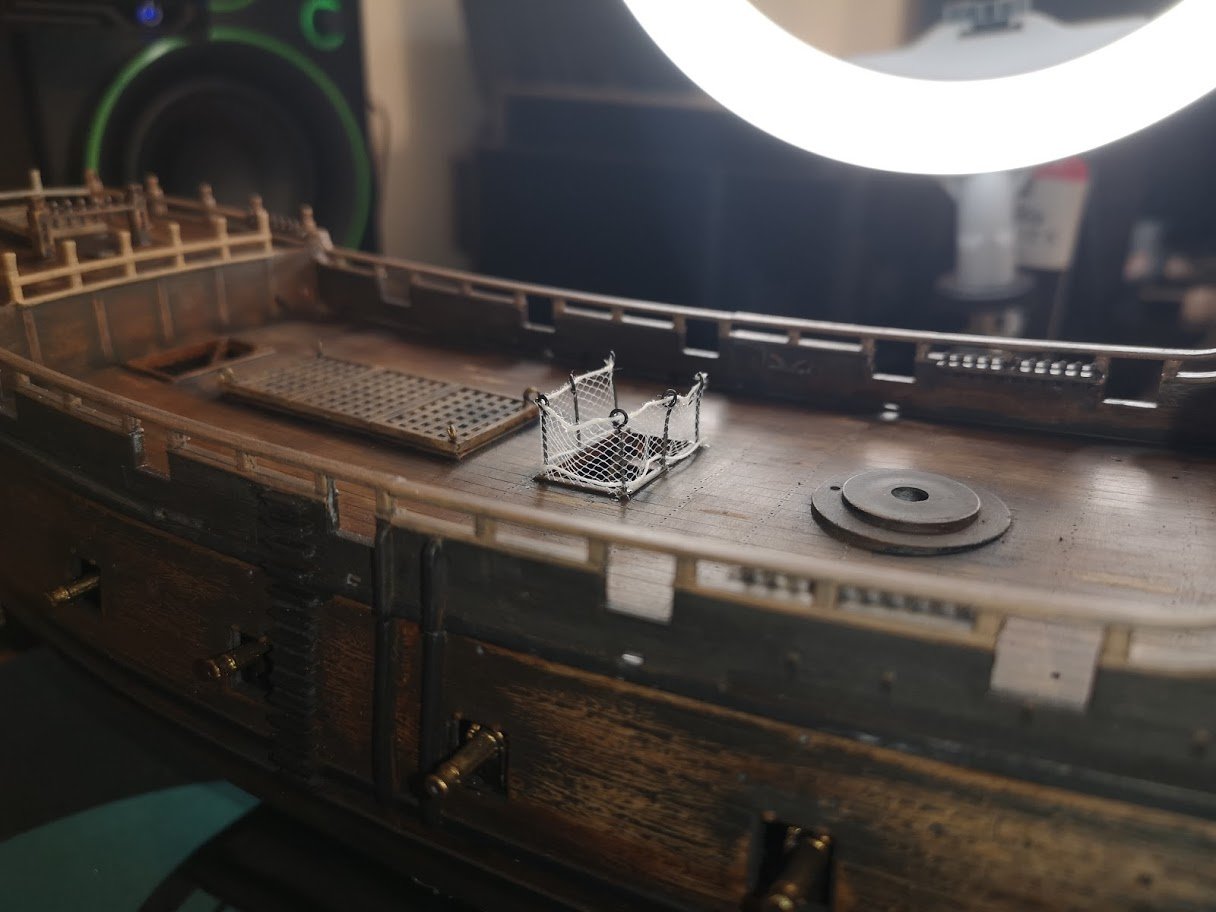
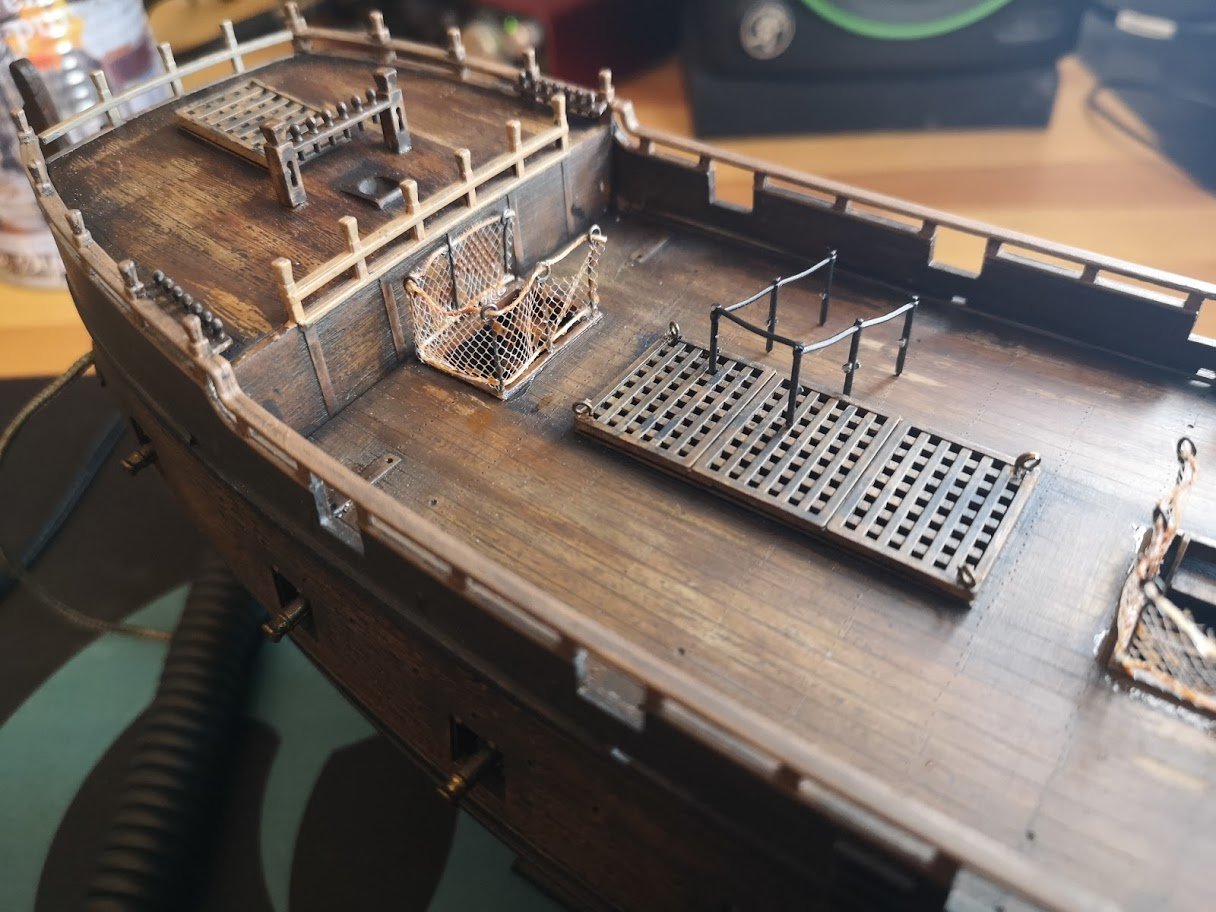
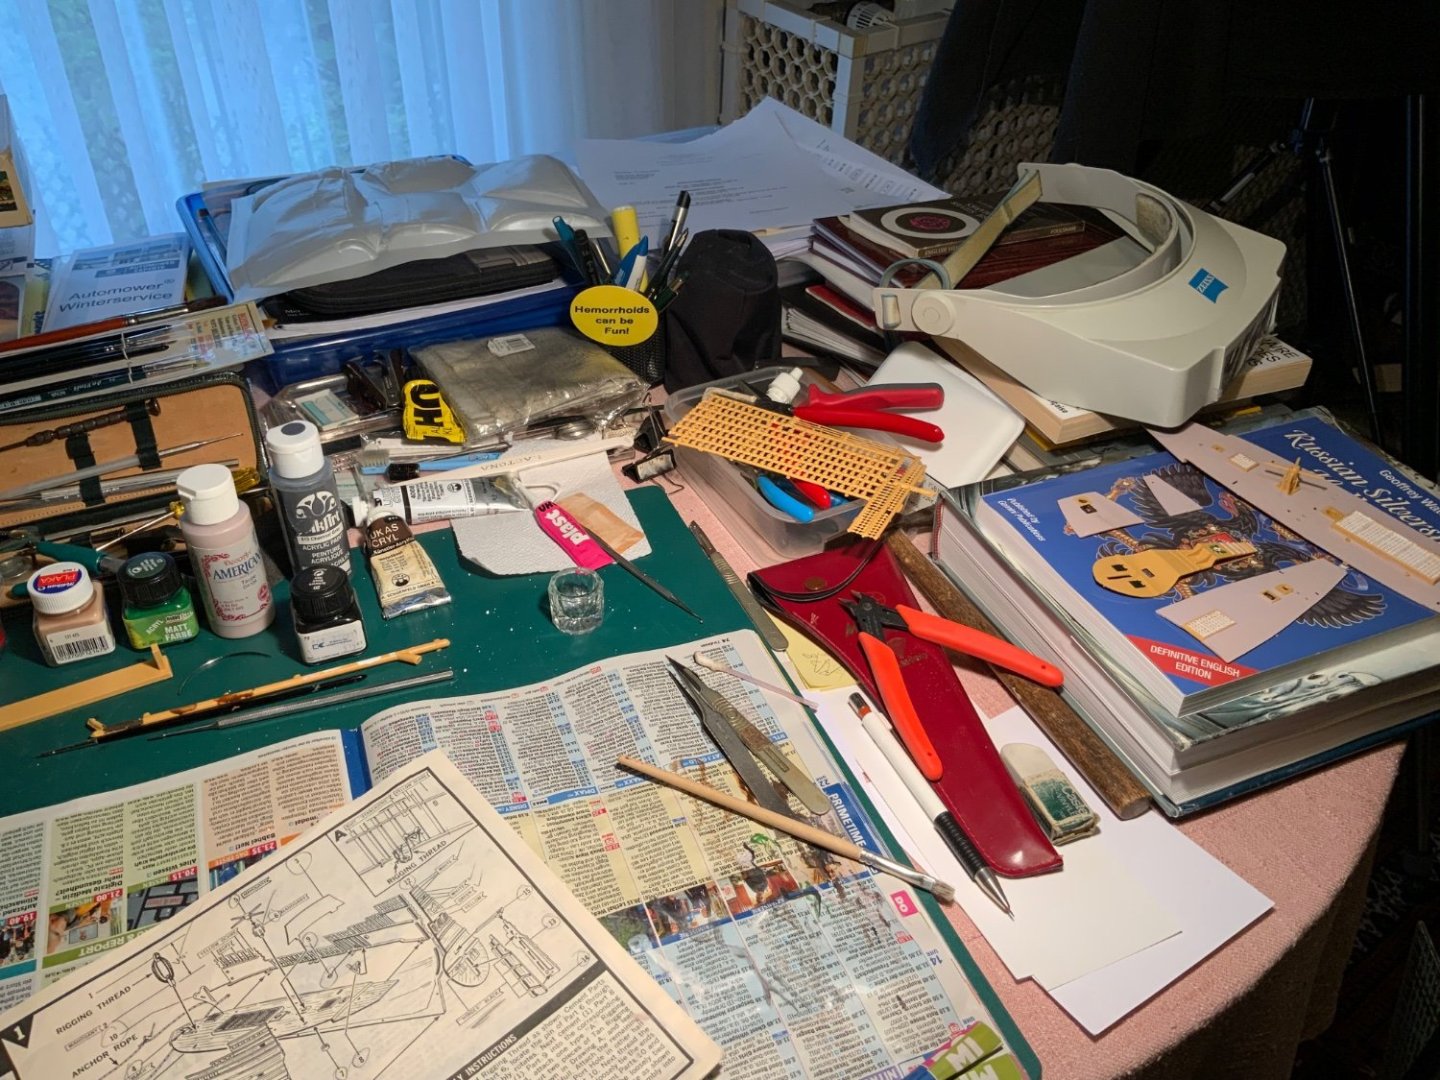
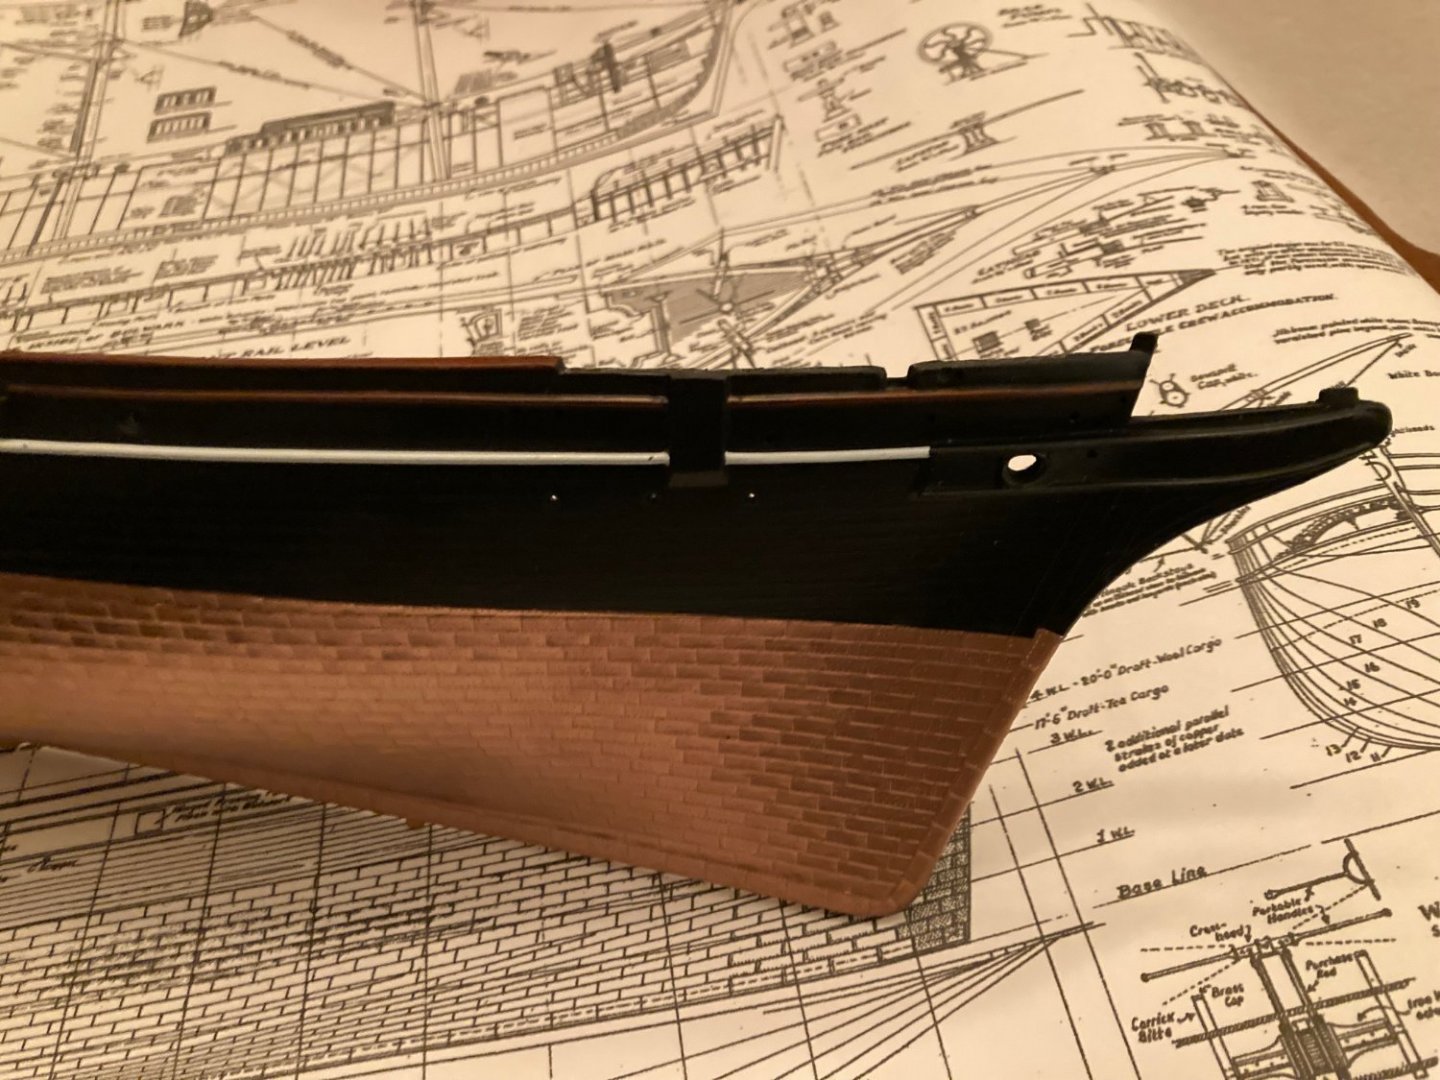
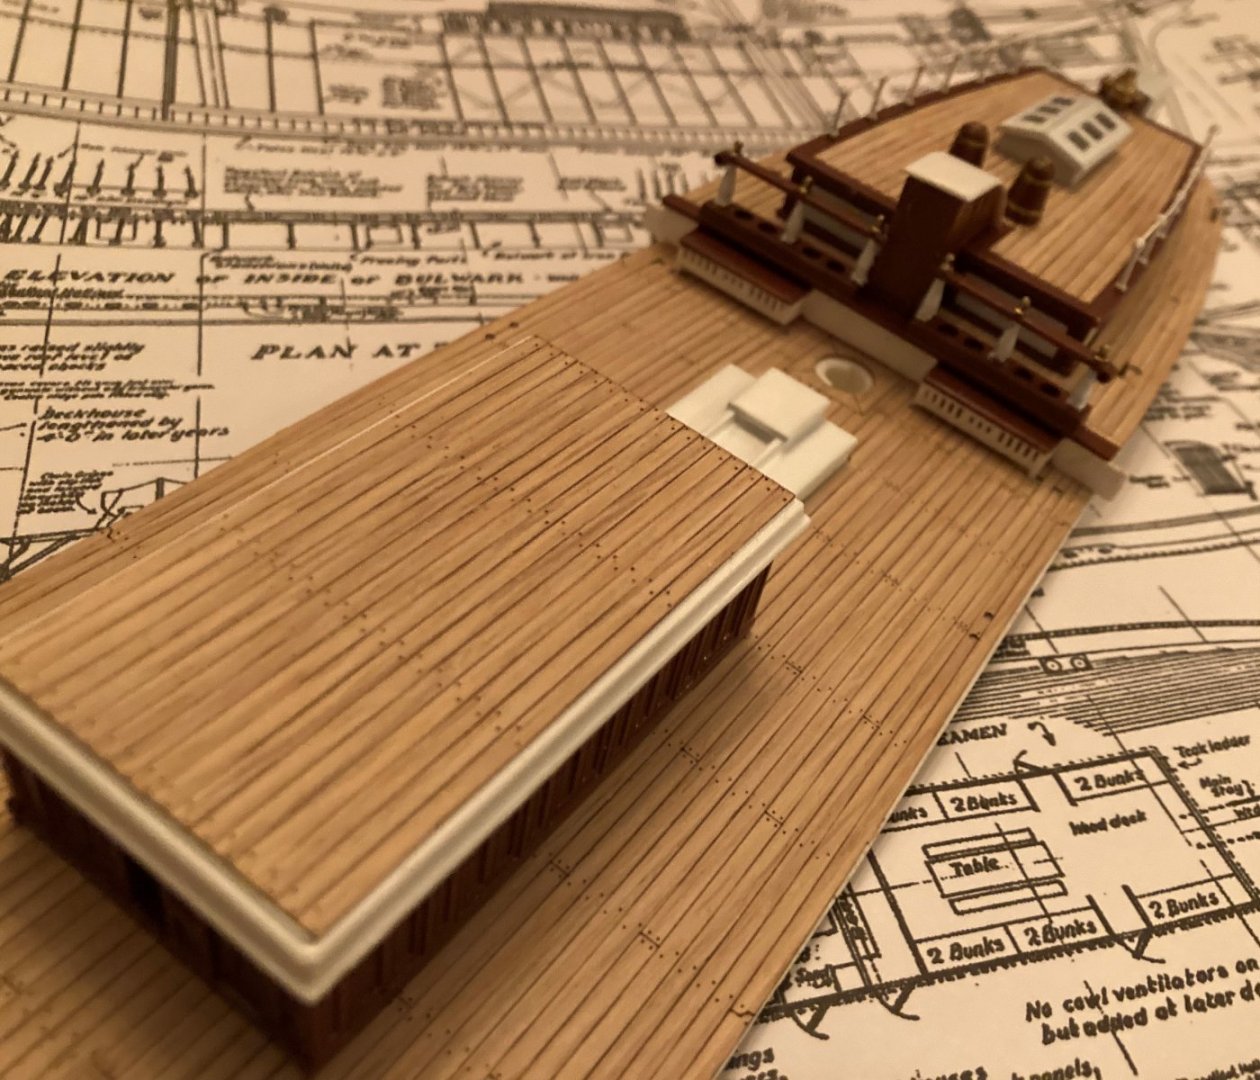
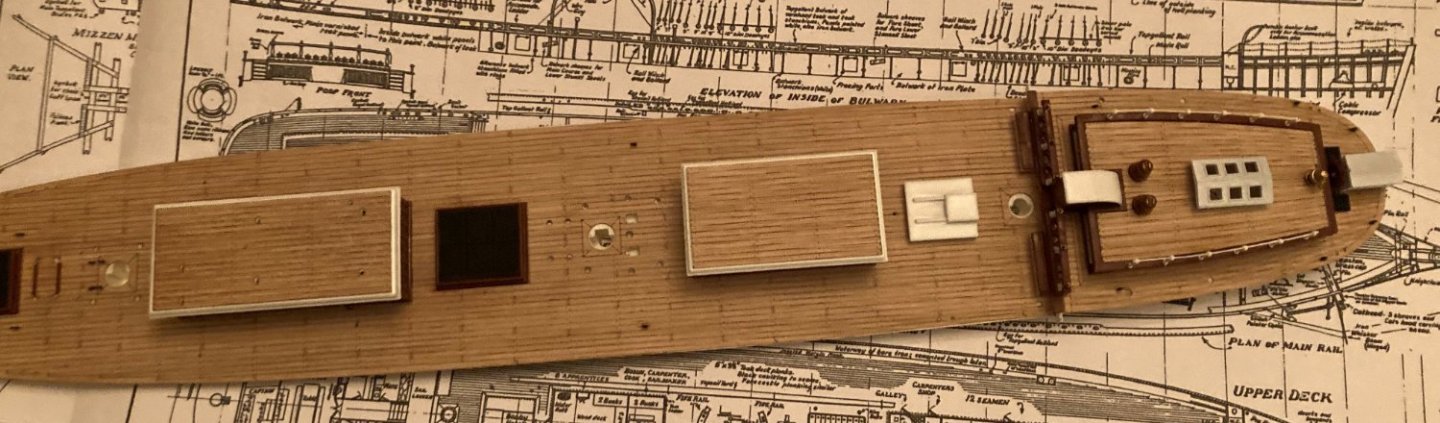
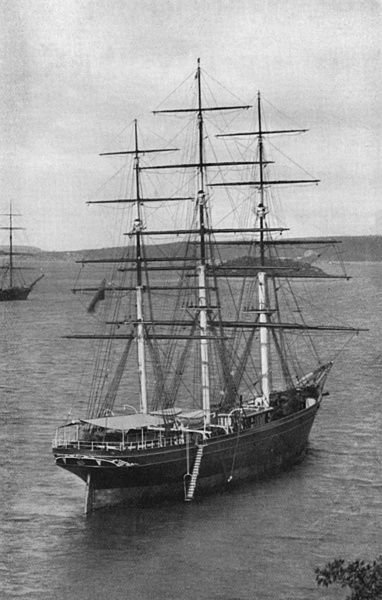
 I am working on the Revell 1/96 Cutty Sark. I haven't gotten too far along, even though there have been many hours spent. The hull is painted and ready to assemble. I have been working on the deck as paint drys elsewhere. The photo taken in Australia is my reference along with books and plans. The model will be what I call clean, by not trying to create a diorama on a stand with weathering and all, just making a replica of a ship in 1/96 scale. I am not sure who else likes the look. I removed the wedges from the inside of the hull. I am going to replace them with small plastic rod. Testors enamel is being used with an air brush and also painting by hand with a paint brush. There are brass stanchions with brass wire. Decals are being used to add the white panels to deck houses. I will also use decals to add the white portions of the inner bulwarks. The eye rings are made by me with annealed wire. The deck covering is from His-Model. I plan to fully rig the ship, something I haven't done before. I am not going to add green to the copper, as copper only turns green in the open air. In the water, it remains copper. The only part of the sheaving that is green is the part out of the water. There is a good picture showing this at the Charles W Morgan website. The ship was being lifted out of the water. Also, I am not going to weather anything. I'll be posting more as I go. I am new to this build format.
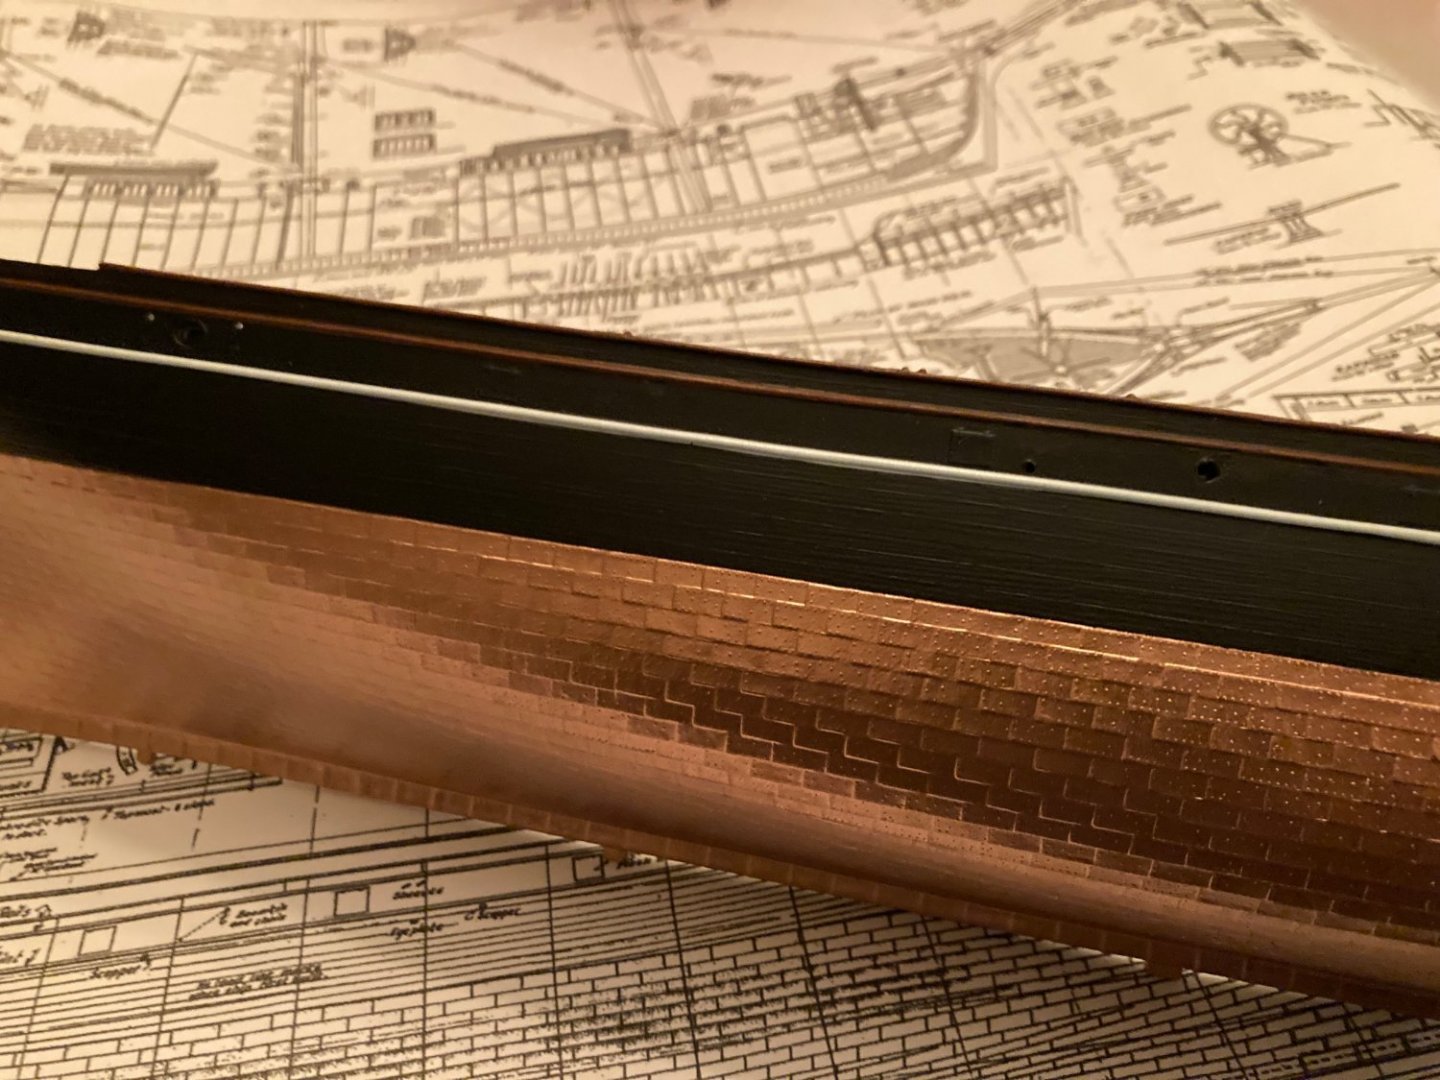


- 481 replies
-
- 9
-
-
- Cutty Sark
- Revell
- (and 2 more)
-
 Welcome to the Jungle! Attentive observers had already discovered the hull of the USS Constitution in my shrubbery for some time. But who now expects a FITZCARALDOOOO downhill is wrong for the time being, it actually goes on in a civilised way The kit has been lying around for quite a while, as it is really great in many aspects, such as the hull, but in others it does not fully meet its own claims, especially with regard to the guns. What could be more obvious than to choose these guns after the purchase of a new printer and to program them in a contemporary correct way. The results were promising ... ... and with a little colour quite convincing ... ... especially compared to the originals from the kit. Grandpa, what big fingers you have!
- 53 replies
-
- 11
-
-
- Revell
- Constitution
- (and 1 more)
-
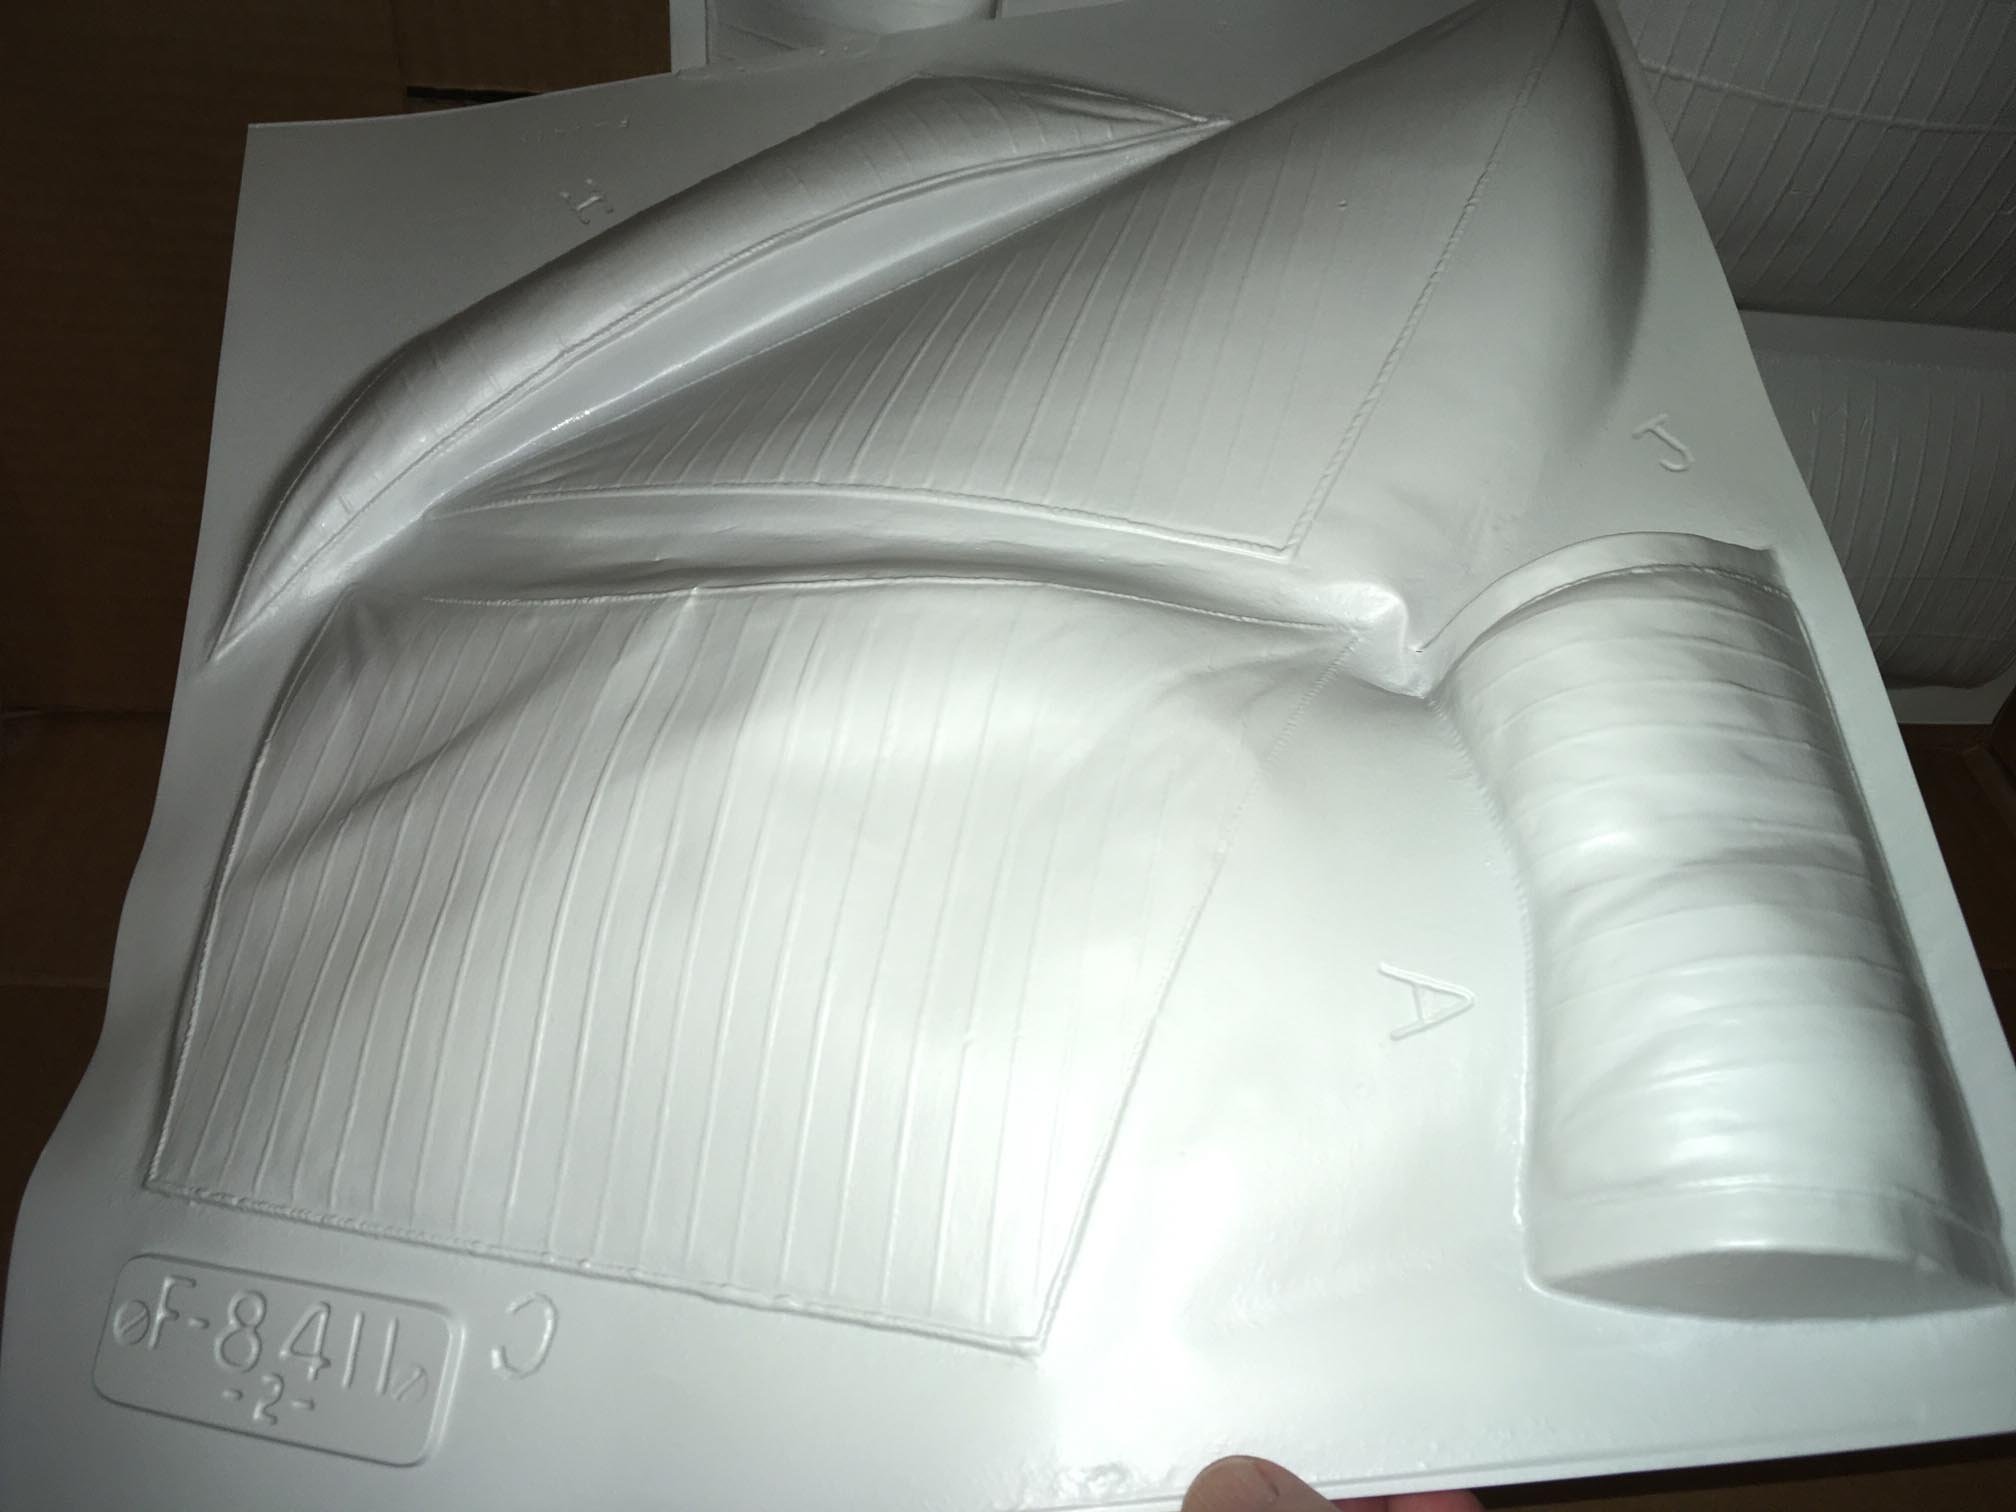
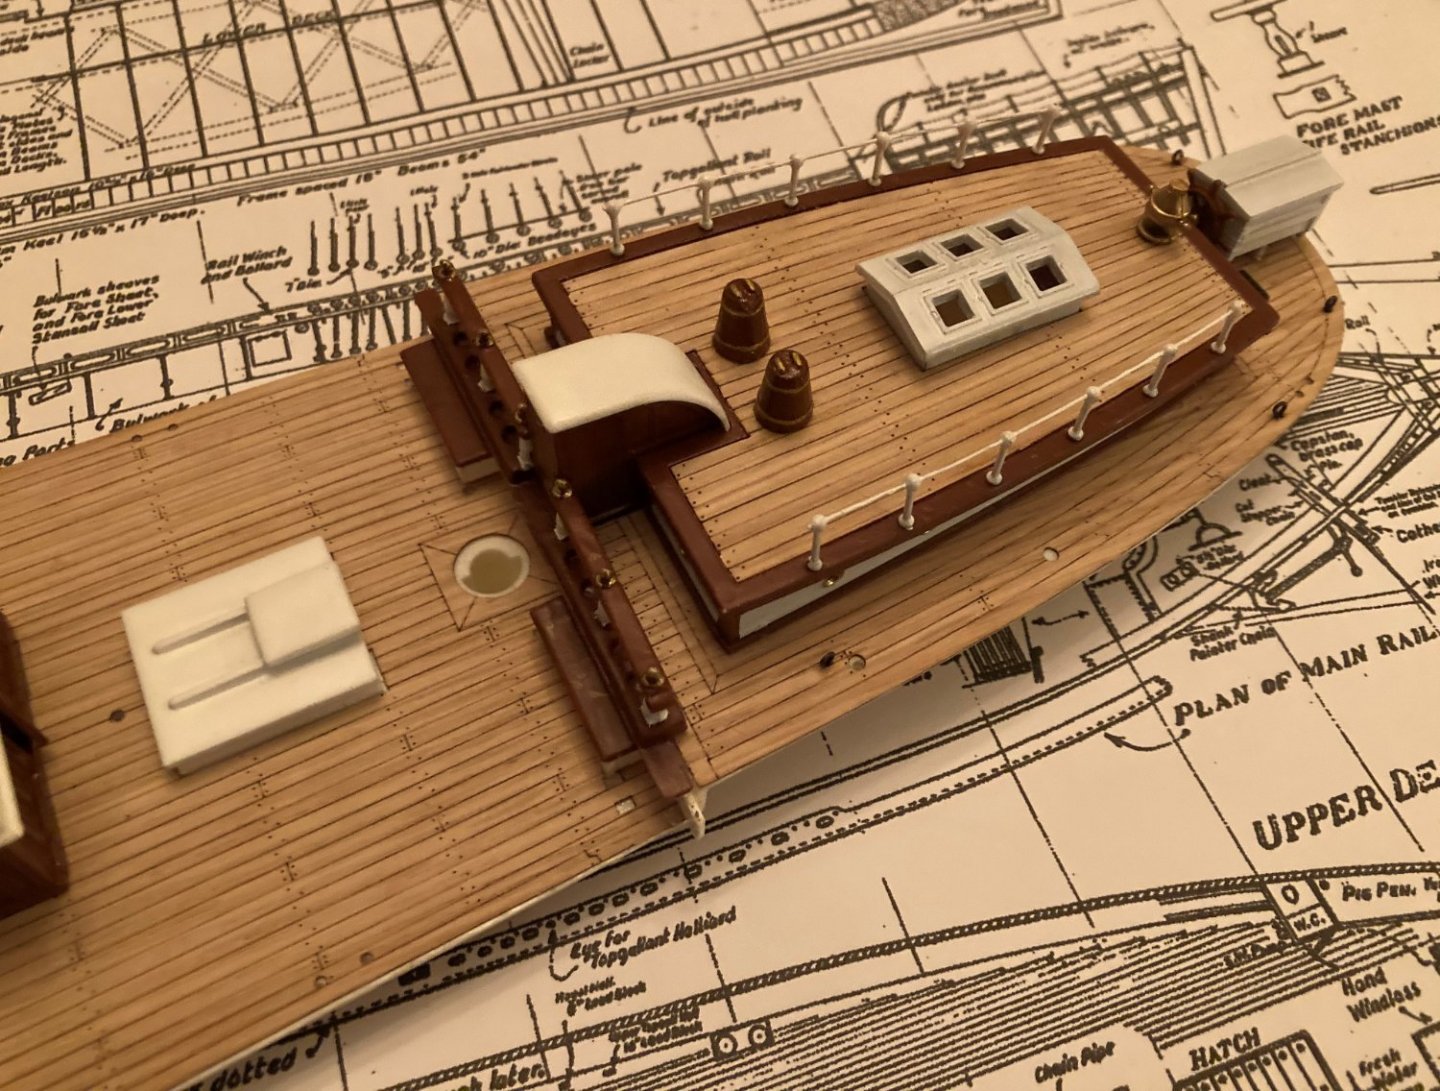
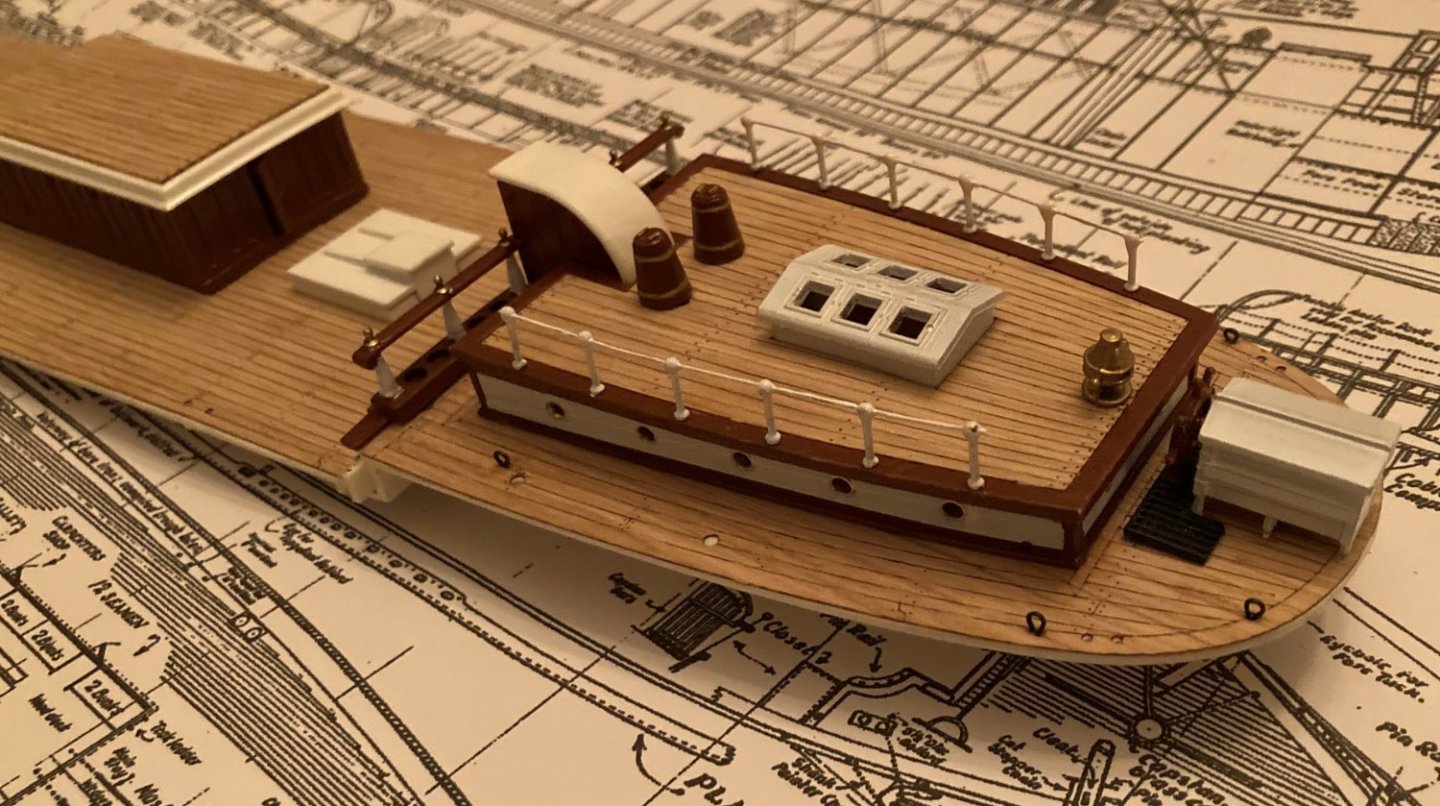
 13/12/21 I started looking at this kit 2 or 3 weeks ago, as an ‘in-between’ project while I take a break from the Victory. The kit is from 1976, it’s a bit brittle and there’s a lot of flash, some of it so heavy that I’ve needed to look at other logs in order to know what to trim off and what to leave. While I don’t want to get into 3D gymnastics on this kit, I’m re-making most of the deck furniture i.e. the windlass rotor, winch rotors, fife rails, sail lockers, cabins etc, as these are very quick and easy to model in F360 and equally easy to print. I wouldn’t say the end result is better than the kit part, detail-wise, just cleaner/crisper and I get to duck dealing with some joints.
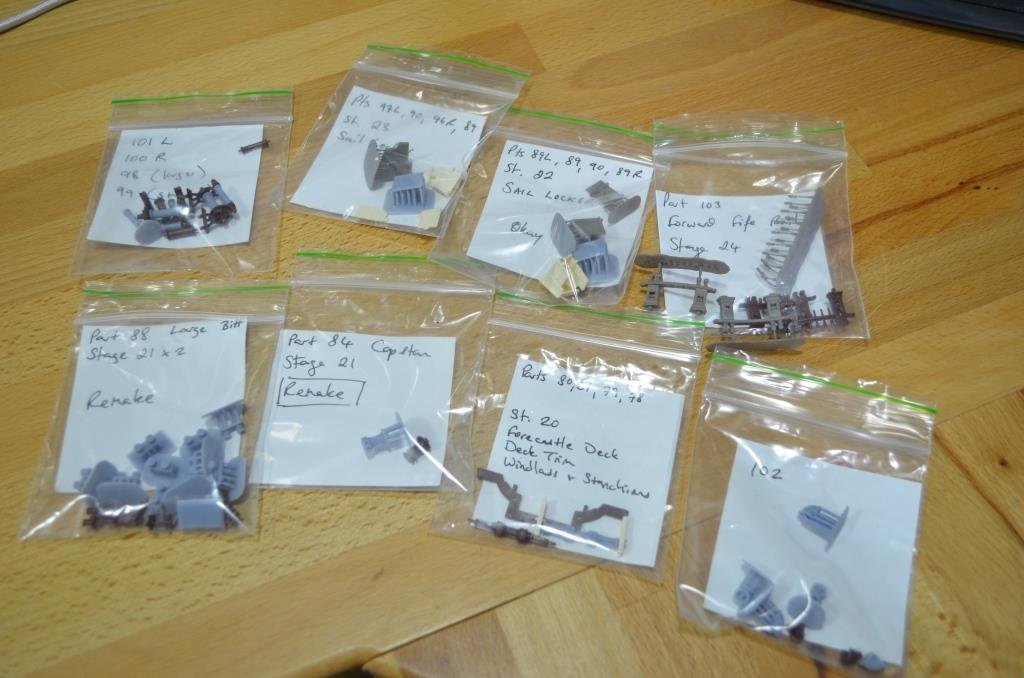
- 443 replies
-
- 5
-
-
- Cutty Sark
- Revell
- (and 2 more)
-
 Another birthday gift, started painting the hull so why not start the log? I know I started a revell Constitution when I was a kid, but never finished it. I figured it was probably the smaller one, I didn't think my parents would buy me a 3 foot long model ship, and I didn't see myself having the means to buy the big one myself. So I ordered this kit with an amazon gift card from my sister in law. It's not the one I had... after looking into reviews and videos on YouTube I have determined that I somehow ended up with the 1:96 kit as a kid!! So I don't get to "finish the one I started ", at least not now, but I'm sure I'll still have fun building this smaller one...
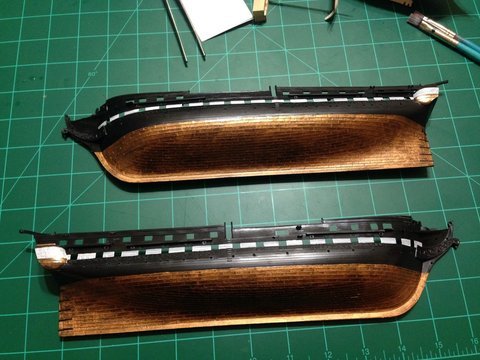
- 21 replies
-
- 4
-
-
- constitution
- revell
- (and 2 more)
-
 This old kit doesn’t seem to have a lot written about it, so I figured I might as well document my ongoing build. I started this as a build thread over on the Ships forum at Fine Scale Modeler, but I figure there isn’t a lot of overlap of readership between the two sites, so I’ll post it here, too. ( I do see that Fright is doing the same thing with his Lindberg Lightship Nantucket build.) The first several posts will be to document the work that was done over the last month or two- once I get the posts caught up, updates will be further apart! The molds date from 1956- the kit is one of Revell’s first attempts at a real scale model- their previous efforts had been the (now infamous) flat-bottomed models that were better for “sailing” on the bedroom floor. The kit represents the Secretary class cutters from the Korean War era. The kit was sold as both Campbell and Taney over the years, with no change to the contents except for decals. The model is about 12.5 inches long, and is one of Revell’s box-scale kits, at 1/305 scale. The seven “Secretary class” Cutters were built in 1936-37, and were 327’ long. The Alexander Hamilton was lost in WW2, but the other six served from 38 to 50 years! They were named for former US Treasury Secretaries (the Coast Guard was part of the Treasury Dept until the 1960s). The ships initially carried the full name such as “Roger B. Taney”, but the names were shortened soon after. The William J. Duane was named after the 11th Secretary of the Treasury, who served under President Andrew Jackson. The ship entered service in 1936, and was decommissioned in 1985. This Revell kit is certainly not up to modern standards, but it is the only one on the market. I never sailed on a 327 in my time in the CG— but a good friend and classmate was on the Duane did, so that’s why I am building it as the USCGC Duane in her circa 1980 fit.
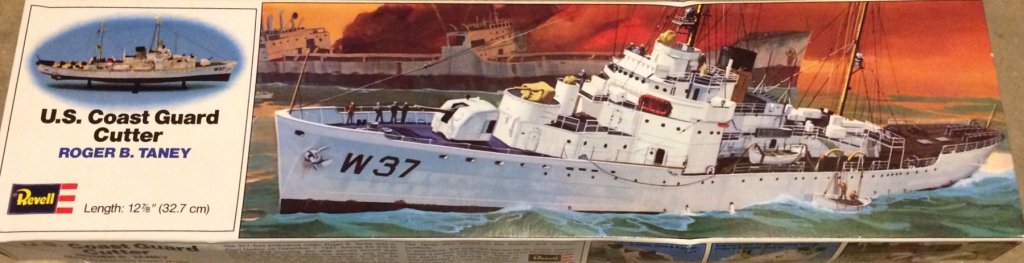
-
 This build log is a restoration of a model built by my mother. This model was what inspired me to pursue a lifelong hobby of model making and a fascination with tall ships and sailing. My mother is 87 and was diagnosed with Alzheimer's last summer and the past year was spent cleaning out her house and getting her affairs in order. Of the items I was entrusted with is her collection of model ships she had built back in the early 1970's. My mother was a professional artist who ran a commercial art studio and taught both fine art and life drawing. In 1975, she was commissioned to paint a series of nautical themed placards for some publication, I cannot remember what, and she started to build plastic model ships to use as reference. The first one was the Revell Thermopylae because she loved the color combinations she could use on it. The kit is not painted to represent the actual ship, but painted in a way to experiment with patina and color depth in 3D instead of on canvas. She got about as far as installing all the standing rigging before she got intimidated and frustrated with forming and tying the ratlines and moved onto a model she enjoyed building and finishing, the Revell Spanish Galleon. So for the past forty-six years, this model sat on top of a china cabinet, collecting dust, and taunting, no begging me to someday finish her. So, after moving it 2000 miles across country from her home to mine, in which the bowsprit got broken, and most of yards had fallen off, I now have it here in my studio and after washing off four decades of accumulated dust, have what I think a diamond in the rough, or a test of my sanity. A few things I will need help with and will need to consider. 1. How far do I want to go with restoring the masts? The main and mizzen lower masts are warped, from what looks like exposer to direct sunlight. Would I try to reform them, or do something I have been dying to do and try and make my own from scratch? 2. Paint restoration - This model was painted mostly with oils and I do not have access to the original paints, so I must be careful not to create any blemished I cannot touch up. 3. Originality - I am a stickler with detail and originality, so I must stay focused on restoring the model and accept many of the building defects that are in it. 4. Time - I have many other projects and things in my life going on, so I expect either this to be a fast moving project, or one that could take years. 5. I have four cats, one is still a kitten and one a teenager who is a shop cat in training. So rigging may be an adventure. Here she is after just coming home, The busted bowsprit. This is nothing new to me, I've busted the bowsprit off of both my Constitution and Alabama, so I'm quite good at repairing them. Stern end with the warped Mizzen mast. Midships and after a bath. The model is extremely well built, and the paint finish is protected with a varnish, so I put the whole model in the tub, sprayed it down with Windex, and sprayed her off. Lots and lots of dirt came off. Full view I put the bowsprit back in place. LOL The Bireme I built back when I was in High school and gave it to her for Christmas. It needed a little work from some damage during the move. And her beloved Spanish Galleon, with a lot of Artistic Licensing. I would love to here suggestions on how I should go about planning. I am a little overwhelmed at were to start. I guess systematically removing the spars and rigging. I do have the original box, all the parts, and instructions along with copious notes she took while she was building this model. Scott
- 38 replies
-
- 7
-
-
- Thermopylae
- Revell
- (and 3 more)
-
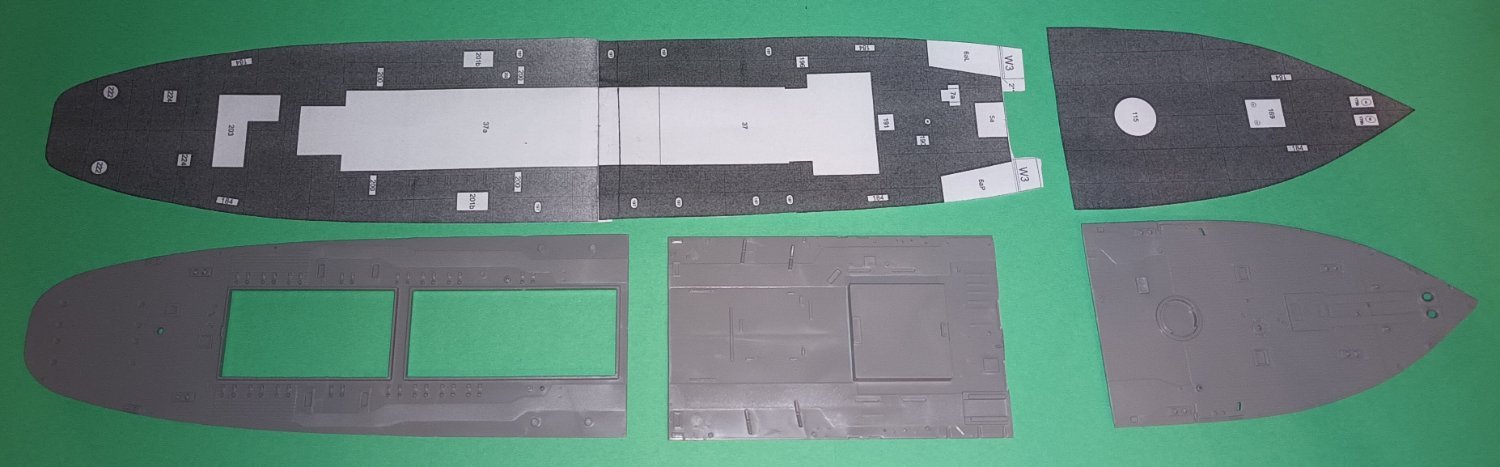
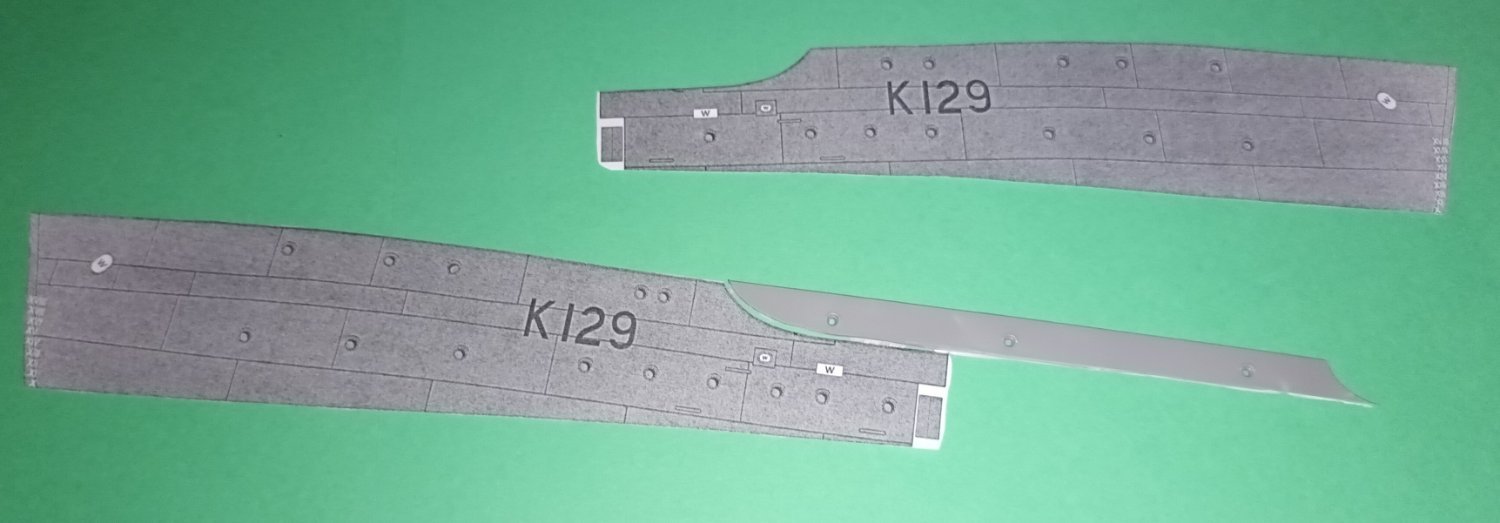
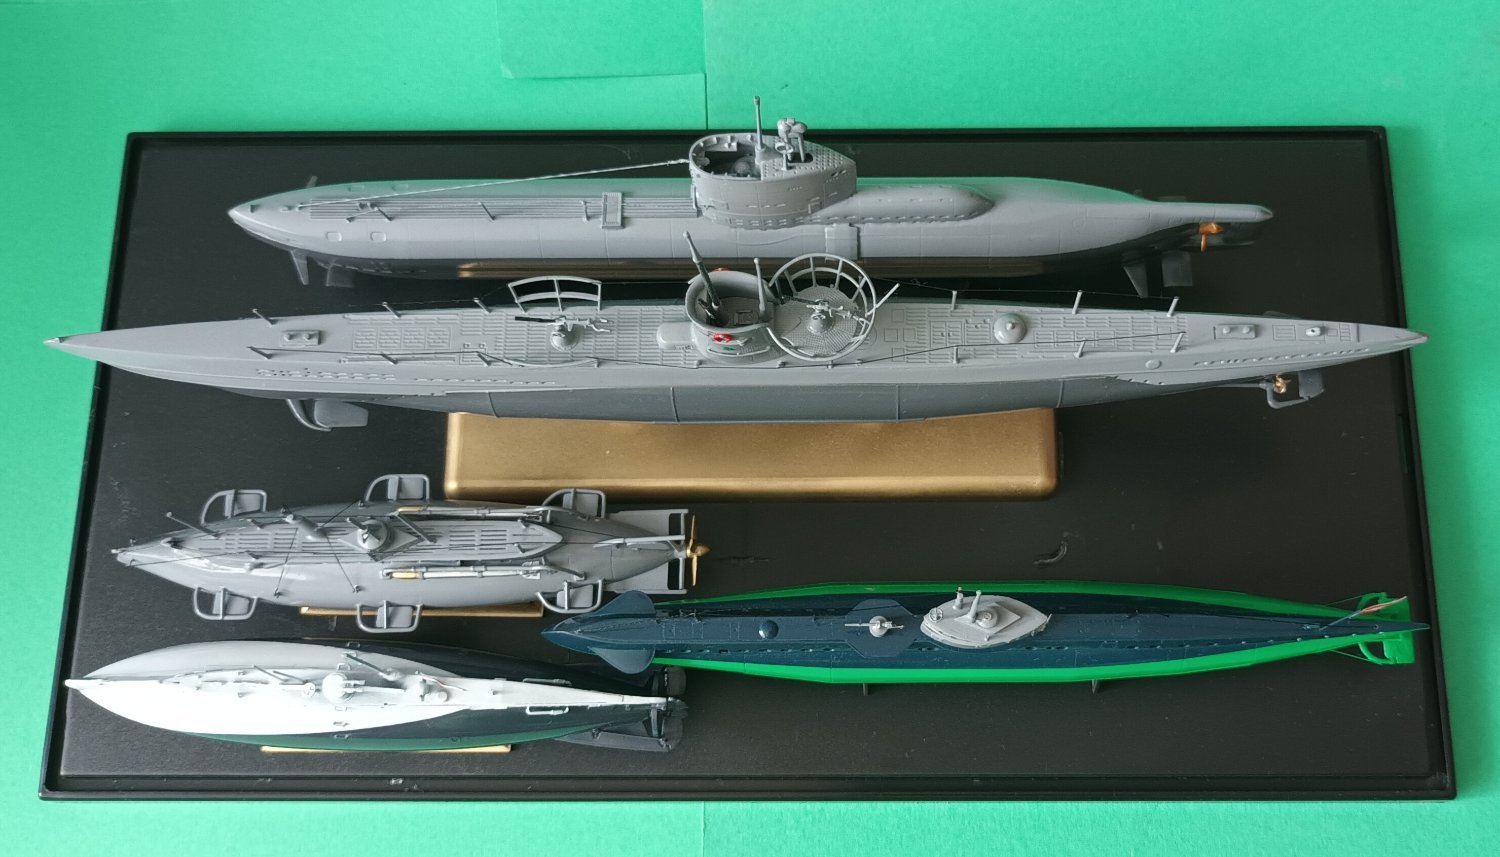
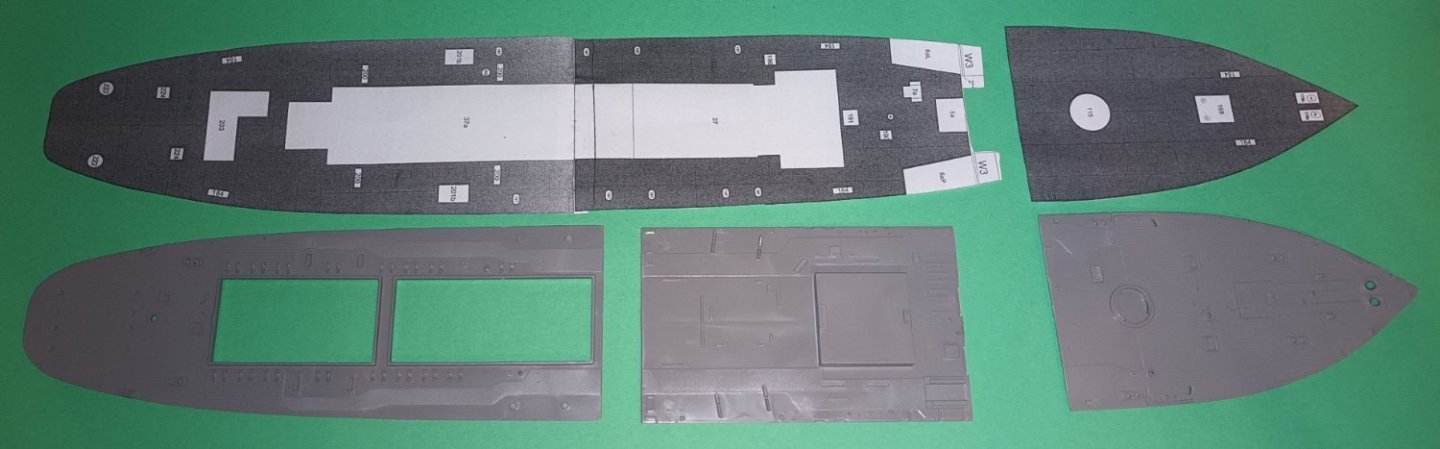
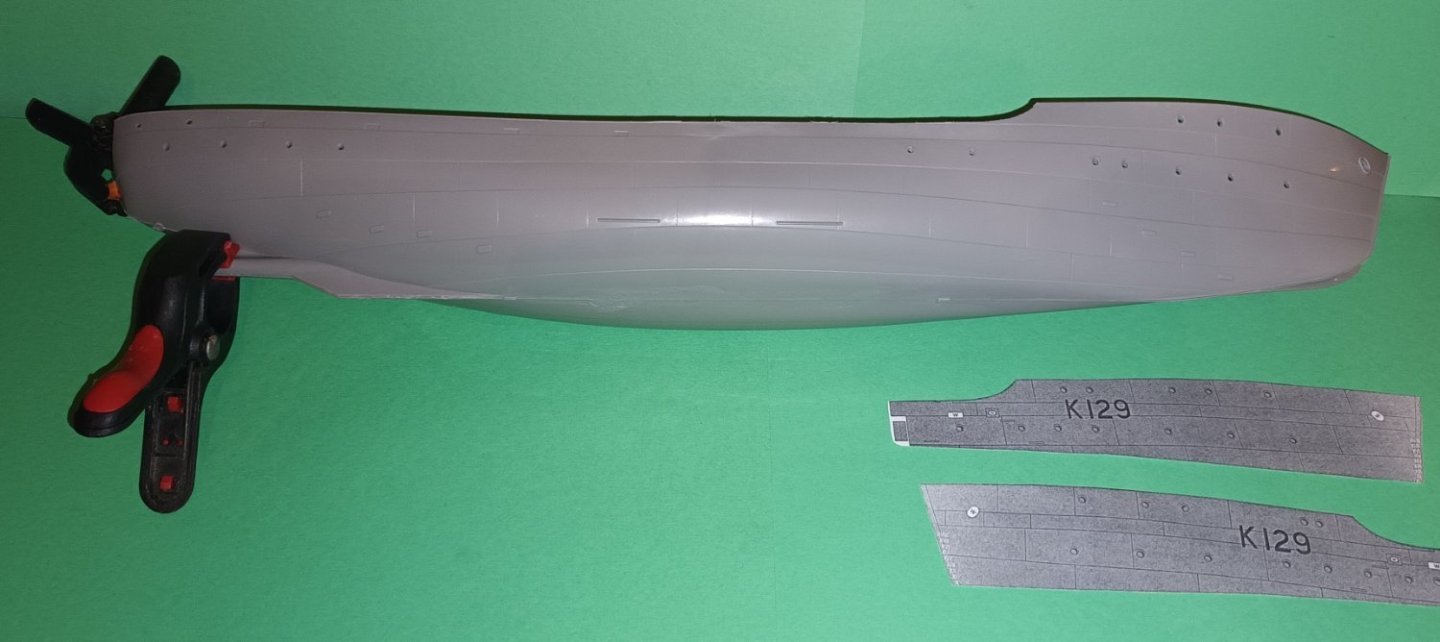
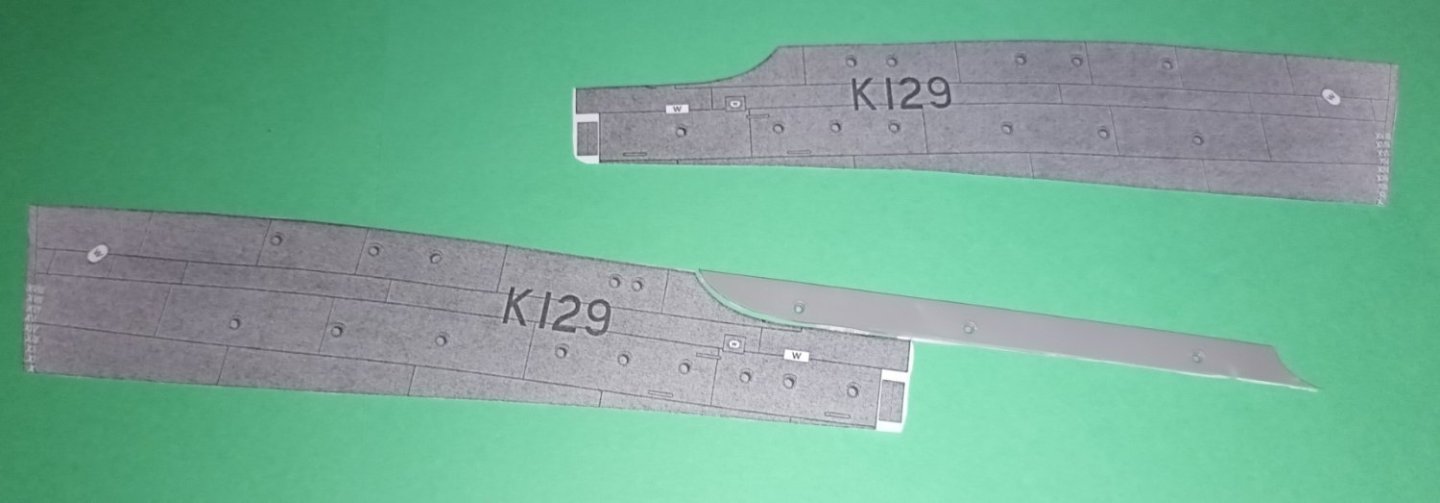
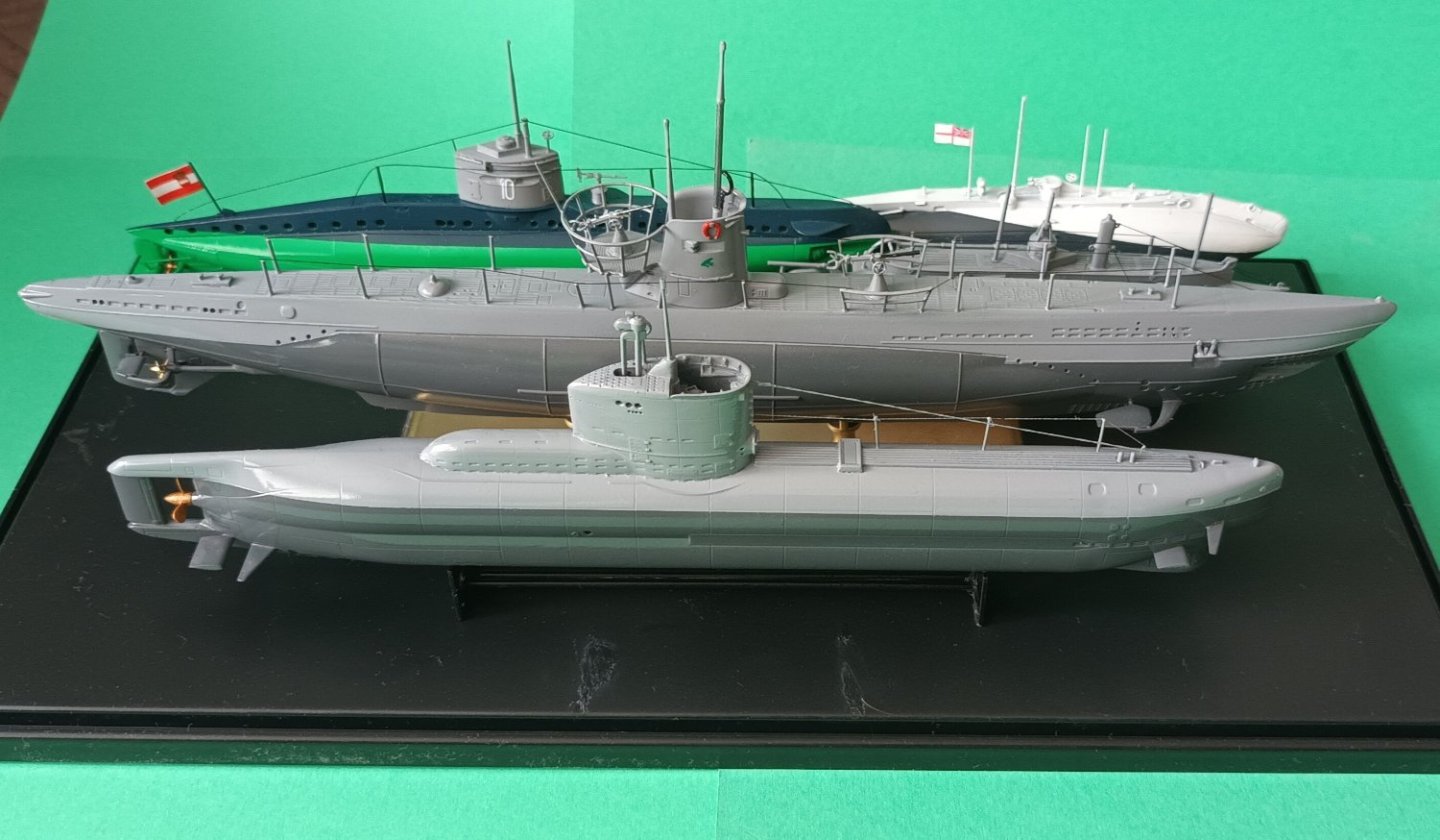
 Hello. It's been a long time. Many years ago as teenager I played into rather forgotten now PC video game Enigma Rising Tide which was arcade style game about what-if WWII naval scenario. Even in such time I was suprised when I saw strange-looking escort vessel looking like highly modified Flower class corvette with anormally looking pyramid of aa guns platforms, serving in German Navy. Due to fact that most vessels in such game were purely fictious or very highly modified vessels from real world countries I was almost sure that such ship was just imagination of developers. However I was wrong. Such ships really existed although their names were different as same as their first owner. Four French built Flower class corvettes were captured in 1940 in French yards and after long reconstruction three of them entered sevrice in Kriegsmarine. Their service was rather short but very active and all of them were destroyed in days after D-Day. They were reconstructed as AA escort ships with minesweeping capabilities, their French armament was removed and instead were armed with 1*I 105mm gun, 2*I 20mm guns 2*IV 20mm guns, 2*II ( or 1*I and 1*II ) 37mm guns. http://www.cbrnp.com/RNP/Flower/GALLERY/German/PA2-1.jpg PA-2 on photo. Maybe I'm blind but setup of 37mm AA seems as 1*I and 1*II. Flower class corvettes have such funny looking shiluettes and were rather popular subject among manufacturers with many kits availaible on market. However there is small problem. French Flowers were akin to first ships of this class what means different forecastle, much shorter than made with plastic kits. However I found card model of HMCS Agassiz by Polish publisher Modelik which depicts Flower in very early variant in scale 1:100 and has really amazing level of details. I rescaled some of pages into 1:144 and decided to merge such parts with HMCS Snowberry by Revell. I like this ships so it's most probably not only vessel from such class which I want to build. Original HMCS Snowberry or pink painted HMS Anchusa are strong candidates for second Flower. There is little source for such unique version so many work will be probably based on solutions known from other ships in such era. Most of info comes from such site http://www.cbrnp.com/RNP/Flower/PROFILE/German_Flower.htm Years ago I made such ship in 1/350 from Mirage Hobby kit but there is little comparison due to size. Box is BIG and it's not marketing trick. I bought also wooden deck for such ship but not sure did I use them as German Flowers most probably never wore wooden deck. Decks are cut into parts. Midship section as same as big parts of superstructure will be taken from rescaled xero of Modelik HMCS Agassiz. Parts of xero will be moved into polystyren sheets of various thickness. AA guns will be 3d printed AA guns from Polish manufacturer Modelhobby. Sides are corrected to the short forecastle variant. As shape I used Agassiz parts. Not sure about ASW and minesweeping gear but most probably I make 6 single drop chutes, 3 per side and 4 deph charge throwers, 2 per side as areformentioned photo suggest such thing. Last thing. My 1/144 coastal submarines collection. I definitely must make something from surface. List of them: 1.British submarine HMS Holland 1 - first sub of Royal Navy 2. Austro-Hungarian submarine SMS U-10 from German U-boot Type UB-1 class, 3. Imperial Russian submarine Delfin, one of first Russian submarines ( torpedoes are mounted on specific mounts called Drzewiecki drop collars ( used mainly on French and Russian submarines, with few examples in other countries ), 4. Type IIB U-Boot U-23. Combat boat of famous highest scoring WWII submarine ace Otto Kretschmer. This boat in 1942 was moved in really interesting journey via land and Danube river into Romanian base and operated against VMF. Whole 30'th U-Boot Black Sea Flotilla scored some hits on soviet mostly smaller vessels. All six boats were sunk by soviet air raids or scuttled near Turkish coast after Romania and Bulgaria change of sides. 5. Type XXIII U-Boot U-2336. Last naval action of WWII in Europe when such boat sunk two allied merchants. Last one was sunk literally few minutes or hour before armistice. First three are from small Ukrainian manufacturer Mikromir, which make plenty of submarines in various scales, often less known or prototypes. Type IIB is from ICM while Type XXIII is from Trumpeter. Collective case for "coastal" boats.
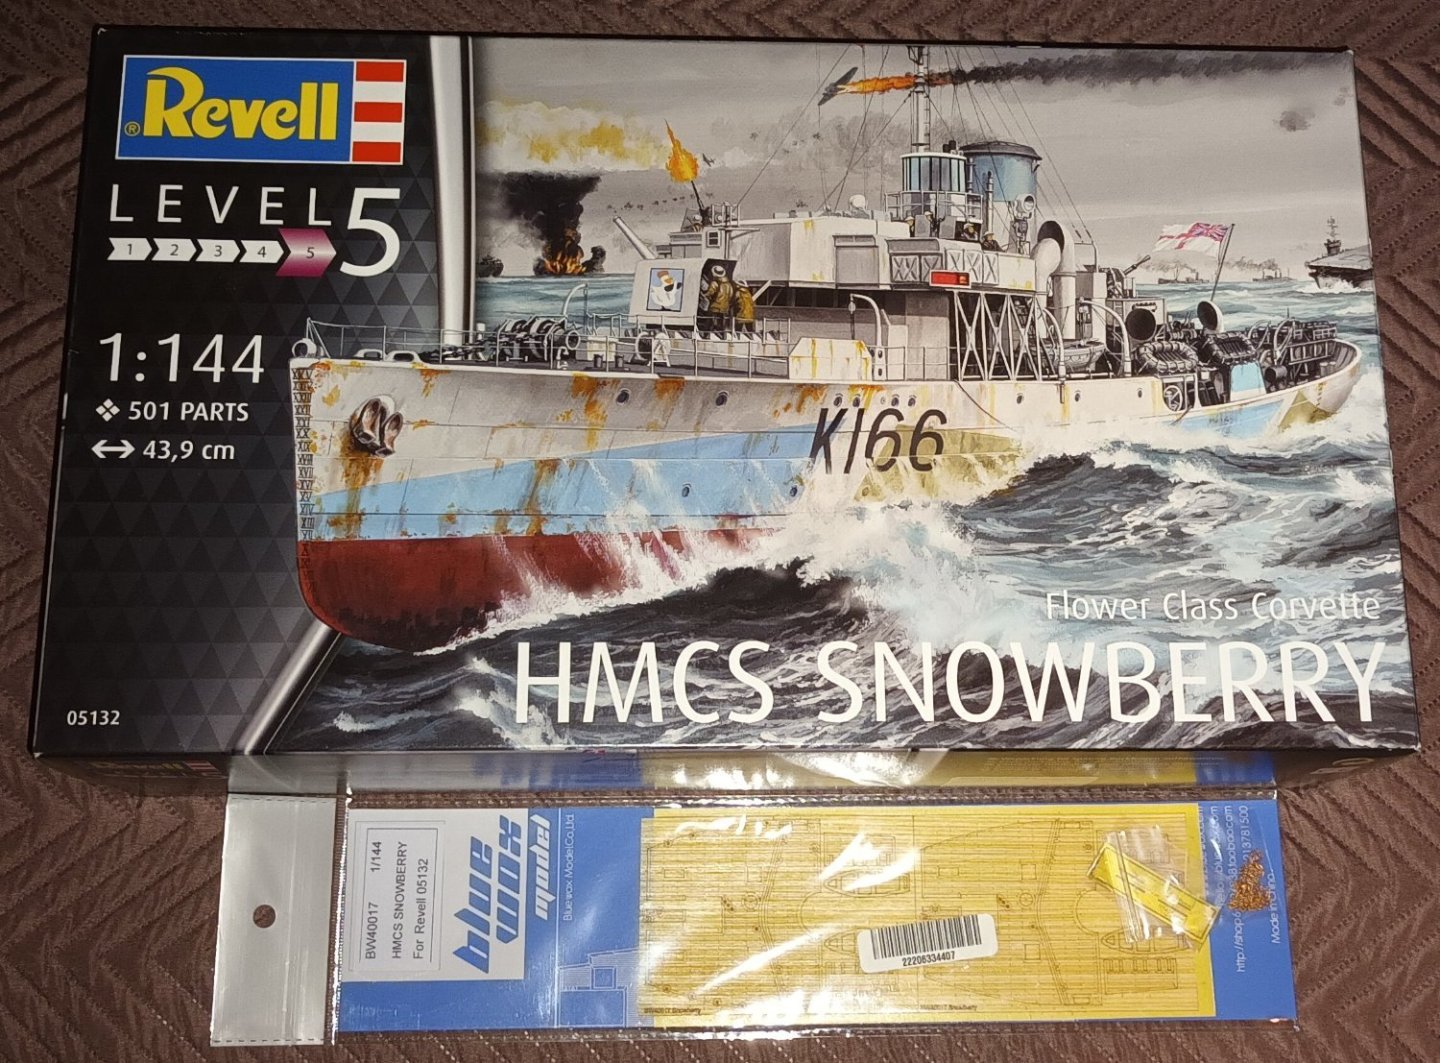

-
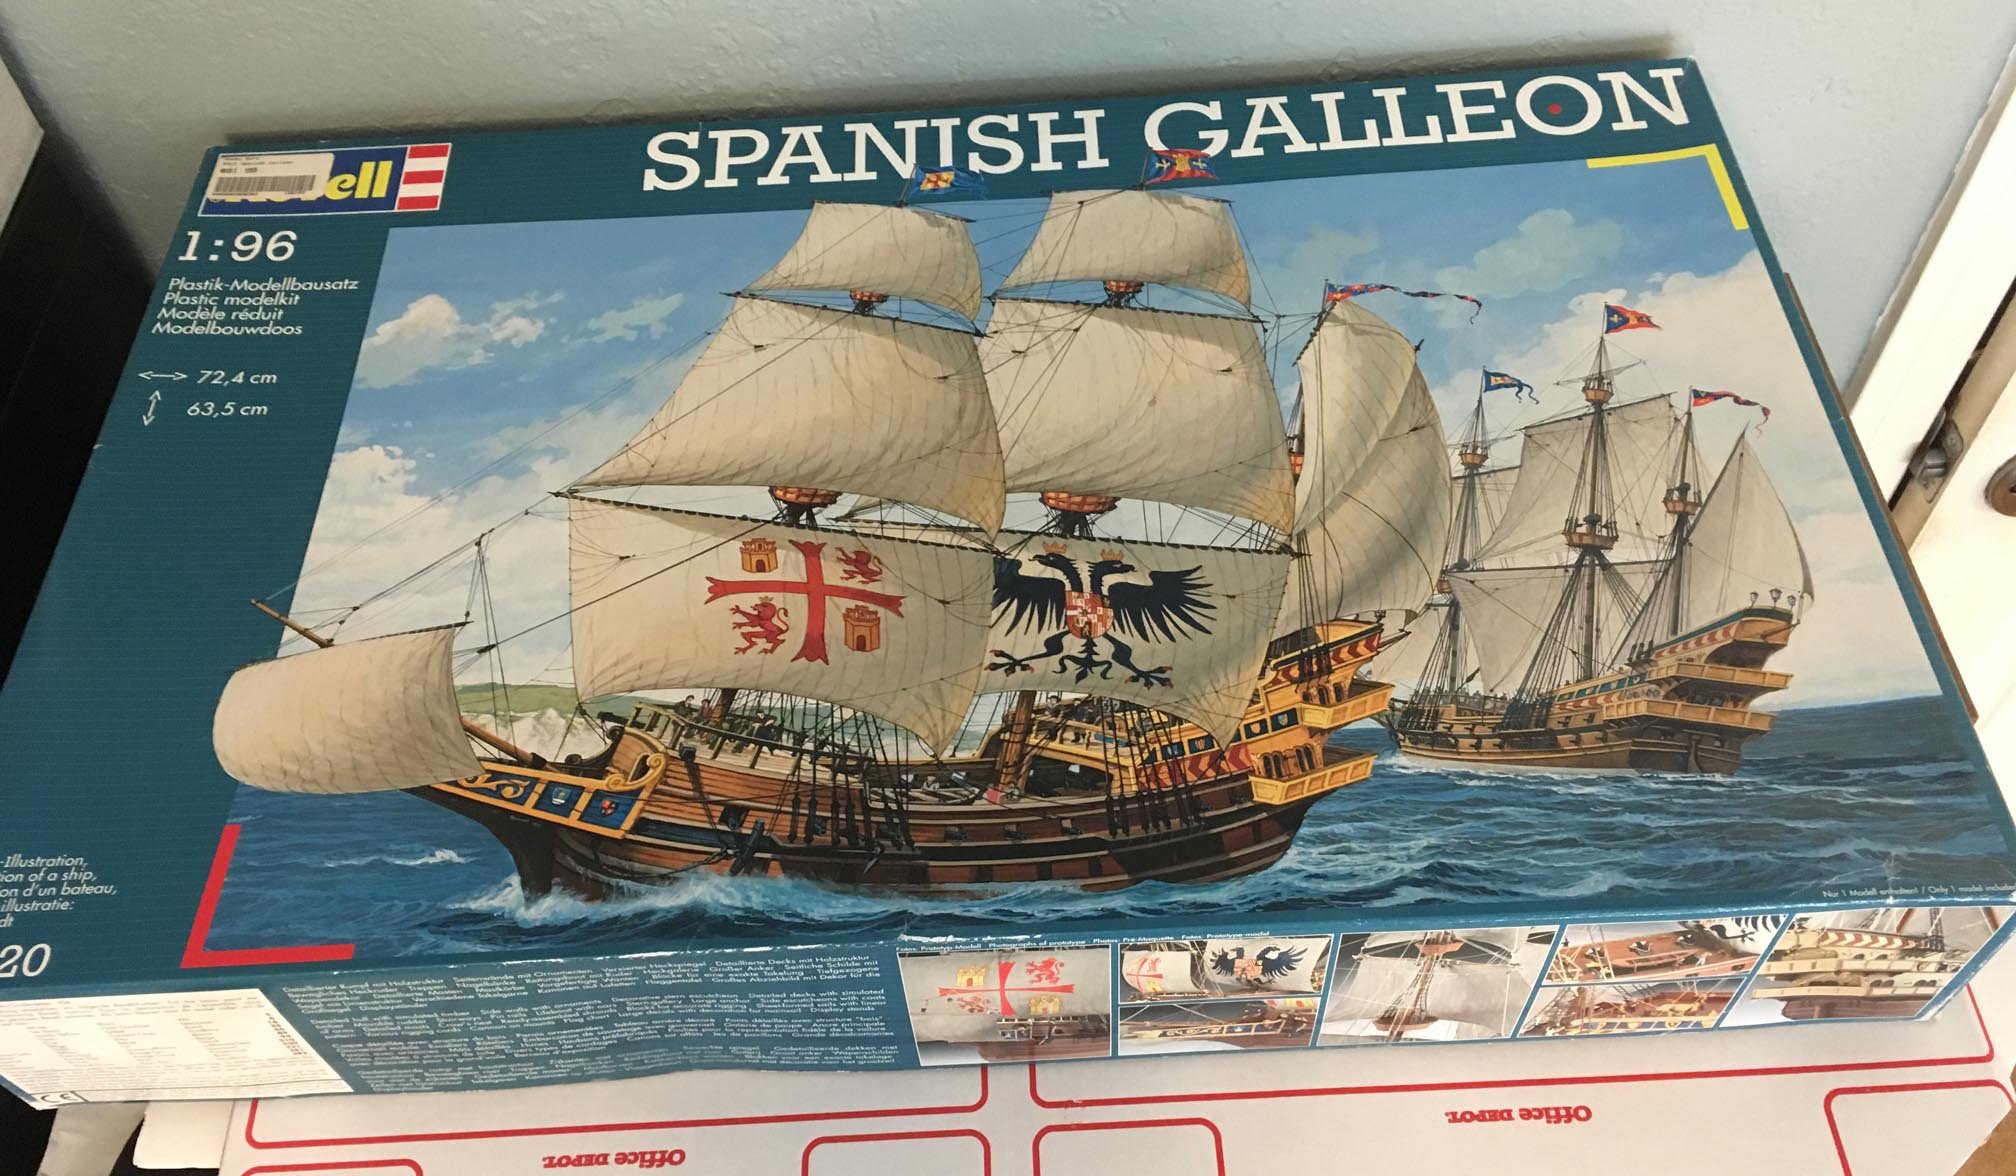
 This is my first build log here in Model Ship World, but it is about a plastic ship model that I have already been working on for about three and a half years. I may have have many years to go on the project, because I am only working on it here and there and I am doing some modifications as well, which add time. First, some background information. As a child and teenager, I built a number of plastic models. Some of my favorites were plastic sailing ships, and I still have a couple of them that I built over 30 years ago: I also tried to build the Monogram 1:120 USS United States at the time, but never completed it. My interests changed, and I left the hobby until December 2016. Then, I began to build the Revell of Germany 1:96 Spanish Galleon (which, I understand from my research on the internet, is more like a 1:64 or 1:65 scale). It's not a model that depicts an actual ship that once sailed, but more like a general idea of a type of ship from a bygone era (Armada era in the late 1500s). We have a replica ship of a Spanish Galleon here in San Diego at the Maritime Museum of San Diego. I saw it being built, and completed, and I have been on it under sail, and am excited about building a Spanish Galleon of my own. This model has some features in its shape that some may say are not very accurate for a Spanish Galleon from that period. Well, in my modifications, mainly with masts and spars, I hope to change some of that, but I would like to think of this more as a "fantasy" version of a Spanish Galleon -- embodying some of the "romance" of the ship type. Here's what the box looks like: And what was inside it, minus the sails: I originally was thinking of building it out of the box, but decided to do modifications when I realized that I wasn't going to use the plastic sails, because one of them was wrinkled, so it wouldn't convincingly "billow":

-
 Folks - Here is my rebuilt log of my Plastic Constitution build. I've copied the entries over from another forum and I reserve the right to alter a few things to clean up previous errors: I’ve had a Revell 1/96 USS Constitution fall into my stash at a very reasonable price (Overstock.com) and it seems appropriate to take it on in recognition of the upcoming anniversary of USS Constitution’s victory over HMS Guerriere on August 19. I’ve been spewing forth much hot air in defense of the Michel Felice Corne paintings and their representation of the ship as she first burst into glory against HMS Guerriere, so I feel obligated to back up my tirades with action. I’ll try to make this version align very closely to what we see in these paintings commissioned by Captain Hull immediately after his victory (https://picasaweb.google.com/106997252788973852335/PEMMichelFeliceCorneGuerrierePaintings'>https://picasaweb.google.com/106997252788973852335/PEMMichelFeliceCorneGuerrierePaintings). This does mean that I’ll set aside my Heller HMS Victory build for a time - I haven’t lost a bit of enthusiasm for that project - but I’ll apply what I learn in this new effort towards making that one better down the line. Like many of us (most of us?) I’ve built this kit before... a few decades (or more) back. It seems to have been almost a rite of passage for anyone wanting to take ship modeling seriously. I’ll call that one the MK 1 version and it still exists in a dusty condition on a high shelf in the garage: I was never happy with that earlier effort. Much has happened in the intervening years to improve my chances of making a more representative kit - most notably the proliferation of great information on the internet to inform my approach. This venerable kit was originally issued back... well, back before some of us were born(!)... and I think it still holds up well. Certainly there is plenty of flash and injection moulding marks that we don't see in modern kits, but the kit still makes up into an impressive display as we can see in the various log entries across this forum. It seems to be a copy of the 1/48 George Campbell plan model in the Smithsonian collection (http://www.modelshipgallery.com/gallery/misc/sail/constitution-48-sm/con-index.html'>http://www.modelshipgallery.com/gallery/misc/sail/constitution-48-sm/con-index.html) - which itself is a refinement of the famous Hull model built by the crew and presented to Captain Hull following his victory over Guerriere (https://picasaweb.google.com/106997252788973852335/PEMUSSConstitutionHullModel'>https://picasaweb.google.com/106997252788973852335/PEMUSSConstitutionHullModel). We see plenty of similarities in the bow and stern between the models and the Revell color guide somewhat follows the original. So the question becomes - does this Revell kit align well to the configuration of the Constitution when she earned her “Old Ironsides” moniker against HMS Guerriere? Well, strictly speaking no... In fact, if built OOB it would not actually represent Constitution as she was configured in any of her wartime cruises. There is a critical difference between the historic model and her modern copy - the Hull model shows 15 gun ports on each side of her gun deck (although the forward most are a bit too far forward) and the Revell kit shows 16. The difference is explained by this journal entry from Frederick Baury - one of Constitution’s midshipmen: 21 Sep 1812 Carpenters cutting bridle ports in bows ‑‑ Lieutenant Morgan and Midshipman Taylor left on recruiting duty. After returning to Boston following the battle, Isaac Hull resigned and command was handed over to the much despised William Bainbridge. He proceeded to make a few changes including the addition of “bridle ports” up forward to help in towing, anchoring, and to potentially serve as bow chaser positions. Unlike the guidance provided by the Revell instructions, these positions would not normally have had a gun mounted. If needed during a chase, a nearby 24-pounder would be hauled into one of these spots to lob a few shots and try for a lucky hit to take out a spar and slow down the prey. To that end Bainbridge made another change as outlined by Commander Tyrone Martin in his overview of Constitution’s armament: Following his succession to command of the ship on 15 September 1812, Commodore William Bainbridge eliminated the 18-pounder, simplifying his ammunition loading and handling problem by dropping one caliber. The gun had been virtually useless, anyway, since the ship's bow structure was not well suited to the accommodation of a chase gun. Bainbridge may have been a jerk of a human being, but he was an astute naval commander and he thought it made more sense to offload the 18 pdr chase gun and make room to store more 24 pdr ammunition for his main guns. So the 16 gun ports and the spar deck bow chaser as provided in the kit could not co-exist. The easiest solution to bring things into alignment is to ditch the bow chaser and the two forward main deck guns and call it a day. You’d likely have the correct representation of Constitution’s configuration when she scored her victory over HMS Java. Since I am trying to show her during the battle with HMS Guerriere, I will preserve the bow chaser gun, but I will need to take the drastic step of filling in the forward bridle ports. If you want to represent her last war cruise under Charles Stewart, then you’ll have to revisit the carronades on the spar deck. Here again Commander Martin provides some insight: [Charles Stewart] reduced the number of carronades to twenty and added two 24-pounder "shifting gunades" recently captured from the British by an American privateer. Designed by Sir William Congreve in 1814, each was 8' 6" long, but being of thinner barrel construction weighed only about 5000 pounds on carriage. The design was an attempt to combine the range of a long gun with the lighter weight of a carronade. The pair sat on carriages like the long guns, and it was expected that, since they were lighter, they could readily be shifted from side to side as combat required. Apparently Stewart had the two forward most and two aft most carronades removed and replaced with one each of the newfangled gunnades. I have no idea how these actually looked when mounted on a carriage, but it might be possible to find slightly over scale carronade barrels and mount them to the two gun carriages no longer needed on the main gun deck. Oh, and you’d also need to paint her with a yellow band - that is well documented. Regarding the carronades... As represented in the kit with the wooden quoins, these would seem to be rather quaint. The carriages on the foredeck with their small trucks would also seem to be inappropriate for 1812. Certainly by the time of Trafalgar it would be more typical for a carronade to be mounted with a pin to the bulwark with trajectory controlled by an elevation screw. I think Karl Heinz Marquardt addresses these same concerns in his AOTS book since the restored ship has these outmoded versions still represented. I’ll optimistically try to modify all of the carronades to include the elevation screws and eliminate the funky rolling carriages on the foredeck. Many folks get caught up in the various permutations of the stern gallery windows. Were there six or five?... or three or eight? The Hull model shows six, but the Corne paintings have five... I’m frankly not concerned either way. I assume there were many chances for the configuration to have changed across the years as different commanders supervised different refits within different time and budget limitations. Perhaps Hull and his crew replaced the six windows with only five after destroying the original gallery windows during their escape from Broke’s squadron (they axed out the windows and some of the transom to position guns to fire at their pursuers). Maybe there were always six and Corne got this wrong. Nobody knows the truth and we likely never will... I’m fine with working with the six depicted on the kit. The rudder on this kit is a bit perplexing... It is moulded with wood grain without any copper plating represented. Hmmm... That doesn’t seem correct. I’ll ponder the idea of putting some of my extra styrene strips to work and setting that right. Of course the kit provided plastic eyelets and rings are worthless - easily broken and a bit over scale. Those will be replaced with wire or PE versions. Somehow I managed to not break any of the plastic hammock cranes on my first effort all those years ago, but I’ll replace those with ones fashioned from brass micro-tubing and Jotika eyelets. Some of the thinner spars are also vulnerable to bending/breakage. I’ll try to shape some brass rod for replacements. I’ll need to carefully consider the moulded blocks - some may be usable or otherwise converted to usefulness. I suspect I’ll replace most with online purchases. The gun port lids will be omitted altogether - the Hull model and the credible paintings of the period (including the Corne series) don’t show them mounted (although the Hull model has a lid for the forward most ports). The pre-formed ratlines, moulded deadeyes, and vacuum formed sails will not be utilized. ‘Nuff said. As for the accuracy of the rig represented in the kit... I am having trouble finding a stable representation of her complete masting and rigging layout. The 1817 Charles Ware diagram may be about the best, but as Marquardt points out it differs in some respects to other seemingly authoritative sources. It is also interesting to note that the Corne paintings are showing crows feet rigged... that is unique. At least it appears that the trysail mast (immediately abaft the mizzen) is authentic - records indicate that Isaac Hull had this added to allow better movement for the boom and gaff. The Hull model clearly shows it fitted as well. I’ll worry more about the rigging when I’m much closer to that phase, but in the meantime I’ll probably fork over the $60 bucks for the Bluejacket manual set and perhaps rely on that for guidance... The biggest bugaboo in this kit is the multi-part decking. Ugh... The forums are full of attempts to mitigate the unsightly seams with various levels of success. Some folks just don’t worry about them at all and instead try to make the rest of the deck interesting enough to be distracting. I’ve even seen one modeler glue “battens” over them and pass them off as a “feature”. My first attempt was relatively successful in aligning the deck sections and eliminating any meaningful gap, but I was hesitant to fill and sand because I was trying to preserve the moulded wood grain detail. I was attempting to follow the “Les Wilkins” method of using a razor or low-grit sandpaper to remove the top layer of tan paint to reveal the base coat of black and highlight the grain (guidance that is also provided in the Revell instructions). I’ve since decided that the grain is a bit overdone at this scale and it’d be best to smooth everything down and use shades of paint and perhaps some artist pencils to impart the wood tones. Eliminating the seams is more important than preserving the grain. There are many fine efforts out there... Here’s one that inspires - well known to those of us who prowl the web for impressive builds: http://www.modelforum.cz/viewtopic.php?f=177&t=11091&sid=a22ea2a7adc8efe9b2fcffd0273bb134'>http://www.modelforum.cz/viewtopic.php?f=177&t=11091&sid=a22ea2a7adc8efe9b2fcffd0273bb134 Other useful online resources: http://www.history.navy.mil/photos/events/war1812/atsea/con-guer.htm'>http://www.history.navy.mil/photos/events/war1812/atsea/con-guer.htm http://www.navsource.org/archives/09/46/46021.htm'>http://www.navsource.org/archives/09/46/46021.htm http://www.maritimequest.com/warship_directory/us_navy_pages/sailing_ships/constitution/uss_constitution.htm'>http://www.maritimequest.com/warship_directory/us_navy_pages/sailing_ships/constitution/uss_constitution.htm http://www.hazegray.org/features/constitution/'>http://www.hazegray.org/features/constitution/ http://navysite.de/ships/consttour.htm'>http://navysite.de/ships/consttour.htm http://www.captainsclerk.info/'>http://www.captainsclerk.info/ Here are some of the modifications I hope to incorporate along the way: Customized elements: Fill in the forward Bridle ports. Thicken the gunport sills. Add a scratch built galley stove. Show the anchor cable/messenger cable rigged on the gun deck. Display Carronades with elevation screws. Replace rolling carronade carriages with lug mounted versions. Copper plating on the rudder. Hammock Cranes fashioned from brass micro-tubing. Brass Rod for delicate spars. New capstan on spar deck (and gun deck). Paint scheme (guidance from Corne paintings and Hull model): Yellow ochre band ending up forward in a scalloped half-circle. White trim on bow and stern details. Red gallery windows. Red gunport sills/linings, Green interior bulwarks on spar deck. White bulwarks on the gun deck. Green deck coamings/furniture on spar deck. Yellow ochre lower masts with “natural” above. Tops in Black. Black bowsprit with “natural” jib boom. Let the fun begin.
- 446 replies
-
- 4
-
-
- Revell
- Constitution
- (and 1 more)
-
 Hello to everyone. Having visited the Missouri in Pearl Harbor with my family, I promptly started work on a 1/700 Trumpeter version. After conversation with a co-worker about my new project, he came in the next day with a battleworn boxing of Revell’s 1/535 Missouri from his garage (pristine and complete inside) and gifted it to me, saying he had never found the time to start her. Needless to say, the 20” long Revell quickly took priority as a fun and relatively simple build. Not only is the Missouri a historically profound ship, the Revell kit is equally profound in the history of model building - developed during the advent of plastic models. Dating back to the 50’s, it was conjectured that the hull below the waterline was at the time classified, hence the generic flat bottom found on the Revell kit. Purists may not like the lack of props or multiple rudders, but for kids running their Navy on the living room carpet this was a huge plus. Even with the flash present due to older molds, this kit is pure fun and a trip back in time. This was a build I did from 2019, before I joined Model Ship World. Hopefully there is some value in documenting her. The deck, hull and main guns go together easily. (Sitting next to the Trumpeter 1/700 project, which has been in drydock ever since.) Regards, Steve
-
 My stepfather has been building a partwork HMS Victory for the best part of a decade, and so I finally caved and bought myself a ship to work on too. I decided to stick with something at least (mostly) injection moulded rather than wood, but it's ended up slightly larger than I expected - baby for scale: It will be built here: The build will not be wholly as instructed, as there are a couple of modifications I'm planning to the base kit which are quite simple such as the bulwark stanchions and moulding around the deck houses. More significantly there are a few aftermarket parts available for the kit - the main one being the replacement of the plastic, three-part deck with a laser cut oak veneer equivalent. The supplied deck has 'positive' timber outlines and so even if I can fix the glaring gaps between the three deck sections and rescribe the grain it's still going to look quite bad. There are also photo-etched names and ornamentation, draft decals and flags which I think I will avail myself of, but the rigging and its level is yet to be determined (see later) Anyway, on with the build, commencing with purchasing two hardback books about the ship (by C. Longridge) and getting the hull together. The first modification are on the bulwark stanchions - seen here: These should be metal posts rather than fillets, so I have cut away and sanded them flush as below. You can see the fairly awful decking laid in place: I experimented with fixing the decks together with supporting styrene to get them as level as possible and extra clamps, but even so the joins are very obvious indeed. As such, I'm expecting to use the laminate decking and will work under that assumption: Despite enjoying the occasional ferry and reading the Aubrey-Maturin series I've no meaningful knowledge of rigging and only a very minor familiarity with terms (please excuse me - lots of googling going on). I am aware that hismodel provide both rigging plans as well as CNC machined deadeyes, photoetched eyelets and hooks, etc. but frankly I don't know if that's just going to end up being too much for me. I think I would be quite happy with the rigging as described by the Revell kit instructions, except for the fact that the shrouds and their associated deadeyes/lanyards are moulded plastic - it just doesn't look right to me. QUESTIONS ABOUT RIGGING: Is real rigging a fools errand for a first sailing ship build? I don't mind taking time but I don't want it to be impossible! I'm thinking given the low cost to replace the eyelets and hooks with photoetch/wire as standard. My first thought was to use the Revell hardware placements like-for-like, and then add any additional for the 'real' rigging as I go along (if I take that path). Is that sensible, or should I really know upfront? If I go ahead with replacing the shrouds with thread, how much time is that as a proportion of the time spent doing a) the Revell rigging, or b) real rigging? I want to know if I'm going to commit to that whether I should just go the whole hog, or whether there really is a large gap and I need to think carefully. It is also really not clear to me why I would replace the belay pins, though it seems to happen frequently - I appreciate they are about twice the size they should be, but they are still very small. Does the fact they are plastic play a role? QUESTION ABOUT OTHER AFTERMARKET PARTS: Most build logs seem to replace the plastic railing stanchions with turned brass equivalents - not cheap at all, worthwhile? Many thanks for reading, see you all soon.
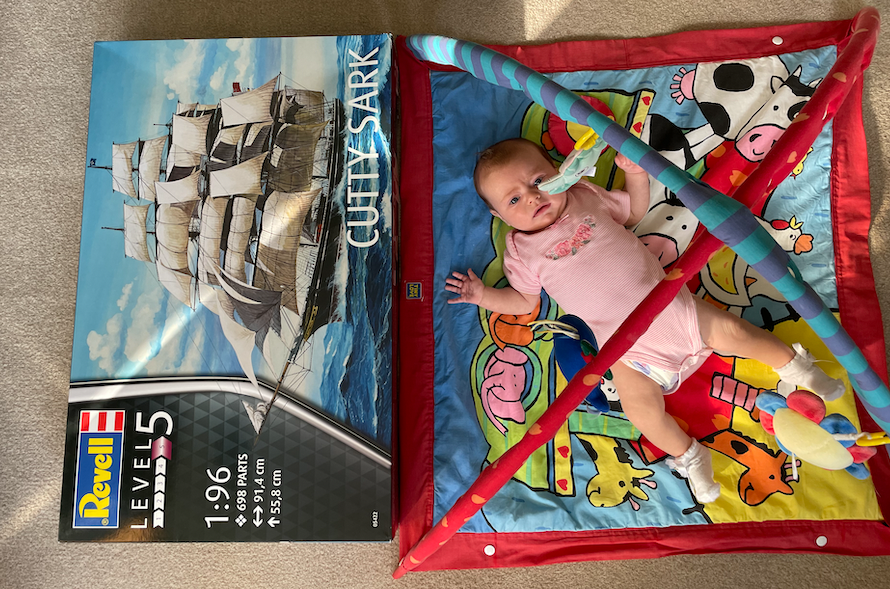
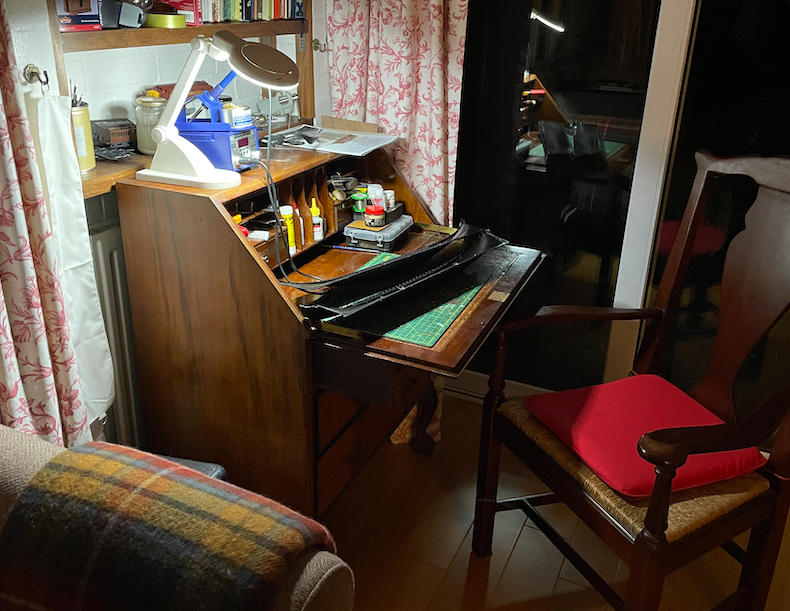
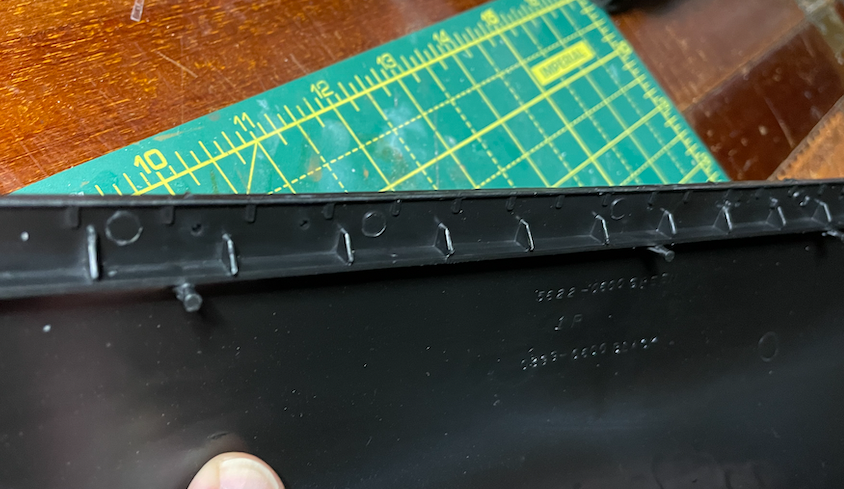
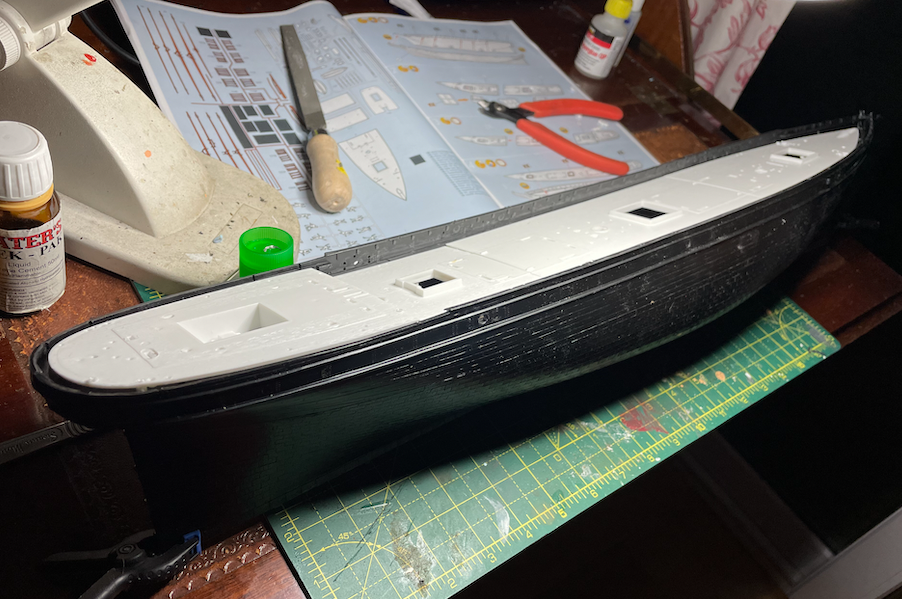
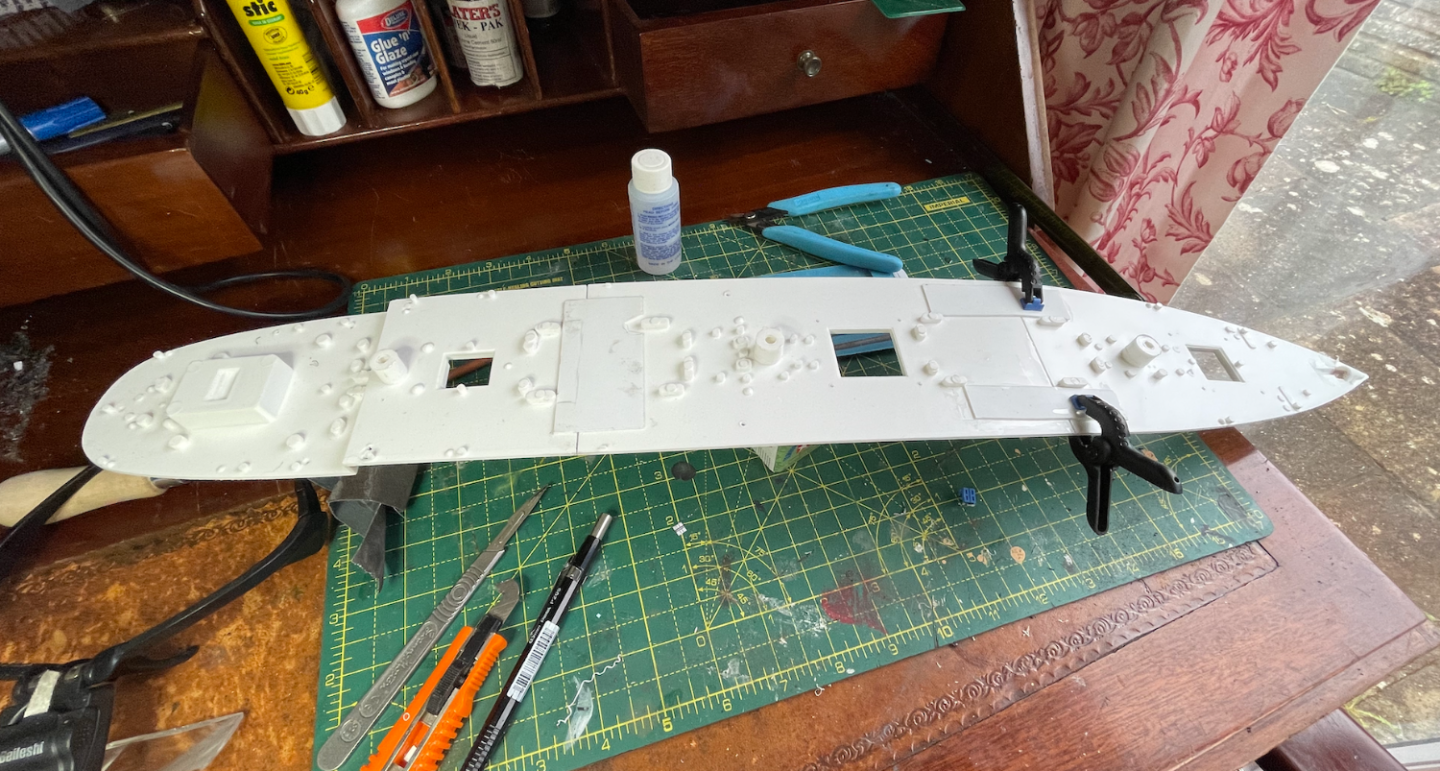
- 6 replies
-
- 6
-
-
- Cutty Sark
- Revell
- (and 2 more)