All Activity
- Past hour
-
 Malcolm Brown reacted to a post in a topic:
HMS Victory by Malcolm Brown - Heller - 1/100 - PLASTIC
Malcolm Brown reacted to a post in a topic:
HMS Victory by Malcolm Brown - Heller - 1/100 - PLASTIC
-
 Oh yes, Branston is God’s condiment. I’ll be serving it up with some good ‘ol pub fare with cheese, crusty bread, my homemade Scotch Eggs and a pint or two of draught beer! 😋 To top it all off, a wee dram of single malt from Campbeltown, Argyll, aka, the ‘Wee Toon’ from whence my family originates🏴😁
 -
oakheart reacted to a post in a topic:
HM Cutter Speedy 1828 by oakheart - from plans drawn by Bill Shoulders in 1972
-
 Get that one but I started a long time ago with Canon, so no need to change. I have quiet some L lenses (which I collected over the years).
 -
 Thank you so much. OC.
 -
wvdhee reacted to a post in a topic:
Hawker Hurricane Mk. I by ccoyle - Halinski - 1/33 - CARD
-
wvdhee reacted to a post in a topic:
HMS Snake by drtrap - Caldercraft
-
Matt D reacted to a post in a topic:
85' ARB by Melissa T. - Scale 1:32 - POB - First Scratch Build
-
wvdhee reacted to a post in a topic:
HM Cutter Trial 1790 by BrochBoating - Vanguard Models - 1:64
-
 I know you were, just given' ya the biz.
 -
 Looks worse than rigging a miniature ship model ...
 -
Keith Black reacted to a post in a topic:
Ghost Ship Jenny by Glen McGuire - 1/400 - BOTTLE
-
 wefalck reacted to a post in a topic:
AEG G.IV - Creature of the Night by DocRob - Wingnut Wings - 1/32
wefalck reacted to a post in a topic:
AEG G.IV - Creature of the Night by DocRob - Wingnut Wings - 1/32
-
Keith Black reacted to a post in a topic:
Ghost Ship Jenny by Glen McGuire - 1/400 - BOTTLE
-
Keith Black reacted to a post in a topic:
Ghost Ship Jenny by Glen McGuire - 1/400 - BOTTLE
-
 I prefer Canon but amazing Nikon glass is so much cheaper than Canon these days. I mainly use a 300 2.8 & a 500 4 so cost was important!
 -
 Allan may be surprised it shows doubles for 12 pounders and up.😁
 -
 Looks really good!! Rick
 -
I've just started rigging my Beagle, and I have found Occre's instructions from Bowsprit installation (in which there were no instructions) to end of rigging to be pretty much useless to the point I probably won't buy another Occre kit. Even the guy making the model for their official videos is doing things differently from the parts I can make out in the instructions, and John Aliprantis who has a youtube Beagle series is doing things in another way. For the bowsprit, I found the general location the Bowsprit hole should be located and started to dig around with my hobby knife until I found the slot that is intended for the bowsprit, I then made a small hole and slowly opened it up with a round file and sandpaper until it fit the dowel pretty snuggly. Here is a pic of my bowsprit inserted so you can get a general idea of where it needs to be installed.
-
 That looks bloody amazing!!!!
 - Today
-
Get you there and a ken, but unfortunately we did the opposite way, we moved into a 3 bedroom bungalow with garage (my wife is disabled and can´t use steps anymore) so it`s hard to stop collecting LEGO lol, she even supports me in it. I buy them and fix them / restore them, all my cameras are working or were working once (have not the time to check on them regulary) but some of the older ones I use frequently. For daily use I have a Canon EOS 70D, a 5D Mark III and a Canon EOS 3 SLR and a PowerShot G7X Mark III for video (YouTube).
-
Hi Glen, that would explain a lot lol, not sure but I think I found this article too, but it looked a bit "dodgy" in my opinion. I was even looking if there is any chance that the name was different, but there are not many 3 mast schooners at all around that time leaving The Isle of Wight in 1822. There have been some ships around 1820 to 1823 but not many three mast schooner and definitely none with the Name "Jenny". The funny fact is, even the whaler "Hope" brings only very strange results. There was a Scottish Whaler which left Peterhead in 1802 sailing to the Greenland but never had a Captain with the name "Brighton". The "Hope" was lost in 1830 in the Davis Strait (roughly 8,900 miles away from the Drake Passage) beside 17 other fishing vessels in this area. Funnily 1823 another 14 vessels were lost around Greenland. So with all that uncertainty I could chose somehow any three mast schooner to "create" my own "Jenny"? Not sure if there are any wooden models out there or plans for a three-mast schooner. The only one that comes in mind is the "Atlantic" and maybe the Virginia (which I don´t like because of the canon).
- 61 replies
-
- 1
-
-
- Ghost Ship
- Jenny
- (and 1 more)
-
 Today, I managed a very dreaded step in the build, finishing the mid section of the upper wing. Before, I added rigging wires from the nacelles through the cabane struts and later to be fixed under the upper wing, therefore they are not taught. WNW tells you to install the cabane struts first, reaching diagonally from the fuselage, which makes perfect sense, but then let you put the inner struts from the top of the fuselage to the gas tank in the middle of the upper wing to be glued into it´s wing fitting and then last into the fuselage. I didn´t like that second part like shown here in the manual and preferred to have all strut gluing to make on the upper wing, which worked good. Alignment was not easy, but now all looks more or less straight. Cheers Rob
 -
 Thats a beautiful build Jeff, Congratulations to finishing this project. Your lightship is great. I like the superstructure and the fitting out very much. The lighting of the pictures is also very nice Nils
 -
 I use liquitex: https://www.liquitex.com/en-ca/products/professional-acrylic-ink-cerulean-blue-hue But I know some people also like daler rowney. They are essentially pure pigment, no binder so they go on translucent and are very vibrant. If you have an airbrush they go on really nice through them. But you can also use a brush or mix them with varnish.
- 61 replies
-
- 3
-
-

-
- Ghost Ship
- Jenny
- (and 1 more)
-
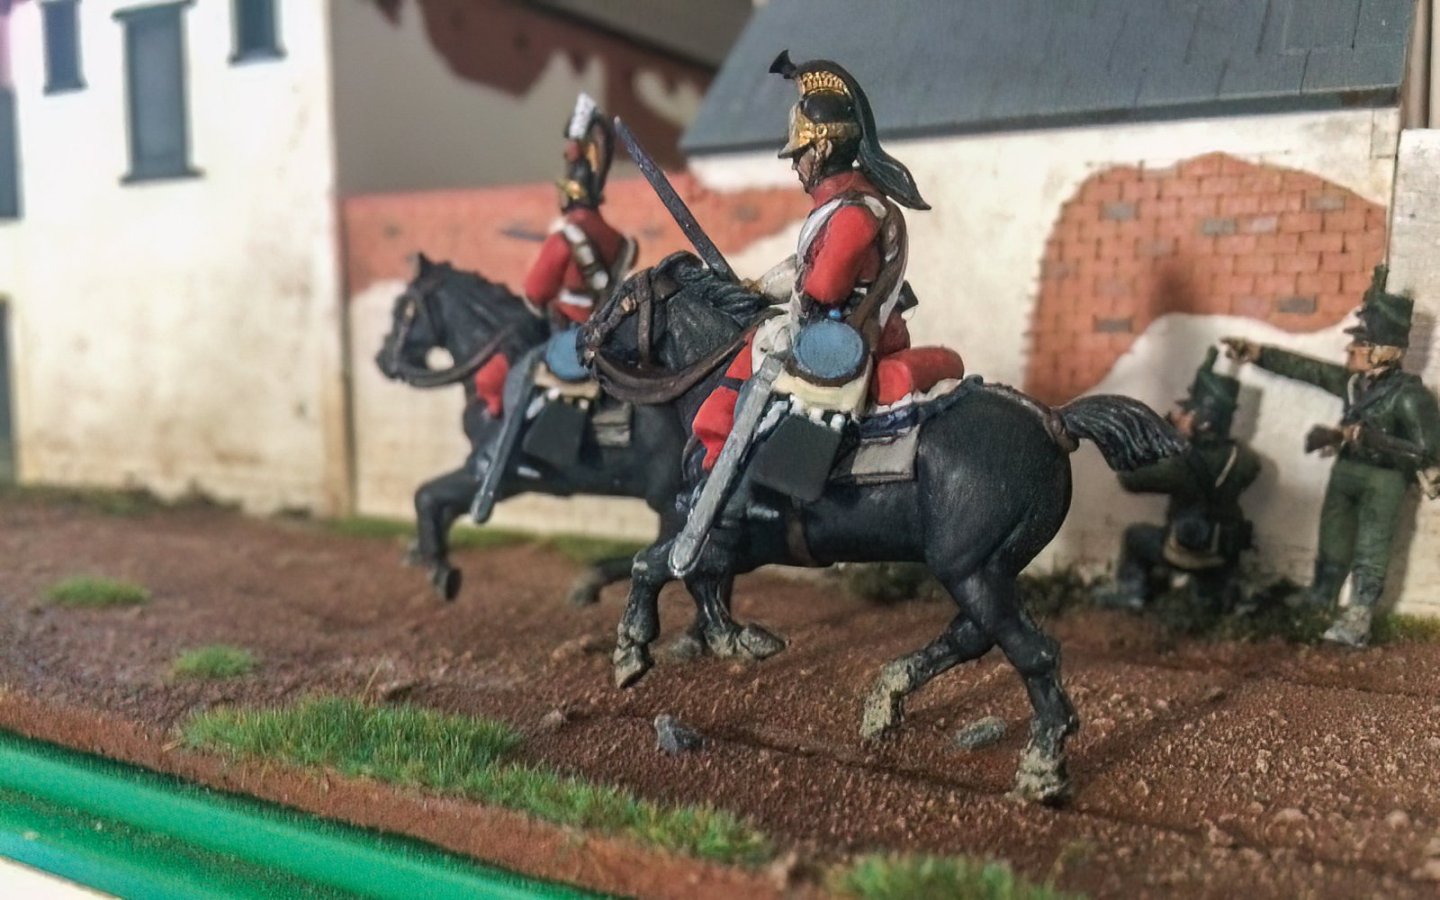
Cavalry "Charge........" OC.
-
 What kind of inks are you talking about? Do you have a product name as an example?
- 61 replies
-
- 2
-
-
- Ghost Ship
- Jenny
- (and 1 more)
-
I try and not collect or I wouldn't stop. Moving to a much smaller property helped there. I'd definitely enjoy old cameras as long as I could use them. At the moment I just use a Nikon D5 & D850, though not for model pic usually!
-
 Fabulous work, Jeff!
 -
 nice job, Jeff. YOur customer file now shows a 10% discount on the next kit you buy from us. BTW, that includes the Amati, Caldercraft and Vanguard models on our website.
- 26 replies
-
- 1
-
-
- Nantucket Lightship
- BlueJacket Shipcrafters
- (and 1 more)
-
You could also try inks. They give you very vibrant colours with little coverage.
- 61 replies
-
- 2
-
-
- Ghost Ship
- Jenny
- (and 1 more)
-
Tell me, I have tons of LEGO in the house as well, was thinking (dreaming) of building Stormwind (World of Warcraft) of LEGO, but I realised that this might need 200 times more LEGO as I own right now... but still tons of LEGO here and won´t sell it, even if the prices are increasing (I´m a bit of a vintage collector with old Commodore C64s, Amiga and Atari computers, cameras from 1872 till nowadays and such stuff - my wife gave up to kill me lol)... Micha
-
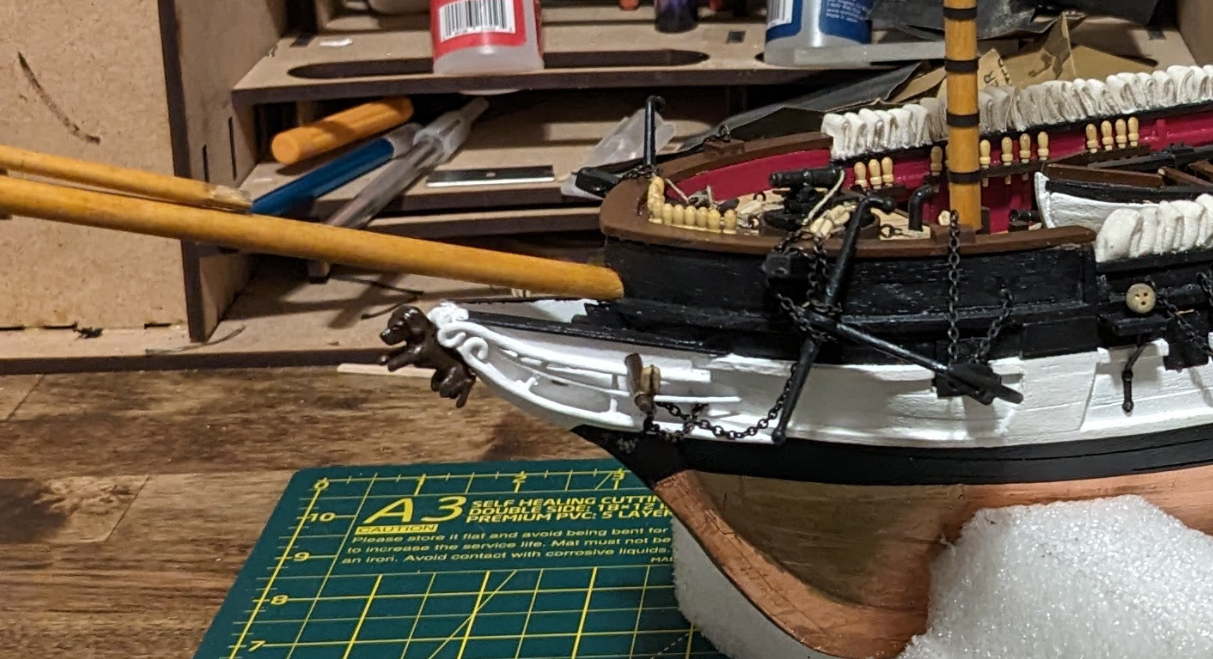
 That is a beautiful part. The galleries (toilet rooms) were by far the most difficult and challenging parts of the CAF kit of the HMS Bellona, that I put together. I wish I had something of that nature, 3D printed. You did a great job at creating these complex parts with your software. Yves
 -
Yes, Gary. I'm experimenting with adding a touch of Tamiya clear blue to some gloss varnish to see if I can get a good look. The Tamiya clear blue is sort of translucent and I'm hoping it will give me just the slightest hint of blue while maintaining the shine of the gloss varnish. I've got lots of leftover icebergs to play around with! I was talking about snow melt, but you are right, Keith. My choco taco used to last about 30 seconds in August heat before it was making a puddle on the sidewalk!
- 61 replies
-
- 3
-
-

-
- Ghost Ship
- Jenny
- (and 1 more)
-
 Unlike steam railroad locomotives, marine engineering practice required use of condensing engines for two reasons. First, high pressure boilers did not tolerate salt water. Scaling from salt deposits impeded heat transfer causing failure of the boiler tubes. Second, the development of the triple expansion engine, increasing thermal efficiency, required steam in the low pressure to be exhausted well below atmospheric pressure. New York City harbor craft, however appear to be an exception to this rule. In his excellent book, Tug Boats of New York City, (Photo caption page 85) author George Matteson writes: "The white vapor emanating from the tug is exhaust steam, which indicates that it is equipped with a noncondensing engine....... Most small harbor tugs were equipped with noncondensing engines to save expense and because clean fresh water was always available from city hydrants." Railroad locomotives are subject to height restrictions from tunnels, bridges, etc. These harbor craft were not. the easiest way to increase boiler draft was to increase the height of the smoke stack with steam vented separately. As with railroad locomotives, as steam technology matured, marine engineers worked to utilize every last BTU from fuel bought and paid for. For sophisticated steam ship designs this lead to all sorts of waste heat recovery devices often located in the smoke stacks. These harbor craft traveling very short distances did not require these complicated steam plants.