-
Posts
1,017 -
Joined
-
Last visited
About Snug Harbor Johnny

Profile Information
-
Gender
Male
-
Location
Southeastern Pennsylvania
-
Interests
history, craft projects
Recent Profile Visitors
The recent visitors block is disabled and is not being shown to other users.
-
 Keith Black reacted to a post in a topic:
Thermopylae by My Fathers Son - or as near as I can get it
-
 Scottish Guy reacted to a post in a topic:
Thermopylae by My Fathers Son - or as near as I can get it
-
 Scottish Guy reacted to a post in a topic:
Thermopylae by My Fathers Son - or as near as I can get it
-
 Scottish Guy reacted to a post in a topic:
Thermopylae by My Fathers Son - or as near as I can get it
-
 Scottish Guy reacted to a post in a topic:
Thermopylae by My Fathers Son - or as near as I can get it
-
When trying to refine the re-scaled (and corrected) bulkheads to the Great Harry, I used springy wire to hold against the sides (fore-to-aft) in many places and sighted down the wire to see the 'ins and outs' of how the wire ran. Some places required veneer strips to be glued to the edges of the errant bulkheads where the wire run 'dipped' - and fairing by sanding where they pushed out. This seems to be an iterative process no matter how careful one is with scaling, drafting and scroll saw cutting. The extra care done at this stage will pay-off with the first planking being better - with less sanding or filling required prior to second planking. Having done a hull already that was single planked, I'm a convert to second planking.
-
 Old Collingwood reacted to a post in a topic:
Great Harry (Henry Grace A Dieu) by Robert Hamlin - Sergal - Scale ~1:64 - KIT RESTORATION
-
 Keith Black reacted to a post in a topic:
Roar Ege by Scottish Guy - Billing Boats - 1:25
-
 Keith Black reacted to a post in a topic:
Cutty Sark by David Chapman - Revell -1/96 - PLASTIC - beginner's build
-
 Paul Le Wol reacted to a post in a topic:
Roar Ege by Scottish Guy - Billing Boats - 1:25
-
The deck is looking great, and you have the opportunity now to consider 'random' plank butt joints, instead of strictly geometrical arrangements often seen ... by that I mean where a 'standard' scale plank length is decided on and the next strip of planking has a joint put exactly halfway between the joints of the neighboring planks - and so on. Some have 'staggered' the joints by thirds or quarters to make a 'herringbone' pattern. BTW these joints are incised by a very sharp chisel of the exact width needed (one can make one's own tool, or adjust the width of a mini-chisel by grinding). In a shipyard, there were likely lots of planking stock from the mill of roughly the same length, but end splits (checks) bad knots, warpage, twist, etc. had to be cut out before use - and this would randomize the lengths of clear stock suitable for decking, ergo a random pattern in the resultant deck that would not 'draw attention' to itself as a very regular pattern might. The question of doweling at the joints depends on the scale of the project and the taste of the user - and there are several ways to approach that (if desired) elsewhere in the forum logs. The subject of caulking also comes up - with various approaches to that (some have darkened the edges of the plank stock with graphite or crayon, each with its own characteristics ... anything liquid tends to 'wick' into the planking stock from the edge - not a good thing). With the planking in place having slight natural gapping, one might consider (after doing a test piece) pressing in actual dark caulk with a putty knife into the gaps - removing most of the excess with the tool before letting it dry. Then a light sanding with very fine grit would clear the planks of any film residue.
-
 Scottish Guy reacted to a post in a topic:
Roar Ege by Scottish Guy - Billing Boats - 1:25
-
The 70s 1:20 'Vikingskibbe' kit had a construction jig designed so that the hull was planked upside down on the jug. Later, frame halves that had to be cut from plywood stock had to be fitted to the inside of the planked hull (once removed from the construction jig and held right side up). With the irregularities inherent in planking, the odds of the jagged outside edges of the pre-printed on the stock of fitting nicely inboard were low. Ergo, if one wanted a good fit, card stock would have to be trimmed and custom fit to make templates to cut out properly fitting frame halves (something like that was supposed to have been done on the original. I'll have to go back and review the logs on that kit that are in the MSW library. As I recall, there were a couple outstanding builds. One has the option of not attempting to model any rivets, while some have gone to great lengths to do so (many hundreds of them). Any plank seams that will be concealed by decking (and the Oseberg gets entirely decked) do not require any inside rivet detailing - simply drilling for whatever mini-brads one has will be good enough, since the square 'washers' for the peened end are inboard.
- 56 replies
-
- Roar Ege
- Billing Boats
-
(and 2 more)
Tagged with:
-
Per the nearly complete log on the Sergal Thermie by Popeye the Sailor, 1:124 is a challenge to work with, and I can see there were some major compromises/shortcuts present in that kit ... ergo many do not recommend it. The 1:78 CS may be another matter, but I can't comment - so check if there are logs on that. I pondered the AL version at 1:84, but MSW response cautioned about various inaccuracies on that kit . Again, I haven't dug into it. The Billing version might be OK, as not all Billing kits are the same. However, all kits seem to have their plusses and minuses ... strong points and weak points in various aspects of materials and documentation. The most experienced builders will tell you that one does not have to build a kit 'out of the box', but can make some common-sense corrections and improvements. And it does not have to be a major 'bust' either.
- 62 replies
-
- Cutty Sark
- plastic
-
(and 3 more)
Tagged with:
-
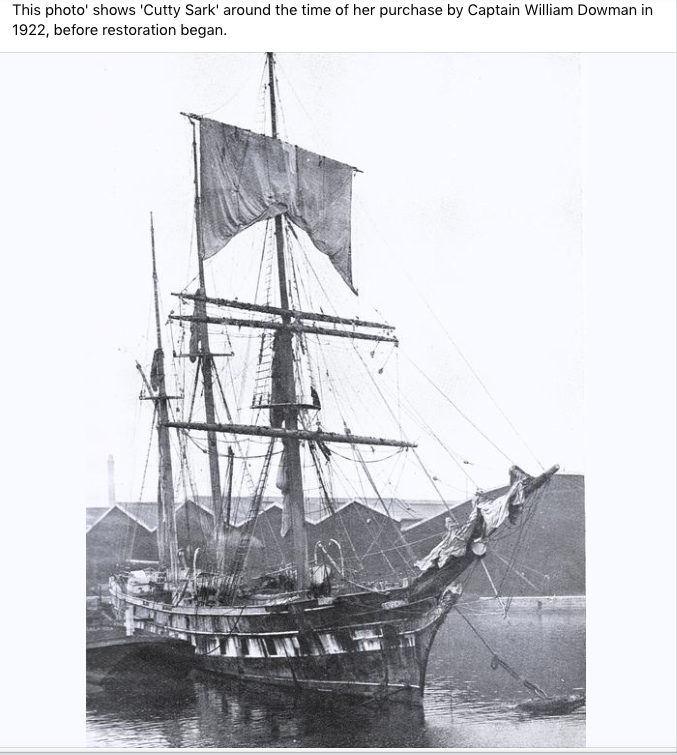
'Just saw this 1922 photo of the Cutty Sark (pre restoration by the new owner to clipper rig) rigged as a barquentine ... 'Wonder if anyone ever modeled her in this configuration. Note that the Revell 1:96 Thermopylae kit has an option to rig as a barque, as she was in the NW timber trade and as a Spanish trainer. The text below gives additional meaning to an ancient paradox that can apply to our hobby ... So perhaps any thoughtful effort of make a reproduction in miniature of a given vessel might be considered 'real'. Science does for reality what Plutarch’s thought experiment known as “the Ship of Theseus” does for the self. In the ancient Greek allegory, Theseus — the founder-king of Athens — sailed triumphantly back to the great city after slaying the mythic Minotaur on Crete. For a thousand years, his ship was maintained in the harbor of Athens as a living trophy and was sailed to Crete annually to reenact the victorious voyage. As time began to corrode the vessel, its components were replaced one by one — new planks, new oars, new sails — until no original part remained. Was it then, Plutarch asks, the same ship? There is no static, solid self. Throughout life, our habits, beliefs, and ideas evolve beyond recognition. Our physical and social environments change. Most of our cells are replaced. Yet we remain, to ourselves, “who” “we” “are.”
- 62 replies
-
- Cutty Sark
- plastic
-
(and 3 more)
Tagged with:
-
 Snug Harbor Johnny reacted to a post in a topic:
SOLEIL ROYAL by Robert Taylor - Heller - 1/100 scale - PLASTIC - side project
-
 Snug Harbor Johnny reacted to a post in a topic:
USS Constitution by JSGerson - Model Shipways Kit No. MS2040
-
 Snug Harbor Johnny reacted to a post in a topic:
DUTCH PINAS 1590 by tartane - FINISHED - scale 1:87 - reconstruction
-
 Snug Harbor Johnny reacted to a post in a topic:
The Mayflower by Knocklouder - Amati - 1:60
-

For Beginners -- A Cautionary Tale
Snug Harbor Johnny replied to ccoyle's topic in New member Introductions
-

Use of “other power tools”
Snug Harbor Johnny replied to kgstakes's topic in Modeling tools and Workshop Equipment
I suppose if one is TOTALLY exasperated with how a build is turning out, or perhaps a pet or toddler has inflicted enough damage that repairs would be impractical or badly show - you could use one of the 'other power tools' ... like tossing the model into the chipper/shredder. 😉 -
Its a plus that there are 'some' instructions in the Roar Ege kit (I just peeked into my stashed kit and saw that there is a booklet included ... didn't open the plastic wrapper to check it out) ... the 'vintage' Vasa (sold in the 70s as Wasa) in 1:100 had none, apart from a few sketches on the plan, which was printed on both sides. My Dad gave me the kit (fortunately he also bought the accessories kit that had cannons and fittings ... sold separately in those days), which was started through hull planking - on the 'assumption' that it was accurate (it wasn't then, but has been revised at least a couple times in the interim based on marine archeology). In recent years I've made some progress (and partial corrections) on the build (now suspended pending learning about rigging). The BEST 'instructions' are the builds available for perusal on MSW - and there are several for the Vasa. There are at least a couple for the Roar Ege, and no doubt if you study those you can avoid some pitfalls and also see what other builders have done to improve on what came in the box. As for text instructions from Einar Billing back in the day, a sheet (in several languages) was provided in my 'Wasa' kit. It included: "You are about to begin the exciting task of building a Billing Boat model, and I hope you will have many pleasant hours doing so. The most important point is that this kit is intended to be built, and not merely assembled. In consequence, you must not expect the parts to fit together perfectly - it will be necessary to exercise skill and imagination in the building of this kit. ... But thought and care should be exercised during construction ... after all, any child could put a puzzle together. ... I wish you a lot of success in building your model. Yours sincerely, Einar Billing." When life gives you a lemon, make lemonade ! Johnny
-
Another reason for my interest ... I have this kit in my stash (as well as the Billings Oseberg), since the early 'Vikingskibbe' version in kit form was far more challenging (although the prow and stern were 'built up' just like the original), since al the parts had to be cut out - and the veneer stock in my inherited kit was so dry, warped/rippled and splitting like crazy, everything would have to be made from scratch. Also, it was 1:20 scale - the Roar Ege AND the Oseberg are both 1:25 - sop can be displayed together. The Roar Ege will be built first to gain experience with this type of ship, and I plan anyway to test-fit the stakes first, modify, then remake in laminated walnut veneer I have in stock.
- 56 replies
-
- Roar Ege
- Billing Boats
-
(and 2 more)
Tagged with:
-
 Snug Harbor Johnny reacted to a post in a topic:
Ghost Ship Jenny by Glen McGuire - 1/400 - BOTTLE
-
 Snug Harbor Johnny reacted to a post in a topic:
Cutty Sark by Richard Dunn - 1/40 scale - scratch built semi-kit prototype
-
 Snug Harbor Johnny reacted to a post in a topic:
Cutty Sark by Bruma - Revell - 1:96 - PLASTIC
-
Why not build them "side-by-side" in one build log? Like Raggedy Ann and Andy dolls (sewn together holding hands), they'll never get separated. That is, future perusers might go through one log yet not see the other.
- 56 replies
-
- Roar Ege
- Billing Boats
-
(and 2 more)
Tagged with:
-
 Snug Harbor Johnny reacted to a post in a topic:
Mary Rose by Baker - scale 1/50 - "Your Noblest Shippe"
-
 Snug Harbor Johnny reacted to a post in a topic:
Mayflower by LCdr Dave - Billing Boats - 1:60
-
 Snug Harbor Johnny reacted to a post in a topic:
Thermopylae by My Fathers Son - or as near as I can get it
-
I'm with you, Keith - and am happy to do what I can when I can for as long as I can. With luck and Providence, there'll be some good years left. I'm learning to be 'one with the ship', insofar as old-time sailing ships were hand built machines with many parts. And there are VERY many parts, so sometimes we have to pick and choose what to include in our 'artwork' models.
- 62 replies
-
- Cutty Sark
- plastic
-
(and 3 more)
Tagged with:
-
I thought that flummoxed or discombobulated were similar ... in the U.S. there is "thrown for a loop", "knocked over with a feather", "mind boggling", "hit me like a ton of bricks", awestruck, "stopped me in my tracks", "made speechless", thunderstruck, dumbfounded, "set back on my heels", "took the wind out of my sails", "totally blew me away" ... or a favorite of mine - "turned my head like a one eyed dog in a meat factory".
-
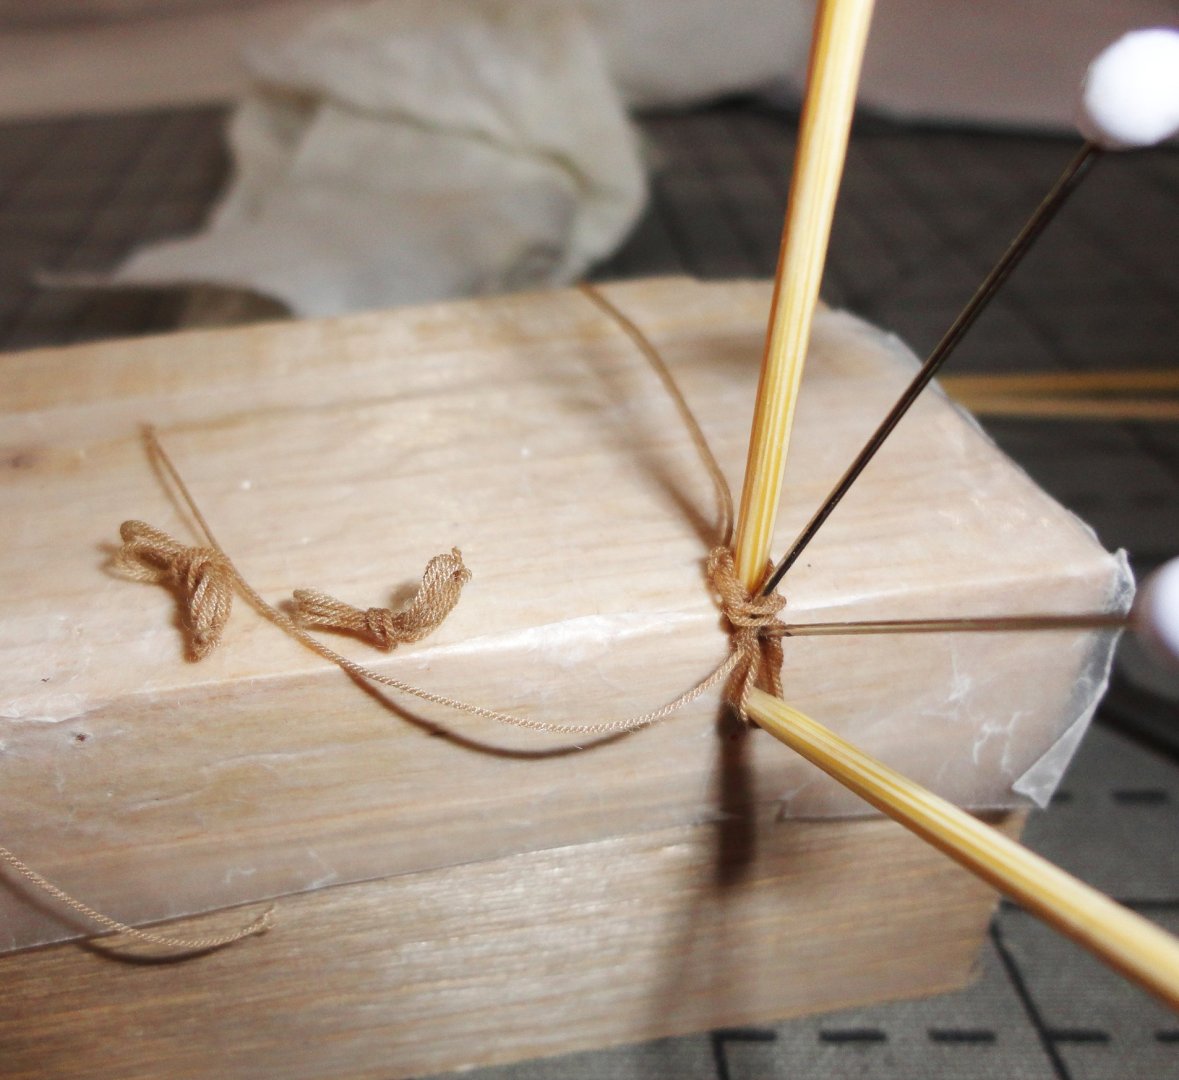
'Finally settling for a uniform method that will look OK in 1:100 scale. In the picture below, there are extra quilting pins not needed ... a third toothpick is just teased under the coil to make it easy to wrap a line three times around the middle (high of center), it stays put but is still fixed with a dab of CA (as is the knot at the top). The short end at that knot is trimmed away (the long end having been used for wrapping the middle & its end is trimmed away after fixing with CA). I can do it now with just a pair of toothpicks on the balsa block protected by waxed paper. The bamboo toothpicks are given a slight twist before removing in case of adhesion, and the coil pops-off the waxed paper. I'm not seeing any discoloration from the small amount of glue being used (applied with the dental tool), and I like the instant drying that happens when the other end of the dental tool applies a touch of 'accelerator'. I figure on needing about 150 of these coils - each going to a belaying pin somewhere. So far I have ten made - leaving 140 to go !
About us
Modelshipworld - Advancing Ship Modeling through Research
SSL Secured
Your security is important for us so this Website is SSL-Secured
NRG Mailing Address
Nautical Research Guild
237 South Lincoln Street
Westmont IL, 60559-1917
Model Ship World ® and the MSW logo are Registered Trademarks, and belong to the Nautical Research Guild (United States Patent and Trademark Office: No. 6,929,264 & No. 6,929,274, registered Dec. 20, 2022)
Helpful Links
About the NRG
If you enjoy building ship models that are historically accurate as well as beautiful, then The Nautical Research Guild (NRG) is just right for you.
The Guild is a non-profit educational organization whose mission is to “Advance Ship Modeling Through Research”. We provide support to our members in their efforts to raise the quality of their model ships.
The Nautical Research Guild has published our world-renowned quarterly magazine, The Nautical Research Journal, since 1955. The pages of the Journal are full of articles by accomplished ship modelers who show you how they create those exquisite details on their models, and by maritime historians who show you the correct details to build. The Journal is available in both print and digital editions. Go to the NRG web site (www.thenrg.org) to download a complimentary digital copy of the Journal. The NRG also publishes plan sets, books and compilations of back issues of the Journal and the former Ships in Scale and Model Ship Builder magazines.


