


thibaultron
-
Posts
2,634 -
Joined
-
Last visited
Content Type
Profiles
Forums
Gallery
Events
Everything posted by thibaultron
-
 Got the Sinagots book scanned , converted to text, and translated. bad news, really bad translation. The OCR I used is 20 years old, and while it did catch most of the words, it missed a lot of the French accent marks! It is readable, but not for technical details. I have found, though, how to set MS Word to spell check the OCRed French text, before translation, so I'll work on that, then re-translate. The spray booth is presently hidden behind building supplies, so not much progress has been made. This weekend, I'm going to be cleaning, and rearranging the renovated portion of the shop. Hopefully next week, I can continue the build.
 -
How about a Catalina, in the markings of the one that spotted the Bismarck, and thus allowed the Swordfish to attack her?
-
Patrick; You are probably the only one who will ever notice any distortion in the shrouds, they look great!
-
Just to put my 2 cents in, a few things I learned about derusting tools while rebuilding a milling machine. Take your average new steel bar. The surface you see is not the steel, it is an oxidized clear surface that is preventing further rust! If you dip the end in a rust remover, pull it out and clean the chemical out, the entire surface will start to aquire a light rust coating. You have to polish it to restore the very fine surface oxide surface. I found this out through reading after trying both electrolysis, and rust removers on the milling machine parts, only to have the parts start to get this light rust as soon as I pulled the parts out of the electrolysis tank, or removed the chemical cleaners. The rust converters, do leave an un-removable coating, as such, I'd worry about using them on critical surfaces, like slides, measuring surfaces, like the tips of micrometers, etc. My final solution was electrolysis followed by a lot to hand polishing with steel wool for the sliding surfaces, and fine sanding on the cosmetic ones. Or wire brushing for lightly rusted areas. I did not end up with a new looking machine, but everything worked as it should, and it cut accurately. For the electrolysis tank I used a large plastic storage tub, the kind you can buy at any major store in the US. The supply was a battery charger I built for the batteries (lead acid seal ones used in emergency lights, motorized child cars, etc.). It had an Amp meter and as the part became less rusty, the current would drop. Any low voltage DC supply would work. Be sure to kill the power before you stick your hand in the water! It has been 20 years, so my memory is a bit vague, but I think I used Washing Soda (not baking soda) in the water. This is available in the laundry detergent aisle, here in the US. In the end, if I had simply gone over the sliding surfaces with some fine steel wool, and wire brushed the rest, I would have been better off. So for just fin rust, a wire brush, or steel wool, with maybe dental picks for the bottom of the knurls.
-
Picture of diagram?
-
Frank; The Willie Bennett rigging diagram, also shows a single block for the topping lift, as shown in the Kathryn drawings. I don't know why, but maybe the crew were in better shape than we are.
-
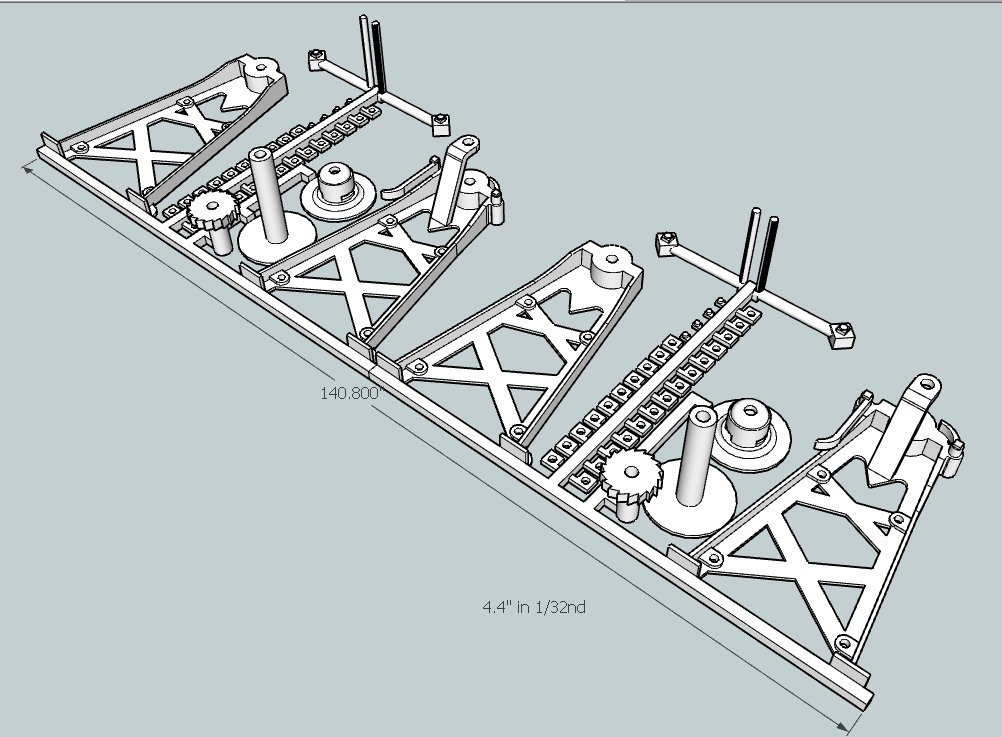
The handle position may have been changed for display purposes. All the photos I have of them in use show them setup opposing. I am also sure that the powered winder was well received! Here is my drawing from SketchUp for the 1/32 scale 3D print.
- 82 replies
-
- 1
-

-
- skipjack
- wye river models
- (and 2 more)
-
The ties would more resemble a fresh telephone pole. Primer red would be too red. Think more the brown of standing rigging, a brown, almost black.
-
I keep de-bonder and acetone around for just such reasons.
-
I'm on board too! I have the "visible" 1/48th version kit, with the clear skin. I'm looking forward to your build! As a side note to you cat lovers: One of the German "crewmen" rescued from the Bismark, was the ship's cat. He was adopted by the British ships crew. Later that ship was sunk, but the cat once again survived. He was then the ship's cat of a British merchant ship, that was also later sunk. He once again was amoung the surviving crewmen. After this he was moved to an old sailor's home, where he lived out his days. They called him Unsinkable Sam. (Yes, this is a true story, he was quite famous in Britain.)
-
Preprinted lines
thibaultron replied to achuck49's topic in Building, Framing, Planking and plating a ships hull and deck
If you have a scanner, scan the one side, use a graphics program to mirror it, and print out a template for the unmarked side. A good free graphics program is GIMP. -
Dennis; I have the 80s version of this kit. I started it back then, but it got put away. I plan to restart construction, after I finish my present round of half finished ship models. For the based/track, paint the ground gray. as it represents gravel ballast. The gravel held the track and ties in place, as well as spreading the load across the ground. By the way, NASA's giant crawler used to move rockets from the assembly building to the launch pad, also runs on a crushed gravel road, for the same load spreading reason. During a tour, they said that there is no paved road in the engineering world, that could support that load, only crushed gravel. The ties would be a dark brown to a weathered gray, depending on how long they have been in place. The ties were Creasote(sp) treated, like telephone poles, only with a heavier treatment. Many lumber yards sell used ties as landscaping timbers. You can go to one to see the proper color. If you are going to weather the loco, paint the individual ties slightly different shades, to represent variations in treated color, and different ages of ties. The rail would be a light to heavy rust color on the sides, with a lighter rust color on the top, with a bright steel color on the inside top of the rail, where the wheels run along that edge. The plates on the ties that the rail slots into, are also steel, so should be a rust color also. I second the idea to find some sticks to make a real wood load for the tender. It would look much better, and probably be easier than painting the plastic part to look like real wood. For the snow plow base, remove the large switch machine "motor", and buy a HO scale hand throw turnout stand. The throwout/switch you show in the picture is an Atlas product, and the switch machine supplied is sized for mechanical function/durability, not a scale assembly. You can find some at Walthers, a model train supplier, or at you local Hobby Shop (but not at Hobby Lobby, Micheals, etc.). For your usage, get a non working scale throw. This type of throw would be the most likely type for a railroad that had this plow to use anyway. Here are some pictures of some from the Walthers site. Another way that both sides would use to destroy track was to remove the rail, heat the center red hot, and bend it around a tree, in a complete loop, trapping it in place. This made the rail completely useless. This worked especially well in the South, as they had quite limited industry to manufacture new rail.

-
I understand that bee's wax is slightly acidic/basic and can damage rigging over time. They sell a similar wax, used by museums that is PH neutral. I can't remember where I saw it for sale though.
- 449 replies
-
- 2
-
-
- sultana
- model shipways
- (and 2 more)
-
Holding small parts for soldering
thibaultron replied to BETAQDAVE's topic in Metal Work, Soldering and Metal Fittings
Use aluminum wire, to hold the parts? I don't know if this would work, it might melt. The AL wire would, however, not stick to the parts. -
Also, Thank You, I've saved a copy too.
-
Can anyone recommend a miniature hand plane?
thibaultron replied to Bettina's topic in Modeling tools and Workshop Equipment
Opps! Forgot to put in the link, sorry. http://www.theluthierblog.com/articles/shaving-braces-kunz-squirrel-tail-plane/ -
Start by drilling a large hole in the center of the hatch, then trim to the outline with knives and the other tools.
-
Haven't given up on the build. I've just been working 6 to 7 days a week, and spent the last week and a half between jobs working on the renovation of the back of my shop. This area will become the ship building section, when done.
-
Can anyone recommend a miniature hand plane?
thibaultron replied to Bettina's topic in Modeling tools and Workshop Equipment
Here is a site about "Acurizing" the Kunz plane. -
Ki-45 Nick by CDW - Zoukei-Mura - 1:32 scale - Plastic
thibaultron replied to CDW's topic in Non-ship/categorised builds
You could do one side clear, or one side painted clear with some areas clear to show off and area, like maybe the engine. Sort of like leaving some deck planks off to show interior detail. -
I will also put in a recomendation for Chuck's Syren Models blocks.
- 82 replies
-
- 1
-
-
- skipjack
- wye river models
- (and 2 more)