bluenose2
-
Posts
263 -
Joined
-
Last visited
Content Type
Profiles
Forums
Gallery
Events
Everything posted by bluenose2
-
HMCS Oriole by bluenose2
bluenose2 replied to bluenose2's topic in - Build logs for subjects built 1901 - Present Day
Hi. Les back. The plans I received are in different scales based upon what the plan sheet shows. I will be having them scanned to a certain scale once I decide upon size. I have downloaded several colour pictures and have decent reference guidelines. The ship has a steel hull so I'm wondering what would be the best way to render it. My most concerning issue is with the supply and building fittings this ship has. Things like fairleads etc are high chrome etc. This will be my biggest concern. I think a larger scale as Jim Lad says will make it easier to recreate the smaller details. I am very fortunate as to have a signed print rendered by noted marine artist John Horton showing this beauty under full sail displaying the prominent Oriole on the foresale. This should make a nice compliment to the finished model. Thank You mtaylor I will post and will be asking for much help as this will be my first scratch build. -
Hello Les here. I am in the process of planning and build of the HMCS Oriole. Canadas oldest serving ship. I have full plans and am wondering about scale. Not too big, not too small. Any ideas? Sorry if it's in the wrong slot.
-
Thnx all. I'll do some more searching then try out my carving skills.
-
Hello Les here. I have a question for all of you out there. I am building Mamoli's 1/64 Beagle. I am looking for a 1/64th scale beagle to decorate the bow. I have searched high and low. Research has indicated there may or may not have been one. I feel it would be a good addition. It could be a Snoopy or metallic. It's for decoration and a conversation item. I have perused the stock of jewellery stores, places like Micheals and craft supply centres to no avail. Does anyone have any suggestions? Thnx.
-
As to resistance soldering I have looked at this and the equipment involved. I just don't know anything about it or if it requires different techniques to achieve the same results.
-
Thanx guys. If I get this right I'll be able to solder fly hairs to a microbe.
-
Well here we go. No guts no glory. Thanks for your help. Fortunately two extras are included, so hopefully I can get this right before I start on the real ones.
-
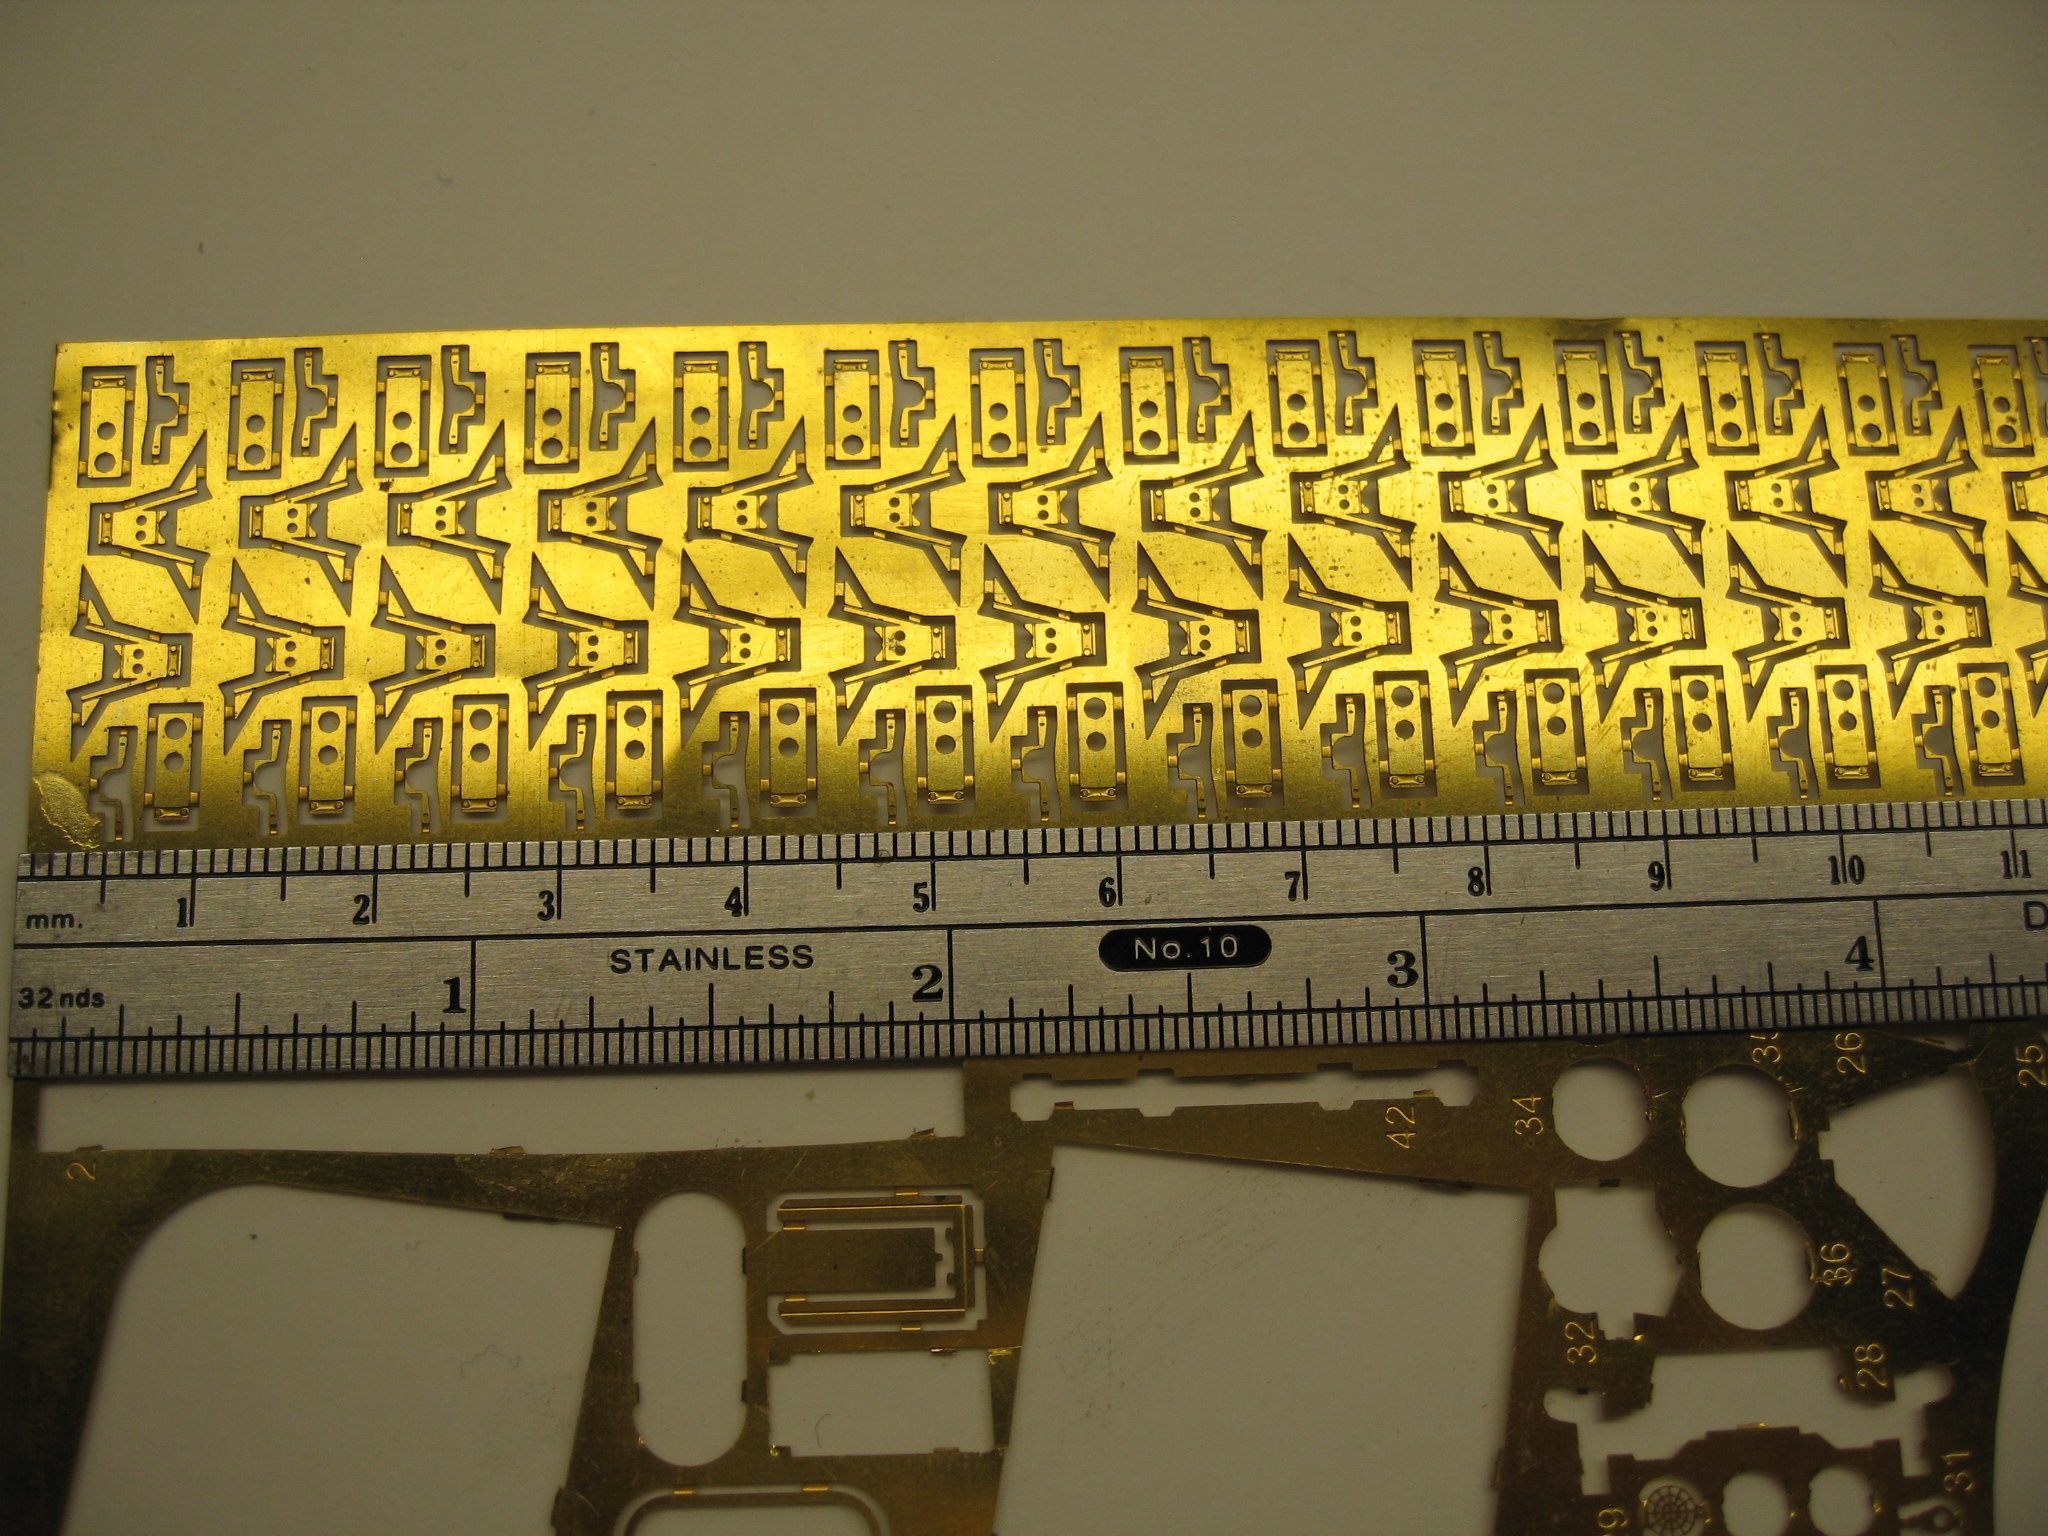
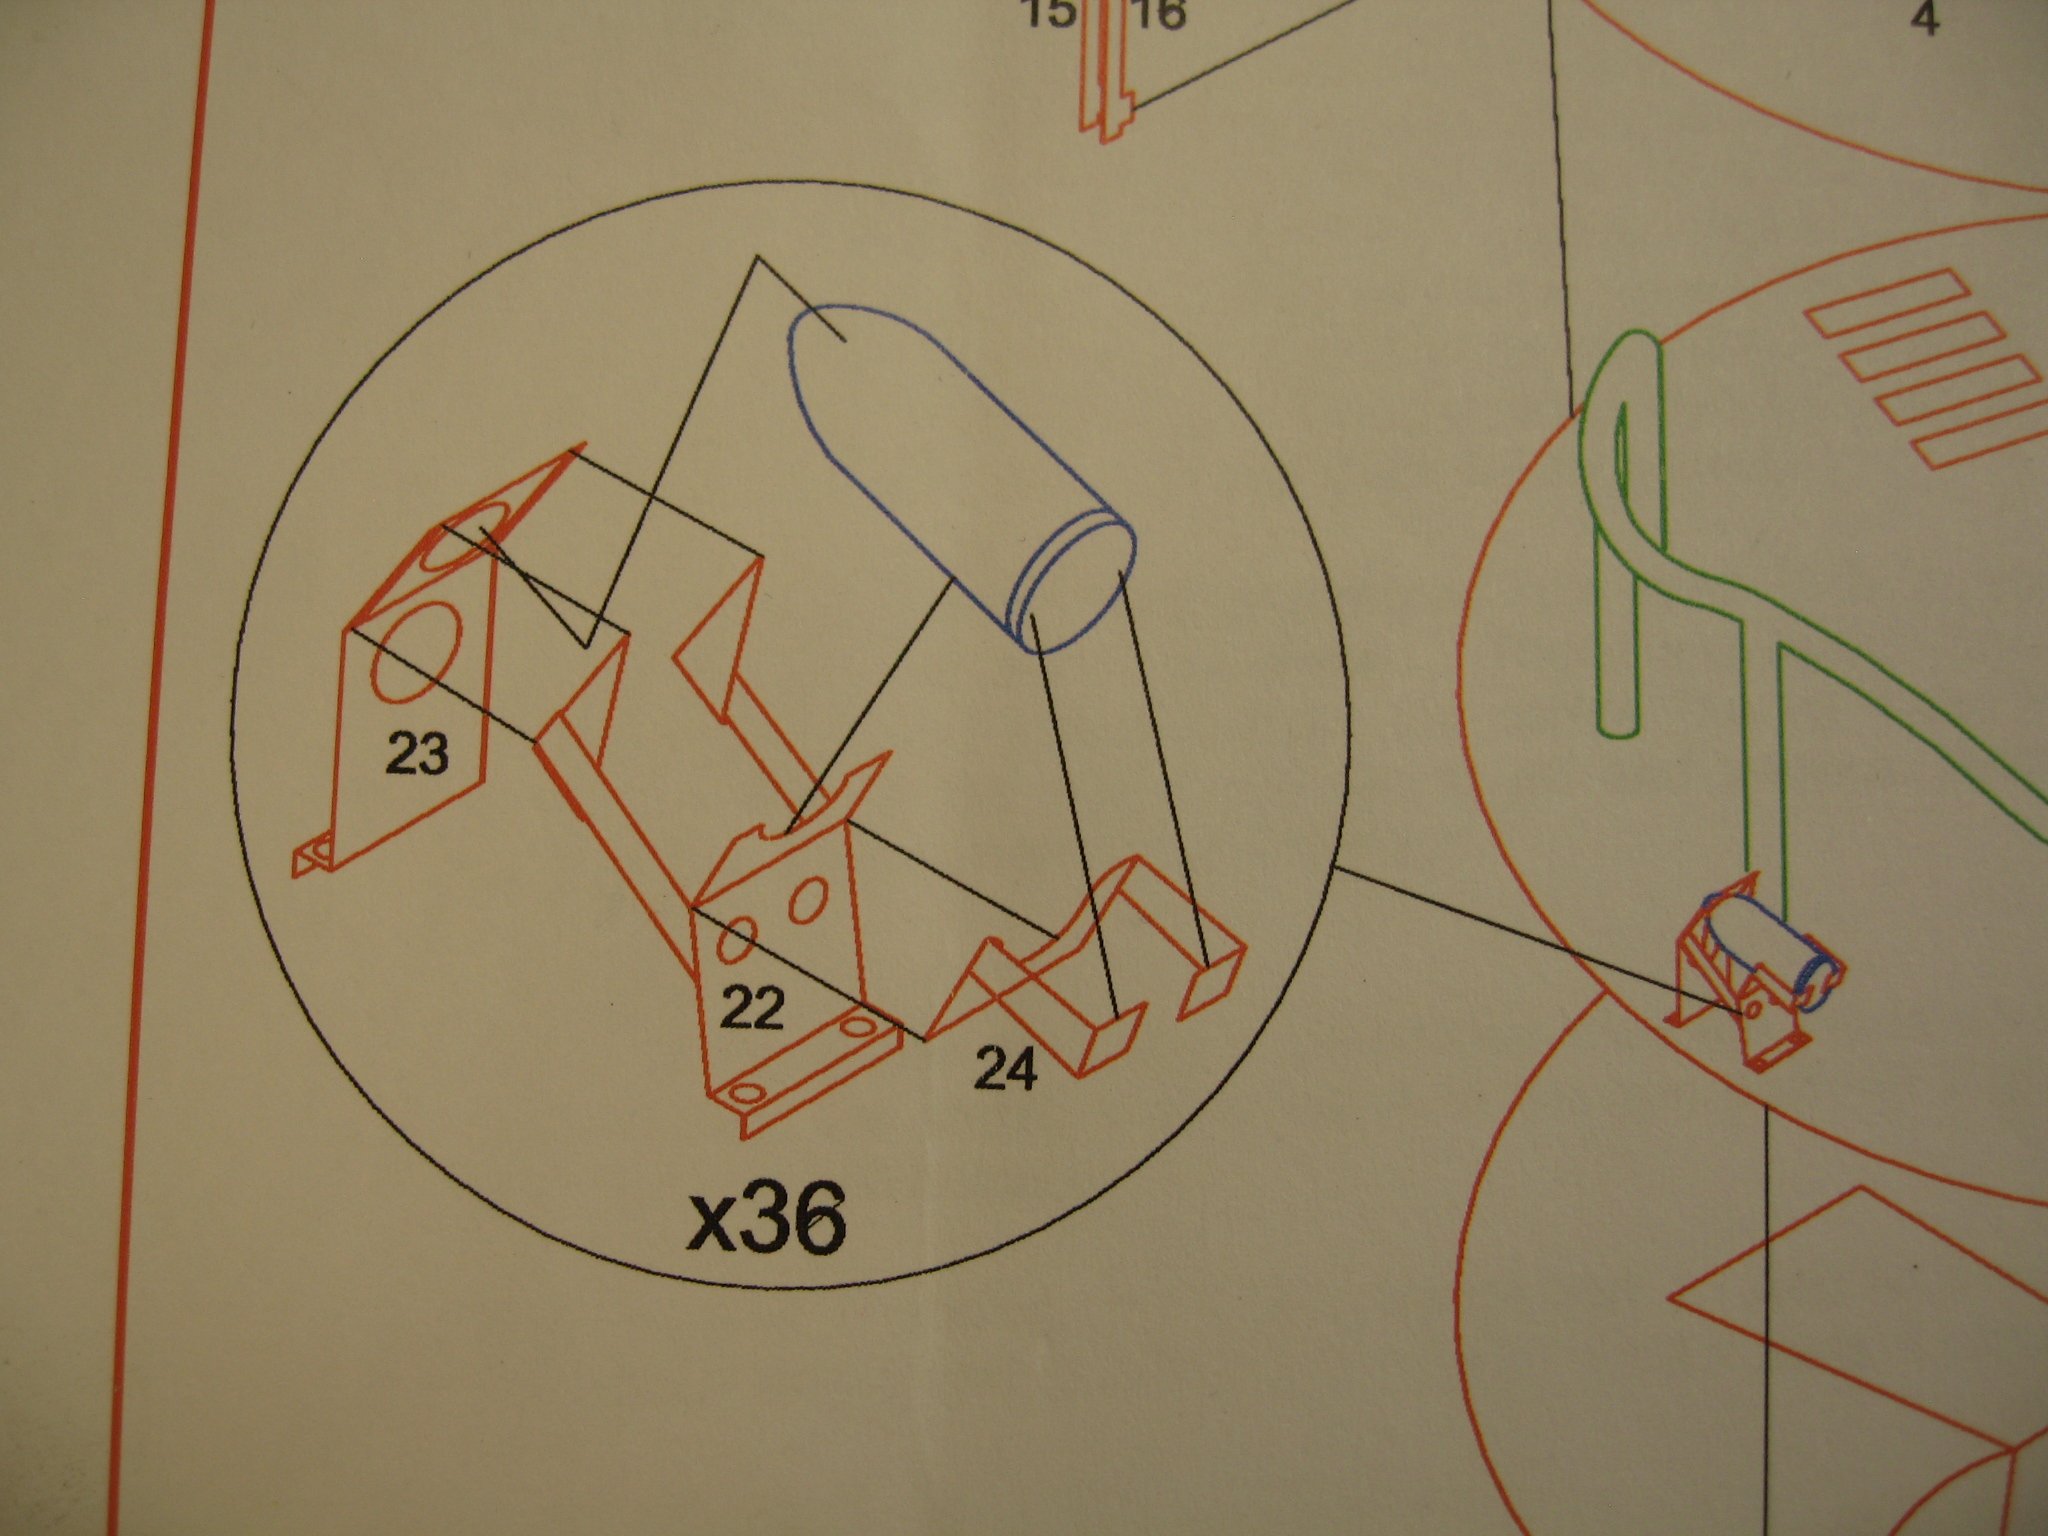
I have pictures in books but they are not close ups. I understand the assembly process and know what they look like, but I'm wondering if would be easier to leave 23 on the fret and solder 22 to it. Or reverse. Im concerned that any alligator clips etc. for holding parts may act as a heat sink and make it difficult to solder such fine parts. I use a Weller WES51 soldering unit for small work and a small hand held butane tourch for larger work. I guess what I'm saying is how would you guys hold the parts together so I can solder them?
-
As you can see. These parts are very small. I don't think I can solder any of these. CA will be the way, but it is figuring out how to assemble them is what's got me.
-
After a long and arduous trek I am finally on the back end of my build of the 1/72 Revell Corvette Snowberry. The thing I have left to the last is the build of the photo etch holders of the amunition for the 4" main gun. This comprises 3 miniscule pieces for the holders of the shells. 36 in total. I'm hoping someone has completed this part and could give me some advise. I can't figure out how to build a jig or some other way to make these units.
-
Hi dragzz Les Here. Billings kits can be a little frustrating becuase they don't give you enough information on the plans. I ended up kit bashing several items to make it work. If you google the Vancouver maritime museum you'll be able to get pictures of the real thing. A huge benefit. I was fortunate enough to be able to go to the museum and take photos. One take away is how small this ship really is. I can't beleive that the crew would spend 2 years at sea in this thing. This is a ship with great Canadian history. Three books for viewing are The Big Ship by Frank R. Sheer and Edvard Omholt-Jensen, Arctic Assignment by Sgt. F.S.Farrar R.C.M.P. and Arctic workhorse The RCMP Schooner ST. Roch. By James Delgado. All very highly recommended.
-
My question would be what parts are you staining. As to glue up, use small amounts so you reduce squeeze out. Less is more. Clean up can be problematic. Softer woods will soak up adhesive and make it difficult to remove excess adhesive. I wait for the glue to set up until rubbery and scrape off. Some water on a Q Tip helps after. CA can pose issues as it coats and seals the wood, making any consistent staining impossible. Be very careful with this product. Best to use to attach or hold fast pre built items or planking. Staining in place poses it's own problems. Oil based stains may tend to leak under masking tape and contaminate the woods next to it, latex not so much. Same goes for painting. Hope this helps.
-
bending planks
bluenose2 replied to bluenose2's topic in Building, Framing, Planking and plating a ships hull and deck
thnx vaddoc. I have maple and oak on hand. The reason for my choice of mahogany is it isn't too harsh of a contrast between the walnut planking but just enough to show another wood. Anything such as oak or maple would be too much of a contrast and draw your eye to this band. I know mahogany has a larger grain than walnut, so I will pick through my mahogany stock to find a sample with a much tighter grain. Hope it works. -
bending planks
bluenose2 replied to bluenose2's topic in Building, Framing, Planking and plating a ships hull and deck
Thnx. I have an electric plank bender and a custom jig for bending. I suspect that the wood is too thick. I will re rip at 1mm x 4mm and see how it goes. I wanted a contrast in wood to ofset a solid walnut hull. -
bending planks
bluenose2 replied to bluenose2's topic in Building, Framing, Planking and plating a ships hull and deck
Thnx everyone. I have an electric plank bender and a custom jig. Worked well on the 1st planking and the 1 mm walnut. I believe I will rip some more mahogany at 1 mm and double plank this area. I was going for a variation of wood on the wales to break up a solid walnut look.If it still breaks oh well I will try another type of contrasting wood. -
bending planks
bluenose2 replied to bluenose2's topic in Building, Framing, Planking and plating a ships hull and deck
Sorry I did this three times. Just took my lap top and gave it a tightening. -
I have run into an issue that has stumped me. I have on hand some old growth mahogany from the late 50's. I have ripped into 2 mm x 5 mm strips for the planking on the wales of my ship. When I try to bend it after soaking for 3 hours it breaks on the hardest bend around the bow. Am building the 1/60 Endeavour. I have ripped it the other way based on grain but still breaks.I know this is much thicker than say .05 mm planking. I am now soaking it for one week to see what happens. My concern is if this works, it may shrink after glue up and cause a later issues with gaps in the planking. What should I do? I am thinking that because of it's age it has lost it's essential oils and become too brittle.
-
I am building the 1/60 Corel HMB Endeavour. I have questions about the finishing of the hull. Karl Heinz Marquardt's book states that sheathing of the lower hull was done with pitch, tar and sulphur. Not painted white. Sheathing below the waterline was done with fir planking. Would this have covered up the paying so you only see fir? Sides were payed with varnish. Would this have been a flat finish or would it have a slight gloss? Wales were blackened with tar. Any help would be good.
-
Hobby putty
bluenose2 replied to whiskers's topic in Painting, finishing and weathering products and techniques
whiskers. What type of putty did you use?- 1 reply
-
- 1
-

-
John, The rings are larger and make them easier to use. Another plus is they grind the nose to a needle sharp point. Perfect for close work. One of the blades has micro serrations so line does not slip out during cutting.
-
Hello everyone. I have just received the best pair of scissors yet. Designed for fly tying but perfect for our hobby. They are the Stellar Scissors 2.0. Very good price point. You won't be disappointed. And no I don't work for this company. It should be in your tool box. Go to risingfish.net. Dylan is a great guy. Please check it out.