MD11pilot
-
Posts
110 -
Joined
-
Last visited
2 Followers


Recent Profile Visitors
983 profile views


-
 GrandpaPhil reacted to a post in a topic:
US Brig Syren by MD11pilot - Model Shipways - 1:64
GrandpaPhil reacted to a post in a topic:
US Brig Syren by MD11pilot - Model Shipways - 1:64
-
Old Collingwood reacted to a post in a topic:
US Brig Syren by MD11pilot - Model Shipways - 1:64
-
Nirvana reacted to a post in a topic:
US Brig Syren by scasey88 - Model Shipways - 1:64 scale
-
jablackwell reacted to a post in a topic:
US Brig Syren by jablackwell - Model Shipways - first POB build
-
Nirvana reacted to a post in a topic:
US Brig Syren by jablackwell - Model Shipways - first POB build
-
MD11pilot reacted to a post in a topic:
US Brig Syren by Hipexec - FINISHED - Model Shipways - 1:64 - building as USS Argus
-
MD11pilot reacted to a post in a topic:
US Brig Syren by Hipexec - FINISHED - Model Shipways - 1:64 - building as USS Argus
-
 Howdy John, and welcome to the Syren club. I'm looking forward to following along.
- 90 replies
-
- 2
-
-
- syren
- model shipways
- (and 1 more)
-
MD11pilot reacted to a post in a topic:
USF Confederacy by ChrisLBren - 3/16 Scale - Finished
-
MD11pilot reacted to a post in a topic:
America 1851 by Kevin Kenny - FINISHED - Constructo
-
captgino reacted to a post in a topic:
Armed Virginia Sloop by captgino - FINISHED - Model Shipways - 1/48
-
MD11pilot reacted to a post in a topic:
Queen Anne Style Royal Barge by Chuck - FINISHED - Syren Ship Model Company - 1:24
-
MD11pilot reacted to a post in a topic:
Cutter Cheerful 1806 by Rustyj - FINISHED - 1:48 Scale
-
mtaylor reacted to a post in a topic:
Cutter Cheerful 1806 by Rustyj - FINISHED - 1:48 Scale
-
MD11pilot reacted to a post in a topic:
Split Brass Ring Frustrations
-
Peter Bloemendaal reacted to a post in a topic:
US Brig Syren by MD11pilot - Model Shipways - 1:64
-
Canute reacted to a post in a topic:
Cutter Cheerful 1806 by Rustyj - FINISHED - 1:48 Scale
-
Dubz reacted to a post in a topic:
US Brig Syren by MD11pilot - Model Shipways - 1:64
-
Now that’s funny, 😂
-
I'm depressed. Spent some time wandering around the "Scratch Built" side of the website this morning. I don't have the words to describe my respect for those folks. Awesome, astounding, incomprehensible, magical. I can only dream.
-
Enjoying a cup of coffee and wandering around the website when I came upon your build log. Wow! Beautiful, precise work.
-
I’m really enjoying your build. I agree with the others - I’m going to follow your lead and make wood cleats. The metal ones just won’t cut it. Love the little plane. How in the world did you find it.
- 1,306 replies
-
- 6
-
-
- syren
- model shipways
- (and 1 more)
-
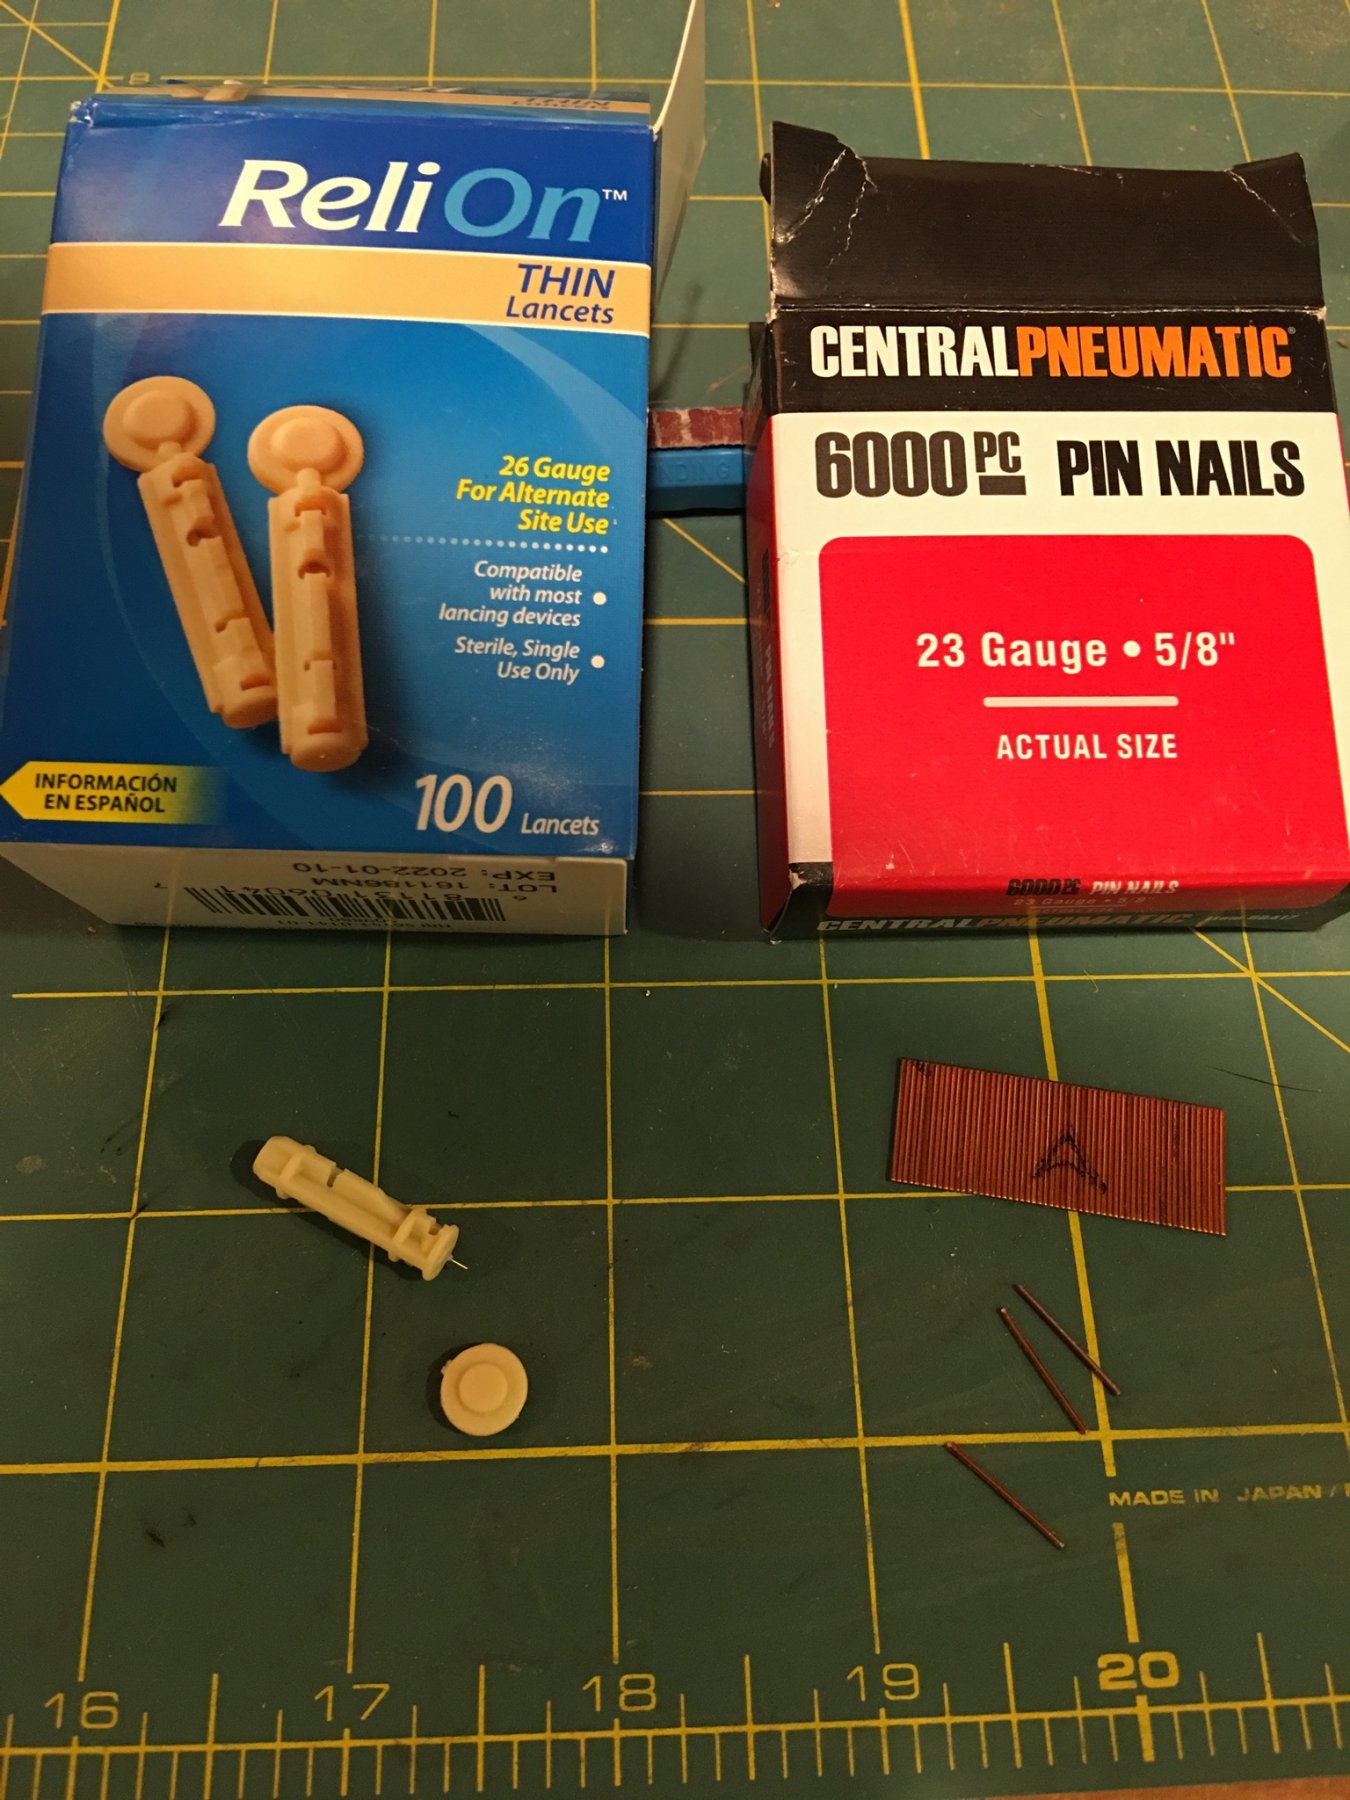
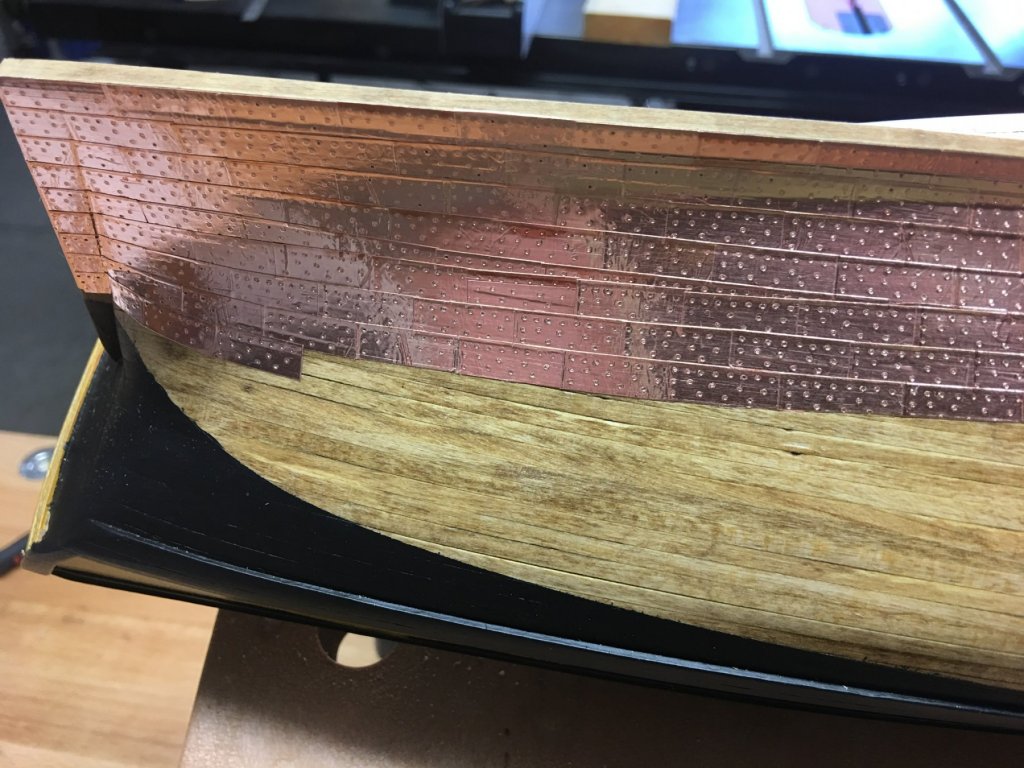
I started with the 26 gauge lancets that are becoming popular for this project. They produce a nice, small nail pattern. However, removing the plastic sleeve is a bit of a pain. You can use nippers to get most of the plastic off. I then set up a candle in a bowl to heat and remove the plastic part that is adhered to the lancet. When I was remaking the second stamp, I remembered that I had a 23 gauge pin driver out in my shop. These finish nailers are becoming quite popular with finish carpenters for holding moldings (and other stuff) together while the glue dries. So I switched to the 23 gauge nails. Worked great without the hassle of removing plastic.

-
Good afternoon Floyd. Chuck's copper jig tutorial is imbedded in the instruction manual. Chapter 8. I’d highly recommend using a drill press to pre-drill the pin holes. I tried to do it with a hand held pin vise the first time. One stamp came out okay, but the second stamp was a complete mess. You’re drilling so close to the edge of the wood that it’s easy for the drill bit to come out the side of the block - either by poor control, or because the very fine bit is following the grain of the wood. Had to start all over again. And that’s when I figured out that I could chuck my pin vise in my full size drill press as mentioned earlier.
-
Just curious. When did you buy the kit? We've seen some kits recently with poor quality plywood. The plywood in your kit looks good.
-
Howdy Peter! Welcome to the Syren club. Even though you're just a few steps into the project, it's easy to see that you do high quality work. I'm looking forward to watching another beautiful Syren take shape. I like that plank bender. Seems easier than the pin boards.
- 242 replies
-
- 2
-
-
- syren
- model shipways
- (and 1 more)
-
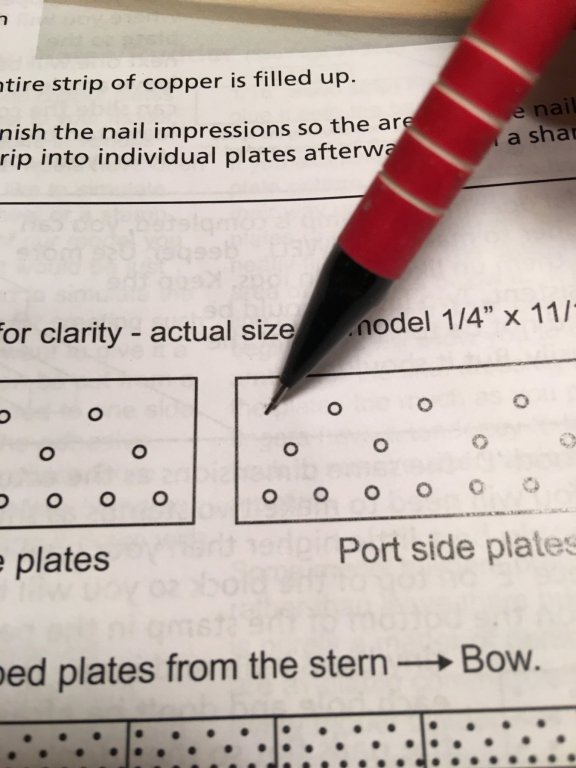
Thanks Floyd, it’s good to be back in the saddle. I’m going to need my stamping jig for the Surprise that’s sitting on my shelf, but thanks for the offer. I only made Port and Starboard stamps as per the instructions. I know some of the advanced guys make a third one for the belt line, but I didn’t think it was necessary. I could go back and add one more nail hole to each plate, by hand, at the position shown in this picture.... I’ll give it it some consideration.
-
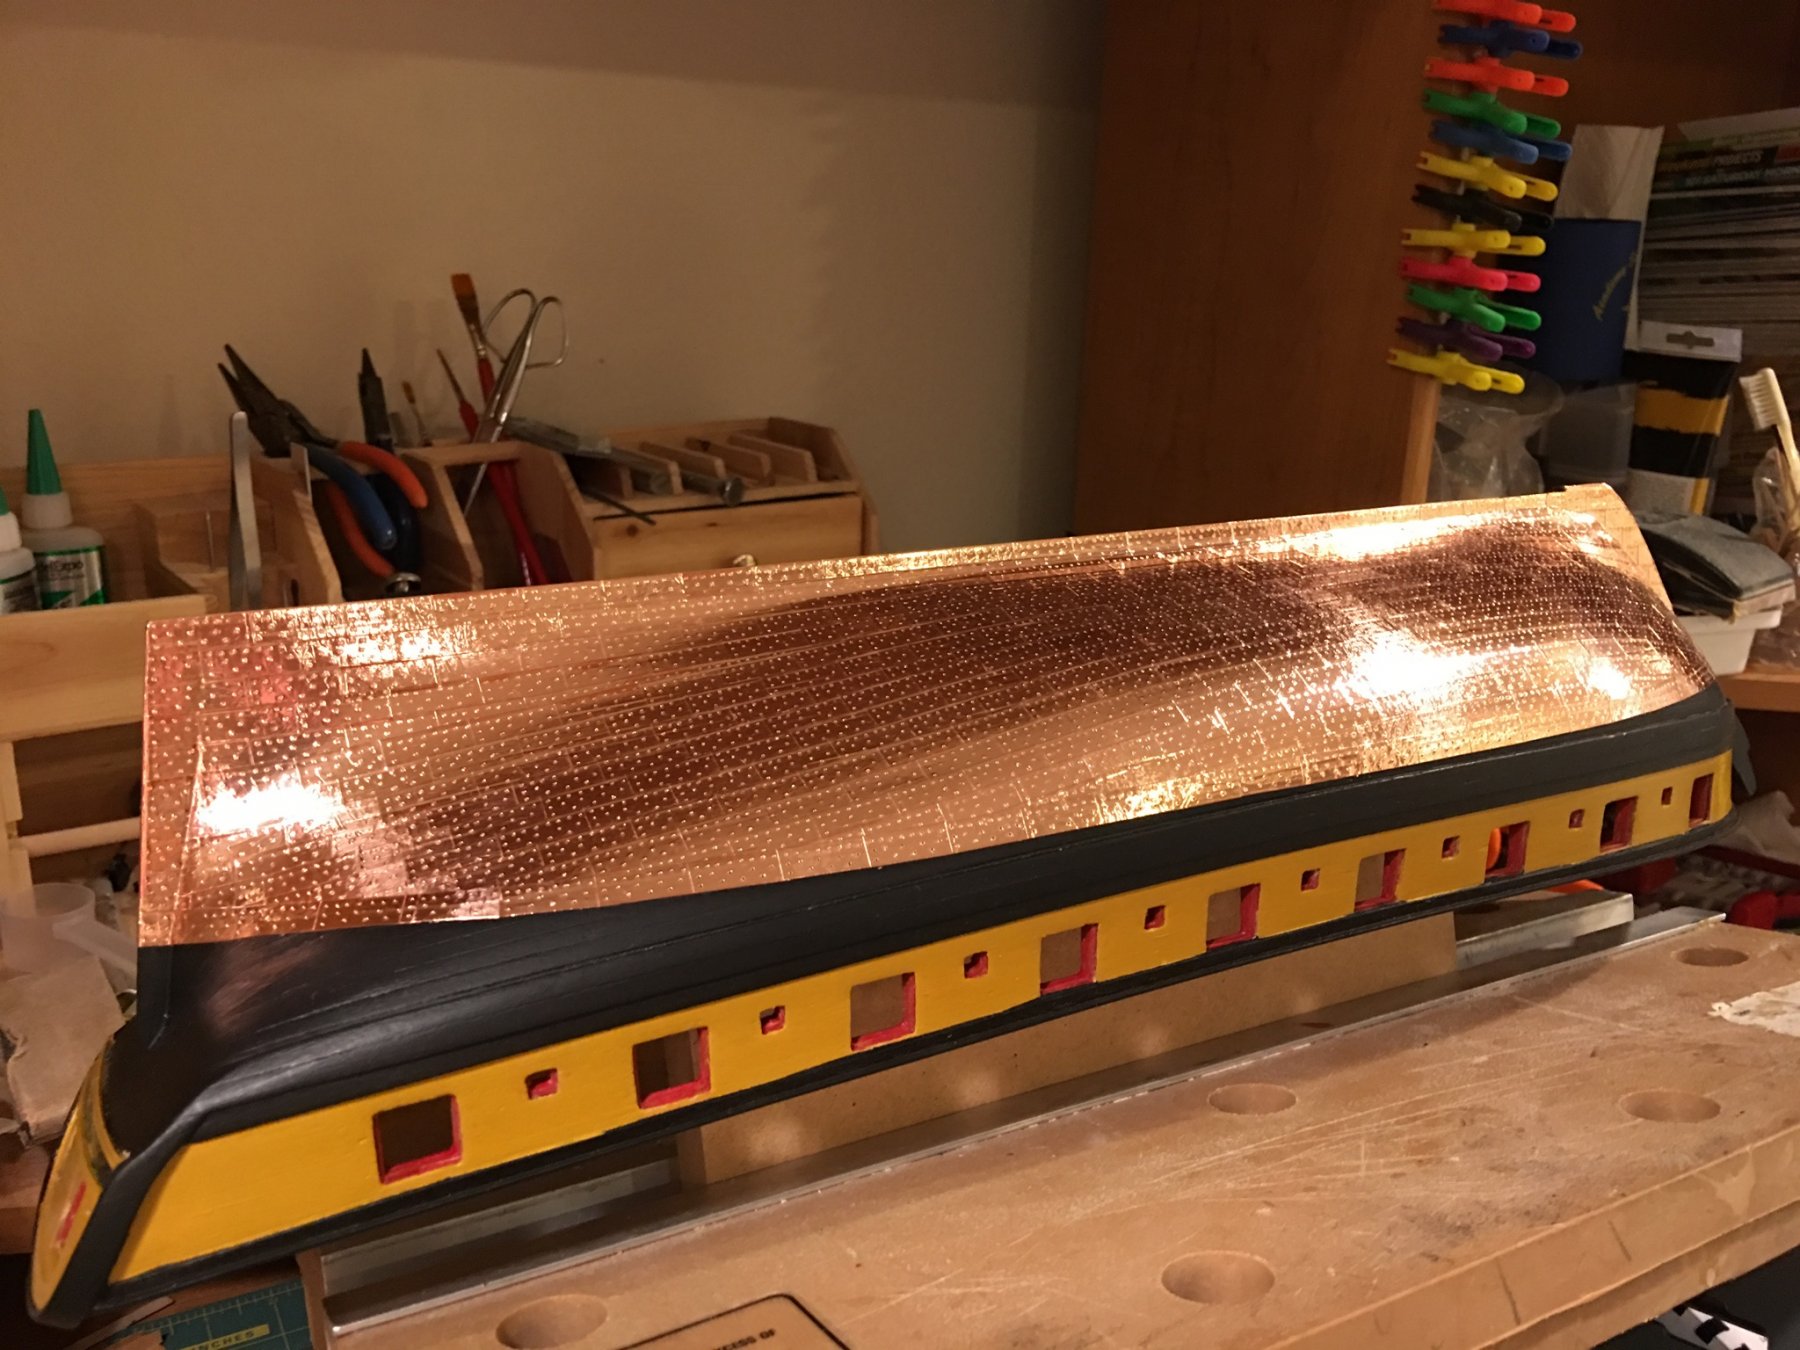
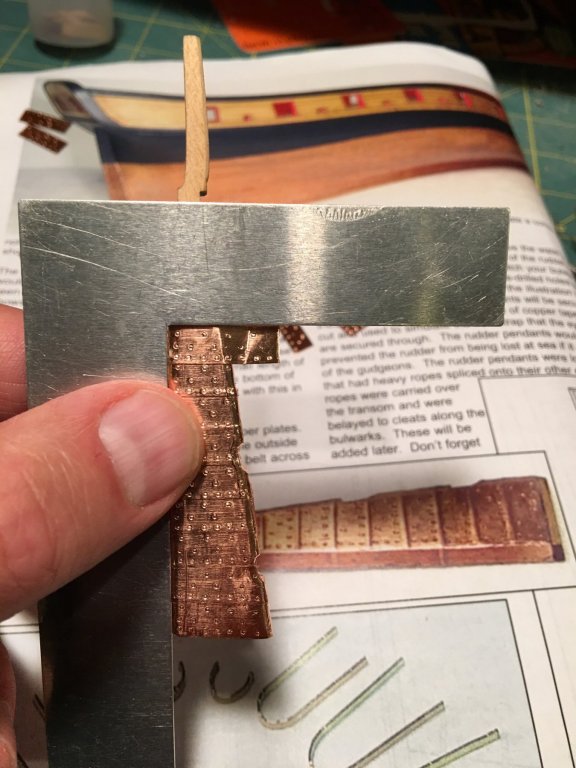
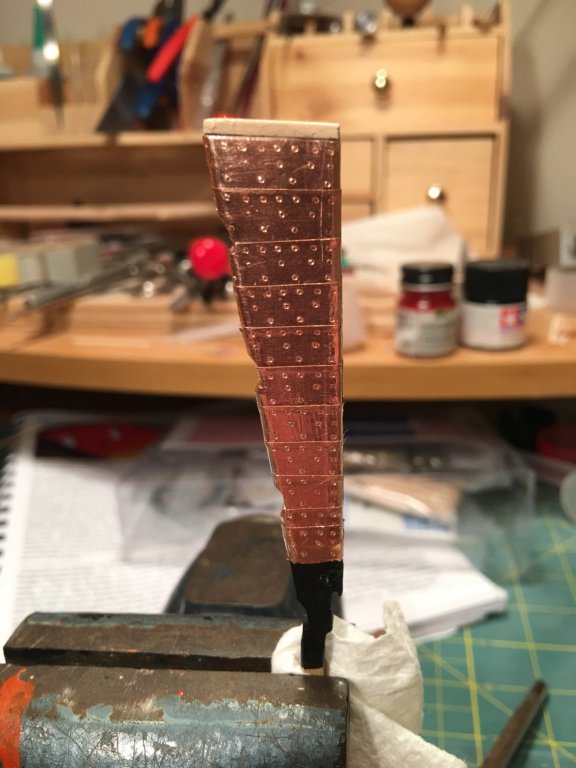
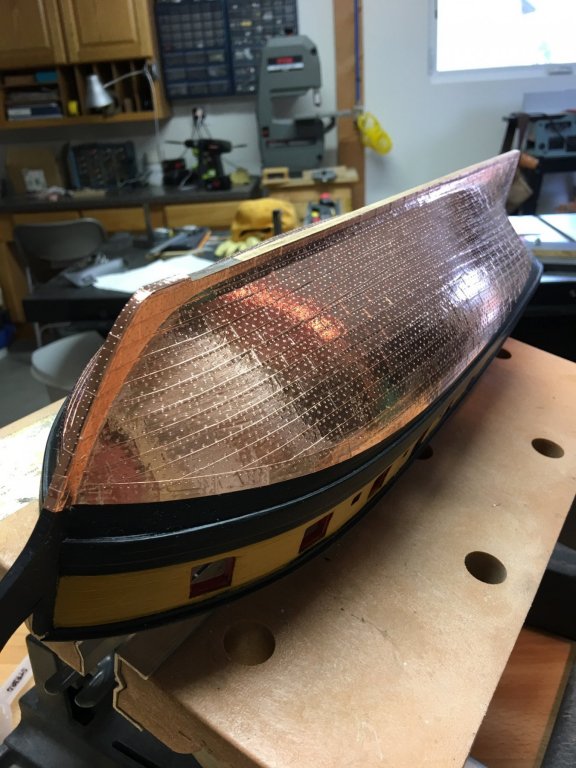
The rudder is a fun little project. Shaped it with a mini hand plane and sanding blocks. Added the copper plates with the aid of a small square.
-
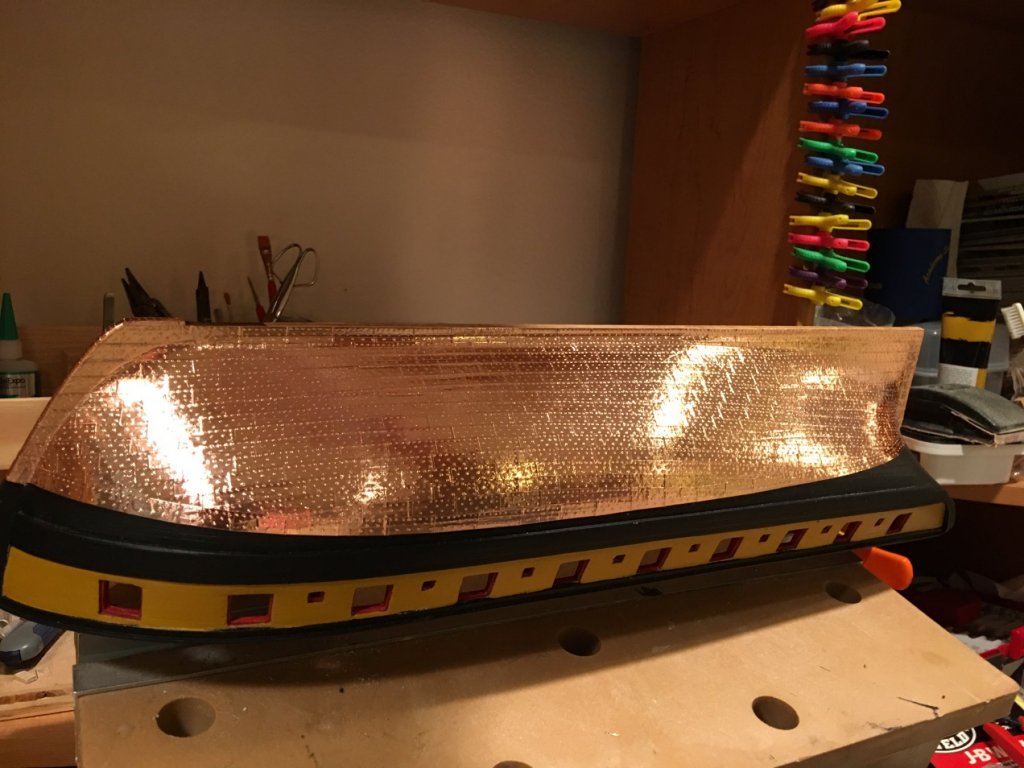
Copper bottom complete.

-
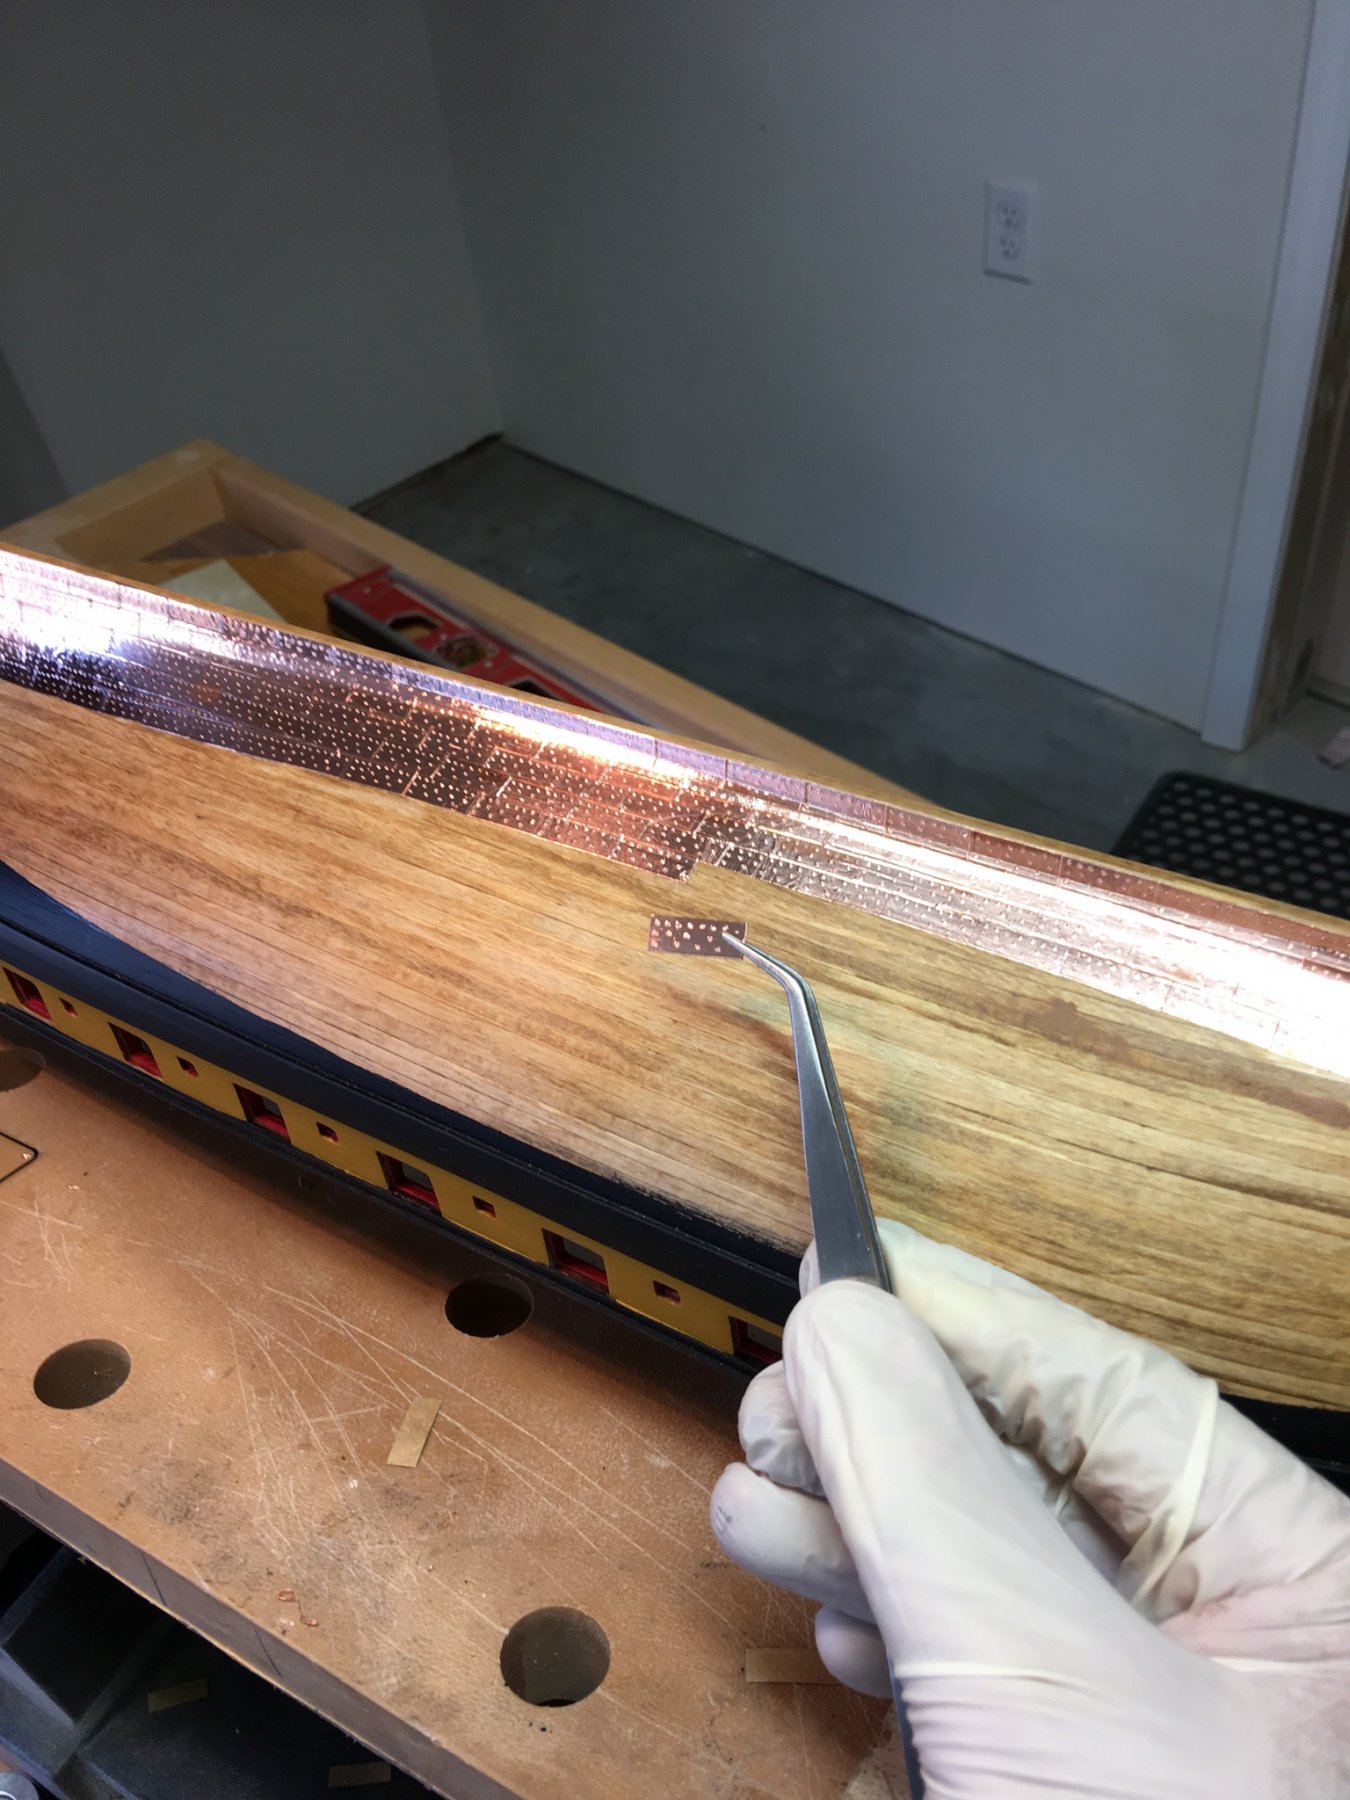
I was wondering how I would keep the lines straight. In other builder logs, nobody ever seemed to mention it so I figured it must not be a big deal. And sure enough, if you keep your overlaps fairly consistent, it just seems to work out.

-
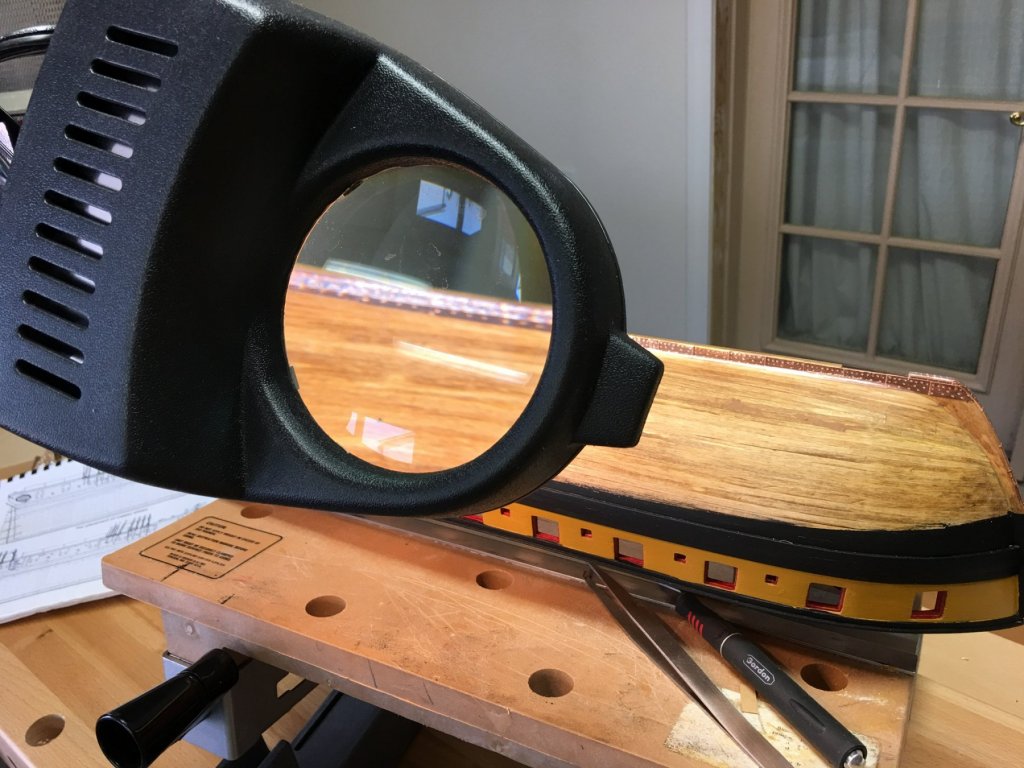
If you’ve got one those fancy lighted magnifying glass gizmos, nows the time to set it up. These plates are small and there are a lot of them. My near vision ain’t what it used to be.