nikbud
-
Posts
203 -
Joined
-
Last visited
2 Followers


Recent Profile Visitors
1,267 profile views


.thumb.jpg.6d6ee4bdbfaac2c58ecc77e7b80ae374.jpg)
-
 Scottish Guy reacted to a post in a topic:
Santa Maria 1492 by Katsumoto - FINISHED - Artesania Latina - scale 1:65
Scottish Guy reacted to a post in a topic:
Santa Maria 1492 by Katsumoto - FINISHED - Artesania Latina - scale 1:65
-
FrankWouts reacted to a post in a topic:
Virginia 1819 by Matt D - FINISHED - Artesania Latina - 1:41
-
FrankWouts reacted to a post in a topic:
Virginia 1819 by Matt D - FINISHED - Artesania Latina - 1:41
-
 Rushdie reacted to a post in a topic:
Acrylic paint tips and techniques
Rushdie reacted to a post in a topic:
Acrylic paint tips and techniques
-
Claire7 reacted to a post in a topic:
Acrylic paint tips and techniques
-
Knocklouder reacted to a post in a topic:
Color of ratlines
-
DaveBaxt reacted to a post in a topic:
Acrylic paint tips and techniques
-
 gonzz0 reacted to a post in a topic:
Virginia 1819 by nikbud - FINISHED - Artesania Latina - Scale 1/41 - First Wooden Ship Build
gonzz0 reacted to a post in a topic:
Virginia 1819 by nikbud - FINISHED - Artesania Latina - Scale 1/41 - First Wooden Ship Build
-
nikbud reacted to a post in a topic:
Acrylic paint tips and techniques
-
FrankWouts reacted to a post in a topic:
Virginia 1819 by Matt D - FINISHED - Artesania Latina - 1:41
-
EricWilliamMarshall reacted to a post in a topic:
Virginia 1819 by Matt D - FINISHED - Artesania Latina - 1:41
-
nikbud reacted to a post in a topic:
Virginia 1819 by Travis - FINISHED - Artesenia Latina - Scale 1:41
-
nikbud reacted to a post in a topic:
Virginia 1819 by Travis - FINISHED - Artesenia Latina - Scale 1:41
-
nikbud reacted to a post in a topic:
Virginia 1819 by Travis - FINISHED - Artesenia Latina - Scale 1:41
-
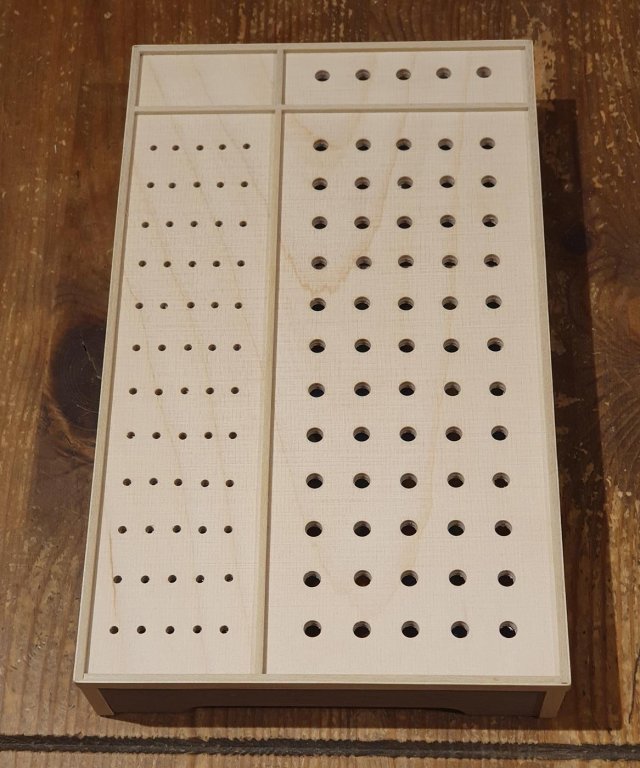
 Hi Alexis I have just measured the strips and you are right; the thin strips are 2mm x 5mm from the kit. the square strips are 5mm x 5mm, although they all have been very well sanded to get them very smooth so the measurements are more like 1.5 x 4.5 and 4.5x4.5. so the strips either side of the keel are 5x5 with a 3x3 small strip between them at either end. If i remember rightly i had to do a little sanding in the inside edge of the two long strips - after they had been glued together - to make the keel fit snugly. I hope this made sense??? Cheers n be safe, Paul
- 50 replies
-
- 1
-
-
- virginia
- artesania latina
- (and 2 more)
-
Hi alexis, sorry I missed your question, I'm not on here as often as I should be..... I'm not sure about the measurements of the strips for the stand, but I will open up the case in the morning and take some measurements for you.
- 50 replies
-
- 1
-
-
- virginia
- artesania latina
- (and 2 more)
-
Thank you Matt, im recovering but recovery is very slow. I have been on so much morphine for so long that my hands and feet are massively over-sensitive, so work on the boat cant restart for at least another couple of months. A real PITA as I'm stuck at home on lockdown. Hope you and everyone out there are keeping safe.
-
nikbud reacted to a post in a topic:
Golden Hind (ex-Pelican) by Baker - FINISHED - scale 1/45 - Galleon late 16th century
-
nikbud reacted to a post in a topic:
Black Pearl by Old Collingwood - FINISHED - 1/72 Scale
-
nikbud reacted to a post in a topic:
Bristol Beaufighter by philo426 - FINISHED - Revell - 1/32 - PLASTIC
-
nikbud reacted to a post in a topic:
Virginia 1819 by rony - FINISHED - Artesania Latina - scale 1:41
-
nikbud reacted to a post in a topic:
Virginia 1819 by rony - FINISHED - Artesania Latina - scale 1:41
-
nikbud reacted to a post in a topic:
Virginia 1819 by rony - FINISHED - Artesania Latina - scale 1:41
-
Thank you Jag!
-
Fixed it for you Mark!
-
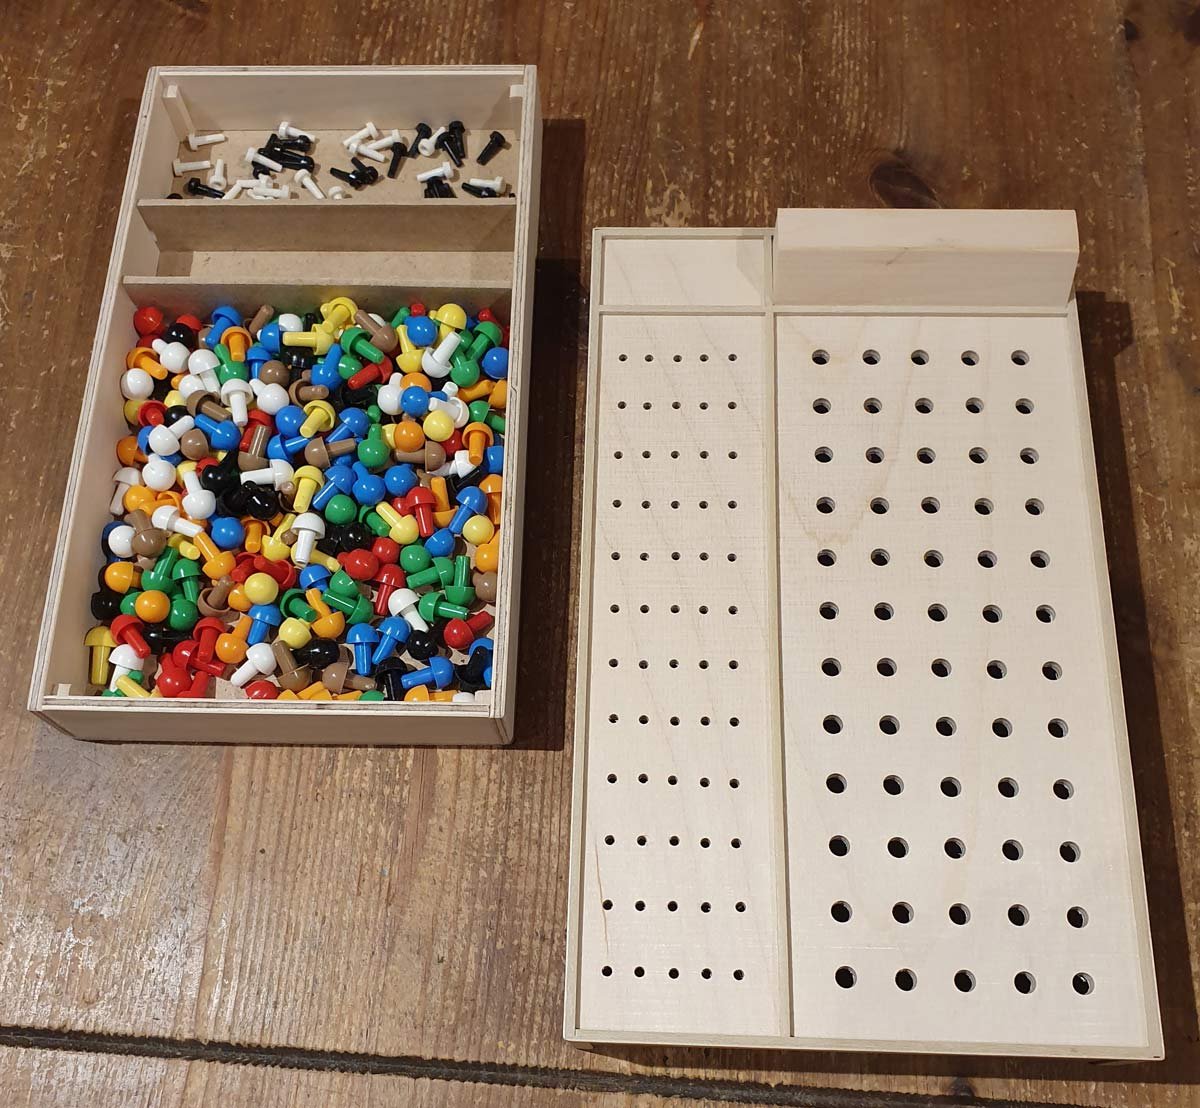
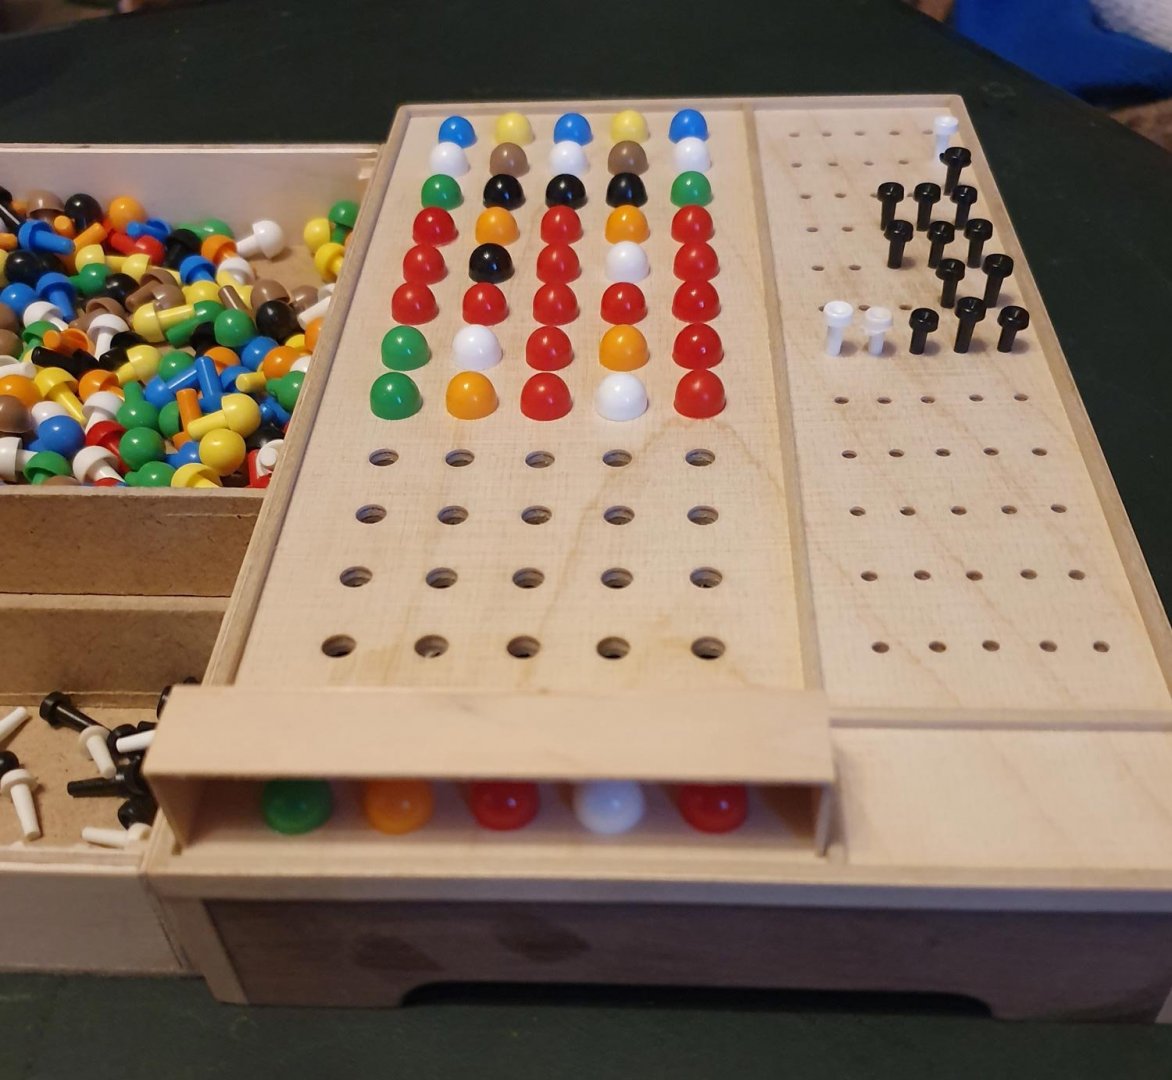
Here is a picture of my daughter solving my code in 8 tries, as you can see it sometimes boils down to luck in choosing the correct combinations at the start; getting three black score pins in row 4 narrowed down her decoding.
-
Thank you, Jeff
-
Thank you Edward.
-
Ooh, I really like the look of this ship, hope you don't mind ifn I pull up a chair for this build.
-
Please don't apologise OC, a lot of people care about you and your Admiral. Sometimes it helps to talk to strangers, you never know we may be able to help in some way. Thinking of you All the best
-
Thank you Mark, I appreciate that. I'll be honest as long as it's a full recovery I don't mind how long it takes!
-
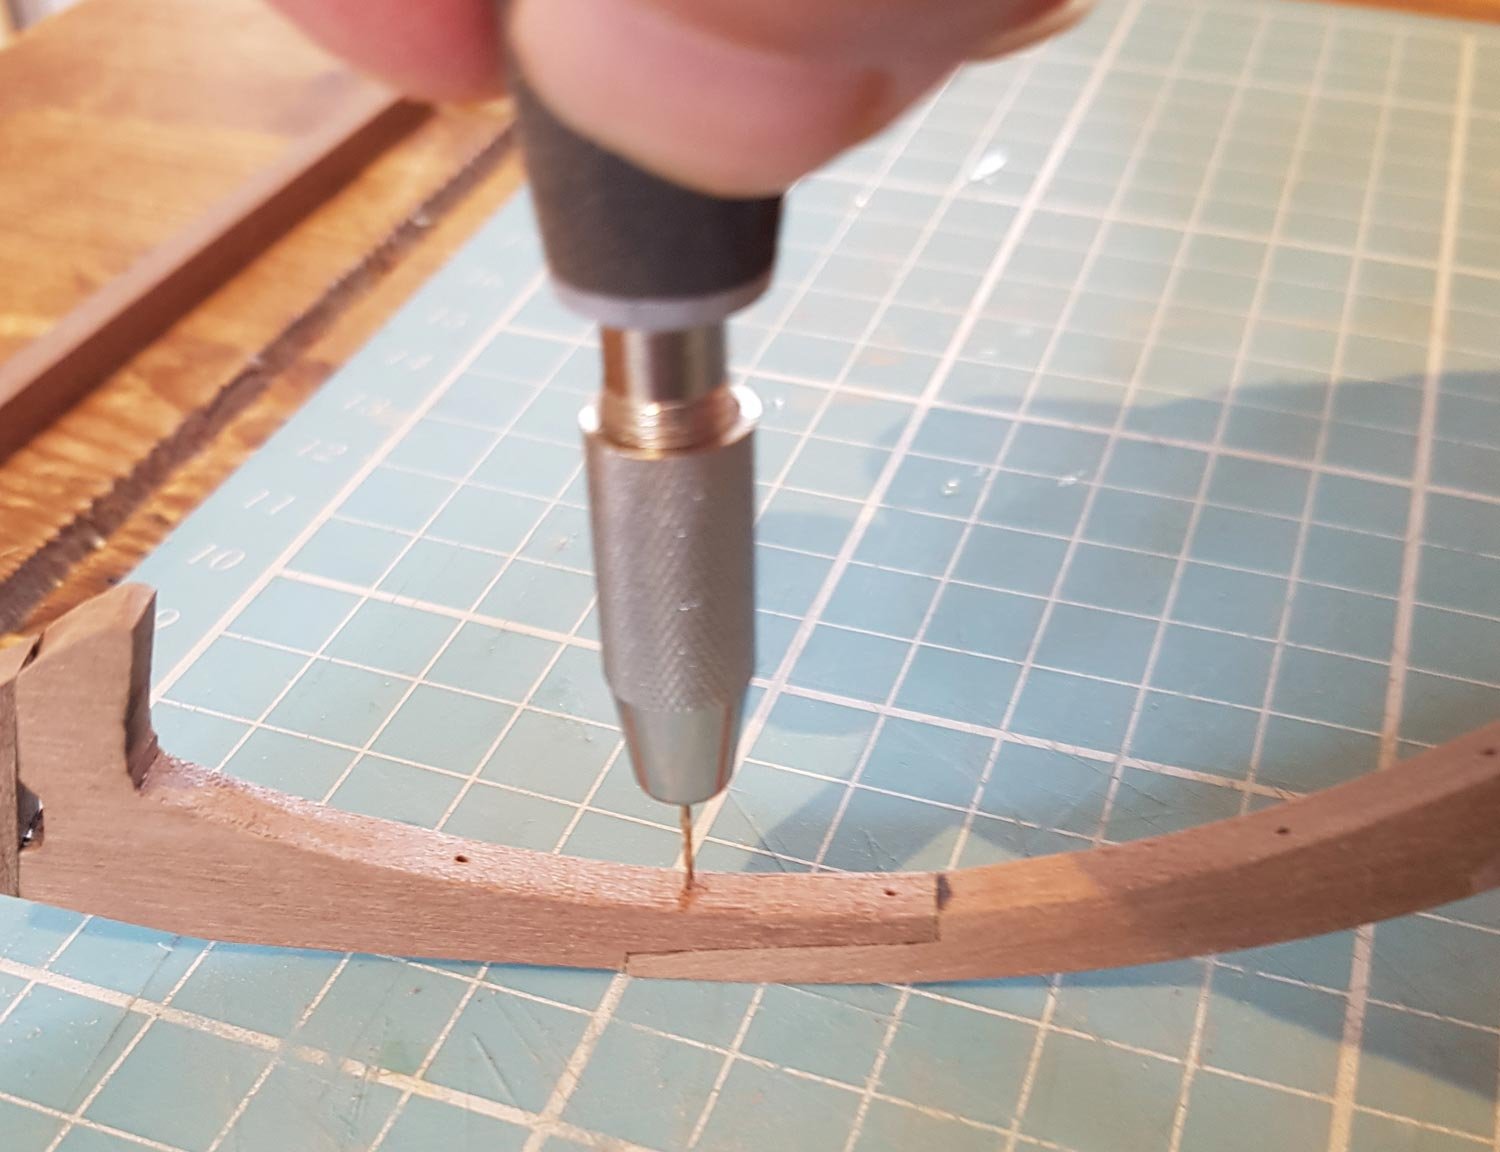
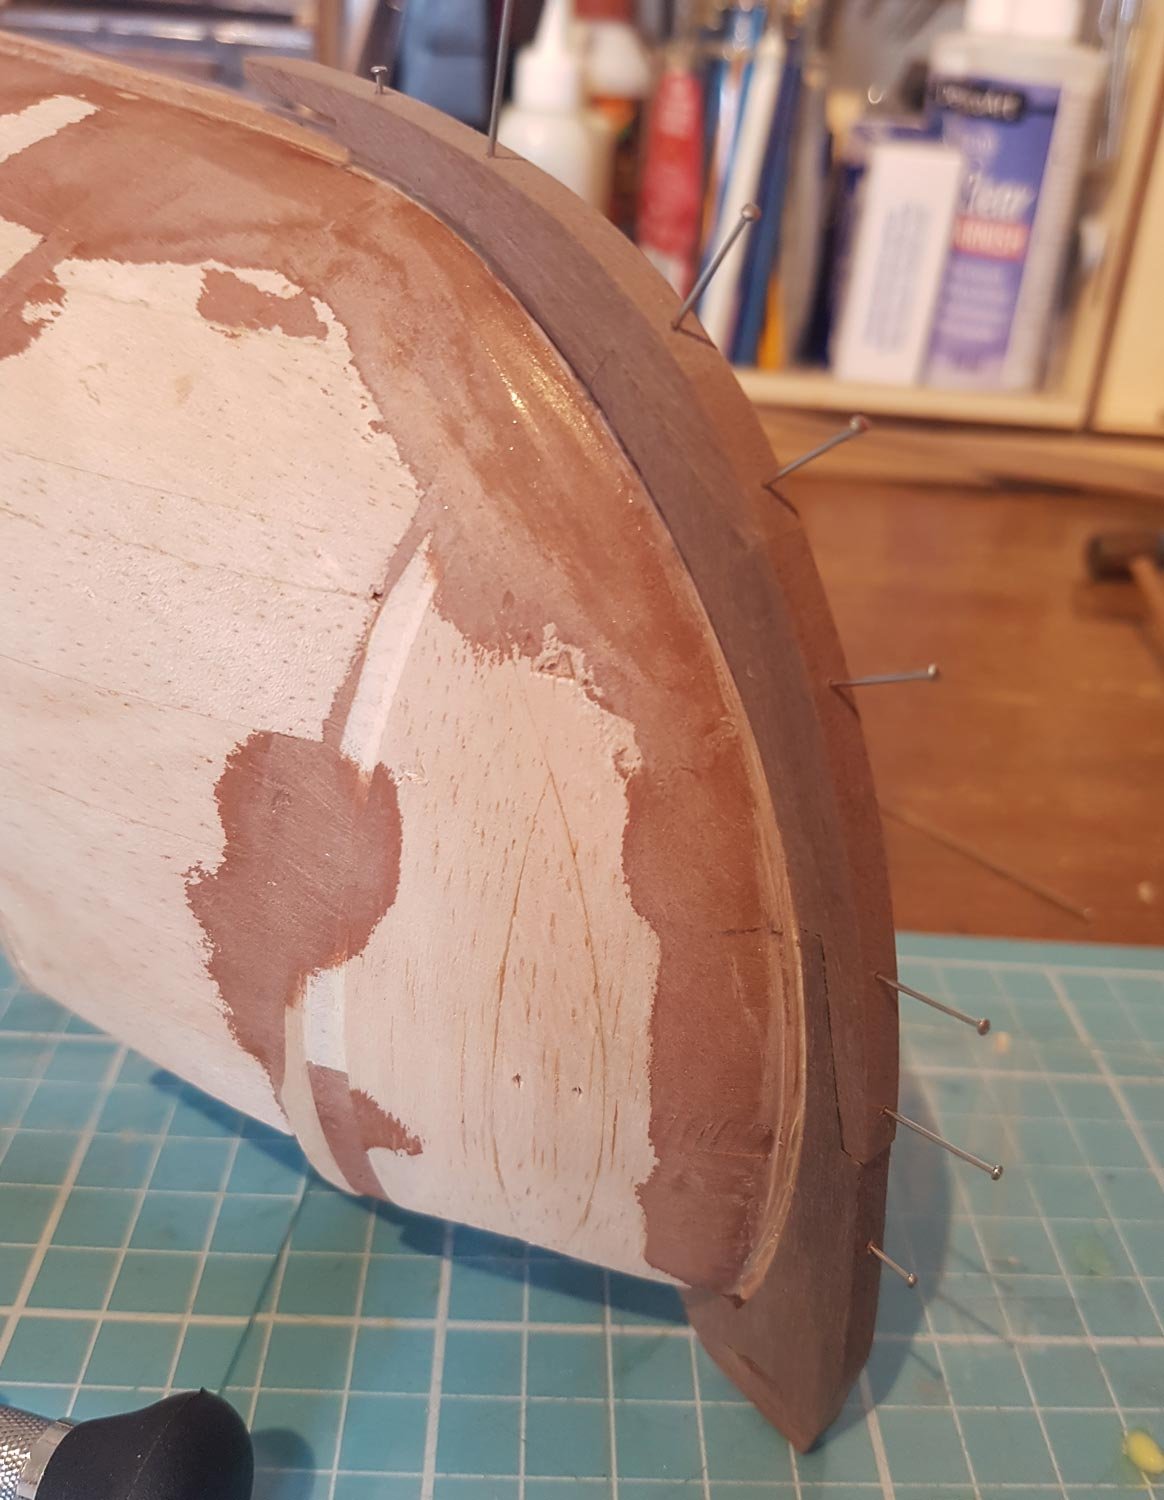
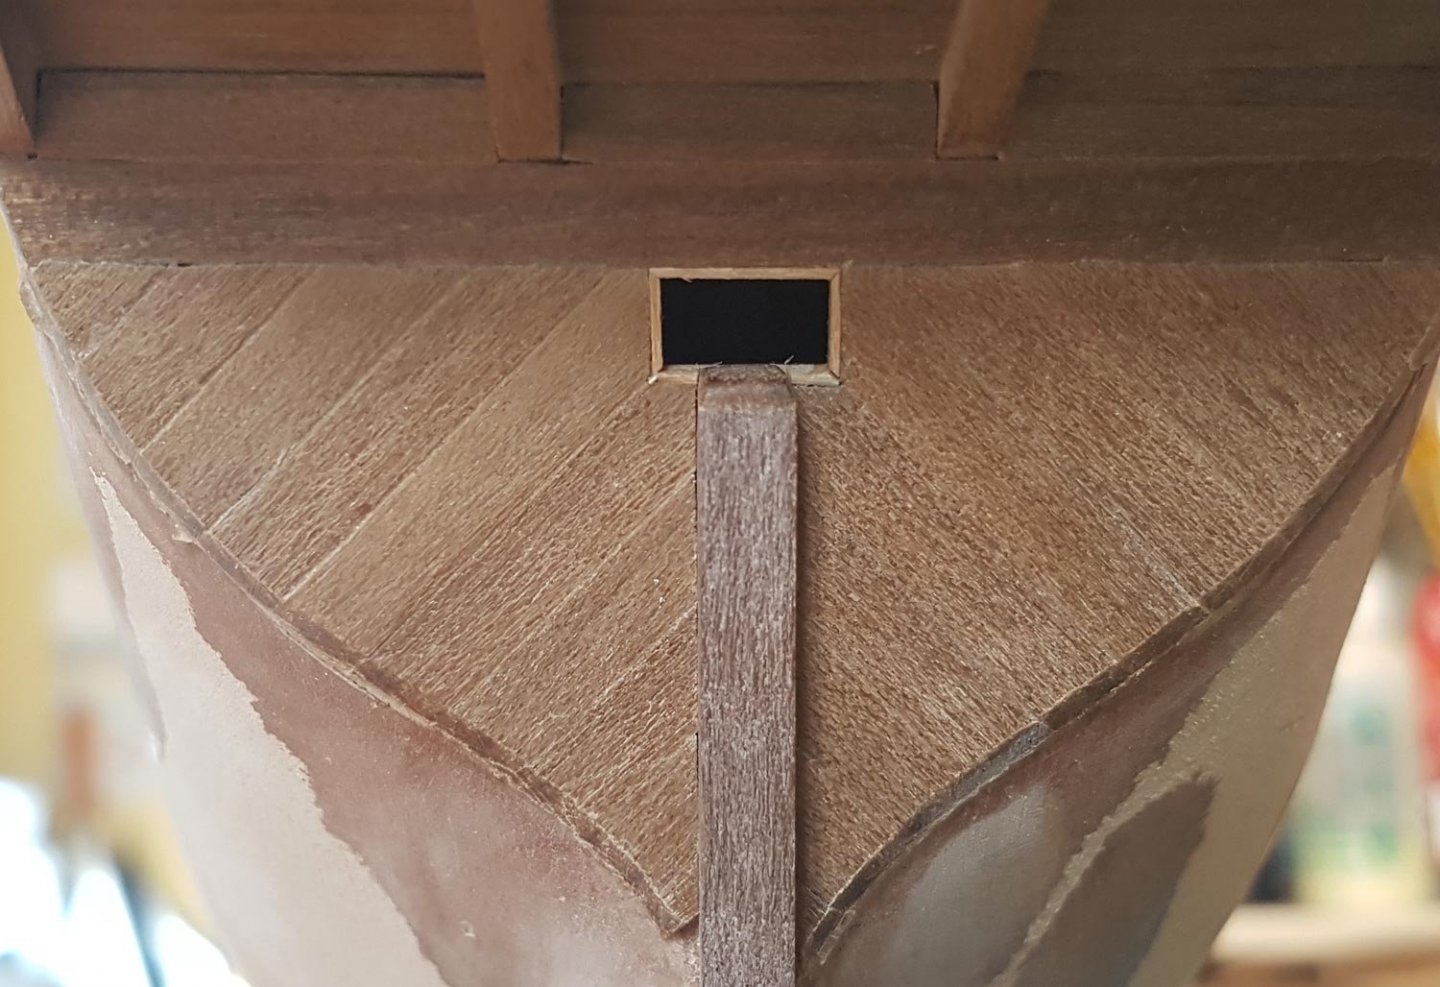
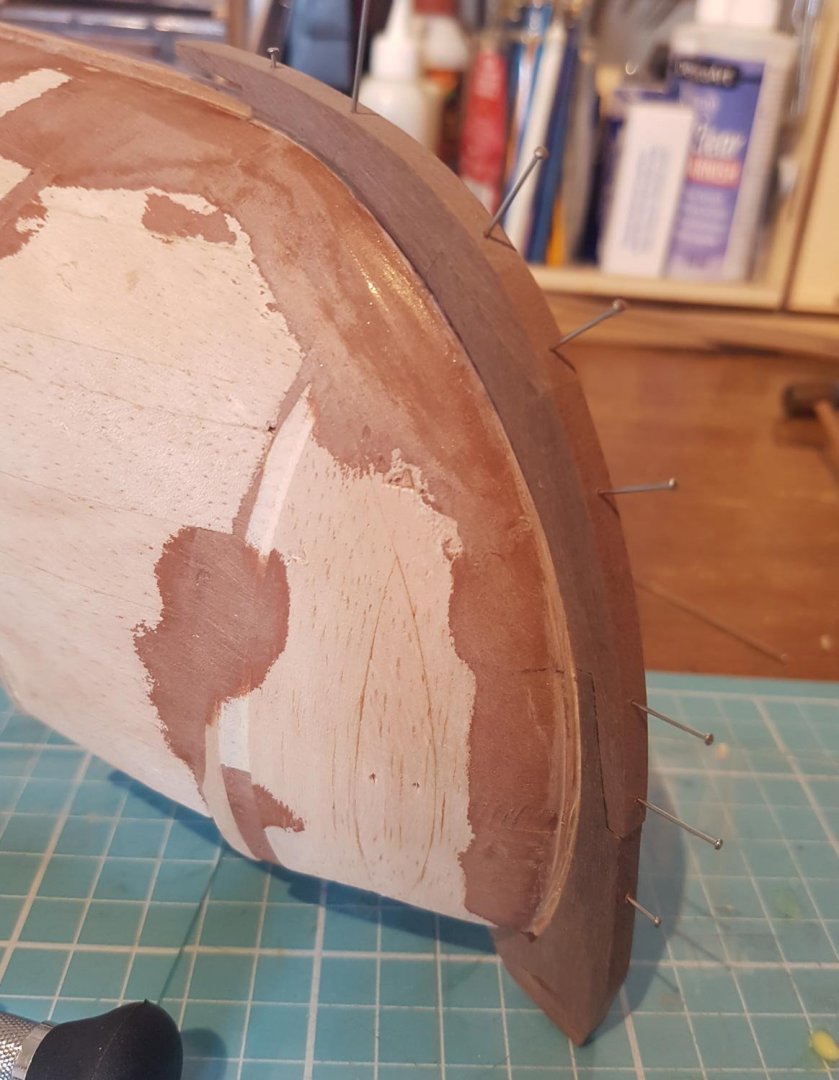
I wish, Edward, but wizardwood is a bit beyond my pocket, tools and skillset! I have to apologise for this late update; the work was done back in April but I was expecting to do more work and then had forgotten that I hadn’t made an update. It looks like only a little work but most of a day was spent sanding the hull and tidying up the planking on the transom. I have lost a little chip from the transom planking - which will be fixed after the hull is planked. I also lined the tiller hole (there must be a nautical for that!) with 0.5mm strip of maple. the whole area still needs sealing and sanding; Next was starting work on attaching stem and the keel to the hull. I started by drilling holes in the stem. I drilled from back to front - this was to ensure that the hole would be central to where the stem meets the hull, and any breakout on the outer surface will be covered by the false keel strip; Once the holes were drilled I inserted pins in the holes and offered the stem up to the hull. These pins will mark where I will drill holes in the hull. The pins will then be CA’d into the holes and thus the stem, and keel, will create the rabbet for the single layer planking. Unfortunately that is where progress has stalled. and will probably remain stalled possibly until next year. Most of my summer was taken up with repeated medical investigations and worry, and the last month and the next 3-4 months have been/will be taken up with the associated medical treatment. Luckily the treatment should result in a cure. I may be well enough to do the odd bit of work in the shipyard, but with the intensity of treatment ramping up within the next three weeks , it’s likely that I won’t be well enough. I do apologise to all of you who have followed, liked, commented or even just read this log, I WILL return, and I WILL finish this ship. I will also try and be more active on this forum, so c’mon guys, get building! Cheers, Paul

-
Another vote for a job well done, Matt. You did yourself and the kit proud, and I bet, like the rest of us '1819 builders, you have learnt a lot that will serve you well in the future. Looking forward to seeing a link in the 'current build' part of your sig...….
- 68 replies
-
- 3
-
-
- virginia 1819
- artesania latina
- (and 1 more)
-
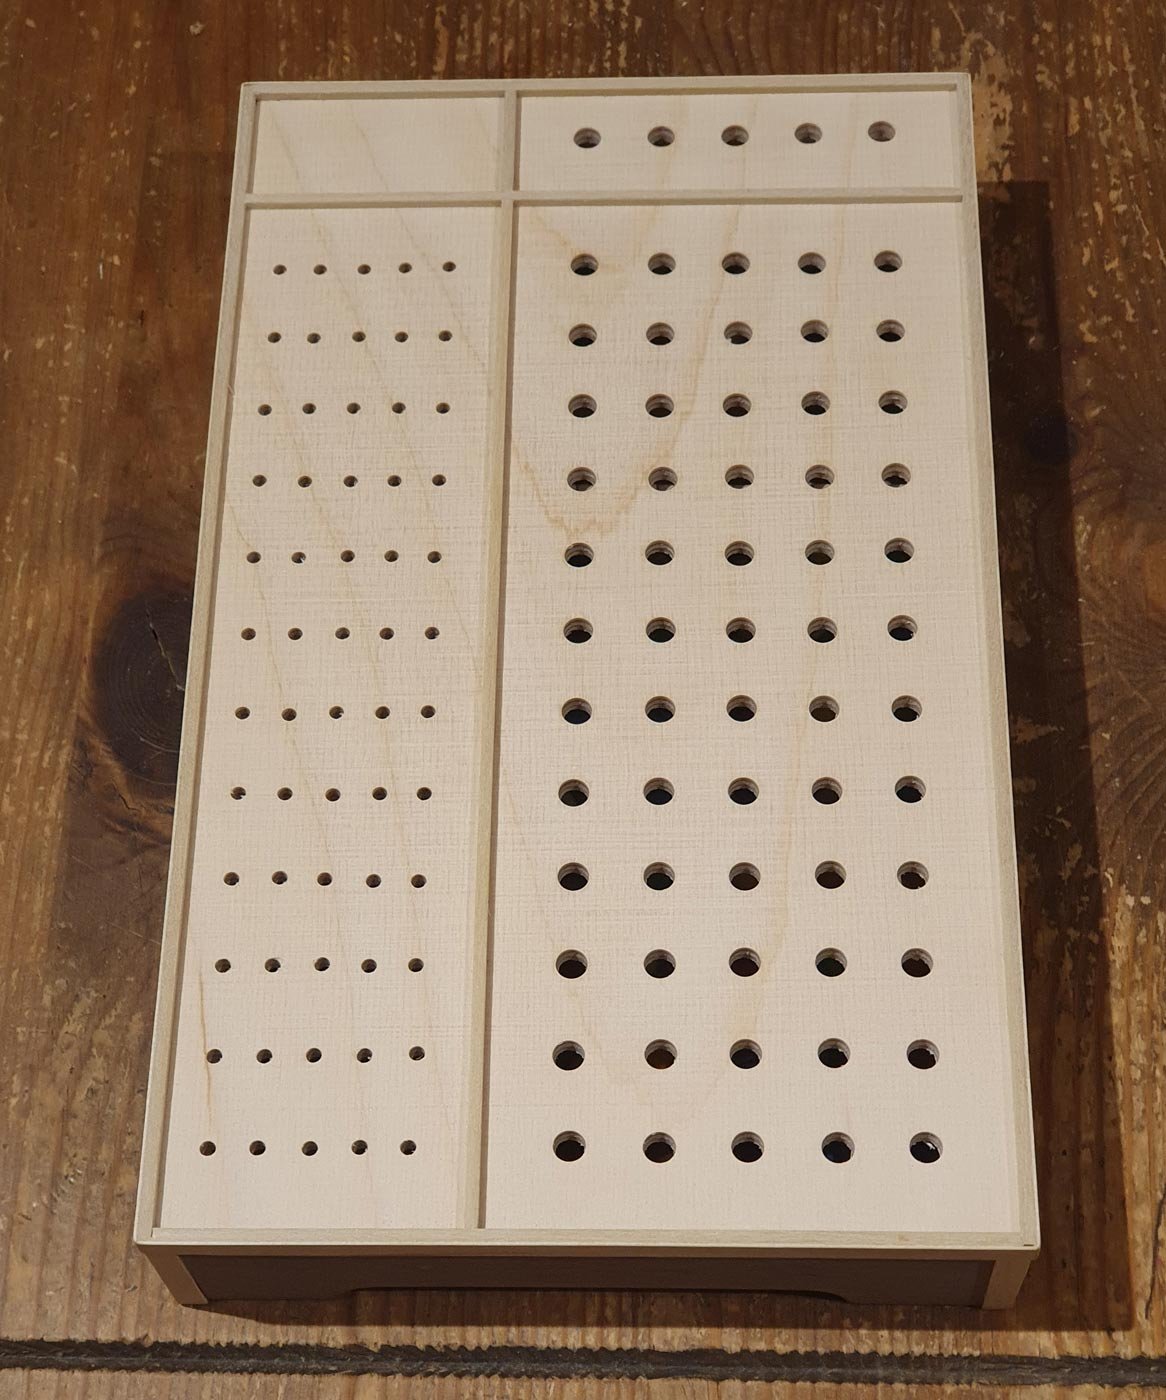
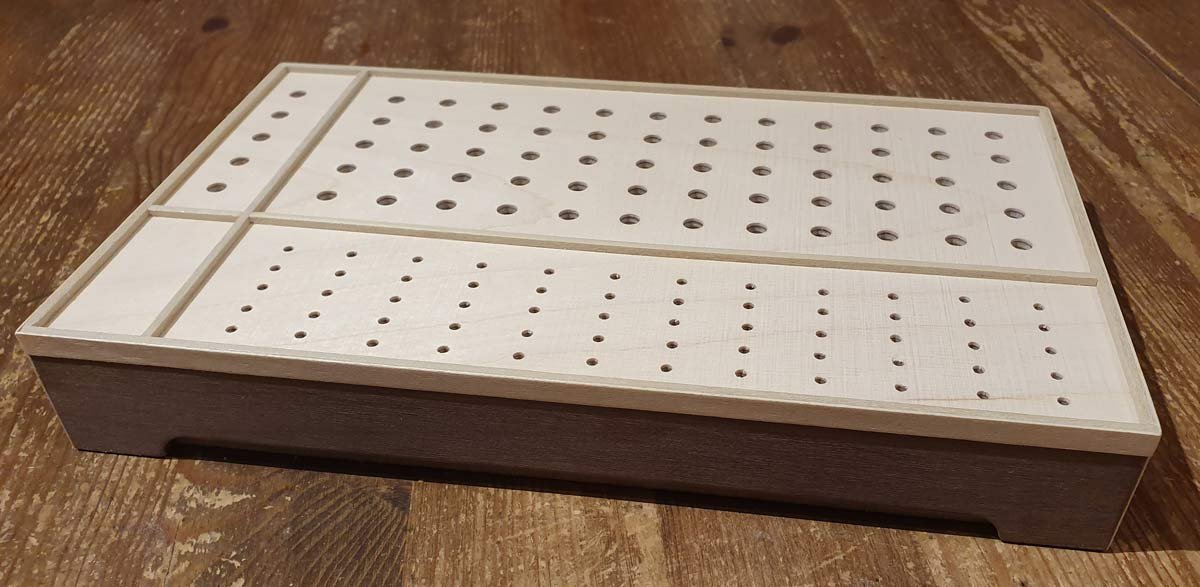
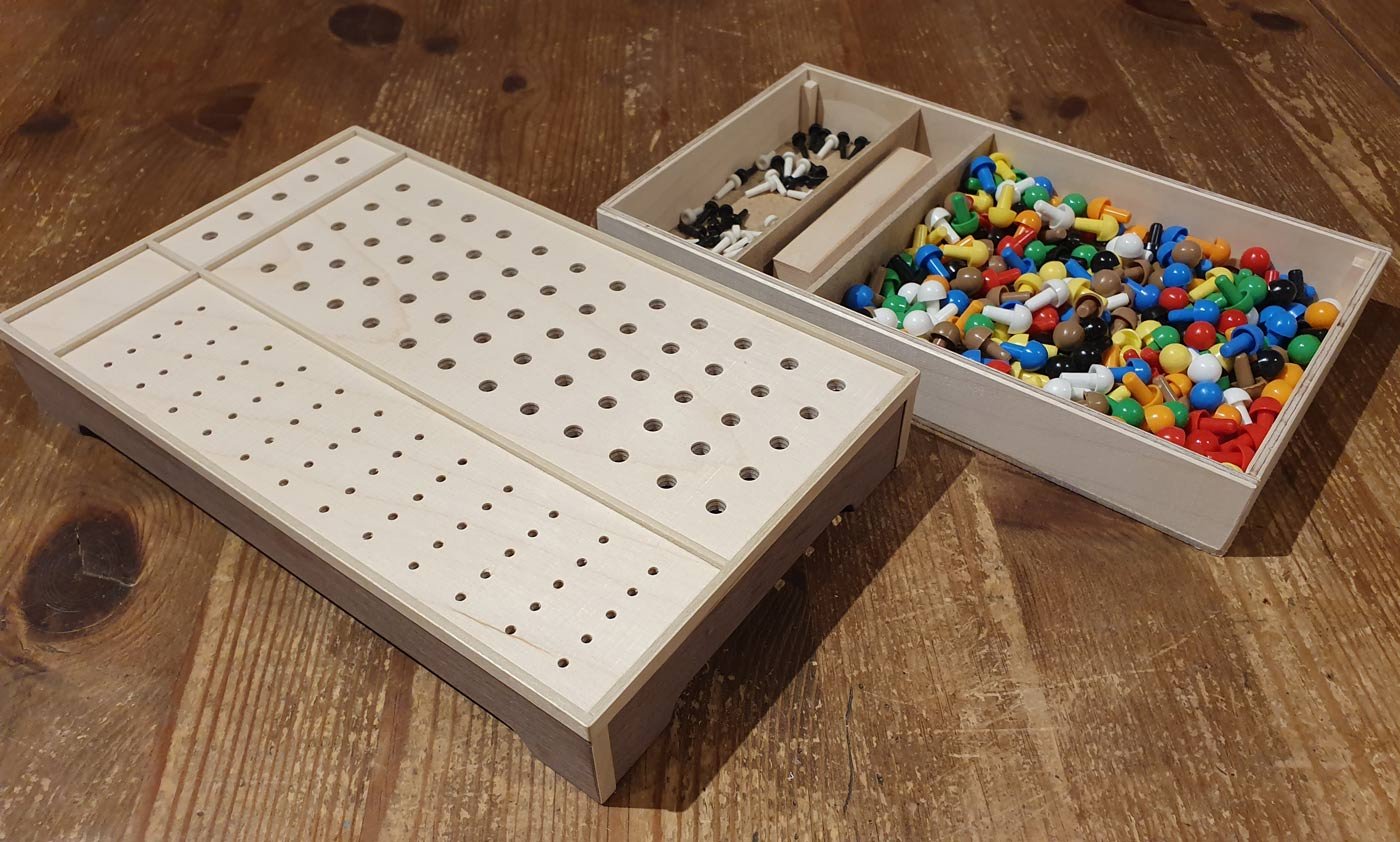
Hi everyone, this not a kit but it is made in wood so I hope it counts..... I used to love playing the board game Mastermind - "A game of cunning and logic for two players - Break the hidden code!" when I was a kid and I recently introduced my 12 year old daughter into the joys of said cunning and logic. The original game had 4 holes to encode and after playing this for a while we decided to purchase from ebay the super 5 hole version. Unfortunately, upon arrival the game stank of age/mildew etc, so I made my own from (hopefully) spare wood from my Vivacia build. The bottom box is made from 3mm board for the base and 4mm birch ply sides. The top box from; 4mm birch ply for the playing surface, 5mm walnut for the sides, 2mm lime strips and .5mm maple for the edging. the code cover was made from 1mm basswood sheet. I know the holes aren't perfectly straight but its unnoticeable while playing. Cheers, Paul


-
Another vote for the Aztec, I found it extremely easy to clean. Almost all of the plastic models shown in the link in my sig were airbrushed with the Aztec. As others have said practise, and then practise some more. Check out some Armor/Aircraft modelling websites and model railroad ones too. The most important thing for me was getting a water trap fitted between the compressor and the airbrush, I had horrible spitting without it.