Griphos
-
Posts
105 -
Joined
-
Last visited
Content Type
Profiles
Forums
Gallery
Events
Everything posted by Griphos
-
 I have my kit! Building schedule is next up after finishing the Skipjack.
 -
Home made thicknessing sander if
Griphos replied to Cabbie's topic in Modeling tools and Workshop Equipment
The rubber sleeves on my spindle sander are quite dense, and are certainly true enough for this sort of operation, and the sanding tubes are themselves fairly thick. You don’t need to crank down on them. Just a slight tightening holds the tube in place, and the tubes are quite stiff and do not deform. The may be expensive. I don’t know. I’ve yet to have to buy replacements. A rubber sanding stick has cleaned them well and they still serve. A light touch sanding and the oscillation keep them from wearing much. Without the oscillation, they might wear more quickly. Here's something like what I had in mind. Not cheap, as it turns out. https://www.mscdirect.com/browse/tnpla/81251803?cid=ppc-google-New+-+Machinery+-+PLA_sTtF8HGSz___291757062200_t_S&mkwid=sTtF8HGSz|dt&pcrid=291757062200&rd=k&product_id=81251803&gclid=EAIaIQobChMIy_-fh-yT4wIVTb7ACh3-RAv5EAQYECABEgK62PD_BwE -
Home made thicknessing sander if
Griphos replied to Cabbie's topic in Modeling tools and Workshop Equipment
Might try a spindle sander shaft arrangement, perhaps with a threaded rod. You can still support the free end, but a nut and washer between the support and the rubber sleeve would tighten a spindle sander tube onto the rubber. You’d need to buy a few spindle sander tubes and a rubber sleeve of an appropriate size and a threaded rod of the same diameter as the spindle shaft. You could set up the free end support similar to the bed adjustment to true the sleeve to the bed. -
Coming up on 30 years in about a week and a half. Hard to believe. Time flies.
-
I’ve been refreshing all day, but it always says out of stock.
-
Plank Bender....
Griphos replied to dvlp47's topic in Building, Framing, Planking and plating a ships hull and deck
I’m used to soaking a plank in hot water and then bending on a jig with nails to hold the shape. Does bending with a hot iron improve on that? Thanks for the help. -
Plank Bender....
Griphos replied to dvlp47's topic in Building, Framing, Planking and plating a ships hull and deck
I like the vise idea. So, basically, I just move the wood over the iron, bending slowly. -
So you’re the one! I had that sander in my cart as well. I guess you completed the checkout right before I tried. I shouldn’t have looked one last time to see if there was anything else I wanted!
-
Plank Bender....
Griphos replied to dvlp47's topic in Building, Framing, Planking and plating a ships hull and deck
I have the Aeropiccola, but I have never really known how to use it. Do I use a form, or just apply the iron and bend by hand? I’ve never seen any thread about how to use heated plank benders. -
Wow. Someone must have bought almost everything while I was adding a few things to my cart. As I went to checkout, all items were removed as out of stock. I only added four things, and there were several of them when I added them.
-
She’s answered that question numerous times over the course of this thread.
- 1,035 replies
-
- 5
-

-
- royal katherine
- ship of the line
- (and 1 more)
-
Hard is what matters, and stable (doesn't crumble or dust). One nice thing about using a primer is that both primer and paint will telegraph the imperfections well. Even small scratches you don't see will show up when primed/painted. A sanding sealer tends to hide imperfections (partly due to the sheen). So, it might be a good idea to prime it just to spot the problem areas and sand them smooth. You want the smoothest surface possible before painting. For both clear coats and paint, time spent prepping the surface pays dividends.
-
I'm not familiar with that brand. A quick google and it appears to remain flexible (doesn't shrink or crack), so it may have some acrylic or other flex agent in it already. It does say you can nail into it, so I suppose it hardens somewhat (although I doubt that it will hold a nail for any length of time). At any rate, it also says you can paint directly on it. And it supposedly takes varnish as well. I suspect you have a fairly thin layer of it over most of the surface. I'd still try the sample pieces first, since we don't really know what sort of material the filler is, or its chemical makeup, and see how it responds to the various treatments.
-
You may have been advised to use poly, or some sealer, in order to “harden” and seal the filler, since there does appear to be more filler than wood that is exposed. That’s not bad advice, depending on what filler you used. Some fillers harden well. Some stay more grainy and it is possible to scratch or dent them more easily than the wood. Shellac can provide a hardened surface to the filler to apply paint to. It was used to create the hard shell on M&M candy originally, which is why they would not “melt in your hand” (I have no idea if it is still what is used). It’s totally natural and fully edible. The person probably suggested poly because it may soak into the filler to some degree (since it is an oil) and harden, providing a better or more durable surface to paint and handle. Shellac will provide a surface shell as well, but won’t soak in. And a single thin coat won’t build much of a shell. Enough for paint to adhere well, however. And multiple layers of paint will be both flexible and protective. I’ve not used MS paints, and don’t know who makes them, so can’t advise about them. I’m sure others here have. Sorry if all all of this is confusing. Totally understandable. Finishing is a complex matter, and although there are basic fundamentals, there’s no easy one-step fits all situations process. But at our scale with our materials, it tends to usually work out just fine rather than not. The key factor in your situation is the filler. I think most of us have been giving advice under the assumption that you are wanting to seal natural wood. Some fillers are made to be painted and can be painted directly with good results. In a sense, such fillers perform both a sealing and priming role already. What filler did you use? Is it a hard surface? Does handling it create any dust or leave residue on your hands? You’ll want to make sure it’s clean before any finish. So a light sanding with 320 or 400 grit paper will present a fresh, clean surface for the finish to adhere well. I don’t know that you should use mineral spirits to clean, since that may react with the filler and perhaps soften it. I'd still suggest making a few samples of glued planks or some solid sheet and apply your filler on top and let it fully harden and dry. Then apply shellac to one, and paint; prime another and paint, and just paint the third. You’ll see what gives the best result in your situation that way. The likelihood is that all three will be very similar. As for building multiple thin coats of the model paint, you shouldn’t need to sand between coats, particularly if you thin the paint so it flows well, or it comes that way, like Vallejo and Polly Scale paints. If you are airbrushing, and have thinned the paint enough to flow well through the airbrush, then no sanding will be necessary. Acrylic paint dries fast, particularly through an airbrush, and that brand may need retarder added so that it airbrushes well. Some brands don’t. I’d just use brushes to paint the hull myself.
-
Shellac is an ideal sanding sealer. Hard to mess up. Polyurethane and polyurethane varnish are the same thing. You can can paint over properly applied poly just fine. Modern, good acrylics adhere very well to clean surfaces. As a sanding sealer, you want to thin the poly by half at least and put on a very thin coat. You wipe it on and then wipe off the excess right away. It will penetrate the wood and not leave any real surface film. You do want to let it fully cure. A thin penetrating coat will cure in most climate conditions within 48 hours, but this is not guaranteed. Fully cured, poly provides a hard durable seal. I’m not sure why that is needed, though. Why are you wanting to “seal” the wood with a clear coat before painting? Did you read that you should somewhere? As you say, you can just sand and paint. Wipe the sanded surface with mineral spirits. A tack cloth will not get all the dust. Again, the paint itself can be used as a primer/sealer. I don’t seal surfaces I paint, and don’t usually use primers. A thin first coat does the job. Always build paint in thin coats. Don’t try to make it opaque in one go. Multiple thin coats of a good acrylic, like Vallejo or Polly Scale, will leave a beautiful and very durable finish. If you want to seal first, shellac is best. Most hardware stores sell a “sanding sealer” that is shellac. Most sell Bullseye here in the States, which is a decent pre-made shellac. I always use blonde or super blonde flakes and make the cut I want myself with denatured alcohol. But I usually use shellac as a clear finish for natural wood, not as a sealer. Blonde if I don’t want to darken the wood tone, and darker flakes if I do. But several coats of shellac will leave a high sheen. That’s where a wipe on poly can be nice. Poly can be obtained with additives that dull the sheen to a satin finish, which works well for decks, etc. I’d just sand and wipe with mineral spirits and start applying thin coats of paint. But I suggest that you make a sample of some planks glued together and test your paint and technique with that first. Don’t start painting the hull until you can paint a sample in a way that looks very good to you. What paint are you going to use? That’s the more important question not all paint is equal.
-
Yes, most poly finishes are oil based. Do avoid the water-based poly finishes. Wipe on poly is just thinned regular poly. You can thin yourself with mineral spirits or other suitable thinner. 2:1 poly to thinner would work, but you don’t have to be finicky about it. It’s thinned to flow on more smoothly and wipe on well. You don't actually have to “seal” the hull first before painting. The paint will seal it. But acrylic paint will stick fine to both the bare wood and wood sealed with poly. Thinned poly is probably better since you don’t want to build up much thickness in the finish. Acrylic paint doesn’t build a lot of thickness except after many coats.
-
If you will look at his post #15, you’ll see his pics of planking the deck. From those it looks like he used an aniline dye on the planks. You can see the raw center plank he has marked for drilling the mast holes and then the same plank drilled and ready to install. It is quite a bit pinker. Aniline dyes often dry pinkish, until a top coat is put on them. And the color is very even, which is hard to achieve with oil stains on basswood (or any softwood). I suspect he used a light dye. Then any oil varnish on top will shift the tint back to tan. Danish oil is good. Hardware store tung oil is good (it will have additives to dry faster). Pure tung oil is good, but takes a long time to dry and is thicker, like linseed oil. Wipe on poly is good. Sanding sealer is often a form of shellac, which would also work fine. That’s why it tends not to change the tint of the wood. Blonde shellac has very little tint, and does not penetrate, like oils do, which is part of why the change the tint of the wood. You can can get your basswood deck to look like his by dyeing the planks with a light dye and/or by using an oil finish that darkens the wood, like tung oil.
-
Not all resins are equal. A lesson I learned working on full sized boats. For models, this is the best stuff I’ve found. https://www.amazon.com/Bob-Smith-Industries-BSI-201-Quik-Cure/dp/B0166FFFD4/ref=sr_1_1?crid=2AKT6FAOKEKJE&keywords=bob+smith+epoxy&qid=1558359268&s=gateway&sprefix=Smith+epoxy%2Caps%2C194&sr=8-1 Portions don’t have to be exact, and it hardens quickly and cures fully and well. Btw, @chris watton what is “black cartridge paper”?
-
Judging from this image, it looks like 1/32".
-
I usually cut tapers of this sort. Your jig should work well for that purpose except the final cut will dull the point of the blade. The trick to cutting the taper with a knife is to use almost no pressure on the first pass. The first pass just scribes the line. With no real pressure and a steady hold, the blade will scribe across any grain well. Then the blade has a channel, as it were, to follow on subsequent passes. I usually can remove the rule after the third pass and the blade follows the established cut well. I use very light pressure and as many passes as it takes. A half dozen or so usually suffices. Trying to cut through in one or two passes is what leads to unsatisfactory results.
- 389 replies
-
- 1
-
-
- bluenose
- model shipways
- (and 1 more)
-
For the whistle, one possibility would be to use solid rod, file the sound hole as you have done on the tubing and just paint the hole black. Might not look very different at this scale.
- 133 replies
-
- 2
-
-
- chaperon
- model shipways
- (and 2 more)
-
I’m going to have to add this kit to the stockpile. Very fine work on it.
- 231 replies
-
- 1
-
-
- model shipways
- armed virginia sloop
- (and 1 more)
-
Beautiful job. I would love to own such a boat in RL. I would not love the almost constant upkeep required. I have trouble finding the time to maintain the minimal teak on my sailboat.
- 49 replies
-
- 2
-
-
- dumas
- Chris-Craft
- (and 2 more)
-
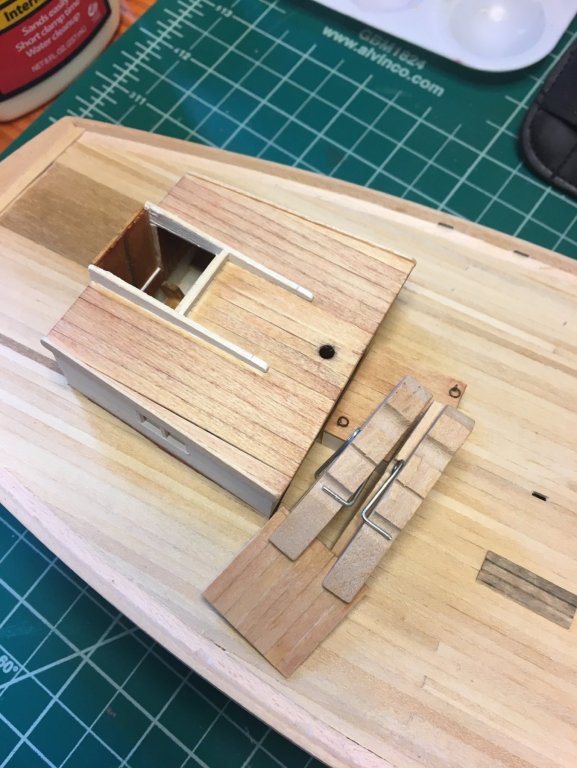
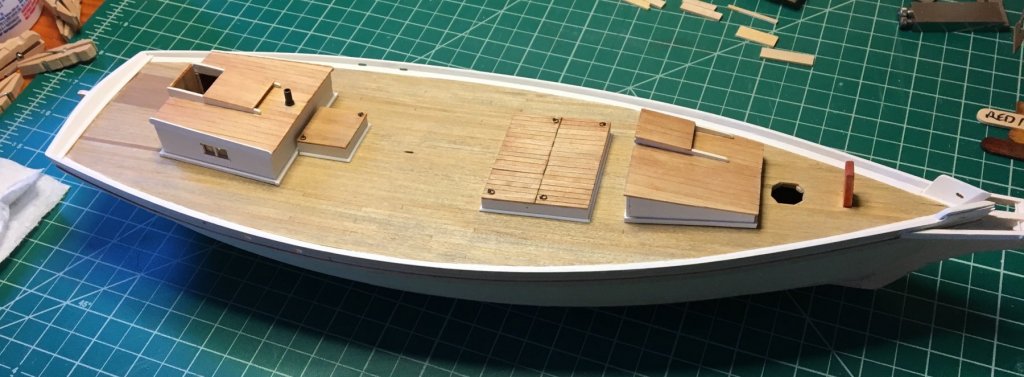
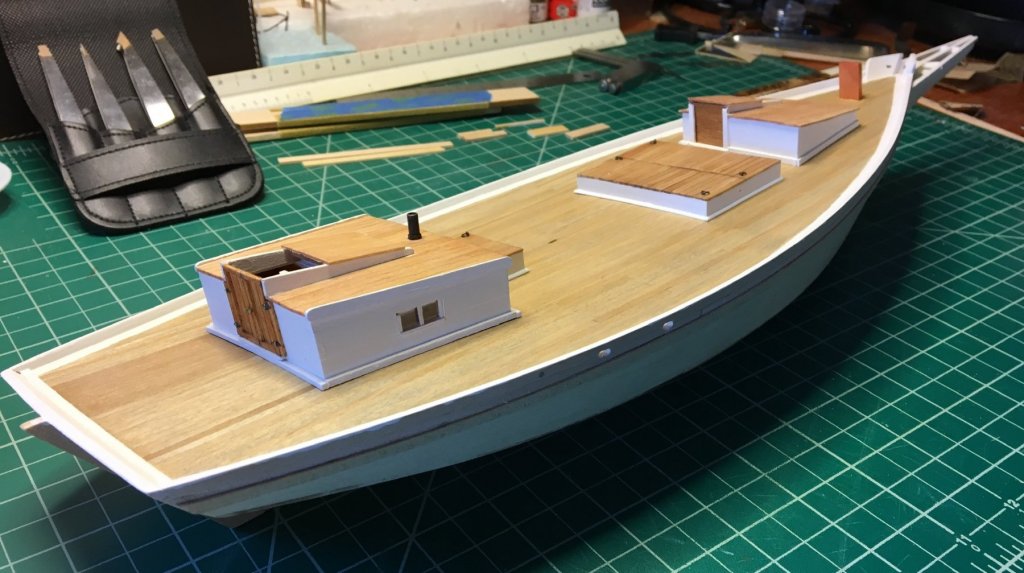
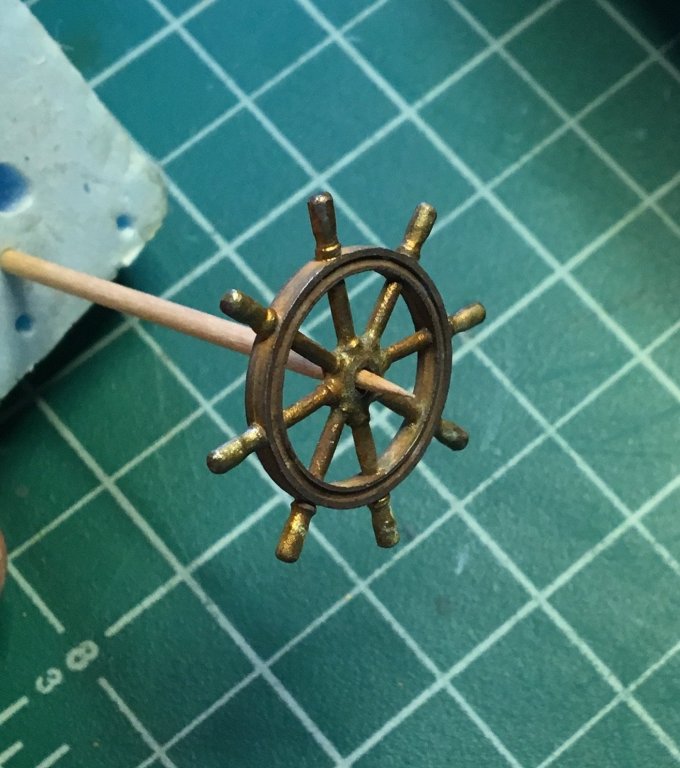
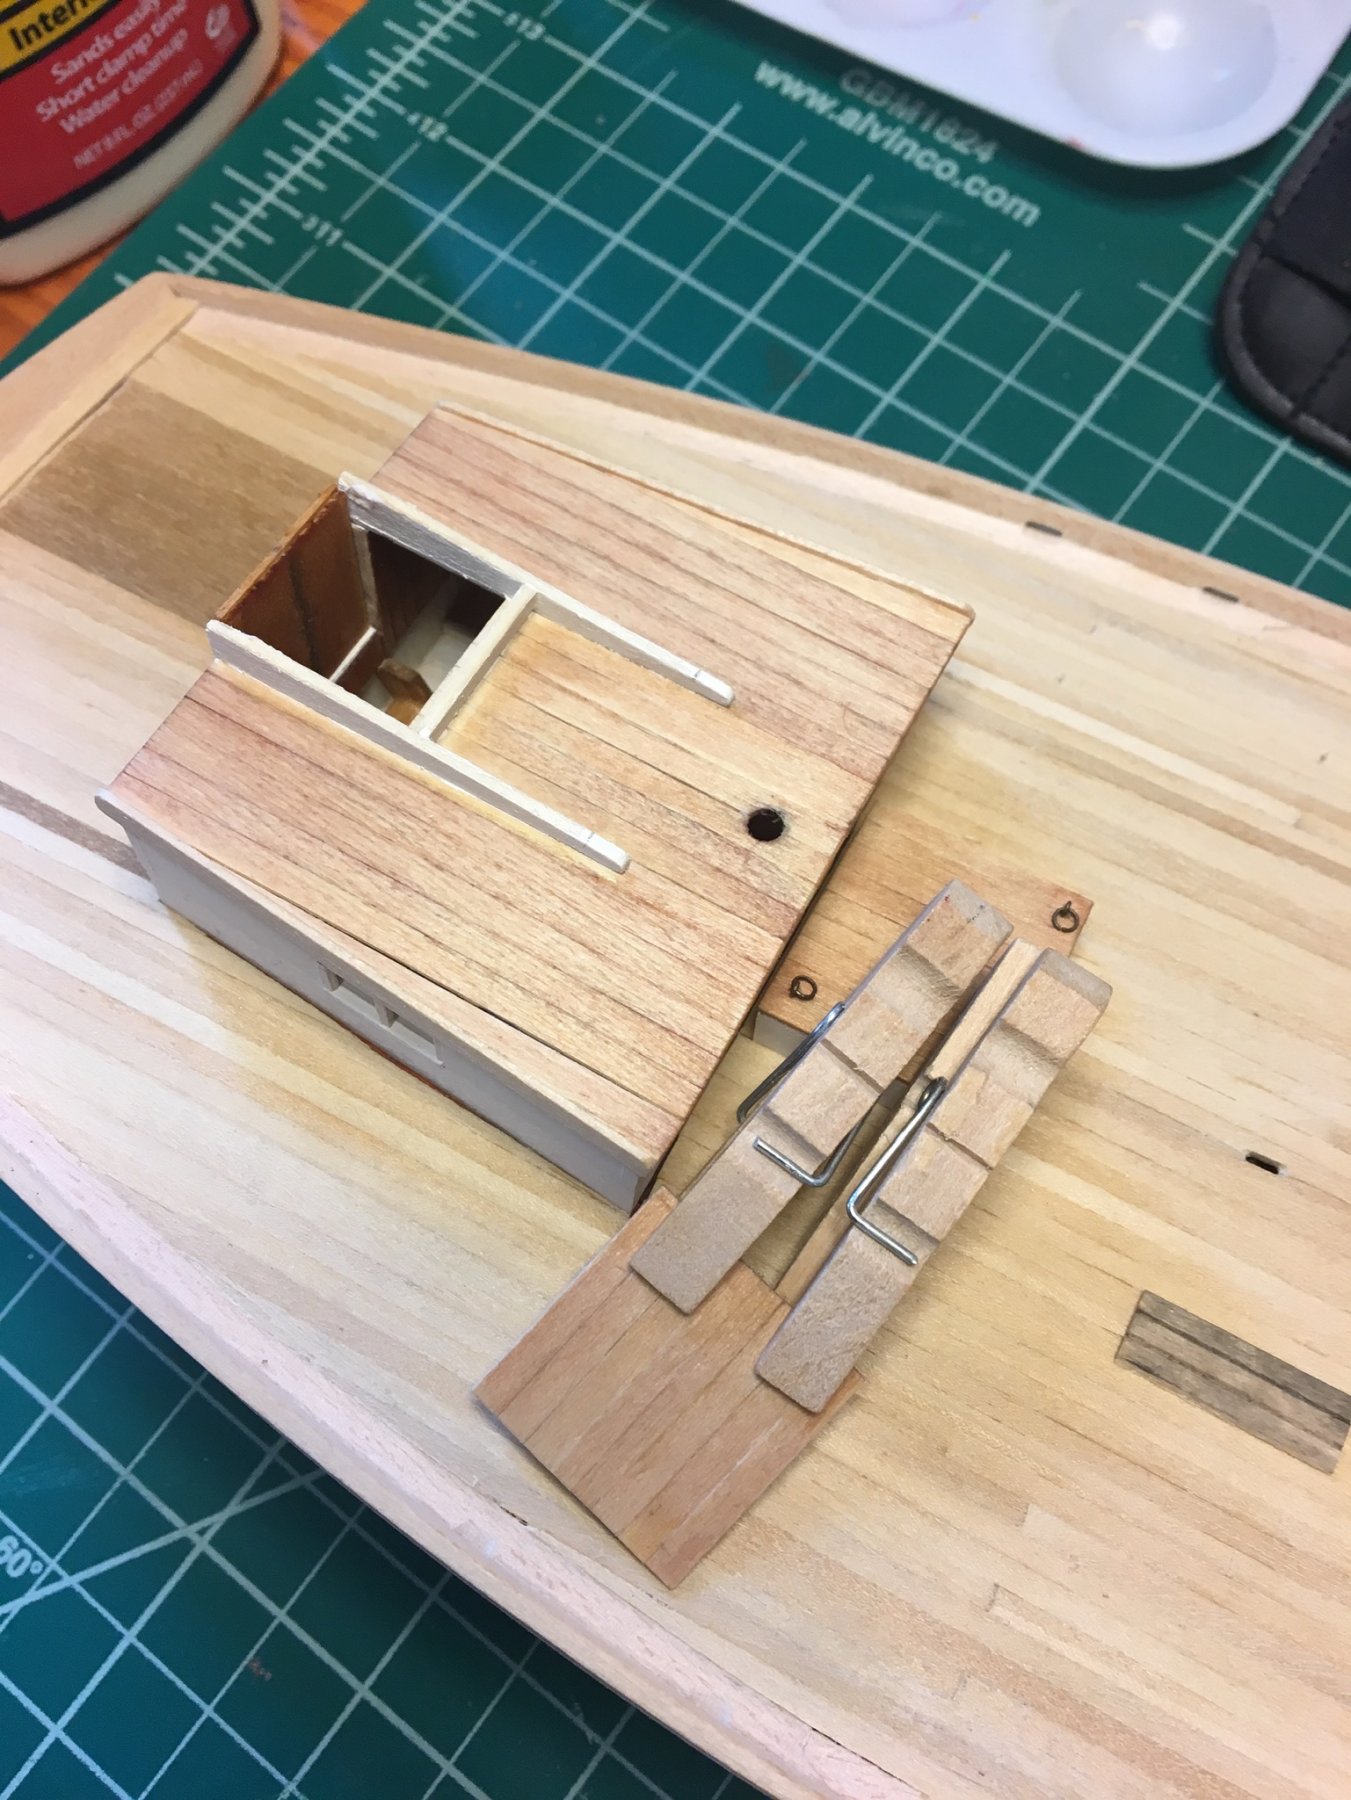
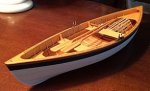
So......I realized that I can't really leave the aft cabin removable, since there will be tackle attached to it. And the boom will sit pretty close to it. So, I decided not to do a stove; but also wanted to see in a little. I used some vinegar and softened the glue on the sliding hatch (that doesn't really slide) and got it off in one piece. Then I re-glued it in the fully open position. I left the door closed. I suspect that there are times when the hatch is left open for ventilation and airing things out. 🙂 Then I made some molding for the various hatches and cabins and painted them. All the other hatches will be removable. I made the hatch molding from some small quarter-round styrene I had. I made the cabin molding from wood. Then I mixed some slightly black-gray acrylic wash for the deck. I just wanted to give it a lived in look. You can see a little test strip in the pic above. That was an alcohol/ink wash with a gray wash over. I went with just a gray wash but put a little black in it. I like the look of it. A second coat of wipe-on poly on the hatch/cabin roofs, and a coat on the deck and then I painted the waterway and log-rail. I'll make the engine cover and steering fixture now. I decided to use the wheel provided in the kit. From my research, it is a pretty good replica of the ship's wheels often found on these skipjacks. I did some preliminary painting/weathering. I wanted a work-boat look, with bronze/brass and iron that has seen some wear and tear of use. I'll do some retouching/refining before mounting.