Thistle17
-
Posts
1,042 -
Joined
-
Last visited
Content Type
Profiles
Forums
Gallery
Events
Everything posted by Thistle17
-
 Your work and results through your photos tell it all Glenn! May i ask what camera are you using? Joe
 -
Thank you Canute. It was a journey to get here Covid isolation and all. Happy it is done and I will post a final photo when the diorama is finished by the museum staff. Joe
-
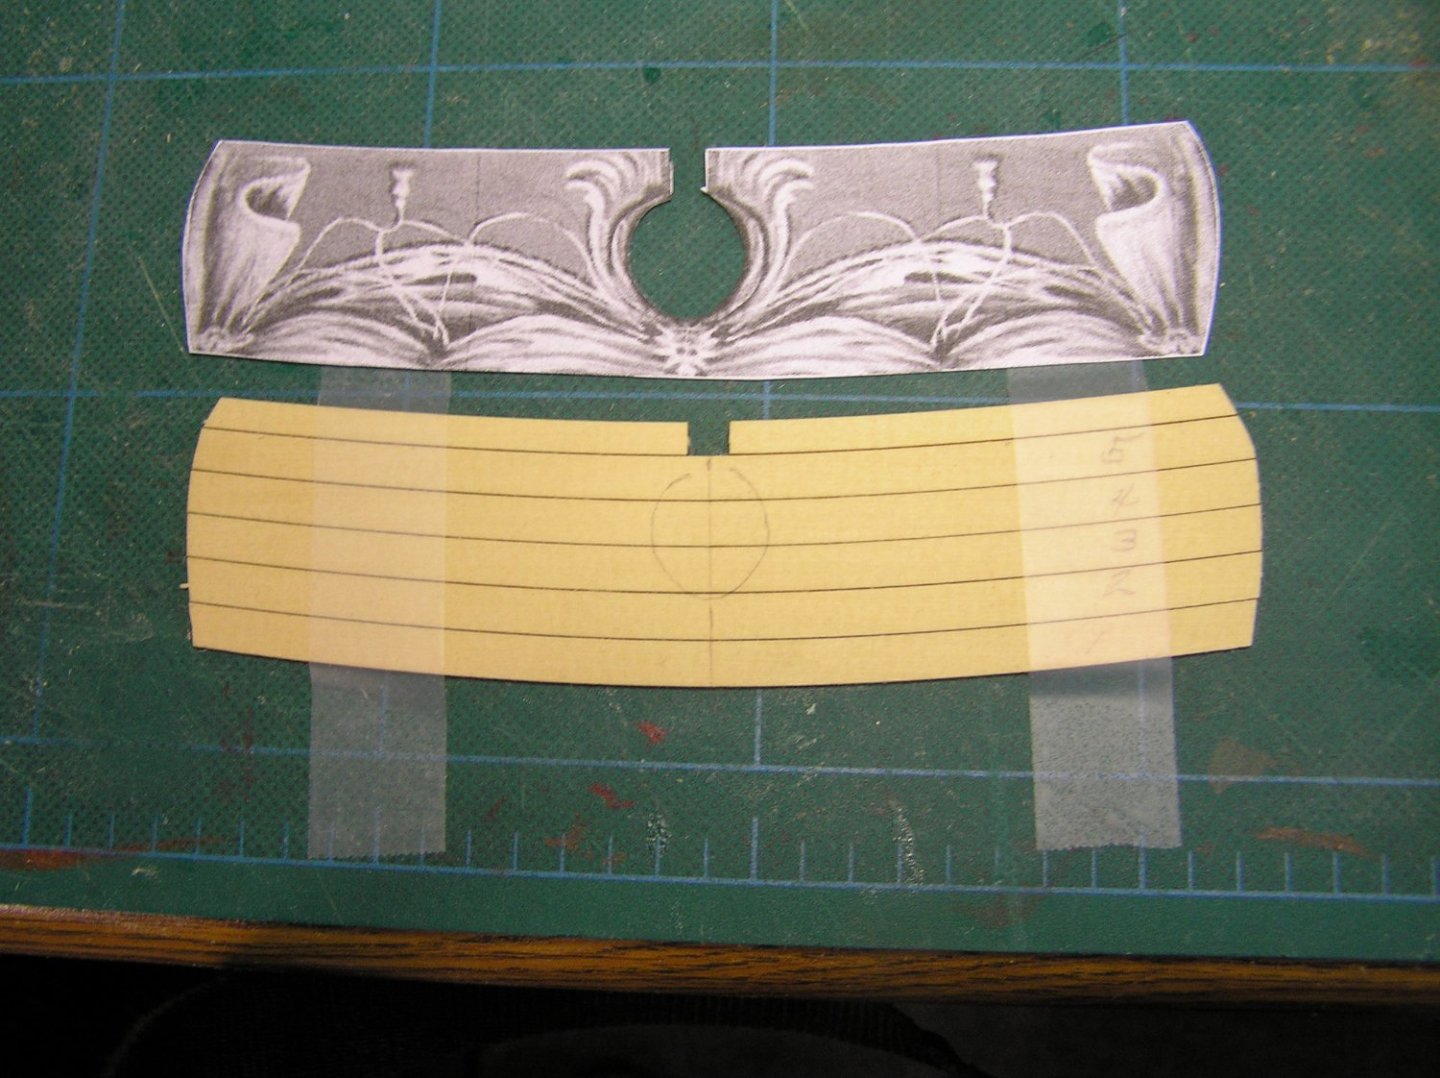
The purpose of this post is more of a personal nature than news worthy to others. With my committment to the Mark I PBR completed I can be more focused on this project. Today I milled the wales first layer planking out of AYC that I happened to have. After confering with the "master' it was suggested I use other than the stock supplied as future need may arise. The wales have been carefully aligned (even checking the P/S height to ensure symmetry after slight adjustment). So now I am ready to start and this post is a marker to see how long this is going to take. Joe
-
Thank you for the recognition. I must reiterate it was a group effort by 6 people but in the last year it was just 3 of us. Joe
-
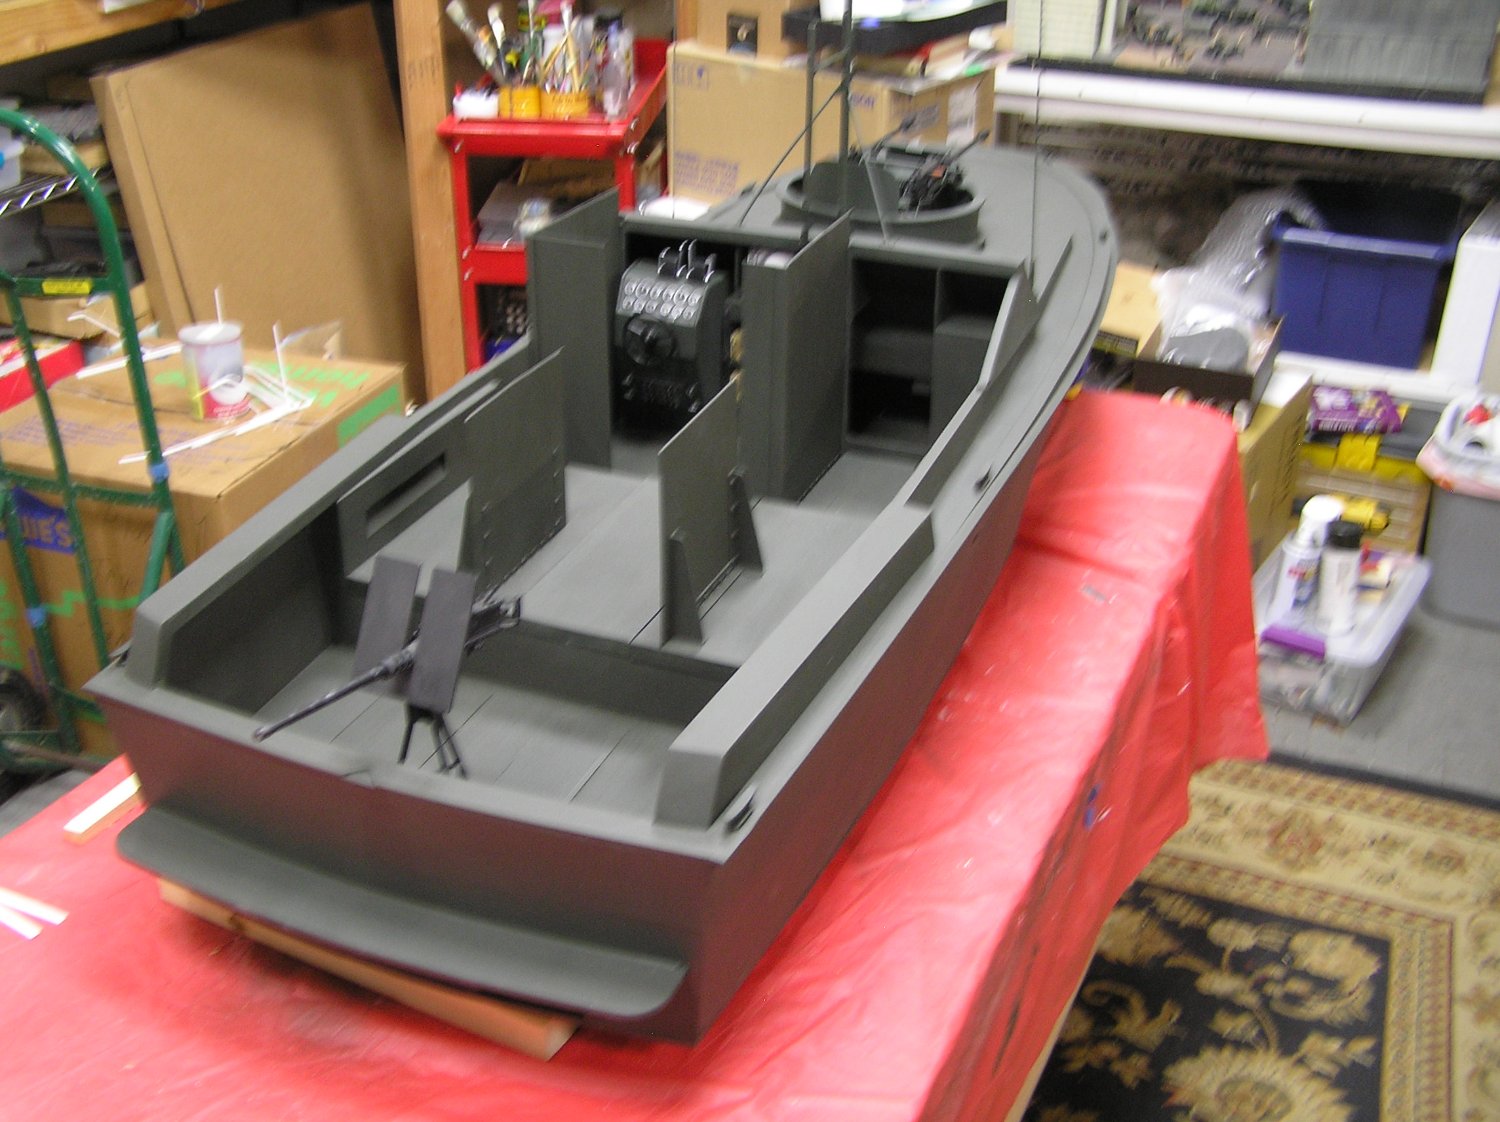
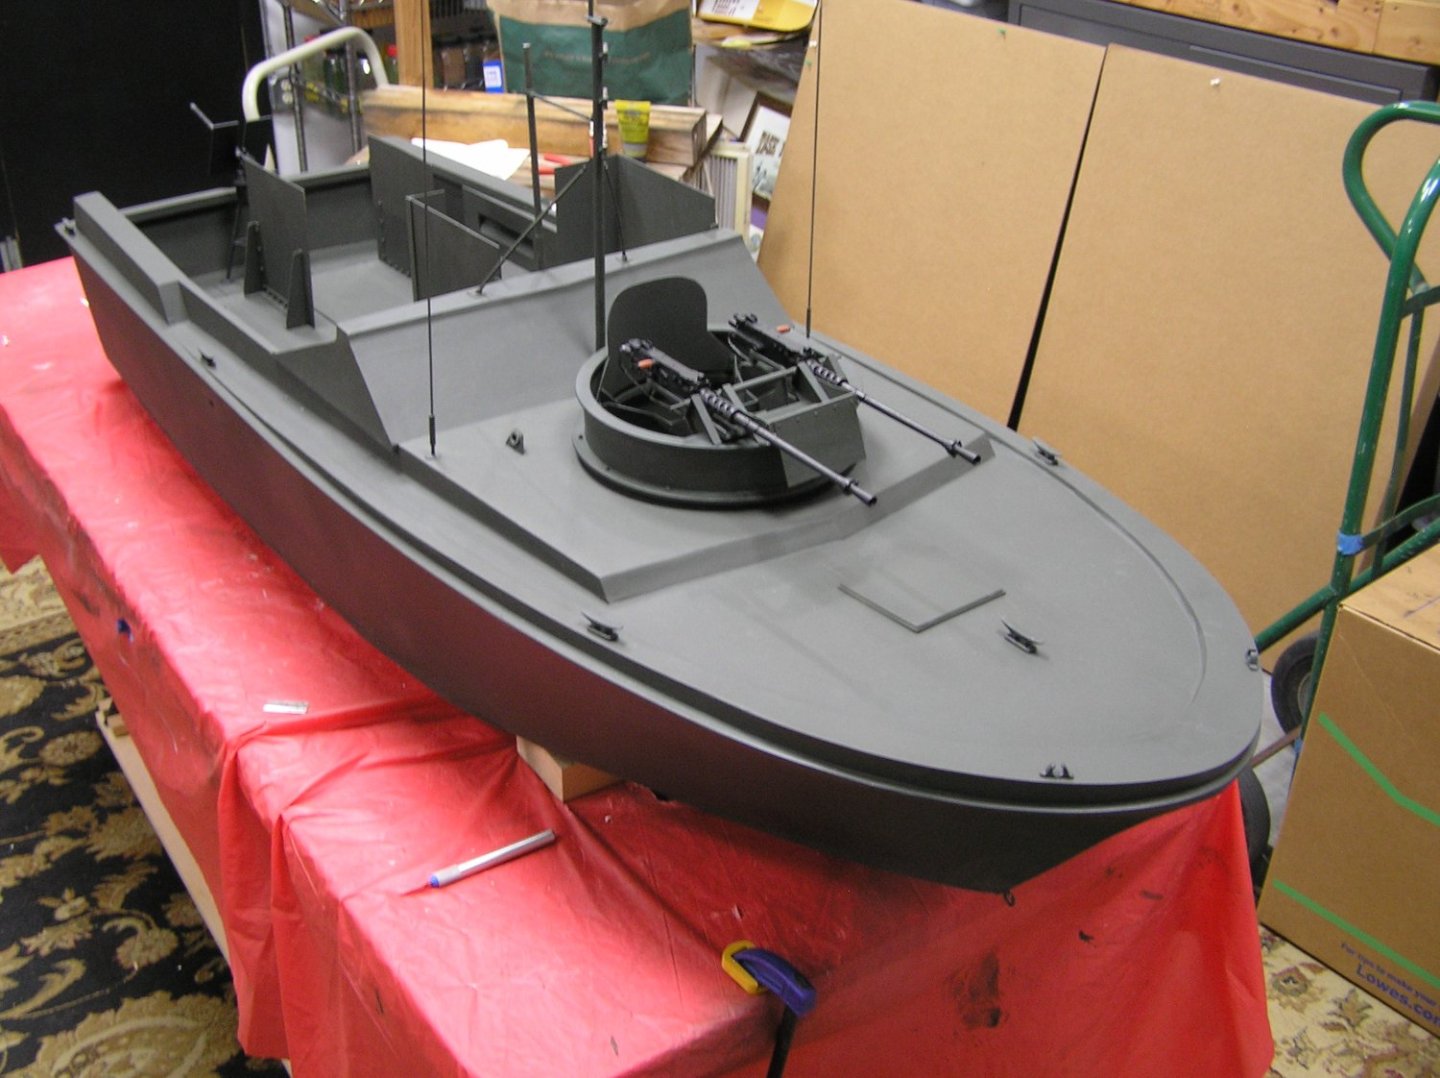
Today was a banner day for the Mark I River Patrol Boat. All the detail and touch was completed save the mounts for the starboard and port guns. This is an easy addition and was taken off line to complete. Note that the canpoy framing has been added. So too with the radar dome, the mast beacon, the rear 50 caliber, boat hook and bilge hand pump. The photos were taken in a hallway as we had to find a suitable backdrop outside the workshop. Doing so does give one the impression it is a small model. I remind all that it is over 5 feet long. A build out discussion will be presented to the group on 1/19 at &PM. It will be streamed so interested parties can message me prior to tune in. Joe
.thumb.JPG.b3fd5f722e0e335b316472aa3828f63d.JPG)
.thumb.JPG.00a3fa5c16af894f6bc3a3797e342c29.JPG)
.thumb.JPG.aa14784af1d0763d5e1f1664d9d0537f.JPG)
.thumb.JPG.e5a25f1e24f0e4962798ee955c770ddc.JPG)

-
Maximizing Model Work Area: Lathe Table
Thistle17 replied to Thistle17's topic in Modeling tools and Workshop Equipment
That can be a problem Keith. I am thinking of puttingup a detachable surround when the lathe configuration is needed. It would be a bit much to bring up the shop vac to deal with the dust. Might even trip my banishment back to the basement if I am not careful. Joe -
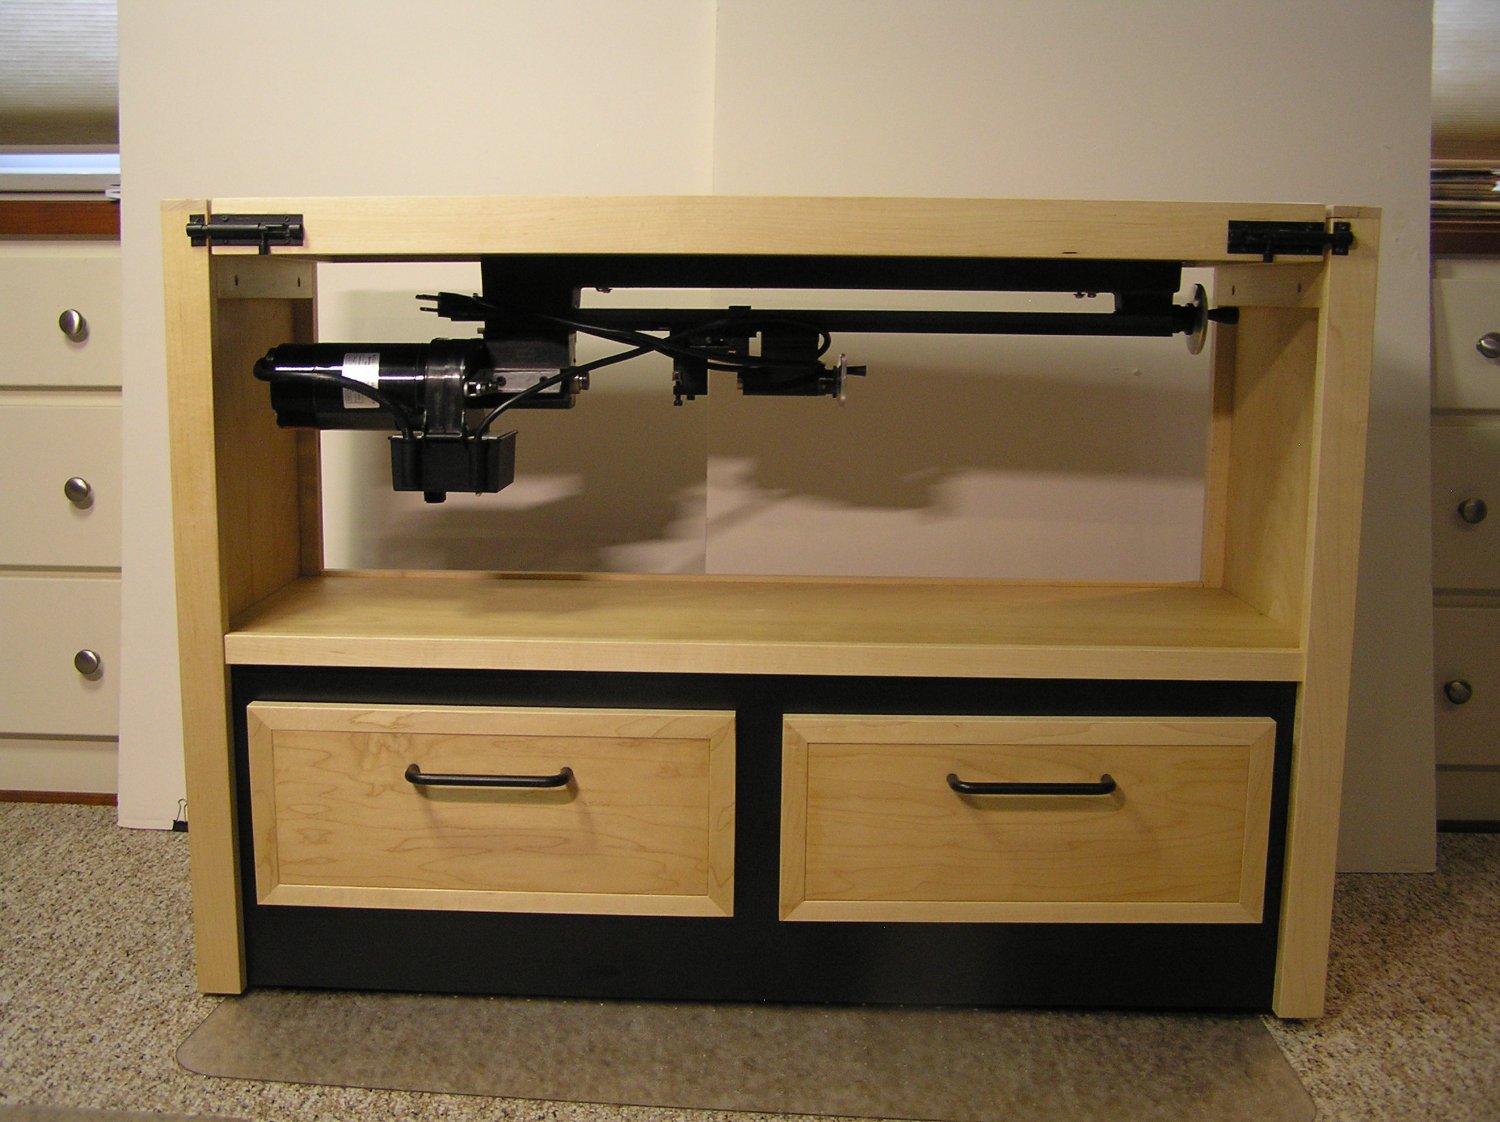
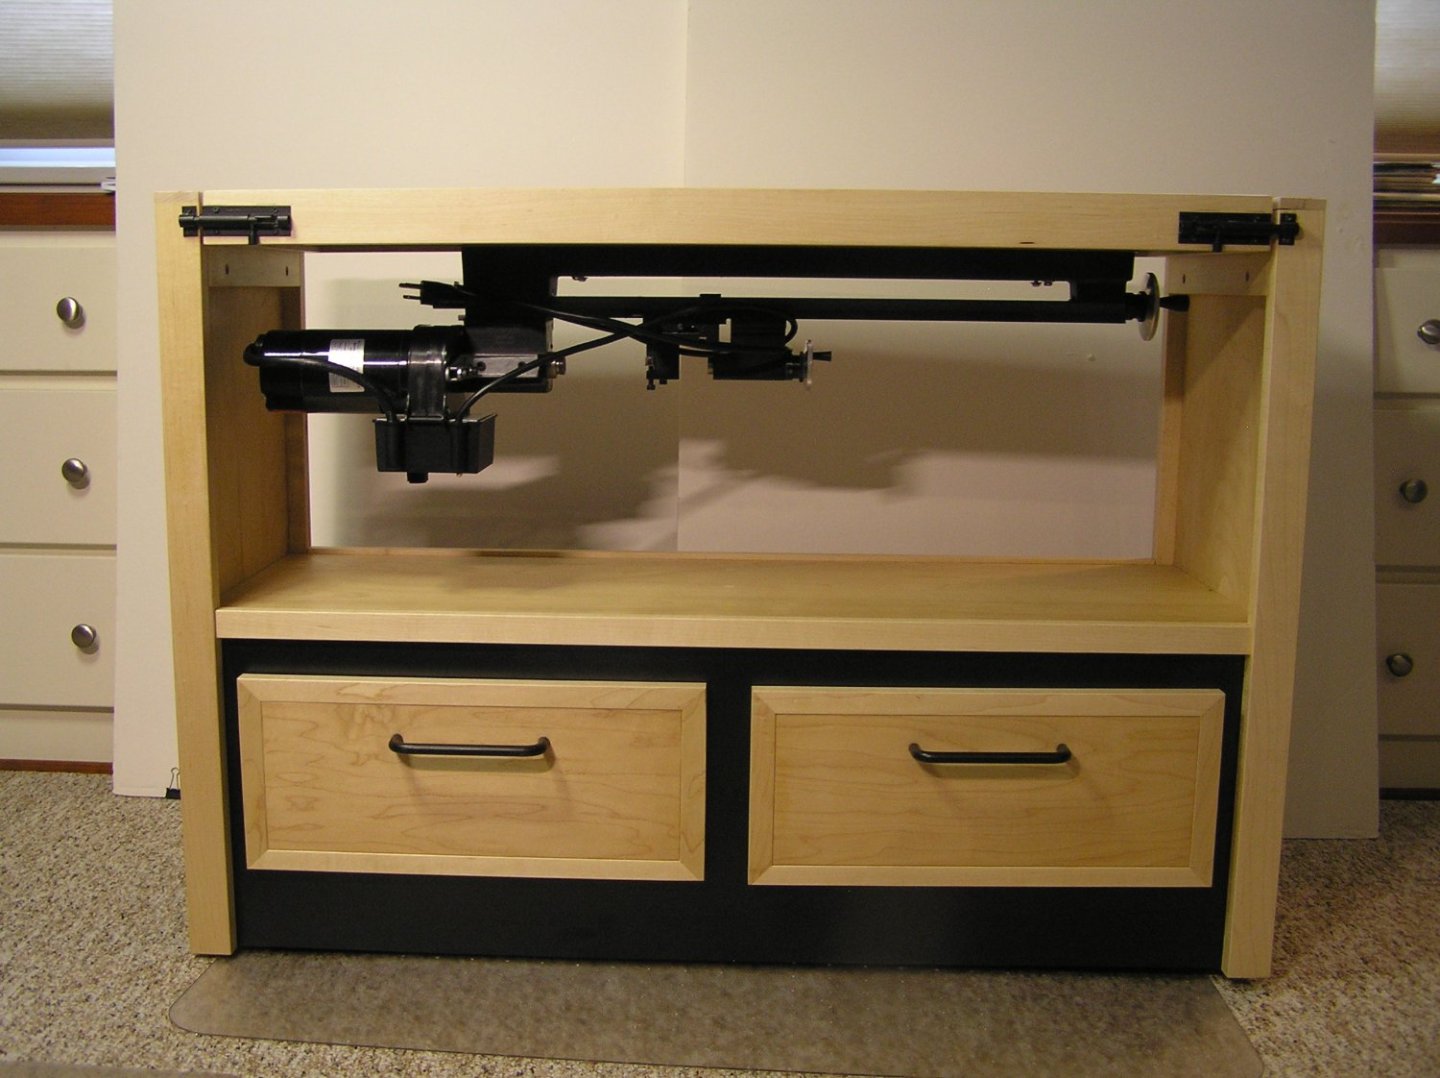
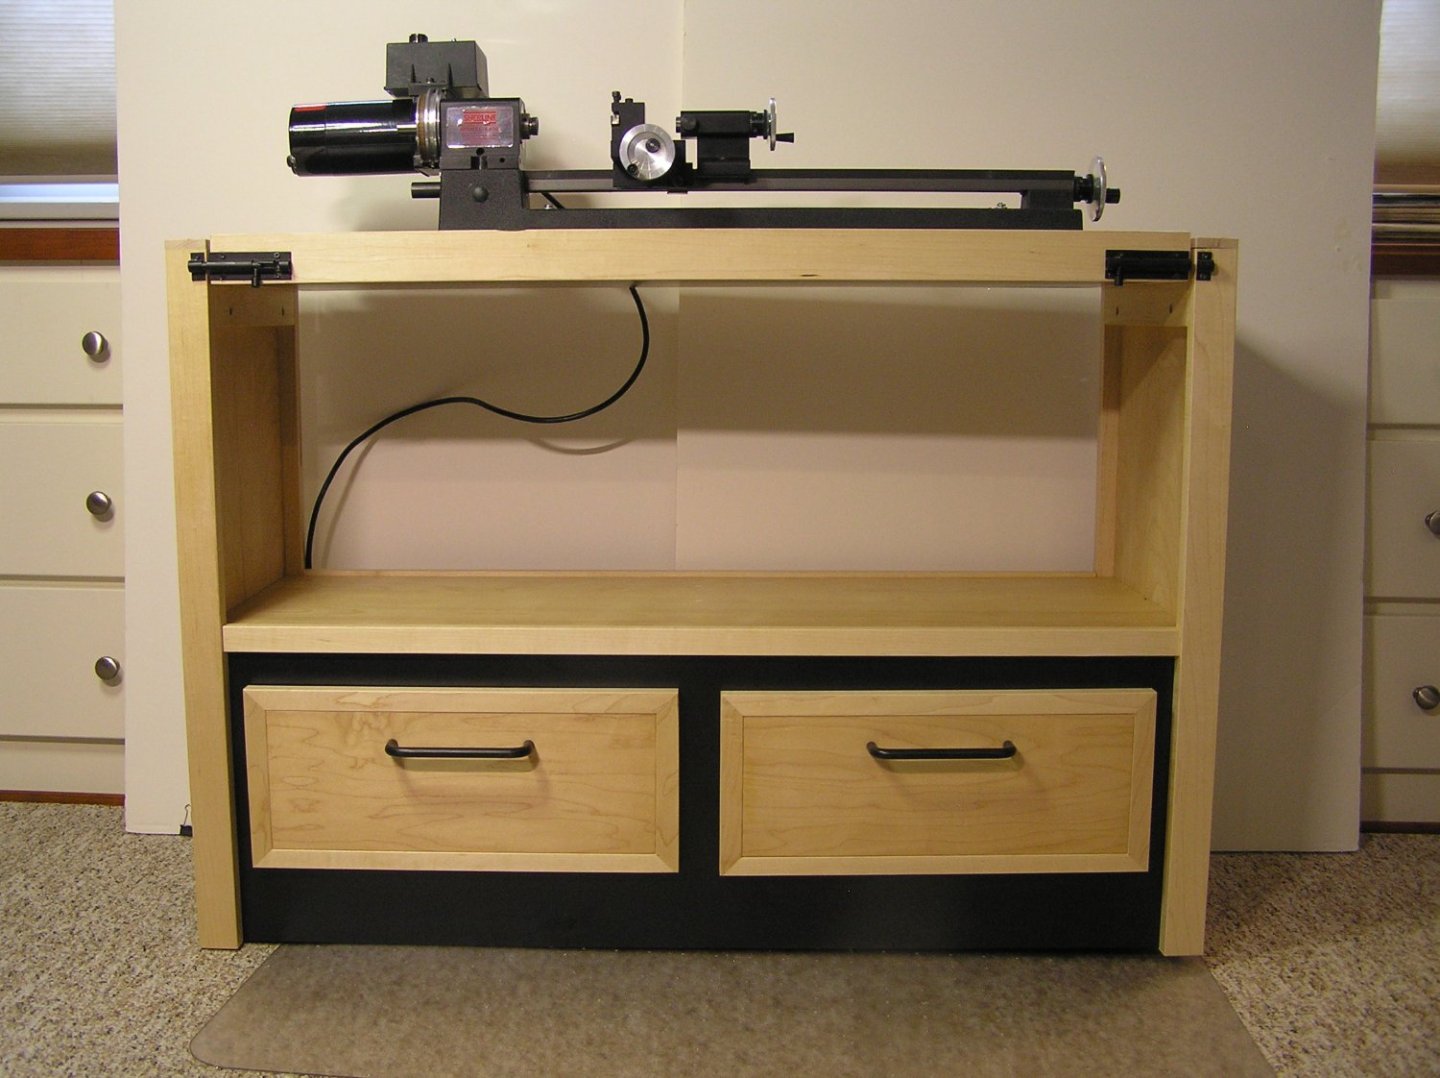
Although I have an adequate woodworking shop I have never thought of it as a model building area, The basement humidity control, lighting, warmth and isolation is too much of a "monastic life" in my way of thinking. So I moved to the first floor in a studio like environment shared by our computer and my wife's art works. The drawback is that the space is not large and keeping it tidy is always a challenge. It became more of a problem when I started Winchelsea. My lathe and mill have been moved to the floor under my desk/workbench when idle. This has been a "get by" solution for about a year. Enclosed are 2 photos of my solution for the lathe that I "stole" from a woodworking shop article I recently came across. Also to build the Winchelsea, which is almost 36 inches in length, I had clamped an extension to my desk area which was an accident waiting to happen. So I merged the 2 thoughts into the solution shown. The cart or table has a flip or pivoting top that will normally be configured as a work table. Bolt latches lock the top in either position. Pivoting the top allows me to use the lathe and "put it away" when not needed. The 2 drawers beneath house all the lathe accessories and also help lower the center of gravity of the assembly when the lathe is upright. When not supporting the model 40% of the unit can tuck under the desk. The whole unit is on casters so it came be easily moved about. The exterior is covered in matte black formica and trimmed in maple. I plan to make a second unit for the mill. Joe
-
Welcome to the party Jim. I believe you will find this project both challenging and rewarding. There are plenty of build logs here to guide you along. I have used a number quite extensively. The key will be to sort out which to follow as there are many good ideas across the board. You have already recognized the ordeal you will have in fairing the plywood you have chosen. yet it can be done with patience and deliberation. I too took an alternate path in the skeletal framing that fundamentally came out well but did have some trip points along the way. I would be glad to share them with you via the off line messaging sytem herein if you wish. Joe
-
Glenn I was struck by your comment about being obsessed with fit. It reminded me of a tour i took some years back of the Stickley furniture manufacturing in Syracuse NY. They make some of the best furniture in the NE. In production of their goods I noticed some pieces being shuttled out of line and put aside. It was related that they did not meet some intermediate requirement. When pressed the tour guide took me over to one of the pieces. He pointed to a joint that was not closed. Yes it was noticable but I could not have gotten a finger nail in that joint. In the finishing area I found a similar piece and there it was being dealt with. The joint was diappearing before my eyes with the deft work of the detailer. The lesson for me was they didn't start over yet the end result was still a beautiful piece. Harder at these diminuitive scales, of course, but the end is still a masterpiece! Joe
-
Getting ever closer to a completed model. The following are back room shots at the museum. At this point most all effort is install of final elements and touch up. The bow shot shows the gun tub in its final home with surrounding detail of antenna, hoist rings, cleats and the like. Signal lights remain to be added. Excuse my out of focus shot of the aft view. It does however show the final install of all armor plate, rear 50 caliber, cleats and a birds eye view of the helm station. Life preserver and boat hook await install. The radar dome will be the last install as we await the erection of the canopy frames which is very delicate work. We will be presenting the wrap up at our January 19th meeting which will be streamed. If anyone is interested in attending please message me as we would be honored with your attendance. Joe

-
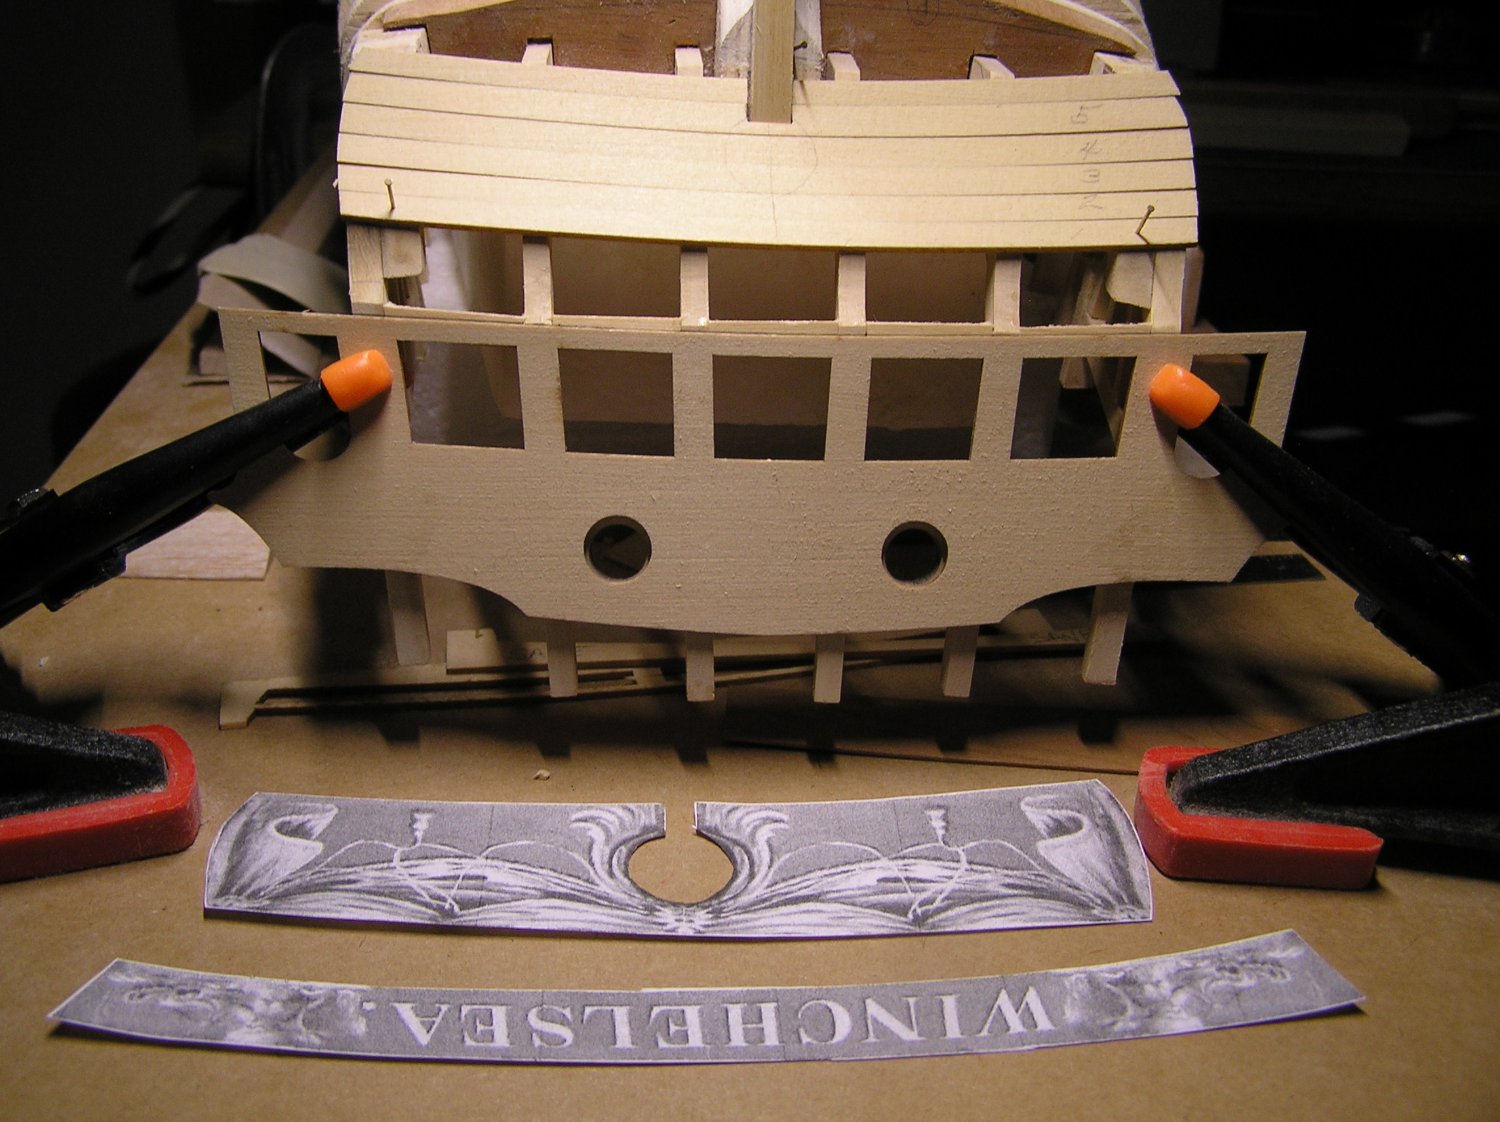
I heeded your warning regarding the upper/lowercounter positioning Glenn. Sure enough if I had proceeded with the placement of just the lower counter as I thought correct I would have been off the mark for the upper counter. I have repositioned and dry fitted the lower counter and also dry fitted the transom "skin". I have marked the correct positions and now it is a matter of fine tuning so the upper counter will dock where it is required. Thank you again you are saving me some pain and agony! Joe

-
Yes Glenn I suspected this and have dry fitted the placement and even marked the placement on the aft side of the frames at least 3 times. The lower/upper junction intersection is indeed a caution. Moldings can't hide everything. Thank you. I was on the phone with Rustyj yestrerday and he too was quite helpful. I value everyone's advice.!!!! Where else but here could there be such a helpful community!!!!!! Joe
-
I am taking your advice Glenn and began the process of planking the lower counter. As I approached strake #5, in a dry fit mode, I encountered a bit of interference with the stern post. I have checked and checked every aspect of the stern framing and the remade frames A and B. They are pretty much on. Rather than fight this I have decided to premark the stern post cutout at this stage and "prep" this area for removal while on the bench. I Have also included the relief in stake #5 to get around the interference problem. I will allow some tune up real estate once that stage is reached on the model. It isn't that long ago that I remember my difficulty with Cheerful's stern post relief so I have to assume in the long run I will be more satisfied with the outcome. Joe
-
Thanks for the coaching Glenn. I have hesitated on the counter planking but will do so now.Your postings is one I follow closely. Your progress is amazing. I have to develop some rythm for my build. The stop, start method I seem to be in just makes the build more arduous. I am not sure I mentioned it before but I worked in Dallas for a year back in 1973 - 1974 on Mockingbird Lane at the corner of I35. Lived in Denton. That was a 32 mile trek to and fro on I35. It was crazy then has to be a white knuckle drive now I would imagine. Joe
-
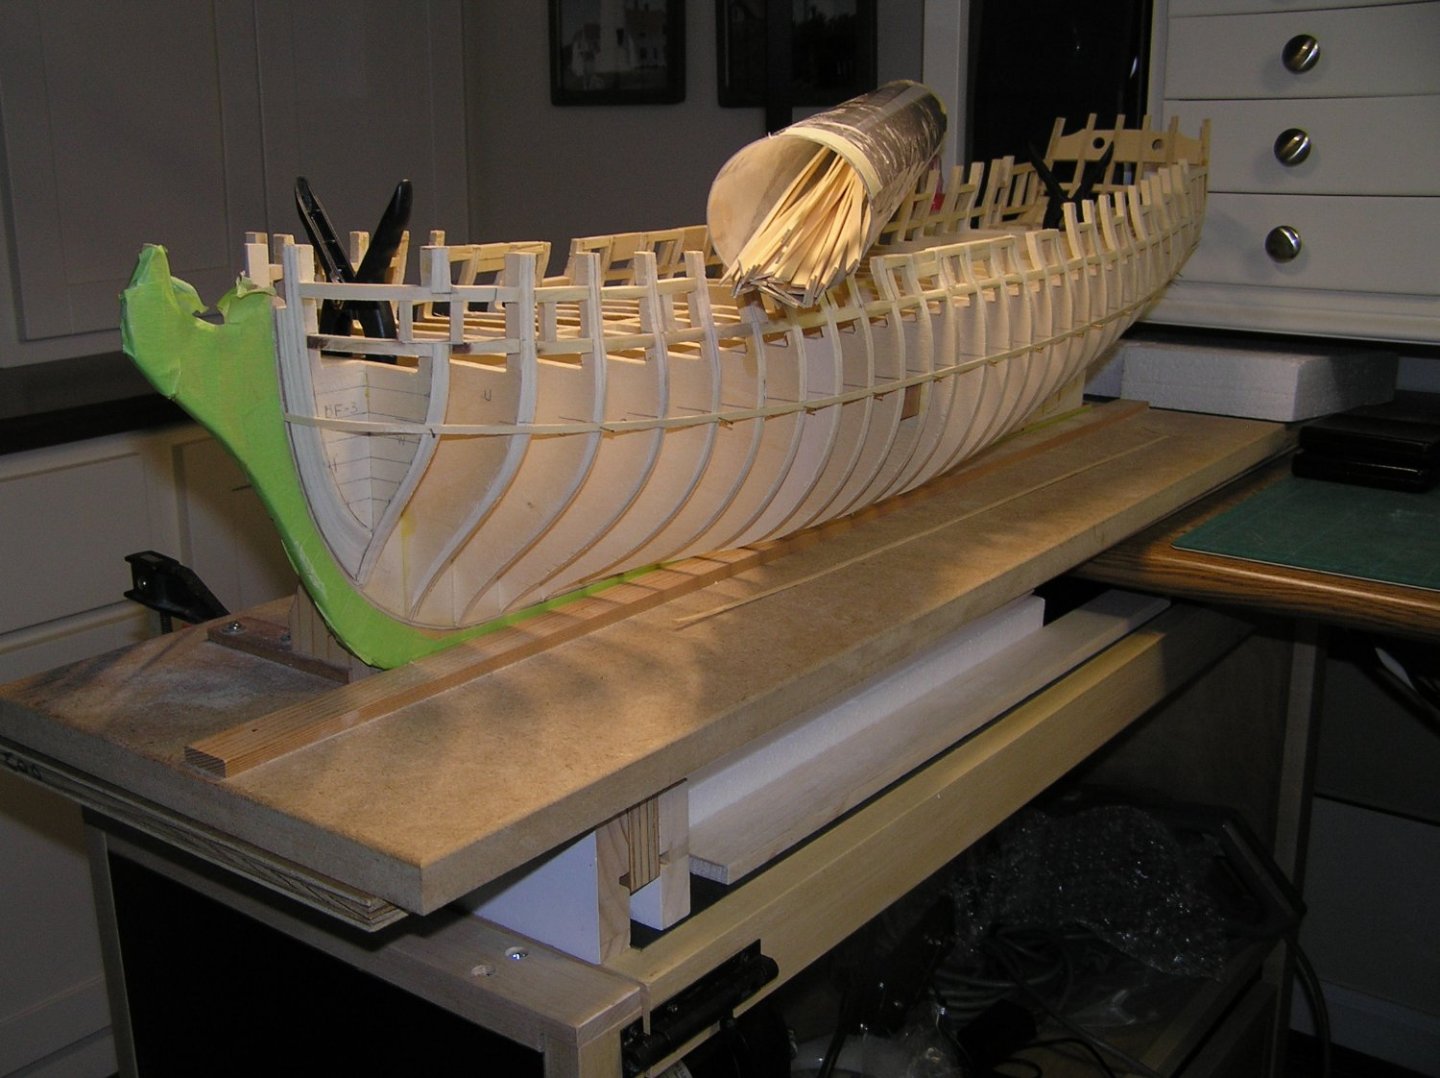
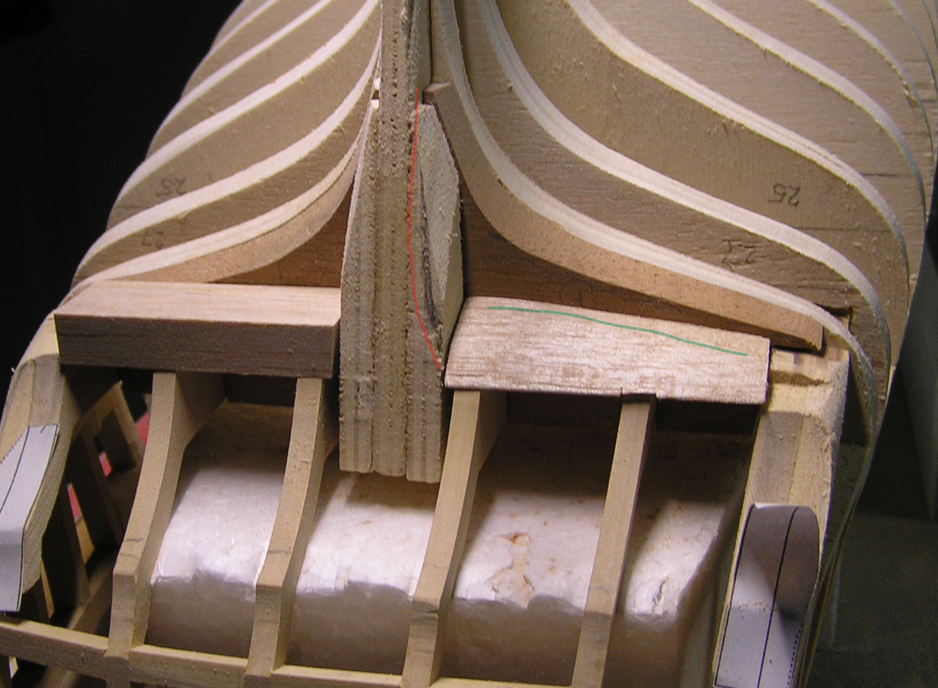
Glenn I wish I were at the planking stage. It has been one interruption after another mostly family needs. I did finish and deliver a display table to my daughter and am wrapping up a portable stand for my Sherline lathe ( I will debut it a bit later). As I work in our study/computer area I have to constantly work to keep the area clean. In addition Winchelsea is so big I have had to come up with a temporary" work bench extension". The lathe stand will help solve that problem as it can support the model when not serving the lathe. So Winchelsea has suffered. As witnessed by this post where I am asking for a little guidance. I have been fairing the stern area after "plinking away" on the gun port framing. I have used a number of MSW builder references including Chuck's postings for stern faiting. To me it seems a bit subjective as to how to achieve the desired end point.The attached picture (with mark ups) shows my progress on this critical area. I have rough formed one of the fillers that will "land" the planking for the port side. Using fairing strips it appears close to the correct taper torward the stern but still needs tapering towards the port side. I have crudely marked that area in green. Secondly the stern post area still appears to need contouring all the way down (up) to the filler. This suggests that frames 29, 28 and 27 need much more sanding to an even more wine glass contour. Am I correct here? And lastly it appears the bottom side of frames C and D need little to no tapering towards the stern save for the side. That appears to need some build back. Again am I correct? Joe
-
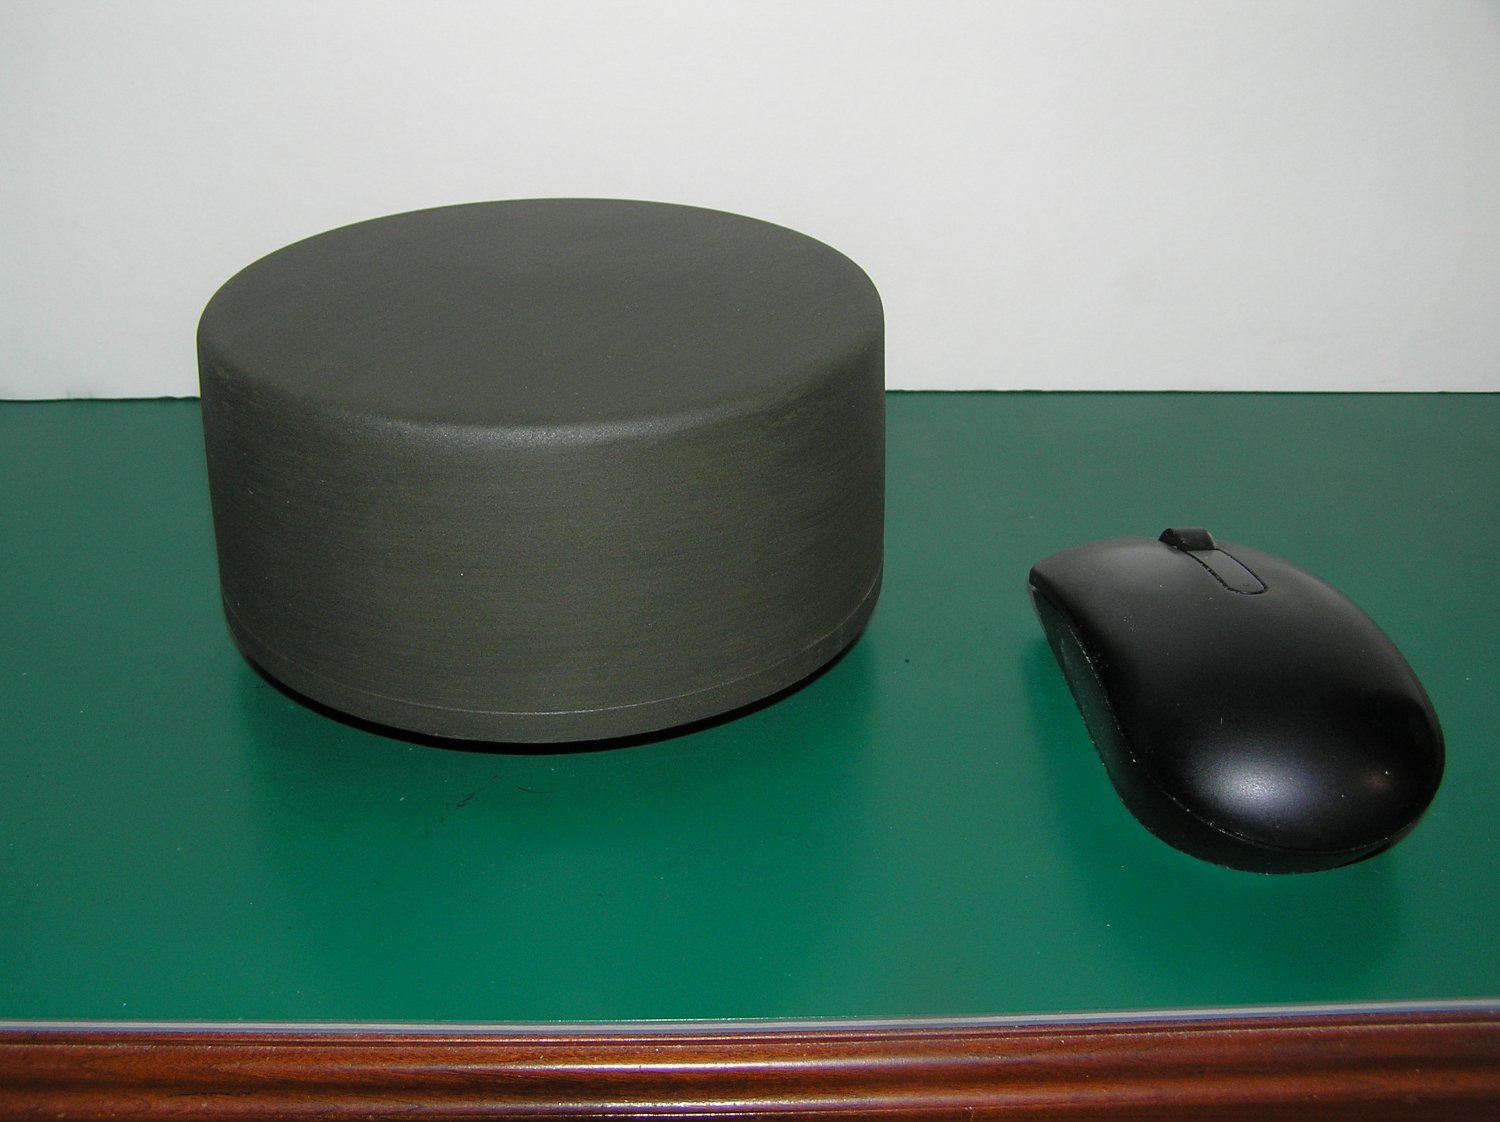
Just a brief update on our trek to completion of this waterline model. Amongst many elements of detail to be added to the model this is one of the final ones. The radar dome is 5.5 inches in diameter and3 inches tall. It was turned on a large lathe as it was too big for my Sherline. Even though it was hollowed out of basswood save for a hub it still weighs about 0.7 pounds. It will be the last thing mounted given its properties. In the catergory of "I should have known better". The basswood was in my basement shop trove for some 10 years at a humidity level of around 50%. The completed dome was brought to the musuem workshop and over 2 weeks shrunk given the quite low RH there. The banding around the base was wrapped and glued 0.20 AYC (cedar). The effect as you might expect was a warped band. The only practical solution was to wrap the lower base in an automotive tape and paint over the entire assembly. It now sits in a sealed plastic bag awaiting final install. Here's hoping! Joe

-
You are gifted Rusty! Your work always amazes me! Your photos along with others on this site, not only are of an instrcuctional nature to me they are truly inspirational. Joe
- 642 replies
-
- 4
-

-
- winchelsea
- syren ship model
- (and 1 more)
-
Amazing you have turned this into a beautiful model. Looking back at your start photo I just realized that is the same kit I bought in the 1980s at Bliss Marine in the Boston area. If I remeber it was on sale for around $90 US as it had a broken but repairable "keel". I started it but never got far as I got distracted. Not only is your work excellent I have to applaud your tenacity! Joe
-
Greetings to you as well. I hope you find this site as enriching as many of us have. It is a treasure trove of information on many aspects of this pursuit. I have also found that the more I have used it, the more I have had personal contatct with some remarkable people who are willing to share. Joe
-
A fine modeler was one of his talents. A kind, supportive, sharing person were among the qualities he revealed to me. My condolences to his family and friends who had the good fortune to be in his life. Joe
-
Thanks Mike I will take the added step. And Rusty I took a look at my Cheerful again this AM and three of the starboard planks which were a tad dark seemed to have darkened even more.The model is now about 3 years old. Port display appears to be in order. Will the perfect model ever be in my reach????? Joe
- 642 replies
-
- 2
-
-
- winchelsea
- syren ship model
- (and 1 more)
-
In touring the Stickley furniture factory, sometime back, it was related that in the finishing stage they apply a translucent base (in the case I saw it was on the order of an orange color on cherry). This tended to "flatten" the color variation across the surface. This can even be evident in the boards of the same tree. I am keeping my ripped AYC for planking from the same blank together to minimize the problem. It was evident on my Cheerful. But I am sure you folk know that. The "wetting" method given is indeed a good idea. Joe
- 642 replies
-
- 1
-
-
- winchelsea
- syren ship model
- (and 1 more)
-
Brad I started with a scratch built hull (bulkheads, false keel or strongback etc.). Even though they were accurately machined using a CAD/CAM approach they have given me some grief. In part because of the inferior plywood I purchased. At this point I have completed the port gun ports, installed my second transom assembly and partially installed the starboard gun ports. I have expended too much energy and time to get to this point. Were I to do this again I would have thought better of starting from the point I did! This is an extremely well designed kit and would have been much easier had I started from the intended point. I have built other models from Syren. Just a caution. Joe

.JPG.a2289845133bf05d661c3726b5022f10.JPG)
.JPG.f54aa243831c2a6f354f8e34bad4bba7.JPG)
.JPG.610109d229e9bfe5b2ba4f6af1fc9756.JPG)
.JPG.1e8475ca5f000d5e240b98260dfd7337.JPG)