chevygrunt
-
Posts
28 -
Joined
-
Last visited
Recent Profile Visitors
462 profile views


-
 Mirabell61 reacted to a post in a topic:
Steam powered river tug "Lorbas" by Nils Langemann-Finished
Mirabell61 reacted to a post in a topic:
Steam powered river tug "Lorbas" by Nils Langemann-Finished
-
chevygrunt reacted to a post in a topic:
Skipjack 19 foot open launch By Michael Mott 1/8th scale Small
-
chevygrunt reacted to a post in a topic:
Friendship sloop by Cap'n'Bob - 1:48 - Finished
-
qwerty2008 reacted to a post in a topic:
Skipjack 19 foot open launch By Michael Mott 1/8th scale Small
-
Hi, Having a small amount of lapping experience. I would be careful with using a grinding/lapping compound between the valves and the brass. As I understand it, certain types of lapping use a soft and hard material. The soft material is the lapping tool and the harder material the work piece. When the compound is applied it beds into the softer material and forms a fine abrasive surface which then works to remove material from the work piece. In your application, I would hate to see the brass become embedded with grit which could be difficult to remove after seating the valves. Most modern day car heads have hardened seats, so it isn't such an issue. I am not an expert in this and would happily be corrected. An excellent job by the way. As a machinist, I can fully appreciate what you have achieved! Well done!! Cheers, Scott.
-
chevygrunt reacted to a post in a topic:
SANSON by rcmdrvr - FINISHED - Artesania Latina - Scale 1:50
-
chevygrunt reacted to a post in a topic:
Skipjack 19 foot open launch By Michael Mott 1/8th scale Small
-
chevygrunt reacted to a post in a topic:
HM Cutter Cheerful 1806 by Chuck - FINISHED - 1:48 scale - kit prototype
-
chevygrunt reacted to a post in a topic:
Friendship sloop by Cap'n'Bob - 1:48 - Finished
-
mtaylor reacted to a post in a topic:
Hr. Ms. O 19 by Piet - 1939 - 1945, scale 1:50, submarine Royal Navy Netherlands - Finished
-
Piet reacted to a post in a topic:
Hr. Ms. O 19 by Piet - 1939 - 1945, scale 1:50, submarine Royal Navy Netherlands - Finished
-
Omega1234 reacted to a post in a topic:
Hr. Ms. O 19 by Piet - 1939 - 1945, scale 1:50, submarine Royal Navy Netherlands - Finished
-
harvey1847 reacted to a post in a topic:
Hr. Ms. O 19 by Piet - 1939 - 1945, scale 1:50, submarine Royal Navy Netherlands - Finished
-
GLakie reacted to a post in a topic:
Hr. Ms. O 19 by Piet - 1939 - 1945, scale 1:50, submarine Royal Navy Netherlands - Finished
-
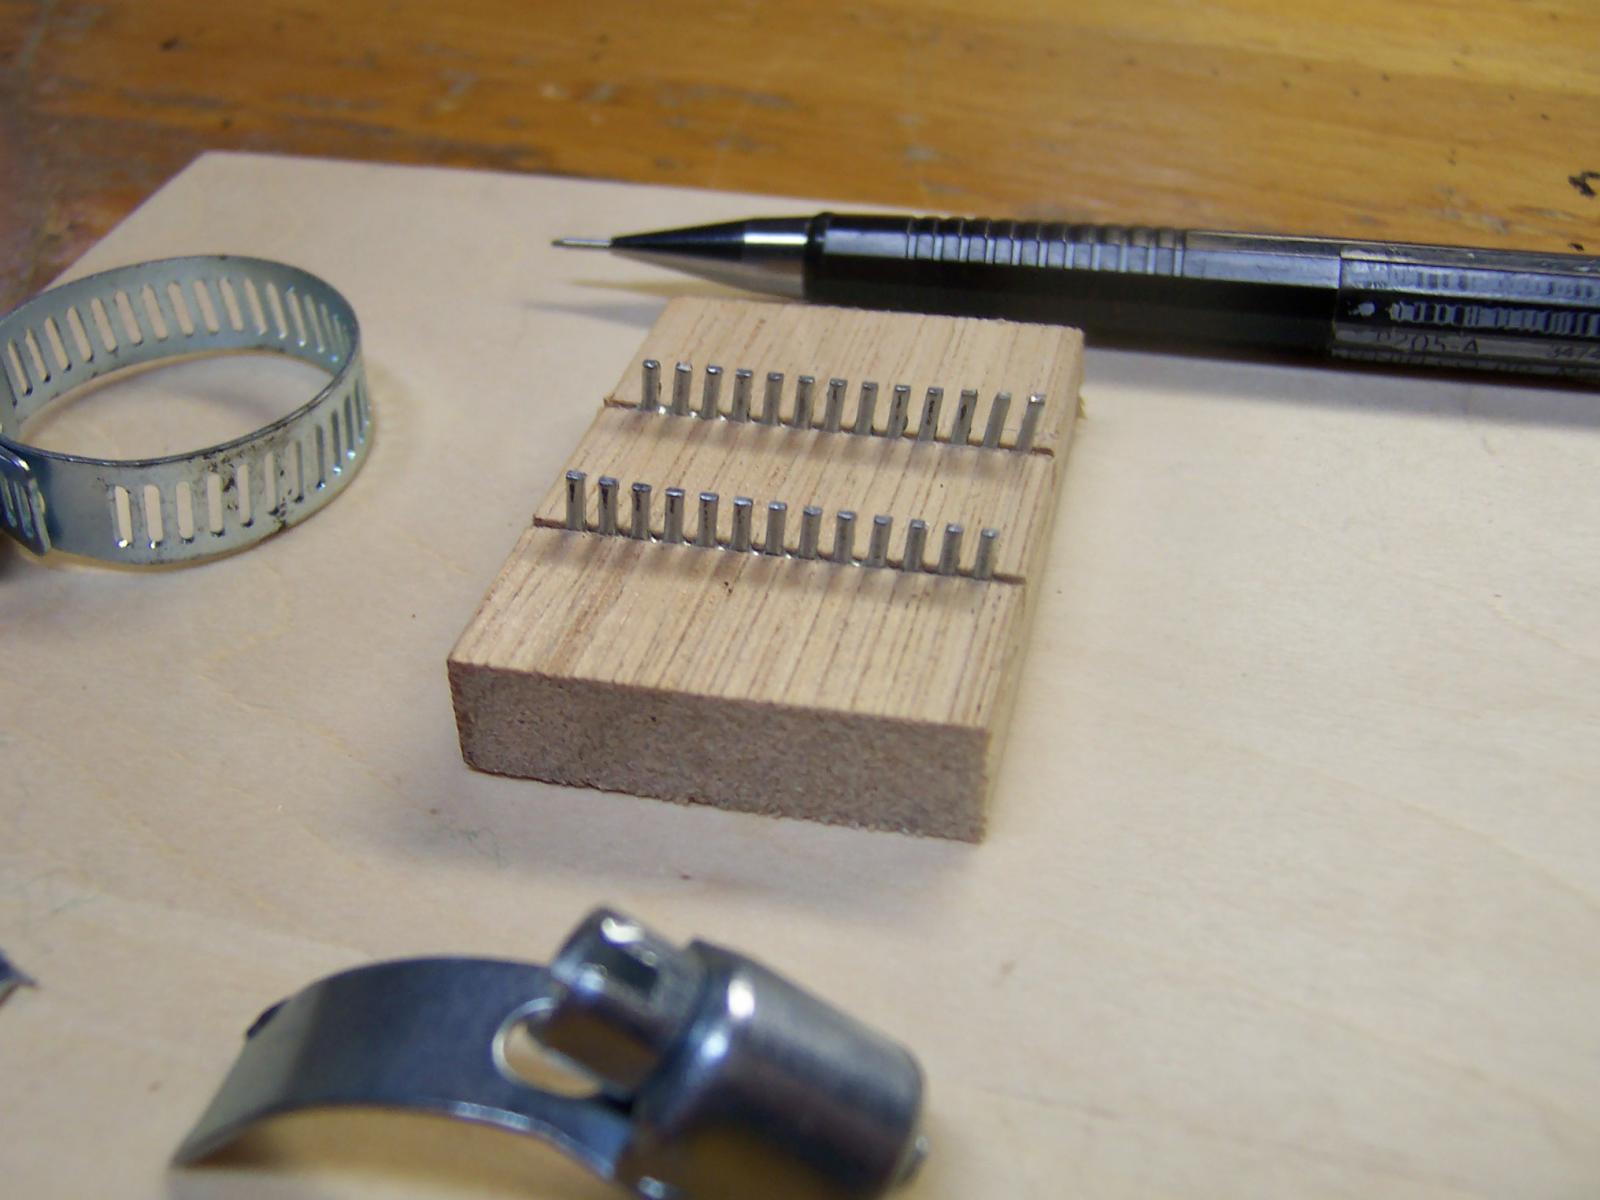
That wasn't the tack hammer you used for the brads in the top left corner of the photo, was it?
-
chevygrunt reacted to a post in a topic:
Kate Cory by jablackwell - FINISHED - Model Shipways - Scale 1:64
-
chevygrunt reacted to a post in a topic:
Armed Virginia Sloop by GuntherMT - FINISHED - Model Shipways - scale 1:48
-
chevygrunt reacted to a post in a topic:
Shenandoah 1864 by SGraham - FINISHED - Corel - Scale 1:50 - American Civil War-era Cutter
-
chevygrunt reacted to a post in a topic:
Friendship sloop by Cap'n'Bob - 1:48 - Finished
-
hexnut reacted to a post in a topic:
Sanson by chevygrunt - Artesania Latina - scale 1:50 - RADIO - kit-bashed - steam ocean tug
-
hexnut reacted to a post in a topic:
Sanson by chevygrunt - Artesania Latina - scale 1:50 - RADIO - kit-bashed - steam ocean tug
-
Hi All, Steve & Bob, thanks for the comments. I AM SORRY to do this! The log isn't finished, and I do intend to finish it (along with the boat). I am just stopping for a while. As big as MSW is, unfortunately, it just isn't big enough for two of these logs. My choice is to continue with the build and record all the progress as I go. Then add it to MSW later. Thank you to everyone who has hit a like, made a comment, lurked in the background, or even unknowingly helped by sharing things in their own logs! Also a big thank you to MSW in general, you are a top notch site!! Cheers for now, Scott. P.s Hellen is looking to get a coat of colour soon! Will post on that when it happens
-
Hi All, Thanks for the all the likes and kind comments! They are appreciated! Due to several reasons, I am going to stop adding posts to my log. I am sad about doing this, and maybe will come back to continue my log down the track. I really don't want to go into details, and am really sorry to all who were looking forward to following the build. Model building to me is something I enjoy and love to share with people who can appreciate the skills and effort involved. It is not something I want to big note myself on, nor do I feel like it should be a competition. Unfortunately, I haven't found running a log on this boat to be very enjoyable. I may even go back to working on "Hellen" for a while. Sadly, signing off, Scott. P.s I will still be reading the other fine logs happening, so don't everyone stop!
-
Hi, I would certainly recommend using a mask when working with MDF. It's not really the wood particles that is the nasty one here. It's the glue! Having worked as a maintenance worker in a former MDF manufacturing plant. I know that the glue they use contained formaldehyde and some say it is released when working with the material. I can remember that the area of the plant where the panels were pressed was particularly nasty and I was glad I was based on the other side of the plant. The only other downfall I find with MDF is that it will swell terribly with moisture, including paints, without proper sealing Cheers, Scott
-
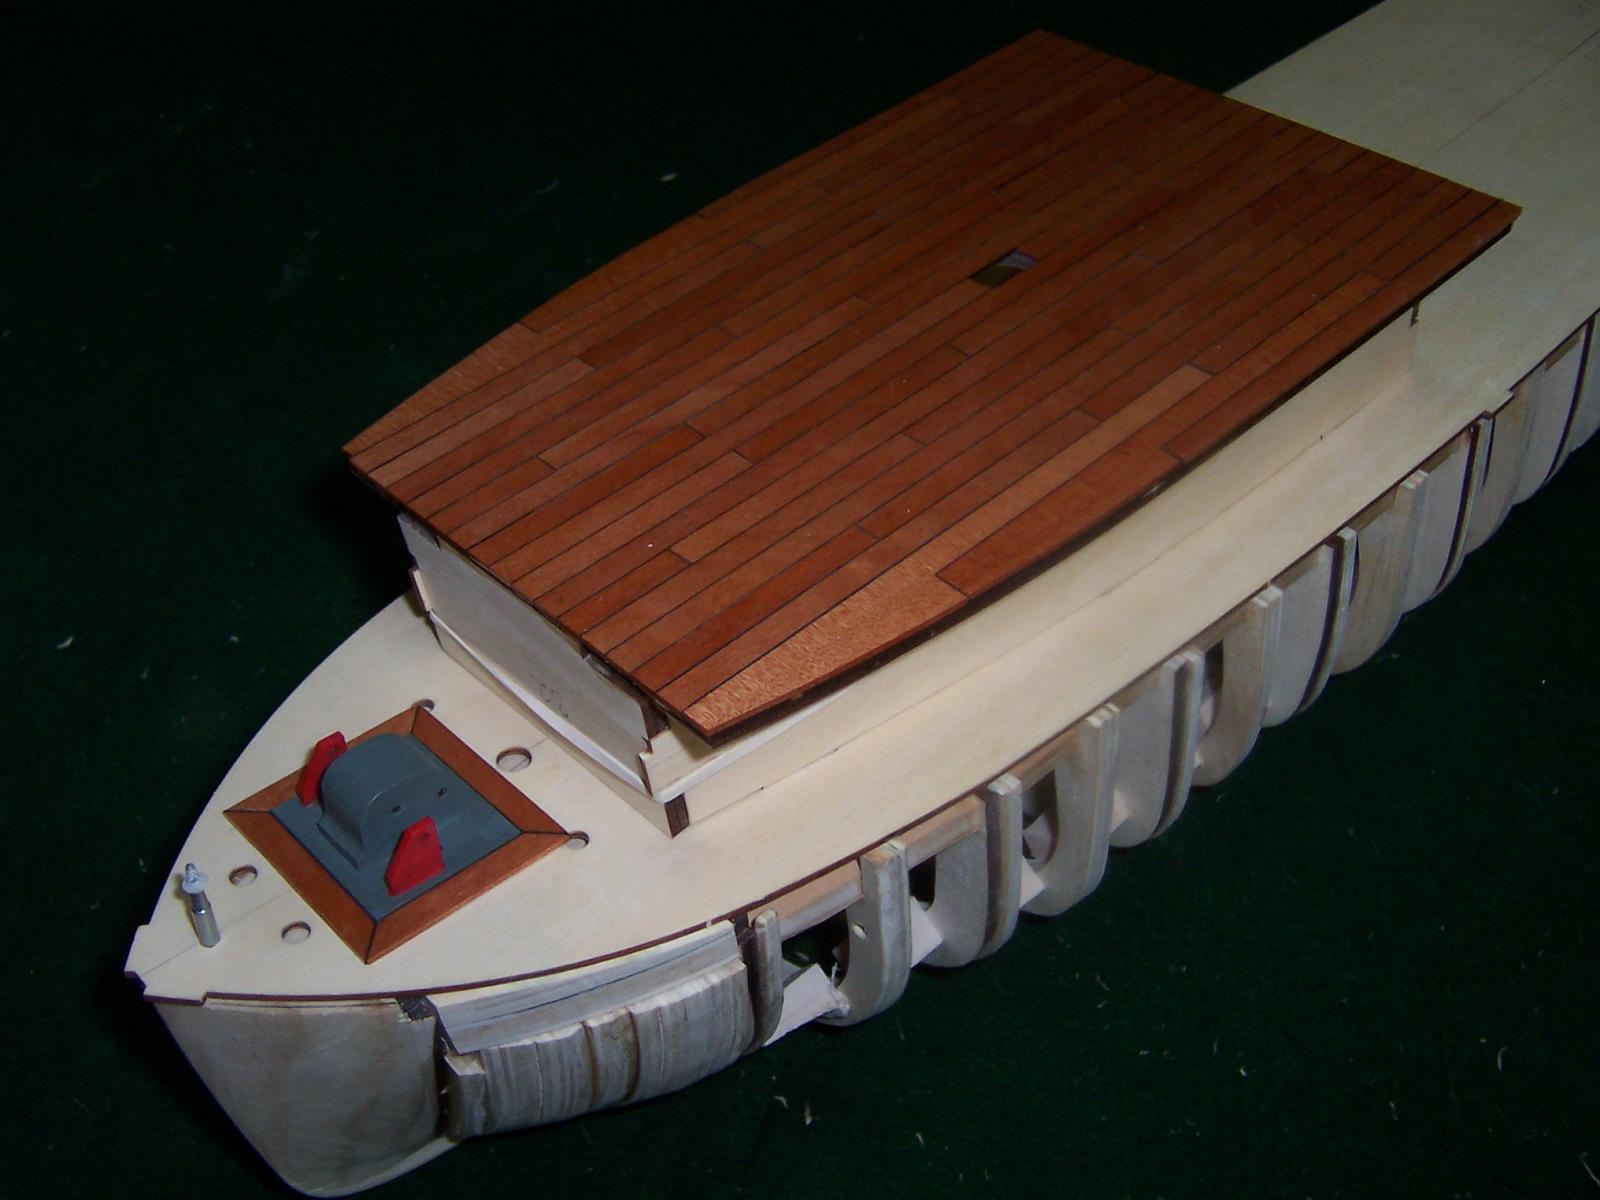
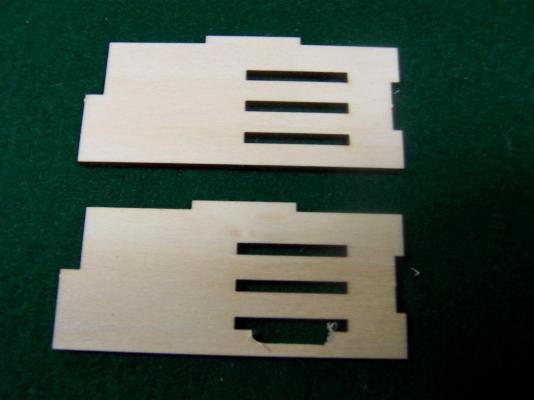
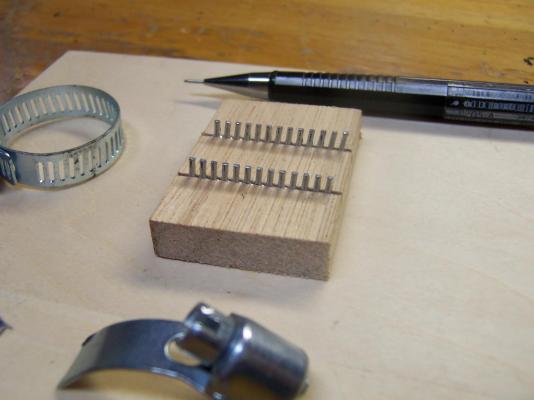
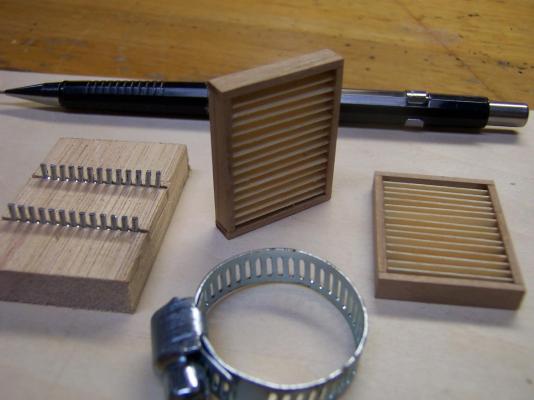
G'day All, A quick update on some progress. I have spent some time working on getting some ventilation into the hull. First I cut some slots under the steps on the rear deck structures. This was done before gluing the parts together, using a Dremel Router Table and a 1/8" cutter. Then the structure extending from the cabin assembly was made and planked with Myrtle. As this assembly will be one of the most removed pieces for access to the internals, I braced the inside with some Tas oak quading. Then I started to scratch some vents that will be mounted into the sides of the sub cabin assembly. I made frames from some leftovers from my Hellen build. Then I used part of a cheap hose-clamp to make a jig to hold slats in place ready for gluing. The hose-clamp was ground down carefully on one side with a small stone in a rotary tool. This gave me a piece of steel with a heap of little fingers ready to hold the slats. Trimmed this into two equal parts and then mounted them into slots cut with a hacksaw into a scrap block of wood to make the jig. Then the frame was placed over the top and the slats cut to size and dropped into the fingers. Once they were dry-fitted and I was happy everything was aligned squarely, I used a toothpick to apply thin C.A to the joints to hold the slats in place. The vent then lifted easily off the jig when the glue had dried and some more C.A was added to the back side just to make sure the were firmly attached. These vents are probably not common on this type of vessel, but they will be hidden behind the bulwarks and are going to be my main intake for fresh air to the burner. The next job is to make the cabin doors swing, so I can pop em open for even more air. I have started on a prototype and will take some pic's soon. Cheers, Scott


- 33 replies
-
- 7
-
-
- sanson
- artesania latina
- (and 1 more)
-
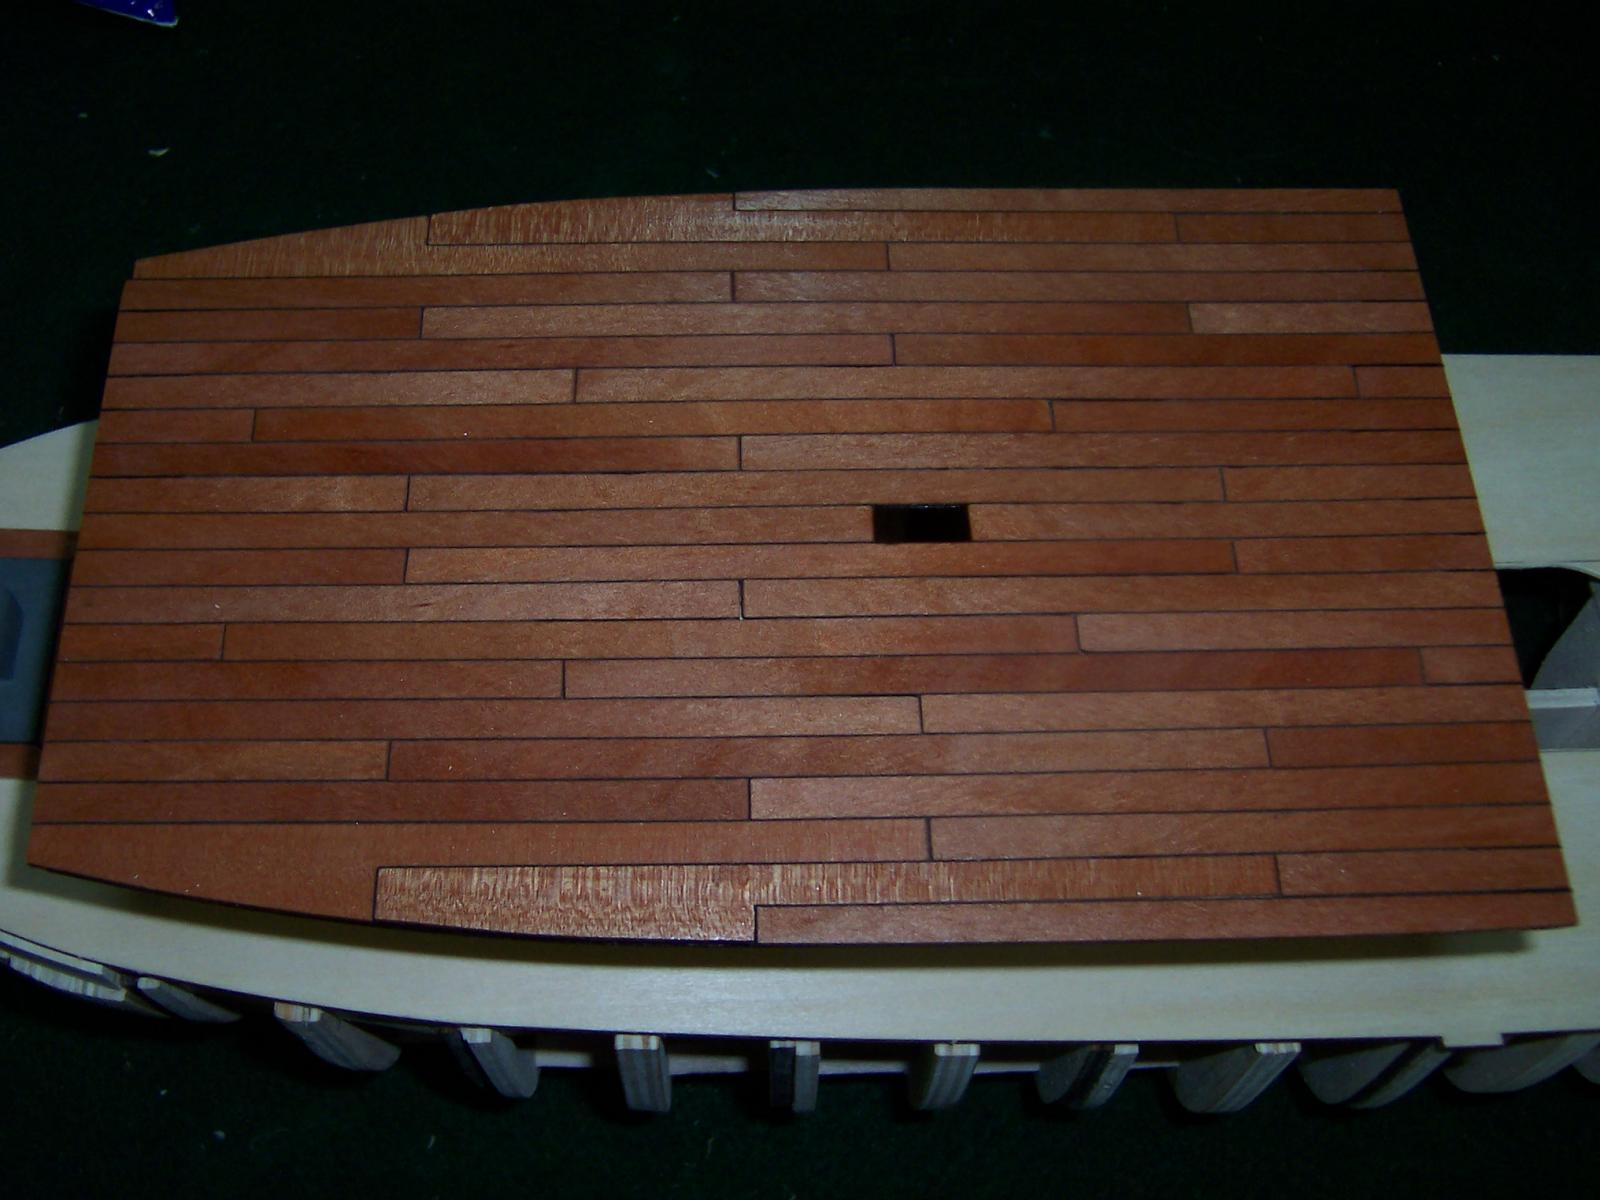
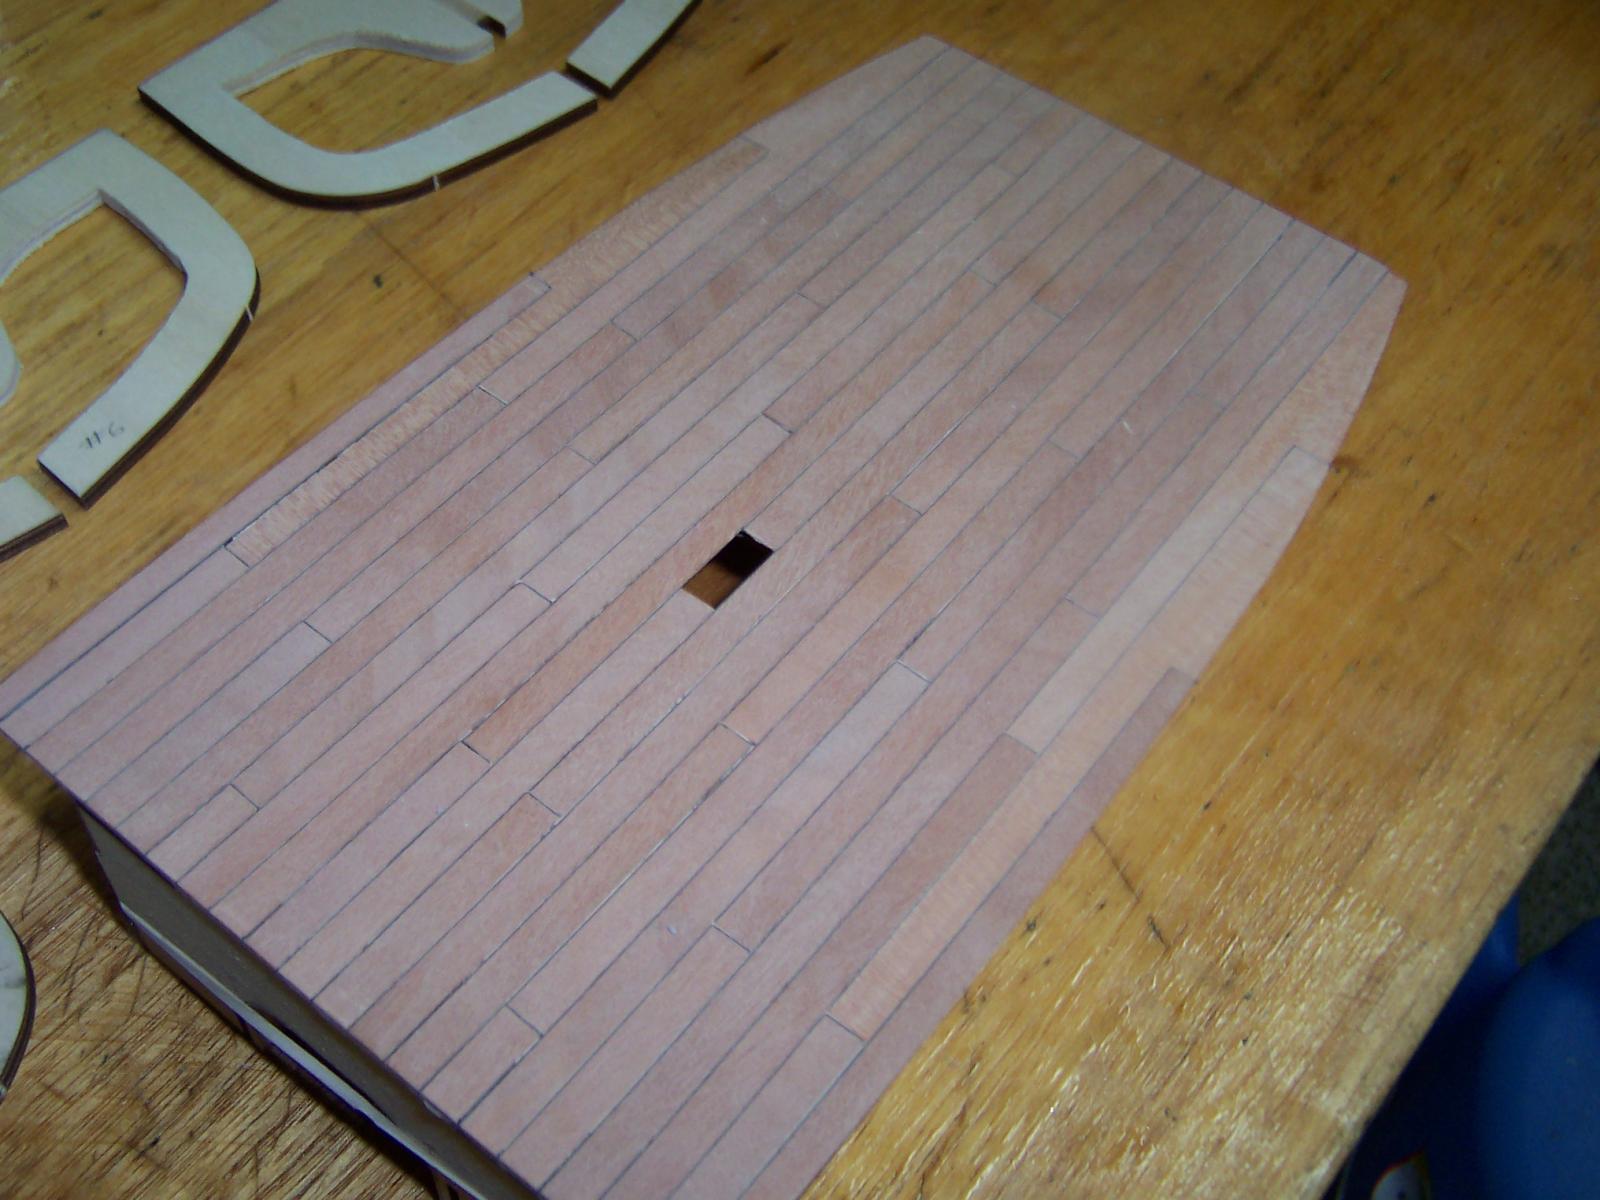
@ John, Thanks for the lovely comment! @ Bob, Yes, I sometimes think I might have bitten off more than I can chew! I will continue till it's done or fail miserably. My fallback is, I can always go electric RC in this one and pick another boat more suitable. My choice for this kit was the size. At 24", it wont take much to transport and display. In my eye's "Hellen" is just too big to be practical (she is close to a meter long). I am determined to finish an RC steam boat, and I'm not going to give up easy! @ Steve, The finish on the Myrtle was a quick sanding with 240g paper followed by a thinned down coat of Bondall Clear Gloss Marine Varnish. The deck has only had one coat to help prevent any damage as I fit the wheelhouse and other fittings. The varnish has only the slightest of tints and is only noiticeable on light timbers with multiple coats. The colour you see is the lovely natural colour the Myrtle is gifted with. I am lucky to have a nice collection of different pieces ranging in colour from a rich apricot orange to lovely deep reds to nearly maroon. Thanks everyone else for the likes. Cheers, Scott.
- 33 replies
-
- 1
-
-
- sanson
- artesania latina
- (and 1 more)
-
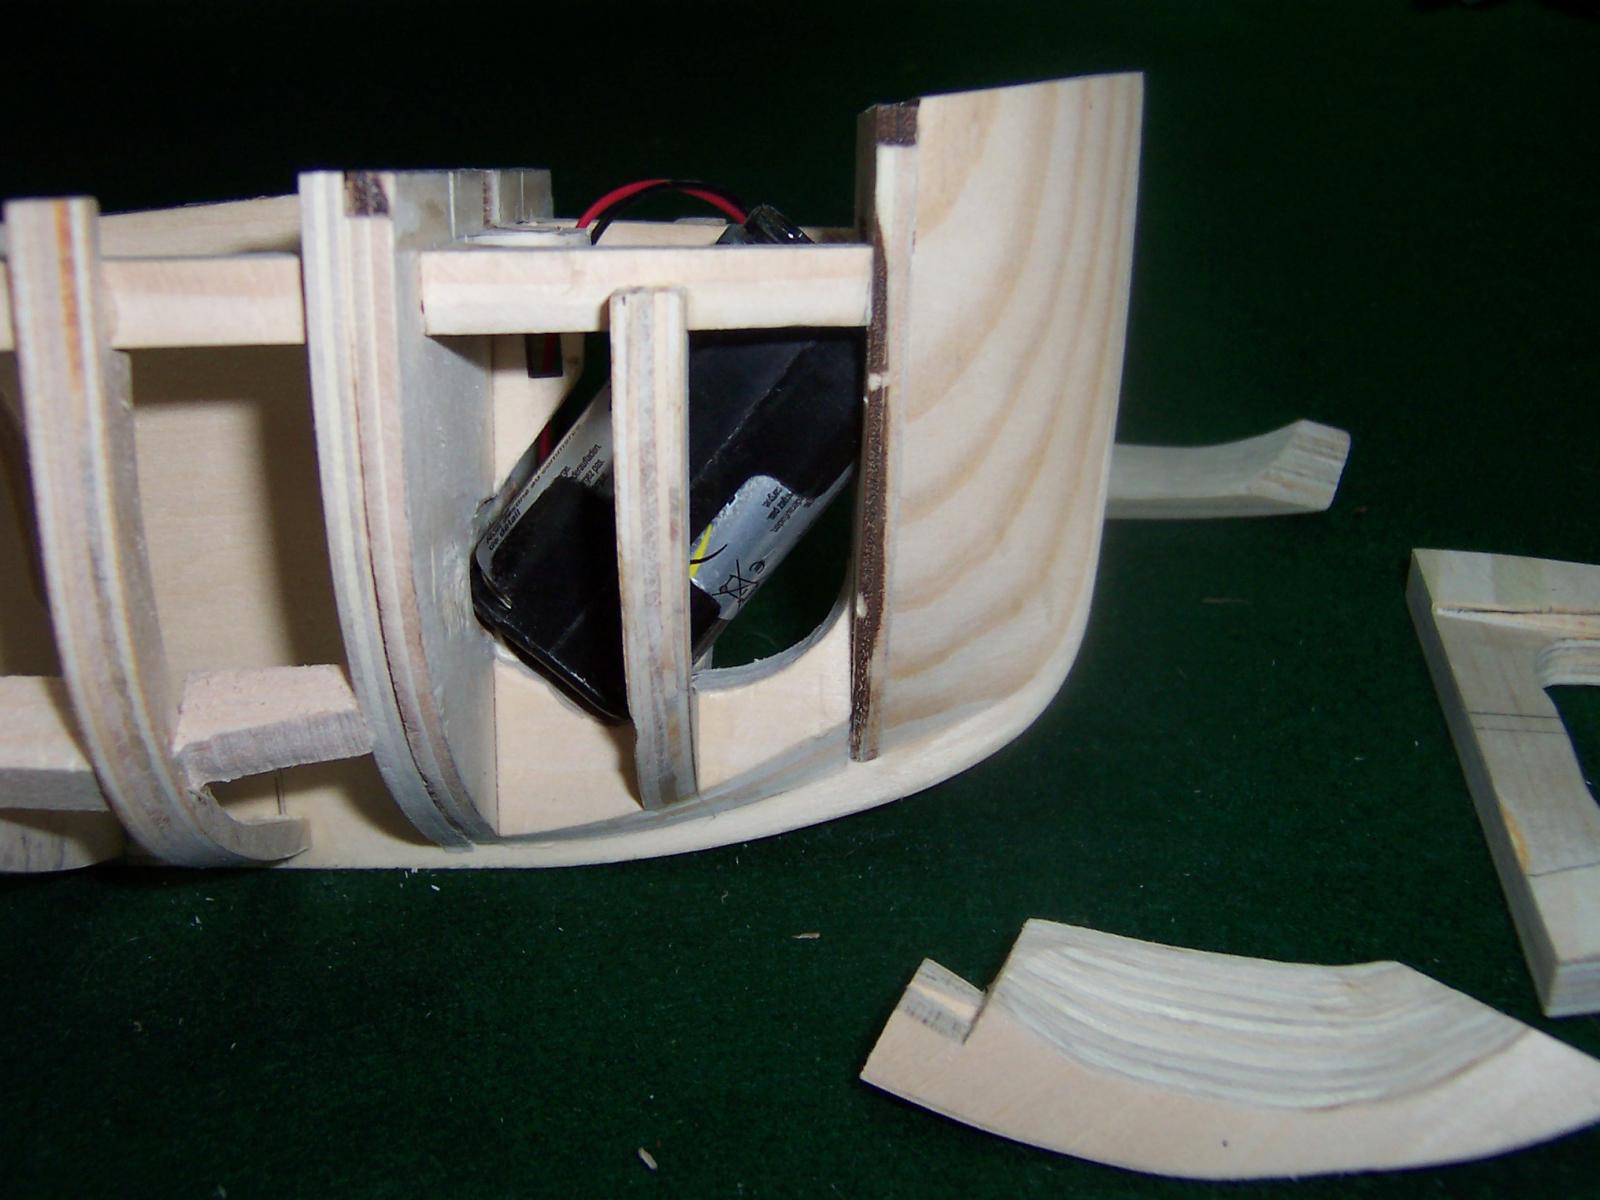
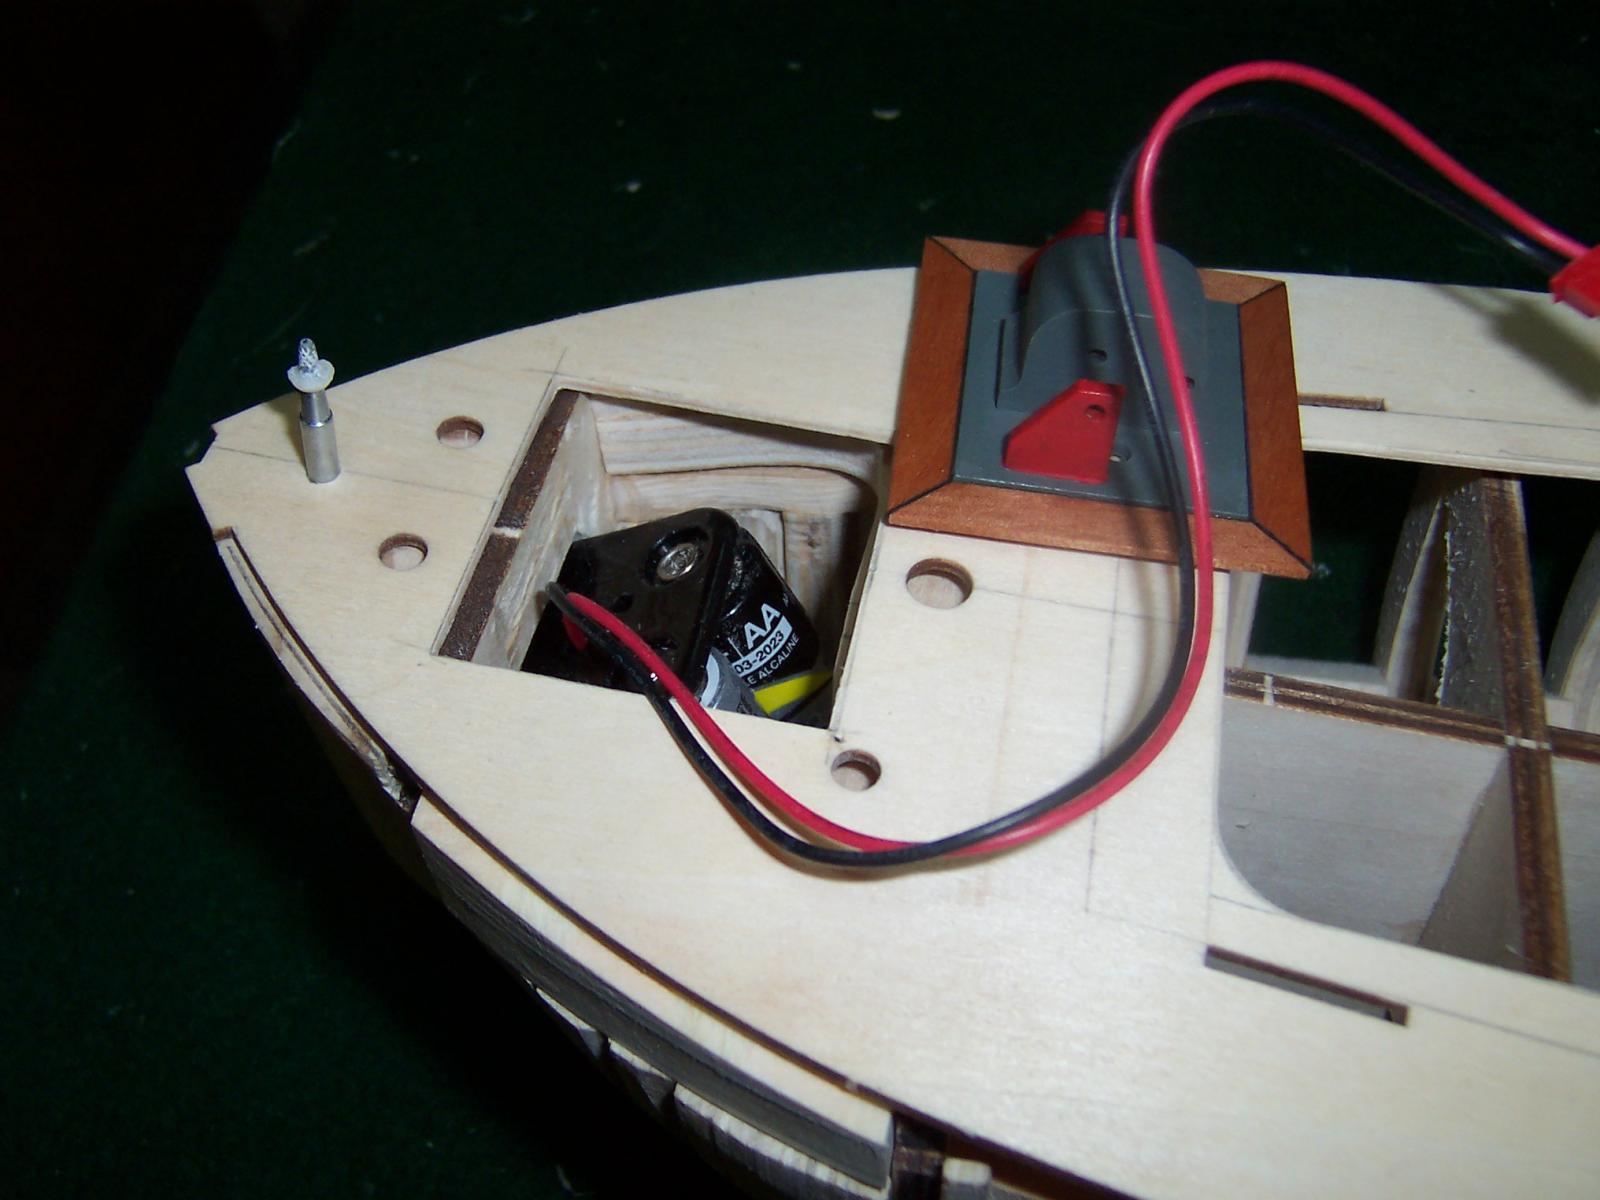
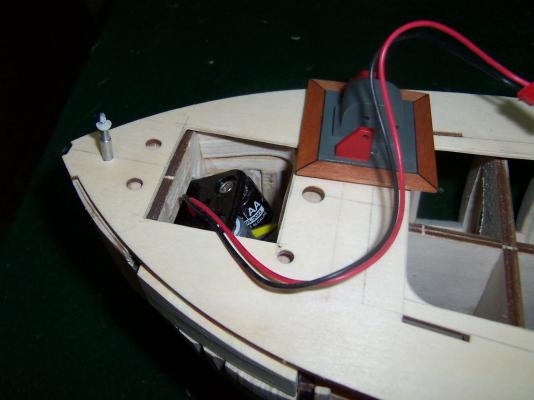
Hi All, Thanks everyone for the likes and kind comments! I feel quite humble to have such craftsmen follow my work! An update on the weeks progress. I mainly concentrated on the bow area, and spent a lot of time cutting and laminating Basswood ply to fill the gaps back to the 3rd bulkhead. I decided to go with the Basswood instead of Balsa, as I will probably want to use some pins or nails to hold things in place while planking. I also wanted to fit the battery pack into this space in the bow. So after cutting the ply, I glued the pieces together to make some removable blocks. Then I shaped the inside to give the batteries space. To access this space, I assembled the anchor winch and fitted it to an offcut of the sub-deck ply. I bordered the winch with Myrtle planks, then shaped a hole to suit in the deck. This ended up being a bit tight between the hawser holes and the breather funnels and I will need to move the funnels a whisker. I gave the new bits a coat of marine varnish and painted the winch with Tamiya acrylics. While I had the varnish handy, I also gave the planking on the lower cabin a quick coat with pleasing results. Then I moved to sizing up for the boiler. Two disks were cut to the O.D of the boiler tube, then slotted to slip over the bulkhead former. This gives me an idea of how low I can possibly mount the boiler to keep the centre of gravity down. From this I can see that I will have to go with the internal burner tube option. Now I need to work out a way to get the exhaust to the stack which will be located approximately half way above the boiler. Next I move to the stern and my plan is to laminate more Basswood ply to fill the voids before fairing. Thanks for visiting and happy modelling to all. Cheers, Scott.


- 33 replies
-
- 5
-
-
- sanson
- artesania latina
- (and 1 more)
-
Hi, What a lovely Tug you have built! The standards have just been raised and I hope I can achieve something half as good as yours(I'm building a little Steam Tug named "Sanson"). Your boiler is quite interesting and a V6 says it all. Please remember all the joy she has given, and really consider rebuilding the boiler in the future. Cheer, Scott.
-
That's a nice looking Tug! How big is the completed model? Will follow your build with interest! Cheers, Scott.
-
Thanks John! Yes, I will be adding filler blocks at the bow and stern. The bow already has some out of pine and I think I will fill the next void between bulkheads too. Later in the build I may use this space by boring a hole down from the deck. It may be needed to mount the batteries or fuel tank. As for the stern, which is still unassembled. I still need to decide the best way to do this. My plan is to mount all the rudder linkage and servo hidden under the deck. I think this is best to be done by replacing most of the stern pieces with larger bits to provide the fill at the same time. Where I am still stumped, is how I am going to run my cuts to achieve some reasonable reference points to fair the stern to. Once I have my head around it, I will post the process. Cheers, Scott
- 33 replies
-
- 1
-
-
- sanson
- artesania latina
- (and 1 more)
-
G'day Steve, You are still producing some fine work there! Currently I have two kits on the go. I started with "Hellen", a fishing boat from A.L and it has moved over for "Sanson", a tug also from A.L. They both have logs going, but poor "Hellen" has nearly stopped for the moment. Keep the good stuff coming. Cheers, Scott.
- 569 replies
-
- 1
-
-
- shenandoah
- corel
- (and 1 more)
-
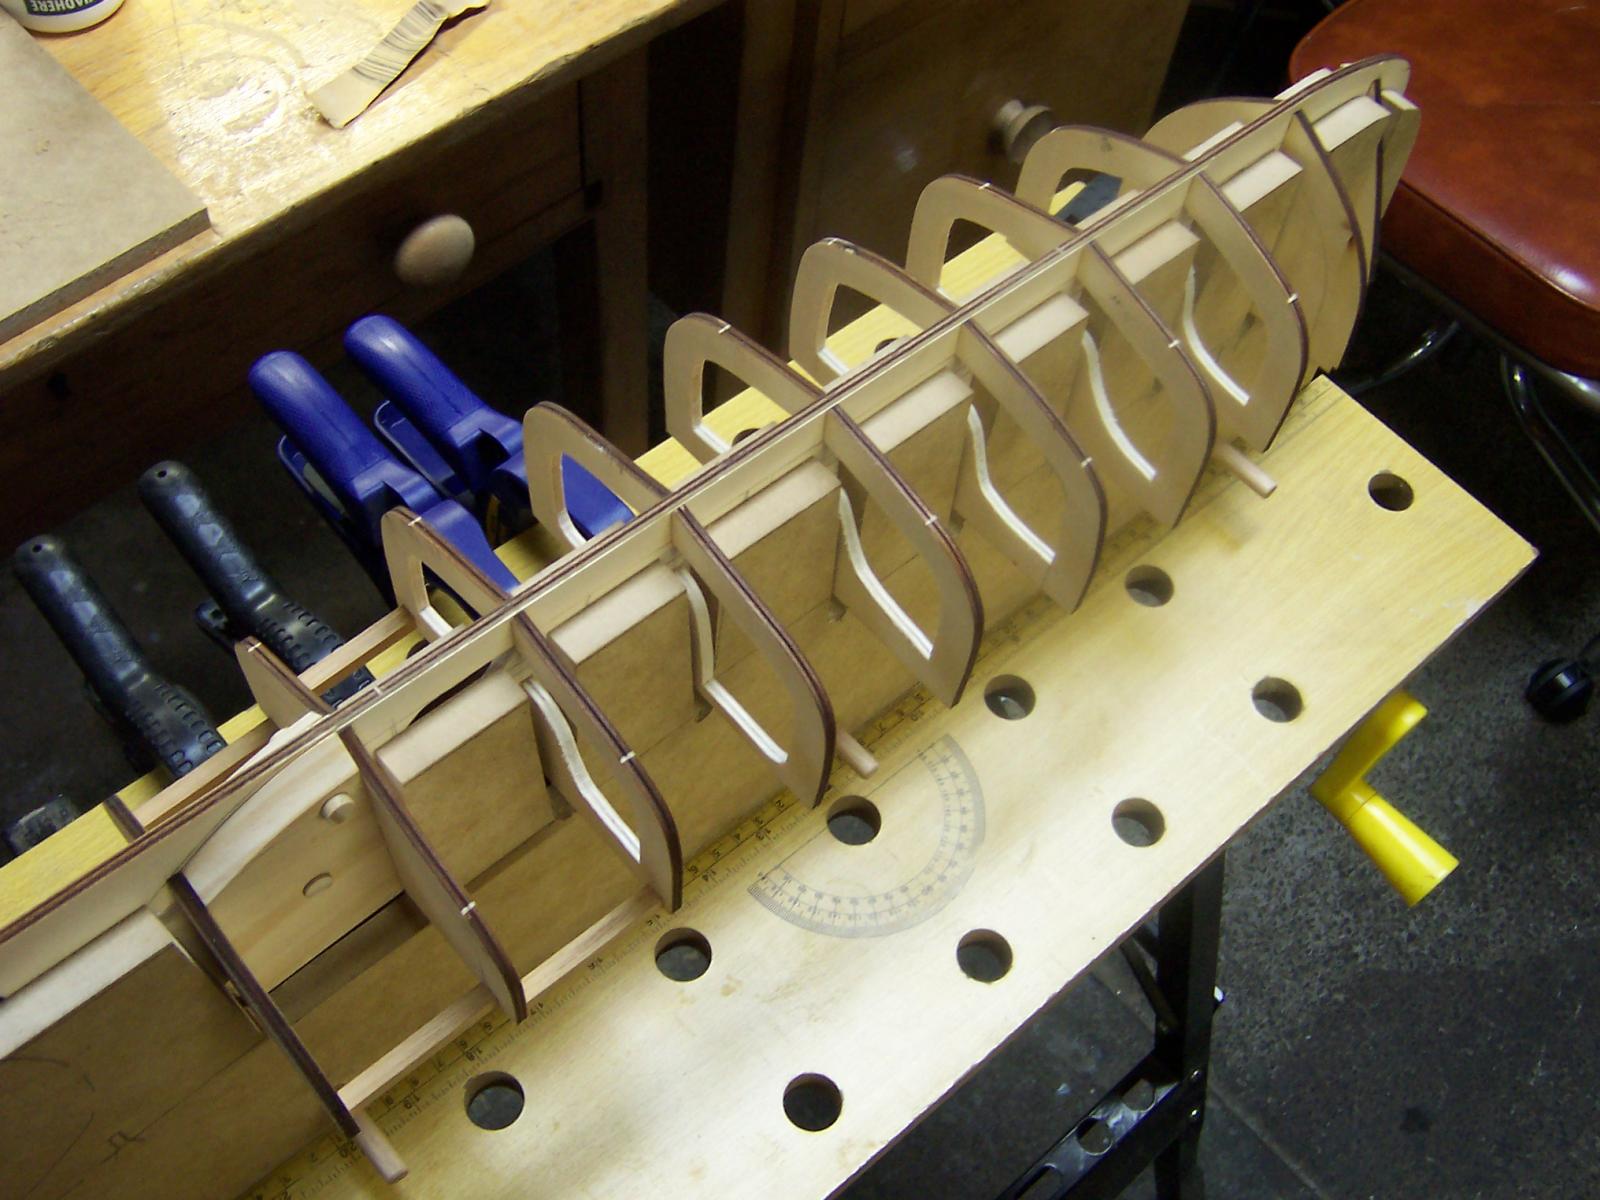
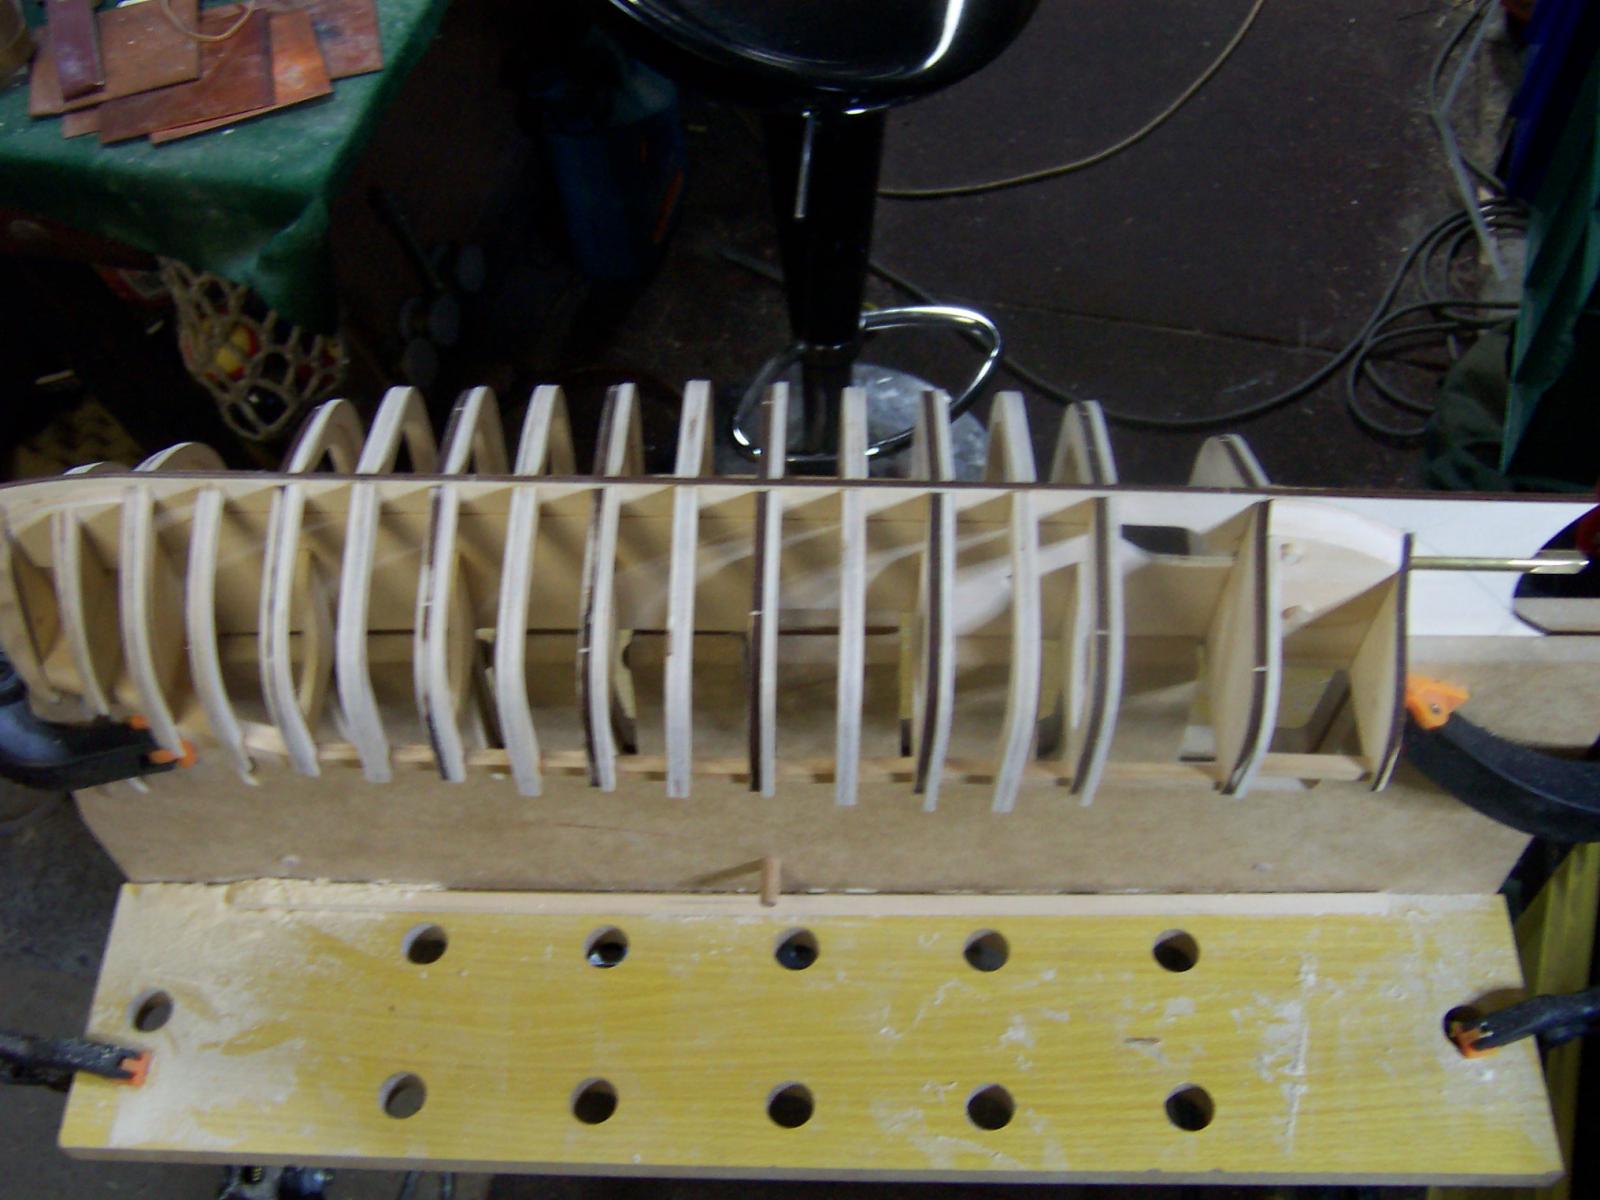
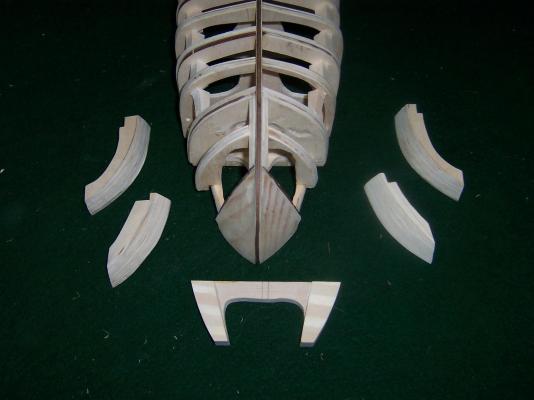
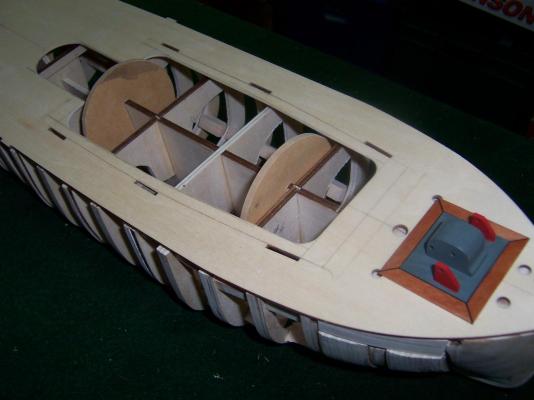
G'day All, Just a quick update of the weeks progress. After starting to fair the bulkheads, I quickly became unhappy of the large spacing between the bulkhead centers (approx. 2"). I also wasn't too keen on the 4mm wide thickness of them. My dodgey aim would place more nails beside the bulkheads than in them. So I cut some scrap ply and doubled the thickness to 8mm. Then I found some 8mm ply to cut some additional bulkheads. These were glued evenly between the existing. The results so far. Before then after (& yes, I still have a couple to go). Cheers, Scott.


- 33 replies
-
- 5
-
-
- sanson
- artesania latina
- (and 1 more)
-
Thanks for your tip Yanos. I have been very careful to keep all my cuts running the same way. It is good advice though and applies to more types of wood than just Huon. Cheers, Scott.
-
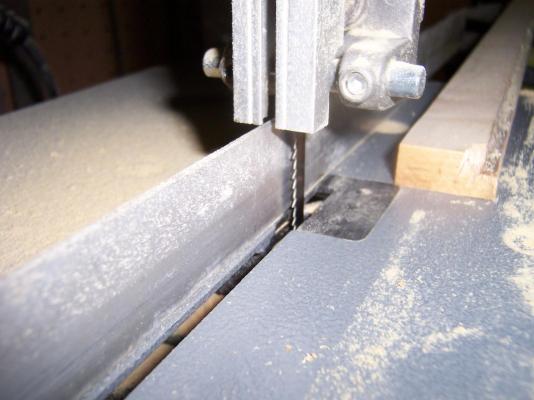
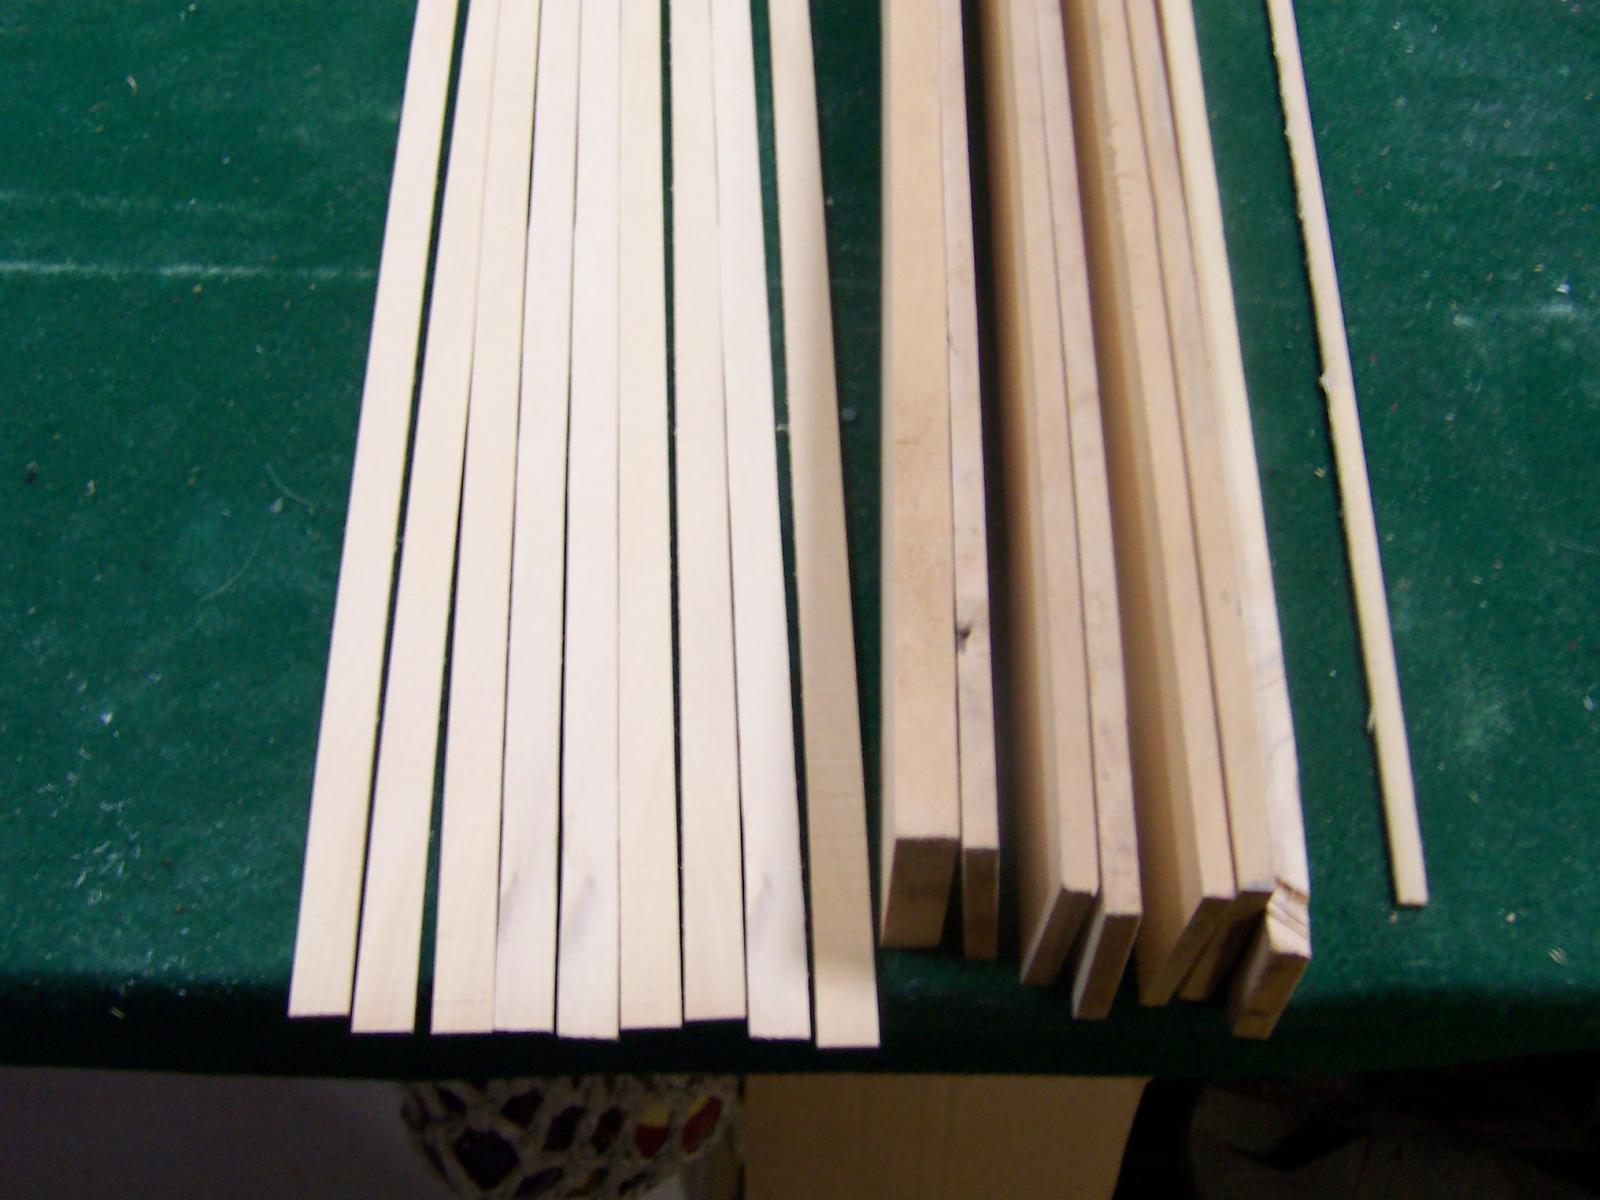
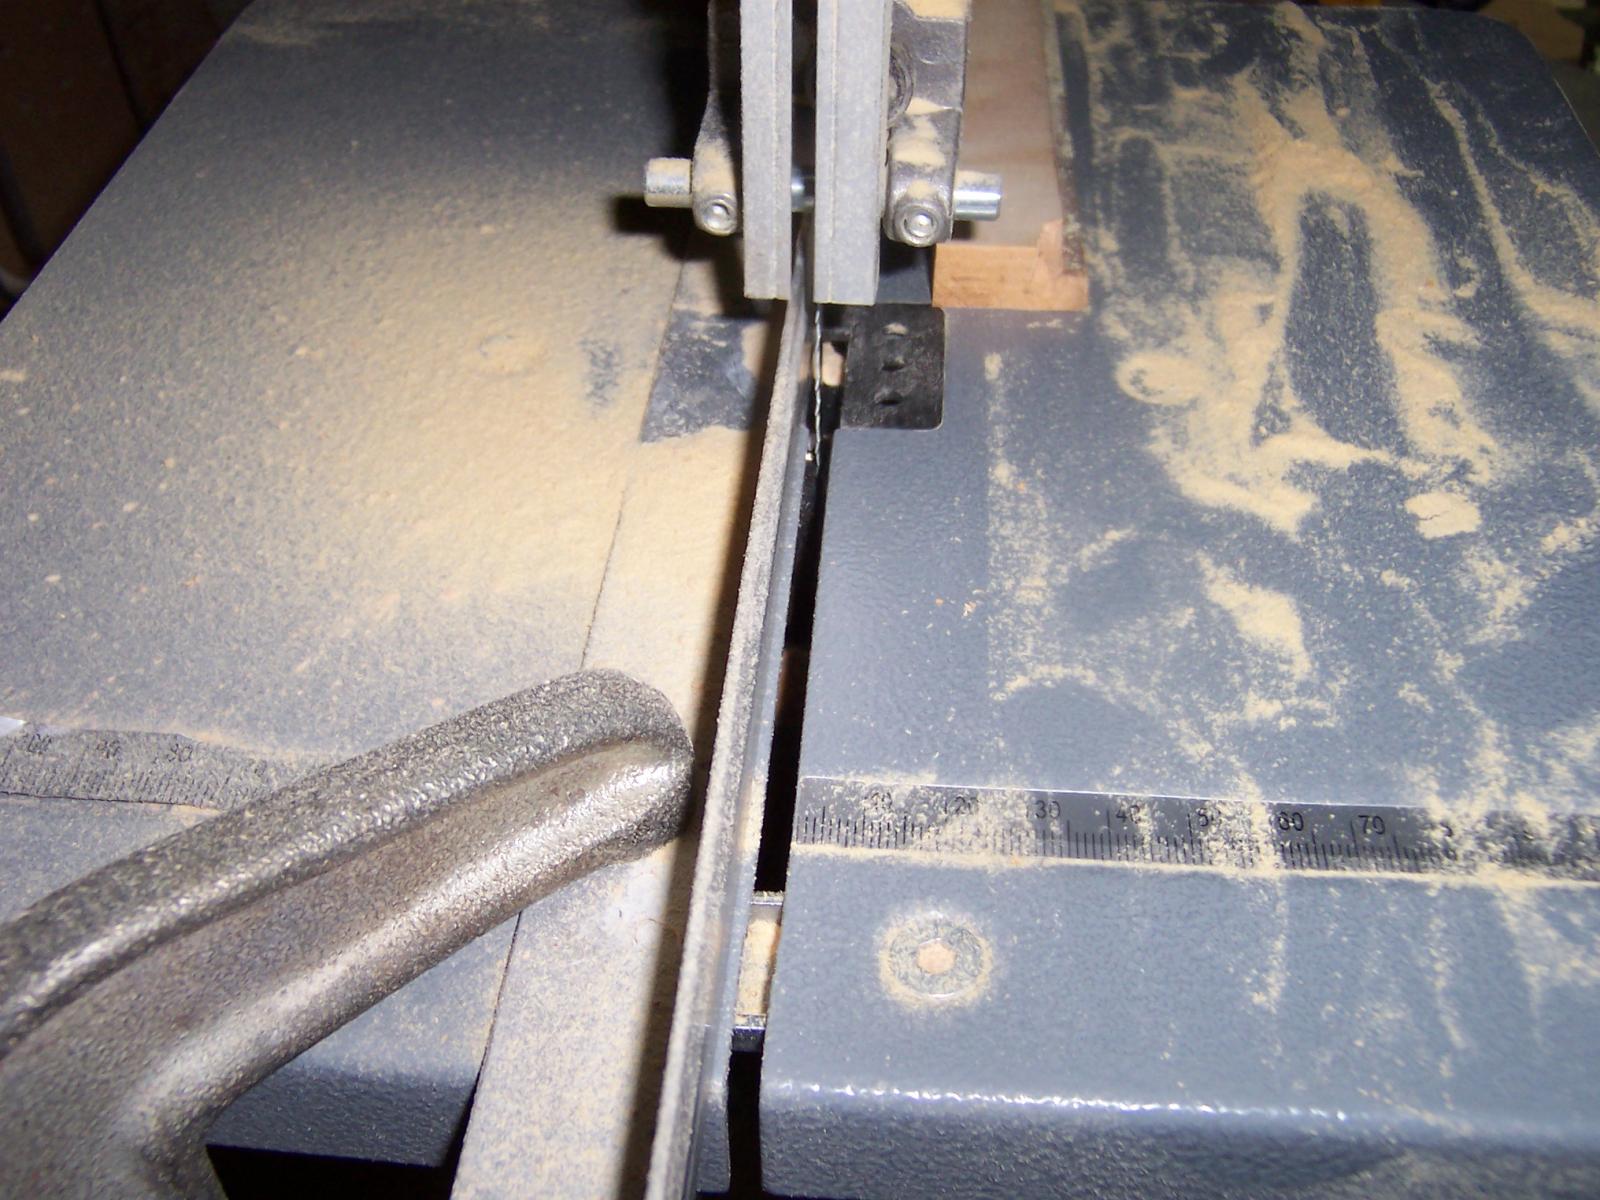
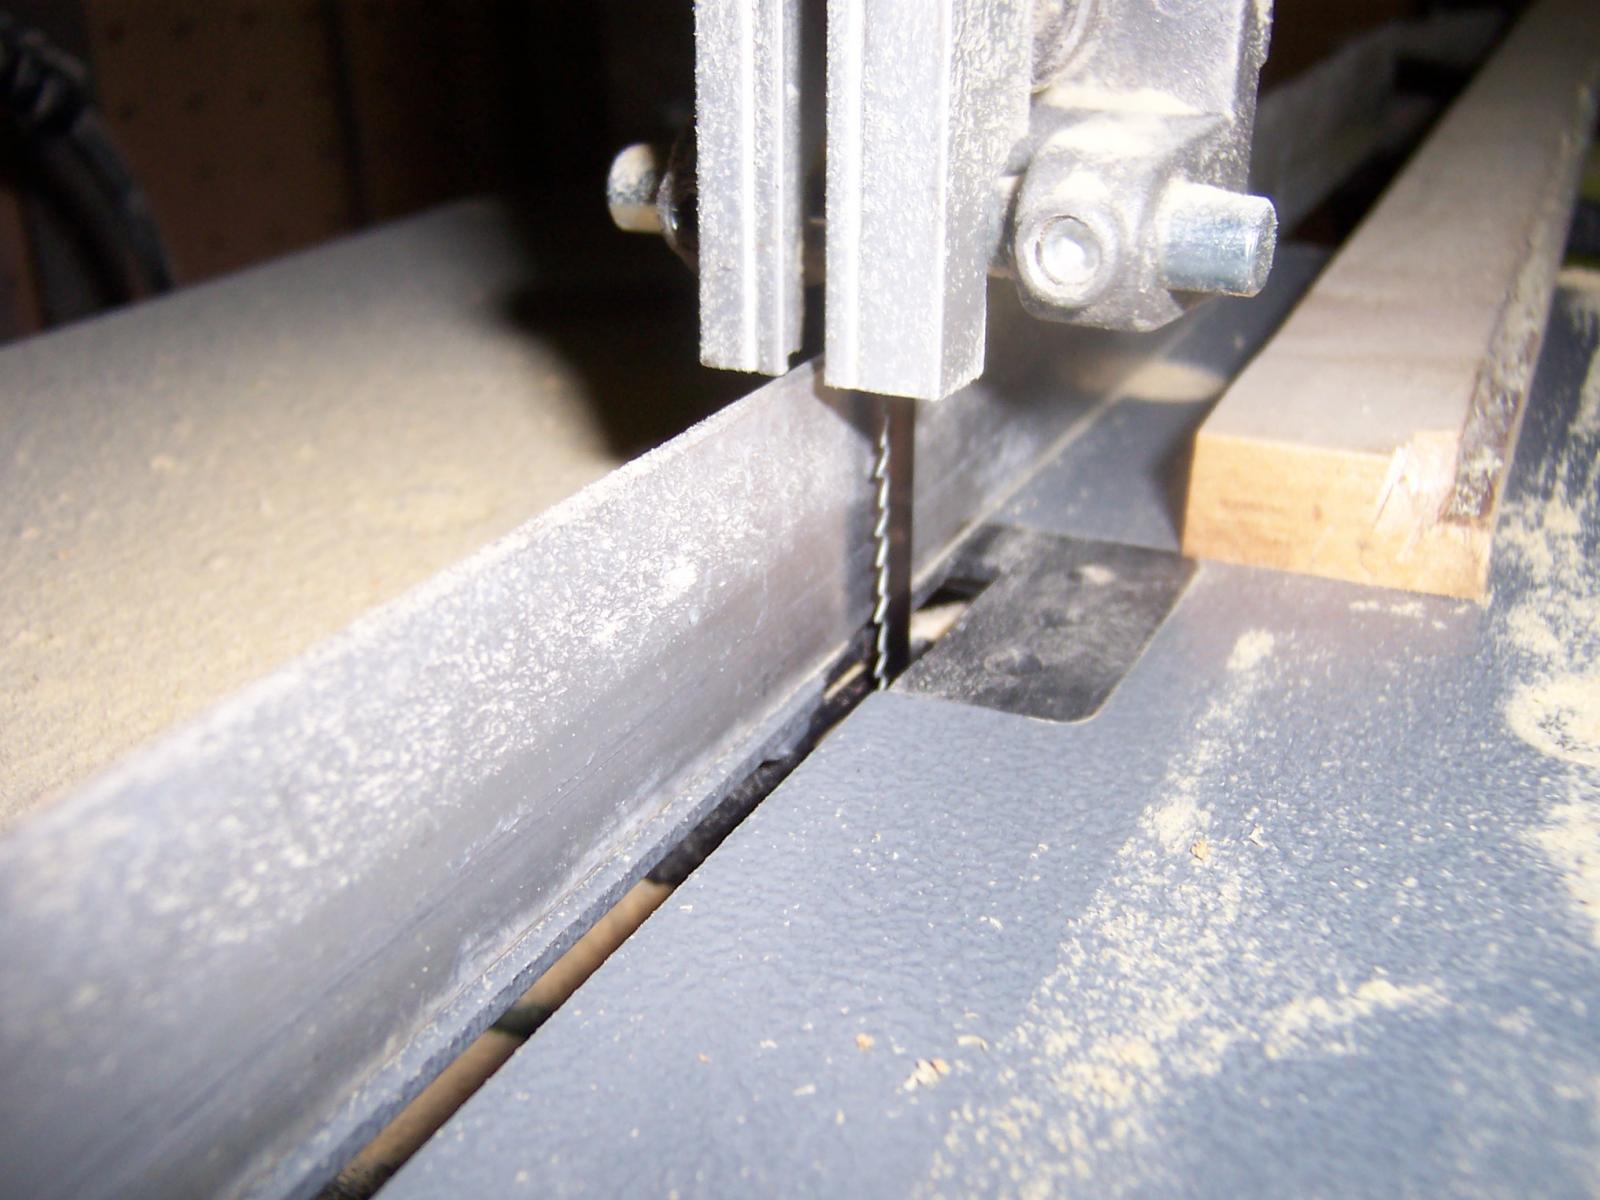
Hi All, I have just made a post in my build log that covers how I stripped some planks for my Tug. I will copy it in here as it may be useful. O.K, I experimented with stripping down the Huon pine. I started with a block about 2" sq and slightly longer than the hull. After some careful setup with my bandsaw (all the guides adjusted and a good clean) and a new 14tpi blade fitted. I stripped two strips 12mm wide, then the remainder 6mm wide. Then I fitted a low fence to my saw so I could lower my top guide to minimal distance above the work piece. After testing the thickness it was cutting on some scrap, I preceded to cut the 12mm down to 1.8mm thick strips. I was impressed with the way the Huon cut. For those unfamiliar with this wood, it is a very slow growing timber found only in certain parts of Tasmania. It is reputed to be the best wood for wooden boat making worldwide and Tasmania has a quite a history for making wooden boats from this timber. In those days they pillaged the forests for it and now days it cannot be logged and only a limited number of people are allowed to recover non-growing timber for specialty woodworkers and craftsmen. It is also reputed to not rot and has a natural ability to take bends very nicely. I am just lucky to have inherited a nice stash from an uncle who had a keen eye for recycling wood. I chose to strip to 1.8mm wide in the hope that I may be able to pull off a single layer hull. If not, I have the Walnut veneer to use as a second layer or I have tried stripping down to 1mm successfully and could possibly do two layers in the Huon. Here is a pic of the Huon strips so far. And of the saw setup. This is a very basic overview of how I did it, but the main thing is, I managed to achieve very satisfactory results without the need for thicknessing or planing. Also my saw is only a very cheap unit, so don't think you need an expensive machine to get good results. It is more in the careful setup and blade choice (new blade if possible). Here is a pic of some Myrtle planks that were stripped the same and only needed a light sand after planking. Hope this gives people more confidence to try their own. Cheers, Scott.