
hwe
-
Posts
28 -
Joined
-
Last visited
Recent Profile Visitors


-
 Prowler901 reacted to a post in a topic:
HMS Speedy by hwe - Vanguard Models - 1:64
Prowler901 reacted to a post in a topic:
HMS Speedy by hwe - Vanguard Models - 1:64
-
whitejamest reacted to a post in a topic:
HMS Speedy by hwe - Vanguard Models - 1:64
-
ccoyle reacted to a post in a topic:
HMS Speedy by hwe - Vanguard Models - 1:64
-

HMS Speedy by hwe - Vanguard Models - 1:64
hwe replied to hwe's topic in - Kit build logs for subjects built from 1751 - 1800
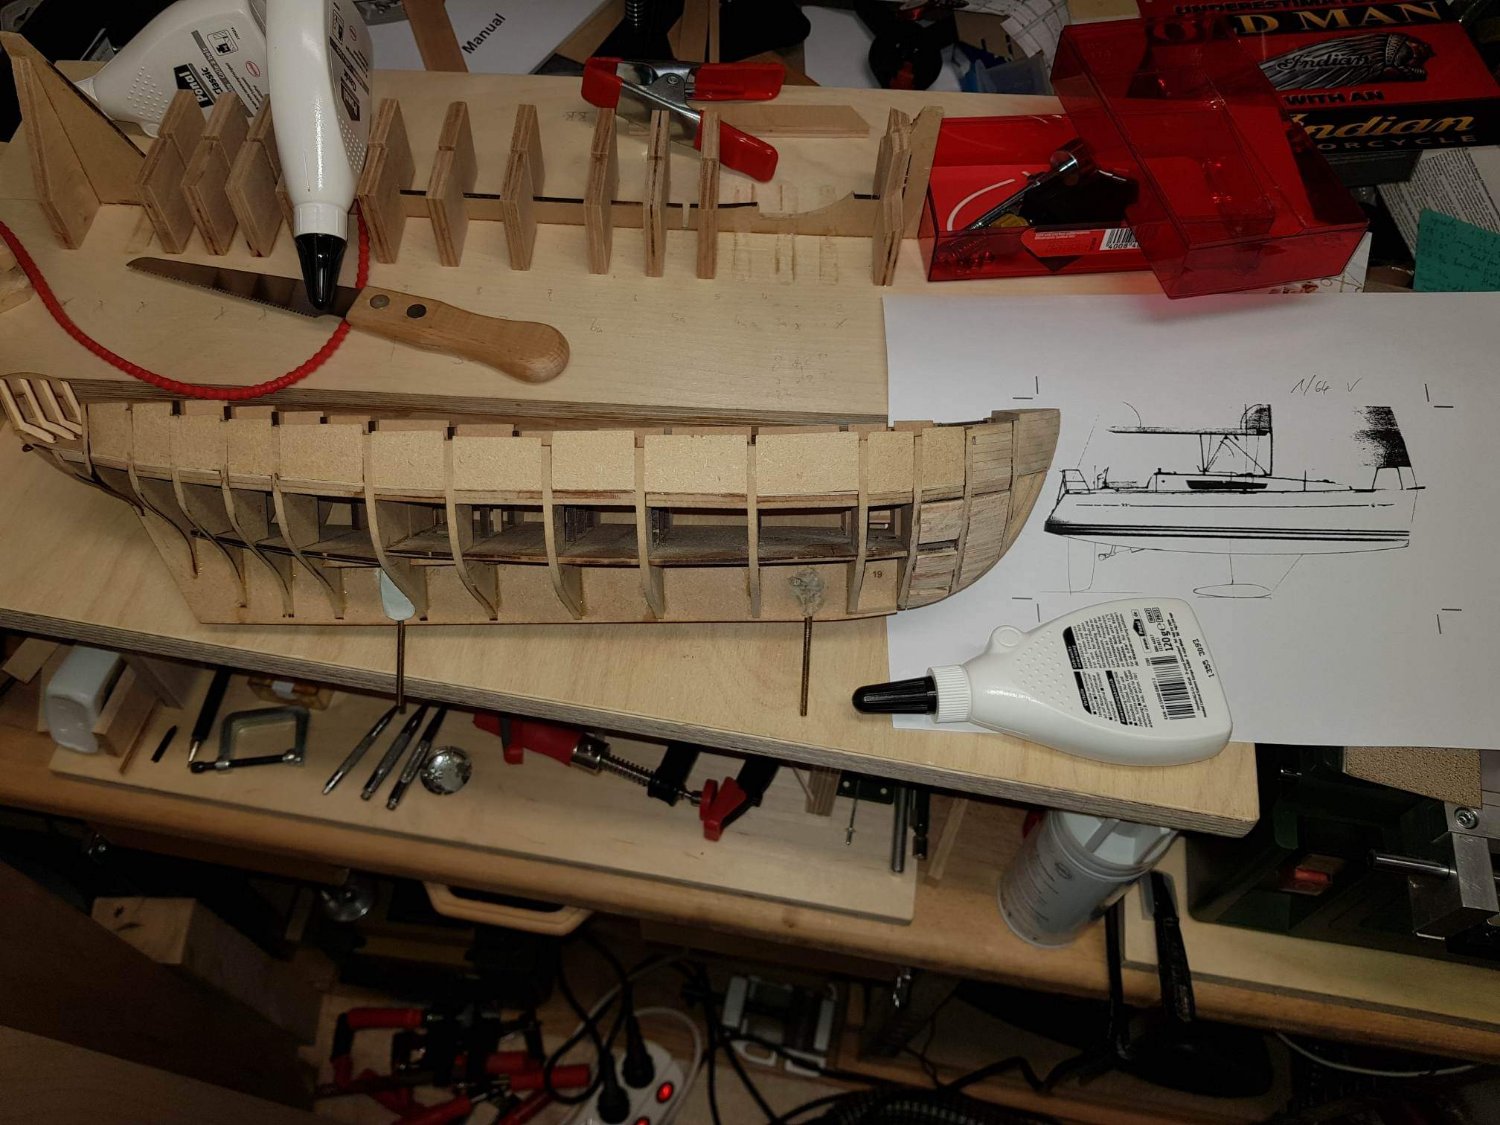
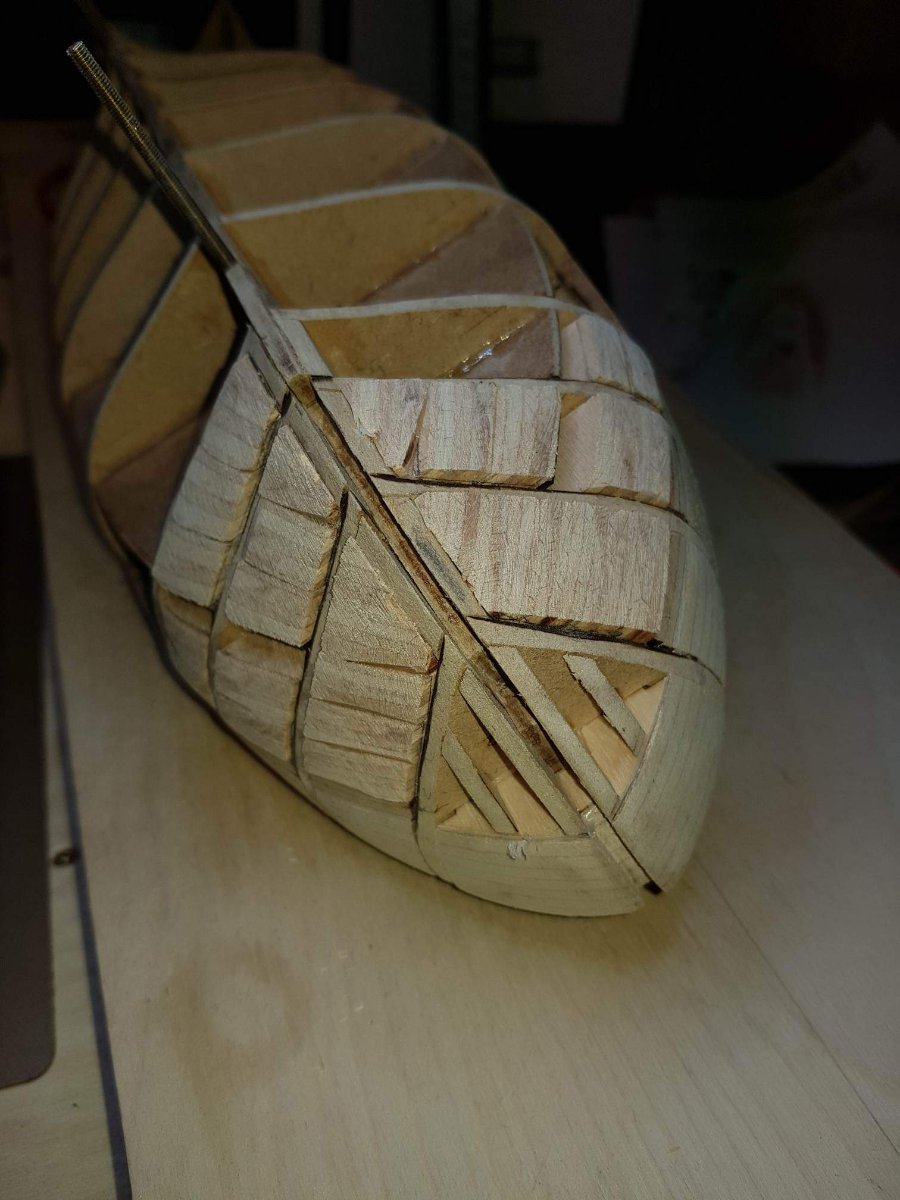
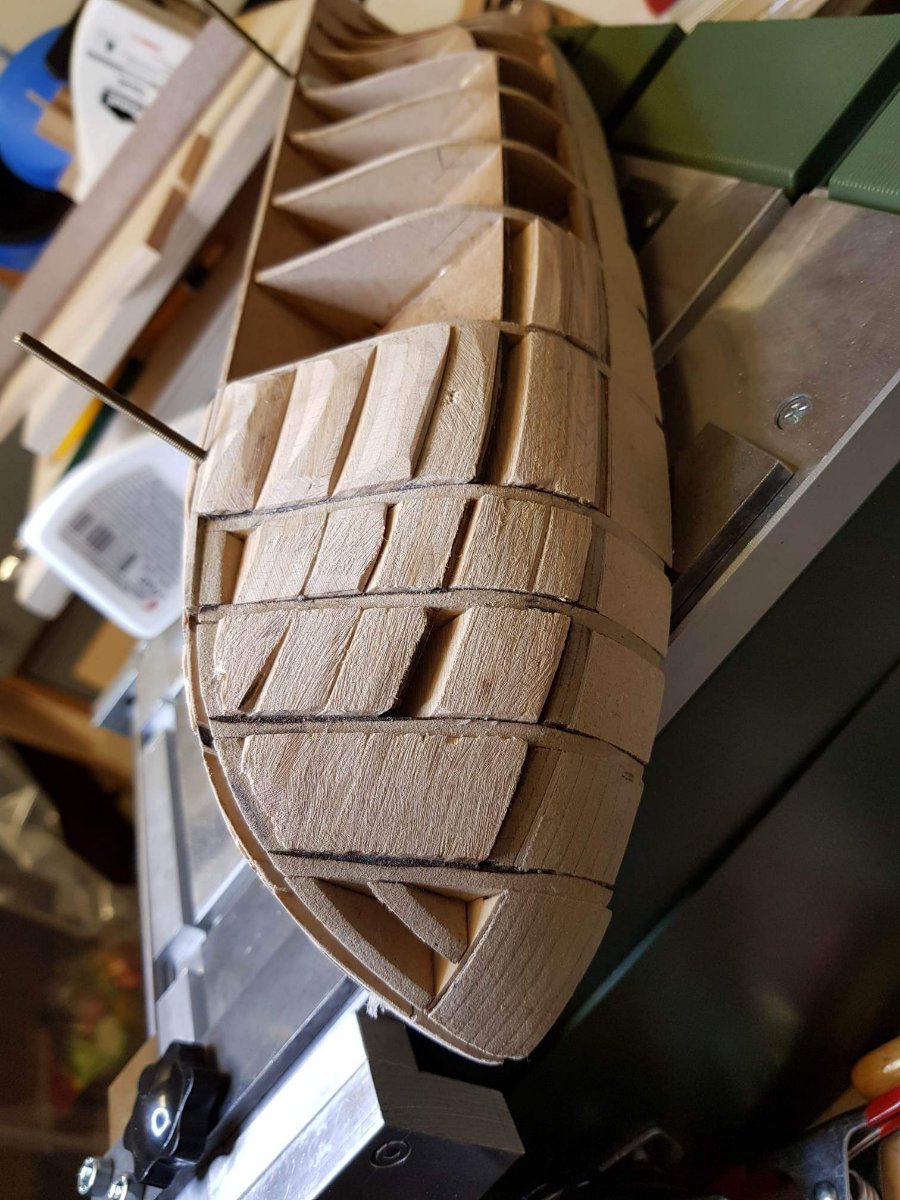
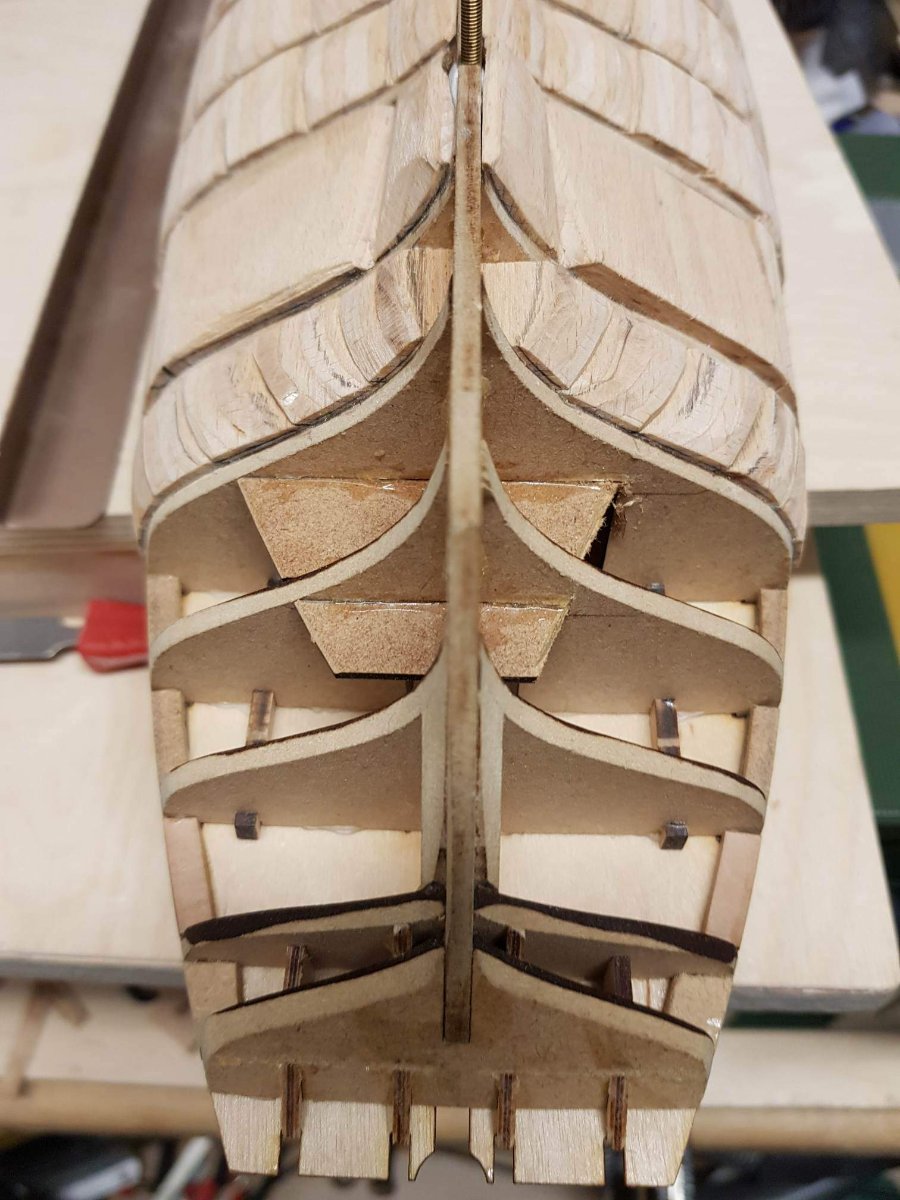
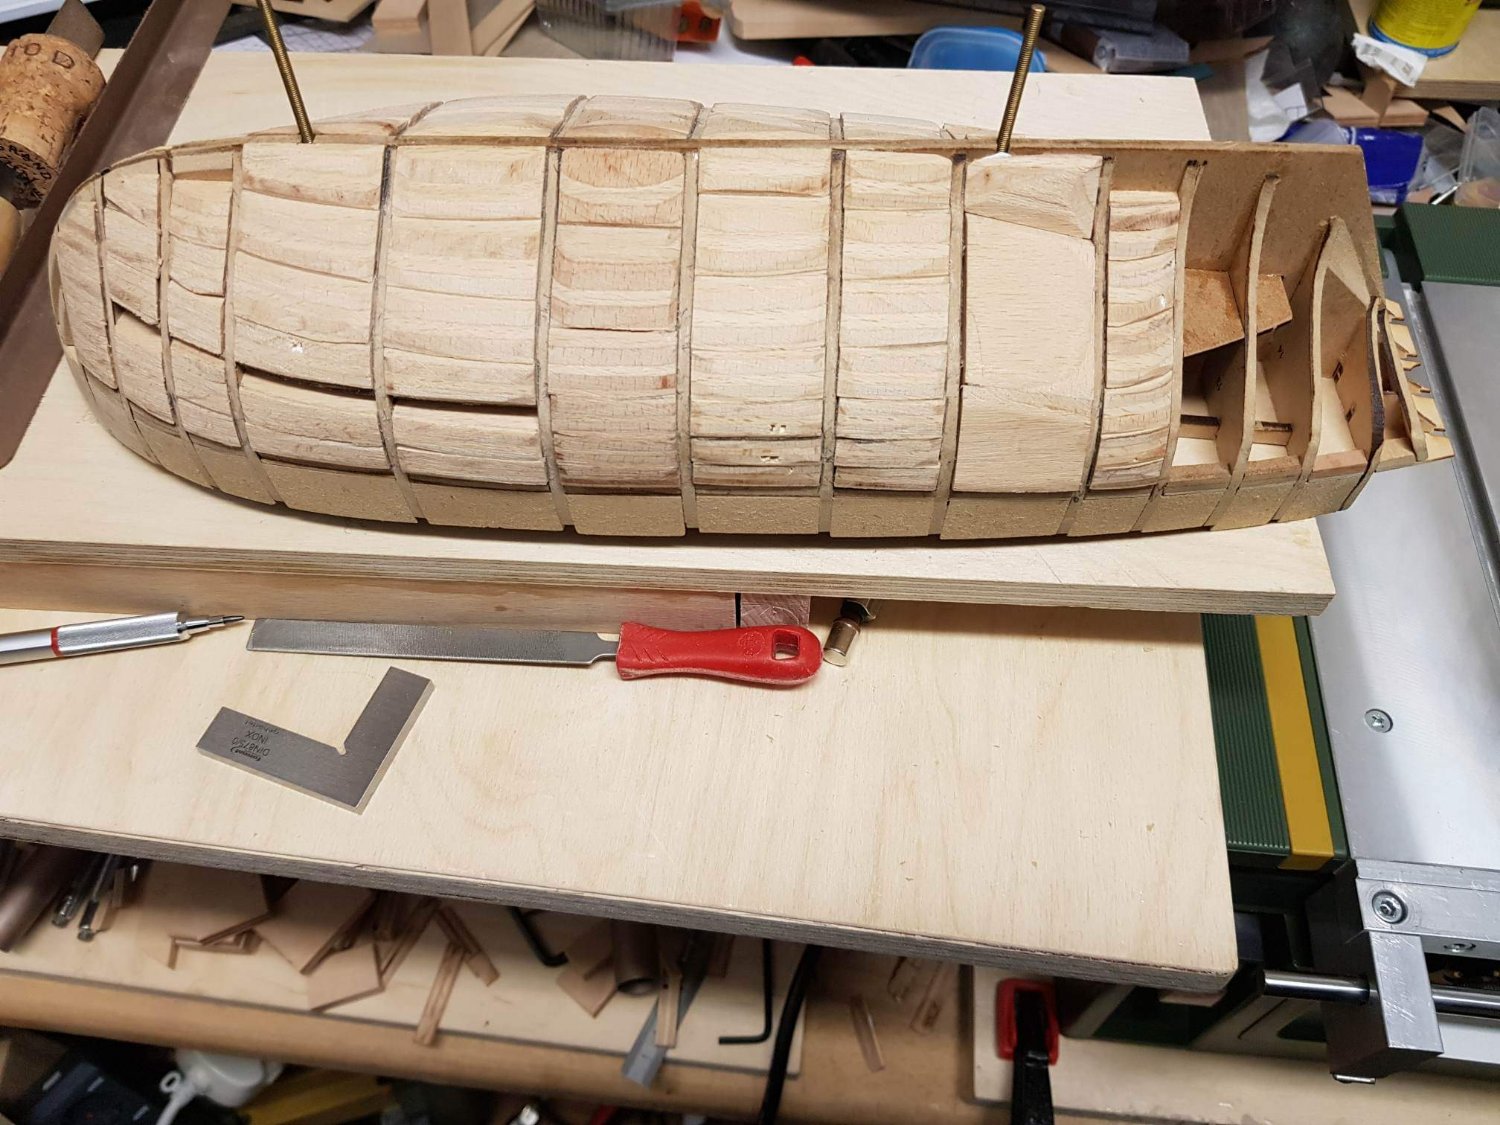
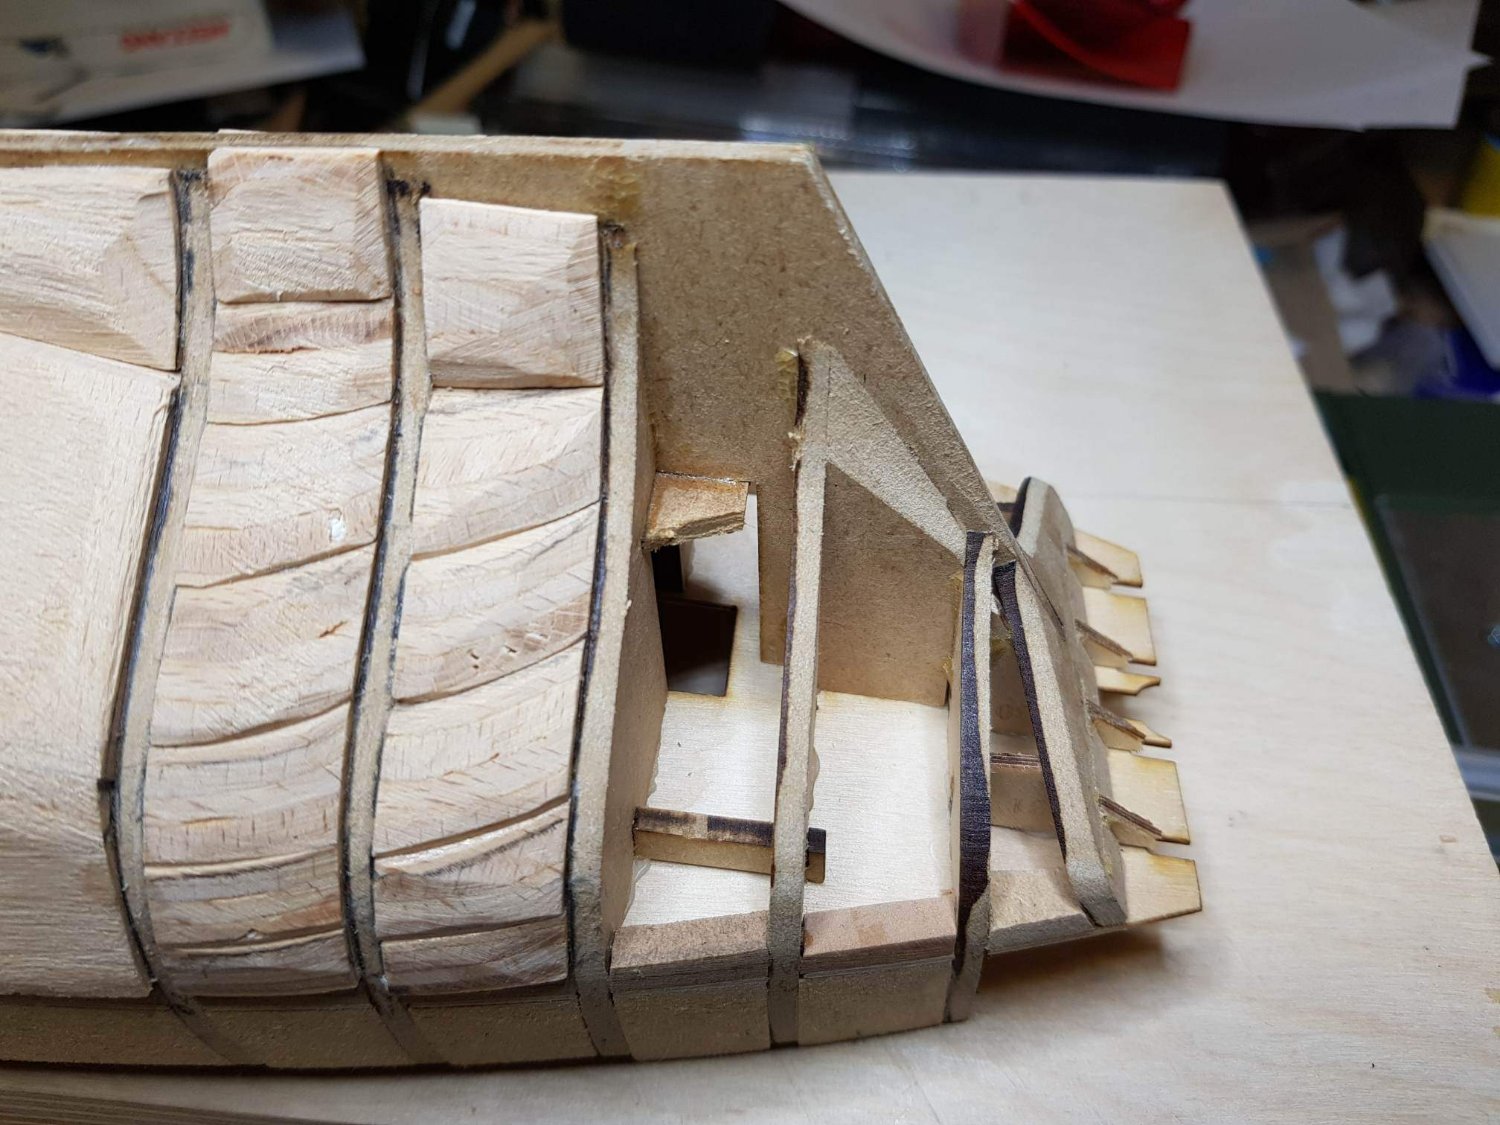
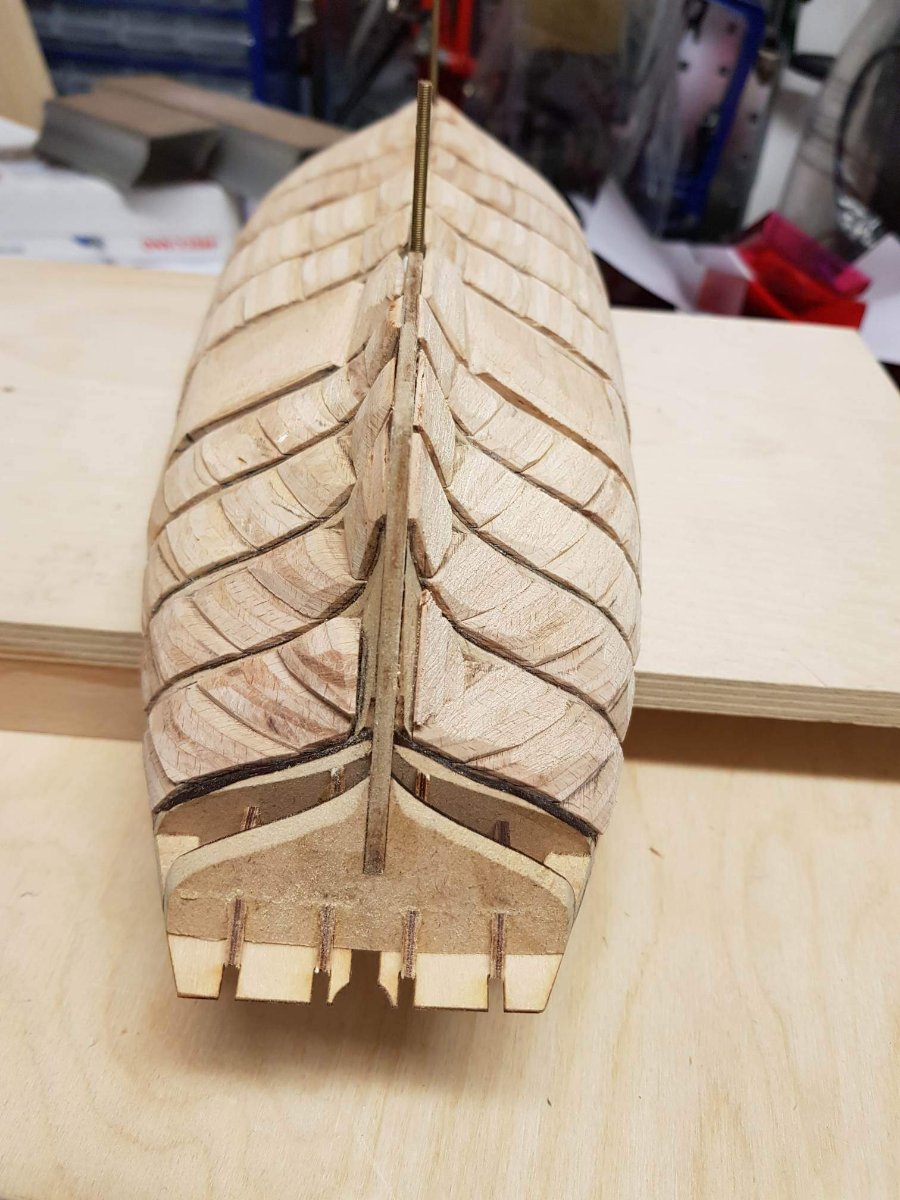
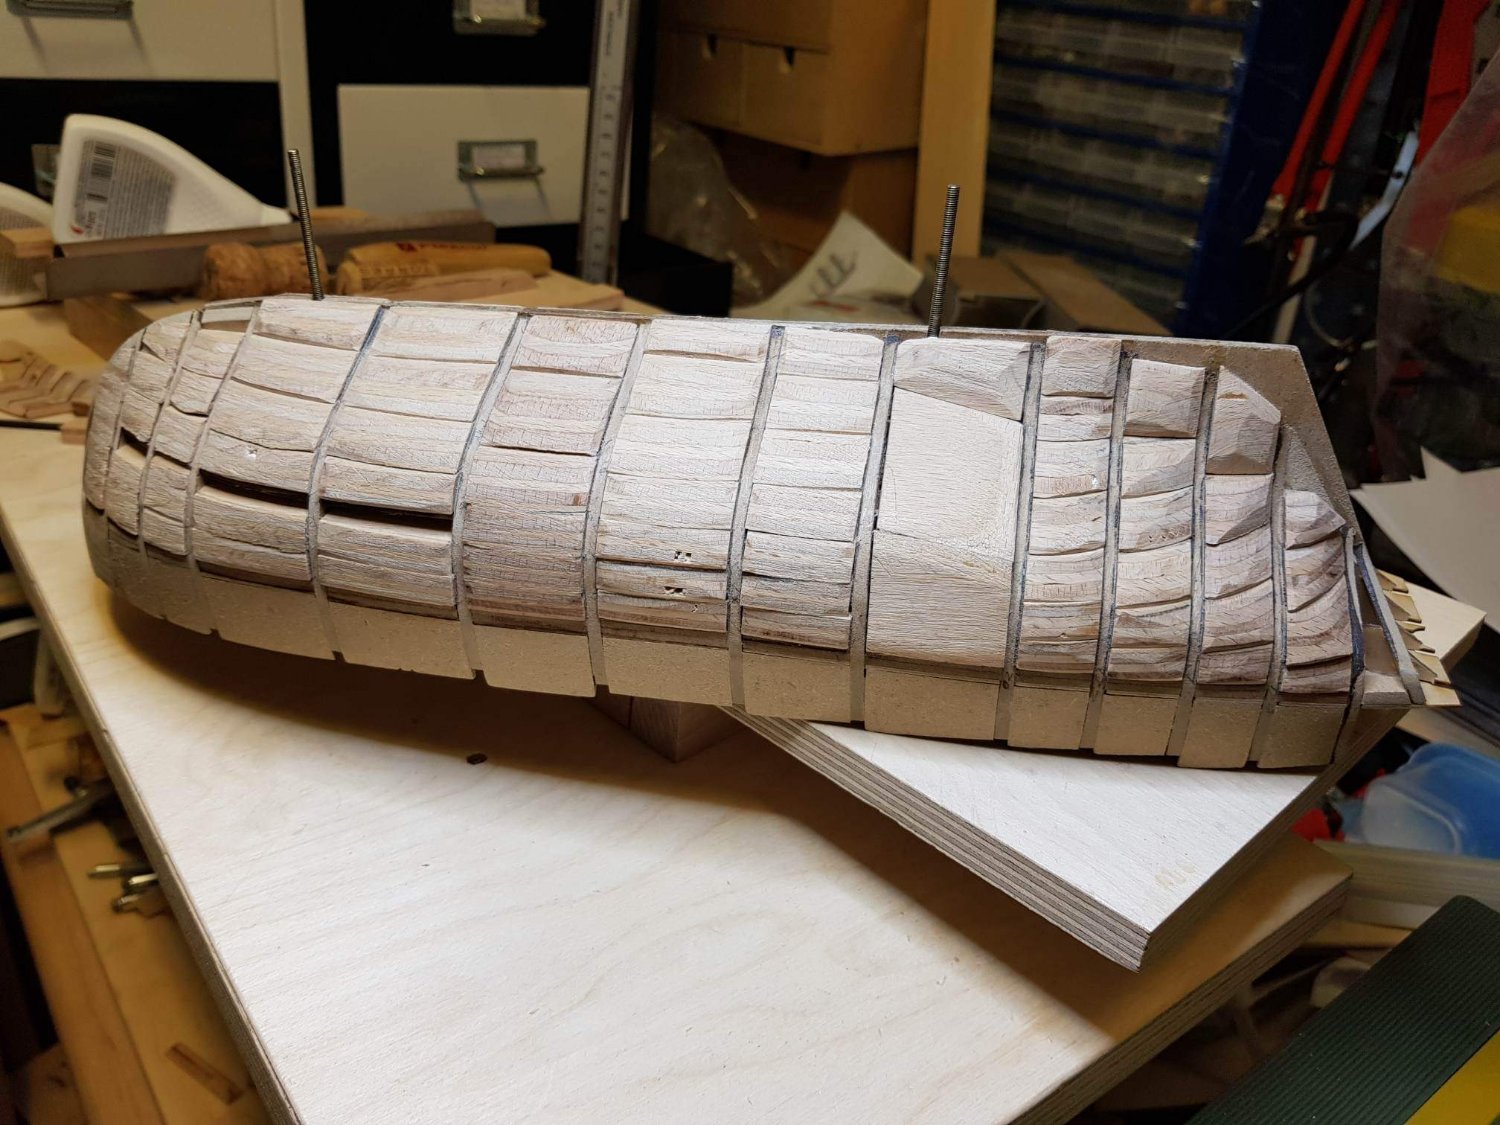
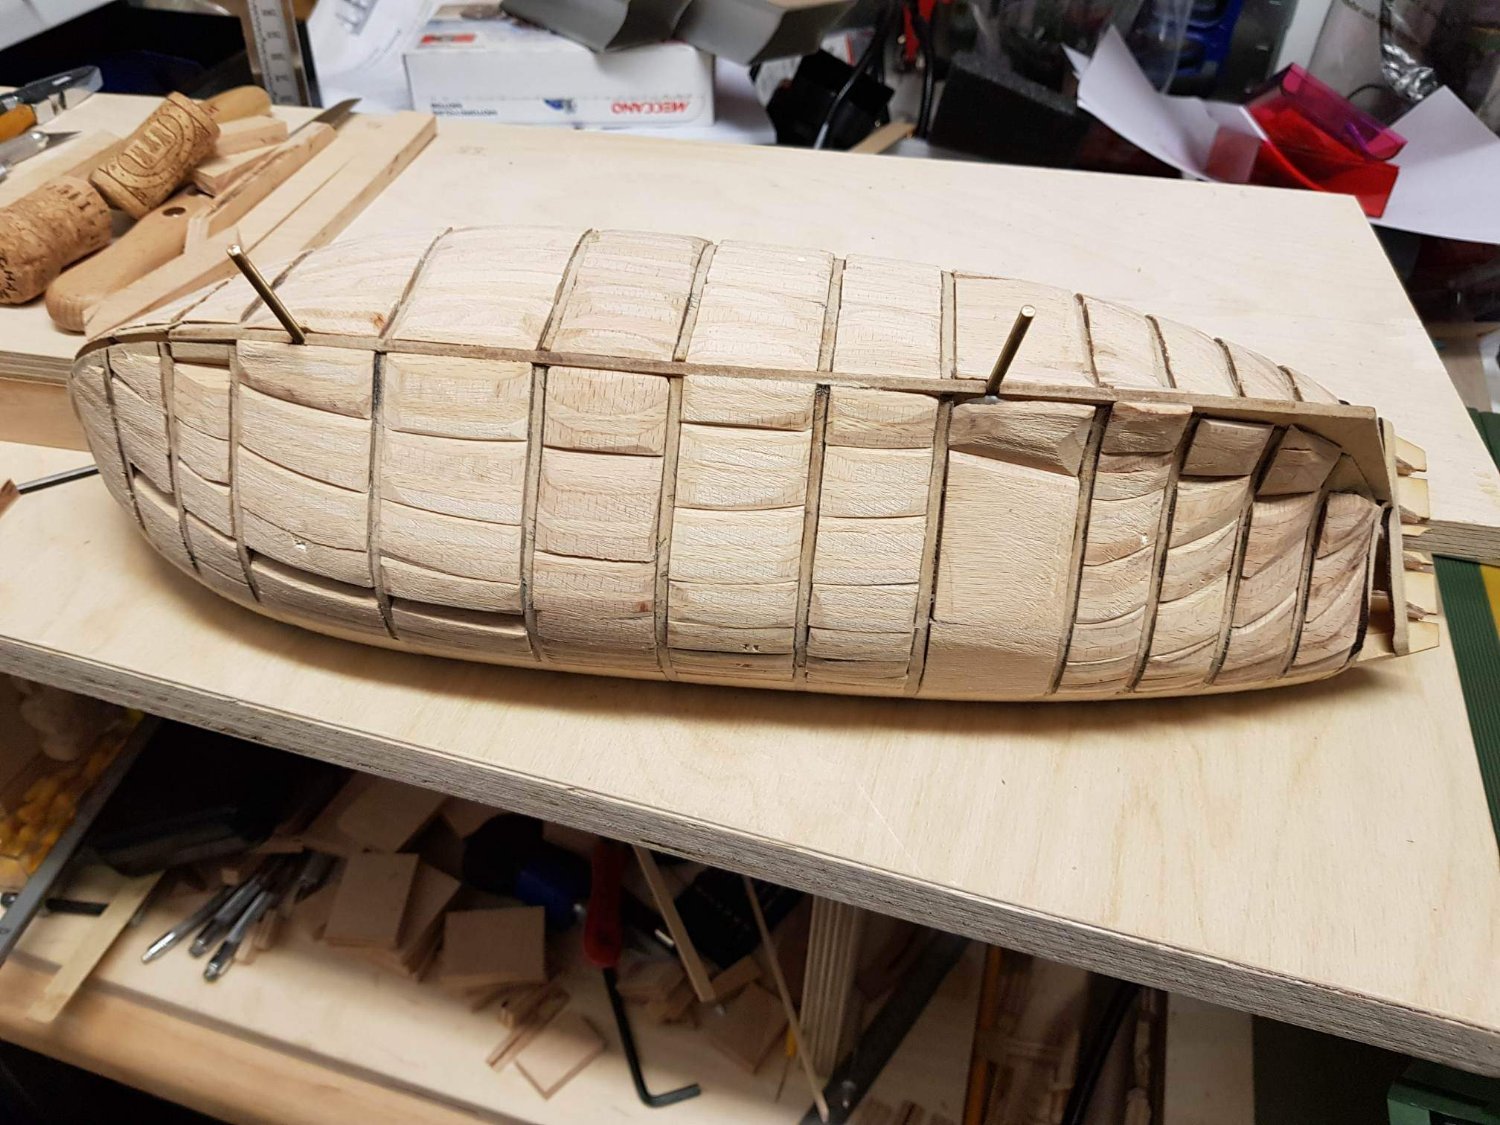
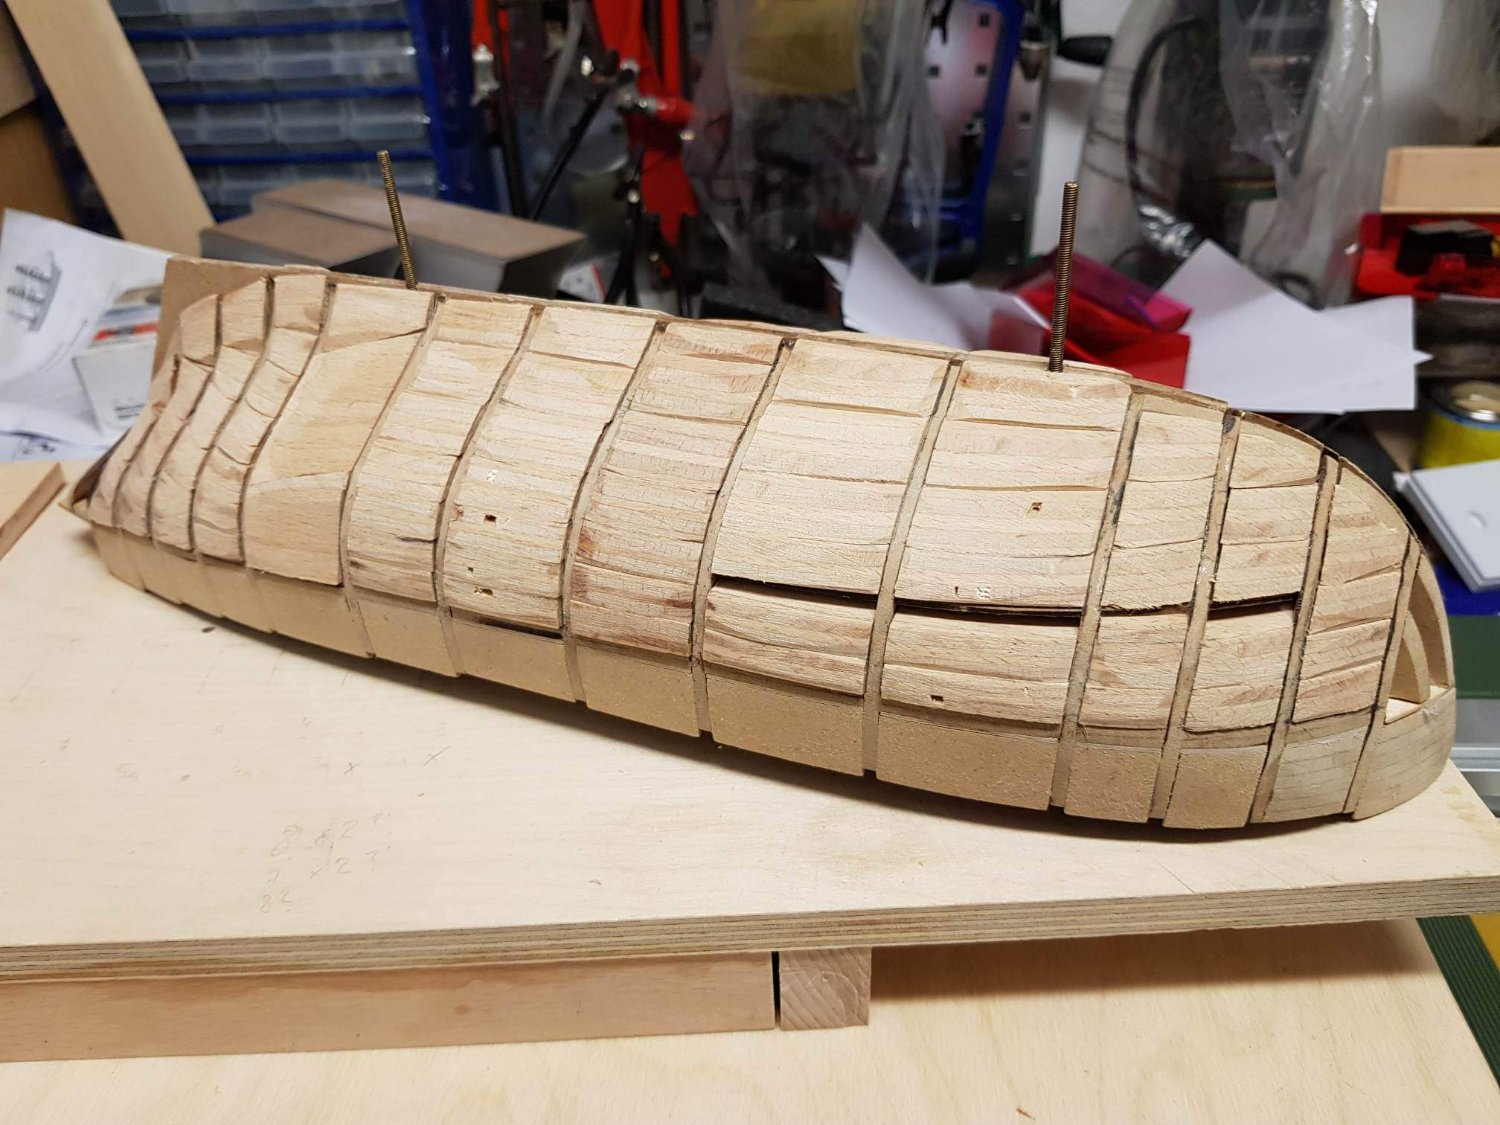
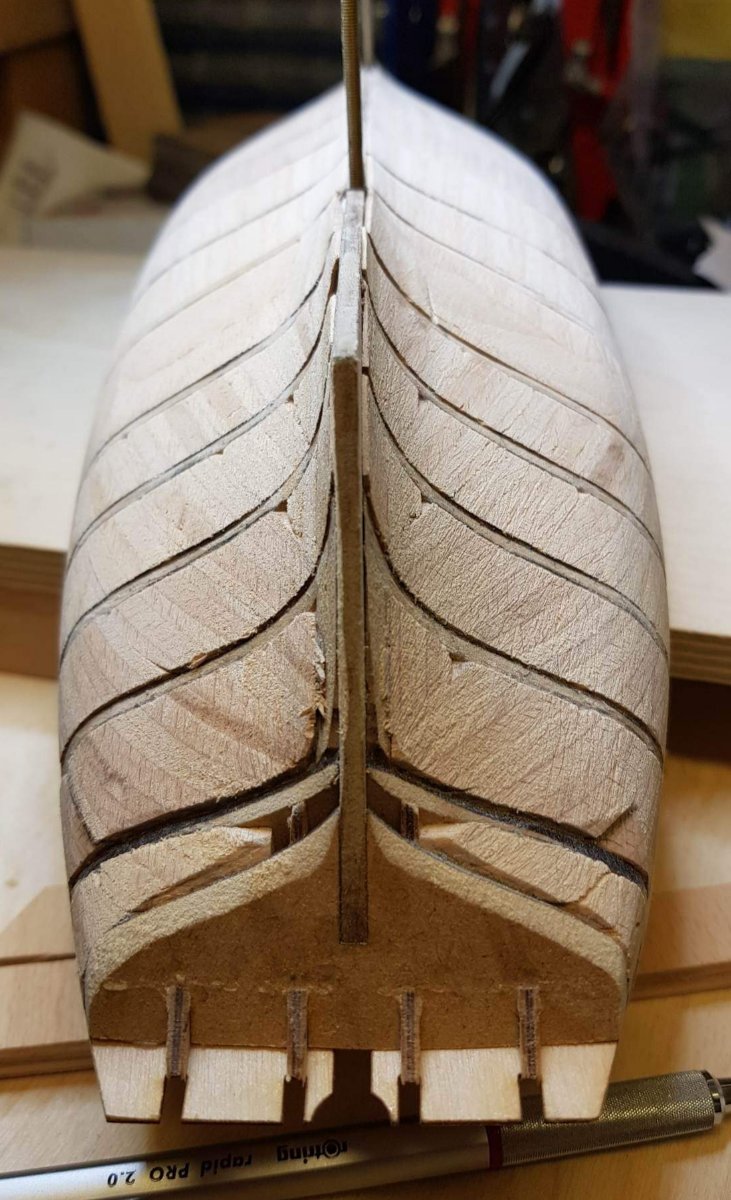
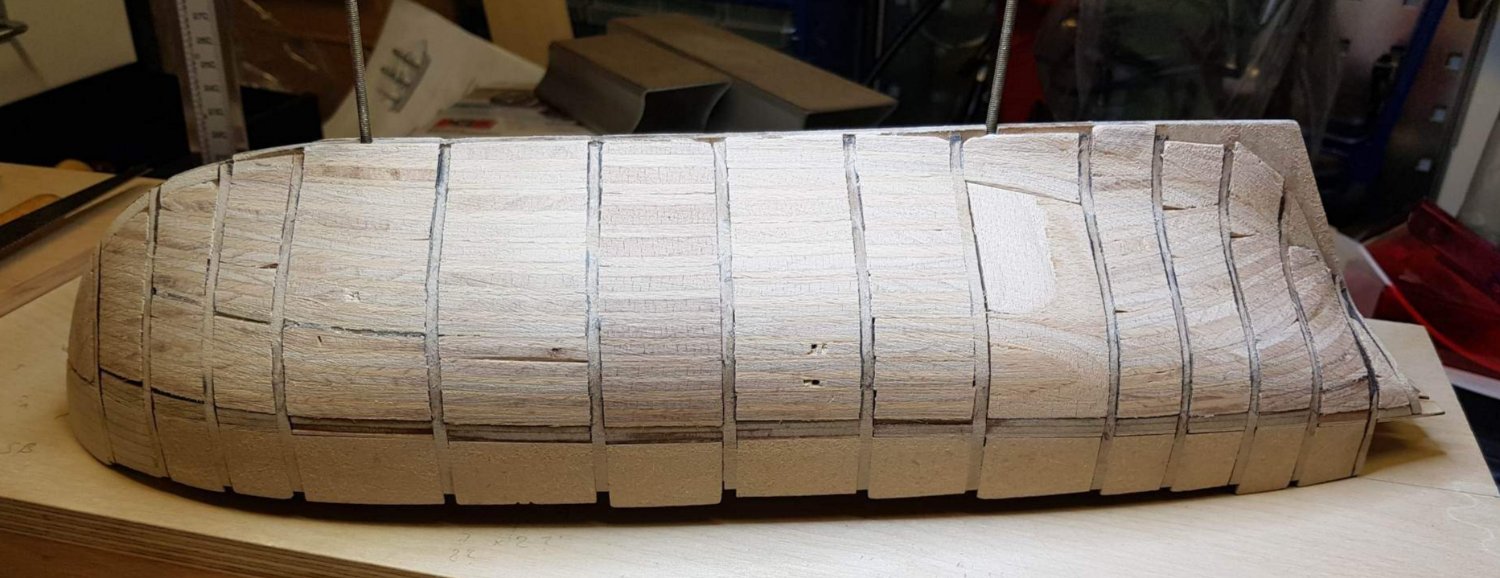
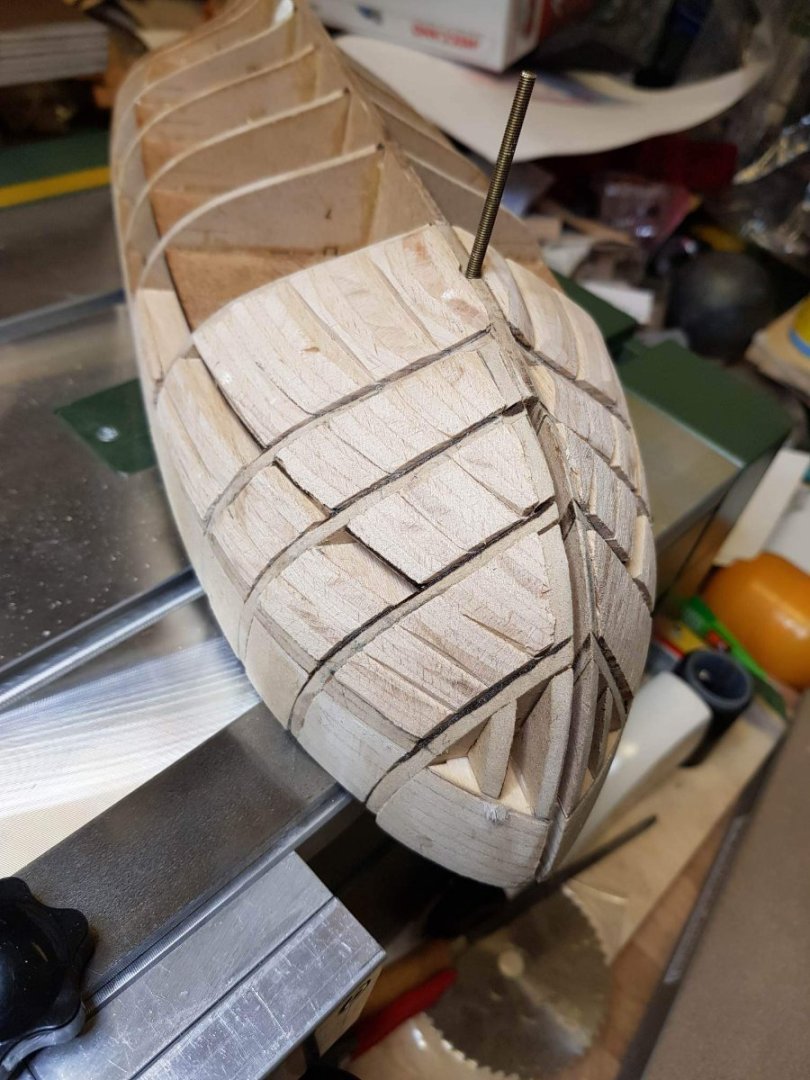
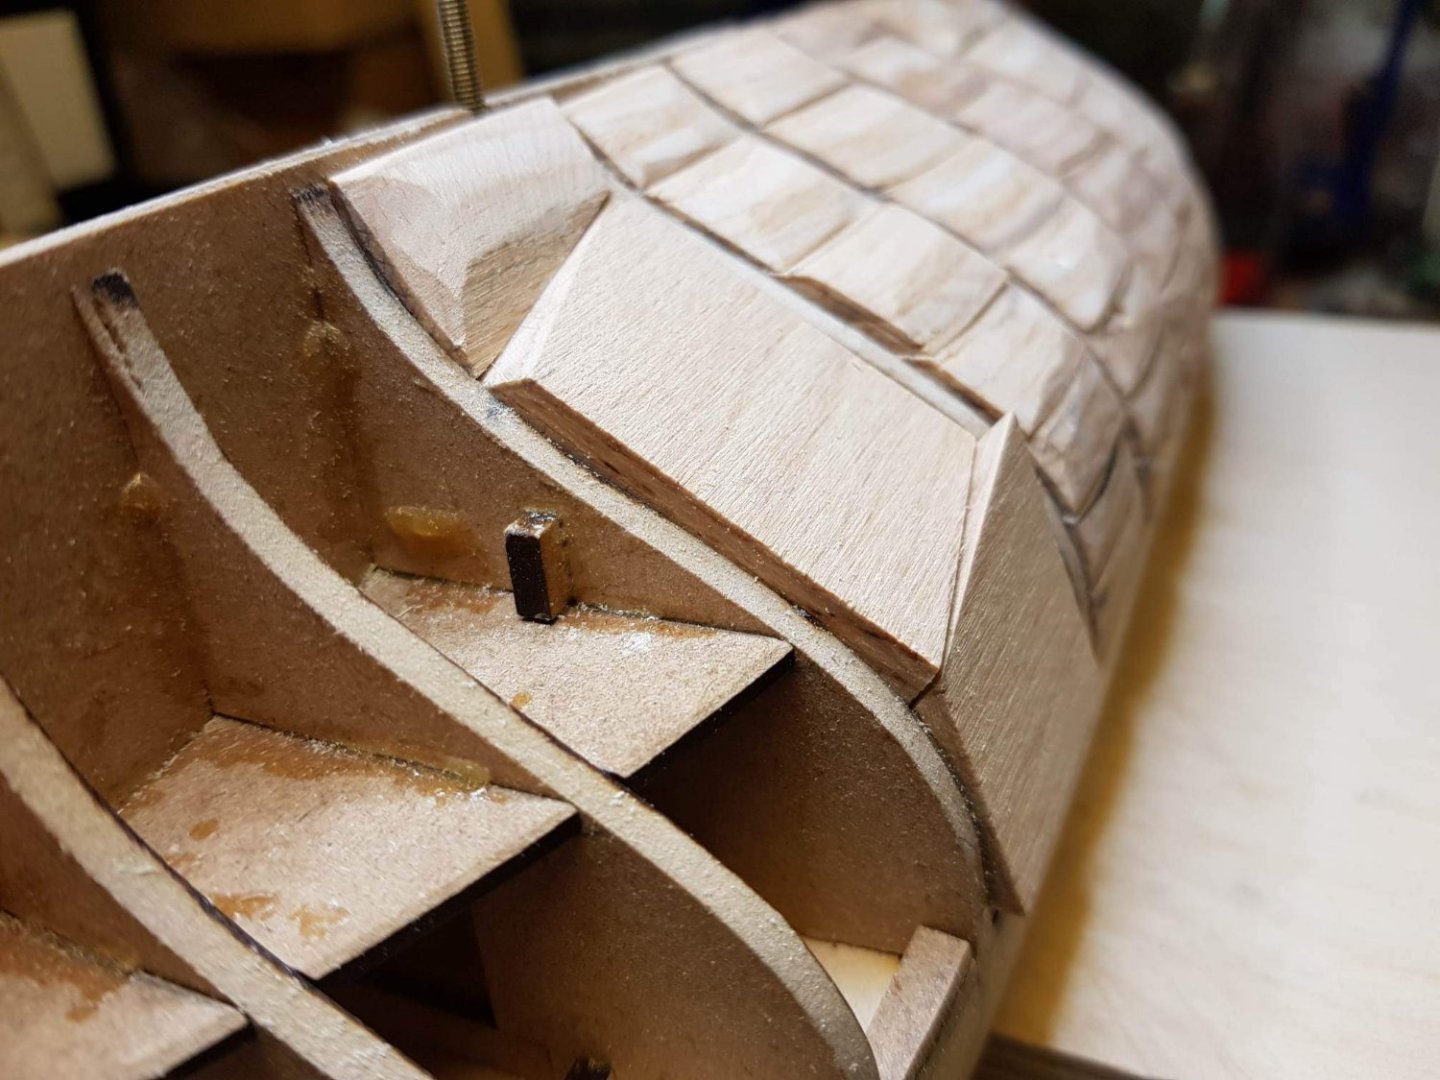
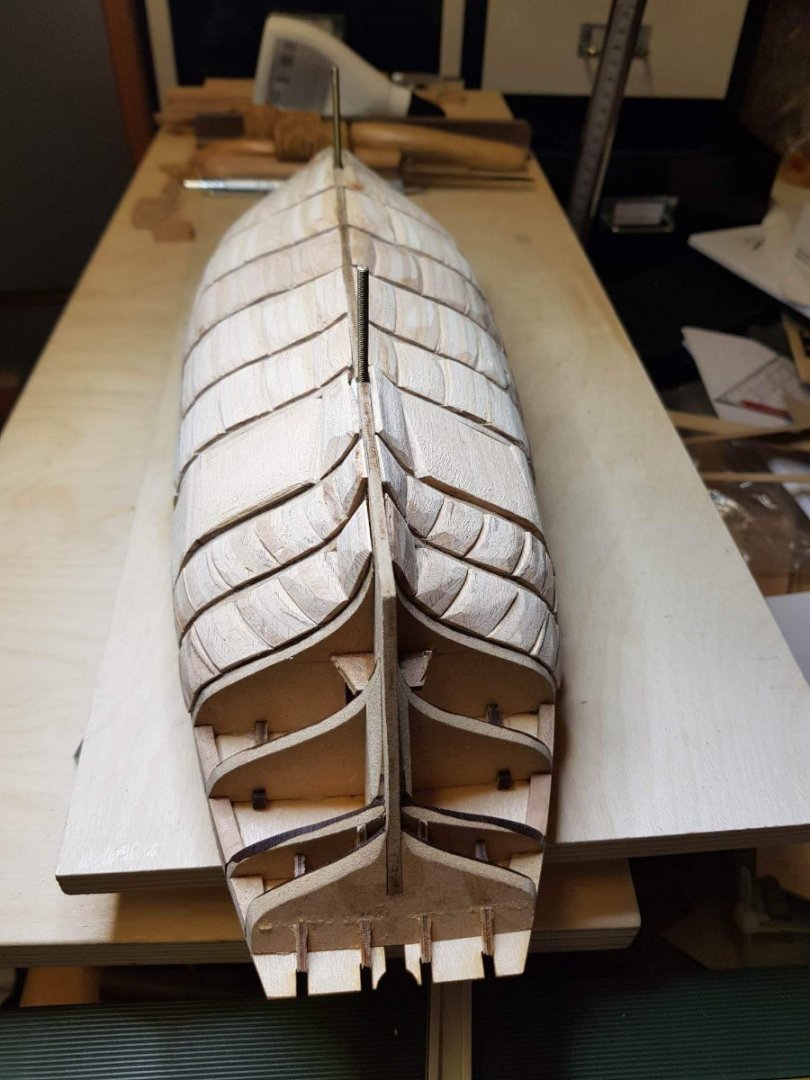
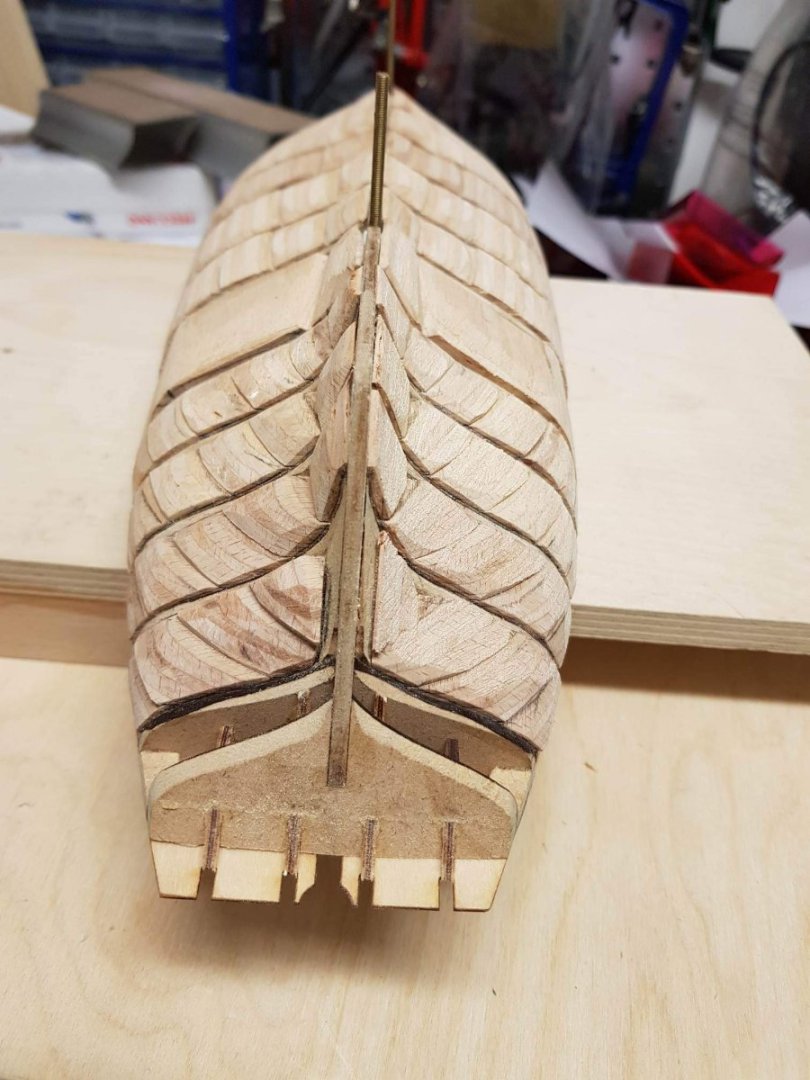
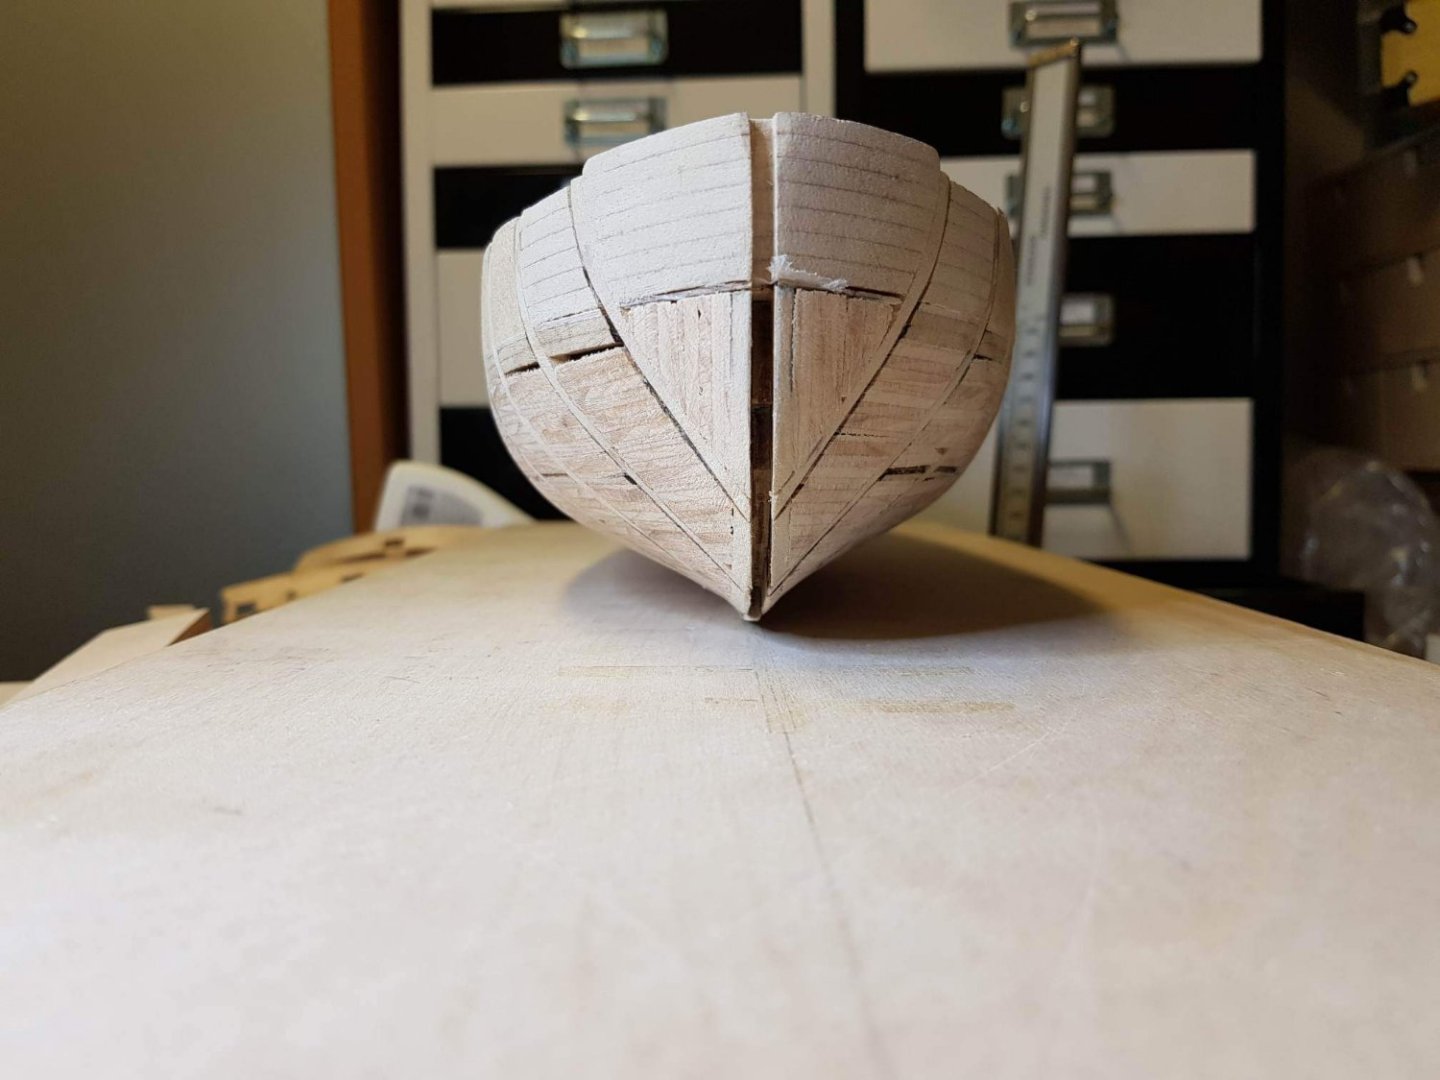
Hello there! Time for an update! I had a lot of other stuff to do, but I won't bore you to death with that. Here is, what happened to my Speedy, meanwhile: As already mentioned before, I create a complete 'inner bulwark', that has to be removed completely, when I have finished. Here is a picture of that: The complete bulwark is closed with excessive material from the kit. 3 mm MDF, glued only to the upper ends of the frames/bulkheads and not to the deck (that would be a big mistake!). You may notice two more things on that picture: - First, a small sideview of a small sailing yacht. - This is in fact a sideview of a 'Jeanneau Sun Odyssey 33i'. The reason it is there, is simple to guess. I do own such a beauty. And the idea behind that, is to build a small model of my own yacht, in the same scale as the Speedy. - This way, everyone, who ever visited us aboard our yacht, will have a good idea of the real size of the HMS Speedy. I may drop in some pictures of that, every now and then, whenever one (Speedy or Yachtmodel) advances... The yacht is 33 feet in length, as you may have guessed already, which is about 10m, for those, who prefer the metric values. - Second, there is 'something going on' in the bow area, between keel and deck. And here is the explanation for that: After I had glued the bulwark parts in place, I tried to affix something (the uppermost plank) to the hull. But I failed miserably. I had bought meanwhile very, very thin (with a very thin tip, even pointier than a standard needle) pushpins, hoping that I could fix the plank to the bulkheads. - I tried this only once, in one place (sorry, no photo available for that) and even though I tried it very cautious, it simply split up the bulkhead and splintered away a piece, half the size of the nail of my little finger. It was clear as the light of the sun to me, that this way, I would never have sufficient support to produce some pressure to push planks together and bring them into the precise shape an place I want them. So I decided to go a hard, long way, which I did before with some other hulls before. I decided to fill up the whole hull with small pieces of plywood. - Plywood is much harder than MDF. And by filling it up, the way I do it, I now KNOW, that at any place of the hull, I now have at least (!, more in most cases) about the quarter of an Inch of rather hard wood, into which I can drill holes and have a very firm hold for anything I may later want to attach to the hull. - May it be bolts or hooks or rings. Whatever may come, it should be easy to give it a strong base now. Another nice sideeffect is, that by doing so, I can already see and have the whole hull in it's proper shape, even before starting with the first plank. - Filled up with some wood filler, any plank will be easy to be glued on, because the glue is used over the whole length of the plank. And I can pencil in the lines for each plank, even before cutting one of them. The idea for this approach is not mine, but that is one thing I really understand, has a nice influence on the whole hull. You can prepare it extremely well, before the first plank is attached. So, this is, what I did since a while before Xmas and the last picture shows the situation from yesterday. I started at the bow. And as you may notice, the lower deck was somehow in the way for my action. I had to prepare some extra wedges to fill in some niches. So I had some extra work. After a while I noticed, that I would be better off, when removing parts of the lower deck. - I already had given up my original idea to create a realistic view of the inside of this lower deck, so this deck is no longer needed for stability. The hull is now as hard as you may want to go with a wooden hull. You can almost drive nails into walls with that hull now! - The reason for that, is that I used extra hard plywood (box tree). This was not by intention, but I had a lot of that lying around here, so I thought, that this could be a good use for that plywood. You can see on the next picture, how much I had to cut away from the lower deck. To left: original. - To the right: cut away. In some places I tried a different approach to my original idea, about how to fill it up. I hoped, I could gain some time. The original idea is: - Cut stripes of the plywood, exactly the width of the space between the bulkheads. - Then you can cut of pieces of that, and simply insert them, with a right angle to the bulkhead sides. That way, you do not need to care much about the 'inner' end of the strip, don't need to care about the side of the strip and only need to take care of the 'outside' part of the strip, which is easy. The other idea was: Try to cover as much space as you possibly can, with a specially crafted piece of plywood. Well... this idea may work well for ships with rather straight hull sides. But not for a curved hull, like the one of HMS Speedy. This ended up with a masters degree in cutting and grinding diamonds, but no speedup at all. Much to complicated and took forever. So I went back to my former way of filling the gaps. Now, that I had filled up almost every corner, I decided to strengthen the bow, too. Next picture: To the left: Original solution, to the right: filled up with plywood. And now we are approaching the current state: Of course, all those tiny blocks had to be sanded down, to make a proper hull. Here are some pictures of the current state (well maybe I'm currently a little further, but not too much). I hope you enjoy my little progress. - I need to fill up the rest. The I have to (re-) attach the stern parts (they broke away during all that, but not in a bad way, this should be easy to fix). And then, I will continue with attaching the first plank. This will be the one, directly below where the kit had the thin plywood bulwark. - I'll raise a new bulwark, completely on my own. I'm still not 100% sure, what and how I will do it. I can only tell that I want to use thin strips, the width of the original planks, maybe. But I also want to create the insides of the gunports, like they have been on the original ship. So, I guess, I'll have to create some nice thin strips for that, on my own. - And then, I want to plank this bulwark over, with the thin strips of the kit, for that occasion. When the hull is completely planked from the outside, then and only then, I'll remove the stuff from the inside of the bulwark and then plank it from the inside, too. That way, I think, the bulwark will consist of some kind of three-layered selfmade plywood, which should be tough enough for anything that comes. Wish you all the best! Burt


-
HMS Speedy by hwe - Vanguard Models - 1:64
hwe replied to hwe's topic in - Kit build logs for subjects built from 1751 - 1800
In the past days, I decided, that I'll go my own, very special way here. I'm going to build some kind of 'block' above the deck in the bow, which I can bring into the form I want. And then, I'm going to 'plank' this block. - I'm currently not sure, if I'll got and plank the whole bulwark (without glueing the planks to the bulkhead top ends) or only the bow area. But doing it with smaller planks, will make it easier to have a proper curve there. I'm not sure, if anyone will ever possibly notice the difference at all. It's only for my own soul's sake. Currently I'm working on this 'block'. - I'll attach pics later. All the best! Burt -
hwe reacted to a post in a topic:
Amati 1:64 HMS Victory - LATEST NEWS
-
hwe reacted to a post in a topic:
Amati 1:64 HMS Victory - LATEST NEWS
-
hwe reacted to a post in a topic:
Amati 1:64 HMS Victory - LATEST NEWS
-
 hwe reacted to a post in a topic:
Planking Model Ships
hwe reacted to a post in a topic:
Planking Model Ships
-
hwe reacted to a post in a topic:
La Belle 1684 by Oliver1973 - 1/36
-
hwe reacted to a post in a topic:
Chris Watton and Vanguard Models news and updates
-
hwe reacted to a post in a topic:
Chris Watton and Vanguard Models news and updates
-
hwe reacted to a post in a topic:
Chris Watton and Vanguard Models news and updates
-
hwe reacted to a post in a topic:
Chris Watton and Vanguard Models news and updates
-
HMS Speedy by hwe - Vanguard Models - 1:64
hwe replied to hwe's topic in - Kit build logs for subjects built from 1751 - 1800
I took a look into the building instructions and decided for myself, that those first planks will not disturb, because it is one of the next steps, to attach the first planking, anyway. I think, I'm going to do it this way. Best regards, Burt -
HMS Speedy by hwe - Vanguard Models - 1:64
hwe replied to hwe's topic in - Kit build logs for subjects built from 1751 - 1800
While I was thinking about how to soak and bend and fix the bulwarks, I didn't fail to notice, that it is extremely important to have them on the same height on both sides of the ship. (I once spoiled a very small model doing this wrong... - long ago). So, what I did right now, was: - hold / clamp the bulwark on one side of the ship - press down to the bulkheads the lower side of the bulwark and mark this place with a thin pencil - then I picked a tool (which I already bought previously, long ago) to measure the exact height at each bulkhead and take it over to the other side and make a mark at the matching bulkhead The next thing, I'm thinking about, is: shall I use one (or two) of the planks of the kit for the first planking and fix this (those) plank(s) permanently, where the bulwarks lower side will be later. Or shall I use only some kind of garbage/wood rests for the same idea and remove it later? I'm only unsure, because I'm not sure, if the planks will be in the way later. I would prefer to attach those two first planks and would not have to remove them. What do you guys think? Have you made some experiences with that? Best regards, Burt -
Mr Whippy reacted to a post in a topic:
HMS Speedy by hwe - Vanguard Models - 1:64
-
Mr Whippy reacted to a post in a topic:
HMS Speedy by hwe - Vanguard Models - 1:64
-
Mr Whippy reacted to a post in a topic:
HMS Speedy by hwe - Vanguard Models - 1:64
-
HMS Speedy by hwe - Vanguard Models - 1:64
hwe replied to hwe's topic in - Kit build logs for subjects built from 1751 - 1800
Anyway, meanwhile I already soaked this 'plank' again, and when the wood relaxed, I could cut a (more or less) random web into the outer sides of the wood, with a surgical blade. I'm sure, it will help my next approach. I'm keeping your idea in mind and I'm also quite sure, that I'll borrow that idea from you... Thanks a lot, again! Best regards, Burt -
HMS Speedy by hwe - Vanguard Models - 1:64
hwe replied to hwe's topic in - Kit build logs for subjects built from 1751 - 1800
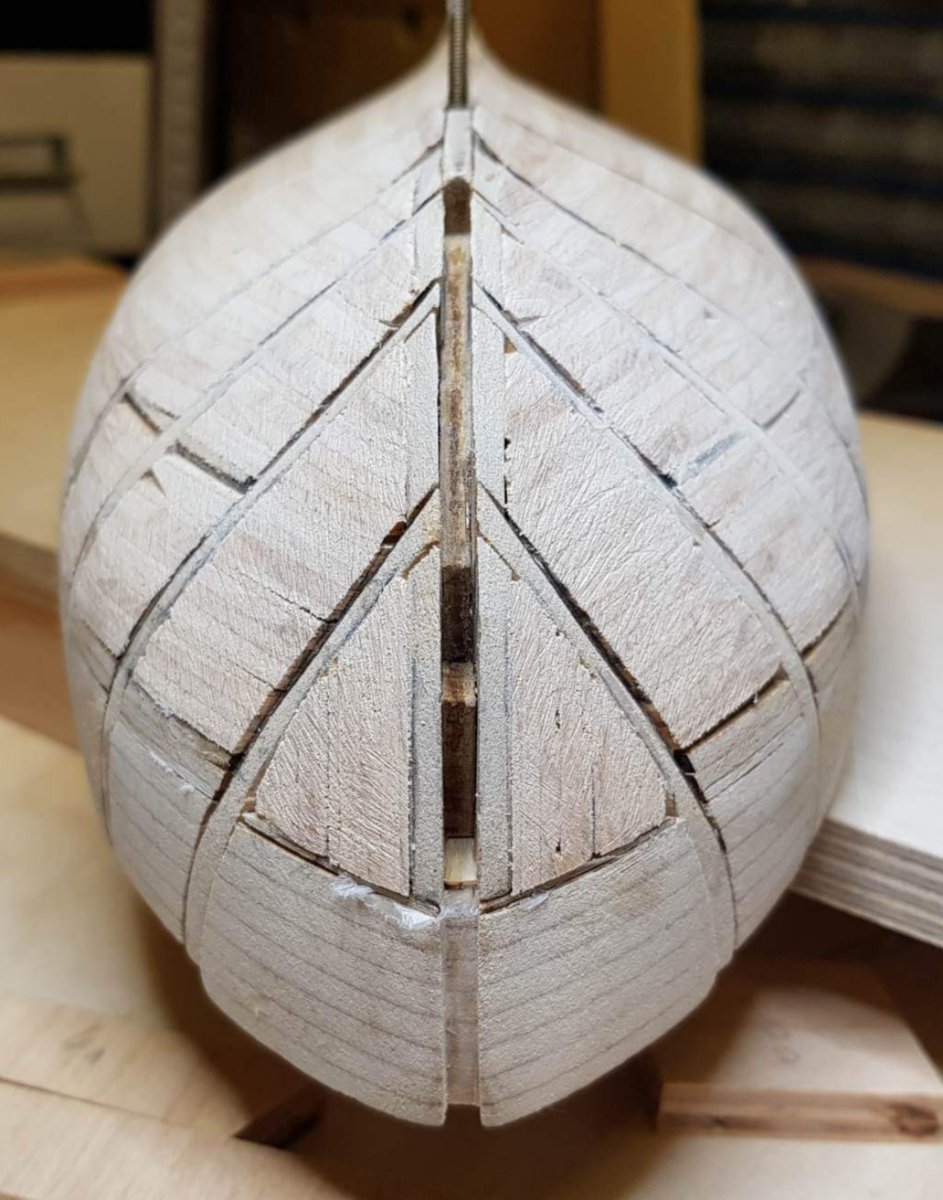
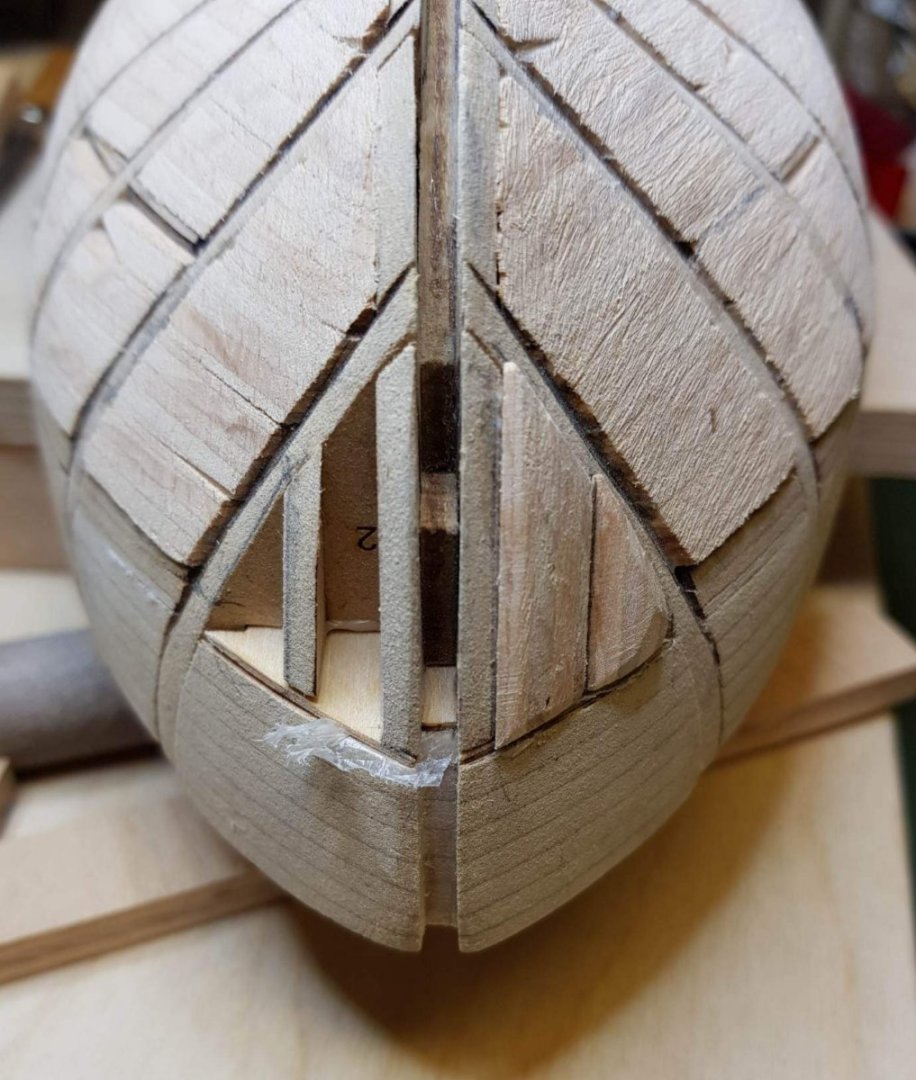
Your wishes are my command! 🙂 But I'll upload only one picture. I think this is already enough to notice the issue. The picture is taken from the top. - The bulwarks are not fastened to the hull (which is what I intended to do so, because I already expected to fail here) and are just laying in a plastic box. The bows end is on top of the picture. If you follow the outlines of the woods, you'll notice that there is no smooth flow, but some corners, between the bow and the first gunport. If you want to know, what I did: I soaked the plywood for about 20-30 Minutes in lukewarm water. Then I tucked the front ends well into the keel, and bent the wood very slowly (not to break it) and placed several clamps at each bulkhead. - One from below and one from above. - Clamping from below was only possible due to my individual try to create the model with some interior. Because I did some quite nice and well fairing to the bulwarks, I can rule out, that this is reason for the corners. If you take a close look at the curvature of the bulwarks, you'll notice, that the bend into two directions at the same time, which is simply impossible with a broad, hard plank. As long, as you don't change the nature of your plank, you are bound to fail. In real life ship building, this is omitted, by using comparatively small (less wide) and thin planks and fair the surface of them. The later second planking of the model shows that way. So, what can I do now? - I still have a rather wide 'plank'. I currently believe, that the best option is, to make the material weaker. If I can make the wood more flexible in some way(s), it should be easier to follow my wishes about bending. The next question is: How can I achieve this? - one would be: make some kind of pulp out of the wood. Beat it up, Maybe hammer on it, while it is wet, like preparing a Wiener Schnitzel. - another possibility is: cut the surface in certain places. In this case the question is: on the inside or on the outside of the bend? - other possibilities are: repeat what you did before. Make the wood wet (soak it) and then let it dry again. Repeat that several times. After some repetitions, the wood will give in. - 'pre-bending' is something, which may help, too. - also another possibility seems to be: Use 'fire'. - Wood also bends, when heated. And it stays that way, afterwards. - So, don't really use fire, but there are small 'hot air guns', with which you can point very exactly to where you need the heat. - But this may as well collide with the glue you use. If you use fish glue (which is often used for restoring wooden things), this may melt your glue. Which is very unwanted. Since I 'm currently trying fish glue at this model, the last idea may not be the best for me. So, my decision for now is, that I'll try to do a mix of : - prebending - mashing it up in certain places - make some clever cuts - repeat that, until it fits nicely. The question about, where to make cuts, is easy to answer: - make the cuts on the outside of the bend! Just imagine you would try 'bending' a thick wood over some corners. If you wouldn't do anything, where would you notice the splintering the most? On the outside. - On the inside, there is no way, where any material will be able to go. It will mostly stay the same. On the outside, there you try to two things at once: bending and 'pulling'. If you do that, it is clear, that it will break. You are 'pulling', because the 'line' on the outside of the plank has a longer way to stretch, than on the inside. Thus the wood need to become longer, which is almost impossible, which is, which is, why it breaks an splinters. It also has room to do that. I don't really want to have the wood splintering. And if I step in here, in advance, it 'breaks', where I want it. By doing some cuts wit a really sharp knife, I tell the wood, where it shall 'break'. And, just like in computer aided design (CAD, at early times), a 'curve' can be made of lots of small straight parts, instead of breaking (heavily) on some select places. - In former times, you could tell a computer, how many corners it should use to simulate, for example a wheel. Calculating a true curve did cost a long computing time (at that times), and using a simulation, with some corners, was sufficient, to make visible, where the wheel was, but the graphics could be made visible much quicker (especially, if you had many wheels in your construction). It made a huge difference on old computers, if you selected, 6, 8 10, 12 24, corners for a wheel, or calculate the proper circle. - Of course, the more corners you choose, the closer it looked to a real wheel. So, cutting the surface with an extremely sharp knife (I'll use a surgical blade) on the surface of the bends, is what I'll try next. Since the bendings are 'delicate', I think, I should use quite a lot. - Maybe even more than the planks of the original planking would be. By the way, 'pulping the wood' is just another face for the same idea. - I opens the structure of the wood and easily allows it to take any form you want. But I dislike that, because the result may be a little more unpredictable. - You'll never know if you have pulped too much or to little or just right. The cuts can be made precisely where needed, as deep as needed and as may as needed. And the gaps that will open up, are so small... they will for sure fill up with some glue and wood dust from sanding the result. Stay tuned for my next posting! Best regards, Burt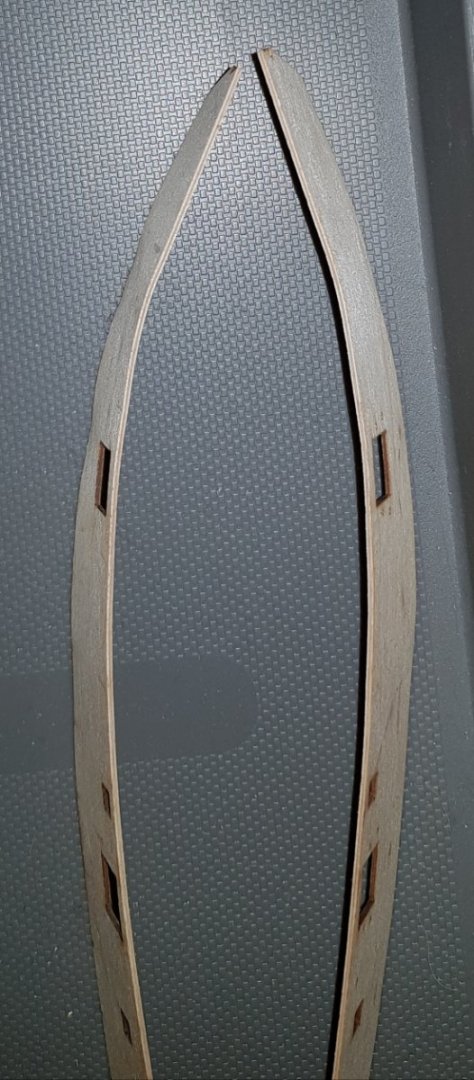
-
hwe reacted to a post in a topic:
HMS Speedy by hwe - Vanguard Models - 1:64
-
EricWilliamMarshall reacted to a post in a topic:
HMS Speedy by hwe - Vanguard Models - 1:64
-
EricWilliamMarshall reacted to a post in a topic:
HMS Speedy by hwe - Vanguard Models - 1:64
-
Theodosius reacted to a post in a topic:
HMS Speedy 1782 by RMC - Vanguard Models - 1:64 Scale
-
Vane reacted to a post in a topic:
HMS Speedy by hwe - Vanguard Models - 1:64
-
HMS Speedy by hwe - Vanguard Models - 1:64
hwe replied to hwe's topic in - Kit build logs for subjects built from 1751 - 1800
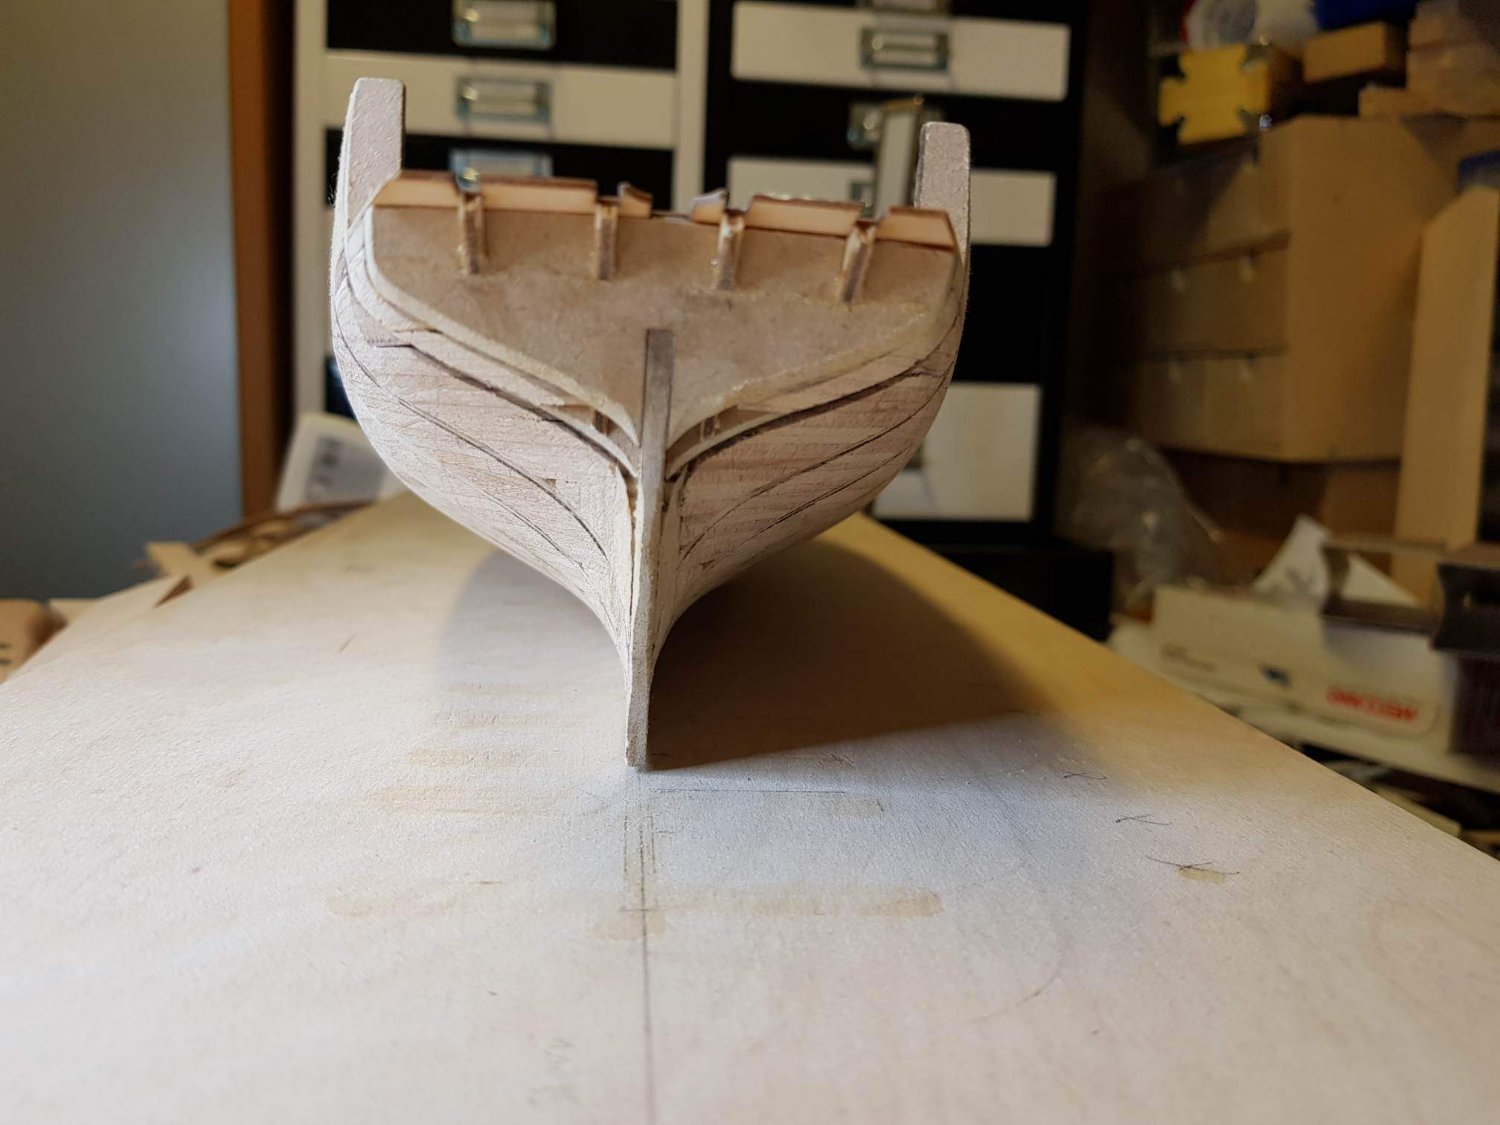
Believe it or not, I'm still alive and the kit is (unfortunately) not come much forward. - Life came in the way, but I think we all have our own stories to tell, so I won't bother you with mine. The current status is, that in the last step I tried to attach the gunport pattern plywoods, which I thought, would be 'a walk in the park' for me, because I prepared the hull quite well (I already have some experience here, so you can believe me, it is well prepared). But I had a lesson to learn. - I'll have to redo it. - Maybe some more times. I just now read the other build logs from my Speedy 'colleague' (Special thanks go to @Theodosius), who showed in painful detail how tricky these parts can be. In my case, I called it (for myself) the 'rubberband effect'. Because I had faired every bulkhead quite well, I expected those pieces to 'just fit in'. - They were much more difficult to keep in place, than I expected and after everything dried out, I had no nice curves, but it almost looked like I had made several corners in the hull. - After thinking about this, I understood, that the wood not only is almost impossible to bend into two directions at the same time, it will, if you try too hard, will just go from bulkhead to bulkhead in the shortest possible way, exactly, like a rubberband would do. - So I had more or less, a multi-cornered gunport pattern. This saddend me quite much. I had to put the kit aside. - And then,as mentioned before, life came in the way. Now, after reading the other logs, I understand that I'm not the only one with issues here and I'm absolutely glad to see, how you managed it. I think, this will help me a lot. I hope, I can continue soon... - If so, you will read more from me here soon (but there still are some obstacles in the next weeks, but they will become fewer...). Read you soon, here! Best regards, Burt -
You did a great job here! - I fully agree with you and I want also plank my Speedy's deck on my own, because the Laser deck is way too 'clean' in my opinion. But that is something everybody can do as he (or she) pleases. Nice for me, to see, that you did it already! - Congrats! Best regards, Burt
-
HMS Speedy by hwe - Vanguard Models - 1:64
hwe replied to hwe's topic in - Kit build logs for subjects built from 1751 - 1800
Hi there! This is currently just a 'sign of life' from me. - In between, I tried to live my dream with the interior of the Speedy. But in the end I realised that I would take too much of my lifetime, to build the interior, the way I originally planned to do. I wanted to come sooner to an end with this kit, because there are mor projects already lurking in the background and my job didn't leave me much room to live (and build). So after changing the job, I know hope I can bring the model better forward now. I can tell you what I tried to make for the interior. - I have created a lot of single frames (only parts of the original frames) from pear wood. - I also created about 20 small 'pillars' to support the deck beams. I turned them on my clockmakers lathe. But all this consumed so much time and I realised, how much more time it would take, just to make the next steps in the building manual (adding the Deck, before adding the bulwarks and the first planking), that I decided to stop this. Current status is, that I did an "undo" of all previous changes of the interior and then glued the first upper deck onto the frames and added the stern parts. Now, while thinking about how to attach the thin planking for the bulwarks, I came to the conclusion, that it would be good if there would be some more wood to glue the bulwarks to, than only the thin (1.5 mm) deck. - So I created some filling strips from the garbage of the kit and glued them underneath the deck, between the bulkheads. Currently, I'm fairing those, to make the hull as smooth as possible. And when I have finished that, I'll try to bend the bulwarks first (before glueing them) onto the hull, by wetting them thoroughly and clamping them to the hull. - Only clamping. - This way, I hope, i can see, where I do have to be more intense with bending. Maybe I'll add some more pictures later to the threads. I hope you all had a great Xmas-time and came well and sound into the new year! All the best! Burt -
AWESOME! How large will she be, when finished? - The one from Caldercraft (in 1/72) is already quite huge for a living room... Best regards, Herbert
-
HMS Speedy by hwe - Vanguard Models - 1:64
hwe replied to hwe's topic in - Kit build logs for subjects built from 1751 - 1800
Derek and Vane have already put the bar quite high. I hope I can come close to their models... I'm also happy to hear that there are some more fans of "Lucky Jack" around. This makes me feel quite comfortable here. And the more I'm thinking about what I could perhaps do with my lower deck, the more I get excited to make it happen! Of course, the downside will be, that it will take virtually 'forever' to finish the lower deck, before putting the lid on it. But for me, it is true: ' The way is the goal.' - I also told my wife that, what she paid for, when making me this present, was not a 'finished model' (she expected me to have it done until December...), but hours of building fun for me! For a long, long time... -
Please tell me, if you find Brown stuff... - I only got Black and White. But I got even 20 DEN(ier). --- 20 DEN means '20 Gramms for 9 Kilometers', if I understand this correct. It is produced by UNI Productions Inc. and is called UNI-Caenis. It is made in Italy and I have it in Black and White. Have you tried Ebay? Best regards, Herbert
- 725 replies
-
- 1
-
-
- vanguard models
- speedy
- (and 1 more)
-
HMS Speedy by hwe - Vanguard Models - 1:64
hwe replied to hwe's topic in - Kit build logs for subjects built from 1751 - 1800
Hi Derek, thank you for your warm welcome to the Speedy club! I'm proud to be a member! And I can only recommend this kit! - It really *is* great! I really have quite some modifications on my mind. Some of them are not for those who have cardiac issues... But one step after the other. Also a big "Thank you!" to you Oliver. I'm pretty sure that there is much to enjoy in it for me. But not as much as in a true POF build, like yours! Best regards, Herbert -
Dear modeller colleages, first of all, I'd like to say a HUUUUUGE T H A N K Y O U ! to Chris Watton, for creating this wonderful kit! I've seen quite a lot other kits over the years and most of them are quite bad. Chris' kit is of exceptionally good quality! I have seldom seen such a complete kit, together with such high quality materials. - Even though the ship itself is only small in size (and so will the finished model be), the kit consists of many, many parts and thus is quite worth the money! Also the building manual is very nice and complete. Many coloured pictures make life easier, as well as the many printed plan pages. They have a reasonable size and are printed only on one side, which is very good, because you don't have to turn them over and over again - which is expected to happen quite often during building phase and surely stresses the plans. Many very nicely details are included, like the etched copper plates or the lasered parts. So, from my point of view, if I would build a model straight OOB, then this should be almost a 'walk in the park', thanks to Chris' good work! But, those few, who know me well enough, know that I'm unable to build something OOB. I always find details, which I want to have a bit different. Mostly I want to show even more detail. So I already have a list of things, that I hope, I can improve for my kit. I'm already convinced, that in the end, it will look quite different from an OOB version. I don't want to spoil the fun and tell you all that I plan to do different. If you are going to accompany me on my trip with this kit, you are welcome and will get to know, soon enough. One example I'll give: I'm planning to replace the plastic gun barrels with brass ones, which I plan to turn on my lathe. Some other things I would like to tell you, are: First of all another huuuuuge THANK YOU!!! goes to my wife! - She just ordered the kit for me, after I told her, I would like to have it. OK, that is as a birthday and Xmas present in one go, but since my birthday is in December, it is very generous of her, to allow me, to start with it already now! Another thing is: Why do I wanted this kit? First of all, I'm a big fan of "Lucky Jack Aubrey" from Patrick O'Brians books. After I got to know, that Sir Thomas Cochrane was the blueprint for this character and what he achieved in real life, I started to admire him. And since the day I understood, that in this case fact and fiction is very close and that the facts came first, I wanted to build HMS Speedy. At that time, there was no kit available. - So I ordered myself a copy of the original plans from the NMM. For a long, long time I thought about building it POF in 1/48. - Which is nice in size, but not really fully compatible with the space I can afford in my living room. Or building it POF, without rigging and spars in the scale of the NMM plans. In the end I understood, it would be better to build it POB in 1/64, for now. - And then there was Chris with this great kit, so I couldn't stand it. Most of my modifications will be based on the plans from the NMM. There is even some more information behind all this, but I think I'll tell everything, once I'm at that point in the building log. Otherwise this intro would become even more lengthy. My first steps will be: - Clean up the workshop and make room for the new project - (still) have to check if all parts of the kit are complete and arrived in good condition (I'm sure they are, but I only want to be sure not to miss a part at a Saturday Afternoon, when I want to start to build the next step of the kit) - Remove all required parts for the first step from the wood and then my first modification will start to happen! My idea is, to highly detail the lower deck of Speedy. I know, it's almost nonsensical, because nobody will be able to have a look at those details later, but ... we will see that later. In order to show more detail in the lower deck, I have to replace the bulkheads partially with some other wood. Deck spars also have to be replaced. And even more. Fortunately, I'm in the position to throw in some (I can choose, which...) Pear, Boxwood or Service Tree and I can "deliver" my own stuff to me. No need to buy something, somewhere. I already own the required machinery and bought the wood years ago. So, my first steps will be, to mark and cut off the parts of the bulkheads, which I will modify. Pictures will follow, as soon as I have started. Hope you all will enjoy this building log! Best regards, Herbert
-
hwe changed their profile photo
-
ancre La Belle 1684 by Oliver1973 - 1/36
hwe replied to Oliver1973's topic in - Build logs for subjects built 1501 - 1750
Hi Oliver, no updates here? Best regards, H.