mikiek
-
Posts
2,229 -
Joined
-
Last visited
Content Type
Profiles
Forums
Gallery
Events
Everything posted by mikiek
-
 Steve - it seems like you are taking this kit to a whole new level. I'd have to say this is the best Pinnace build I can remember. Your care for the details is really obvious.
- 190 replies
-
- 1
-

-
- pinnace
- model shipways
- (and 1 more)
-
Hi Brian - I'm about at a point where I am going to have to make a move on displays. I'm thinking at a minimum some shelves on an office wall but some built-ins would be preferred. I've got so many kits on the shelf (ordered more today) and I think it's about to be a problem. At the moment this one is on loan to my Dad at his apartment - uncased. I had given him Niagara with the case I had made, but he thought it was all too big so I took it back. He wants a square rigged build so my next may be to fulfill that wish. Once again thanks for coming along for the ride.
-
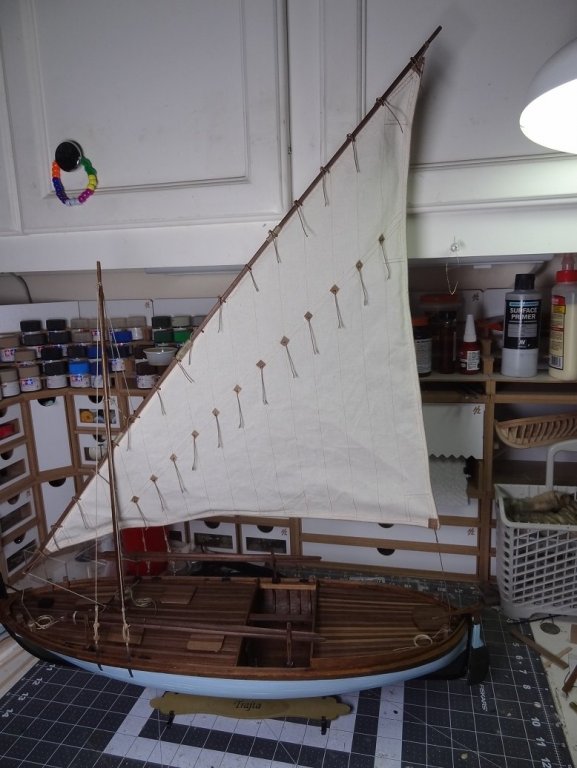
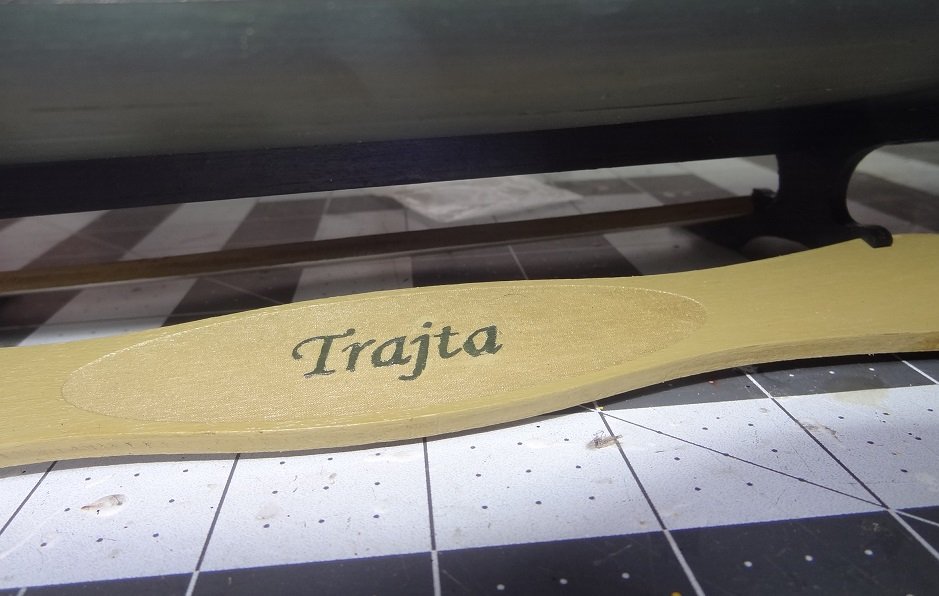
Zoran - I believe YOU should be proud of the product(s) you are turning out. I find it very refreshing to have a choice of kits like yours. Something quite out of the ordinary and different than another Victory or Constitution. The simplicity of certain parts of Trajta allowed me to step into some new areas like the sail. This was my first try at that. Techniques learned from that will be applicable for future builds. And of course your guidance adds a lot of value to the overall experience. Thank you sir! I do have Cog on the shelf. I think I will tackle a square rigger next but Cog will be coming up soon.
- 204 replies
-
- 1
-
-
- trajta
- marisstella
- (and 1 more)
-
Steve - we'll never know the answer for sure. My thoughts on a wheel - a lot more work to put together. I guess it depends on if you buy into the "no extra time" argument and how far you take it. A tiller on a rudder is undoubtedly easier and probably quicker to implement. Less hardware required. Chappelle did admit he took some liberties drawing up those plans, although what & where we may never know. Although I added one, some might even argue about a binnacle. Since these boats were intended to stay on the lake would they need one? We do know that most of the boat traffic would sail the shorelines, the draught dictating how close. So navigation was town to town in most cases. Just another line of thought. BTW - your Lawrence looks great. Very unique (and cool) color scheme. At the risk of sidetracking Darrell's thread can I ask what you came up with as far as differences between Lawrence & Niagara?
- 647 replies
-
- 2
-
-
- niagara
- model shipways
- (and 1 more)
-
Hello Russ - yes they are definitely different than your square rigger. Standing rigging took about 2 hours tops.
-
Hey Brian - Thank you for following along on this one. It's always a little strange when there's nothing left to do. Definitely some pride in the work you've done, but some emptiness too as you realize the boat doesn't need you anymore. Time to move on. Get after Bluenose.
-
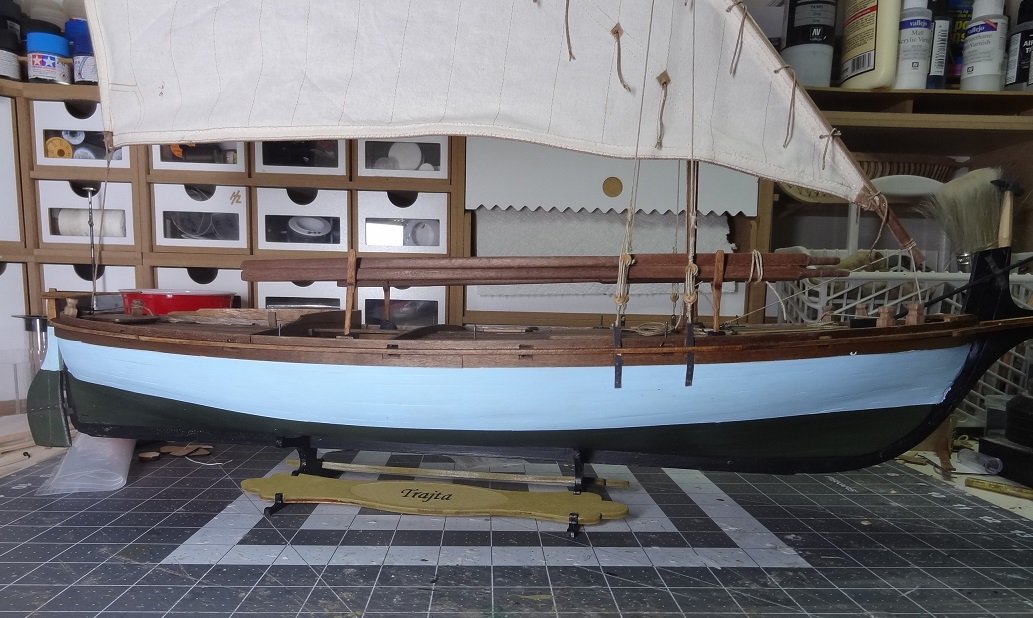
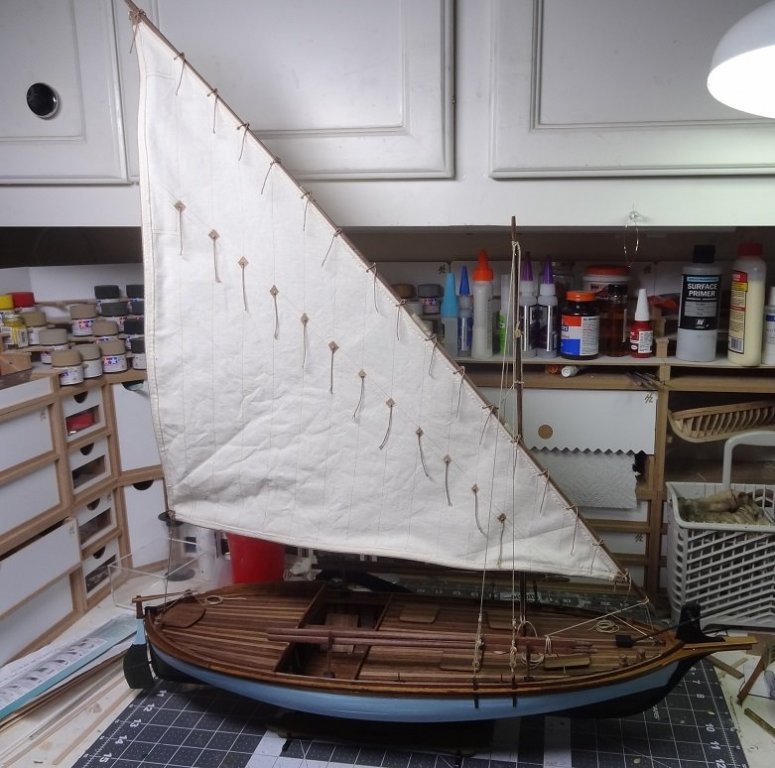
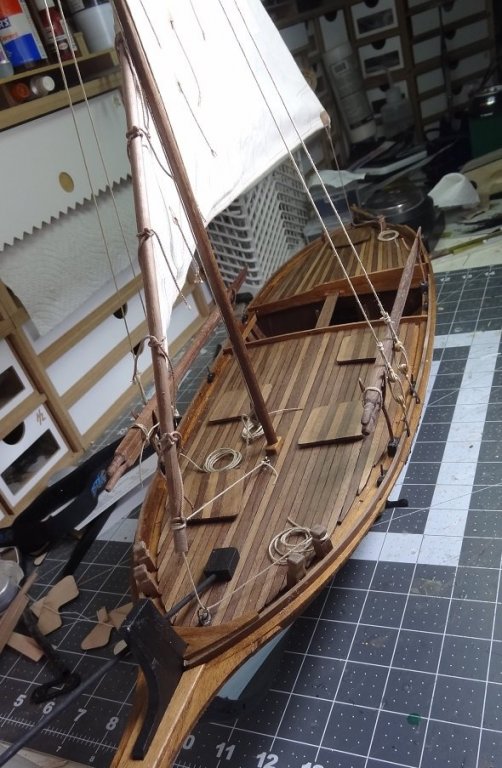
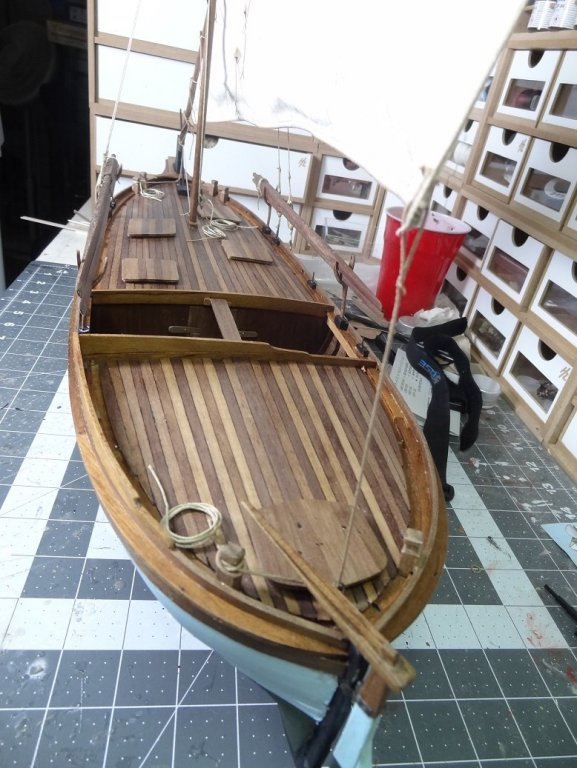
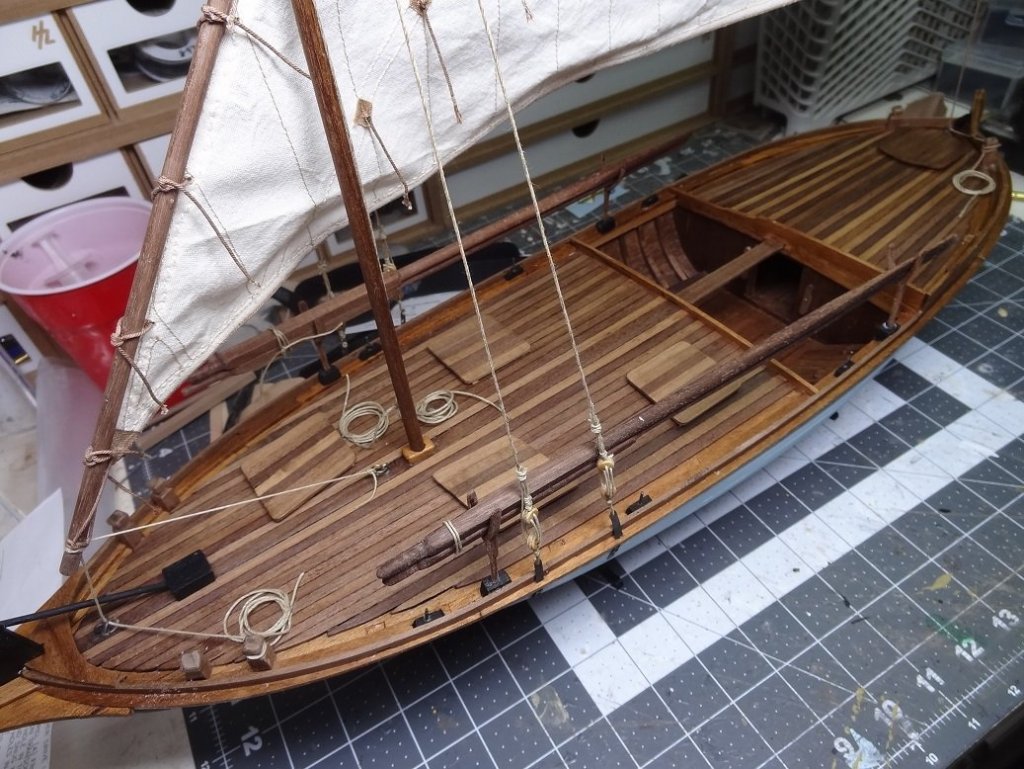
I guess it's goodnight on this one. There may still be a few tweaks but I'm calling it done. Trajta was a good build. It started out a little rocky, but that was mostly just where my head was at the time. With some renewed focus and help from Zoran and Don I was able to pick up and complete the build. It's interesting how the various kit designers put together the documentation for a project. Manual and plans - sounds easy enough. Everyone has their way of trying to get the idea across. I'm sure we each have a few favorite kit makers and maybe one or two never agains. I think Marisstella is working hard on improving the weak points in their product. I know Don has had a hand in revising some of the documentation. For the most part Trajta was well thought out and well executed. And it's not too often you can get feedback from the designer. I have no problem recommending the product to others. So what's next? In addition to the RC boats in progress I am leaning towards a square rigger again. Got a number of them on the shelf so it won't be an easy decision. Well here she is folks:


- 204 replies
-
- 9
-
-
- trajta
- marisstella
- (and 1 more)
-
That sounds even worse than the other brace work you were doing. About as far in as you can get. Lots of pix please, when the case is ready. I should have asked the even tougher question. Have you decided what you will do next when you are finished? I'm wrapping one up now and will have the same decision to make.
- 647 replies
-
- 2
-
-
- niagara
- model shipways
- (and 1 more)
-
It makes perfect sense. You're right on track. I figured it might have been me that wasn't getting it. Nice drawing too.
-
It is nice. Sometimes though, I feel like I'm preaching to them. Trying to save them from every little headache that we went thru. She's a great build. Have you decided what you will do with her once you are finished?
- 647 replies
-
- 3
-
-
- niagara
- model shipways
- (and 1 more)
-
Planking deficiencies? We're going for ZERO defects right Tom? No stealers?
-
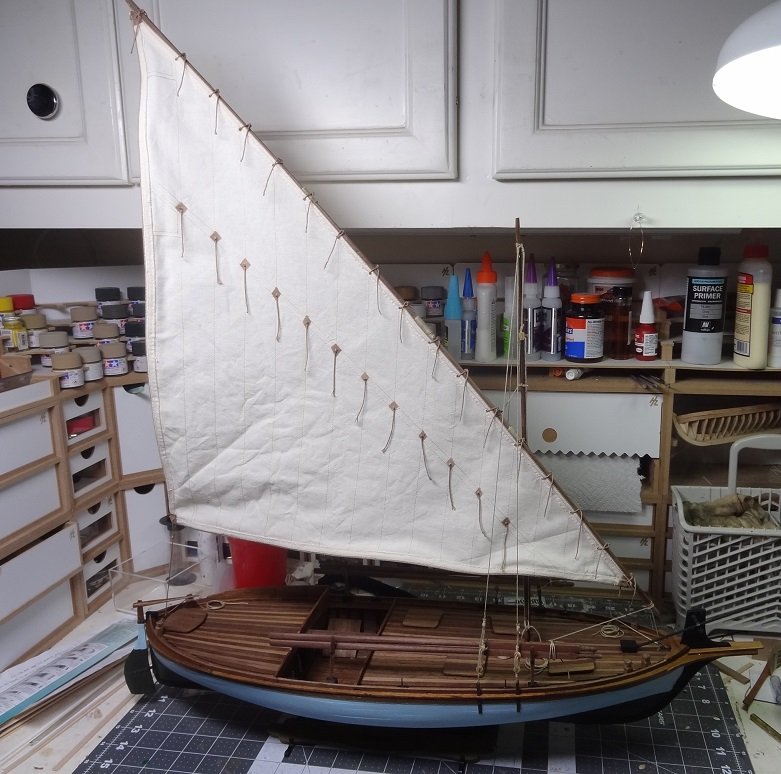
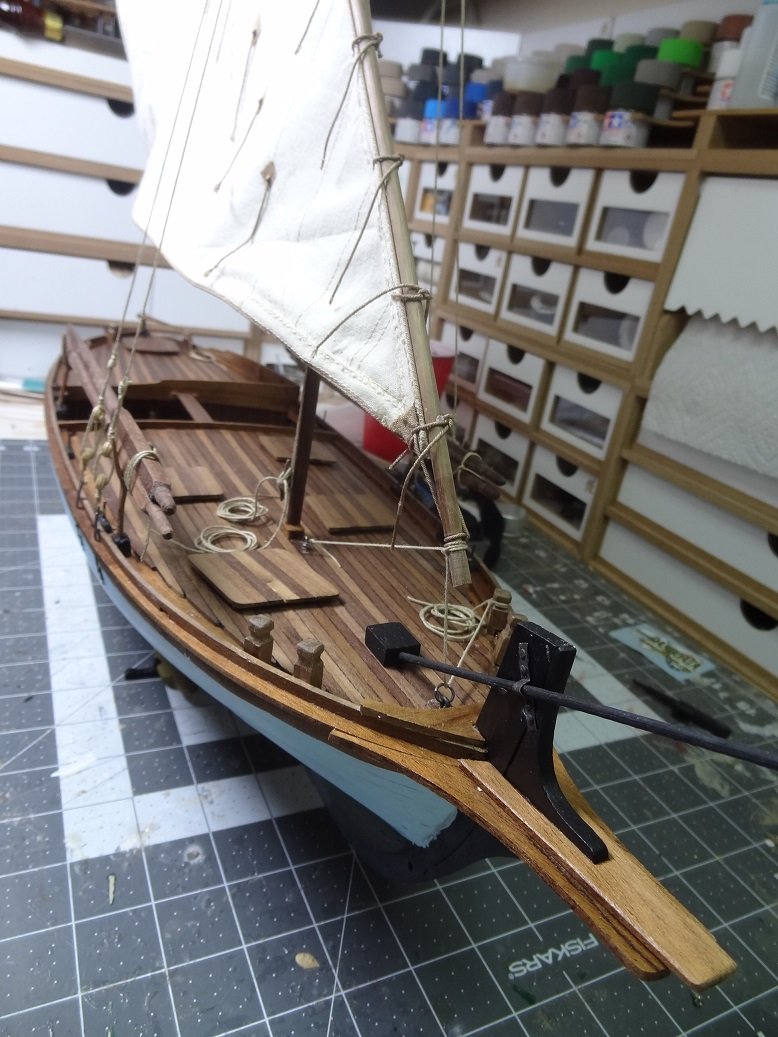
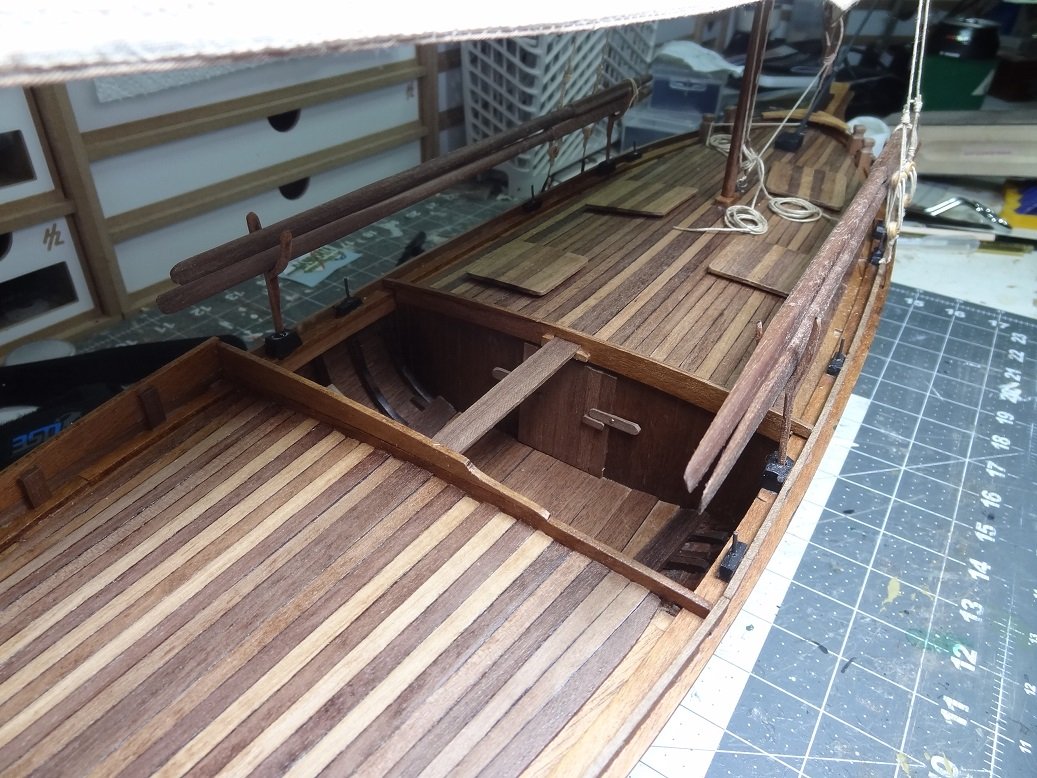
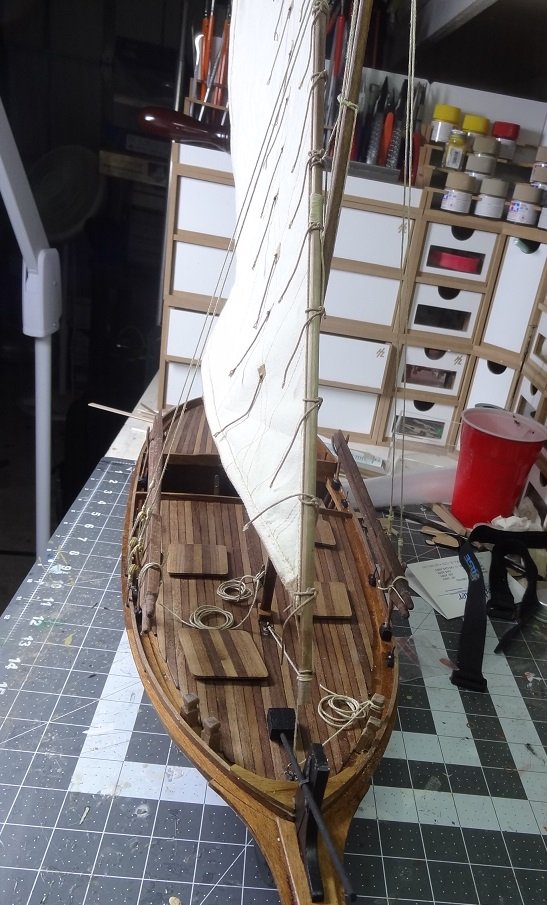
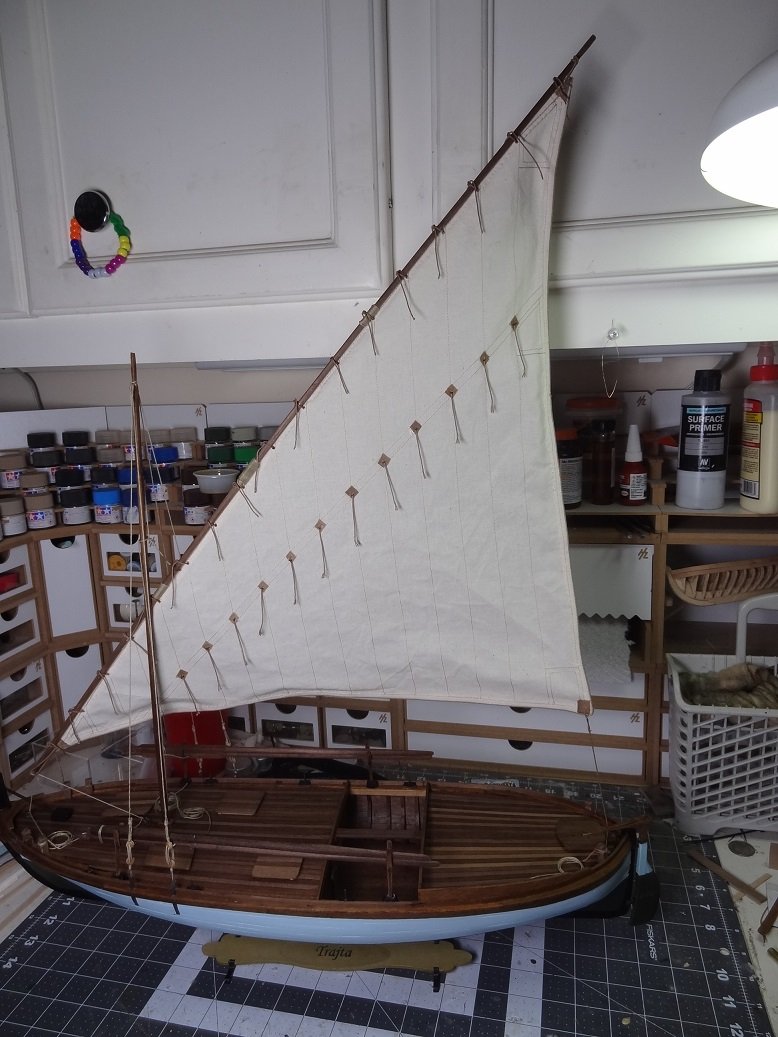
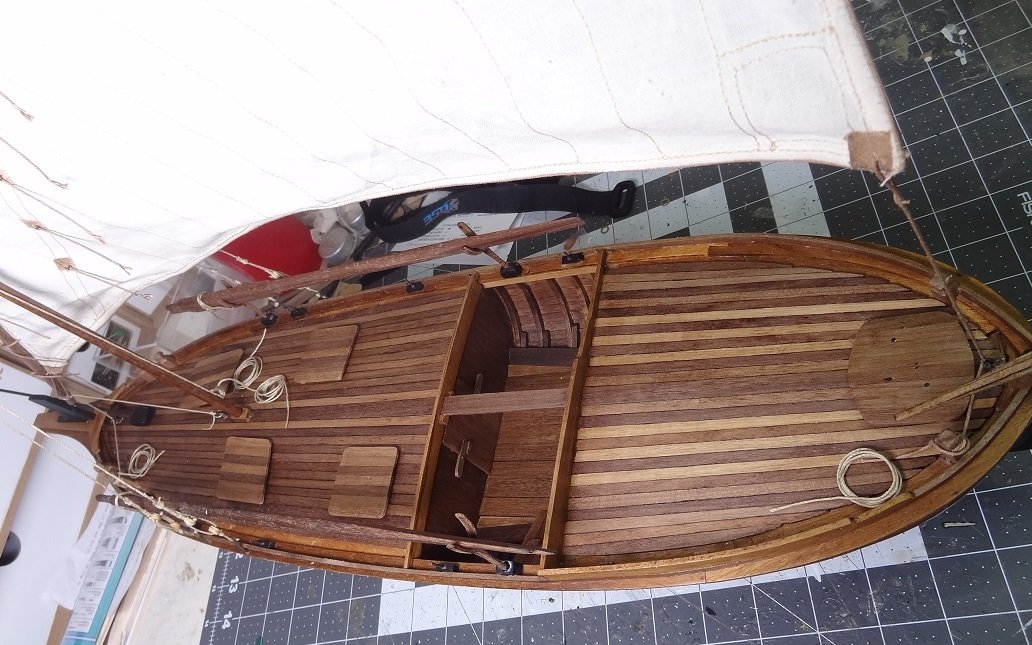
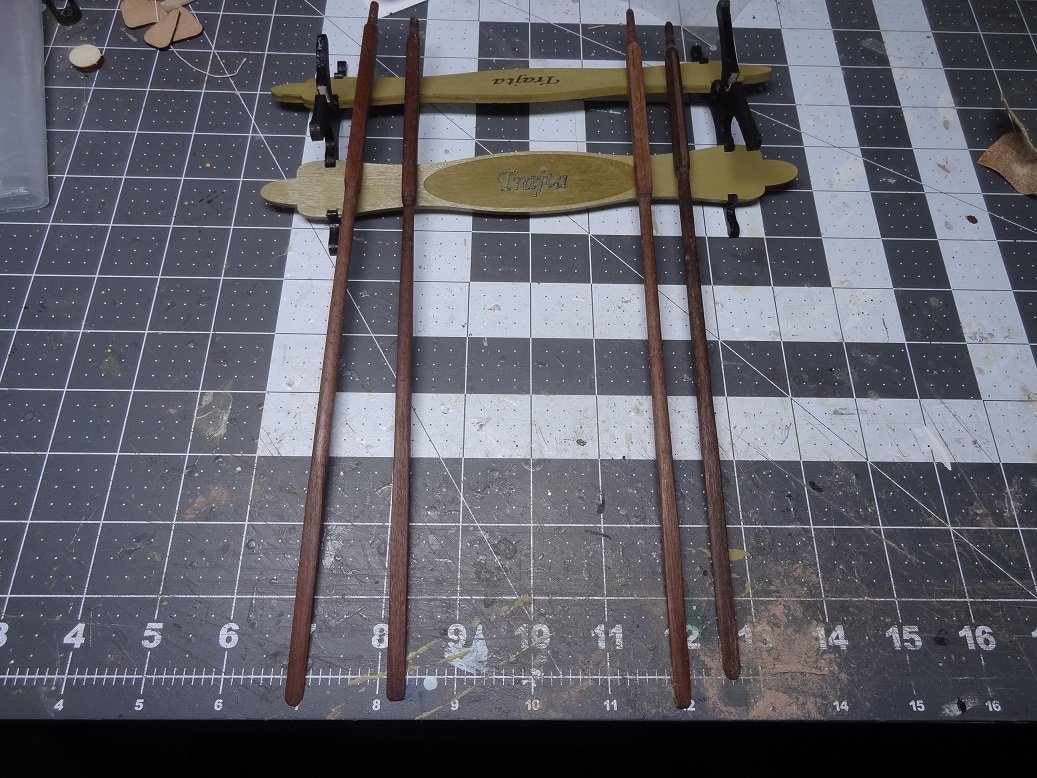
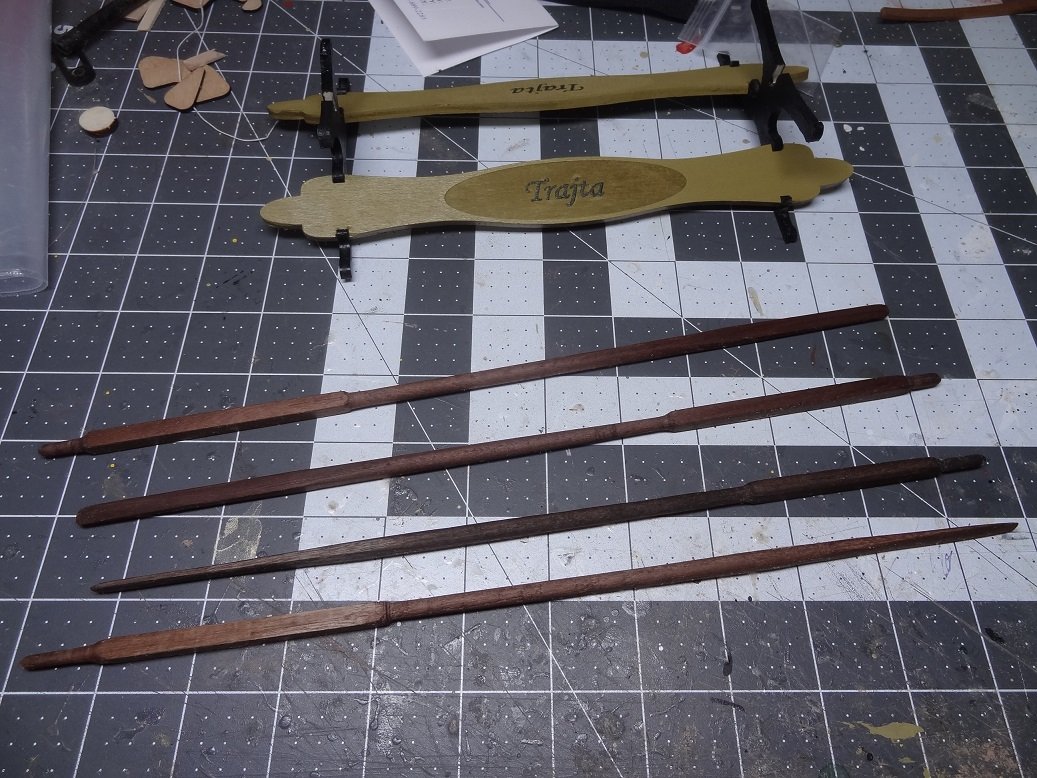
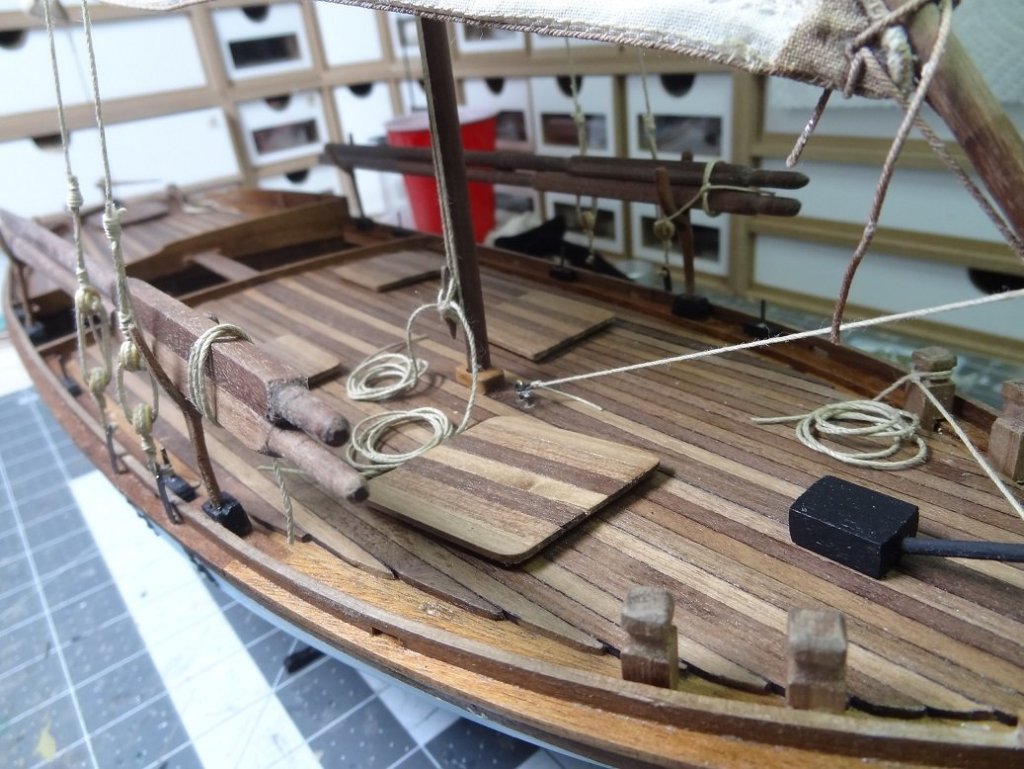
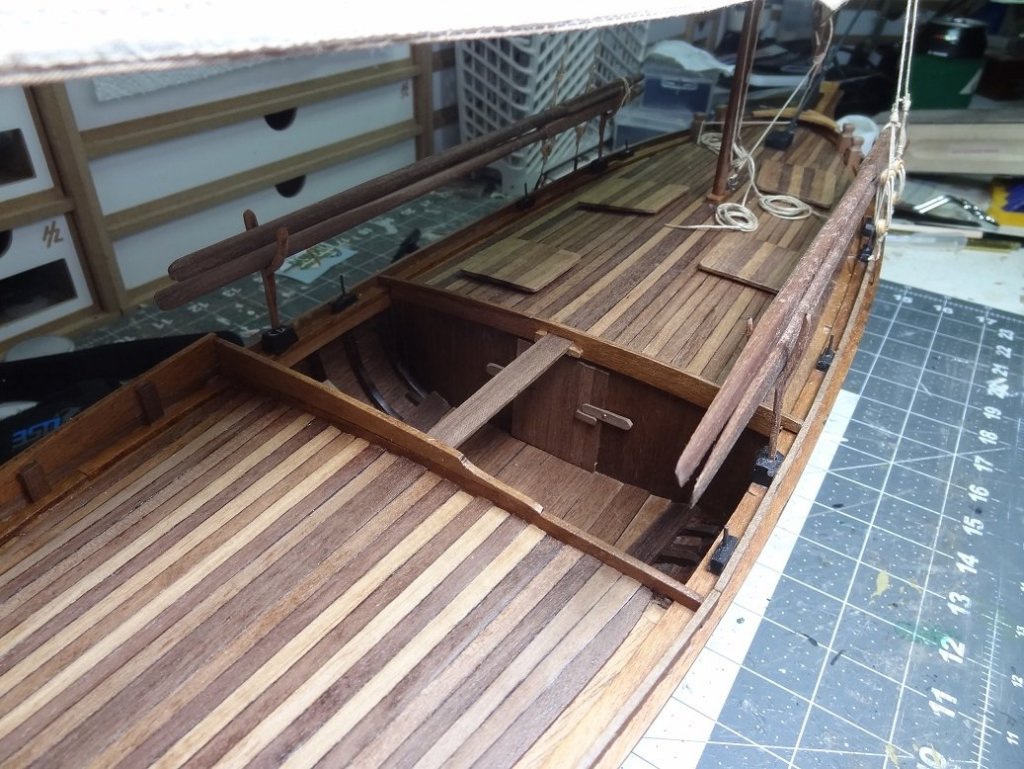
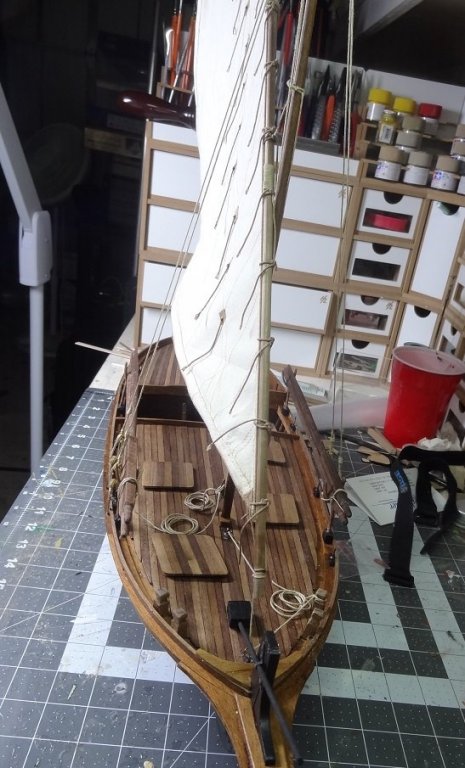
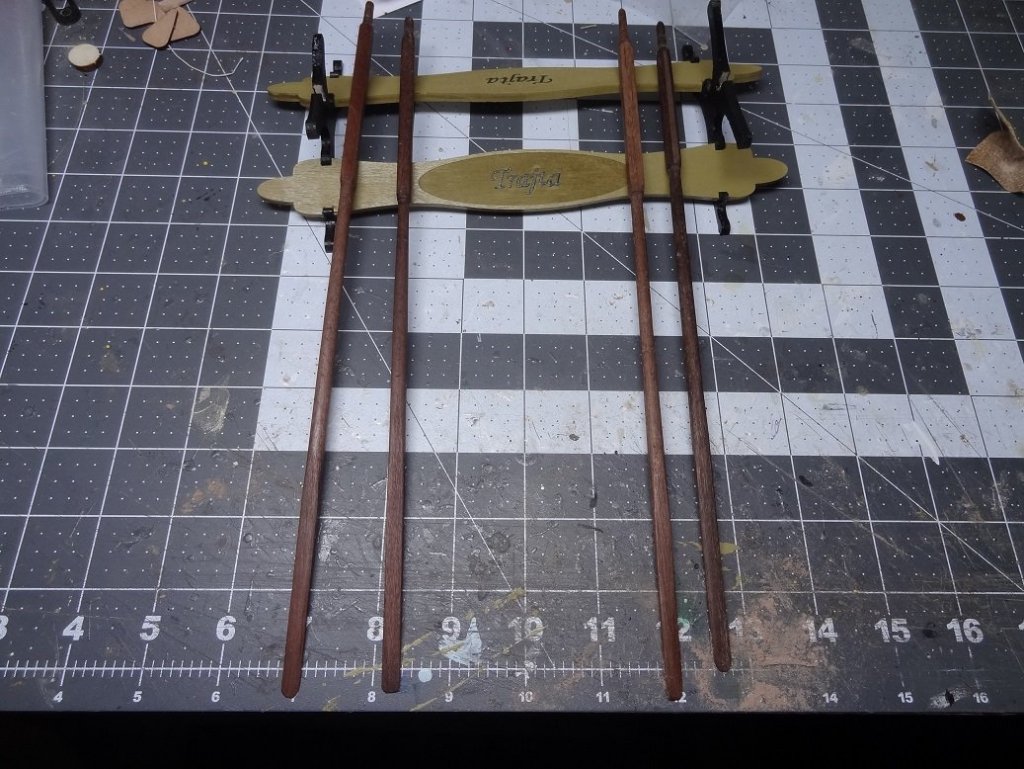
I believe the Trajta Project is winding down. Sail is up and cleated. I have yet to do something with the excess rope like coils or something like that. I'm just waiting to see if I will have to undo the sail for some reason. I was planning on cutting the ropes so the ends just hit the deck, gluing the ends to the deck and then make separate coils and glue them on top. Of course I need to be pretty sure I'm done trimming the sail. The lateen setup was a little strange this build. The sail is pretty big and getting (and keeping) it in the right position took a few tries. I'm not showing photos of that until it's finished. I did finish the last big task - turning some oars. I have this great lathe with all the bells & whistles but don't have a clue how to use it. Sad but true. I did manage to get a few oars made. Pix below. They also show the completed kit supplied stand. Interestingly, I believe it was Zoran's Trajta log that mentions the covers on the foredeck are not openings to the hold below. Instead they're little holes that someone can get into and stand (or sit?) so that their upper body is lower to the deck. This allows for rowing as I guess ones arms & shoulders are just slightly above the rail and the oars can be worked against the tholes. Hope I got that right. So I'm in that mode of going back over plans and thru the manual to make sure I've got everything. I could wrap that up tomorrow.

-
Nice work on the braces. Yeah, that could have been done way back but where's the challenge in that? Don't know if you've laced them up yet but IMO the braces are the finishing touch to the whole rigging job. Those lines zig zagging from yard to yard just make it more ship like. If you can, use the brace lines to do just that. Get them pretty snug. I've found after my build has been sitting on display for a while that a few of the yards have moved a little - up or down, left or right. I wish I had done them a little tighter. I think a little stretching of those ropes might have helped too. You're headed for home dude.
- 647 replies
-
- 2
-
-
- niagara
- model shipways
- (and 1 more)
-
Hey Ron - I was asking about the stringer because something looks off in the pix. It could be the angle, but it looks like you could use another strake in front of the stringer - on top of the strakes already there. The stringer looks like it is recessed behind the face of the planking. Does it need to be covered? Maybe you're on your way to doing that and I'm not following your plan? I see you're about to get to a spot where I got suckered in. I wanted that hand rail on top of the bulwark, and I wanted it NOW. Resist the urge if you can. That poor thing will get the dookie beat out of it with all the work you're going to be doing. That's not an easy piece to replace. With all that said, DO cut out the rail pieces and lay them on top of the bulwark. They will give you a good indication of how your bulwark construction went. If there are any corrections needed, you can get to them now while you have good access.
-
Definitely no deck until your hull is done. Being able to grab the boat by those inside frames to turn it upside down is priceless.
-
I think you know where I stand. Look at it this way all the functions of the capstan (anchor, raising spars, hoisting goods) are now wench driven. I doubt if the capstan is even used except for show. One of the captains of the new ship said a lot of the new design was done because a typical crew is much smaller now. If I recall it was in the neighborhood of 30-40 vs. 140 on the real one. 30-40 men was 1 watch. Things were done to facilitate the small crew. Masts are shorter, current safety requirements, etc. But really now, captains skylight maybe but personally I doubt it. Companionway nope. Problem there is if you remove it what do you put in its stead? They had to get up & down somehow. All that just more sources for splinters. On the flip side, all your work came out really nice. Your woodworking skills shined. Would be a pity to toss them. Didn't help at all did I?
- 647 replies
-
- 4
-
-
- niagara
- model shipways
- (and 1 more)
-
Ron - the second part of that Tamiya recommendation is after the tape is applied and burnished, paint some clear paint over the edge of the tape. Let it work into any slight openings between tape & wood. You're trying to fill minor gaps with the clear rather than having your red work its way in. THIS IS CRITICAL! Isn't it funny how a build takes life when some color is added? What are you going to do with the stringer on top of the bulwark?
-
Enjoy the time away Elijah. Sometimes I wish I could do the same. The ship-o-holic in me keeps cracking the whip and telling me "Back to work you loafer"
- 228 replies
-
- 3
-
-
- gunboat
- model shipways
- (and 1 more)
-
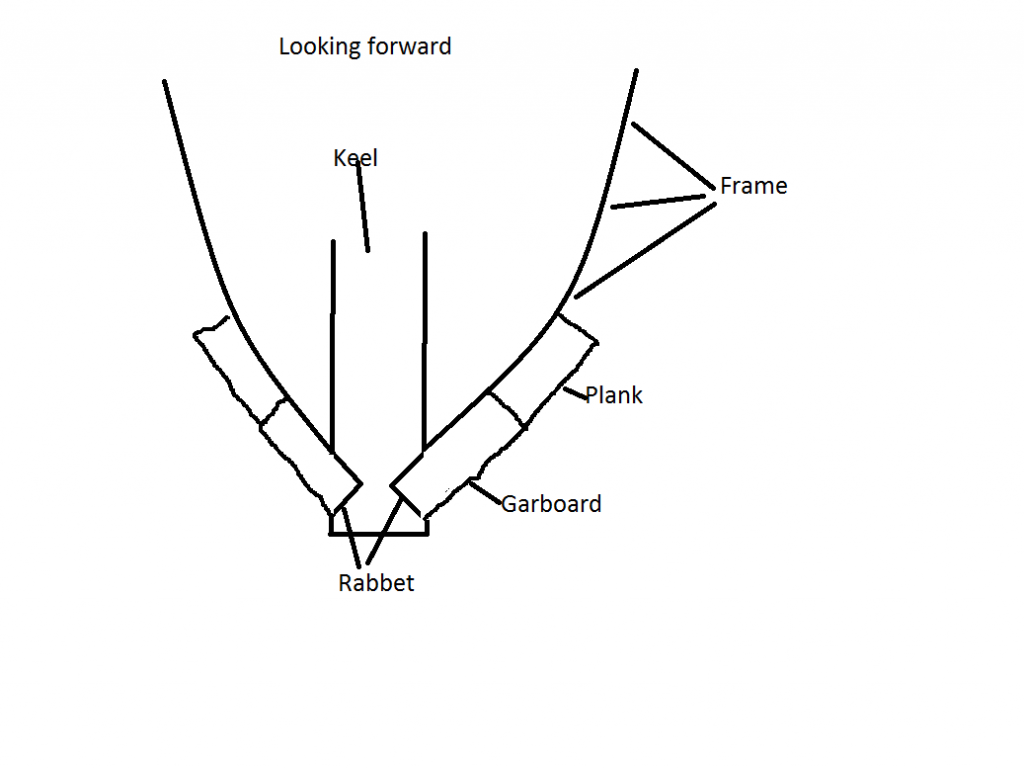
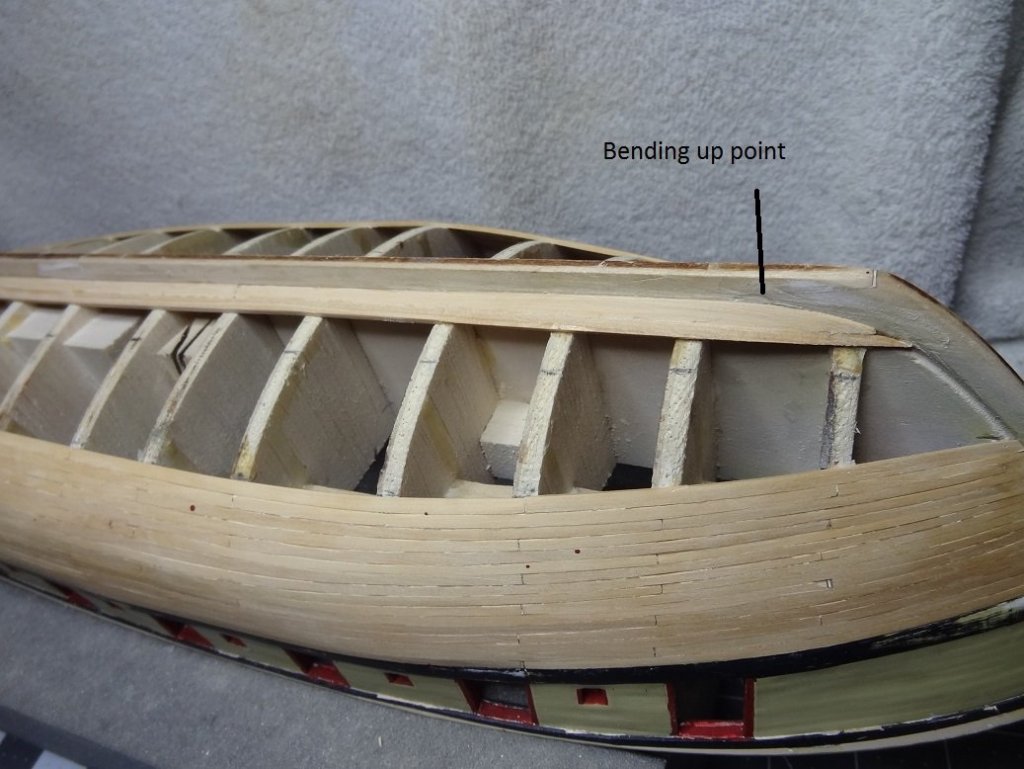
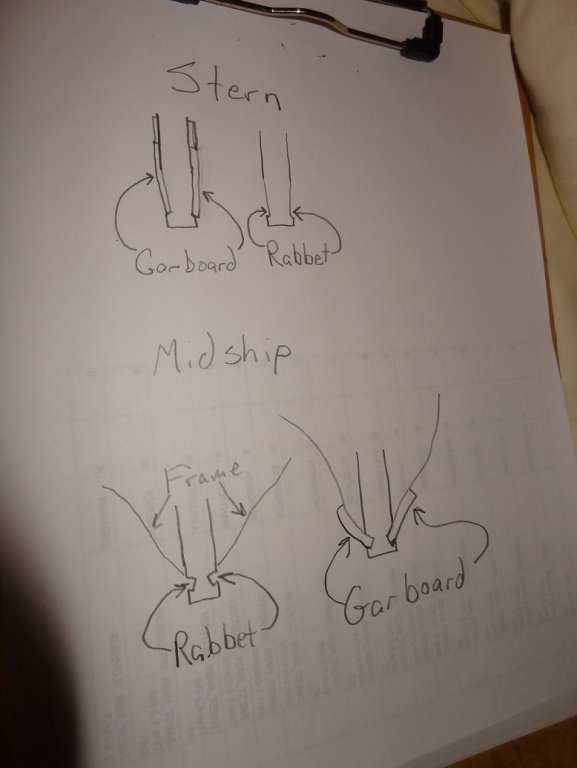
Maybe this pic will help. To clarify the procedure - think what is happening. As you slide the GB forward, the bottom leading corner will be what hits the point in the rabbet that forces it upwards. What should be done at that point is nip off the corner at about a 90 degree angle and do the slide exercise again. The GB should slide a little further forward before it starts upwards. Nip off a little more and try again. What you are trying to do is get the bottom edge of the GB to fit into the rabbet while keeping the GB upper edge level. You can see how mine ended up. Thinking back I believe the GB was the only strake that I put some nails in, at least while fitting it all together. If you can get the GB nailed into position with no glue the easy test is to lay the next strake on the GB. If it sits flush then life is good. If you see a gap up at the bow then it is likely the GB has started bending upwards. In that case you would want slide the GB backwards a bit and try again. Don't feel bad if you go thru that exercise many times. I think I also went thru 3-4 sticks as well. That is probably the most difficult step in planking. It is for modelers and it was for shipwrights. But it is worth doing right - almost like the "foundation" of your ship. Literally everything else rides on that one strake. I also found these crude drawings I made for someone. This kinda shows how the angle of the rabbet groove changes from bow to stern. Probably no help for this build, but something to remember for the next.(Uploading is failing-will try again later)

-
Tom - time spent on the garboard is a good investnment. Yours is looking good. Nice and snug in the rabbet. I don't understand your need for a stealer. As Darrell said the bottom of the GB at the bow end will be rounded somewhat. The exact shape to be determined by the fit between the rabbet and GB. Shaping that correctly should give you a smooth upper edge for the next strake. You shouldn't need any correction there. If you do, something is not right. Try like the dickens to use a complete stick for the GB. That was one of the few boards that shipwrights would search the woods to find something long enough to use a single board for the whole strake. If you have to go with planks, make the split at an "easy spot", where everything is laying perfectly. Your question regarding the GB raised above the 3 left frames. That would most likely be the rabbet not allowing the GB stick to go where it needs to. In a perfect world the strake would lay flat on the frames mid-ship but remember that GB has quite a few twists in it. That spot on the hull is one of those places. At this point you may consider pressing the edge down onto the frame and gluing with some CA. It's not much of a gap really. One thing I can recommend (because I didn't do it) is constantly observing your planking from the bow and stern. You want uniformity on each side, but also side to side. When you are looking at the bow or stern head on, the strakes should be symetrical. This can be easy to overlook until it's too late - and then you might need a stealer to get back on track. The mock gundeck can be very helpful in determining how to rig the guns. Don't forget to add eyebolts in the bulwark for the tackles to hook into. I found that adding a split ring into each eyebolt made the hookup a lot easier, both on the bulwark and carriage eyebolts. Personally I think it looked better as well. Trying to put 3mm hooks into the eyebolt ring can be brutal. The split ring is much easier. You can also play around with rope sizes if you want. IMHO the rope sizes on the plans for the tackles was too small. I spent a lot of time (literally weeks) neurotically going thru various combinations of rope and blocks. Try what the plan calls for first. If you like that, great. But don't be afraid to try something different. There is a school that says all rope sizes should be proportional to the scale of the build - meaning you can calculate any rope diameter and there is one and only one size for any rope on the boat. That just didn't work for me on the tackles. I felt they looked like they were held with a thread rather than rope. They needed some beef. As you said, you are not quite ready for guns yet but it is an incredibly repetitive, time consuming task so best to start early, when you can do a few when you feel like it. That said, it is always more efficient to use an assembly line approach. Drill all holes for eyebolts. Add all split rings to eyebolts. Glue all eyebolts into holes. Etc. This was helpful for making the tackles - I believe there was over 100 of them. After the first few you will begin to see a pattern that you can follow, and you can crank them out more efficiently. Practice on your mockup. Speaking of eyebolts, don't forget to color them BEFORE you glue them into the bulwark. I'm preaching again as usual....have fun
-
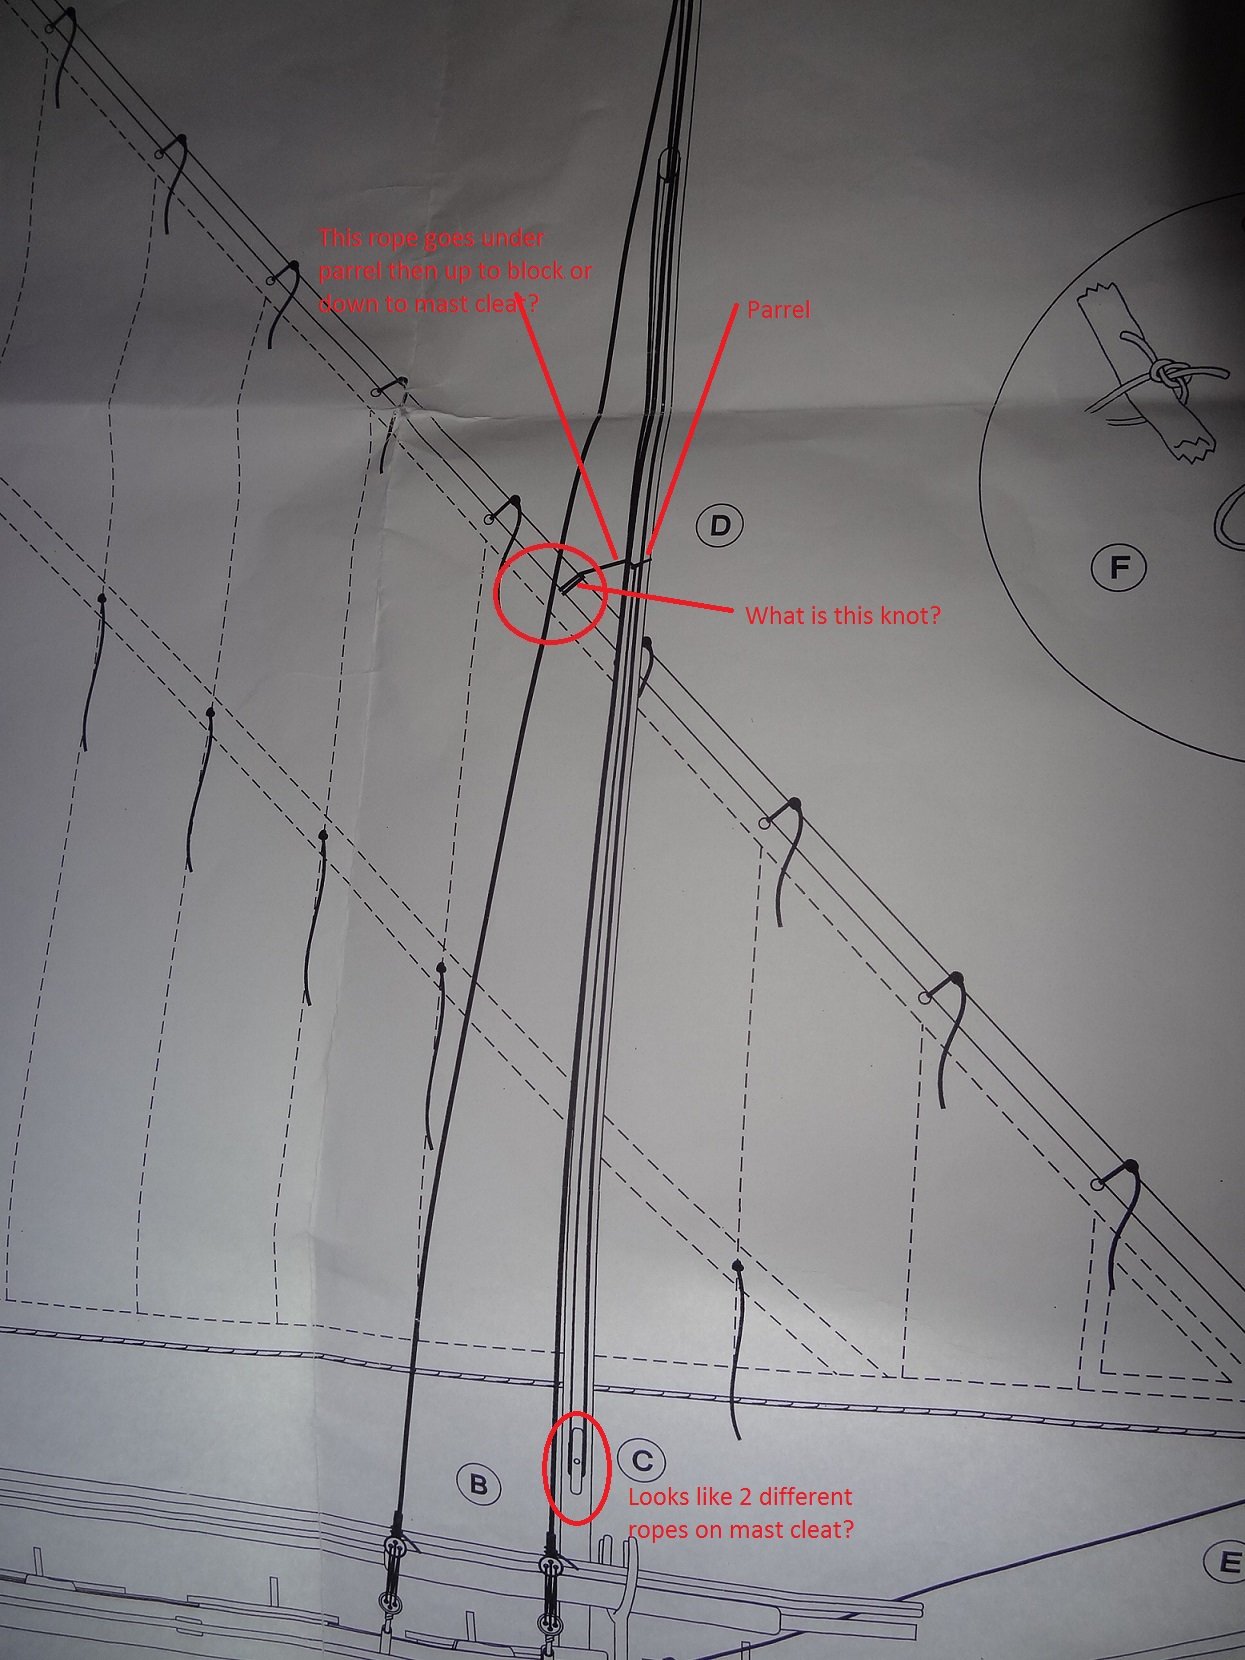
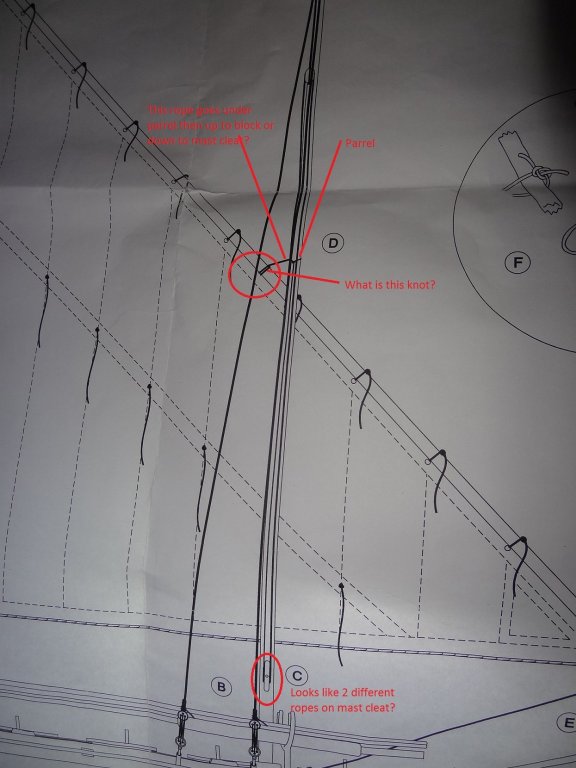
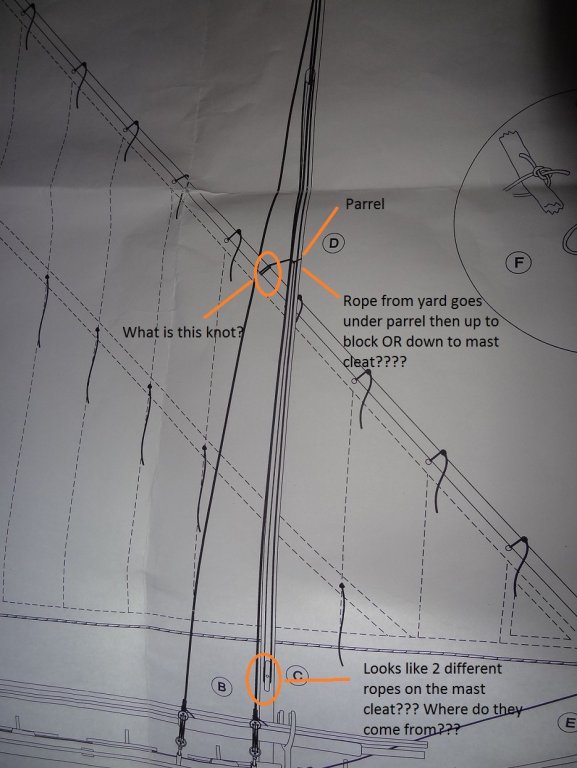
I'm sorry Zoran - I do not see enough detail for the rope on the yard. All I see is what appears to be 2 wraps around the yard (inset D), which in and of itself is not not enough to hold up the yard. No problem, I can wing it with the best of them. For those of you that have ever worked with tell-tales, nettles, little strings hanging off the sail, you know how difficult it can be to get them lined up uniformly. Same issue here. My solution looked kind of funny so I thought I would share. Crazy looking but it worked great. Add a clip and then paint lacquer on the string to stiffen it up. Same drill on the other side. If you gently shake the sail the clips make a nice percussive sound.
-
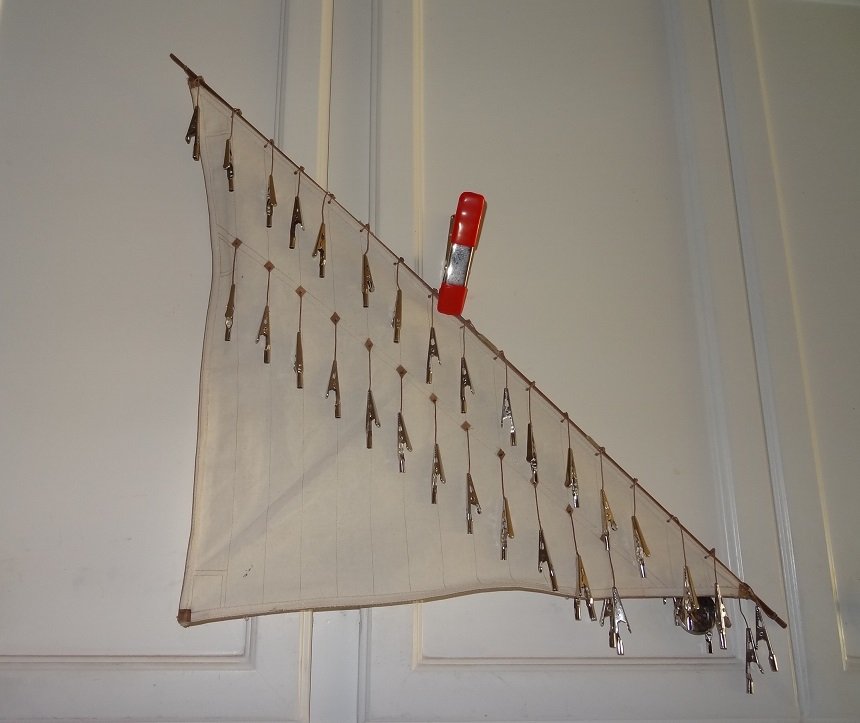
With the nettles finished and the yard fasteners well under way I am looking at the sail plans to hang the yard on the mast. I'm not able to figure out a couple of places - @MarisStella.hr. I hope my questions in the photo make sense.
-
I keep forgetting this is not a warship. Fish blood maybe?