mikiek
-
Posts
2,229 -
Joined
-
Last visited
Content Type
Profiles
Forums
Gallery
Events
Everything posted by mikiek
-
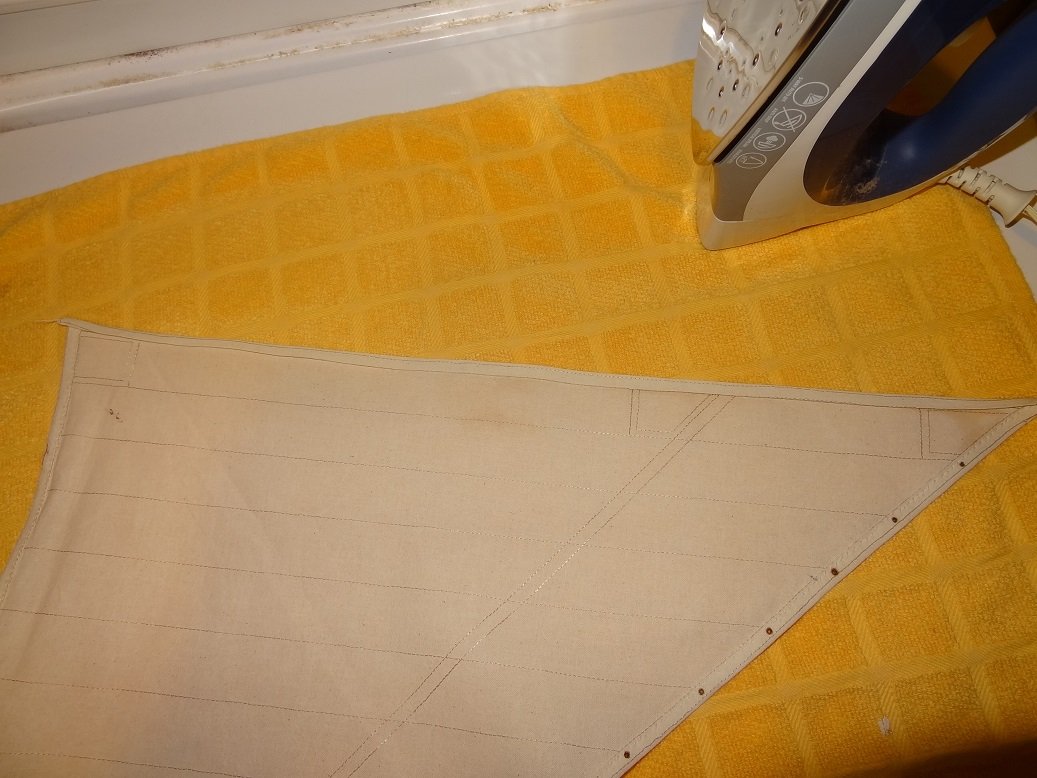
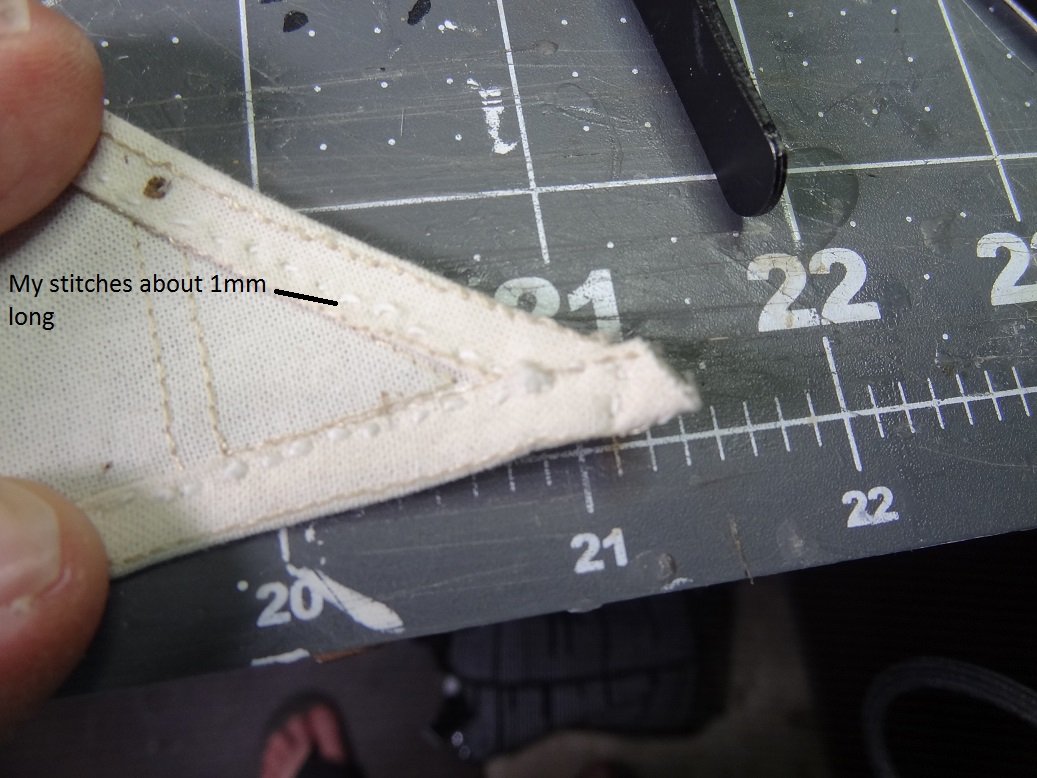
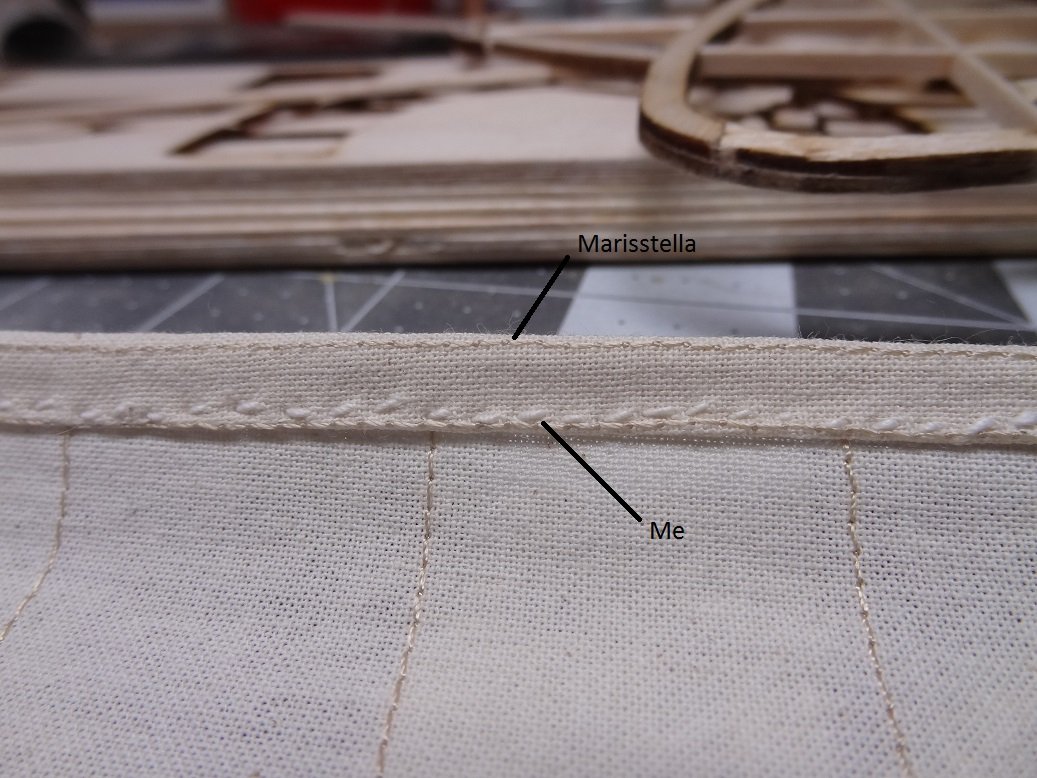
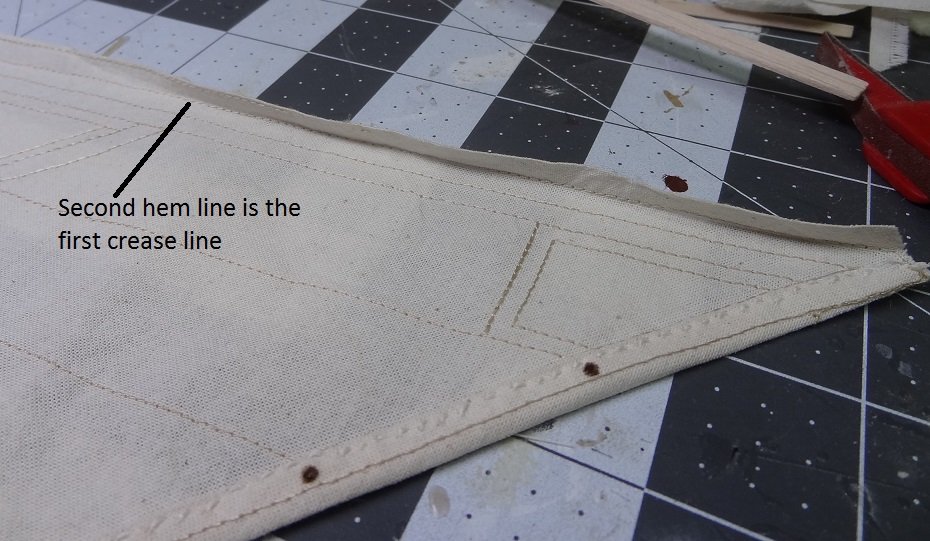
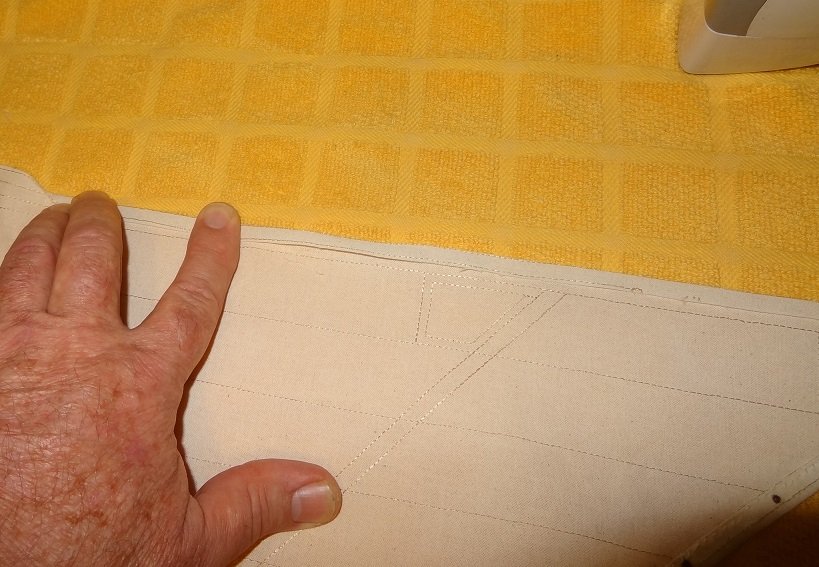
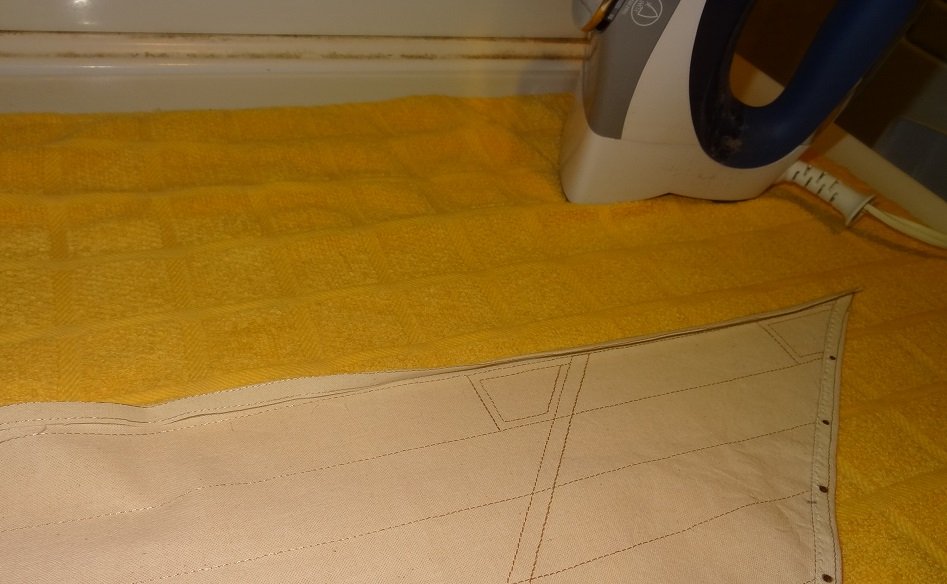
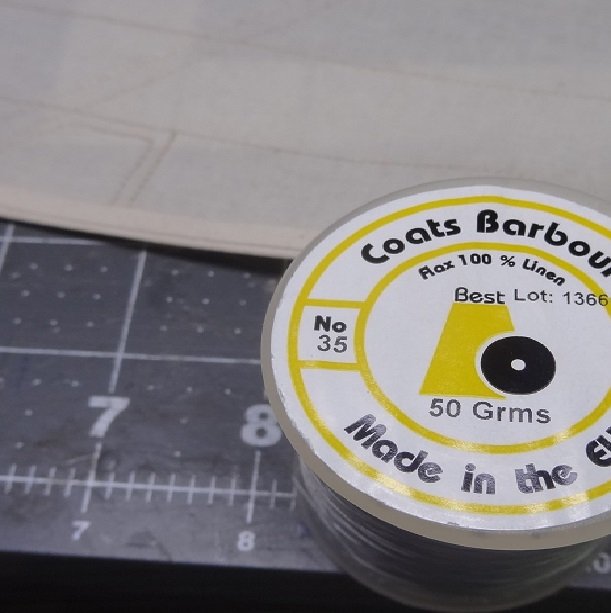
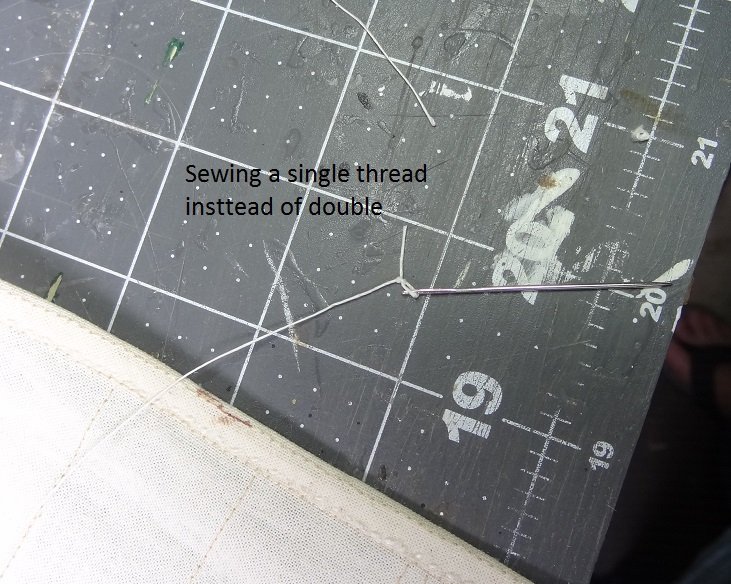
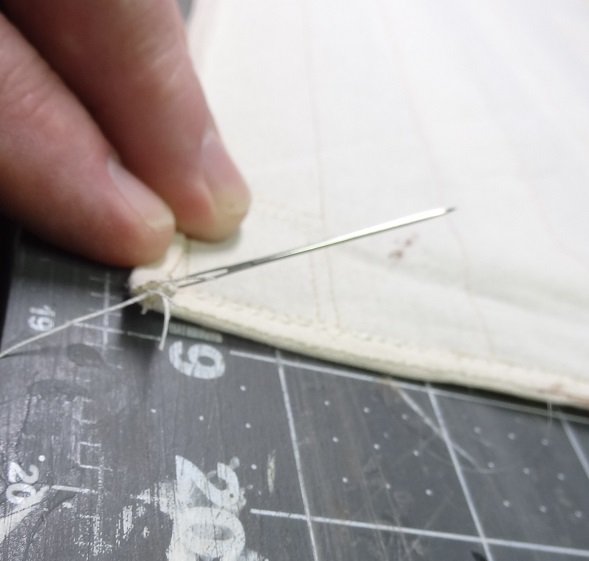
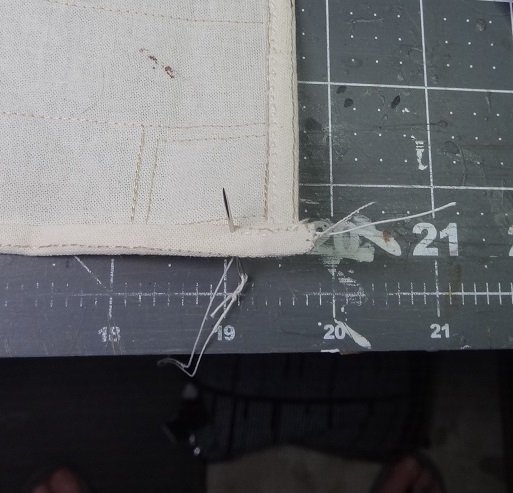
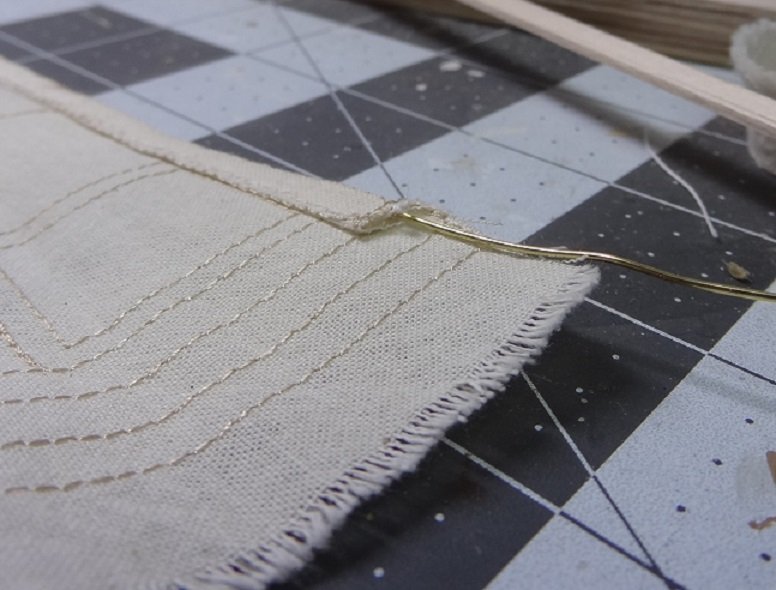
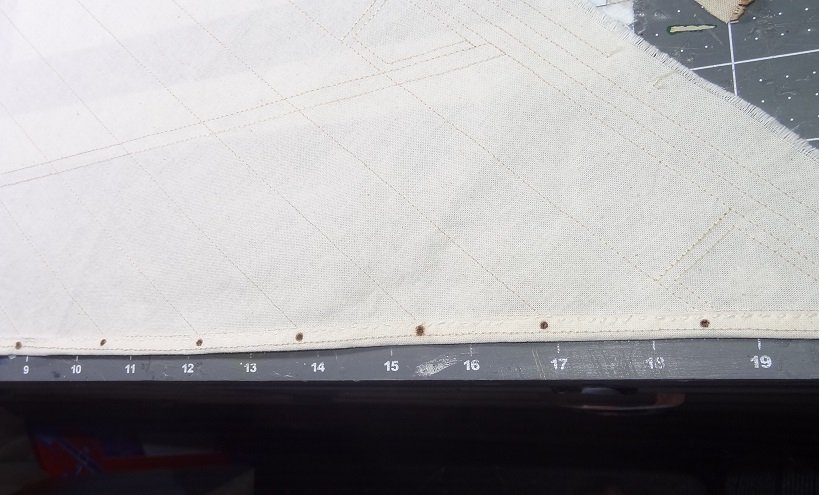
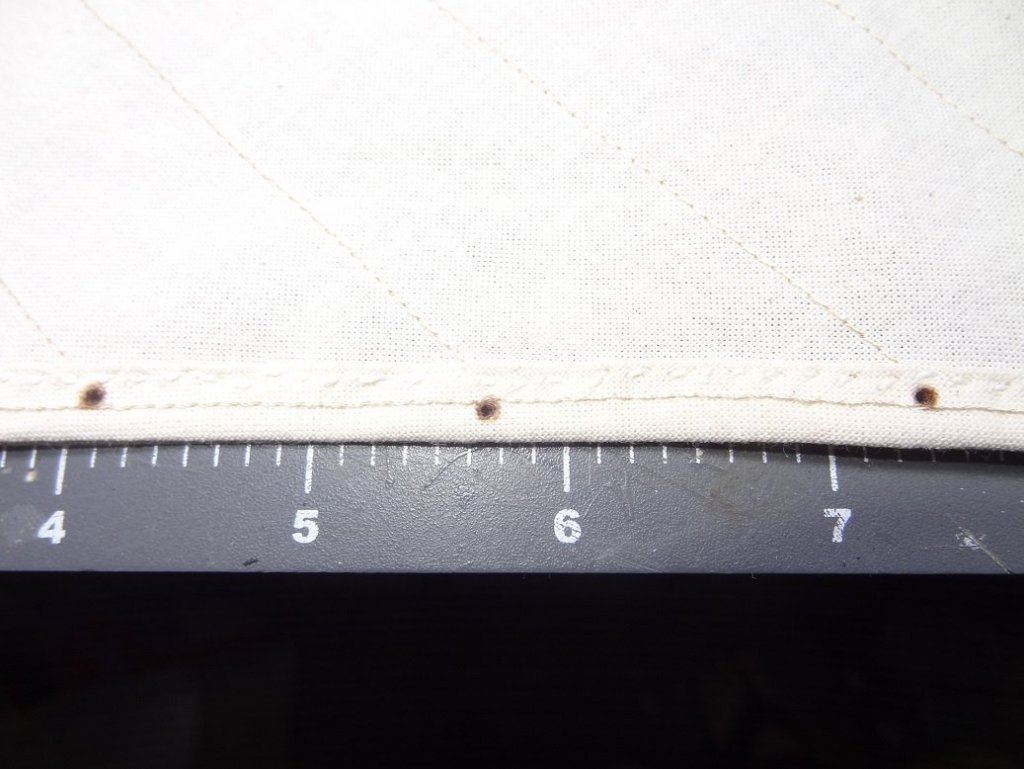
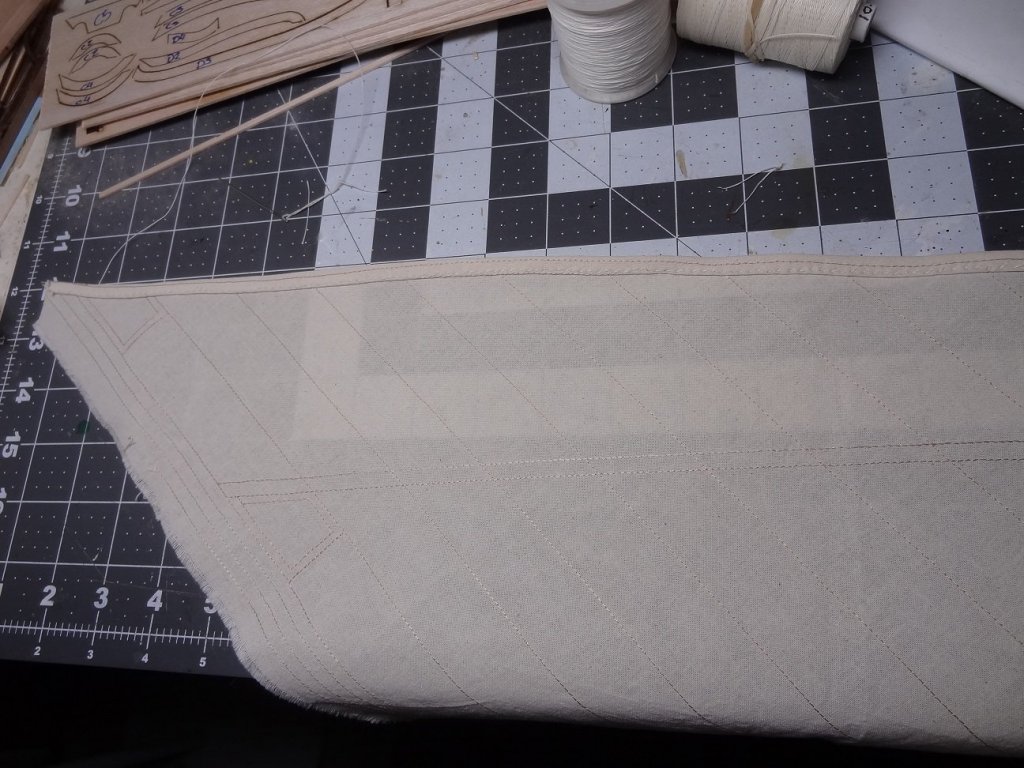
 I finished the 3rd edge of the sail last night. Was admiring my work and looking at what was next, then I saw it. The bolt rope. Last time I did one of those I glued it to the sail edge. I could quickly see that wasn't going to work this time. More on that in a while, but first a few notes on stitching a sail edge. None of it is complicated and I doubt if what I show here is anything revolutionary. But it might have helped me, so maybe it can help someone else. As I've said before, Marisstella did a nice job for a out of the box sail. The interior and edge stitching is there, the builder has only to hem the edge. So first the edge is trimmed with sewing shears down to the outer most stitch. One note - the pix below are not all from the same hem edge. They are a compilation of shots as I was sewing all the edges so don't let that confuse you. Then you begin to fold and form the hem. Keep in mind we will be sliding a piece of 0,75mm wire inside the hem after the stitching is done. The wire will allow you to easily add a lot of shape to your sail. I have not seen another sail technique that makes shaping as easy and realistic as the wire does. Get an iron nice & hot. It will also REALLY help if you use some spray sizing or starch. On an ironing board or a towel on a hard surface, make the first fold again and begin to iron it. I found the easiest way is to let my left hand working on folding and holding it down while the right hand is ironing a few inches behind. PAY CLOSE ATTENTION the hem has a tendancy to want to widen. I was shooting for a hem width of 3/16". Continue from one corner to the other. When complete spray some sizing along the folded edge and iron again NOTE: While sizing is a big help be careful with it. If you spray too much (as in saturate the material) and then iron it, it can burn. Leaving an indelible brown spot on your sail. So do 2 passes with a light spray each time. When finished with the first fold, begin the second fold and repeat the process. Time to start sewing. I used an oversized needle on the first edge - it was too big. Hard to push thru the folded material. The second edge I used a slightly oversized needle. Much better. I used the same size linen thread for all. For a lot of sewing you run the thread thru the needle eye, then back down to the other end and tie off both ends. So as you stitch you are running 2 threads thru the material. I felt this was not necessary for my purposes, so I threaded the needle then tied off the end at the needle. So I'm only passing 1 thread thru the material. Tie a granny knot in the bitter end of the thread. Starting at one end of the edge (the right hand edge is better for righties) run the needle starting inside the hem to the outside and pull the thread all the way to the granny knot. There's your anchor. From there, begin your stitching towards the other end - only a few hundred more to go Work on keeping each stitch in line with the previous. Leave enough free space in the hem to slide your wire in. Keep the size of your stitch to about 1mm. The smaller the better. The bigger the more visible the stitch is. Your thread should start out at least twice as long as the hem you are sewing. Keep stitching all the way to the edge at the other side. Occasionally, stop and try to slide your wire into the hem to make sure you have left clearance. Better to find out early on if there is a problem. When you get to the end put in a few extra stitches for reinforcement. Terminate the sewing by barely running the needle thru a few threads on the top layer of material. Before you pull it tight run the needle thru the loop. Repeat that at least one more time. Slide your wire into the hem and all the way across. There are several ways to terminate the wire. You can pull it back out about 1", cut it and slide it back in. It will not be visible this way. Others cut the wire long enough to extend out of the hem and become the tie down at the sail corner and let it extend to a belay pin. You can add amazing action to a sail using option 2 as the wire can hold a sail out and extended where a rope will not. You must paint the wire rope colored. Above shows the corner and also the start of my bolt rope which I think I will show in another post.
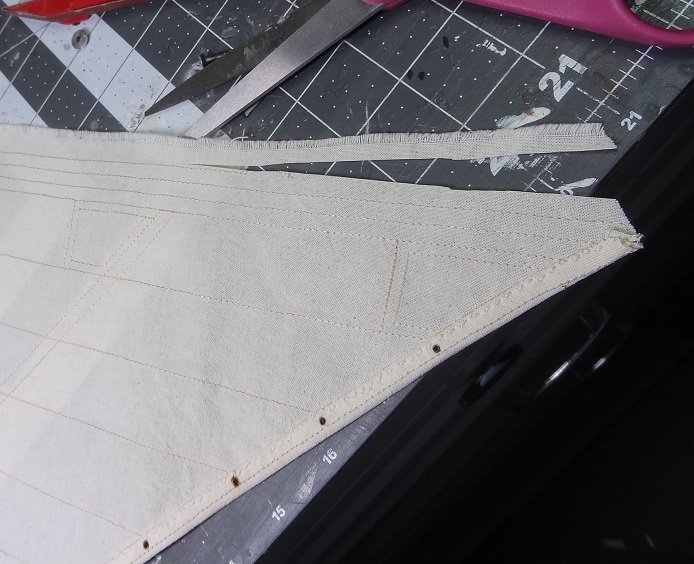


- 204 replies
-
- 1
-

-
- trajta
- marisstella
- (and 1 more)
-
I'll disagree with a few and say it may well be a kit. I just finished a 70 year old restore and had many of your questions when I started. Interestingly, your boat while completely different than mine has the same style and feel to it. Even the name plate is similar in design. As mentioned - pictures, pictures, more pictures. Every piece of wood. Every sail. Every rope. From both sides and front and back. You will thank yourself one day. Don't take things apart piece by piece if you can help it. For instance I cut the rat lines (the triangle climbing ropes-catwalk) right at the hull and was able to take out the entire mast with everything still intact. The mast then becomes just one project in many for the restore. Working on items off the boat is a lot easier than on the boat. I was also able to keep much of the original material in place. You will find that modelling ropes made today don't look much like those made years ago so the more original you can reuse the better. The same goes for other materials. Have a look at the structures on deck. Even under the structures. Take them off. I took off a skylight and there was the manufacturers name stamped on the deck. A company out of business for almost 60 years now. But if you find a piece of info like that, Google is your friend. You might even find the same model today on Ebay and now you have spare parts. Save every scrap you remove, cut, sand, etc. It may be just the thing to make a repair somewhere else on the ship. For some reason, many kits back then were of fictitious and fictional boats. Mine came from Treasure Island. Since there was no real model to go by, a lot of artist discretion was used. Does it look like any real boat? Not really. Does it matter? Not really. In my signature there is a link to the restoration build log I kept. It shows a lot of what I am describing here. If you are going to follow thru with a restore I strongly suggest you consider a log. Good luck and enjoy. There will be frustrations, just persist.
-
New member with a question about shipping models
mikiek replied to CJ2S's topic in New member Introductions
Welcome to MSW CJ2S. Something else you will want to be asking is, is there anybody in (nameyourtown) that works on models that might be willing to fix what will hopefully be just a few small breaks? Unless you drive the models home yourself - and maybe not even then - it is inevitable that things will break off, fall off, come untied, scratched, etc. during transport. I have things break off mine just driving 15 minutes to some show. Of course that could also be your opportunity to jump into the hobby and learn what we do here. You won't find a better group than those here to help you out. Make sure you get the display case as well. Depending on your home situation - cats, kids, dust, dirt - the cover will keep the build looking pristine for years to come. You can get them made locally but they range in price from maybe $150 - $500 for one that size. Always keep them covered. BTW I agree with Chris, your dad did a wonderful job with that build. Let us know what you decide..... -
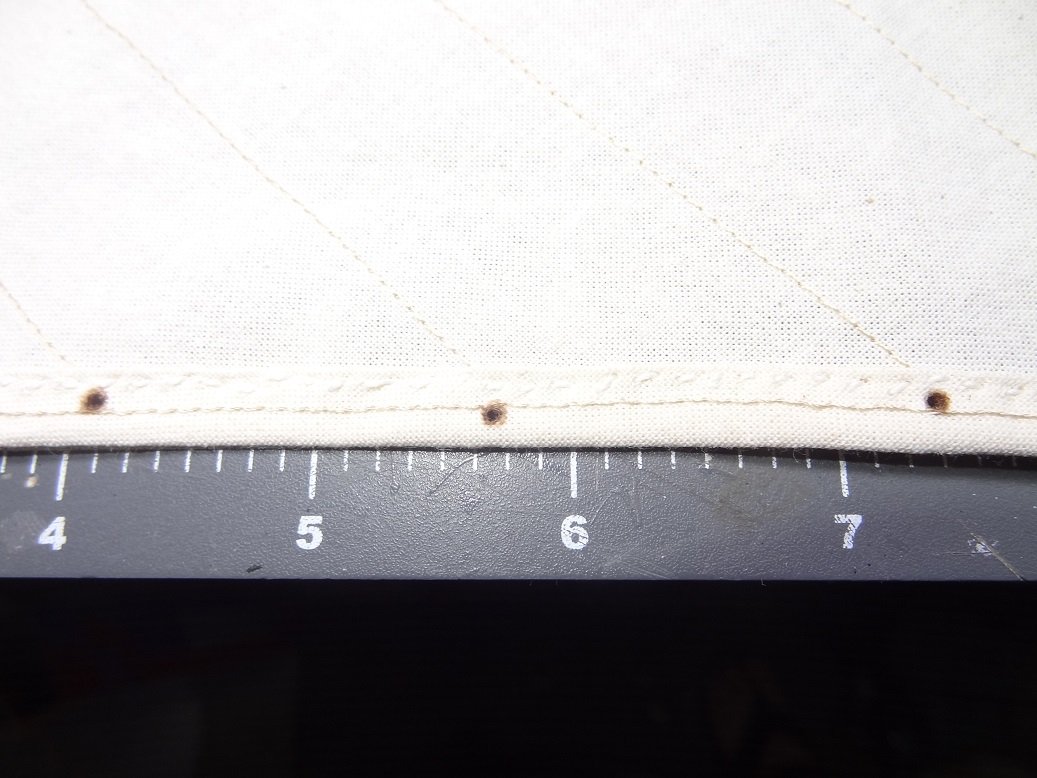
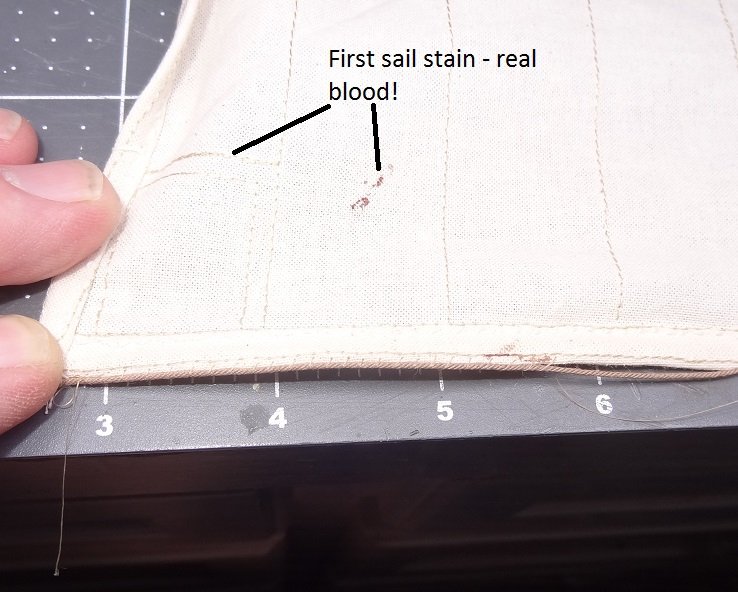
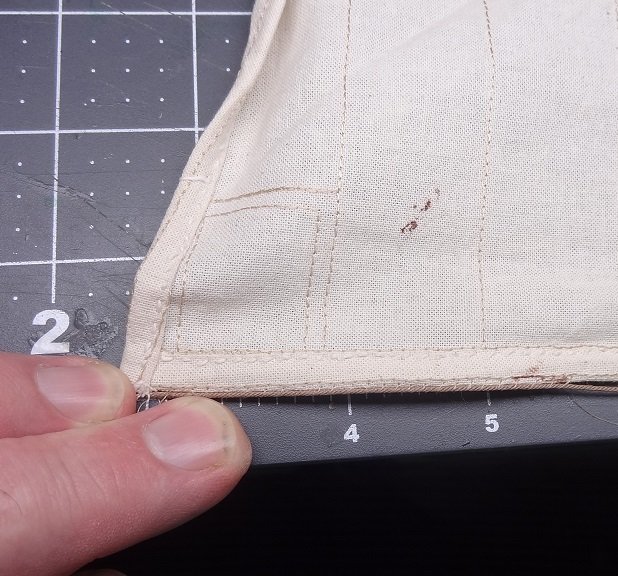
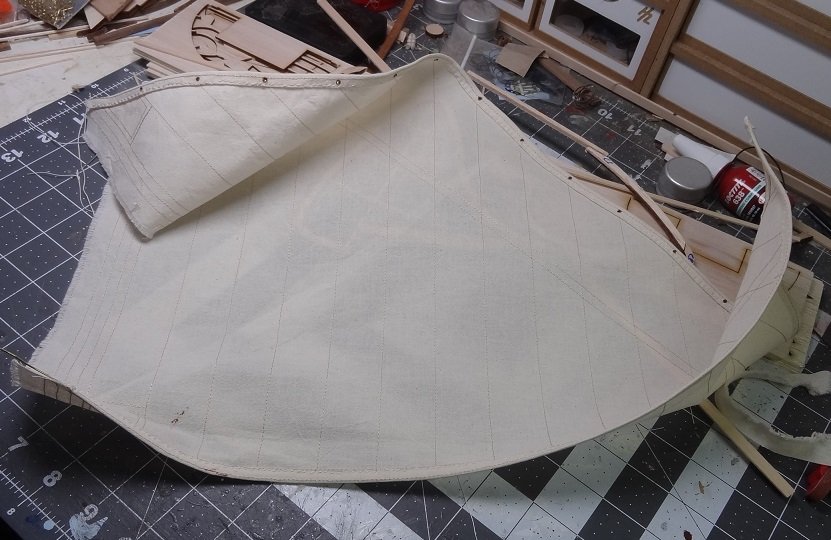
I'm quickly gaining respect for the seamstress/tailor occupation. No patience for the repetition involved with hand sewing. But, still I persevere. I was able to finish hemming the second edge tonite. One more to go. This one came out better than the first so I must be learning. This is the first hem to have a wire in it. As mentioned previously, rather than trying to stitch the hem with the wire in it, I just did the sewing and slid the wire in when I was done. Much simpler! After close inspection of the hem, I won't quit the day job but it could have been a lot worse. I also added some grommet looking holes to the first edge - the edge that fastens to the yard. I picked up this idea from the restore I did, someone passed it on to me. As you will see it doesn't look great from 6" away but from distance it's not bad. This was done by drilling holes (yup drilling) at the appropriate places. Then a mixture of dye (season to taste) water/white glue at 25%/75% is applied by dipping the tip of a toothpick in the mixture, then sticking the tip into one of the holes. Not too much on the toothpick as the liquid will soak in and spread. The result is a nice brown spot that looks sort of like a grommet or just reinforcement stitching at the hole. The glue dries and keeps the hole spread open. One pic shows what you can do with the wire in a sail. No plans on leaving it like that but I think you can see the possibilities. Now that I have the routine down I'll take a few pix as I'm doing the last edge. Maybe it will help someone. Lastly, I've mentioned dying the sail - a little darker. I want the sail to look a little dirtier and hoped my white stitching would pick up the color and blend in better. No such luck. I put a few stitches in some scrap and dyed that. If anything the stitching sticks out more now. The dye didn't take very evenly in the sail either. Different materials taking up different amounts of dye. I'll have to think on that a little more. Here's what I have:


- 204 replies
-
- 2
-
-
- trajta
- marisstella
- (and 1 more)
-
That is beautiful work! Do you have to supply the sail plans? The wire trick I learned restoring a 70 year old build. It was in the old sails. However Marisstella does it as well - it's in their manual. I would definitely use it for any build with sails. You can really add some action to the sails.
-
A good piece of work Darrell. I had thought about a single unit for a while. Was actually pretty surprised at the amount of room there actually was under the shrouds. It's good to see you back! Get this girl finished up.
- 647 replies
-
- 2
-
-
- niagara
- model shipways
- (and 1 more)
-
mitbok - just curious, what is this guys profession? You know I guess it would be different if I had to make the sail from scratch. The Marisstella sail already had a fair amount of stitching in it. Even the edges - where I am putting the hems - have stitching already. They are kind of like the marking where you fold the material.
-
I need to learn some machine basics myself. Probably would have taken less than 5 minutes for something that took me about 4 hours.
-
Painfully slow but persistence wins out. Took all evening and a bit of last nite to get the long hem of the triangle shaped sail stitched up. At this rate it will be the weekend before I'll be done. This was a good starter exercise as there is no wire for this side Next step will be adding some grommet looking holes on the hem. The ropes that hold the sail to the mast use these. I've learned a few things already. 1. Keep pushing the the folded over material up so the overall hem width doesn't get any wider. 2. Keep the stitches small. No more than 2mm. 3. When stitching the hem for the 2 edges that do have wire in them, feed that wire into the hem after each 10-12 stiches. It's a lot easier to work with. 4. When feeding the wire to the hem put a couple of small pieces of tape on the end to cover the tip of the wire so that it doesn't catch inside the hem. 5. Iron the heck (with starch or sizing) out of the hem before sewing. More than anything, this made the stitching easier. The crease made by ironing held the entire time I was sewing. 6. I'll use a smaller needle and thread on the rest of the edges. I do have a couple of photos this time.

- 204 replies
-
- 2
-
-
- trajta
- marisstella
- (and 1 more)
-
The bad news is - the embroidery shop I thought might do the hemming for the sail does stuff like logos on shirts, etc. I was thinking more like needlepoint. They won't touch the sail. One very good idea came out of our discussion. Rather than trying to keep the wire inside the folded hem as you sew, they said sew first. Leave an opening at the end so you can slide the wire into the completed hem. That made sense and was enough to make me try it myself. The catch - you really have to sew the hem, adhesives won't work. So I'm off doing that. It's painfully slow, I was at it for about 10 minutes and did about 2". I don't seem to be able to go much longer without a break, or I start seeing double. I'm using a course all linen white thread. On the next side, I may go thinner so it's not as visible. I'm beginning to think the sail is going to need a splotchy dye job. As pretty as it is, it's a little too sterile for my liking. The white thread should pick up the dye and hopefully blend in better. No pix yet......
- 204 replies
-
- 1
-
-
- trajta
- marisstella
- (and 1 more)
-
Have at it Tom. Where it really saved me was with all the cleats and stops on the spars. Left in a pile those were always breaking off.
-
Tom - as you begin your collection of spars you will need somewhere to put them. Also a place to work on them as you start to rig them, add the tops, etc. I used a 1"x6" maybe 15" - 18" long. Drill holes in it, about the diameter of the various spars. This was the first one, the second one included holes for the bowsprit and all the yards.

-
This hull has very graceful lines Zoran. A beautiful boat.
-
That helped a lot. Thank you Zoran. That gives me something more to do on the sail. I'll see if I can whip the ends of the ropes I'm curious where your illustrations came from? The style reminds me of drawings in Darcy Lever's book Young Sea Officers Sheet Anchor - one of the best around for square riggers.
-
Mark - I have found that often when my epoxy doesn't dry well it's because I didn't mix it well. The guy that taught me to use epoxy would stir for at least a minute before using. The same guy would hold the container over a light bulb while stirring. He used orange juice containers cut in half. The ones with the metal bottoms. As Sam mentions heating it will speed up drying, Will just heats it before using instead of after. Of course you can't fool around much, you have to spread it quickly. FWIW The build is coming along very well.
-
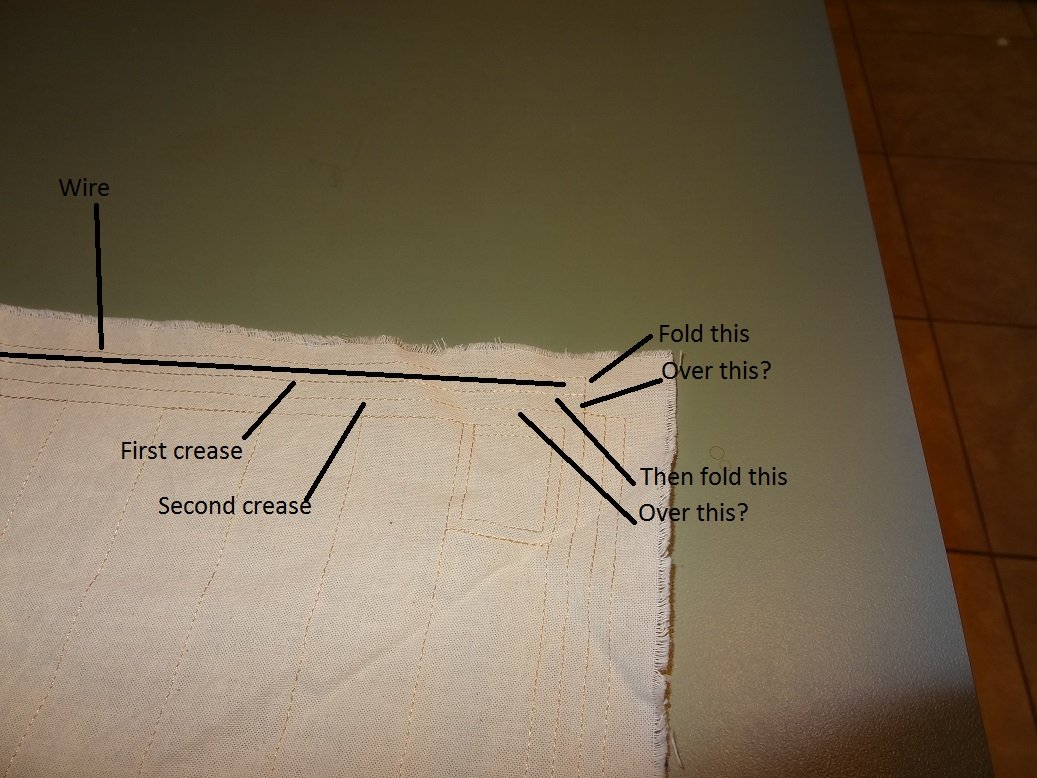
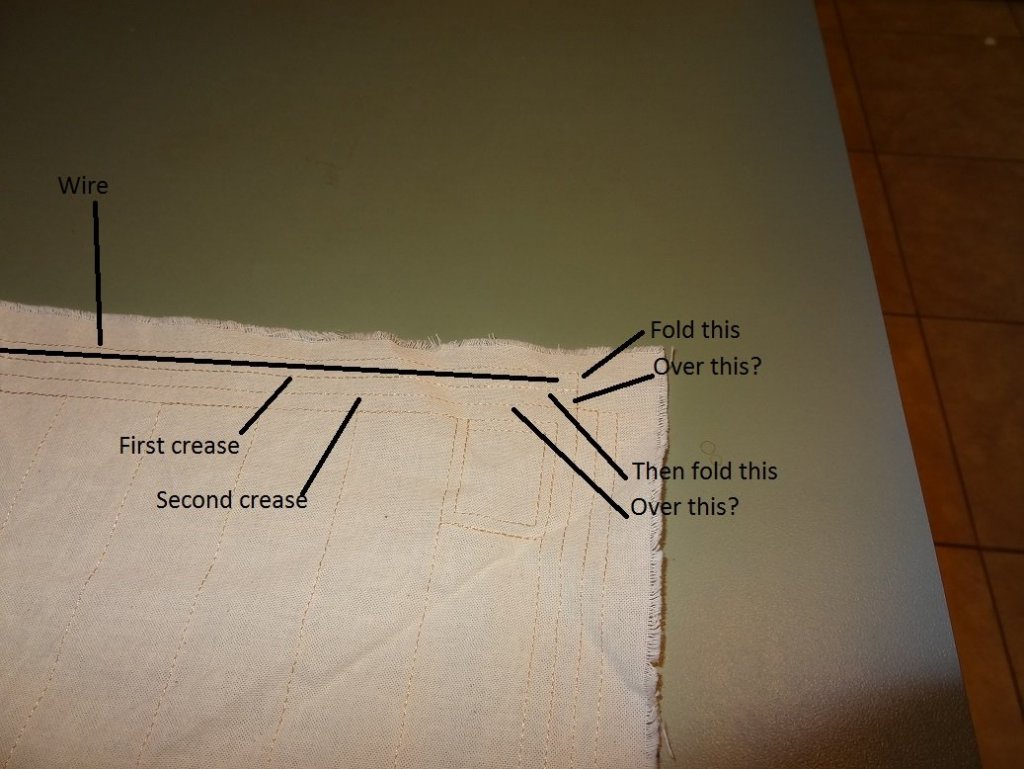
So Zoran - do you make the first fold and sew that, then the second fold and sew that? Or is it fold, fold and then sew? Also on the sail, I don't know if there is another name - I call them tell-tales. The ropes lined up diagonally through the middle of the sail and hanging down. Is that a single rope that you pull through the sail so it hangs down on each side? Or two different ropes - one on each side? And did you tell me you do the sewing by hand?
-
Thank you Brian - I think it will all be even less obvious once I put the sail on. It all ties on to the yard so there will be lots more rope around the yard to distract from the windings. And like I said, I won't have to worry about the yard drooping over time. It will not bend at that joint. The sad thing is I'm kinda done with this build until I can get the sail hemmed. There's an embroidery shop down the road a way. I'm going to see if they can do it.
-
They probably know better than I. I've always had the notion that you seal for staining and prime for painting.
-
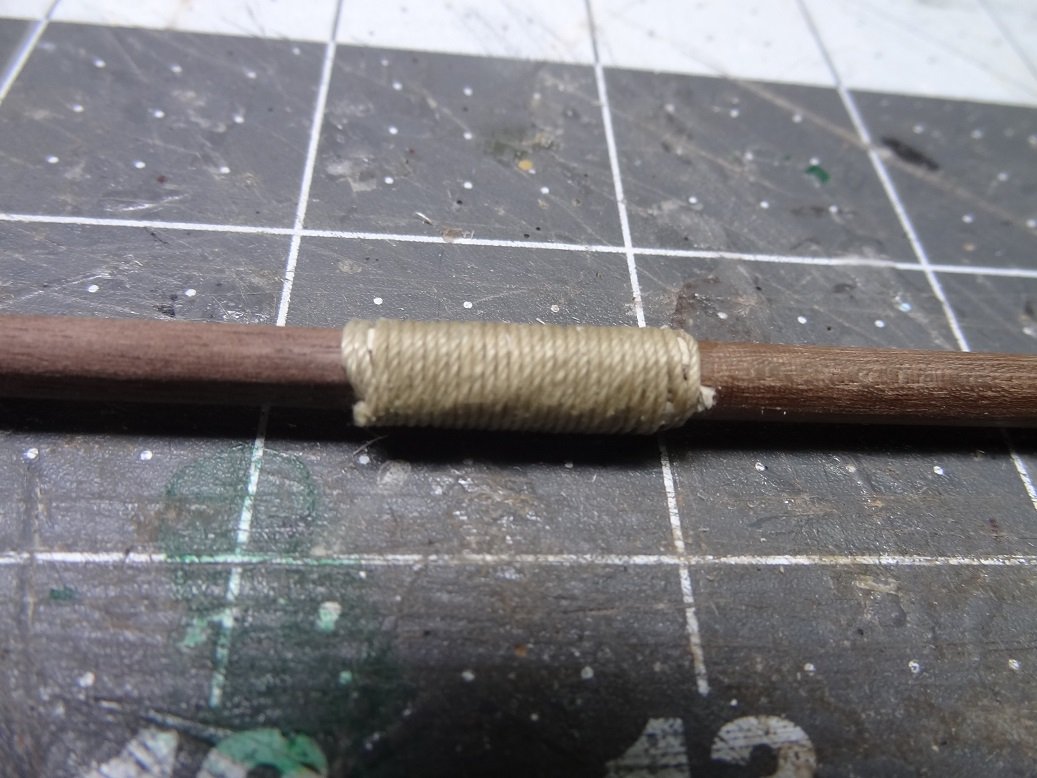
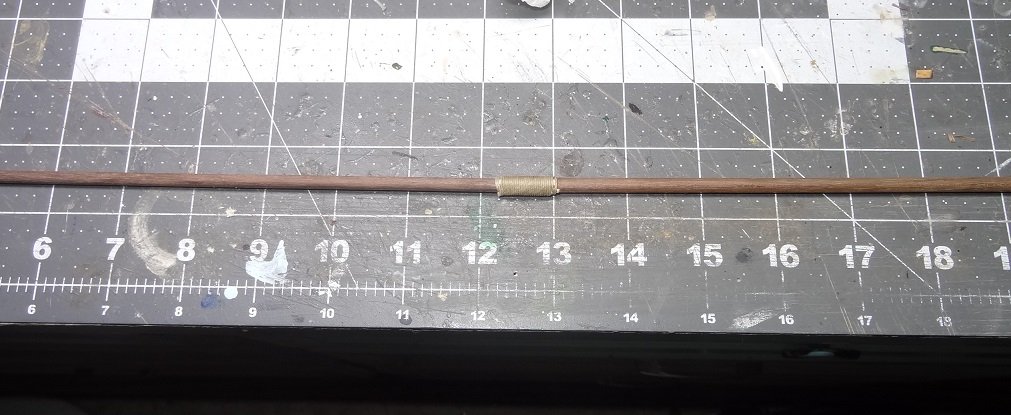
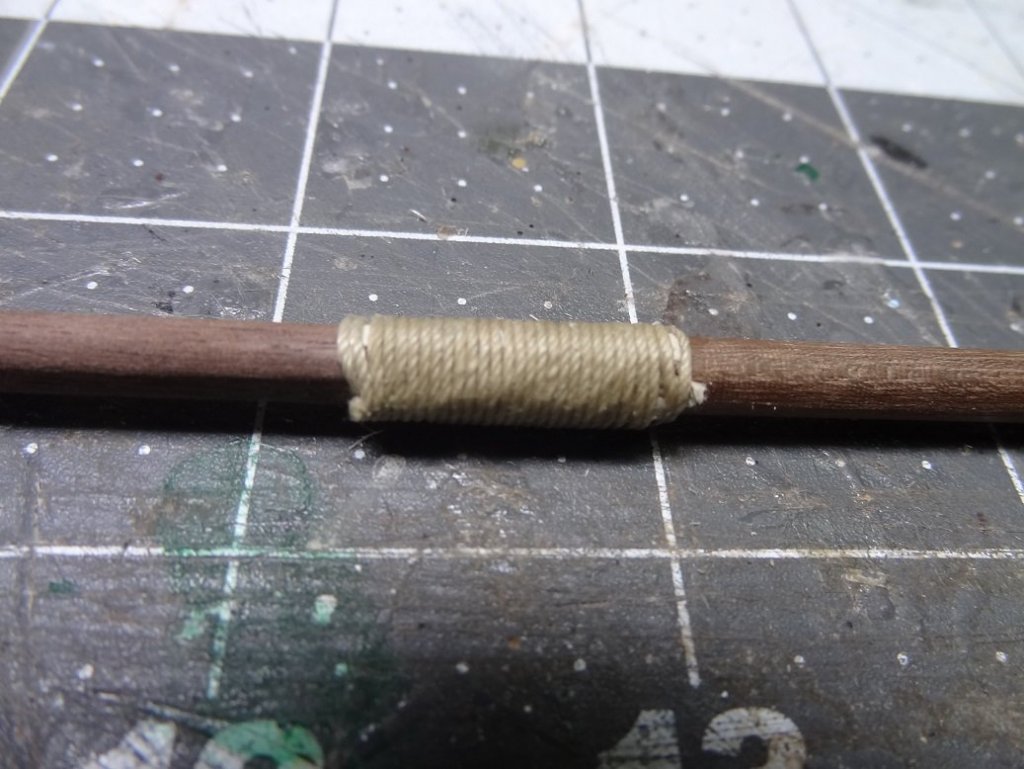
OK - I have beefed up the yard. I'm kicking myself because I forgot to take pix. What I did was take 1/16" square stick and cut 4 pieces and 3/4" long. Then I glued them longways over the joint. After that dried I sanded them down quite a bit, removing maybe 2/3 of the material. Then I took some rope and wound that over the sticks. Finally some watered down white glue was painted over the rope. I didn't get the yard perfectly straight, there's a little crook in it but you would have to look for it to see it. One thing for sure, it's not gonna bend at the joint anymore. I plan to put a few more windings on the yard to balance the look.
- 204 replies
-
- 1
-
-
- trajta
- marisstella
- (and 1 more)
-
Hey Brian - I learned on the restore project I did. I had to make sails for that. I just glued the hems - looked OK but not great. The absolutely cool thing was putting the wire into the hems. You can make any type of sail into any shape you want. I was totally impressed with that technique and will use it on any build that I do sails. I hope paying for someone to do it doesn't end up costing too much. This was too nice of a sail to glue it, and my feeble attempts at hemming would certainly not add anything.
- 204 replies
-
- 1
-
-
- trajta
- marisstella
- (and 1 more)
-
Ron - if you are going to paint it, why the sealer? Just prime & paint. She looks ready for some makeup.
-
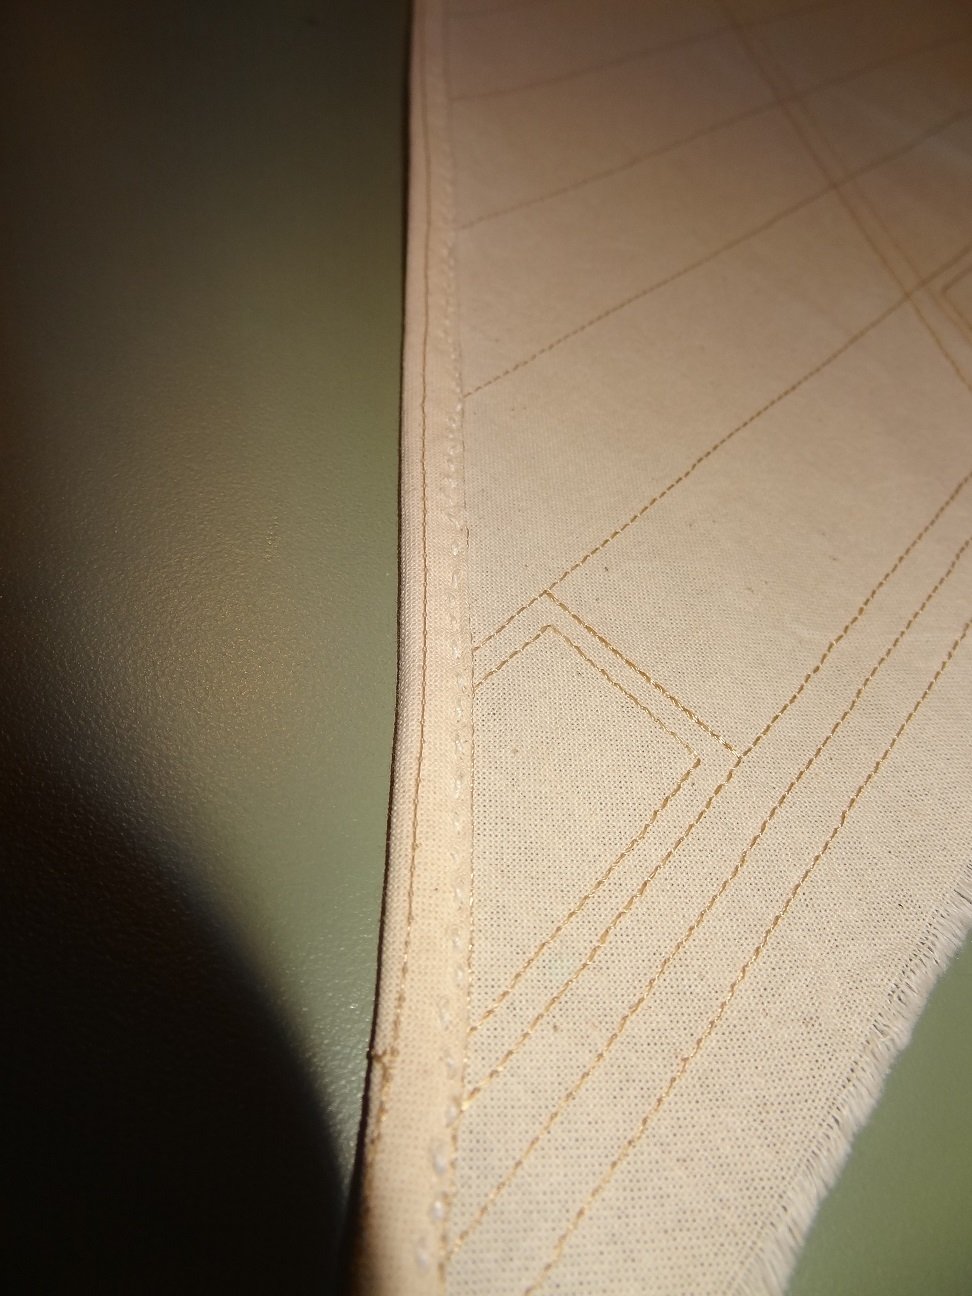
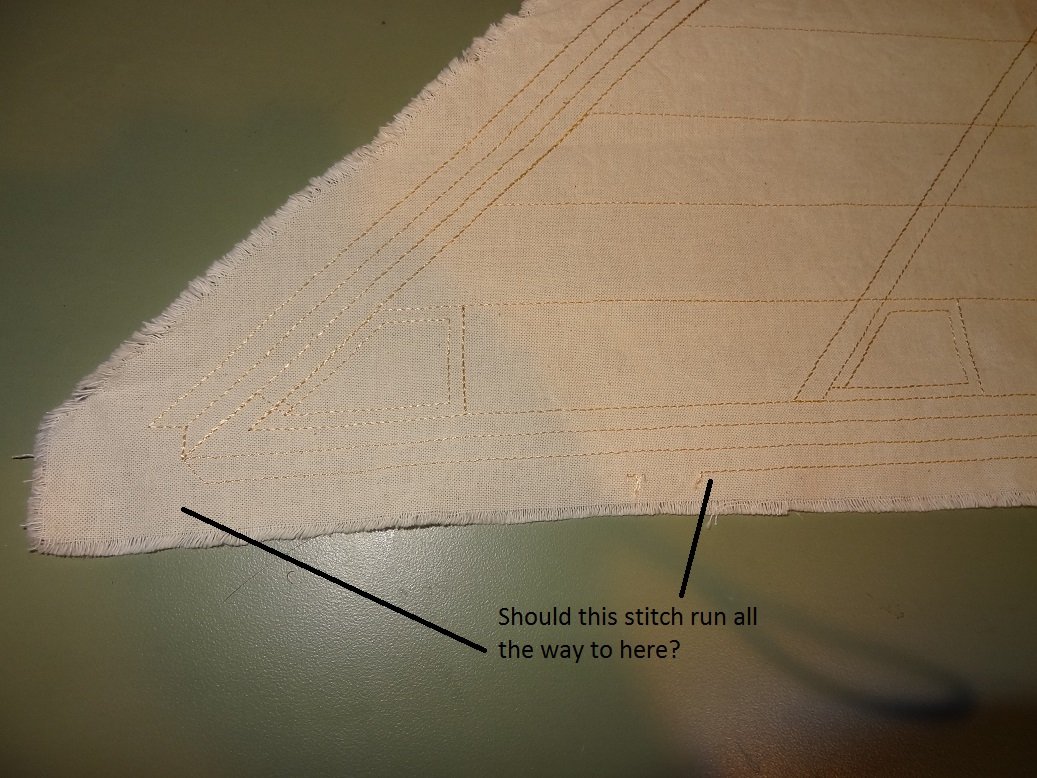
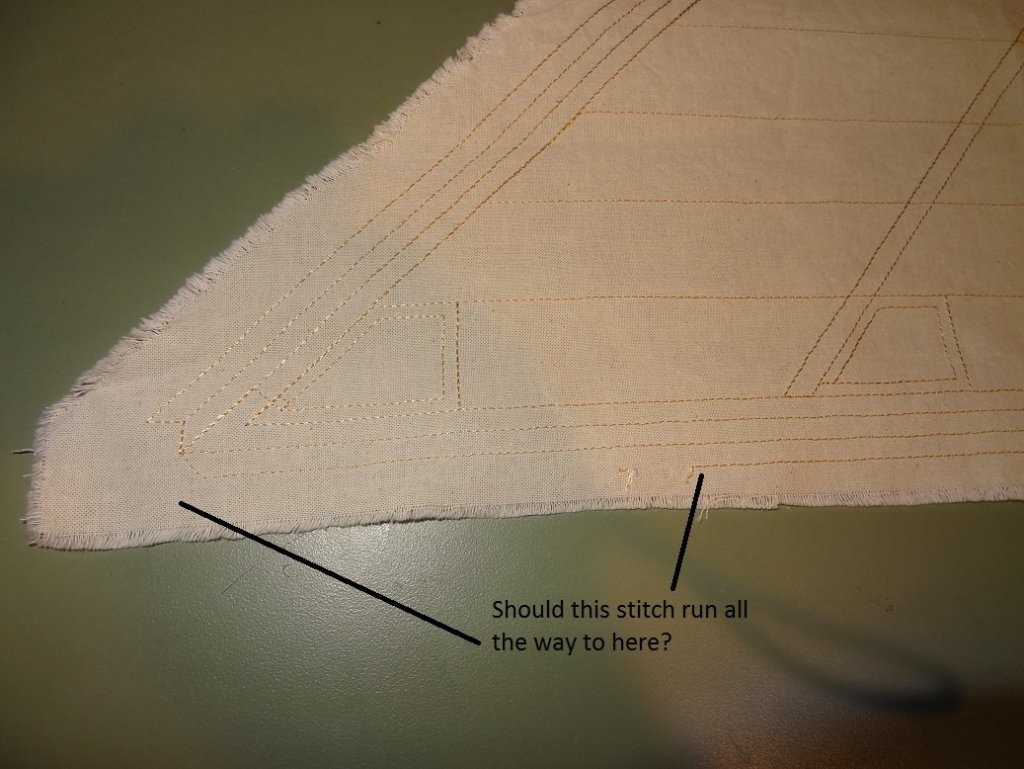
Hey everyone. I have a couple of sail questions. Will ask @MarisStella.hr but feel free to chime in. I have pretty much decided to have someone that knows what they are doing hem the sails properly. I'll be paying someone so I want to make sure I have it right so I can tell them. First off I'm wondering about the outside stitching shown in the pic. Is it supposed to stop there? Why would it not continue over to the corner? So does the edge fold over twice? The first time over the wire and then one more after that? Hope that made sense.
-
Nothing more nerve wracking than drilling a "simple hole" in the side of your boat
-
Without changing the length of the entire piece too much I think the last option makes the most sense. I should have used something besides a straight pin - was considering 2 pins but the dowel is not that thick and I was not sure I could drill 2 without splintering the end, Adding a "splint" of sorts and covering it with rope should work. A few more coils evenly spaced over the yard would probably not look too odd. I think that's the ticket. Thanks Don!
-
All good ideas Brian. Hadn't thought of brass but did consider coiling some rope around the joint for maybe an inch. Then soaking the rope in some water glue mixture. I even briefly considered lashing the 2 pieces side to side. Nothing is really striking me as the way to go.
- 204 replies
-
- 2
-
-
- trajta
- marisstella
- (and 1 more)