Julie Mo
-
Posts
885 -
Joined
-
Last visited
Recent Profile Visitors
3,376 profile views


-
 Scottish Guy reacted to a post in a topic:
For Beginners -- A Cautionary Tale
Scottish Guy reacted to a post in a topic:
For Beginners -- A Cautionary Tale
-
Scottish Guy reacted to a post in a topic:
For Beginners -- A Cautionary Tale
-
Scottish Guy reacted to a post in a topic:
For Beginners -- A Cautionary Tale
-
Archi reacted to a post in a topic:
Can i live without a BYRNES TABLE SAW
-
Rob S reacted to a post in a topic:
For Beginners -- A Cautionary Tale
-
Rach10199 reacted to a post in a topic:
DIY Dremel Table Saw/Router Table
-
Mike Y reacted to a post in a topic:
DIY Dremel Table Saw/Router Table
-
SJSoane reacted to a post in a topic:
DIY Dremel Table Saw/Router Table
-
Julie Mo reacted to a post in a topic:
Endeavour by John Gummersall - FINISHED - Amati - Scale 1:80 - J Class yacht
-
Julie Mo reacted to a post in a topic:
Endeavour by John Gummersall - FINISHED - Amati - Scale 1:80 - J Class yacht
-
Julie Mo reacted to a post in a topic:
Endeavour by John Gummersall - FINISHED - Amati - Scale 1:80 - J Class yacht
-
Julie Mo reacted to a post in a topic:
Endeavour by John Gummersall - FINISHED - Amati - Scale 1:80 - J Class yacht
-
Julie Mo reacted to a post in a topic:
Endeavour by John Gummersall - FINISHED - Amati - Scale 1:80 - J Class yacht
-
Julie Mo reacted to a post in a topic:
Endeavour by John Gummersall - FINISHED - Amati - Scale 1:80 - J Class yacht
-
Julie Mo reacted to a post in a topic:
Endeavour by John Gummersall - FINISHED - Amati - Scale 1:80 - J Class yacht
-
Julie Mo reacted to a post in a topic:
Endeavour by John Gummersall - FINISHED - Amati - Scale 1:80 - J Class yacht
-
 I agree. That planking is too pretty to paint over. Nice work!
 -
Julie Mo reacted to a post in a topic:
Endeavour by John Gummersall - FINISHED - Amati - Scale 1:80 - J Class yacht
-
Julie Mo reacted to a post in a topic:
Endeavour by John Gummersall - FINISHED - Amati - Scale 1:80 - J Class yacht
-
Converting a Backyard Shed into a Model Workshop
Julie Mo replied to Hank's topic in Modeling tools and Workshop Equipment
We did peel and stick tiles in our basement in the last house. When the floor was poured, they laid visqueen down first but that often gets pinholes when the pressure of the concrete presses on the 3/4" limestone below. So you could say the floor is questionable when it comes to being sealed from moisture wicking up. IIRC, the tiles were installed in the early 1990s. And they were still there when we sold the house in 2015. The only tiles that came loose were the ones that had something heavy dropped on them, like my son's weights. I was really surprised how well they stayed down. If you decided to go this route, I'd seal the floor first. That should give the tiles a good surface to adhere to. But if there is any give to the floor, that could present some problems. BTW, when we were selling the house, a couple realtors suggested we replace those tiles. This picture will tell you why.
-
Jointer question/recommendation
Julie Mo replied to davec's topic in Modeling tools and Workshop Equipment
I had a Craftsman 6" jointer for years. It had the power to handle whatever I threw at is as long as I adjusted the depth of cut accordingly. But after a while it became harder and harder to keep the table halves coplanar. I ended up giving the jointer away and bought a Lie-Nielsen #62 low angle jack plane. It changed my attitude toward woodworking. It made it much more enjoyable. While it takes longer, I get more satisfaction from the end result. (I also ended up buying more L-N planes, so you have to be careful going this route. It's addictive!) -
Converting a Backyard Shed into a Model Workshop
Julie Mo replied to Hank's topic in Modeling tools and Workshop Equipment
Hank, The problem with laminate flooring is it requires conditions typically found indoors, particularly in the temperature range. So sitting on a floor that may be substantially colder than the air temperature could cause problems. Sheet vinyl would be a good choice. But you would need a glue unaffected by vapor or temperature swings. Exterior grade paint is always an option. You could insulate the base of the shed with foam boards typically used for the exterior of basement foundation walls. That would reduce the temperature swings which would help minimize moisture issues. If you were building new, you'd lay down insulating board and put a vapor barrier over that. But I think if you insulate around the perimeter of the base, that could work well enough. Julie BTW, SO is significant other -
Converting a Backyard Shed into a Model Workshop
Julie Mo replied to Hank's topic in Modeling tools and Workshop Equipment
You're doing a really nice job, Hank. So nice you may have to put in a Murphy bed because I don't see you wanting to leave for a while after it's done. As to the floor, is it well insulated? What about a vapor barrier? Is the plywood fir or SYP? My SO is in flooring and recommends wood planking. -
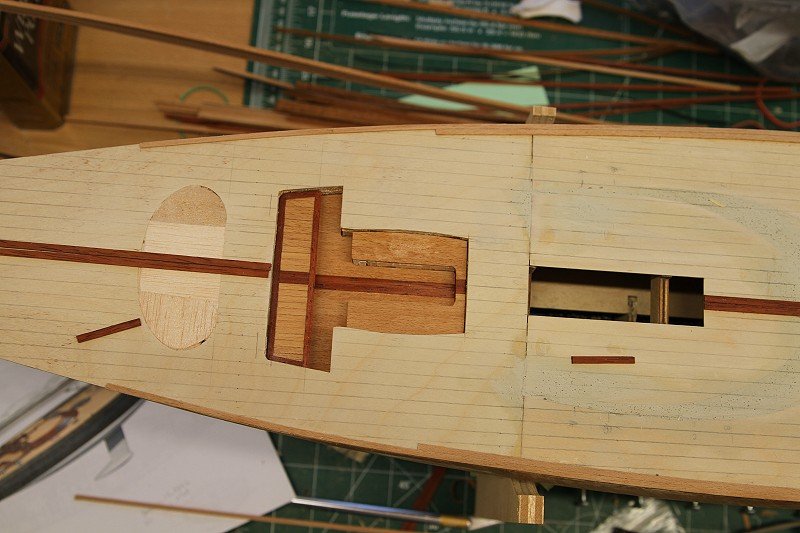
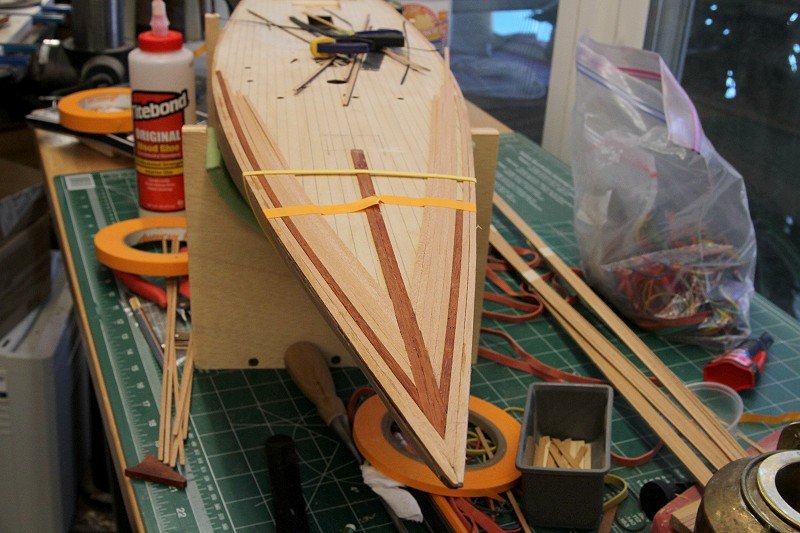
Now that I've got a reasonably accurate table saw and the padauk planks are cut, it's back to work. The recessed helm station on the Spirit 130 has been bothering me. It seems with the raised cabin and a single wheel, the helmsperson would have a tough time seeing what's ahead. So I filled it in with balsa to see how it would look without it. I made up the aft crew seat similar to what is on the Spirit 130. The other seating and the flooring didn't have the dark trim. But the dark separation between the planks didn't show upon the flooring or forward seating. Don't know why.
-
DIY Dremel Table Saw/Router Table
Julie Mo replied to Julie Mo's topic in Modeling tools and Workshop Equipment
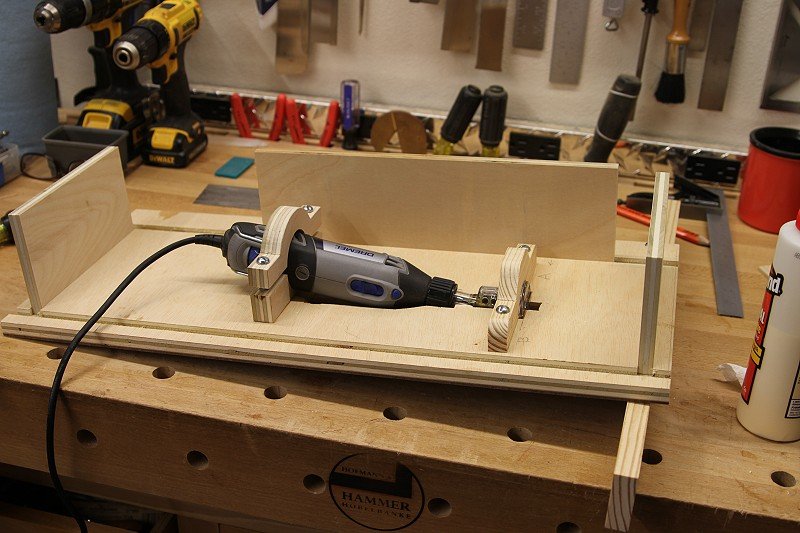
Just finished ripping the padauk I had previously sanded to 1mm thickness. This should be enough to get the deck done. As the width of the pieces I was ripping narrowed, things got a little dicey. Thus the wider strips in the photo below. Rating it, I'd say it does a decent enough job, especially considering the cost. The blade doesn't cut perfectly clean edges like I'm used to on my full-size table saw. But it only takes a few strokes with a sanding block to clean them up. Guiding the stock in requires close attention, but I suppose that's true of all wood this thin. The fence is rock solid and the blade doesn't show any signs of vibrating, other than what's inherent in the tool. I think the bracing held the tool pretty snug. If I find I am using this with any frequency, I'm sure there will be some modifications in the future. As for the sander, some modification is definitely necessary so as to keep the stock firm against the fence.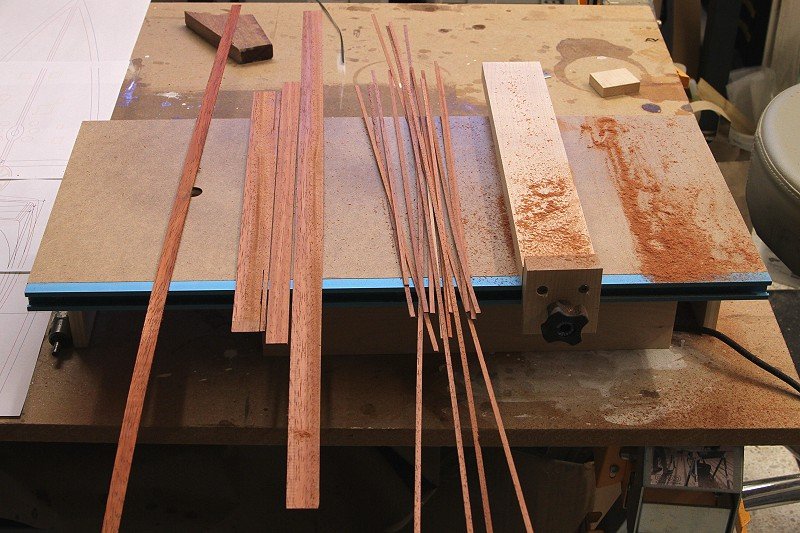
-
DIY Dremel Table Saw/Router Table
Julie Mo replied to Julie Mo's topic in Modeling tools and Workshop Equipment
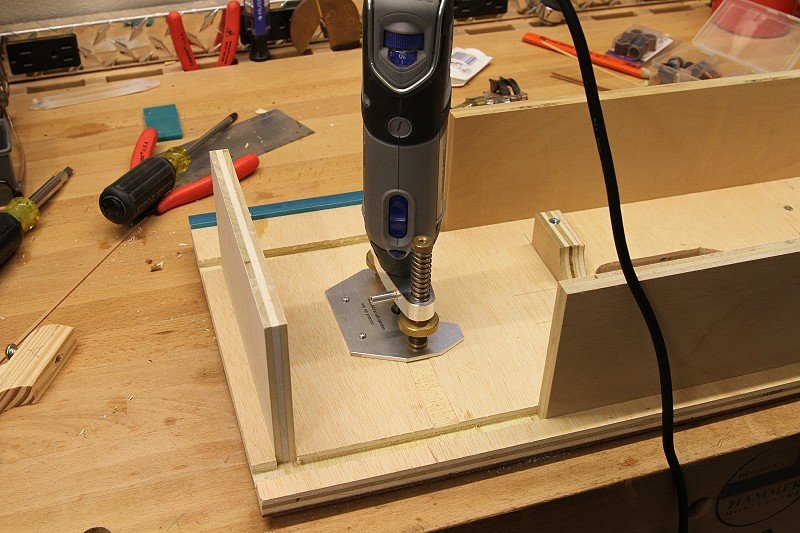
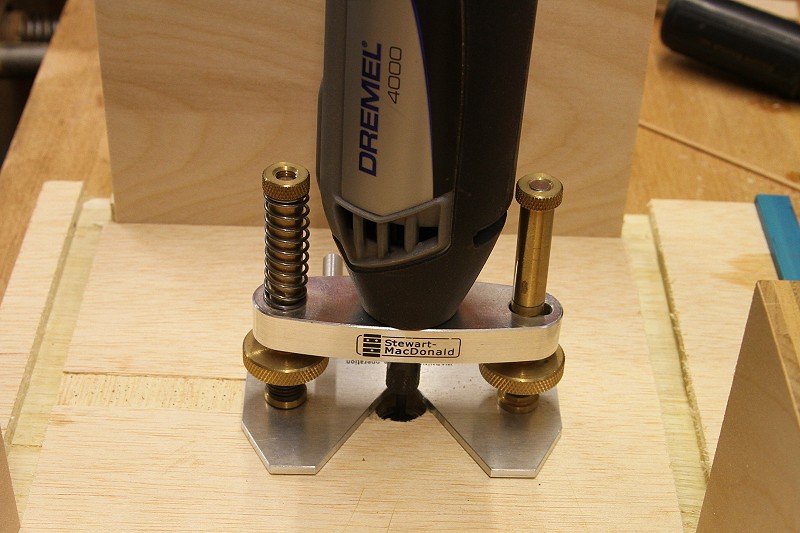
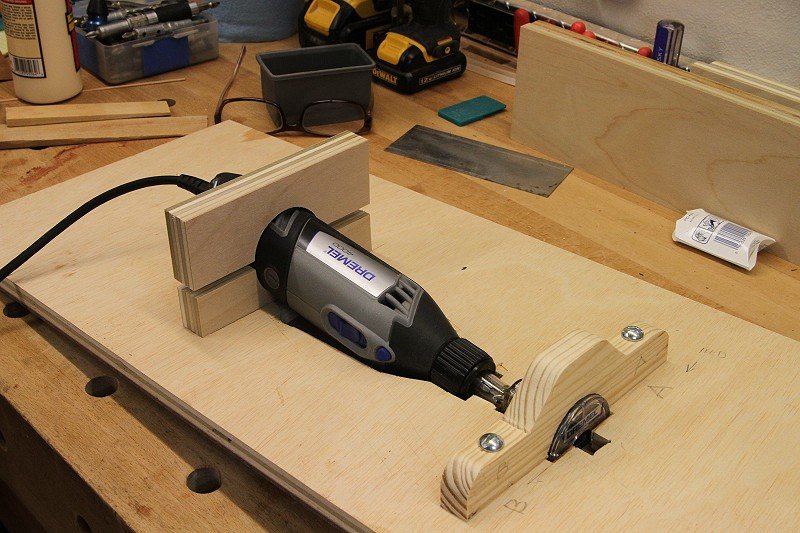
The router table modification was pretty straightforward. Find where you want it to go, drill a hole, mount an adjustable base and let 'er rip! When switching over to a routing bit, I don't think the larger hole will present any problems but I'm sure I'll find out when I try it. The base is by StewMac. Depth is adjustable enough to expose the full width of the Dremel sanding attachment. I rarely use this base so it can stay with the DIY table. A little clearer view of the base. The only negative is the sanding attachment is slightly larger than the V in the base, so it rubs against it when lowered. My immediate need is to rip 1x3mm planks. Tests show it can do that better than anything else I've tried. Later, I'll need the router table for an idea I have. Fingers crossed! Thanks for the likes! Julie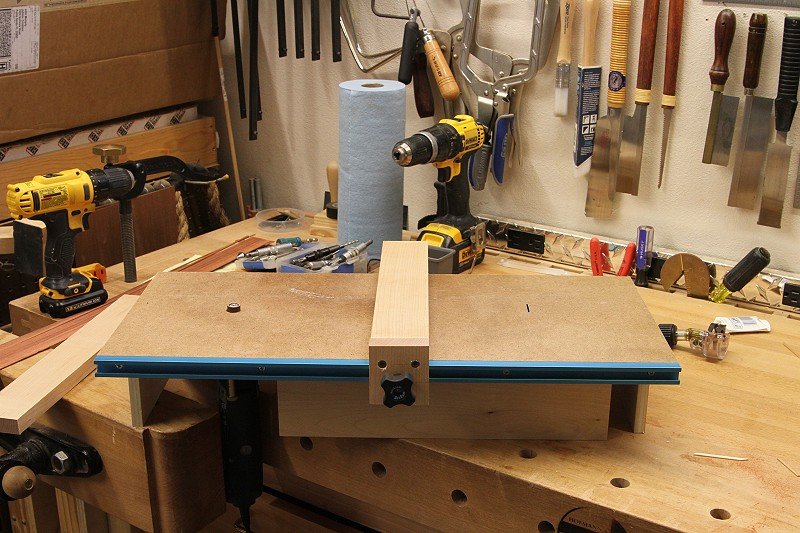
-
DIY Dremel Table Saw/Router Table
Julie Mo replied to Julie Mo's topic in Modeling tools and Workshop Equipment
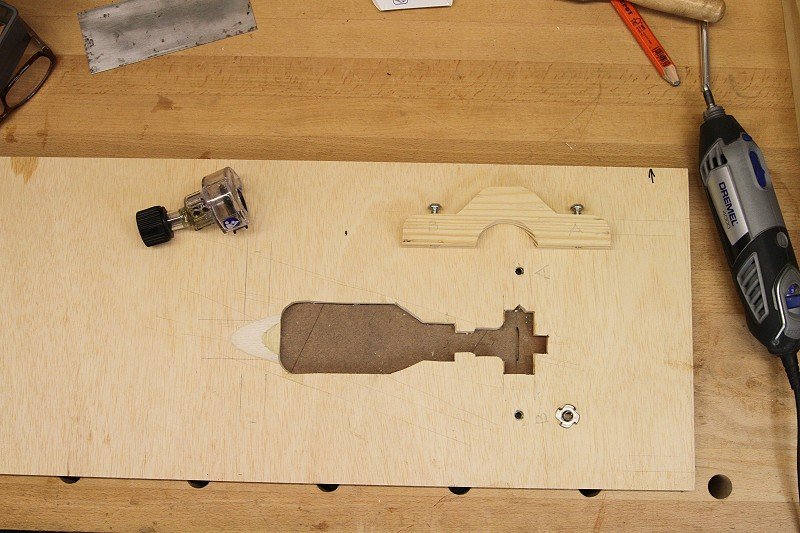
I shaped the top of the brace and used 1/4-20 inserts in the bottom half. Since the Dremel lays at an angle, I took a rasp to soften the inside of the brace. I ran dados along the bottom for 1/2" plywood supports. None of these will be glued in for now. It will make it easier to store. The Dremel is pretty easy to remove when done. Table saw half finished. I used a universal T track for the fence rail. The Fence is made of quartersawn maple jointed straight. First test on some 1mm stock ripped to 3mm wide ran pretty well. So far, everything was made with materials I had on hand. Later, I will make the other half a router table. I think I have everything I need to finish that up, too.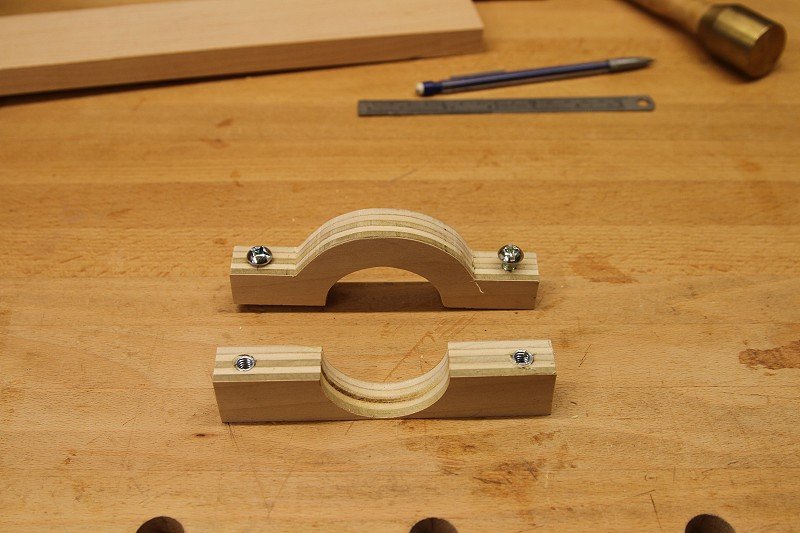
-
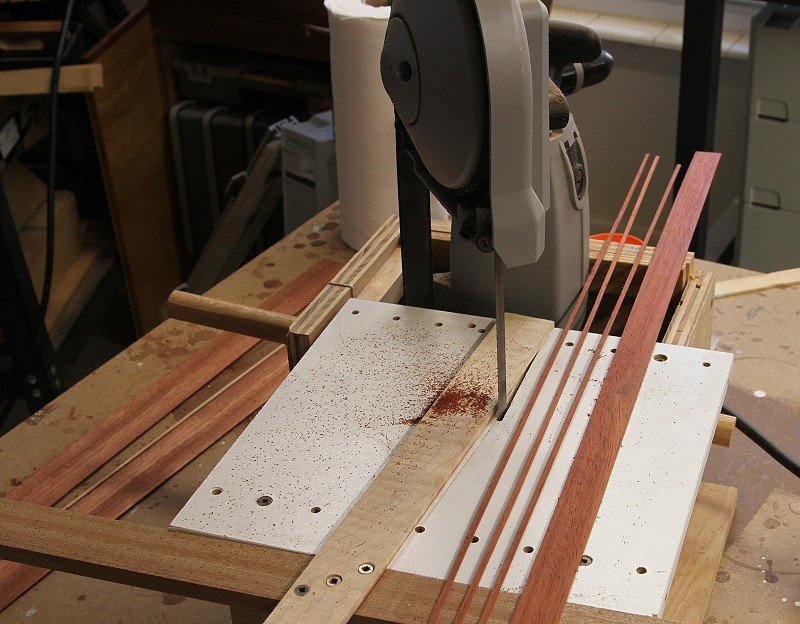
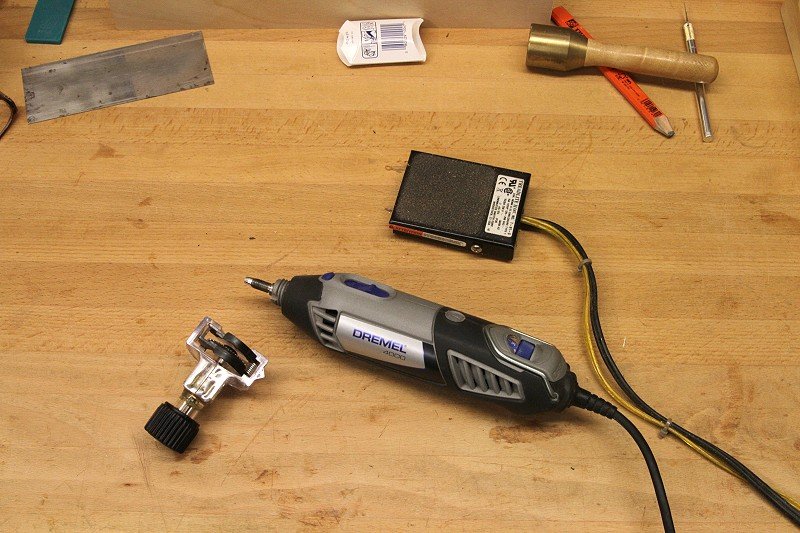
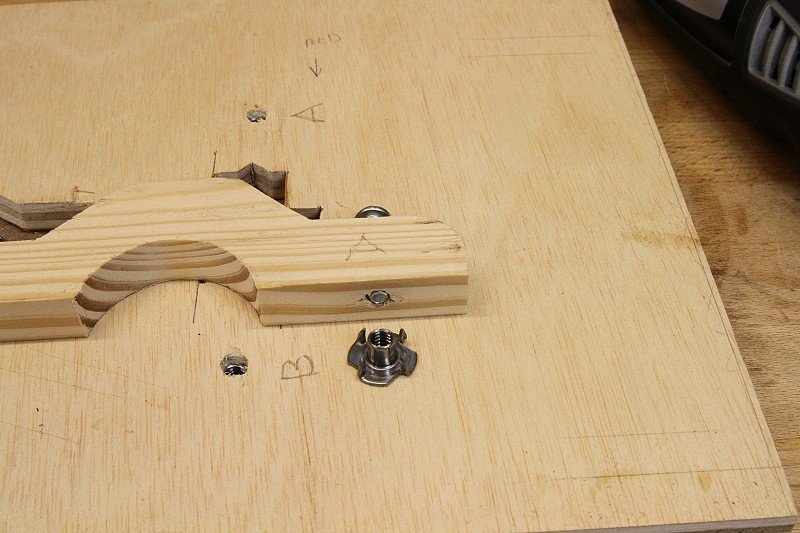
"The most expensive tools are the ones you buy cheaply and often." While I usually heed the wisdom of that warning there are times when you can't afford the best tools or can't justify the expense. I have finally realized, though I enjoy model making, I have too many irons in the fire to justify buying a Byrnes, or anything else, for that matter. But I do want to finish this model. Thus this DIY effort. What prompted this was everything else I tried failed to produce usable planks for the ship's decks. So I did a web search and found these plans. Anyone who has followed my build thread knows I quickly stray from the plans. And I held true to my tendencies. After looking around the shop I realized I may be able to make this mini table saw with what I already have. Below is a Dremel 4000, their circular saw attachment and a foot activated switch. I took a piece of 1/2" plywood and cut out the area for the Dremel according to the above plans. The Dremel saw attachment has a spring loaded guard that has a lot of resistance to it so it can't be used as a table saw guard. Even if it could be used, it's too wide if you are looking for a zero clearance slot. This is close to the max depth you can get with the attachment. So I had to keep the finished top as thin as possible while still allowing for sufficient strength to hold back the spring guard. I took a 1/8" piece of masonite and adhered it to the 1/2" plywood with contact cement. Next was making something that would hold the attachment in place. Before I glued the masonite to the plywood, I hammered in some T-nuts to secure the brace. Now I've got to work on the back brace.

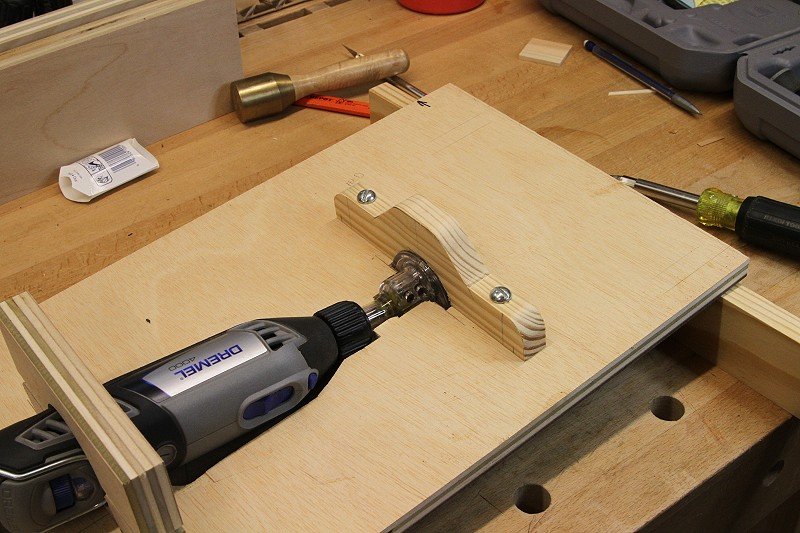
-
I was just looking at this, as a means to rip wood I milled for deck planking. When I saw it was an upside down jig saw, I abandoned the idea. The Byrnes is simply too expensive for what will most likely be a one-time build. Thus the search for something that will rip wood to acceptably consistent widths. My Porta Band setup couldn't do that because the blade moves side-to-side just enough to create inconsistencies. I found plans on the Indestructibles website for a table saw for a Dremel. I already own the Dremel and the circular saw attachment. The plans are free and I've already downloaded them so this should be a fairly inexpensive venture. I'll let you know how it goes.
-
Nice work, Richard! I had no idea how small the model was until I saw your hand. Then I was really impressed!
-
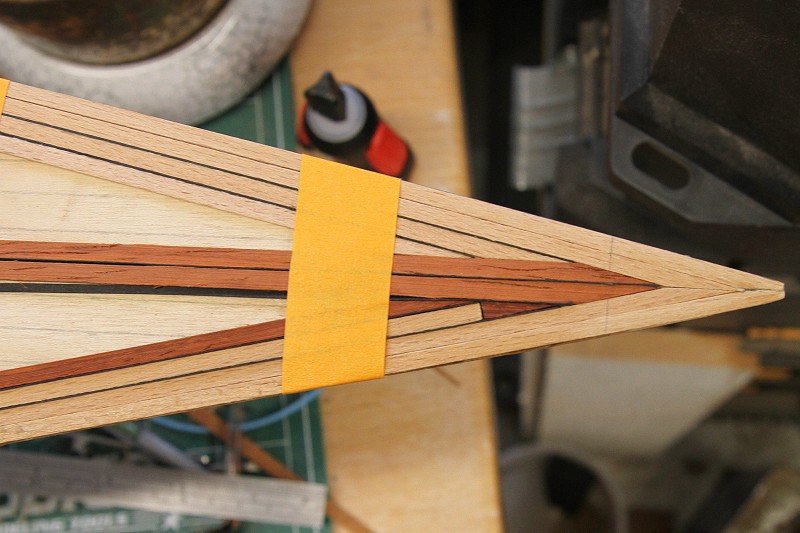
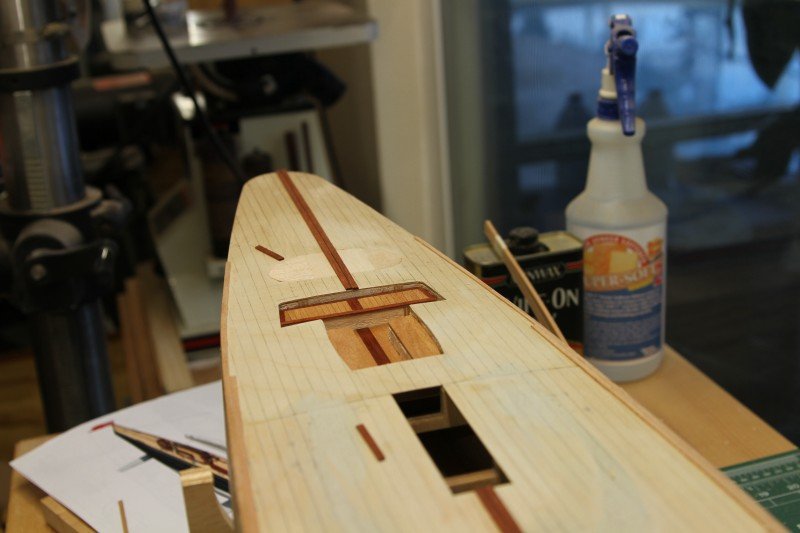
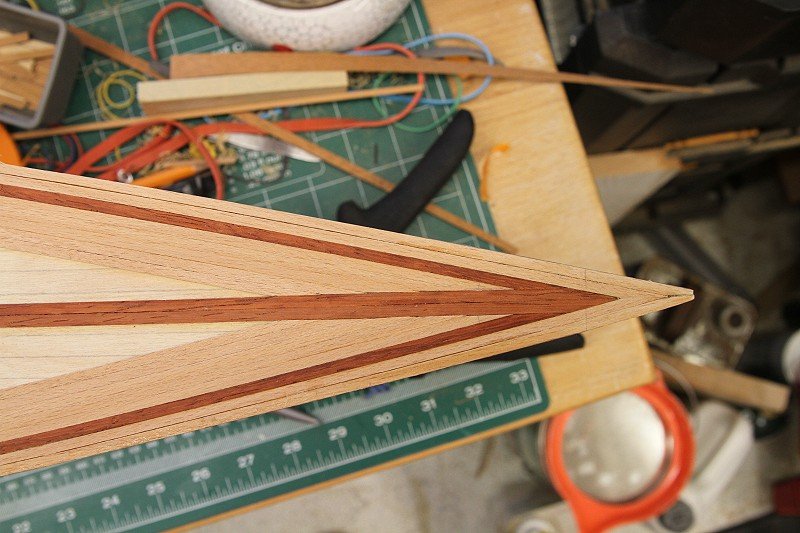
More playing around with the deck patterns. With this plan I'd be using the padauk to surround the hatches, to break up the monotony a bit. I like the cleaner look of this layout but am still not committed. Isn't it a woman's prerogative to change her mind?
-
Thank you for the thumbs up! It's much appreciated. I was playing with different deck plank designs when, just before I dozed off last night, I came up with something I wanted to try today. But first I had to find some darker woods, which I didn't have already milled. I settled on padauk, not the best grain-wise but the color was just want I wanted. The stock I have has a lot of red in it. All my milling tools are for full-sized lumber but I was able to resaw, joint, resaw, etc until I had three strips close to the thickness of the deck planks I purchased. I was then able to use the drum sander to get it to the same thickness as the other planks. But how to cut them into the same width? A full-sized table saw isn't the answer. Then the light bulb clicked on. Years ago I made a table for a Milwaukee Porta Band I have. I've used it for cutting conduit and Unistrut but I needed a table to cut up some metal wall tiles. It worked pretty well. So I took it out to see how it would work cutting the padauk strips to width. Not bad! Next was to test my idea. I ran two padauk planks down the center. On the port side I taper cut the birch planks to butt up to the padauk center planks. On the starboard side I would add a padauk insert so the birch plank would butt at 90 degrees. Sort of creating a saw-tooth design with the padauk. (imagine the padauk plank to the left of the tape is birch) I'm leaning toward the saw-tooth design.