


Koppalakki
-
Posts
172 -
Joined
-
Last visited
1 Follower
.thumb.jpeg.fc5d633a7b34428fcf19419a73d56d55.jpeg)
Recent Profile Visitors
2,082 profile views


-
 yvesvidal reacted to a post in a topic:
USS Missouri by Koppalakki - FINISHED - Tamiya - 1/350 - PLASTIC - 1991 configuration with Pontos detail set
yvesvidal reacted to a post in a topic:
USS Missouri by Koppalakki - FINISHED - Tamiya - 1/350 - PLASTIC - 1991 configuration with Pontos detail set
-
 I suggest you prime (if you didn't) and use Mr. color leveling thinner to thin Tamiyas paints, I assure after that you don't have any problems of paint peeling off anymore! The leveling thinner makes the paint so much stronger and with good primer is a damn good combination.
 -
Thank you for your couraging words! Fun ride, even though at times the sheer ammount of work can feel a bit overwhelming... What's next? Hmm.. a carrier? No, gonna be something small and cute just to clear my head! 😋
-
Just fold them. It's best to fold them in a hold and fold using a sharp knifes blade to do the bend so it comes as sharp as possible.
- 140 replies
-
- 6
-
-
- the sullivans
- trumpeter
- (and 2 more)
-
Just search it for from your hobby shop. Atleast freetime has it https://freetimehobbies.com/gator-grip-hobby-acrylic-glue-original/
- 140 replies
-
- 5
-
-
- the sullivans
- trumpeter
- (and 2 more)
-
Gator Grip white glue is worth a try. It works really well for PE doors and other details you want to adjust. Though you need to be patient with it as it can take over 15 minutes to cure so you might "adjust" the part unintentionally!
- 140 replies
-
- 6
-
-
- the sullivans
- trumpeter
- (and 2 more)
-
Thank you gentlemen! Just a few launches to finish, some final detailing passes and we should be guchi! Fairly fast 6 months with all the detailing in mind though! 😁
-
And prolly the last update before finishing! After seeing this I knew exactly what I wanted to have on the helipad! Only one I could find in 1/350 for the moment was a Sea Dragon from Orange hobby so that had to do! The chopper is made of resin and some PE details. I dressed her up with my own details including grab handles wires etc. details. And on the deck! Had to move the Pioneer a bit and added one deck equipment tractor.
- 178 replies
-
- 19
-
-
Some minor stuff before the great end! Some finished liferafts and a bushmaster. Some launches. It's getting there!
- 178 replies
-
- 23
-
-
I would if I actually made a sea base for it! In my opinion displaying the ship like I do doesn't really fit into it. Atleast in my opinion. If doing a simple diorama then hell yes!
-
If you look at real pictures of the ship you can see that there are 2 types of railing. Solid and ones with wires running through them. The ones painted black are simulating the wire ones.
-
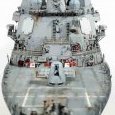
Some smaller details I've been working on. Added some warning lights near the aft boom. Used some 0.2mm brass wire to get the basic shape of the lights. After this the light bulb section was build up using white glue. After painting the bulb section is first painted chrome silver, then some light clear orange. The usual electric lines added. One RQ-2 Pioneer standing on the platform ready to be launched. Some addition details to the pioneer equipment. Containers for the equipment added behind the aft turret. Started to add the life rafts. Some grab handle ladders and some leasure activities added. All the rest of the directors finished. Anchors and jack staff finished.
- 178 replies
-
- 18
-