Peter Bloemendaal
-
Posts
236 -
Joined
-
Last visited
3 Followers


-
 Obormotov reacted to a post in a topic:
Completed Model Gallery is for Completed models only
Obormotov reacted to a post in a topic:
Completed Model Gallery is for Completed models only
-
 Peter Bloemendaal reacted to a post in a topic:
USF Confederacy 1778 by WalrusGuy - Model Shipways - 1:64
Peter Bloemendaal reacted to a post in a topic:
USF Confederacy 1778 by WalrusGuy - Model Shipways - 1:64
-
Peter Bloemendaal reacted to a post in a topic:
USF Confederacy 1778 by WalrusGuy - Model Shipways - 1:64
-
Peter Bloemendaal reacted to a post in a topic:
USF Confederacy 1778 by WalrusGuy - Model Shipways - 1:64
-
Peter Bloemendaal reacted to a post in a topic:
USF Confederacy 1778 by WalrusGuy - Model Shipways - 1:64
-
Peter Bloemendaal reacted to a post in a topic:
USF Confederacy 1778 by WalrusGuy - Model Shipways - 1:64
-
Peter Bloemendaal reacted to a post in a topic:
USF Confederacy 1778 by WalrusGuy - Model Shipways - 1:64
-
Peter Bloemendaal reacted to a post in a topic:
USF Confederacy 1778 by WalrusGuy - Model Shipways - 1:64
-
Peter Bloemendaal reacted to a post in a topic:
USF Confederacy 1778 by WalrusGuy - Model Shipways - 1:64
-
GrandpaPhil reacted to a post in a topic:
USF Confederacy 1778 by Peter Bloemendaal - Model Shipways - Scale 1:64
-
CaptMorgan reacted to a post in a topic:
USF Confederacy 1778 by Peter Bloemendaal - Model Shipways - Scale 1:64
-
Peter Bloemendaal reacted to a post in a topic:
USF Confederacy 1778 by WalrusGuy - Model Shipways - 1:64
-
Peter Bloemendaal reacted to a post in a topic:
USF Confederacy 1778 by WalrusGuy - Model Shipways - 1:64
-
WalrusGuy reacted to a post in a topic:
USF Confederacy 1778 by Peter Bloemendaal - Model Shipways - Scale 1:64
-
WalrusGuy reacted to a post in a topic:
US Brig Syren by WalrusGuy - FINISHED - Model Shipways - Scale 1:64 - Second wooden ship build
-
Edwardkenway reacted to a post in a topic:
US Brig Syren by WalrusGuy - FINISHED - Model Shipways - Scale 1:64 - Second wooden ship build
-
CODY reacted to a post in a topic:
USF Confederacy 1778 by Peter Bloemendaal - Model Shipways - Scale 1:64
-
abelson reacted to a post in a topic:
US Brig Syren by Peter Bloemendaal - FINISHED - Model Shipways - 1:64
-
DmitriyMarkov reacted to a post in a topic:
USF Confederacy 1778 by Peter Bloemendaal - Model Shipways - Scale 1:64
-
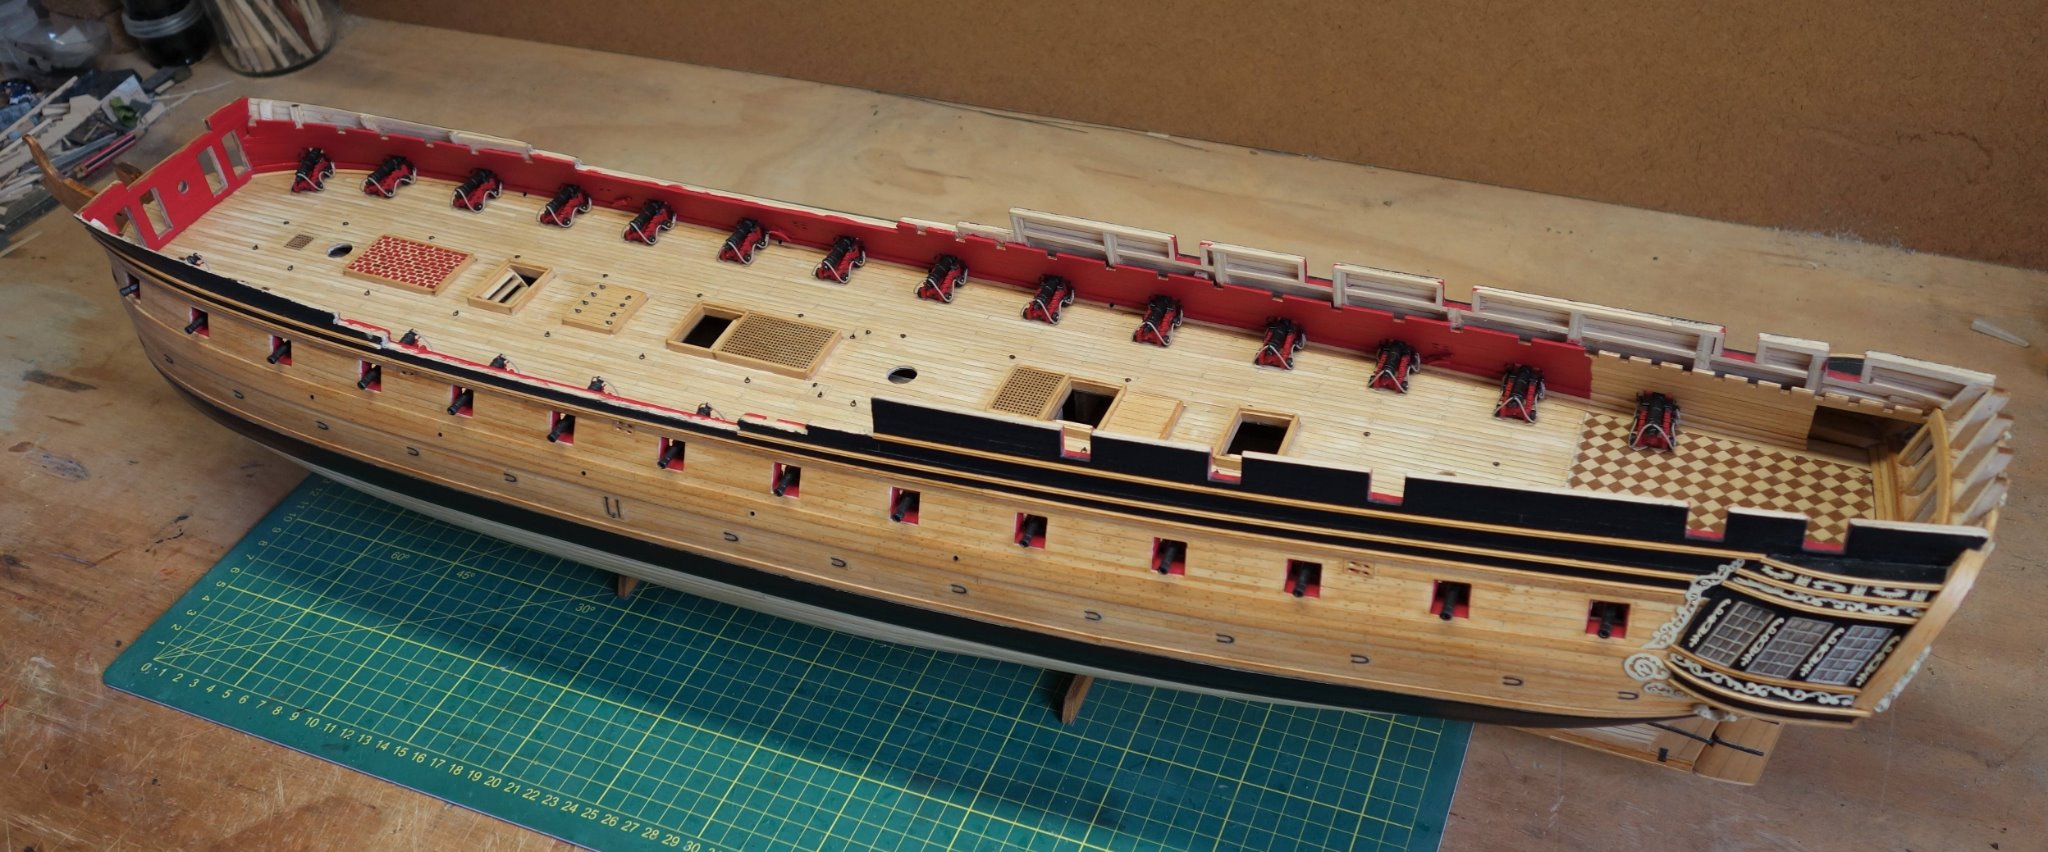
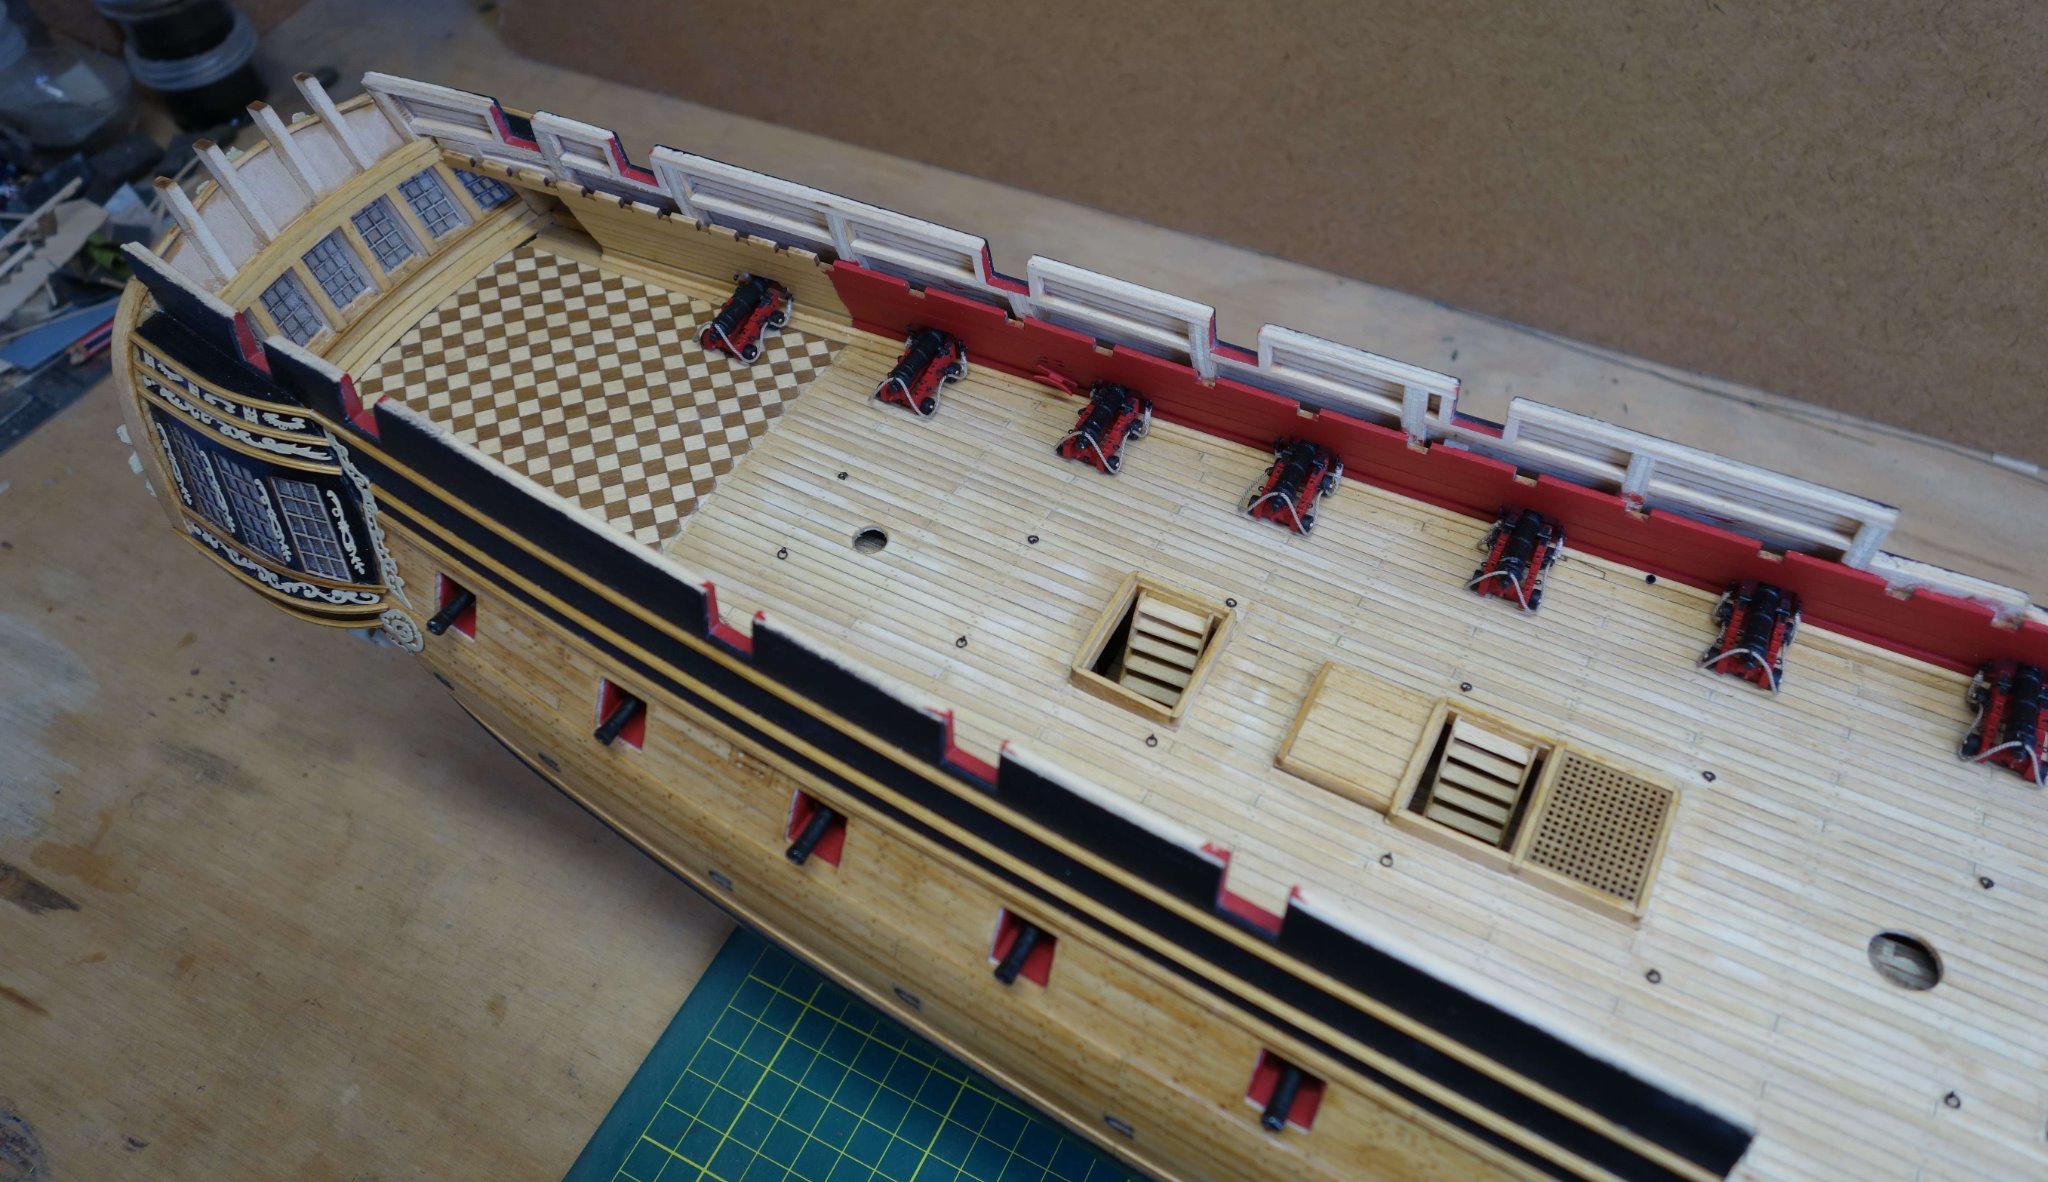
 Thanks Bossman, Chuck and PRS and also thanks again for all the likes. Well, the speaking tube with tube bases, mizzen mast coat, ship's wheel ropes, hanging and lodging knees and second bulkhead are in. Before I can continue I need to get the next 4 sets of gun tackles done (sigh) so it's a good opportunity now for some photo's. Here she goes...
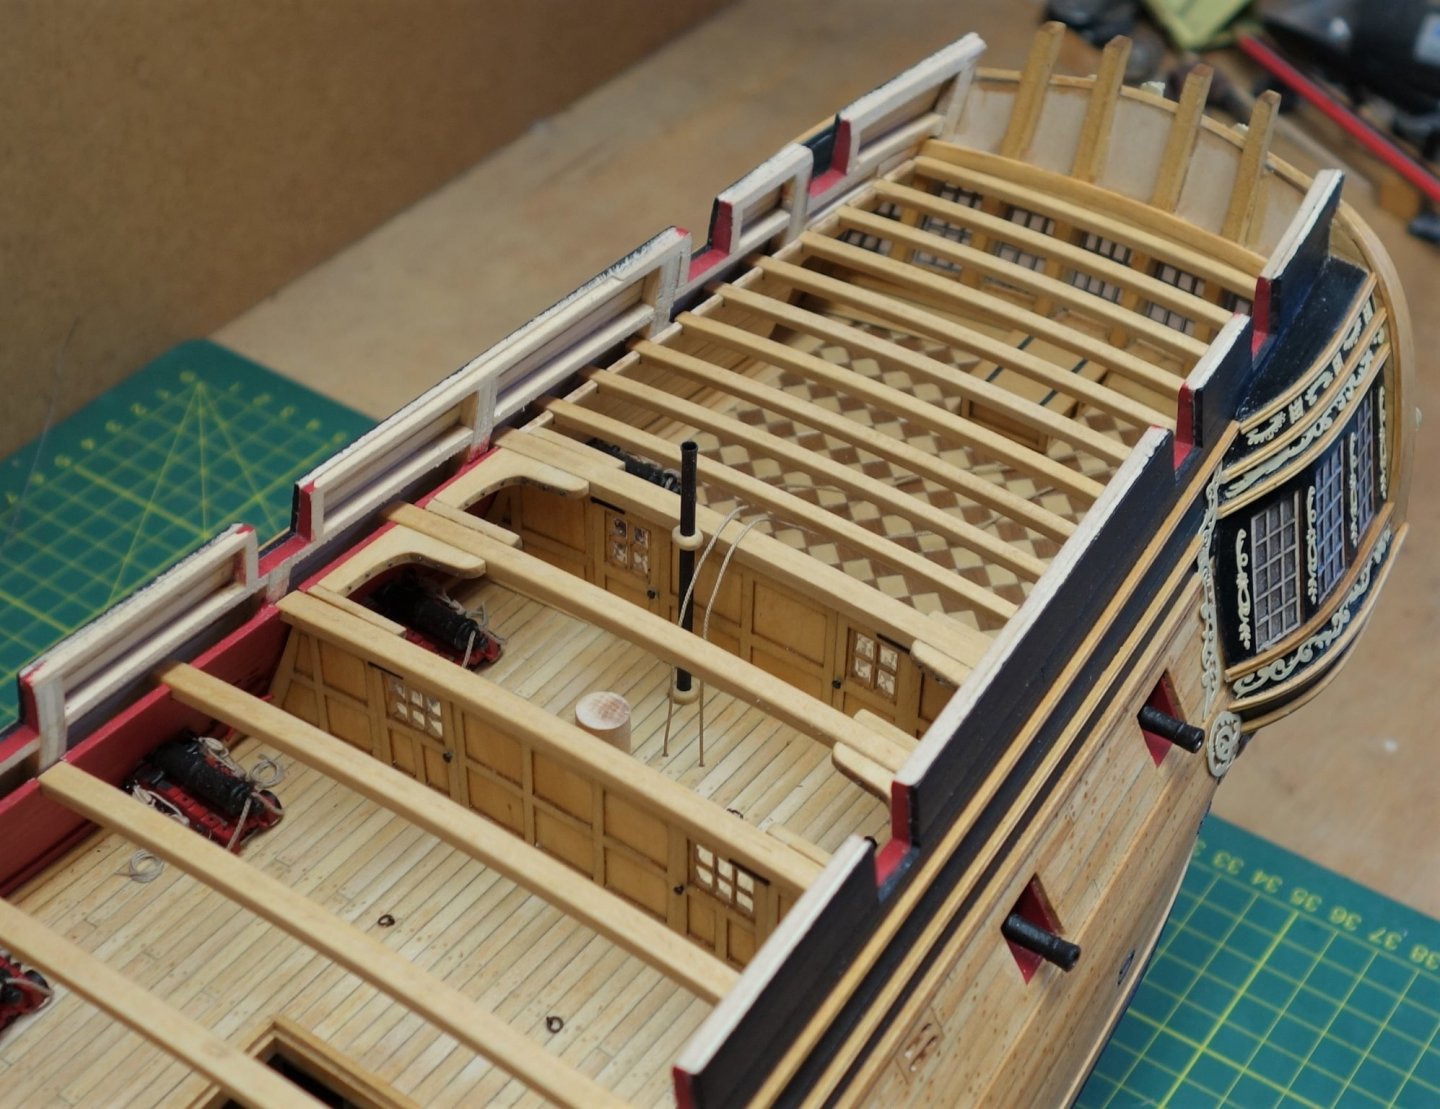


-
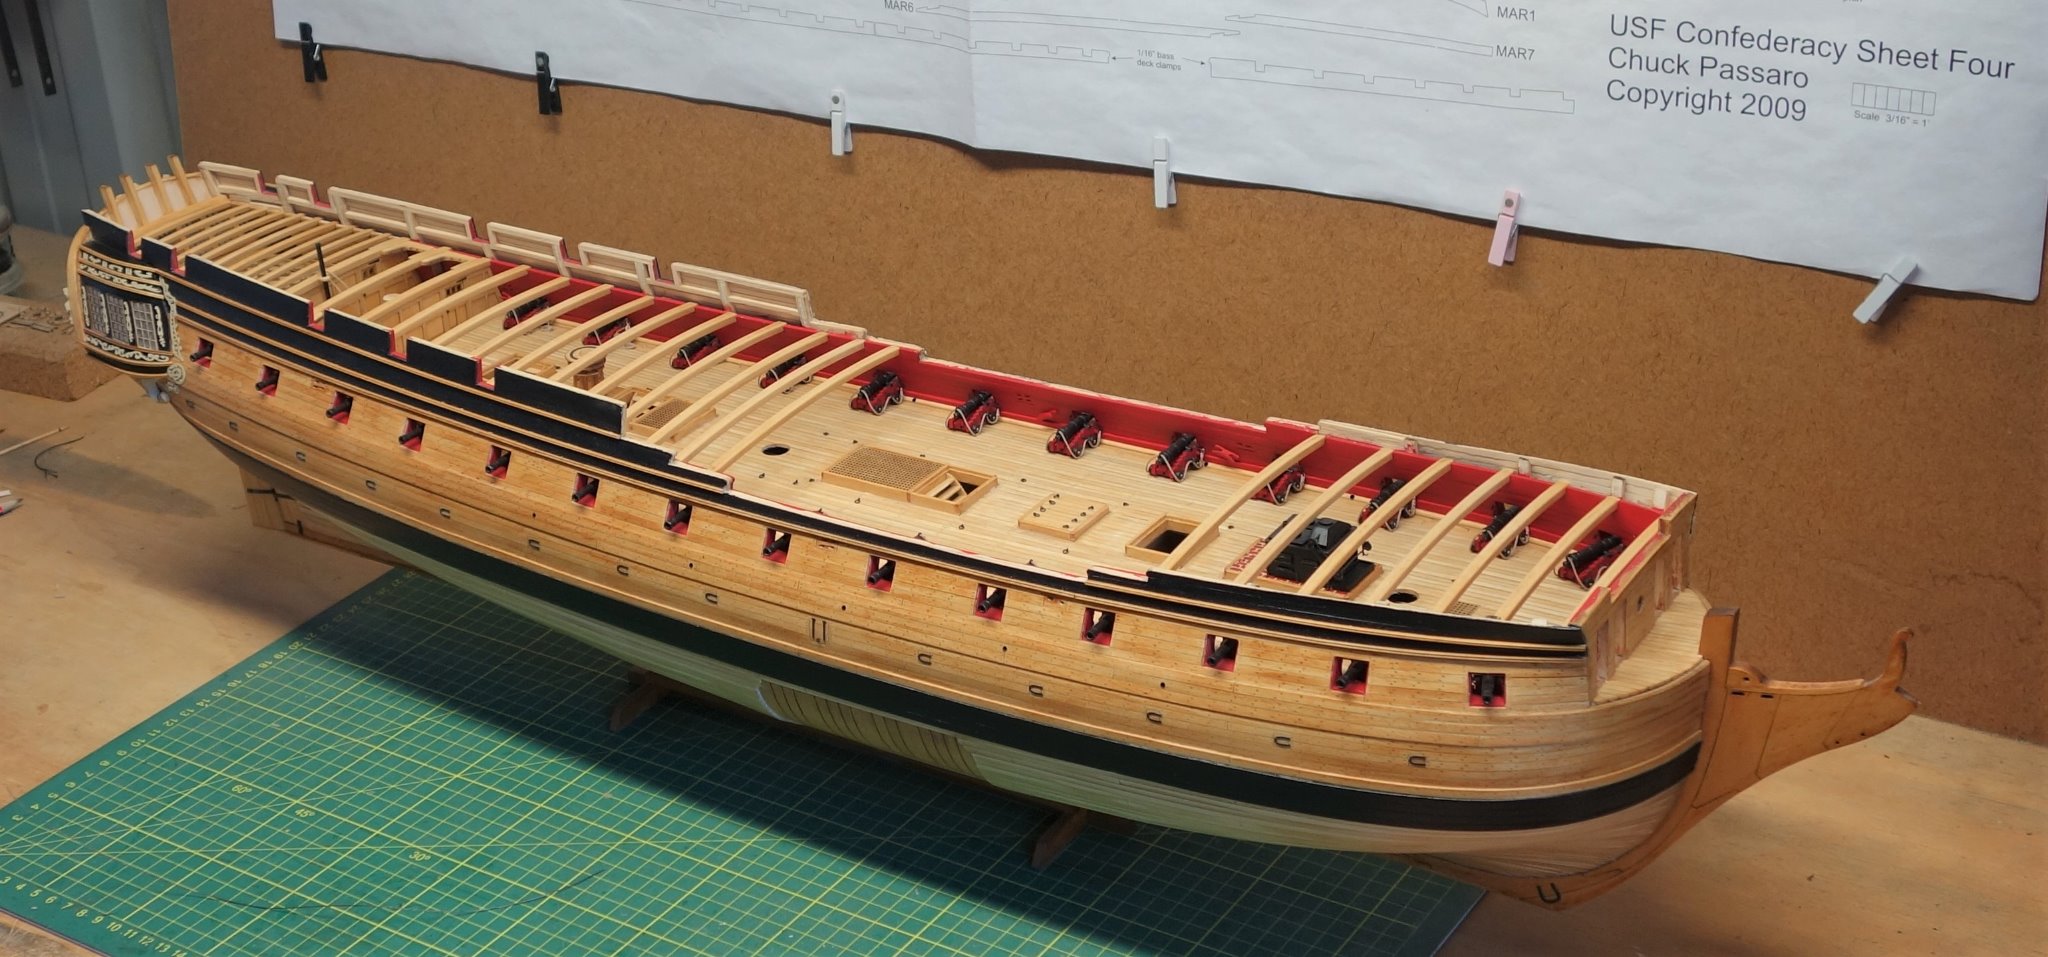
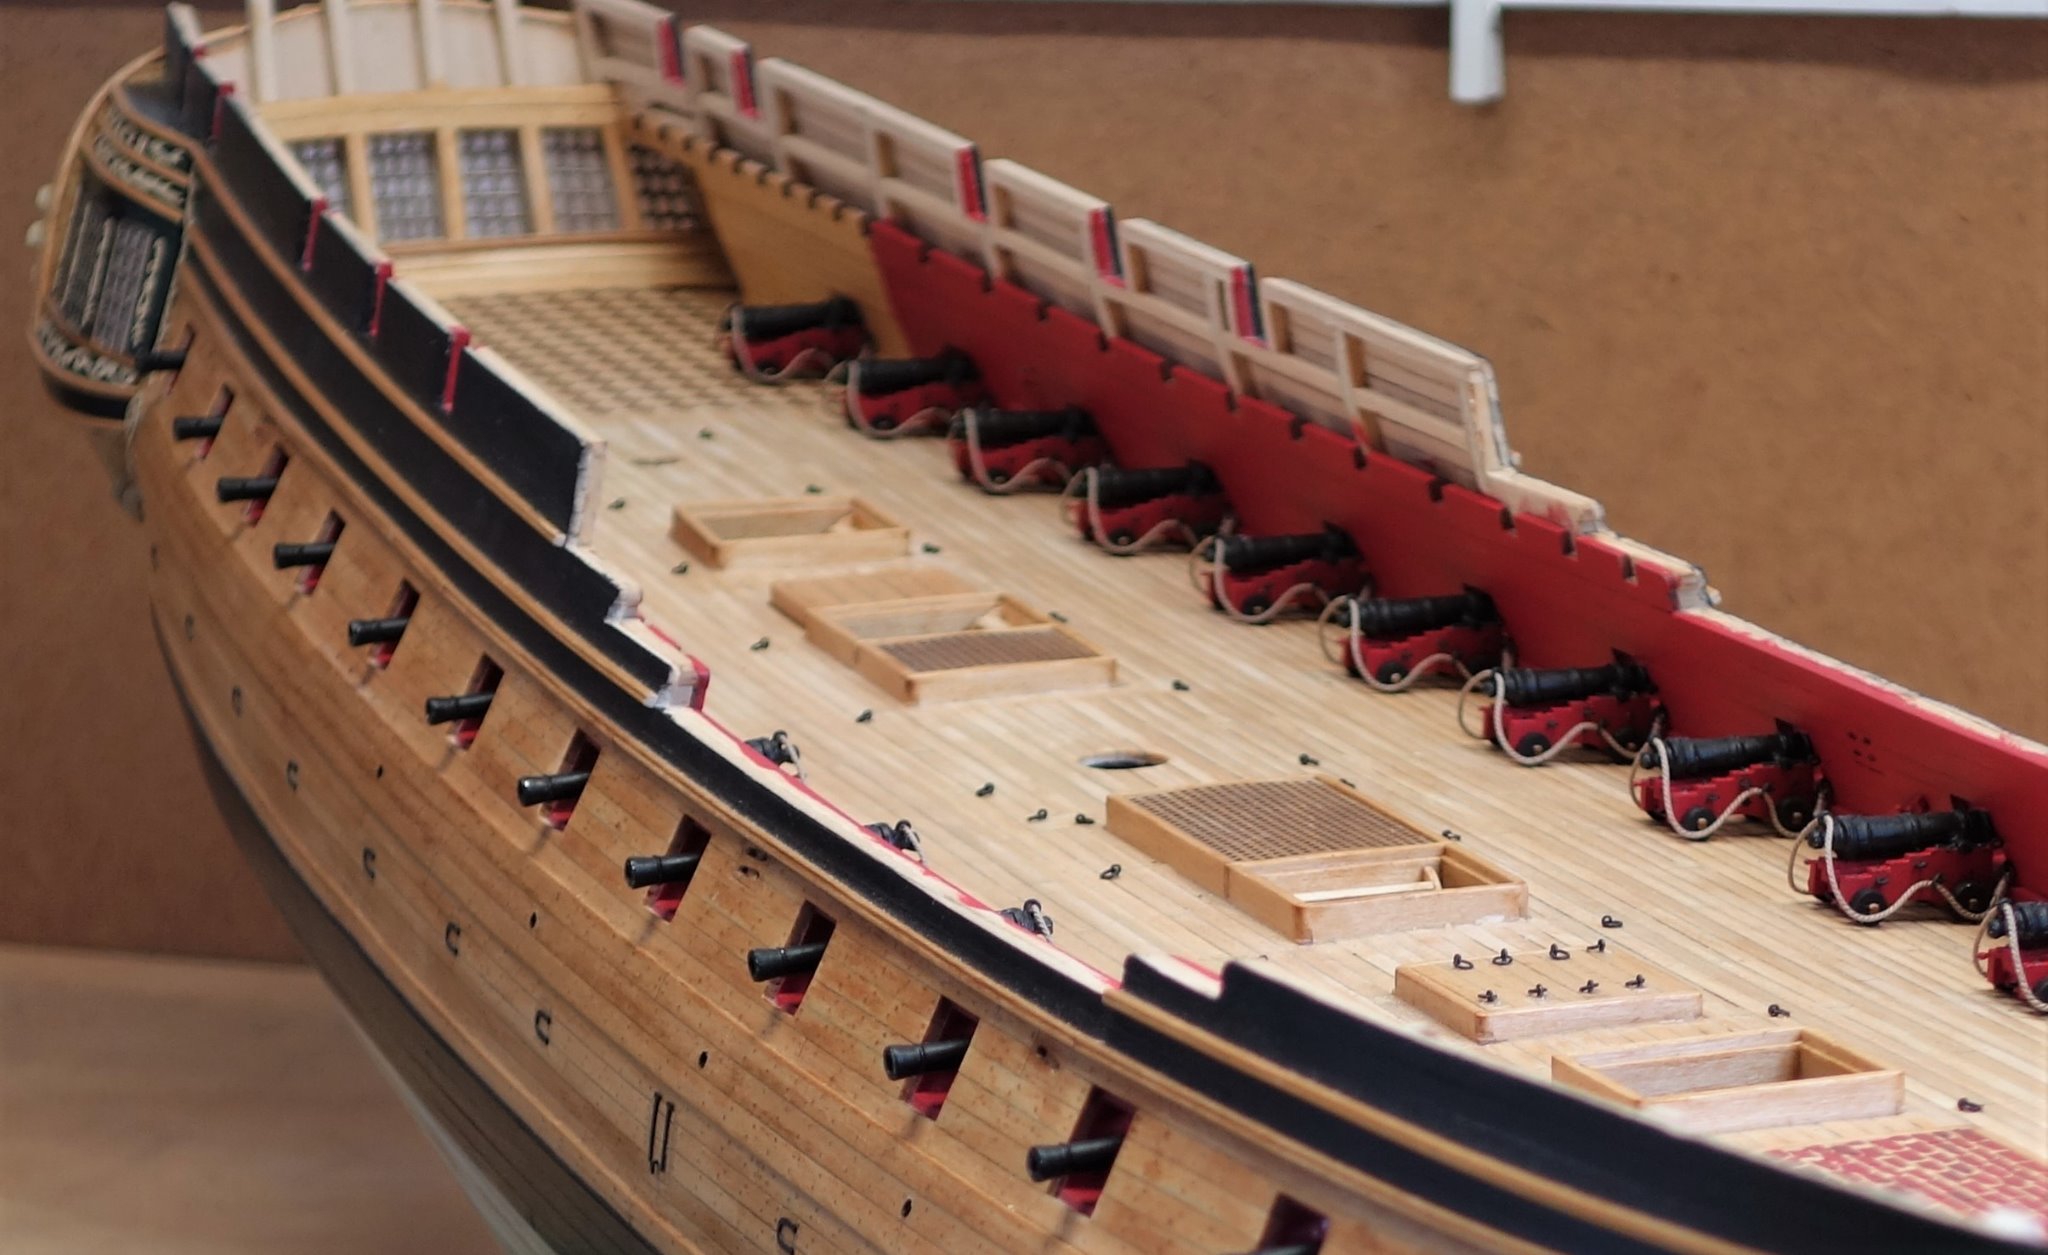
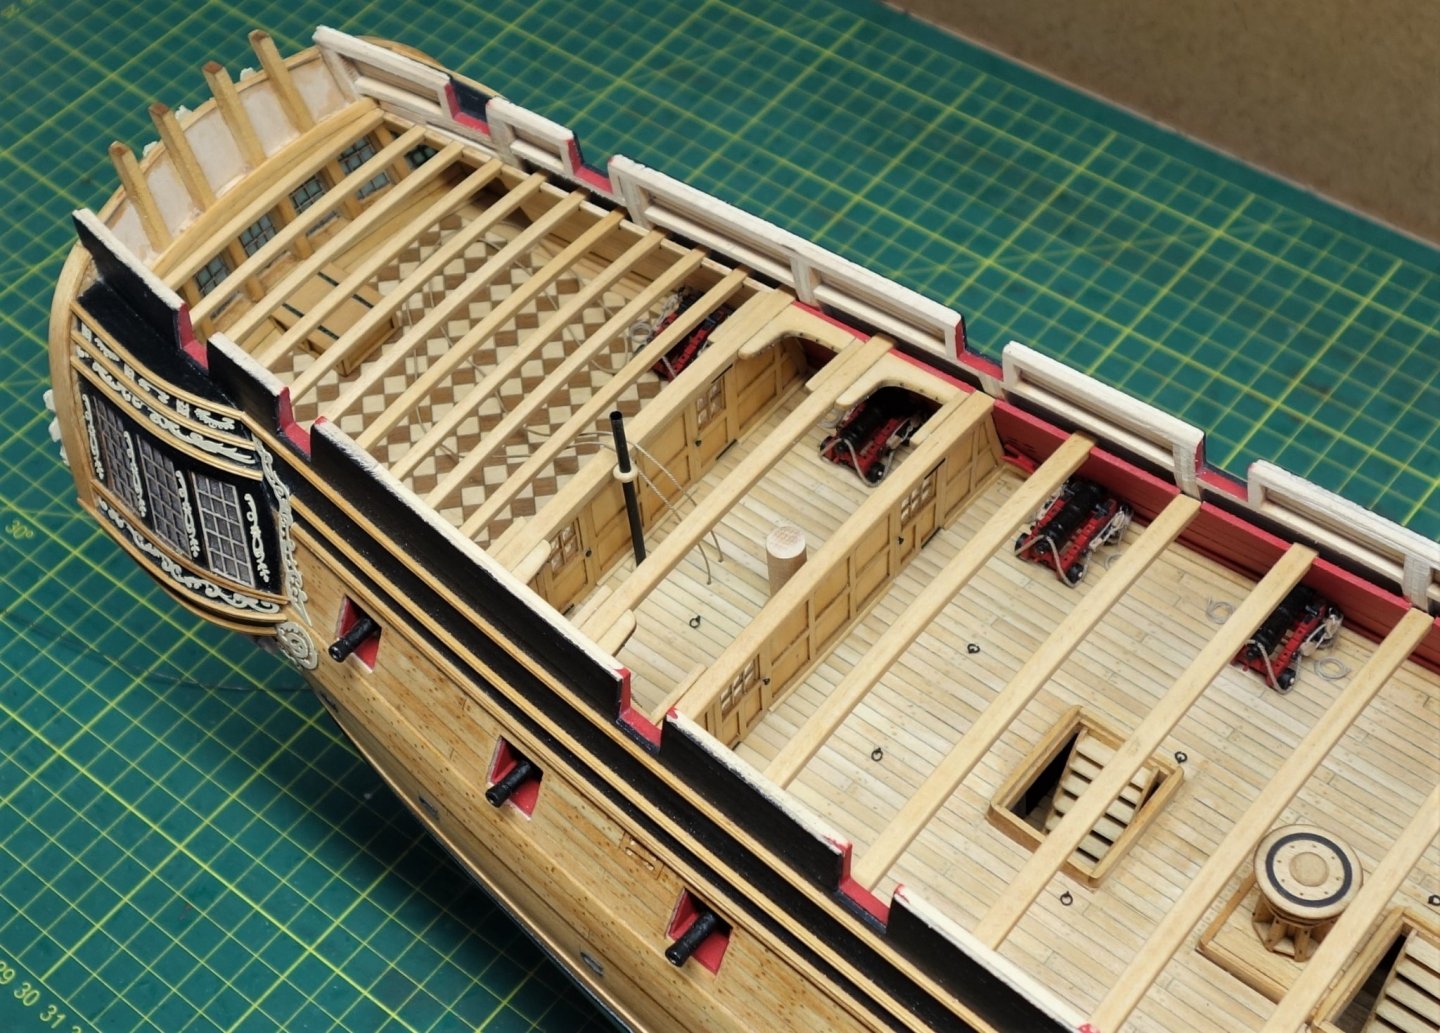
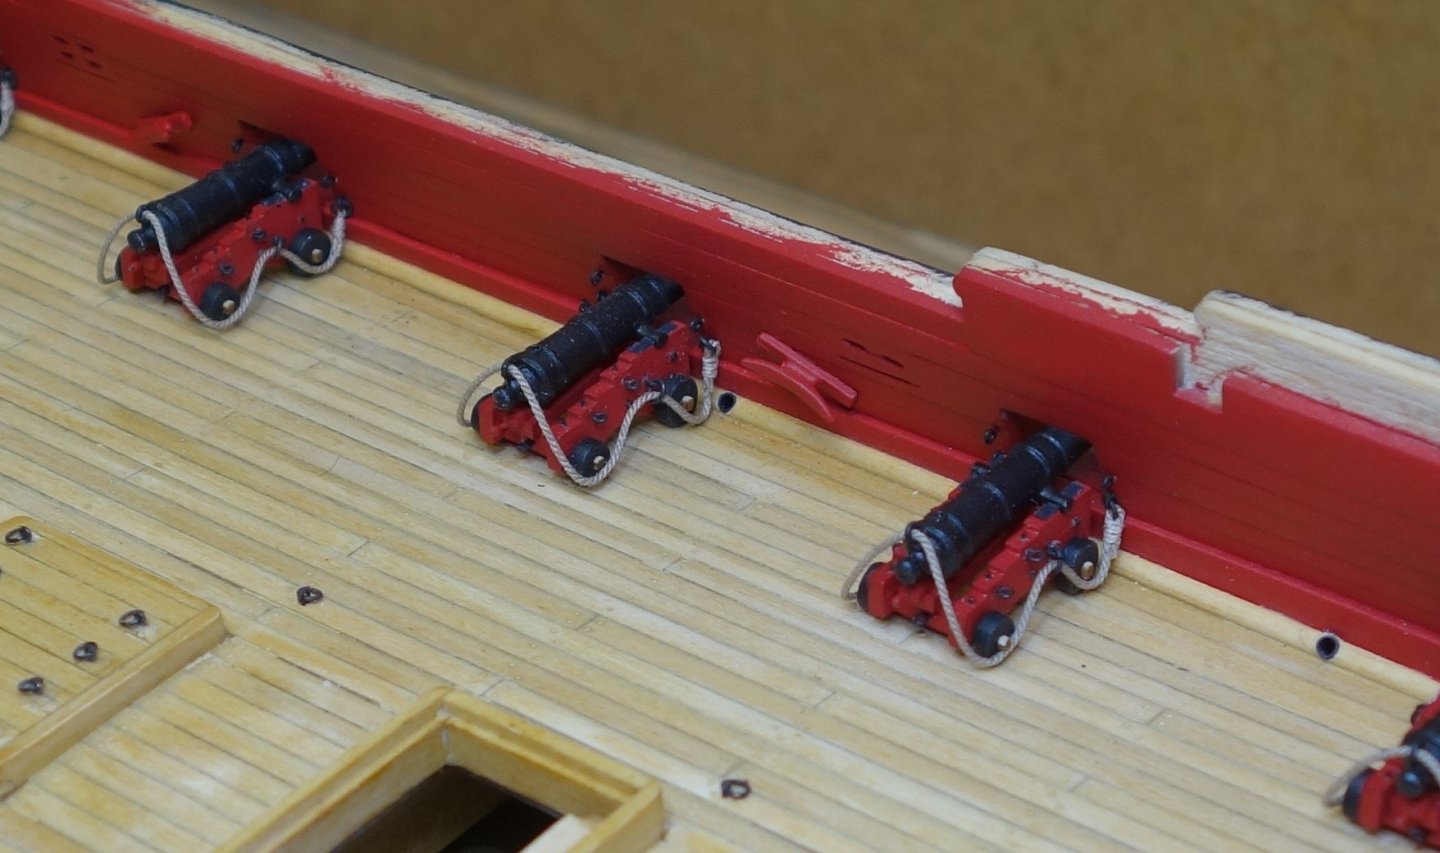
Thanks Vladimir and thanks for the likes as well. I ended up deciding to add the gun tackles as well. So the break in working on the guns and doing some deck fittings must have helped...lol. I have started working from the aft and doing them in sets of 4 or 5 so I can continue building up the gun deck following the instructions. As this point 4 sets of guns are done and I have added the aft bulkhead. Here are a few photo's.


-
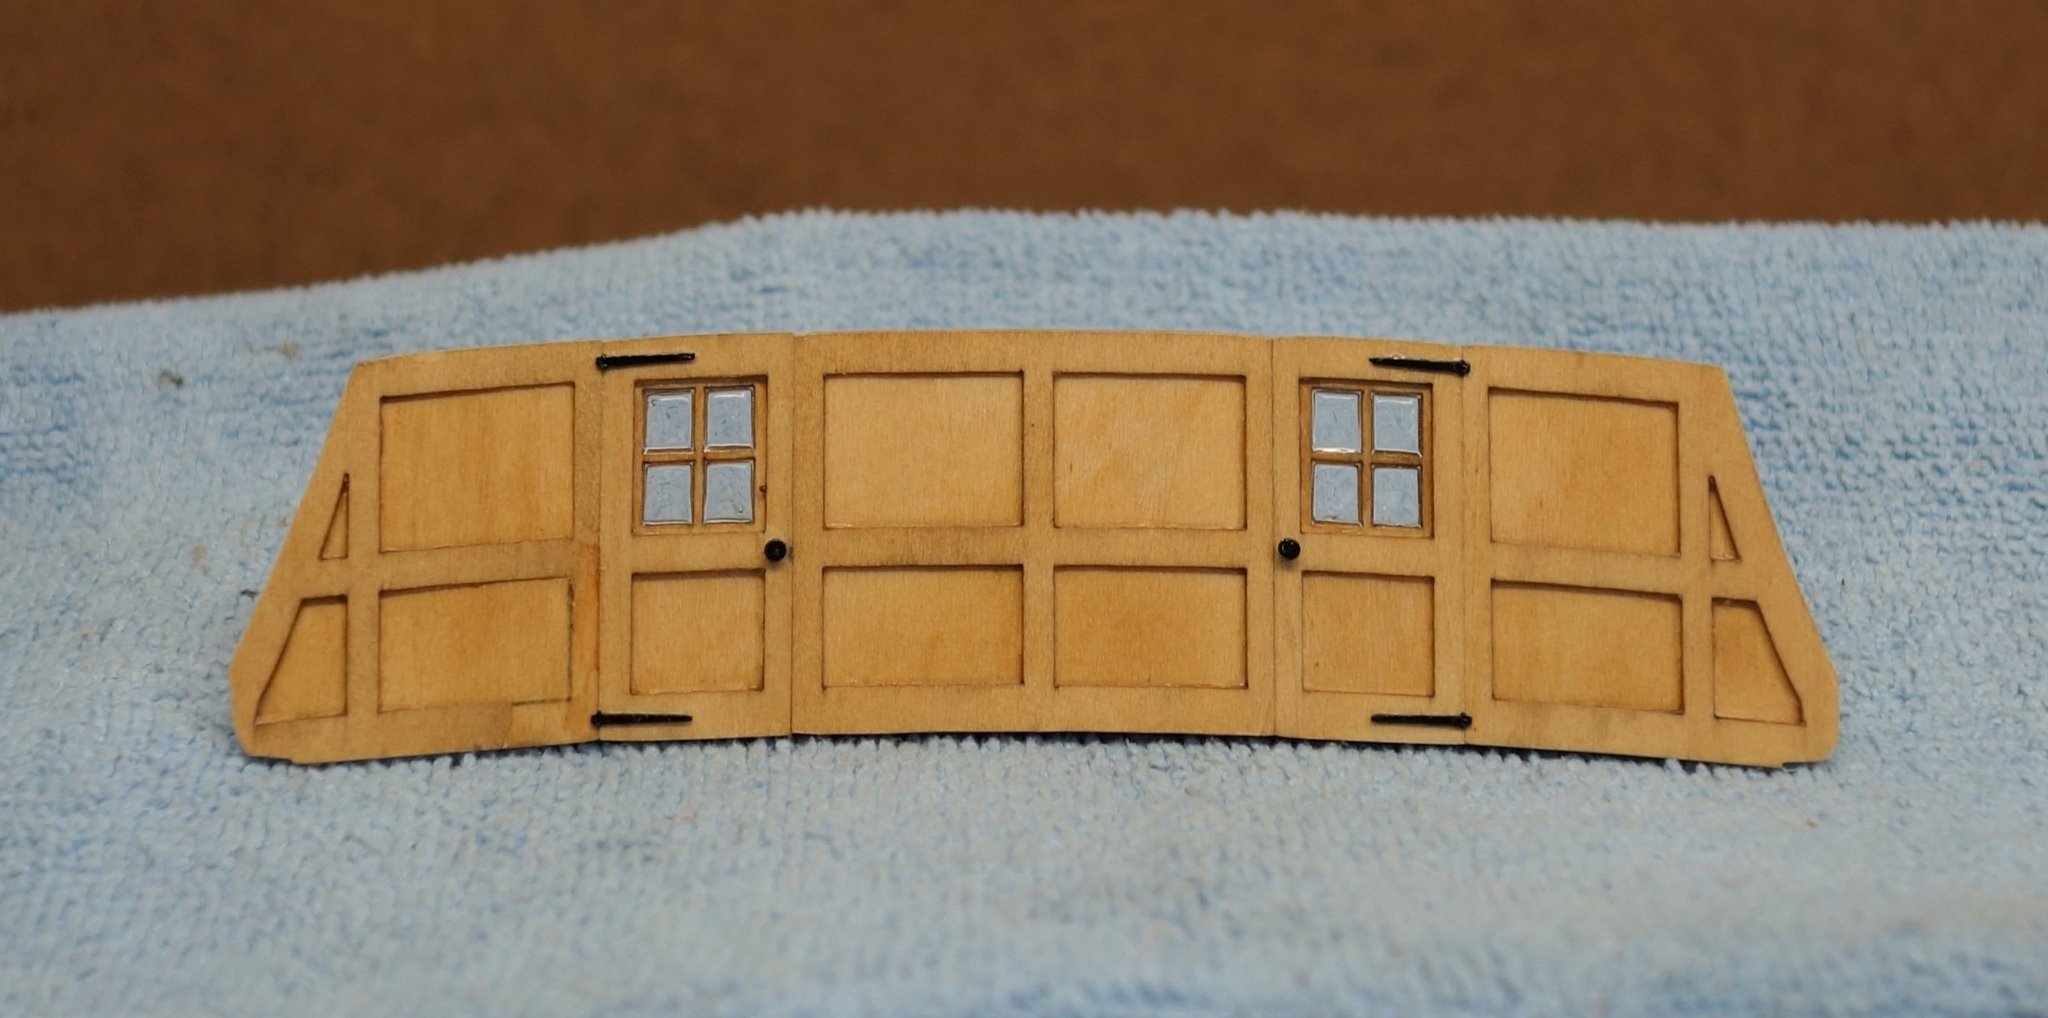
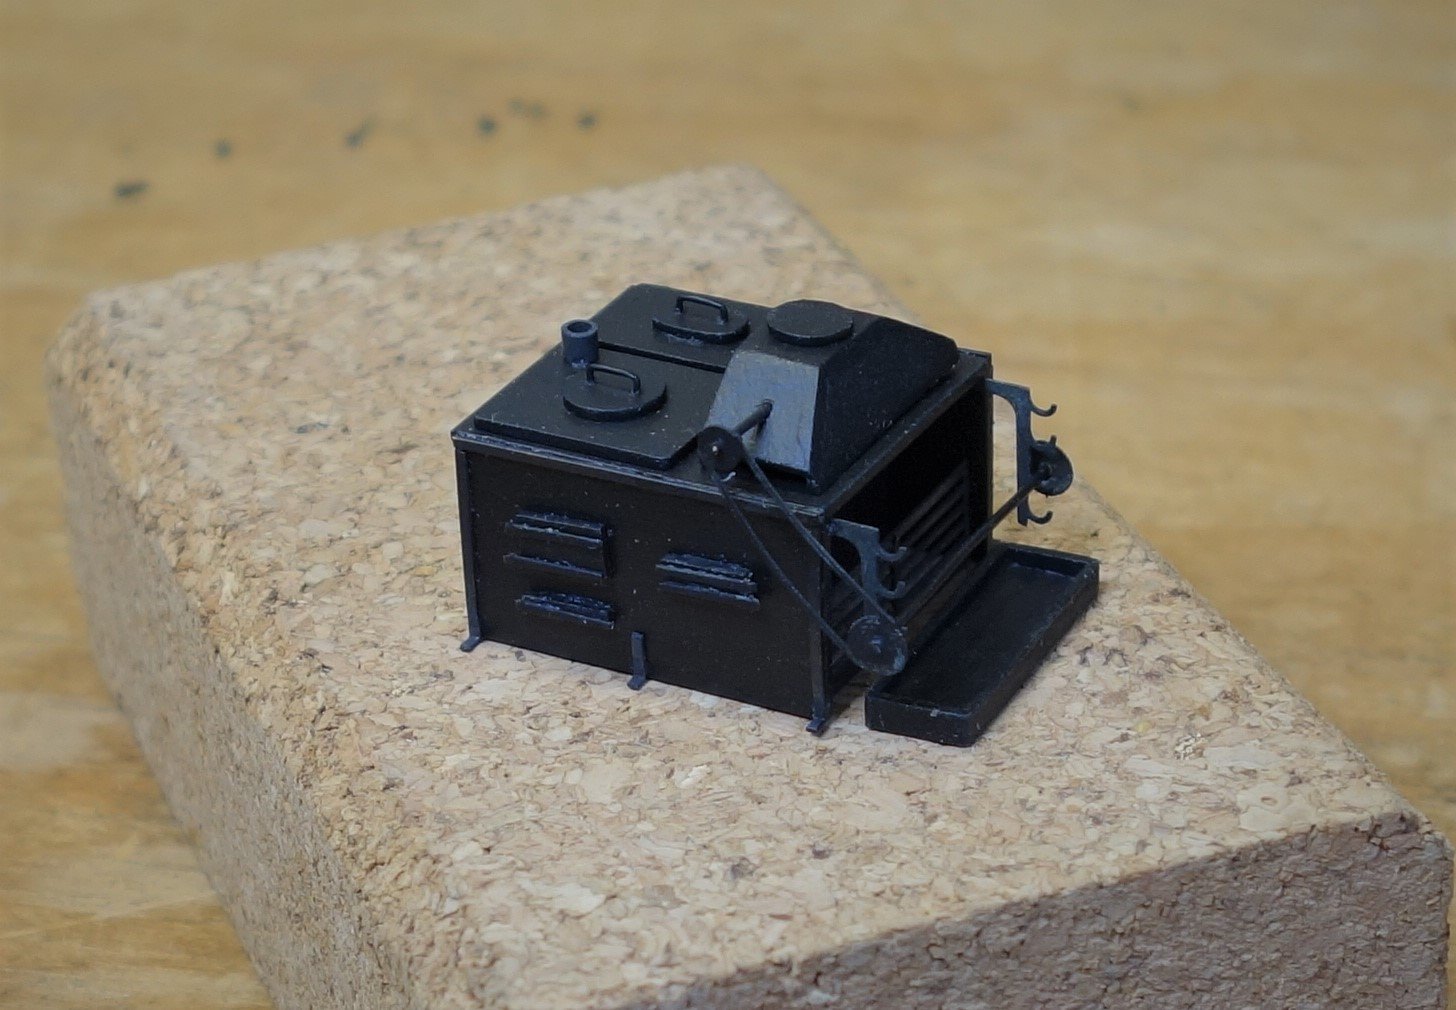
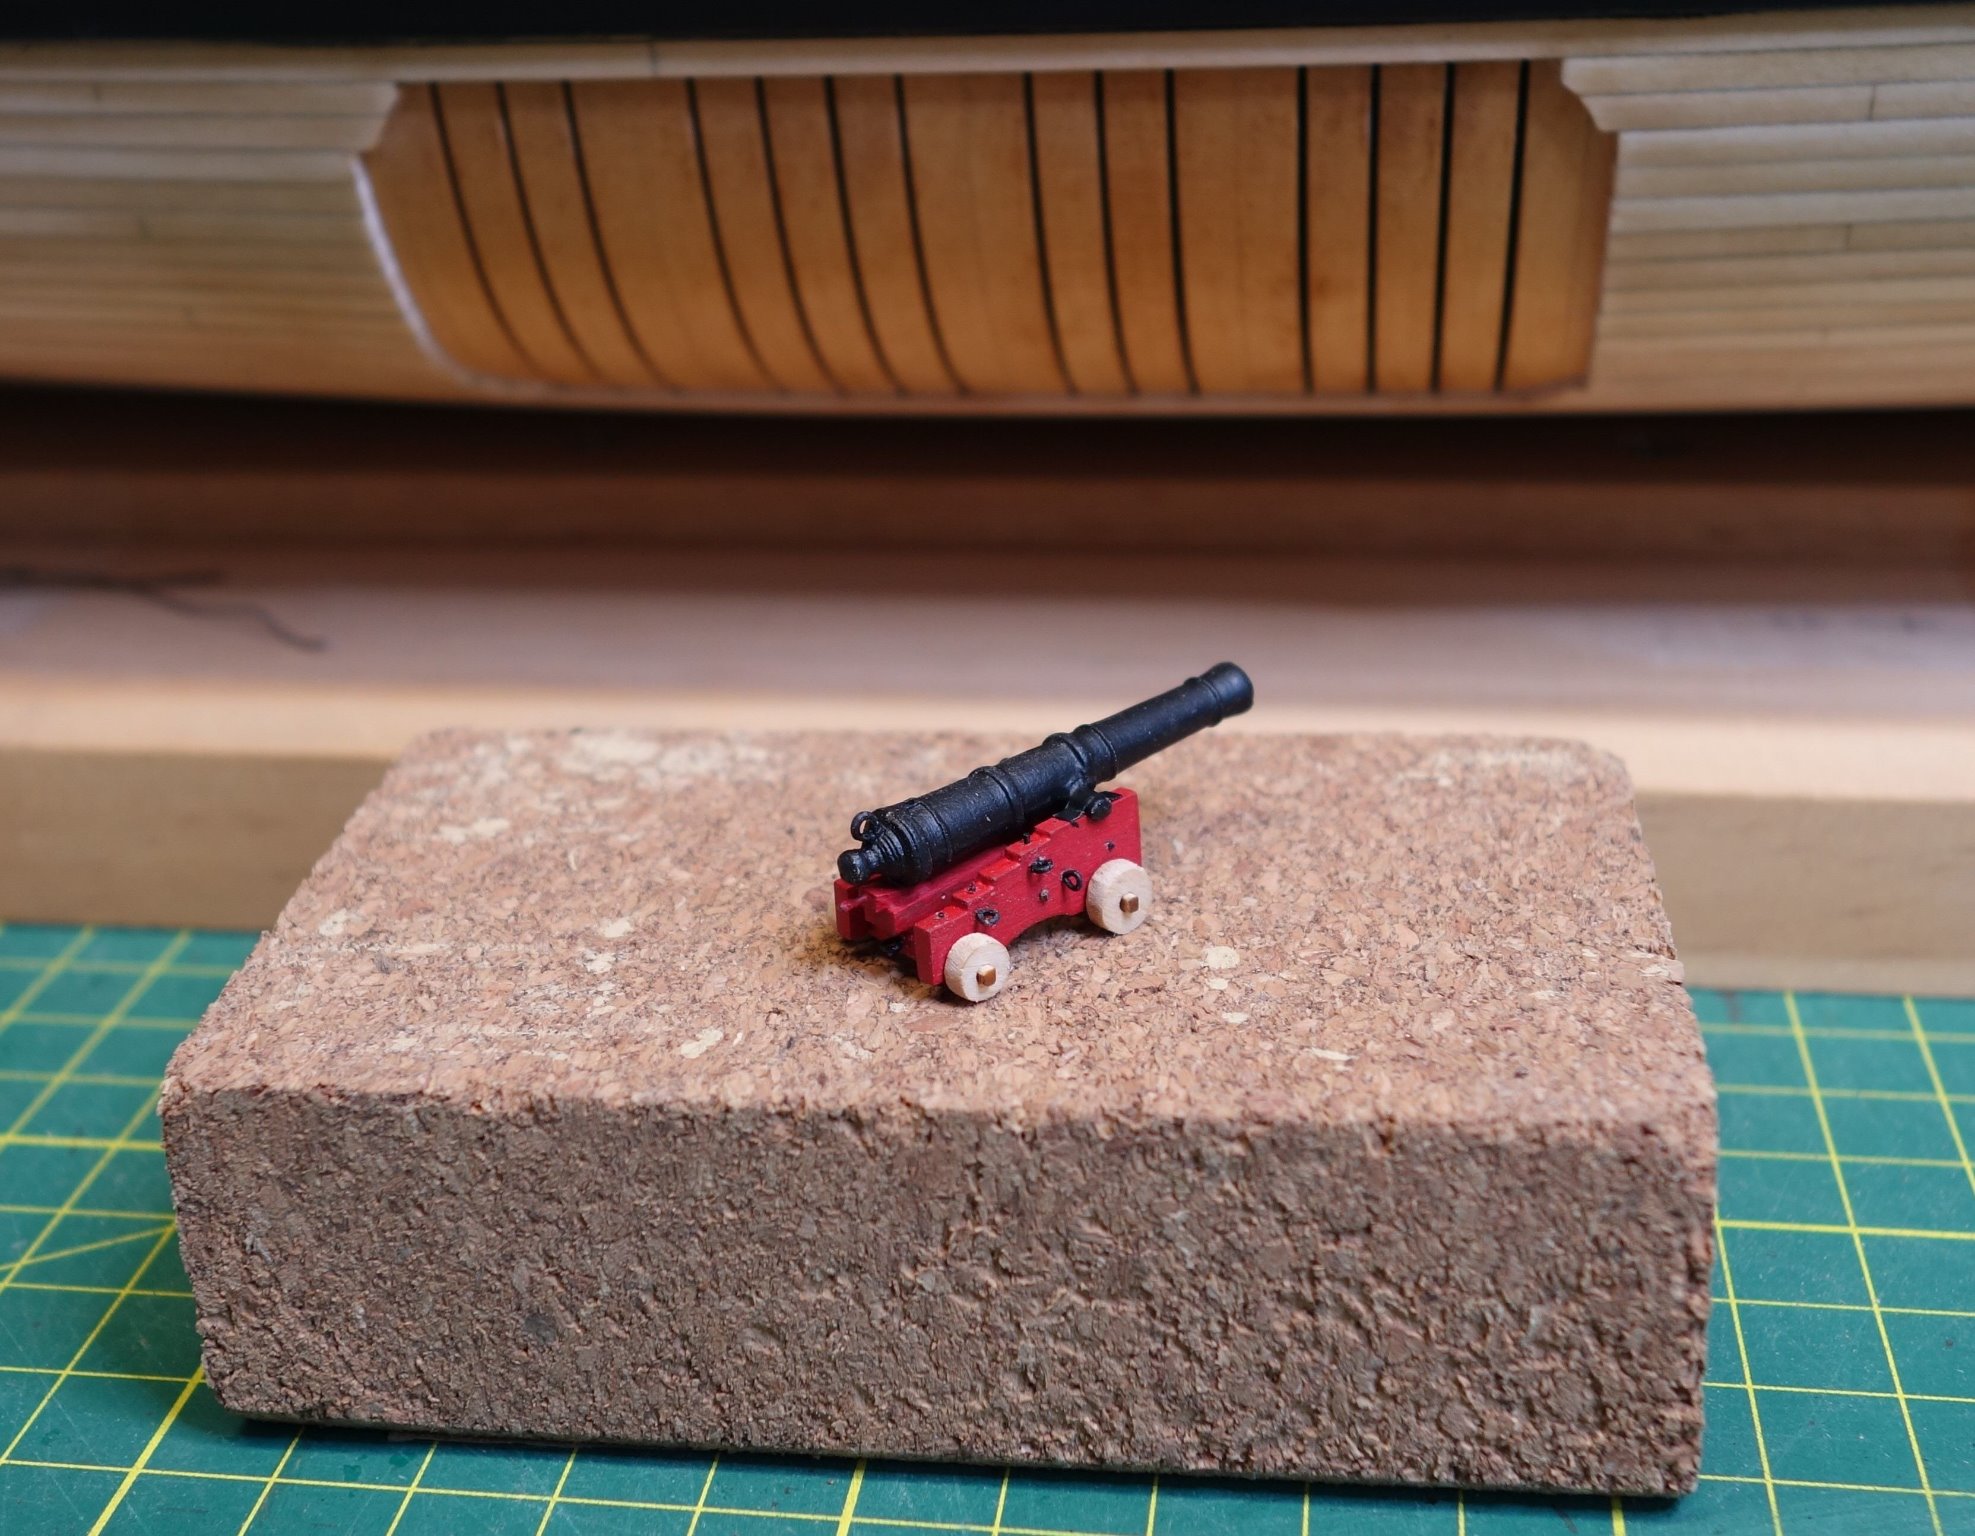
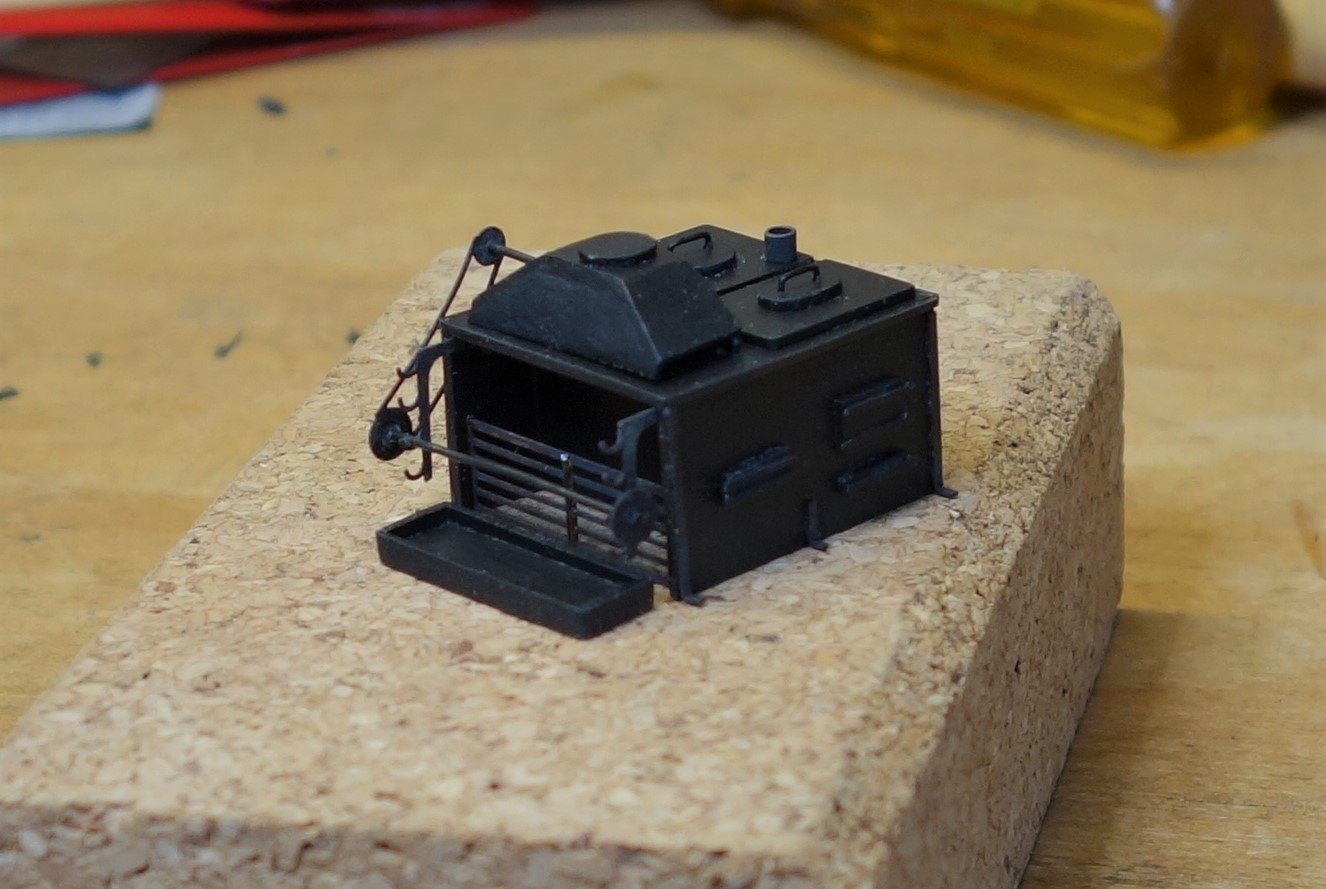
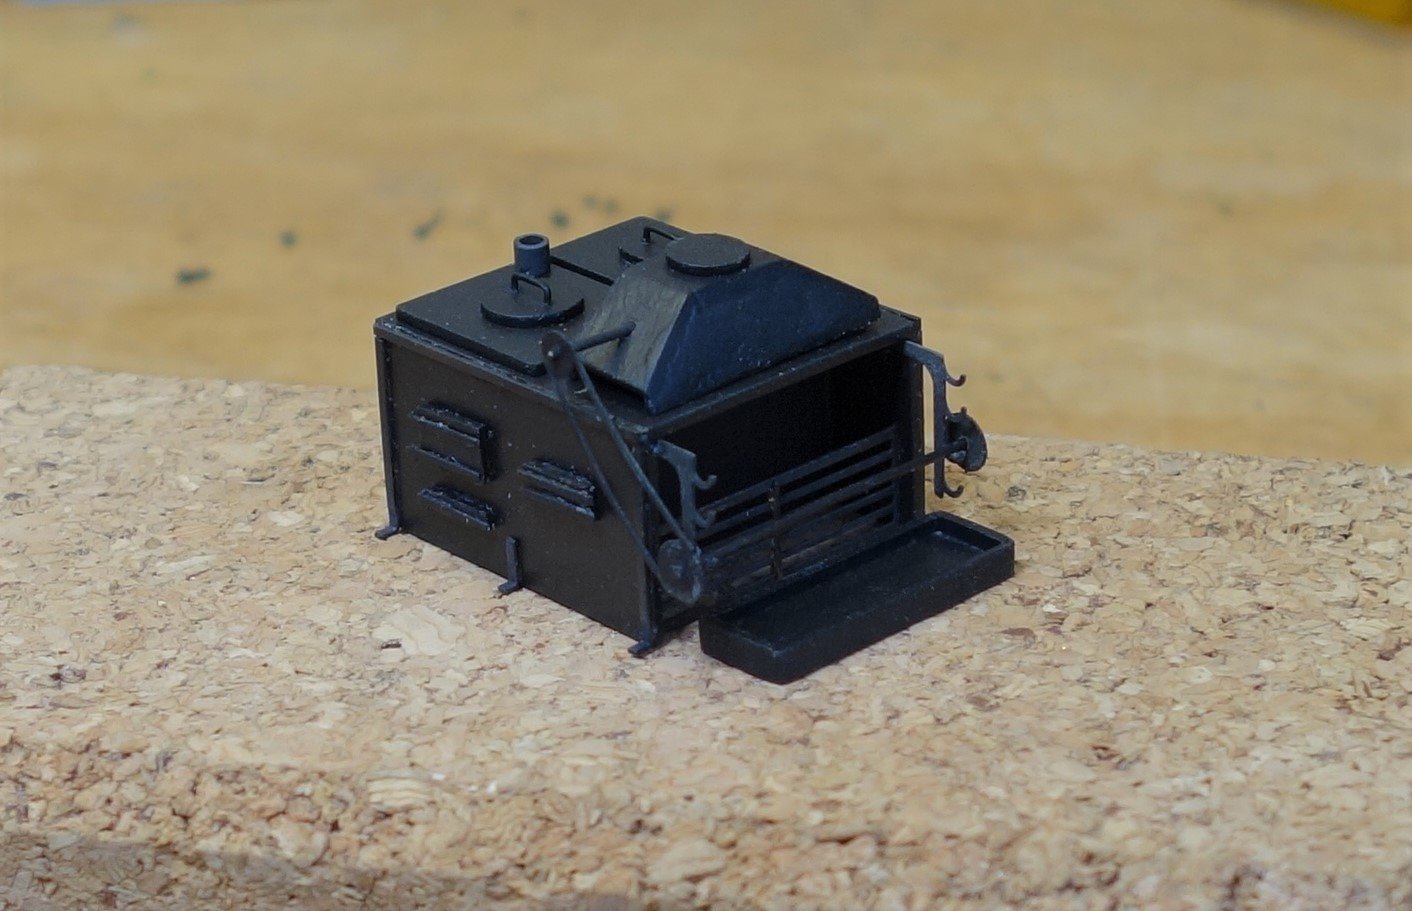
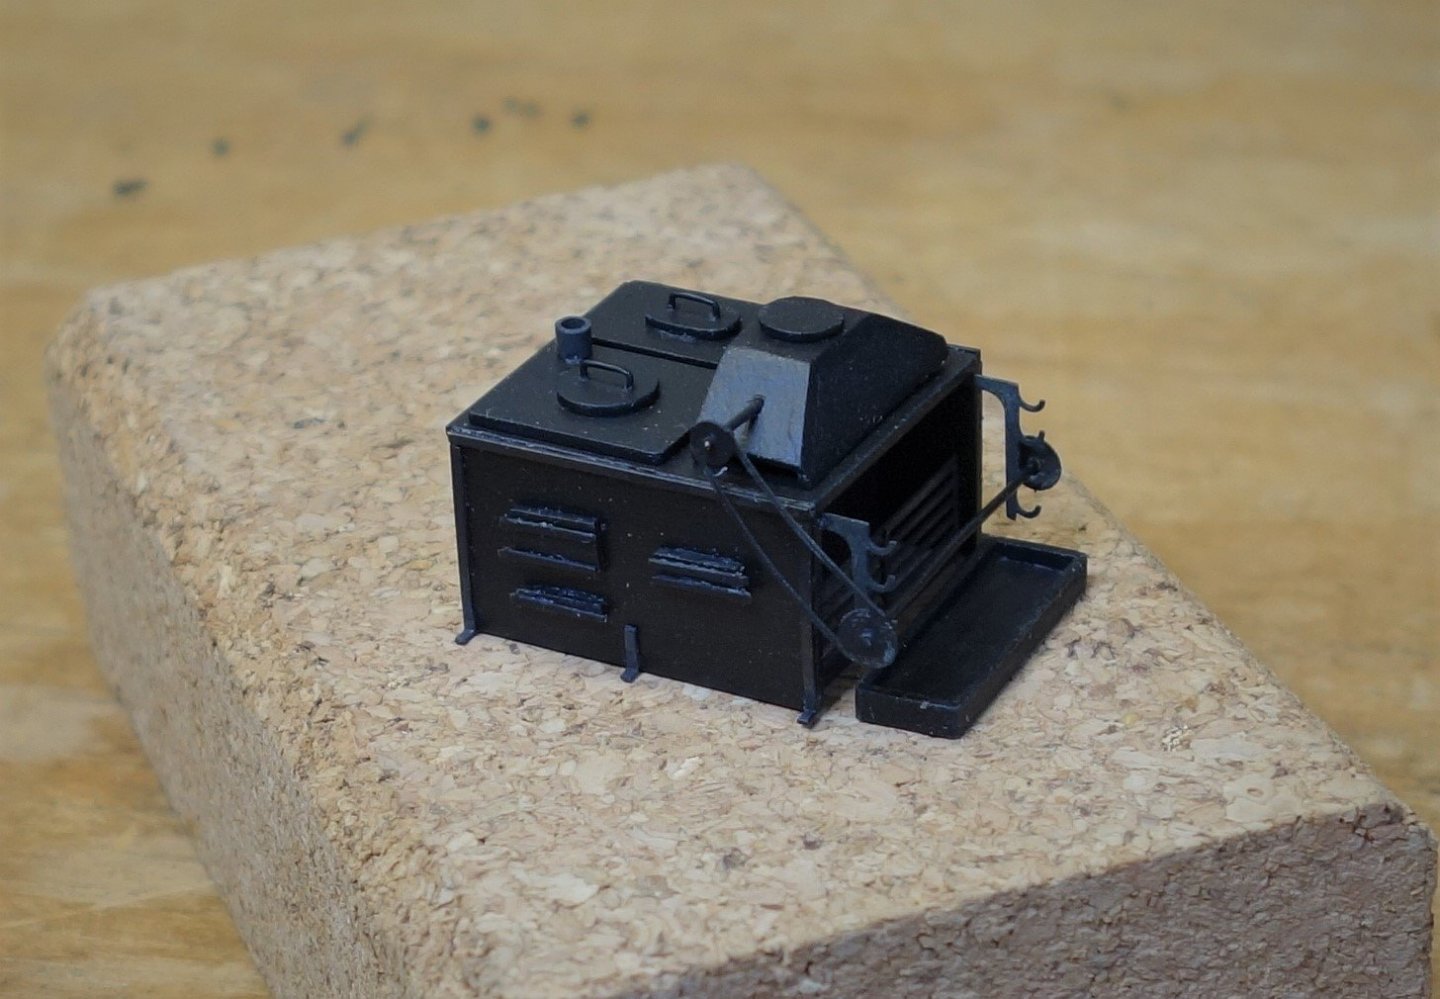
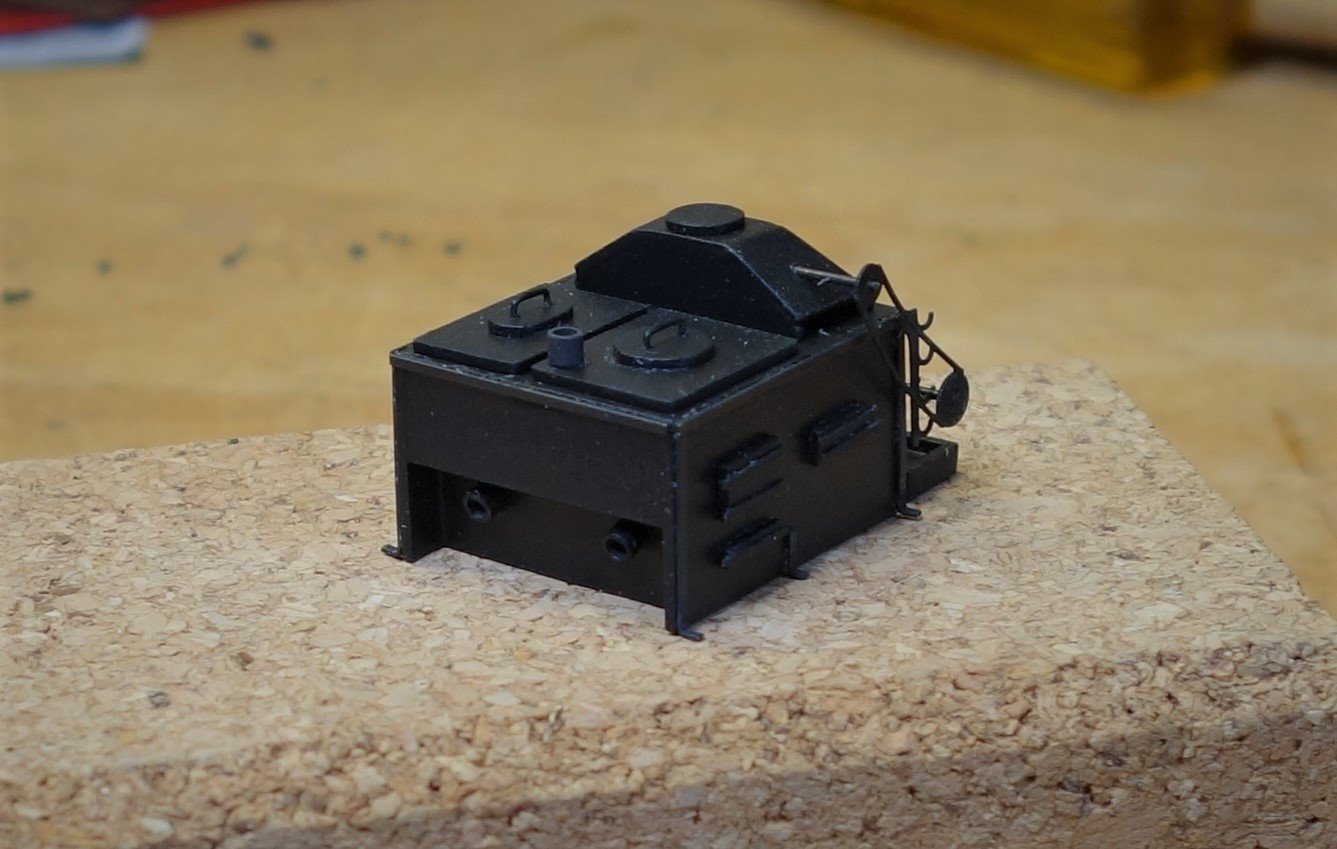
Thanks for the likes!! Well the ship's stove is finished so I have attached a few photo's to show what it looks like. A fiddly but fun little project.
-
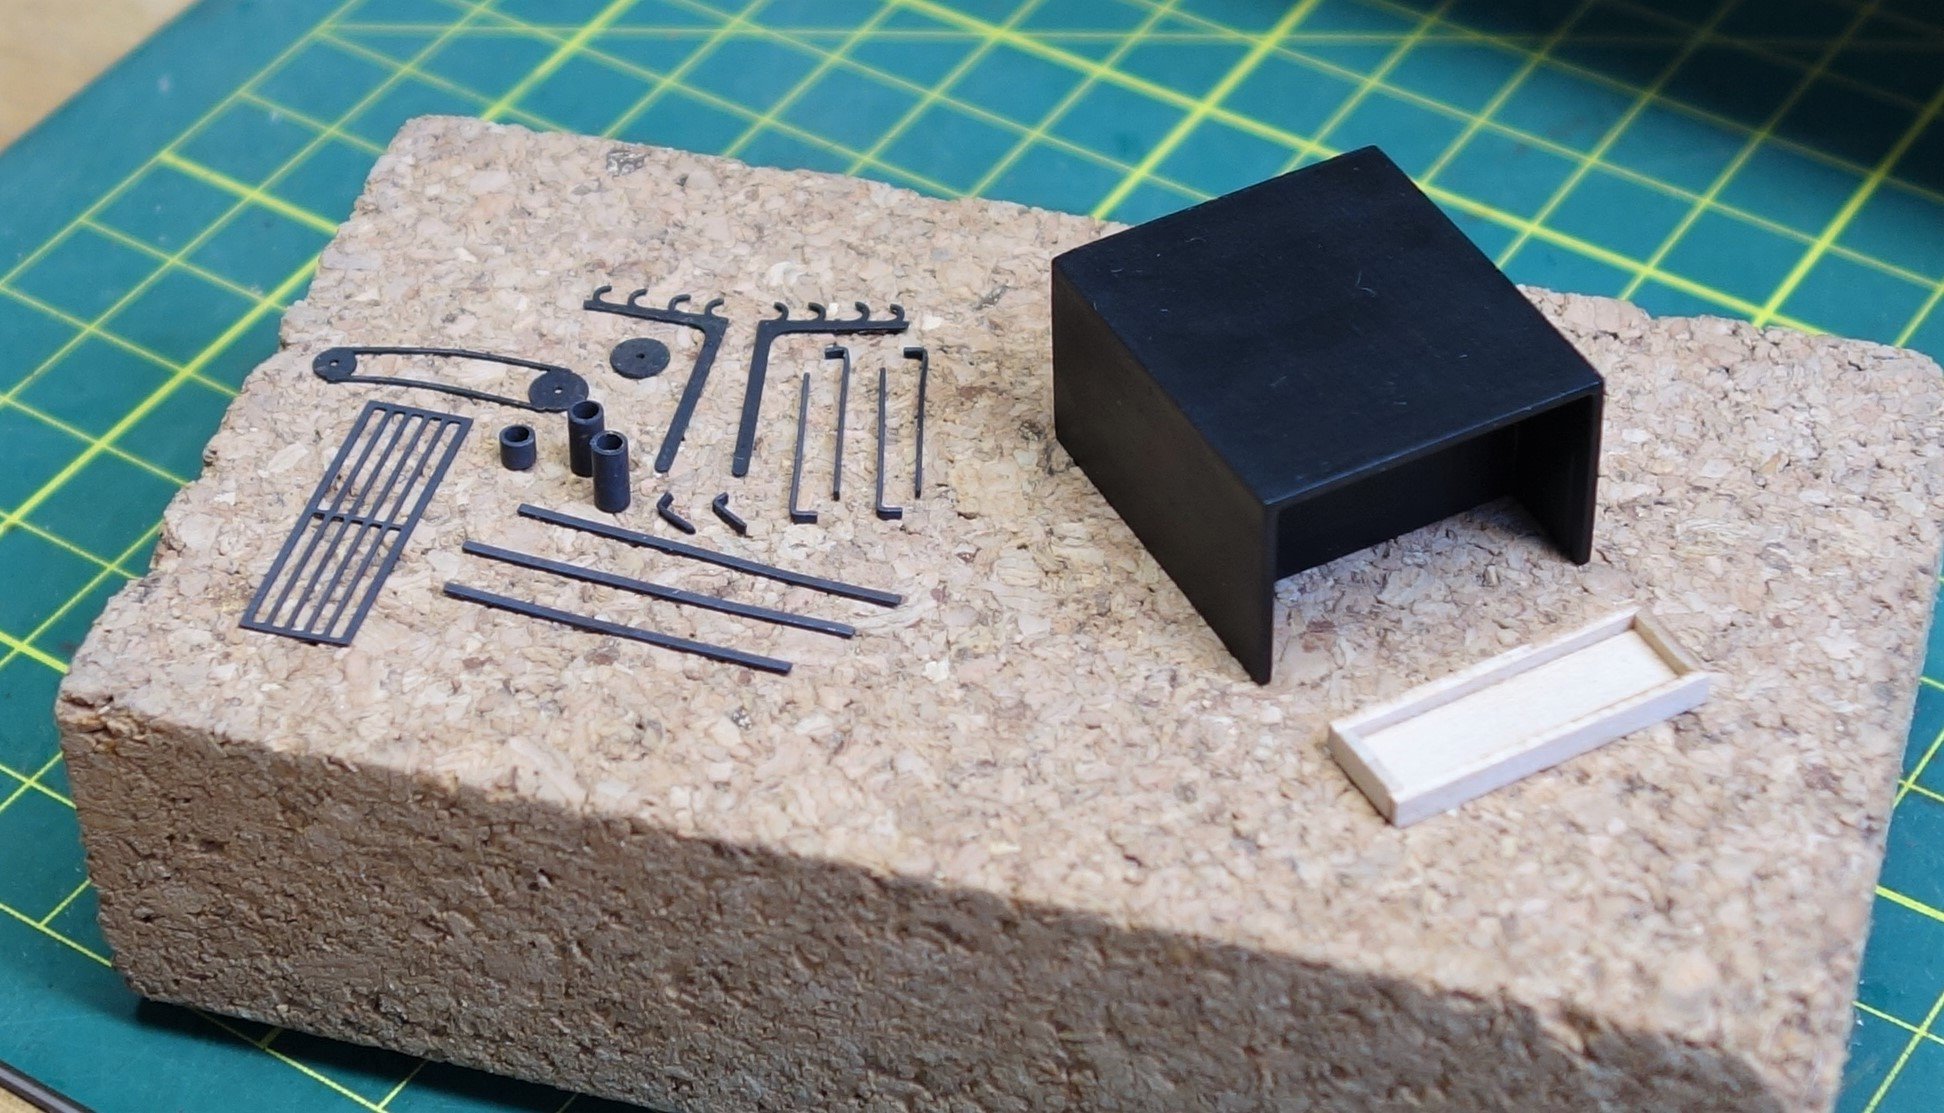
Another small log entry. I am undecided if I will add the gun tackles or leave them off. While mulling this over I decided to spent some time on the deck fittings. I needed a break from the cannon build anyway because it was quite a marathon effort. The rudder trunk are capstan are finished and I made a start on the ship's stove. The photoetched and brass bits on the left are all blackened which I prefer to painting. I has a better "metal" look in my opinion. And the painting option is still there if the surface gets scratched or damaged. Here are some photo's.


-
Hi WalrusGuy, All is well, thanks for asking. I lost my Mojo for a while and noticed I started to make silly mistakes. So I took a bit of a break and covered the model up for a few months. When I got going again with building the 12 pounder cannons, I didn't take a lot of photo's, so this log entry is a bit of a jump from where the model was at with my previous entry. I'll try to create more regular entries again. Here are some photo's


-
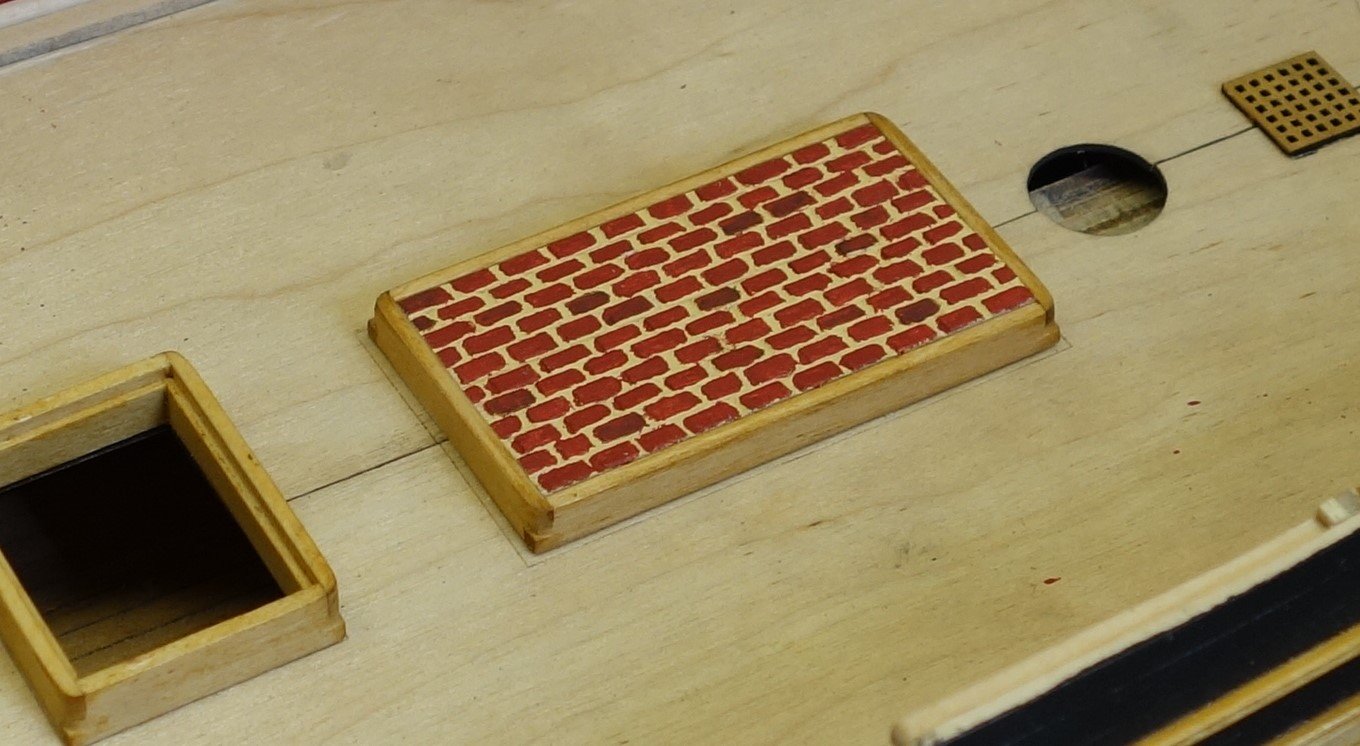
Thanks Ekis.👍 Very true. I did actually have a look at the stove coverage and the location in relation to it's surroundings and gave it my own thumbs up. I'm sure the brickwork on the actual ship didn't look 'new' as well after a few years worth of cooking (just aiming to be authentic here.....cough, cough)...lol I can't believe how fast you are going. I'm already past the one year mark and expect to tack on at least another 2 before I finish. Yours looks almost finished after only 8 months. And the speed hasn't diminished the quality at all. It's a beautiful ship...
-
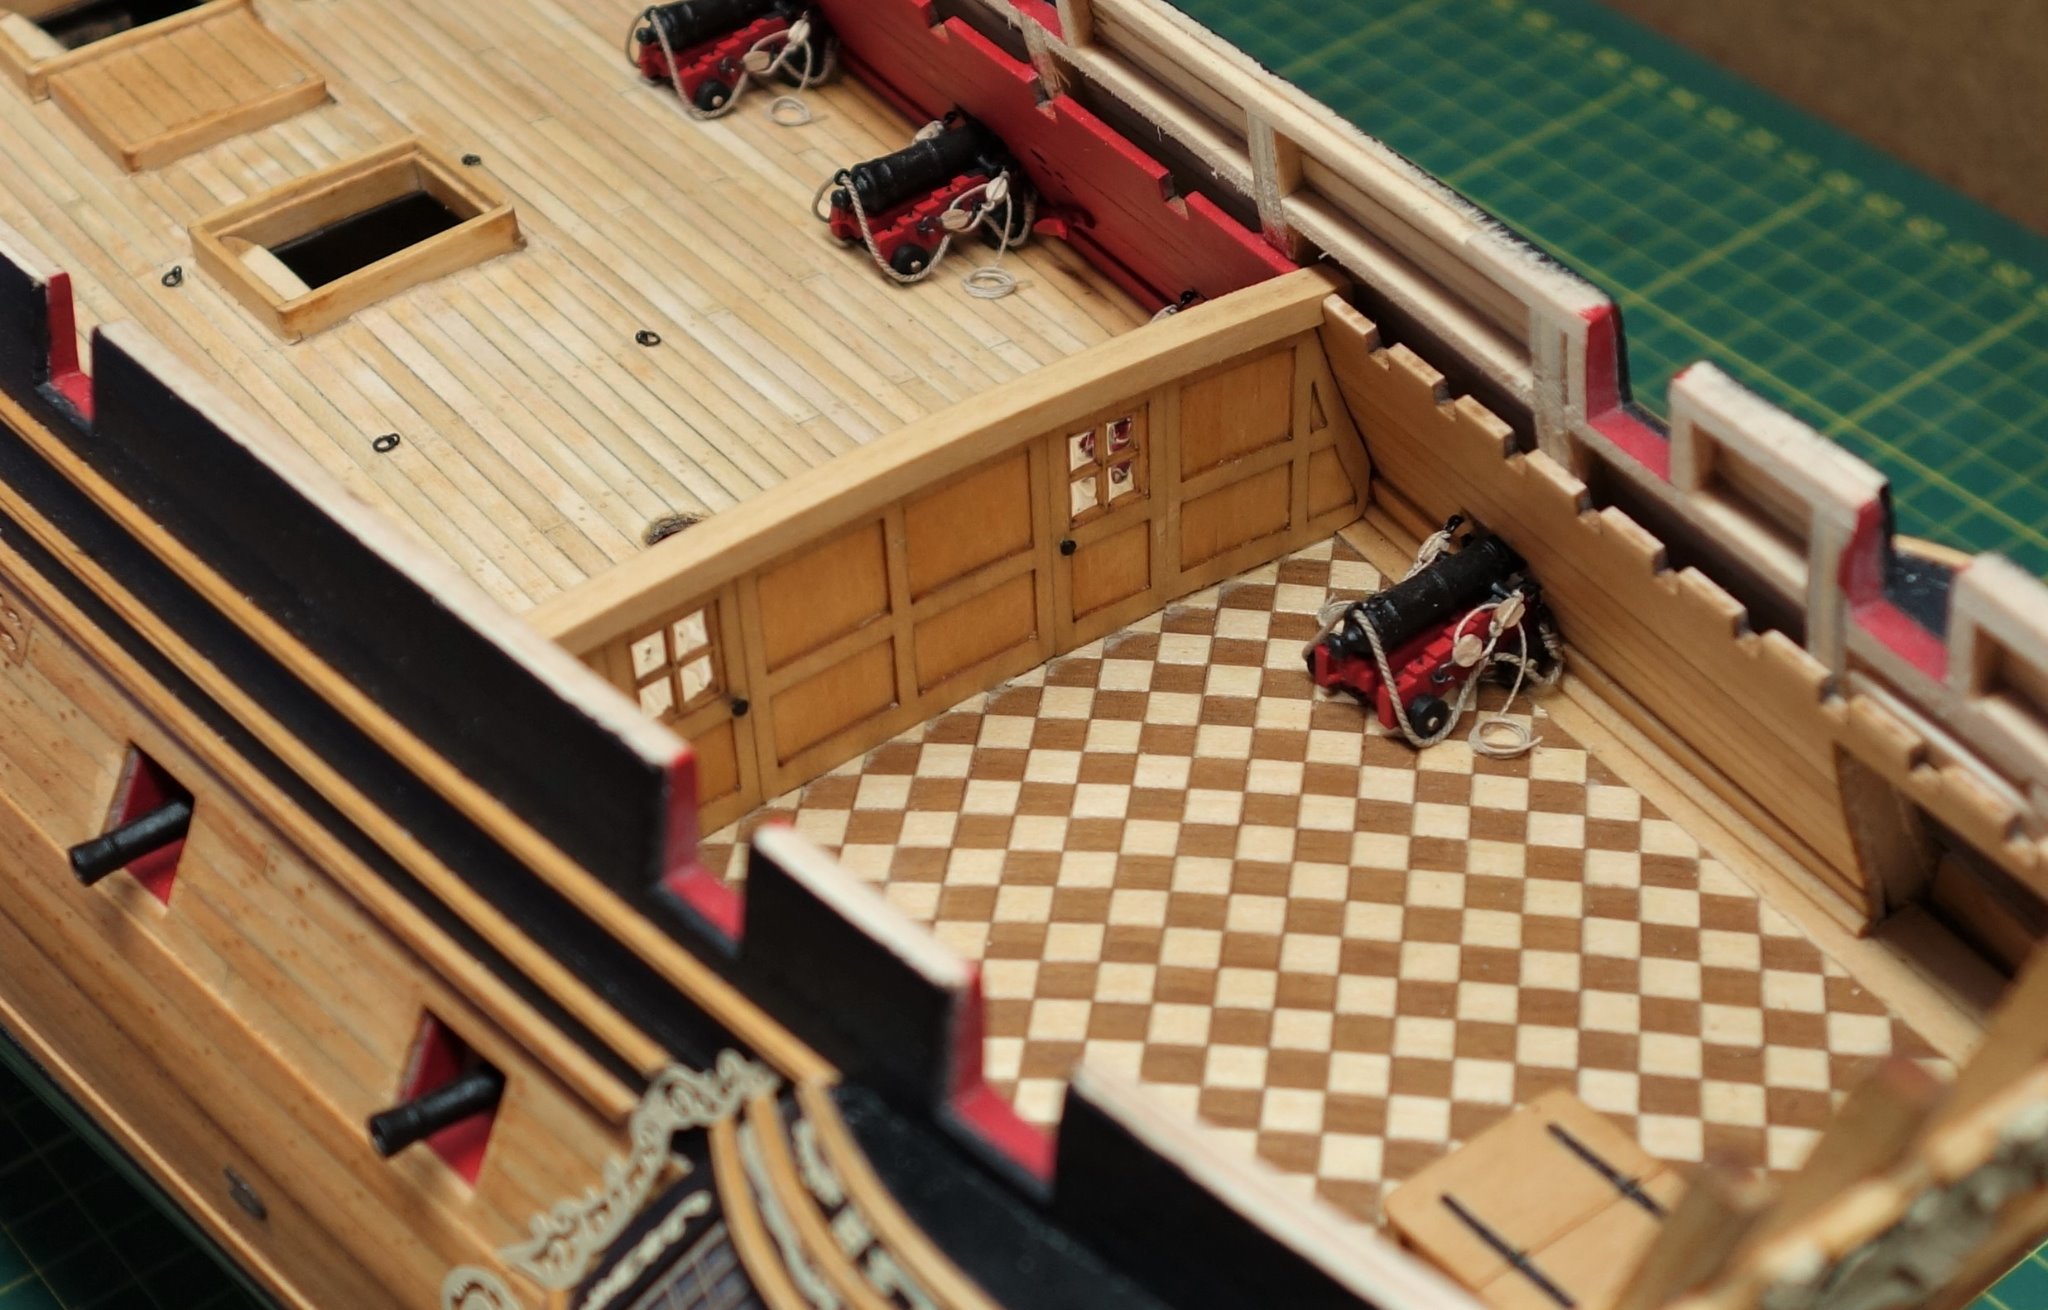
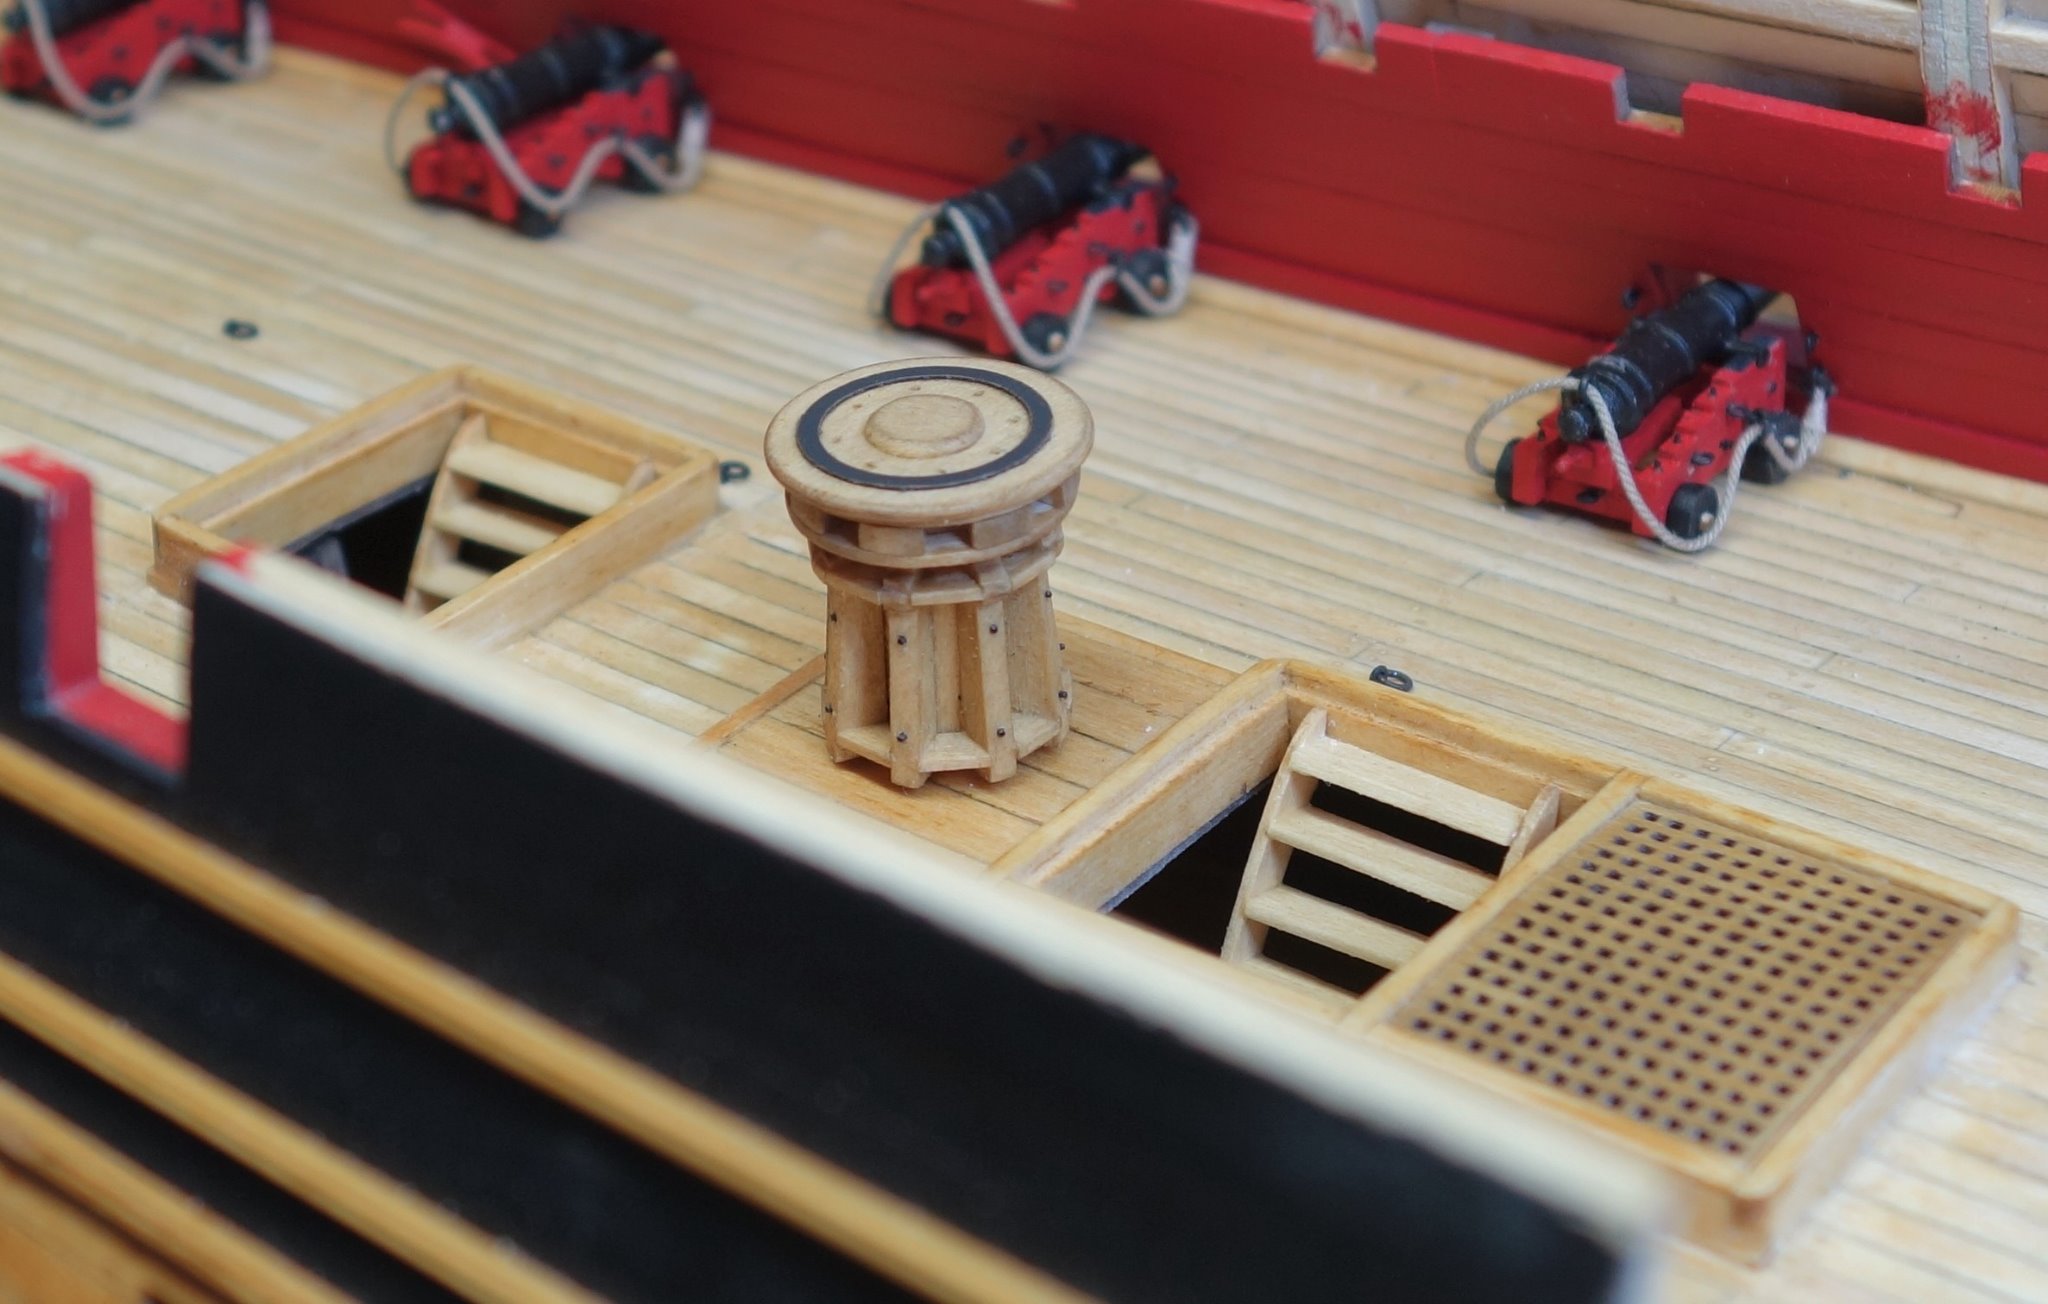
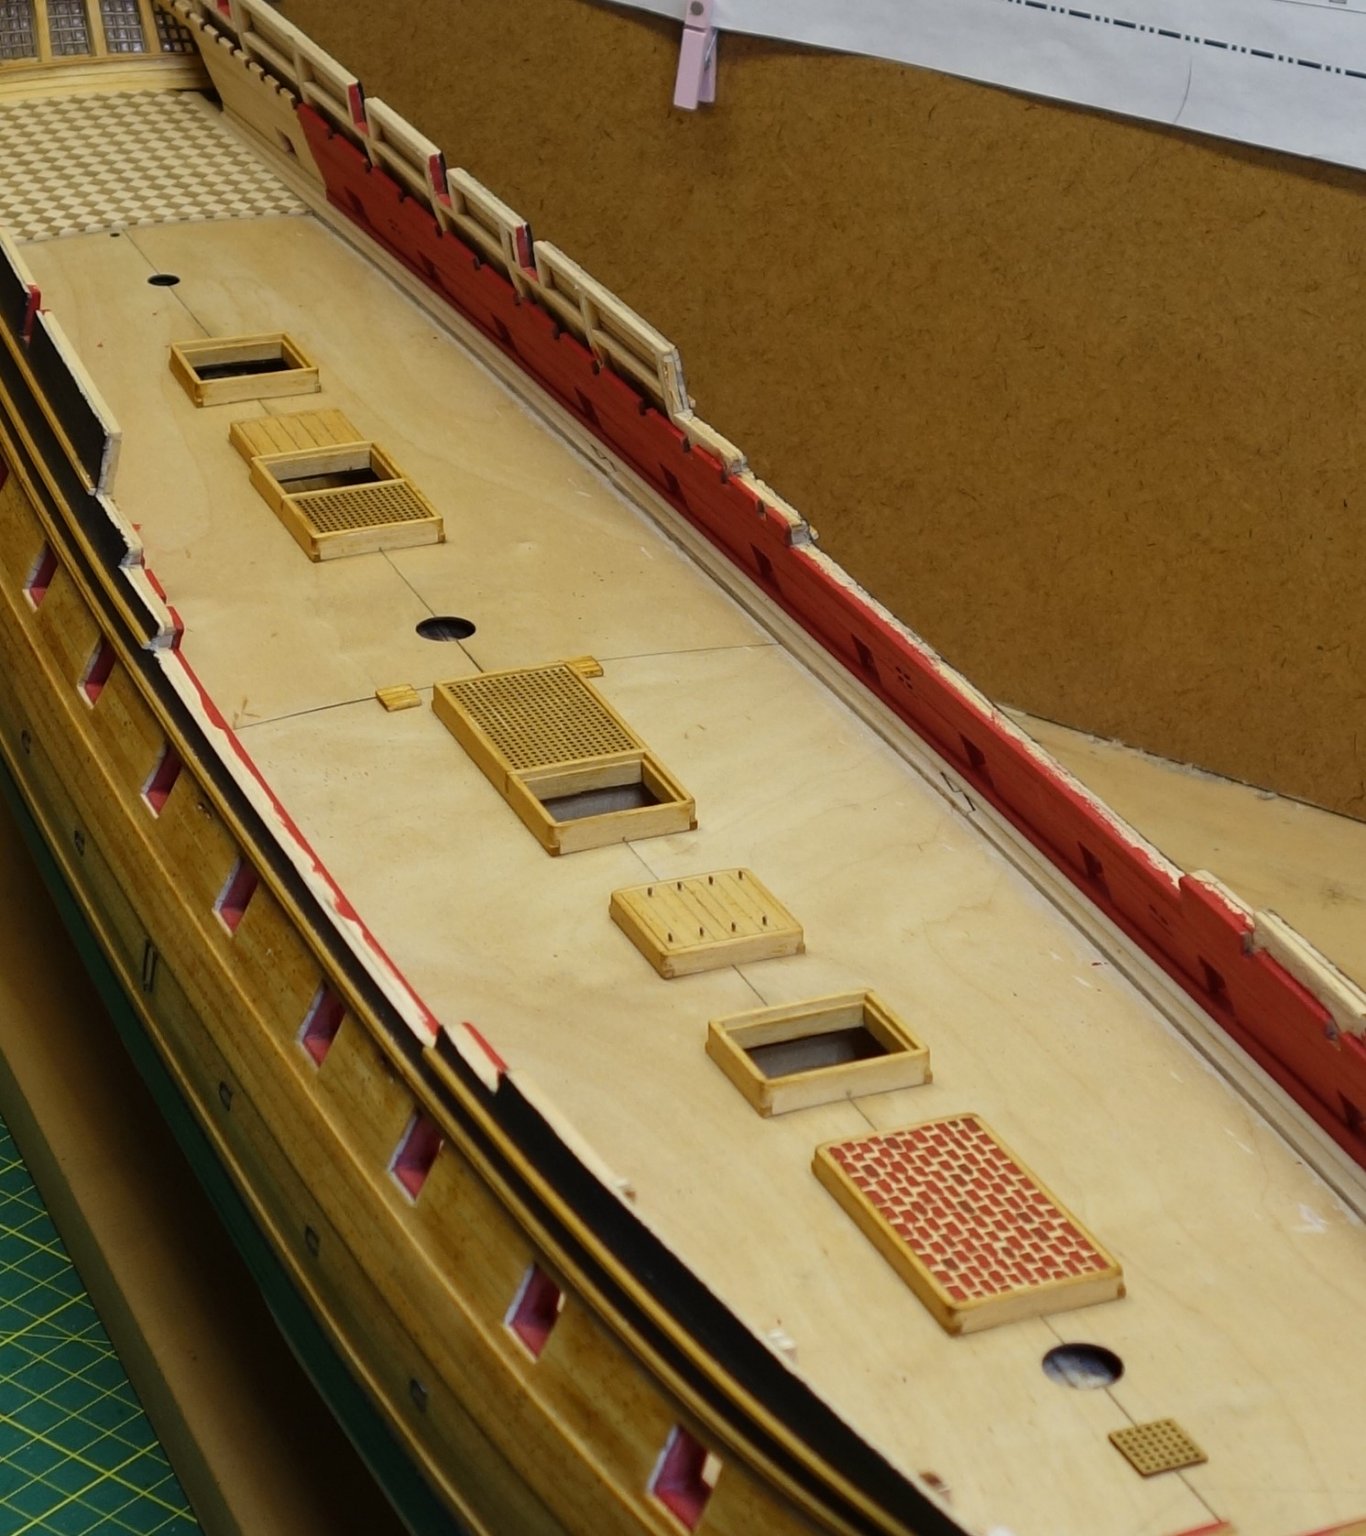
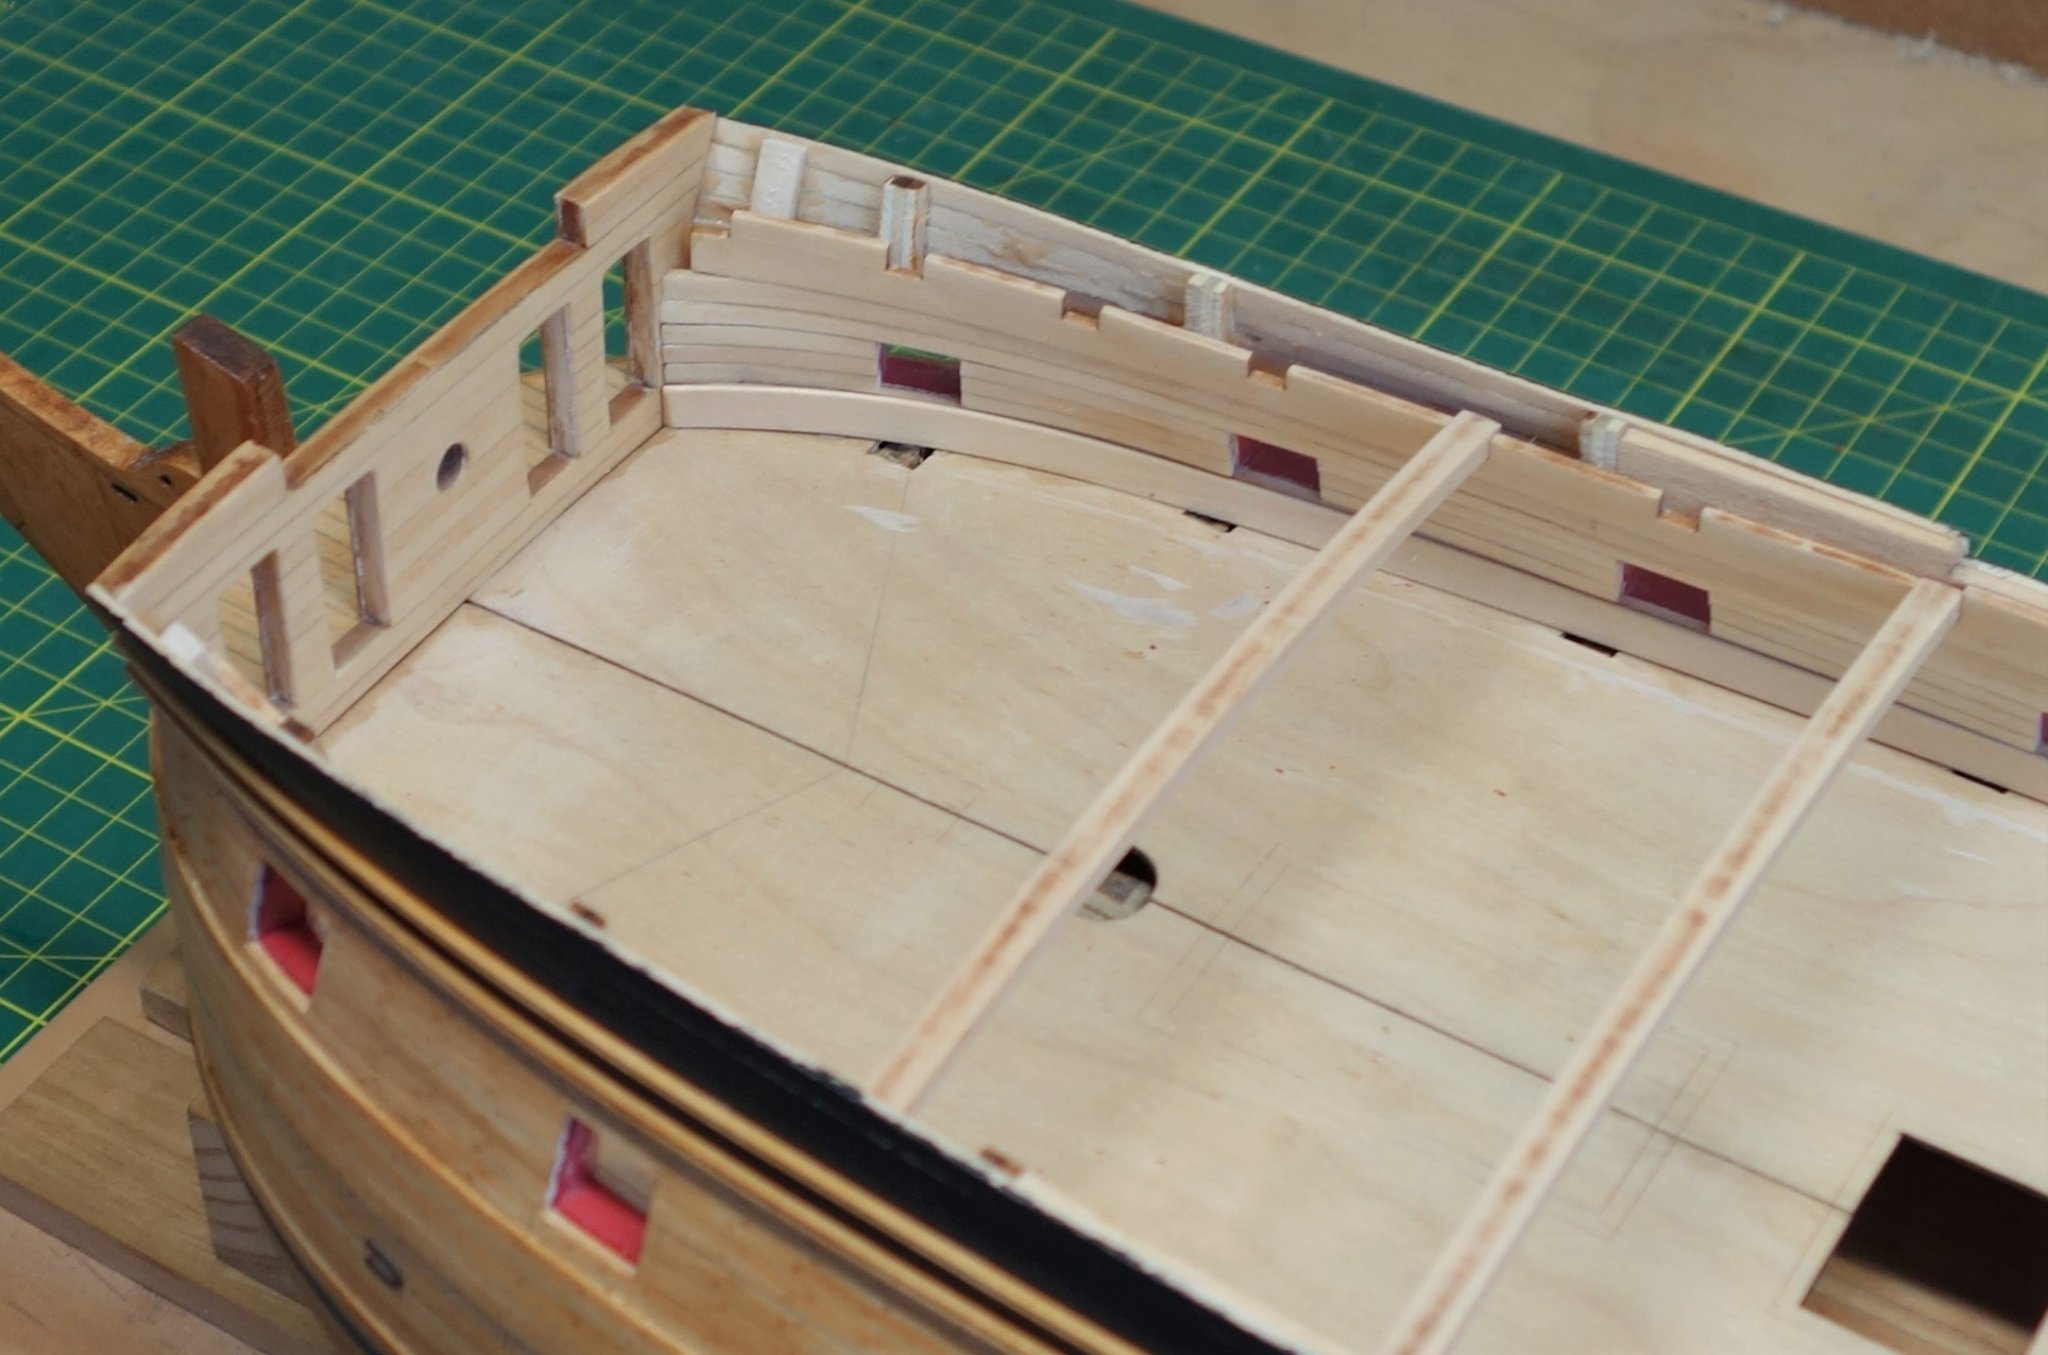
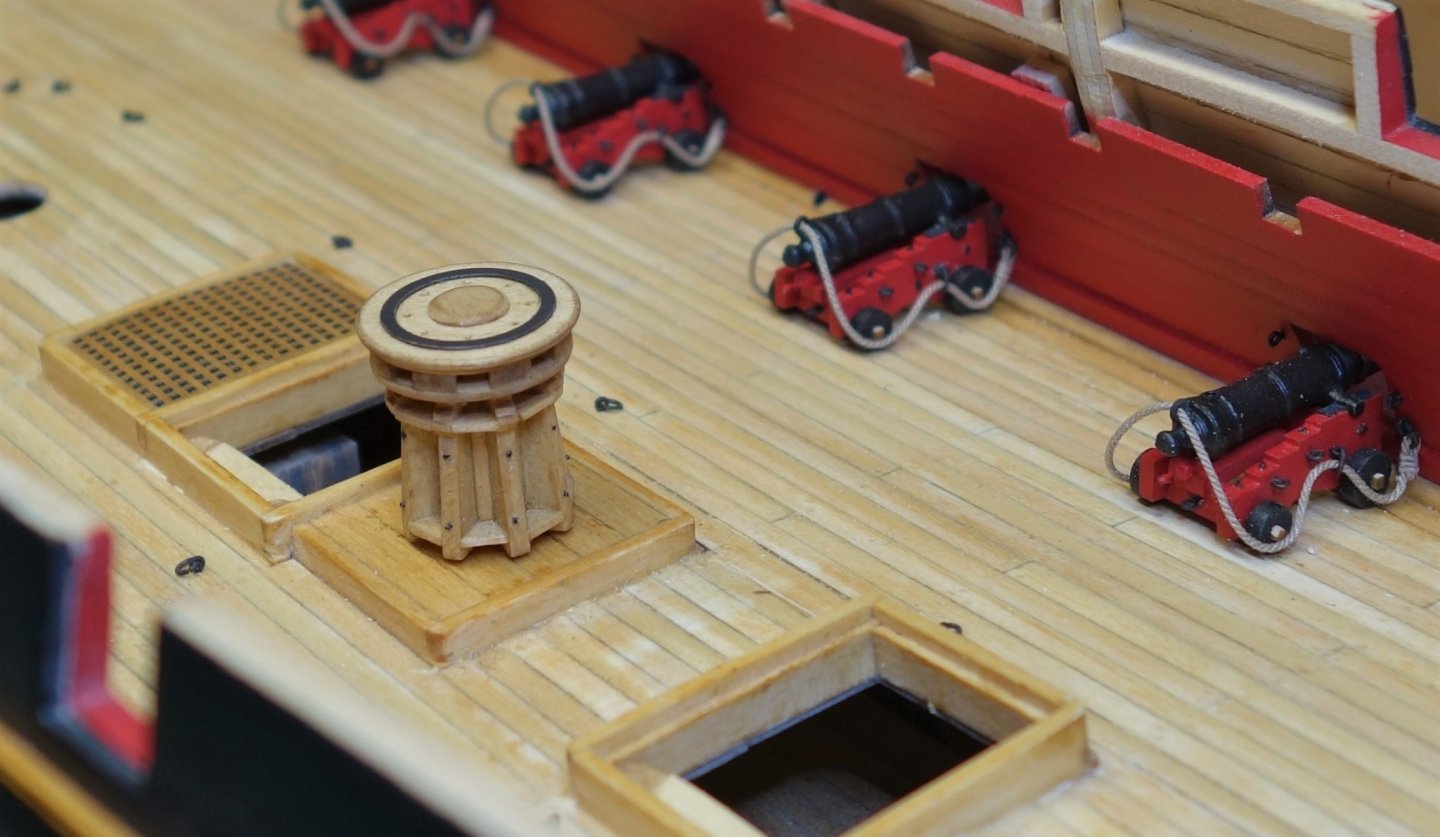
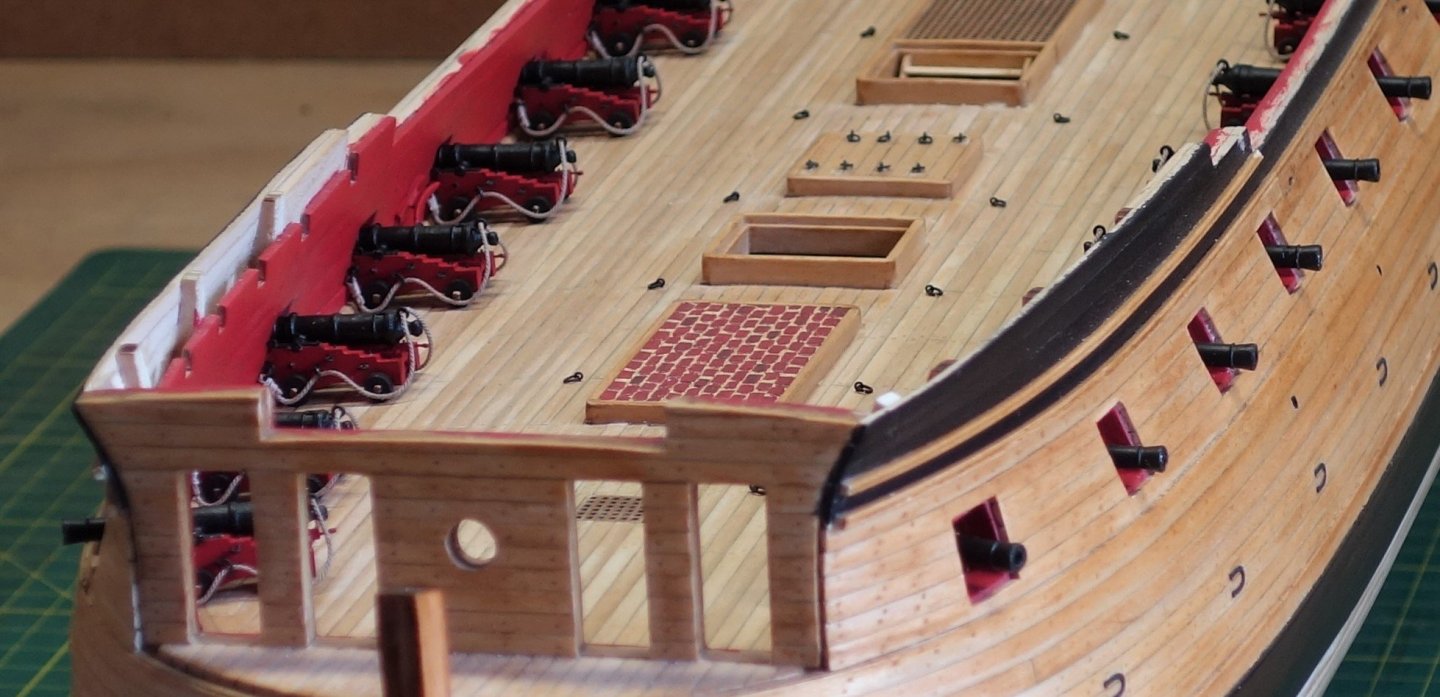
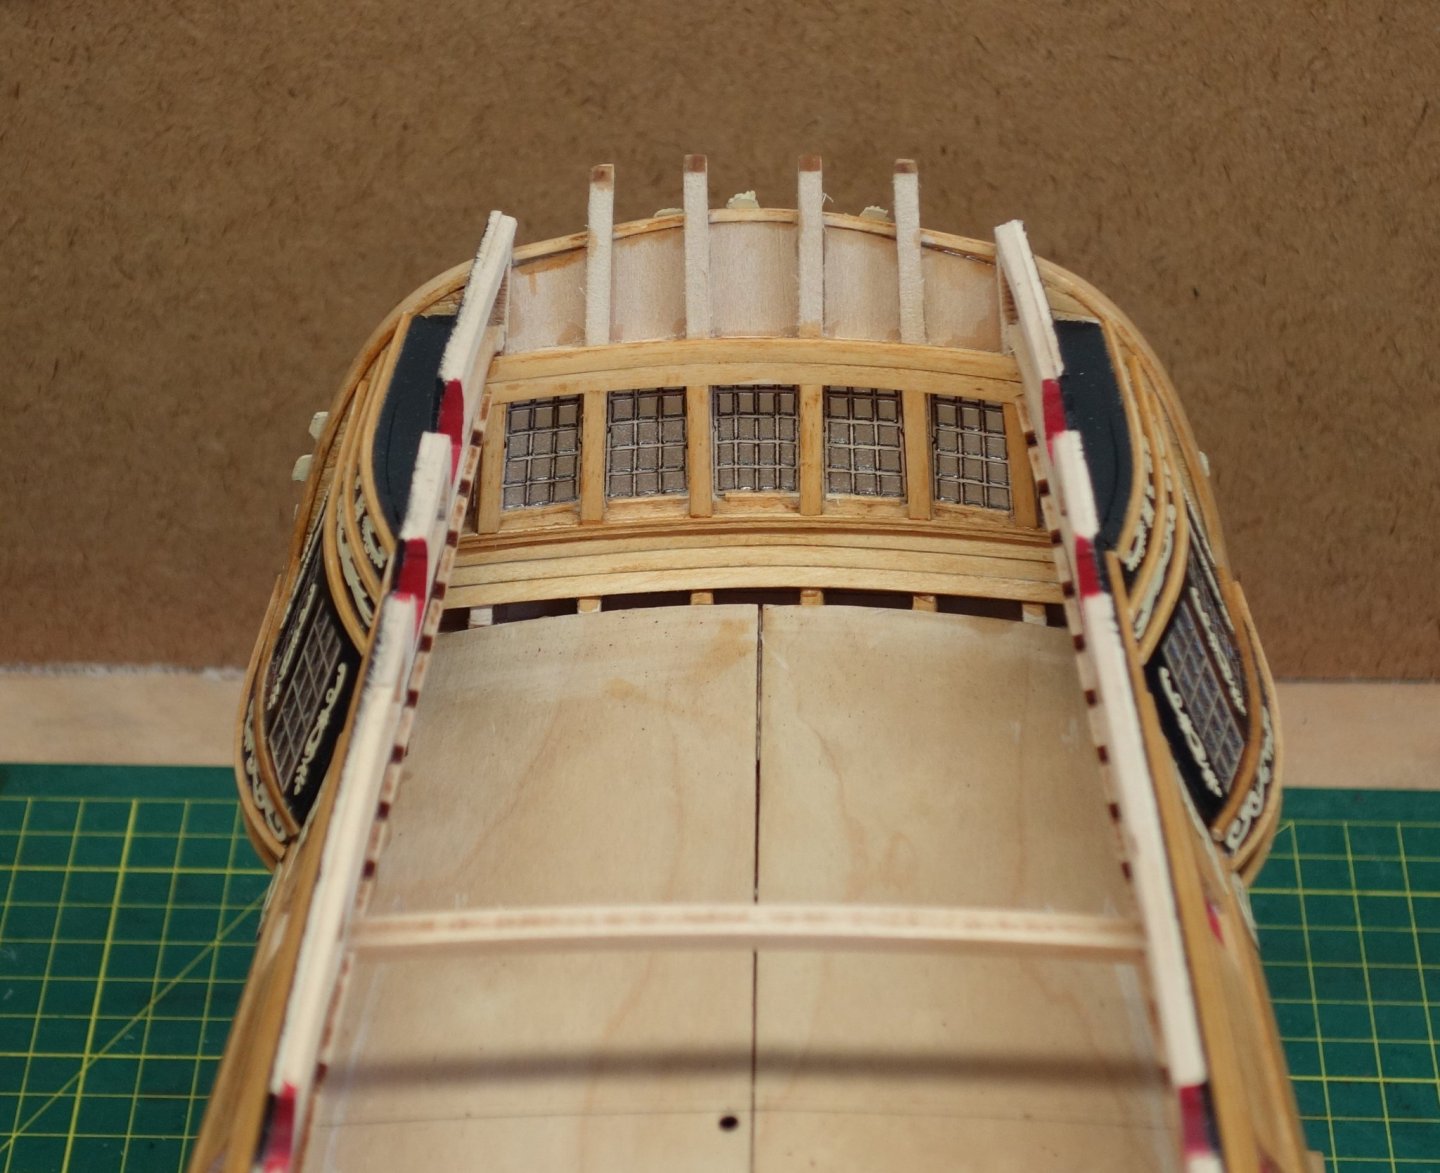
Keeping the log going with a few more photo's. This time with the work done on some of the gun deck hatches and gratings. The bricked platform was a challenge, not sure if I nailed it (actually I'm pretty sure I didn't nail it...lol) but I'm sort of satisfied with the outcome and happy to move on.


-
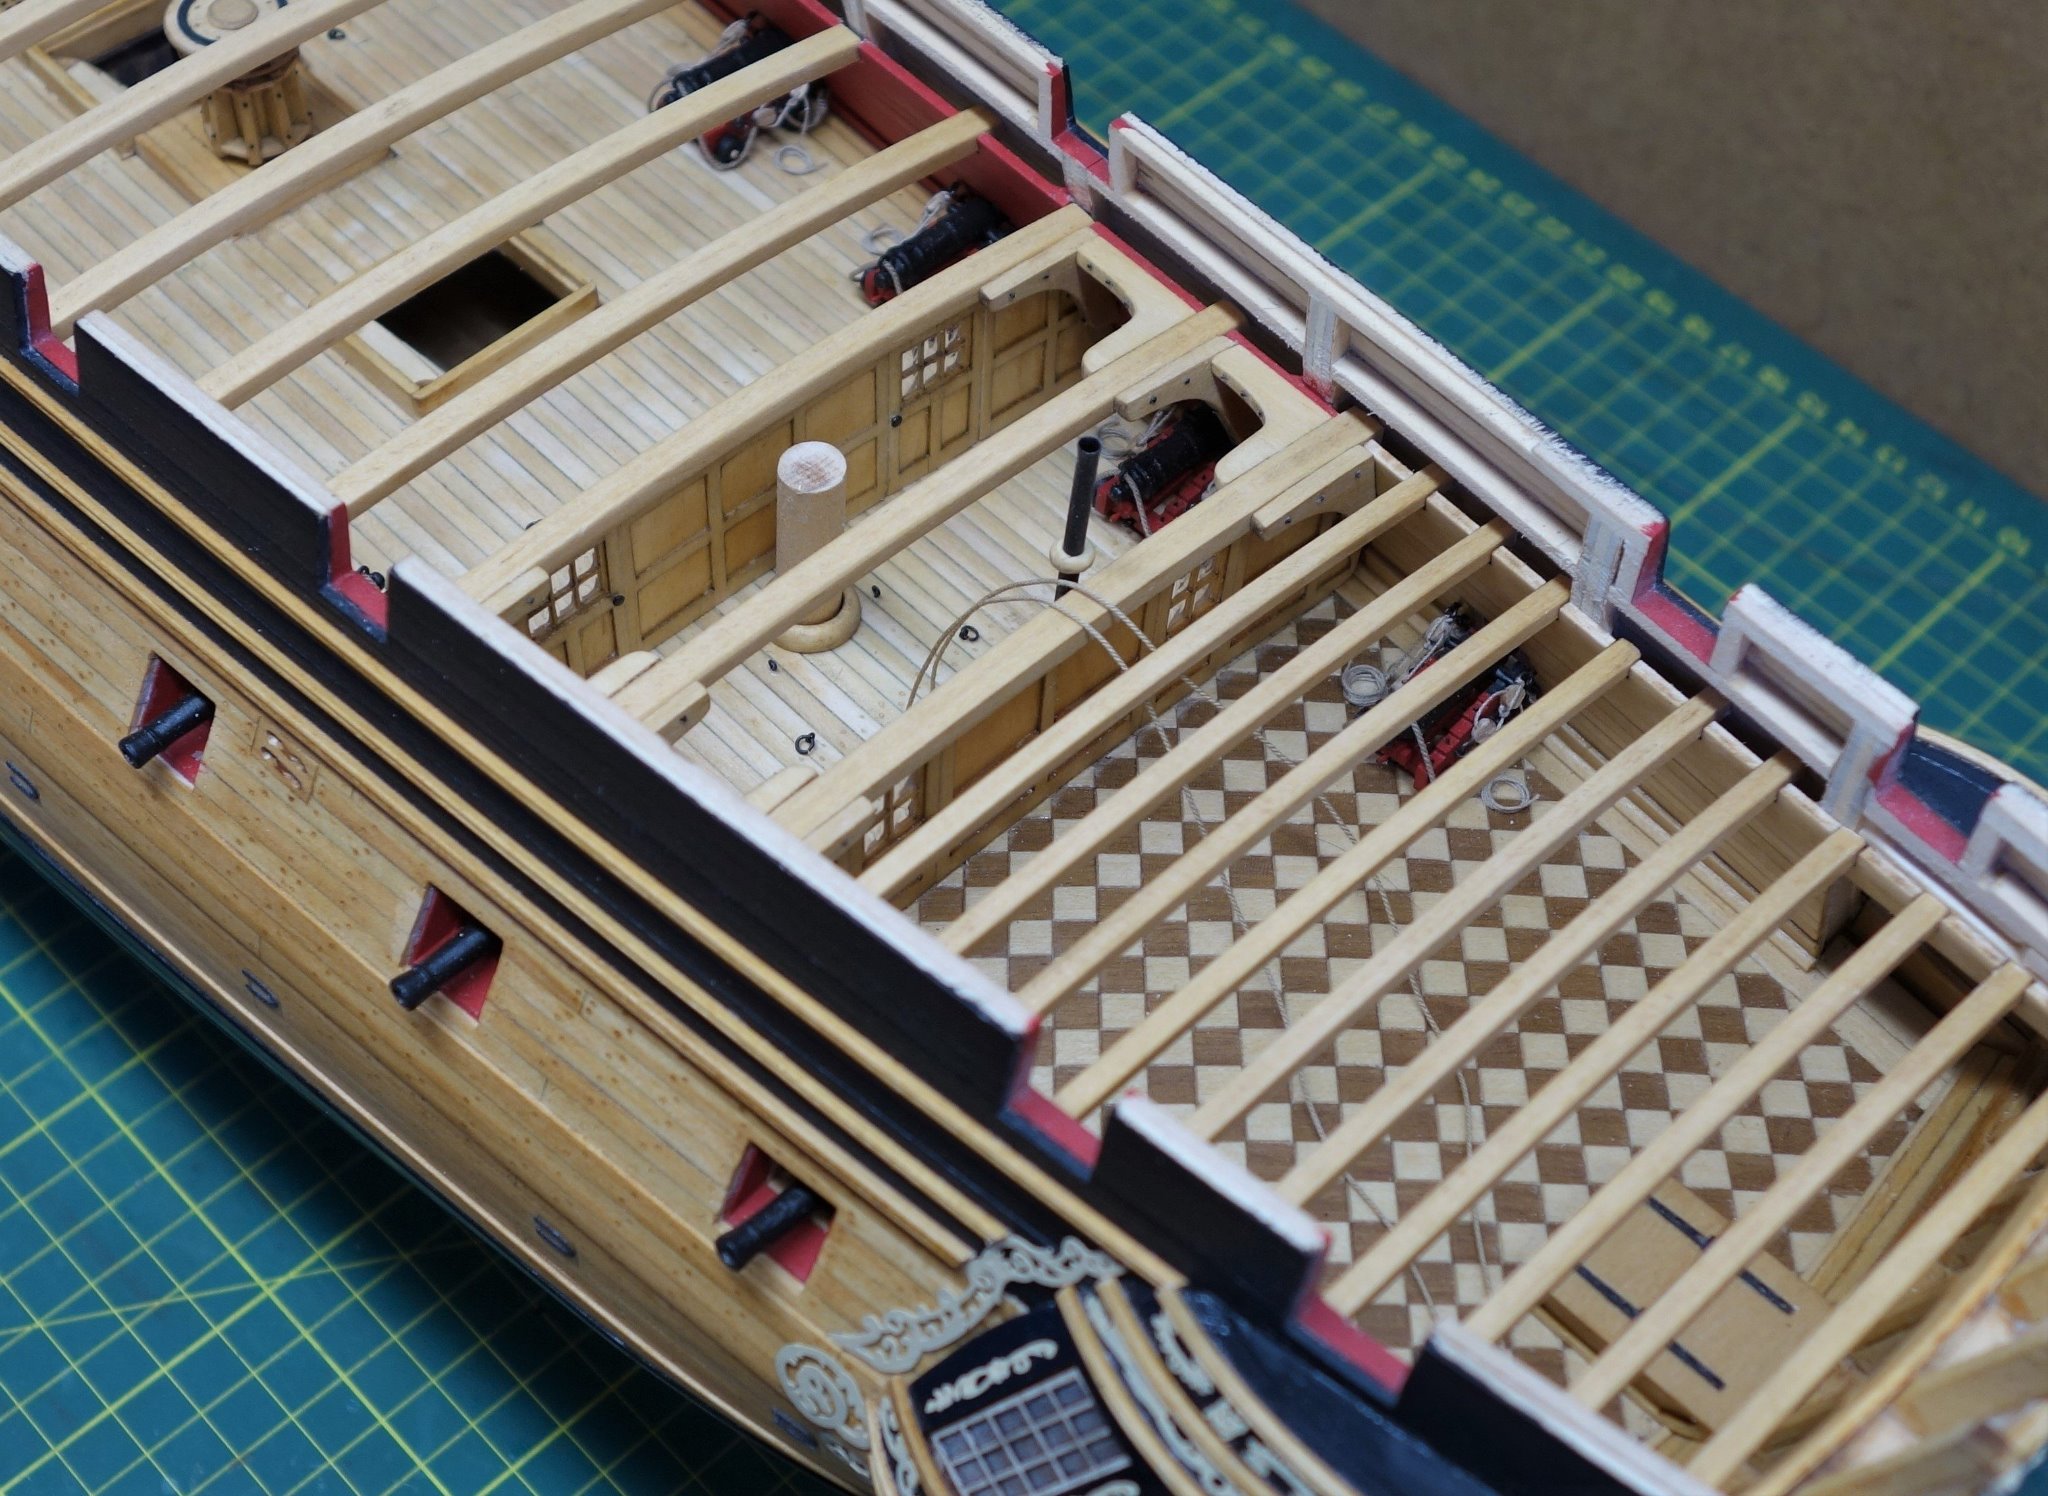
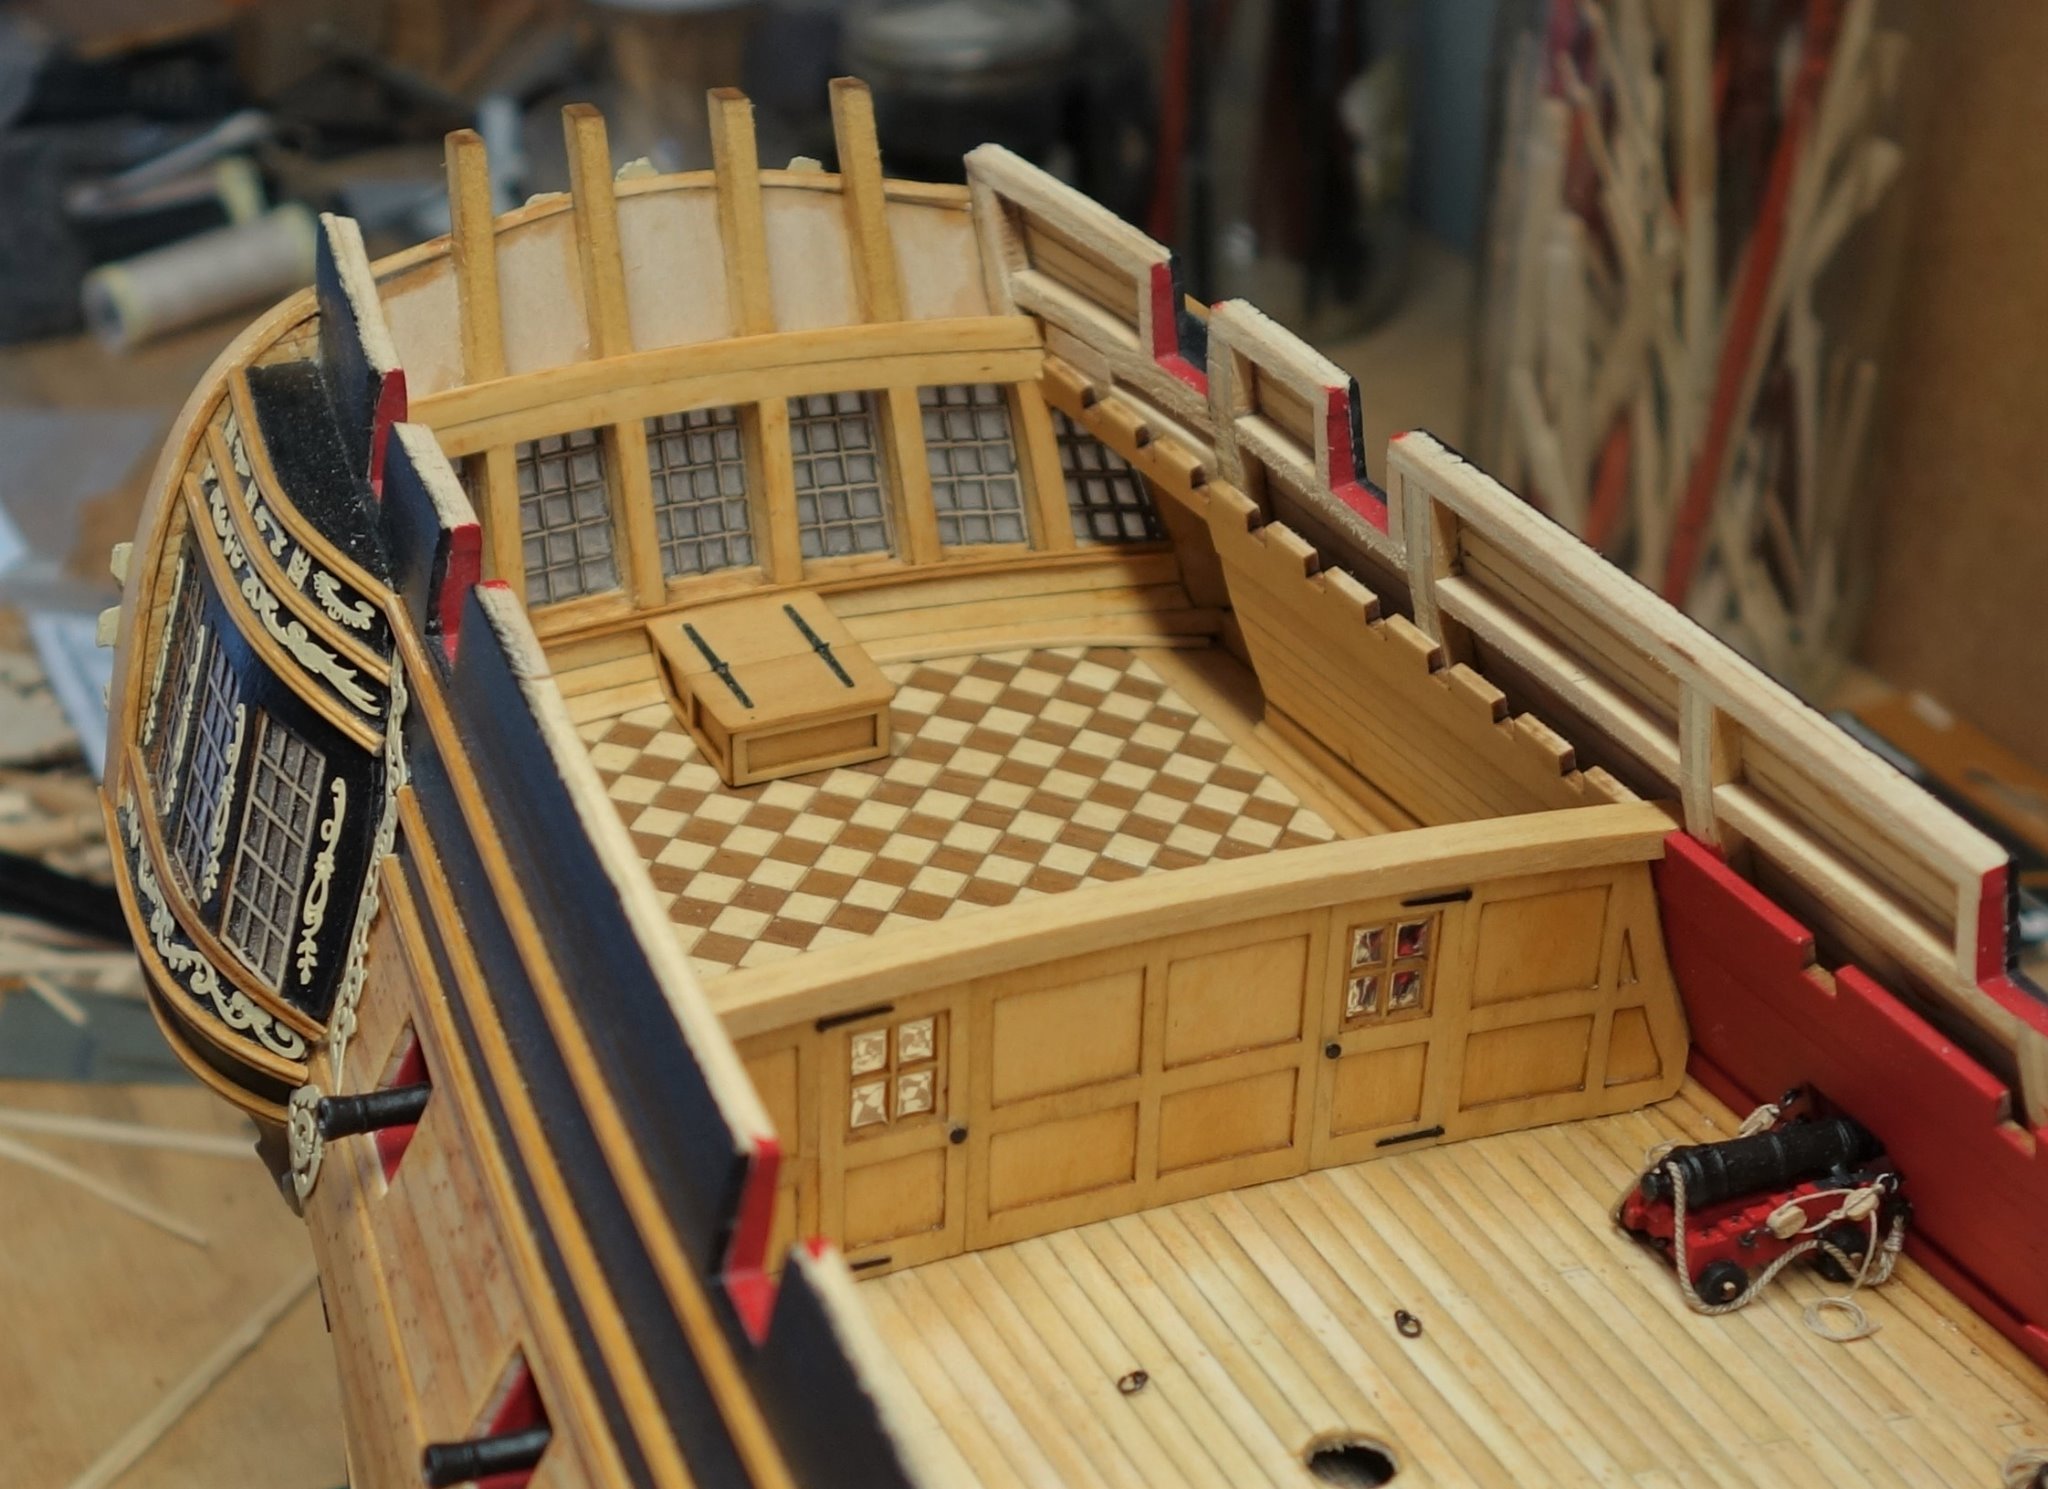
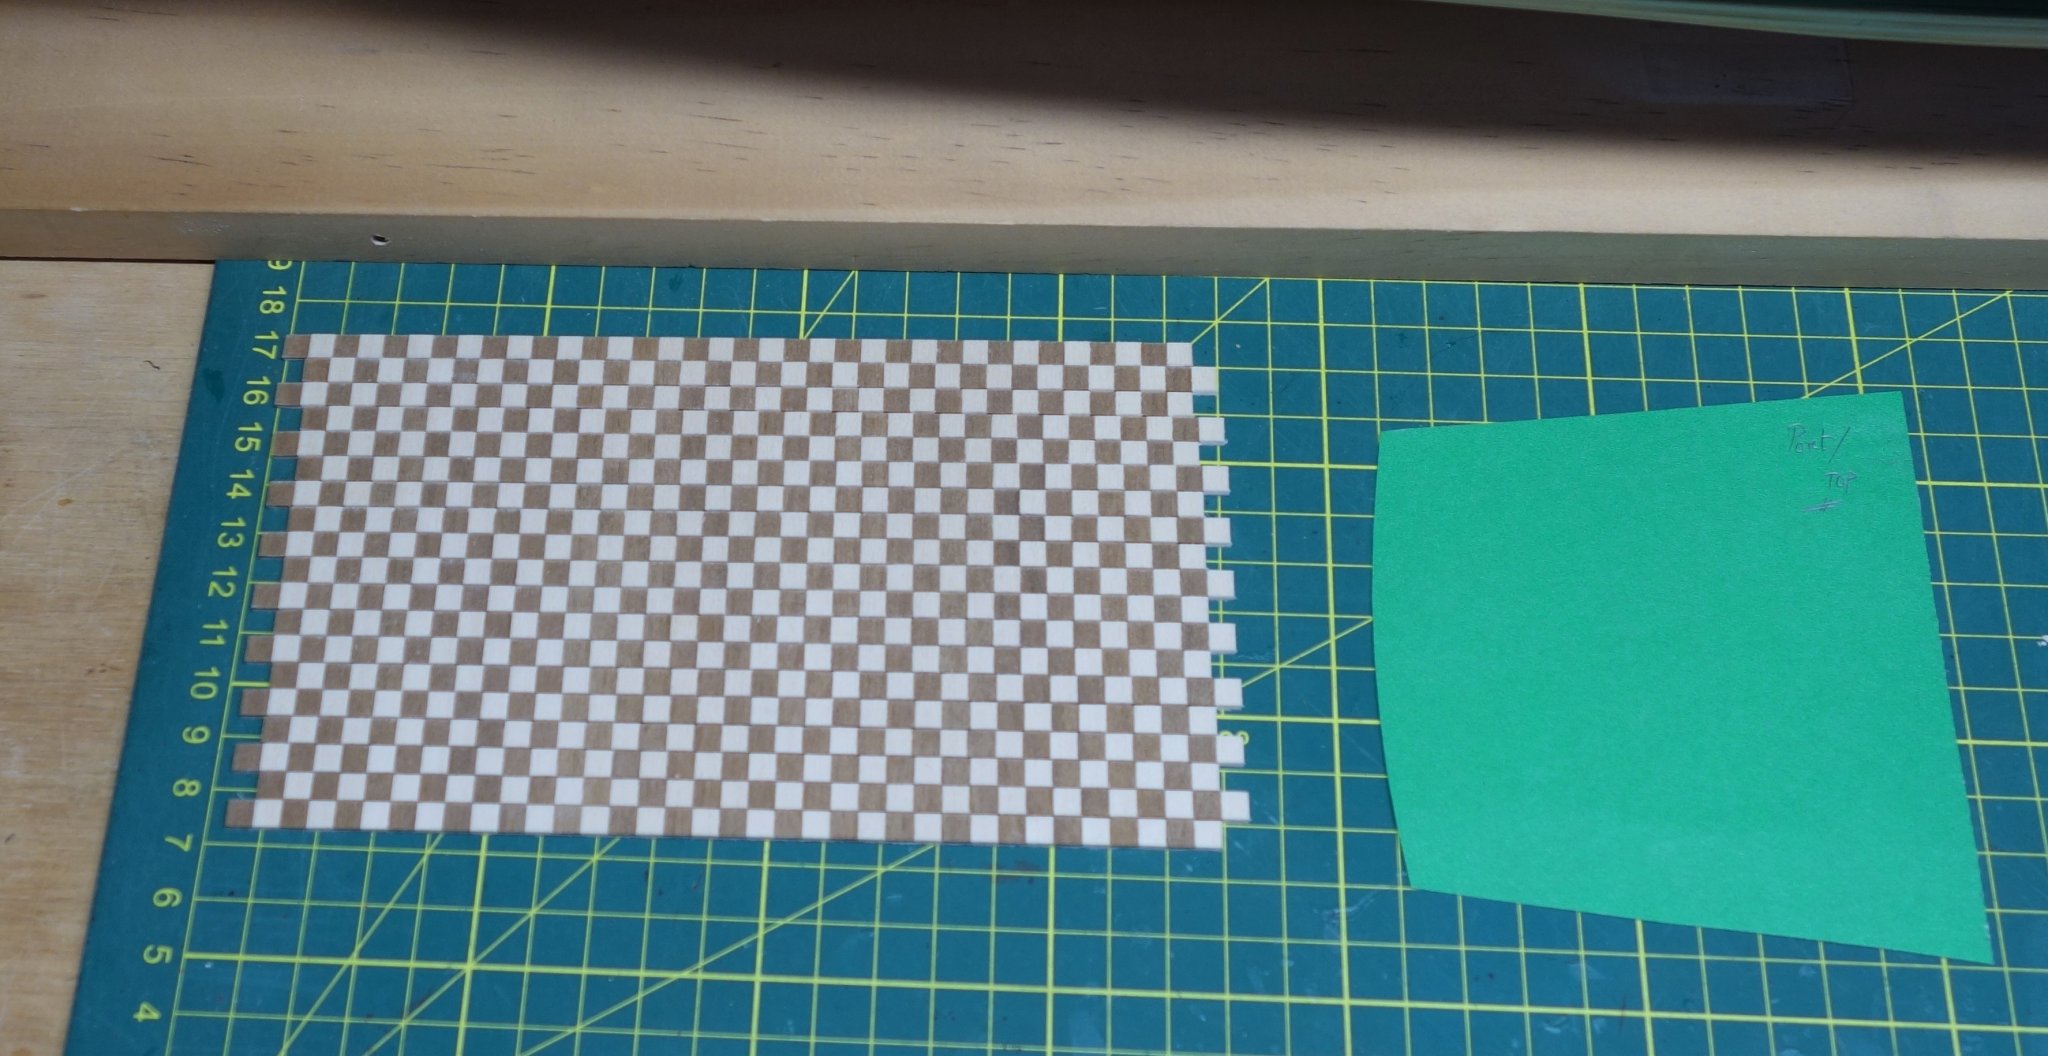
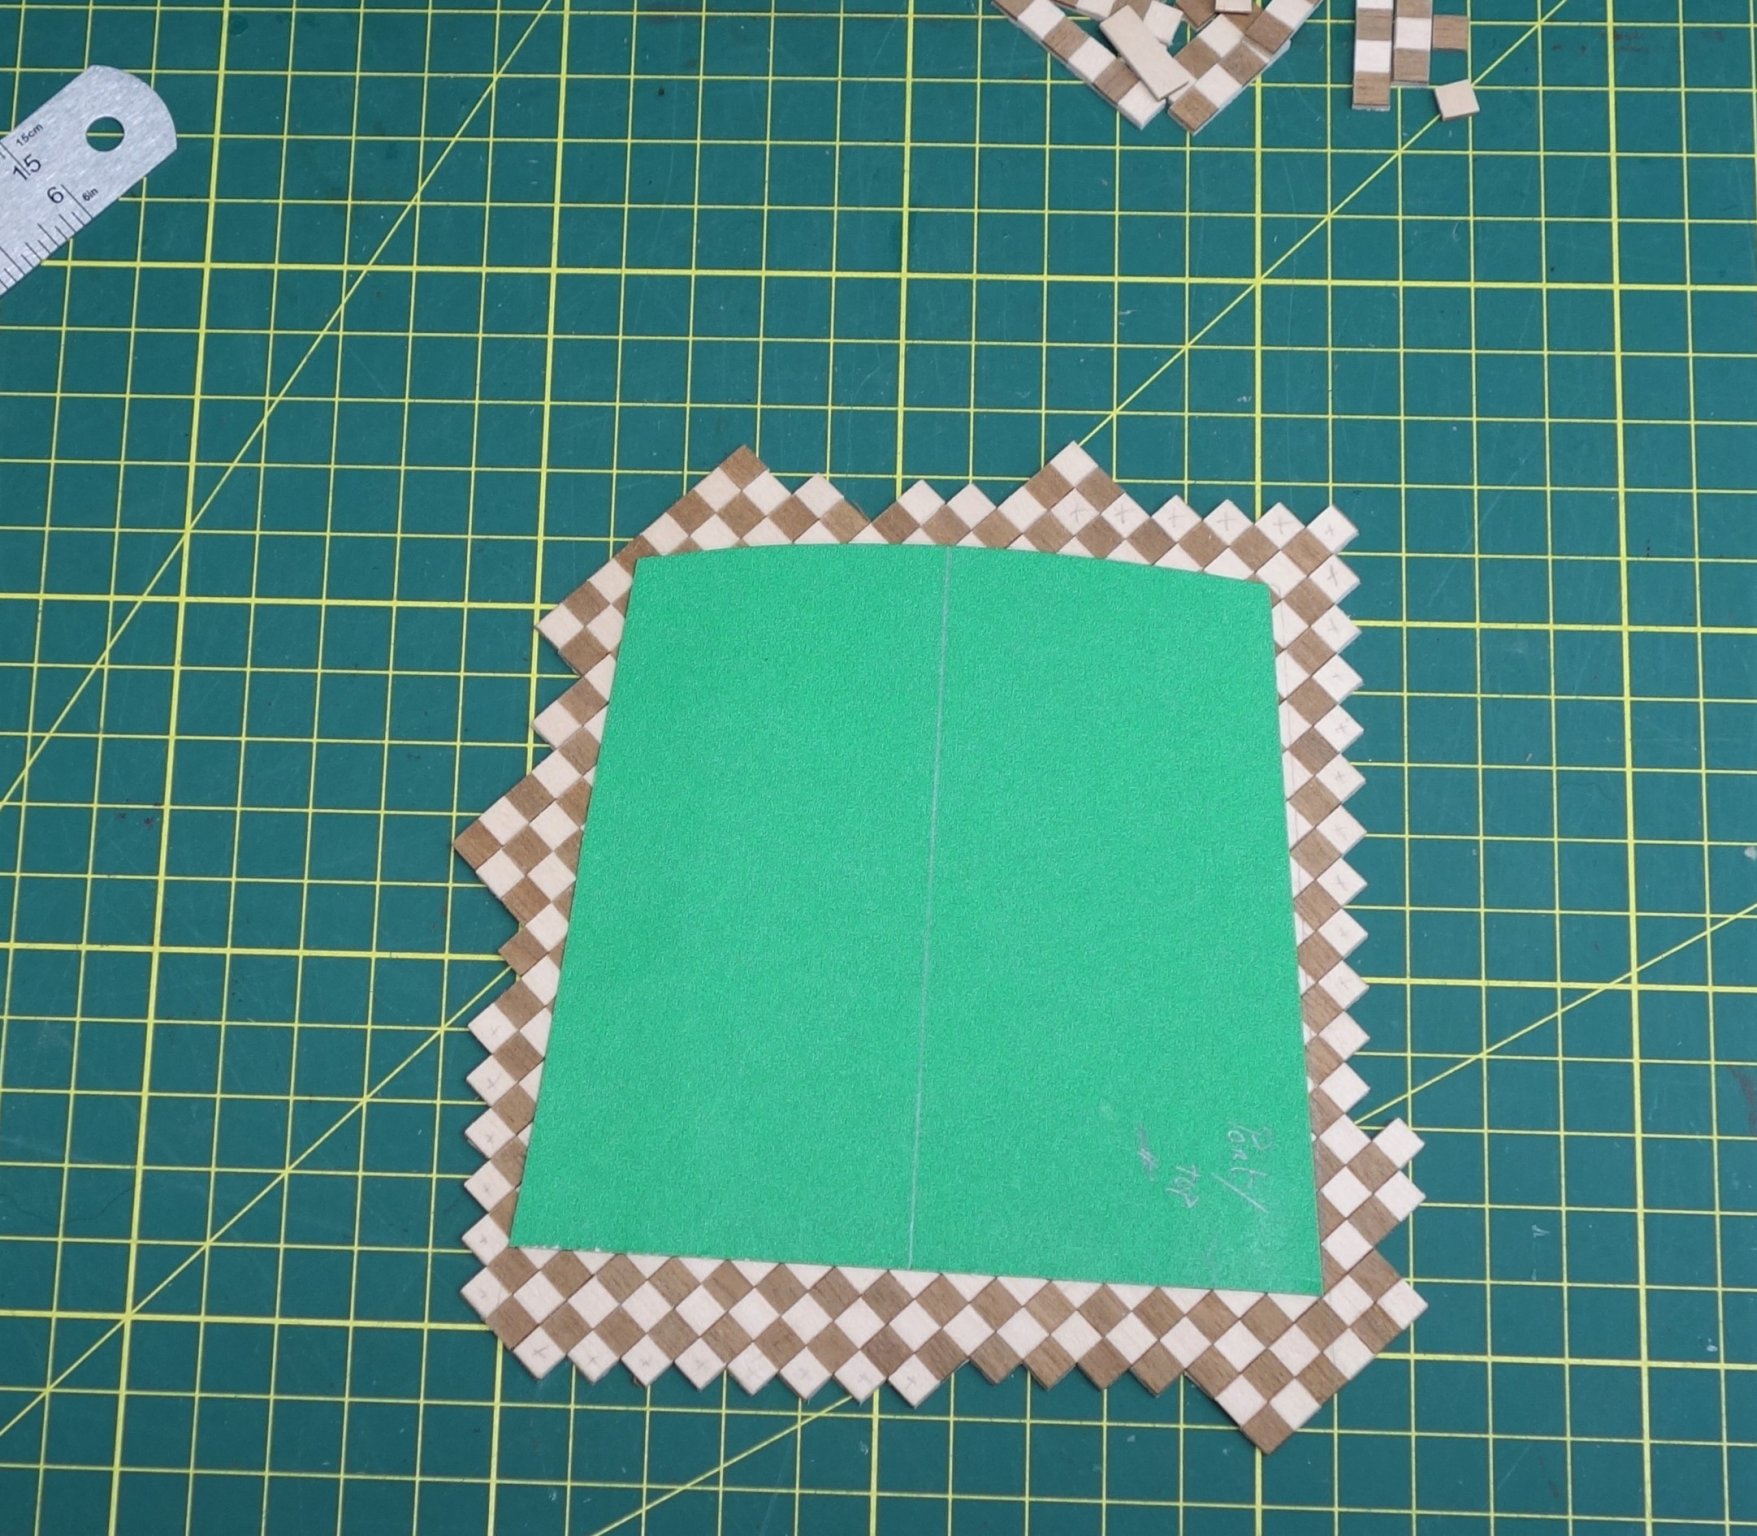
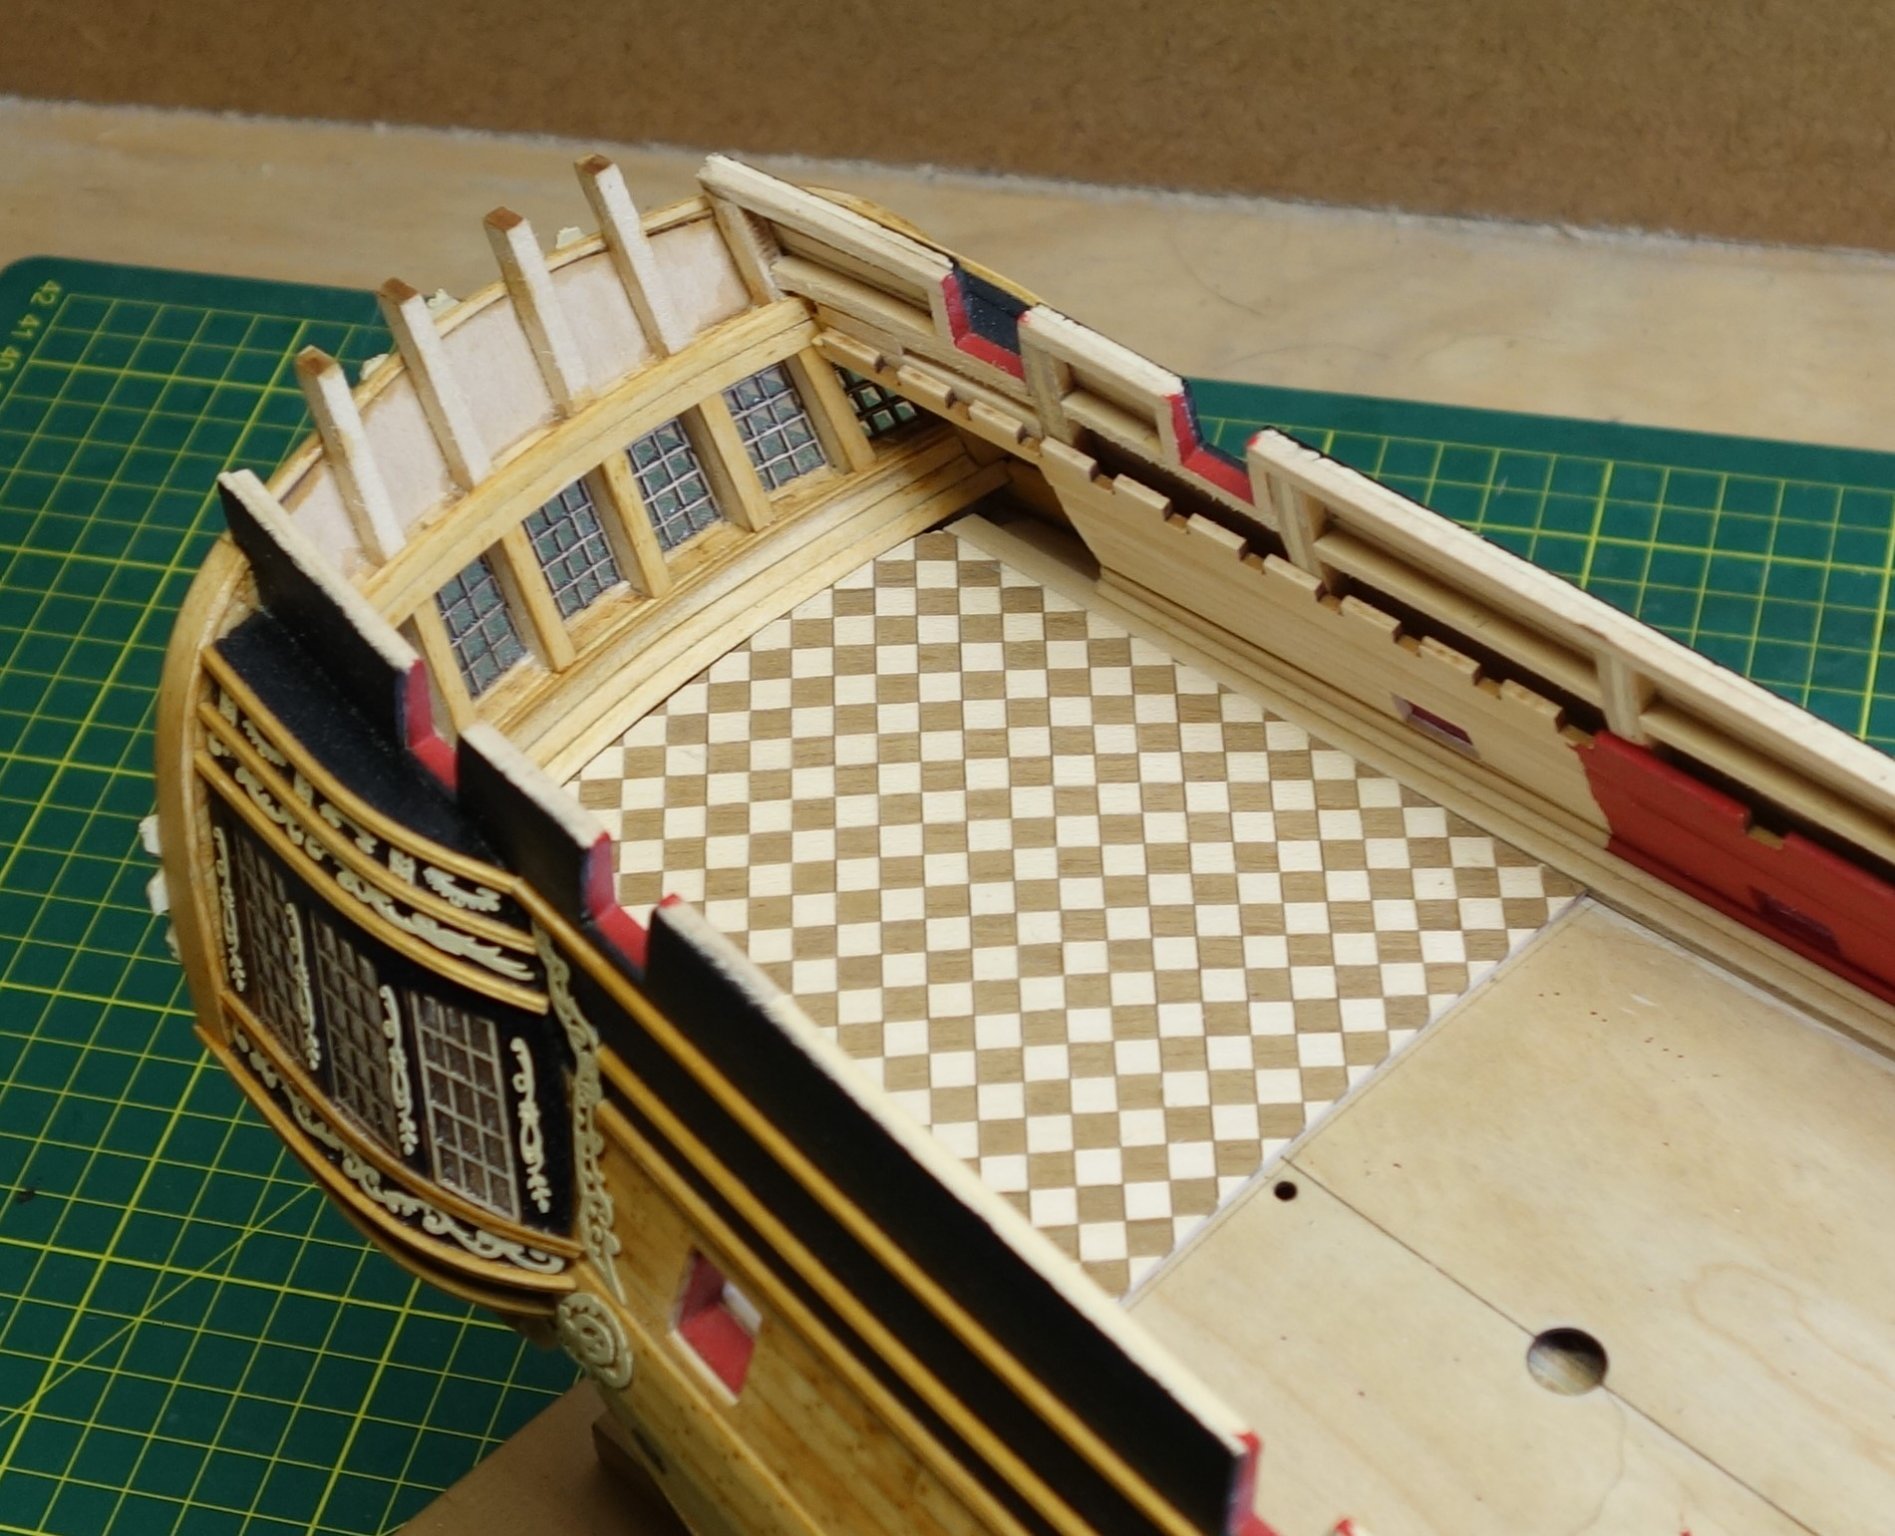
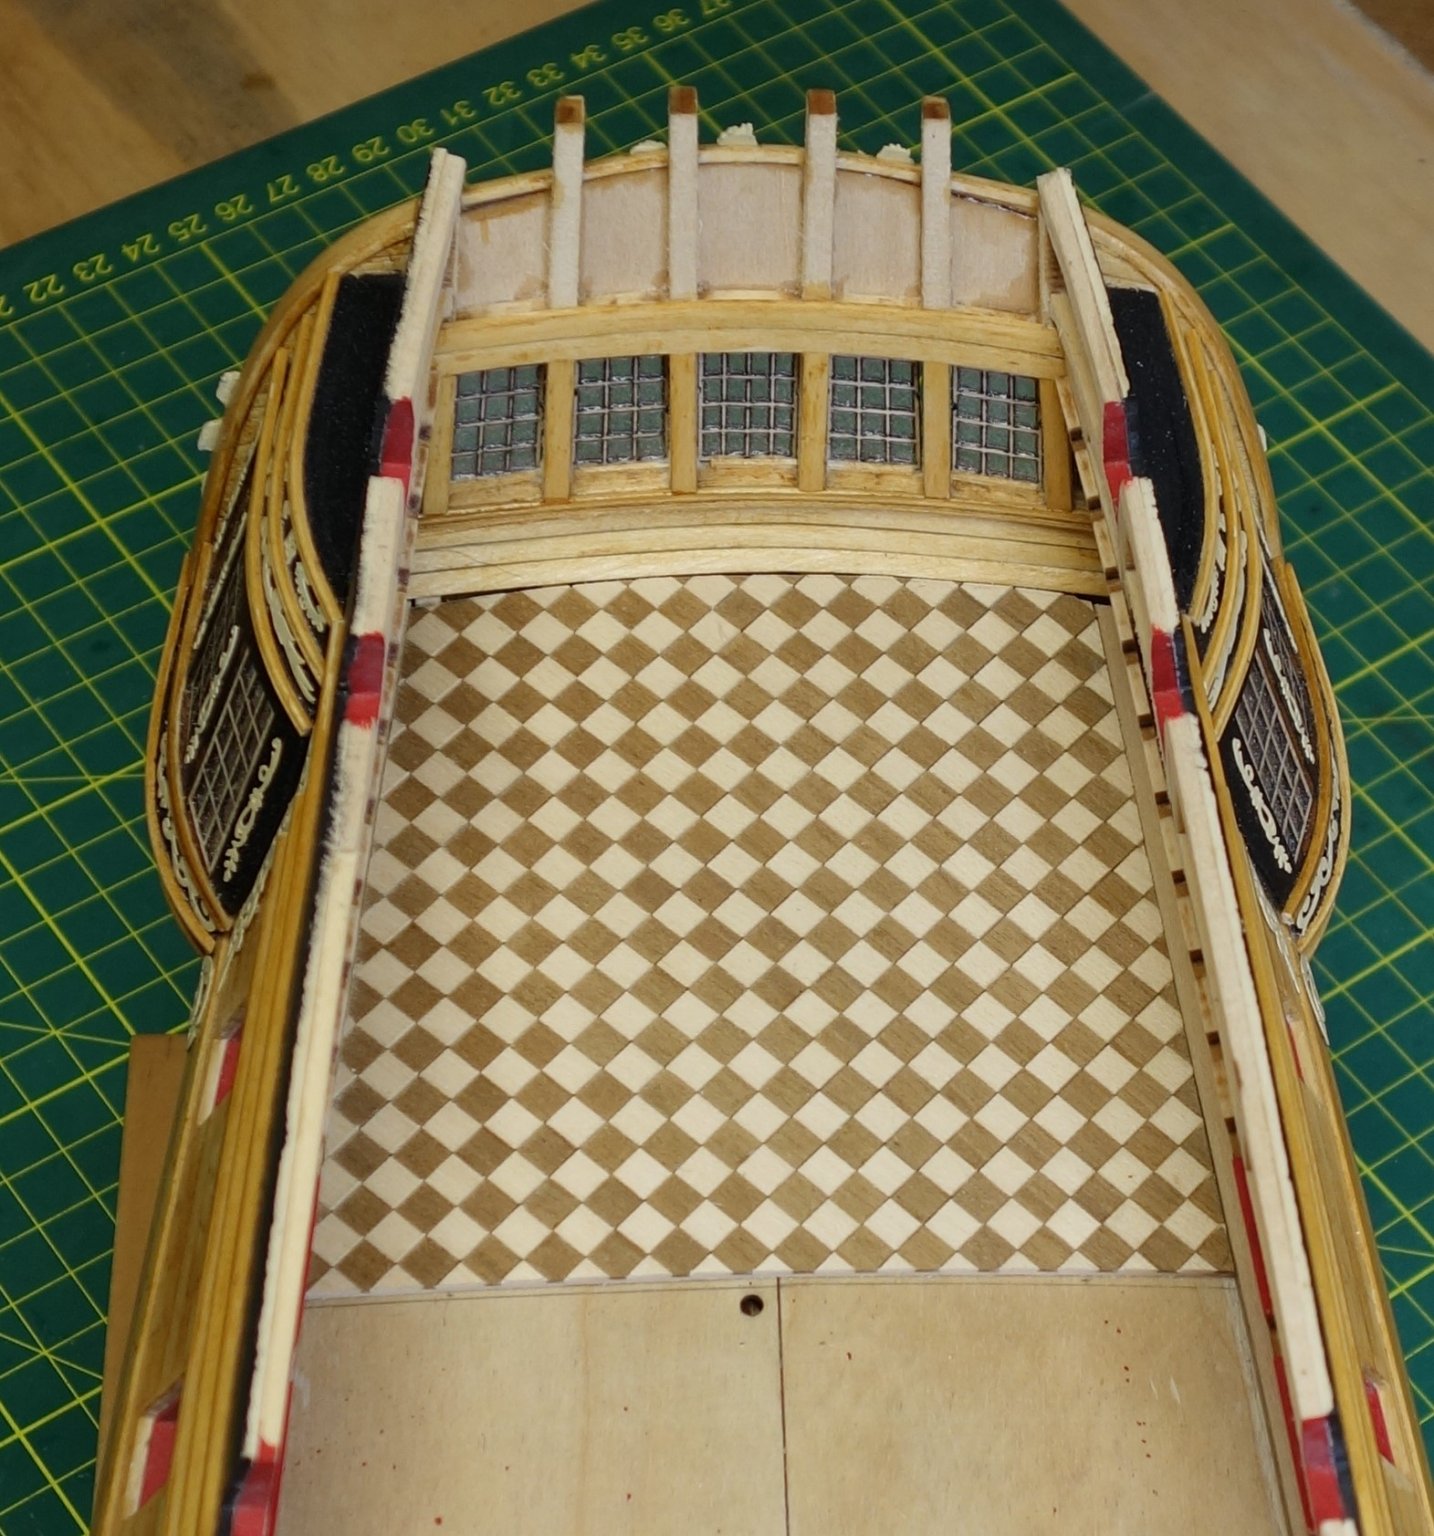
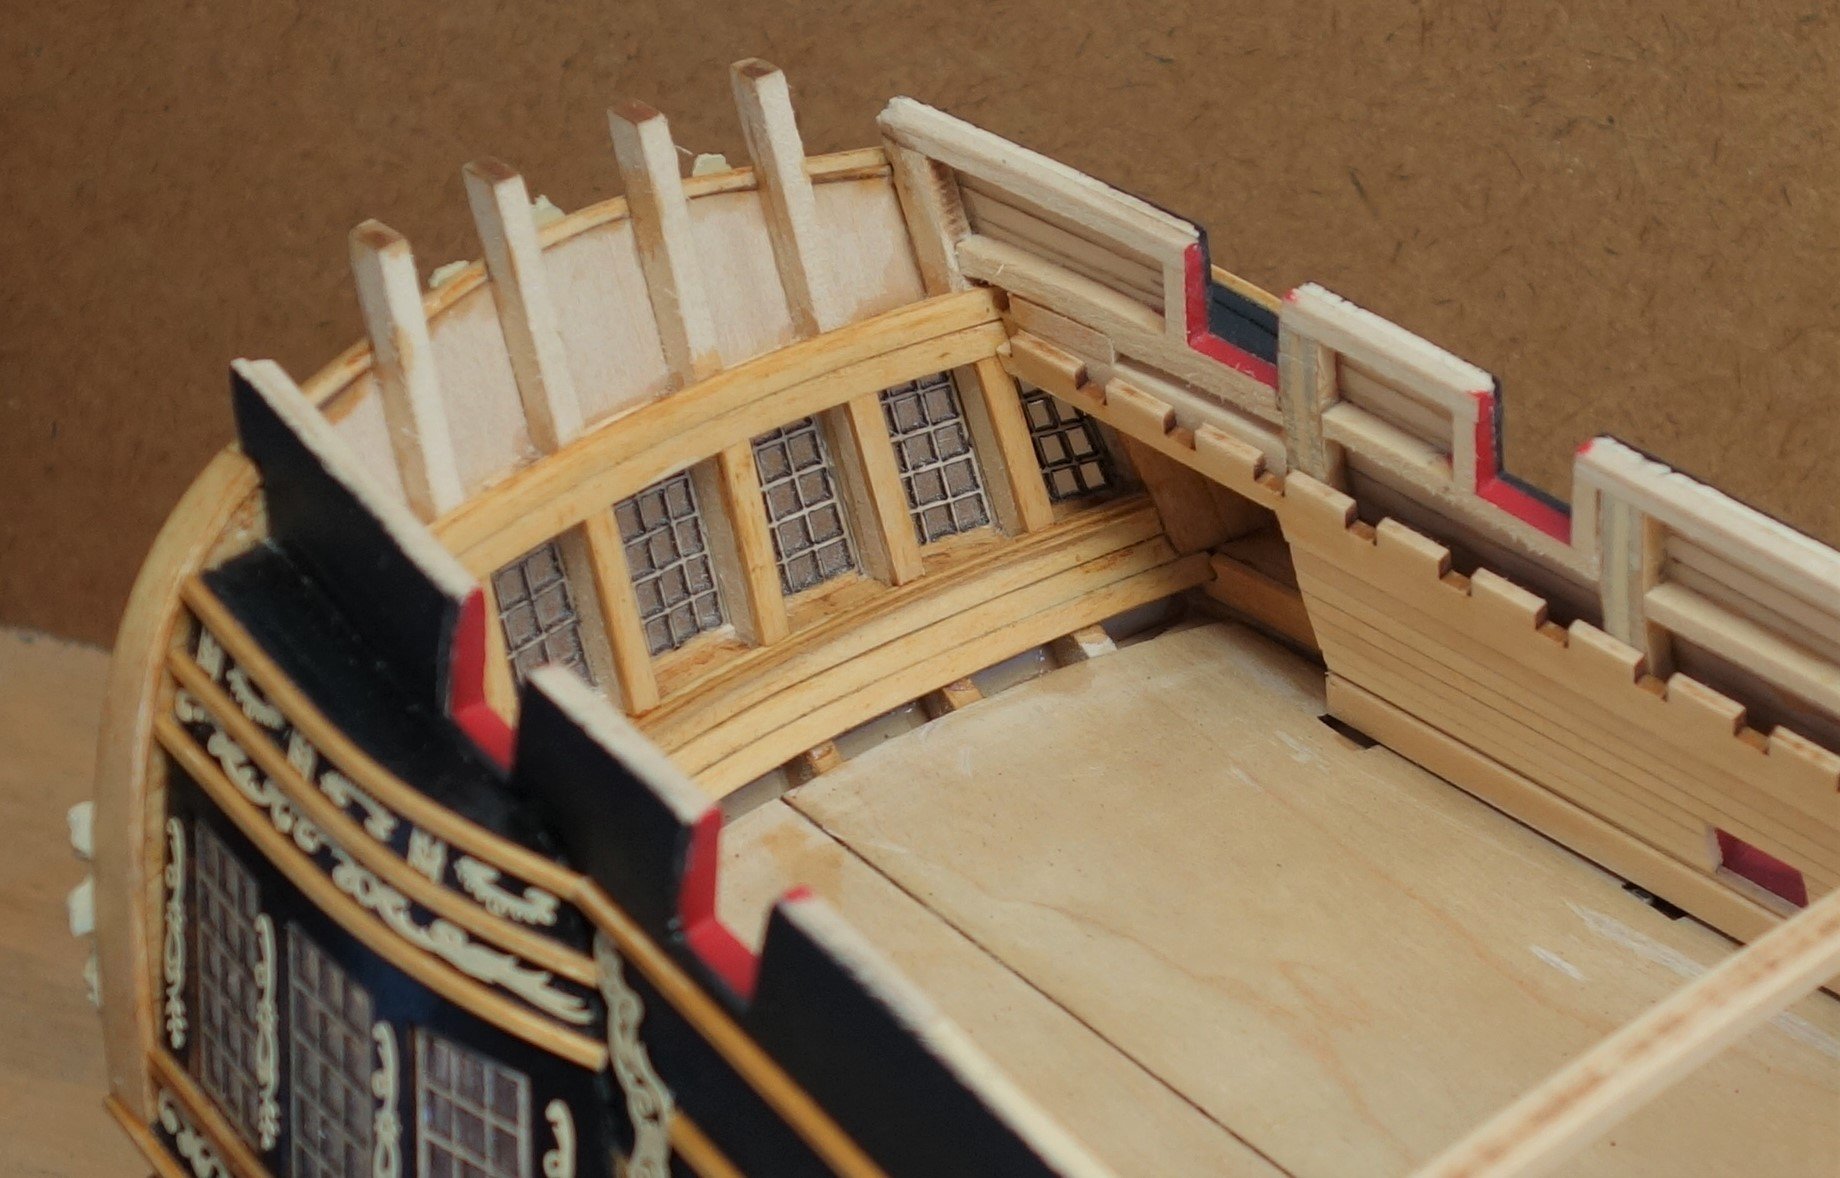
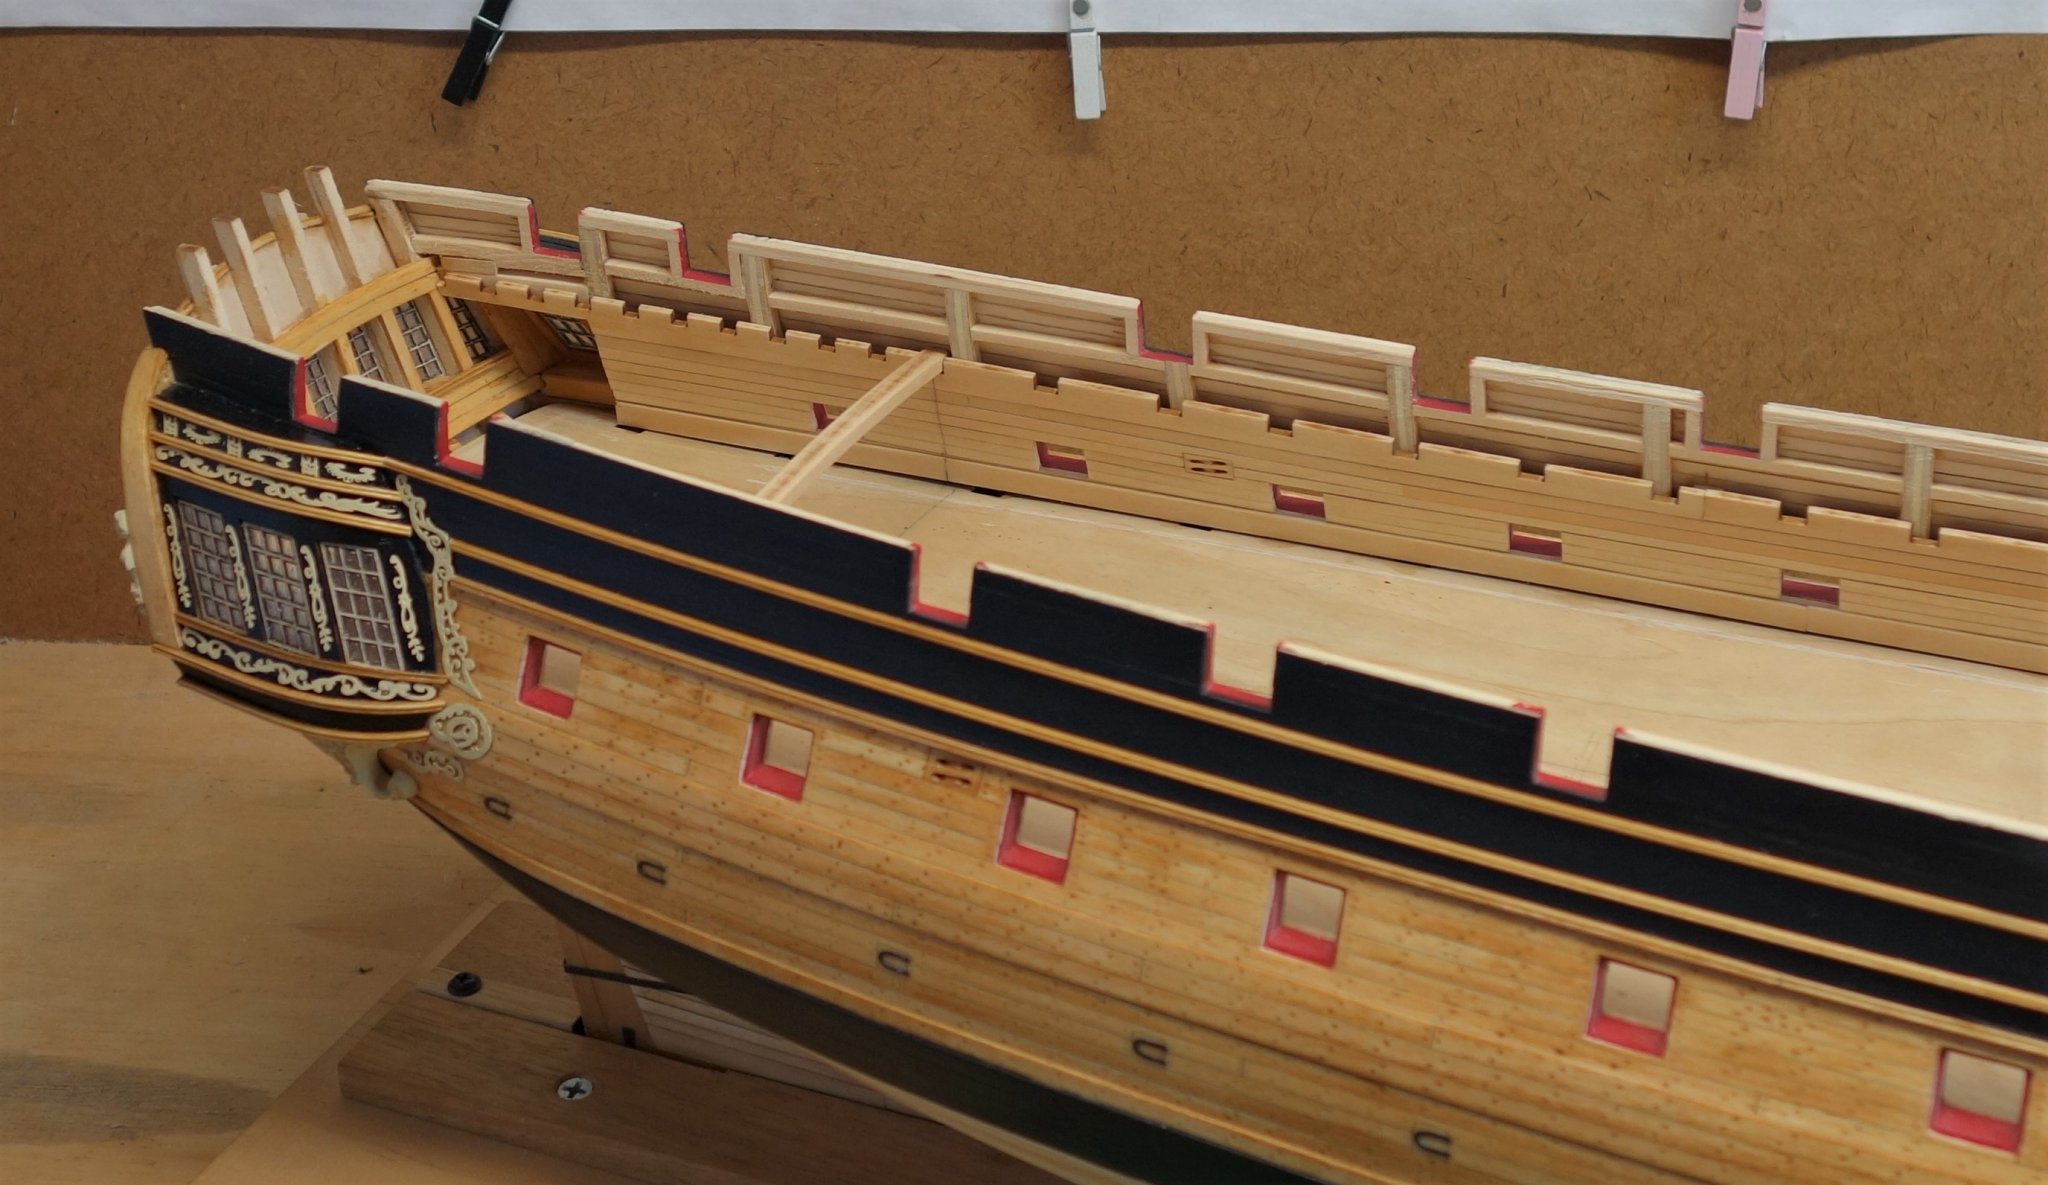
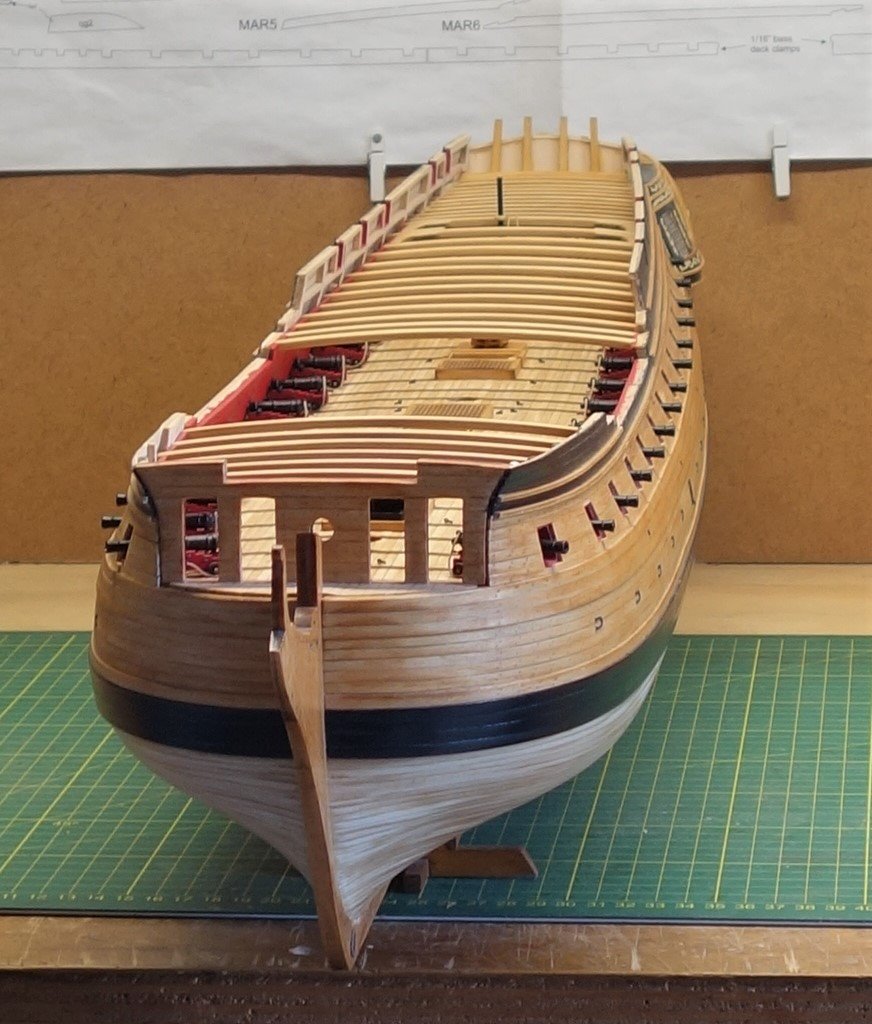
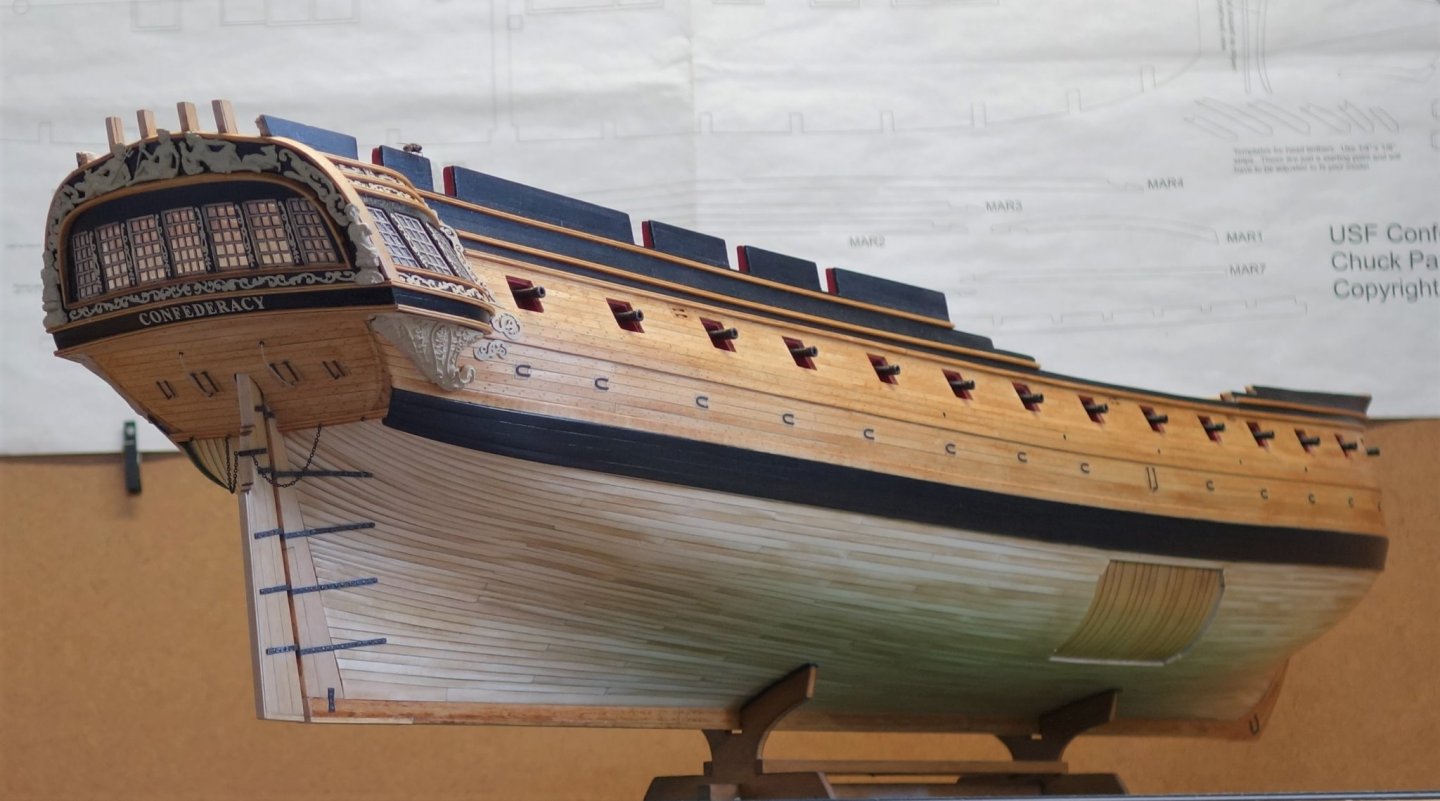
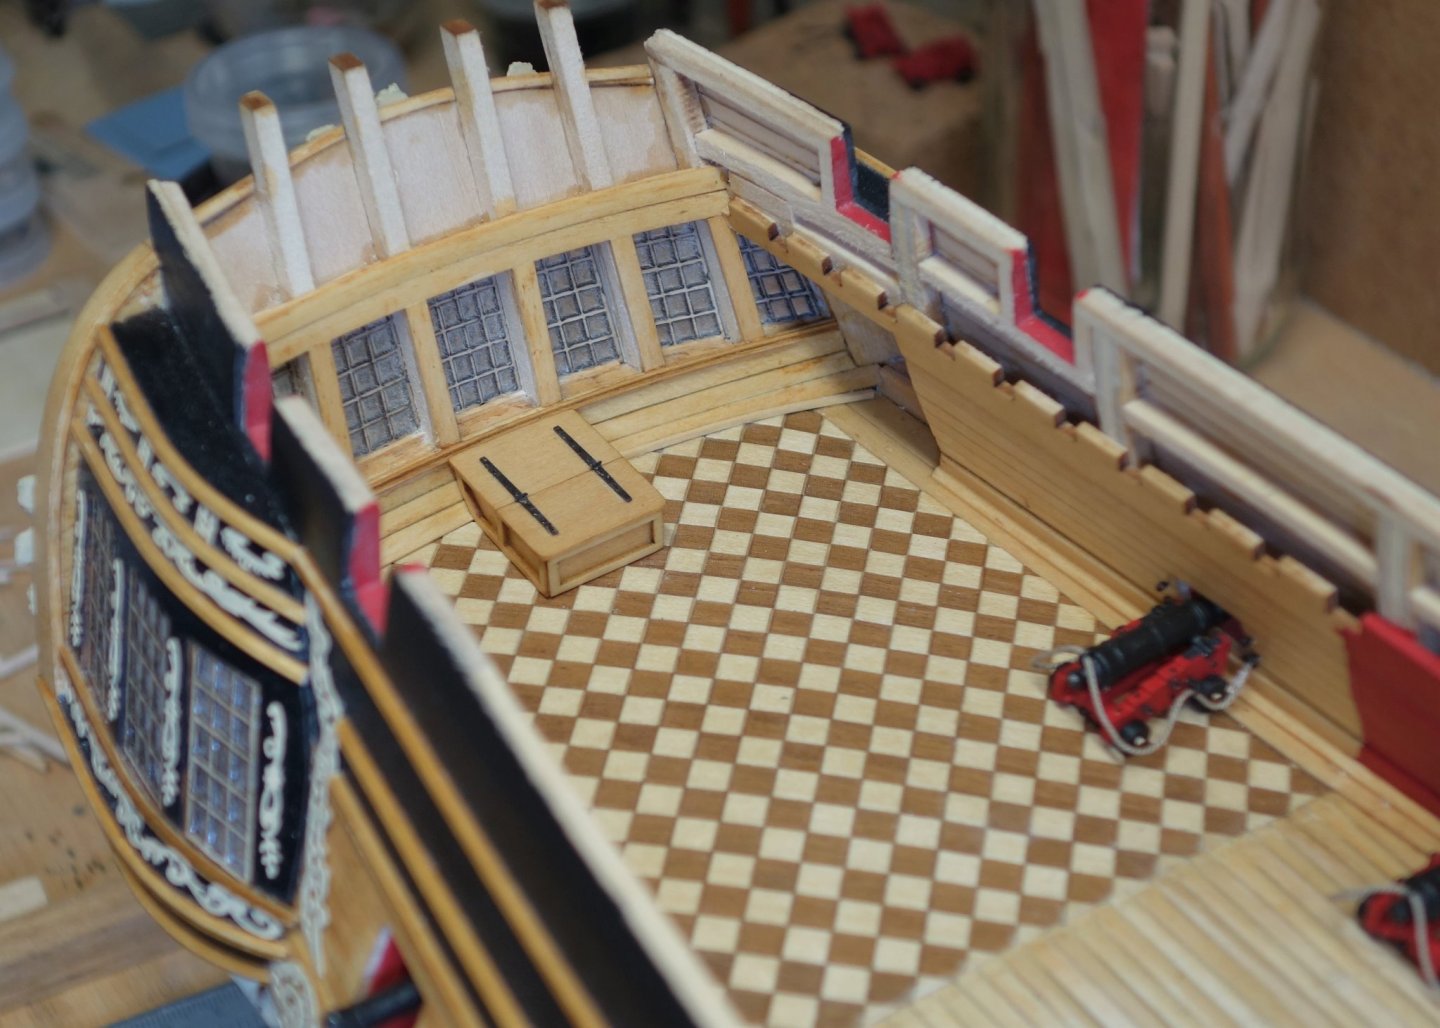
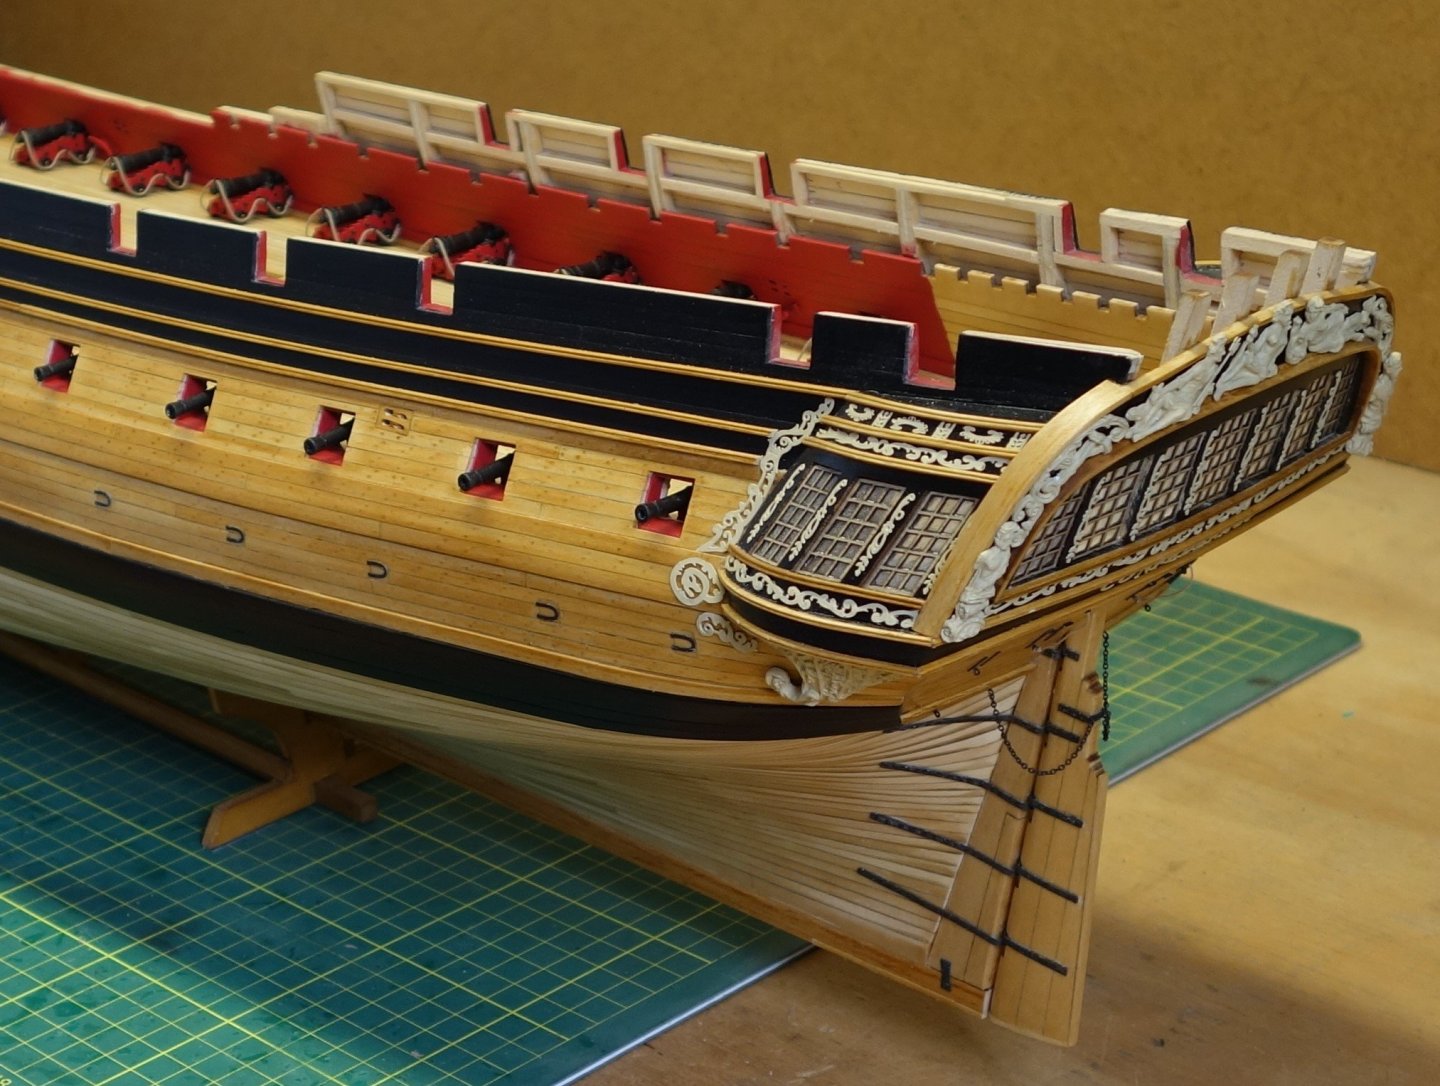
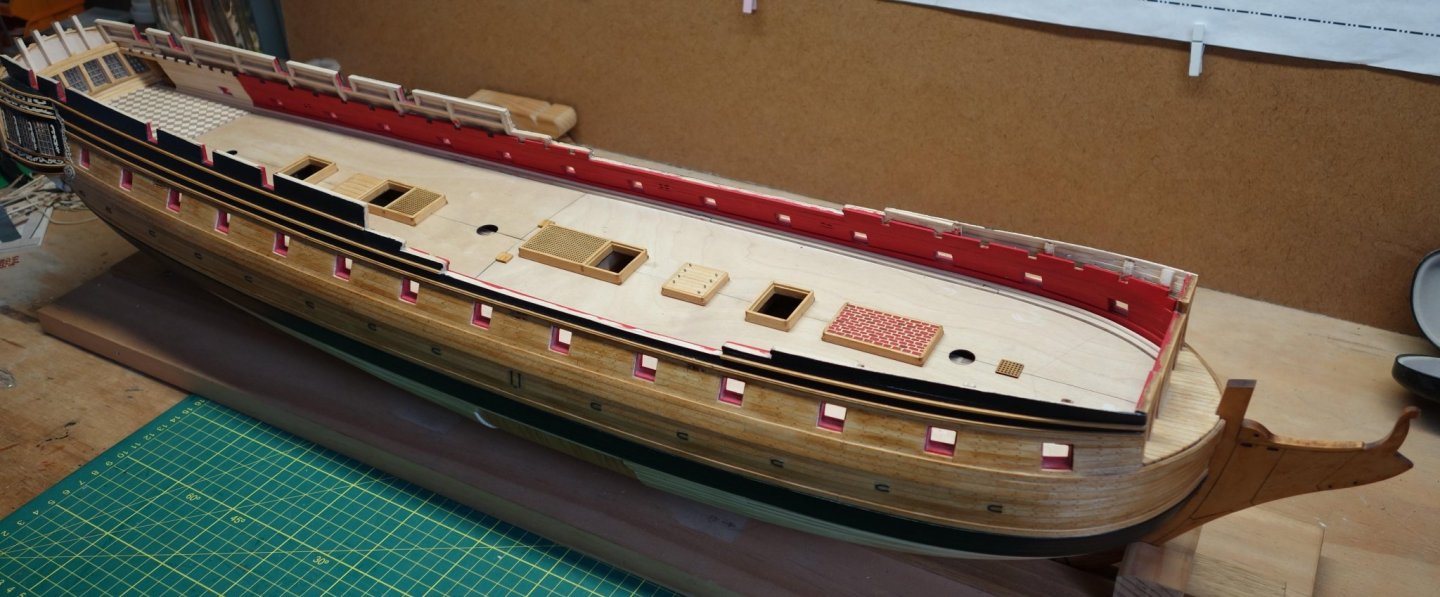
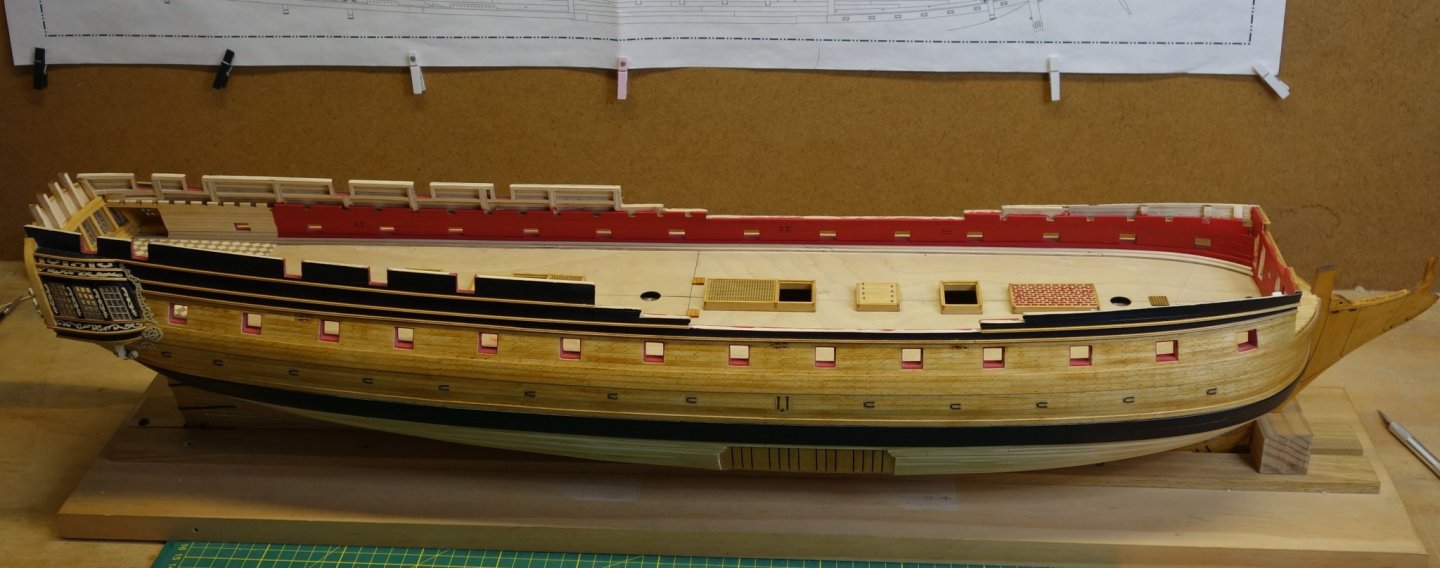
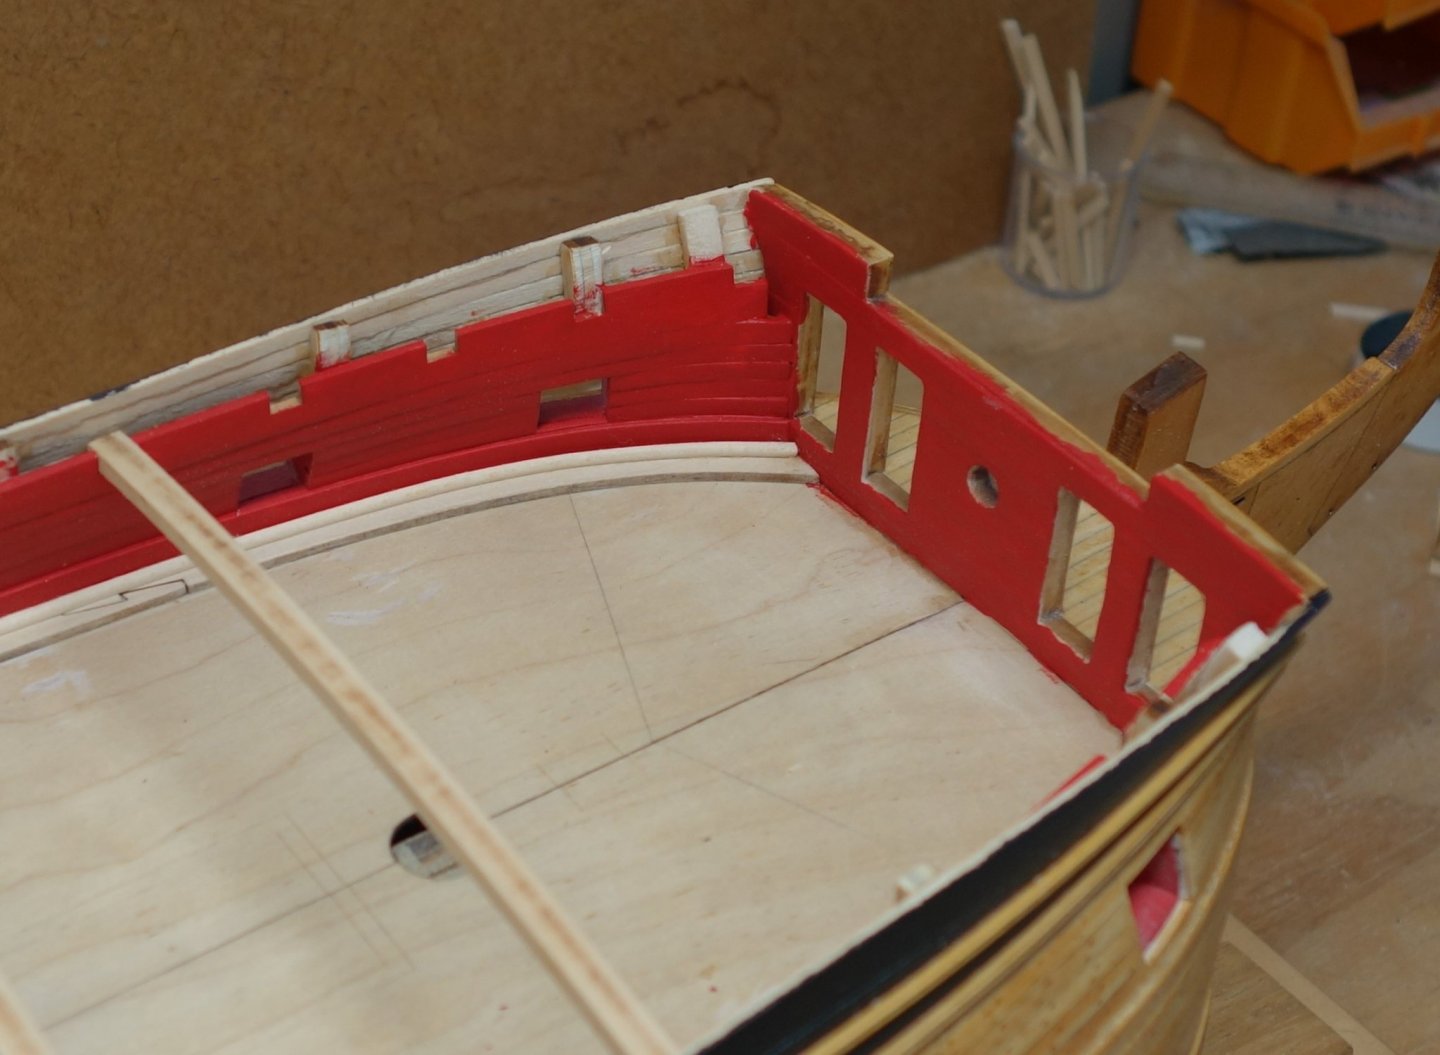
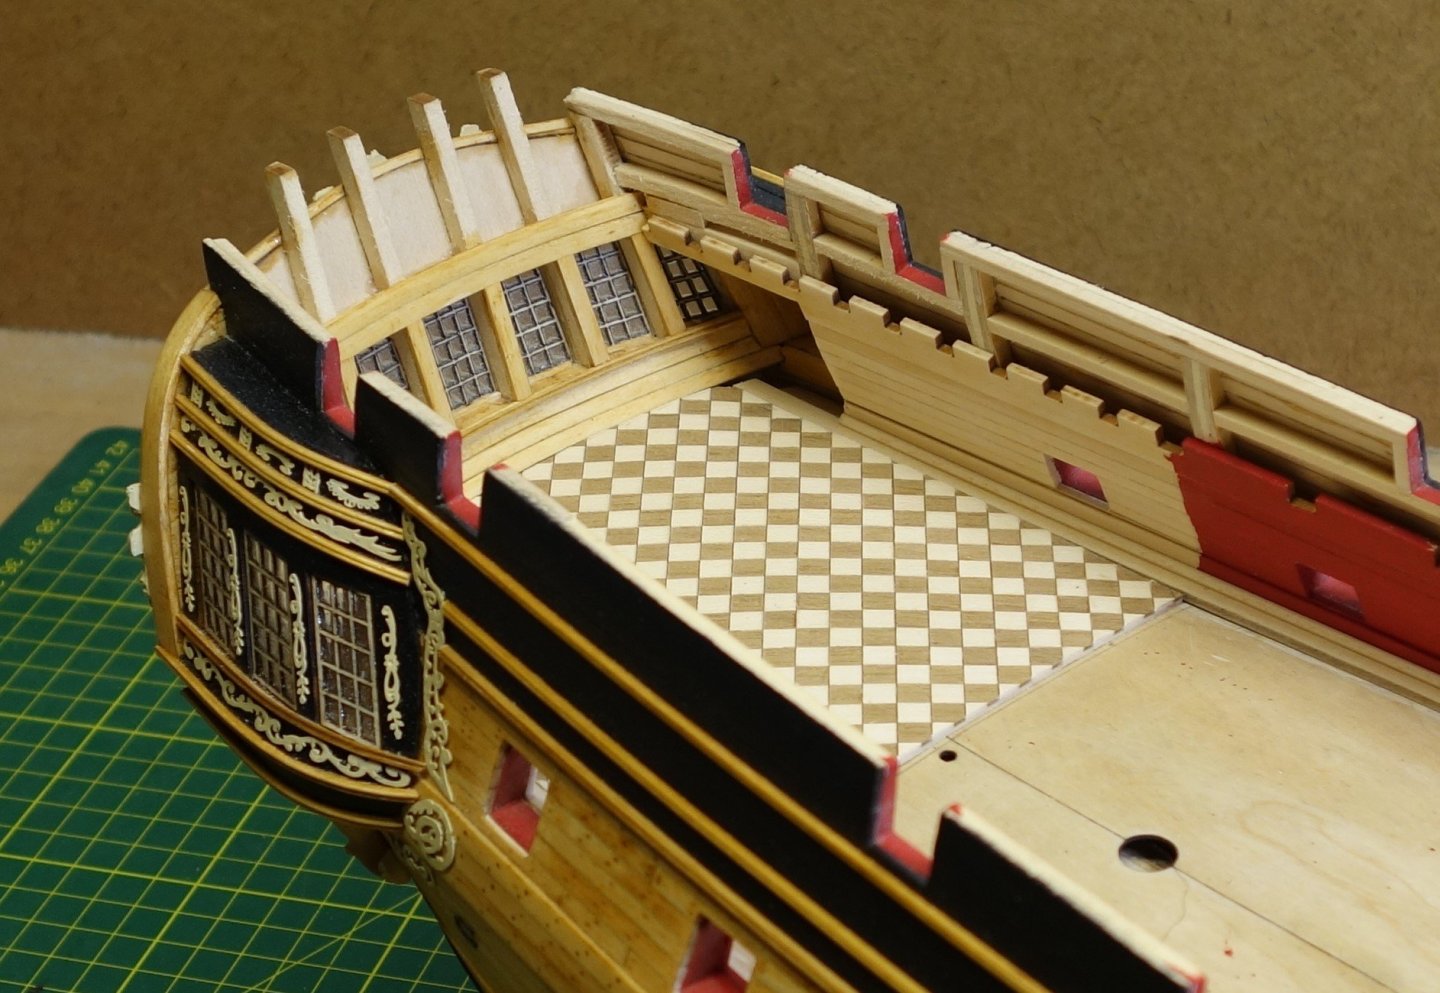
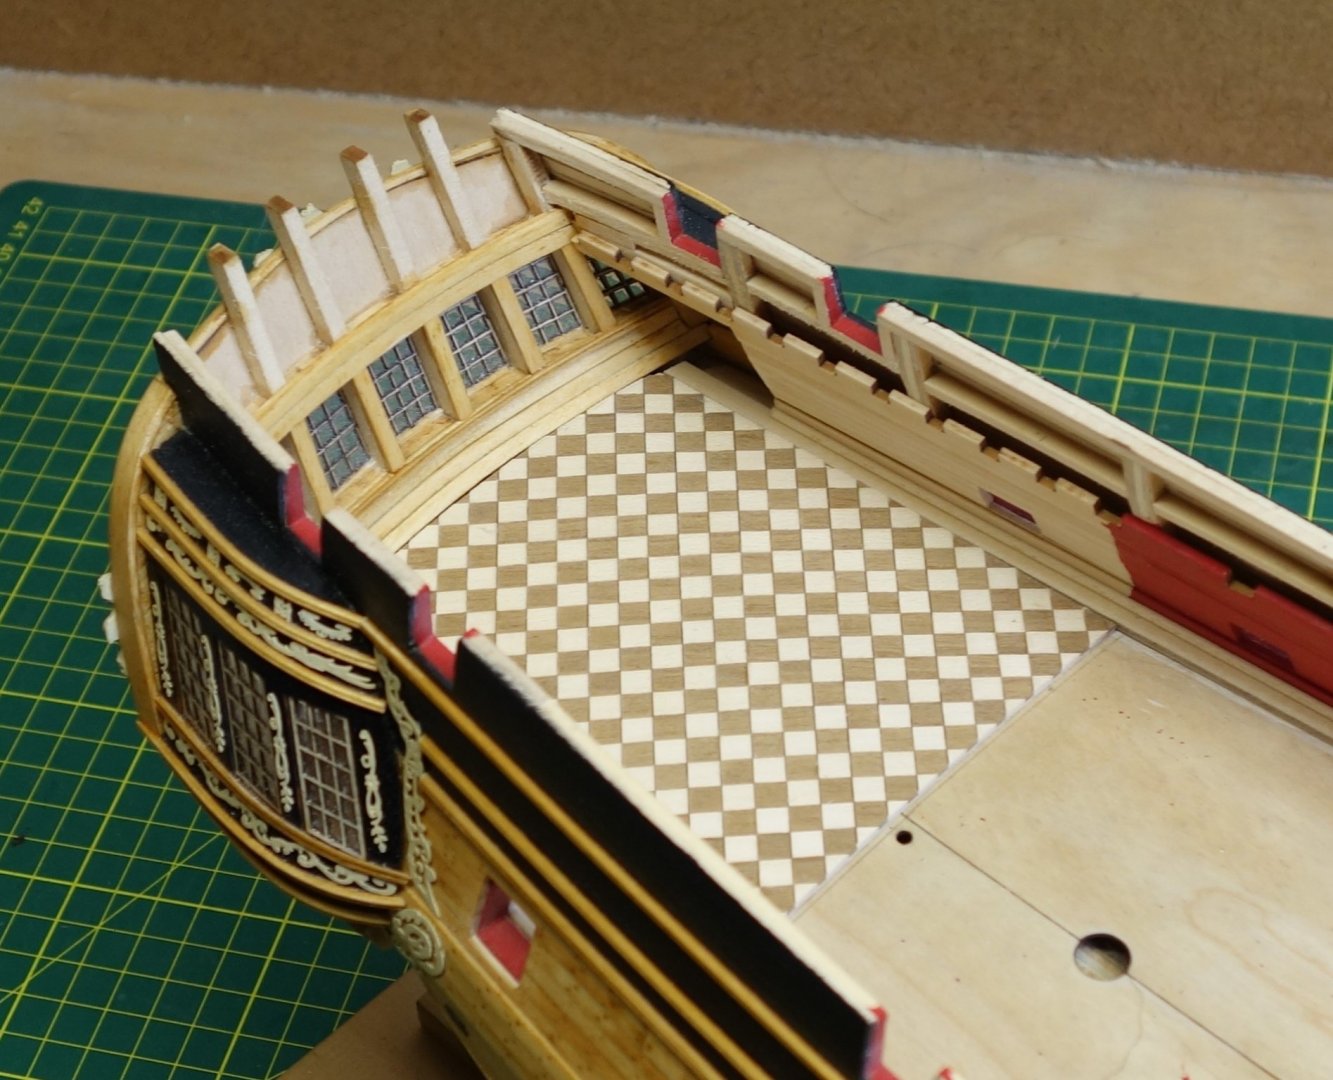
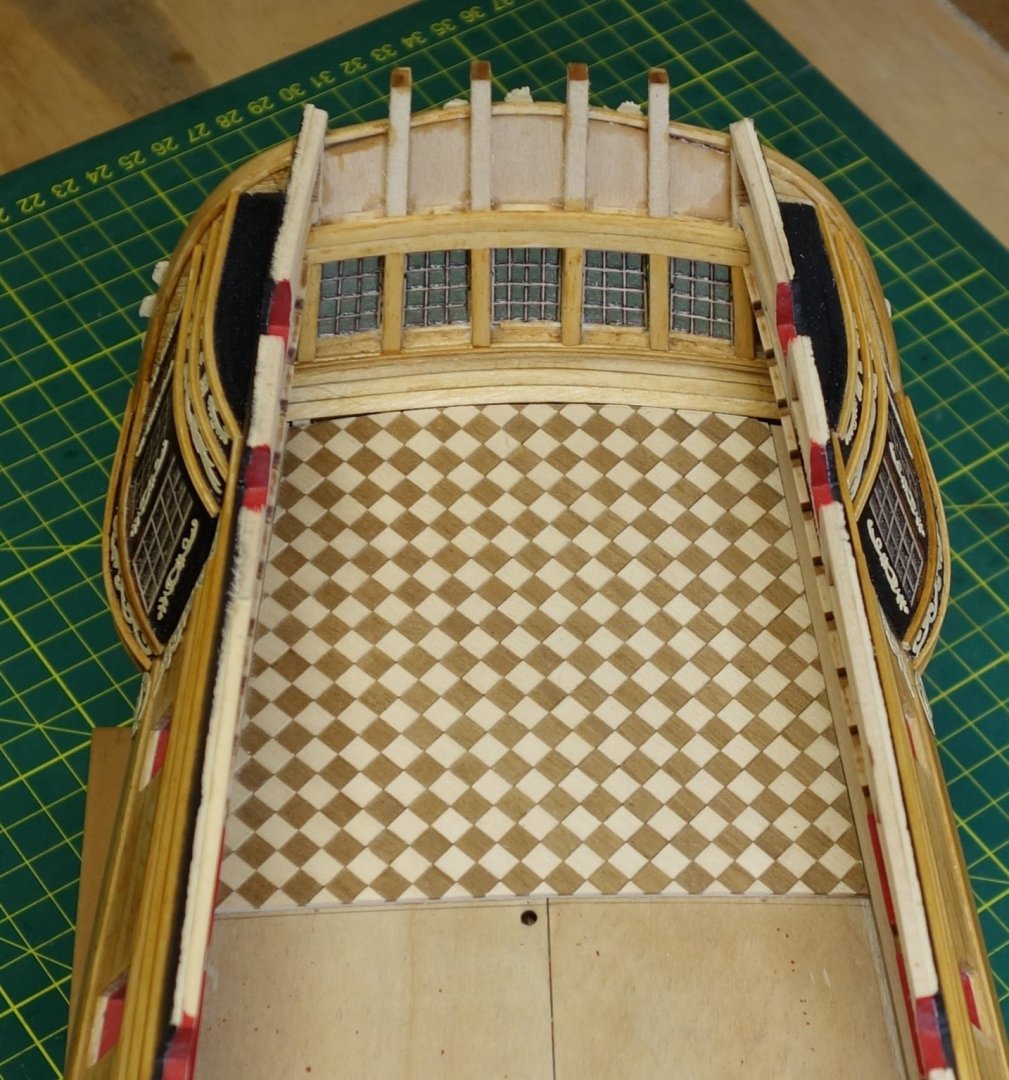
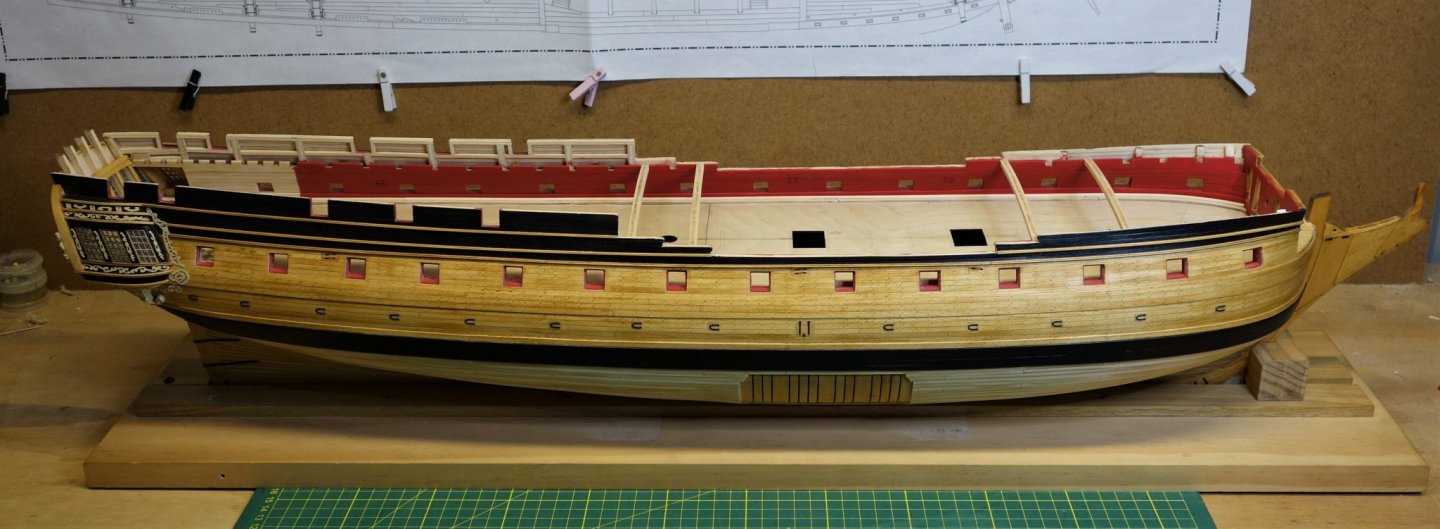
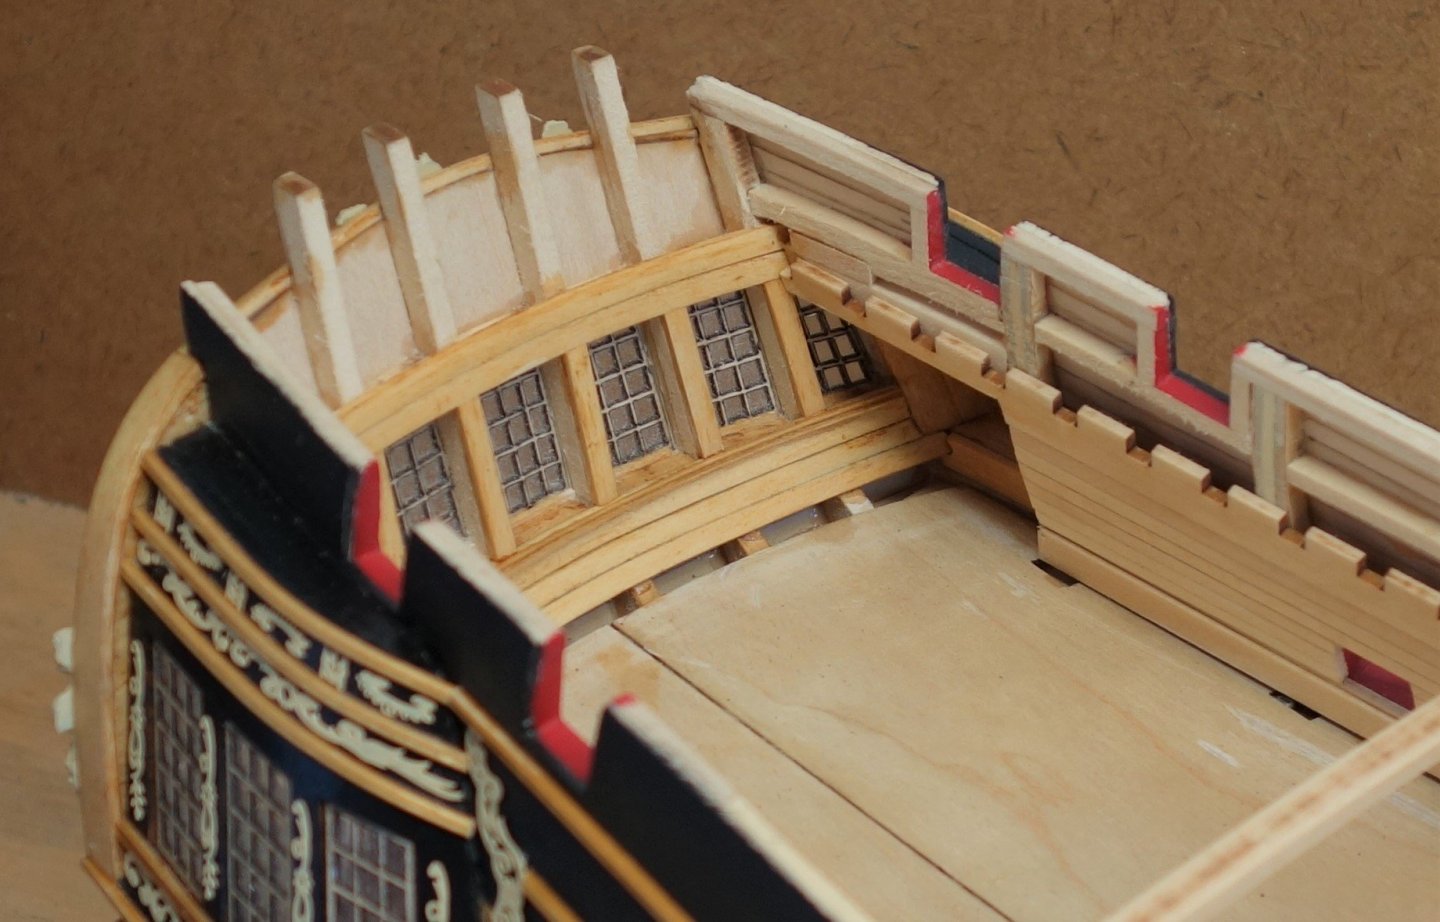
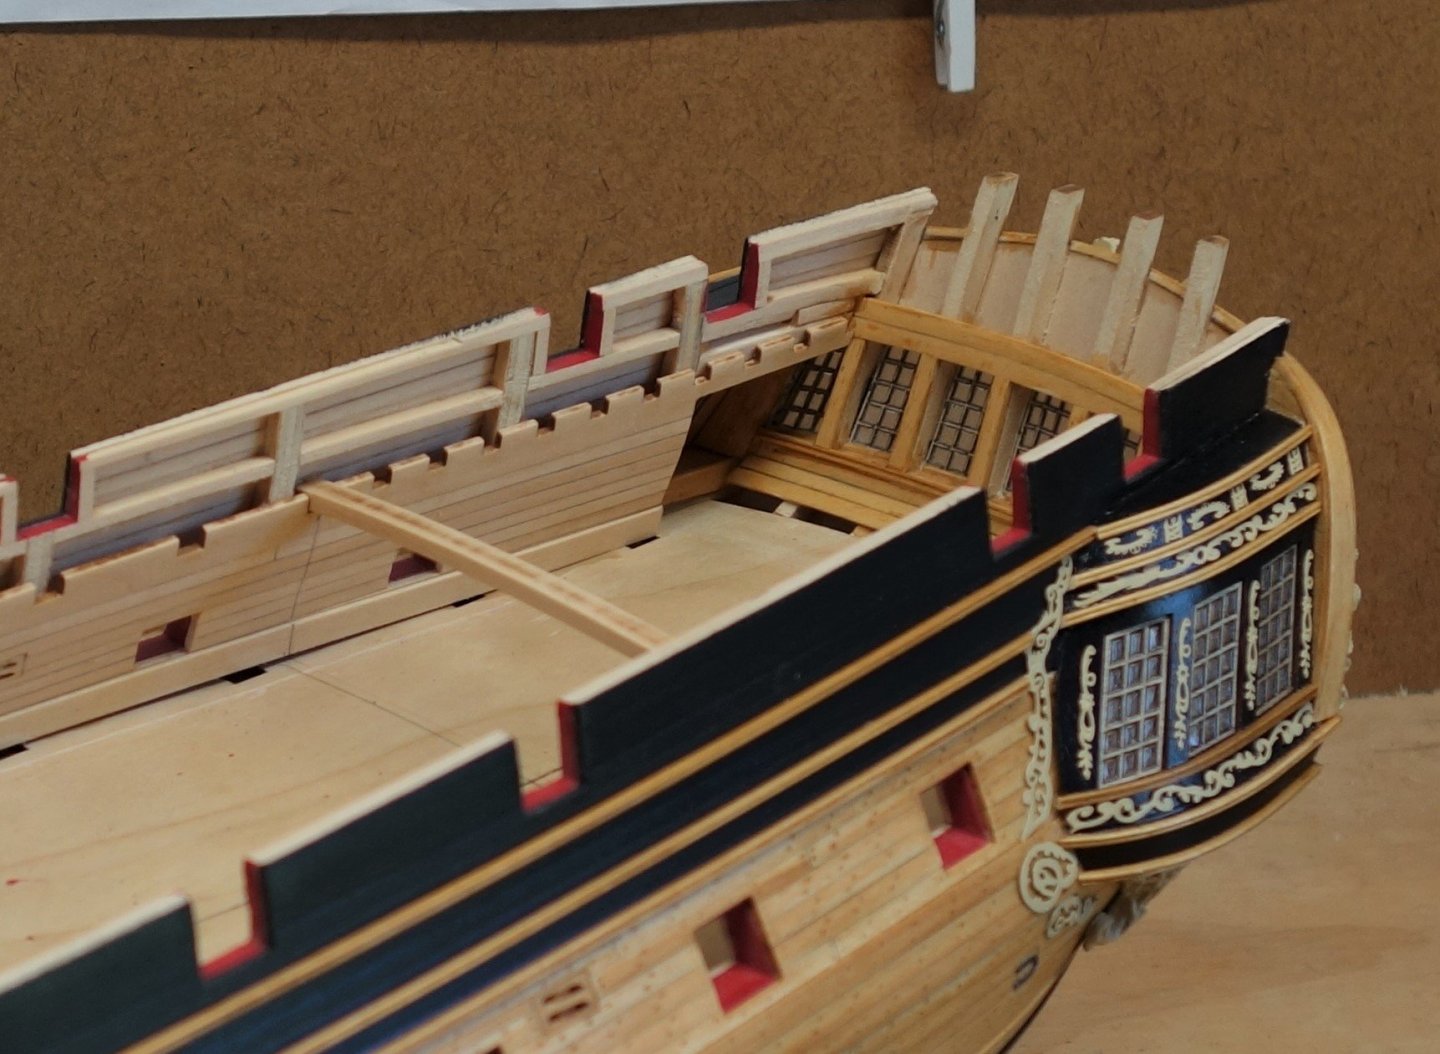
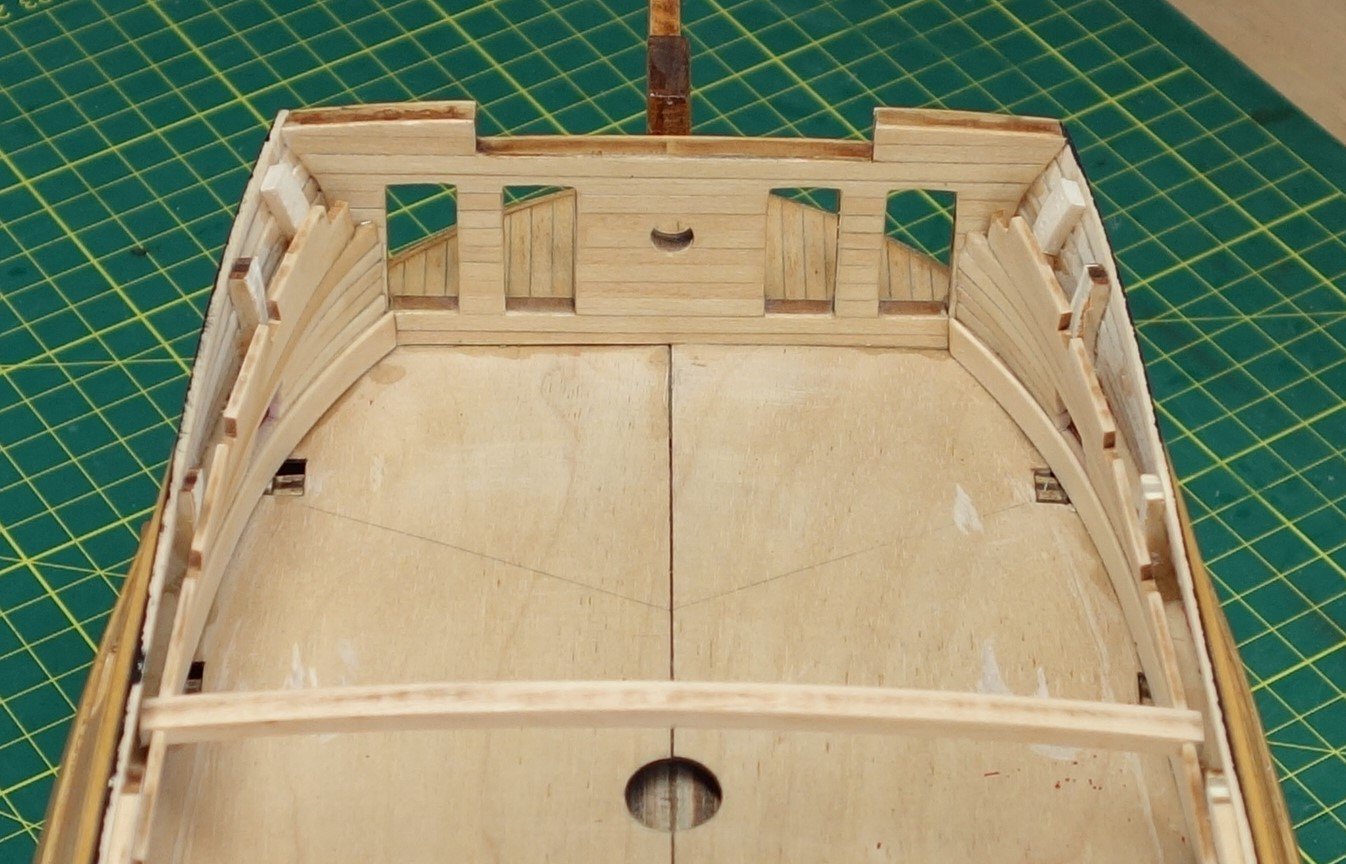
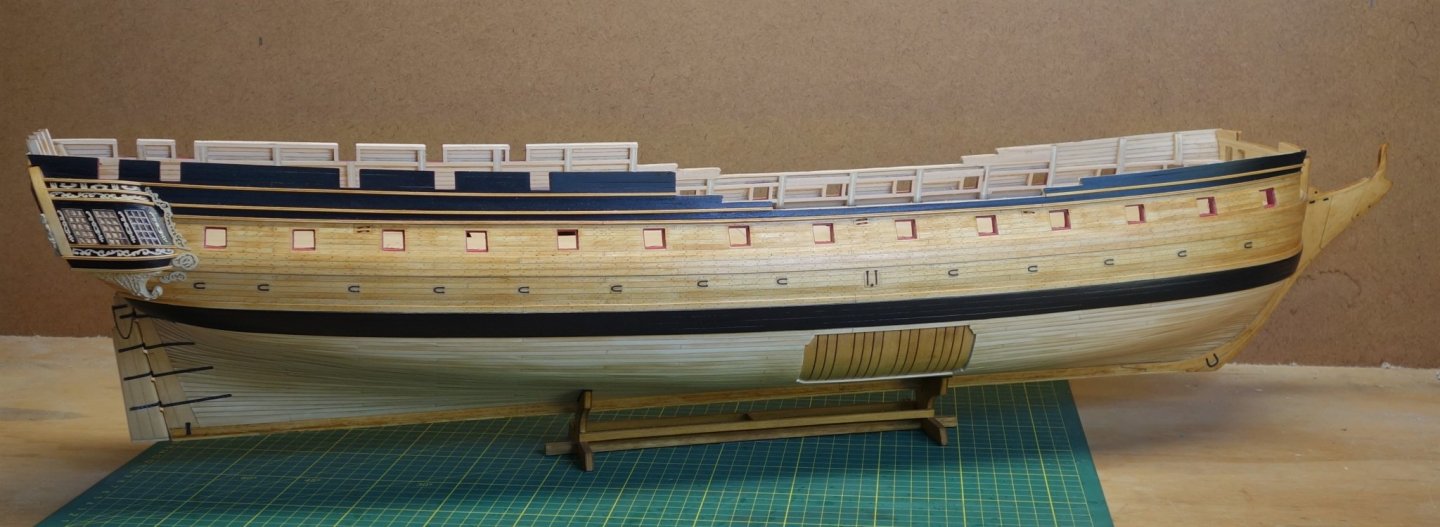
Thanks again for the likes and comments. Time for a progress update with a few photo's. I added some red to the bulwarks (makes a big difference to the appearance of the model, almost feels like I'm getting somewhere...., for a little while.), added the margin planks and the waterways. The extra bend to the margin planks made the fit a lot better. Next was the checkerboard floor panel. I have been concerned for a while about getting the strips accurately cut with a scalpel only and have been playing with the idea of getting a cheap or secondhand 4" table saw. In the end I didn't trust the cheap Chinese options, couldn't find a secondhand one and end up just going for it with the scalpel....lol. I shouldn't have stressed as the result in my humble opinion is quite acceptable. Here are some photo's (in random order).


-
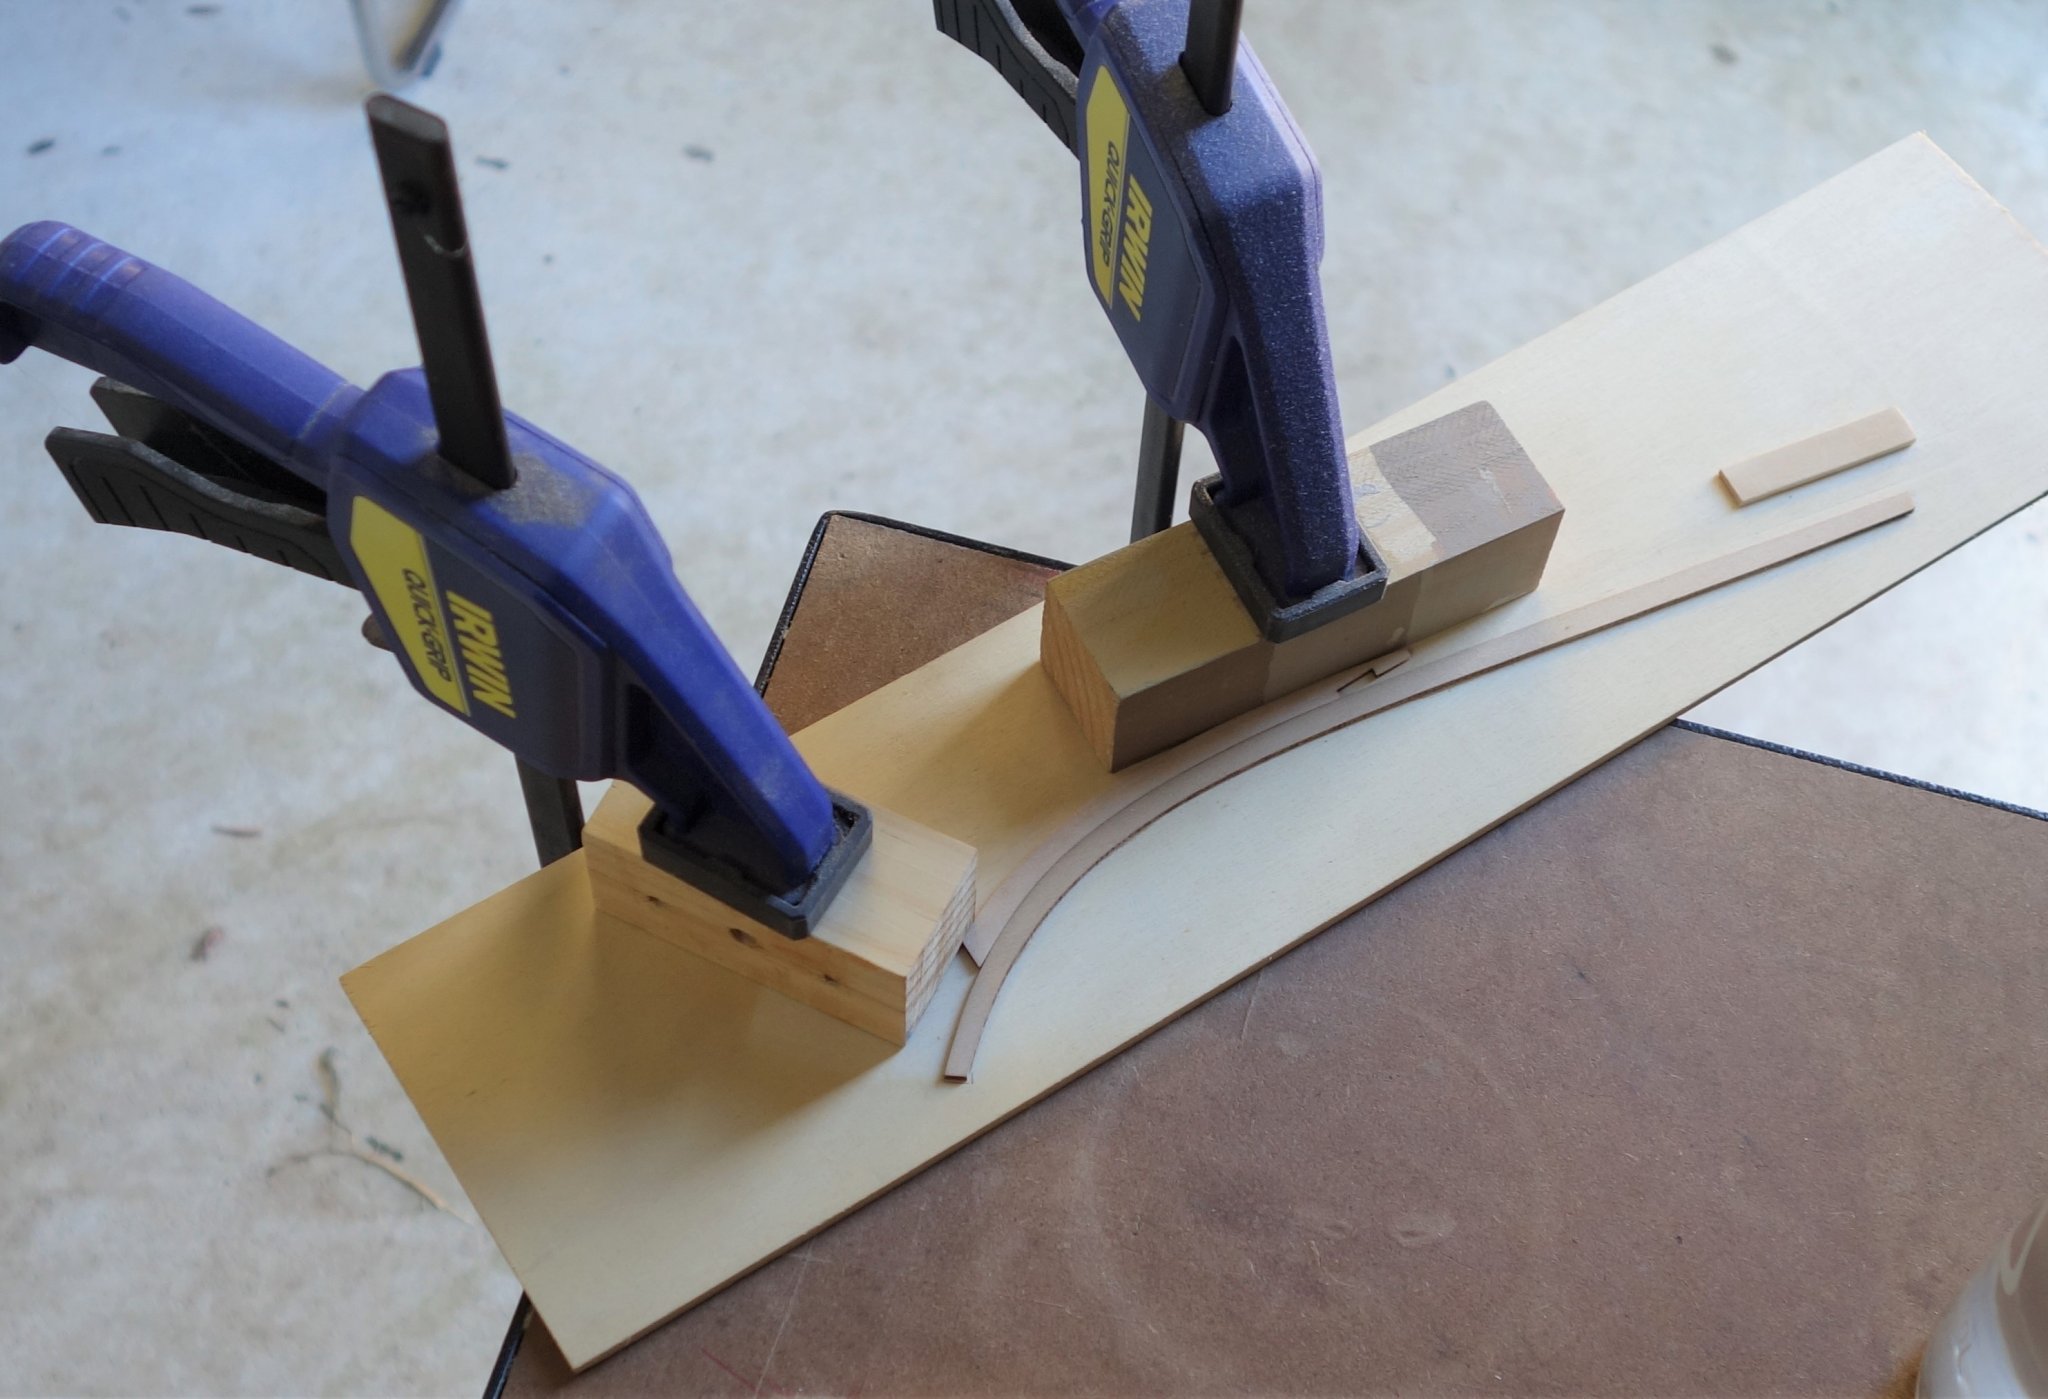
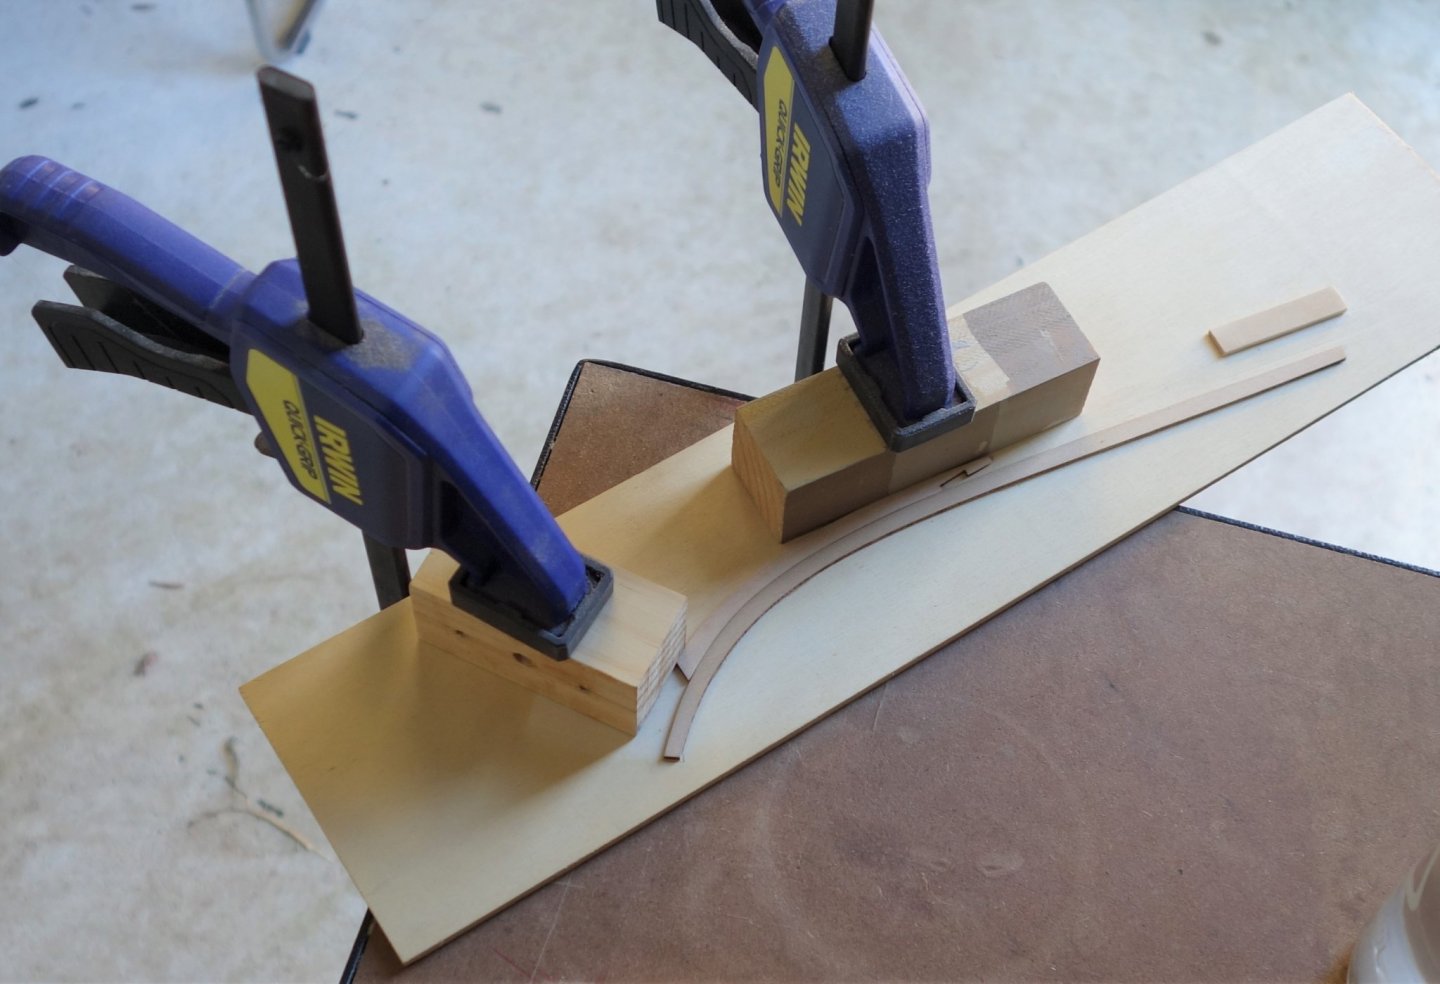
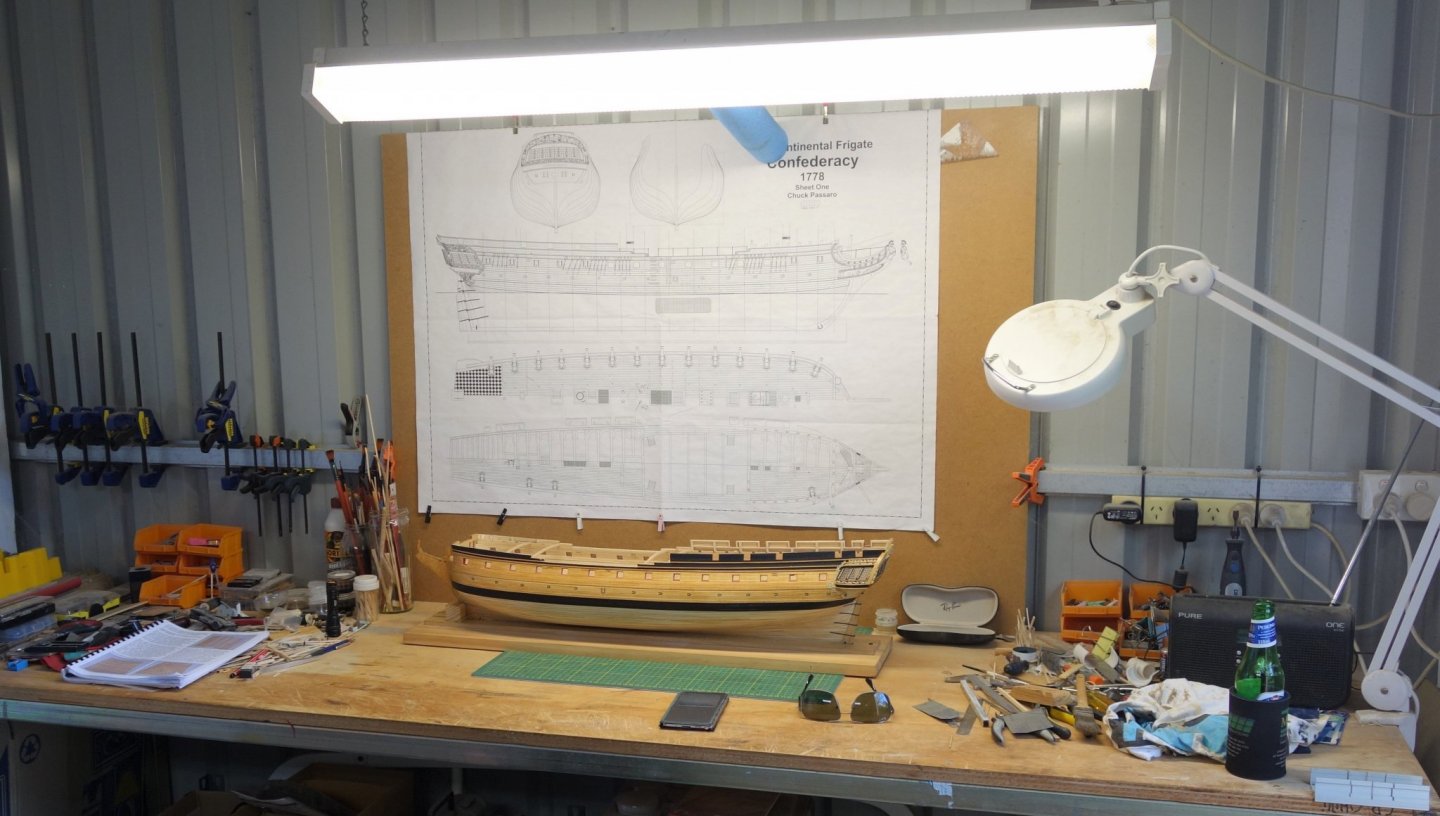
Here is an update on the progress with chapter 9, the planking of the Bulwarks. WelI..., maybe a bit more than just progress, I have basically finished them. I only still need to paint them red. When starting to look ahead at the next step, the margin planks, I noticed that the curve of the most forward plank doesn't match my model, there is quite a gap. So I used Chuck's jig to laterally bend the hull planks to give the margin plank a bit of an extra bend. I added a photo. I'll find out tomorrow if it worked or not. The last photo I just added to show my work setup (in it's un-edited messy state...); Here are some photo's.


-
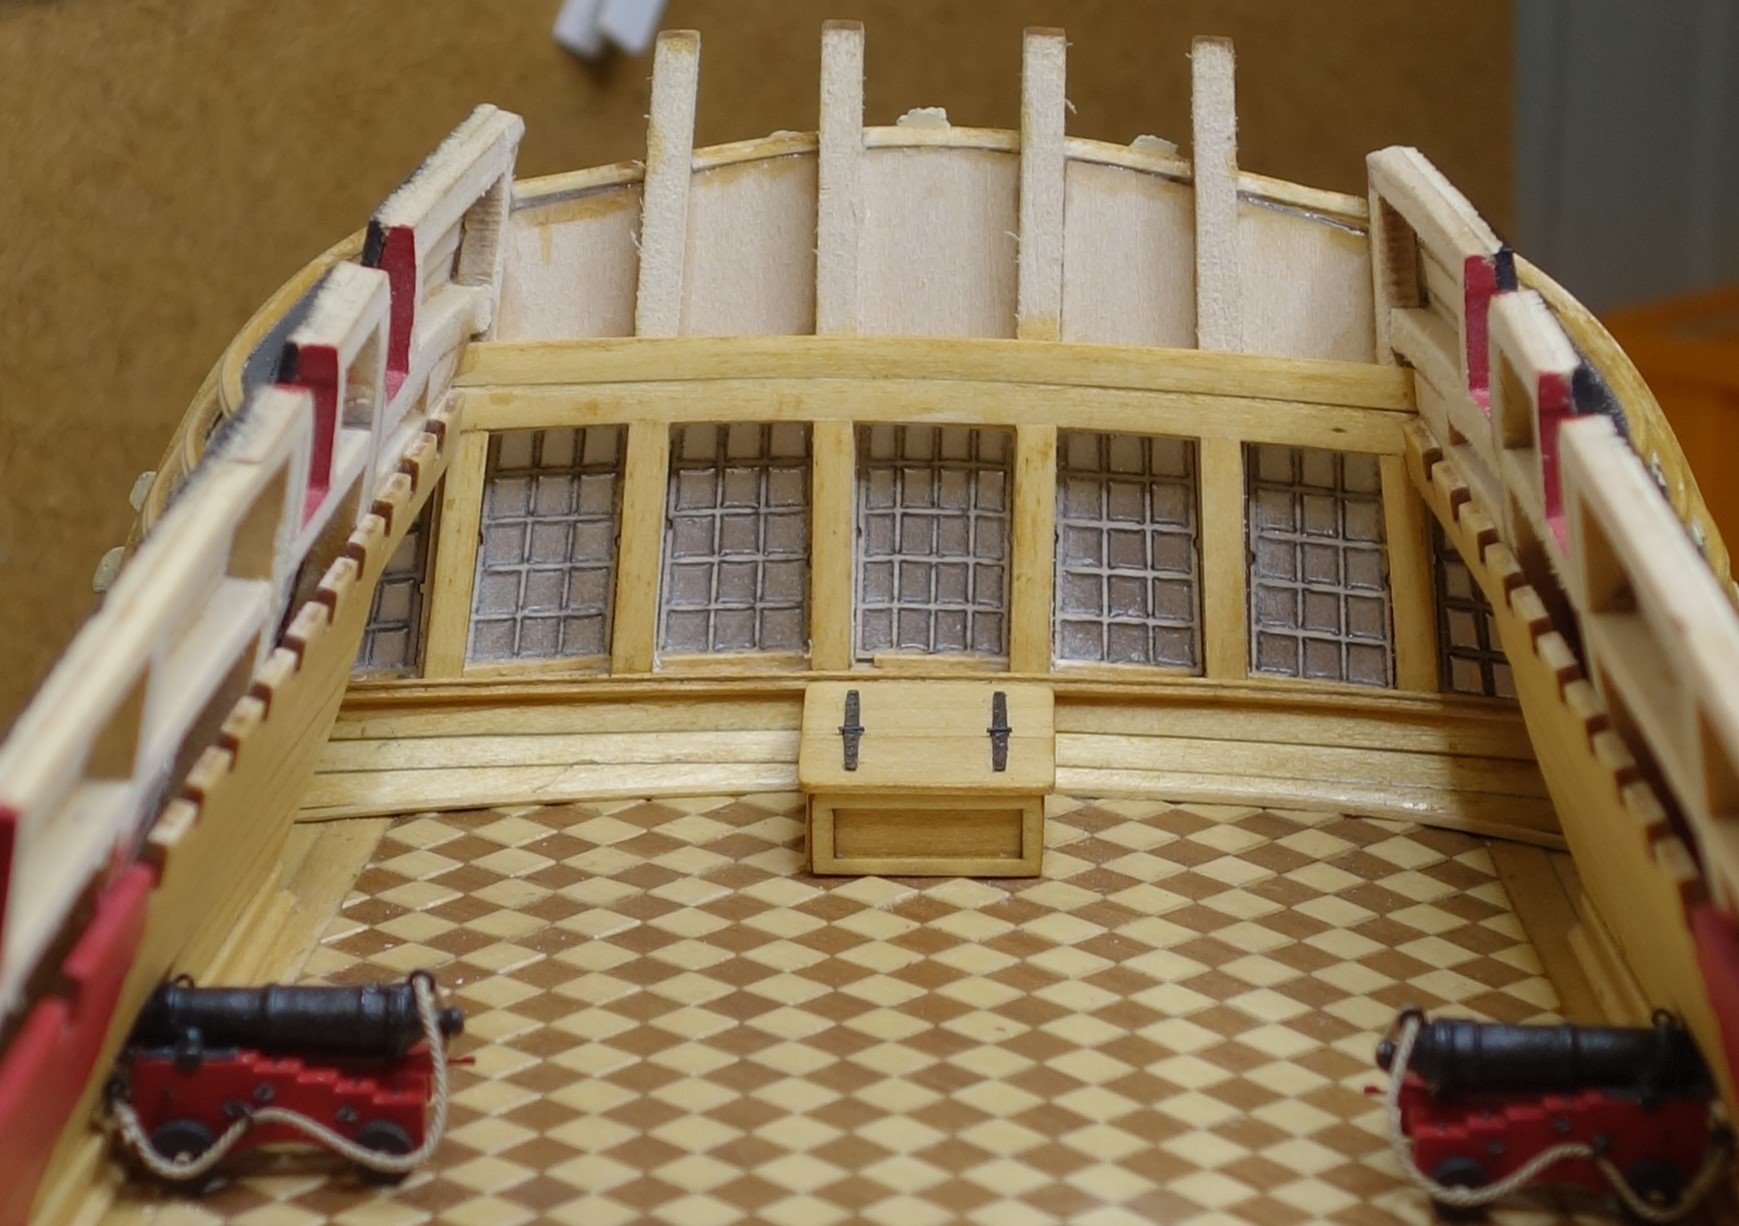
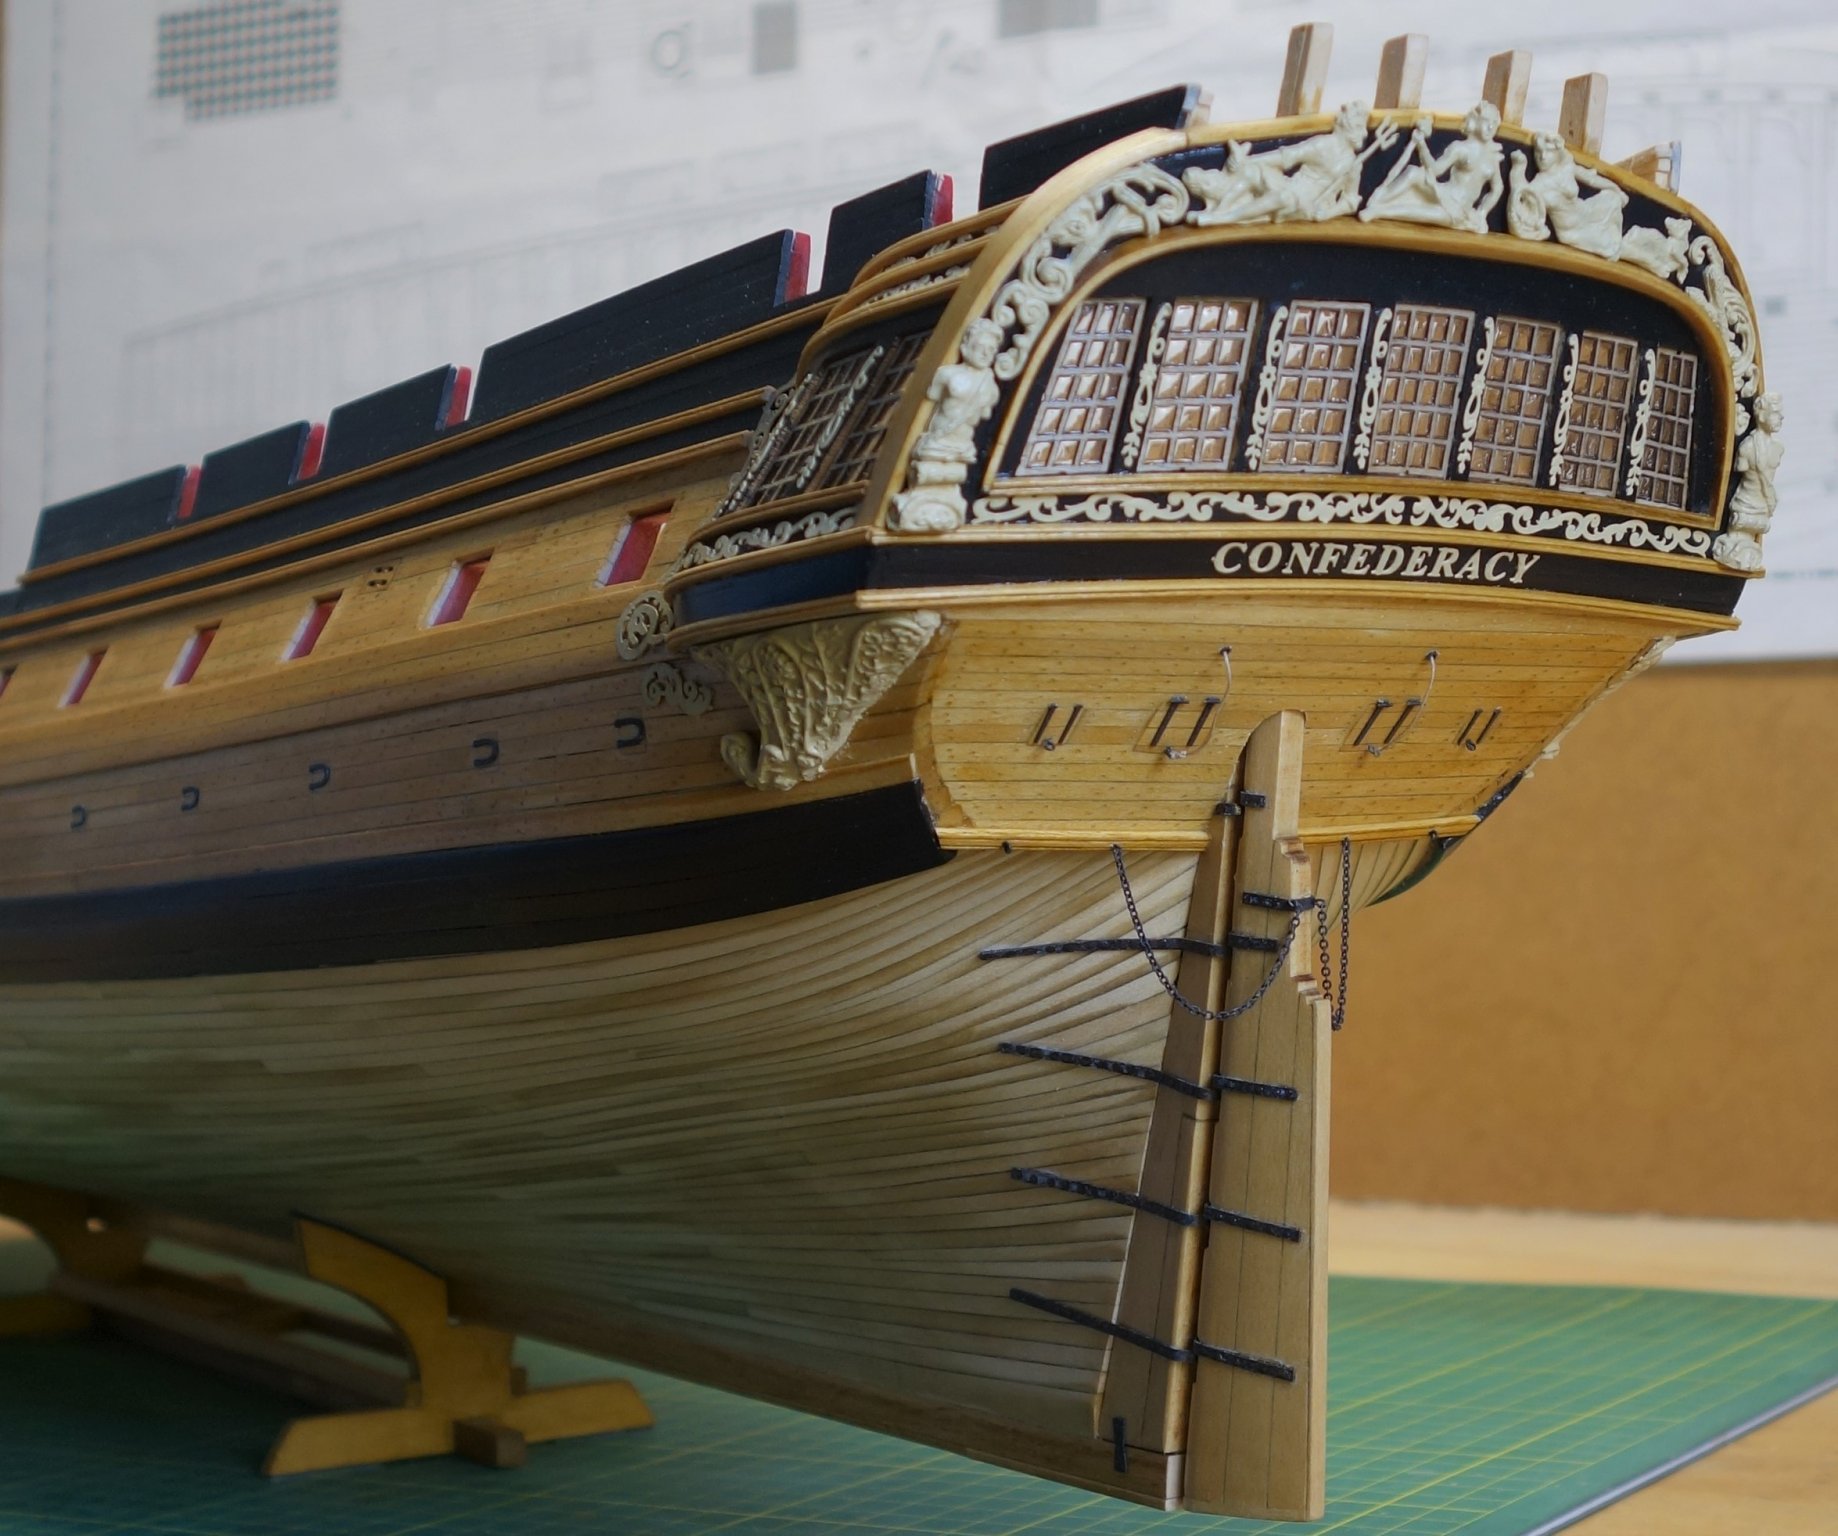
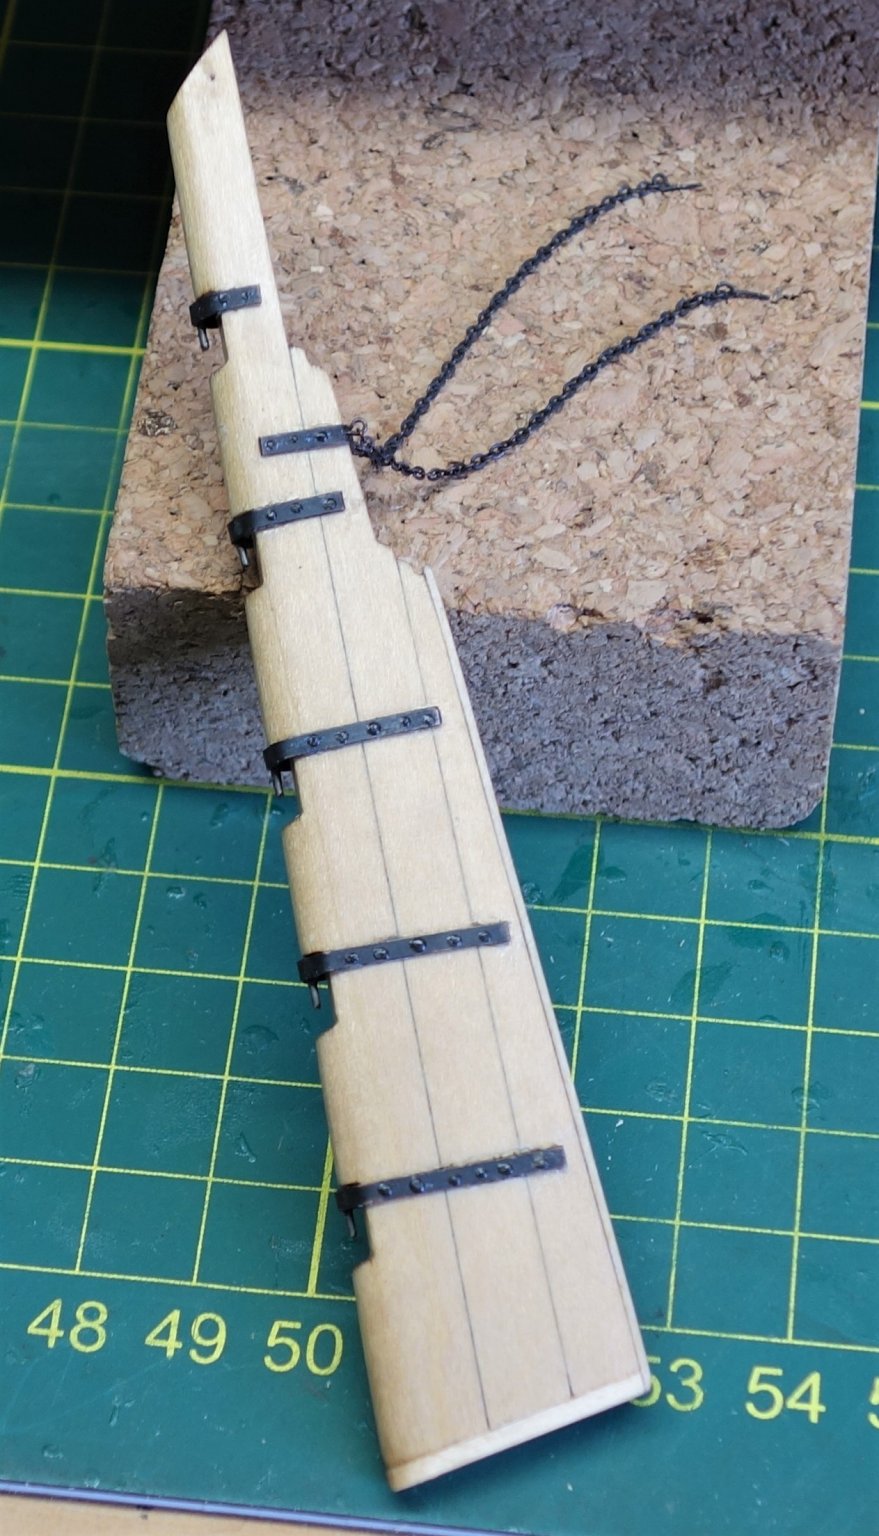
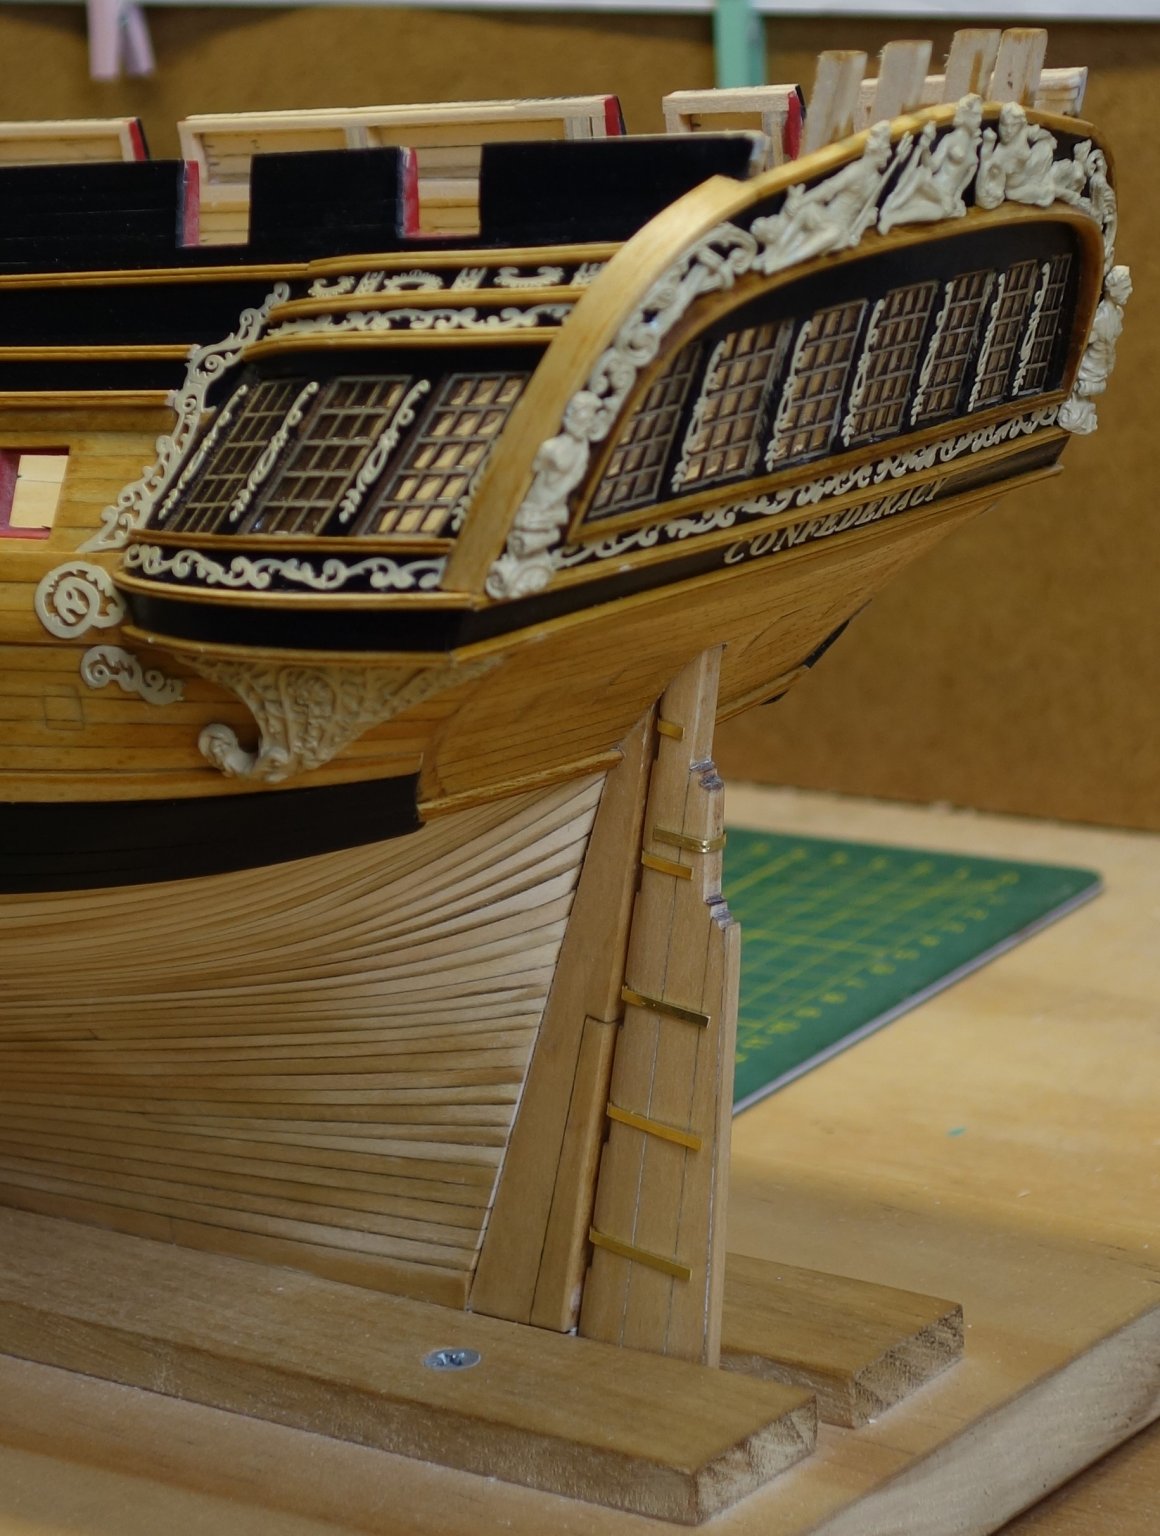
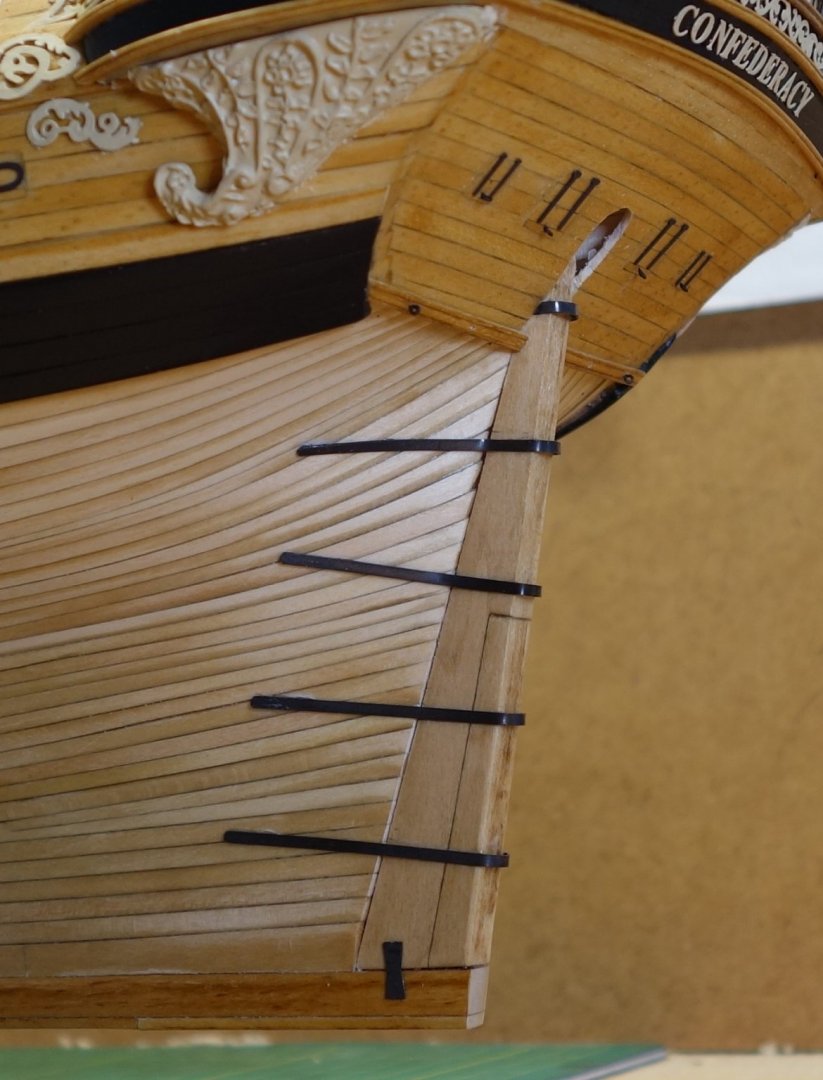
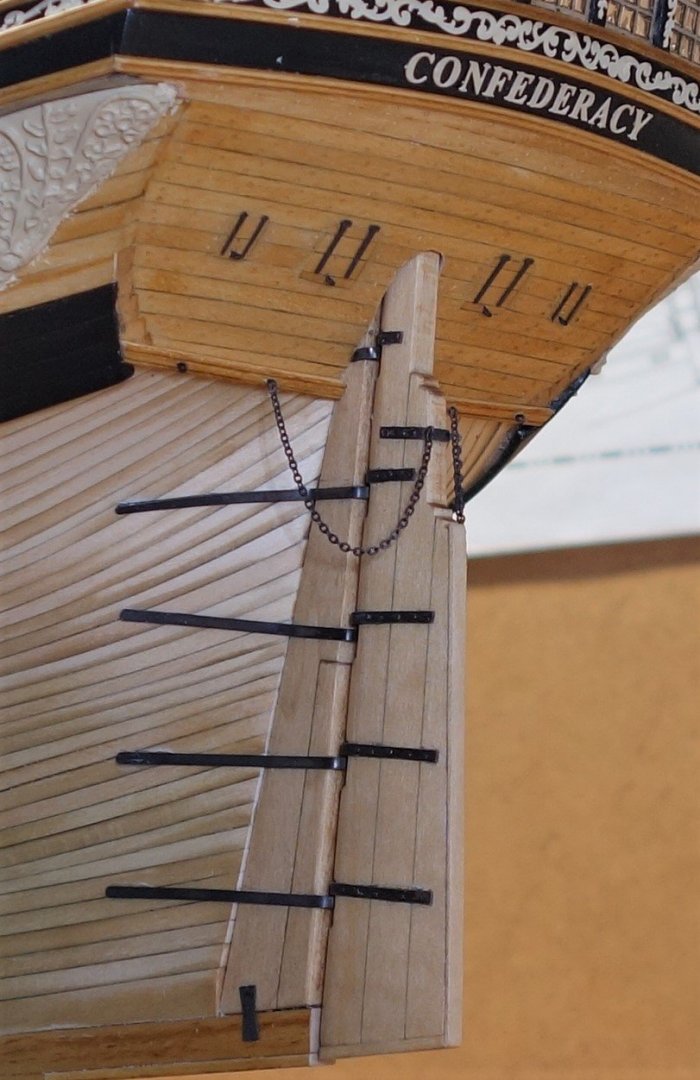
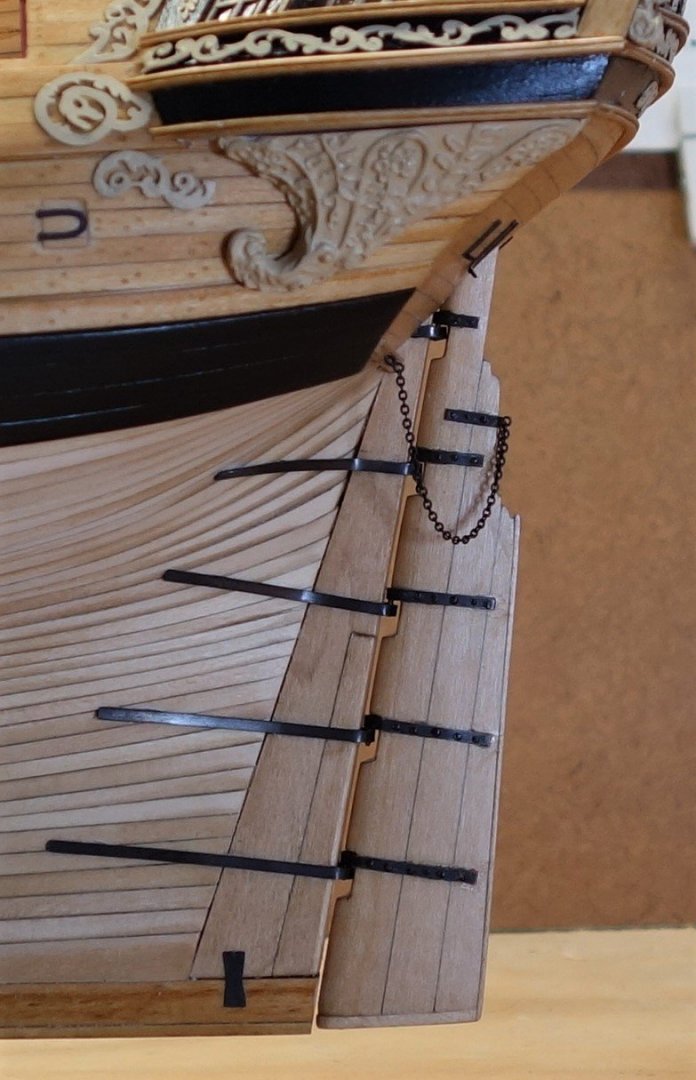
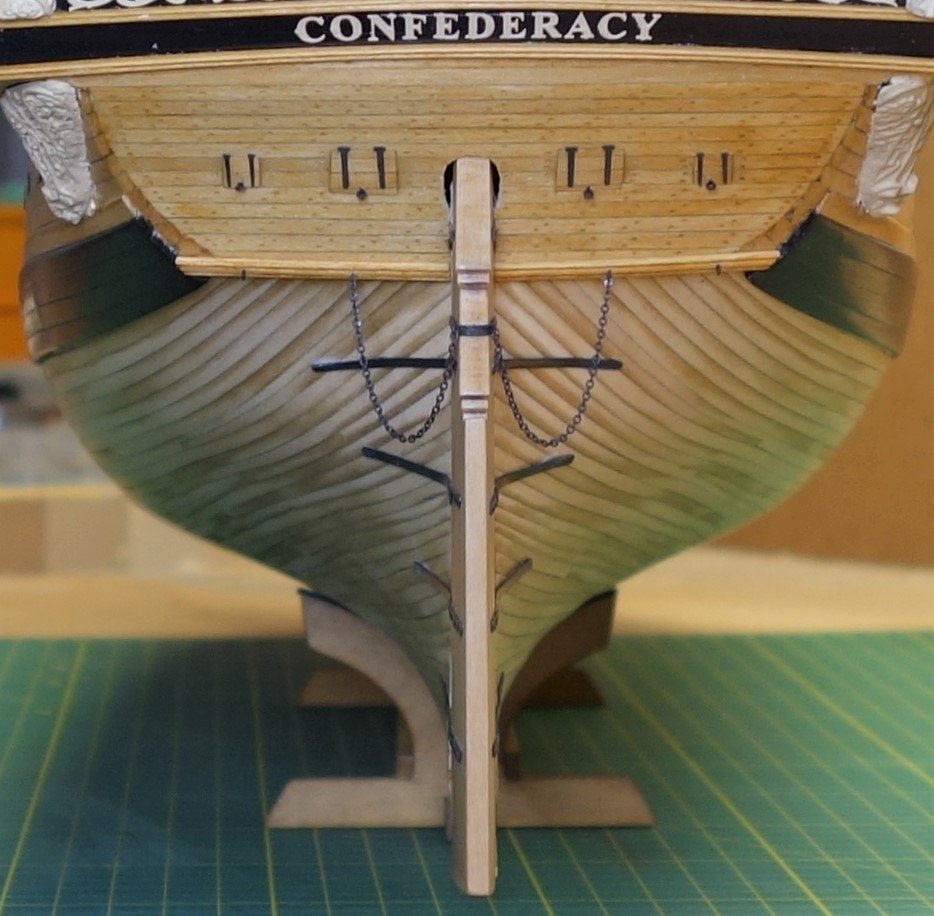
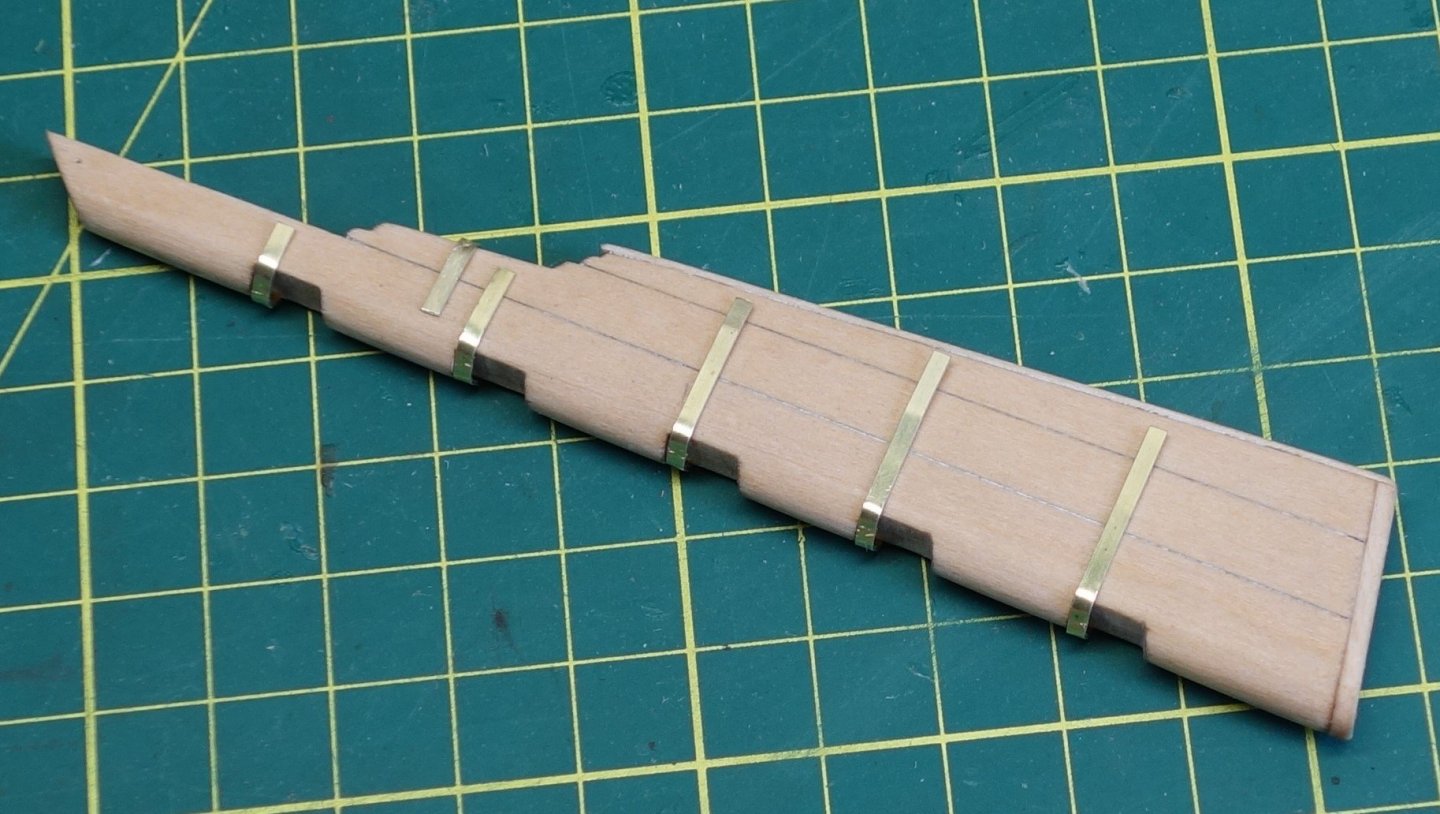
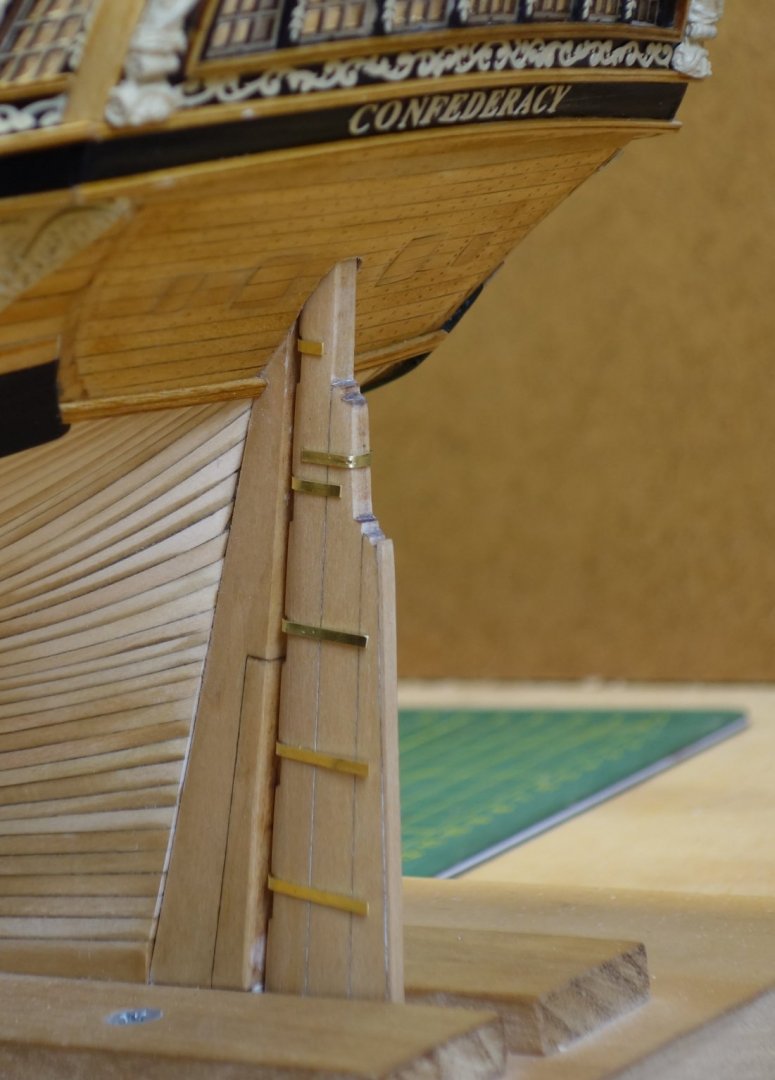
Again, Thanks for the likes everyone. I have added just 3 photo's this time with not a lot of progress. I decided to add the ropes to the stern port hinges, try to simulate the bolt heads to the pintels, gudgeons, keel plate and horse shoe plate with some CA (with mixed results). I also added small pins to try to accentuate the stern port hinges a bit. After I took these photo's the rudder has gone into "storage" until the end of the built. A pin came off one of the pintels when putting the assembly back into my working cradle. The rudder was slightly angled, didn't make the slot and jammed a bit. So to avoid future mishaps, while using the cradle I won't have the rudder assembly fitted.


-
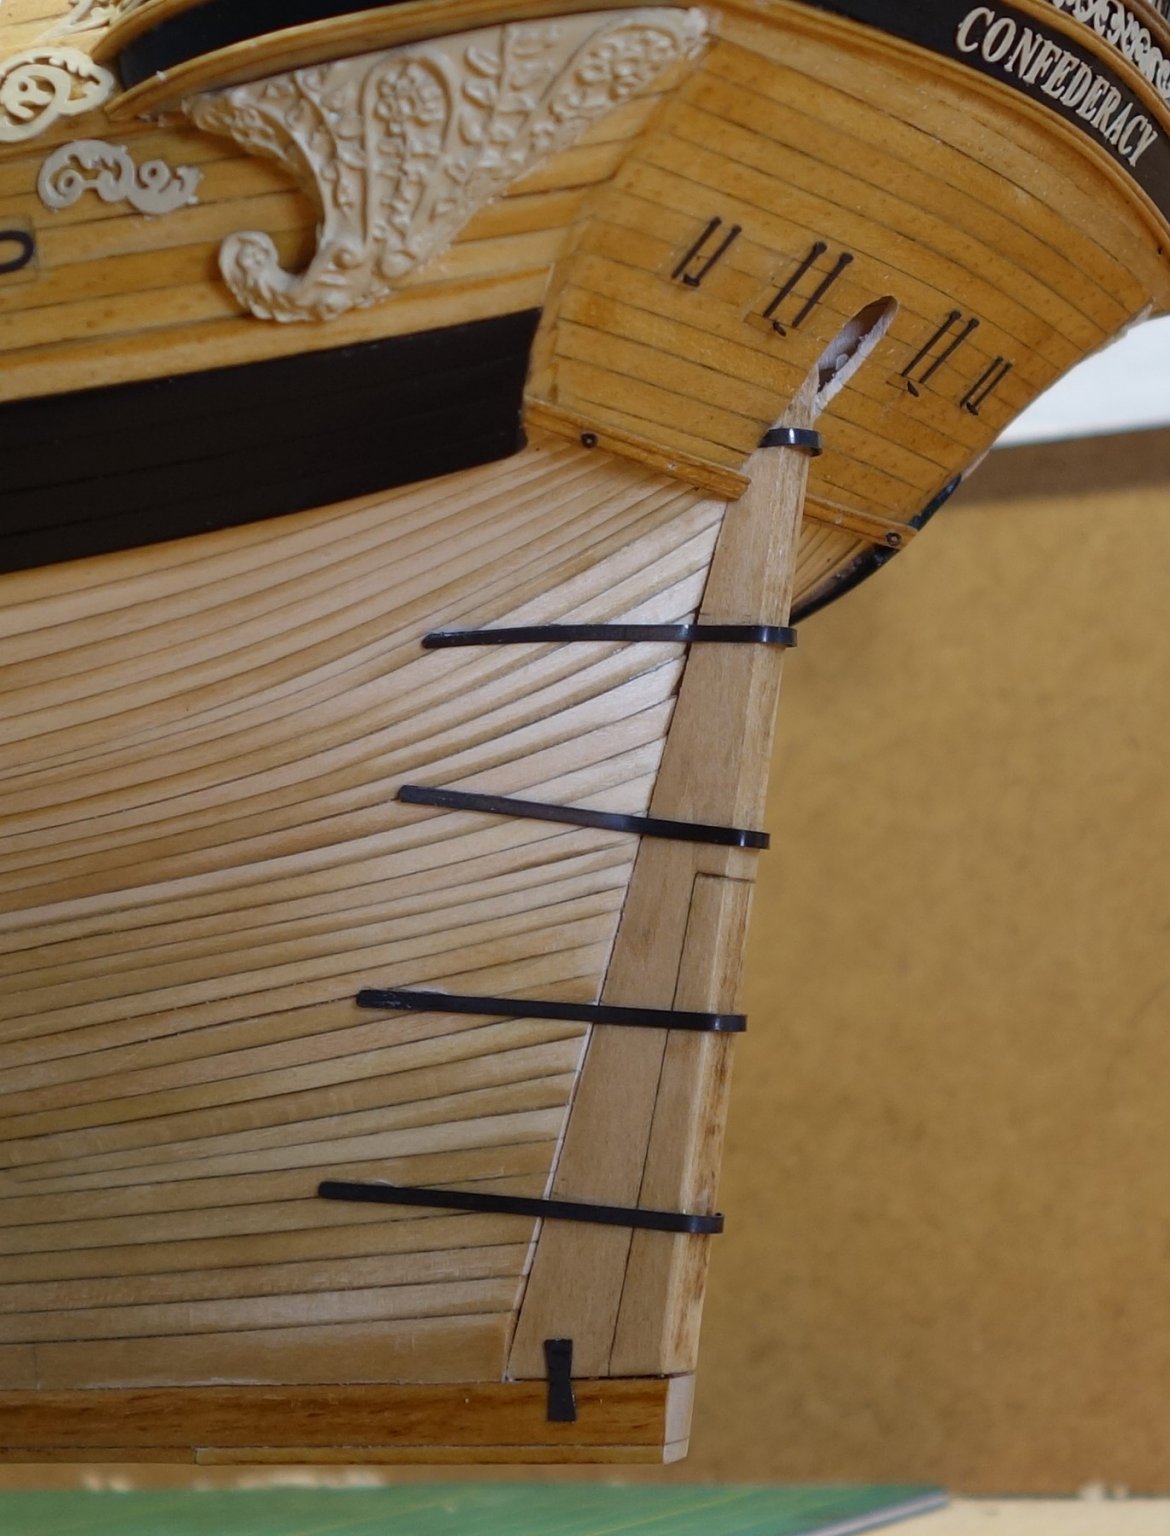
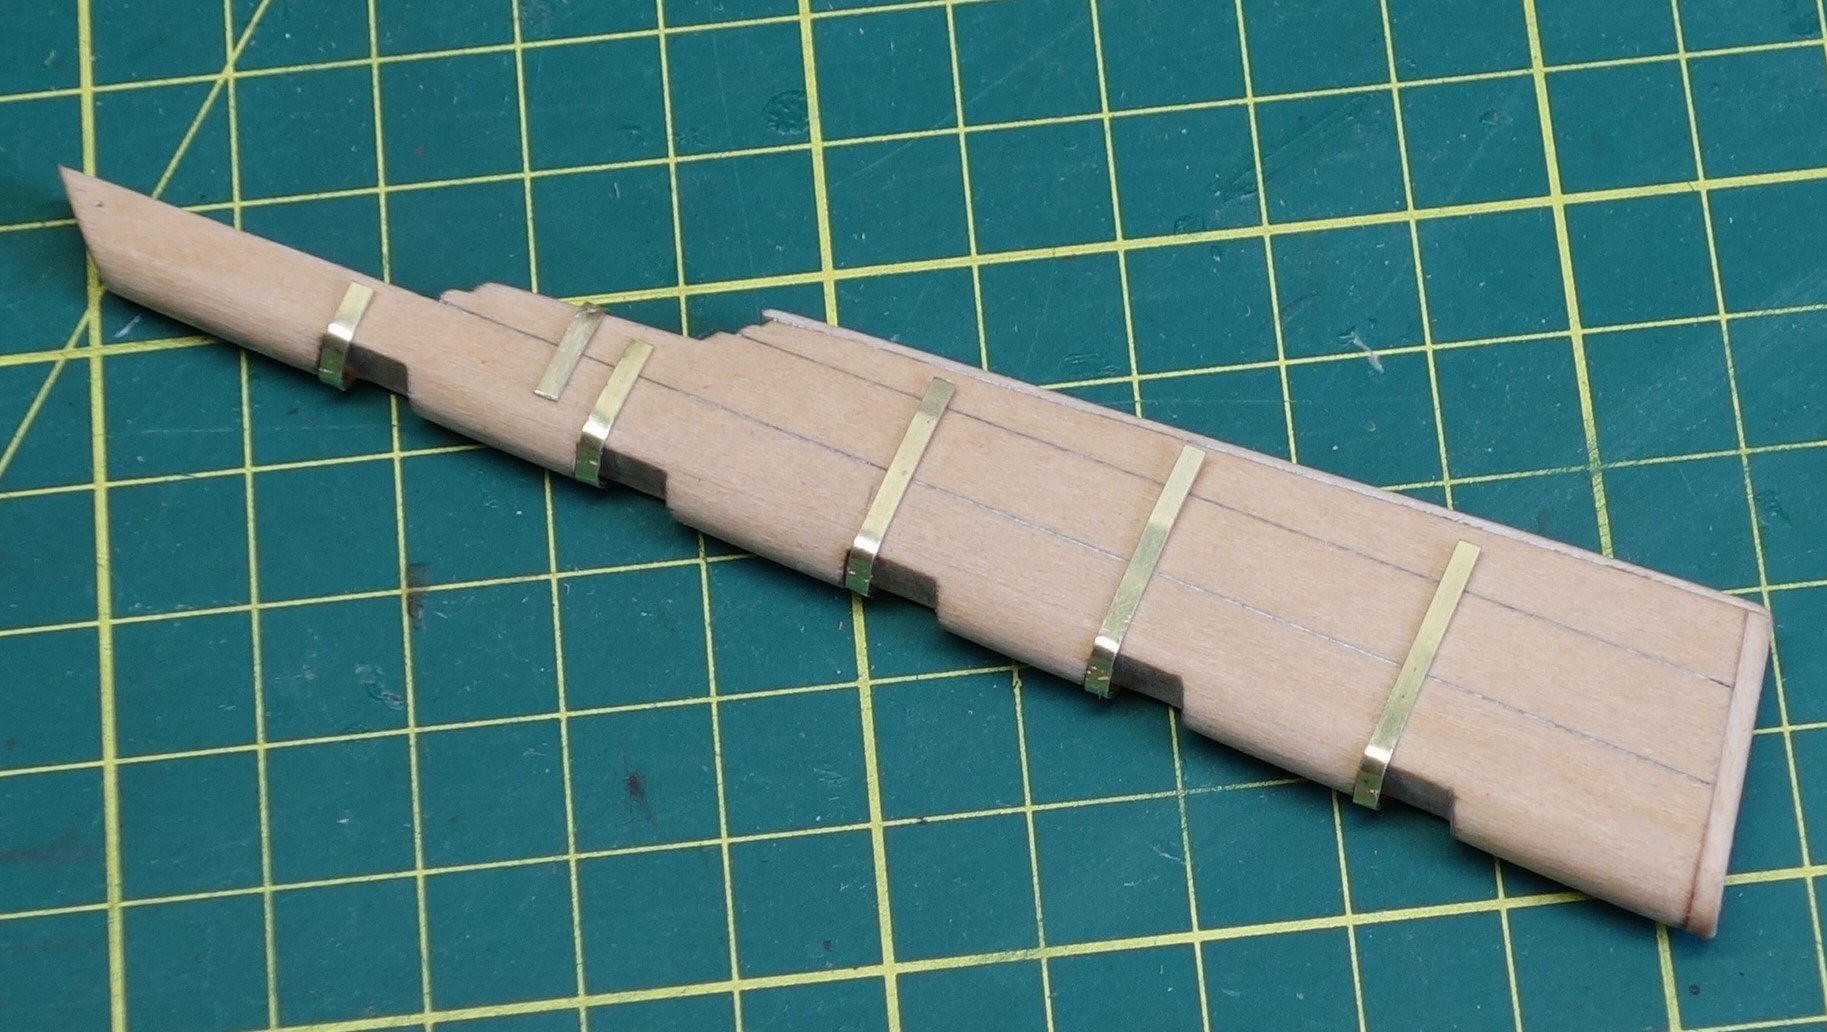
Thanks for the likes everyone. Here is the continuation of the rudder efforts. I did try soldering for a bit but this was a big fail. Too flimsy to hold the parts in place and I couldn't get the solder to adhere to both parts. So CA glue was used as the next best option. I'm pretty happy with the result. I managed to be able to take the rudder assembly on and off the stern post as intended. Here are some photo's.


-
A little progress on the rudder. I remember I had a lot of problems with fitting the pintels and gudgeons on my Syren build so I plan to take it slow. I might try soldering the pins onto the pintels this time. Using CA glue on the pins isn't very strong and gets messy when things don't fit 100%. Here are some photo's. All dry fitted up to this point.


-
Thanks John, I pretty much use Gorilla PVA wood glue for everything (except rigging of course). It glues more than just wood, takes long enough to cure to move things around if necessary and any excess can easily be cleaned or peeled off while it's curing. Up to this point in the model I only used superglue to help glue 2 parts because I needed the instant "hold". Peter
-
Thanks Bossman.. Thanks Svein...