josh44
-
Posts
112 -
Joined
-
Last visited
Content Type
Profiles
Forums
Gallery
Events
Everything posted by josh44
-
 Thanks Patrick! I agree with your view and I do like how it looks offset like that. but truth be told, due to my miscalculation of the mast heights vs the bottle height, that position was as close to the center of the bottle as I could get her!!! 🤫🤣🤫🤣
 -
Thanks, Mike! Yes , he was very touched!
-
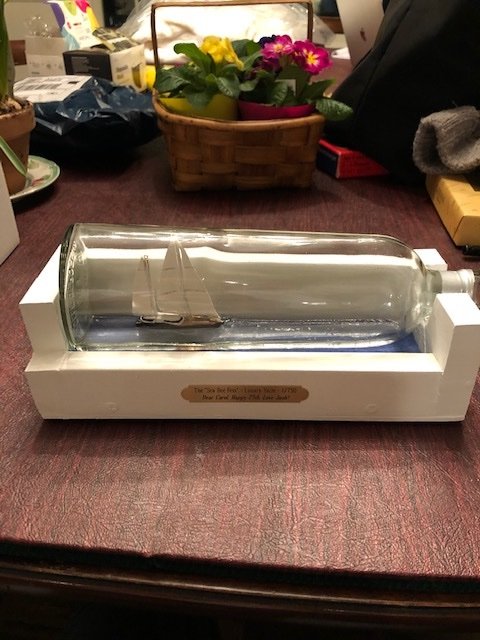
Thanks, Patrick! So glad to see your new luxury yacht in the works. By the way, when I made Parsifal for my MIL I remembered your haunting words: Once you make a luxury yacht, you'll never be able to stop! (or something like that! 😁)
-
Thank you, Phil!
-
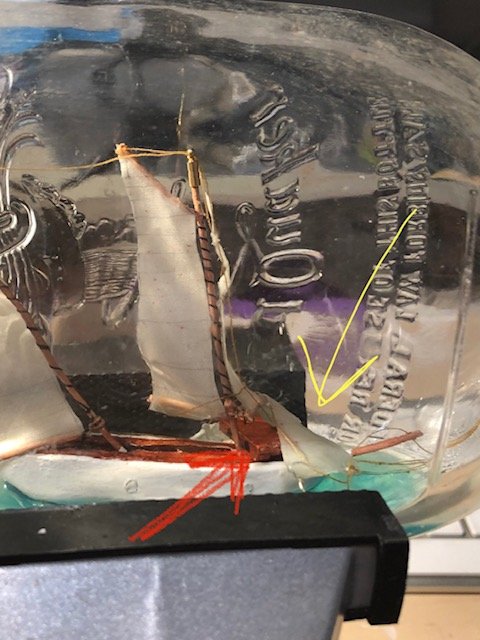
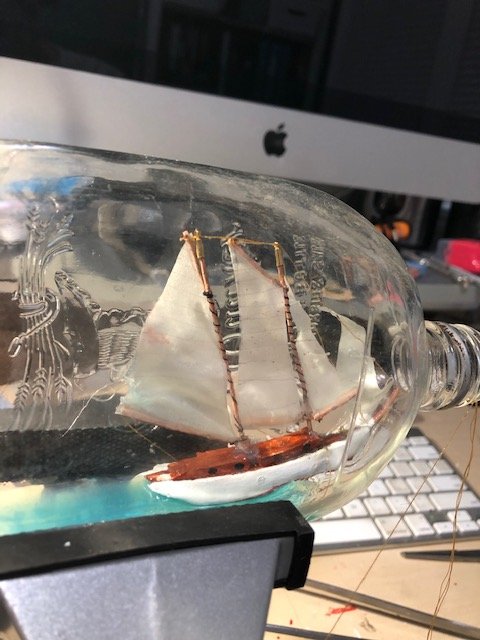
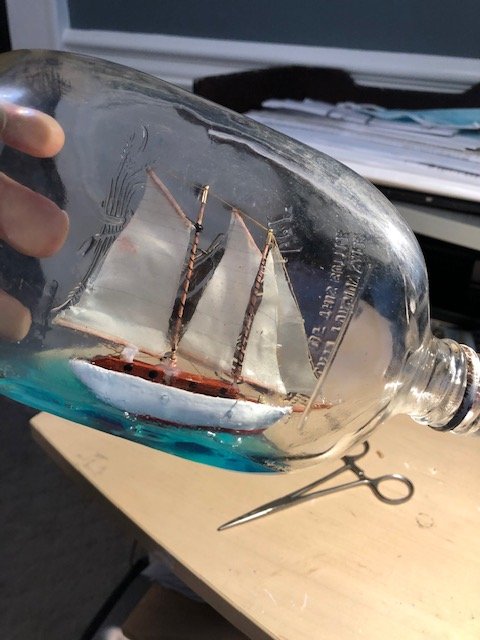
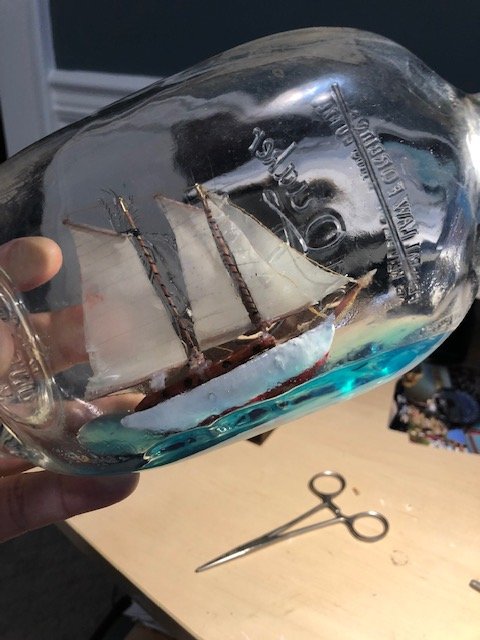
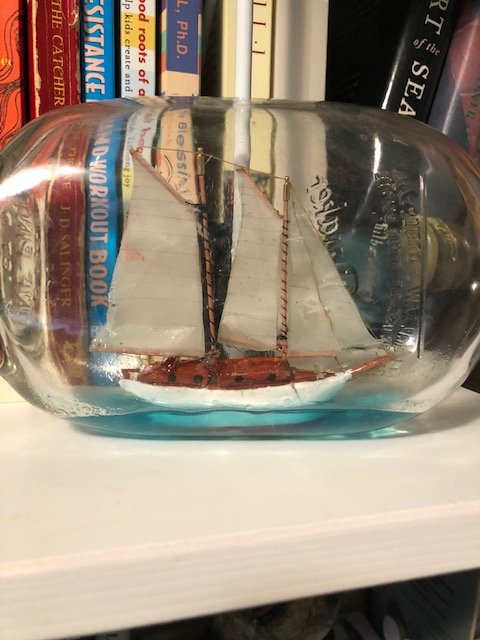
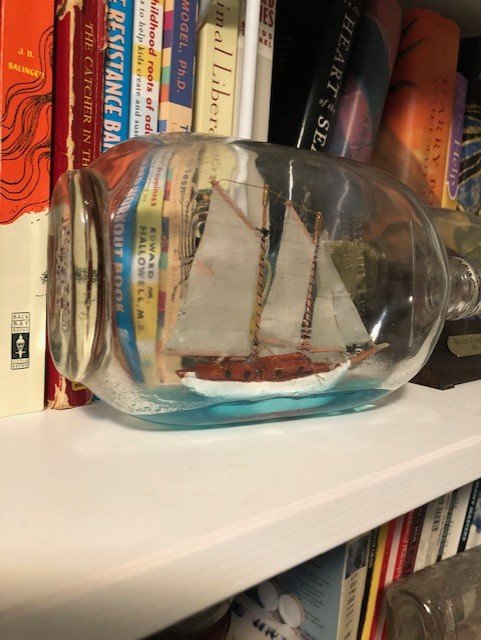
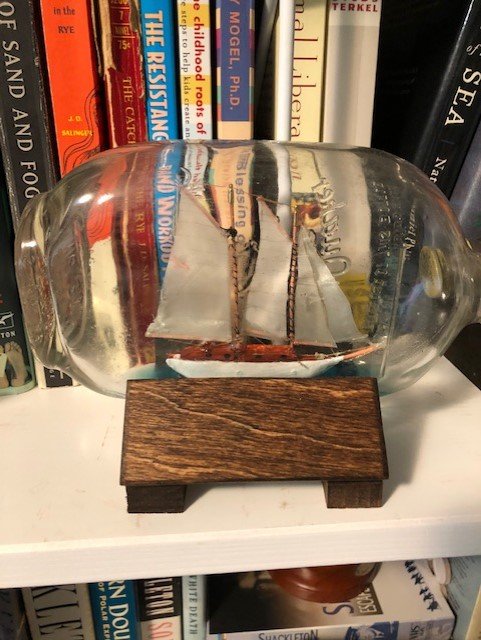
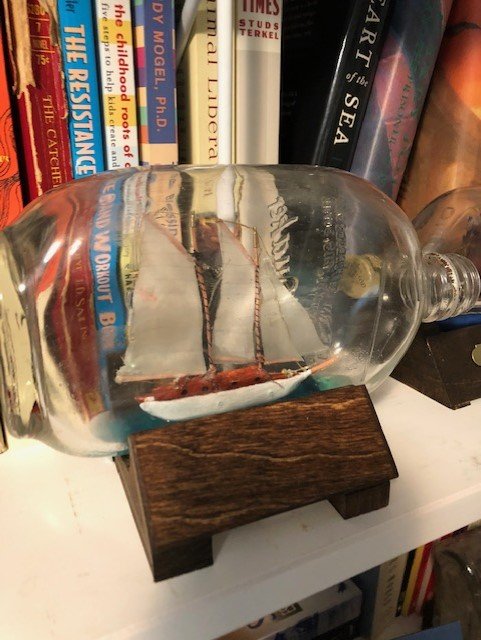
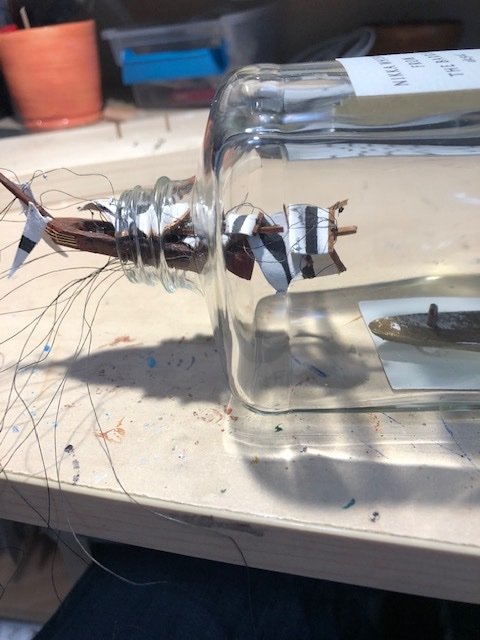
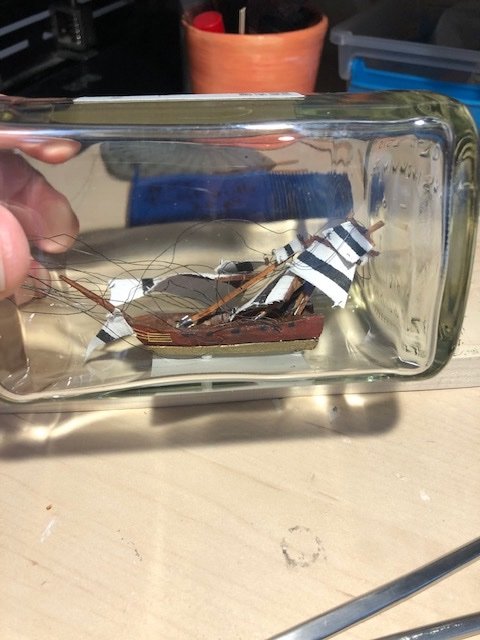
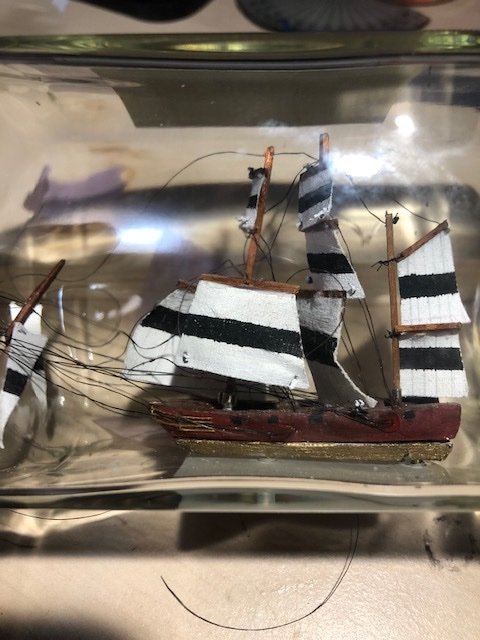
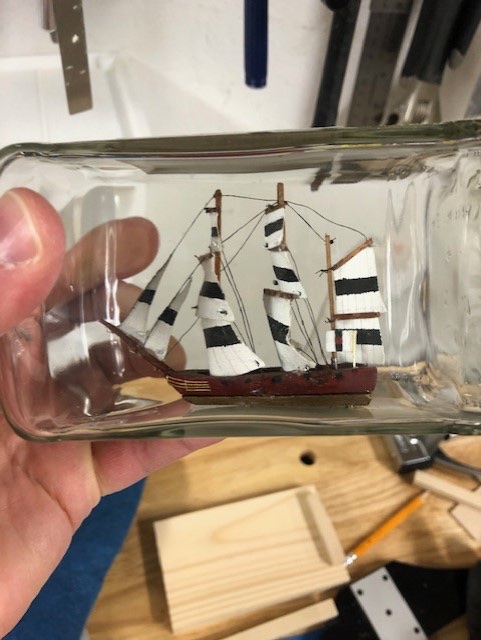
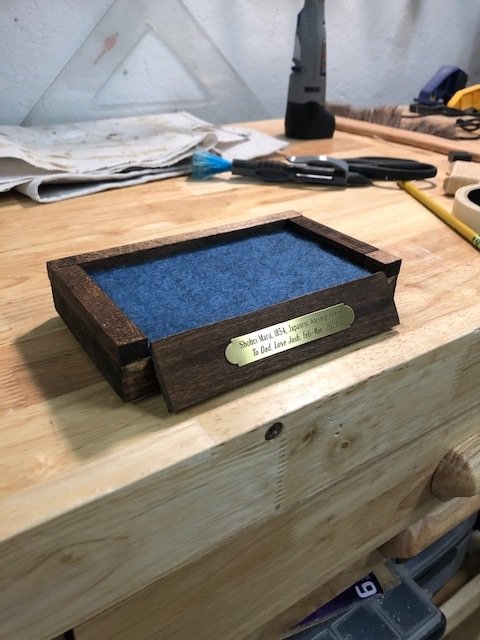
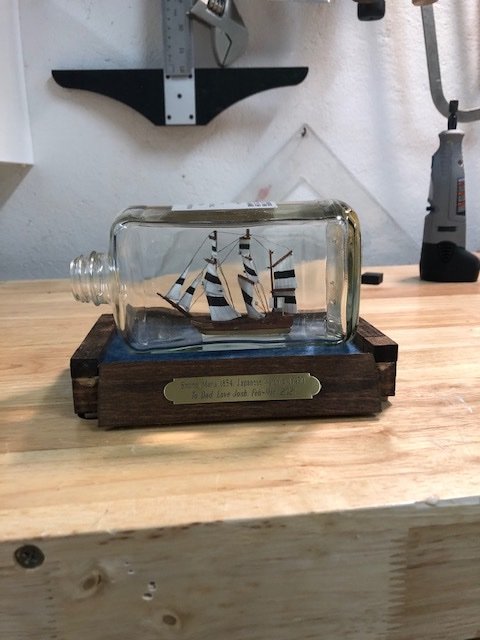
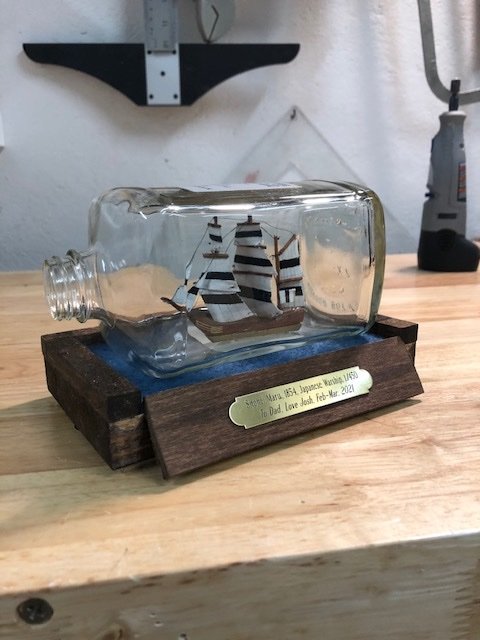
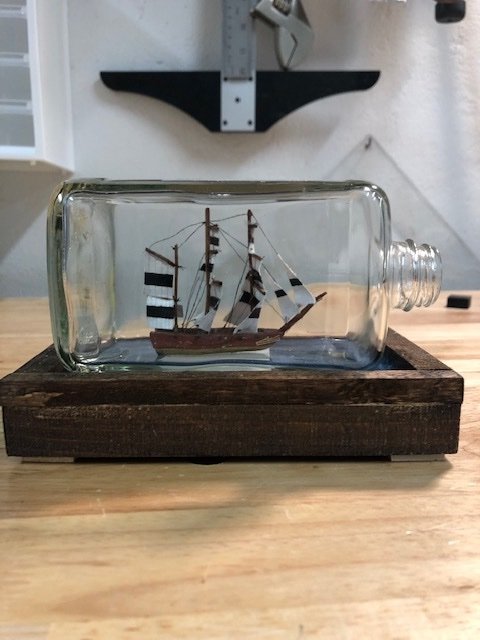
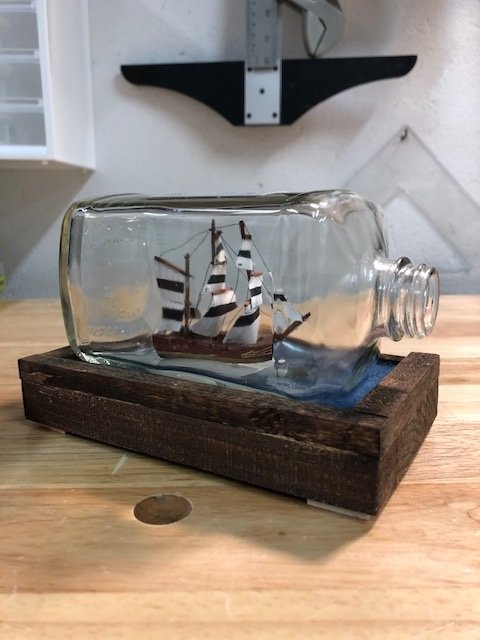
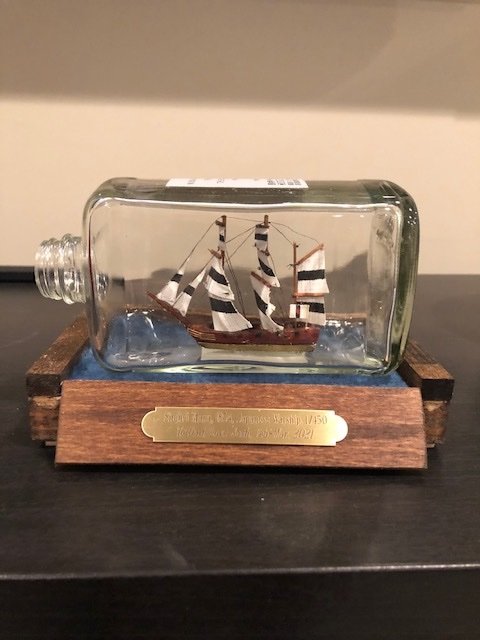
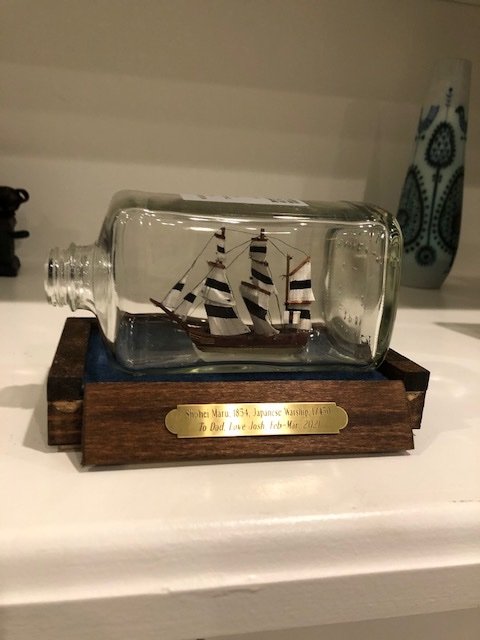
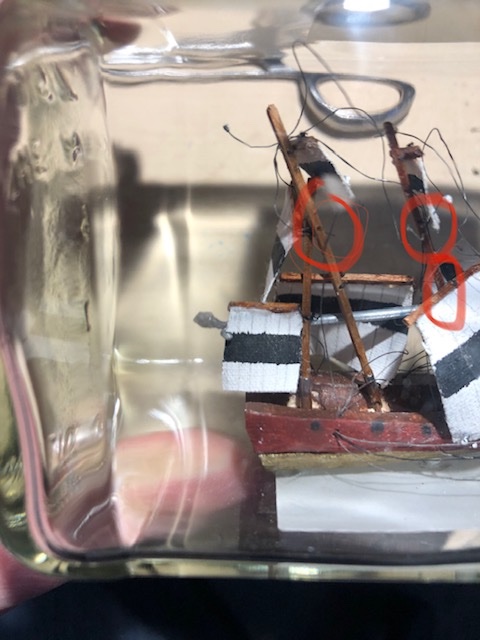
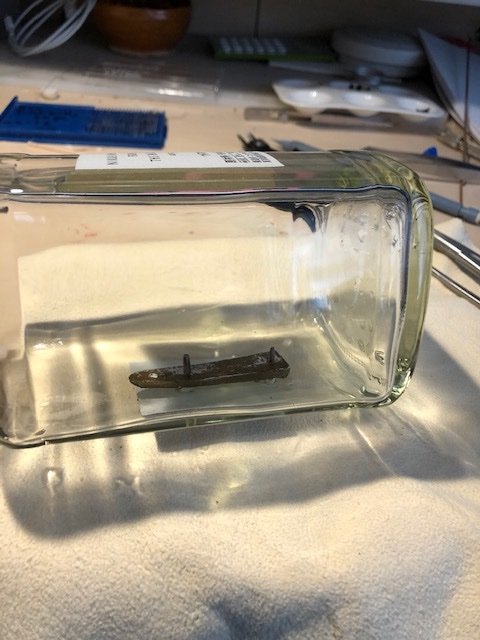
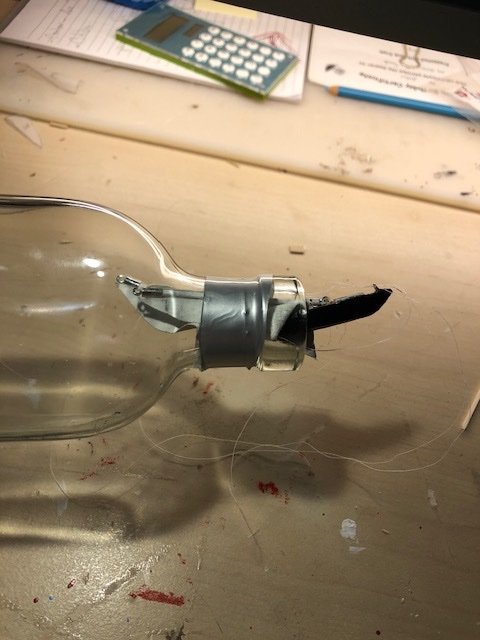
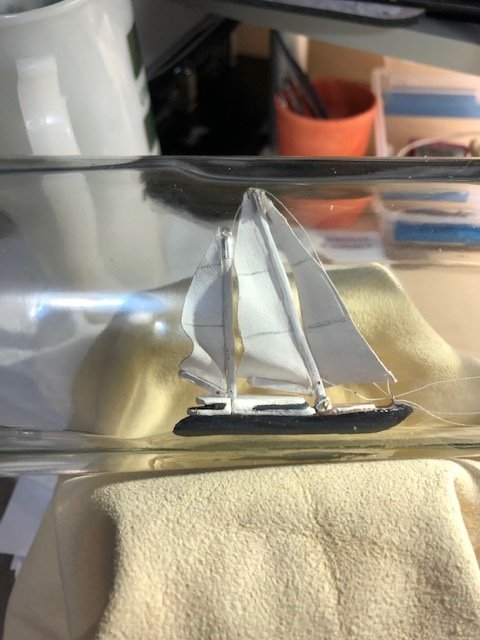
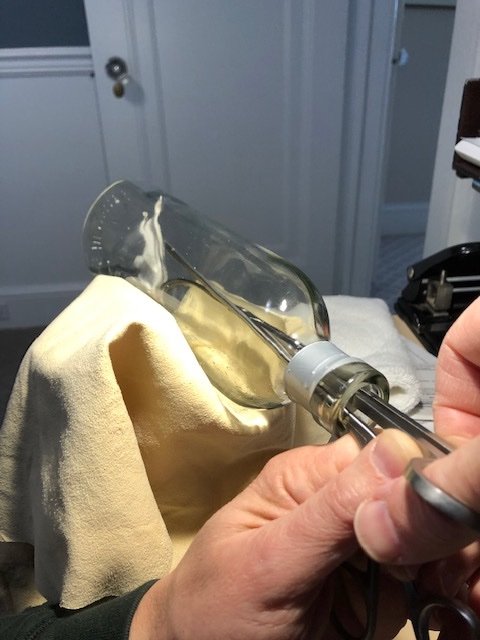
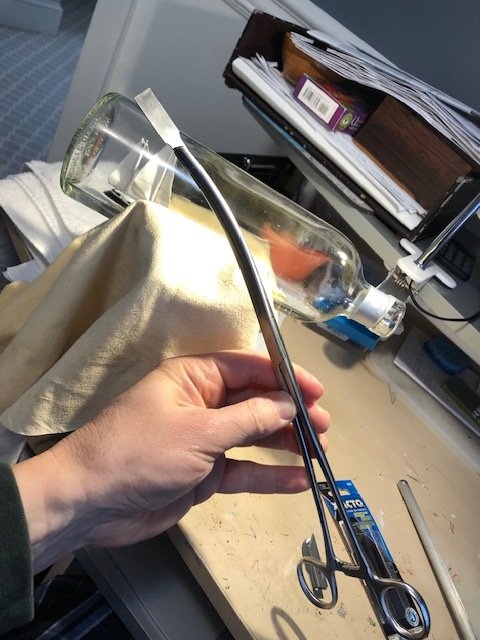
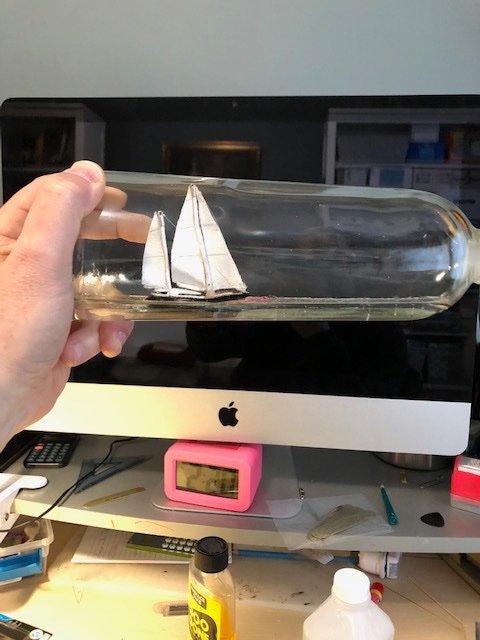
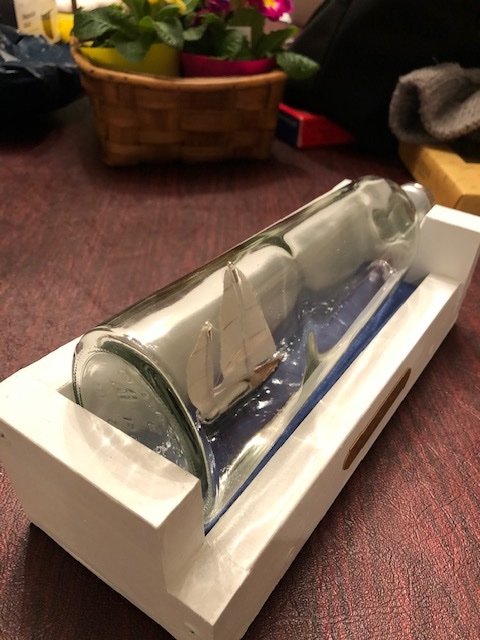
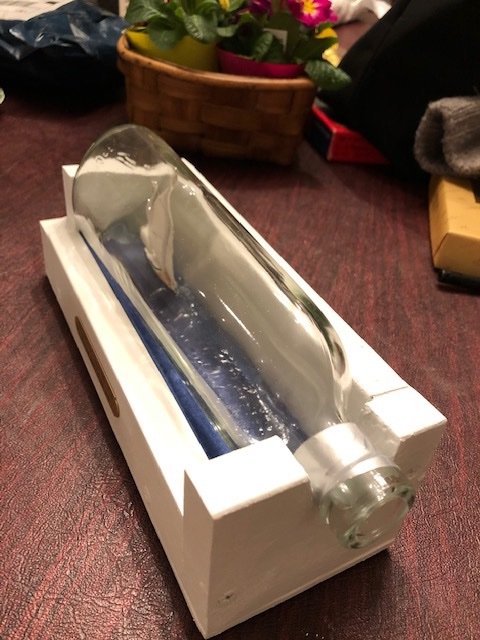
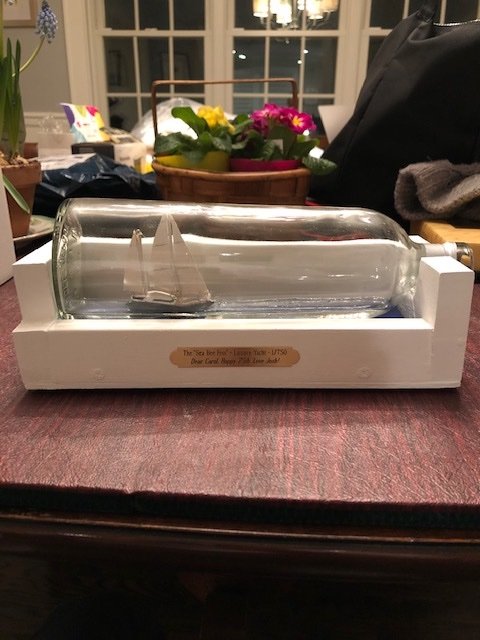
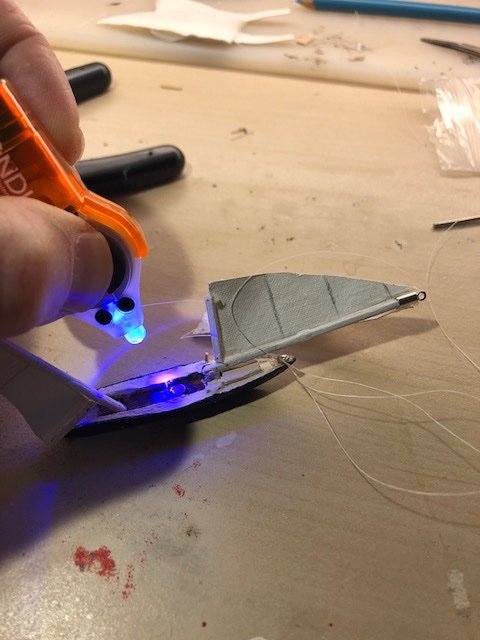
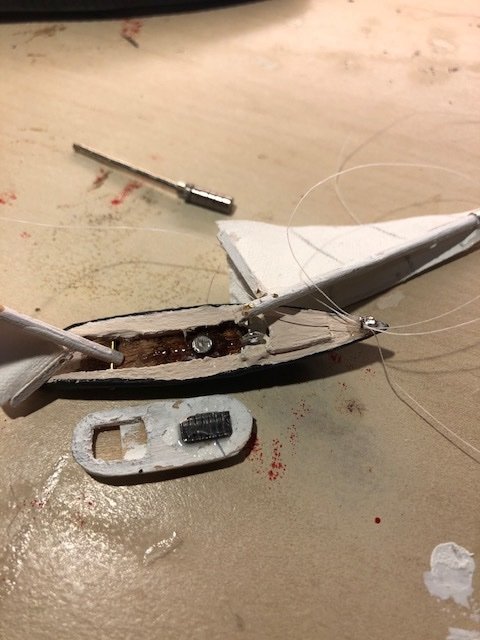
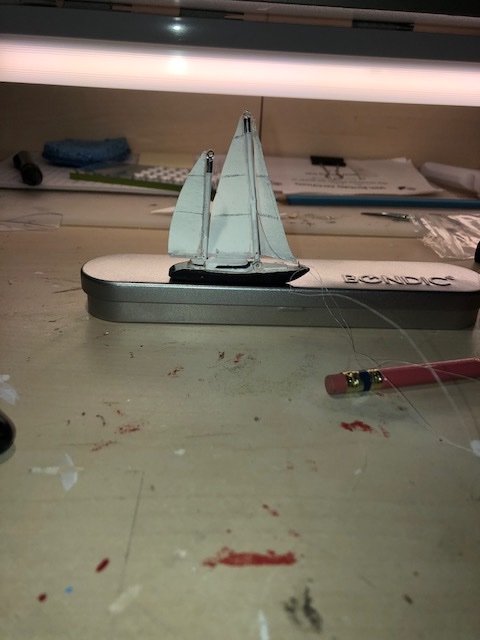
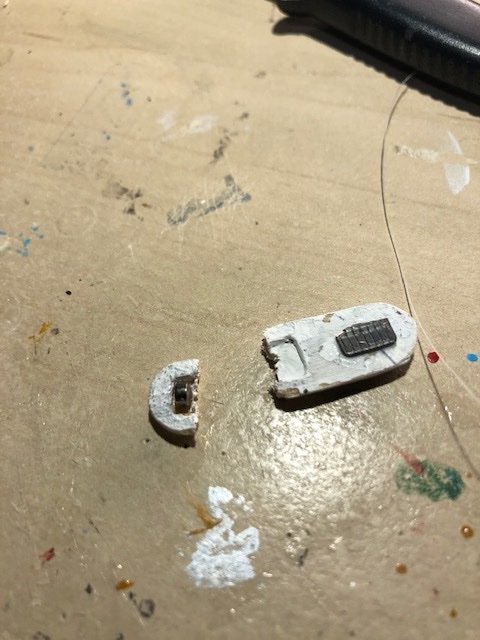
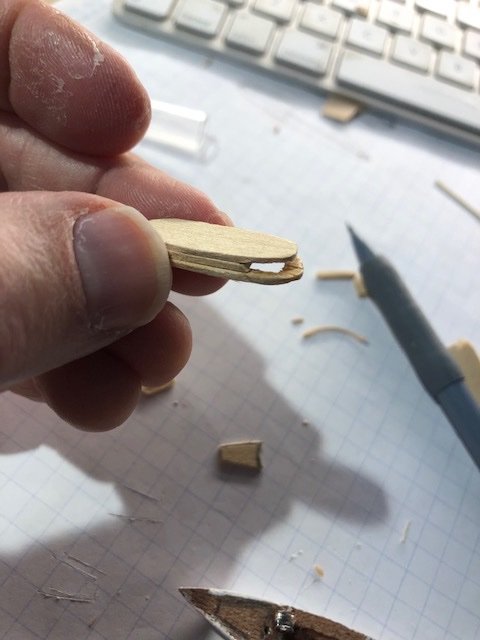
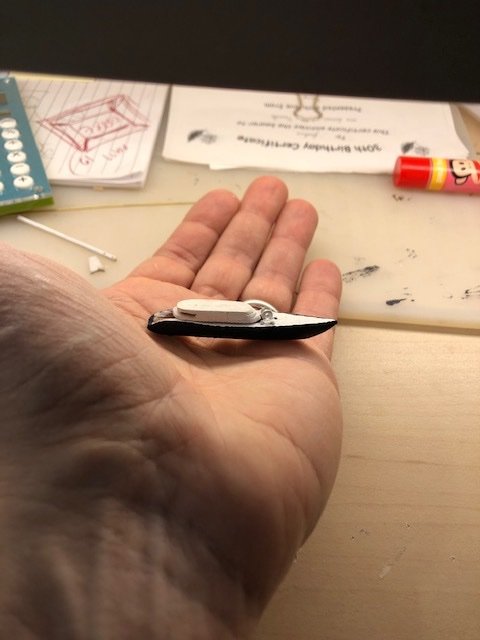
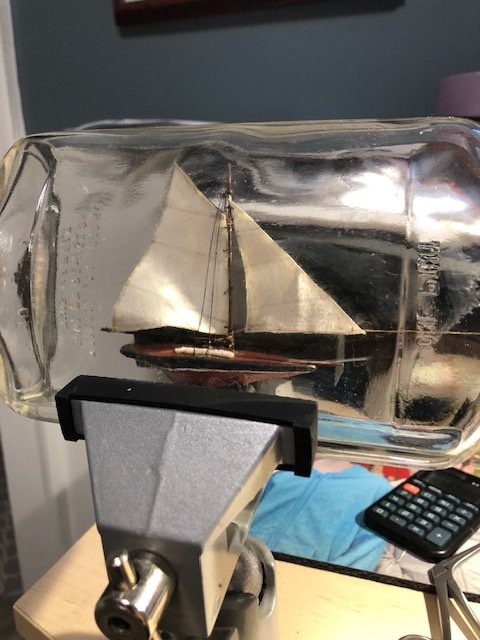
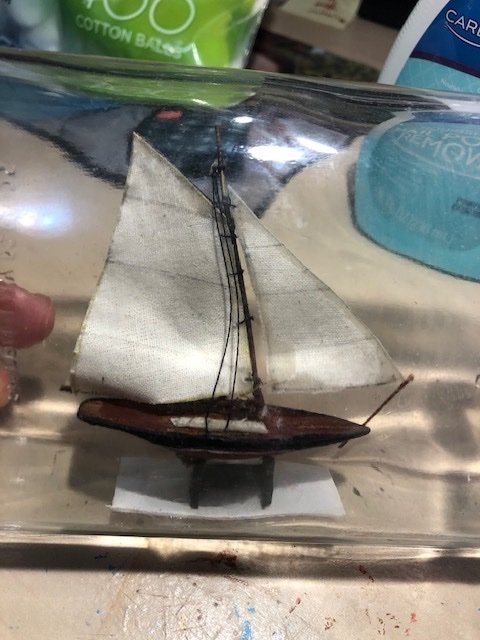
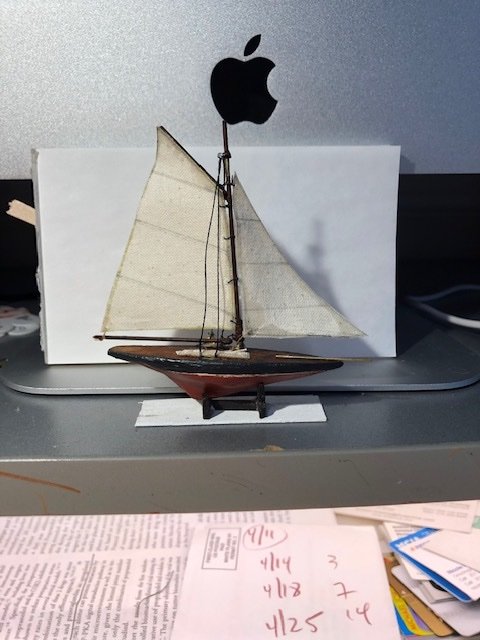
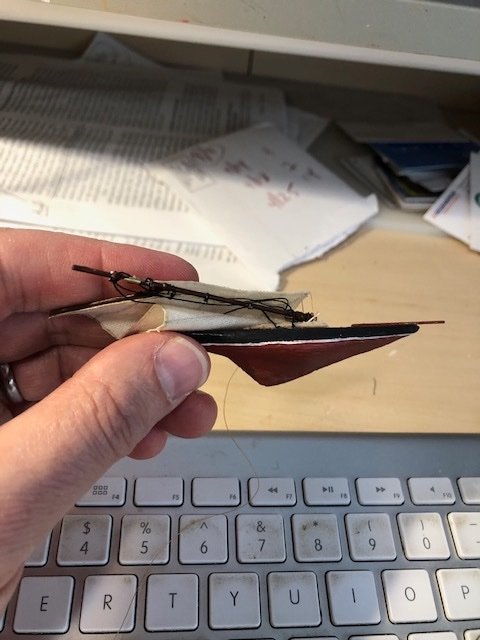
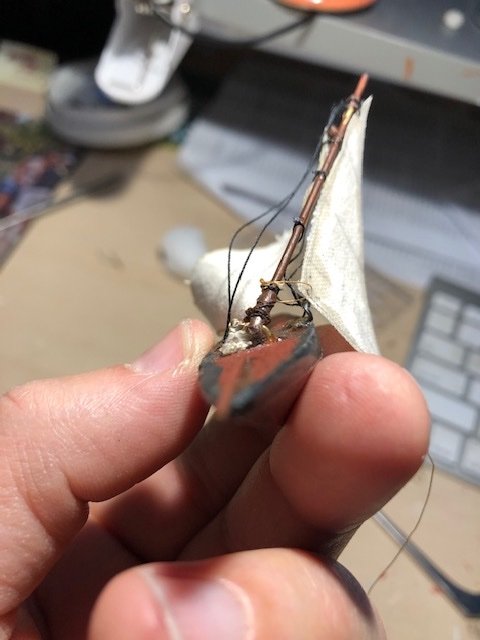
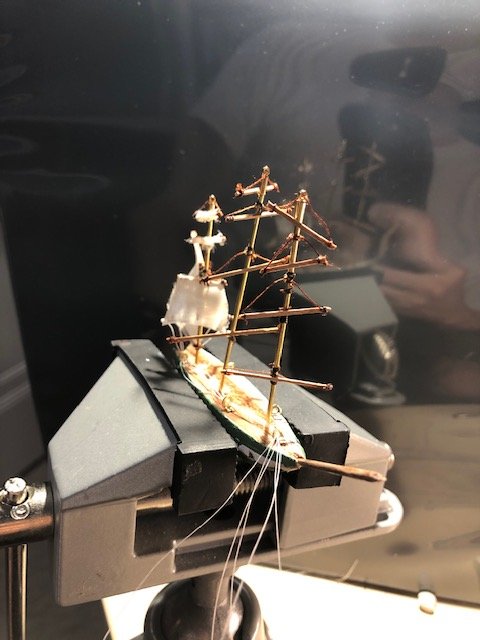
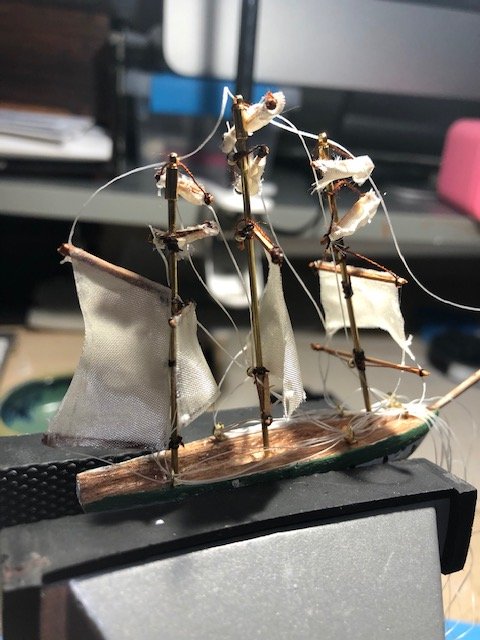
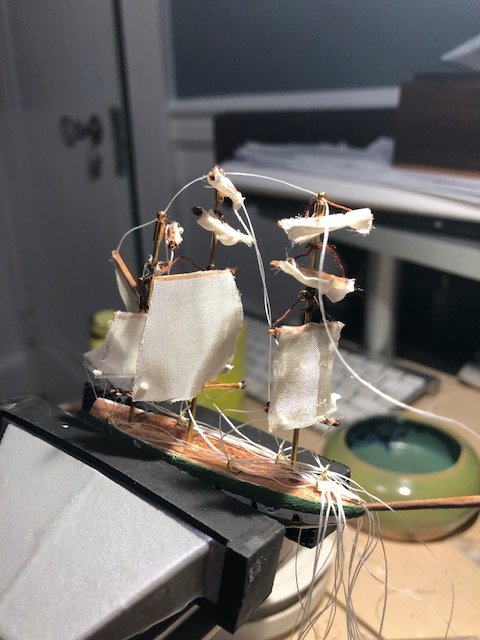
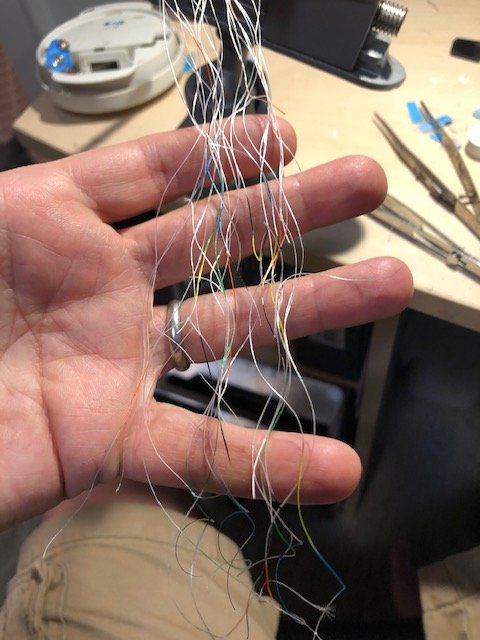
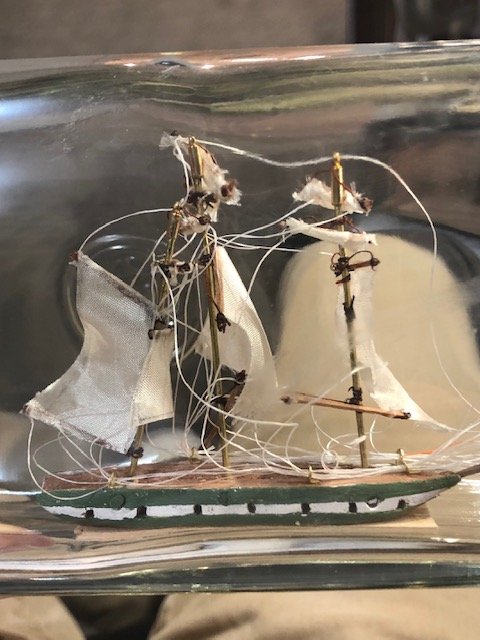
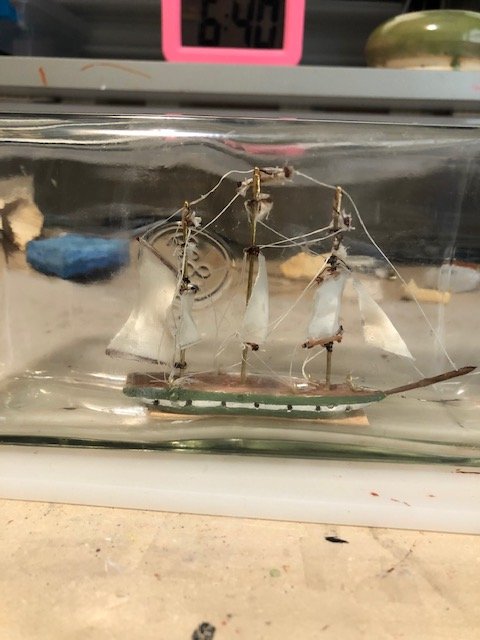
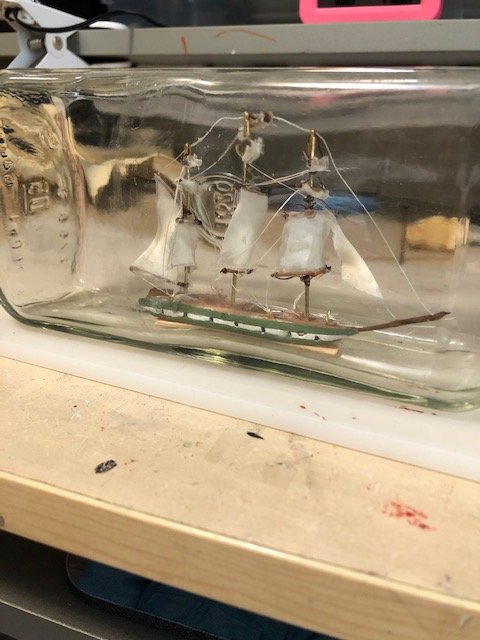
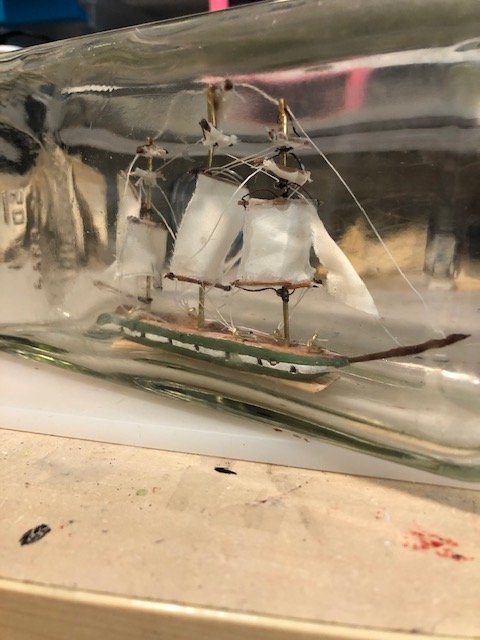
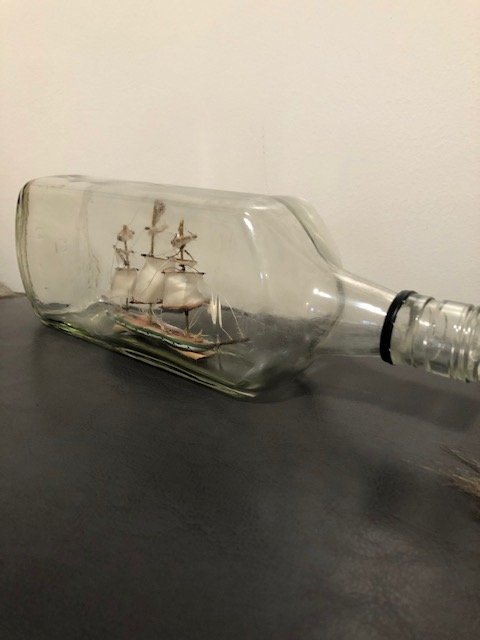
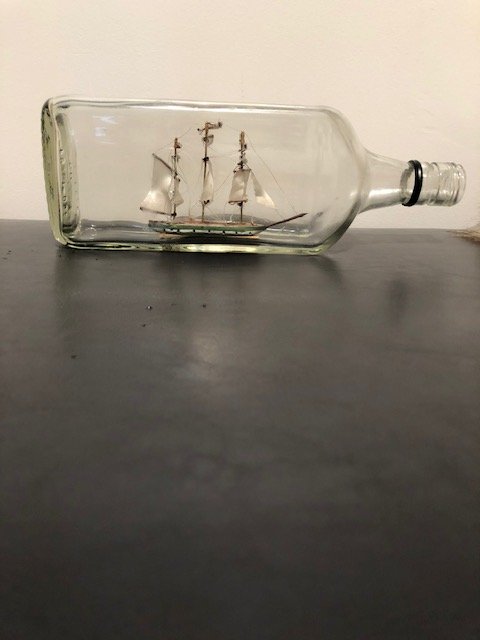
Part III: Launch, Repairs, and Finish She folds nicely - a good start! Even better! The Stern was too wide for the bottle neck, so I had to grind it down a bit. No snaps or cracks - music to my ears. Secured by CA onto the 2 posts drilled up from the bottle bottom. The next part - the fixing and finishing of the yards and rigging - is the where I experience the highs and lows of these projects. Inevitably, and despite my sometimes careful planning, there are major repairs. Some of these repairs ar a result from the folding, and some from the insertion: I always fix from stern to stem, so some damage is foreward from my attempt to fix aft in the bottle. Below, in red the major damage came from folding and squeezing into the bottle. Three sails, the main-lower , fore-lower , and for-upper topsails, all came off during insertion. This was probably because the knots I made in the fishing line were too small, and got pulled through the holes I drilled in the yards. I think I simply glued these yards to the masts. The more elegeant option of rethreading inside the bottle with hartmanns clamps was proving too time consuming and unnecessary. Here the mizzen is up, and the main mast is set and glued, but the bowsprit has inadvertantly been torn from the hull during the repairs. Because many of the rigging lines passed through the bowsprit, I had to get it reaffixed before I completed the Foremast. Many hours later, all is completed. I decided not to take pictures of the model in various states of repair and frustration. A proper custom base. My new thing is laying felt down tohave its color picked up and reflected, as if it were the ocean. I kept the whiskey label on the bottom of the bottle. I might choose to remove it to improve the optics of the feaux-cean. The Jibs look better from this - the windward - side. Can't wait to give it to Dad! He will Love it! Thanks for reading!

-
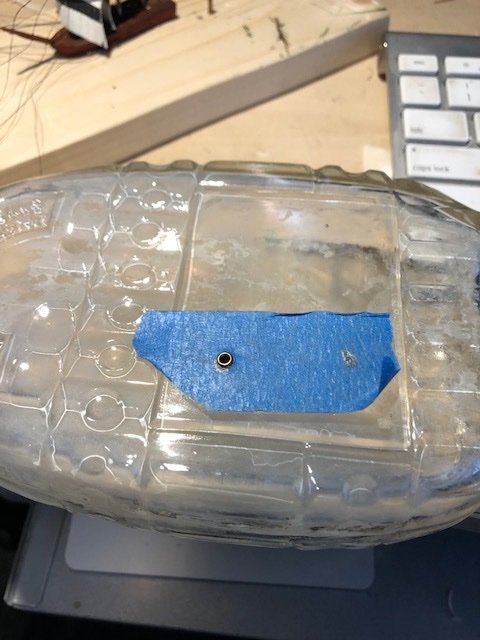
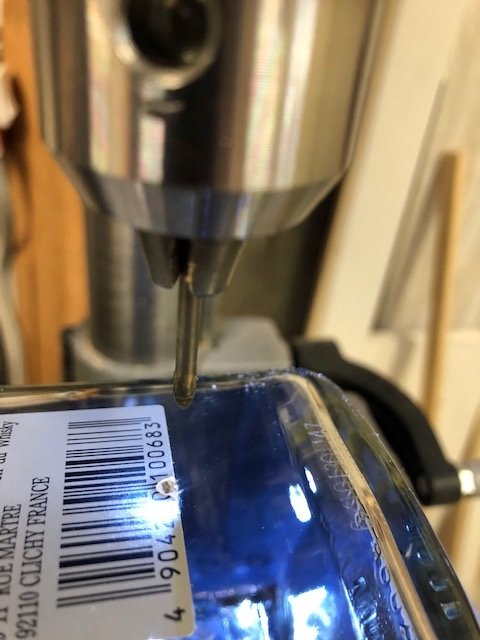
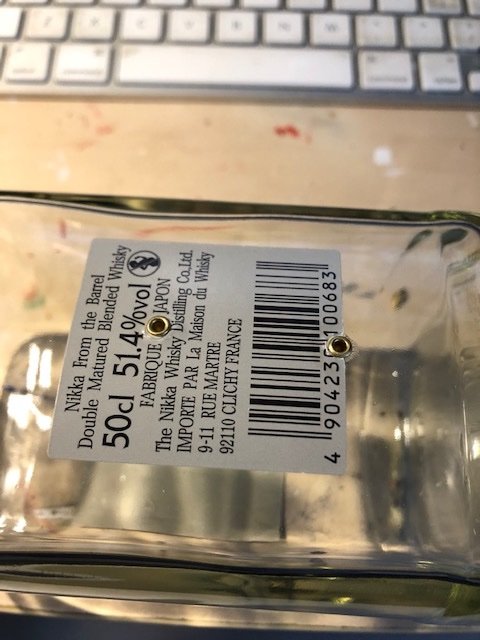
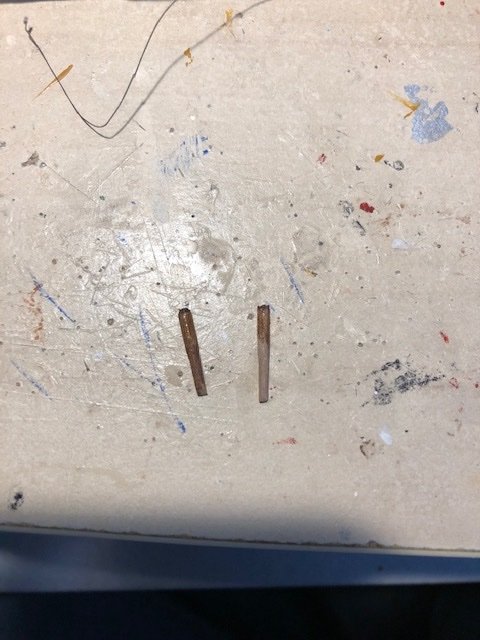
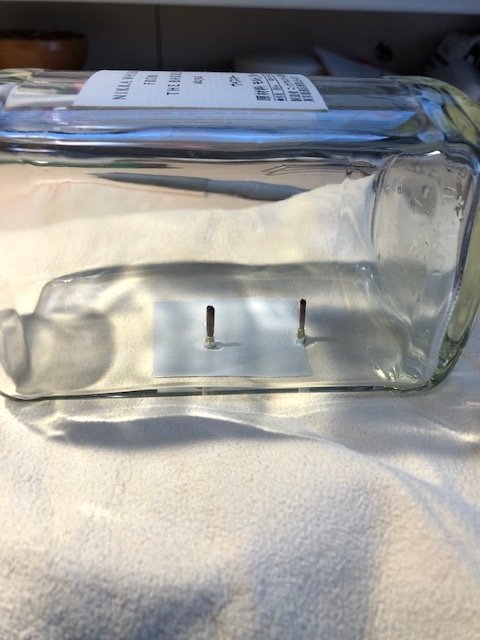
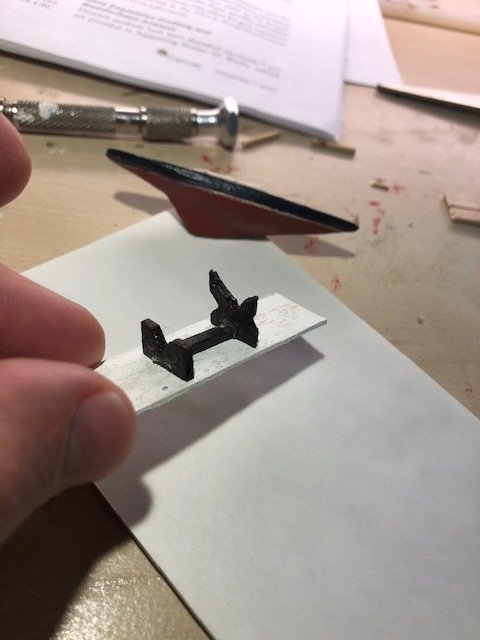
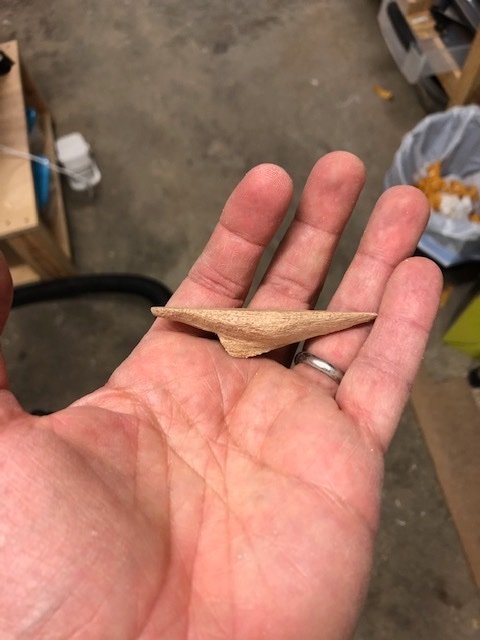
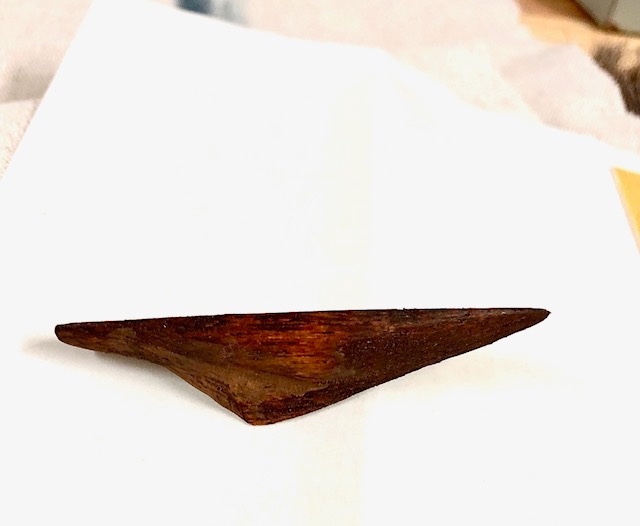
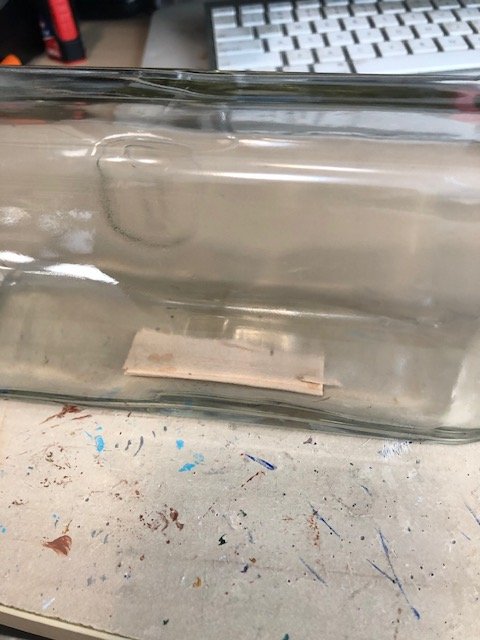
Part II - Hull, rigging, and bottle prep. The Lower hull on the working plank Upper and lower I decided to have the masts fold aft on a hinge rod running athwart the upper hull. I drilled out space in the hull for the masts and rigging to fold back, scooped out - not unlike - how the Missus likes her Subway sandwich bread! The Mizzen mast is fore and aft rigged with two gaff rigged masts. Main mast up, and Fore mast up. I tried to keep the rigging simple, leaving the yards alone, and attaching running rigging as beckets on the lower corners. Also no channels, dead-eayes of belaying pins for me; with my crude skill set, any attempts at those features would just be more ways for me to junk it all up. Instead, I drill some holes aft of each mast and uses them as pull-throughs. As for the bottle prep, I wanted to try something new for me: Drilling through the base, and inserting brass eyelets to secure the hull posts. The holes will be in the same configuration as on the working plank I exprimented on thos bottle of Calverts Special. Needed a bit for glass drilling, low speed, and lubricant for the bit. it worked well. Taping or having a label over the hole helps as well. In go the eyelets, CA'd. All part of the plan to create a firm base for the ship, for when I want to tighten the rigging after launch. Sturdy dowels are filed to fit into the eyelets, resembling a belaying pin! After much filing and cajoling, they are CA'd in as well. And finally, the lower hull snuggly sits upon the well-secured posts! Next: The launch

-
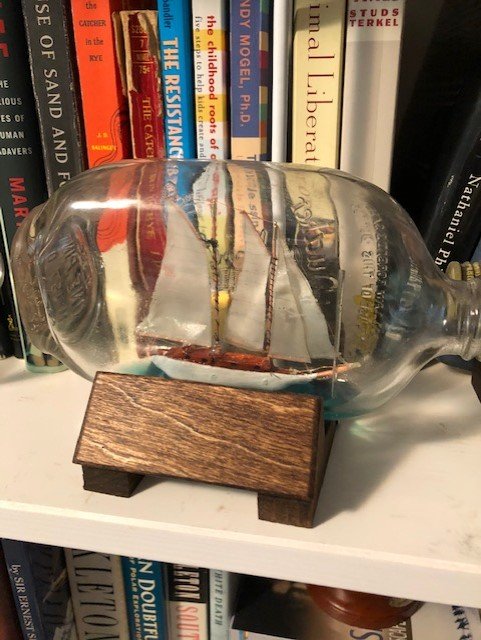
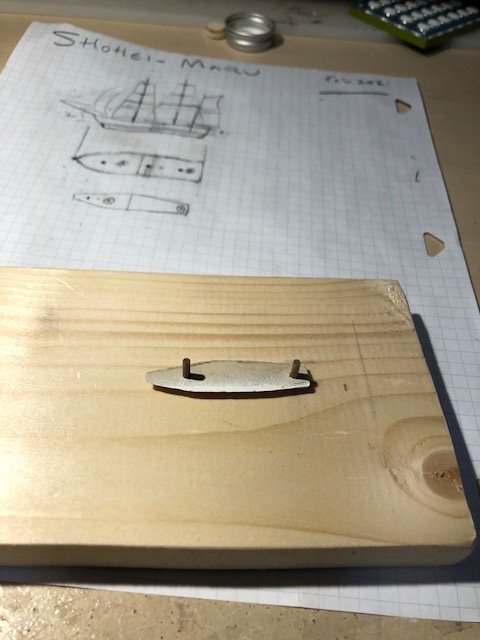
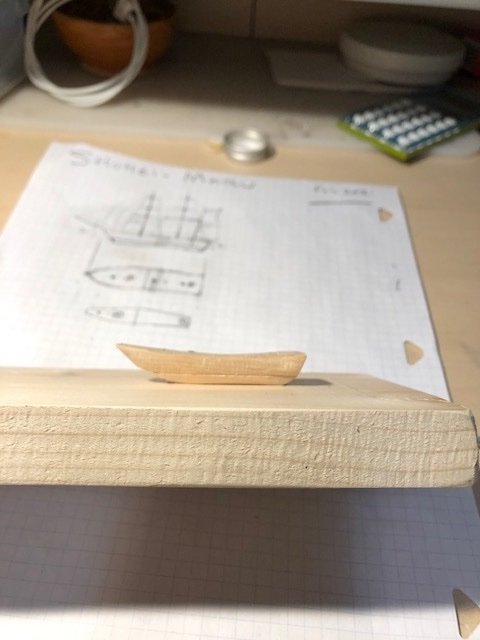
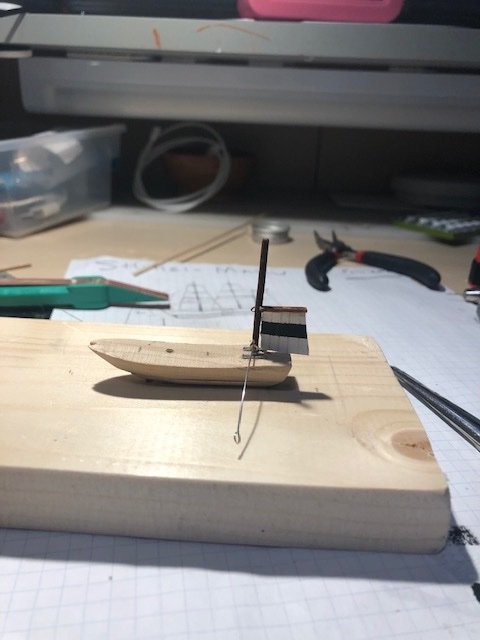
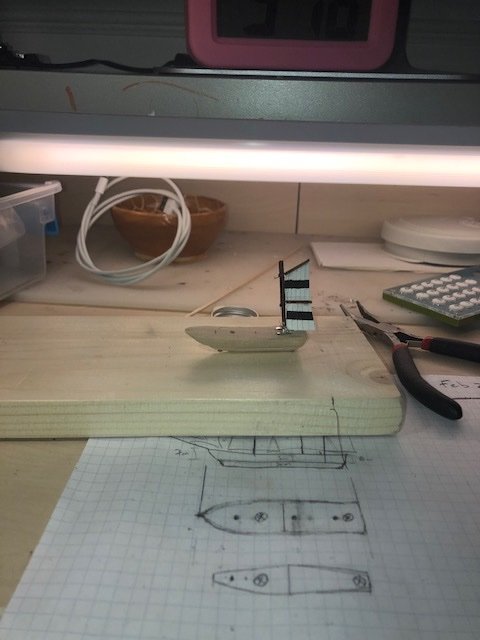
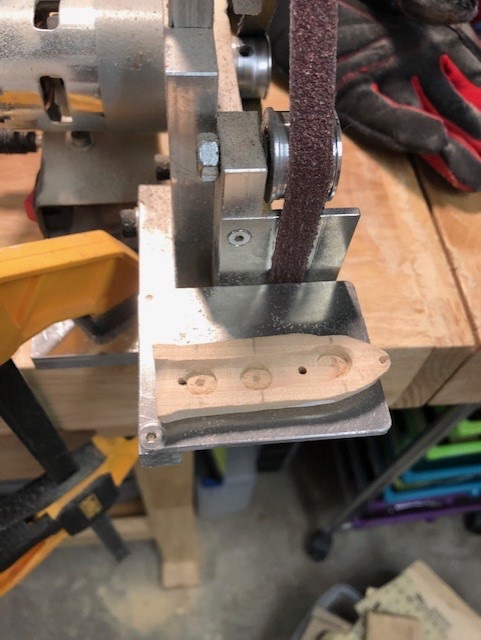
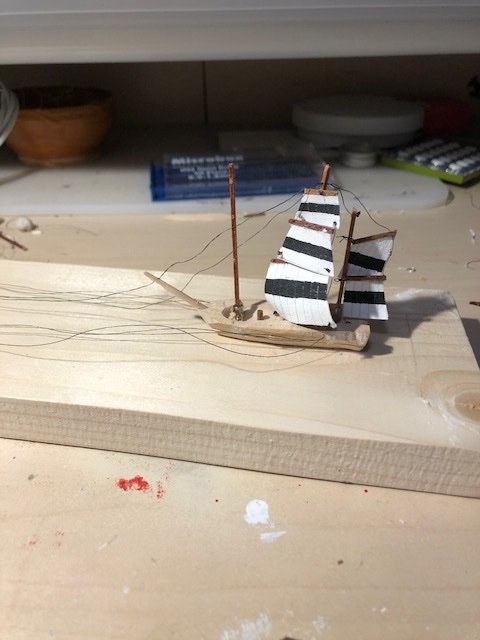
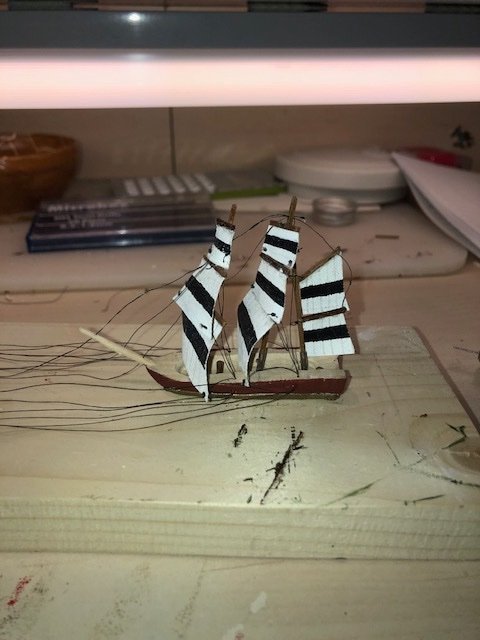
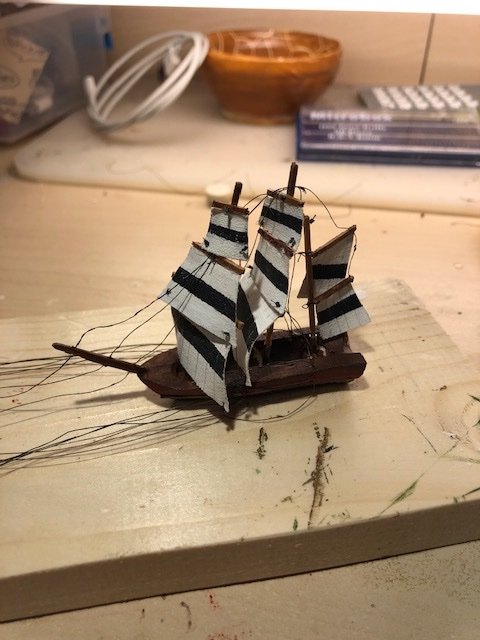
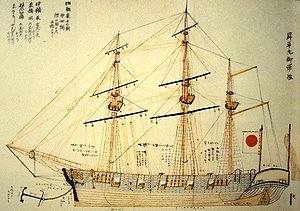
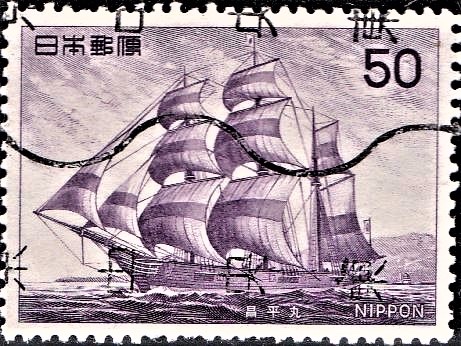
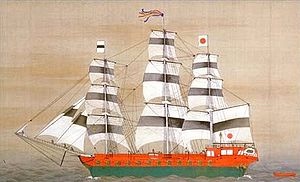
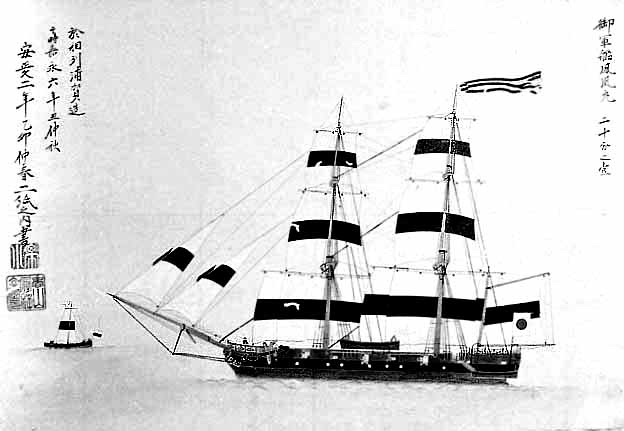
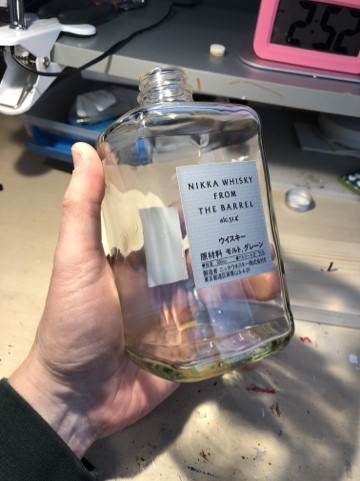
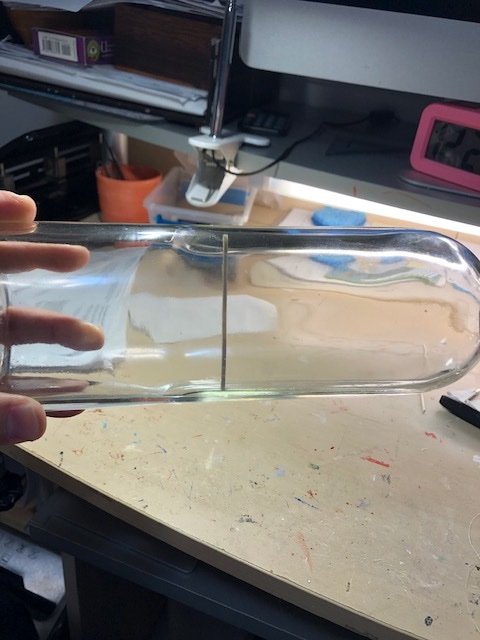
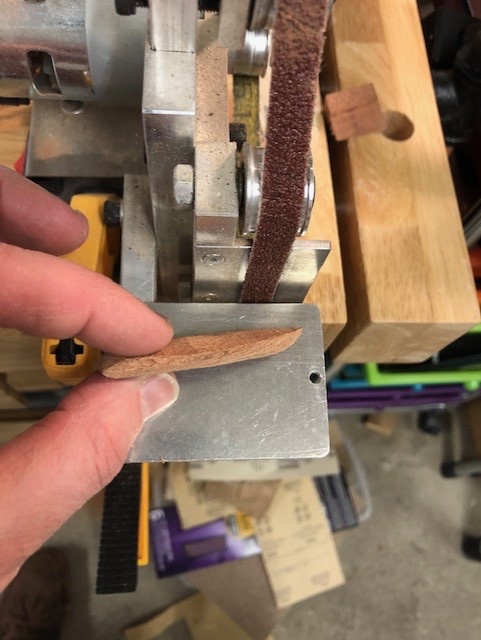
It was time for me to make a Ship in a Bottle for dear ol' dad. He's been through quite a bit recently, and I think a gift like this will do some good! Dad always liked a Japanese asthetic; when I was a boy, he designed and built a Japanese tea house in our garden in Connecticut , and his yards always feature a Japanesse Rock Garden. After a few fore and aft SIBs, I wanted to return to the square rigged ships, to see if I can improve upon my technique. Fore and aft SIBs are easier because you only have to worry about one plane of folding, ie the masts. The square rigged ships have the added challenge of all the spars folding or twisitng on the masts. It seems a perfect pairing to try a Japanese Warship from the 19th Century. According to my not-so-very-extensive research on Wikipedia, the Shōhei Maru " (昇平丸) was a sailing frigate constructed on orders of the Tokugawa shogunate of Bakumatsu period Japan by Satsuma Domain in response to the Perry Expedition and increasing incursions of foreign warships into Japanese territorial waters. She was built from 1853 to 1854 at Sakurajima in what is now Kagoshima Prefecture. Shōhei Maru should not be confused with the World War II passenger/cargo vessel of the same name, sunk by the submarine USS Spadefish off of Korea." "The Shōhei Maru was a three-masted barque-rigged sailing vessel, with an overall length of 31.0 m (101 ft 8 in), beam of 7.3 m (23 ft 11 in), and displacement of 370 tons. Of wooden construction, she was depicted in contemporary artwork as being armed with five cannon on each beam. Her sails had black bands, characteristic of Tokugawa naval vessels. She was depicted in an 1855 print as flying the rising sun flag. " The pictures above are the only representations I could find of Shohei Maru, but there were other similar Japanese Warships commissione during the same period of the Tokugawa Shogunate. These include Asahi Maru, and Hoo Maru, whose image was my true muse for this project. I really like these Japanese Nikka Whiskey bottles! Perfect for the job! To start, I decided to fashion and use a plank a working board. This is used in some American SIB kits, and should give me tighter control of the masts and sails as I make her.

-
Thanks, Mike! I dont know about your SIBs, but for me all the work comes down to the planning and execution of the launch. The better that is, then the less damage control and cleanup is required. Still havent figured it all out, but I have anew plan for the next one!
-
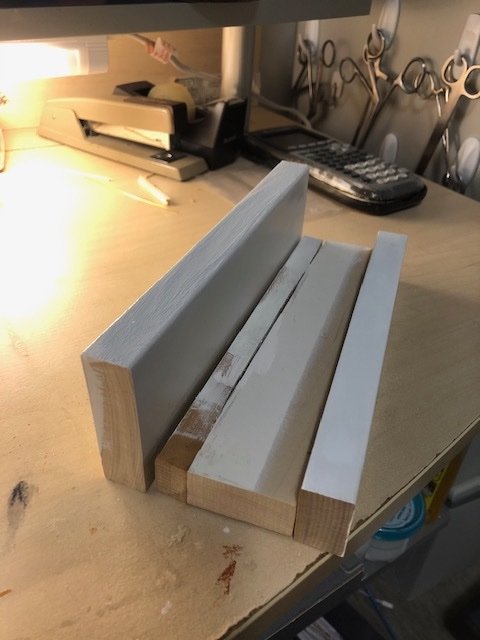
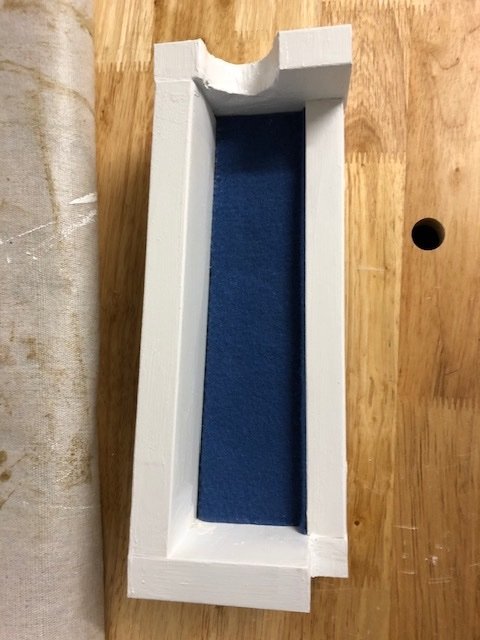
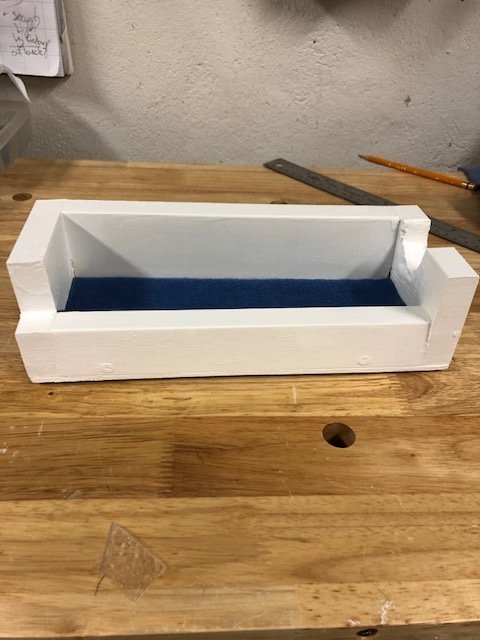
Part III: The Launch and Repairs I thought I was smart by measuring the height of the bottle with a stick. It's always hard to tell from the outside. I don't want too much space, but I certainly don't want the masts too tall. Once I was assured, I laid down a layer of sil-poxy atop the dry silicone base inside; It dries quickly The ship folds down easily, with no snaps or pops. The superstructure attached on well with the magnets. But, despite my stick measurement (!), the main mast is too tall (!!!). Still not sure how that happened. This error led to all my problems. By now the epoxy was curing, and I was trying desperately to move the ship back in the bottle where there was a bit more clearance for the main mast. Meanwhile, the sil-poxy under the ship is strecching out all over the place as I try to maneuver the ship aftward in the bottle. I tried getting more silicone-poxy where I needed it further back; but the more I put in, the sloppier things got. I still need the ship to be fixed on the base, so that I could pull the masts into position and straighten the sails. Out of desperation, I dripped in a thin second layer of clear silicone, to hopefullt set around the ship; it hardens very firm. Unfortuantely, as i saw with the Caroline, when I pour the Encapso-K into a non-pristine environment, eg with a boat and epoxy tainting it, I run the risk of silicone not curing. I was lucky that it eventually did cure, but it took several days instead of 24 hours. By then the new silicone base was covered in grit and particles, looking rather shabby. Eventually, I got her fixed in place in the back of the bottle. A 12" Hemostat clamp with a blade up top helped to cut the rigging in place. Looking much better after I cleaned the huge mess off the bottle. Cobbling together a base. Kind of oblong shaped, but totatally custom built for this SIB. Possibly my favorite decision in this entire process: Lining the bottom with dark blue felt. The blue gets pulled into the bottle, She sits nice and snug, in her cozy base. Both Mother in law and wife are very pleased! So am I! Thanks for reading!
-
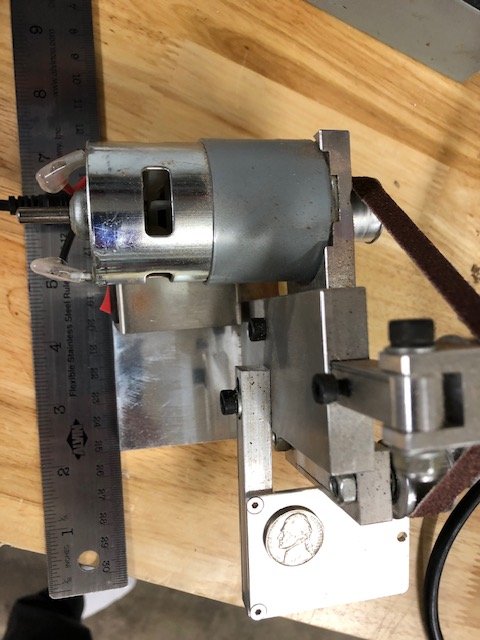
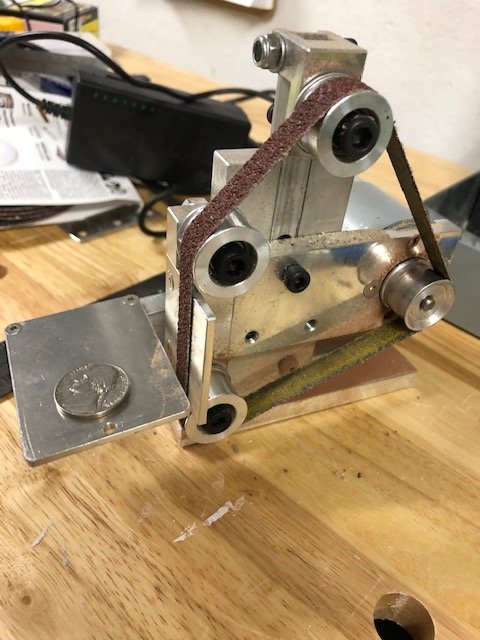
Thanks Mike! Everything was going great until the launch - as usual. I'll post the disaster and hopeful salvation in a few days once, the silicone dries and I clean up the mess. Re the sander, of course. the sander was a gift from my brother Harry. It has no names or brands or labels. I searched for it on the web and appears to be a no-name product from Hong Kong. If you look up 'mini belt sander' or 'mini polisher' you will see it.
-
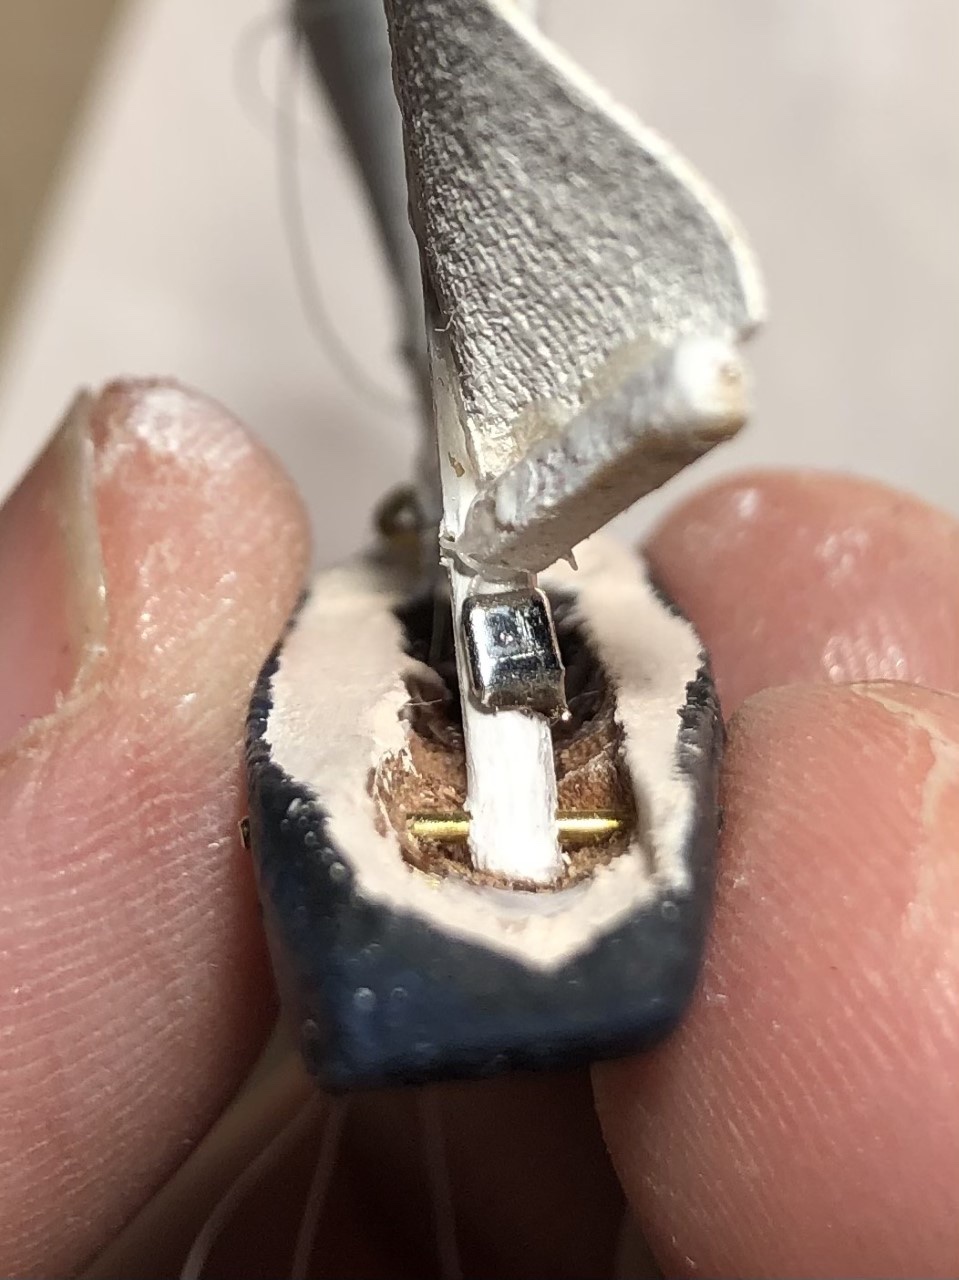
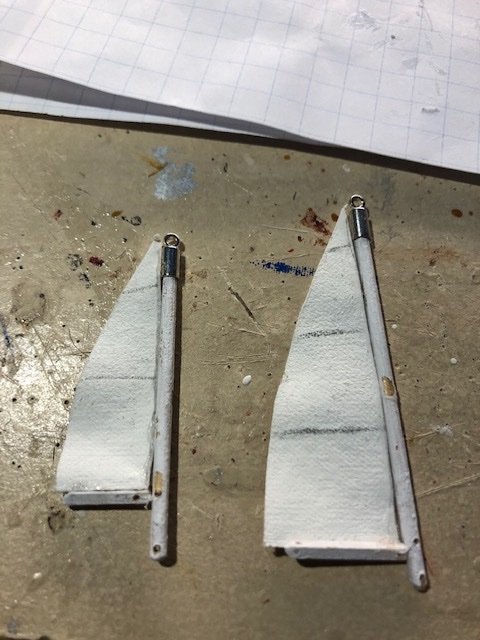
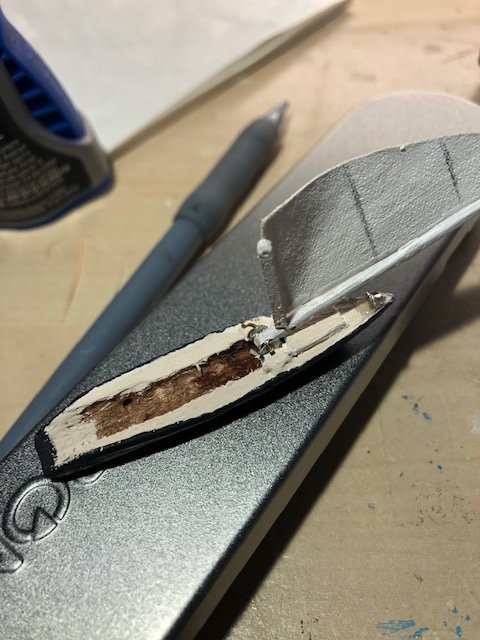
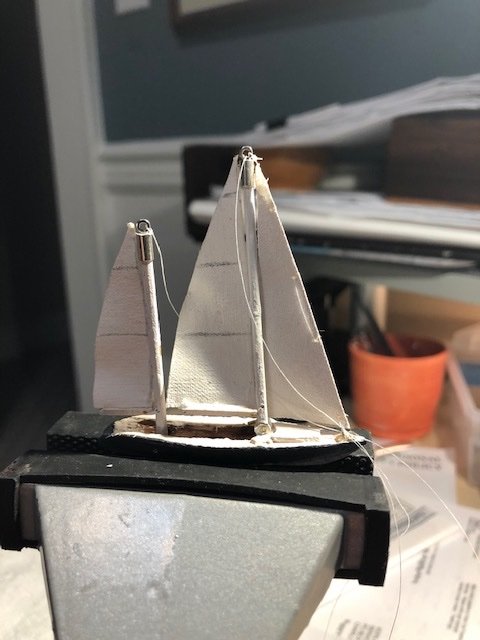
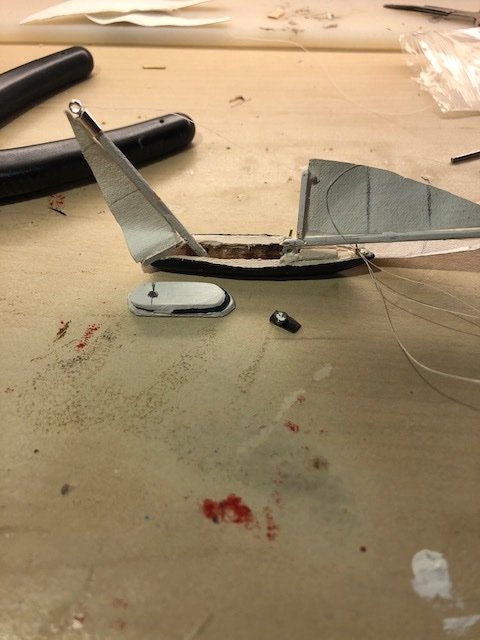
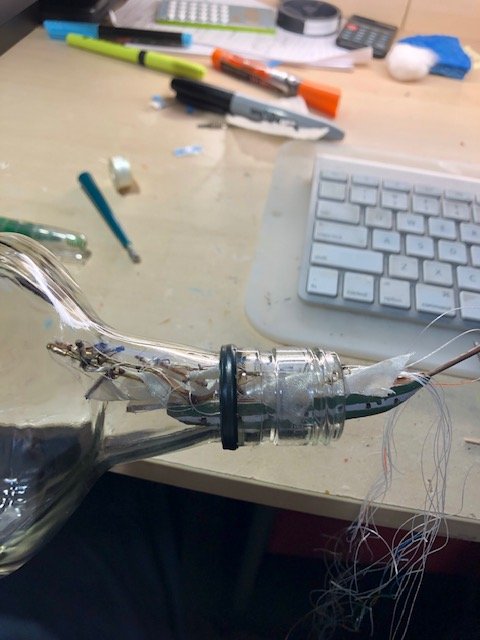
Part II: Masts and Rigging Main and Mizzen masts. I used sail cloth and painted it white with acrylic. Made it very stiff, but it think this workes to my advantage. I like cord ends atop my masts. Super structure - the fore is painted inlieu of glass, and the aft is truly aired out. simple hinge for the main mast - no way I could hide it. All three sails up. The mizzen mast is hinged a level below, athwart the hull. I had to figure out how to get the supr structure around the masts. I decided to drill a hole, and cut the roof across, then fit then on after the masts were up (in the bottle). I figured using the tiny magnets would be perfect here. Secured with Bondic plastic welding and CA. Here lies the Main Mast Magnet's Mate: A flat peice of metal on the underside. But this was the easy part. What about the aft part of the superstructure? This would fall apart after the cuting across. So I used Bondic on the port side - not the display side - to keep the top and bottom together after the cutting. Same as above. Successful drilling and cutting. The top and bottom did stay together. Again with the magnet, but this time I needed to secure it on the under side of the superstructure. Its mate: a small peice of metal on the mizzen mast. This is the idea; let's see how it goes inside the bottle. The masts and rigging are really rather simple, which is great! Practically fool proof. The Bottle was stripped and cleaned of its labels; then I put in about 5mm of Encapso-K silicone to create a flat base. The ship will be attached to the silicone with Sil-poxy, and even that I expect to go smoothly. But, it will be the attachment of the two superstructure pieces using magnets that will be the challenge, and all though a narrow and long bottle! Next: The Launch!


-
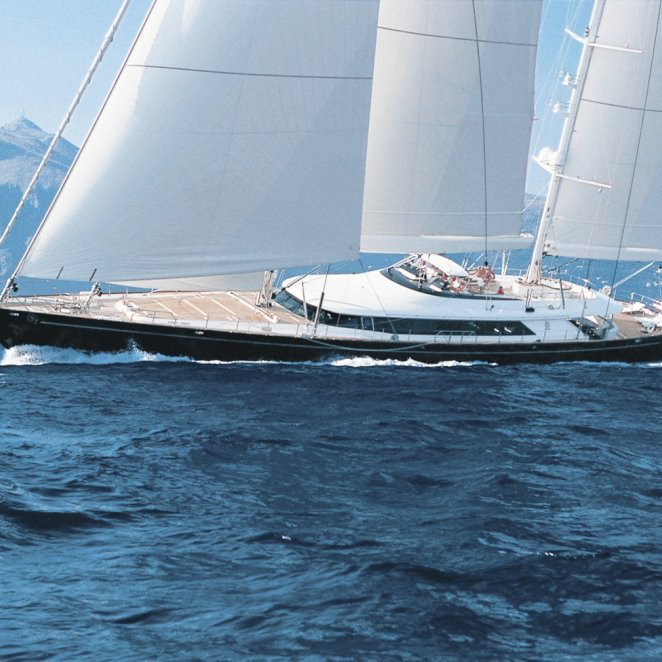
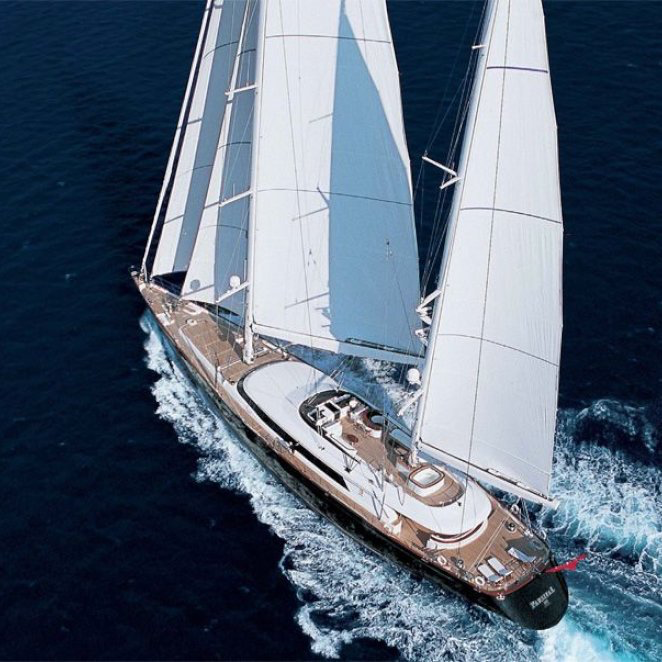
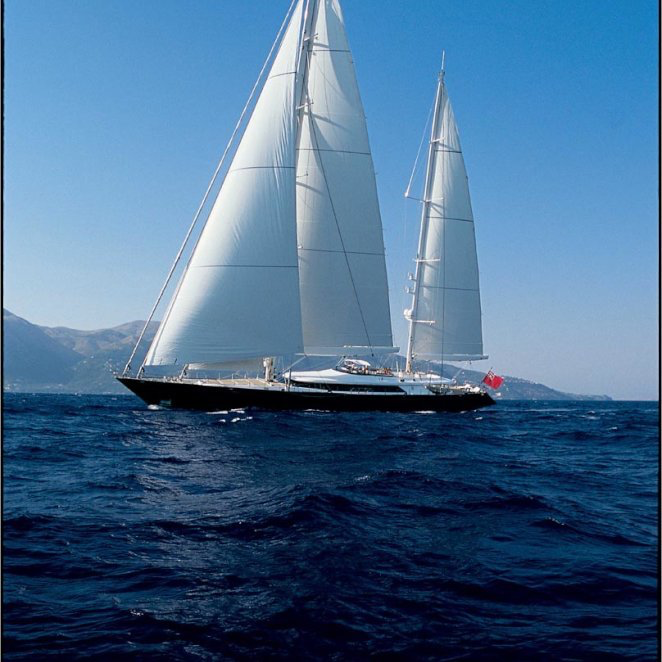
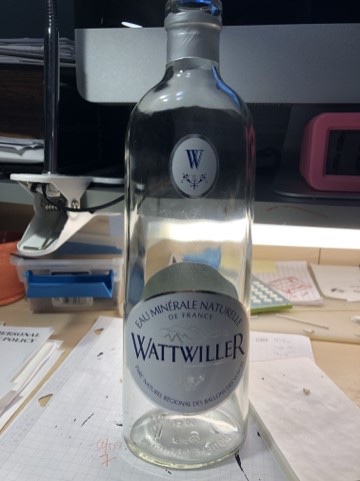
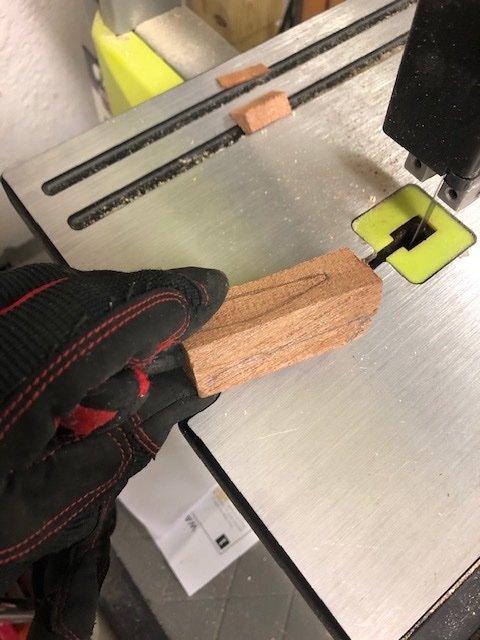
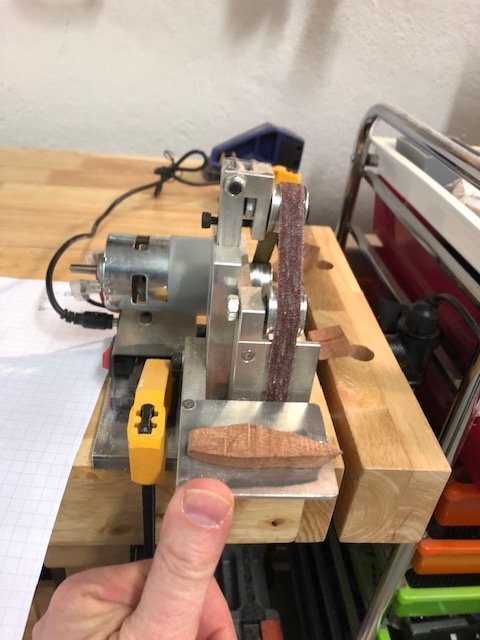
INTRO: I promised my mother-in-law that I would make her a ship in a bottle for her big birthday coming up. She deserves a modern sail yacht, not some crusty old schooner. The Parsifal III - built in 2005 by Perini Navi and refitted in 2012 - ought to do the trick. Similarly, my typical vintage whiskey bottles wouldn't fully speak to her charm; and since I cant find a proper size bottle of grey goose (!!) I will use this sleek french water bottle! PART I: The Hull and Superstructures Starting with a hull blank. I suppose this is more of an american style approach as opposed to european or japanese method using sagittal slices. Mini belt sander to grind it close. I do wear gloves. Sanded down to 320 grit, then primed. I decided once again to drill-route a channel into which the masts will lay flat aft. The two masts will each sit on their hinges at a different level from each other. Here the mizzen mast axle hole is drilled athwart, through the hull. While the main mast will hinge atop the deck. I hope this split-level approach to the hinges will allow for an easier fold. Making the cabin superstructure Straight lines are not my strong suit. But its beginning to take shape. Next: Masts & Rigging


-
I am looking forward to seeing this built!! My own sits patiently in the beautiful wooden box, waiting for a rainy day.
-
Agree with the Woody joe santa maria. The only other vertical SIB kits I know are not currently made anymore, and were made by Imai: The Golden Hind, Winston Churchill, and Santa Maria. and those were nice models, not exactly dirt cheap. You might be able to find them on eBay or similar. Although in some editions the instructions are only in japanese.
-
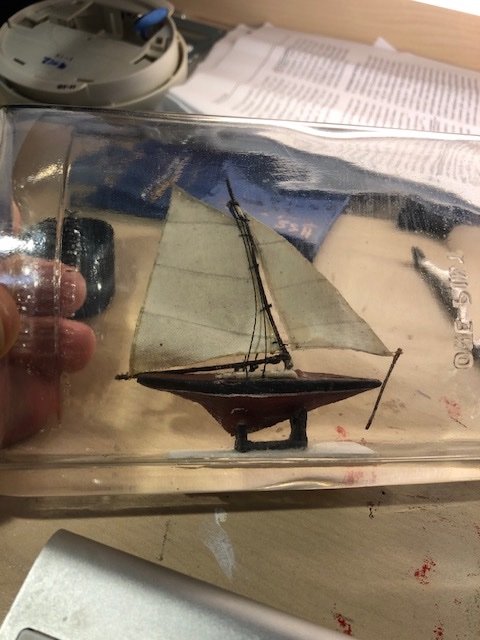
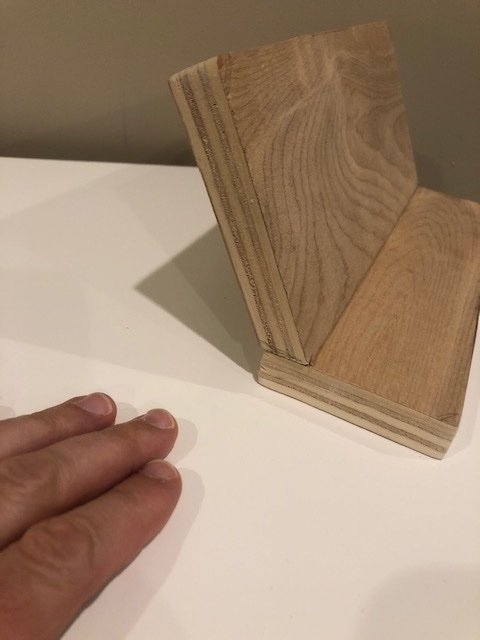
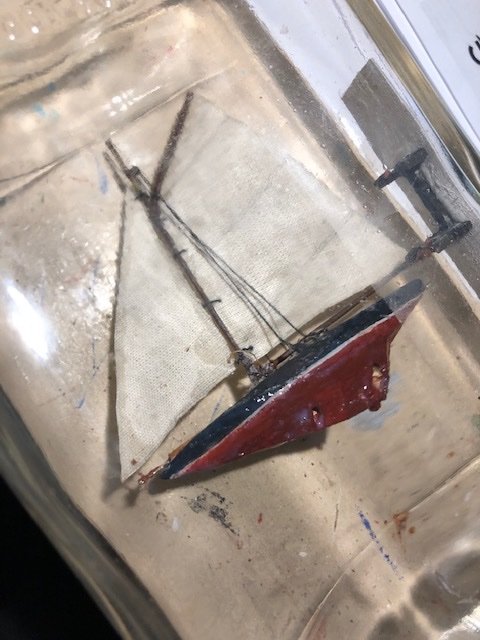
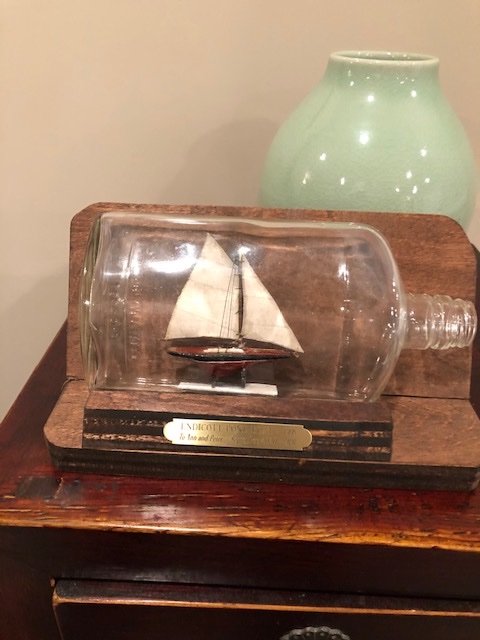
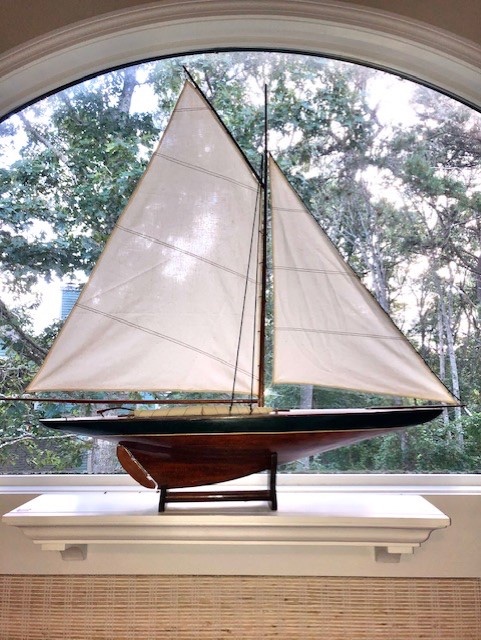
Part 3 of 3: She settled in rather well. Until I pulled too hard on the Running rigging I attached to the bowsprit. So now, there's this. And this. Which I Eventually fixed with more CA and Bondic. But because the mast sat on the bent rod at a 30 degree anle to port, so did all the rigging. Although the ship herself rested kind of funny in the cradle - maybe only a few degrees to starboard. But in the end the sails were a bit askance to the deck, and the deck had a more prominent top view than the proper side view. Therefore I had to build a stand which corected for all this, and let the enitre bottle tilt back about 35 degrees. A recliner for my lazy ship in the bottle. But it made the optics better!! I slapped on several coats of clear acrylic varnish to heghten the shininess! Oh yes, and in case anyone noticed, that's the boat what come off the cradle inside the bottle. I used that disaster as an opportunity to grab the ship with forceps and clean up any imperfections, holes, CA bloom, and paint issues. Then I more formly reattachd her to the cradle with CA and Bondic. The stand is sanded and finished with Honey stain. I dont even mind that the plywood sides are showing . The plaque completes my job. If the mainsail hadn't come out so wonkified, Id be much more pleased. But as it is I think she'll do! As I type, she is in the mail (!!!) to the owners of the condo, as a surprise gift! Thanks for reading!


-
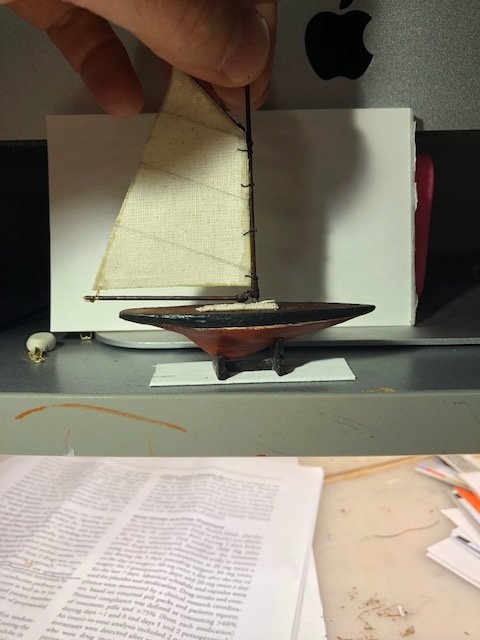
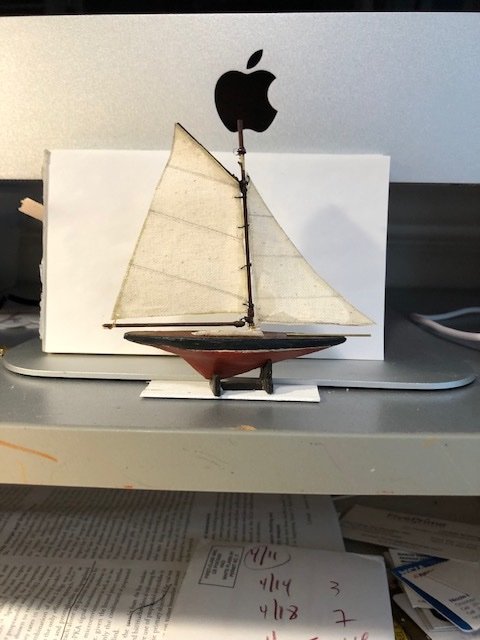
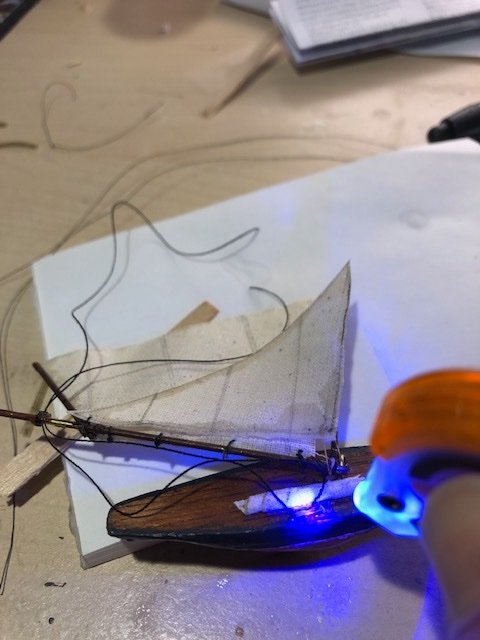
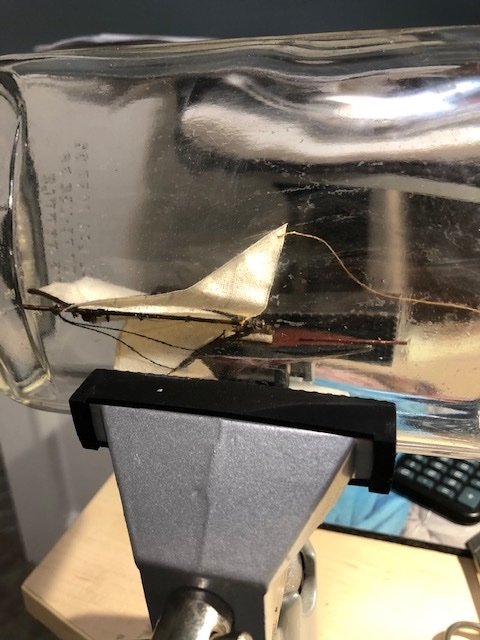
I was still trying to figure out which hinge to use, and after a few tries I went with a very simple design: a cord end at the bottom of the mast to form the hing hollow, and small brass wire bent to 90' - basically no leafs on either side, just the pin up, over, and through. Then i scrapped the idea of the two-posted pedastal that i favor for some other SIBs, and decided to make a tiny model of the cradle which holds the actual pond boat.This little cradle would prove to vex me later. Brass rods for the mast and spar. The gaff mainsail is sitting up rather ok! The mainsail sets up ok, as well. I attached the shrouds onto thin, etched brass stencils, and then plastic welded that to the deck with bondic - Perfect for this. The cradle was deceptively obliging at this point. I used a 1 pint vintage whiskey bottle, as is my preference. The inside of the bottle - on its side- was a bit wonky and uneven, so i mixed & poured small layer of liquid silicone to form a new base surface, smooth and clear. (forgot to take pics). Shes folding down pretty easily Ha!! In retrospect i see how the hinge pin was at a lousy angle, probably off by 30' !! On initial attempts, i was unable to get the collasped ship into the bottle; the hinged mast stood up too high when flattened. So i figured to take the mast off the hinge pin, and insert it all in unattached. "Get in! Get in, Laddie!!" Next: Cleaning up all the mess!
-
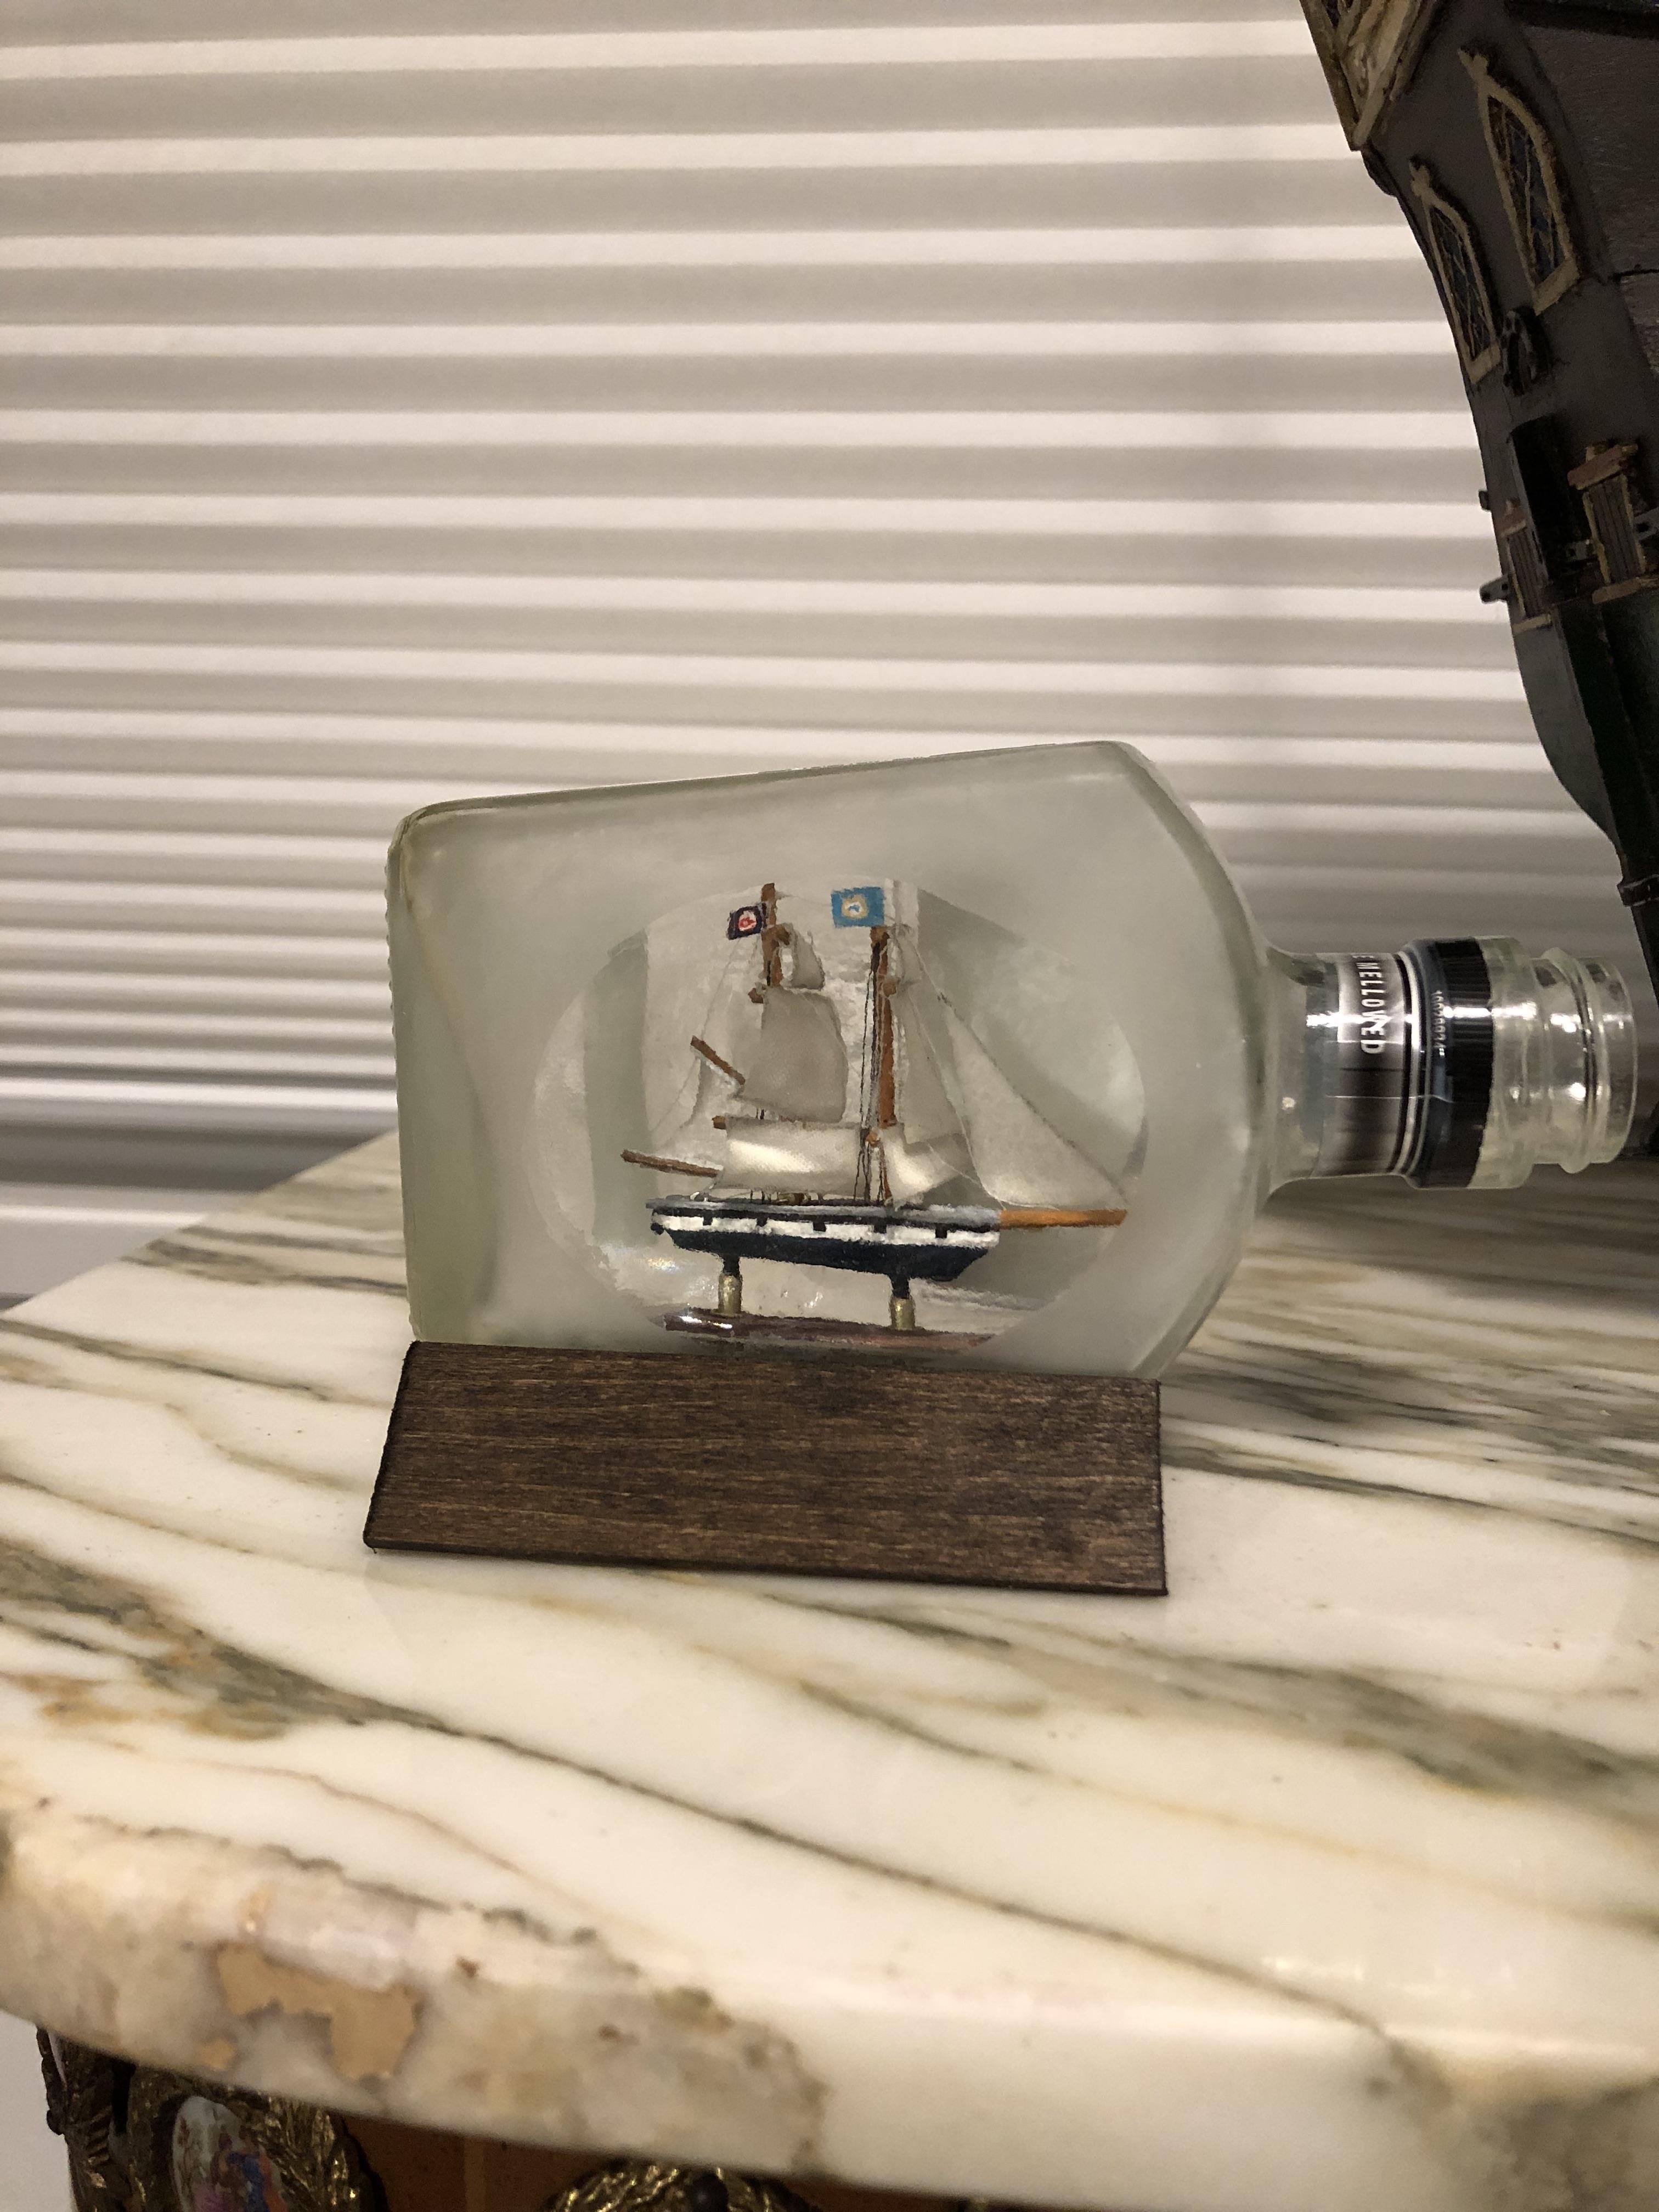
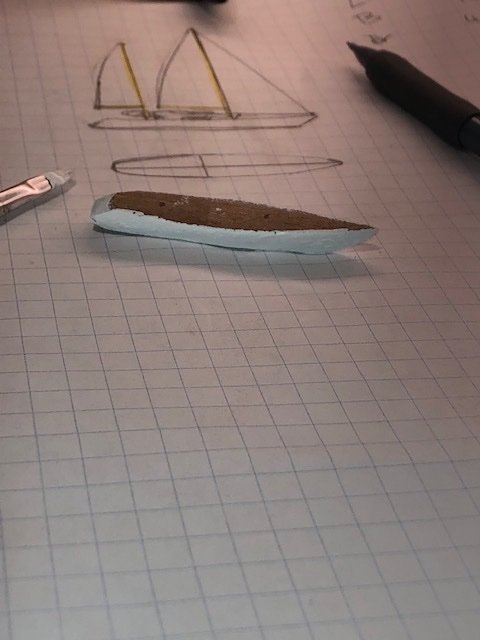
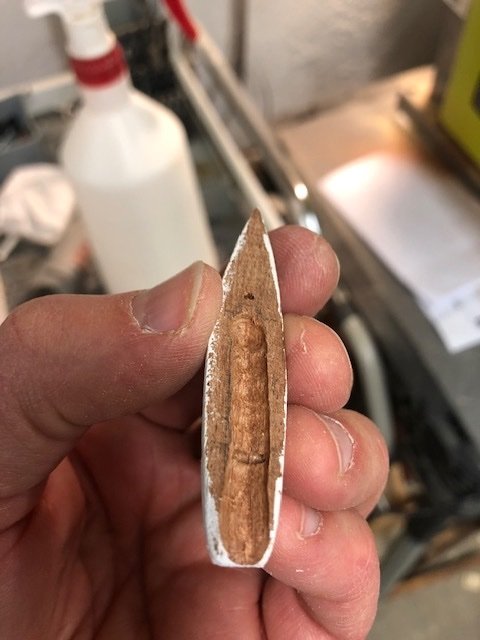
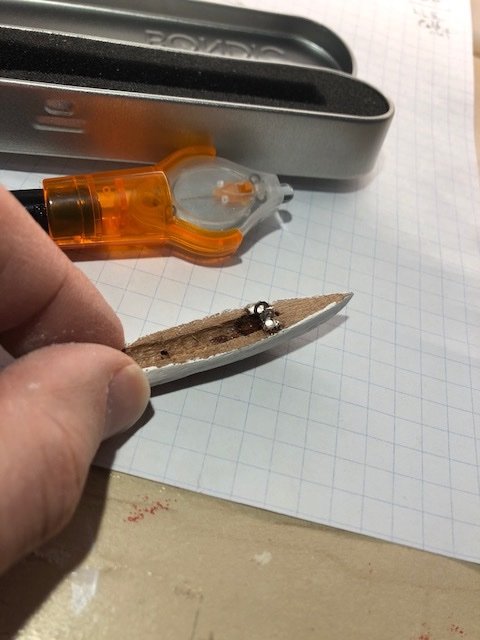
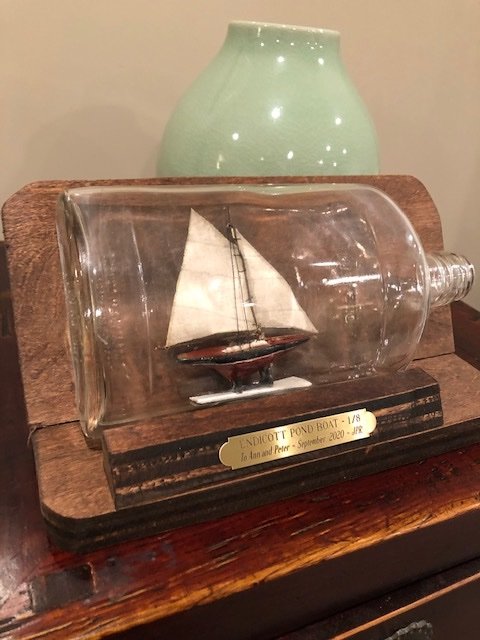
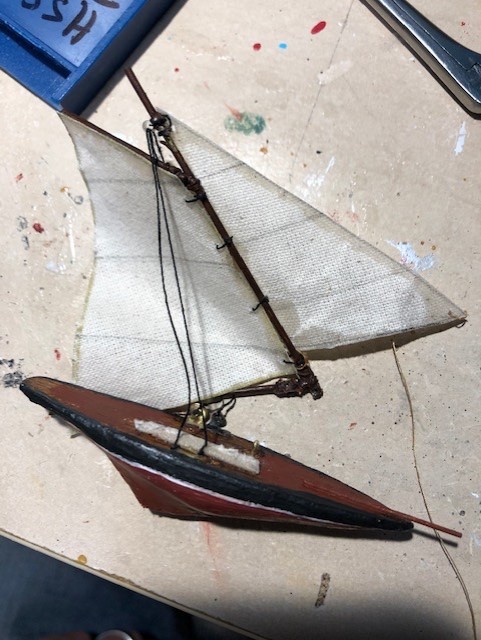
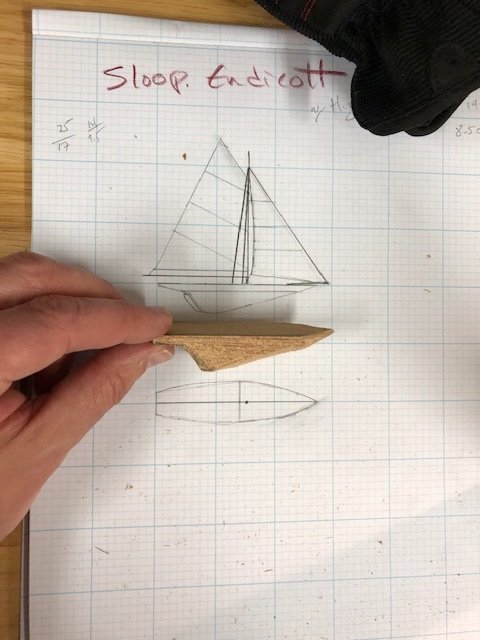
The family and I had the opportunity to stay in a beautiful Cape Cod rental this summer. We'd been to the cape many times, but this time was the best. The condo was decorated with wonderful Cape decor. Apart from the tide clock, my favorite was a pond boat mounted way up on the wall, just below a clerestory window. In my mind this boat was the embodiment of our stay there; the perfect totem! On the first night, I knew that i would eventually make a SIB for this one. You can imagine my happy surprise when this suggestion was met with great enthusiam from the entire family! In my ongoing - and futile- quest for perfect SIB execution, i was particularly drawn to this project: A simple sloop with two shrouds, crisp colors, and a few accents on the deck. The key to this one was not to be in a complicated construction , but rather in a careful and faithful build to best pay tribute to this inspiring image. Spoiler alert: i came close! I started with a hull blank - i didnt try and make the saggital cuts. The wood i have are some nice scraps form the lumber yard, but I'l have to pay attention and get some finer-grained wood for the future. I spent a lot of time working on those graceful curves and bends. Lots of time with the mini belt sander, dremel, and hand sanding of course. This is as good as it was going to get. I played around with stains, but this wood was not fine enough, and i needed some really glossy. Ultimately I chose a Testors oil based enamel. Yeah, not sure why i started with the classic 'two post on a base' concept. But i did, and even drilled two terrible holes in the keel of the boat. Later i came to my senses and made a mini cradle. The mast is a 3/64" brass rod. A cord end at the base of the mast will serve as part of the folding mechanism for the launch. Keeping it austere. Next: trying to bring it home!

-
Ha! Thanks Patrick. Quite the opposite. Looking forward to the next Luxury Yacht!
-
Thanks Moab! Ships in Bottle are very satisfying. I like how in a few weeks I can be done with it, and either stare at it on the shelf, or give it a away as a gift(!) , or even scrap it if necessary (although i've never done the last!). By the time i'm finishing one, I'm already thinking about the next. It suits my temperment well. Probably a very different process than with the big ships most of you make. the sander was a gift from my brother Harry; it is not branded or labeled, and according to my search on the web appears to be a no-name product from Hong Kong. If you look up mini belt sander or polisher you will see it. it works veyr well to grind and sand down the small hull blank from very crude to less crude. Then I use a dremel for finer touches. By the way, if you decide to make a SIB, I would consider starting with a kit or two: There are the Japanese (imai, woody joe), italian(amati) , Dutch (authentic models), and American (woodcrafters and more) brand kits. I way prefer the Japanese and the italian kits. After a few, it gives you a good idea of what you can do. Thanks again, -Josh

-
Thank you Mike! Much appreciated!
-
Thanks Mark! Yes, the greatest pleasure I get is in the planning and building - how it comes out is just gravy!
-
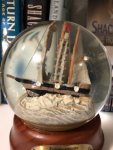
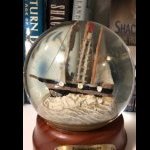
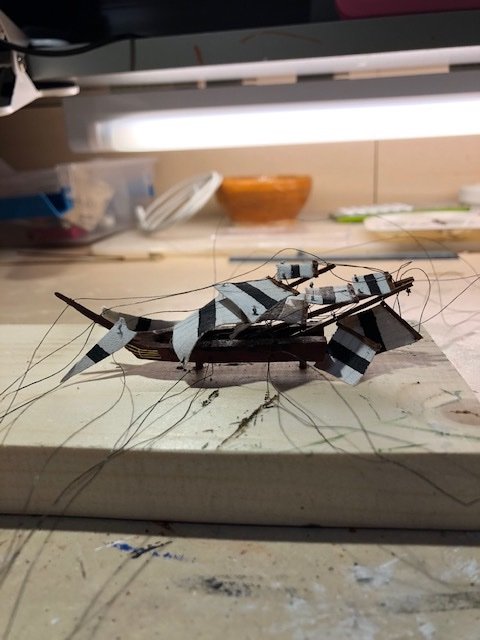
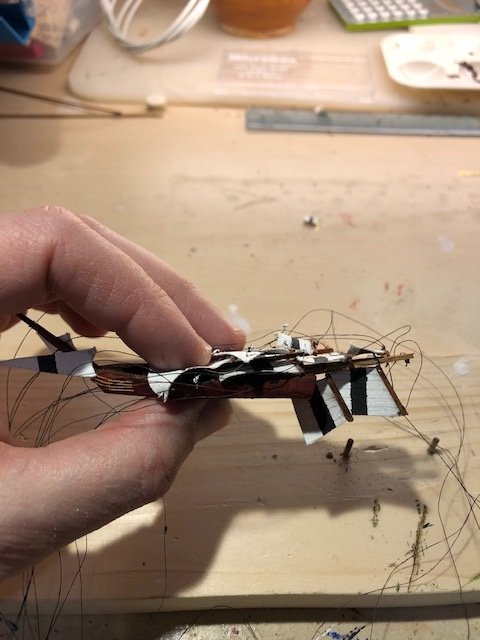
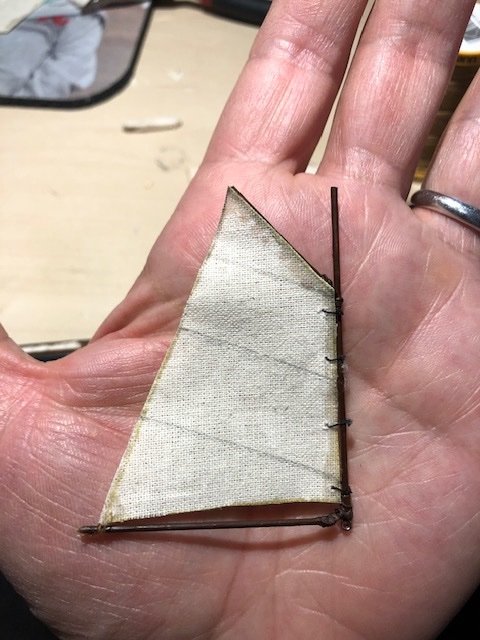
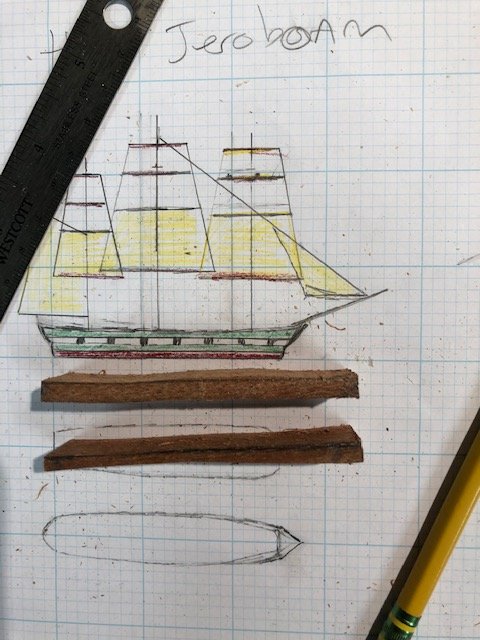
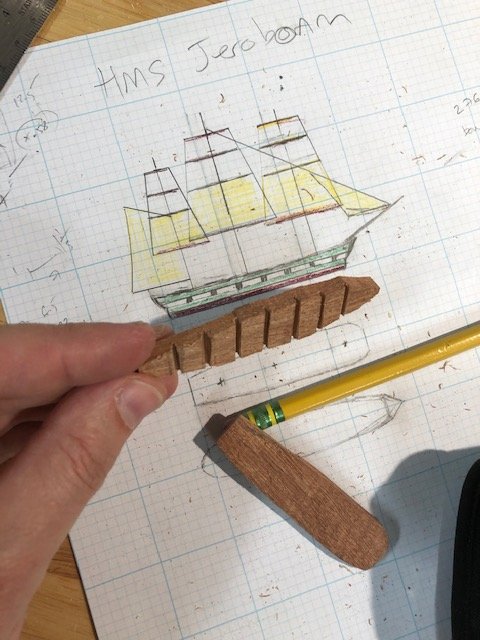
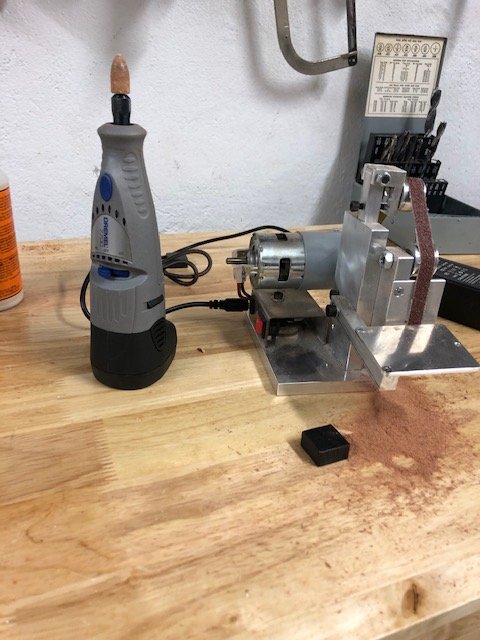
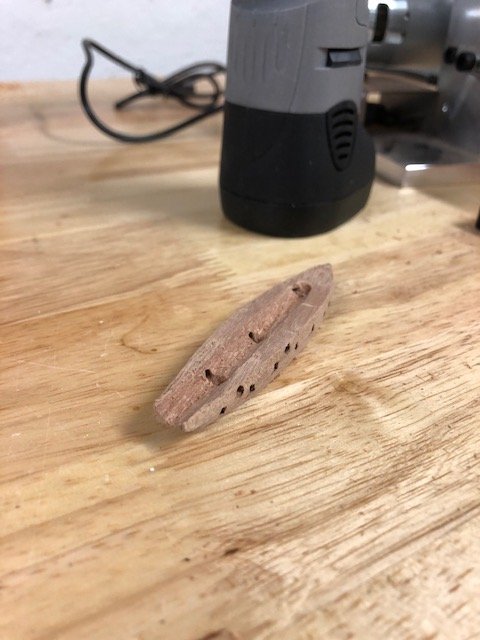
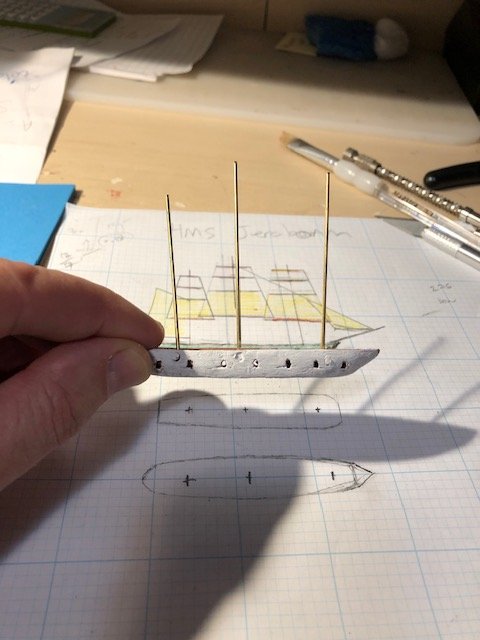
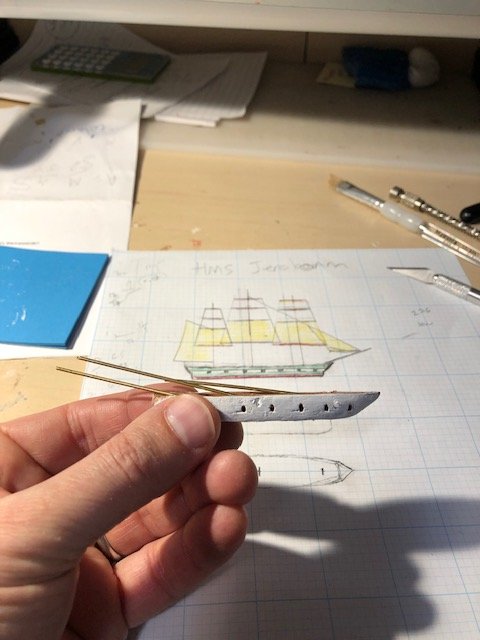
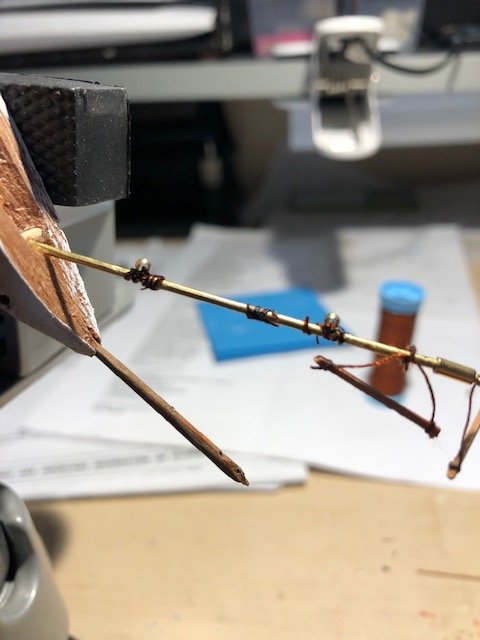
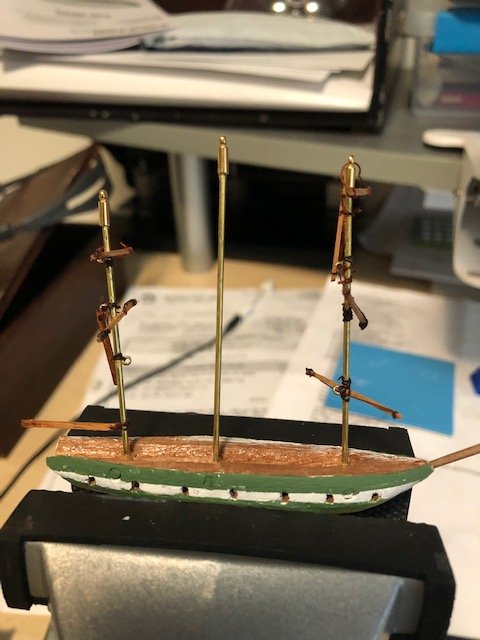
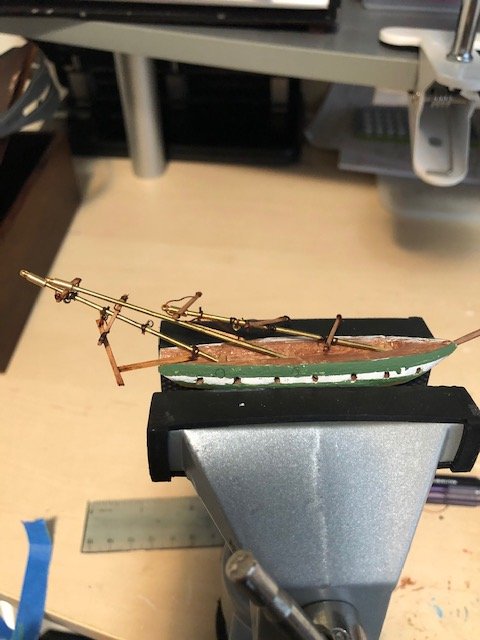
I wanted to work on skills for a square rigged SIB, which I think is more of a challenge than fore & aft rigged. The story of the Jeroboam in Moby Dick was one I liked, with weird ship qurantines and doomy prophecies. I also like building fictional ships in bottles; as if i've captured part of the mystery. I found no illustration of the actual fictional Jeroboam, so I looked for Nantucket or New England Whaling ships from the first half pf the 19 the century. This painting by Salvatore Colacicco really caught my eye, and I used it as my muse! I especially liked how only the lower topsails were unfurled - would make it easier for my job! For anyone reading, I need to break the news to you now, that the ship in the bottle (as usual) did NOT come out a crisp and neat as I (always) had hoped. Ans If you dont like wonky SIB, then read no further, but please enjoy S Colacicco's beautiful oil painting!! 🤔 ----------- I picked a bottle of Tullamore Dew for its broad, square shape; it seemed a good fit! sagital cuts for better shapping of the hull Used a table top jig saw to cut athwart for the gun ports. The three holed are for the mast axles ( to be painted over later). Love the mini belt sander - a gift from big bother Harry! My new thing: A longitudinal trench in which the folded masts lay. Primed, and with three brass masts, of pleasing proportion. They fold back nicely. For me the biggest challenge with square rigged SIBs, is how to have the yards turn for the folding. I still havent figured it out completely, but am experimenting with tiny beads, lashed to the back of the masts. With bead caps at the top and a coat of paint. Folding back well with the bare rigging. Kind of where she begins to fall apart. I need to find new sail material - this satin frays and shrinks way too much. The furled upper topsails and top gallant sails did not stay neatly furled. For the standing rigging I used organic thread which takes CA better. For the running rigging I used nylon - not a bad idea, but I didnt plan out the running rigging as well as I will next time! Until the sails were up, it was hard to predict which would need to be tugged pulled aft or fore. Cord end caps were added onto the deck for pass-throughs for all the runningn rigging. It got to be quite a traffic jam of line. At first I labekled the 30 or so lines with taped paper and number - but it didnt work well. Then I tried color coding, eg yellow- green - yellow. Cute idea, but needs to be done better. Also, need fewer lines next time. A simple base in the bottle - not a stand and no silicone sea. She launches quite gracefully! Oh Brother! Fast forward, and afterabout 3 hours later of glueing, and snipping, and snapping, and pulling.... All in all, I learned a lot, and she looks well enough to the casual observer, but I still wished she came out a bit closer to perfection.. Hmmm... Maybe its like the whale the Pequod was chasing? Thanks for viewing!
.jpg.f1fdd7d5c0cb56b35da8cc2a41becf23.jpg)


-
Thank you Mike, Kevin, and Mark! It came out better than i had expected, that's for sure. I gave it to Caroline and the entire nursing team loves it! While I'm getting pretty good at salvaging my launch disasters, I just wish i didn't have so much practice!😱
-
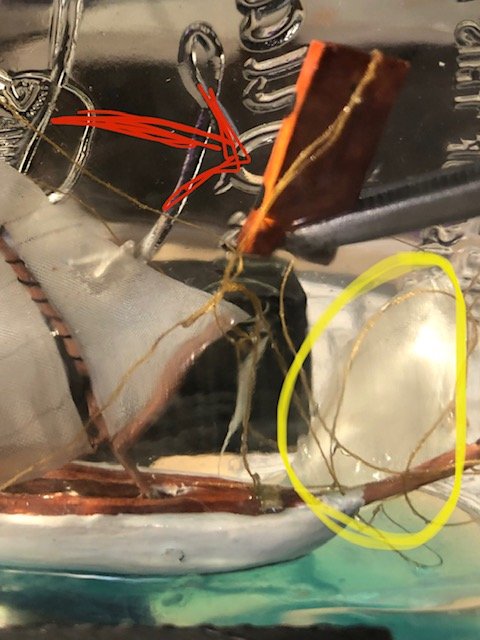
Part Three: The End! So the launch itself went fine, the masts collapsed, and all the rigging folded in well enough. The problem was that I didnt ensure that the hull was fixed well enough to the lucite base inside the bottle. I used CA, but I guess not enough. And as this impatient SIB builder got exciited to complete the project, I rushed the process, and poured in the silicone sea too soon. I think part of me was foolishly hoping that the curing of the silicone would be enough of a fix for the hull. Well, something weird was happening in that bottle, because neither the CA was setting, nor was the silicone. Typically the silicone will cure after 24 hours, but by day 7, it was still a loose, gloppy mess. And all of my fussing had ensured only one thing - that the entire ship was coated with a thin, slimey coat of uncured aquamarine dyed silicone gel. Most all of the running rigging was covered, as was the jib, and that stupid fore deckhouse! Yellow arrow is the slimed up jib, red arrow is the deck house. Everything is a wet tangled mess, and I dont have the one thing I need to easily fix it: A hull properly fixed to the bottom! Red arrow: deck house in pincers, yellow circle: A sad tangle of jellied rigging. I didnt want to toss it into the scrap heap, or break the bottle, or extract the ship. So I decided to try to make it work with 11" alligator forceps and a lot of hope. My CA had been rendered useless by the miasma within that bottle. Neither did Bondic plastic welding work - too far from the UV source. But what did work was Sil-Poxy silicone epoxy! I was able to slowly, joint by joint, afix each yard and mast with the silicone adhesive. This part of the work was the worst, and I was not in the mood to take pictures. Most of the five yards were rendered functionally untethered by this entire process, so I needed to make new running rigging and attach them from within, creating the tension required for snappy sails. In the absense of a fixed hull, I did figure to pull the ship towards the bottle, and use that as an anchor point. Eventually, I was able to get the masts and yards in place, all the rigging just so, and the deck house in place. The deck house I had to snip off of the line from the fore mast yard arm - it was a bad idea to begin with. What remained was an interesting build: The ship was now in full sail, but unfixed, and able to glide a bit atop the uncured silicone goop. Fore and aft. Here is a video: IMG_4402.mov Was defintiely not my intention, but still kind of cool. Of course theinside of the bottle got all mucked up with all the commotion I had been stirring up. I cleaned the glass as best I could with goo gone, and did the requisite touch ups with paint over the epoxy. Here she sits on her custom stand. I will order the brass plaque and present her to the real Caroline soon! Thank you for reading! EOM!