-
Posts
111 -
Joined
-
Last visited
Recent Profile Visitors
-
 SigEp Ziggy reacted to a post in a topic:
USS Constitution by MikeU48 - Revell - 1:96 - PLASTIC - with sails
-
 SigEp Ziggy reacted to a post in a topic:
USS Constitution by MikeU48 - Revell - 1:96 - PLASTIC - with sails
-
 SigEp Ziggy reacted to a post in a topic:
USS Constitution by MikeU48 - Revell - 1:96 - PLASTIC - with sails
-
 SigEp Ziggy reacted to a post in a topic:
USS Constitution by MikeU48 - Revell - 1:96 - PLASTIC - with sails
-
 SigEp Ziggy reacted to a post in a topic:
USS Constitution by MikeU48 - Revell - 1:96 - PLASTIC - with sails
-
 SigEp Ziggy reacted to a post in a topic:
USS Constitution by MikeU48 - Revell - 1:96 - PLASTIC - with sails
-
 SigEp Ziggy reacted to a post in a topic:
USS Constitution by MikeU48 - Revell - 1:96 - PLASTIC - with sails
-
 SigEp Ziggy reacted to a post in a topic:
USS Constitution by MikeU48 - Revell - 1:96 - PLASTIC - with sails
-
 SigEp Ziggy reacted to a post in a topic:
USS Constitution by MikeU48 - Revell - 1:96 - PLASTIC - with sails
-
 SigEp Ziggy reacted to a post in a topic:
USS Constitution by MikeU48 - Revell - 1:96 - PLASTIC - with sails
-
Looks nice!! You made a lot of progress. One thing to mention when you start installing items to the spar deck. I'd recommend not installing parts 51-54 (step 12) around the hole for the Fore Mast as well as parts 65 and 66 (step 12) that are by the main mast. These pinrails (to keep it simple) are there to secure rigging way down the road and they will make attaching eyebolts and deadeyes to holes in the spar deck very difficult. You may want to check the holes around the fore mast opening where the eyebolts attach (Shown in the second rigging manual) to make sure the eyebolts will fit because of the paint in this area. I like to read ahead of myself many many times in the instructions but this was one thing I missed along the way. After you attach the necessary eyebolts and rigging to these areas then it's time to glue the above mentioned parts on the spar deck.....in my humble opinion. Keep up the good work.
- 35 replies
-
- constitution
- revell
-
(and 1 more)
Tagged with:
-
OK...this is better BOB...I have an older brother named.... My dad had him practice writing his name forwards and backwards. Took him awhile to figure it out....rotflmao. Have a nice night and nice to meet you Bob.
- 35 replies
-
- constitution
- revell
-
(and 1 more)
Tagged with:
-
WOW!! I like your decks. You did a great job on them Daddy (ya gotta put your first name up here guy...I feel funny calling you Daddy...lol) I like the different shades of wood. Keep up the good work and yes....take your time...lol Mike
- 35 replies
-
- constitution
- revell
-
(and 1 more)
Tagged with:
-
You can really use any scrap material you have (maybe some of the wood scraps from your wood veneer deck sheets) Just make sure it doesn't elevate the carriage especially on the spar deck where the front of the cannon carriage fits on pins at the gun port opening.
- 35 replies
-
- constitution
- revell
-
(and 1 more)
Tagged with:
-
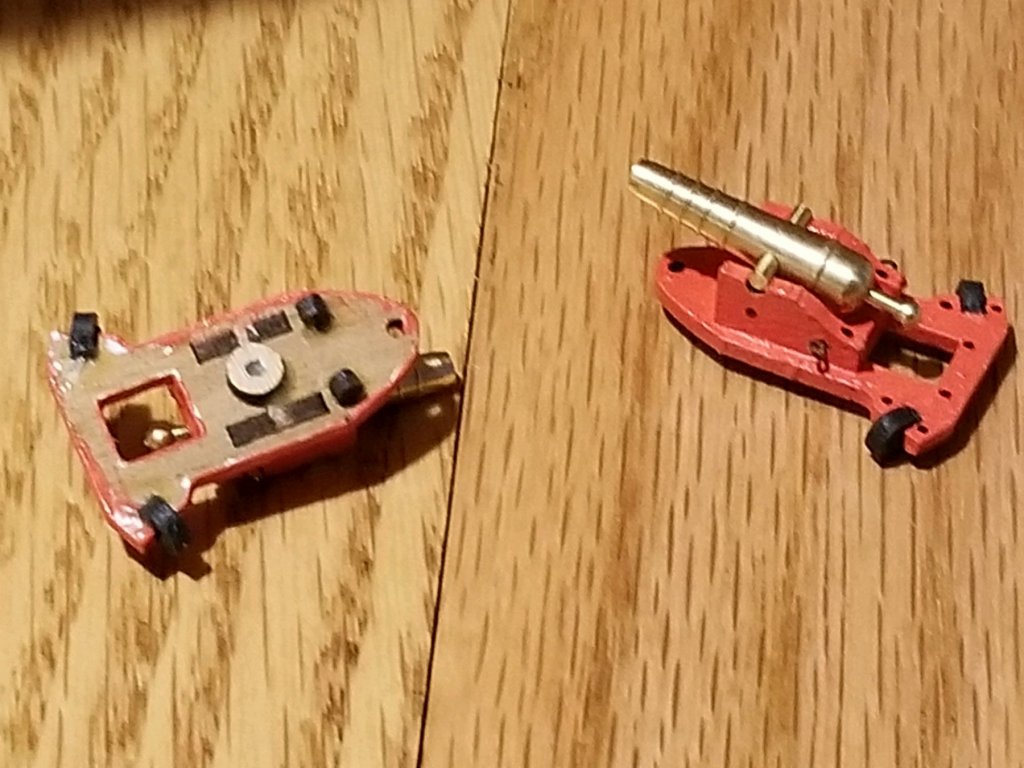
Looks Super !!! One thing to be aware of with the satin finish...you may need to scuff up the area under the cannon carriages when you glue them to the deck. Otherwise the glue may not hold. Especially important on the lower gun deck because once the upper spar deck is installed it's a real challenge to put the cannon back where it belongs. Trust me I know. I just used liquid plastic cement (several coats) but still several cannons broke loose from the glue joints. I used plastic carriages on the gun deck as they would not be seen. On the spar deck I used the wooden carriages from HisModel. I glued spare wheels under the carriage so I would have a glue spot. I ruff up the area under the spare wheel on the deck and used Titebond wood glue professional strength that I got at the local hardware store. Here's the spare wheel glued under the carriage for the spar deck.
- 35 replies
-
- constitution
- revell
-
(and 1 more)
Tagged with:
-
Hey Ozark, Nice to see you back. I'm enjoying the pics of your build and you're doing a great job. That tiny scroll painting drove me crazy and crossed eyed as well even with the mag headset. Anyone who criticizes your work I'd just say..."So show me yours"...lol Keep up the good work. I'd contact Syren about the beeswax for their threads. I have just started rigging blocks on the bowsprit (off the ship) and am using the stock thread that came in the kit for blocks and deadeyes. I have started using a safety pin to open up the holes to make it easier later. When I tie the threads I use CA on the knots because they don't hold that well without it and I don't want them coming loose when I start the actual rigging. I know it's hard sometimes to get a clean cut on the threads with scissors and the beeswax helps get a clean cut. Let us know what Syen says about the beeswax.
- 49 replies
-
- constitution
- revell
-
(and 1 more)
Tagged with:
-
Hey Daddytotwo, Thought I'd drop by and pull up a chair. Nice paint job and I like the three pedestals and the red strip (I only used two pedestals i mean...not stripes) Just one thought at this point. Consider replacing the wood base now as it will be much easier to handle compared to trying to do it once your Connie is finished. You can always cover the wood to protect it during construction. Just a thought and I'm full of them ....among other things...lol What after market upgrades have you bought? Looking forward to following your progress. Mike
- 35 replies
-
- constitution
- revell
-
(and 1 more)
Tagged with:
-
 MikeU48 reacted to a post in a topic:
USS Constitution by daddytotwo - Revell - 1:96 - PLASTIC - Here we go again!!!
-
Hey Daddytotwo, Thanks for the compliment. Tell Radimir at HisModels in the Czeck Republic I said HI!!! I'm headed over to your build now and I'll pull up at chair. Anxious to see your build and progress along the way. Got any Dr. Pepper and Pretzels??? lol
- 209 replies
-
- constitution
- revell
-
(and 1 more)
Tagged with:
-
Hey Lou, Thanks as always for the reply. I may have gotten to wordy on the rigging subject. I will contact Revell but I have to email Germany and it seems according to there website that the US service Dept. is closed for revamping. I'll try to make my long story short. In the Revell instructions for the Connie there is a symbol used for option parts. This is the case with several sections of the running rigging. As I understand it the build can be done with just the running rigging or with the running rigging necessary for sails. Some areas of the Rigging Only option are included with the sails option as I see repetitive steps for both. The rigging only option is just more extensive. I hope I cleared that up a little.
- 209 replies
-
- constitution
- revell
-
(and 1 more)
Tagged with:
-
Nirvana, LOL...That's what I told Lou after his suggestion to visit the Ebay site. So far, and I THINK I'm done I've purchased Oak Veneer decks (Gun and Spar) Brass cannons for Gun and Spar deck with their carriages, 25 piece cloth sail kits (12 piece studding sail kit in the mail) Cloth flags Depth marker decals metal eyebolts and a partridge in a pear tree,,,,, So far sell my plasma has kept me from bankruptcy and sell my home.... he he he
- 209 replies
-
- constitution
- revell
-
(and 1 more)
Tagged with:
-
Nirvana, HisModel has expanded his web site to show all the accessories available for the 1/96 scale Connie. https://www.hismodel.com/uss-constitution-united-states-revell-1-96?PaggingValues=5%3A24%3A1%3B&_TargetFile=uss-constitution-united-states-revell-1-96
- 209 replies
-
- constitution
- revell
-
(and 1 more)
Tagged with:
-
I'm sorry... I forgot two other questions Is there an easy way to attach the stock plastic deadeyes to the bowsprit (no eyebolts just wrapped around bowsprit) as well as attaching the deadeyes to eyebolts? Instructions don't really cover it. I assume I just have to tie a knot the glue it to the deadeye then do the same to the eyebolt. On the bowsprit the assumption it to again tie the thread to the deadeye wrap it around the bowsprit then glue the wrapped thread on the bowsprit (to hold it in position on the bowsprit) the tie the other end of the thread to the last deadeye on the bowsprit but I know what assuming can mean. Also should the holes on the blocks be "expanded" before they are rigged? One of my only memories of building this model 40 years ago is using a heated safely pin to open the blocks up so I could get the various size threads through the blocks. It will be easier to do while they are on the plastic tree. Thanks guys in advance as always.
- 209 replies
-
- constitution
- revell
-
(and 1 more)
Tagged with:
-
OK folks.... A couple of "uninformed" questions. Remember...I'm a NOVICE here picking my way thru an "interesting" build. I also ask this for other novices following behind me. All the build logs I have seen are what I consider as Master Builders that take this plastic model any create their own masterpiece with a millions custom parts. 1. Is it necessary to glue the three mast to the spar- gun deck? Reason for the question is that I and installing as much as I can with the masts off the deck. Easier to install the standing rigging (most of it) when it's not inserted to the ship. I'm also thinking that the Standing and running rigging will hold them in place anyway. Remember these questions are coming from a NOVICE so be KIND in your replies...lol 2. After reading the Rigging instructions a bazillion times I think I am understanding them a little better. Backstay and forestays now make sense Lou. Question: I will be building the Connie with sails including the studding sails. The rigging instruction (booklet #2) starts out with the standing rigging rat lines, bowsprit rigging, forestay then backstay rigging. Then it proceeds to optional steps 13-18 Running rigging. That is followed by another optional section, running rigging- steps 19-26. Then we come to Optional steps 27-33 Running rigging with sails followed ,(last but not least) Optional steps 34-41 Running rigging with sails. I took the long way around the question but if I am going to install the sails I just eliminate steps 13 thru 26. I hope this makes sense...Again be kind in your replies as I cry easily...rotflmao.....
- 209 replies
-
- constitution
- revell
-
(and 1 more)
Tagged with:
-
Just a few comments on the instructions for the 1/96 scale plastic Revell Connie for the novices like me. Step 12 of the basic ship construction shows the fife pinrails, fore fiferail , monkey rail and main fiferail all to be installed on the spar deck around the Fore and Main Mast. Doing so this early in the construction, in my humble novice opinion, will obstruct installing eyebolts and eyebolt/deadeyes that are described in the second set of instuctions (Rigging). It would be easier to wait until eyebolt and eyebolt/deadeyes are connected to the spar deck and then glue (and surround) the rigging eyebolts. I wasn't so fortunate to realize this error until the forementioned Fiferails, etc. were glued to the spar deck. Any deadeyes connected to eyebolts will be mated before the eyebolt is glued to the deck. Live and learn I guess...lol Also, for the Novice, I have found reverse tweezers are really the go to tool, in so many instances, when working with tiny parts, threads etc.
- 209 replies
-
- constitution
- revell
-
(and 1 more)
Tagged with:
-
Thanks Ozark. I always start any work on the Port side as that will be the back of the Connie when its in its case. That way I can learn from my mistakes before I do the Starboard side. It just took time and patience using a toothpick to help wrap the thread around the stanchions. You just can't pull the thread too tight. I found the gluing the thread on each Stanchion as I went helped keep it from unraveling as I went. I also used a small round file to open up the eyebolts at each end. I also glue the knots on the eyebolts as the waxed thread doesn't hold a knot too well and the last thing I want is for the thread to come loose when I start the rigging. Low, Thanks for your tips, as always. I haven't built anything of this complexity in 40 years. I will do the blocks on the bowsprit BEFORE I glue the bowsprit into the ship. I think it will be easier to maneuver. Same with the Standing rigging for the masts.
- 209 replies
-
- constitution
- revell
-
(and 1 more)
Tagged with:
About us
Modelshipworld - Advancing Ship Modeling through Research
SSL Secured
Your security is important for us so this Website is SSL-Secured
NRG Mailing Address
Nautical Research Guild
237 South Lincoln Street
Westmont IL, 60559-1917
Model Ship World ® and the MSW logo are Registered Trademarks, and belong to the Nautical Research Guild (United States Patent and Trademark Office: No. 6,929,264 & No. 6,929,274, registered Dec. 20, 2022)
Helpful Links
About the NRG
If you enjoy building ship models that are historically accurate as well as beautiful, then The Nautical Research Guild (NRG) is just right for you.
The Guild is a non-profit educational organization whose mission is to “Advance Ship Modeling Through Research”. We provide support to our members in their efforts to raise the quality of their model ships.
The Nautical Research Guild has published our world-renowned quarterly magazine, The Nautical Research Journal, since 1955. The pages of the Journal are full of articles by accomplished ship modelers who show you how they create those exquisite details on their models, and by maritime historians who show you the correct details to build. The Journal is available in both print and digital editions. Go to the NRG web site (www.thenrg.org) to download a complimentary digital copy of the Journal. The NRG also publishes plan sets, books and compilations of back issues of the Journal and the former Ships in Scale and Model Ship Builder magazines.


