BANYAN
-
Posts
5,530 -
Joined
-
Last visited
Content Type
Profiles
Forums
Gallery
Events
Everything posted by BANYAN
-
Hi from Melbourne Alex. Welcome aboard and let me also say what a beautiful model you are building. I am also interested in ships of this era so will follow you build with some interest. cheers Pat
-
 Ditto Rick's comments; that ocean looks great even before you planned additional work Rob. cheers Pat
 -
Great news Keith, I am happy to hear of Maggie's recovery; that will also be a great weight off your mind. cheers Pat
-
Very nice work and level of detail in those 3D printed funnels Greg. Looks really nice. cheers Pat
-
Thanks Jerry, it produces a great result, super clean finish. cheers Pat
- 524 replies
-
- 1
-

-
- sloop of war
- constellation
- (and 9 more)
-
Those laser cut 'ironwork' pieces look very authentic Chuck, that is so nicely done. cheers Pat
- 777 replies
-
- 5
-
-
- speedwell
- syren speedwell
- (and 1 more)
-
She is looking great, very nicely presented Ian. cheers Pat
- 502 replies
-
- 4
-

-
-
- Quadrireme
- radio
- (and 1 more)
-
I agree Greg. I am sure the old salts also had some apprehension with the introduction of plastic kits, or manufactured brass parts? cheers Pat
-
Sorry to hear this news Keith; my thoughts are with you. I hope Maggie has a full recovery. cheers Pat
-
Nice prints Jerry; I may have missed this, but what material are you using (resin/filament)? cheers Pat
- 524 replies
-
- 1
-
-
- sloop of war
- constellation
- (and 9 more)
-
And note the warm clothing in the MIDDLE of SUMMER - yikes. It has been one of those seasons down this a-way. BTW, nice carving Steven. cheers Pat
-
how to secure a rope hank to the sheer poles?
BANYAN replied to paul ron's topic in Masting, rigging and sails
Paul, if lines were bent to the sheer poles, this would probably have been done using the tails of the line. The excess would first have been made up into coils, a length of the tail end then wrapped around the coils on their upper end, forming a sort of eye, through which the tail will have been passed. The length of the tail will have been long enough to form at least a clove hitch by which to bend it to the pole, but probably a little more to allow a constrictor hitch, or safety turns in addition to a clove hitch. However, if carelessly/haphazardly bent to the pole, this could also have led to several of these made-up coils dangling and swinging freely if the pole was fitted much higher than the cap/roughtree rail. This would have imposed a significant hazard for the crew when stepping into the ratlines? This could be somewhat mitigated by bending them onto, or even around the shroud, near where the poles crossed them, leaving the parts between the shrouds clear to access/step-on? Hope this helps? cheers Pat -
I would hardly say 'suffering through the build' Glen; I have enjoyed every second of it; especially when you keep building these interesting and well executed projects. cheers Pat
- 174 replies
-
- 4
-
-
- Waa Kaulua
- bottle
- (and 1 more)
-
That is one nice diorama Glen, you may not be a florist but I think you could give Bonsai a fair old shake cheers Pat
- 174 replies
-
- 5
-
-
-
- Waa Kaulua
- bottle
- (and 1 more)
-
You have done a superb job on this model Eberhard; such great detail at the scale you use. I know that term is overly used, but in thios instance well and truly deserving. I have enjoyed the voyage. thanks. Pat
-
A wonderful display Rob, she looks great in her final home. Congratulations on an excellent build. cheers Pat
-
Druxey, at least you recognized them, I was perplexed until the hint given by the more observant FlyingFish. cheers Pat
-
Thanks for the info Eberhard. In hindsight, and as I am working at a larger scale, do you think drafting linen might work?
-
Oh so true! cheers Pat
-
I love this model Steven, especially in her quasi-diorama - a very nicely displayed model. Hopefully you won't accidently catch one of those protruding corners in her new home? cheers Pat
-
Those gripes/sea lashings look so good Eberhard, very nicely done. Now I have something to try and emulate for the Victoria's boats Can I be so bold as to ask for a link to that material for making them? cheers Pat
-
How to "unstick" this chuck from the mill spindle?
BANYAN replied to rlb's topic in Modeling tools and Workshop Equipment
Hi Ron, I have a Sherline mill also. That chuck usually comes with a draw bar (threaded on one end and a bolt type head) that you put in from the top of the spindle assembly. I partially engage the thread of the draw bar into the chuck bore, give it a tap or two with a small rubber mallet (small hammer will work also) which usually disengages the tapered (morse) chuck head. If you don't have the draw bar, putting a metal rod of suitable OD down into the spindle bore and tapping that should also work, BUT put a rag or something under the chuck so that if it dislodges completely, it will fall onto a padded surface and not damage the cross-table or the chuck etc. The rod could be one of the many different bars/rods provided by Sherline, but should be a smaller OD than the bore, but bigger than the internally threaded bore in the top of the chuck (so that you don't drive the bar into this and damage the thread). I hope that resolves the issue for you. cheers Pat -
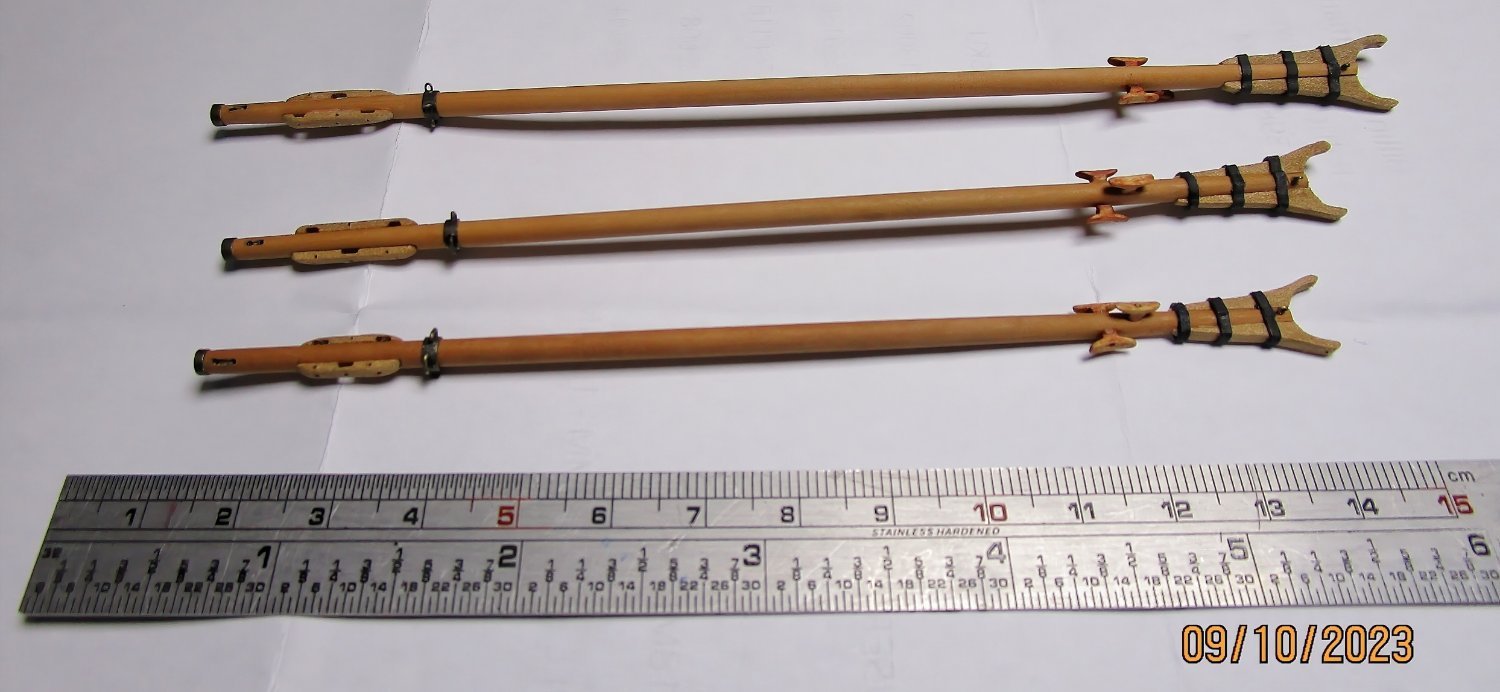
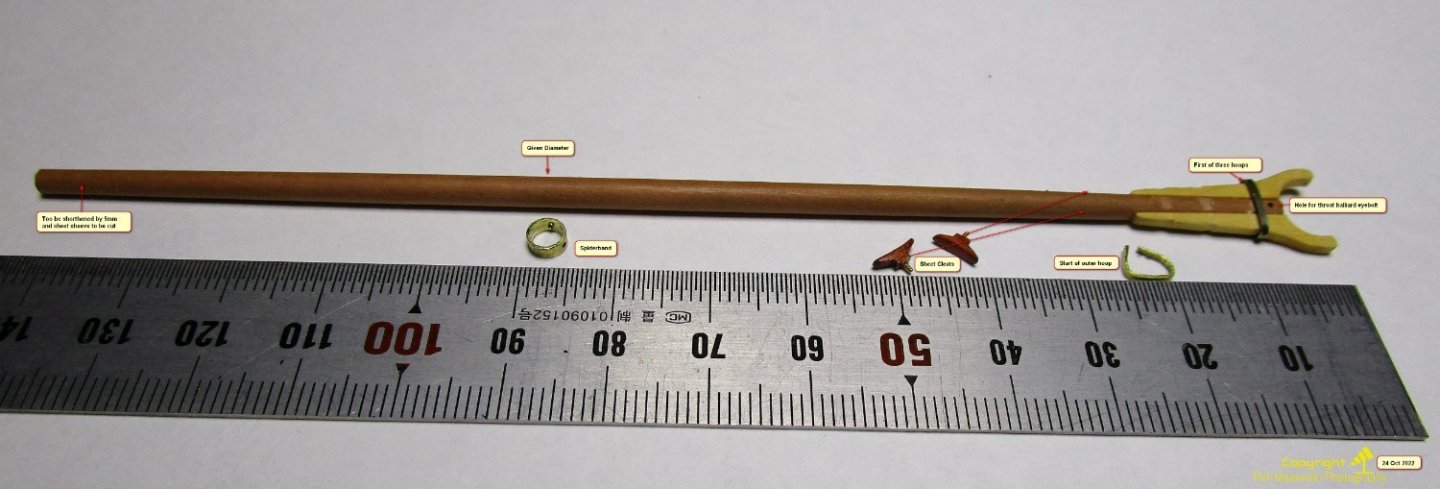
Hi Clovehitch. I had to do these for my build at 1:72 recently. I found I had to use very dense grained wood for any success. My method was to first file flats on either side of the boom inner end. To make the jaws I printed scaled copies of each jaw set as templates l(that is, the jaws as a full integrated piece). I thicknessed the wood to the appropriate thickness, and pasted the paper template onto it; and double sided taped (low tack) a sacrificial thin piece of wood under it to keep a clean cut. I then cut these to the required shape following the outer lines. Once cut, I sliced these in half to get the individual jaw pieces and sanded the centre cut back to the required line (to allow for boom neck thickness and taper. I removed the template but before separating the sacrificial piece away, I drilled holes at the required places to simulate the through bolts (leaving the sacrificial wood in place helps with protecting these thin pieces. I then removed the sacrificial piece and edge glued (two part epoxy for strength) to the flats on the neck being sure to keep them aligned. The following shows my test boom to prove the method and the final results. I hope this helps? The outer reefing combs look slightly large, but at this scale they are quite small and look better scaled to the naked eye. cheers Pat Pat

-
Of so true Tom, a hard act to follow. cheers Pat