-
Posts
5,531 -
Joined
-
Last visited
Content Type
Profiles
Forums
Gallery
Events
Everything posted by BANYAN
-
The other way to overcome the 'leakage' issue (if it is a concern to you) is to use overpressure. That is a mask with a powered inflow that creates an overpressure which keeps any of the nasties getting in if the seal is not tight. I have a battery powered one (the battery container clips to your belt (or the like) and causes very little drain on the batteries. I got this pretty cheap (same price as paying for a good quality unpowered mask) a few years ago. cheers Pat
-

HMCSS Victoria 1855 by Banyan - 1:72
BANYAN replied to BANYAN's topic in - Build logs for subjects built 1851 - 1900
Thanks Mark, not too bad for a test run, but hopefully I can do better yet. Keith, I drew up the parts in CAD to scale (including a test legend) and a railroad modeller who lives in the eastern parts of Melbourne etched them for me. I can pass on his details if you need them? cheers Pat- 973 replies
-
- screw
- gun dispatch vessel
- (and 5 more)
-

HMCSS Victoria 1855 by Banyan - 1:72
BANYAN replied to BANYAN's topic in - Build logs for subjects built 1851 - 1900
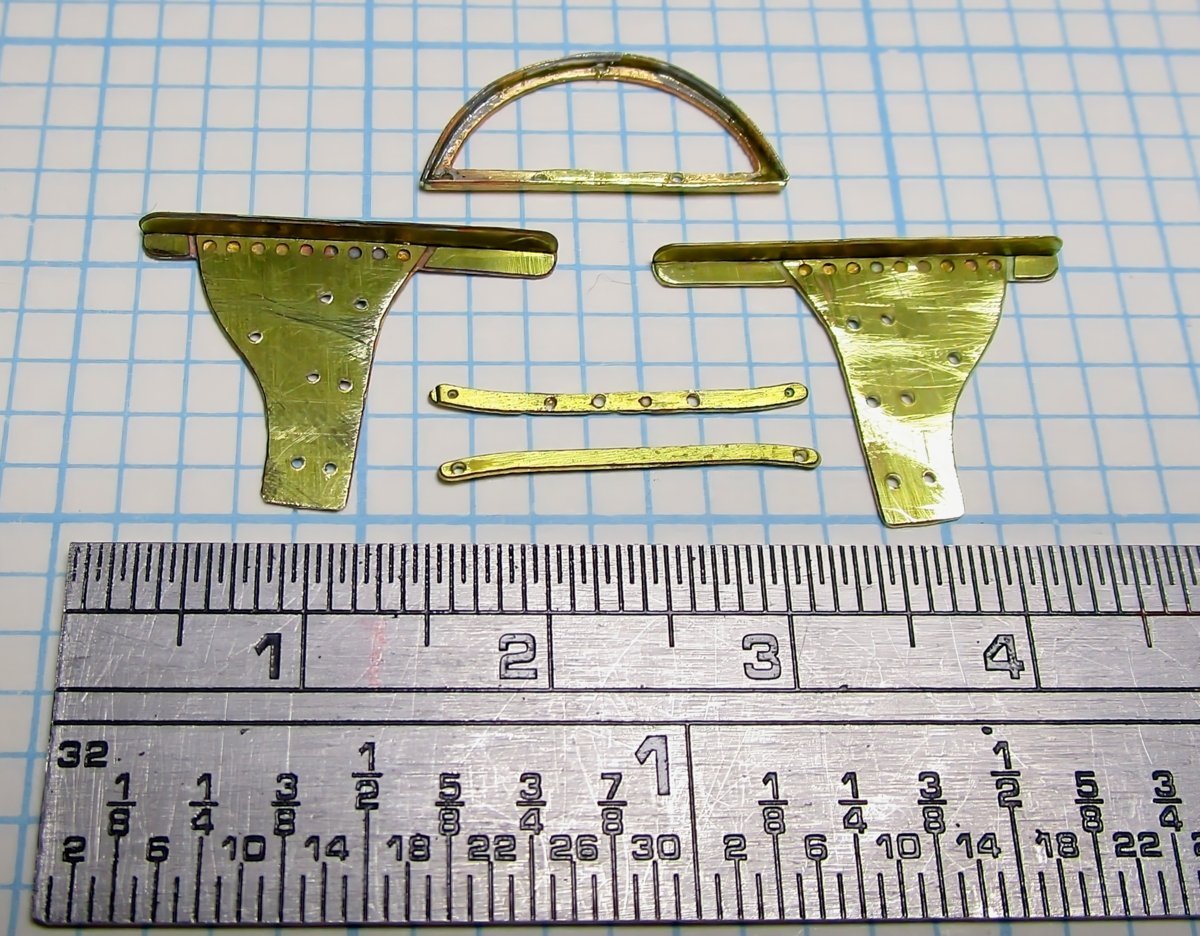
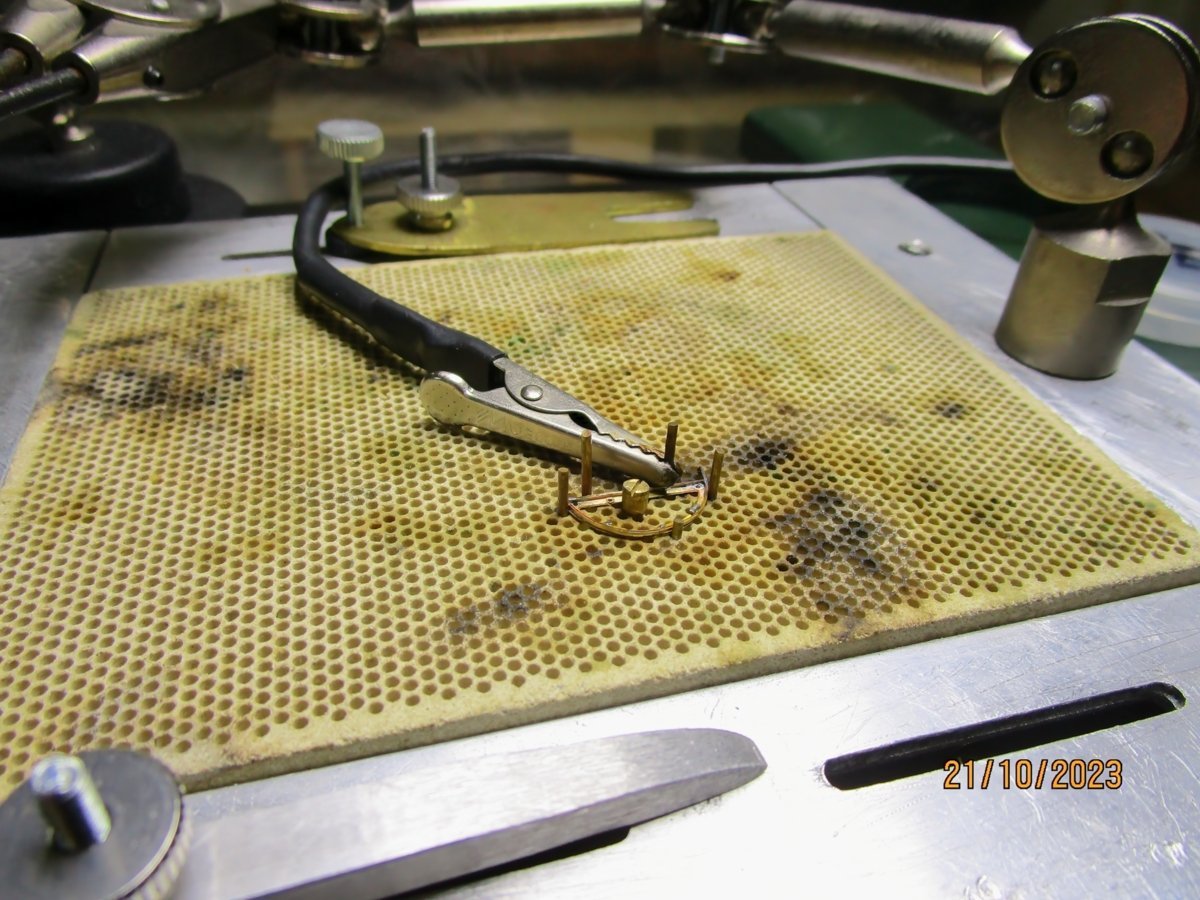
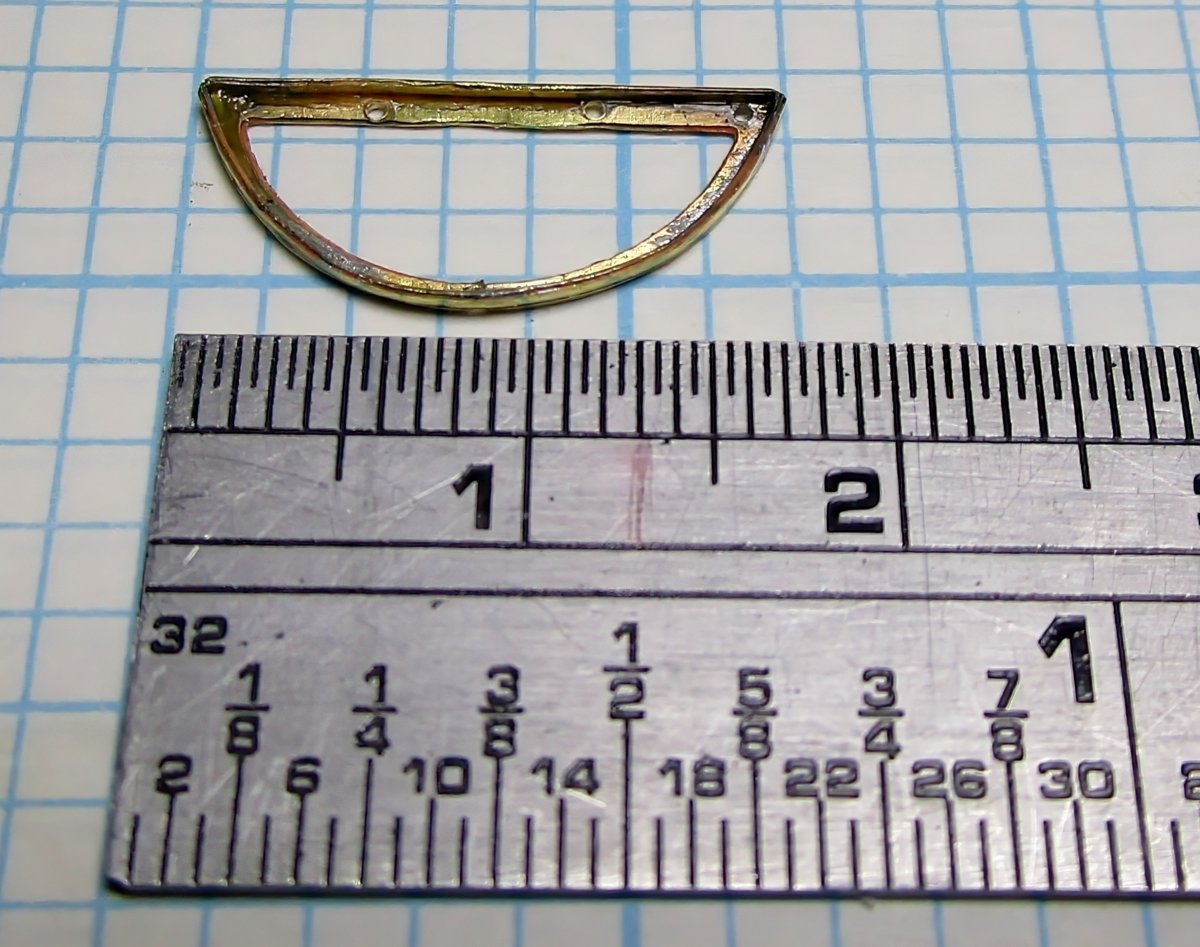
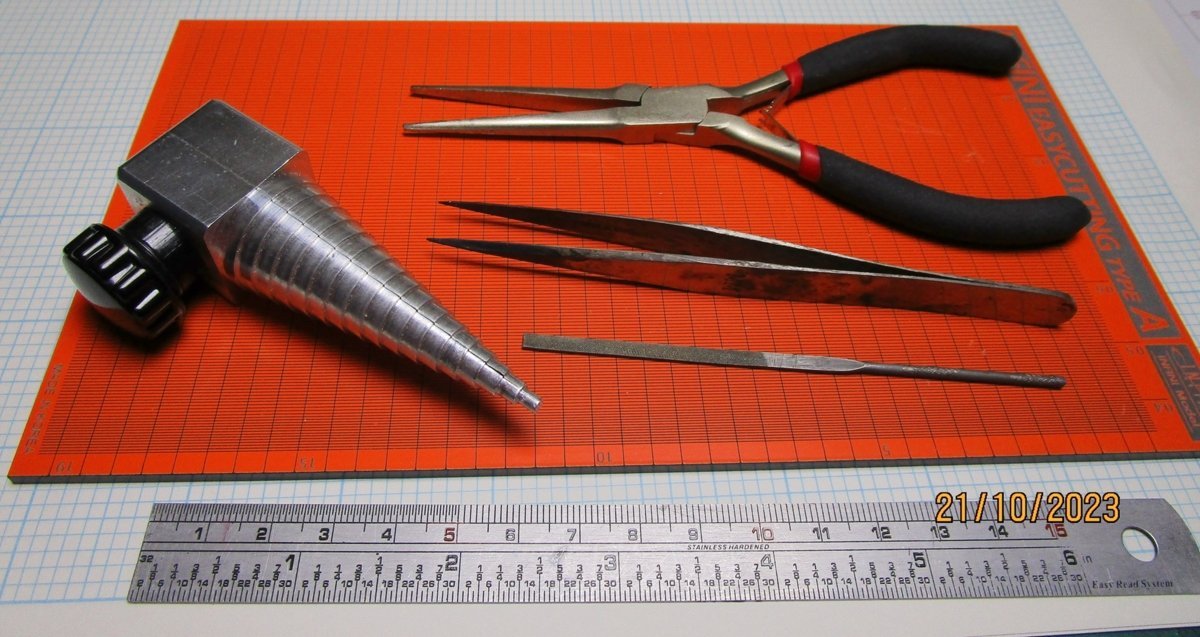
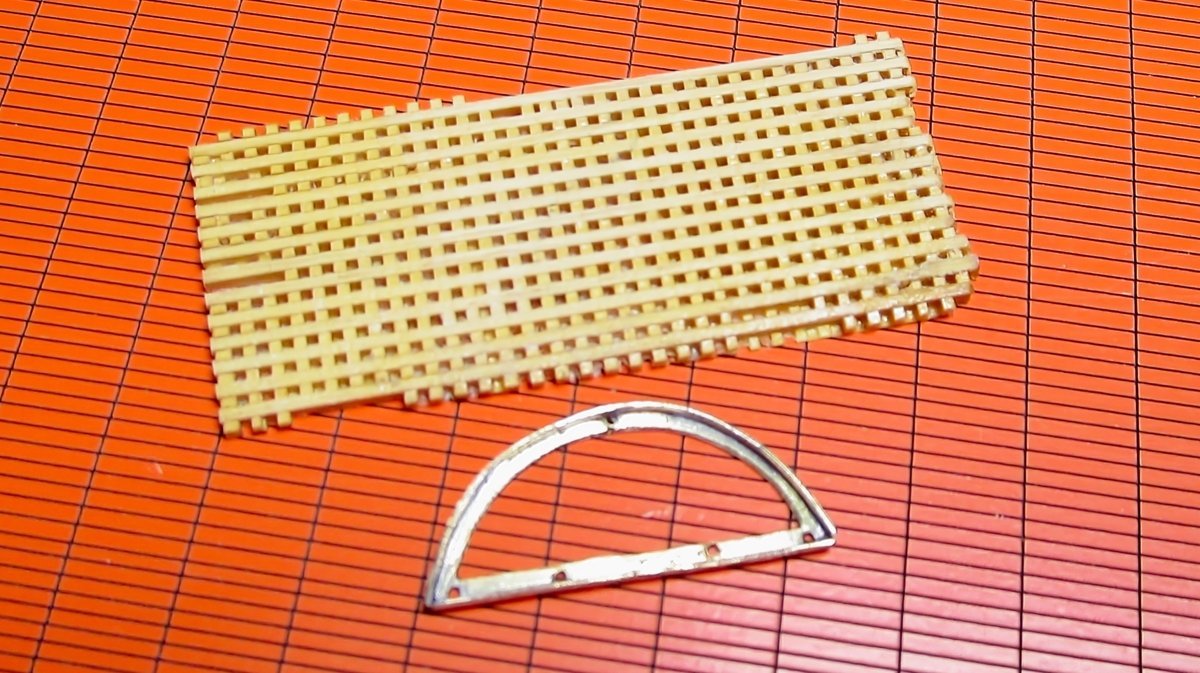
Hi again folks. Some small progress made; well, more experimentation and trials/tests than progress. The Victoria was fitted with skeletal iron tops which when reduced to 1:72 make for some very small and thin parts. My real concern (for the future) apart from blowing them apart when soldering, is that the arms of the cross-trees will bend. I have yet to attach the iron (brass) rod futtock staves which will give them some support (I hope). I drew up the parts and had them photoetched from 0.2mm brass as you can see from the photo. These tests are to see if I can actually solder them. The parts were first folded along fold lines/creases I had etched which sort of worked OK - you have to look closely to see the slights waves/rolls in the parts. I drilled the holes (0.6mm) where needed for the eyes which I will solder into place later. I then had to solder on the curved rim which I formed on the 'wrangler' which you can see in the tools photo - this part is only 1mm high by 0.2mm thick. I put it on my soldering station and held in place with some brass pins and an eccentric cam (thanks Eberhard for the idea and guidance) and soldered with y resistance soldering unit on its lowest setting - and it worked In one photo the part looks very distorted due to the aspect the photo is taken, but in others you can see it is reasonably formed. Next will come the true test, see if the heat sink/paste will work as I solder in the eyes. I'll show the results (hit or miss) in a future post. A club member (Al - AlPays avatar) made the grating for me. They are formed from about 0.6mm combs and staves - how he managed to make it still amazes me. I have yet to form the shape which has me a little bedeviled at the moment as I think shaping by any form of power tool will simply blow these apart. The next task, to solder in the eyes and the other parts together, is to make a wood jig that will hold the elements the right distances apart. cheers Pat PE Parts Parts pre-formed Soldering the rim in place The soldered part (before cleaning up) Tools used The grating (the rim/part looks distorted but is not in reality)- 973 replies
-
- screw
- gun dispatch vessel
- (and 5 more)
-
Well for someone ho doesn't like planking you're doing a pretty decent job of it Steven cheers Pat
- 379 replies
-
Your build of Speedwell is looking very good Chuck, I continue to be amazed (and jealous) with your skills in doing such clean joinery. I hope you don't me commenting with an unsolicited suggestion. I have had success with, and like, your 'paper' friezes that you have provided me in the past and they looked good when applied. If you are experimenting, have you thought about trying to find someone that prints 'embossed' card/paper? If the costs are acceptable, that may be an option for you that offers some 'relief' to the printed friezes. I have never had the need to have this done, but I have thought about using a business card printing service who offers embossed/raised lettering services. I considered this technique for the basic 'gingerbread' on the bows of the Victoria. However, as the detail was minimal, we ended up using cotton threads pasted to the headboards. Offered for your thoughts/comments only as it may also prove unpractical, and you may already have completed your experimenting. cheers Pat
- 780 replies
-
- speedwell
- syren speedwell
-
(and 1 more)
Tagged with:
-
Hi Mike, sorry I missed your build here. That section model looks great- very nicely done., cheers Pat
- 47 replies
-
- Fubbs
- Weasel Works
-
(and 1 more)
Tagged with:
-

HMCSS Victoria 1855 by Banyan - 1:72
BANYAN replied to BANYAN's topic in - Build logs for subjects built 1851 - 1900
Okay, okay I get the hint - I'll see what I can do. Eberhard, I may end up having to do the really small spars such as studding sail booms, and maybe even the gaffs from metal as you have suggested, but painting them to match the wood will be a real challenge. cheers Pat- 973 replies
-
- screw
- gun dispatch vessel
- (and 5 more)
-

HMCSS Victoria 1855 by Banyan - 1:72
BANYAN replied to BANYAN's topic in - Build logs for subjects built 1851 - 1900
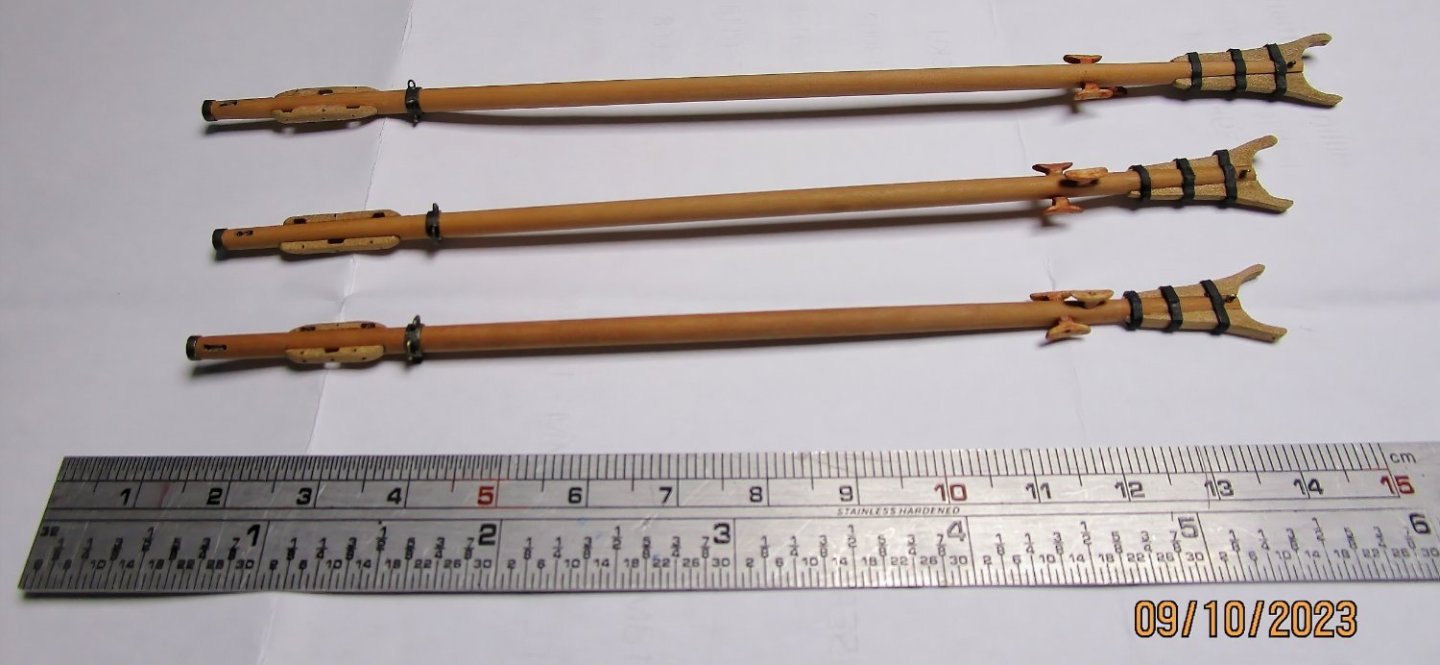
Hi again all. I have been slowly working on the booms since my last update as you can see in the attached photo. I have still to add the parrel ropes and a couple of blocks for the guys, as well as leather the inside of the jaws. The spiderbands and end band are made from thin wall brass with the eyes and ears soldered in, then blackened (as shown in an earlier post). The Jaw bands are black paper card as I need them to conform with the ovoid shape of the jaws and indentations - the thin brass I intended using just would not hold shape properly and gluing them was getting messy. About 3 remakes later.... see the result (acceptable I think). it took a few tries to find a wood that matched the wood I used for the spar proper. The spar is Kaurie, and the furniture Ballarat Pear - the Kaurie kept splitting when trying to use it for the finer detail. I am also still not that happy with the cleats but they are so fiddly to make, and I do not want to use small plastic ones as they will be difficult to paint (to match). I have not put pulleys in the slots of the reefing combs yet; still thinking on how I will do that (to keep them looking realistic). for some reason (camera perspective I think) the jaws look shorter and wider than they actually are. I am now trying to figure out how to make the mast partner wedges/collar. This will be done on the lathe and textured to look like canvas (the individual wedges do not need to be scribed as they will be covered). The problem I am now trying to solve is how to keep the collar horizontal (to fit closely to the deck), with the mast holes at rakes of 5, 10 and 15 degrees for the fore, main and mizen masts respectively. My current plan, which I hope will work, is use some oversize stock (in diameter), drill out the core to the mast diameter, then turn the outer dimension to size. My plan is then to put this in a jig of some sort (still being thought on) to allow me to cut/slice it off at the mast rake angle. Hopefully this will result in a collar that is close fitting at the deck, accepts the mast at the correct angle and will retain a uniform size all around the mast. cheers Pat- 973 replies
-
- screw
- gun dispatch vessel
- (and 5 more)
-
Welcome back Eberhard, have been missing your updates (as if I have been posting ) Those extra details really add to this wonderful model. cheers Pat
-
Hi Allan, to me 'A' looks a bit like the pedestal for a swivel gun (fitted much like they were in HMB Endeavour). The shape looks octagonal, which is right, and the bulk is fitted behind the bulwark which explains the red. But my concerns for this suggestion are that it appears a little deep (long) but then again could be the support/strength they needed; and, I cannot fully reconcile the item at its head, which is similar to that of 'B', - but perhaps these are intended to represent iron rings/hoops driven on to strengthen the top ends? Just a though and bracing for incoming fire cheers pat
-
Thanks for your response Ian; your response highlights that I may not have been as clear as I should in my wording. I think your answer was definitive, but just in case, what I tried to say, was that while two oars are fitted, only one was typically used at time? From your response though I gather that both oars were either united or manned? Just interested cheers Pat
- 502 replies
-
- Quadrireme
- radio
-
(and 1 more)
Tagged with:
-
Coming along well despite the set-backs Ian. An interesting video. One small point, while I am unfamiliar with this period of history, many oar steered vessels only used a single oar at a time. Were these vessels using two? Perhaps a trial with a single oar may offer different effect? cheers Pat
- 502 replies
-
- Quadrireme
- radio
-
(and 1 more)
Tagged with:
-
Well Glen, there is always the 'dancing (Bundy) bears' cheers Pat
- 290 replies
-
- Quinquereme
- Finished
-
(and 1 more)
Tagged with:
-
This is an extraordinary bit of modelling Glen; very nicely executed and presented - and added entertainment in the build log to boot . The sea surface turned out really well, you have a gift for making water look realistic. cheers Pat
- 290 replies
-
- Quinquereme
- Finished
-
(and 1 more)
Tagged with:
-
Love your process and determination to get this right Ian; an interesting log to follow. cheers Pat
- 502 replies
-
- Quadrireme
- radio
-
(and 1 more)
Tagged with:
-
Hi folks, chains were indeed used, but it appears more so in the later wooden ships (replaced the ropes). While written in 1919, Desmond describes these as being in use in 19th century wooden ships, in his "Wooden Ship-Building", page 101: "In wooden vessels these passageways consist of openings cut across outside of frame timbers (these openings are clearly shown on Fig. 212) and as it is necessary to have some method of cleaning out the openings, should dirt fill them, it is usual to either reeve a chain through all openings from bow to stern, leaving the ends in a convenient place for crew to take hold of them, haul chain back and forth and thus clear [the] limber openings of obstructions, or to leave removable boards over the frames and thus by removing a board [the] crew can reach any obstruction in [the] passage and clear it away. The best and most satisfactory method is to use both the chain and loose board. The passage cut along outside of frame timbers is named the limber; the chain that is run through [the] passage is named a limber chain, and the boards placed over opening left between ceiling and keelson are named limber boards." Also, Charles Davis, also writing of ships built in the latter half of the 19th century onward, in "Building a Wooden Ship", 1918, page 96 describes the chain as: LIMBER-CHAIN-a chain running through the gutter or limber along the bottom of a vessel inside the planking, and used to clean out the dirt and free or clear the limber, so that water will drain freely to pump well. As Bob pointed out earlier these were probably made of a non-corroding metal and of light construction. I think another author also describes these, but I have not been able to find that now cheers Pat
-
A very neat solution and beautifully presented SIB diorama Glen. You do realise that you have set a very high bar for yourself now don't you cheers Pat
- 290 replies
-
- Quinquereme
- Finished
-
(and 1 more)
Tagged with:
About us
Modelshipworld - Advancing Ship Modeling through Research
SSL Secured
Your security is important for us so this Website is SSL-Secured
NRG Mailing Address
Nautical Research Guild
237 South Lincoln Street
Westmont IL, 60559-1917
Model Ship World ® and the MSW logo are Registered Trademarks, and belong to the Nautical Research Guild (United States Patent and Trademark Office: No. 6,929,264 & No. 6,929,274, registered Dec. 20, 2022)
Helpful Links
About the NRG
If you enjoy building ship models that are historically accurate as well as beautiful, then The Nautical Research Guild (NRG) is just right for you.
The Guild is a non-profit educational organization whose mission is to “Advance Ship Modeling Through Research”. We provide support to our members in their efforts to raise the quality of their model ships.
The Nautical Research Guild has published our world-renowned quarterly magazine, The Nautical Research Journal, since 1955. The pages of the Journal are full of articles by accomplished ship modelers who show you how they create those exquisite details on their models, and by maritime historians who show you the correct details to build. The Journal is available in both print and digital editions. Go to the NRG web site (www.thenrg.org) to download a complimentary digital copy of the Journal. The NRG also publishes plan sets, books and compilations of back issues of the Journal and the former Ships in Scale and Model Ship Builder magazines.


