

Arjan68
-
Posts
31 -
Joined
-
Last visited

.thumb.jpg.891f66d64fd4486179970eca1dfee43e.jpg)

-
 FrankWouts reacted to a post in a topic:
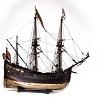
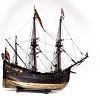
De Zeven Provinciën 1665 by Dražen - Scale 1:45
FrankWouts reacted to a post in a topic:
De Zeven Provinciën 1665 by Dražen - Scale 1:45
-
flying_dutchman2 reacted to a post in a topic:
De Zeven Provinciën 1665 by Dražen - Scale 1:45
-
JerseyCity Frankie reacted to a post in a topic:
HMS Halifax by Arjan68 - 1:80 POB, a 58 ft schooner (1768)
-
JerseyCity Frankie reacted to a post in a topic:
HMS Halifax by Arjan68 - 1:80 POB, a 58 ft schooner (1768)
-
 I haven't but it is very well possible. The planks will have to be a bit thicker to give enough strength to the body, so there could be some problems bending them. But with the sharp lines of this kit I expect no problems there. If you are a perfectionist, the frames should be made a bit wider to compensate for the thinner skin. So, for example, if the double planking was 1.5mm + 1mm and the single planking is 2mm you could glue a strip of 0.5mm veneer to the outside of the frames.
 -
That's a goot start. Improving the kit right from the first part. Do you have other improvement plans on this project ?
-
It's starting to look very nice ! Because of the small scale you're working on I will not start about 'historical inaccuracies'
-
mtaylor reacted to a post in a topic:
HMS Halifax by Arjan68 - 1:80 POB, a 58 ft schooner (1768)
-
It's true that there are no original plans from a fluyt. In the 17th century the dutch built without plans. Most shipwrights built by eye and from the knowledge that was passed from generation to generation. So we have to do with the few remaining paintings, drawings and models. Recently a lot of research has been done on the fluit by some dutch authorities (i.e. Ab Hoving and Cor Emke). They made some reconstructions and plans that should be very close to the original.
-
seafarermiami reacted to a post in a topic:
Dutch Flute by seafarermiami - FINISHED - scale apr. 1/250
-
That's an interesting little build! I am planning to scratch build a fluyt myself and have already done a lot of research on this type of ship. Do you have any drawings of how your finished model will look ? The correct dutch spelling is a fluyt (or fluit in modern dutch)
-
Not much progress since the last update. The frames or bulkheads are glued to the keel and I've made mast fittings to keep them aligned. Here some pictures of a dry-fit with the masts and bowsprit. The decks are not yet glued. I have placed reinforcements between some of the bulkheads because the deck is not continuous in those places. Without them, the hull would not have enough stiffness and could distort during the planking. For reference: the main mast is 6mm diameter. The foremast and bowsprit are 5mm
-
Jeff-E reacted to a post in a topic:
HMS Bounty by Captain Al - FINISHED - Artesania Latina - Scale 1:48
-
Jeff, thanks for your better explanation on how to use the pins. Explaining such things is difficult when english is not your native language.
- 265 replies
-
- 1
-
-
- finished
- artesania latina
- (and 1 more)
-
hexnut reacted to a post in a topic:
HMS Halifax by Arjan68 - 1:80 POB, a 58 ft schooner (1768)
-
Hello Captain Al, Like you I'm a newcomer to MSW, but not to ship modeling. I've built a number of kits so I'll be so bold to give my own two cents of advice. I agree with Amfibius that this Bounty kit is not an easy introduction into this hobby, but with the help and experience of other members it can be done. A single planked model is more difficult, but it is also only half the amount of work of a double planked one There are a lot of howto's and theories about planking a ship's hull. You can read them all from start to end and back, but still the practice will be a challenge. No two ships are the same. The shape of the bow and stern have a big impact on how the planks behave. For your first kit you should not be concerned about a 'historically correct' planking pattern. Your main goal will be to have a smooth result without any gaps. This will make life a bit easier. I do not agree with amfibius where he suggests to drive nails trough the planks! It is better pin them down with a drawing pin pushed into the frame. I hope you understand what I mean. About the bend in your keel: it should not be necessary to try to fix that. A sturdy keel clamp can keep it straight during the planking. Afterwards the stiffness of the hull will keep the keel straight.
-
Thanks Mark, At least you will learn from the mistakes that I will make during this build
-
michael mott reacted to a post in a topic:
HMS Halifax by Arjan68 - 1:80 POB, a 58 ft schooner (1768)
-
SailorGreg reacted to a post in a topic:
HMS Halifax by Arjan68 - 1:80 POB, a 58 ft schooner (1768)
-
The Halifax has six small 3-pounder guns on deck. On a 1:80 scale they will be very small, so I started work on one of the carriages to see if it is feasible.Well, it is That's a 5 eurocent coin for reference
-
Here's a overview of the work that has already been done. The keel and bulkheads were sawn from 3mm plywood (by hand with a fretsaw). The decks are made of 1mm plywood. I use high-quality birch plywood. A dry-fit of the bulkheads. So far I'm satisfied with the result A dry-fit with the decks.
-
Hi all, The HMS Halifax is my first scratch build project after many kits. I've chosen this ship because the original navy plans still exist and also because it is a nice looking ship. Harold Hahn has made a complete and detailed set of plans based on the original, so enough info should be available to build an authentic model The Halifax was originally built as a merchant schooner in 1765. In 1768 she was purchased by the Royal Navy and converted into a 6-gun ship for coastal patrols against smugglers and the upcoming colonial unrest. During this conversion at the Portsmouth dockyard the detailed drawings were made. I like small-scale models, so I've chosen a 1:80 scale. The model will be approx. 25cm from bow to stern. You may wonder why I have not chosen for a more standard scale like 1:96 or 1:87 (H0). The reason is a practical one: I don't have any sawing machines and in 1:80 most sizes and dimensions are a multiple of 1mm, This means that I can use my extensive supply of kit wood The build was started last month, so there's already some progress. In the next post I will give an overview of the work so far. Arjan
-
This build will be stopped. It turns out that the shape of the frames is wrong in many places. Apparently the kit was only loosely based on the original model. I made the mistake of not doing proper research before starting (as always too eager to start something new ). Some time and materials wasted, but on the other hand I learned a lot about fluyt ships and some new techniques Soon I will start a new build. This time a full scratch, based on real plans. So stay tuned. Arjan
-
Hi Dražen, I followed your build on the old forum and it is some inpressive work you are creating ! Being Dutch I am also very interested in our 17th century ship building. You mention Ab Hoving. He is indeed a great source of knowledge. I have met him in person last year when he still was the head maritime curator in the National museum. He is retired now but still very eager to help others. Arjan
- 487 replies
-
- 2
-
-
- ship of the line
- 80 guns
- (and 1 more)
-
I agree with the other comments: this caulking technique has a very good result ! I will try it out myself and perhaps use it on a future project. Your project itself is also very interesting. Trying to recreate a ship type of which there is very little info and pictures available. It's like combining ship modeling with experimental archaeology My own build is a bit like that too, but for flute ships there is much more data available.