allanyed
-
Posts
8,041 -
Joined
-
Last visited
10 Followers


About allanyed

- Birthday 04/25/1947
Recent Profile Visitors
11,313 profile views


-
 SiriusVoyager reacted to a post in a topic:
Drill bit suggestions
SiriusVoyager reacted to a post in a topic:
Drill bit suggestions
-
Scottish Guy reacted to a post in a topic:
Drill bit suggestions
-
mtaylor reacted to a post in a topic:
Drill bit suggestions
-
mtaylor reacted to a post in a topic:
Do I need thes books, or just want them?
-
mtaylor reacted to a post in a topic:
Do I need thes books, or just want them?
-
Scottish Guy reacted to a post in a topic:
Fiber glassing over wood hull?
-
 Curtiss (easier than p40warhawk1😀) First, WELCOME TO MSW. Please post a little intro in the new member forum and mention your project as it may get additional responses. Fiberglass saturated in resin can be applied but it will be the texture of fiberglass and difficult, if even possible, to give a super smooth finish. The following is not a great way to go for a one off, but will give you an idea of how fiber glass hulls are so nicely finished. When fiberglass is used to make a hull it is done in steps. The following is somewhat simplified but it should give you an idea of what is involved. First is making a plug that matches the shape of the hull (in this case, your model hull). This is finished to super smooth surface than coated with a mold release wax. This waxed hull/plug is then coated with gel coat and left to cure. Once cured a thick fiberglass and resin coat is made, usually with some wood or other reinforcing so the mold will not flex later on. Once the fiberglass resin is cured the plug is removed from the mold. Next the mold is coated with a mold release wax. Gel coat is then applied to the mold and allow to cure. Last, fiberglass and resin is layered in an appropriate thickness and allowed to cure. Once cured, the new glass hull is removed from the mold and the mold is ready for the next hull to be made. For your purposes and to use the hull you have already made as is, some coating such as just gel coat might work or more simply why not fine sand the hull you have, then apply four or five coats of a good quality spray finish/paint? There are wooden models with simple finishes that have been around for over 300 years. I am sure there are members here that can give you the benefit of their own experience for simple yet effective way to get what you are shooting for. Allan
 -
Chris is of course correct that TFFM is based initially on building a fully framed model, but the volumes have a lot of application for any ship model in the days of sail. Such things as proper planking in volume I, making various realistic small parts such as a ship's wheel or chain pump housing and much much more in volume II and rigging in Volume IV. In the end no one book will answer address every ship, era or nationality. Allan
-
allanyed reacted to a post in a topic:
HMS RESOLUTION 1667 by KarenM
-
allanyed reacted to a post in a topic:
HMS RESOLUTION 1667 by KarenM
-
I have gotten great pleasure in following your build log Tiziano. I truly hope to see you again and the model the next time we are in Italy. Ciao amico mio Allan
-
Hi Gregg, I love the blocks from Syren. Hard to tell from the photos, are you using the internally stropped blocks that would be on Bluenose? They take a little doing to assemble but they enhance the model a lot as the blocks are prominent and very realistic. Regarding the silk span sails, there is a little booklet on making sails by David Antscherl at Sea Watch books for $5 as well as the Tom Laurie video mentioned by wmherbert that shows similar techniques. https://seawatchbooks.com/products/swan-iv-sail-making-supplement-from-the-revised-and-expanded-edition-by-david-antscherl Allan
-
Totally agree with you Dean. My library is in the neighborhood of 75 books, but there are fewer than ten that get used on a continual basis. Basics include Lees for rigging, Lavery and Goodwin for details, TFFM for a lot of "how to" information, and Scantlings of the Royal Navy for dimensional information on virtually every part of every size ship in the RN from 1719-into the early 19th century. Schooners bring out Chapelle. The Articles Database here at MSW has a ton of information as well. Allan
-
Drill bit suggestions
allanyed replied to SiriusVoyager's topic in Modeling tools and Workshop Equipment
My go to is McMaster Carr https://www.mcmaster.com/products/drill-bits/drill-bits-1~/ Allan -
allanyed reacted to a post in a topic:
HMS Victory 1805 by Darius359au - Artesania Latina - 1:72 - Cross-Section
-
allanyed reacted to a post in a topic:
HMS Indefatigable 1794 by Blue Ensign - FINISHED - Vanguard Models - 1:64 scale
-
allanyed reacted to a post in a topic:
Do I need thes books, or just want them?
-
allanyed reacted to a post in a topic:
Do I need thes books, or just want them?
-
 allanyed reacted to a post in a topic:
Blue holly: can it be saved?
allanyed reacted to a post in a topic:
Blue holly: can it be saved?
-
Definitely worth a try Phil, but need to be careful to avoid------------->

-
Thanks Eberhard, I REALLY appreciate your help on this. Allna
-
This is a truly valuable resource but I have difficulty navigating it. Eberhard and Craig (or other members😀) -- I went to their main site and in the search bar typed various words such as pinnace, longboat, and launch and I get zero hits. Any tips on navigating their site? Sorry to be such a novice on this, but would love to learn. Thanks! Allan
-
Craig These are without doubt the most detailed pinnace plans I have seen and I thank you very much for posting these. For me one of the most important things is that they both include a top view which very clearly shows these two particular boats were single banked. Too often we see models that are either missing oarlocks or have too many probably because the contemporary plans can be deceptive. Do you know the dates on these or where the dates might be found? Thanks again, these is greatly appreciated. Allan
-
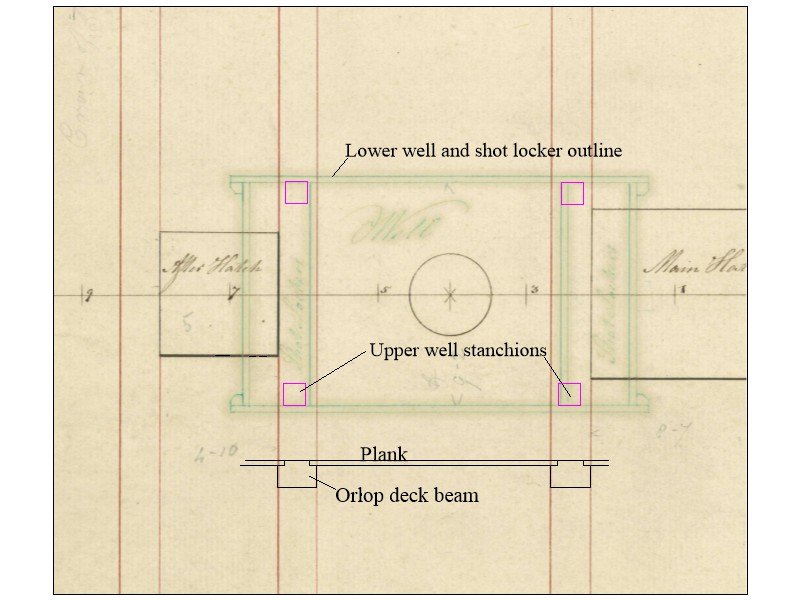
HI Richard, I hope the following sketch might help. The upper well stanchions were tenoned into the top of the orlop beams and the bottom of the beams in the deck above. The orlop and platform planks were often short pieces that sat in recesses along the upper edges of the orlop beam. I am not sure if this was the case in Victory circa 1805, hopefully some member will have more information. Allan
- 23 replies
-
- 2
-
-
- Victory
- Artesania Latina
- (and 1 more)
-
Daniel, Not only is your workmanship grand, the photography is exceptional as well. Allan
- 476 replies
-
- 5
-
-

-
- vanguard models
- alert
- (and 1 more)
-
Hi Dean For the plug it is catch as catch can for me. If I have poplar laying around, or pine 2X4 or bass or other soft scrap, that is what I go with. Fun times!
-
I was going to ask if this was doable and practicable so thanks for pointing this out. My Byrnes plate has seen hundreds of passes and I wondered if it and the moulding cutters you posted can be similarly sharpened? Heretofore I have made my own moulding cutters from stiff back razors or pieces of hack saw blade but for the price, these cutters look like a great alternative. Allan
-
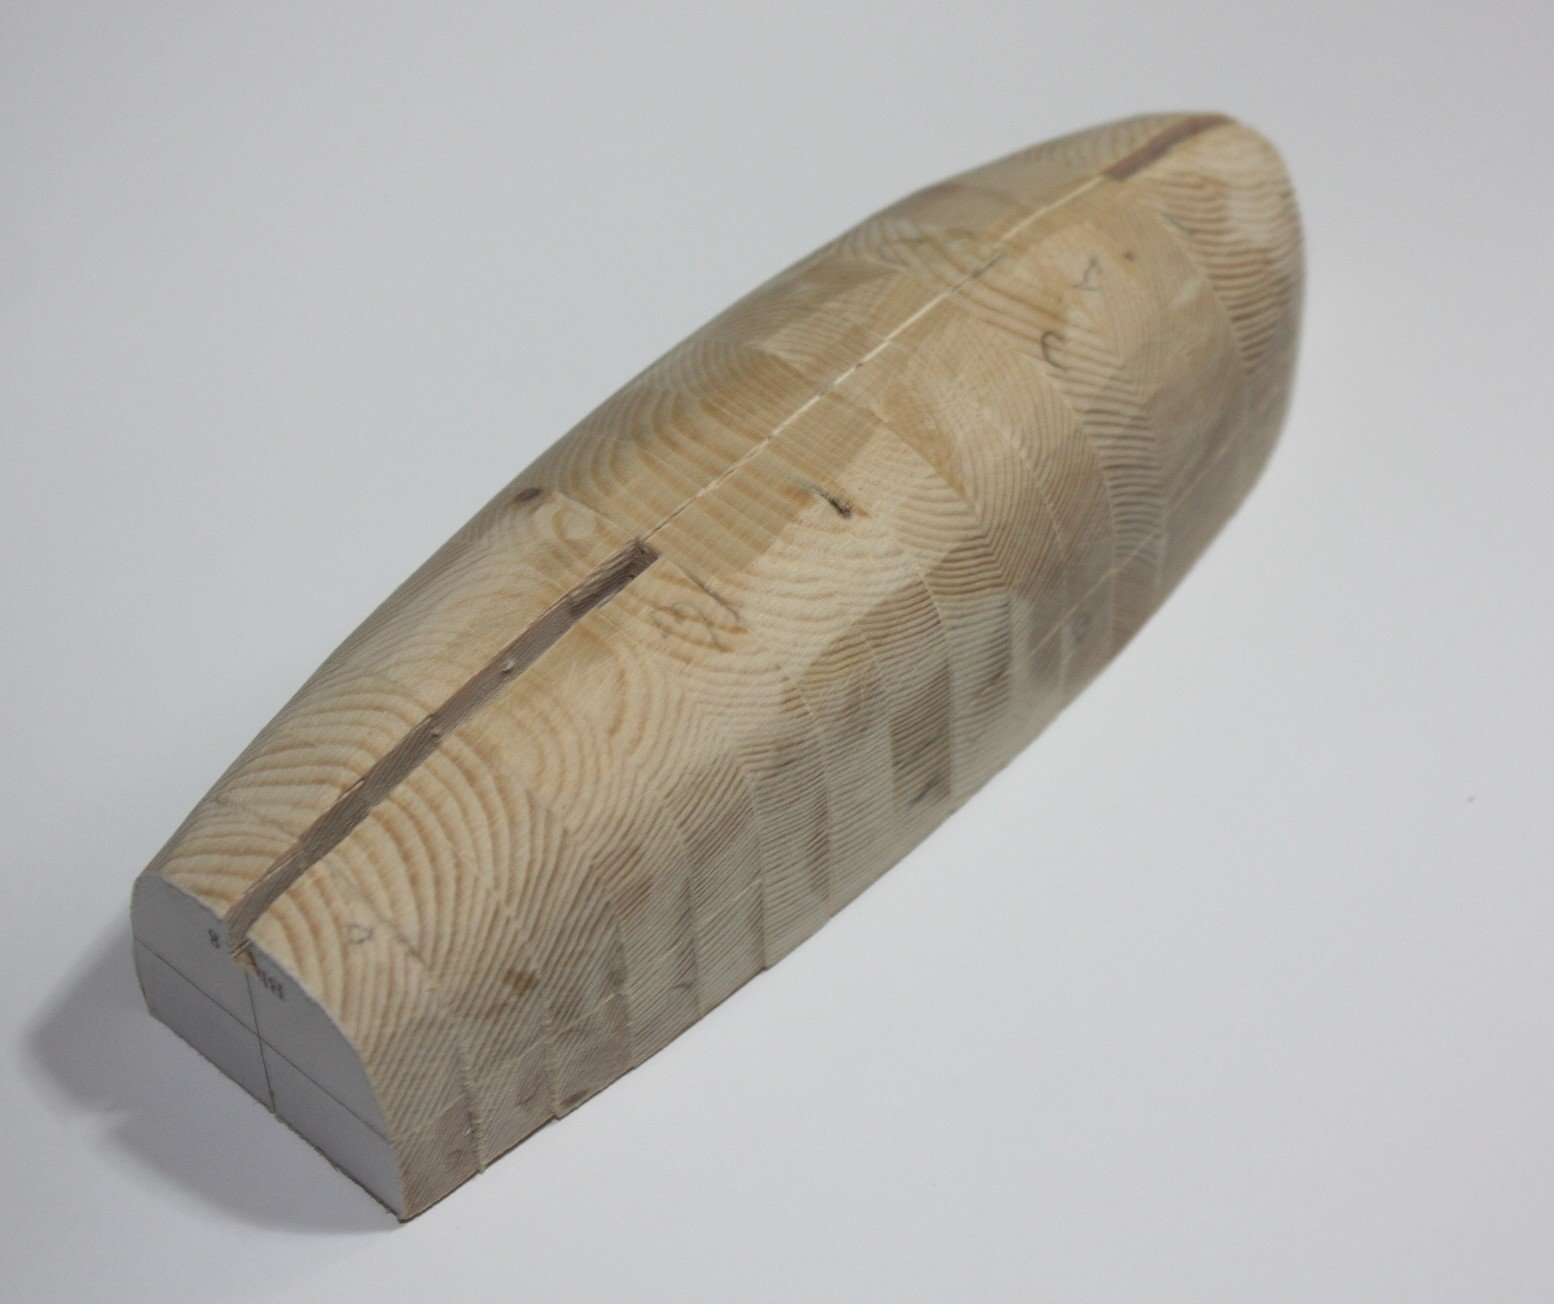
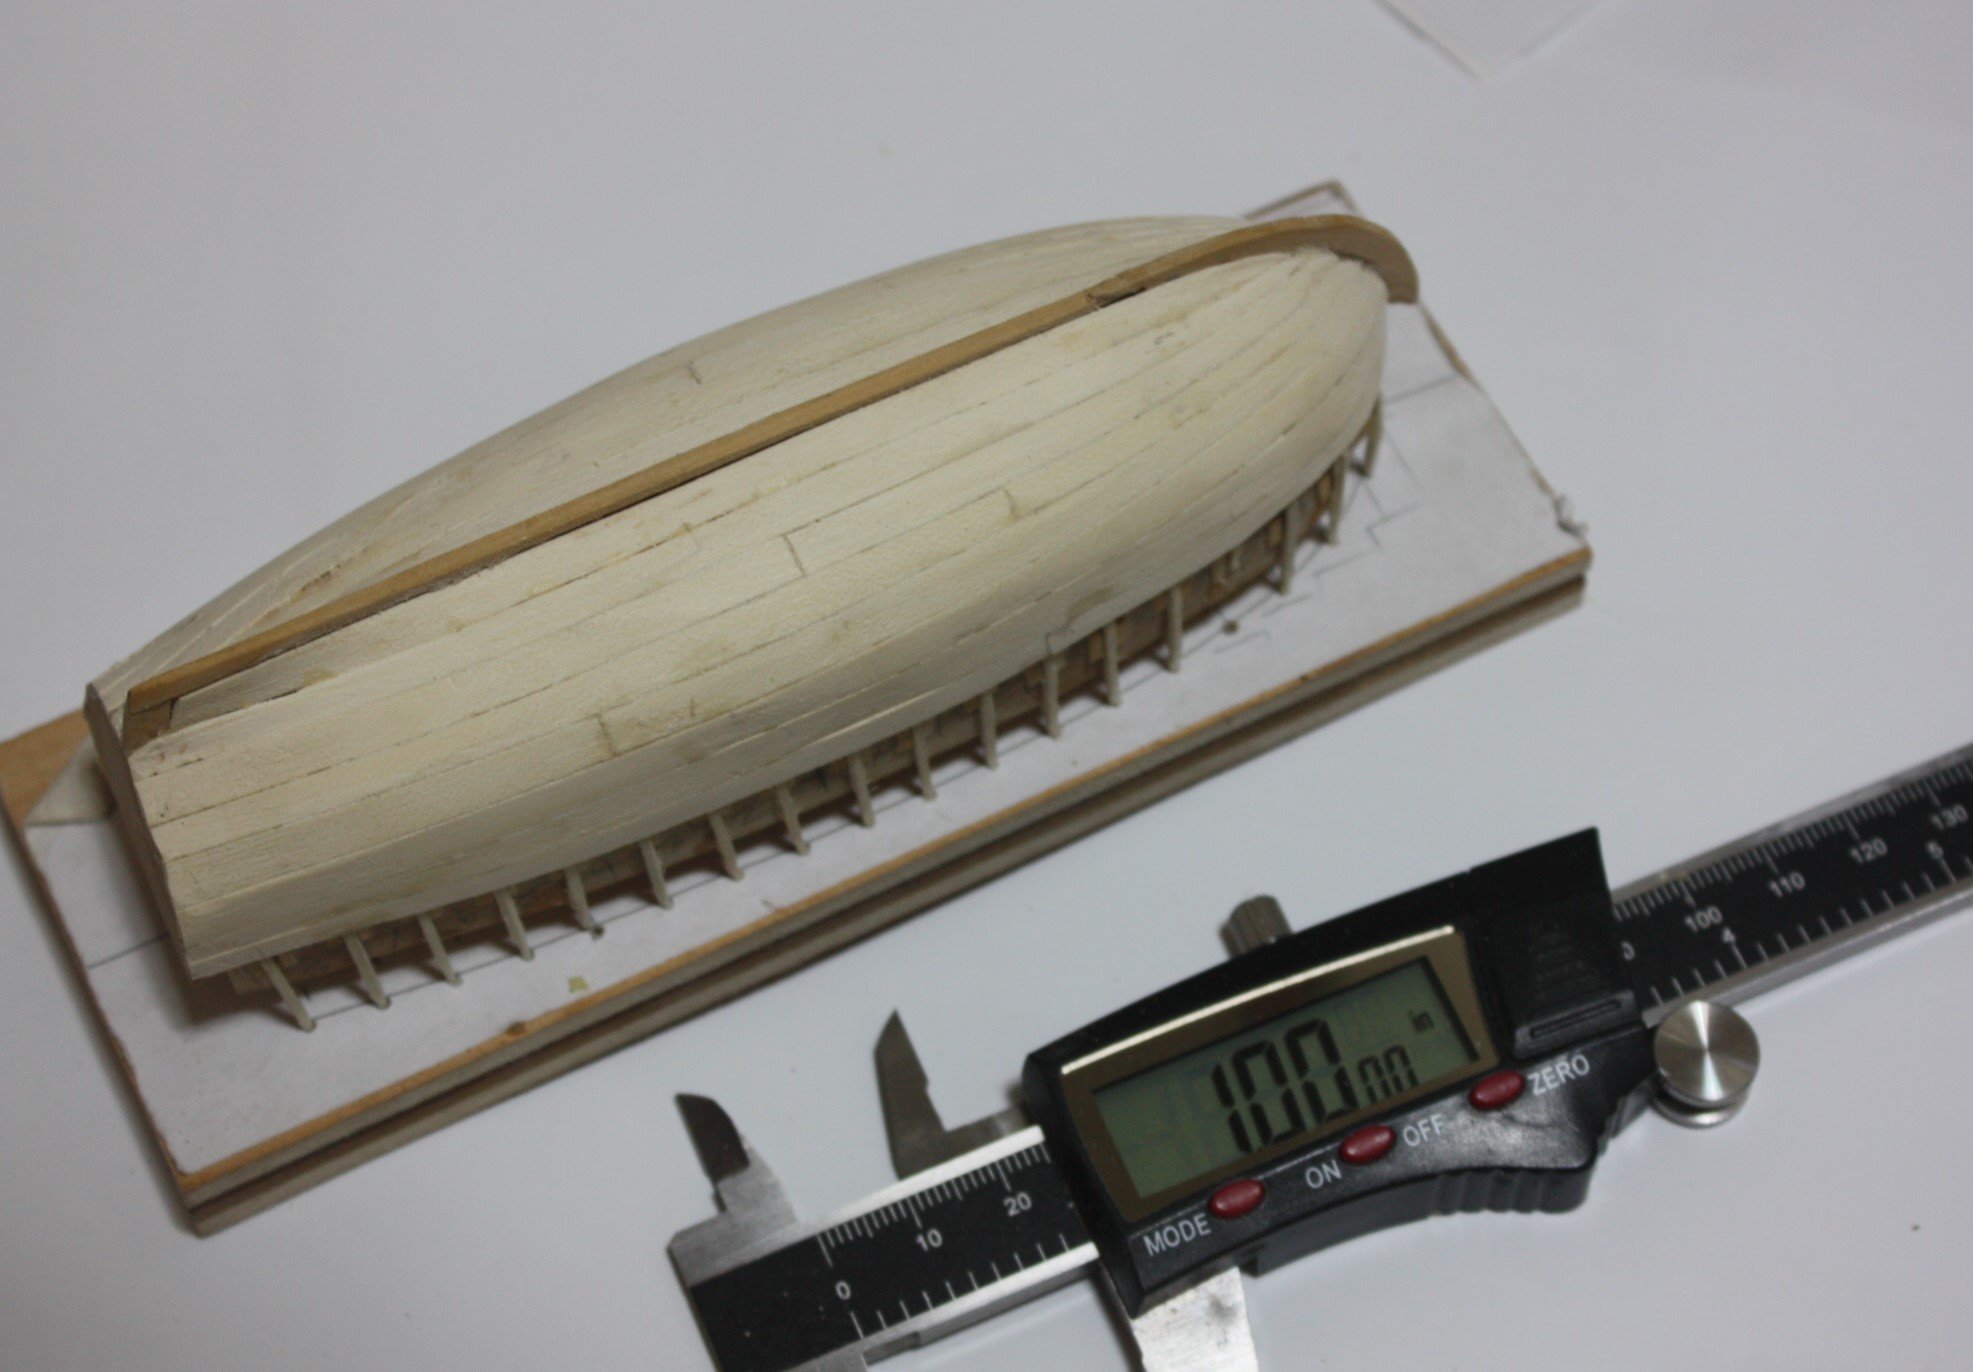
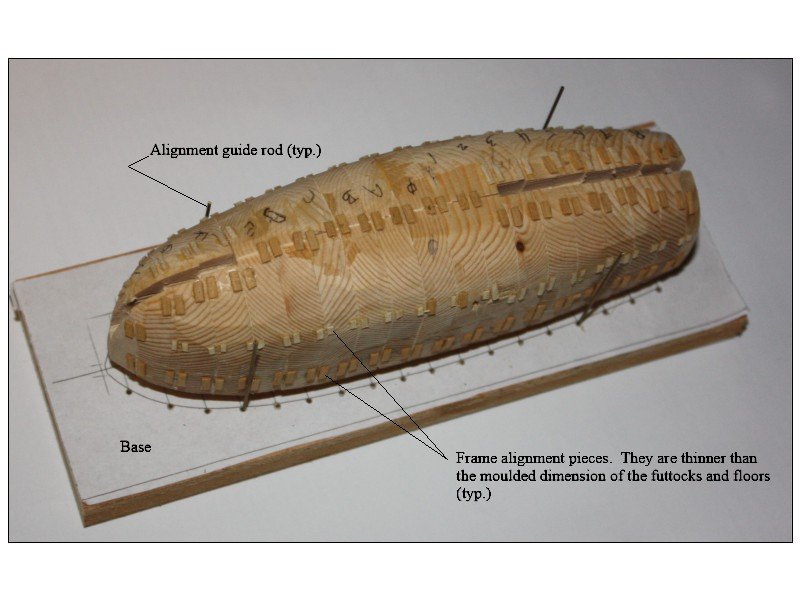
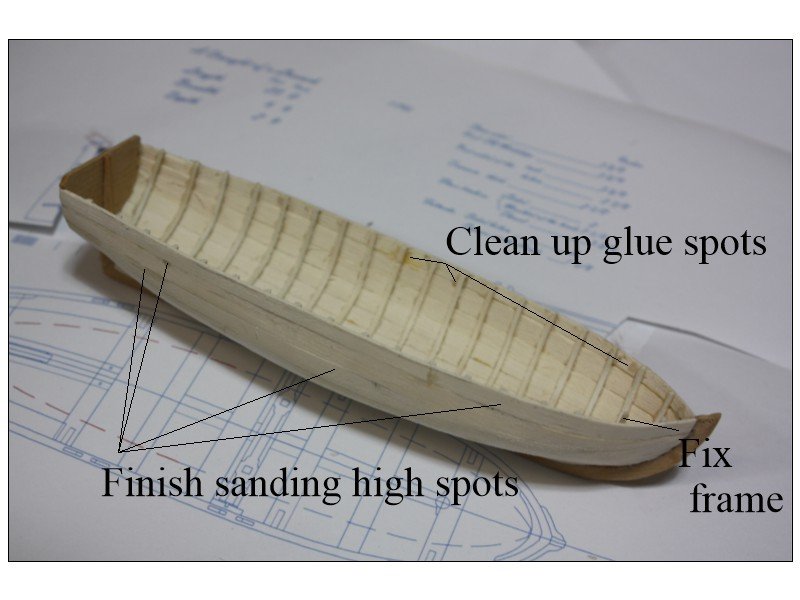
FIRST THANK YOU ALL for your quick responses. It seems I have been on the right track with the spacing as lacking other information until now, went with the station lines. Dean, This is how I have gone as well. I first saw this in Frolich's The Art of Ship Modeling and a highly regarded MSW member showed me a plug he had made (I think before there was an MSW😀) Originally I made the plug to the outside of the frames and cut grooves for the frames. Due to the high risk of a frame getting stuck when removing the hull I change to carving the plug to the inside dimension of the frames and rest the frames on top of the plug. The thickness of individual pieces of the plug are the same as the distance from station line to station line. Couple pictures follow. I think this is similar to what you describe. Thanks again to all of you Allan


- 16 replies
-
- 10
-