


wefalck
-
Posts
5,536 -
Joined
-
Last visited
Content Type
Profiles
Forums
Gallery
Events
Everything posted by wefalck
-
 I was about to suggest to use a home-made scraper with a half-round profile, made from a piece of razor-blade to shape the shafts of the oars. You can cut the profile into an ordinary razor-blade with a diamond burr. Brake off the piece with pliers. This scraper can be held in a pin-vice that is slotted cross-wise. I have used such purpose-made scrapers for shaping very small profiles etc.
 -
Indeed, jewellers' drawplates are not suitable for reducing wood in size. I think we had this discussion already in some thread here. The anatomy of an oar depends on it's use and the period. Sea-oars are rather different from the oars that are used on inland waterways. Basically, sea-oars are symmetrical, so that one can use them forward and backward. Also the diameter is round for much of the length. Likewise, the blade is quite narrow. The diameter is, of course, proportionate to the length. The length depends on the breadth of the boat and whether it is single- or double-banked. For single-banked boats the length would be about three- to four-times the breadth. In 1/128 scale I think it would be not so easy to make the blade and the shaft in two pieces. You would need to slot the shaft for the blade and this could be a challenge for a shaft only somewhere, say, 0.6 to 0.8 mm in diameter. I would start from a flat piece of wood (or styrene), layout the shape, cut out the shape, and then shape the shaft and blade by scraping and sanding. My 1/160 scale oars where made from layer of paper blanks cut out with the laser-cutter and laminated together using varnish. They were further shaped using diamond files.
-
Nice progress indeed ! Just wondering: where the pilot-houses open to the rear?
-
Absolutely. Here my personal selection: https://www.maritima-et-mechanika.org/maritime/madrid/madrid.html The building inside is also congenial.
-
That would have been a job for my shop-built filing machine ... I like the strategy for arriving at a solid round boss. Instinctively, I would have tried to silver-solder the boss on, but the large brass-piece might have drawn too much heat.
-
Yep, oils are good for leather. Not sure whether I read this or whether I just tried, when I was into 1/35 military figures in the mid to late 1970s. I gather the Humbrol paints didn't give the right shine and I was look for something more leather-like.
-
Thank the zealous law-makers, the custom-officials are only executors - today no one uses common sense and judgement anymore in case some greedy lawyer finds a way to sue them. BTW in earlier post I erroneously wrote the German Ivory Museum is in Michelstadt, it is in Erbach, another town nearby: https://elfenbeinmuseum.de/.
-
Ah someone, who also read Heraclitus ... for me almost all that is almost all I remember from my A-level in Ancient Greek nearly 50 years ago 🥴
-
I gather the postman was well-paid for this 🤑 ... shipping cost from everywhere have exploded - except the for the Chinese, who are state-subsidised.
-
In Germany these nuts are sold as 'stone-nuts/Steinnüsse' and have been used since about 200 years to make buttons (apart from using antlers and horns) - before plastics (first celluloid and bakelite, then hydrocarbon-based plastics) took over. I have to make a mental note again, to get some samples, because I am still looking for a dense, homogenous but not brittle material to make really small blocks (say 1 mm long).
-
In principle it is easy to show whether a material is bone or ivory, but one has to take a sample and make a thin-section for microscopic inspection. Apart from the DNA-analysis, one can also take samples for a C14-analysis, which shows the age of the material (in the case of historic ivory).
-
There are precedents for ivory antique containing shipmodels (and other artefacts indeed) sent to exhibitions abroad that were held up by customs and were only released after a long battle. It's not necessarily the fault of overzealeous customs officials, but that of imprecise and summary legislation. So I would rather not use any ivory, even if mamuth ivory is legal. In Michelstadt/Odenwald (Germany) there is a traditional centre of ivory working and an ivory-carving school, which has been hit very hard by the ban on ivory. However, they today use man-made substitutes. These don't seem to be easy to obtain on the market, but I once bought some small pieces for a restauration project there from a workshop.
-
I am not a carver at all, but I can see, where the texture of the chosen wood would pose serious challenges at this small scale. I only know Wengé as wood for furniture (and don't like it's colour and texture, but it seems to be fashionable these days) and would have doubts, that it would be suitable for small-scale carving. And, of course, I like the result of your carving efforts both, the execution of the carving itself and the colour of the wood.
-
Bragozzo by maurino
wefalck replied to maurino's topic in - Build logs for subjects built 1901 - Present Day
A seldom seen subject here. As I have a soft spot for those boats from the Venice lagoon and I will follow the progress. That book has been sitting on my shelf also for some time now - I think I bought in the bookshop 'Carta di Mare' in Venice or from Gilberto Penzo. The 'Padiglione delle Barche' of the Museo Storico Navale in Venice preserve a couple of Bragozzi from the late 19th/early 20th century: https://www.maritima-et-mechanika.org/maritime/venezia/museonavalevenezia-3.html. I took a few pictures in case one day I also want to build one. -
If you are sailing before the wind, the boom would have to swing out as much as the shrouds permit ... the gaff may be steadied by guys, but not all ships had them. The flag-halliards seem to have been run in a somewhat haphazard fashion, whatever was deemed to be convenient at the time. Thus, I have seen many contemporary images, where the halliard is let down to a cleat or belaying pin at the aft bulwark. Another option is a cleat on the boom. In general, the halliard is somewhat inclined forward, so that the flag unfolds and it recognisable when there is no wind.
-
Trying to understand white balance
wefalck replied to Gaetan Bordeleau's topic in Photographing your work. How to do this.
After school I wanted to join the navy for s three-year officer‘s course. Given my father‘s colour vision isues, he arranged for me to be thoroughly tested at the university hospital. They put me through the paces, such as aligning some 30 cubes with colours ranging from purple to violett in the right order. I came out with flying colours so to speak. -
Trying to understand white balance
wefalck replied to Gaetan Bordeleau's topic in Photographing your work. How to do this.
Me too actually, but the workbench now only has LEDs and that seems to work well, althought they are different LEDs with no guarantee that they have same (warm) temperature 🫢 -
Trying to understand white balance
wefalck replied to Gaetan Bordeleau's topic in Photographing your work. How to do this.
Colour vision is indeed a funny thing. My father was the typical red/green colour-blind, but may have had overall a limited colour vision. His view of what was 'green' was more defined by convention, than by real vision it seems: I remember that he sent me once to fetch a green book from his study, which I didn't find, because the cover was actually blue ... Colour-photographers of old used a colour-temperature meter to select filters to compensate for unwanted colour tints brought about by different light temperature in the course of the day, when working in the shadow etc. The meter was used together with a 'neutral grey card'. I still own one of those meters inherited from my father, but not normally use. I rarely play around with the colour-temperature setting of the digital camera, but rather compensate in Photoshop when post-processing my RAW images. In Photoshop you can either select the colour-temperature summarily or you can select an area in the image that you want to appear 'white' or 'neutral grey'. As I normally do not scientific or archival photography, the choices are based on aesthetics and not on trying to achieve a 'true' colour of an object. One thing to avoid is mixing lights from technologically different sources, such as LED and incandescent or daylight. It is virtually impossible to correct such images, as the areas lit by one source will always be 'wrong', when correcting for another source. -
No, not for gem-stones, but you are right, these have a similar 'goniometer-head'. The Deckel SO is a tool-grinder for single-lip tools, such as D-bits, engraving cutters, and can be also used for chisels. The tool can be turned around its axis at a given angle to the grinding wheel, which is needed for hollow gauges.
-
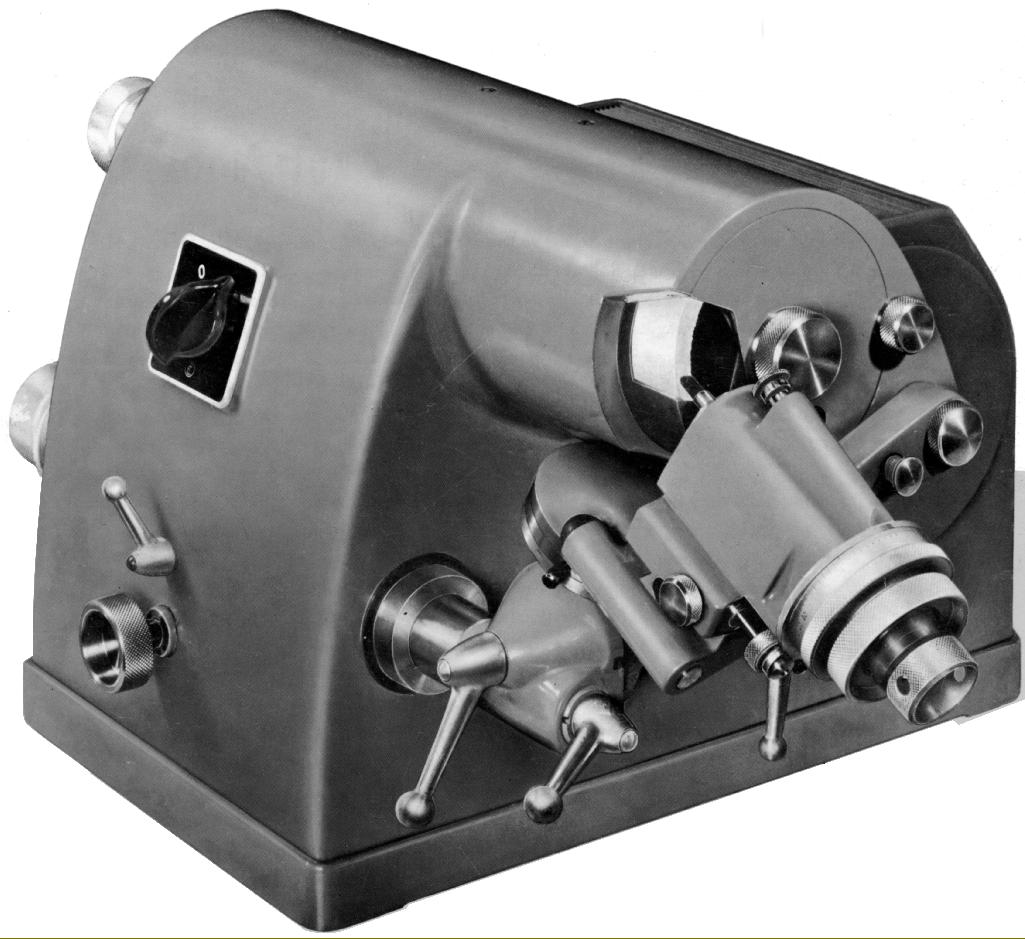
Ideally, one should have something like the Deckel SO (or one of the various old or modern clones), perhaps with a diamond honing wheel, for sharpening: Image from http://www.lathes.co.uk/deckel/page3.html To make the gauges one probably needs something more complex, with knife-edge grinding wheel. Or one starts from silver-steel/drill rod, drills a hole on a lathe and then grinds away the rest. This then needs to be properly hardened and tempered. Not sure, how V-gauges are made.
-
Miniature Russian carving tools
wefalck replied to druxey's topic in Modeling tools and Workshop Equipment
... and one shouldn't anyway now. In principle, anyone with a good tool-grinder could make such tools from round HSS-blanks. -
OUTSTANDING Mini Drill
wefalck replied to Bill Jackson's topic in Modeling tools and Workshop Equipment
Looks like the thingy that was given to me by my wife with good intentions, but I found the speed too high for most practical purposes. Mine has three speed settings, but it starts from the highest and then steps down. With all battery-operated equipment it has the disadvantage that one cannot start and stop it free-hand, i.e. with a foot-switch ... Do the inserts have the usual 2.34 mm diameter shaft? -
It should be possible to find someone with EDM (Electrical Discharge Maschining) capability to make such dies from hardened steel in a small series ...
-
In my experience, acrylics are better applied by airbrush. Somehow, the self-levelling is not as good as for organic solvent-based paints. They also dry too fast to be able to equalise them well. Or may be, I am not that good a painter ...
-
I am still pondering the kit. I wouldn't build in WD-finish, but rather as a normal road-locomotive. The WD specifications (for good reasons) seems to have included unusual combinations of features, such a dished fly-wheel (as for road-locomotives, to not frighten horses on the roads) and wheels as for agricultural engines.


