FlounderFillet5
-
Posts
139 -
Joined
-
Last visited
Content Type
Profiles
Forums
Gallery
Events
Everything posted by FlounderFillet5
-
Edward, Can you post a picture of the damage? Pictures make it easier to give good advise. Without a picture, I can only say that you could use some of the scrap wood that is wider than the bulwark thickness to make the repair. It may be feasible to cut out the bulwark in the damaged area, glue in the scrap wood, and then sans it down until it matches the bulwark thickness. Once complete, I imagine you could just recut the scuppers and move on with the project from where you left off. Just an idea. Regards,
- 32 replies
-
- 5
-

-
- phantom
- model shipways
- (and 1 more)
-
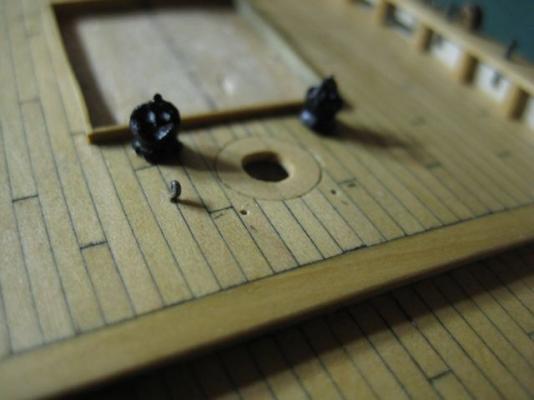
*Stretch* *yawn* *stretch* After a year of hibernation, I think it is time for this thread to come back to life. Classes have just kicked back off so there is no guarantee for regular updates because classes have been demanding but working in the dry dock has proven to be a stress reliever in the past. First, I want to make some very belated responses. Russ, the vellum worked great; I was really happy with how it came out and a year later out in the garage and elements, it is not showing any sign warping or peeling. Tom and Hamilton, thanks for the nice words. The chainplates were certainly finicky, they were one of the first things I had to fabricate a second time for acceptable results. I do like how they came out the second time though! Update: It took about two days to clear the workbench, get it mildly organized again, and set back up for ship building. After getting set up, I began working again last night. Most of the work from this first update is work that was completed a year ago so details might be a little scarce. Last night I drilled the #78 holes in the aft deck for the two pumps and an eye bolt that will be used later for tying of a row that will come off of the fife rail. The pumps were some of the previous work but they were cleaned up with needle files and i decided to drill a couple holes in them because they are not supposed to be solid pieces, the results are only okay but they are such small pieces that it's no big deal. They got eyebolt posts installed and then were painted black. Those items are now installed and glued in place. With the aft fife rail installed as well. Next, I noticed that the cleat on the fore deck fife rail was missing so I fabricated a new one out of boxwood and just need to glue it in place. The fife rails were made last year and were just cleaned up and then drilled with a #75 or #76 bit for the belaying pins. Chuck said that it would be impossible to drill between the two uprights but I found that to be wrong, not sure why he said they would be so difficult to drill, though mine are a little lopsided so there was some merit to his statement. I like having the extra two pins back there though. Last thing I worked on last night were adding the belaying pins to the navigation lights to be handles, I drilled the holes with a #76 bit and added just a touch of glue to keep them in place. The navigation lights were fabricated following Chuck's recommendation to use paper clips for the posts but my painting job from last year is not very good so I may end up sanding then down and repainting them when I paint in the light colors. I just wanted to confirm which color goes on which side, if I recall correctly, the green good on the right and red on the left but I want to make sure before painting. Any guidance would be appreciated. That's it for this update, it was great to get back to this project and I am going to try to knock out my obligations quickly today so that I can make a little Labor Day progress, stay tuned. Groggily,

-
Edward, Your Phantom build is off to a great start! I am about to get back to work on mine but need to finish clearing my workbench and get set back up for model building. My build started on the original MSW so the early steps are not on here as they were lost with the transition to this new site but it can be something to reference when you get further as I take a ton of photos and give probably too much detail on how I did things. For the water line, I used the model expo tool that they sell but all you need to do is set your hull up such that the waterline is horizontal and then use a pencil held onto a piece of scrap wood that gets your pencil lead to the correct height and just trace around the hull. As for thinning the bulwarks, I think it just took some sandpaper and a ton of patience, just keep sanding a little bit at a time and you will get them thinned down to the 1/16" or whatever the plans call for. For the bulwark step,I just wrapped some sandpaper around one of the pieces of square stock that is used later in the build and ran it along the roughly carved step. It was also easier to thin the bulwarks from the outside because of this method. Hope this helps you at least a little and good luck going forward!
- 32 replies
-
- 3
-
-
- phantom
- model shipways
- (and 1 more)
-
Dewalt 788 Scroll Saw Steal
FlounderFillet5 replied to FlounderFillet5's topic in Modeling tools and Workshop Equipment
My flying dutchmen blades just came in and I got a couple of the starter packs that come with a variety of sizes in the selected blade layouts. I think I will probably start buying the blades by the gross once I find which blades I prefer and which sizes etc. I am excited to get started making saw dust but now that school has started back up, I fear it might be some time before I have any real time to cut. Also, I need to find some time to tune the saw a bit, it has a little bit of the knock that seems to be common with dewalts and I may need to adjust the length of the rod that aligns the upper blade holder to get a better blade track. That may just have been the way I put the blade in though, I just havent had an opportunity to mess with it since I cut my first project. -
Grsjax, Thanks for the reply, that is just what I was looking for. I just found a guy on craigslist that has a huge storage unit FULL of exotics at reasonable prices. He is milling some of the wood for me which is costing extra but hopefully soon I will be able to pick up the tools needed to do it myself.
-
Hello, I am interested in purchasing some wood to do some scroll saw work with but I figured I might as well get wood in useful dimensions for this hobby as well. What are useful dimensions for extra wood in this hobby? thickness 1/8", 1/4", 1/2" etc and as for width is the wider the better so if I can get like 7"+ wide sheets then that would the way to go? I intend on getting a Byrnes saw before too long and possibly a thickness sander if that helps with this question. Next question: what species of wood would you guys recommend, I know there are a ton of different woods that are useful in this hobby but if you were just going to buy a few, which would you go with? maple, basswood, cherry, mahogany, poplar, walnut and various others are commonly available in my area and where I am looking to purchase online. Thanks for your responses to these very broad questions.
-
Don, The build is coming along very nicely, it is getting me excited to start working on mine! I used Russ' method on my Phantom and was very happy with the results. As for stain or not, I would take a few pieces of the planking material and test stain them, try it with some wipe on poly or similar, maybe some tung oil or something and see what you like. If you have enough scrap planking material, it may be worth it to build little test deck sections on a building board or something so you can see the stain etc with the simulated caulking and everything. Keep up the good work,
-
Dewalt 788 Scroll Saw Steal
FlounderFillet5 replied to FlounderFillet5's topic in Modeling tools and Workshop Equipment
Hey guys, thanks for all the replies! The flying dutchman blades were the ones I remembered being highly recommended and I am ordering some of those for sure. Mark and reklein, you guys found some great deals as well, without the added risk of buying a broken item so well done! Jud, I thought about contacting him and letting him at least know the saw started working but the cragslist post is now removed and my phone is kind of glitchy so I cant seem to find the text message thread that would reveal the seller's number. Oh well, I took a risk and it paid off. I have been so happy today, going around town and looking for stuff to get all set up now. I found a great woodworking shop that has a decent selection of hardwoods so I got a few sheets of various species, a little variety pack of Olsen blades to get me working before my flying dutchman blades come in, and I have been reading though some books and whatnot on scroll sawing. I think I am going to do a few scroll saw projects just for fun now that I have my saw haha, modelling will have to wait at least a few days. Well, happy modelling guys! -
Hey guys, Today I lucked out like no other and wanted to share with you all. I have been searching for a Dewalt 788 for a while now and have only been finding the occasional one pop up on craigslist, normally costing between $300-$400 and they get snatched up before I even see the ad. I was surfing craigslist tools today and not much had changed from the night before when I had checked it last, darn. Then I took some time to post some various things the wife wanted sold on the site and when I finished was about to get up but thought I should check the tools section one more time before moving on with my day. Lucky I did because the top item on the list was a Dewalt 788 scroll saw which had been posted less than twenty minutes before and only asking $100! I looked at the pictures and it looked practically new. I quickly called the number... no answer, I then texted and was drafting up an email when I get a response to my text saying that it worked well and I could come take a look a few hours later. When the evening rolled around, my wife and I hopped in the car and drove nearly an hour to get to the seller's house. We went down stairs to the basement and saw the beautiful saw. I asked to test it so we plugged it in and the machine hummed to life with little to no vibration and not much noise at all. The seller asked if I wanted to cut some wood and I said "of course", excited to give it a try. While he was fetching the wood, I played with the blade tension-er, speed control, and made sure the light worked, then turned it off. The seller came down the stairs with wood in hand and I excitedly flipped the switch to test this bad boy out... silence. It turned out the outlet breaker had popped the safety fuse so we brought the saw up stairs to the garage. We plugged it in and flipped the switch... still nothing. Perplexed, the seller found a new fuse and swapped it out and nothing at all. The seller then apologized for wasting our time and gas and figured I no longer wanted the saw. I asked if he would come down on the price and offered $60 since I was taking a risk on a broken machine. He agreed after a short (felt like an eternity) pause and I hauled it off. When I got home, I plugged it in to check if it would work and nothing, then I pulled the switch housing off the saw and vacuumed out the debris... still nothing. Then, I noticed one of the wire terminals was very loose where it connected to the switch and I held it tight and the saw hummed to life. Now I have a flawlessly working Dewalt 788 and only paid $60 for it! I can't wait to start making saw dust with this thing. Anyone have any suggestions on wood to practice on just to get the hang of it? Also, what blades would you guys recommend?
-
Csimoni, Those metal pieces in the first two photos are magnets that are sold by micro mark if I am not mistaken. Based on the photo of the mat in picture #2 of post #4, it looks like the building mat is also magnetic. Hope this helps! Regards,
- 64 replies
-
- 1
-
-
- willie l bennett
- model shipways
- (and 1 more)
-
Don, great start so far, keep up the good work! I will be following your progress as i will be starting this build as soonas I finish my Phantom build. Happy building,
-
Model Shipways Willie L. Bennett Questions
FlounderFillet5 replied to FlounderFillet5's topic in Wood ship model kits
Yea, those were the instructions i had looked at, just couldn't tell if they had everything there. That is always exciting to start a new model, i will keep an eye out for your build log. I got a great deal on the willie bennett kit and will be starting my build in the next few months, i will probably try to finish my Phantom first but we will see if it actually works out that way. -
Model Shipways Willie L. Bennett Questions
FlounderFillet5 replied to FlounderFillet5's topic in Wood ship model kits
Russ and Rick, thank you both for the replies! I think I am going to pull the trigger on the willie bennett soon. I still have a bit of work to do on my Phantom but that just gives me some time to wait for a big sale on the kit. I am going to build this ship for my mom so I think the size will be a good fit, a pretty large ship model but not so big that there won't be anywhere to put it in her apartment. I think the 3ft+ models are incredible and can't wait to have a few more builds under my belt so that I feel comfortable spending the money on one of the beautiful brig or frigate kits out there and know I will do the ship justice. Anyways, thanks again guys, I appreciate the responses and guidance and look forward to starting this build (hopefully) soon. Regards, -
Sal, The vellum does not have a shiny finish, it is pretty much tracing paper, quite thin but I think it would still do okay in this application. A couple options if the white wasnt vibrant enough due to its transparency would be to cut a smaller rectangle and glue it to the back to make the strip thicker where the words are but still thin around the edges or add a little bit of white paint on the back side, again, away from the edges so that you keep that low profile.
-
Sal, that is a great idea! I also like the text you chose. I wonder if you could reduce the imprint of the paper by adding a little black paint on each side to blend in the two surfaces. The other question this leaves me with is i wonder if the glued paper will deteriorate with time or if it will hold up. Another thought is to use thin paper like vellum to both reduce the imprint and i think it is a little waxy or something so it may last a little longer? So many things are going through my mind because i really wanted to paint on the name but havent had the gall to try with a paint brush or air brush. Once again Sal, an ingenious solution to this problem, one i might run with on my build haha.
-
Sal, Your Phantom is coming along really well, all the fittings look great! I especially like the "Phantom" labels you painted on. Did you just free hand paint those on or did you use a stencil or something? Happy building,
-
Hello, I am interested in buying the model shipways Willie L. Bennett kit and was just wondering how the instructions are that come with it. I took a look at them on the website but wasn't sure as to how well it walks you through the build. This will be my second build and first POB build so I just want to know if this will be a good kit to start POB with. Any comments, opinions, guidance would be appreciated. Thanks,
-
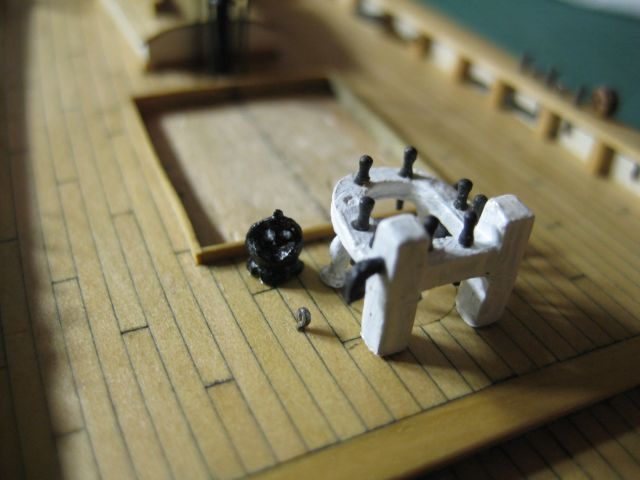
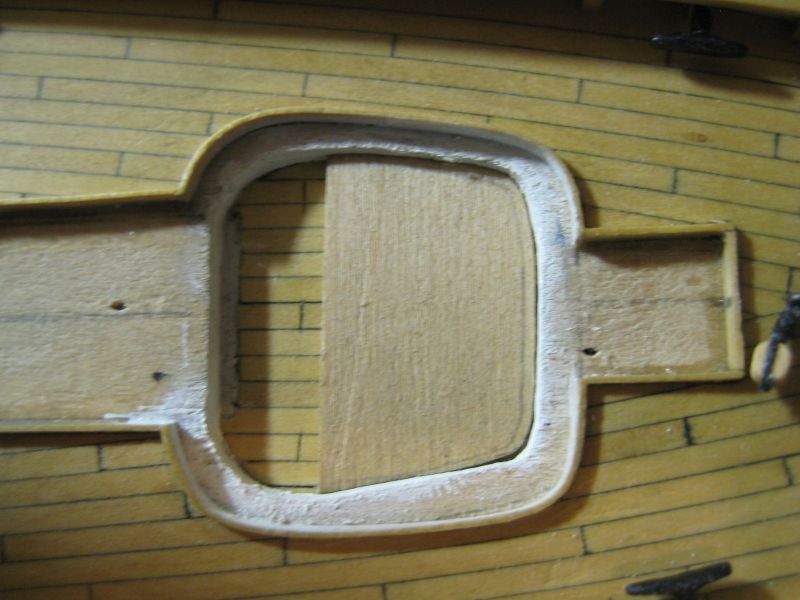
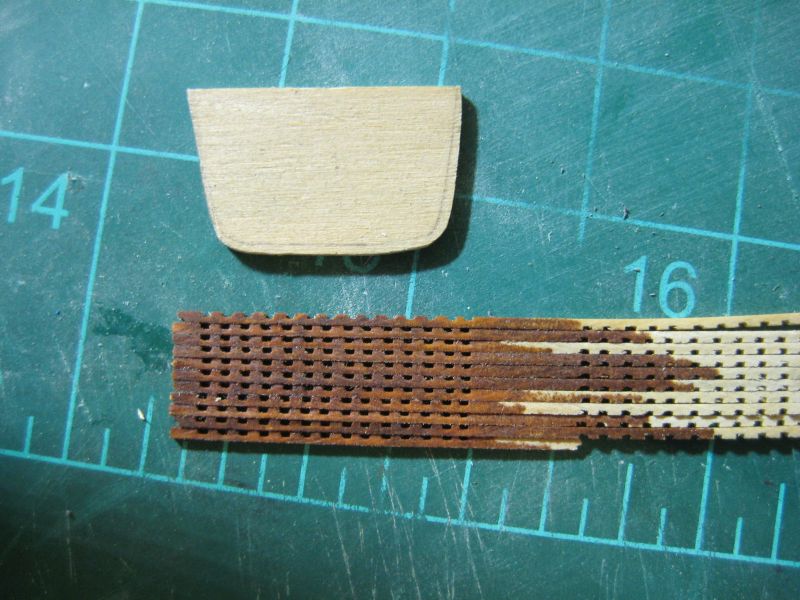
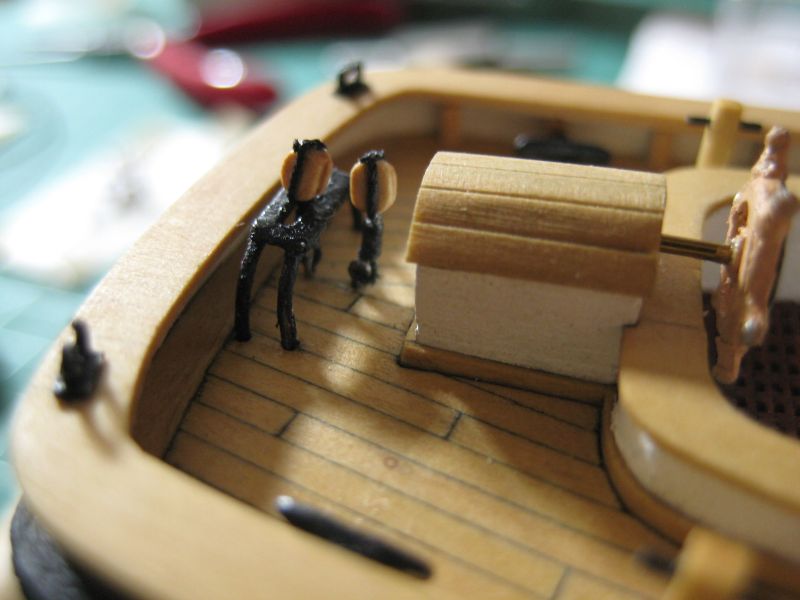
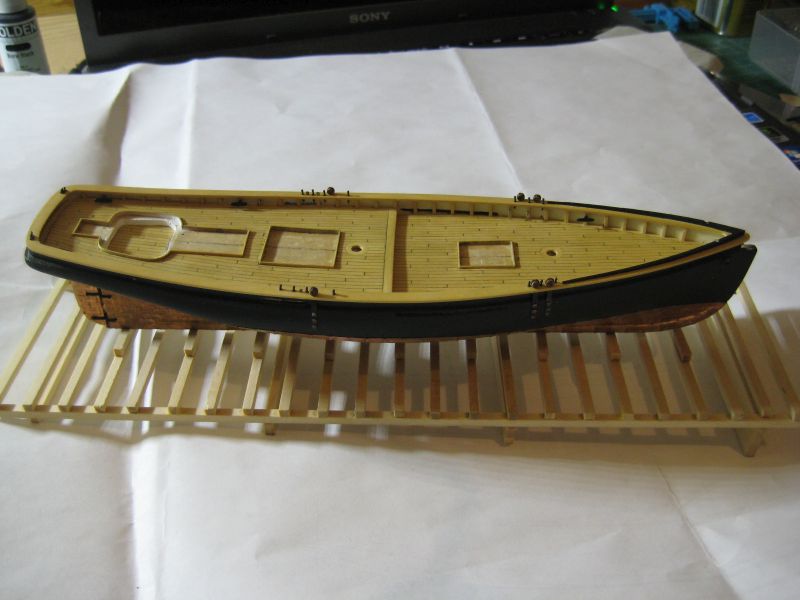
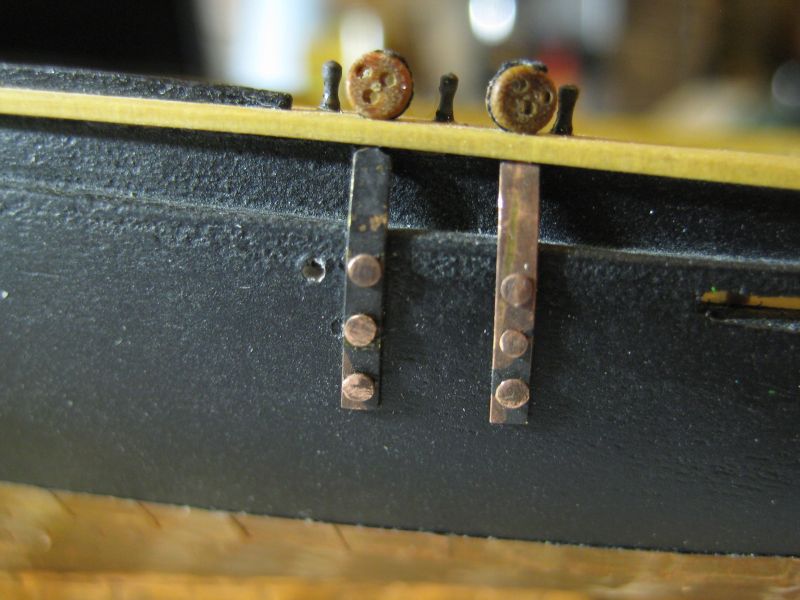
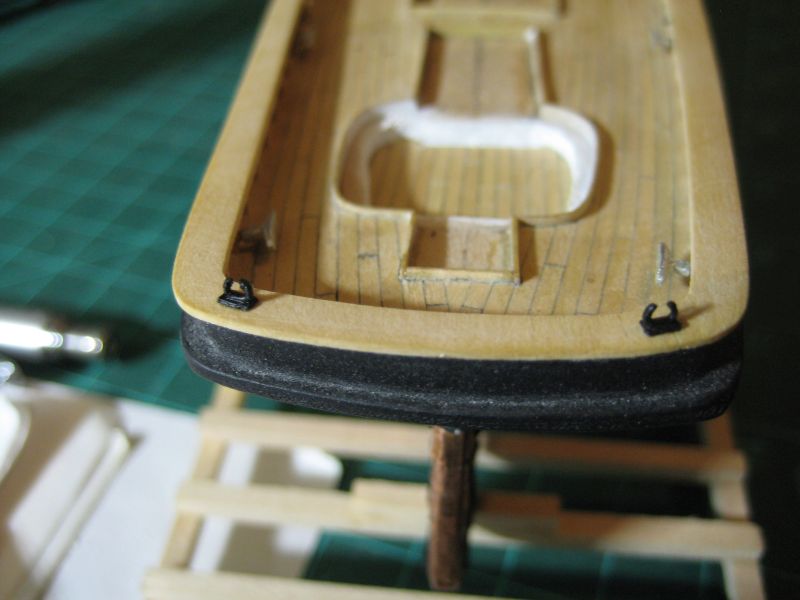
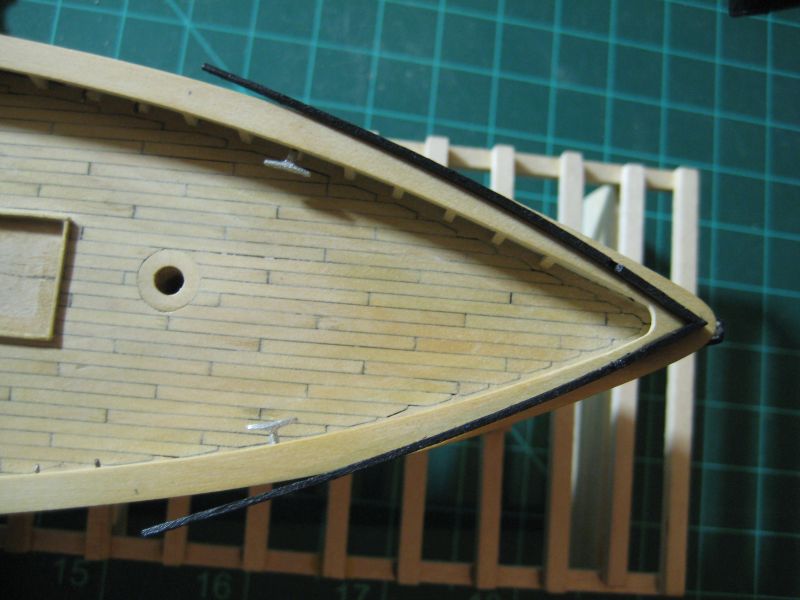
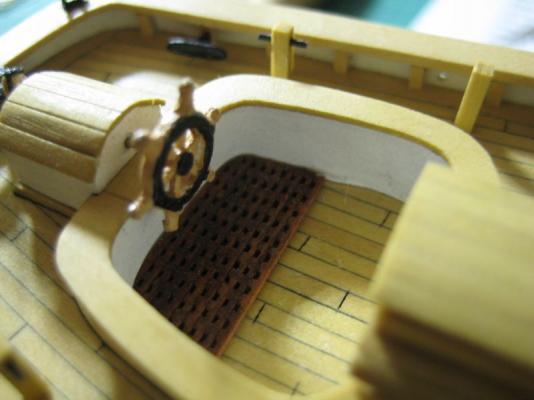
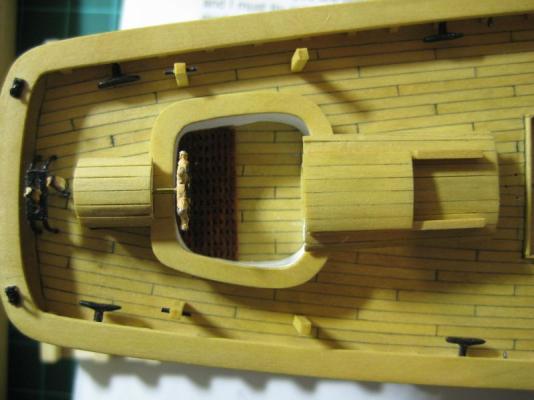
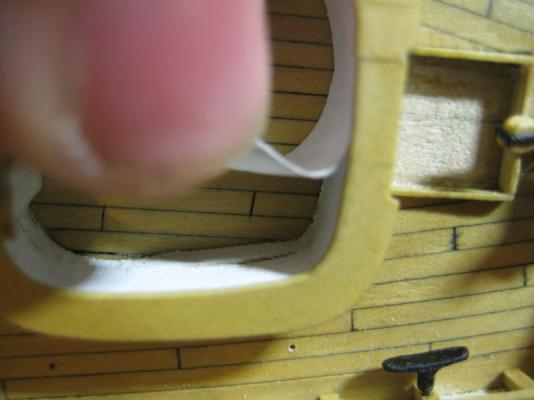
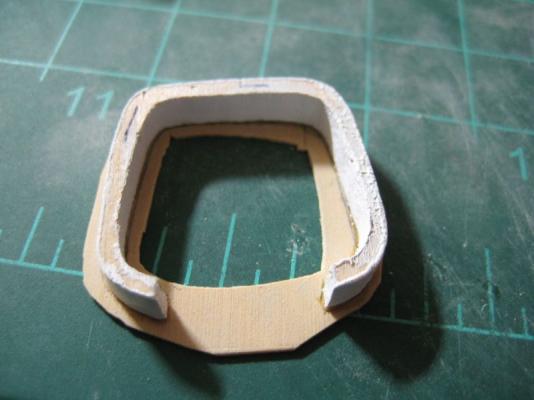
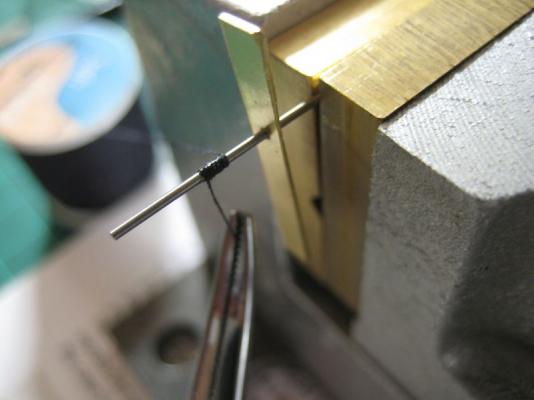
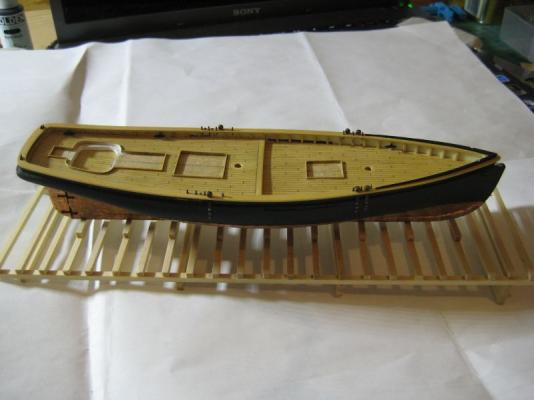
Hey all, Robert, Russ, and Sal: Thanks for the kind words on the progress. Sal, glad you found something useful in my log, take any ideas you find here and run with them, that's why these build logs exist. I have made some more progress and now all these small projects are finally coming together and being installed on the ship, exciting! I made the cockpit coaming cap rail by gluing on some rough shaped boxwood and filing down to size. I used an idea that Sal came up with in his log to line the cockpit with a strip of painted material to make it look nice and neat. I used some vellum paper painted white. This is a picture of installing it in the cockpit. Here you can see the cockpit coaming installed with its cap rail. I had test fitted this coaming multiple times and then when I went to install it, it cracked a bit so I had to glue it, leaving another little line in the cap rail. Then I shaped the cockpit grating with my template I used to carve the sunken cockpit. The wheel house installed with the grating in place. I made some make shift seizings that I am installing on all of the stropped blocks. This jig is a number drill held in a vise and the string is wrapped around several times and glued with some thin CA. I also drilled a hole through a little piece of brass that is used for breaking the glued siezing free from the drill bit shank. The traveler I mentioned that was installed last time with siezings in place. Here are the bollards for the deck. I made them out of some boxwood and some of the thin black wire supplied with the kit. Here they are installed. And last but not least, a top view of the aft deck nearly completed. I think all I have left is to install the stove pipe (being painted right now), the wire frame that will protect it, the skylight, and the navigational lights which might be put on hold a little while longer until the fore deck is also completed so that I don't accidentally knock them off repeatedly which seems like an inevitability if I install them now. Oh, I guess the fife rail also needs to be installed before the aft deck is complete. Hope you enjoyed this update, I know I have been enjoying actually installing all these things to the ship, hard work is finally paying off! Best Regards,


-
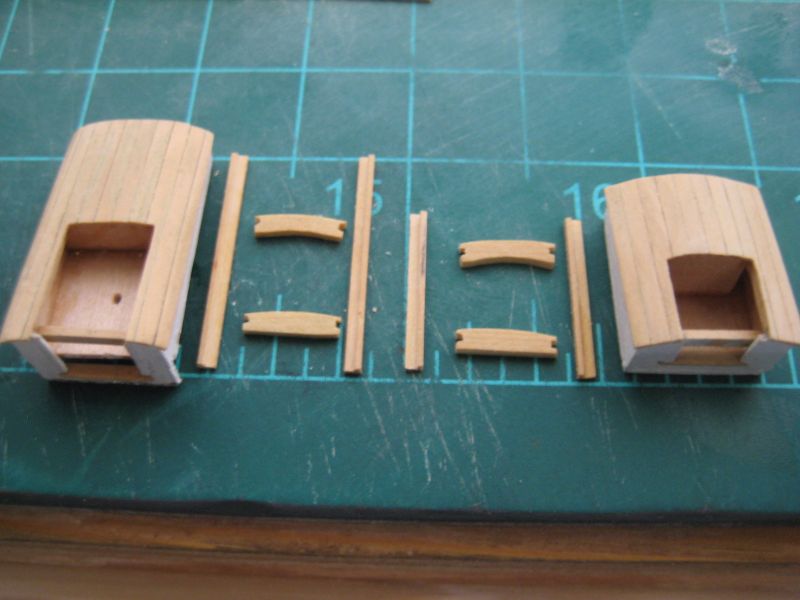
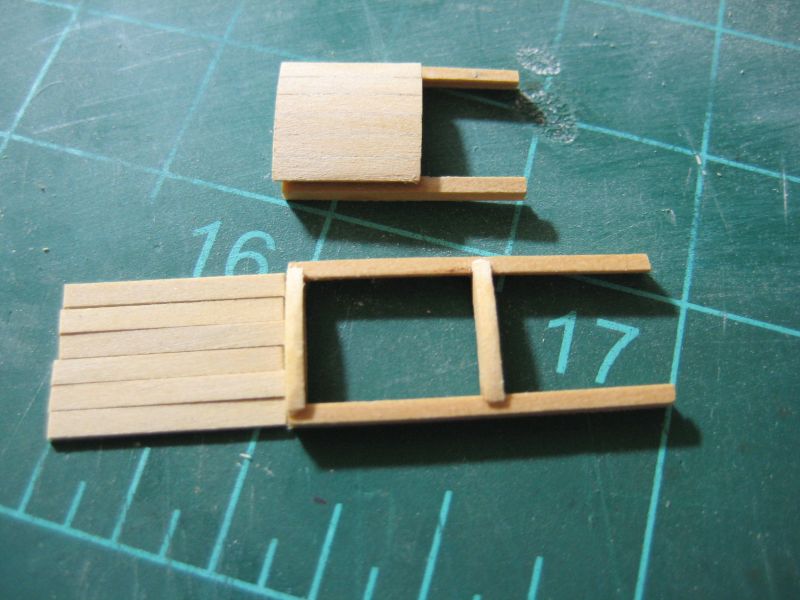
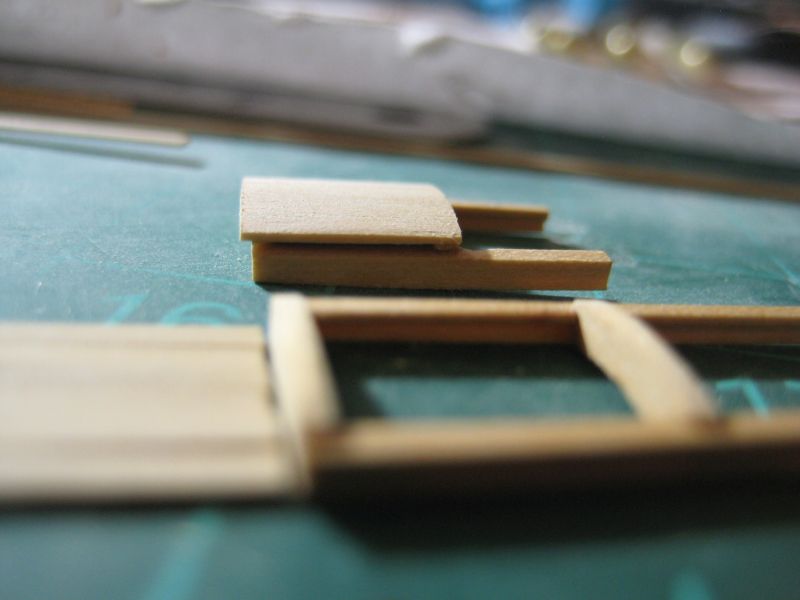
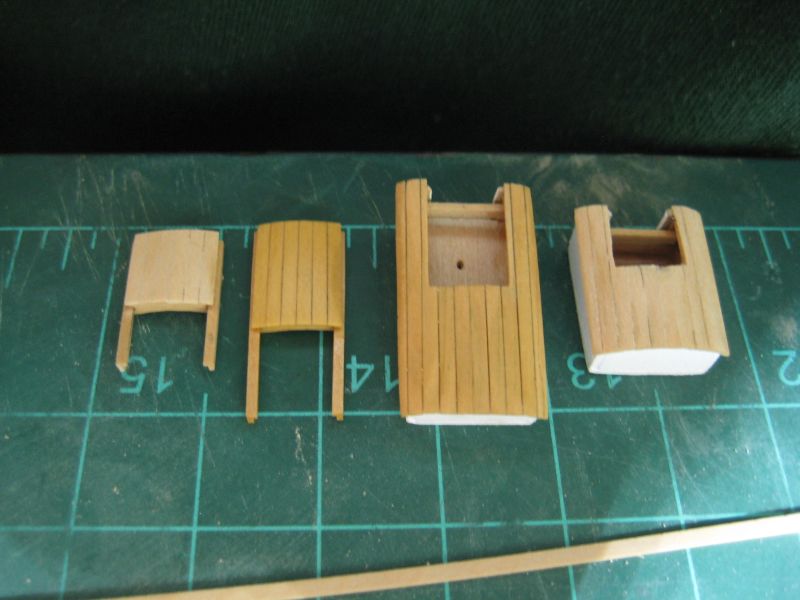
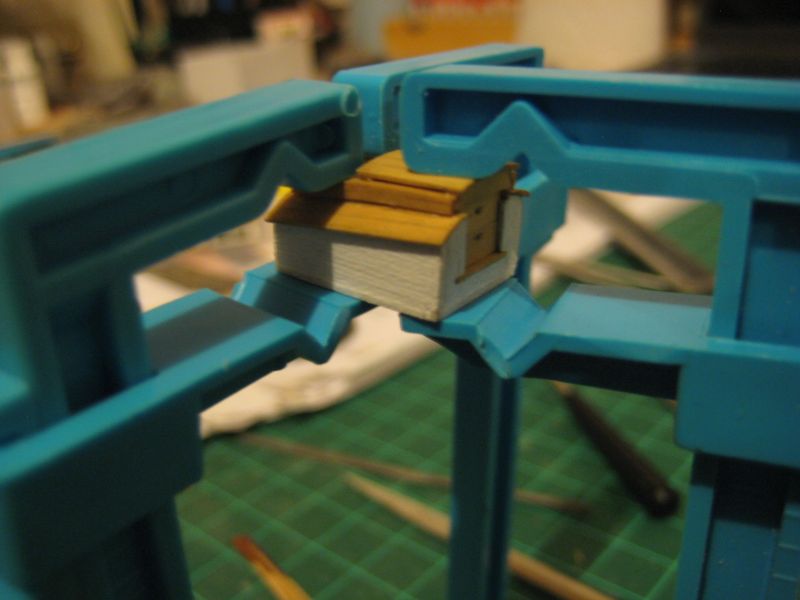
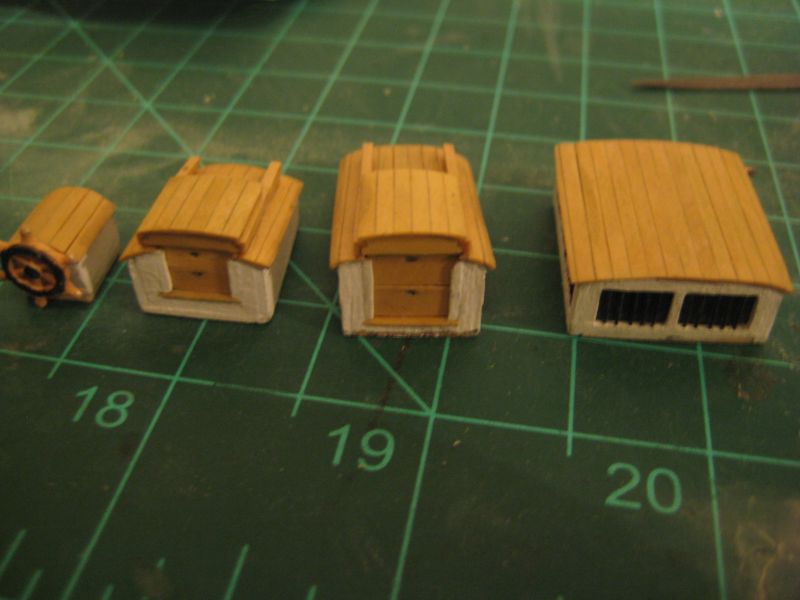
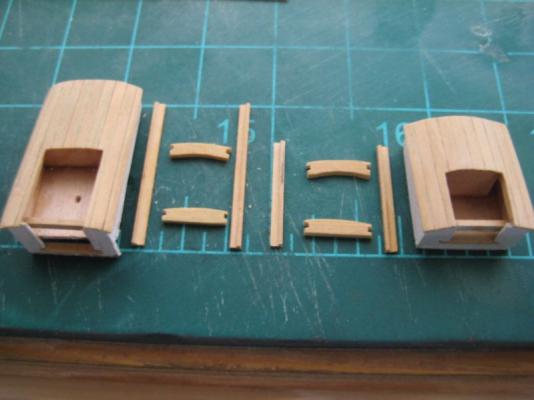
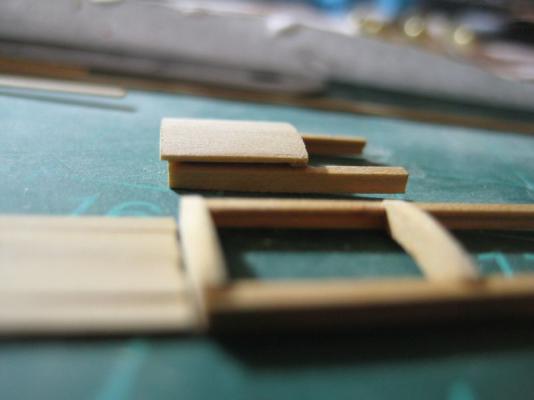
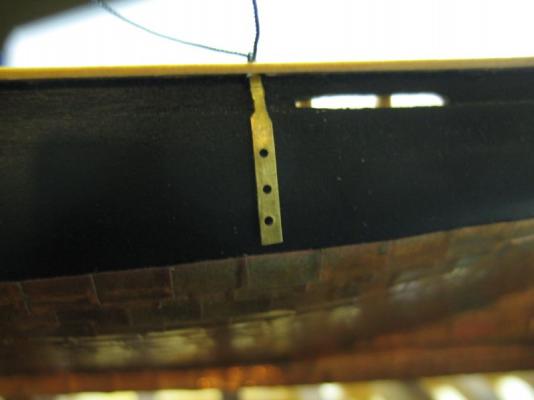
Hey everyone, Been finding a bit of time to build lately but I have been kind of all over the place with what I have been working on. I got the chain plates and cap rail fixtures installed, have completed building the deck houses, and have been working on a plan of action to tackle the sails and rigging for this ship even though 1) I'm not there yet and 2) this model is not typically displayed with sails. Before I get into pictures I want to welcome Wayne back to the log, glad to hear from you again man. Also Sal, who is building a beautiful rendition of this model over in his build log and where I am drawing a lot of my inspiration. I got the chain plate technique from him and will likely be stealing another little trick he used on his Phantom, the lining around the sunken cockpit. Now for progress and pictures! Last time, I left you with the blackened chain plates and they are now installed. When hammering in the nails, some of the blackening agent came off of both the chain plates and the heads of the nails, the one pictured here is one of the better looking ones but some lost quite a bit of their finish as shown in the second picture. I'm not sure yet if I will just paint them black or leave them because it really doesn't look terrible, maybe it adds a little character? I'll have to see what the admiral thinks. Also, if you guys have any opinions on whether to paint them, leave them, or some other idea, let me know in your responses. Here is a picture of the hull in pretty much its current state with the chain plates, eye bolts, and belaying pins installed on the cap rail. Also, you can see the cleats are painted black and the deck has been wiped down with some wipe on satin poly. Next, I have been working on the deck fixtures. I built most of them a while back, before MSW 1.0 went down into the deep abyss, but there were still some details needing to be finished. Here is the progression of the companion ways' hatches. This first picture shows the rails and the front and back of each hatch. Once the hatch frames were assembled, I realized I needed to thin some more boxwood strips for the hatch roofing planks. This is a simple jig I made which works quite well. It is just a couple strips of brass which are the desired thickness (in this case 1/64"), the strip is placed between them, secured with thumb tacks, and sanded until the strip is flush with the brass strips. Here are a couple pictures of the hatches . I was really surprised to see the difference between the raw wood and the wood with the wipe on poly finish so here is a good comparison picture. When installing the hatches to the companion ways, one of the hatches was not very square and did not sit flush so I clamped it down and let it dry. The clamps made a great tripod for the photo :lol: Last, a picture of the deck fixtures as they stand right now. You can see the companion way doors are also installed in this picture, they are each two pieces of box wood with little notches cut out and filled with pencil lead for handles. I think I will do some touch up painting before installing them and the wheel definitely needs a new paint job. I have made a little bit more progress but forgot to take pictures so I will do that when I get home but I made and installed the traveler and the cockpit coaming is done and has its own cap rail installed on it. I am also really excited about the sails, I have bought some material and have been trying different techniques for the stitching and other details. Hope you all enjoyed,


-
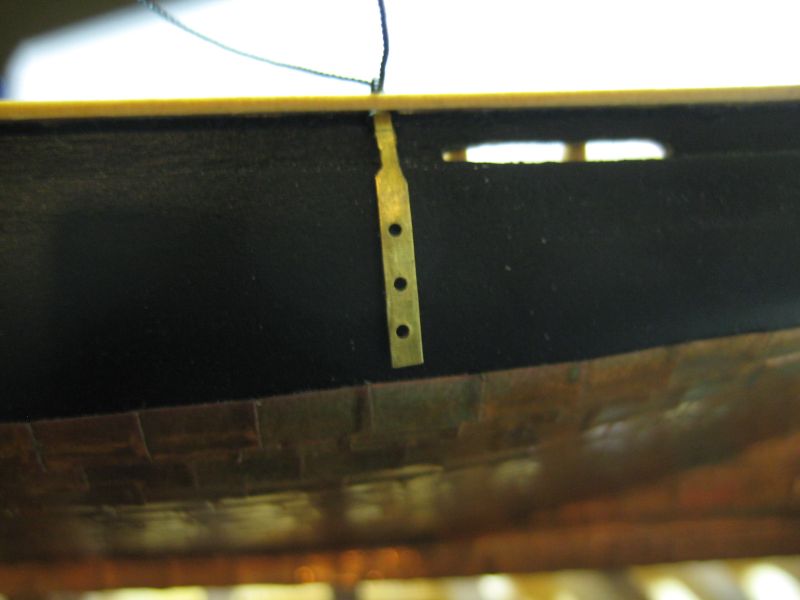
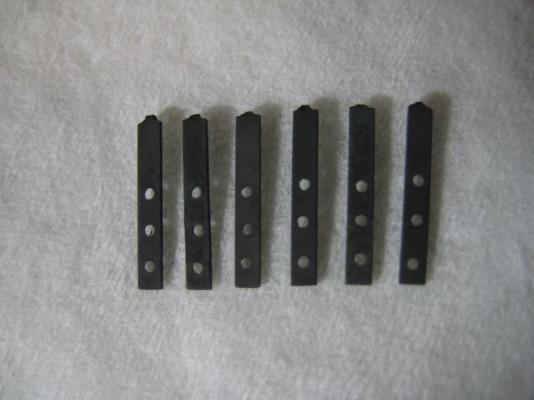
Russ and Nils, thanks for the encouragement and stopping by. I threaded the rigging lines through the holes in the cap rail to test the fit of the chain plates and was kind of disappointed. The rear chain plates came very close to the hull sheathing and all of the chain plates had the thin part very exposed which I figured out was wrong when I looked at the pictures of Chuck's install chain plates. Here is a picture of one of the rear chain plates. I remade the chain plates following the process outlined in DrWatson's build log, thanks Sal for the great example to follow. These new chain plates came out MUCH better than the first set. Then I chemically blackened the chain plates and am really happy with the results. I think I am going to hold off on installing the chain plates until later in the build when the masts are up and I begin rigging so that I can get the proper angle on the chain plates. Next, I think I am going to install the belaying pins and eye bolts on the cap rail and then get started on installing deck furniture. I also need to wipe down the deck with some wipe on poly (this should have been done earlier in the build but it got overlooked) and paint the cleats black (this should have also been done before installation but I think we can get it done without too much of a mess. Hope you guys enjoyed this update!

-
Sal, I just stumbled upon your build and am very impressed! I am at roughly the same point in my Phantom build, a little bit behind where you are currently. I am going to be installing the cockpit coamings and whatnot very soon and your idea for putting painted manila folder on the inside is absolute genius! I may just have to steal that feature for my build. Thank you for helping find a solution to something that has been bothering me about my build and I look forward to your progress. Happy building,
- 139 replies
-
- 1
-
-
- phantom
- model shipways
- (and 1 more)
-
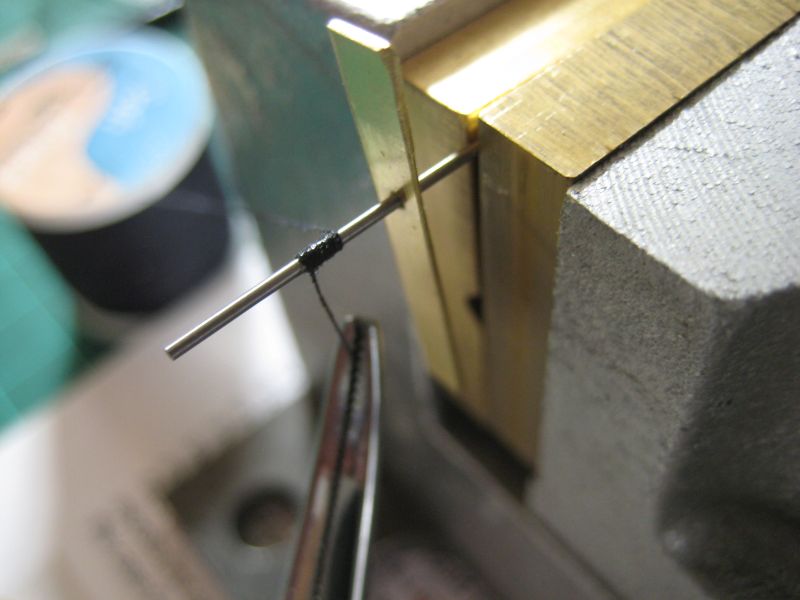
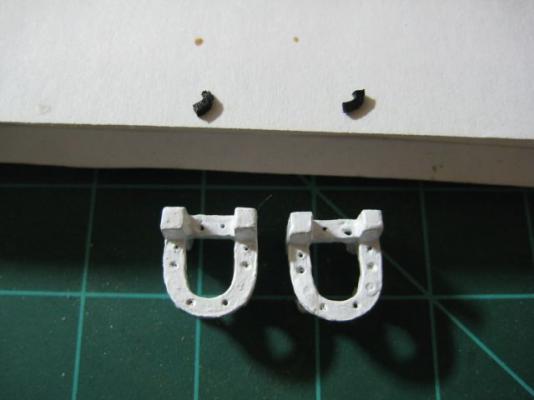
Hey all, work has been getting done in the dry docks. First, the fairleads have been installed on the cap rail. The splash rails have also been installed. I glued these in two parts to get the right bend in them. The chain plates have also been coming along nicely. I followed Chuck's instructions here. After cutting and inserting the standing rigging line (.25mm), I crimped the loops down to hold the line in place. The rigging line I am using on this build is not the supplied line, instead it was ordered from morope, they make really nice rigging line. Last, I thought the kit supplied kits had way too thick of heads so i filed them down a bit, here is a picture of the unaltered vs. the filed nails. Next, I will be installing the chain plates and start the first step of rigging, securing the dead eyes to the chain plates.


-
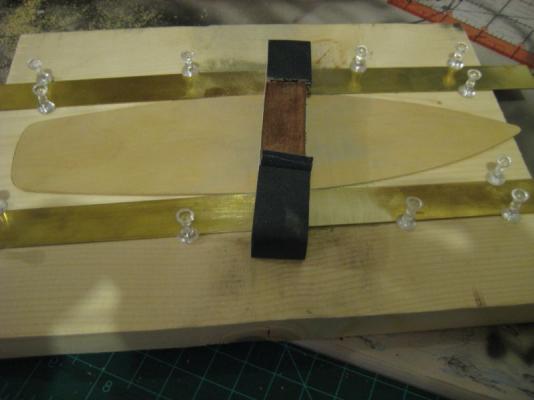
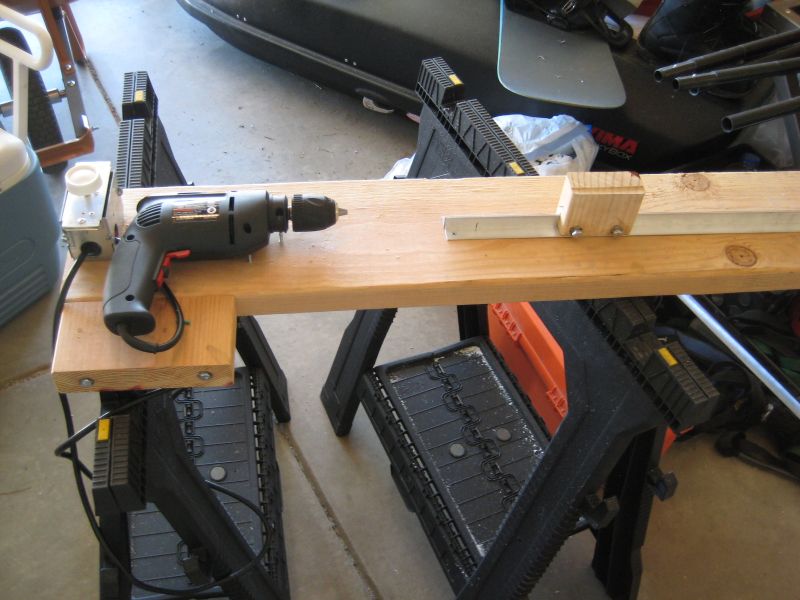
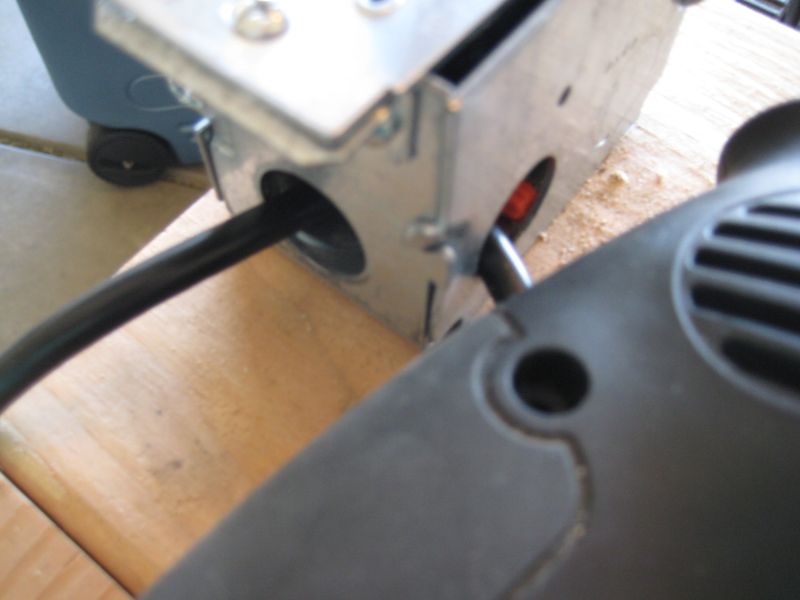
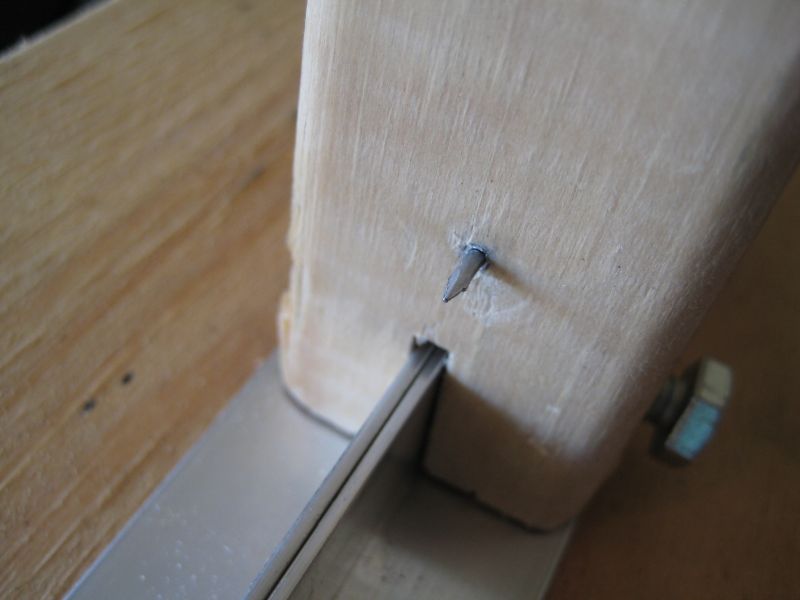
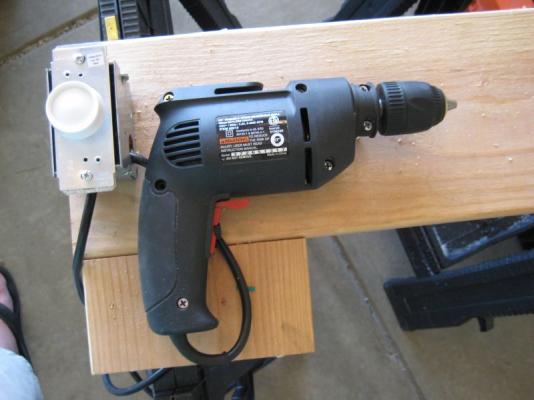
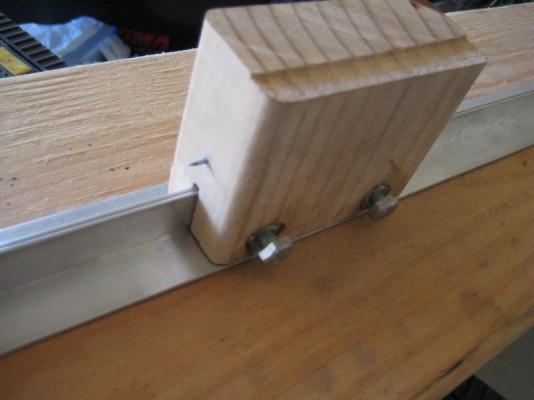
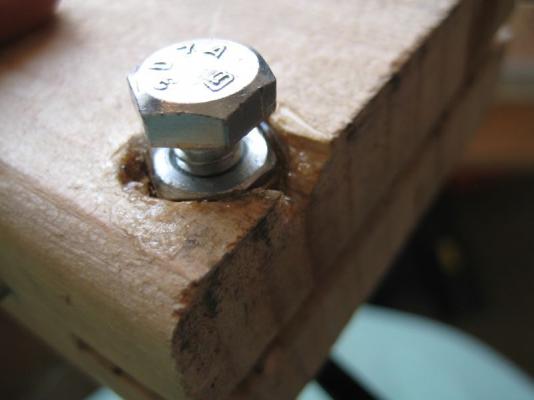
Gulf, I finally got around to making this lathe. It is basic but I think it turned out ok... it should get the job of turning the masts done just fine. Here is a picture of the completed lathe. The base is made of a 2x6 board and another piece screwed to it with a couple 6" lag screws. Then the rail is made of two aluminum right angle strips laid up against each other. Here is a closer view of the drill and rheostat. The drill is just a cheapie from harbor frieght. I think I might change the rheostat to just a simple switch because the drill itself has a little knob on the trigger which works as a rheostat and the rheostat doesn't supply enough power until the very end of its range and then it only gives me like an eighth of a turn to actually vary the power. The tail stock was just made of a scrap piece of 2x4 which I used my dremel to cut the slot for the tracks. The live center was made with a nail and a piece of the metal tubing I used for the mounting system for the hull. the nail can spin freely inside the metal tube and seems like it will work great. Last, the locking system for the tail stock is a couple nuts epoxy'd into the side of the 2x4 and a couple cut lag screws that will press against the rails on the base when tightened down. The epoxy job got messed up a bit but I am going to go with this attempt until it fails, then I will rough up the inside surface and the nut better and re-pour the epoxy (and let it fully dry before removing the lag screw). I am really hopeful that this lathe will work for the job it is intended for and be worth the $30 or so I spent on all of the parts and whatnot. Eventually, I want to get a legit metal turning lathe but this will hopefully hold me over until that is feasible. Hope this helps!


-
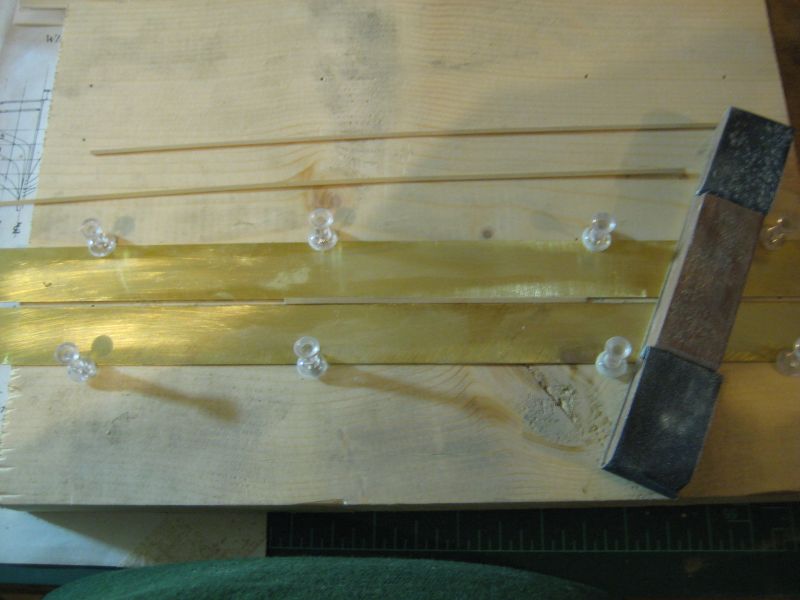
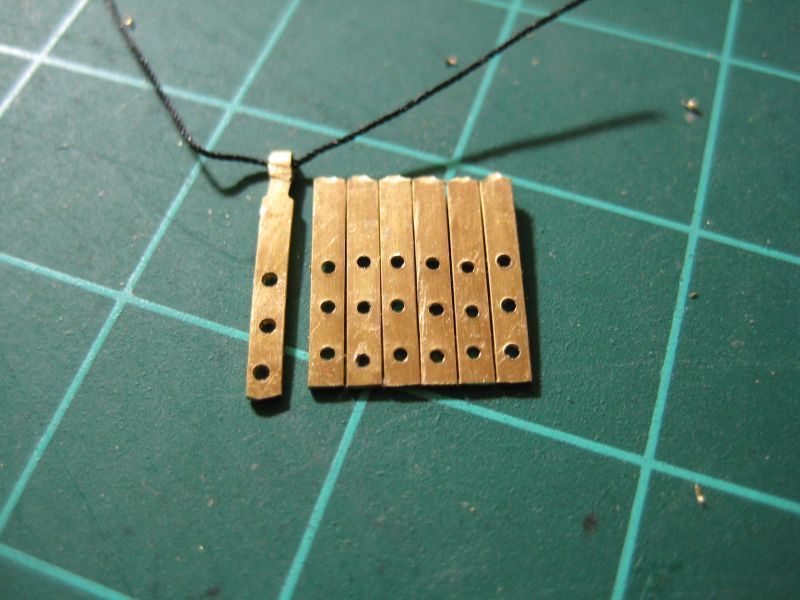
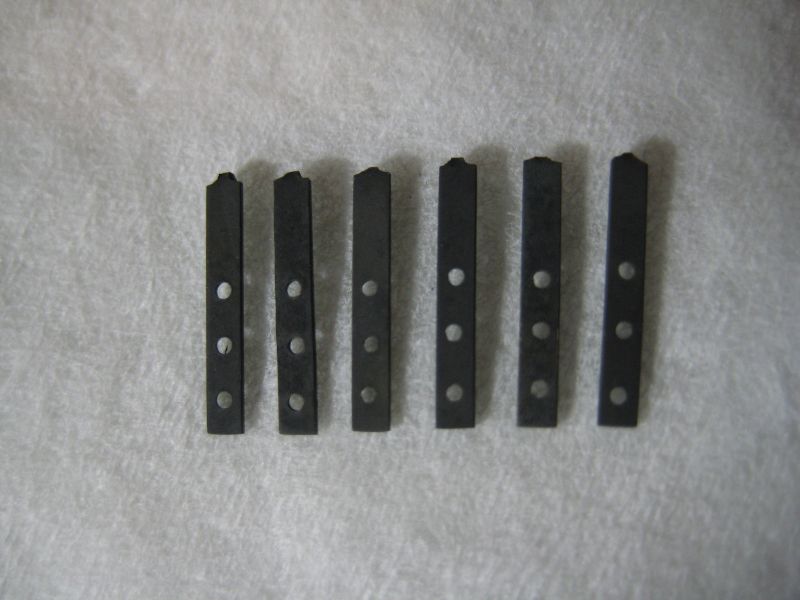
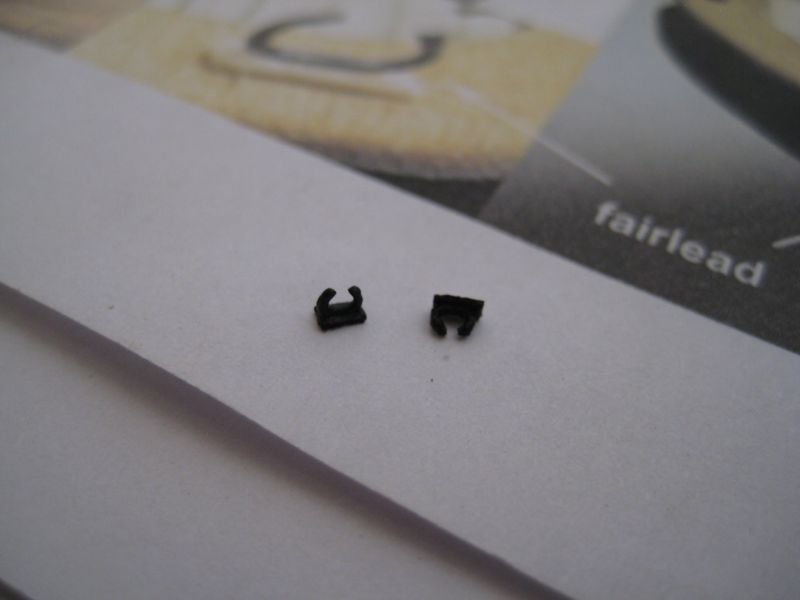
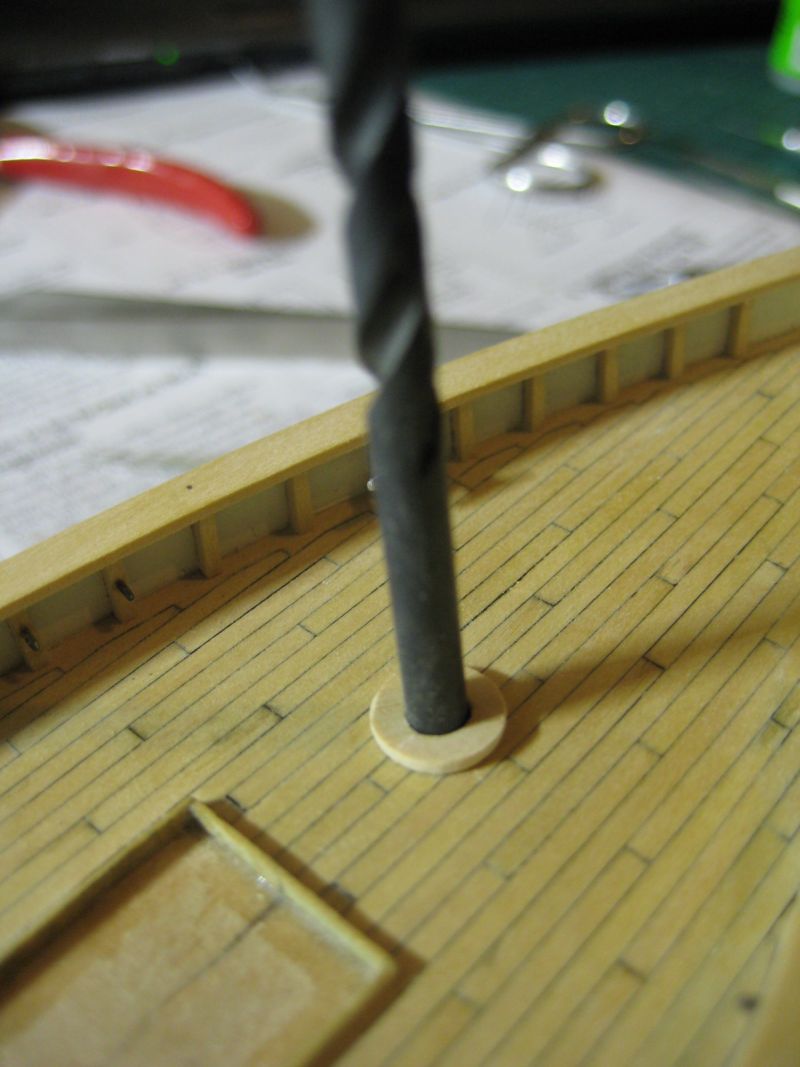
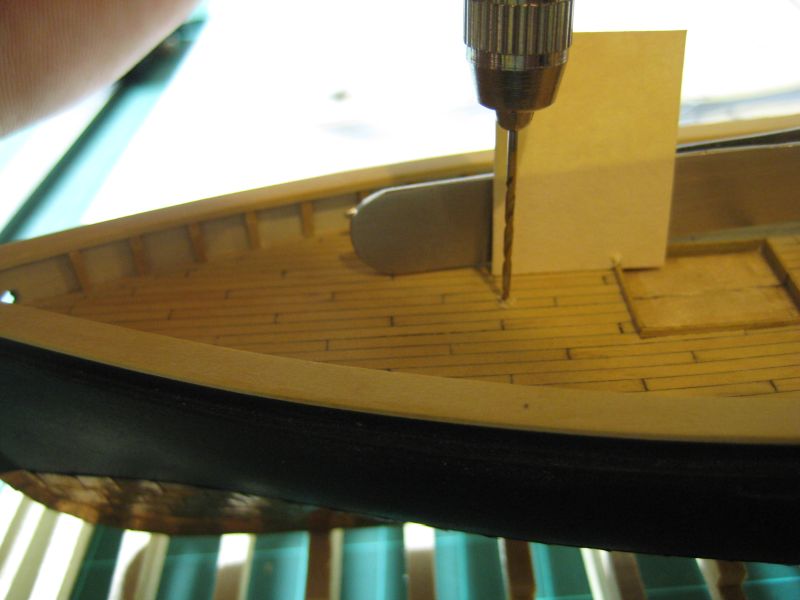
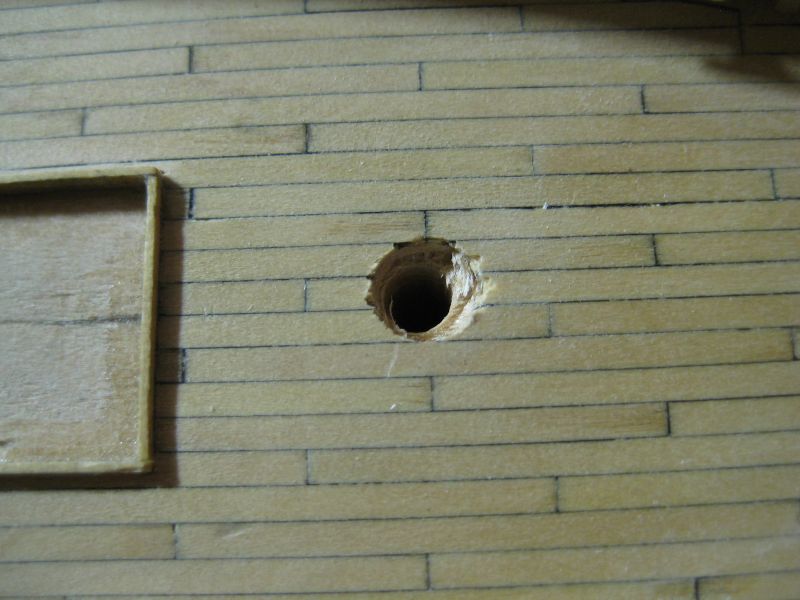
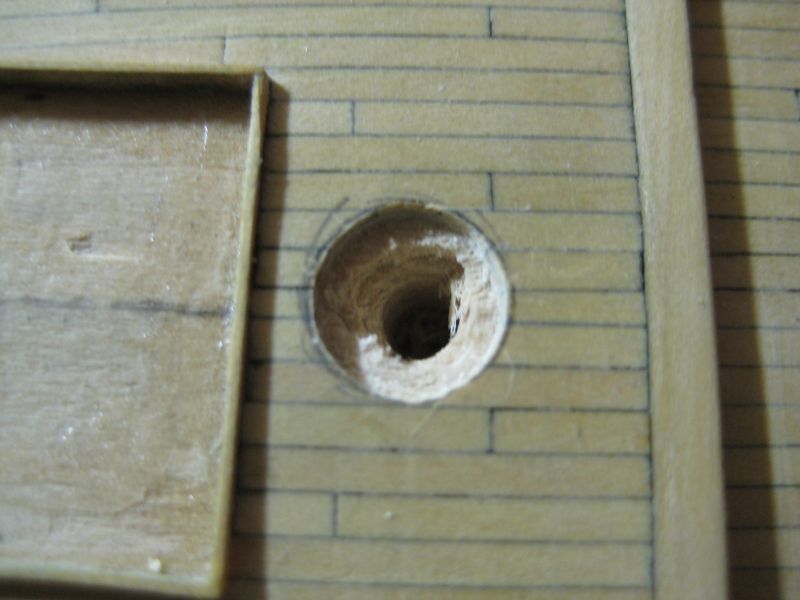
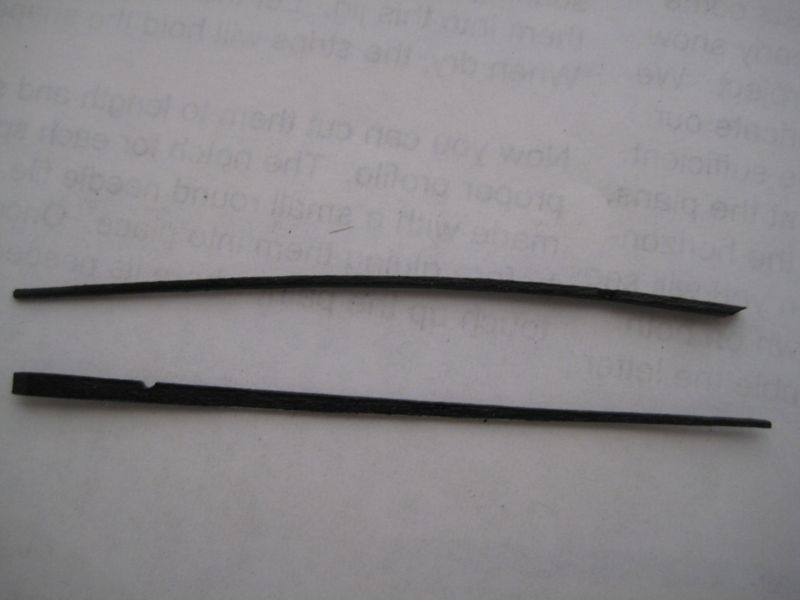
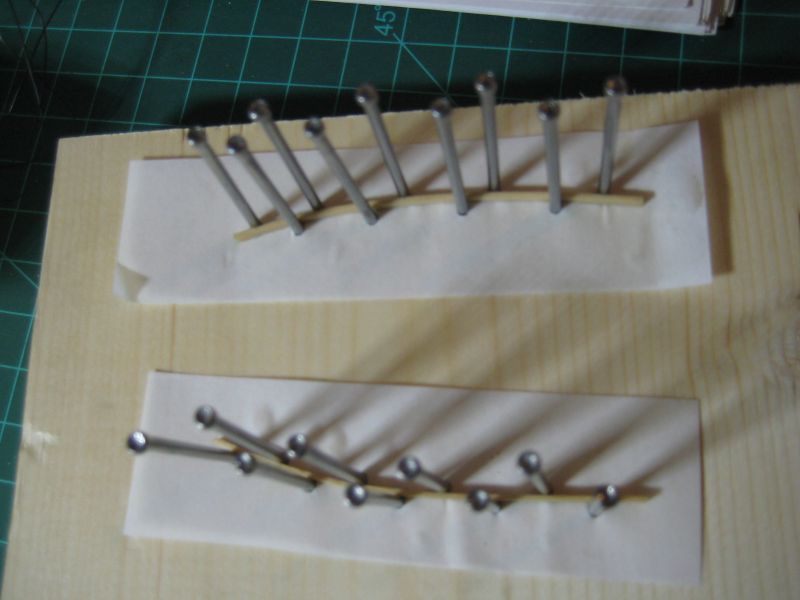
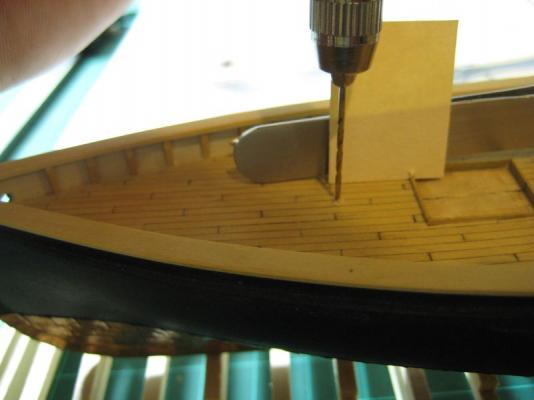
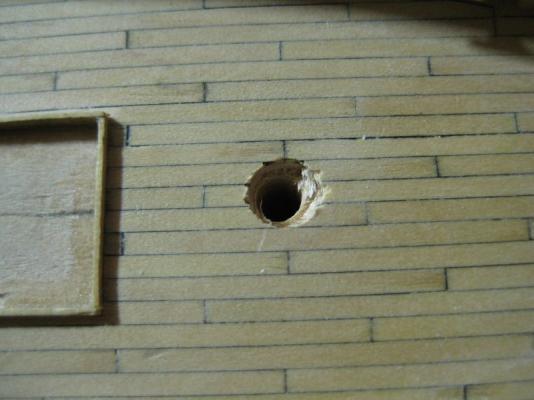
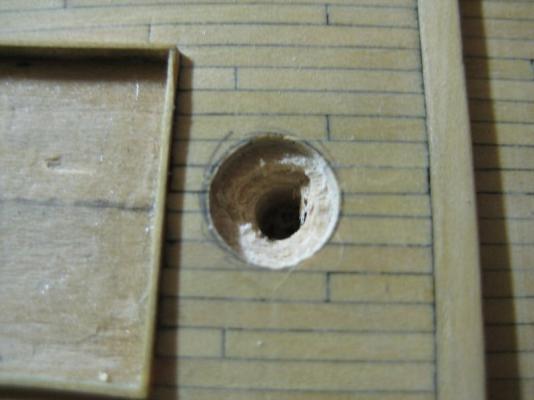
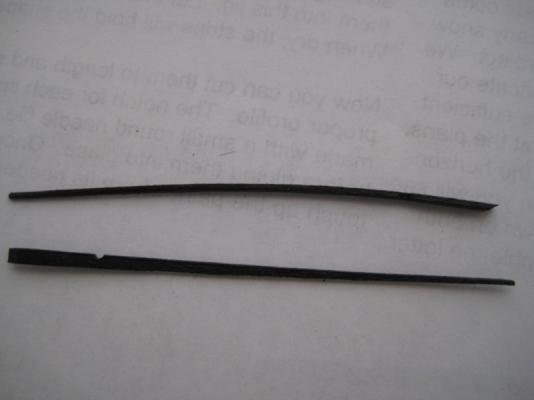
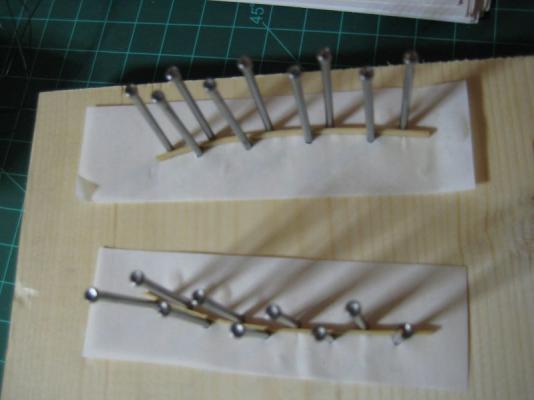
Now for the progress I have made this weekend. Man, it feels good to be building again, stress relief. This weekend I have made the fairleads, splash rails, drilled the mast holes, made the mast coats, and made my lathe. The fairleads were pretty straight forward to make, I just followed chucks instructions and cut the manila folder bases with dimensions from the plans, and bent some of the black wire that came with the kit. Glue and paint and you're done! The splash rails were kinda fun for me to make because this was the first time that I have successfully bent wood. Here is a picture of the jig I used to make the bends. I just soaked the wood in some hot tap water and then threw them into the jig to dry over night. The following day, I filed them down to the proper shape, added in the little notch and painted. The mast holes were a little bit of a challenge to drill properly. I drilled them using a guide I made with a piece of manila folder, stepping up in sized about 7 times in the drilling process. Despite stepping up the drill bit diameters little by little, the larger drill bits still damaged the deck planking a bit. This is a pic of what the deck looked like after drilling the 9/64" holes. Because of the damage, I decided to make the mast coats from the boxwood sheet I had for the cap rail. I drilled through the deck planking with a larger bit but still left the holes smaller than needed. I used my exacto knife to widen the holes to the proper diameter to fit the mast coats. Making the mast coats was a relatively simple process, I just drilled the 9/64" holes in the sheet of boxwood and cut/filed the wood until they were a reasonable diameter. Lastly, this weekend, I finally built my DIY lathe. I will make one more post detailing the lathe. Hope you all enjoy!


-
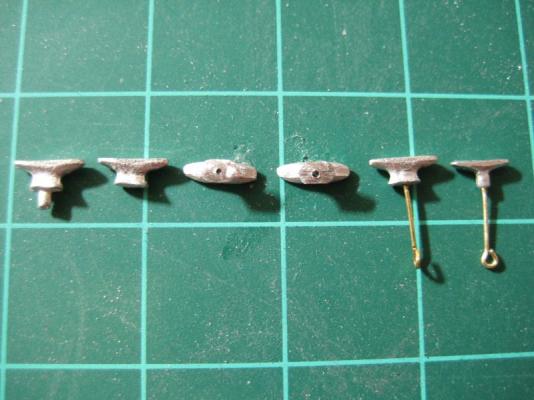
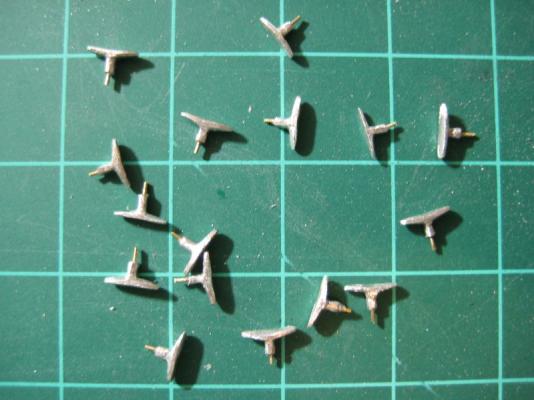
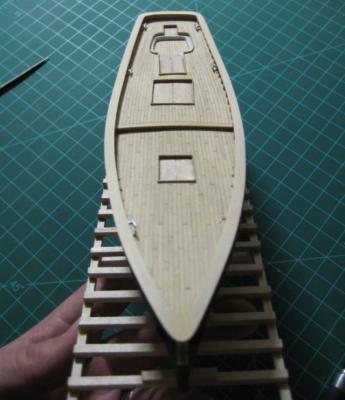
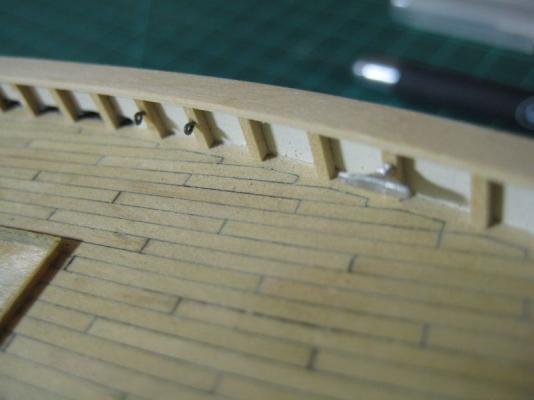
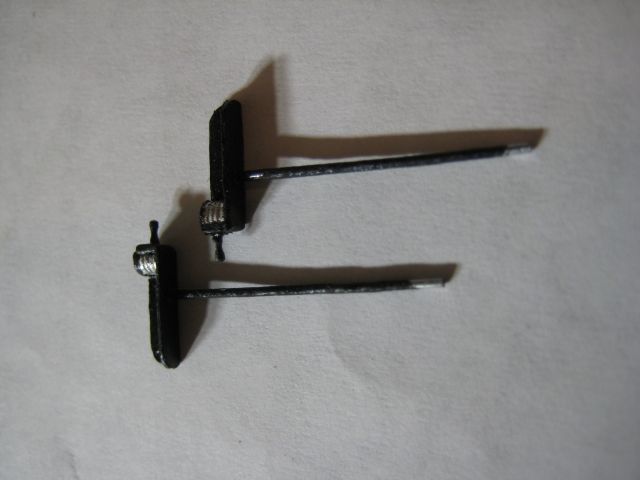
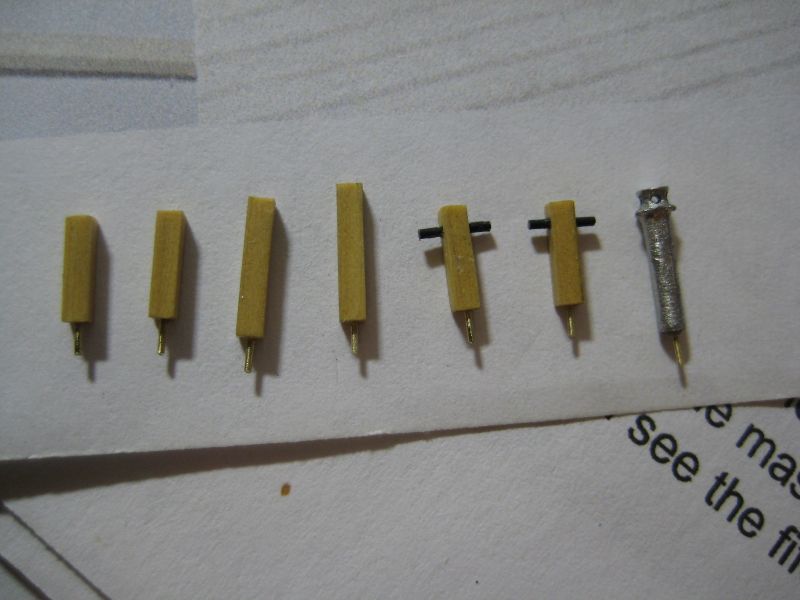
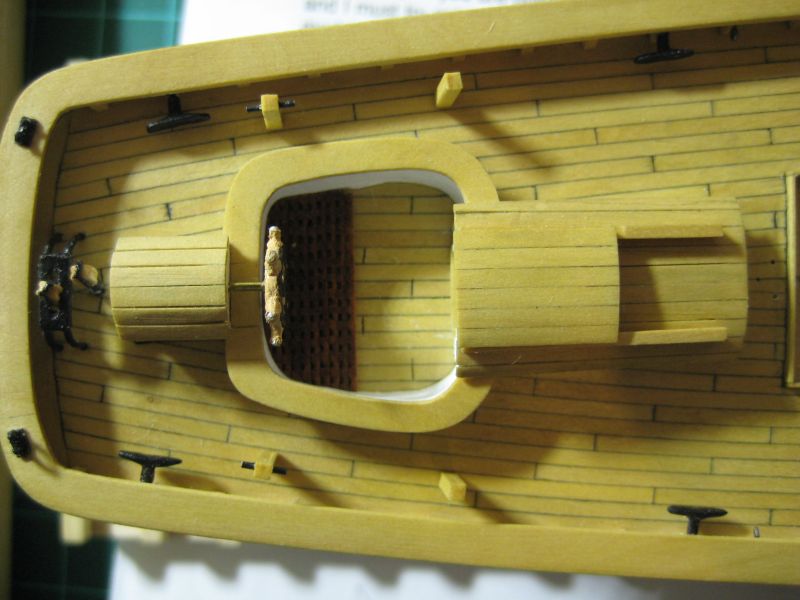
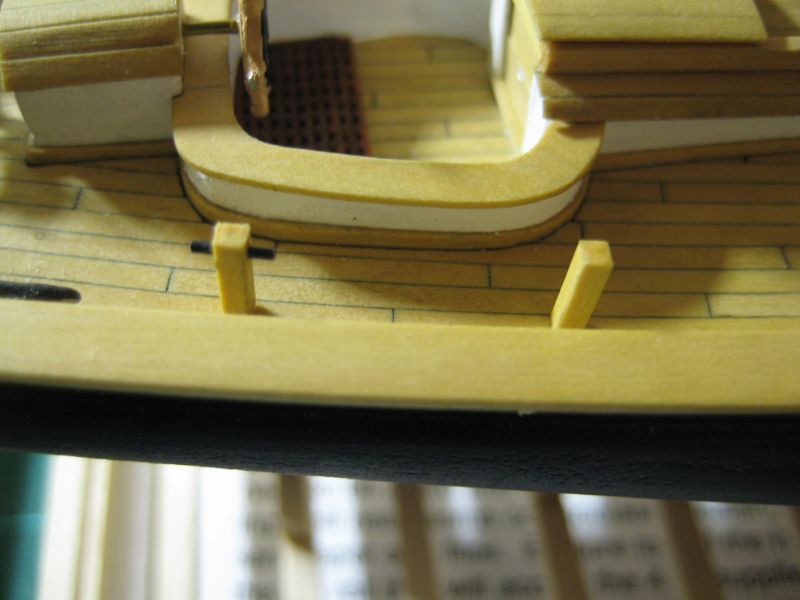
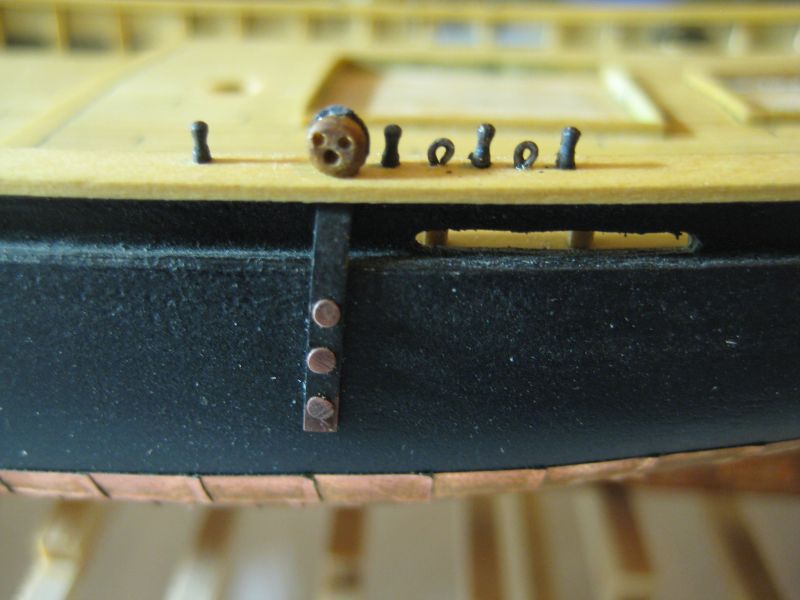
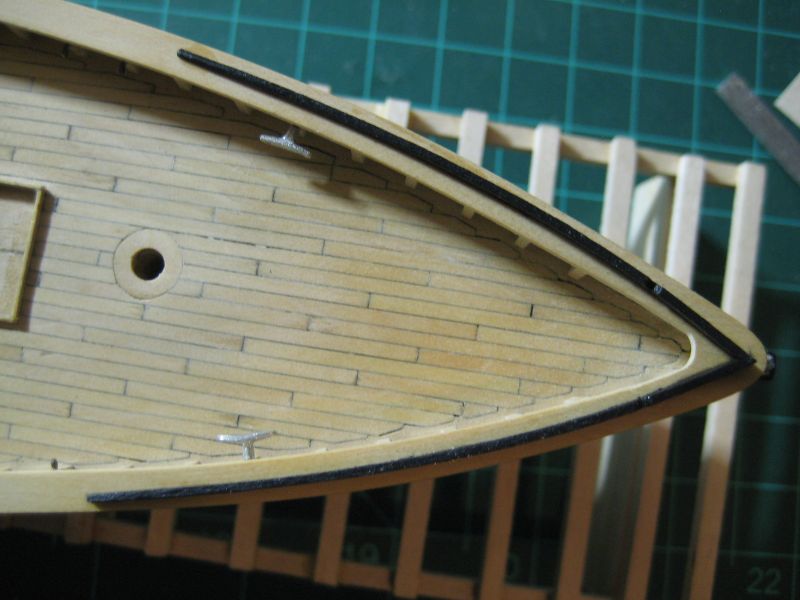
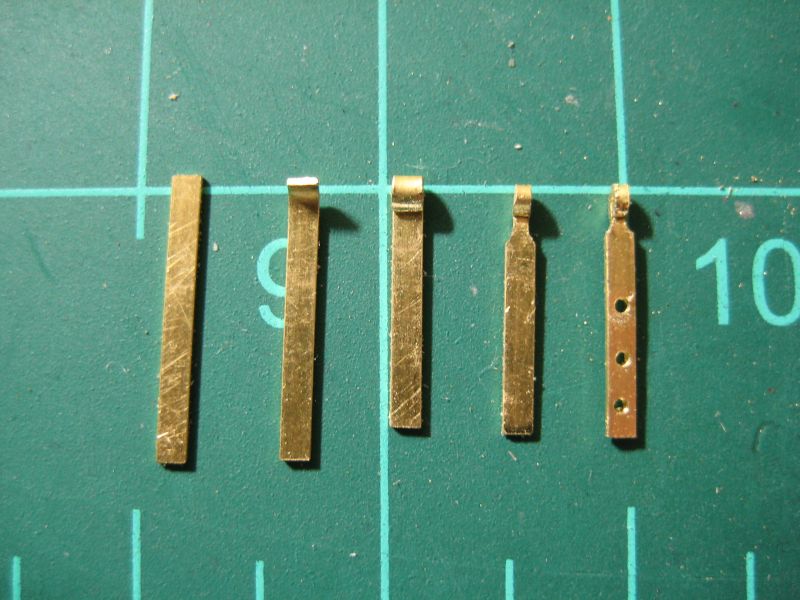
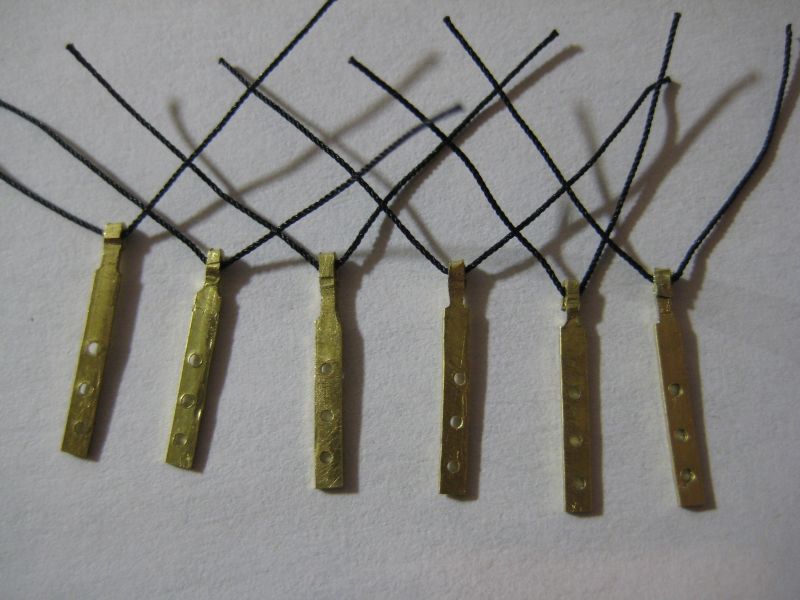
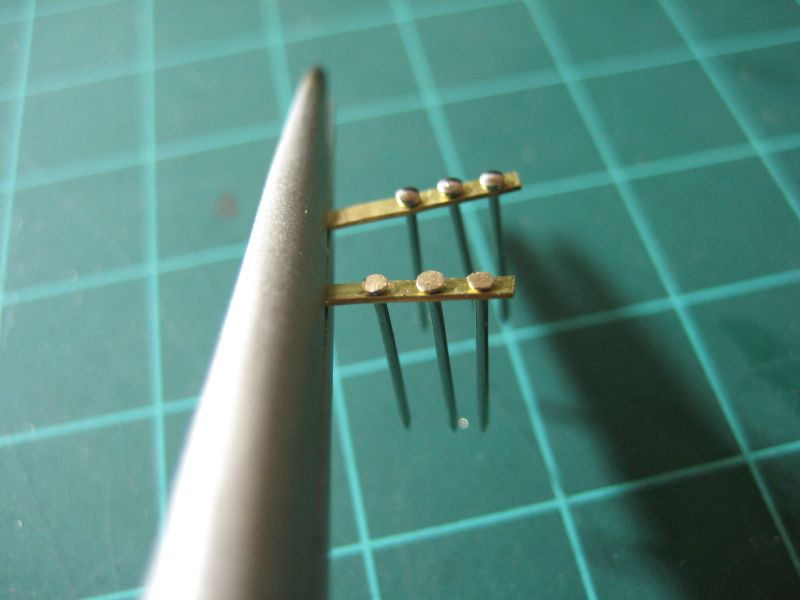
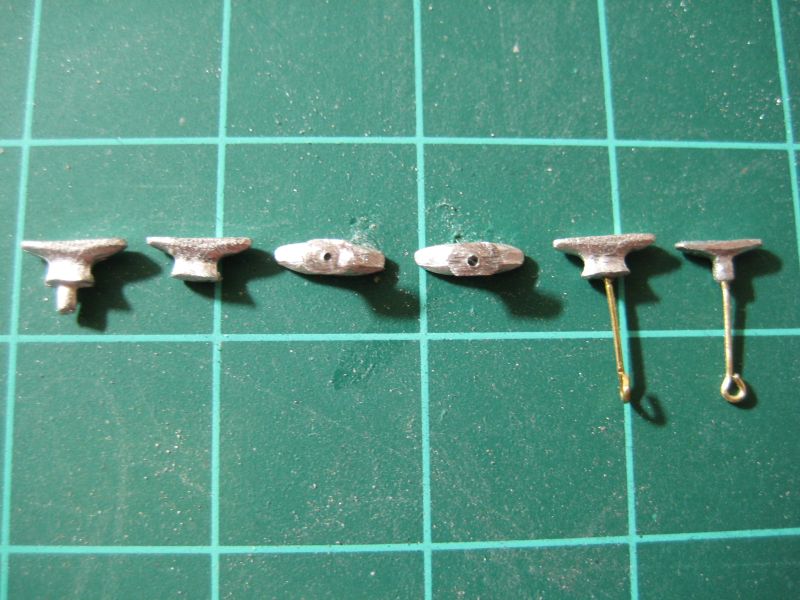
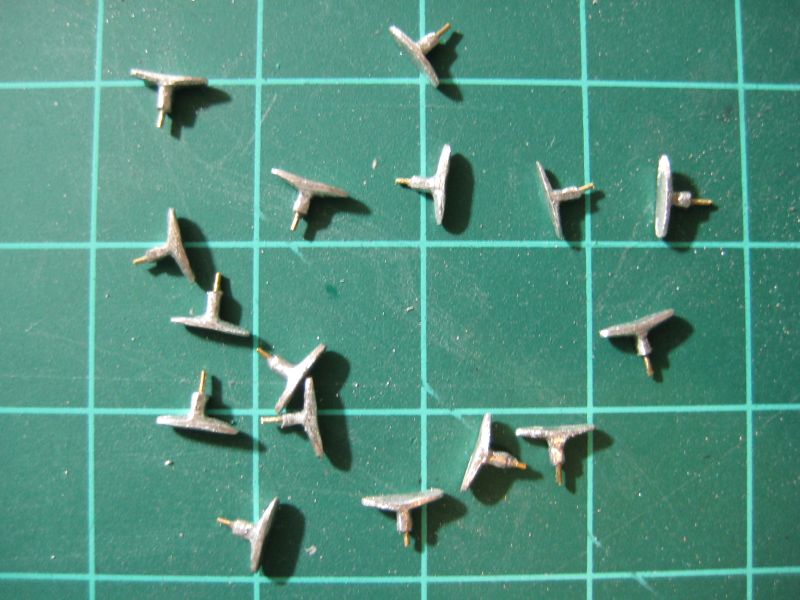
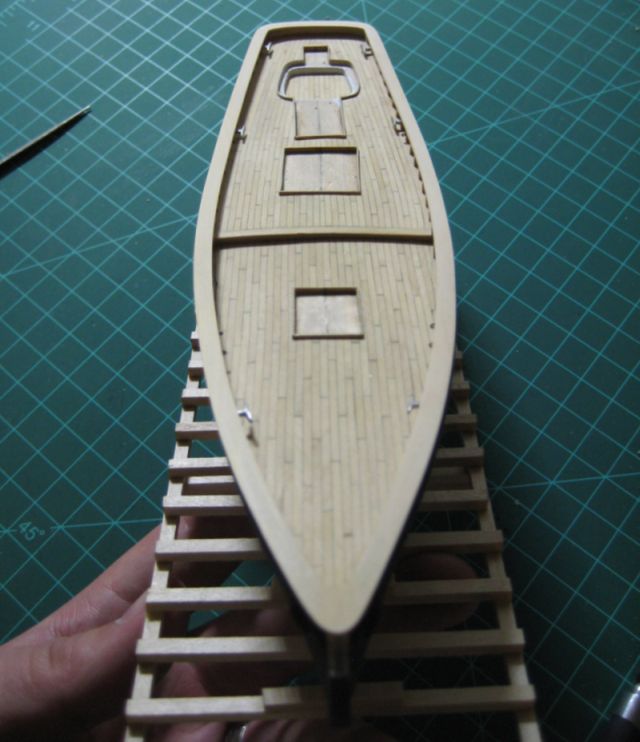
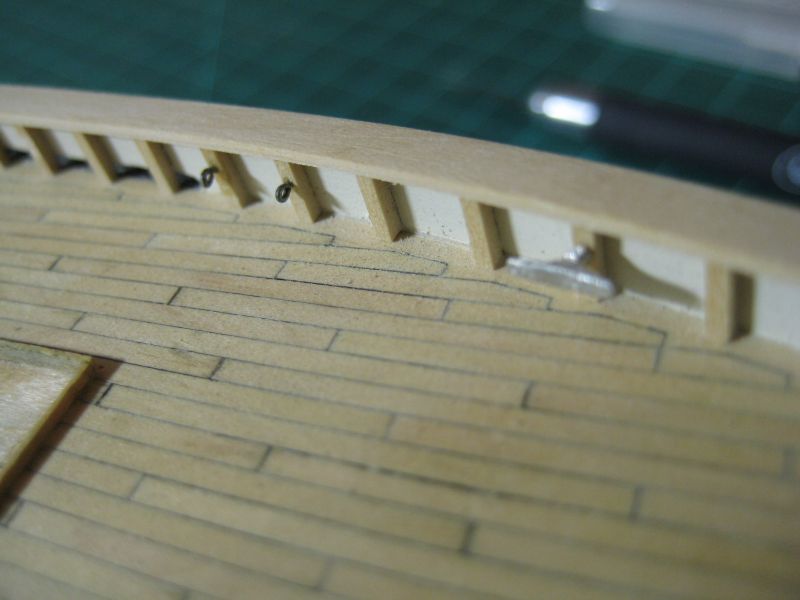
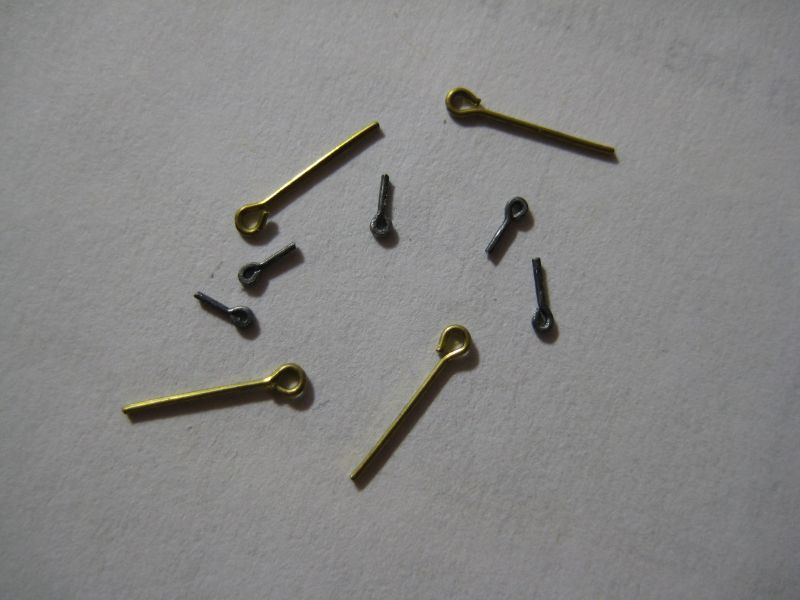
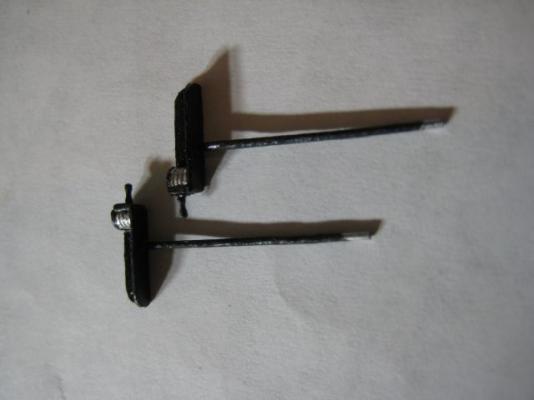
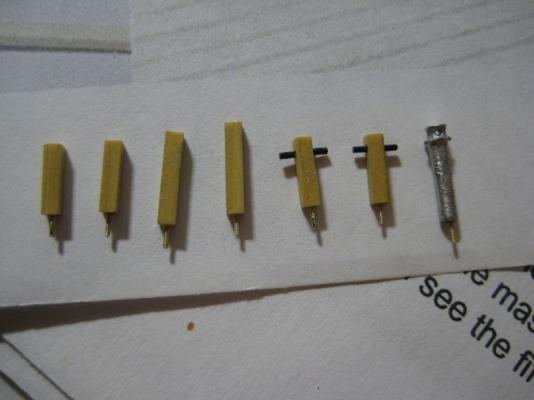
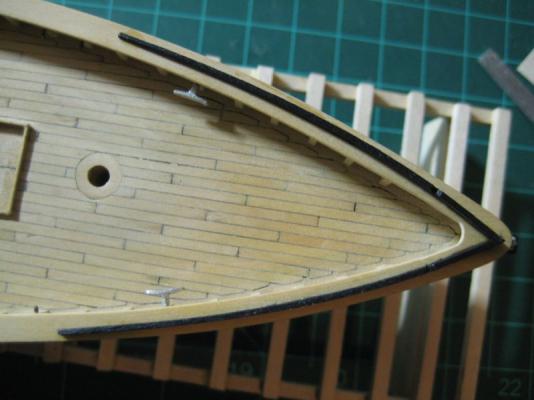
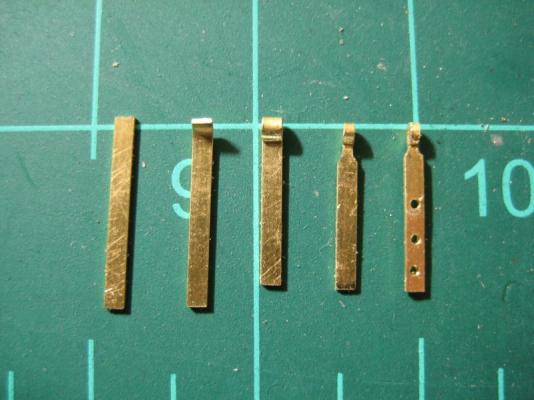
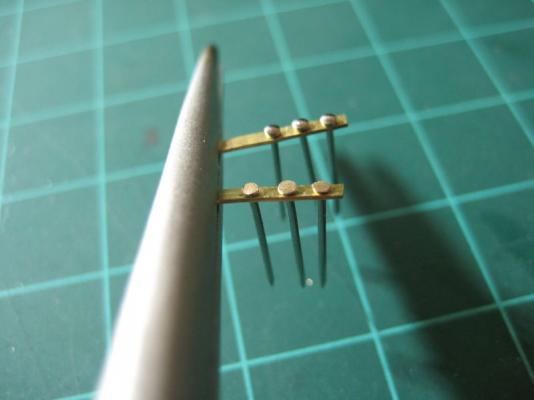
Why hello again, it has been about six months since my last update and that is mostly due to not doing much building... until now! I hope you all have been doing well. I have made a bit of progress since my last update. First, here are pictures of the cap rail. Basically, I used my thinning jig to thin the cap rail blank down to approximately 1/64" of an inch. Then I just carved out the inside and, this time, it fit properly so I glued it into place. Next, I decided to modify the eye bolts and cleats to make them closer to being in scale. All I did for the eye bolts was take some pliers and bent the wire into a smaller loop, cut them to a proper length, and blackened them. As for the the cleats, this was a few step process: (from left to right) - Untouched cleat - Cut/file off the little tab at the bottom - Make a center hole with an awl for drilling - Drill an appropriate diameter hole that will fit the eye bolt wire, I think I used a #78 drill bit but don't quote me on that. - Glue an eye bolt into the drilled hole and let glue set (These were cut first and then the eye bolts were made from the remaining end) - File down the cleat until it is closer to scale size (I left these oversized (out of scale) a bit because I figure I am going to need some extra area on them for the rigging line. - Cut the wire so that it protrudes about the thickness of your bulwark stanchions (Not pictured) Here are the cleats all done and ready to be installed. Next, I drilled holes in the appropriate bulwark stanchions (found on the plans) with the same size drill bit used on the cleats. Here are pictures of the eye bolts, cleats, and cap rail installed. That is the progress I made over the past few months. Let me know what you guys think! My next post will be the progress I made this weekend.