piratepete007
-
Posts
512 -
Joined
-
Last visited
Content Type
Profiles
Forums
Gallery
Events
Everything posted by piratepete007
-
 Keith, Would you mind contacting me? I will look at MSW on occasions - tired of criticisms - but messages like yours today I can easily miss. I thought they also came through via an email ? Speak later today. Pete
 -
Keith, will look at that this afternoon. Out all morning.
-
'Tidy up the Spaghetti'
piratepete007 replied to piratepete007's topic in Masting, rigging and sails
Allan, thanks for taking the time to present that detailed set of references - will be invaluable. Pete -
'Tidy up the Spaghetti'
piratepete007 replied to piratepete007's topic in Masting, rigging and sails
-
'Tidy up the Spaghetti'
piratepete007 replied to piratepete007's topic in Masting, rigging and sails
Thanks for your reply Phil. What you have done with the falls on the Albatross makes sense. -
Hi Folks, Building models is always open to individual interpretation and I fully respect what everybody does but I am wondering if somebody can assist me. Gun tackles are always a challenge in whether to include side tackles, train tackles and breech ropes and I appreciate all the intricacies involved. However, there is one aspect of rigging that I have not resolved - in my mind, at least - due in part to a post I read on MSW by Stockholm Tar, 21 July 2014 ... that I had kept in my own files ... “Ropes left lying on deck would probably never dry out, being repeatedly wetted by either salt or fresh water. If you consider a deck (with rope coils laid on it) which has just been rained on, or a sea has come over the side, the deck itself might gradually dry out, but you can bet that that part of it under the coils will still remain wet or damp – an ideal situation for rot to set in. Apart from that a heavy sea coming aboard would also leave the coils in a hopeless tangle, so coils on deck are also a safety hazard. From experience, the only time you would normally see a large amount of rope on deck, is when the ship is either setting or furling sail, or engaged in some manouvre such as tacking or wearing… The last order normally given after such an operation was to 'tidy up the spaghetti' – ie, coil up, and hang the running rigging from its pin “. Many modelers like to show the side tackles in a tight coil, sometimes known as a cheese, beside the gun, but I think this was usually only done for inspection purposes … During action of course, they probably wouldn't have been coiled at all”. Majority of builds have the barrels projecting out and are therefore ready for action. So ... it appears that when builders attach the side tackles, a few add the rope coils onto the adjacent deck but most just don't show this excess rope at all. If this rope is hung as suggested in the above quote, there must have been a series of pins along the inner bulwark walls ? Does anybody have any specific comments on this and especially a photo or two to show these ropes hanging during the normal running of a ship ? Thanks in anticipation, Pete
-
Keith, Absolutely blown away by your meticulous work. Just incredible. Best of all, you have returned to writing these posts that will prove invaluable to other ship builders no matter what they are working on. Looking forward to your continued writings !
-
Keith, I agree - to post any detailed comment on this forum does take a great effort. What you have written so far has been very interesting and illustrates what happens when building a Euromodel ship - every step is questioned, research is encouraged and individualism becomes a natural part of each build. You have done all of that. It would be a pity not to be able to follow your work as it happens. Pete
-
Keith, There are two types of kit modelers - those that give up and those that don't. You certainly fall into the latter group and indeed the Euromodel philosophy in their kit designs is to leave the door wide open to doing your own thing. Almost without exception, I observe Euromodel builders researching and researching how these ships were built. Your construction of the transom components was amazing and just so individualistic. Have fun with adjusting some of those stanchions. By the way - and down the track - the plastic ship's boat is a great project in itself - exterior and interior profiles are easily carved and with various boards, thwarts and stringers added and doing some dry brushing, you can finish up with a real beauty !
-
Ah Keith, great to see you have returned to you RW build. Looking forward very much to your future posts
-
Max, Your kind words make me feel humble. You know as well as I do that these 'kits' are a unique way of moving away from kit building and inching towards scratch building. Just love the challenge. Out of the two ships you mentioned, the Falmouth is a good choice. HOWEVER, coming out of left field, the Euromodel Lyde schooner is the one I am working on at the moment and the files are the most thorough and extensive I have ever written for any ship. Just an alternative. Looking forward to your masting and rigging. Pete
-
Great stage to have reached Max. The photos say it all and almost defy adding words of praise. However, I will - fantastic accomplishment my friend. One to be proud of. Coincidentally, I have just added this week revised files for the hull construction on the Euromodel website. A little late for you ! Pete
-
Hi Max, Its quite a while since I caught up with you and just came across your fantastic work on the FW. What a build it is and congratulations on your work that you have put into this. Your attention to detail is obvious and I look forward to seeing more of those photos. Pete
-
Looking good Max. When it comes to making a decision on most aspects of ship building, Mondfeld is an excellent reference. However, the beauty of working from the incredible Euromodel drawings is that you are always free to select what level you wish to work at. The Euromodel builds are certainly not scratch builds but in some aspects get close. So, keep up your meticulous work. As regards Euromodel, they have no upfront shop to physically go to but am sure some arrangement could be made to collect a ship from them in Como. Pete
-
Max - you have 'hit the nail on the head'. I agree there are some wonderful kits out there that can be assembled to produce a great looking ship model. Euromodel have kits that are intermediate between those kits and scratch models. To build a Euromodel kit is indeed, as you said, a challenging journey and at the moment I am building their Lyde schooner. What a dream it is. Every day there is a new challenge peppered with interpretations and it is an incredible experience to be involved with. I could never go back to a straightforward assembly build. No good manuals ? I am lucky enough to be allowed to post building instructions onto the Euromodel website and there is much information available... and yes there are plenty of photos.
-
Max, After all that hard working with the fixing, cutting, sanding, sanding you are forming a beautiful ship. So many builders shy away from painting over the wood and just finish with some type of sealer to highlight the beauty of all that wood and I can appreciate that view point. However, we love to create these ship models and put so much effort into getting things correct - the right scale, the right fittings and so on. My personal view point is that if you have been so careful and meticulous with building the ship, then why avoid the thing that all builders of the actual ships actually had to do - a layer of substances over the timber to protect the ship from the dreaded Teredo worm This is often a good talking point when others view your ship. When I build a ship, I love others to see my handiwork BUT, as they say, its the journey and not the ultimate destination, that counts. As for the various figurines, I generally like to paint them with an antique type of gold finish and then apply an over-wash of brown. Hope that helps, Pete
-
Hi Max, Just came across your build and really impressed with what you have been doing with the FW. I am now following. Pete
-
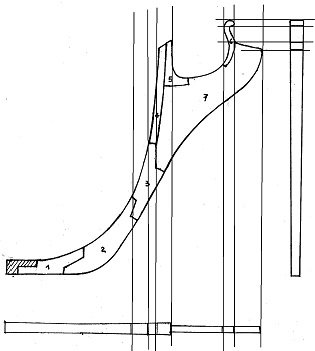
JMartti, You are correct - this is indeed a beautiful ship and the drawings are very detailed. The drawings are sufficient in many details for a scratch build but this whole thing is presented as a 'kit' build and that can cause a few problems and you have highlighted one such area - the stem post. Euromodel supplies a blank that represents the total outline that includes essential components such as the knee of the head (7) and the gammoning knee (5 ?) and it is here that differences in thickness historically did occur. These three detailed drawings are aimed at the scratch builder, not the kit builder. I can see the correlation between the main head drawing and the one on the right and have added some lines (slightly off-set) to show that. The drawing on the right is viewed as from the bow aftwards. It shows an appropriate definite taper downwards and I agree that a taper forwards is also required as many ships did. In this case, as you point out, the figurehead dictates a tapering. The bottom drawing (a top view of the head) may be somewhat historically correct in that it shows a variation in thickness but I suspect that it contains sufficient errors to be ignored, especially for this kit build. Hope that helps. Pete
-
Fray, I know exactly what you are talking about but so as not to clutter Robert's post, if you like I will send you a 'PM' (private message) and we can discuss the matters you raise. Pete
-
Robert, thinking laterally but not answering your question about the use of those slotted pieces, is there any reason why the obstructing grates could not be made flush with the deck surface ? That would then possibly allow the normal recoil of the cannons, albeit over the grates ? Interested to hear what others would say about that as I have only ever considered recoiling cannons moving over a solid deck surface. Or ... is there enough of that channel material to make a solid platform between the grate and the rail for both sides ? Pete
-
Given the configuration of the cheek rails on this particular ship, I can see no reason for cutting into them to accommodate the gammoning. Pete
-
Teaching us all a few good lessons here Robert - your research has produced a few painful backward steps with your construction but you keep moving forward with your improved and more accurate view of what this type of ship really looked like. Pete
-
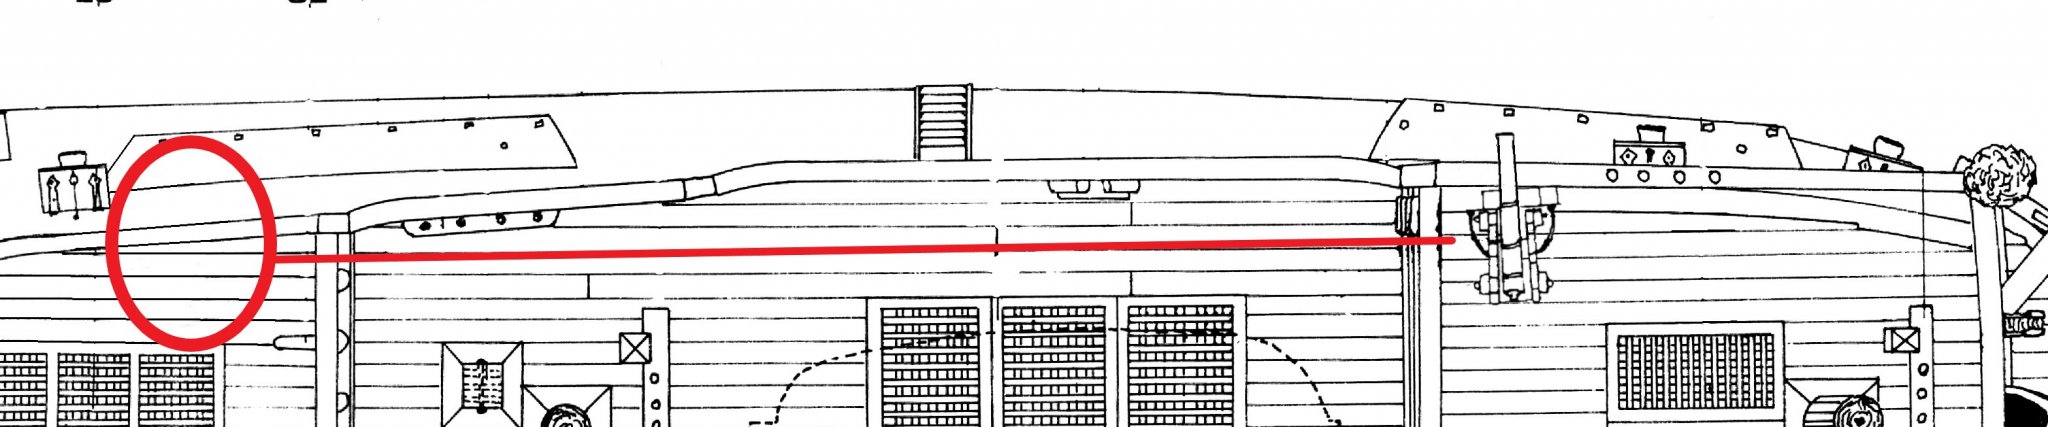
Robert, The 'ship has sailed' as you said but the attached diagram is a definite possibility (locating from the quarter to the focsl'e deck). A much earlier input from Marcus would have steered both you and myself in a better direction ! Pete

-
Maybe Marcus could make a comment here about the guns being on the main deck in what looks like an improbable position ? I believe these decks were deliberately narrow to lessen the tax imposition by certain countries based on a ship's main deck area. That then makes me wonder whether any guns were placed on this deck at all ? I came across this drawing of a Dutch fluyt which could support my suspicions. Just throwing that idea in for discussion.
.jpg.11aee2a75d7bb695b8cc5579b47be205.jpg)
-
Good update Robert and thanks for the info. After reading the above quotation, I was reminded about this argument that pops up from time to time. As a chemist, I appreciate the points being made but believe the ammonia reaction is extremely slow and soaking for a week or two will only partially change the lignin structure without any overall long-term damage. My approach is to lift the strips out of the aqueous ammonia after a week and to then place them into a previously contoured timber press that has curves slightly stronger than that required. There they sit for a few weeks - although I have used a warm oven to accelerate the process. I went and checked on ship of mine that had had some curves created by the above process approx. 10 years ago and everything looks fine. Using ammonia solution on wales and rails yes but not for general planking. Pete