

knightyo
-
Posts
490 -
Joined
-
Last visited


.thumb.JPG.4d3261ccae06041fa7cc2933fb43d577.JPG)
-
 Scottish Guy reacted to a post in a topic:
Hawker Hurricane Mk. I by ccoyle - Halinski - 1/33 - CARD
Scottish Guy reacted to a post in a topic:
Hawker Hurricane Mk. I by ccoyle - Halinski - 1/33 - CARD
-
laarmada reacted to a post in a topic:
Philip Reed style Navy Board models: are there any on MSW?
-
mtaylor reacted to a post in a topic:
Sloop Speedwell by Chuck - Ketch Rigged Sloop, 1752 - POF
-
FrankWouts reacted to a post in a topic:
Sloop Speedwell by Chuck - Ketch Rigged Sloop, 1752 - POF
-
Jack12477 reacted to a post in a topic:
Sloop Speedwell by Chuck - Ketch Rigged Sloop, 1752 - POF
-
 Ok, that's just shocking. I'd nervous to steer that ship on a lake. lol Alan
- 780 replies
-
- 3
-
-
- speedwell
- syren speedwell
- (and 1 more)
-
Ryland Craze reacted to a post in a topic:
Bregante by AmateurModelBuilder - Mini Mamoli
-
 bdgiantman2 reacted to a post in a topic:
Sloop Speedwell by Chuck - Ketch Rigged Sloop, 1752 - POF
bdgiantman2 reacted to a post in a topic:
Sloop Speedwell by Chuck - Ketch Rigged Sloop, 1752 - POF
-
FrankWouts reacted to a post in a topic:
Sloop Speedwell by Chuck - Ketch Rigged Sloop, 1752 - POF
-
king derelict reacted to a post in a topic:
Bregante by AmateurModelBuilder - Mini Mamoli
-
CaptMorgan reacted to a post in a topic:
Sloop Speedwell by Chuck - Ketch Rigged Sloop, 1752 - POF
-
I see a recipe for kittens with a cat in both bow and stern; I see that one of them also knocked one of the checkers. down. I also like the tombstone cutaways. Everything looks fantastic. Alan
- 780 replies
-
- 6
-
-
-
- speedwell
- syren speedwell
- (and 1 more)
-
Hello, Gregory was exactly right. Below is a photo of my mini-Mamoli Nina. The keel parts are glued into the pre-drilled groove all the way along the keel. Since the keel will be painted below the waterline, it doesn't really matter what pattern of pieces you cobble together down there as long as they are all snug in the groove, and against each other. It also helps to install pieces which stick out too far as well, so the entire keel/stem can be sanded down as one unit after the glue dries. Alan
- 14 replies
-
- 6
-
-
- Solid hull
- Bregante
- (and 1 more)
-
Warship identified off Florida coast 3 centuries after it sank
knightyo replied to Gregory's topic in Nautical/Naval History
They were just experimenting with fiberglass cannons. Alan -
Hawker Hurricane Mk. I by ccoyle - Halinski - 1/33 - CARD
knightyo replied to ccoyle's topic in Non-ship/categorised builds
I'd wager that your shipbuilding experience creating stealers had an influence on this solution. Alan -
knightyo reacted to a post in a topic:
Sloop Speedwell by Chuck - Ketch Rigged Sloop, 1752 - POF
-
Hello Kai, Since you enjoyed the Hornblower books, I would like to recommend the series by Patrick O'Brien which covers the same era, if you haven't already read them. That series of books is so enjoyable to read that many people read the entire series annually. Alan
-
From one Oregon introvert to another, welcome aboard! Alan
-
knightyo reacted to a post in a topic:
Revenge 1577 by Loracs - Amati - 1:64
-
There are also mini LED's that flicker, simulating fire, that one could install in the fireplace if one wished to go overboard (I couldn't help myself) with the build. Alan
- 780 replies
-
- 6
-
-
-
- speedwell
- syren speedwell
- (and 1 more)
-
knightyo reacted to a post in a topic:
The San Marco mosaic ship c. 1150 by Louie da fly - 1:75
-
knightyo reacted to a post in a topic:
The San Marco mosaic ship c. 1150 by Louie da fly - 1:75
-
I do it the same way as portrayed in the video, but the tool that works best for me is the edge of my steel ruler. It takes a little while to get the knack, but once you have it, you can create them very quickly Alan
-
knightyo reacted to a post in a topic:
SS Blagoev (ex Songa )1921 by Valery V - scale 1:100 - Soviet Union
-
knightyo reacted to a post in a topic:
The San Marco mosaic ship c. 1150 by Louie da fly - 1:75
-
knightyo reacted to a post in a topic:
The San Marco mosaic ship c. 1150 by Louie da fly - 1:75
-
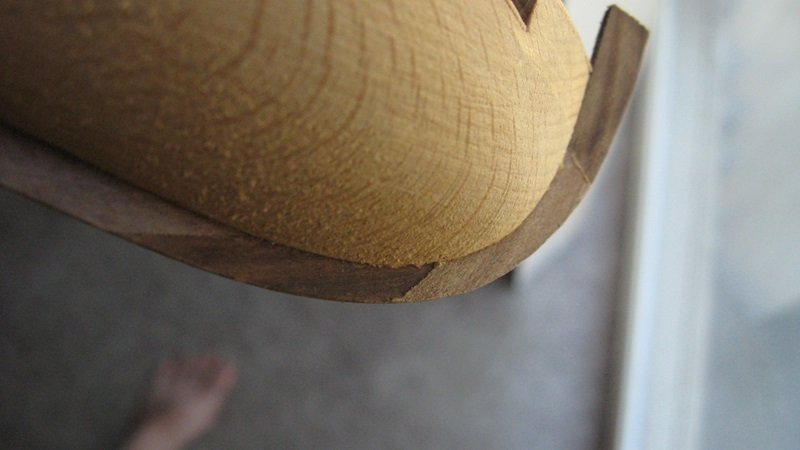
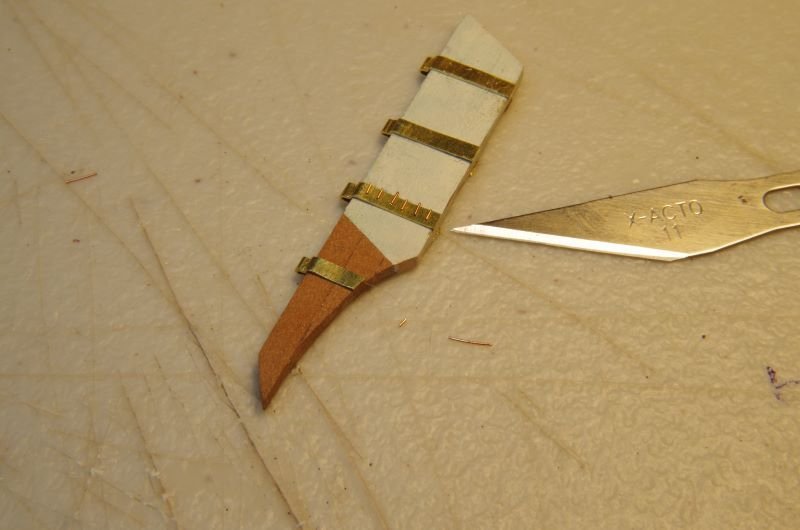
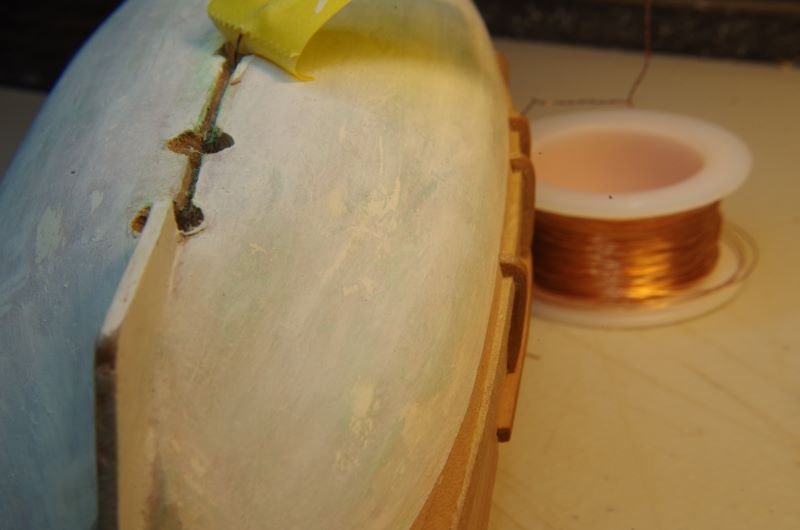
Metalwork around the rudder has been slowly taking place, and the straps are loosely placed on the rudder. They will be further shaped to the rudder and blackened before being permanently affixed (no idea how I'm going to permanently affix these. The wire bolts won't really have any strength long-term, so am really pondering this one). I had quite a learning curve in learning how to uniformly fashion the straps; many, many scrap pieces throughout. The photo also shows the bits of 30 ga wire that will be made into bolts. I'm just laying them down on the strip in the middle to see how the thickness of the wire will look from a scale perspective. I'm thinking of having 2 bolts per plank. The rudder is basically made up of 3 planks. I've also been experimenting with the finish on the hull. Goal is to try and make the finish appear to be as "real/aged" as possible, so there are a lot of green/brown washes on there now in addition to other white washes. The plan is to have shellac on the model, and I'm thinking of extending that down all around the acrylic on the hull as well to give it a bit of a wet/shiny appearance. Still debating that one, however. The gouges in the hull are for the brass tubing in which the lighting will run through from the ship down into the stand where the power source will be. When the tubing has been installed, the keel will be replaced and everything tidied up.
-
That's actually perfect. If you decide that you've sanded too much off, it's easy to reapply. I applied/removed acrylic to the hull of my Nina for a long, long time until I finally ended up with the look that I liked (applied different wash "layers" with slightly different colors as well. You might be able to get a pretty nice effect by applying washes of greys/greens/browns, showing not only the standard wear of the black, but also the effects of a boat that has been in the water with sea life). As Baker mentioned, it would probably be best to practice on scraps first. It's all your personal choice, however. The model is looking great! Alan
-
knightyo reacted to a post in a topic:
Bulkhead sanding advice
-
Hi James, I would also fill the spaces between the bulkheads with blocks of wood (balsa would be easiest), and sand to shape. It would then be easier to see the curves with the eye, and also far easier to plank those areas. Alan
-
knightyo reacted to a post in a topic:
Revenge 1577 by Loracs - Amati - 1:64
-
Yes! With a flashlight whilst also swearing. Now THAT would be an authentic scene.
- 780 replies
-
- 8
-
-
-
- speedwell
- syren speedwell
- (and 1 more)
-
You will have to let us know when this moving comes out. It will really be fun to see the ship modeling part, knowing that you helped! It makes me wonder if any of the cast will be drawn to the hobby as a result of seeing your models, the process, etc. (Your Speedwell is looking absolutely stunning) Alan
- 780 replies
-
- 5
-
-
- speedwell
- syren speedwell
- (and 1 more)