husky1943
-
Posts
100 -
Joined
-
Last visited
Recent Profile Visitors
726 profile views


-
 FrankWouts reacted to a post in a topic:
Cutty Sark by deckape - FINISHED - Revell - 1/96 - PLASTIC - 1959 kit
FrankWouts reacted to a post in a topic:
Cutty Sark by deckape - FINISHED - Revell - 1/96 - PLASTIC - 1959 kit
-
GrandpaPhil reacted to a post in a topic:
Mayflower by husky1943 - FINISHED - Revell - 1:83 - PLASTIC
-
popeye the sailor reacted to a post in a topic:
Nuestra Señora del Pilar by Anja & Sjors - FINISHED - OcCre - Scale 1:46
-
Old Collingwood reacted to a post in a topic:
Cutty Sark by deckape - FINISHED - Revell - 1/96 - PLASTIC - 1959 kit
-
popeye the sailor reacted to a post in a topic:
Cutty Sark by deckape - FINISHED - Revell - 1/96 - PLASTIC - 1959 kit
-
Old Collingwood reacted to a post in a topic:
Mayflower by SomethingIsFishy - Revell of Germany - PLASTIC
-
popeye the sailor reacted to a post in a topic:
Santa Maria by SkerryAmp - Artesania Latina - 1:65 - PoF
-
Hennie reacted to a post in a topic:
Sovereign of the Seas by Tallshiptragic - Sergal - 1/78
-
Eddie reacted to a post in a topic:
HMS Bounty by Steve 12345 - FINISHED - Billing Boats - 1:50
-
husky1943 reacted to a post in a topic:
Bounty by Mike Dowling - FINISHED - OcCre - 1/45
-
husky1943 reacted to a post in a topic:
HMS Bounty by Steve 12345 - FINISHED - Billing Boats - 1:50
-
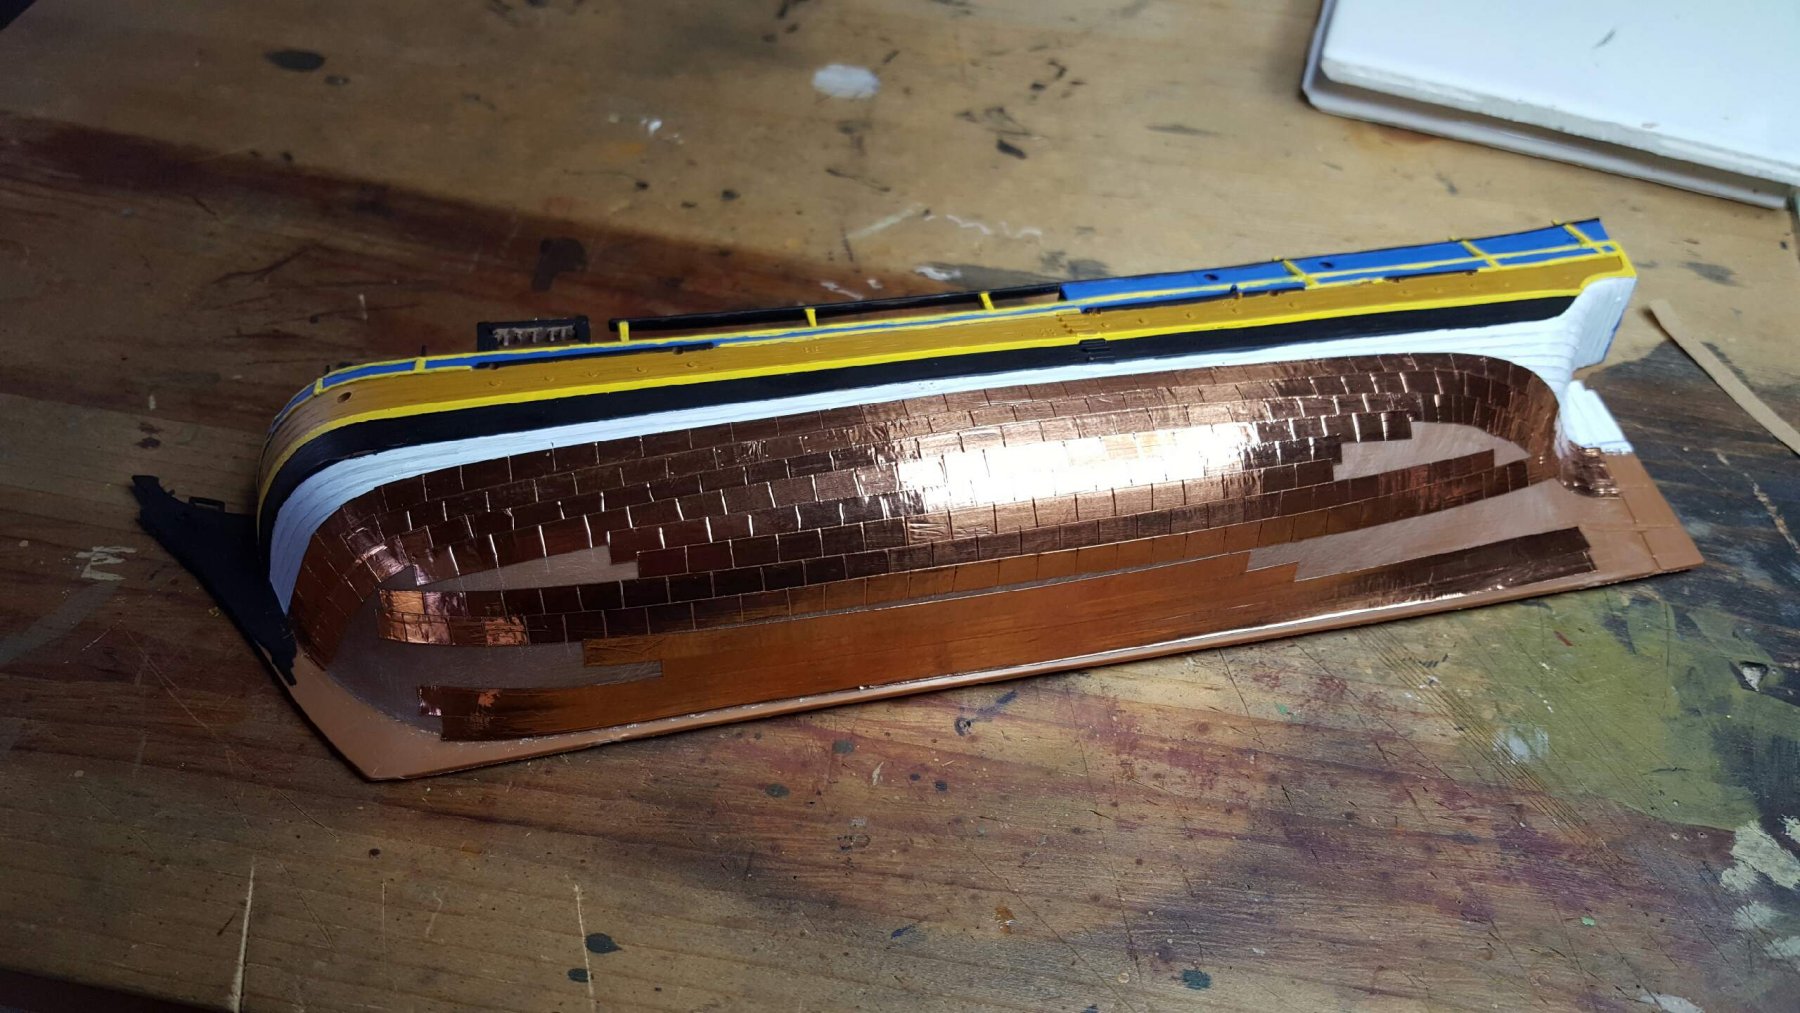
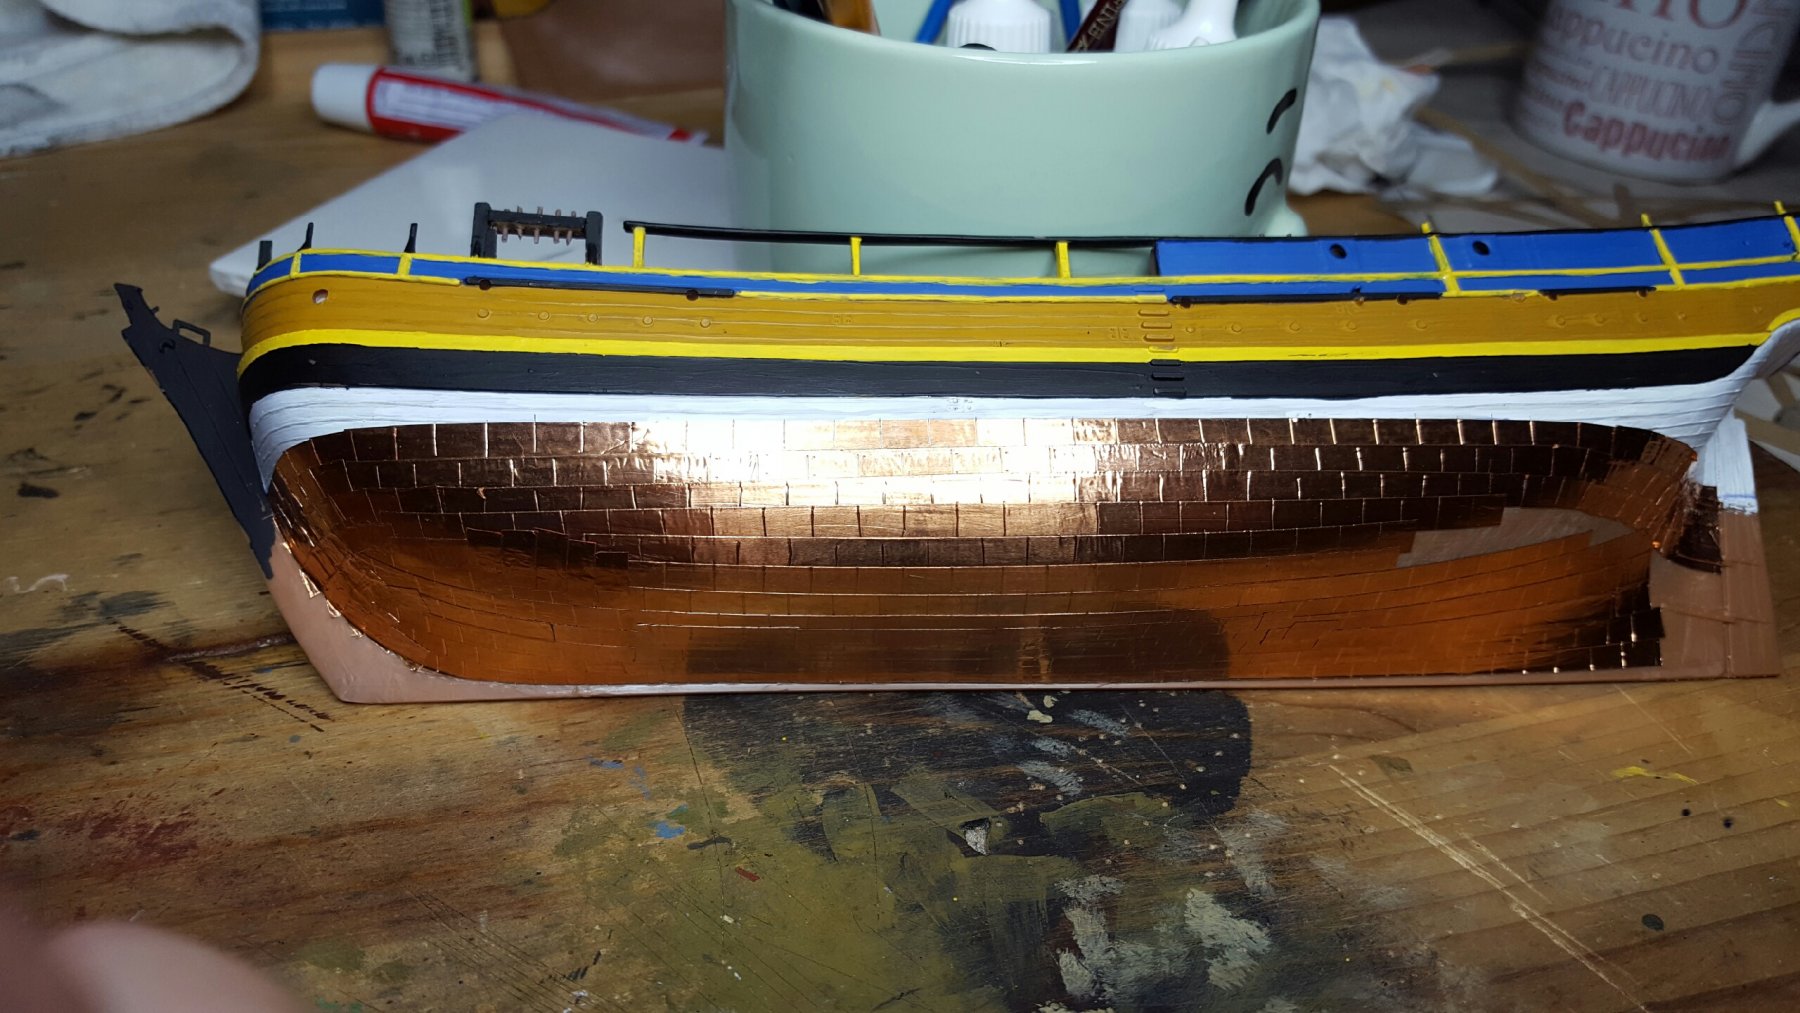
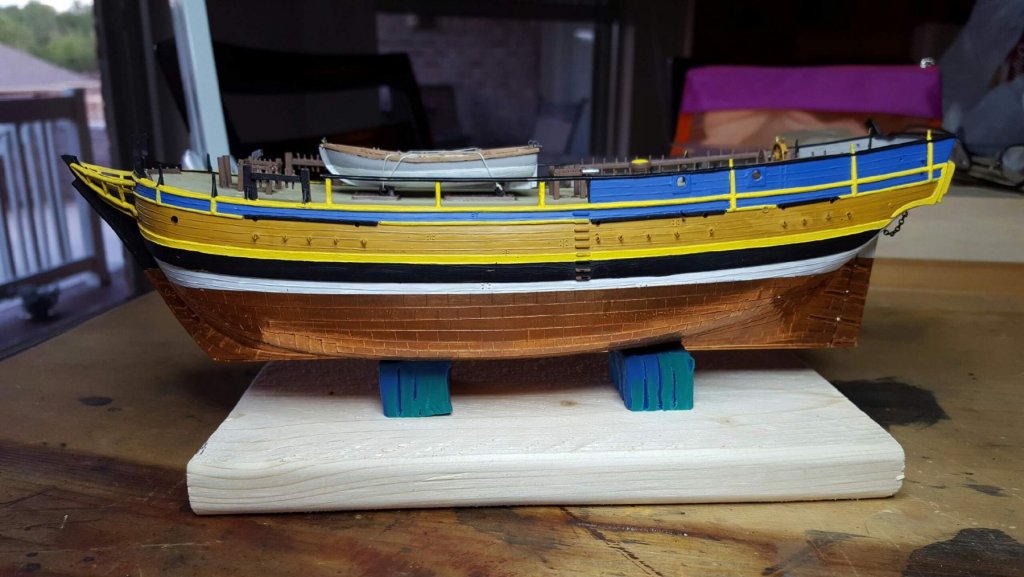
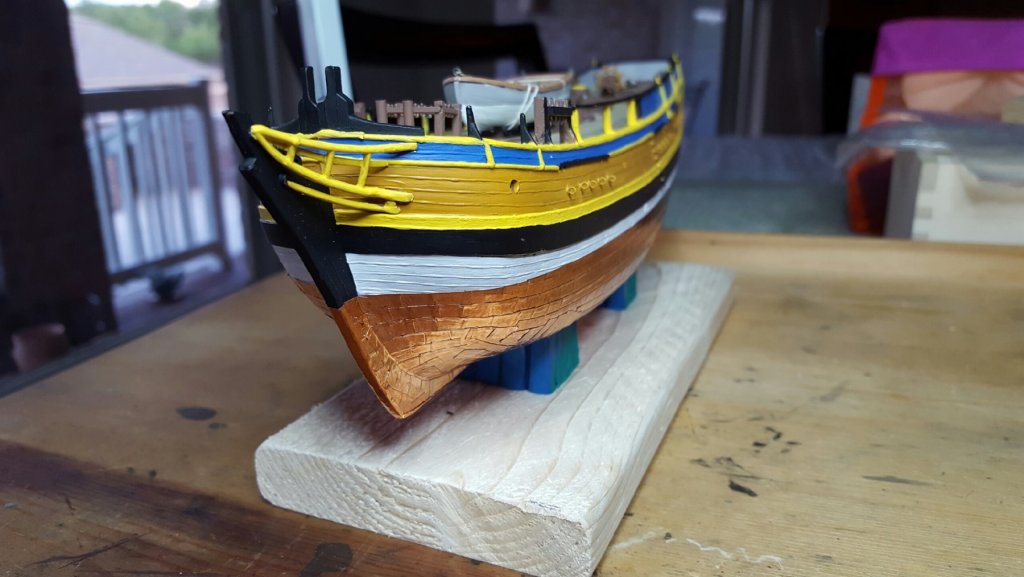
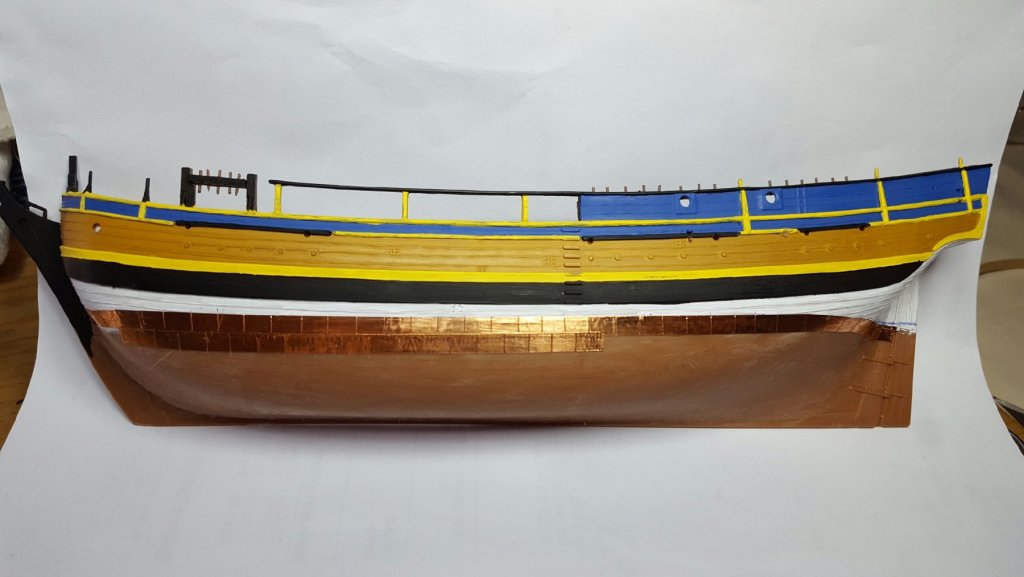
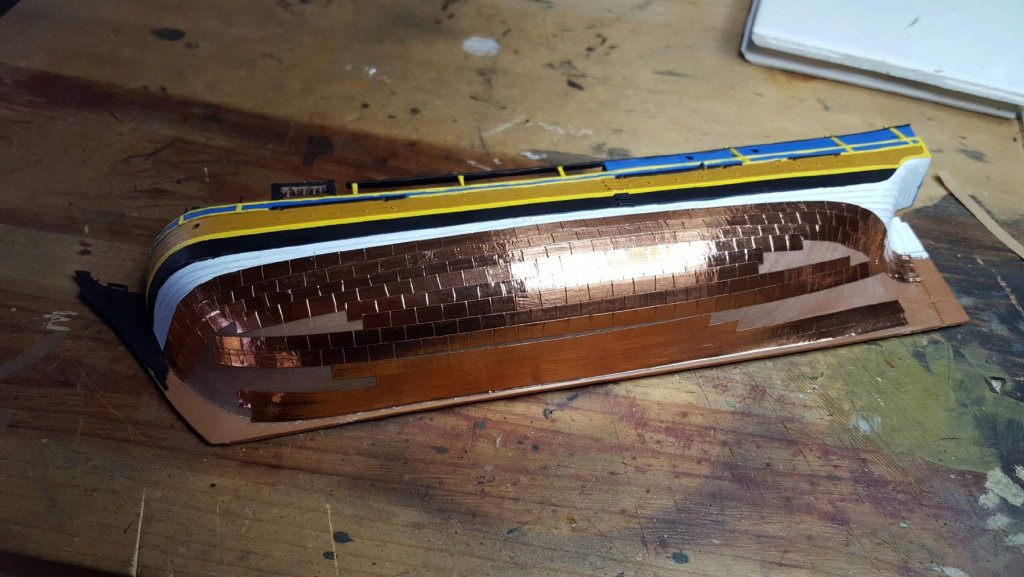
 Howdy all, Finally, got the boat halves welded together, and the aft finished up. Plus, I had to do quite a bit of touch up painting since I'm about as delicate as a steam shovel! I really like the coppering on the bottom. I think it adds a lot of "wow, that's different." Added some chains to the rudder. Not sure how accurate, but they look nice - so good enough. The mount is just temporary. The clay grips the model, but allows me the ability to manipulate the boat if I need to get at a weird angle. The eyebolts were a bear to make and install, but I think, worth the time and effort. I now have to start working on the guns. Four deck guns that I have to detail out. What do you call the tools that a Sailor used to load (like the worm, a rammer and a sponge)? What would be the nomenclature for a set of those? Anyway, updates will be slower and slower with summer coming. I have some acres in the country, and that means cleaning, shooting guns, mushroom hunting, camping. Plus, the beach is going to be calling our name here in a bit. Got to get our tan on! Ciao for now
-
husky1943 reacted to a post in a topic:
HMS Bounty by Steve 12345 - FINISHED - Billing Boats - 1:50
-
husky1943 reacted to a post in a topic:
Spanish Galleon ISABELLA by deckape - FINISHED - Billing Boats
-
husky1943 reacted to a post in a topic:
Spanish Galleon ISABELLA by deckape - FINISHED - Billing Boats
-
husky1943 reacted to a post in a topic:
Spanish Galleon ISABELLA by deckape - FINISHED - Billing Boats
-
husky1943 reacted to a post in a topic:
Spanish Galleon ISABELLA by deckape - FINISHED - Billing Boats
-
Howdy Steve, I continue to marvel at your skill! Really, you are 'ROCKSTAR'ing it big time! This model belongs in a museum! Ciao for now
- 291 replies
-
- 3
-
-
- bounty
- billing boats
- (and 1 more)
-
Howdy CAPT Al, I look forward to following this one. Keep it coming! Ciao for now
-
Howdy Anton, I respect much your build! Beautiful. I hear you on the movie "Admiral." I watched it on Netflix, and while I had to read the subtitles, I absolutely was fascinated by the movie. Well-made, well-acted and very interesting!! Ciao for now
- 322 replies
-
- 3
-
-
- sergal
- sovereign of the seas
- (and 5 more)
-
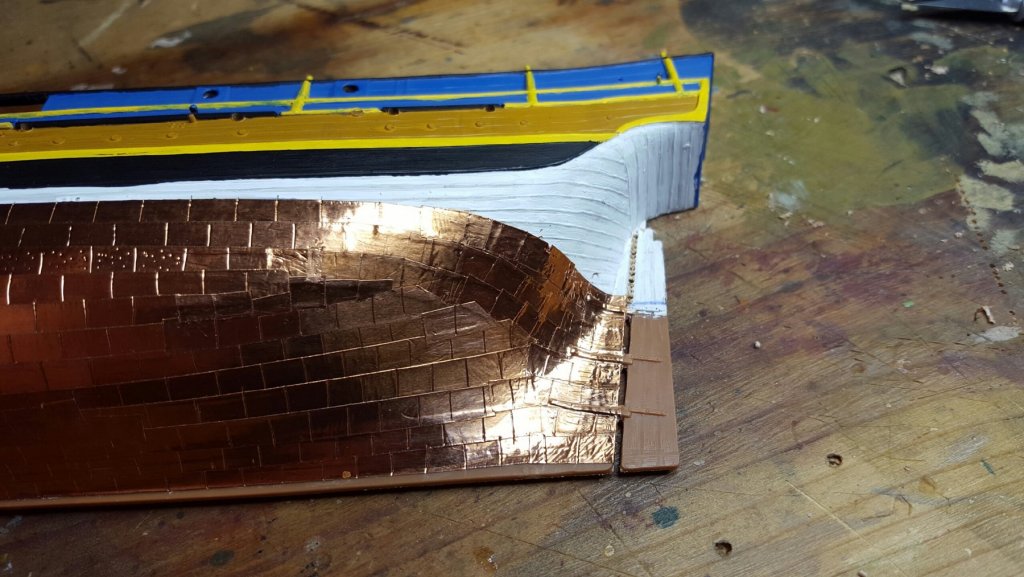
Howdy all, I had noticed this before, but the rudder and the hull were solid plastic. The more I looked at it, the more it bothered me. So, I took a drill and drilled all the holes between the hull and the rudder, and then cleaned it out with an Xacto knife. Small detail, but I think it looks much nicer than just painting it black, and creating an "illusion" on the gap. Anyway, OCD won the day, and I feel better now. Plus, thanks to Gregory for turning me on to JTilley's Bounty (which is a masterpiece, BTW), I will try his copper sheathing layout on the opposite side of the boat. Lord God, please grant me the patience...... Ciao for now
-
Howdy wefalck, Thanks. That makes absolute sense. Sorry about the "hinges" thing. I don't know the nomenclature like I should. Ciao for now
-
Howdy all, I have a question for the brains around here; would the copper sheathing go over the hinges? The reason why I ask is because I have seen both styles (hinges covered by sheathing and hinges not covered by sheathing). In thinking about it, I think that the hinges would not be covered because that would cause galvanic action. Thoughts? Ciao for now
-
Howdy Race and Fright, Fright, are you talking about the tab located between the two supports that keep the ship upright? I do believe that one is for a center support that also holds the nameplate (I think). Ciao for now
-
Howdy all, Well, I did decide to copper the bottom. First, I went to the LHS and got some nice Vallejo blue and yellow. I never prime (something that I really need to start doing) so it took 6 coats to get the color somewhat uniform. After the LHS, I headed over to Hobby Lobby and bought some of the copper tape that stained-glass window folks use. And, it went on like a dream. Now, I tried to make it look accurate, but I mostly used strips and then scored it with a tweezers (made the size the same, and did the job twice as fast. I used strips because I didn't want to cut each individual plate. I like the effect. Ciao for now

-
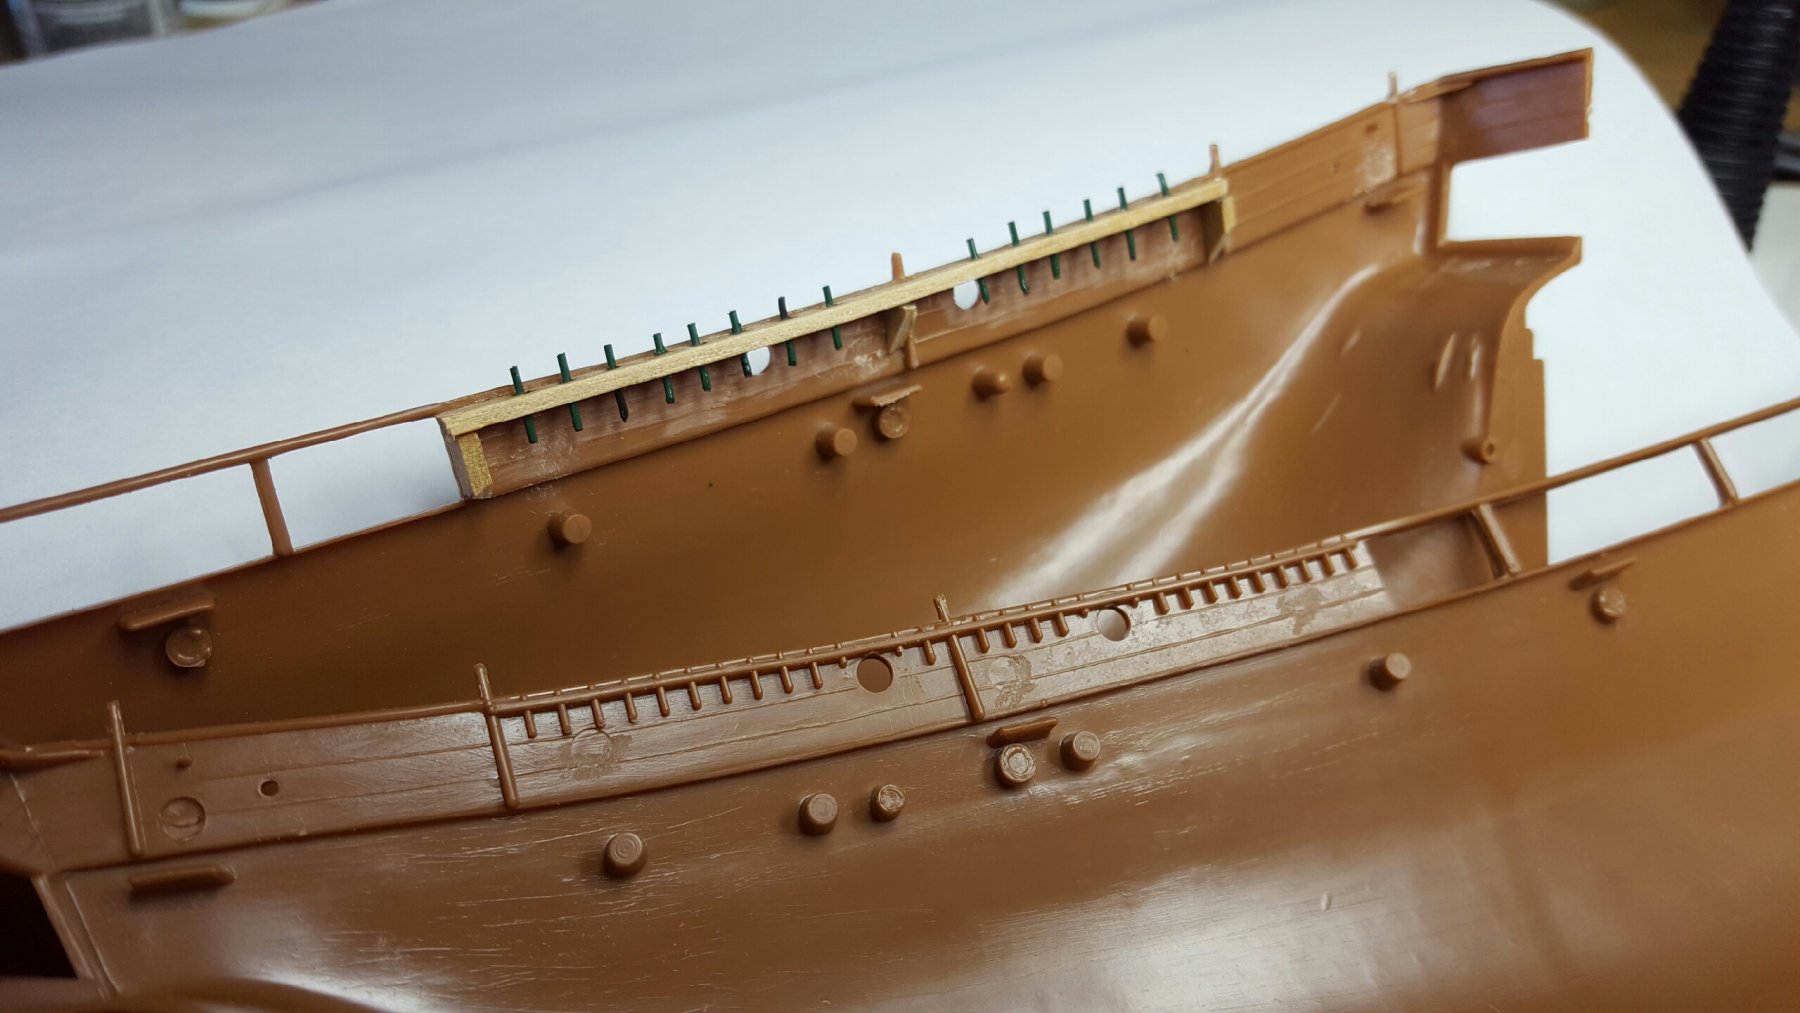
Hey Race and Fright, Good job on the boat. She is really coming along. I have an idea; I make the belaying pin racks by cutting them off, drilling holes, and then super-gluing wire into the holes, and cut them to length. I use the wire that people use for floral arranging. It's thicker, but still bends easy. Maybe you could do that....The decks look really great. Ciao for now

-
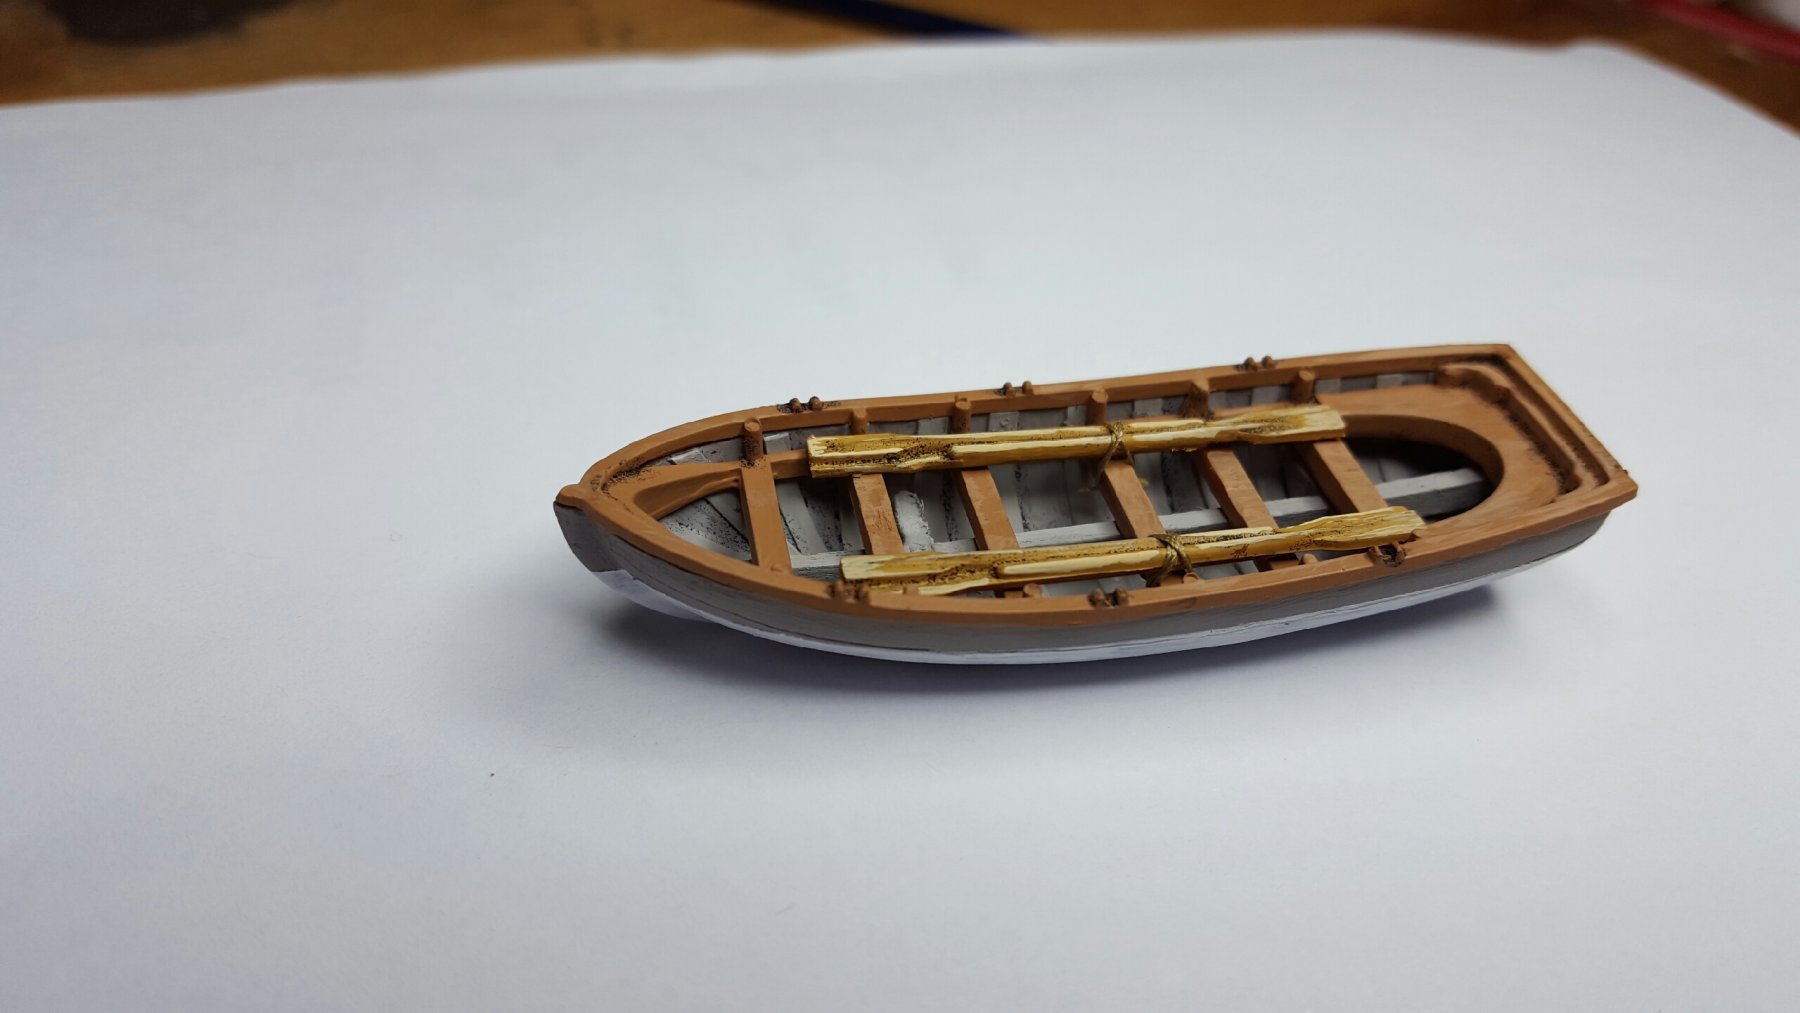
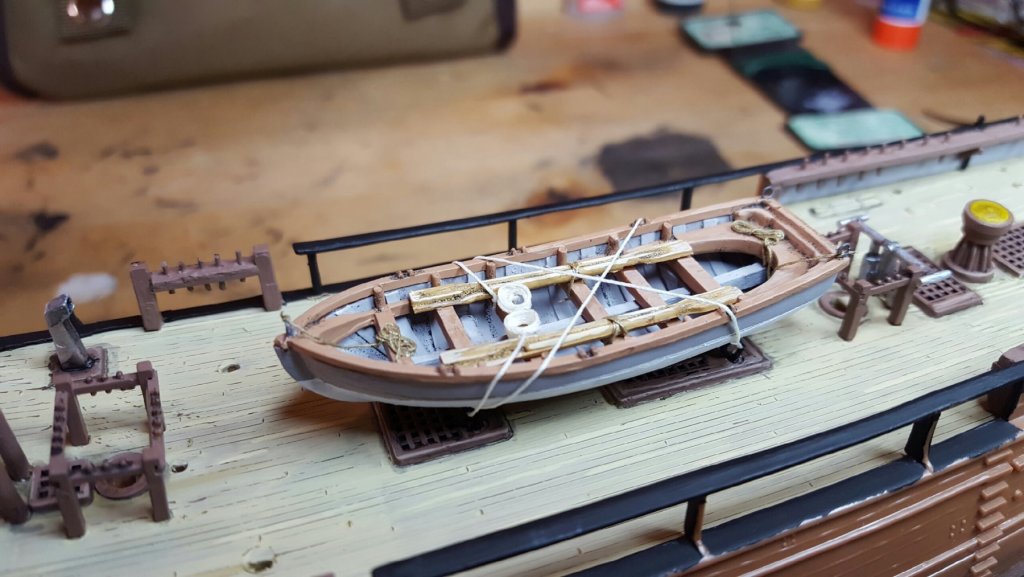
Howdy Eric, Thanks for the support and looking at my humble attempt at making plastic better. I had mine in my office, when the vacuum caused a door to slam real hard and actually made a frame fall off the wall, which then knocked the Beagle onto the floor.... However, I did want to show what the life boat looks like now that she is finished and in place. I know the coiled ropes look a little cheesy, but I like them, so they stay. Then I did some smaller ropes fore and aft and that's it. She's good

-
Howdy everyone, Well, I just learned something else on the website. Someone (and I wish that I could remember who, but hat tip to them) suggested doing the ratlines after all other rigging has been done. I say right now - Genius!!!! I owe that man or woman a beer (or suitable drink of their choosing). Ciao for now
-
Ciao Frankie, Robert said it best; She is a treasure. Loves me some Revell Plastic. I heard they are re-issuing it sometime soon! Wonder how much the kit cost in 1959??? Ciao for now
- 20 replies
-
- 4
-
-
- cutty sark
- revell
- (and 2 more)
-
Howdy Captain Al, She is a real beauty! Love all the detail. Ciao for now
- 265 replies
-
- 3
-
-
- finished
- artesania latina
- (and 1 more)
-
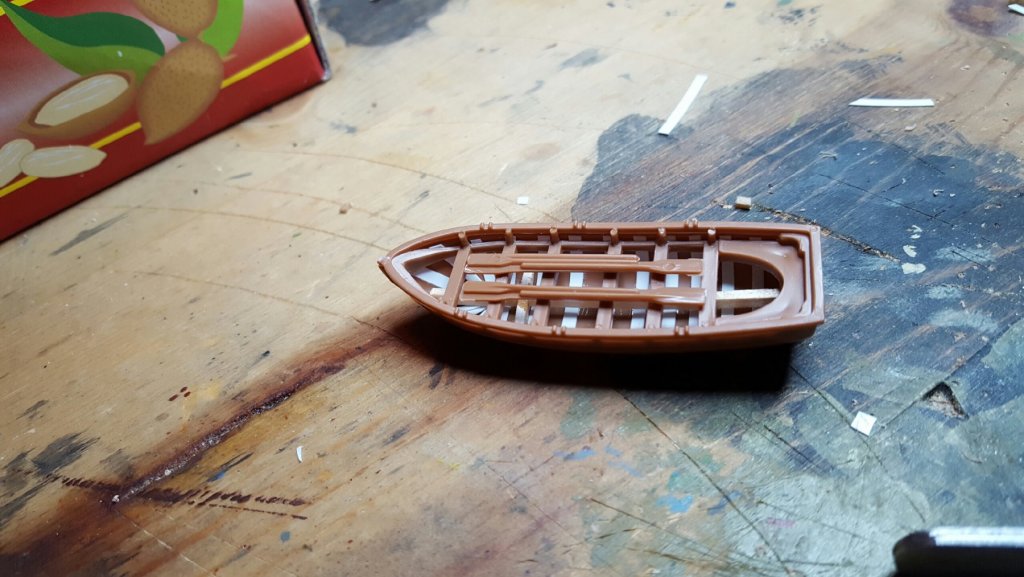
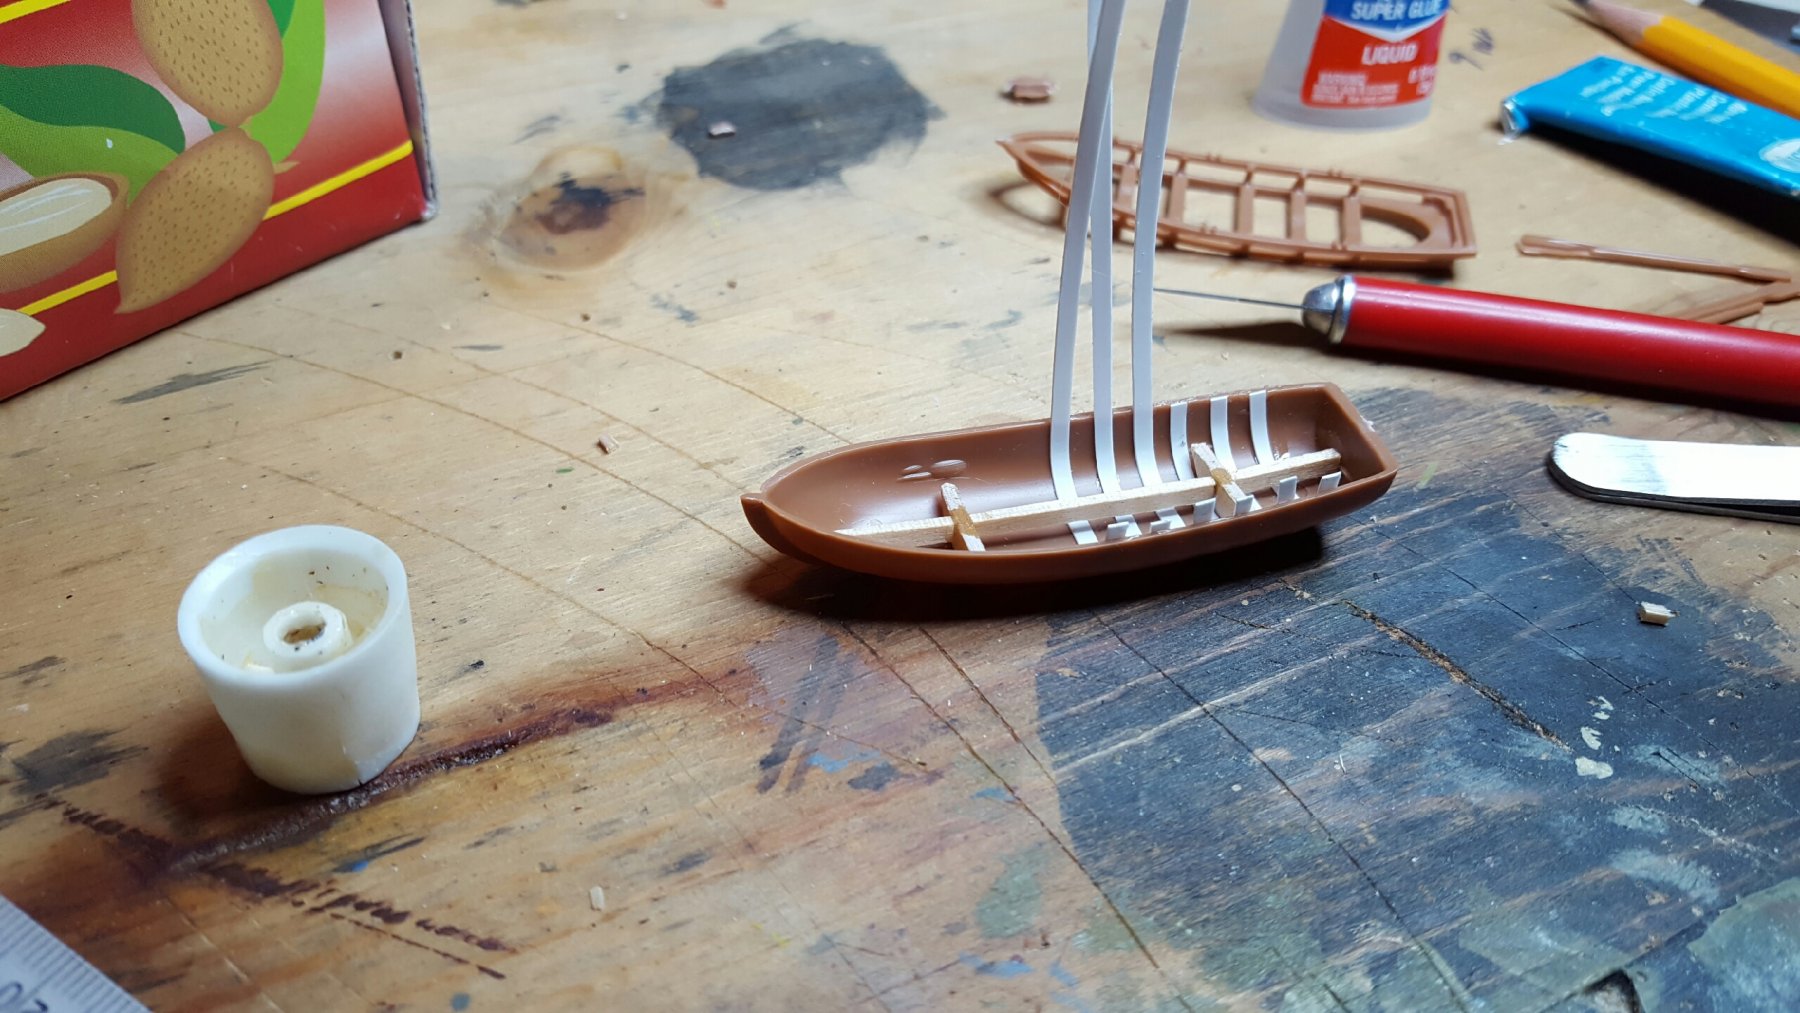
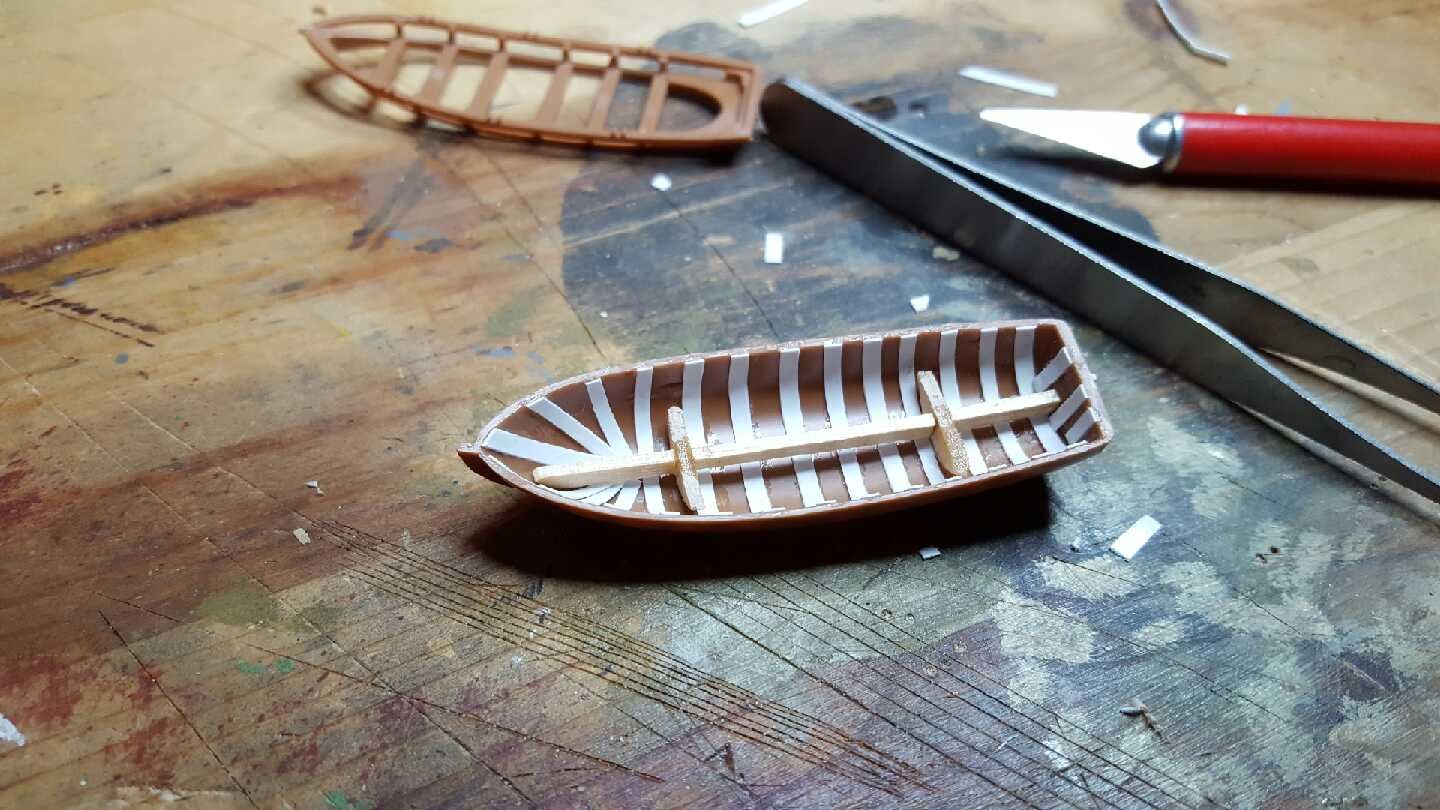
Howdy all, Just wanted to make the launch a little more detailed. I still need to afix a rudder. I just used styrene strips and put some ribs in. The center piece of wood was my first idea to put a wooden lower deck/floor, but it didnt' work out too well. So, I just added the plastic ribs and good to go. Oh, I will also be adding some eyebolts; one on the fore, and two aft. Ciao for now