GaryKap
-
Posts
276 -
Joined
-
Last visited
Recent Profile Visitors
1,307 profile views


-
 Hi John - Very nice looking model of the gunboat "Philadelphia". I am just starting mine. Thank you for your excellent build log with illustrations and discussions of problems your encountered along the way. This will make my work easier, but I am sure I will find new problems of my own to address. <<Gary>>
 -
 Archi reacted to a post in a topic:
Trusses and Lifts and Jeers, Oh My (Fair American)
Archi reacted to a post in a topic:
Trusses and Lifts and Jeers, Oh My (Fair American)
-
etubino reacted to a post in a topic:
USS Constitution by TomCulb - FINISHED - Model Shipways - 1:76.8 - cross-section
-
EricWilliamMarshall reacted to a post in a topic:
Fair American by KenW - FINISHED - Model Shipways - 1:48 Scale
-
EricWilliamMarshall reacted to a post in a topic:
Fair American by KenW - FINISHED - Model Shipways - 1:48 Scale
-
EricWilliamMarshall reacted to a post in a topic:
BENJAMIN W LATHAM by GaryKap - FINISHED - Model Shipways - scale 1:48
-
EricWilliamMarshall reacted to a post in a topic:
BENJAMIN W LATHAM by GaryKap - FINISHED - Model Shipways - scale 1:48
-
EricWilliamMarshall reacted to a post in a topic:
BENJAMIN W LATHAM by GaryKap - FINISHED - Model Shipways - scale 1:48
-
EricWilliamMarshall reacted to a post in a topic:
BENJAMIN W LATHAM by GaryKap - FINISHED - Model Shipways - scale 1:48
-
EricWilliamMarshall reacted to a post in a topic:
BENJAMIN W LATHAM by GaryKap - FINISHED - Model Shipways - scale 1:48
-
EricWilliamMarshall reacted to a post in a topic:
BENJAMIN W LATHAM by GaryKap - FINISHED - Model Shipways - scale 1:48
-
GaryKap reacted to a post in a topic:
USS Constitution by TomCulb - FINISHED - Model Shipways - 1:76.8 - cross-section
-
Hi Tom - I hesitate to bring this up, but your cannon are lacking capsquares. These are the iron fittings that cover the trunnions of a cannon and hold it in place. They are usually black in color. On a model, they can be made of brass or light cardboard and painted black. Or they can be simulated with black paint. I hope I am not too late in raising this small observation. <<Gary>>
- 162 replies
-
- 1
-
-
- Model Shipways
- Constitution
- (and 2 more)
-
GaryKap reacted to a post in a topic:
USS Constitution by TomCulb - FINISHED - Model Shipways - 1:76.8 - cross-section
-
Hi Tom - Looking very good! One observation regarding the rigging line. I don't much like the Model Shipways threads either, but the suggestion in the instructions goes a long ways to improving them. Soak and rinse the thread prior to use. That will take out the sizing and make the thread much more workable. I was amazed at the difference after doing this. Having said that, I also made good use of Coats Upholstery Thread that can be found at the local Walmart in both black and hemp (tan) colors. It is nice to work with and is much easier to tie knots with...and it is inexpensive. Of course this works best for smaller rope diameters. Your wonderfully detailed build log will continue to be a great help to future builders of this model. <<Gary>>
- 162 replies
-
- 1
-
-
- Model Shipways
- Constitution
- (and 2 more)
-
Hi Tom - With this ship model, the closer you look, the more "discrepancies" you will find between the plans, the photos and the instructions. I can't fully answer your question. For the long guns, I only rigged the breeching lines because I figured they would be not very visible in the finished model. (I did fully rig the carronades though). So it depends on how fully you are going to rig the long guns. The drawings at the bottom of Plan Sheet 2 are most helpful. I was able to use the provided brass hooks for the breeching lines on the long guns but gave up with the carronades and simply tied the rigging lines to the eyebolts. <<Gary>>
- 162 replies
-
- 1
-
-
- Model Shipways
- Constitution
- (and 2 more)
-
Hi Tom - Your model is looking very nice. A couple of thoughts. First, a reminder. Make sure all of the pieces/parts (pump parts, cannon, fife rail etc.) are securely glued down in the appropriate places. Remember that the hull needs to be upside down for an extended period of time while you are coppering and stuff can work loose (speaking from experience). At that point it is MUCH more difficult to return a wandering part to its proper location. This comment does not aim so much at the mast surrounds) Second, the idea of only half planking the spar deck. I considered that too, but in the end I decided against doing it for three reasons. The complex deck framing for the spar deck would obstruct much of your view of the gun deck. It would be more difficult to place the carronades, and all the other stuff on the spar deck without decking to provide the proper spacing. And a third reason...I simplified the rigging on the long guns of the gun deck and that might have been more visible if the spar deck was not planked. I will be interested to see what you decide to do. <<Gary>>
- 162 replies
-
- 1
-
-
- Model Shipways
- Constitution
- (and 2 more)
-
Hi Tom - Your build log will be a wonderful guide for future builders of this kit. I also had trouble figuring out the "knees" and your photos would have been of help to me. For me, the instructions are sometimes lacking and the sentence structure difficult to follow. I relied more on the pdf electronic version than the printed version - partly because the photos were clearer and could be enlarged. Happily, most of the parts fit together well. One item that deserves special attention will be the gun port frames (page 38 of the instructions). Make sure the gun port openings on the gun deck and spar deck line up EXACTLY with the openings in the hull exterior wall gun port openings. Chance of error is in the fore and aft alignment of these parts. Even small differences will make it more difficult to set the gun port frames. The instructions have you assembling the gun port frames completely and then inserting them into the gun port openings. I could not do this and opted to install them piece by piece; first the outer frames and then the inner frames. Keep up the good work. I look forward to seeing your progress. <<Gary>>
- 162 replies
-
- 2
-
-
- Model Shipways
- Constitution
- (and 2 more)
-
GaryKap reacted to a post in a topic:
USS Constitution by TomCulb - FINISHED - Model Shipways - 1:76.8 - cross-section
-
GaryKap reacted to a post in a topic:
USF Confederacy by Brucealanevans - FINISHED - Model Shipways - 1:64
-
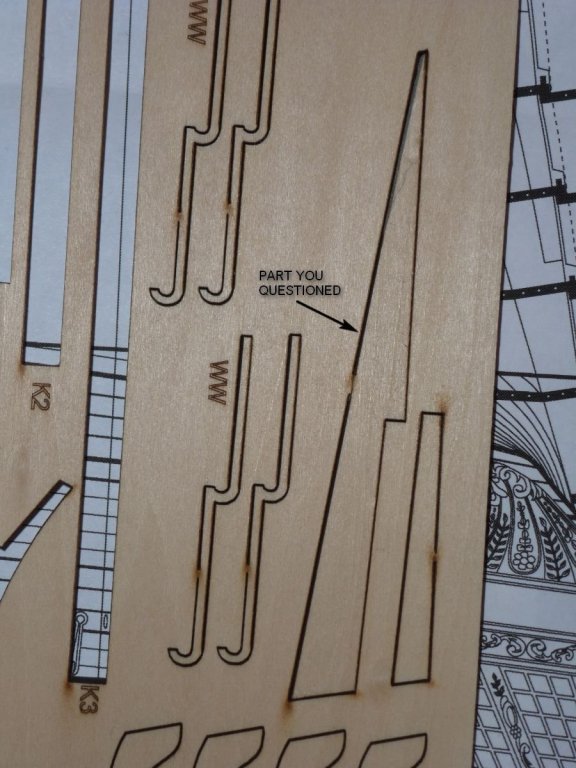
Hi TomCulb - I am also building this model of the USS Constitution cross-section. I am currently rigging the main yard (page 82 of the instructions). From my experience - definitely DO NOT remove that part of the frame that you have circled above. The ladders will fit just fine. You are doing a great job on your build and an excellent job documenting your progress. I found this to be one of the most enjoyable ship models that I have built to date. I hope you find the same to be true. In a future post or posts I will offer some suggestions that may be helpful. I see that you live in Spokane. In the early '90's I lived in Couer d'Alene. Beautiful country. <<Gary>>
- 162 replies
-
- 4
-
-

-
- Model Shipways
- Constitution
- (and 2 more)
-
GaryKap reacted to a post in a topic:
AVOS by Peta_V - FINISHED - Master Korabel - scale 1/72 (exclusive kit) - Russian tender
-
GaryKap reacted to a post in a topic:
USS Confederacy 1778 by CRI-CRI - FINISHED - Model Shipways - scale 1/64
-
GaryKap reacted to a post in a topic:
AVOS 1806 by greenstone - Master Korabel - 1/72 - Russian Tender - test build
-
GaryKap reacted to a post in a topic:
AVOS by Peta_V - FINISHED - Master Korabel - scale 1/72 (exclusive kit) - Russian tender
-
GaryKap reacted to a post in a topic:
AVOS by Peta_V - FINISHED - Master Korabel - scale 1/72 (exclusive kit) - Russian tender
-
GaryKap reacted to a post in a topic:
AVOS by Peta_V - FINISHED - Master Korabel - scale 1/72 (exclusive kit) - Russian tender
-
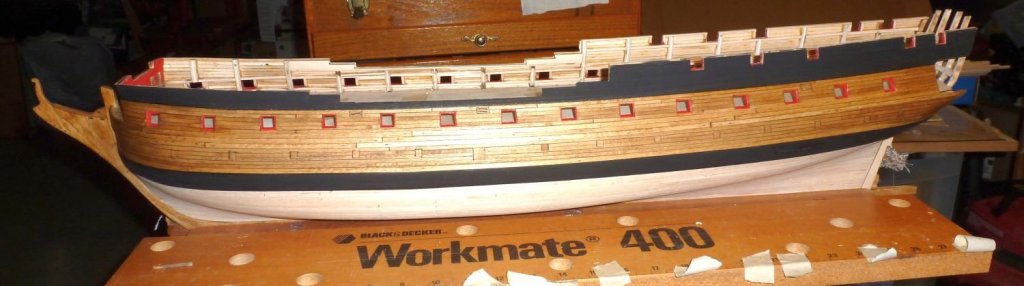
Hi Jim - Thank you for your kind words. I have not been active on this web site in a few months. My wife and I have moved into a "patio home" - a compact two bedroom unit that is one of four on a concrete slab. My work space has been reduced to a 2 foot by 3 foot work table in the second bedroom. Because of the need to downsize, I had to give this model of Benjamin W. Latham - and others - away for want of space. But I am still managing to work on my "Confederacy" with its three foot hull. The work table does OK and I can take the hull outside for sanding. This model has a LOT of fine detail work that should keep me occupied for several months. And that is the real enjoyment of this hobby of ours. On the other hand, I have absolutely no idea where I will display the finished model. I am considering donating it to our local library to be auctioned off and provide funding for books and supplies. In the days to come I will post to my Confederacy build log and provide a progress report and some pictures. <<Gary>>
- 50 replies
-
- 1
-

-
- benjamin w latham
- model shipways
- (and 1 more)
-
Dirk, I really do appreciate having you there looking over my shoulder. I would much rather go through the thought process as we did above than make some major error in my construction. Like we say here in the U.S. "If you see something, say something!" and that applies equally to model ship building. In the near future I hope to be doing the stern and quarter galleries and I will be looking to you for guidance after the stunning job you did on your Confederacy build. John, thank you for your kind words. Harley thanks for your thoughts. Jeez; when they said this kit was for advanced builders, I thought they meant advanced in years . My advice is to plank the third belt from the top down. That way you can hide your planking mistakes along the bottom near the keel. You, me, and the other Confederacy builders all try to do the very best job that we possibly can and when our result does not measure up to our expectations we can get frustrated. Thanks to you all for letting me vent.
-
Thank you guys for the "likes". They are always welcome and give me encouragement. And thanks to Russ, John, Jim, Mike, alde, and Dirk for your comments. It is probably true for each of us that we are our own worst critic...except for the Admiral, that is. Jim, I will be looking for your build log. Mike, the color below the wales is just the naked basswood; not even finish sanded yet. Dirk, I appreciate your watchful eye, but in this case I think you are mistaken. Take a look at the Instructions on page 65. It says "There are three laser cut pieces for the rudder. They are 1/4 inch thick (R1, R2, and R3)." Take a look at the plans and sheet H. I believe I have the correct part in the right place. Happily, it is not yet glued in so any change will be easy. What do you think?

-
Jesse - I can only echo what the others have already said. Our love for our pets is almost as great as their love for us. I know that I grieved long and hard when I lost a dog. Hard to say good-bye. I understand and sympathize. <<Gary>>
- 1,306 replies
-
- 10
-
-
- syren
- model shipways
- (and 1 more)
-
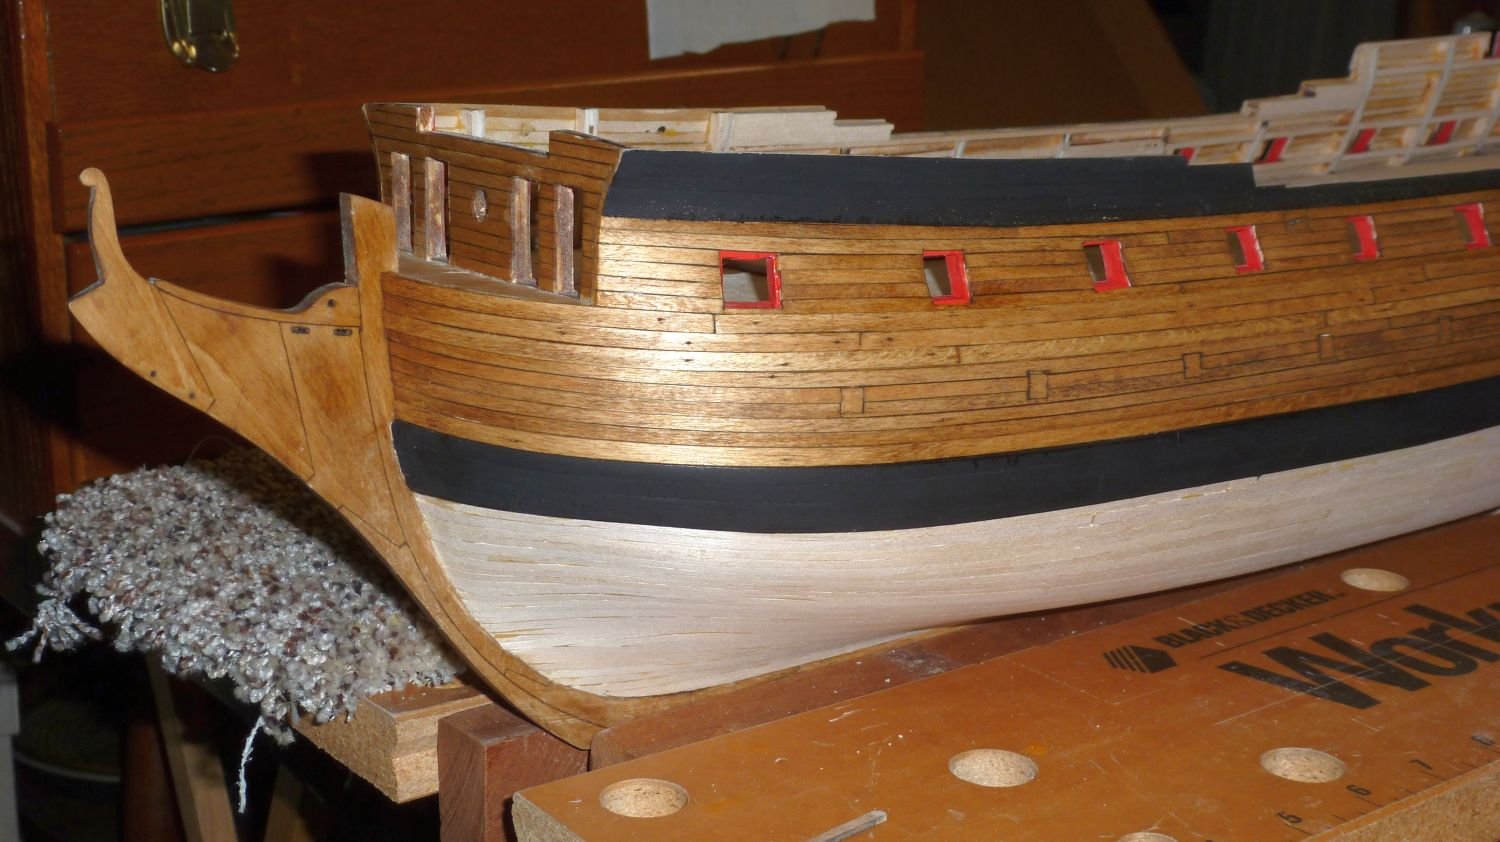
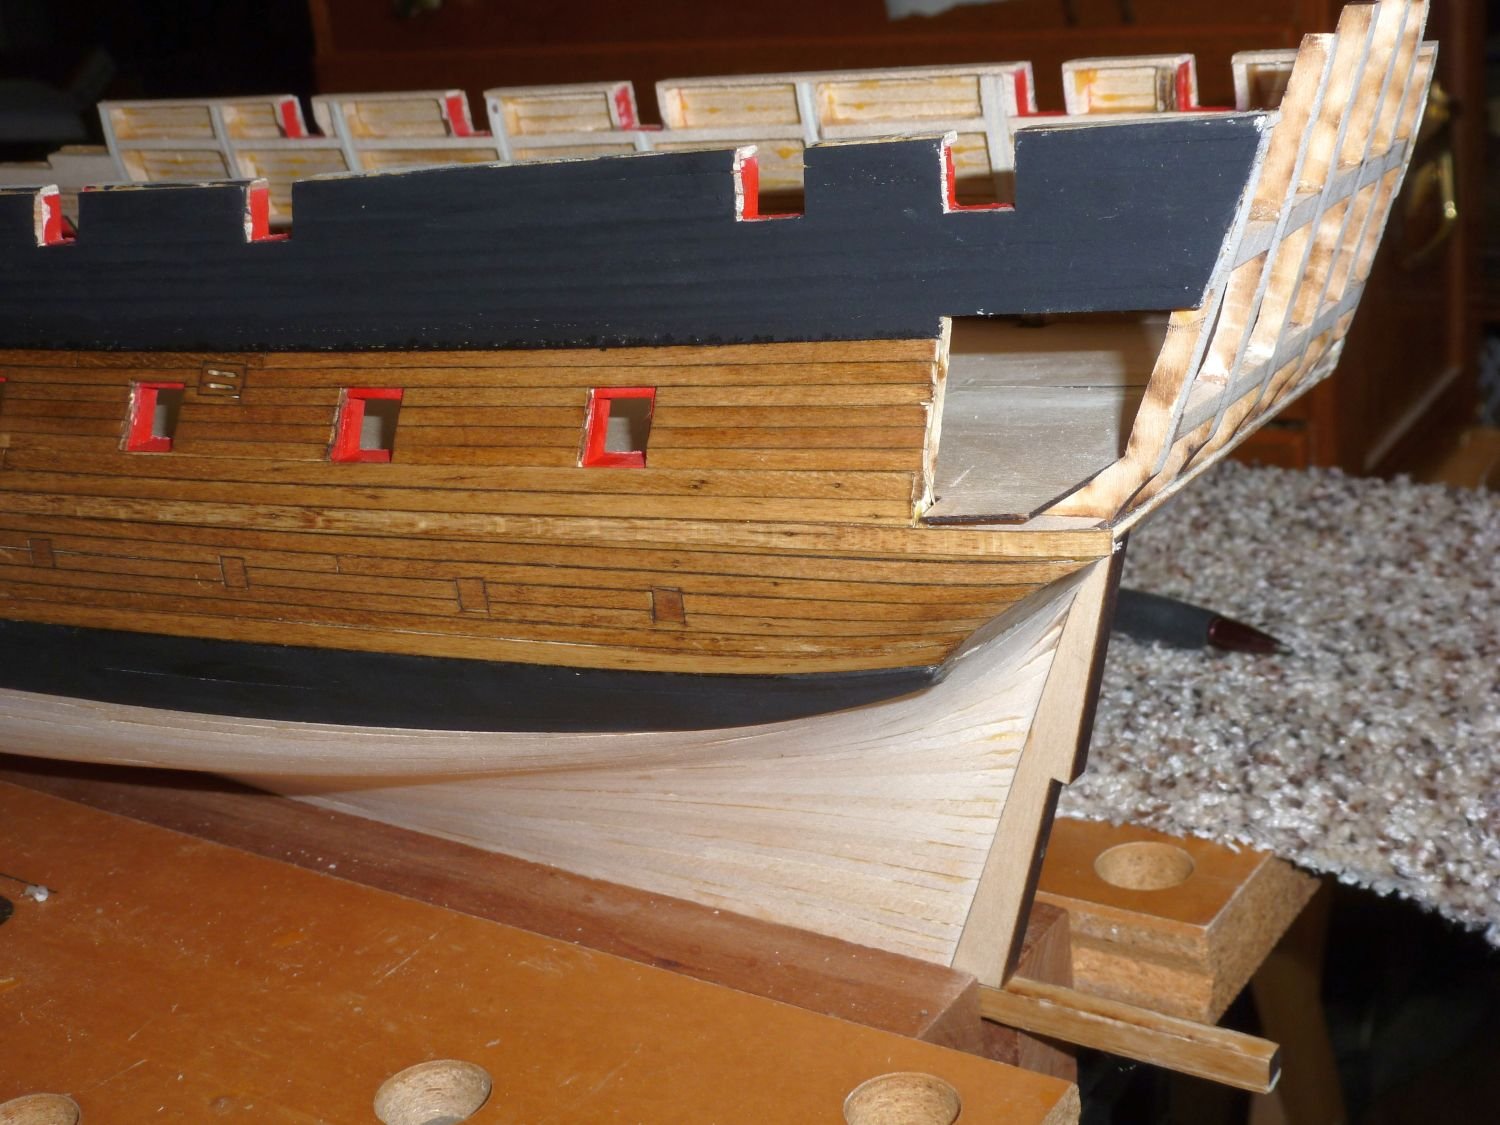
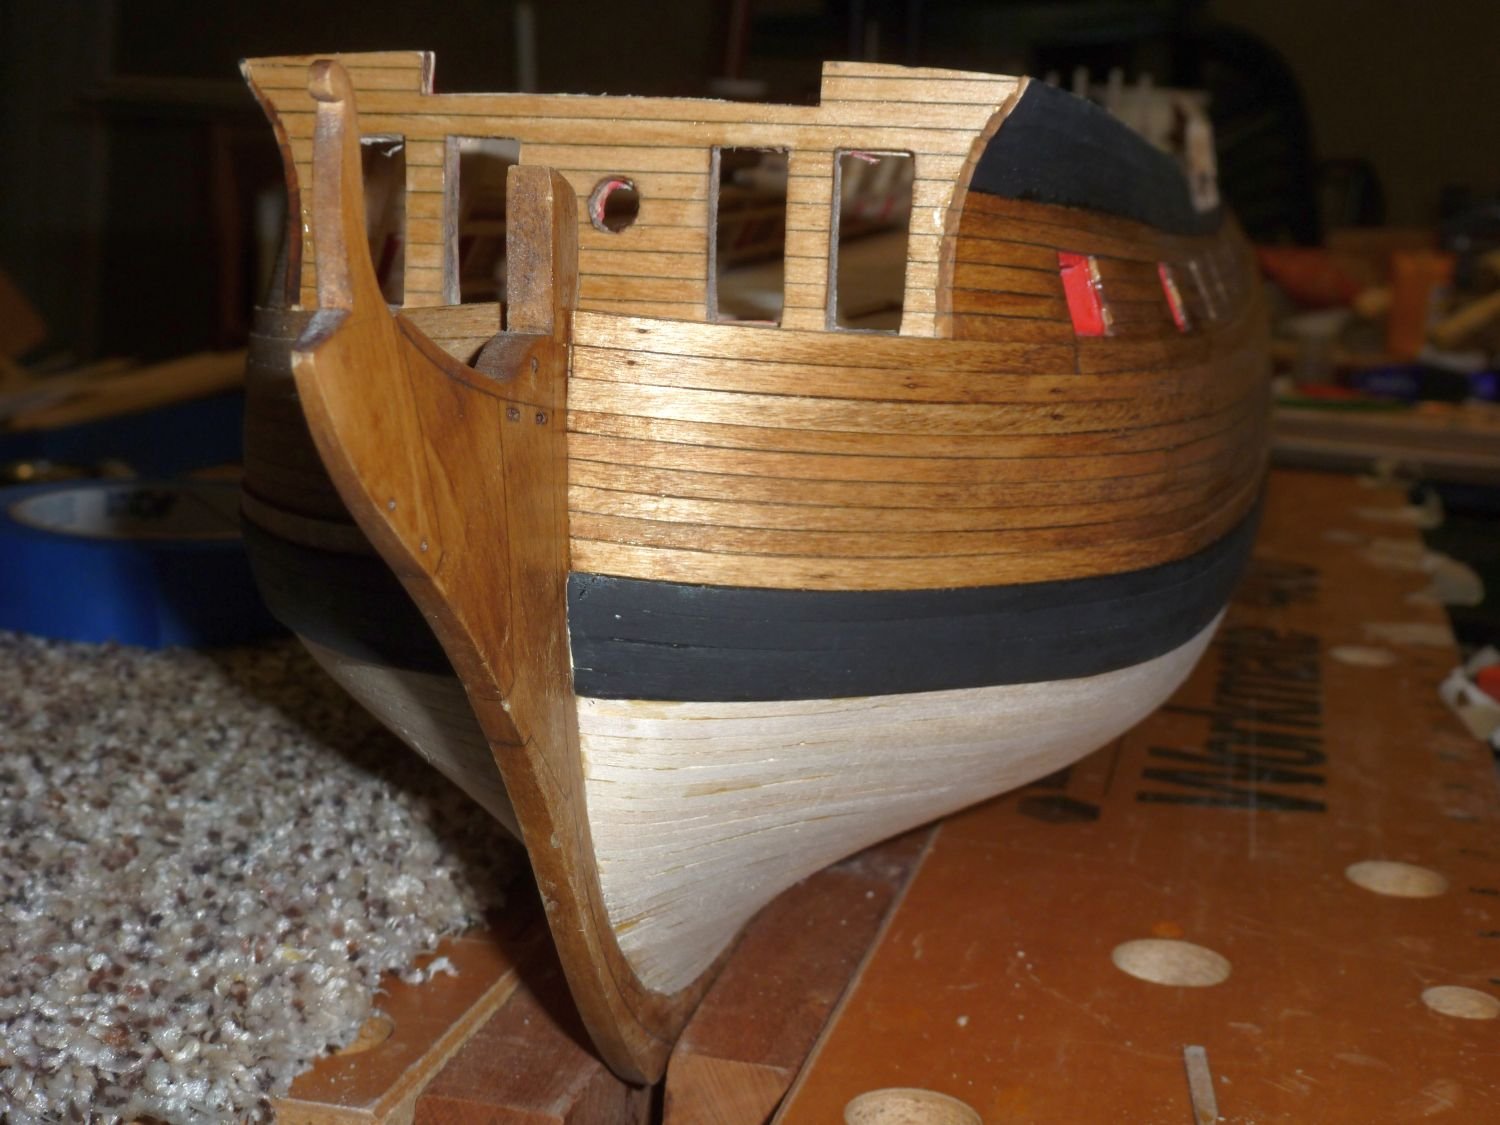
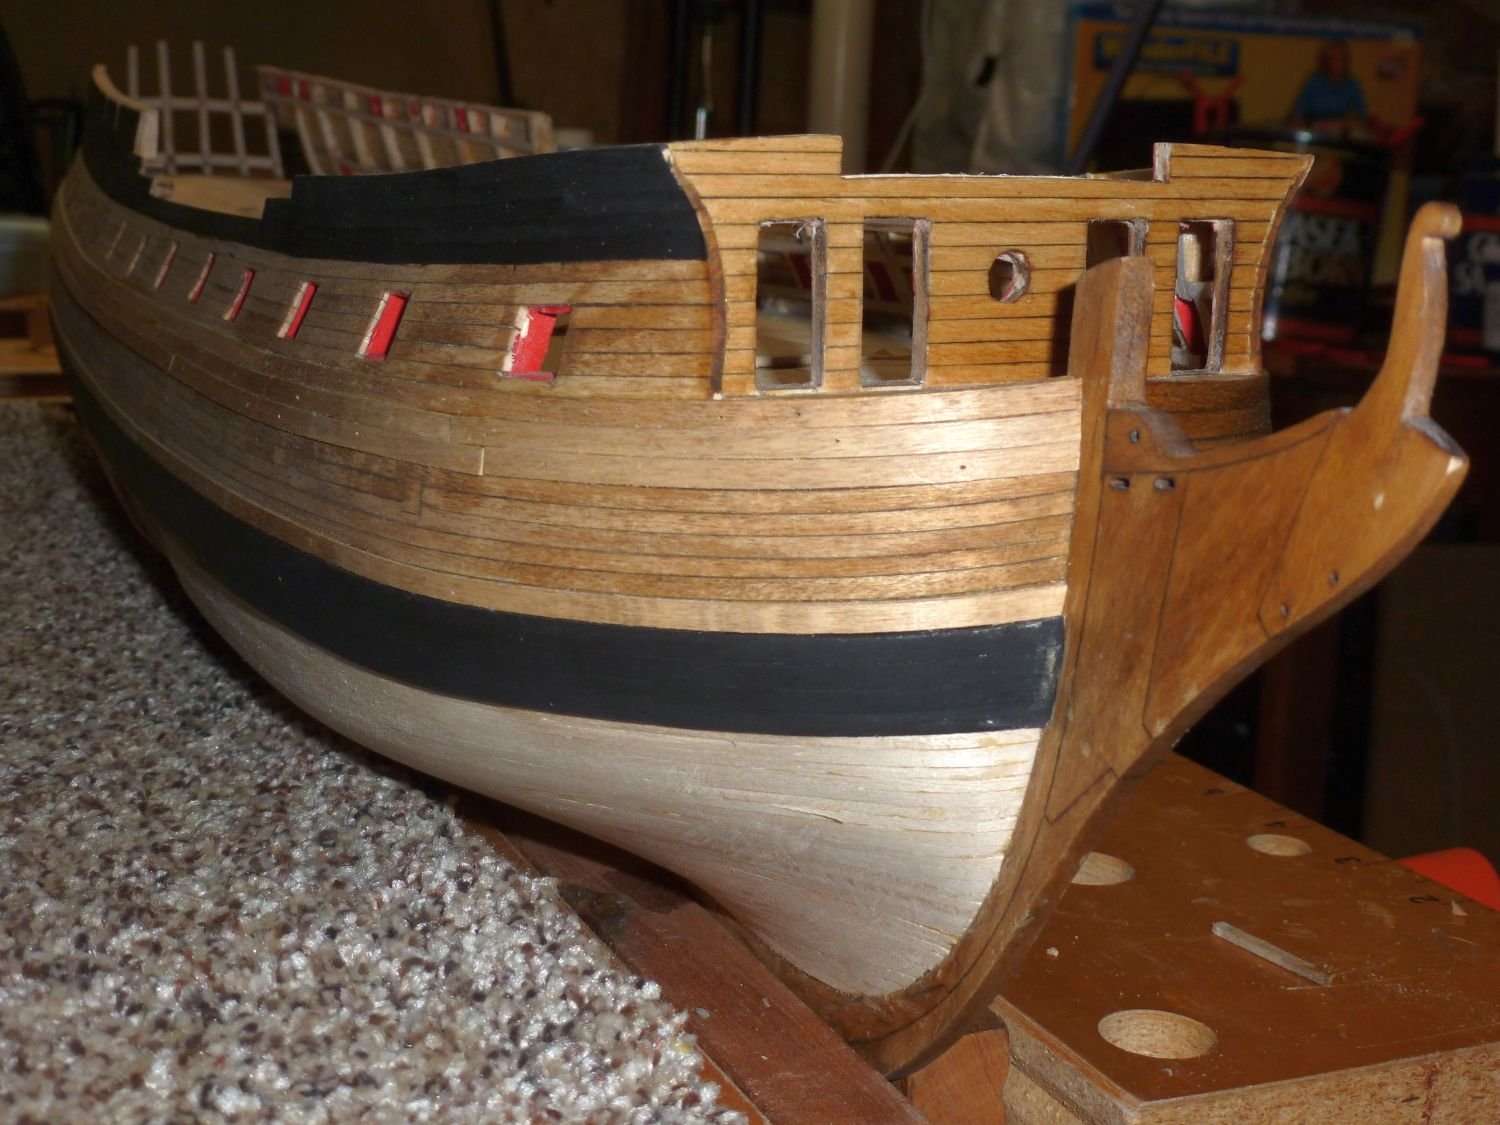
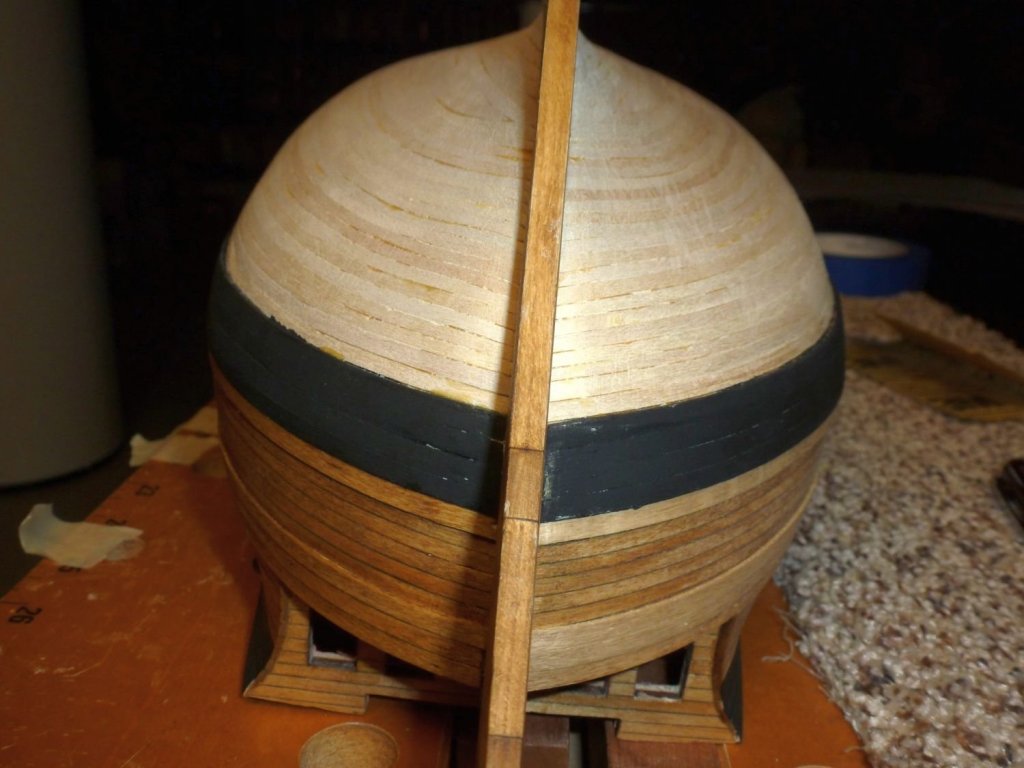
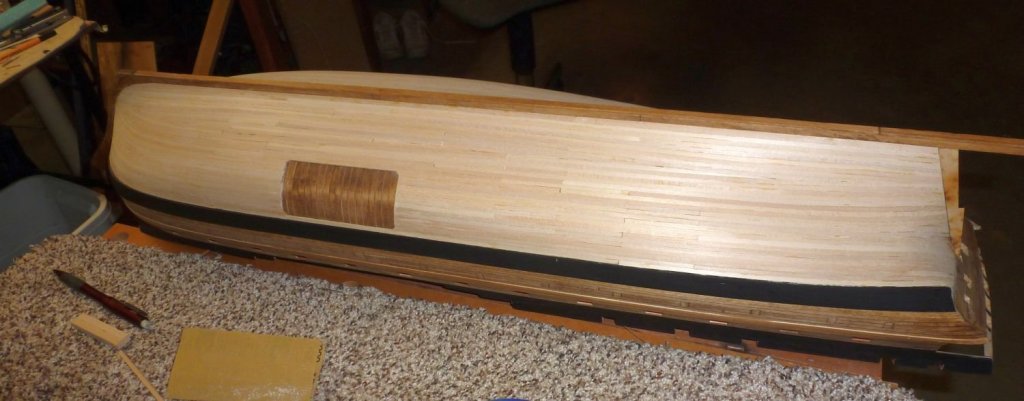
I have finally finished planking the hull below the wales and adding the second (final) layer for the main wales and channel wales. The pictures are below, but I would like to add some thoughts and recommendations for future builders. I lulled myself into believing that Confederacy, although HUGE, would be an easy hull to plank. She is NOT. This is the fifth ship model hull that I have planked and the result is not even close to my best work. My fault...I did not follow the directions. (I did not understand their implication). On page 52, Chuck says “The forward end of the garboard strake should be glued to the center of bulkhead “E” as shown in the photo provided. It should not start forward of this bulkhead.” Well I disregarded this because the garboard strake ran nicely much farther forward. What I failed to realize was the resulting decrease of space at the bow necessitated a more severe taper at the bow of all planks in between. Also the shape of the hull is such that planks need to taper not only at the bow but also at the stern to Bulkhead 8 and then flare out again necessitating stealers between Bulkhead 8 and the transom. But the job is finished and most of my “fixes” are near the keel and will not be noticed in the completed model. On a positive note, Chuck includes a “spiling guide” that he describes on page 51. This thing is WONDERFUL!! and results in a much smoother run of planks than would happen otherwise. I strongly encourage future builders to use it. I also did a LOT of sanding the inside of the bulwarks to decrease their thickness but still have a ways to go. Another caution for future builders. When you do this, do NOT sand “freehand” just holding the sandpaper against the surface. The plywood bulkhead extensions are much harder than the soft basswood gunport frames and freehand sanding would create concave surfaces between the bulkhead formers that would make planking difficult. My solution was to glue sandpaper to a piece of plywood 1/8 inch thick and 3” x 3” to get the smooth even surface down to the false decking. I will continue to work sanding the inside of the bulwarks. I also need to add the fancy molding along the hull. I am still undecided about whether to treenail or not. Then I will start on the Stern and Quarter Galleries.


-
Jesse - Yeah, but I seem to remember when visiting HMS Victory being told that each sailor had TWO hammocks...one to use and one to air out . Seems to me that the key thing is that you fill the netting with hammocks. There is the famous quote that "all models are wrong; some are useful". It was aimed at mathematical models but certainly applies equally to ship models. Here is a link to a page of a book on model ship building that addresses hammocks and hammock netting. The illustrations look very similar to the work you have done on SYREN. This certainly is a learning experience, isn't it. Here is the link: https://books.google.com/books?id=5nrXLkfLBGcC&pg=PA202&lpg=PA202&dq=hammocks+on+ships&source=bl&ots=HeLveDcnoX&sig=s3kiErMFCSs7m2EGNQAIm3Q2MSY&hl=en&sa=X&ved=0ahUKEwiB55Ox1NPYAhVlct8KHX1ED-oQ6AEIngEwFw#v=onepage&q=hammocks on ships&f=false
- 1,306 replies
-
- 8
-
-
- syren
- model shipways
- (and 1 more)
-
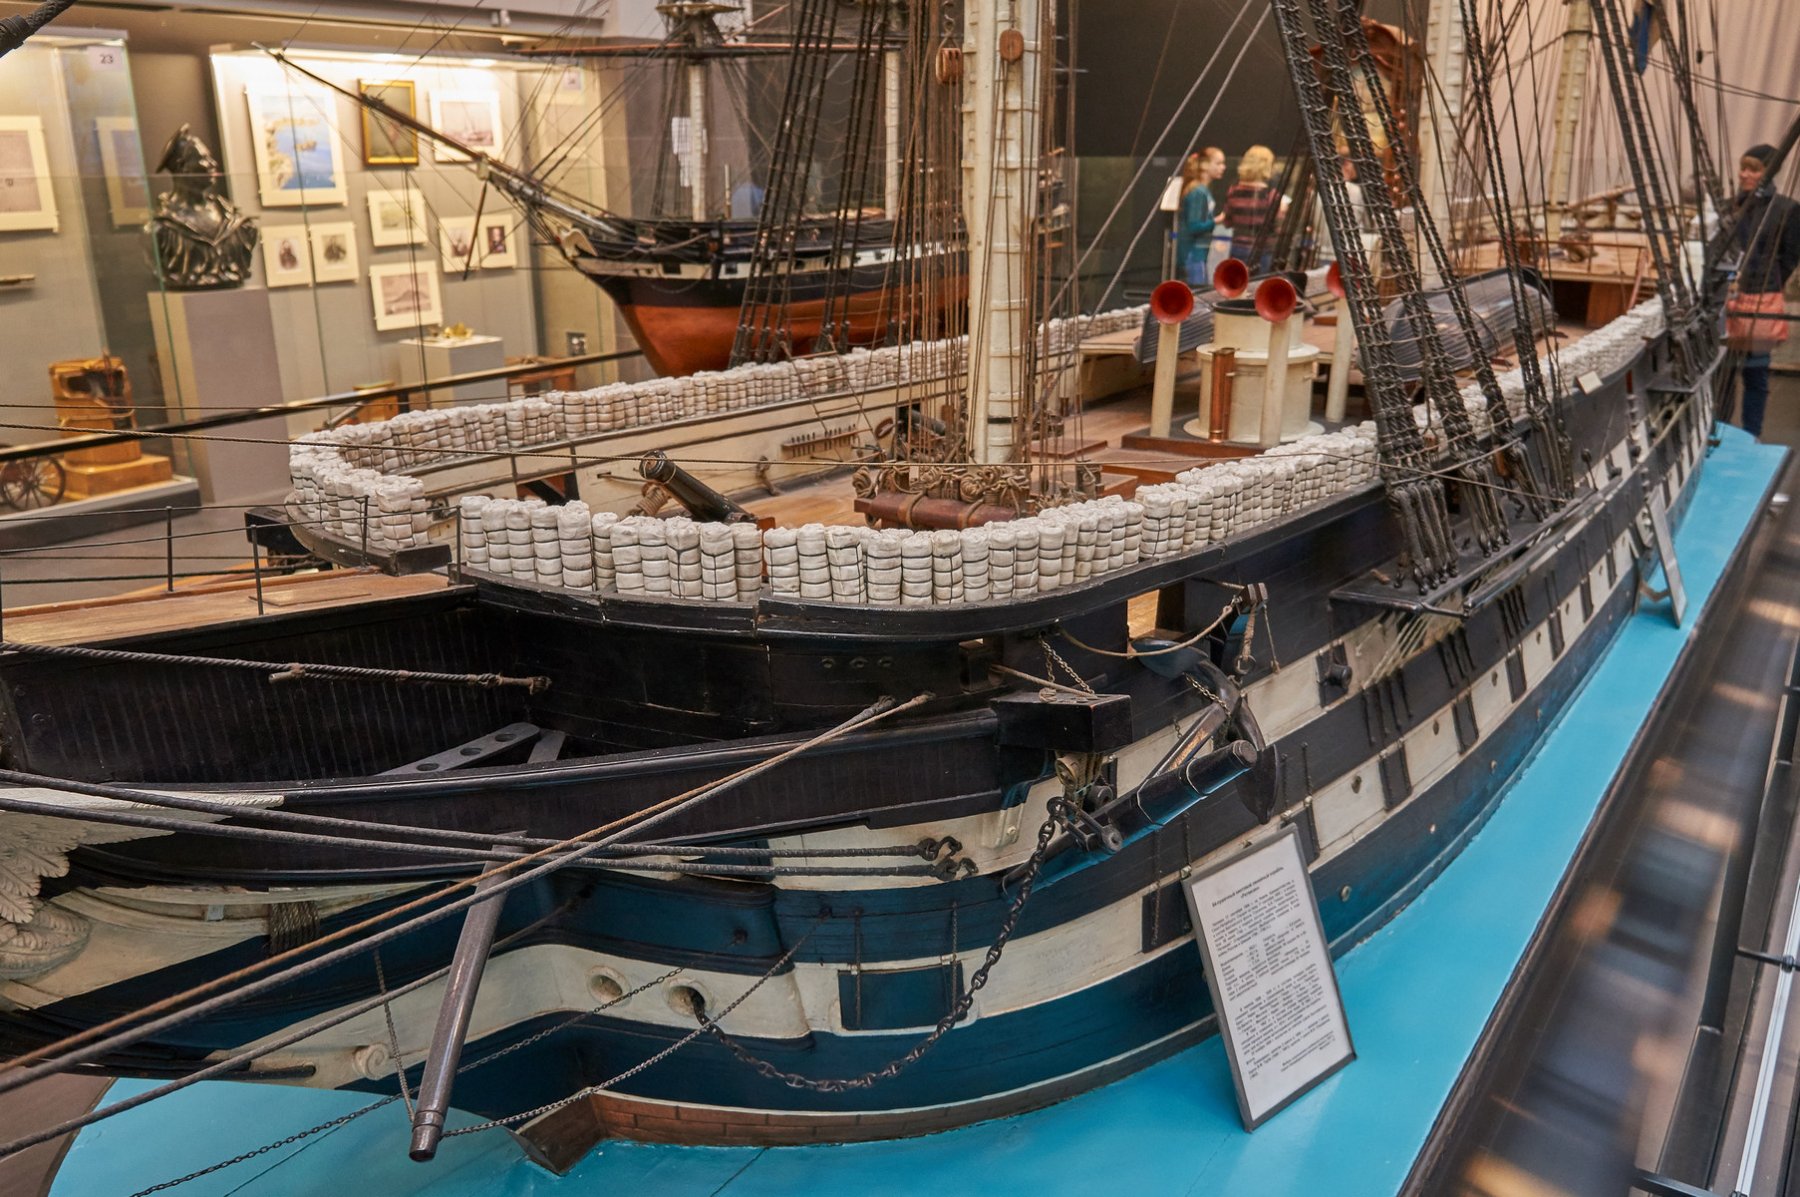
Jesse - Here is a picture of a model from the Russian Naval Museum in St. Petersburg showing hammock rolls. I don't know if the Russians rolled their hammocks differently than the Americans, but at least this might be of some help. Your SYREN build is looking very nice. How many times have you snagged your arm on that long bowsprit already? I'm looking forward to more pictures etc. <<Gary>>

- 1,306 replies
-
- 9
-
-
- syren
- model shipways
- (and 1 more)
-
Hi Jesse - When I was adding the netting, I found that a couple of small dabs of super glue worked very well to hold it in place. Be sure to get the netting all the way down to the bottom of the hammock cranes and not leave a big gap between the netting and the rail. Your model is looking very very nice. I admire the quality of your work. <<Gary>>
- 1,306 replies
-
- 7
-
-
- syren
- model shipways
- (and 1 more)