Smac
-
Posts
59 -
Joined
-
Last visited


-
 Jeronimo reacted to a post in a topic:
HMS Naiad by EdT - 1:60 Frigate (38) 1797 - Finished
Jeronimo reacted to a post in a topic:
HMS Naiad by EdT - 1:60 Frigate (38) 1797 - Finished
-
Captain Poison reacted to a post in a topic:
HMS Naiad by EdT - 1:60 Frigate (38) 1797 - Finished
-
Captain Poison reacted to a post in a topic:
HMS Naiad by EdT - 1:60 Frigate (38) 1797 - Finished
-
Jorge Diaz O reacted to a post in a topic:
HMS Naiad by EdT - 1:60 Frigate (38) 1797 - Finished
-
Jorge Diaz O reacted to a post in a topic:
HMS Naiad by EdT - 1:60 Frigate (38) 1797 - Finished
-
tadheus reacted to a post in a topic:
HMS Naiad by EdT - 1:60 Frigate (38) 1797 - Finished
-
Smac reacted to a post in a topic:
Young America by EdT - FINISHED - extreme clipper 1853
-
Yes David, just about that ... Salvatore
-
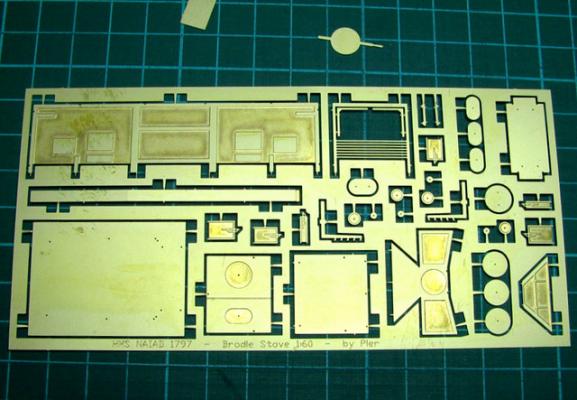
Hi Guy and Pat. See below the plate Pierluigi made for me. I suppose he is willing to make and sell it again. I suggest to contact him directly by e-mail (pier@pimini.it) and to have a look at his website (www.pimini.it). I could not believe my eyes the first time I actually saw the stuff he makes. Regards Salvatore
- 511 replies
-
- 10
-
-
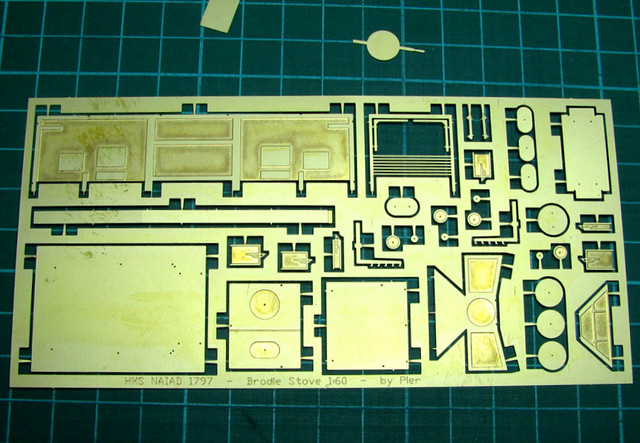
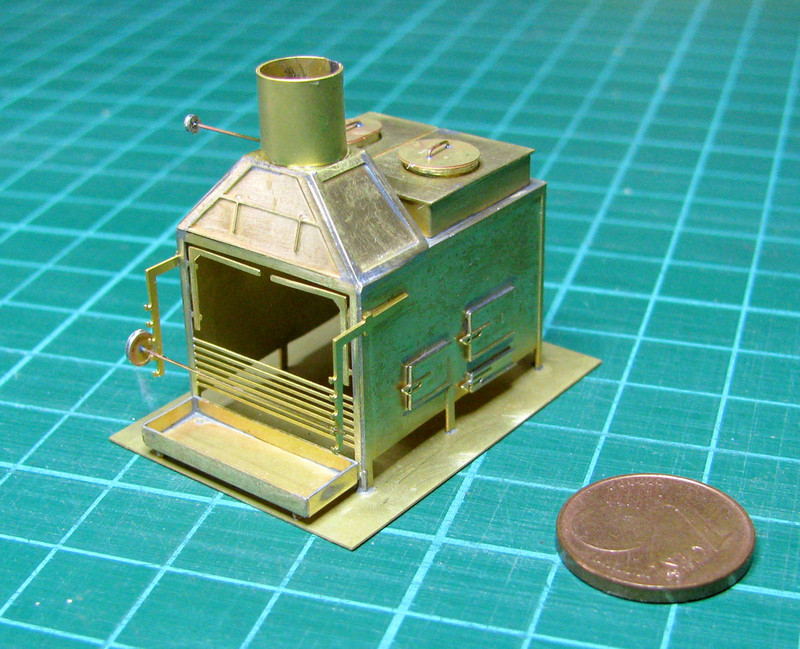
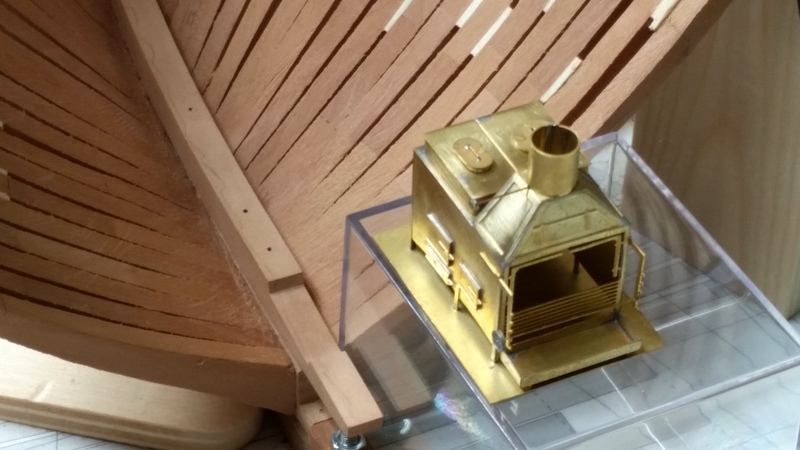
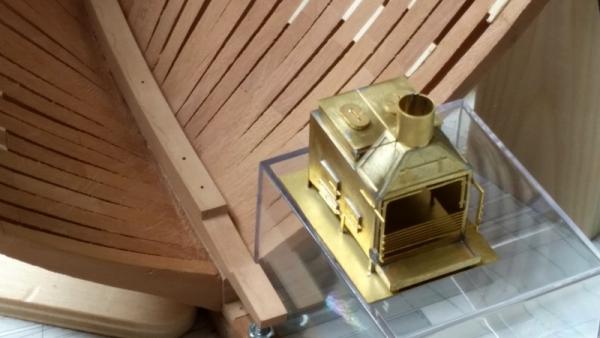
Ed, I wish to share with you and everybody interested in the building of the Naiad a little jewel, made by a fellow Italian modeler, who specializes in dollhouse equipment. On my request, he has drawn the stove very precisely from different sources and had all parts photo etched. He then assembled the article to check that all parts fitted. They do. It is in the scale of 1:60, the same as that of your model. Unfortunately, he will keep the finished stove for himself. I hope when the time comes to be able to make a stove as nice as his. It is a very, very tiny little thing! Enjoy the pictures. The stove in shown in the fore part of the ship where it will eventually be located. Regards Salvatore

- 511 replies
-
- 16
-
-
Thank you Ed, very interesting how the availability or the paucity of raw materials affect the construction's technique, hindering perhaps the development of maritime science. I would have thought that a composite structure is stronger and lighter in general terms than a wholly wooden one ... Salvatore
-
Yes indeed Ed. I will try it, although the "more complex" clamps are extremely flexible and very effective (I made 20 of them and they are constantly in use), but I can understand why making them could appear mysterious and a little scary. I don't know if this is the proper place to praise Young America, but let me say it is even more beautiful than the Naiad. I have recently been to Greenwich (UK) and gone onboard the Cutty Sark, now fully restored after the great fire of few years ago. It has a combined structure of wood and iron and I wonder when this building practice was started, compared to the, I believe fully wooden, structure of the Young America. A book on it would be a feast; give to it a serious thought. Regards Salvatore
-
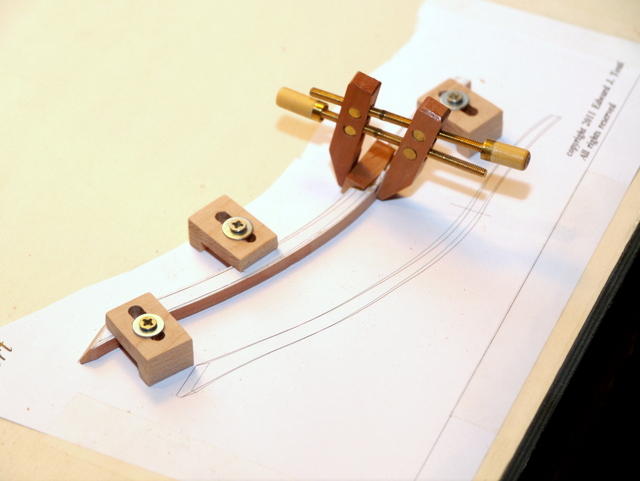
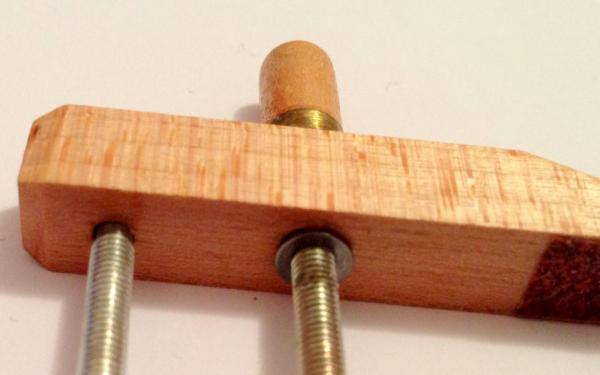
Richard, when I made the "simpler" clamps, I thought of a little improvement along the lines of the machinist clamps, that is to insert a small washer between the upper jaw of the clamp and the top of the threaded rod. This will improve the cleanness of the design and the effectiveness of the clamping. To do this you need to reduce the diameter of the rod just enough to allow a small washer to be inserted and for a such a length that allows a small portion to protrude from the top of the upper jaw to place the handle. The attached picture should make it clear. Salvatore
-
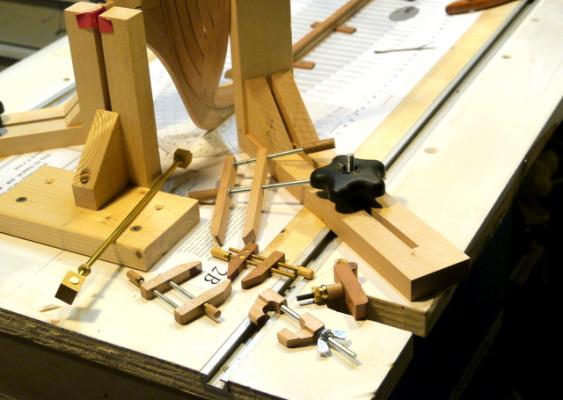
Richard, I could not agree more with what you say about the look. When you look at the tools made by the great craftsmen of the19th and18th centuries you can see that the look was then as important as the technical function the tools were intended to perform. Why use a still nut bought at an hardware store when you can make a beautiful turned and knurled brass round nut? The time needed to make it is not wasted. Time is not money for us, at least not the time spent in modeling ... As regards the screw down clamps, the are moved around the board in relation to the shape of the piece to be held down. I simply start a hole with an bradawl where the clamp is needed and screw down the screw. Be careful not to tighten too much the screw otherwise the clamp would break. When you cannot shift the clamp by moving it with your hand then you have to stop tightening. Salvatore
-
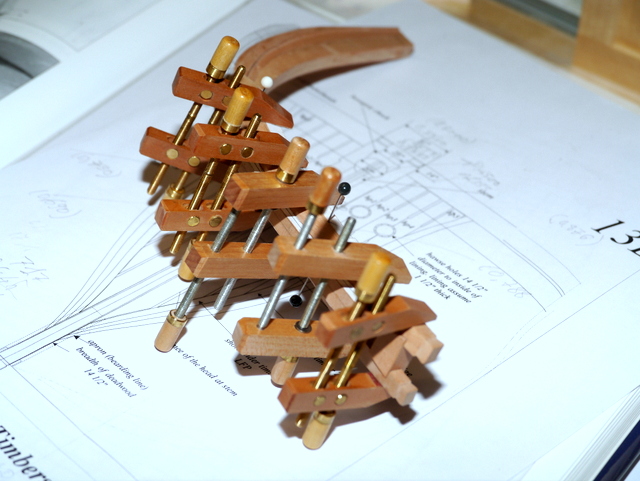
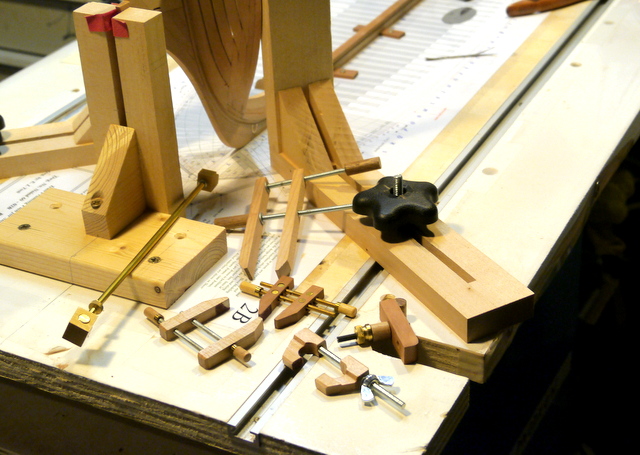
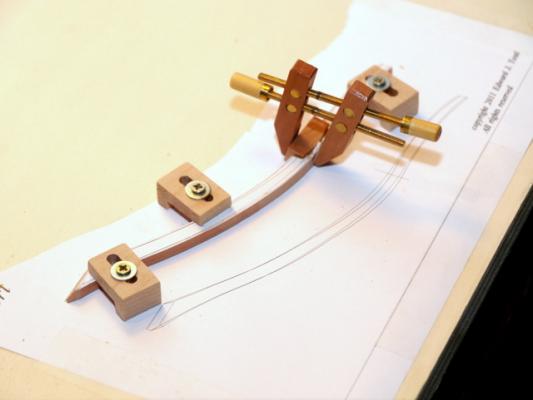
Richard, the flexible clamps are a challenging project to make, but they are extremely useful in the building process, as much as the other ones Ed has shown in his (splendid) # 1 book. You can set the pressure you need, which you cannot do with the spring clamps, clamp odd sized pieces and, last but not least, they are themselves beautiful little things. I have made several clamps of various sizes and shapes to accommodate different clamping needs. Pictures below, taken at various stages of construction, show the clamps and their use. Make them, you will enjoy it! Happy modeling and regards Salvatore

-
Ed, I am so sorry. I should have known better than bother you with bevels and angles at Christmas time! I will come to that again at a more appropriate time. Merry Christmas Salvatore P.S. I am about to leave for NYC where I will at last put my hands on my two copies of Volume II.
-
Ed, I am proceeding with the building and I have found some minor mistakes in the drawings you might perhaps wish to fix. In particular, the bevels of some aft cant frames seem to be wrong: 27a, 7.4 deg. should be 5.4 deg. - 26.a, 4.6 deg. should probably be 3.6 and 25.f, 1.1 deg. should be 3.1. There might be others, but these are the only ones that at first glance I have detected. Very best season greetings Salvatore
-
Ed, I fully understand the uneasiness of us continental Europeans when it comes to inches. I would however strongly recommend to all Naiad's prospective modelers to use the conversion chart that has come with your book. Inches cannot really be converted into mm that can actually and reasonably be measured. 1 quarter is 6,3 mm and something and it is that something that creates the problem. I am building the Naiad using the original chart and one of those inexpensive digital calipers that can read up to millesimal inches and convert them into millimiters, if you wish to do so. So far, at least as regards measurements, I have not come across any real difficulties and I am even getting somewhat used to inches ... Warm season greetings to everybody Salvatore
-
Ed, if I ever started a build log it would only be a poor copy of yours, but I will still post some photos, hopefully soon. Once the work on the stern is finished I trust the most difficult parts of Naiad will be behind me and progress should become faster. Modeling Naiad is an exacting job, but seeing her grow up is so rewarding. If I just had more time to devote to her ... Thanks again Salvatore
-
Sorry the message flew away before I was done with it. I would only like to stress the enormous contribution you have made to ship modeling with your forums, explanations, methods of work, drawings and research. We European modelers are used to the French technique of ship building with double frames after the Ancre books and the Naiad's modeling technique is somewhat disconcerting, but absolutely authentic and thoroughly enjoyable. Like everybody, everyday I look forward to your new posts. Many thanks for sharing your art with us! Regards Salvatore
-
Ed, I will pick up my two copies of Volume II in New York as a perfect complement to Christmas holidays. I am sure it will be even better than volume I, not least because the color prints I know will accompany the text and drawings. I am proceeding in the building of the Naiad. It is a daunting task and my scrap books is a sad evidence thereof, but I am enjoing every hour I am able to spend in my workshop. Hawse timbers are finished and I hope to complete the work on the stern in a couple of weeks. After the inception of your new great project, the interest in Naiad might perhaps be fading away, but nontheless I would like to post some pictures of my own model with few comments.
-
Ed, building of the Naiad is progressing nicely albeit slowly, but that was expected, due to the many other commitments of life. I wish to point out a misprinting in the measuremnts in the stem patterns sheet, where it is wrongly stated that the two lower pieces are 13.5" wide, whereas it should be 15.5", otherwise you cannot meet the moulded size of 15" and 14.5" respectively. Regards Salvatore