


Captain Al
-
Posts
613 -
Joined
-
Last visited


-
 Scottish Guy reacted to a post in a topic:
For Beginners -- A Cautionary Tale
Scottish Guy reacted to a post in a topic:
For Beginners -- A Cautionary Tale
-
robert952 reacted to a post in a topic:
How to avoid twisted lanyards
-
robert952 reacted to a post in a topic:
How to avoid twisted lanyards
-
robert952 reacted to a post in a topic:
How to avoid twisted lanyards
-
robert952 reacted to a post in a topic:
How to avoid twisted lanyards
-
robert952 reacted to a post in a topic:
How to avoid twisted lanyards
-
robert952 reacted to a post in a topic:
How to avoid twisted lanyards
-
robert952 reacted to a post in a topic:
How to avoid twisted lanyards
-
robert952 reacted to a post in a topic:
How to avoid twisted lanyards
-
robert952 reacted to a post in a topic:
How to avoid twisted lanyards
-
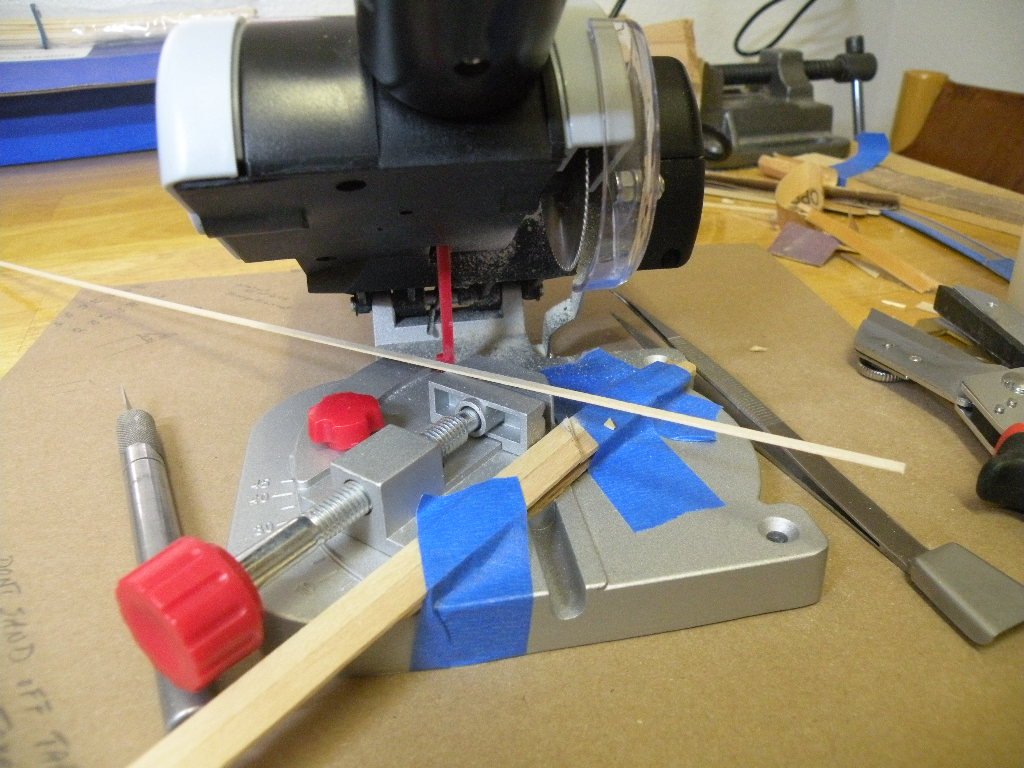
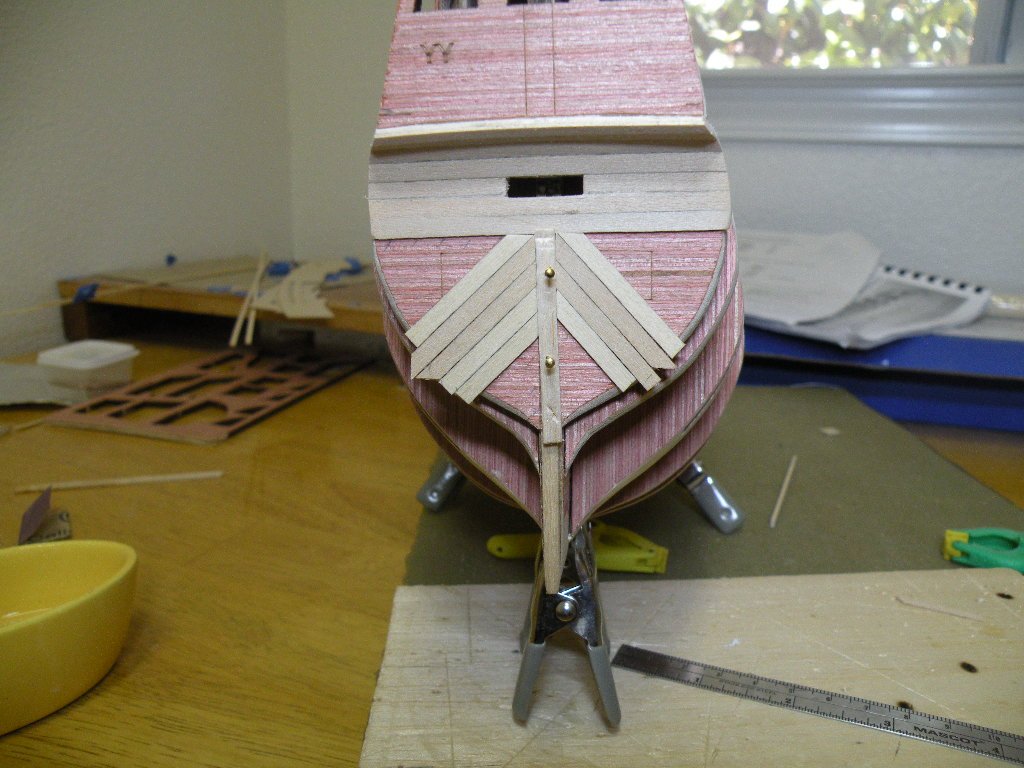
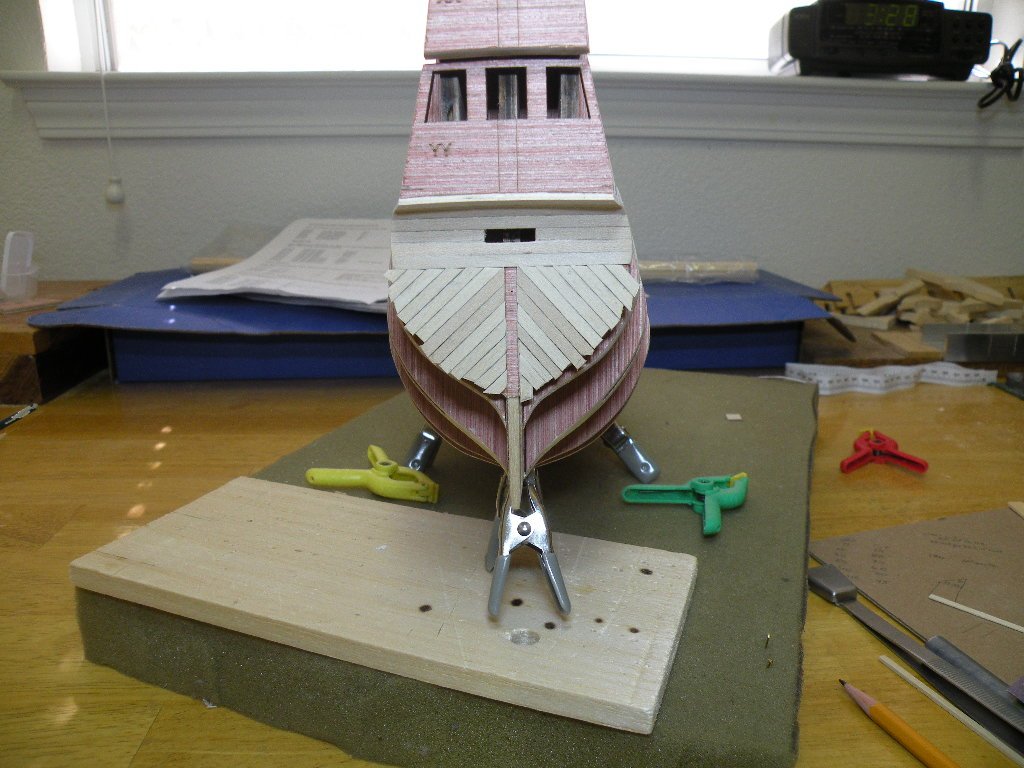
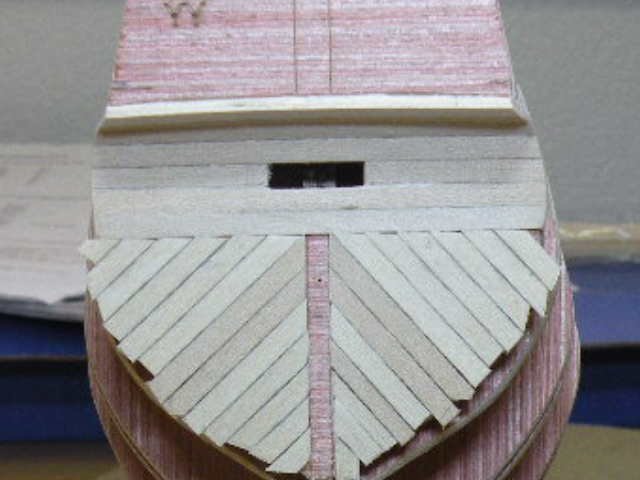
So I took the plunge and made a management decision: I decided to ignore the ports on the transom and plank the full ZZ on the diagonal, planking right over the etched squares for the ports. I intend to attach two home made ports over the planking. Or not. It will be determined at a later date and depend on how I like the outcome of the full hull planking and whether or not I decide to stain and varnish the undersides or to go with the the white paint below the wales. The sample port I made yesterday came out OK and it could be even better. My little MicroMark cheapo cutoff saw was very useful. Its a $50 investment and isn't the most sophisticated device, but you soon learn its limitations and drawbacks and adapt to them. Overall it is a great time saver, cuts angles more accurately than I ever could (with my wobbly miter box), and saves my tennis elbow from getting sore. Not a whole lot to describe; the pix tell the story. I highly recommend pinning a 1/8th inch strip down the center where the rudder post will go. Allows you to cleanly butt the planks up against something creating a perfect (well we shall see how perfect when the rudder is installed) rabbet for the rudder post. Eliminates lots of filing or sanding. And it aligns the 45 degree plank pretty well on the diagonal. Without it, that line is not easy to make straight. So nothing ever goes according to plan. I had some pencil lines drawn on ZZ and along with the strip down the center the planks were going on quite well -- symmetrically that is. I did one plank on one side then its corresponding plank on the other. Started in the upper center corner and worked down. Long about the 4th plank down I noticed that the planks had fallen out of alignment with its corresponding plank on the other side. Not horrible but unsightly given what I'm trying to accomplish with this fully planked transom. I think I fixed it pretty well by shaving a wee bit off the next two planks on the starboard side. Instead of 1/8th inch (3 mm) I cut off a little less than a mm. After these were placed the rest were back in alignment. Finished up the top section with little sweat. Those don't really line up with anything. I made my planks longer than necessary and I won't try to cut them back and fair them to the hull until I'm laying the hull planking. I needed to squeeze a couple tiny bits of plank into the bottom and top corners. I don't know if the design and size of the model, if faired perfectly, would result in a perfect fit of X number of planks, but it didn't for me. I suspect that when all is done, the hull planking will cover those areas enough to make the tiny planks unnoticeable. I am gone for a week. Off to Texas for some R&R. When I return the real fun begins (planking the hull).
-
Okey doughky. I won't belabor it but to me its alot of white paint where it need not be. I owned boats for 30 years and the idea of putting anti fouling paint above the water line is hilarious. I just wish Chuck had not mentioned that this white stuff was used for the purpose of warding off underwater critters. Then I would have just accepted the painting scheme for what it is; a painting scheme. I'm now almost sure there will be no white paint on my Mayflower. I'm going for the artistic and fine finish down below.
-
Still not sure though why that area would be painted with the anti fouling white stuff.
-
I got a PM back from Chuck with a photo showing that the ports are well above the water line. And yet the white paint still covers them and goes up the transom pretty high. I'm still weighing whether to make this model authentic or visually appealing.
-
I like seeing you back at work and I like what you've done. Lots of char left indicating lots of fairing to go. I can't offer any advice on this except what I've already noted on my log: don't be surprised at how much wood needs to come off from various bulkheads; especially toward the stern and bow (and particularly #5). And take it slow and keep going back to areas you may have thought were already done. Use those bulwark templates as battens as well. I'd suggest that you put in the eyebolt now before you put a lid over the hole. I wish I'd painted all at once. I used the only black paint I have which is Rust-o-leum. Its a cleanup pain much worse than any acrylic. I have to start thinking about paint and brushes and all that sometime soon. I see ZZ on there. Looks pretty square. Is it perfect? Did you use spacers to glue them on or just eyeball it? The 'graceful curve' looks very nice; shouldn't give you any planking problems. I would not accentuate the camber of xx, yy and zz any more than necessary. The more curve there is the more issues with the planking later.
-
I'm wondering about the white paint job. Richie's comment about painting over the nice diagonal planking made me think. I haven't yet paid much attention to the painting scheme for the ship, and I thought that most (if not all) that diagonal planking was above the water line and therefore not going to get a coat of that "white stuff" as Chuck calls it. The white stuff in reality was a form of anti fouling paint (which probably contained a ton of lead and is not legal any more) and was only necessary below the water line. So I'm looking at my stern/transom and comparing it to the pix in the instructions. Yeah, Chuck shows the entire ZZ painted all the way up to the start of the curved counter. And yet there are these two ports which would therefore be below the water line. I find it hard to believe that there were ports that opened that were below water level. I'm starting to get my head back into trying to do a great job of planking all the way down to the keel and then staining and finishing it. Like the example I posted above.
-
Hey Joel, these look fantastic. I take it when you say 'knocked off the corners' that you mean beveled the outside edge just a tad.
-
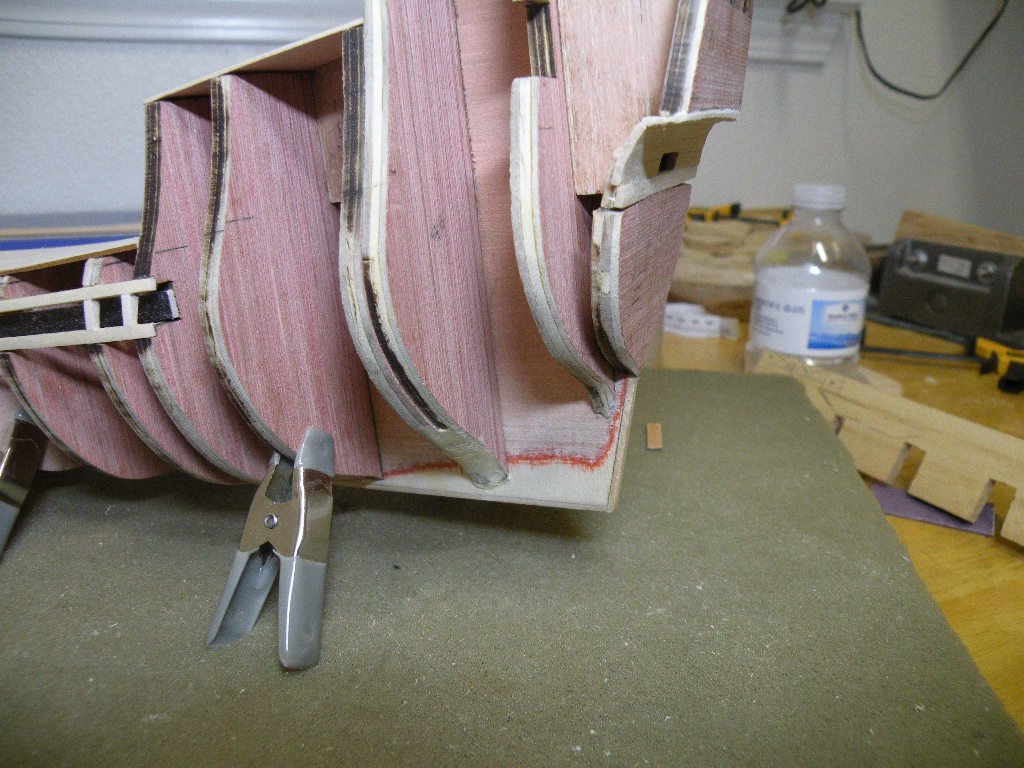
No excuses to delay the second planking of the counter now. I did the tiller hole and sanded the first planking to as "graceful" a curve as I could. I'll probably go with Tiger's suggestion to put the planks on first cause I don't have any decent stain on hand and don't know when I can get some. Anyway, here's the counter ready to go:

-
So on close inspection of that build I just posted, there are significant differences to our MS kit that make doing anything too elaborate with those stern ports kind of superfluous. First off ours is painted below the wales and this other one is finely planked, stained and probably finished. So the ports are important to not detract from the hull's look. Ours are painted and no matter what I do it won't show very well. Its also interesting to note the difference in how far up the transom the diagonal planking goes on this other example. Not nearly as far as ours. So the ports are part of horizontal planking while on ours the ports fit in the area of diagonal planking. Anyway, I need to stop thinking and do some work on this ship. Time now to cut out the tiller hole.
-
Technology is not one of my strong suits.
-
Whoops. I should have said the instructions have no further mention of these ports.
-
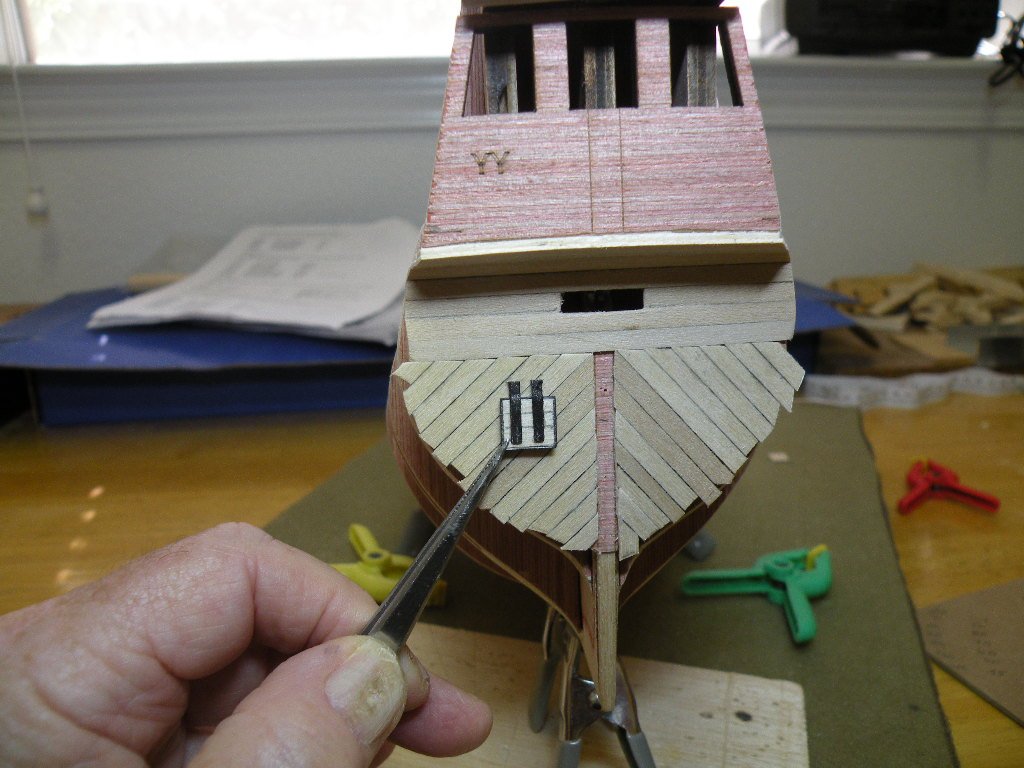
I've been pondering this for several days now; ever since i turned my attention to the aft end of the boat. It never really sunk in (bad pun?) what those two squares of horizontal planking on either side of the tiller opening were supposed to be. Now that I'm planking around these squares I decided to look into it further. This link makes it clear that they are supposed to simulate ports. So why aren't we doing something a little more detailed, real, authentic or at least like the gun ports on the hull? I've looked over the instructions and there is further mention of these ports after the stern planking section. So I am considering at least some molding around them and some hardware. Before I go further with planking though I'm thinking of building two little boxes and gluing them on instead of just the three horizontal strips. They'd look like a framed port hole closed. Then I'll plank right up to the edges of these boxes. Sort of the same as putting molding around the square; just a bit more realistic.
-
How'd you do that Willis? How'd you take my black and white screen shot and color in those strips? Pretty neat. Thanks for the suggestions. Either way better than starting in a small corner; I'll consider both and pick one. What do you think about the temp rudder strip?
-
Today and probably tomorrow I'll be second planking the counter. I've been reading the instructions and looking closely at the pictures. A couple things came to mind which I will throw out for discussion. First, is it safe to assume that the photos in the booklet replicate the end product in terms of how many planks it will take on each side and, what the angle of the end (middle) of each plank is. Second, it appears that Chuck would have us plank to the line, and leave an opening for the rudder post. I've done this before and its pretty hard to get the cuts and placements so perfect that when you put in the rudder post there are no gaps. Now it could be that there will be moldings between the post and the planks which will cover any imperfections. But I was thinking that maybe I would temporarily pin in a strip to simulate the rudder post and would then have something to butt the planks up against. Do you guys think this is a good idea? Then there's the question of the best place to start the diagonal planking. I think I would have started at a corner with a small plank and worked my way down or up getting longer and longer and then shorter and shorter til I finished up at the bottom or top. But my wife reminded me of how a tile layer lays down tiles for a diagonal pattern on a floor -- they will start at the middle and work toward both ends. The reasoning is that when the time comes to narrow the last plank or two its less noticeable in the small corners. How would you proceed? And finally, since this is the second planking I'm going to have to make some color decisions today. This area is above water line so it should be stained. I have to check what stain i have, I think only American Walnut which I'm guessing is too dark. I don't want to just lacquer the basswood; too white. Thinking about an oak stain. I'll take a look at some pix on line and see what other's have done. But the question I have is: should I stain each plank before gluing it on? Or glue them all on taking care not to get glue on the surface, then sand and stain the whole surface at the same time.
.thumb.png.a7284f9ef1cd6b95e160d367450bf1b8.png)
-
Thanks Joel. By "solved" I guess I would say yeah, I solved it by gluing in the last plank as best as it would fit and today I'll put a bit of putty into the cracks on each side. But for the second planking I am going to work out the sizes (widths) that will let me use 7 planks and I'll try to cut that last one most carefully.
.png.740f30d55e40af9f92aa4569881f014a.png)