


vossiewulf
-
Posts
1,207 -
Joined
-
Last visited
Content Type
Profiles
Forums
Gallery
Events
Everything posted by vossiewulf
-
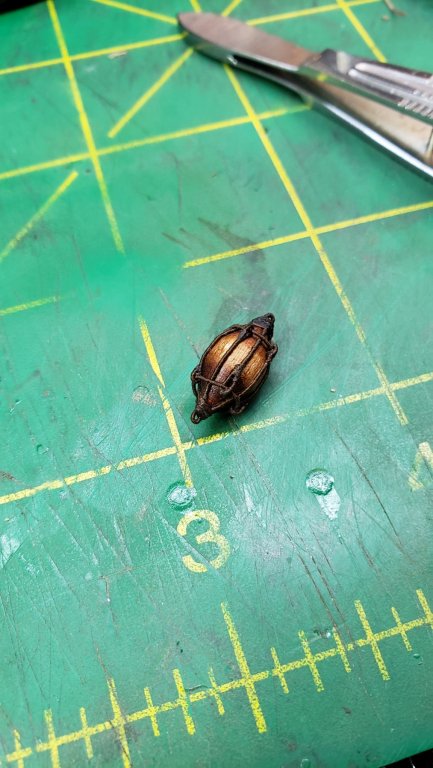
 For anyone who wanted to see the rest of the process of making these damnable things Each hoop has two "short" lines and one long. The short lines go on opposite sides of the buoy from each other, run the length of the buoy and then are cut off at the end with the ends hidden by the seizing. The long line as you see, runs down one side, is made into a loop, and then back down the other side where it wraps around the hoop. Because of that you have to glue and seize that one in place; the rest were made on a post, soaked in glue at the top of the loop, cut at that point, inserted onto the hoop and then reglued. Way easier than doing it in place. Run it under the hoop and bend it almost all the way around and glue it at that point at the top of where it bends around the hoop. Then soak the next bit of line in thin super glue. Within a couple minutes, before that glue hardens fully, clip it at about a 60 degree angle, put a small drop of glue on the cut face, and press it down into the rope below. I've just done that here, the loop we're working on is at the top now. Then wrap some 14/0 fly line under it and tack glue it in place. Cut off one end of the fly line, then put thin super glue on the tip of the other end and then start fishing it around, tack gluing it every couple turns or even every turn. This is very squirrely to do so keep gluing as you go. Done, the one we just did is at the top. Then seize the end loop. Then repeat that process going the other direction. Once done, go over everything with Testor's Dullcote or some other flat varnish to hide the glue.
- 624 replies
-
- 12
-

-
- lady nelson
- victory models
- (and 1 more)
-
The destruction of of HMS Barham.
vossiewulf replied to uss frolick's topic in Nautical/Naval History
What Bruce said. In my opinion it was criminally poor leadership by Beatty in striving for an absurdly optimistic idea of "overwhelming" an enemy with so many shot splashes that their spotting becomes useless. This prioritized shooting speed over all other considerations, including accuracy, and was responsible for both the first two magazine explosions at Jutland and the very poor shooting of Beatty's battlecruisers. Notably the 5th Battle Squadron that trained with the Grand Fleet and not Beatty were attached to Beatty's force at Jutland and shot much better than Beatty's ships. Also the Germans always used an inherently safer cartridge, with their main charge in a brass case and only the fore charge was silk-bagged. And they very nearly lost Seydlitz at Dogger Bank to a turret hit, and were therefore lucky to be able to see exactly how close they had come to losing the ship. They modified their safety practices between that battle and Jutland and were operating with altogether much safer gun operation processes than the British were at Jutland. Hood and Invincible weren't lost to terrible safety practices as much as to the weak armor favored by Jackie Fisher. With armor unable to stop the shot being fired at the range at which it was being fired, all it took was a lucky shot aimed at one of the magazines. No safety practice saves a dreadnought from a direct magazine hit. This photo is another one that captures the ugly side of the peak of gunnery combat. Some 750+ of these guys didn't make it. It's Blucher capsizing at Dogger Bank in 1915. -
Rob, I have neck and back problems too, if the chiropractor can't clear the problem after several tries and nerves are still so pinched that you're numb in a hand, this might be one of the rare cases where a shot of cortisone is called for to get the inflammation down enough for the chiropractor to get the vertebrae back in place. Steroids should be avoided but sometimes they can be needed.
- 1,205 replies
-
- 3
-
-
- great republic
- clipper
- (and 1 more)
-
kit review 1:32 Fifie – The Scottish Motor Fishing Vessel by Amati
vossiewulf replied to James H's topic in REVIEWS: Model kits
Considering the Lady Nelson instructions consist of about two pages of "stick all the stuff in the box together", you'd already be way ahead of my choice with the instructions you get with this kit. And with minimal rigging and what looks like relatively straightforward planking, I think it would probably make a good choice. If you want the argument against, it's pretty big and has a fair amount of fiddly-looking deck detail, you'll need patience for those. And if you're not just a novice ship builder but a novice making stuff, you might want to start even easier with like the Model Shipways rigged longboat. -
You could call it a Fazdangler Boomenhooper rig and it would make just as much sense as most of sailing terminology.
-
Kathryn, pretty clearly no one has an idea as to what is happening here. Usually white patches and blushing is moisture being trapped under the finish, but that is seen with film finishes, not oil. The second major possibility is silicone, as people will use paste waxes or dusting products that include silicone and once silicone is on a piece of wood you'll never get it off no matter what you do. But again, that usually impacts film finishes, causing what are called fish eyes. I don't really know what silicone would do reacting with tung oil, so that could be your problem.
-
Yes you do, it's sold as Historic Ship Models by zu Mondfeld in its English version. Check Amazon, it's a very useful resource.
-
Filler Blocks
vossiewulf replied to olopa67's topic in Building, Framing, Planking and plating a ships hull and deck
That will work fine, however Drazen's problem had little to do with his filler blocks and everything to do with him leaving the model in a basement where it swung from 20% to 80% humidity. That will tear apart just about anything made out of wood, if you put a $4000 acoustic guitar into those conditions it would suffer damage and if you put a Stradivarius there you better have good lawyers because someone is going to be suing you for lots and lots of money. You'll have more success protecting your model by controlling the environment than you will by reinforcing it at every step against movement if you live in a harsh environment like that. You don't want any significant movement if you want it to survive, reinforcement just delays the inevitable if it's put through regular significant humidity swings. This is true of anything precision made out of wood. -
As Jon said, this is deck sheer and is one of the basic design considerations in building ships in the age of sail. Generally it went from very high sheer in the early carracks and galleons, slowly reducing over the age of sail until we had nearly flat decks just before steam engines arrived.
-
Filler Blocks
vossiewulf replied to olopa67's topic in Building, Framing, Planking and plating a ships hull and deck
I think there are considerable advantages in planking in terms of no flat spots or dips that have to be addressed when you fill all the bulkheads with balsa, and the only downside is the time required to add the balsa pieces. I'll be doing exactly that with any build where it's possible to do so moving forward. -
Same glues you use for regular wood.
-
Yeah those and the RF-101Cs, as I recall their real motto was "Alone, Unarmed, and Scared S***less."
-
Oops, sorry, forgot to say. Easier way is drilling a hole in each end and mounting it on a mandrel first on one end, then the other. At least that seems a much better way, I'm about to try, or was until work called and now I have to join another weekend conference call for the next couple hours. Sigh.
- 624 replies
-
- 3
-
-
- lady nelson
- victory models
- (and 1 more)
-
This was about as easy as trying to stuff a live octopus into a beer can. But that's partially because I was being stupid about how to hold the buoy, just at the end of an arduous battle with this one I facepalmed when I realized there was an easier way. Also, I used .012" line as I thought .008" would be too thin. But in retrospect I was wrong, I should have used .008" for the buoy rigging and .012" for the buoy lines.
- 624 replies
-
- 18
-
-
- lady nelson
- victory models
- (and 1 more)
-
Danny, you might want to change the title of the thread as the box says those are one LF and one FR Mk.IXs, not Mk.IVs. Mk.IVs would have been interesting as there weren't many, and in fact there were two Mk.IVs, one was the original R.R. Griffon-engined Spitfire, replacing the Merlin engine used in most Spitfires, it was basically a test aircraft and was later redesignated the Mk.XX to avoid confusion with the photo-reconnaissance Merlin-engined PR Mk.IV. The LF Mk.IX was by far the most common Mk.IX, being a dedicated fighter using a Merlin 61 with a two-stage supercharger and increased horsepower that gave it a considerable boost in performance over the previous primary fighter version, the Mk.Vb, which was clearly coming out on the short end in combat with the German's newly-released early FW-190As in 1942. The LF indicated an aircraft rated for low and medium altitudes, only a fairly small number of HF versions were built with a different Merlin with superchargers designed for best performance at higher altitudes. By the time of the Mk.IX, basically all aircraft came with the C or Universal wing, which allowed armaments of 8 .303" Brownings, 2 Hispano-Suiza 20mm cannon and 4 .303" Brownings, or 4 Hispano 20mms. This was opposed to the early A wing that just allowed the 8 Brownings, and the B wing which just allowed four Hispano cannon. However, the majority of LF Mk.IXs flew with an armament of 2 x 20mm Hispanos and 4 x .303" Brownings. The Brownings were obsolete at the beginning of the war, and were almost useless in combat unless you were at very close range against a fighter target. Using them against say a Ju-88 was like trying to take down an NFL running back by throwing gravel at him. The Hispanos on the other hand, like all other good 20mm guns in the war (best is a tie between the Hispano and the Mauser MG151/20) was devastatingly effective. Whereas those four Brownings put .303" holes in aircraft, a typical 20mm hit would blow a hole 18" across in aircraft structures, since they were explosive rounds. You don't have to blow many 18" holes in airplanes before important bits start breaking and falling off. The downside was ammo, whereas it was easy to carry 500 rounds per gun of .303" ammo, the early Spitfires flew with only 60rpg for the cannons, later increased to 120rpg when they converted the Hispano from drum to belt feed. Also we know the front aircraft is after D-Day, because the black and white stripes on the wings and fuselage were added to all low-flying allied aircraft prior to the invasion to help ground gunners distinguish friend from foe. There were two photo recon versions, the PR and the FR, the latter is the all-gray version you have. The PR was a dedicated recon aircraft, with all armament removed and two cameras shooting straight down added, it was mostly used from higher altitudes. The FR version retained its armament and had a single oblique-shooting camera in the rear fuselage, these were used for very low altitude high speed recon flights that I'm absolutely sure that I wouldn't have enjoyed at all had I been chosen to fly them.
-
There are a couple hundred pitfalls you can drop into that are basically invisible until you've fallen into them, so don't get down, you fix whatever you need to and move on a bit wiser in the ways of building ships. When it comes to gluing a piece back that has broken off, drill a small hole on each side and glue in a small dowel at the same time you glue the two pieces back together. It will make the joint much stronger. So one thing you definitely need is a set of small drill bits and a pin vise to hold them for drilling holes.
- 10 replies
-
- 1
-
-
- 18th century longboat
- model shipways
- (and 1 more)
-
My LN has a clear-finished holly counter and transom for no justifiable historic reason, and clear-finished cocobolo wales, stem, keel, and sternpost. No one has attempted to burn me at the stake yet.
-
Jolene, as you can see here, sanding those planks once in place is going to be tricky. In those cases, it's best to fully sand and prepare the parts before installing them, doing so at least considerably reduces the need to sand into corners and around things. Also you can level a wood surface like that by scraping with a sharp Xacto blade, often faster than sanding. That said, balance what I am saying against how much those planks will really be seen.
-
In modeling software this is a primary use case, as 3d objects have to be texture mapped with 2d graphics. Therefore the modeling software has to be able to project all of the surfaces onto a 2d plane, it's called unwrapping UVWs, UVW being the XYZ axes of the texture space. So if I made a model in 3DS MAX with all the planks, it would then be very easy to output all of the plank shapes into a 2D file that could be used to drive a laser. But most people will use CAD, where as described above the process is a little different, but the result is the same. So the answer is that 3D CAD/modeling applications have built in functions for several reasons that are able to take 3D shapes and project them into 2d.
-
That reminds me, I need to threaten to take out a contract on Keith if he paints that mahogany.
-
Horst, try Seamanship in the Age of Sail. It does a reasonably good job of explaining what everything is and how it all works.
