


Ulises Victoria
-
Posts
1,790 -
Joined
-
Last visited
Content Type
Profiles
Forums
Gallery
Events
Everything posted by Ulises Victoria
-
 Hello Jo. Remember that the purpose of both the balsa fillers and frames are to support your planking. Try laying a plank in the place approximate where it should be and try eyeballing if there are gaps or bumps between the plank and the fillers/frames.\ If so fill or sand accordingly! You are doing a very good job! Keep at it!!!
 -
Ask Chuck...He is our expert: https://www.syrenshipmodelcompany.com/
-
Very nice job you are doing there Mustafa. Looking good. Congrats!!! Approaching the end... aren't you excited? What will be your next project? Best wishes Ulises
-
Thank you Pat, E.J. and Mustafa for your comments!!! Really appreciate it!!! Ulises
- 786 replies
-
- 2
-

-
- Royal Louis
- Finished
- (and 1 more)
-
April 10 2019 update Hello dear shipmates: A small update regarding sail fixing and dressing: Making of a parrel Bowsprit and lower fore yard sails: Fore mast and bowsprit completed Some details worth showing Largest sail and yardarm ready to start work Please don't mind loose ropes, misaligned yards, etc... Remember nothing is definitely fixed at this moments, except maybe the sails to the yardarms. Thanks for visiting, friends!!!
.JPG.ea5dc216e2d6be38806471057c10e0b6.JPG)
.JPG.c985a53f351da2e215f352b3871a30ec.JPG)
.JPG.de4f08c728a3fad7933f31d2200d41f9.JPG)
.JPG.dcc1aa5d85eac0560bfb22286971d148.JPG)
.JPG.4105a3d679240d2688503b1c213f3065.JPG)
.JPG.af08877196ee9cd7f13b81173eb4f6a3.JPG)
.JPG.97072c612d1c04ae9091a95e53a65ff2.JPG)
.JPG.75174bceb27f2253fc96516f16fa5a76.JPG)
- 786 replies
-
- 13
-
-
- Royal Louis
- Finished
- (and 1 more)
-
Hey Jo... don't be sorry. This is part of the learning experience! We all have been through that! Take a note of what you think went wrong. And when you make another mistake in a future build, (note I say "when" not "if") use it to add to your collection of learning process!!! That is how you will get better and better!!!
-
Plank Bender....
Ulises Victoria replied to dvlp47's topic in Building, Framing, Planking and plating a ships hull and deck
I use some round thingies women use to curl their hair. They come in different diameters. To me they work wonderful.
-
Looking good, Jo. Whenever you can do things off the ship, go for it!
-
Hello Viv!!!! (Big welcome hug) So glad to see you again and wonderful news about your marriage.!!!
-
Hey Jo! Let me talk to you about the "learning process" in this hobby. If you check build logs, (which I recommend you take some time to do) you will see that almost all of them have something in common: mistakes. And those mistakes come in two forms: mistakes WE make, and mistakes in the kit, be it in the physical pieces or in the drawings/instructions. No kit is perfect. The important thing is to learn how to cope with mistakes. If you study your plans and instructions ahead, you may detect mistakes in the plans or instructions and try to go around them. If you make a mistake because you didn't understand something, or just didn't pay enough attention to the instructions, by all means, go back and fix it. I can't tell you how many times I have done this, and the sense of satisfaction and accomplishment that you get! People often thinks that Patience is the foremost skill you need in this hobby, I would say it is Perseverance. Keep on it!
-
Hello. This is one strange case in which a 1 star review made me purchase the product. Someone complained that the nails were "way too small" This is what made me to complete the purchase:) https://www.amazon.com/PECO-SG_B001BHLR4E_US-Track-Nails-PPCSL14/dp/B001BHLR4E/ref=cm_cr_arp_d_product_top?ie=UTF8
-
Quick update. Just for the sake of comparison: Original color: Stained color: (For some reason, they look much better in person. The actual color is a bit darker.) Here you can see the first sail already sewed to the yardarm and furled.
.JPG.f071a7e26e2d974679addeb44e94f57d.JPG)
.JPG.c2285ae876bb3fd1b8147535eee60ce5.JPG)
.JPG.8a1dd29f7672b4049fcb35f42ea5c427.JPG)
.JPG.96ea5fe7b4f34f3e62d90e15f3dcd1e0.JPG)
.JPG.92bb3a1f5ae9e2554f2f17a65f0582a4.JPG)
.JPG.6837fa8f6d02940d1625cc2daf0d1e68.JPG)
.JPG.987a889ad49c8b47f0b857a3cf680bec.JPG)
- 786 replies
-
- 10
-
-
- Royal Louis
- Finished
- (and 1 more)
-
Thank you Pat! Indeed... I chose to use that stain instead of strong tea or coffee which being organic may deteriorate over the years. I will post soon a couple of photos of how the sails end up looking after dried. Have to say I am very happy with the result! Best regards!
- 786 replies
-
- 1
-
-
- Royal Louis
- Finished
- (and 1 more)
-
Hello friends! Update as of March 20 2019 Working on the chainwales. This has to be the most frustrating experience in my shipbuilding career! Assembling the chains Remember a few posts above I mentioned some errors in design like the placement of deadeyes directly in front of cannons? I managed to fix that, but... design flaws made me do things I am not happy about. I just could not: 1- Align the lower shrouds deadeyes to not interfere with the upper cannons line of sight, AND 2- Align the chains that attach the strops to the hull in a way that they do not interfere with the lower cannons line of sight, AND 3- Keep the same number of deadeyes/shrouds for each mast. Anyway I just finished mounting the chaiwales. Good or wrong I am going to have to live with that! Now working on the sails... Original color: Drying them after staining with a water based stain from a Guitar Products shop in UK. Thank you all for watching. This is a general view of how my ship looks at the moment.
.JPG.fcb68de8a4206b5d667b173d59c6d11d.JPG)
.JPG.83ea986ebe0a79a03a3d1d88140bff9a.JPG)
.JPG.6f5a4d329af80ebd7ada160d6832eb33.JPG)
.JPG.7dae6867744a3cf56a0997cbc8c76be6.JPG)
.JPG.d8c44fa871c135271eb4bb1faa287174.JPG)
.JPG.e004bb9fb2aedb4e25bccc0ffebf789b.JPG)
.JPG.09353146e0227d4135b974c86feee10a.JPG)
.JPG.99a69371f267eb79d6587e0a5394874c.JPG)

- 786 replies
-
- 11
-
-
- Royal Louis
- Finished
- (and 1 more)
-
Nice start Jo! Above all remember this: it is YOUR ship. Do whatever you feel like and whatever you want with it!!! Don't try to please anyone else but YOU!!! Best wishes
-
Ouch!!! Those colors!!! In my opinion, the fastest and most effective way to spoil a build is to use shiny paints or varnish. If painted, colors should be flat. When in doubt, better leave it in natural wood finish!
-
Hi Jo... remember to start a build log, if you haven't yet. It is the best way to get help/advise/comments and pats in your back with your work. Best wishes Ulises
-
What first wooden ship kit should I buy.
Ulises Victoria replied to SHIPSCAT's topic in New member Introductions
Cannot wait to see you start!!! -
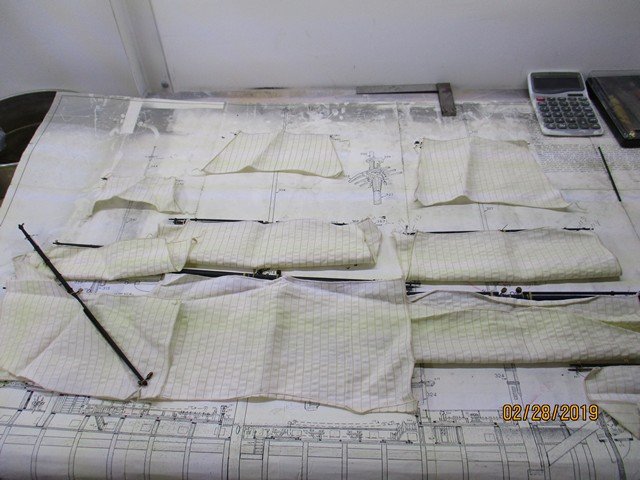
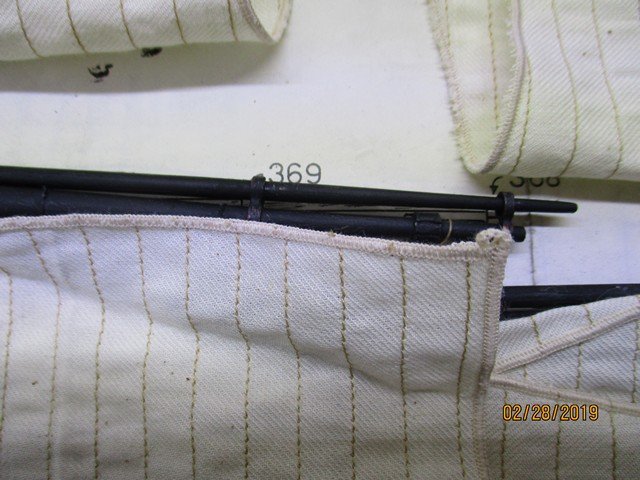
Hello Michael. Thanks for your question. Many years ago I purchased a set of sails for the RL. I remember it was the last one they had. The kit comes with instructions to build with no sails, so I would have to go somewhere else to get running rigging instructions. (Now that you mention it... it's about time to start rummaging through my rigging books ) Here they are deployed over the drawings. They ended up being too thick, however, they are very well made and too expensive not to use them. 😮 So I am planning to put them in furled/semi-furled position. I always like to put sails on my ships.
- 786 replies
-
- 8
-
-
- Royal Louis
- Finished
- (and 1 more)
-
What first wooden ship kit should I buy.
Ulises Victoria replied to SHIPSCAT's topic in New member Introductions
Titebond regular. Don't bother with II or III etc. Those are for exteriors and waterproof etc. -
Short update, but a big advancement... I finally finished work on all the yardarms. Here they are displayed over the drawings in their respective places, with all the blocks, rings and ropes called for in the plans/drawings. I always try to avoid making knots, but if I must, I try at least to make them as aesthetically looking as possible. I will start working on the chainwales, now that my replacement pieces have arrived!!! Thanks for visiting, mates.
.JPG.1ef4dc8fb1eb38c29211d00783b3ded4.JPG)
.JPG.4d73c07ab4c8972cb6c2c22de3e870c6.JPG)
.JPG.2323359b884240659e8077dfa52ec467.JPG)
- 786 replies
-
- 10
-
-
- Royal Louis
- Finished
- (and 1 more)
-
What first wooden ship kit should I buy.
Ulises Victoria replied to SHIPSCAT's topic in New member Introductions
Jo... for a first time build, you won't need too many tools. Definitely an indispensable item would be wood glue. Titebond or Elmer's work great. You can start with a few files, sandpaper, knife, scissors for the rigging stage and a jeweler's saw with a few different saw blades. A hand drill and small drill bits. It has been advised before to other beginner modelers: buy tools as you need them. It is amazing the amount of tools you will accumulate as you progress in the hobby. Best of lucks. Nice to have another Lady in our group.