


Ulises Victoria
-
Posts
1,790 -
Joined
-
Last visited
Content Type
Profiles
Forums
Gallery
Events
Everything posted by Ulises Victoria
-

What first wooden ship kit should I buy.
Ulises Victoria replied to SHIPSCAT's topic in New member Introductions
Hello Jo... welcome to this forum. I am not familiar with the kits you mentioned. However I have to mention that Mamoli factory was burned down a few years ago which means replacement parts will be hardly available. I am presently building my first Mamoli kit, after several of other brands. Instructions, at least in my kit. (follow Royal Louis link in my signature if you wish) are scarce and badly translated. Drawings have mistakes. All these things can be fixed by an experienced modeler, but may be a frustration for beginners. I would follow any of the suggestions mentioned above. I felt into the trap of attempting a master level ship as a first kit and it was a disaster. Best of lucks. -
Get a good set of mini reamers in different sizes. These have became my most useful tools when rigging. They enlarge and CLEAN the holes. I have used them in blocks down to 3mm, which is the smallest I can handle.
-
Hello and thanks for your prompt response. I am in the market for several power tools and this represent a somewhat heavy investment. So I have to prioritize my needs. Unfortunately after some thought, I decided that a thickness sander is not at the top of the list. Best regards.
-
Do you take PayPal? This would be shipped to Texas 78557 if I decide to buy it.
-
Small update Jan 16 2019 Working on the Spars. Here they are, painted in black and displayed over their respective place on the drawing. Detailing will follow. Hope its seen in the photos. Here I add the loop wires where the stirrups will run through. A very light touch of aluminum color applied with dry brush, to make look those part "metallic" And some "rust" Finally a light dry brush with a lighter color to make them look more "woody" Not sure if these effects are captured by the camera, but anyway, the thing with "weathering" is that it should be very subtle. I am very happy because finally I sat down at my computer and organized all of my build's photos. I have 853 photos which were scattered through 2 computers. Now they are properly organized. Bye, best regards and thanks for coming!!!
.JPG.b45ea141c88d0757bc7f2f68c98adf94.JPG)
.JPG.3e25595b50922f20c1a204bdd48c8e32.JPG)
.JPG.e76466249697345f43fb23122f3082ee.JPG)
.JPG.5ef55992779c6eb13b8a7f5a1ad9120b.JPG)
.JPG.cdccbfaa74578d7868c0281261bc66f0.JPG)
- 786 replies
-
- 11
-

-
- Royal Louis
- Finished
- (and 1 more)
-
Update as of Jan 11 2019 and a couple of funny events. I had to re-do the spacing in the main mast channels also, as it was just like the ones in the fore: some cannons were placed exactly behind of a deadeye. Here I am marking the wood with a pattern I made upon the plans. Checking the correct alignment OK. I'm happy now! Making a mirror piece for the other side. This is the main lower yard in process. You can appreciate its size! It is the largest yard in the ship. Tapering in my lathe the mizzen stay yard (I think that's what it's called) I had to drill a 3mm hole in this part to replace with a dowel a broken pin in the end of the piece; as expected (I'm a firm believer in Murphy's Law) the part cup-like shape exploded! so an emergency repair had to be done Here is the end result, anyway. The other end Here is the funny part. Plans showed a 9mm dowel to make this part. It felt strange that the tapering had to be down to 3mm at the ends. So after I finished the yard, and was celebrating that finally all the yard arms were done, I went to check the plans again. And I realized that this... ... was not a 9, but a 6... (Are you done laughing now?) So I had two options: make all the yard again, or back to the lathe to thin it to the proper size. I opted for the second and everything is correct now. Here is a general view of all the yard arms in its place on the plans. They will be painted black. Now another funny bit. Some days ago I went to review all the printed material I have of my ship. Plans, drawings, instructions, etc. And saw that one sheet with pages 5 and 6 was missing. This was a critical paper for the rigging stage. I went through all my papers, drawers and boxes and couldn't find the sheet. I started thinking about asking members who had those plans and to send me a copy of that sheet, I searched the Internet, etc... then I went out of my shop for a coffee and when returning.... .... this is a photo of my shop... can you guess where that sheet of paper was??? Ok ok... It happens...!!! Bye all. Thanks for watching. Happy New Year!
.JPG.431b313aea1108f218007de841d52787.JPG)
.JPG.88e0853732745423eba266345db833bb.JPG)
.JPG.83bff4b70cf43378ed8557f5950ab3b0.JPG)
.JPG.ce91ecccbe04f8e5780ff06a9e28138f.JPG)
.JPG.48b074bfb68846c84c440da5d75c0f91.JPG)
.JPG.bf4ea58231970439bffa627aec7a26aa.JPG)
.JPG.f317f284b81d2b1d966a80e677766013.JPG)
.JPG.44d64034af4d0c31f586e7e733e4c8cb.JPG)
.JPG.73d6393af5c5855b2e6b52be161ddfaf.JPG)
.JPG.eb1ed9b74f7d4e55c25e18b4f547b95c.JPG)
.JPG.66cec2822a72799b1deab0d869edd05f.JPG)
.JPG.0279814d691914b04049a3bce7df985c.JPG)
.JPG.0b2d7f42d589b833dde2d1ce604af158.JPG)
.JPG.2167b579f65f440220a24f1716f0ce9e.JPG)
- 786 replies
-
- 7
-
-
- Royal Louis
- Finished
- (and 1 more)
-
Beautiful and well done beyond words. I am truly speechless and humbled at your build. Best regards!!!
-
Very nice job, Jorge. I hope one day I can scratch build a ship. Where do you live? Saludos desde Monterrey, Mexico.
-
Sjors, I wish you and Anja the best. I really pray so you can leave your health issues behind. My best wishes
-
When I built my Vasa, I came up with the same problem/question. My research indicated that there was not a fixed pattern on the decks of Vasa. This is how I planked mine.
-
Hello all. The link to Proxxon Tools Discount Store in the home page is not working. It sends an error that the site can not be reached. Anyone knows if they are still in business? Thank you.
-
Error in kit and asking for advise
Ulises Victoria replied to Ulises Victoria's topic in Masting, rigging and sails
A Luigi Volonté in this case. -
Update and fixing of an error in kit design. I found out a mistake in the kit. As you can see here, some deadeyes are placed exactly in front of some cannons. The arrows mark openings where the cannons could be placed to clear the deadeyes. Moving the chainwale 17mm to the left made the cannons clear the openings but that would unbalance the whole thing. So after seeking some advise in other thread, I was suggested to re-do the chainwales. So I started by sanding off and replace the planking. Then on to the drawing board to see where the deadeyes wiould have to fit in order to clear the cannons and keep the exact number of them. There were some 5mm and some 4mm deadeyes Here I am checking the new arrangement against the actual placement on the ship. Everything looks good so far. Making a board and starboard copy Finished! Unfortunately one of the futtock strops broke when ungluing it from the old chainwale, and to my dismay, there was none to spare in the kit. So I was lucky to find some replacements at Age of Sails. While they arrive, I'm going to stop work on the chainwales and start work on the yardarms. Thanks for visiting!!!
.JPG.3325a8fdc206617c8e21f3a60c45e0db.JPG)
.JPG.fe61c510ab9cd000348fceff5518513f.JPG)
.JPG.187302dfad3b66b10b558e7122240da0.JPG)
.JPG.74df7d549f62ed603a4276e078347e7d.JPG)
.JPG.b110c0b6f04c078829c4714dd8ecd75b.JPG)
.JPG.7d5d2b4d8c491e61a01d61d779ec8ec6.JPG)
.JPG.c2a13e73481e7a4dadc4b21c66a7daa4.JPG)
.JPG.fab385e07870b9c3f741a7594c70bde4.JPG)
- 786 replies
-
- 5
-
-
- Royal Louis
- Finished
- (and 1 more)
-
Error in kit and asking for advise
Ulises Victoria replied to Ulises Victoria's topic in Masting, rigging and sails
OK! You guys made me do it. First I had to re-plank the chain-wales Next, to the drawing board to mark where the new deadeyes will fit in order to clear the cannons. The short lines mark the 5mm deadeyes and the long lines mark a few 4mm. Had to be careful that the number of deadeyes remains the same. Checking the new arrangement against the actual placement in the ship. Everything looks good so far. Making a copy of board and starboard parts. Finished! Unfortunately, one of the Futtock strops broke when removing, as they were CA glued to the wood, and to my dismay, they were exactly counted in the kit... not one to spare, so I was lucky to find some replacements at Age of Sails. Now I have to wait for them to arrive. So I'm putting apart the chainwales for the time being, and begin work on yardarms. Thank you all!!!.JPG.6dcd8ed98f3ab29961df598a1c21c99f.JPG)
.JPG.2f0ddaa14b4c12ef0e0672707b8718b1.JPG)
.JPG.96bd351a31765bcfb892de8f445fb494.JPG)
.JPG.78fdf902087ecce809004f3e8905abdf.JPG)
.JPG.b30193fe8fbb25512b9a0962bcbcc0e2.JPG)
.JPG.0b7d35ca126399b57fa832d5ed29beb1.JPG)
-
Hello all. I just found out what I think is an error or mistake in my Mamoli Royal Louis. As you can see in the photo of the plans below, the deadeyes are just in front of the cannons. However, as you can see at the arrows, there are two spaces where supposedly these cannons should be. If I move the chain wale 17mm to the left, as in the next photo, the cannons align correctly with the spaces, but I am afraid that this will change the angle of the shrouds and I don't know what more consequences this may bring. What would you do?
.JPG.c7e94deefa0409201654a62cecea2c07.JPG)
.JPG.b47eb1e4585c93f4f1c0151ff8fd070b.JPG)
-
Roberto: Welcome to the wonderful world of ship modeling. I hope you will get hooked on this wonderful hobby. Greetings from Monterrey, Mexico.
-
Thank you all for your comments. Jean-Pierre... nothing is completely fixed at this moment. Some things will be corrected in due time. I appreciate your comment!
- 786 replies
-
- 1
-
-
- Royal Louis
- Finished
- (and 1 more)
-
Hello Christos. Those blocks did not come with the kit. I purchased them, but can't remember Where. It was long time ago. Chuck makes very nice blocks btw. I took some rope from the kit and served it using Chuck's serving machine. I wouldn't use Chuck's rope for serving. It is a very nice rope to hide with the serving. Use any thick thread for that. And as for the rest of the ropes, I make my own. I have 3 different rope walking machines 😮 Thank you for visiting.
- 786 replies
-
- 1
-
-
- Royal Louis
- Finished
- (and 1 more)
-
Mini-update. With this set of blocks, I finish the first stage of the bowsprit and masts. I just realized why I must keep building large scale models only: these 1 x 3mm blocks is the smallest I can handle. I just found some 2mm and there is no way I can work with them. 😯 Here is how my ship looks at this stage. I think I'm gonna take a break from masts, and start working on the chain-wales Here they are just being planked. Thanks for visiting!!!
.jpg.84f62c3a4ab3391e4fbeba1af2109850.jpg)
.jpg.ea175224f0b44bd62b2bff5743f37986.jpg)
.jpg.8787fe4795ce265f651c9ccd303ddae5.jpg)
.jpg.bc4586f23fe37b47ca31cd054d341acf.jpg)
- 786 replies
-
- 6
-
-
- Royal Louis
- Finished
- (and 1 more)
-
Thanks E.J. and Michael. Rigging is my favorite part of a build. I really don't mind tying several thousands of clove hitches in the ratlines...
- 786 replies
-
- 3
-
-
- Royal Louis
- Finished
- (and 1 more)
-
Thank you Pat. Your comments are always appreciated. Thank you Nick. Serving is done with Chuck's serving machine. Christos.... more than welcome and thanks for your words and visit.
- 786 replies
-
- 1
-
-
- Royal Louis
- Finished
- (and 1 more)
-
Hello all, mates. More progress on the bowsprit. My God! This thing deserves a build log all on its own!!! lol Photos are self explanatory, I think. Still, if you have any questions, by all means...shoot!!!
.jpg.e155205a6a1b91b609f25508d80fc91b.jpg)
.jpg.26c45b3f44acb6fe951226e03c4cb846.jpg)
.jpg.e9e9da24ff10a61d0ce331fb6c1bae34.jpg)
.jpg.71cd24442190f36cdc0460e2fd98bc16.jpg)
.jpg.d88a2c128cd24236cbda6b990211f4a7.jpg)
.jpg.f81b663ac307dc92e8802b94e803c10c.jpg)
.jpg.74a2ce49ddfaccadd890a9cafb920bf1.jpg)
.jpg.285442c44edf478eeb6a32e45bccb255.jpg)
.jpg.aabe2e2a981c30b6d4ff31fe01c759aa.jpg)
.jpg.e50fee50660764ce359d6ab5b05cb024.jpg)
.jpg.27a198a4e2410be21ff73698c8411432.jpg)
.jpg.782342c45265fd6f589ad35daf09755e.jpg)
- 786 replies
-
- 9
-
-
- Royal Louis
- Finished
- (and 1 more)
-
WOW! Outstanding! This is a magnificent ship, and you are doing a magnificent job with it. Congratulations!!!
- 593 replies
-
- 3
-
-
- royal william
- euromodels
- (and 1 more)
-
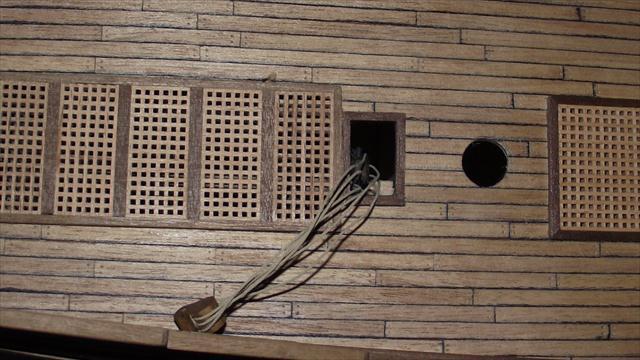
Sorry I'm late. You are up to a very nice start E.J. Replacing the metal porthole frames with wood ones is a wise move I wish I did when in this stage. Will keep following your build as I am sure I'm going to learn plenty of things that can be applied to any ship model, whatever that is!!! Best wishes