AON
-
Posts
2,570 -
Joined
-
Last visited
Content Type
Profiles
Forums
Gallery
Events
Everything posted by AON
-
 and lastly... Most industrial heat treat companies soften their steel by cooling it very slowly, over hours of computer controlled heating temperature drops in a heat treat furnace. This forces it to cross the transformation lines higher on the curve so the material is even softer (HRC25?). This would be ideal but we hobbyists do not have the means or time to do this. From what I've learned today about home quenching in oil I would personally avoid it. Hot water should work as well but the blade is so thin that allowing to air cool shouldn't take an unreasonable amount of time.
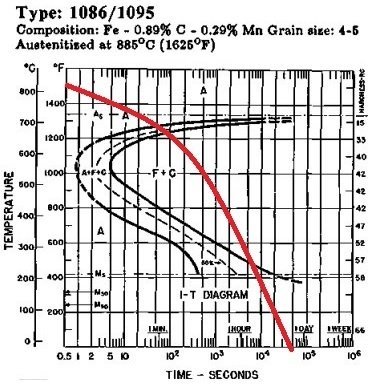
-
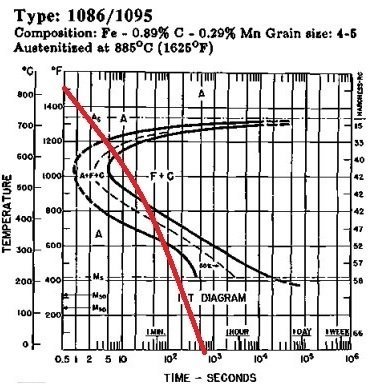
In this figure we are showing air cooling from 1500°F to warm in 600 seconds = 10 minutes (?). We pass completely through the transformation curve. Where this happens is in the Pearlite phase and is about a hardness of HRC40. Once it completely cross that third line it cannot become anything else. This is considerably softer and easier to machine than Martensite. I believe this is what Druxey described he does. As his scrapers are not for production use he does not bother to re-Harden, Temper and Age his scrapers. If you were to do this it would be a case of heating the scraper to 1500°F, allowing it to air cool to become warm to touch, only because it was worked on and any localized heating may have changed the microstructure in the area. Then Temper it by re-heating it to 275°F in an oven and holding at that temperature for more than one hour to phase to achieve a hardness of about HRC63 to 65. Finally you would shut off your oven and let everything cool naturally in the oven to room temperature to Age it, make it more ductile, less brittle. If you did do all this you would have a harder/tougher/longer lasting scraper... but is it necessary?
-
Good evening Kevin. I will do my best to explain what it all means... I was taught to read these diagrams 50 years ago so if there is a professional metallurgist out there that can do this better than me please step in. I will explain the Isothermal Transformation Diagram (T-T-T) as simply as I can in three postings - this being the first. Hacksaw blades are made from high carbon steel (C1095) and this is the Time-Temperature-Transformation diagram for it. On the left is a scale for temperature. On the bottom a scale for time in seconds. On the right a hardness scale in Rockwell C (Rc) where Rc15 is soft and Rc58 is hard... so soft is towards the top of the graph. There are three swerving curves in the middle of the diagram. The one on the left is the start of transformation from one structure to the next. The one on the right is completed transformation. The one is the middle is 50% transformation. You can interpolate 25% and 75% from that. You must heat the blade above the "As" line, a horizontal line at about 1375°F to completely transform into Austinite. So you heat the high carbon steel blade to a Red colour which would be above 1400°F... in the "A" or Austenitic zone and to soften the material you want it to cool at a rate that will cross all the transformation lines in the upper "F+C" zone. Once it crosses that far right line it is fully transformed and cannot become anything else. F+C is Ferrite (soft) and Cementite (hard). The higher you are the more Ferrite is formed and the softer the material will be. This is the Pearlite phase. The lower you are the more Cementite is formed and the harder the material will be. This is the Banite phase. At the very bottom of the graph is the M zone... Martensite. This is very hard and brittle. The hacksaw blade is very thin and so heats up and cools down very quickly. What you did was oil quench from 1400+°F to warm in possibly 10 seconds (?) or more. If you draw a line from 1500°F to 10 seconds (red line on the diagram) you see the material passes through the knee of the transformation curve but does not completely transform. Instead it passes into the "M" zone and becomes mostly Martensite, hard and brittle at possibly HRC66.
-
Kevin The chart is SAE not Imperial so that would be about 1000°F. The fire extinguisher needs to be for oil. What type oil did you use? I believe Druxey's method was correct and I will explain later tonight after our company has left ... or tomorrow. Alan
-
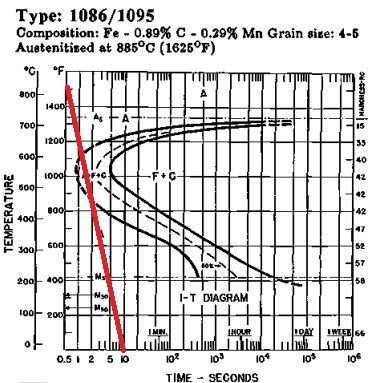
Thanks D. So you do not quench at all. Kevin Hack saw blades are usually 1095 carbon steel. TTT is the Time-Temperature-Transformation diagram. It shows at what temperature and over what time the microstructure changes Austenitic to Ferritic + Cementitic) I believe low red heat is not 200 to 300 F it is more like 1000 F and well above the flash temperature of some oils.
-
Are your degrees F or C? In your research did you find the T-T-T diagram for the material to understand what happens in what time frame?
-
A very good video that shows the process quite clearly. Thank you for that... but I have few questions about the process you followed. In your first stage annealing (softening) process you do not quench the part. Why? Do you not want to freeze the microstructure in its new homogeneous crystal phase? After re-hardening you Temper the scraper in your (toaster) oven. At the 14:01 minute mark you mention putting the part in an oven at 250° to 300°F for 1 hour At the 14:48 minute mark you say 350°-400°F for 2 hours Which did you do? With a hacksaw blade likely being a rather thin piece of 1095 grade steel wouldn't 350°F for 10 minutes be adequate? You quenched in oil. What oil did you use? Motor oil, cooking oil? Is there any concern of flash ignition? Some cooking oils flash ignite at 600°F and the part is rapidly cooling from about 1500°F or less. Some motor oils flash ignite at 400°F to 600°F. I understand oil is a slower quench and less stressful on the steel. Why not hot water? I believe cold water might be too much shock and crack the metal. Would it be better quenching the blade holding it vertically in the quenchant and swishing it about gently to get an even (front and back) and efficient (heat transfer) quench? Thank you Kevin.
-
Kevin I emailed you five slides from Toni's PPT presentation that I saved for my personal library. I do not have permission to post them. Alan
-
I didn't recognize the piece to have been a hacksaw blade. Seemed much deeper than what I use but is probably just camera and scale. Toni Levine had made a wonderful presentation on making and using scrapers at a MMS or NRMMS Club meeting. I'll check my files to see if I have anything useful from my screen captures. I believe she used a hand held dremel and metal cutting disc. Get back to you in a couple hours.
-
A couple guys in the MSON use old hacksaw blades to make their scrapers. Heat it with a torch to cherry red and fast quench in water to anneal it and then file the teeth away and cut molding shapes into them.
-
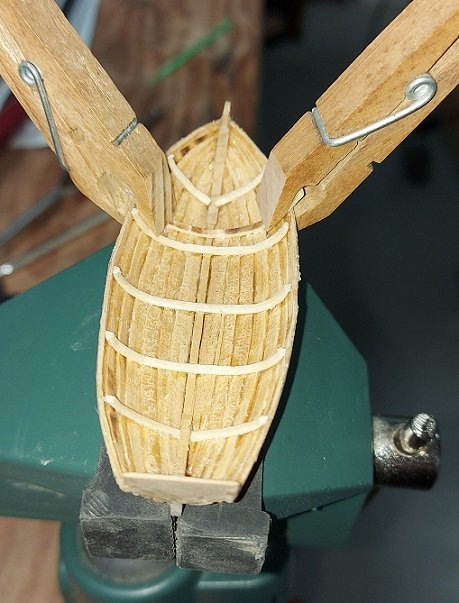
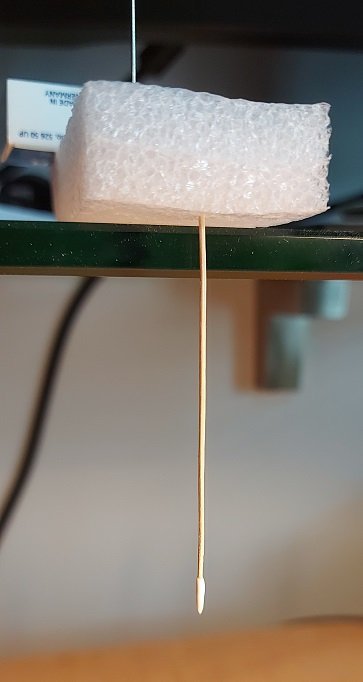
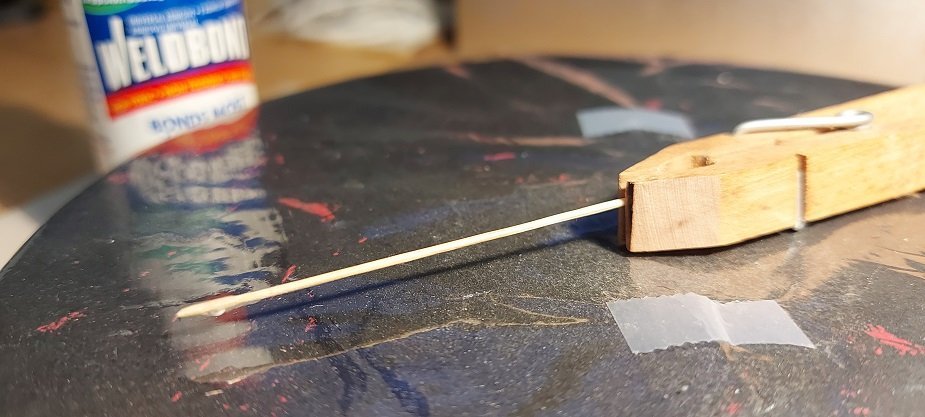
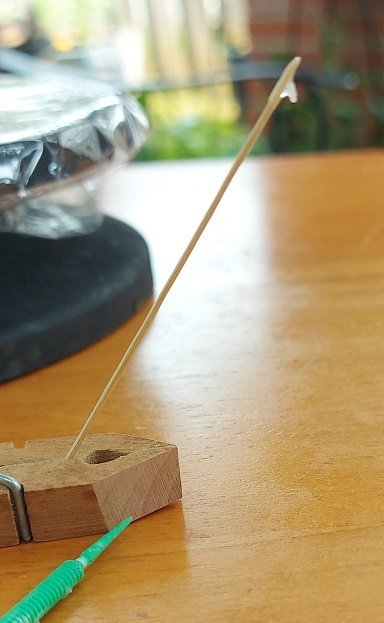
The boat hook shaft was made from a bamboo skewer, quartered and sized with a draw plate. It is 12 ft (2-1/4") long. The metal head was made with dabs of Weldbond PVA glue. One end of the shaft was sanded to an elongated cone shape and that was rotated in a puddle of glue to give a thin cone layer shape. This was hung to dry upside down, stuck in a piece of Styrofoam and hanging off the edge of a shelf so gravity was working with me. Then I clipped the shaft in a wooden spring clothes pin clamp and applied dabs or dots of Weldbond to one side of the hook base with a straight pin, allowing each dab to dry before adding the next, building out to the hook shape. Again each dab was allowed to dry a bit before adding the next. It was set down horizontally at first and gradually was raised.. with gravity working with me. The hook shape eventually revealed itself. When done and dry it was painted with Acrylic metallic black paint.
-
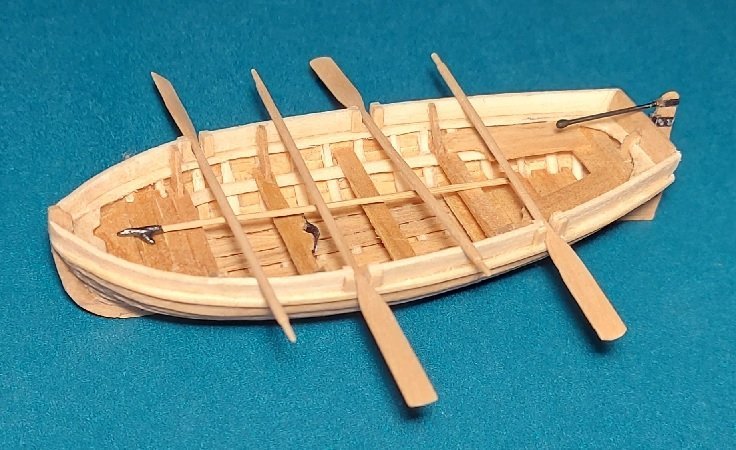
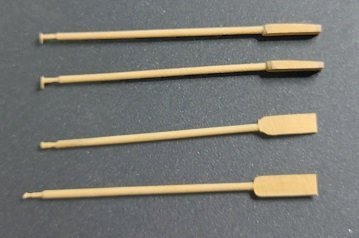
Remade my oars and added a boat hook The original oars were just nasty.
-
I was lucky enough to attend the Admiralty Models Frieze painting and Flag Workshop held in Niagara-on-the-Lake, Ontario, Canada (30 minutes from my home) in 2015. The images attached are what I did at the workshop. David Antscherl told us they may be painted on the model directly but it is much more convenient to paint them on paper and glue this to the model. This was done to quite a few 18th century museum models. Long friezes were made in short sections. Painting is with water-based acrylic paint. To avoid the paper buckling when glued it must first be stretched. Soak the paper in lukewarm water for a few minutes, drain the excess water off the paper, then lay it on a flat ply board. When the paper has turned dull tape it down to the board with four pieces of gummed brown paper - watercolour Kraft paper tape from an Art Supply store. After throughly dried the paper will no longer buckle when glued. First paint the background on the paper (cobalt blue hue - aka cobalt blue deep). Layout the design on tracing paper, checking that it fits the area on the model. Transfer the design to the painted paper using a sharp pointed hard lead pencil and white Saral brand transfer paper (similar to carbon paper... but white not black). Paint the frieze by first blocking off the figures with a mixture of yellow ochre and a touch of white (or unbleached titanium white). Work left to right (if right handed) and turn the work so the edge you are painting is on your left (again if you are right handed) so you are always painting in one direction up and away from what was just done. Paint without thickness or brush marks. When dry repeat the painting process if any background colour comes through. Highlighting with a light ochre (yellow ochre and a bit more white) normally comes from above and one side. Shadows (burnt umber for darker shadows and burnt umber mixed with red oxide for lighter shadows) will be opposite. When dry cut the strips from the sheet with a new blade on a scalpel and a straight or curved edge guide. Cut the lower edge to fit and leave the upper edge and sides with a little extra material that can easily be trimmed off to fit perfect when on the model. Turn the model on its side if you can and glue the frieze to the model with a 2 or 3 parts white glue and 1 part water mixture. Brush the diluted glue onto the model, not the paper. Place the frieze on the model. Wipe away excess glue with a water dampened paint brush. wash with a wet brush. Press the frieze down with a dampened pad of paper towel. When dry you can carefully trim away the extra paper. Allow one strip of frieze to dry before applying the next.


- 476 replies
-
- 9
-

-

-
- vanguard models
- alert
- (and 1 more)
-
Has anyone responded to your painting question? I thought I read some people painted on paper and then glued the paper onto the model. This seems more comfortable in many ways.
- 476 replies
-
- 2
-
-
- vanguard models
- alert
- (and 1 more)
-
I am sorry to learn what you've got to go through with all this. What I've learned is I best get some photos as proof of what I have accumulated for any insurance claim.
-
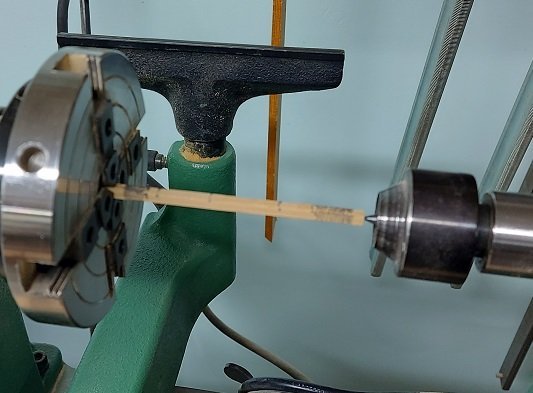
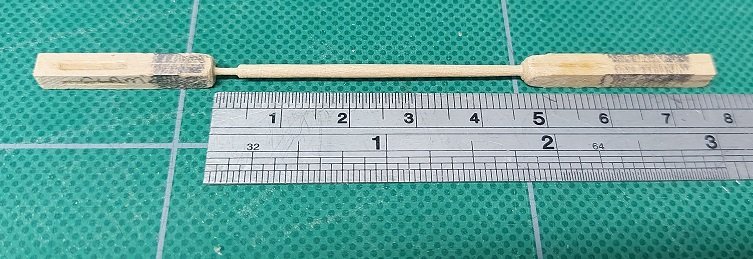
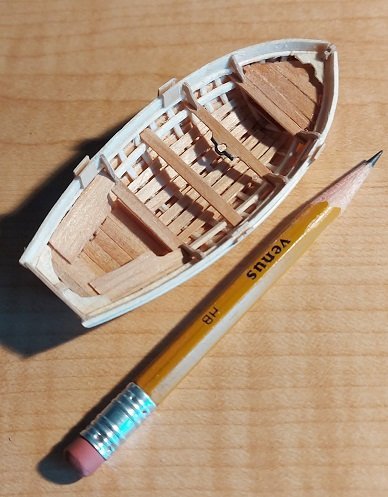
Finished this on May 3rd. Should have posted earlier but jobs around the house have been keeping me busy and I plum forgot! My sweeps or oars were made in one piece from Castello boxwood on my wood lathe using files and sand paper to shape the grip and shaft. At 1:64 they measure about 2-3/8” long. I found that when I noticed the shaft beginning to flex I was very near the proper diameter of 1/16”. Shafts have been sanded to 0.059" diameter and grips to 0.03" diameter. My sources for dimensions are the Specifications for Oars of the US Navy for the year 1900 published in the Nautical Research Journal and provided on the Model Ship World Forum, and also a formula provided by DRUXEY on the Model Ship World Forum with his build of the 28 foot American Cutter. I have gone back to my ship build.
-
My understanding is the stack did have an elbow type redirection to it and it was rotated to the downwind direction for exactly the reason you stated. I've even seen one with a sort of fin on it to possibly allow it to auto rotate. Not sure how well that would have worked in a harsh sea environment. Square rigged ships were more efficient with wind from the stern (running) or stern quarters and the yards would be swivelled as much as possible to catch wind from the quarter.
-
Thanks Thuky. We had hail an hour ago. I could hear the trees crying.
-
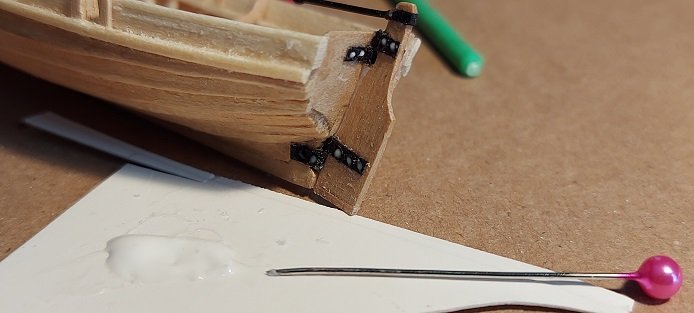
Had to get some yard work done. Cut the grass. Install a new 1000 litre tote box/ rain water collector for the garden. Move three yards of mulch. My shop needs cleaning and the wife's new out door dory wooden flower pot is cut, steamed and bent and sitting on the bench for more than a week now waiting to be assembled so she can paint it. But the sun was out... raining buckets today. Got my crutches/oar lock pockets cut into the washstrakes using files and mini chisels. Rudder installed with blackened paper gudgeons and pintles. Tiller made and installed. Just the sweeps/oars left to do. I've got all pertinent dimensions and am ready to move... but I better get the dory done first. The tiller is a black jewellery wire dabbed in Weldbond PVA glue to create the balled end. When dry this was painted black with acrylic paint. This was cut to length and glued to the rudder. The rudder is mounted to the boat with blackened paper bands and jewellery wire pins. The fastener heads on the bands are simulated with dabs of Weldbond PVA glue using a fine point straight pin. The glue goes on white but dries crystal clear so it seems to be black as the paper under it is black.

-
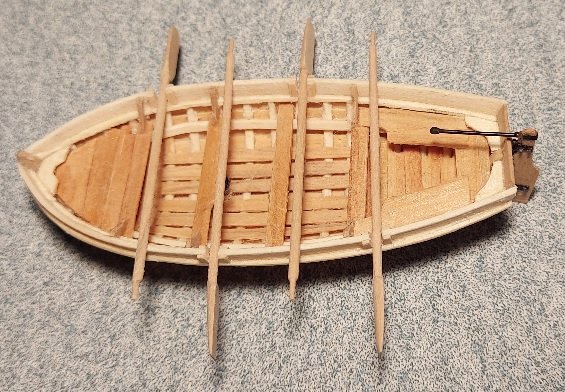
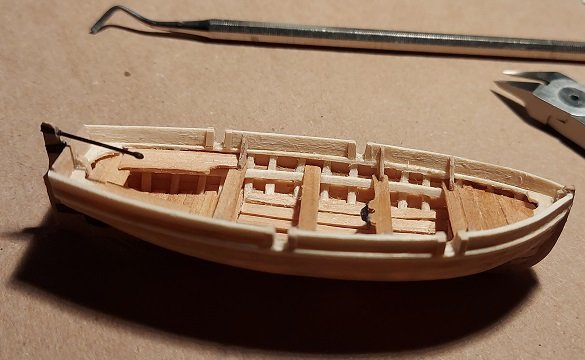
The outside temperature rose to almost 20°C today. If this keeps up it is going to be difficult locking myself down in the basement workshop. I have a number of small clamps made to allow me to install my gundeck deck clamps. I have also been working on getting closer to completing my first small boat. Items installed include the floor boards, benches, thwarts, mast bracket, knees, breasthook, gunwhale, washstrake and sweep (oar) crutch or pocket reinforcing pieces both inboard and outboard. Things left to do include cutting in the sweep (oar) crutches or pockets, tiller and rudder, gudgeons and pintles, and the sweeps or oars. Not sure if I will paint her or leave her raw. I kind of like the raw look.
-
Niagara by Alex-Ks1 - 1:7 Scale
AON replied to Alex-Ks1's topic in - Build logs for subjects built 1801 - 1850
Sorry to read that. Life just isn't fair but you keep getting up every day and play the game the best you can. Live for the good moments. -
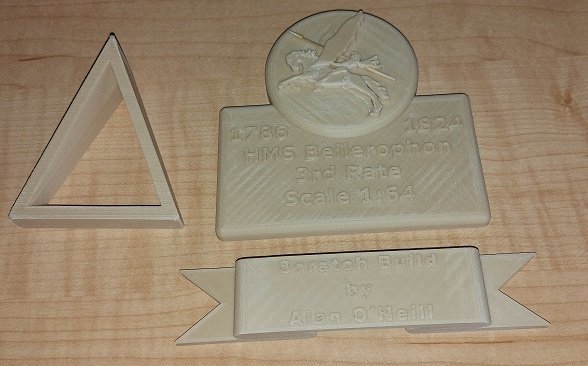
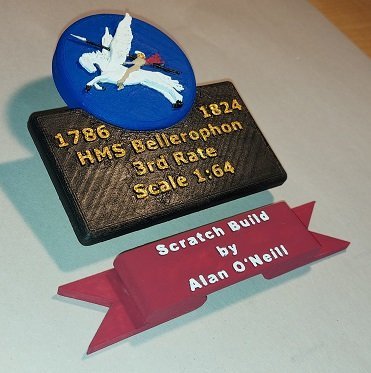
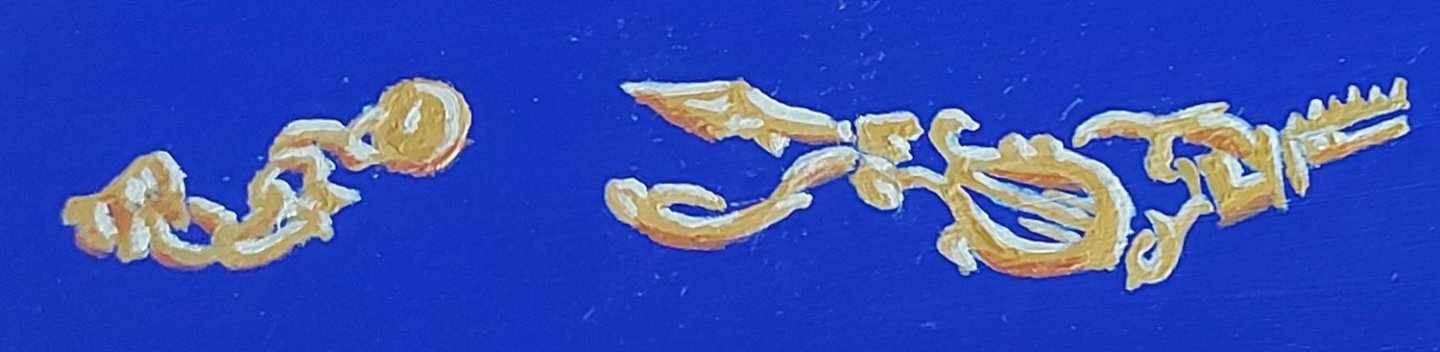
I made my quarter deck counter beam (twice) and installed it (once). Working on my short clamps to install the aft portion of the upper deck clamps so I can then make and install that deck counter beam. Meanwhile I have been slowly adding frame timbers to my small boat.... and I modelled, 3D printed and painted a nameplate for the model. It is in 3 parts. The main piece with image, a bevelled stand for it, and a ribbon. After cleaning the pieces up (scraping away stringers and sanding) I shaped the figure by chiselling away the corners, sanding again, cutting in the mane and tail hair, and I added raised details with well placed drops of Weldbond on the wings to give more definition. Then I added the javelin and it's head. They are made of bamboo and lift away from the base plate to give more interest. The head is glued to the shaft. These parts were too small for my filament printer. I used a PLA/Wood mix filament. I chose the transom painting scheme for the main part with the lettering in gold. The ribbon in cherry red with white lettering. Bellerophon himself is the only part unpainted but his helmet is gold with a white plume and his cloak red. Now if I decide to take the model to either of the two local events to show this summer I have a nameplate.