roach101761
-
Posts
204 -
Joined
-
Last visited
1 Follower

Recent Profile Visitors
1,511 profile views


-
 Roger Carter reacted to a post in a topic:
18th Century Long Boat by roach101761 - Model Shipways
Roger Carter reacted to a post in a topic:
18th Century Long Boat by roach101761 - Model Shipways
-
gulfmedic1 reacted to a post in a topic:
18th Century Long Boat by roach101761 - Model Shipways
-
gulfmedic1 reacted to a post in a topic:
18th Century Long Boat by roach101761 - Model Shipways
-
toms10 reacted to a post in a topic:
Is there a better #11 blade handle
-
Mr T reacted to a post in a topic:
18th Century Long Boat by roach101761 - Model Shipways
-
BranPie reacted to a post in a topic:
Show a photograph of how you use the #11 or exacto knife
-
Duanelaker reacted to a post in a topic:
18th Century Long Boat by roach101761 - Model Shipways
-
Duanelaker reacted to a post in a topic:
18th Century Long Boat by roach101761 - Model Shipways
-
popeye the sailor reacted to a post in a topic:
RMS Titanic's Lifeboat by monkeyman - Artesania Latina - Scale 1:35
-
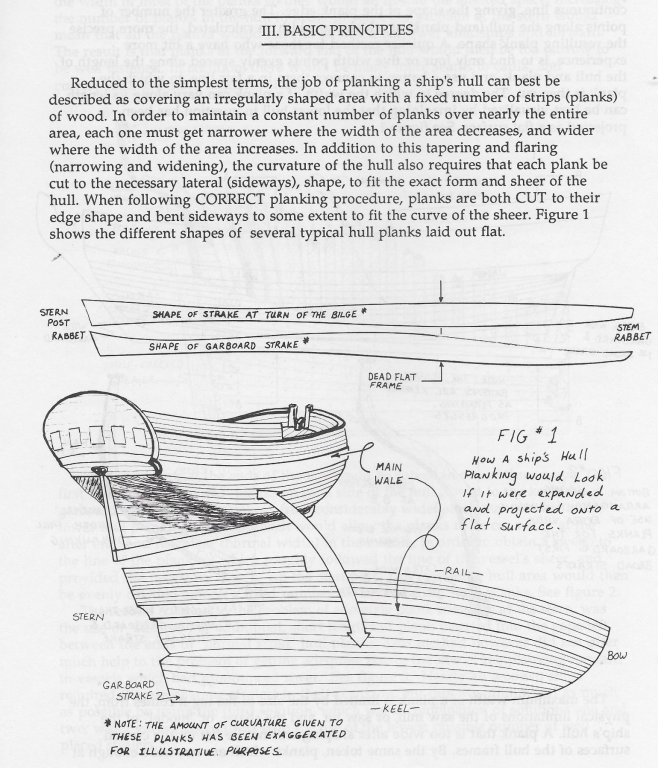
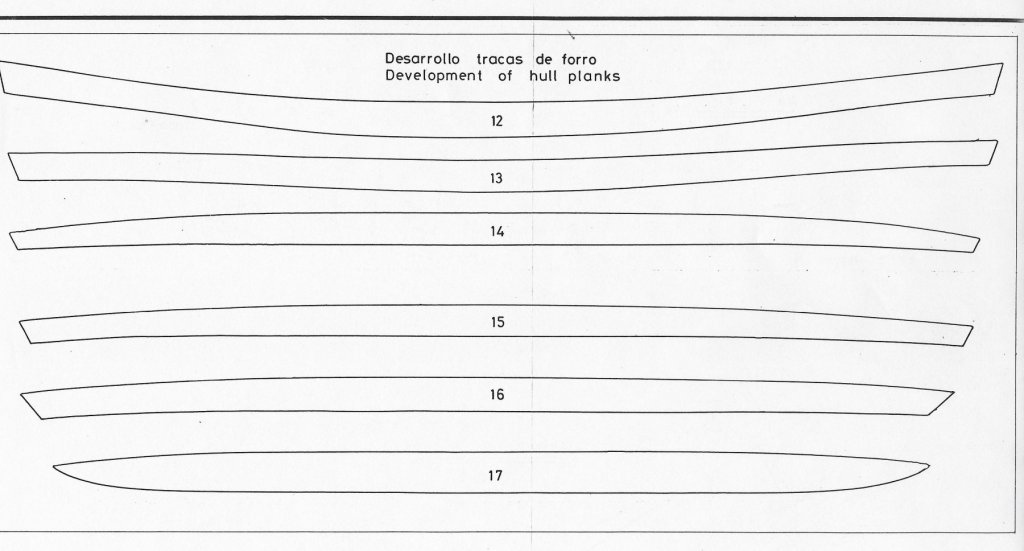
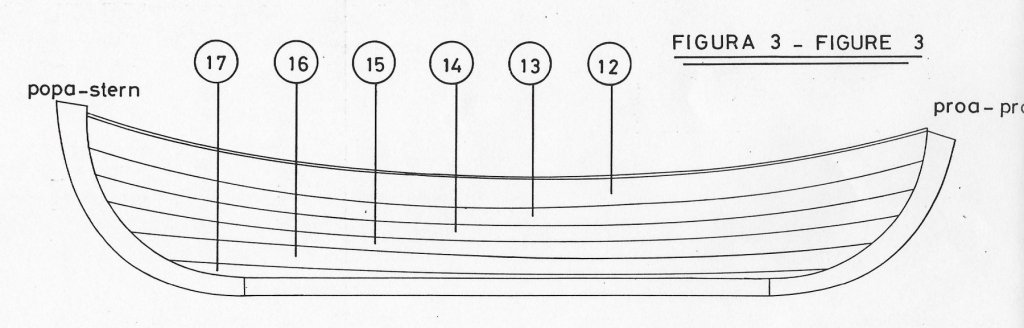
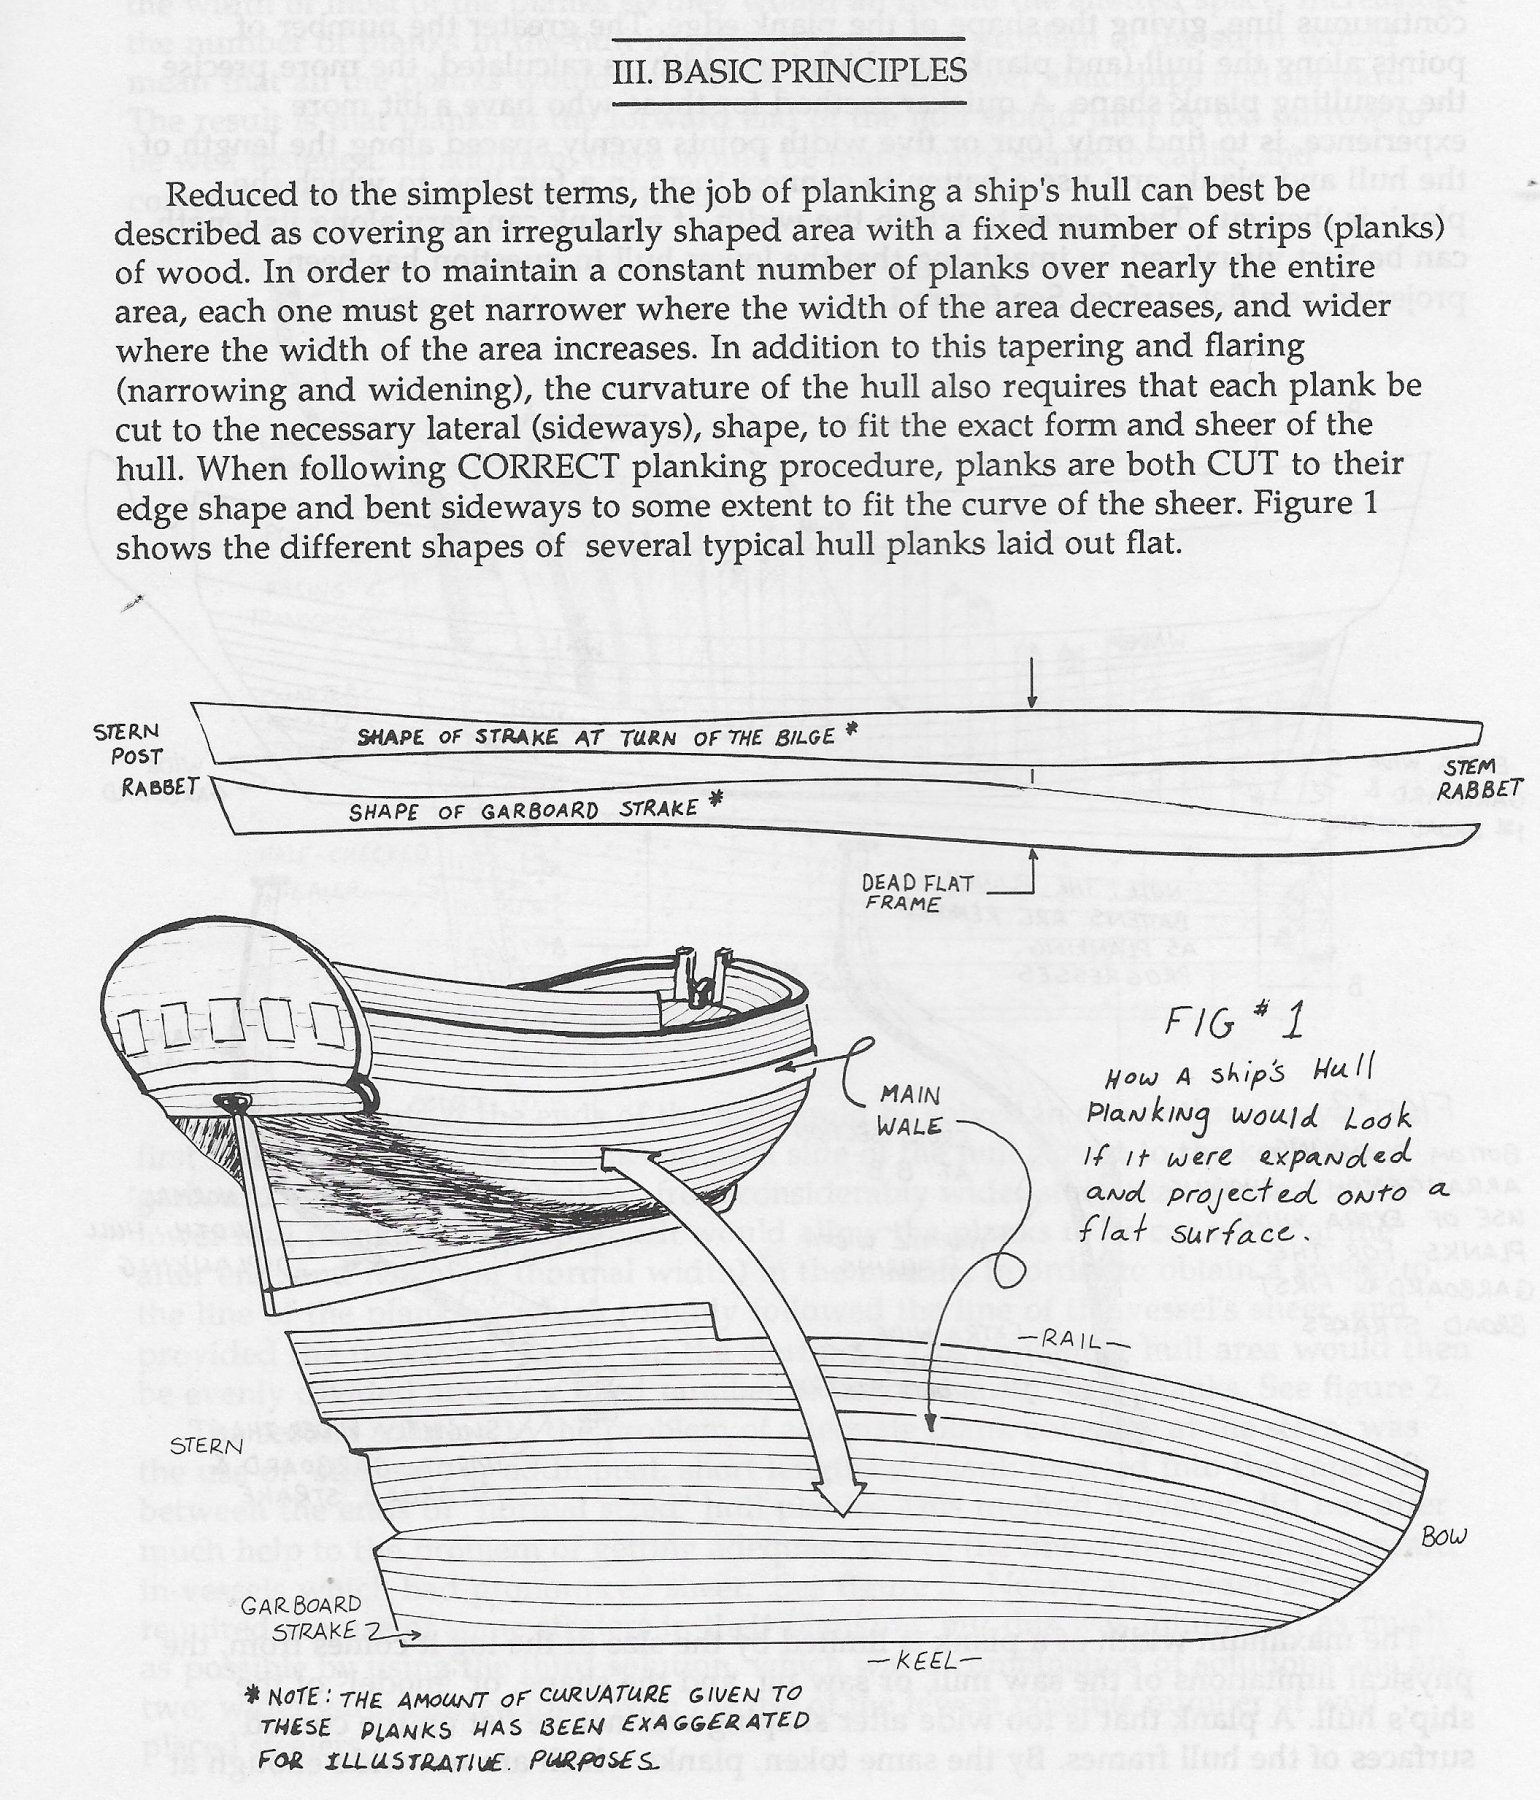
BENDING PLANKS It is time to move on toward planking this model. To begin this process it is necessary to install the sheer planks as instructed in the manual. There will be two planks installed on the Port side and two installed on the Starboard side. In a larger subject these planks would be the wales. These are the planking strakes that bind the hull together to solidify the hull shape. The instruction manual describes two very good techniques for bending the planks. First, to bend the planks to take the shape of the bow, and second, to to edge bend the planks to take the shape of the hull around a compound curve in the stem. You edge bend the plank in a downward direction. It seems counter intuitive, but it is correct. Bending planks to the proper shape is a SHORT CUT developed for building a model ship or boat. IT IS NOT SPILING. Spiliing is a much more difficult process to plank a boat or ship model and the most correct method. Let me define spiling and show you an example or two so you will understand that Spiling is not for the beginner. Jim Roberts defines spiling as follows: Further Jim Roberts defines the basic concept of planking a hull as follows. This example also shows a few drawings demonstrating the problem of what the shape of the planks should be, although exaggerated. The best example that I have ever run across to demonstrate the issue is the Artesania Latina kit and plans for the Morgan Whale boat. It is a double planked kit of a whale boat. However, the first layer of planks are actually spiled planks to cover the frames and form the basic shape of the hull. The model actually provides the cut planks spiled to fit the shape of the hull. Here is a portion of the plans showing actual shape of the planks. Here is the profile of the hull showing the run and installation of the spiled planks. In the boat yard or ship yard these planks would actually be cut from larger material to fill the space needed. After they were cut, they would be put in the steam box in order to bend them to the shape of the hull, and when installed they would take the compound shape the hull and be fixed in place. In the next installment I will show and describe the method I used to bend planks for the sheer strakes of the boat. As hint, I suggest you start looking at your frying pans. Especially those that slope from the top edge to the bottom of the pan just like the curves of a boat.

-
Just when I thought I was done buying ship model kits, Model Expo dangles a model in front of me that temps me greatly. The most recent Model Expo Sales email features CCV Modelli's Bilancella, a small work boat from the mid to late 19th century. It appeals to me because it is a less complicated subject, thus promising success in completion in a short amount of time. With a little bit of additional research perhaps it can be super detailed to improve the quality of the end result. Does anyone here have any experience with this kit?
-
Just when I thought I was done buying ship model kits, Model Expo dangles a model in front of me that temps me greatly. The most recent Model Expos Sales email features CCV Modelli's Bilancella, a small work boat from the mid to late 19th century. It appeals to me because it is a less complicated subject, thus promising success in completion in a short amount of time. With a little bit of additional research perhaps it can be super detailed to improve the quality of the end result. Does anyone here have any experience with this kit?
-
roach101761 reacted to a post in a topic:
Making small nails with round head
-
Making small nails with round head
roach101761 replied to Aleksei Domanov's topic in Metal Work, Soldering and Metal Fittings
That was fantastic. What a neat trick. -
roach101761 reacted to a post in a topic:
18th Century Long Boat by roach101761 - Model Shipways
-
roach101761 reacted to a post in a topic:
18th Century Long Boat by roach101761 - Model Shipways
-
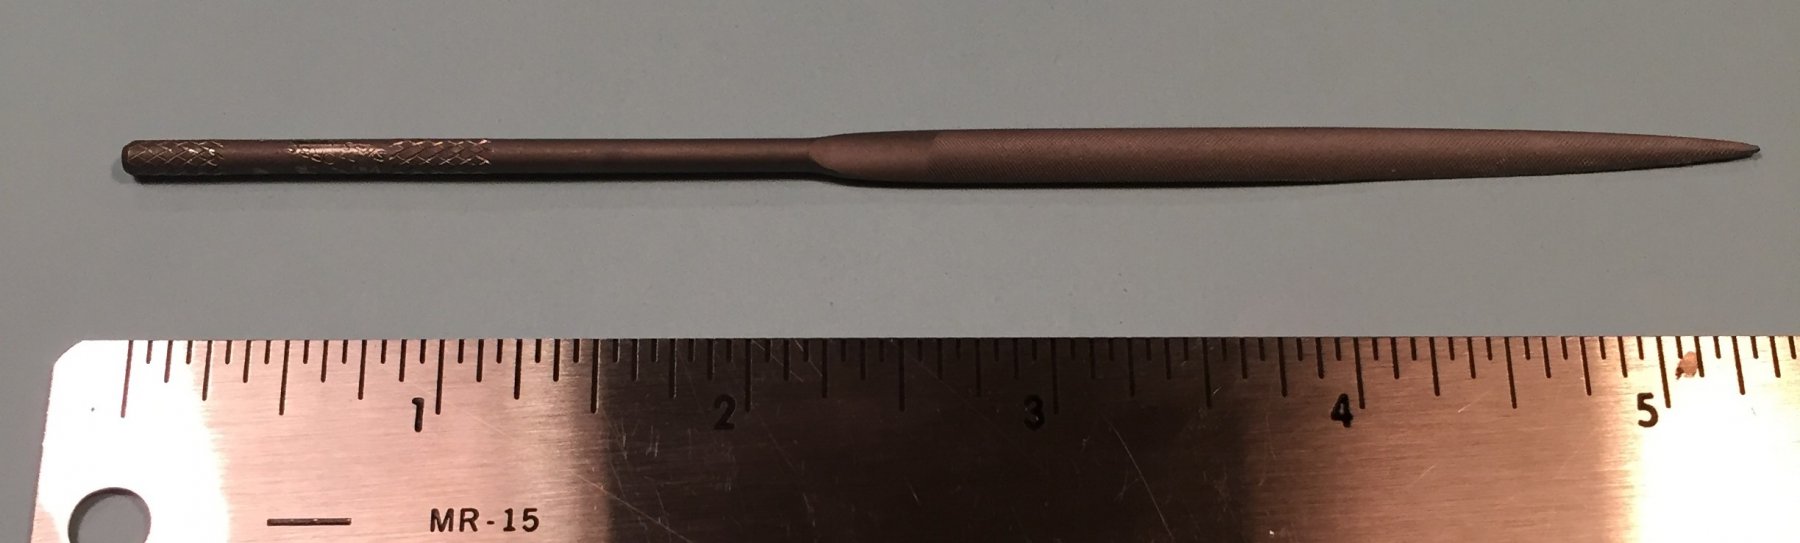
FAIRING THE TRANSOM TO THE HULL It was a few days before I could return to the model to fair the transom. The white glue had days to set up. The transom was very rigid as glued and braced. It showed very little movement as I filed it down with my Swiss half round 5 1/2 inch needle file. This was the only tool I used for fairing the transom. It worked very well and the work went surprisingly fast. It only took me about 35 minutes to get the desired result. The more I use this file the more I appreciate the advice given by Jim above. He says you can complete the model with this one high quality file and recommended buying one file rather than a set of lesser quality files. Here is the picture of my file, followed by the photos of the transom.

-
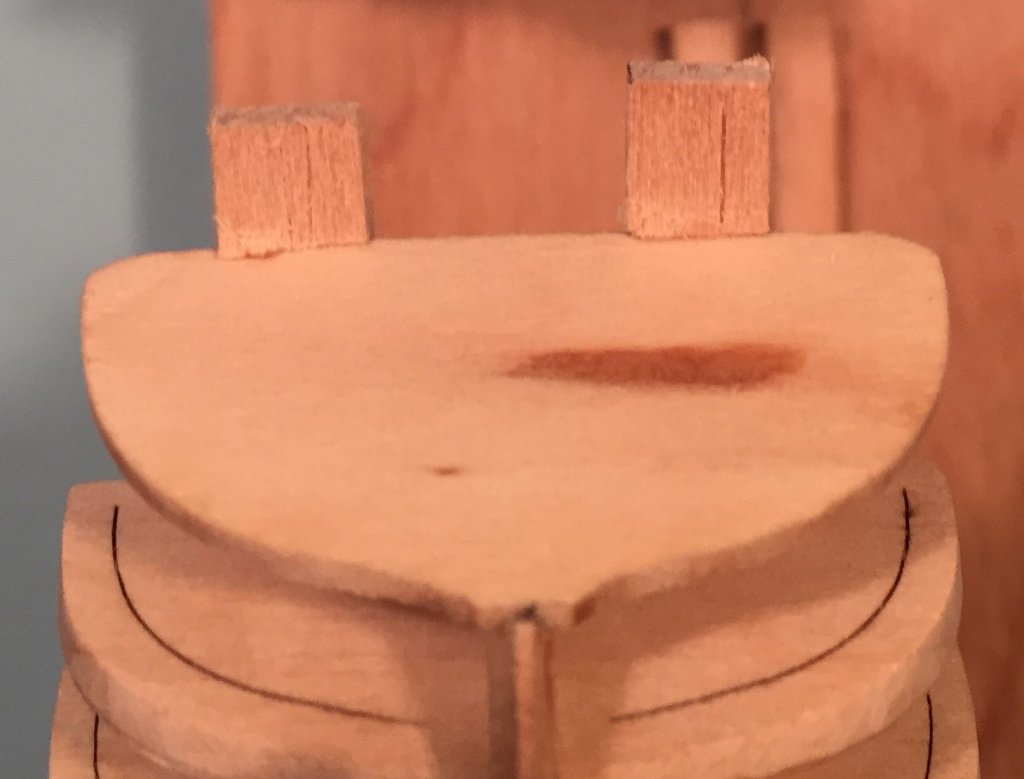
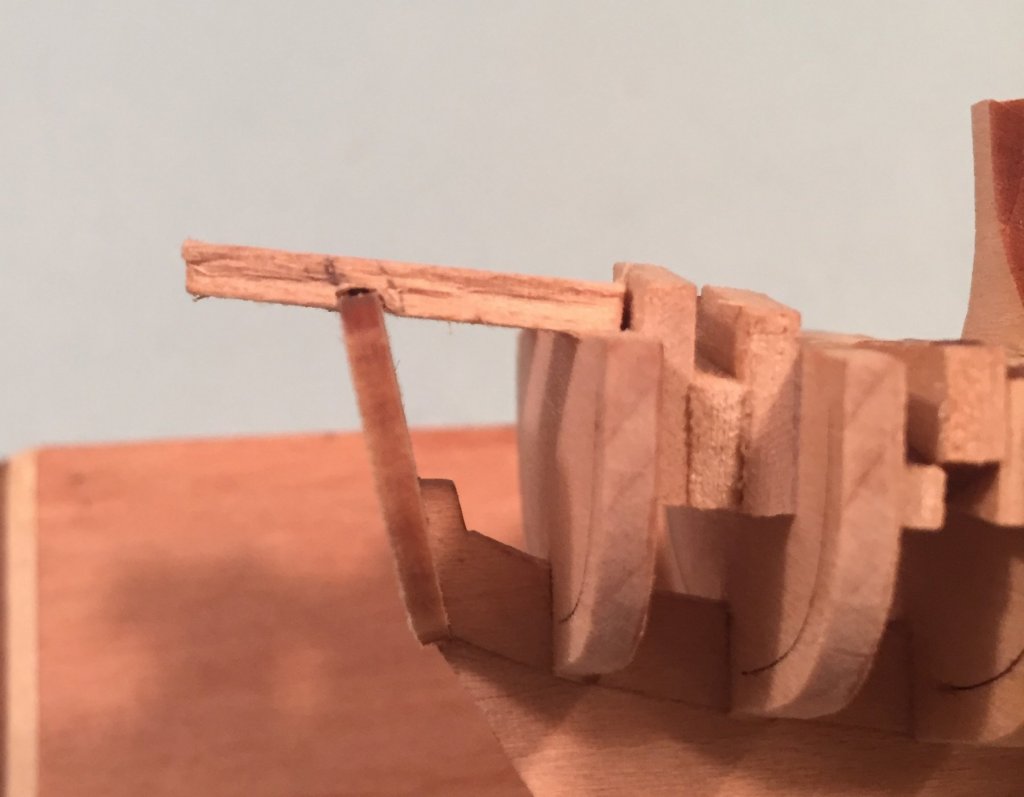
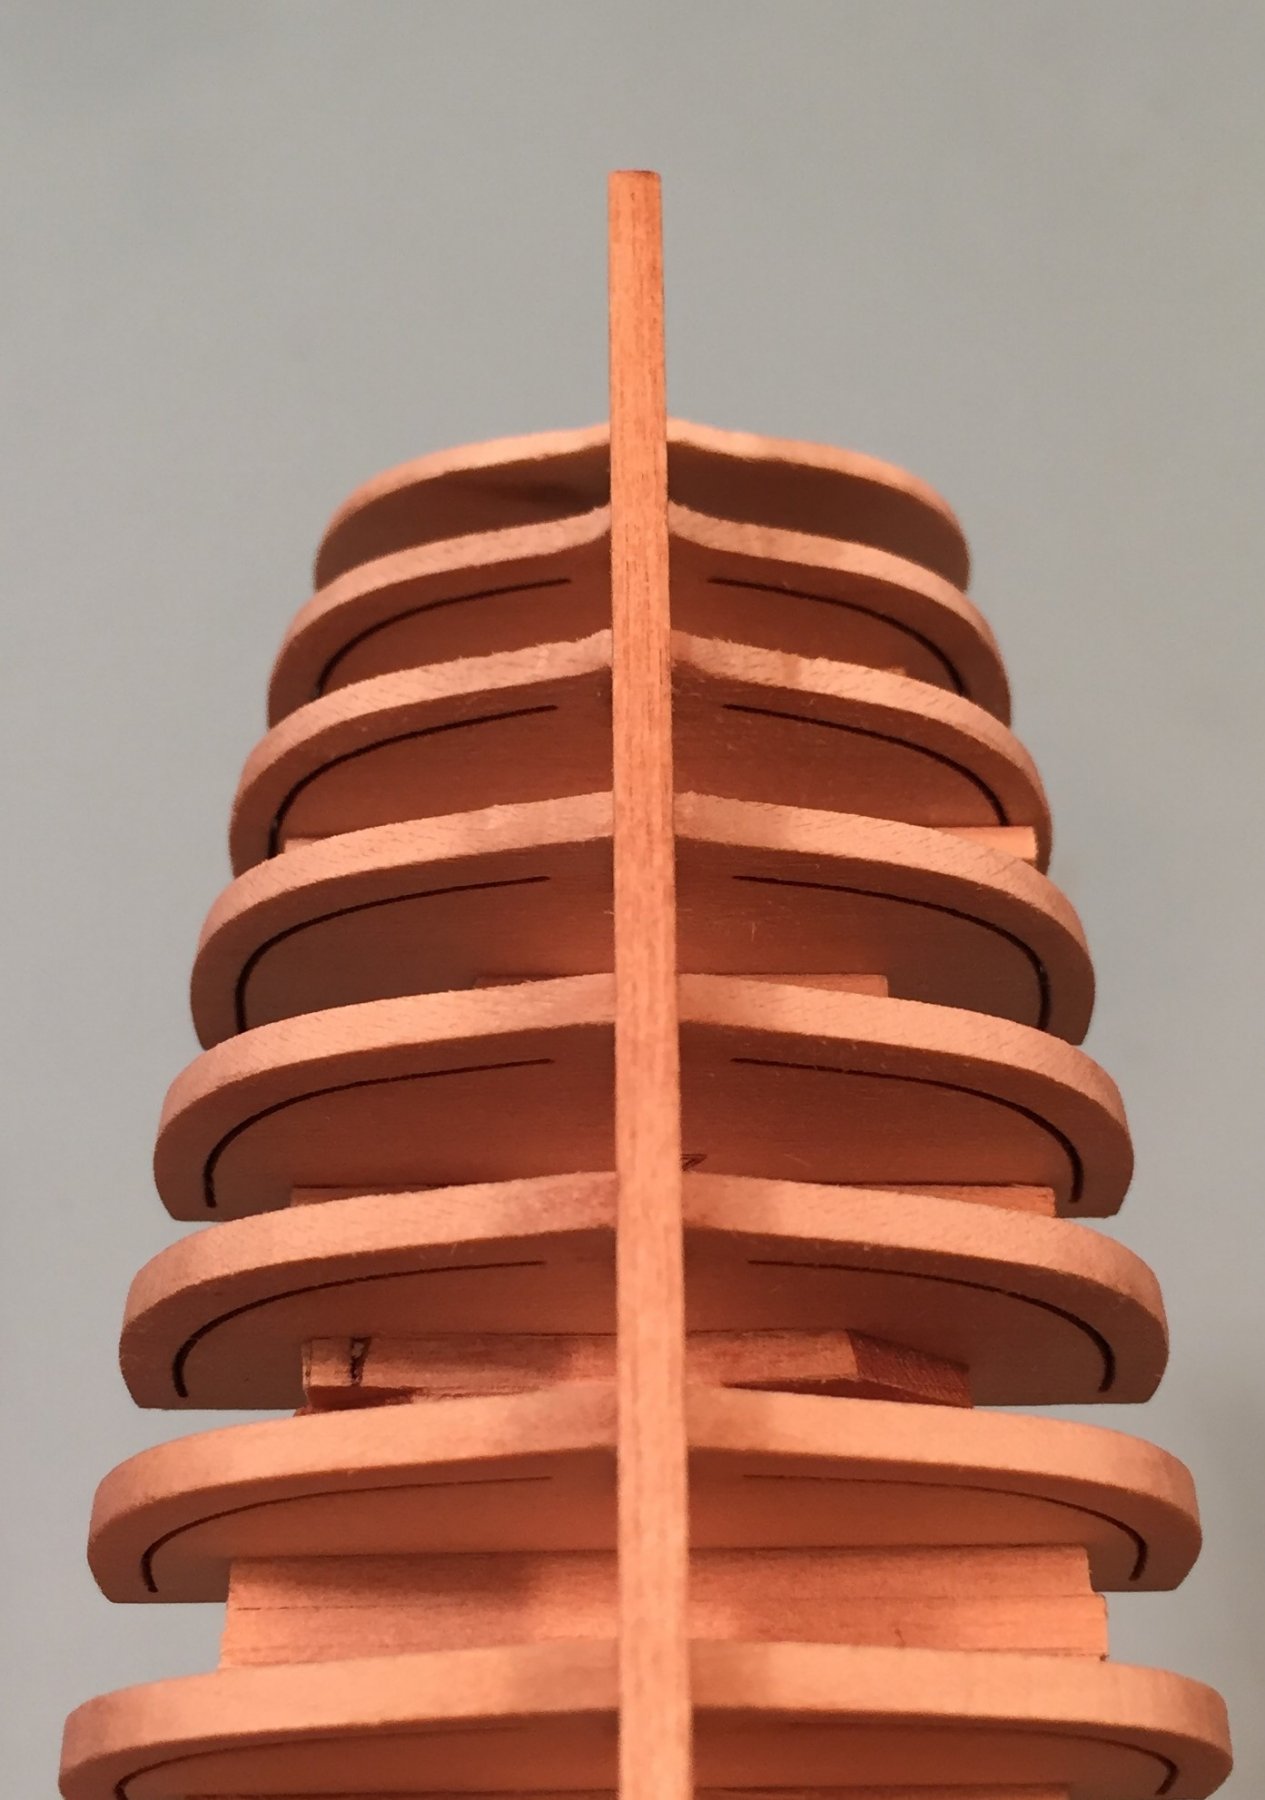
CENTER LINE ON BRACED TRANSOM As promised above here are a few pictures of the center line I placed on the transom and photos of the braced transom prior to fairing it to the hull. Just so all of you know, one of my personal short comings is that I have a terrible time finding the center of anything. I may have slightly missed. However, I believe the transom is centered and my line is a midge off. Here is the center line and the braced transom from above. Here is the braced transom from below. Here is the braced transom from the starboard side. The brace pieces are more scrap from the kit. I cut grooves in them to have them saddle or fit over the transom. I did this with an xacto #11 and my files. I sanded down the part that rests on the bulkhead to match the angle to provide a good bond for the white glue. White glue rules. The bottle says to let it set overnight for maximum strength. I have put the transom on three times now. I glued up and clamped the transom. I let it sit overnight. Actually 24 hours because I came back to it after work the next day. I then made the braces and glued them on and left it over night. Actually, more than 24 hours because home life and work life did not allow any modeling. None the less, I let the glue set up pursuant to the instructions on the bottle. I will let you know how it turns out when I fair the transom to the hull.
-
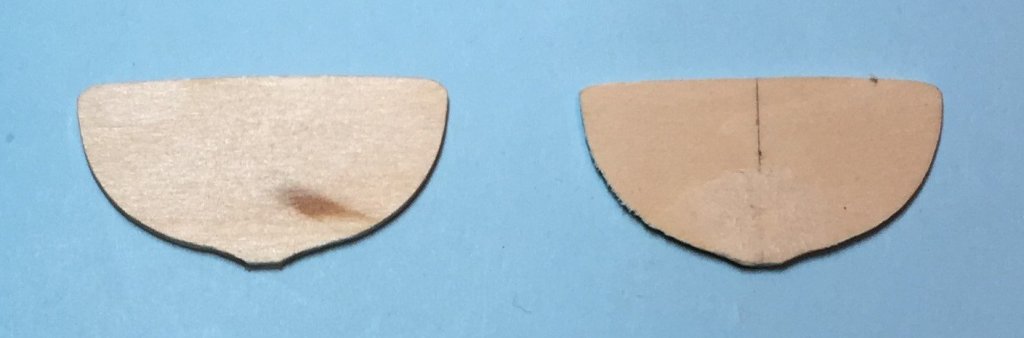
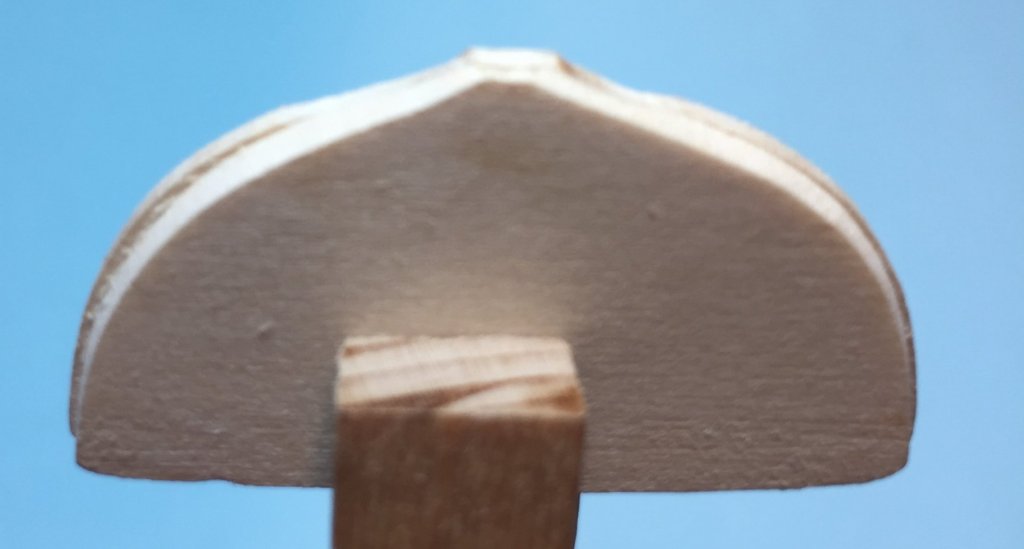
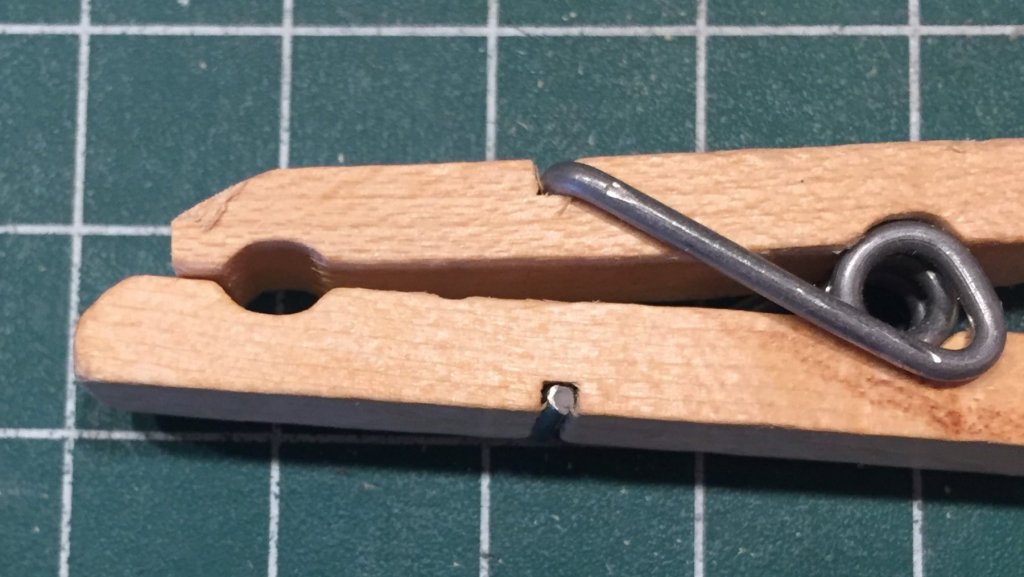
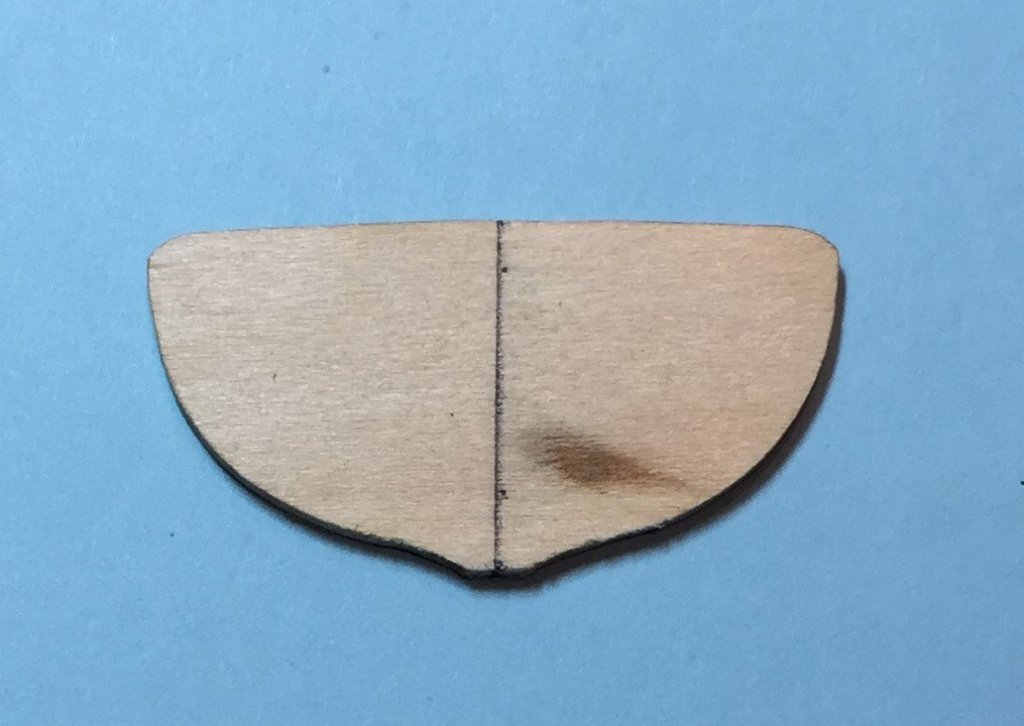
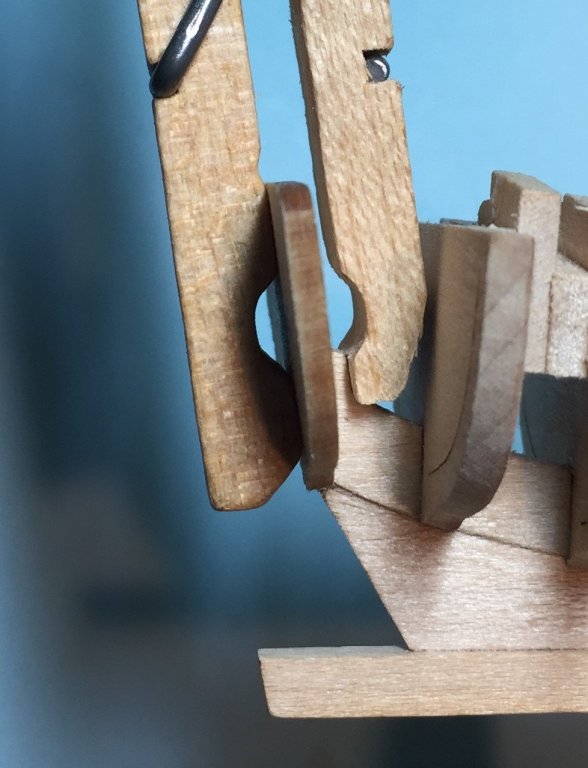
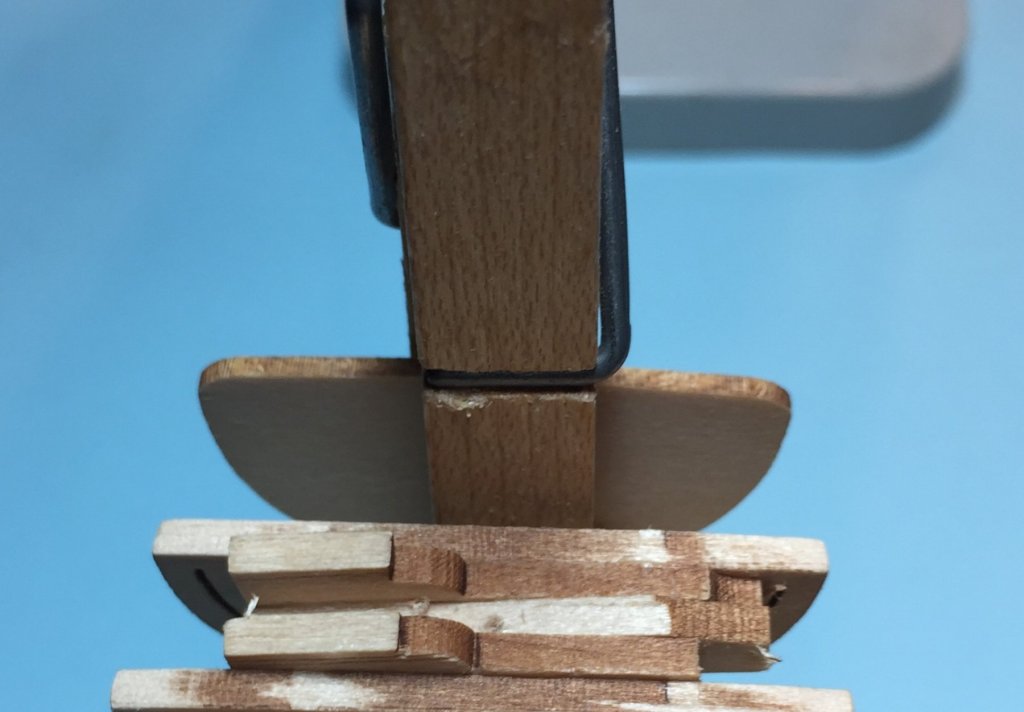
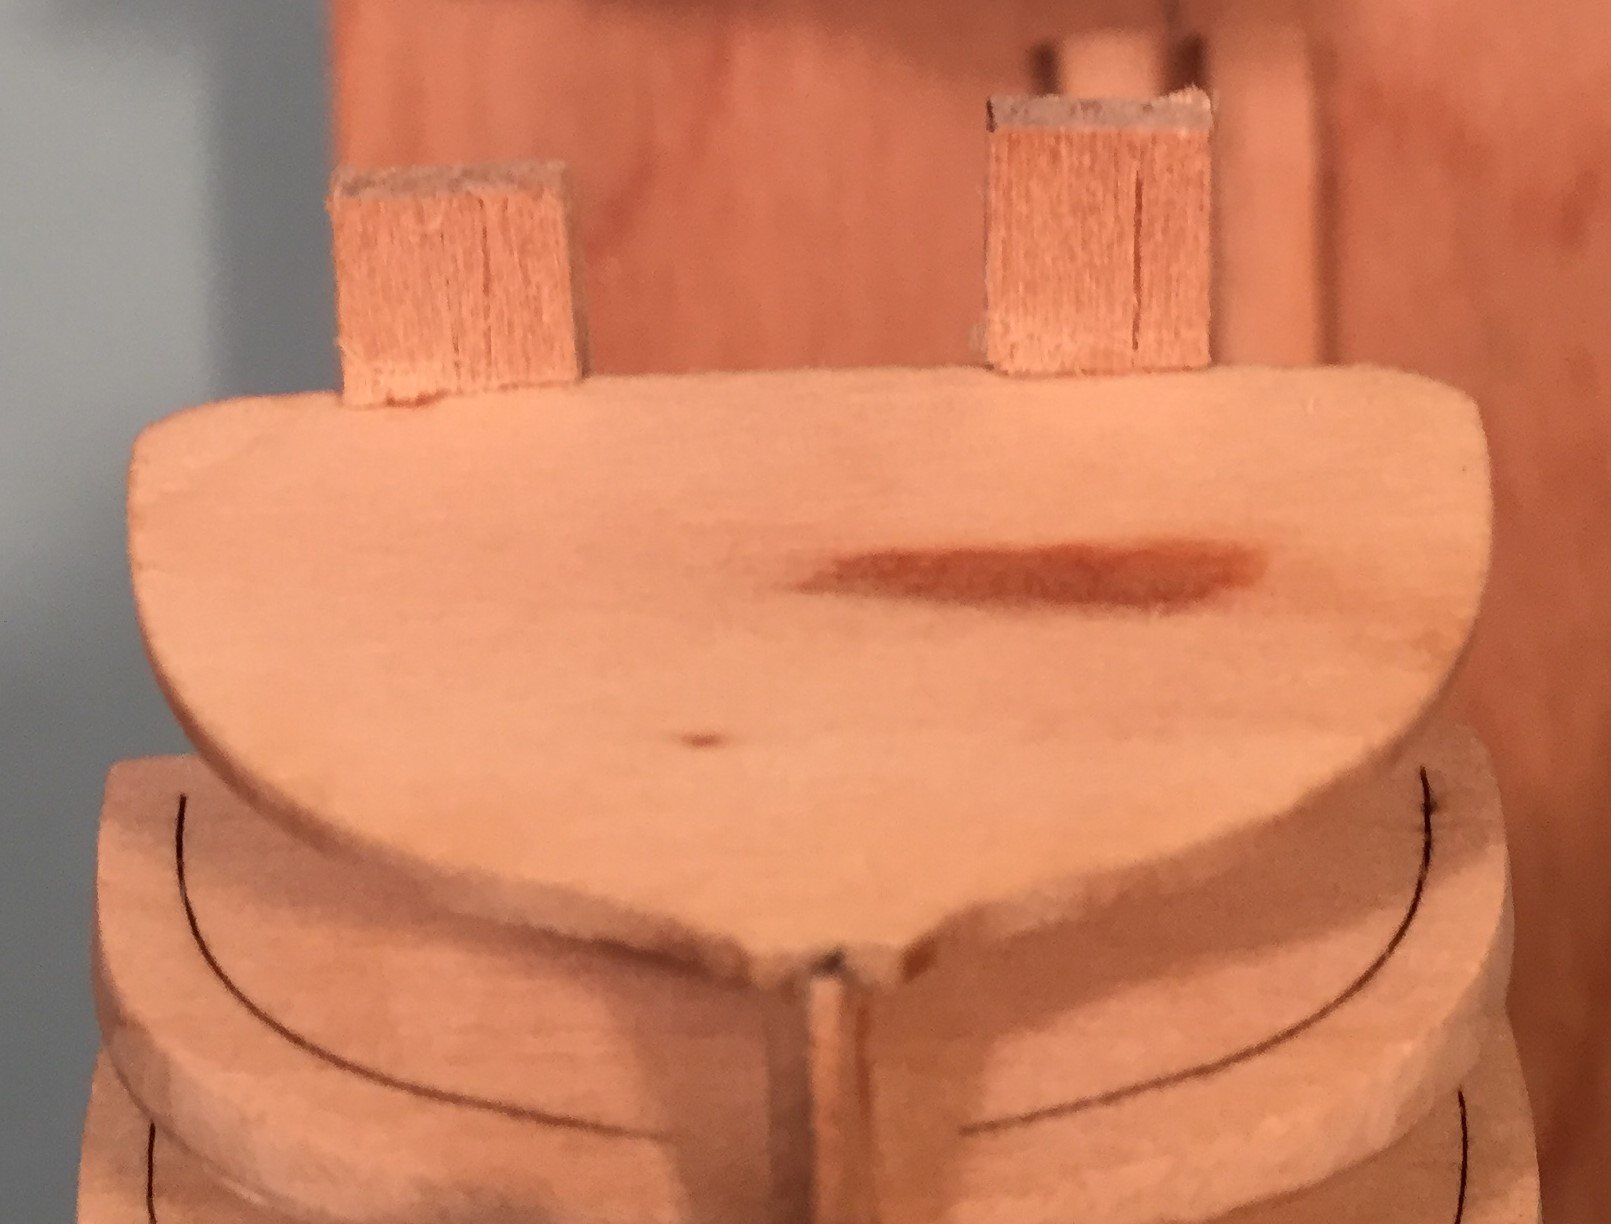
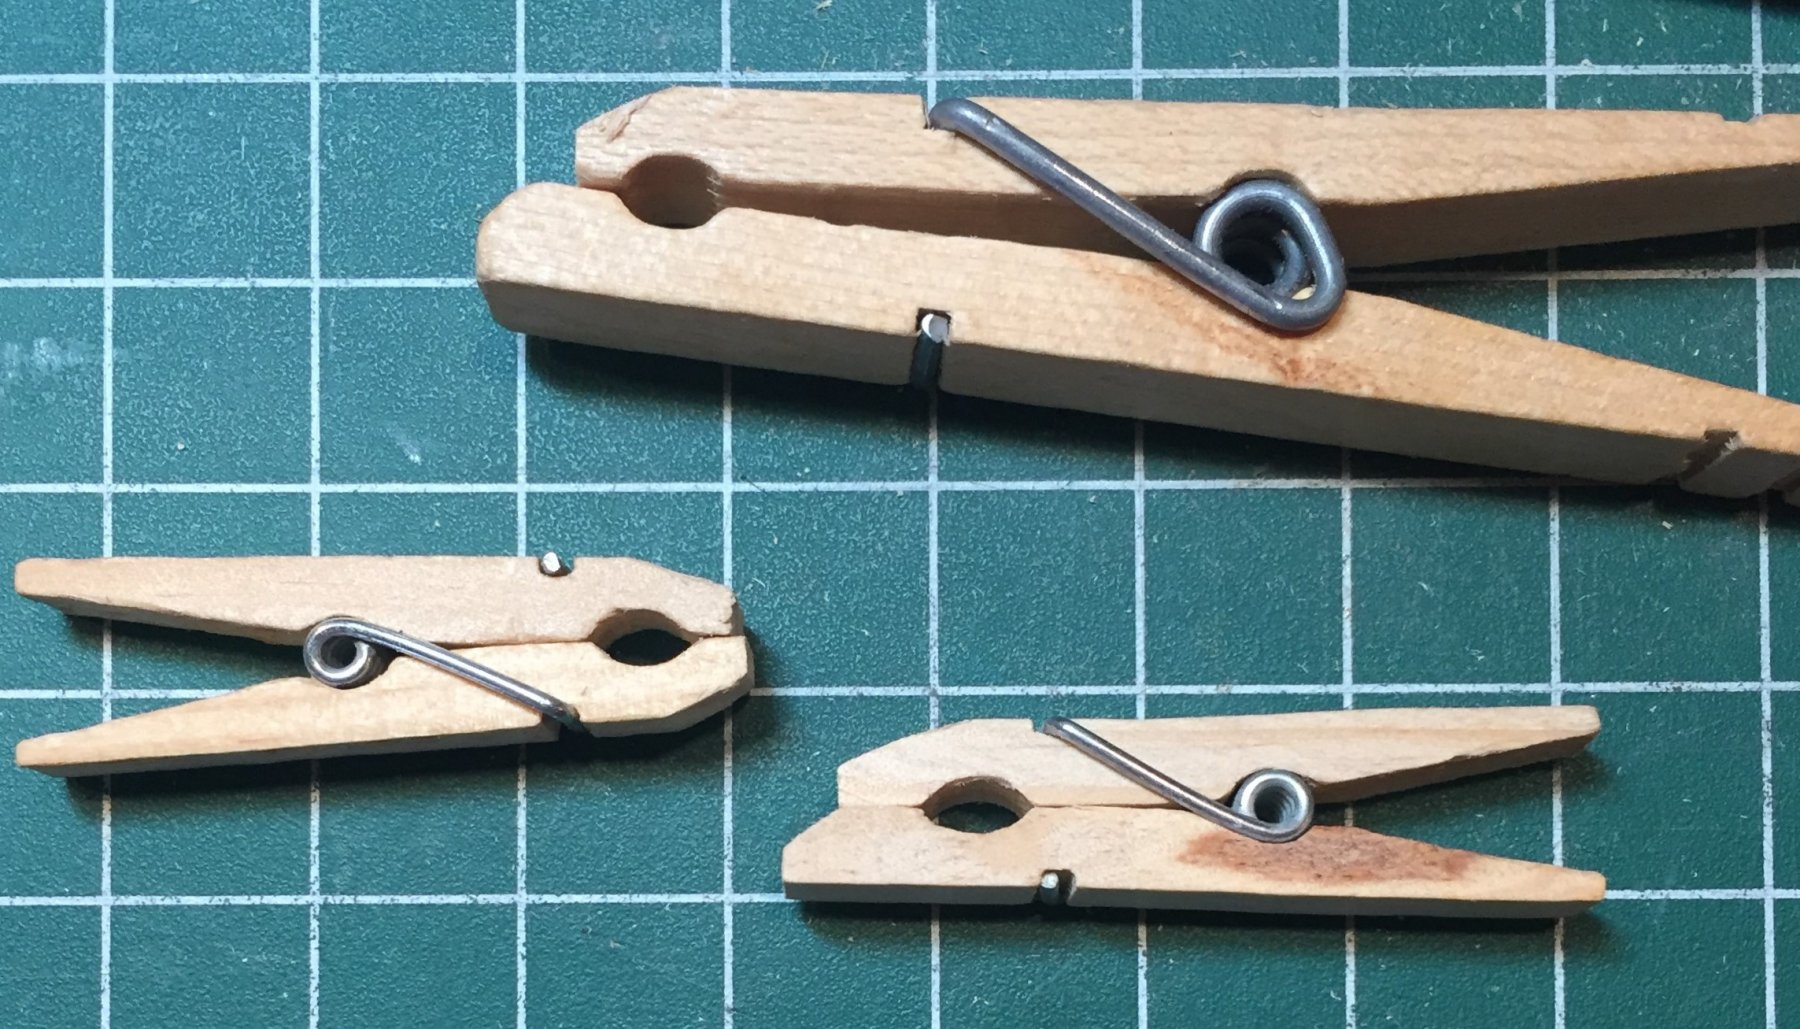
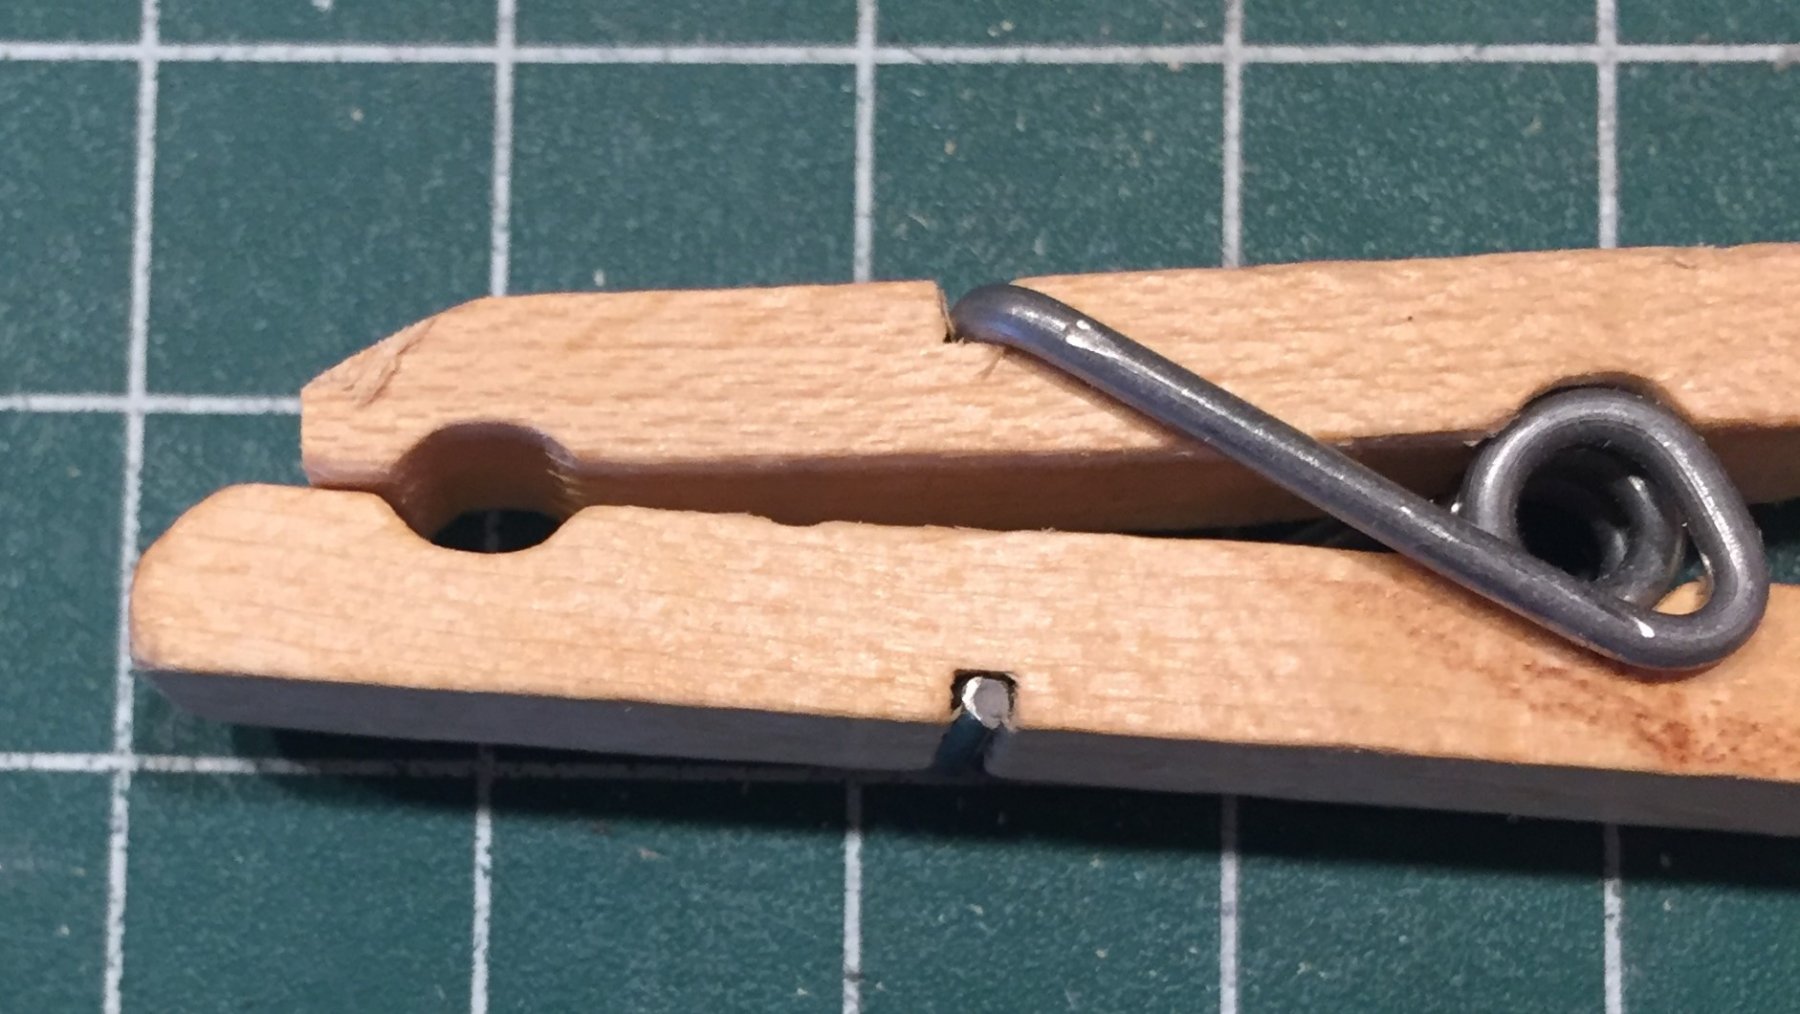
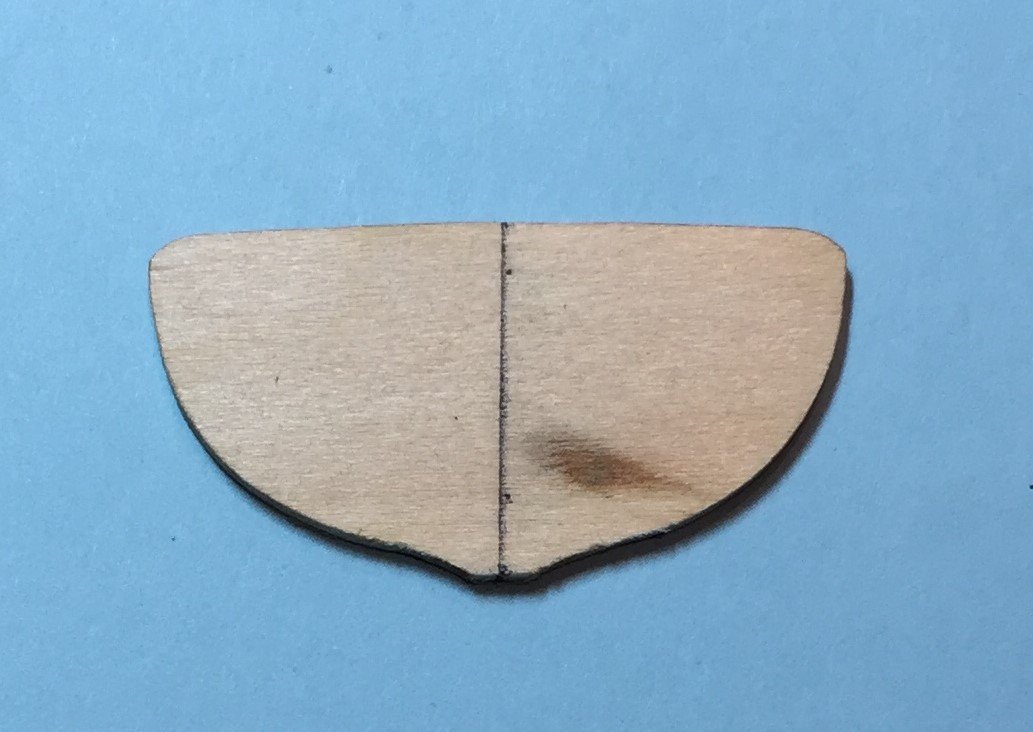
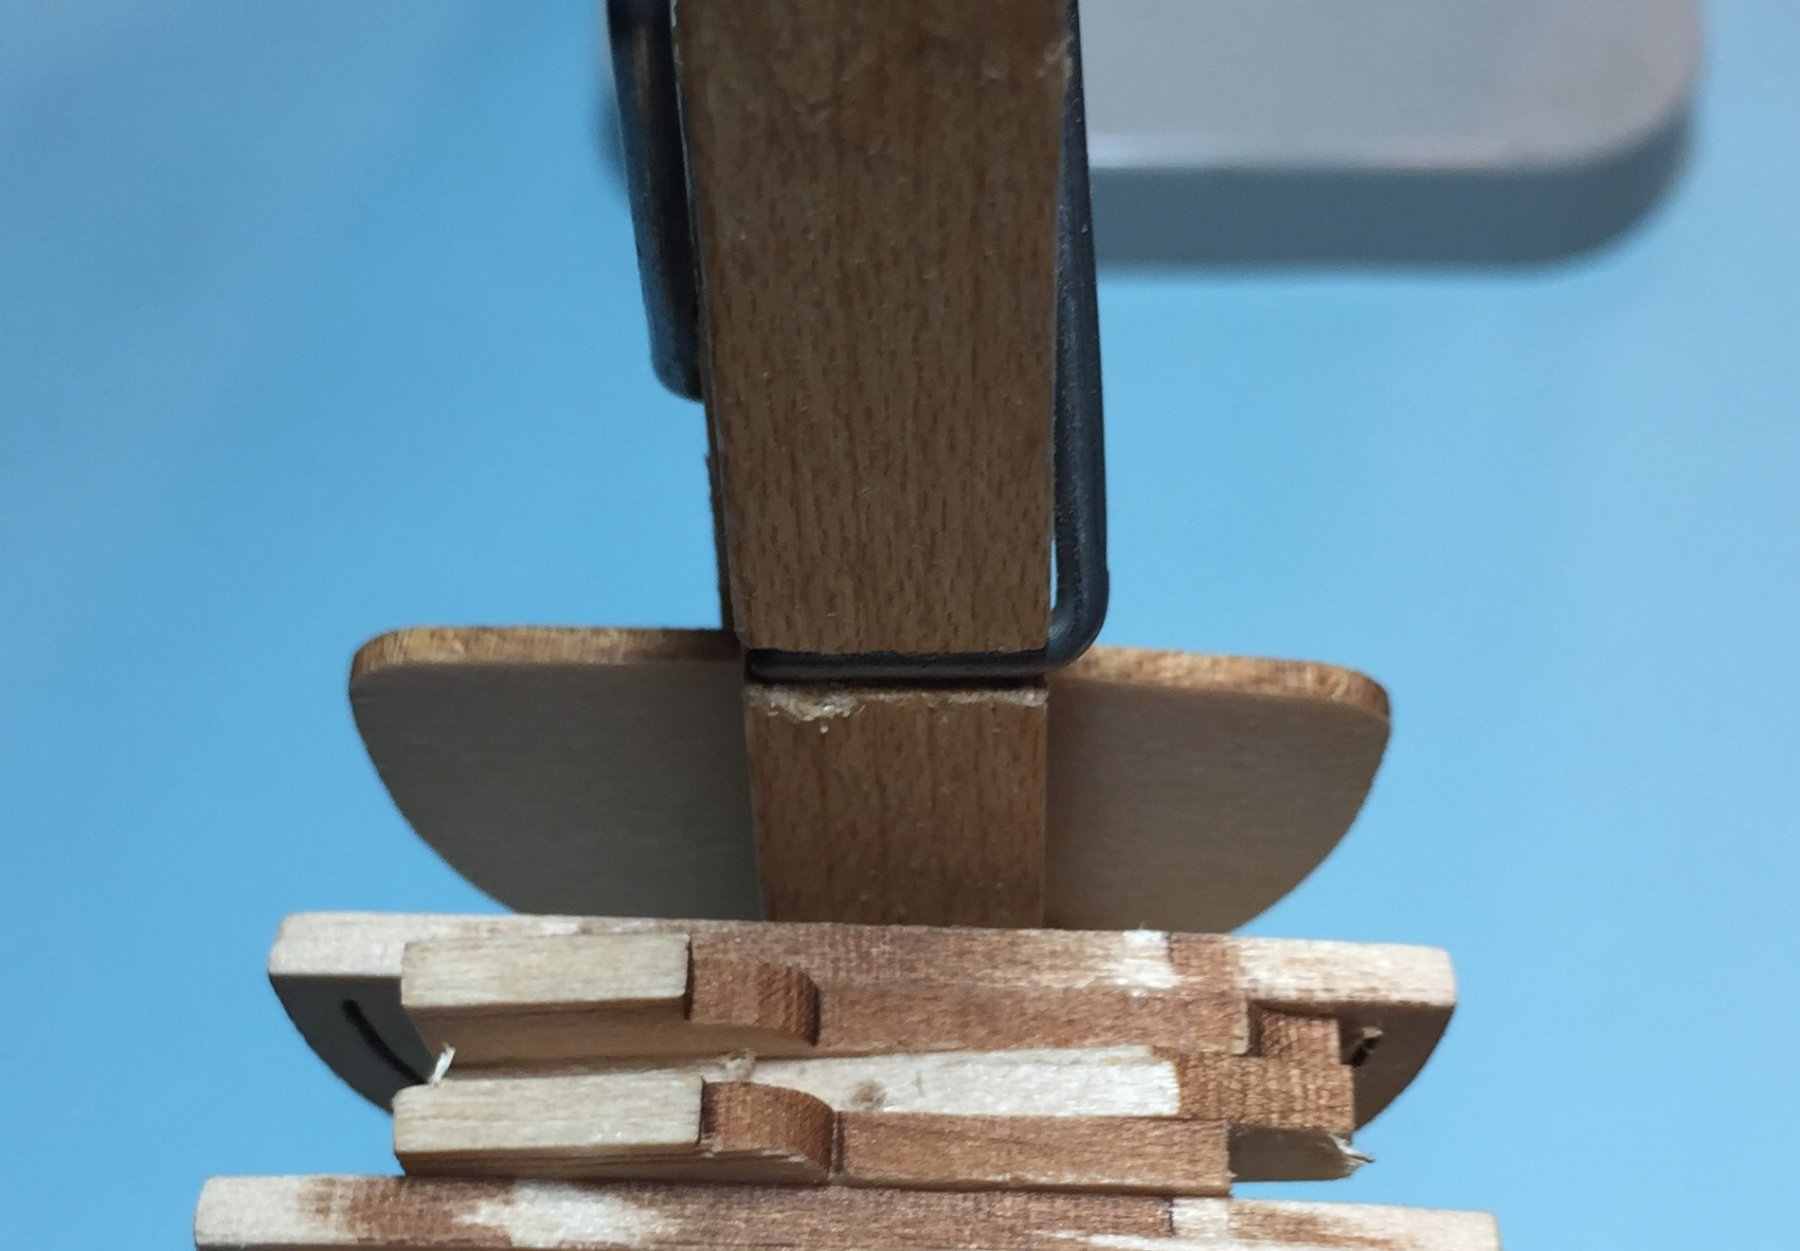
ATTACHING THE TRANSOM WHITE GLUE AND MODEL EXPO = SECOND CHANCES AND A DO OVER My replacement transom came from Model Expo. Now I get to reattach the transom and pursuant to the instructions fair it to the hull after the rest of the hull has been been made fair. The first thing I did was compare the the old part to the new one. Here are two photos to show the new and old. I did not alter the part as much as I thought, but more than I liked on one side. Next I had to determine how the transom would be clamped in place while the white glue set up and dried. The regular close pin would not work because it was too big. Both too thick and to long on the inside portion of the hull. Rather than look for another clamp, I decided to modify a close pin. Fortunately, on the outside portion of the hull the close pin was the right size to clamp the transom in place. I decided that I would not block up the space between the bulkhead and the transom because of the angles involved. I tried the the small close pin as well. The modification of the close pin was done with my Zona saw and my sanding block. First I cut off the end of one side with the saw. Next I sanded down the one side so it would fit the space between the transom and the next bulkhead. I modified a regular size pin and and smaller one. The regular size turned out to be the best option. The entire operation took about three minutes. The close pin sanded to shape very easily. Next I coated the end of the false keel where the transom is mated to the false keel with alcohol to remove any remaining white glue. I rubbed it off with my fingers and then filed it down smooth and flat. Next you have to find the center of the transom. Measure carefully. It is an odd and not square shape. Finding the middle is difficult. I located the middle at the top and bottom and drew a line with my sharp pencil. When I measured I obviously missed the mark for the two middle dots. You must line up the middle of the transom with the middle of the false keel. That will be the last photo. I will not remove the clamp till the next day to insure that the part has set. Here are two photos showing the transom clamped to the hull to dry.

-
S. The fairing looks as if it is going well. You have made a good start to the model.
-
Making a New Transom from Scratch? Steve, thanks but no thanks. I did think about it though. However, I fell victim to the profit making goals of Model Expo this week and placed an order. While I was there I requested the replacement part. Also it will be a trial of the printed instructions to fair the hull and then attach and fair the transom to the hull. Also I obliterated any chance of making a pattern for any of the other bulkheads because I cut up the scrap to block up the model and constructing the building board. However, as you are between models please fell free to add the lesson here.
-
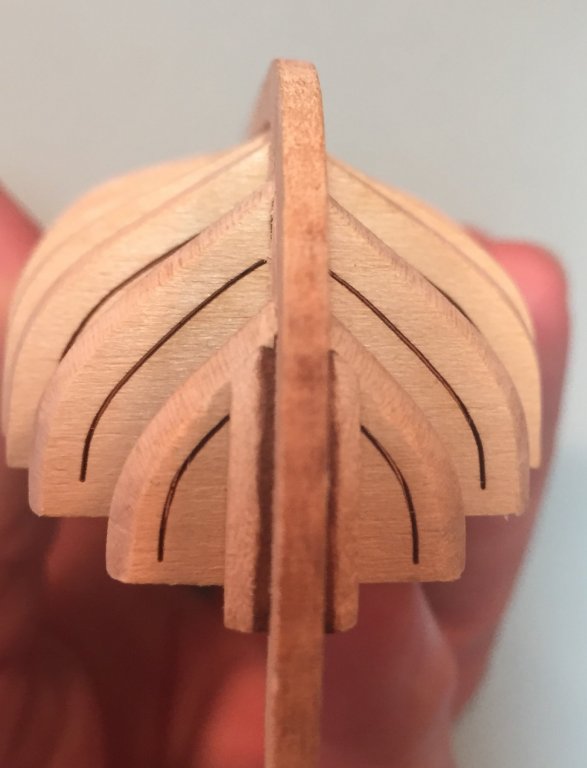
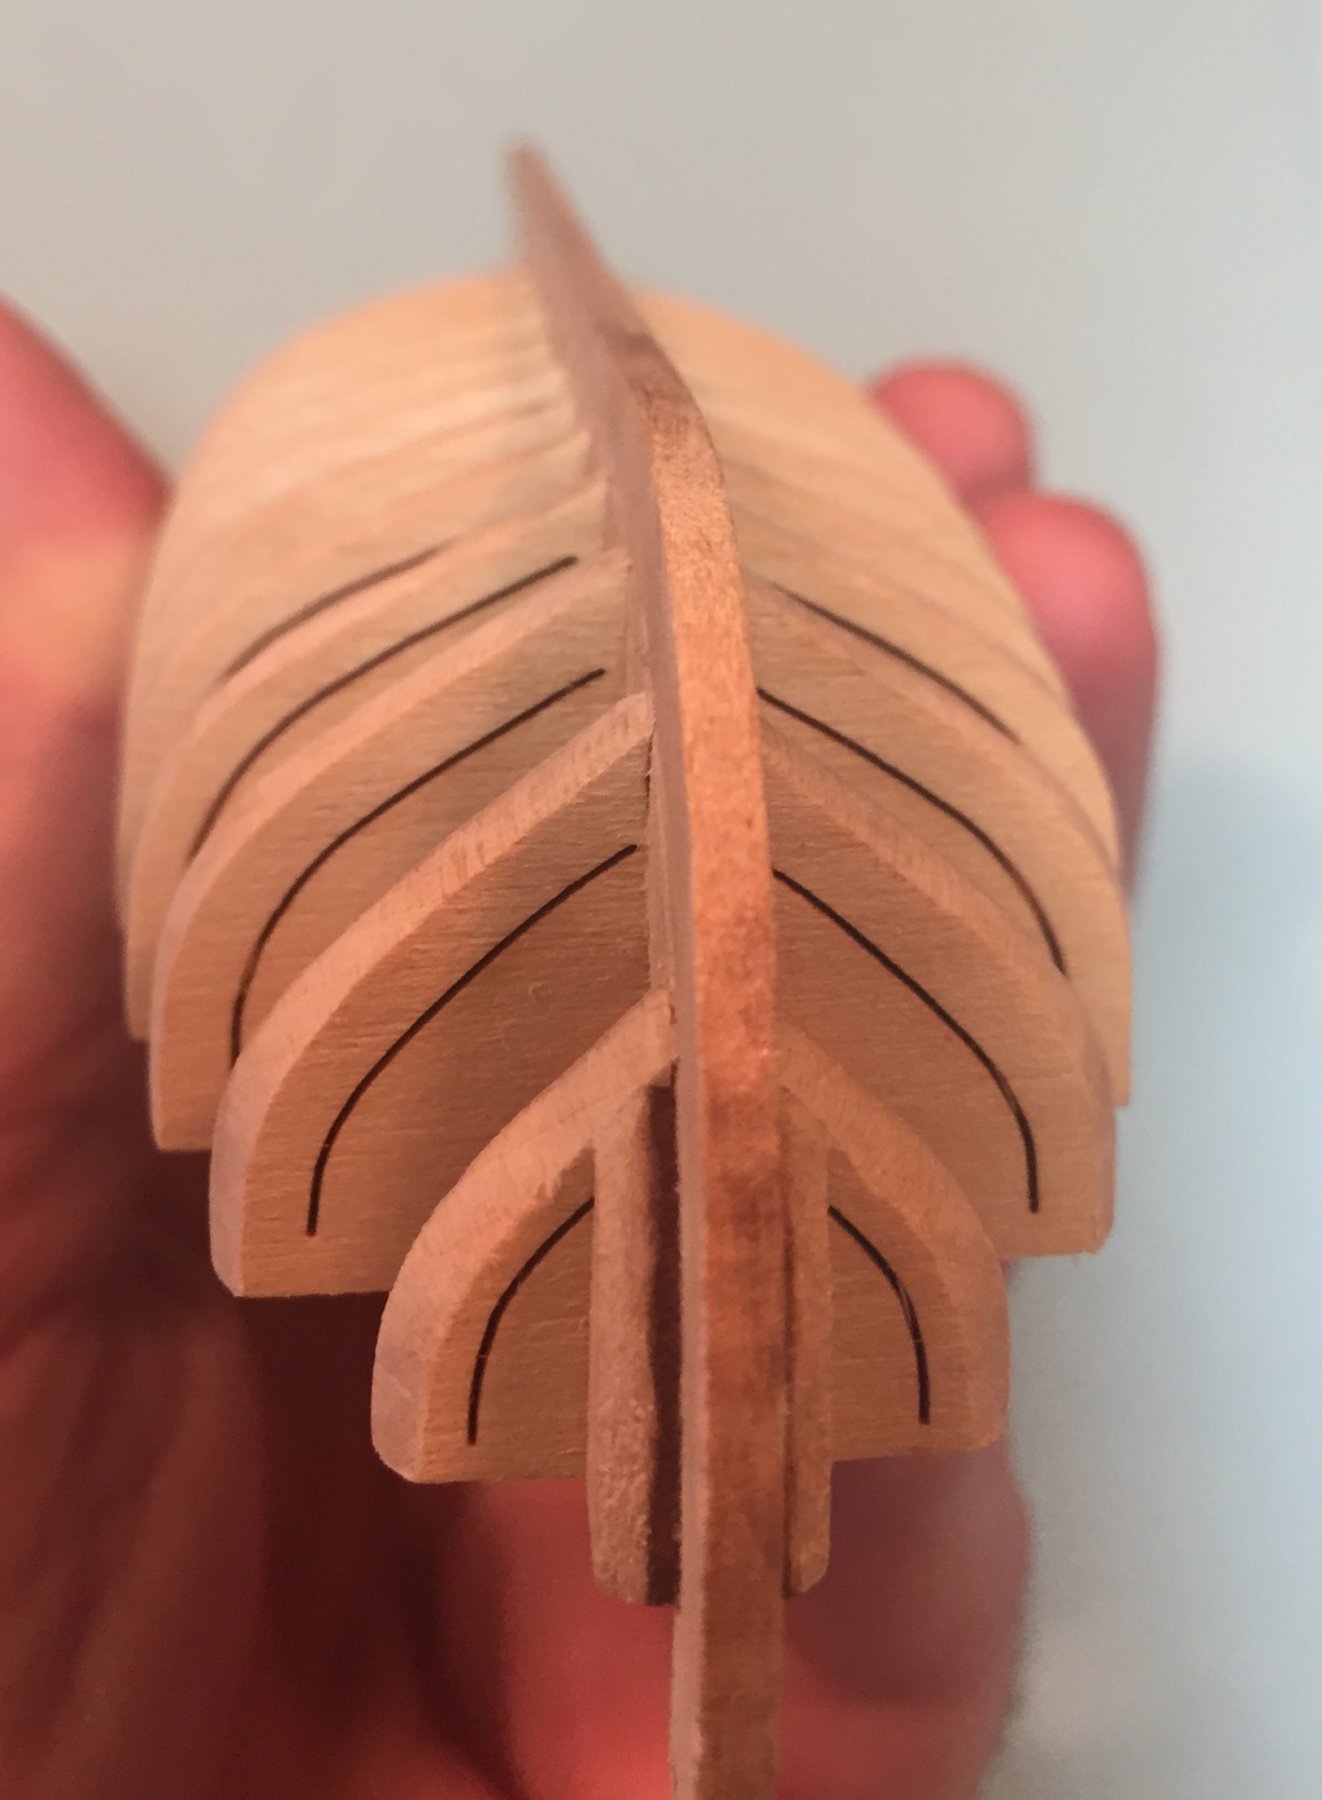
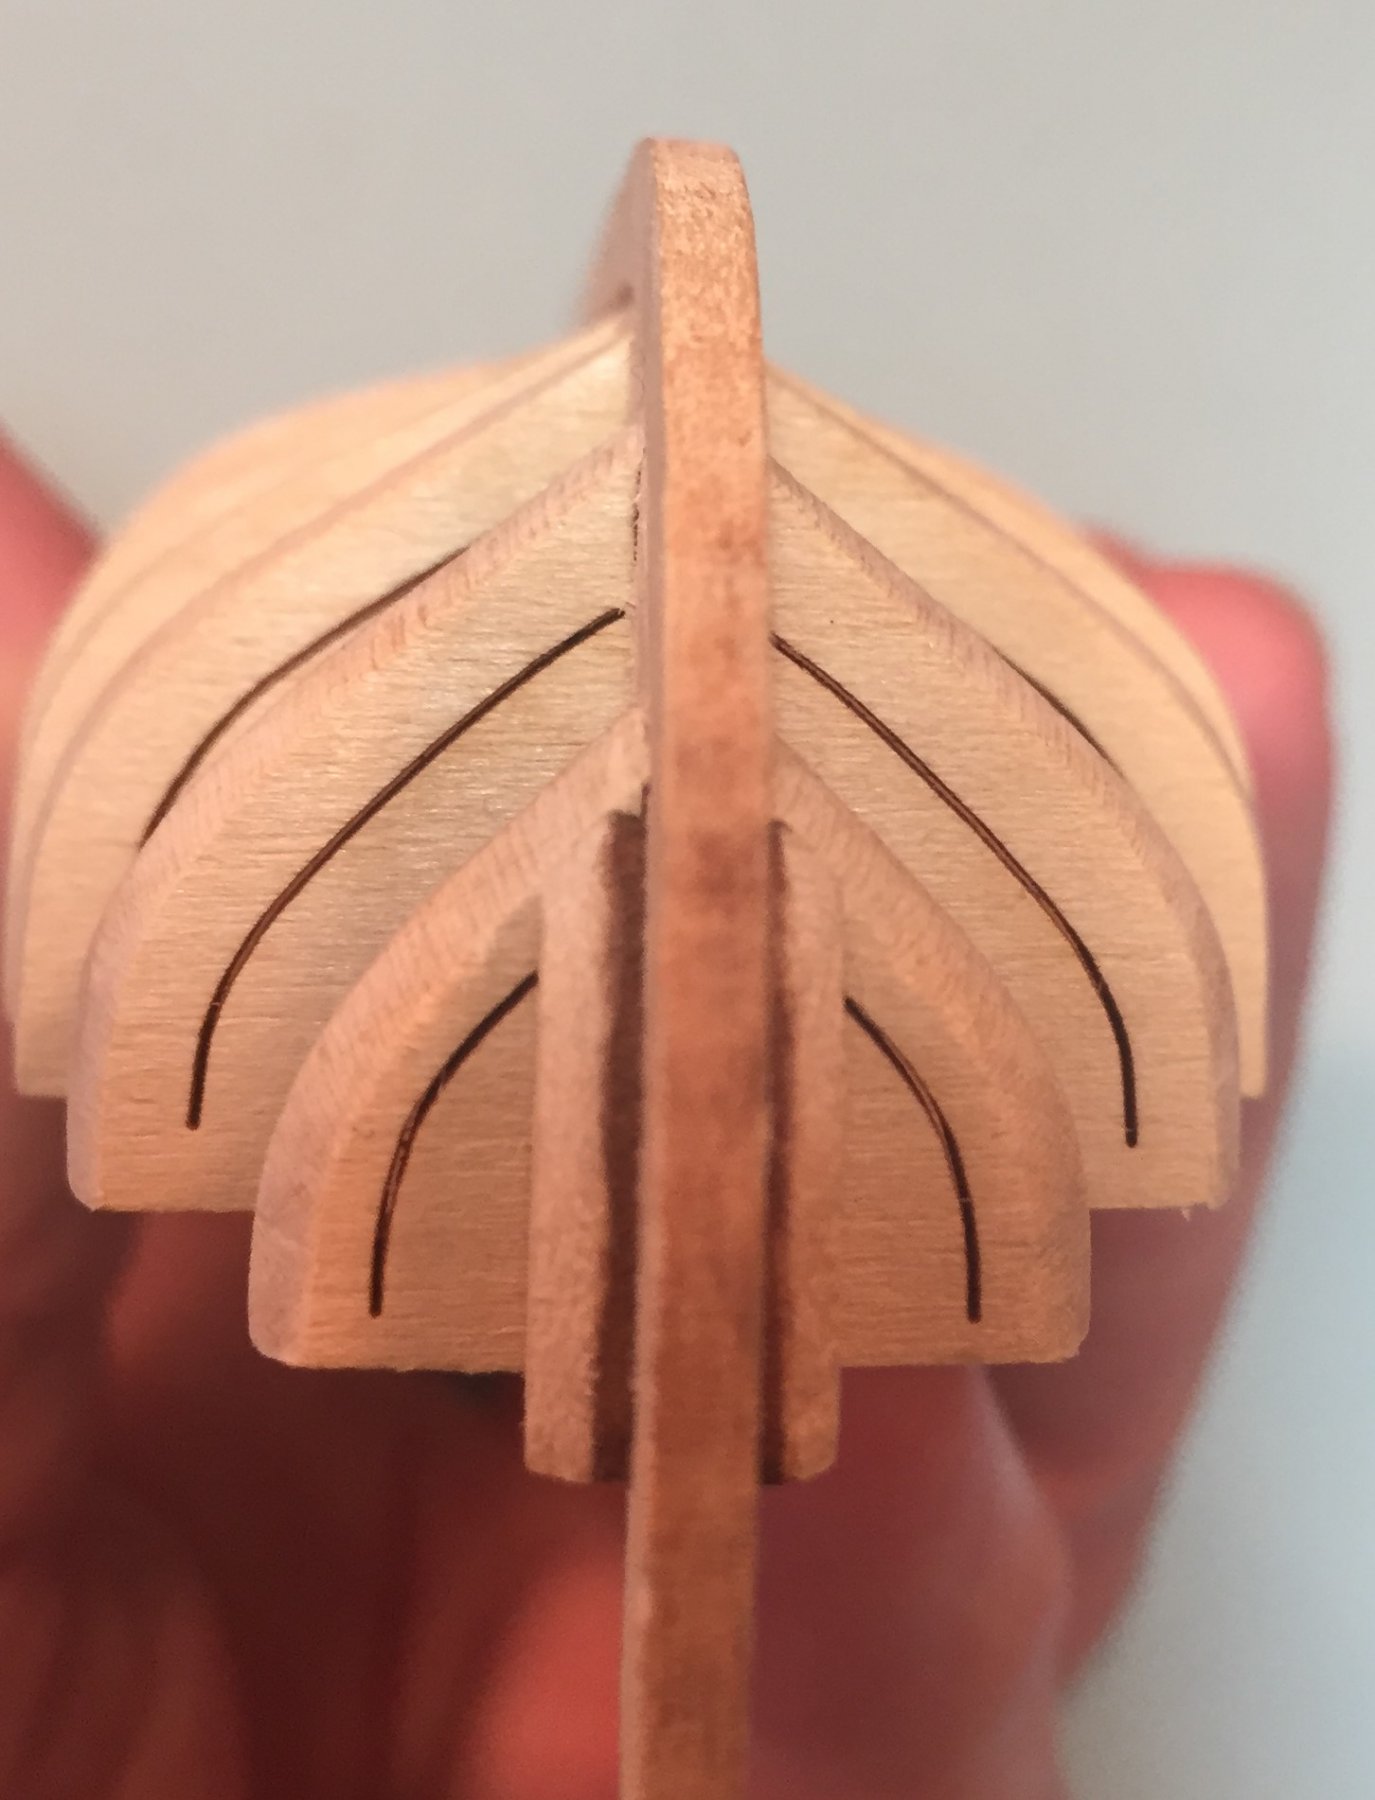
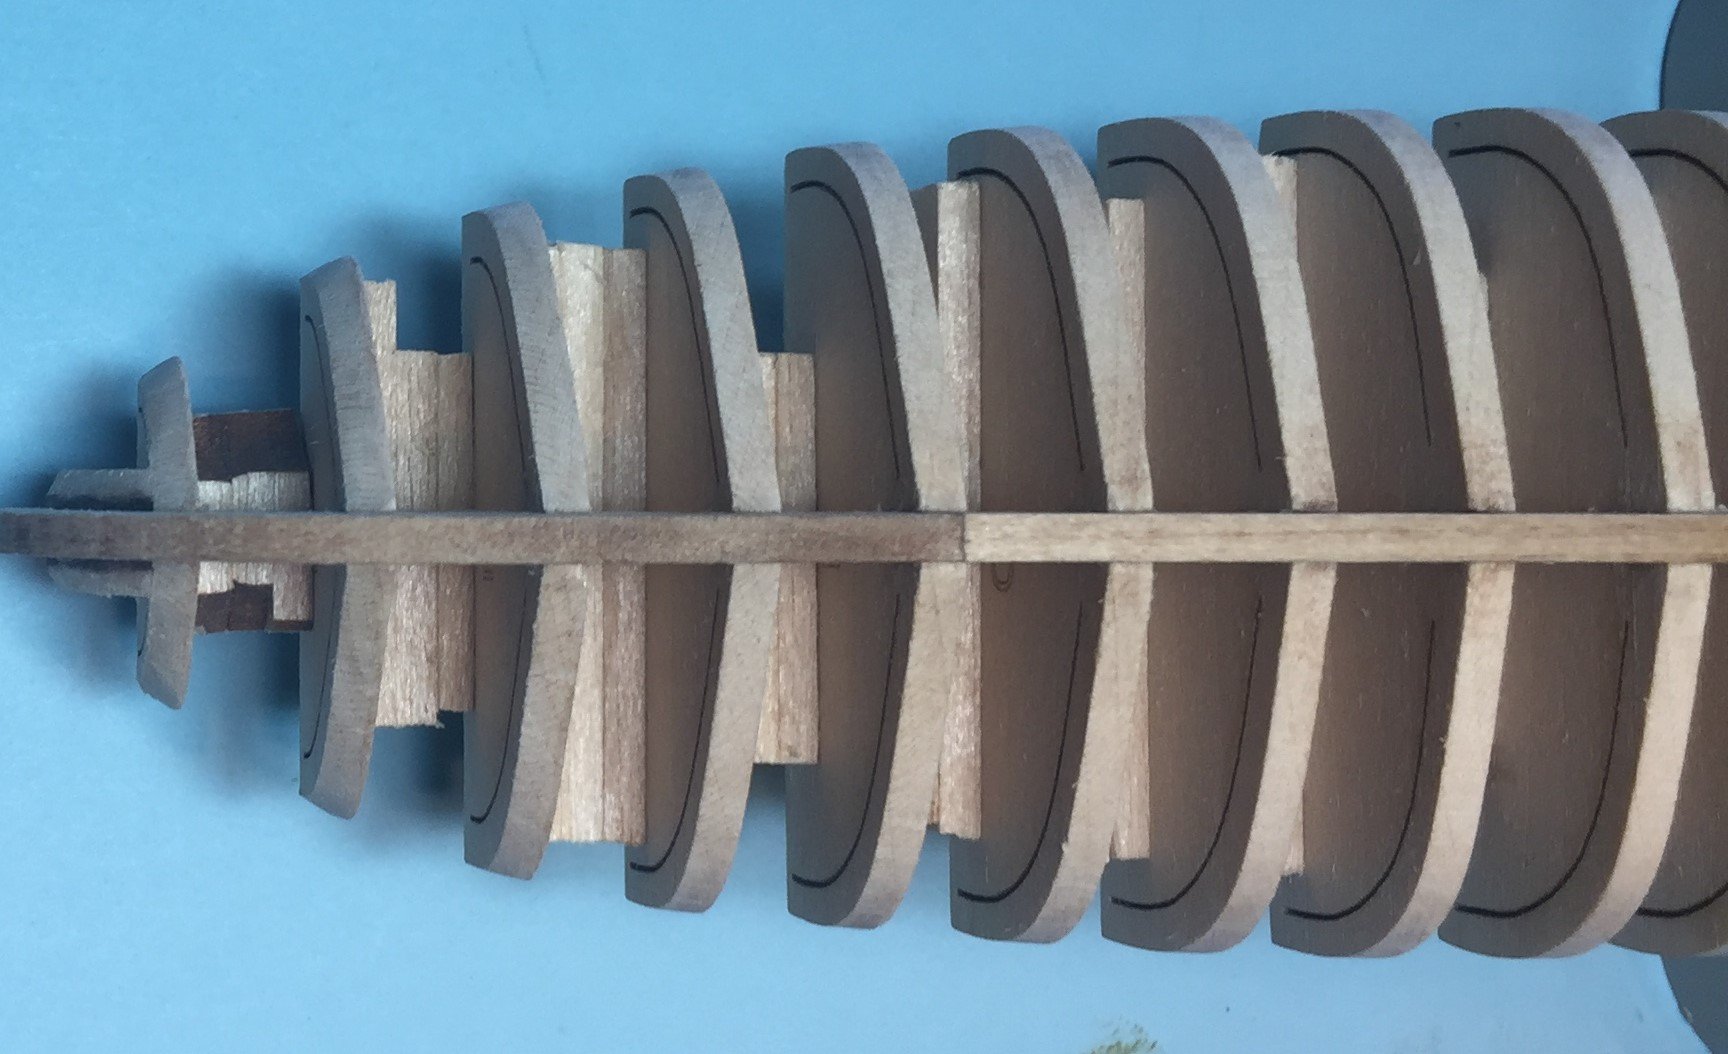
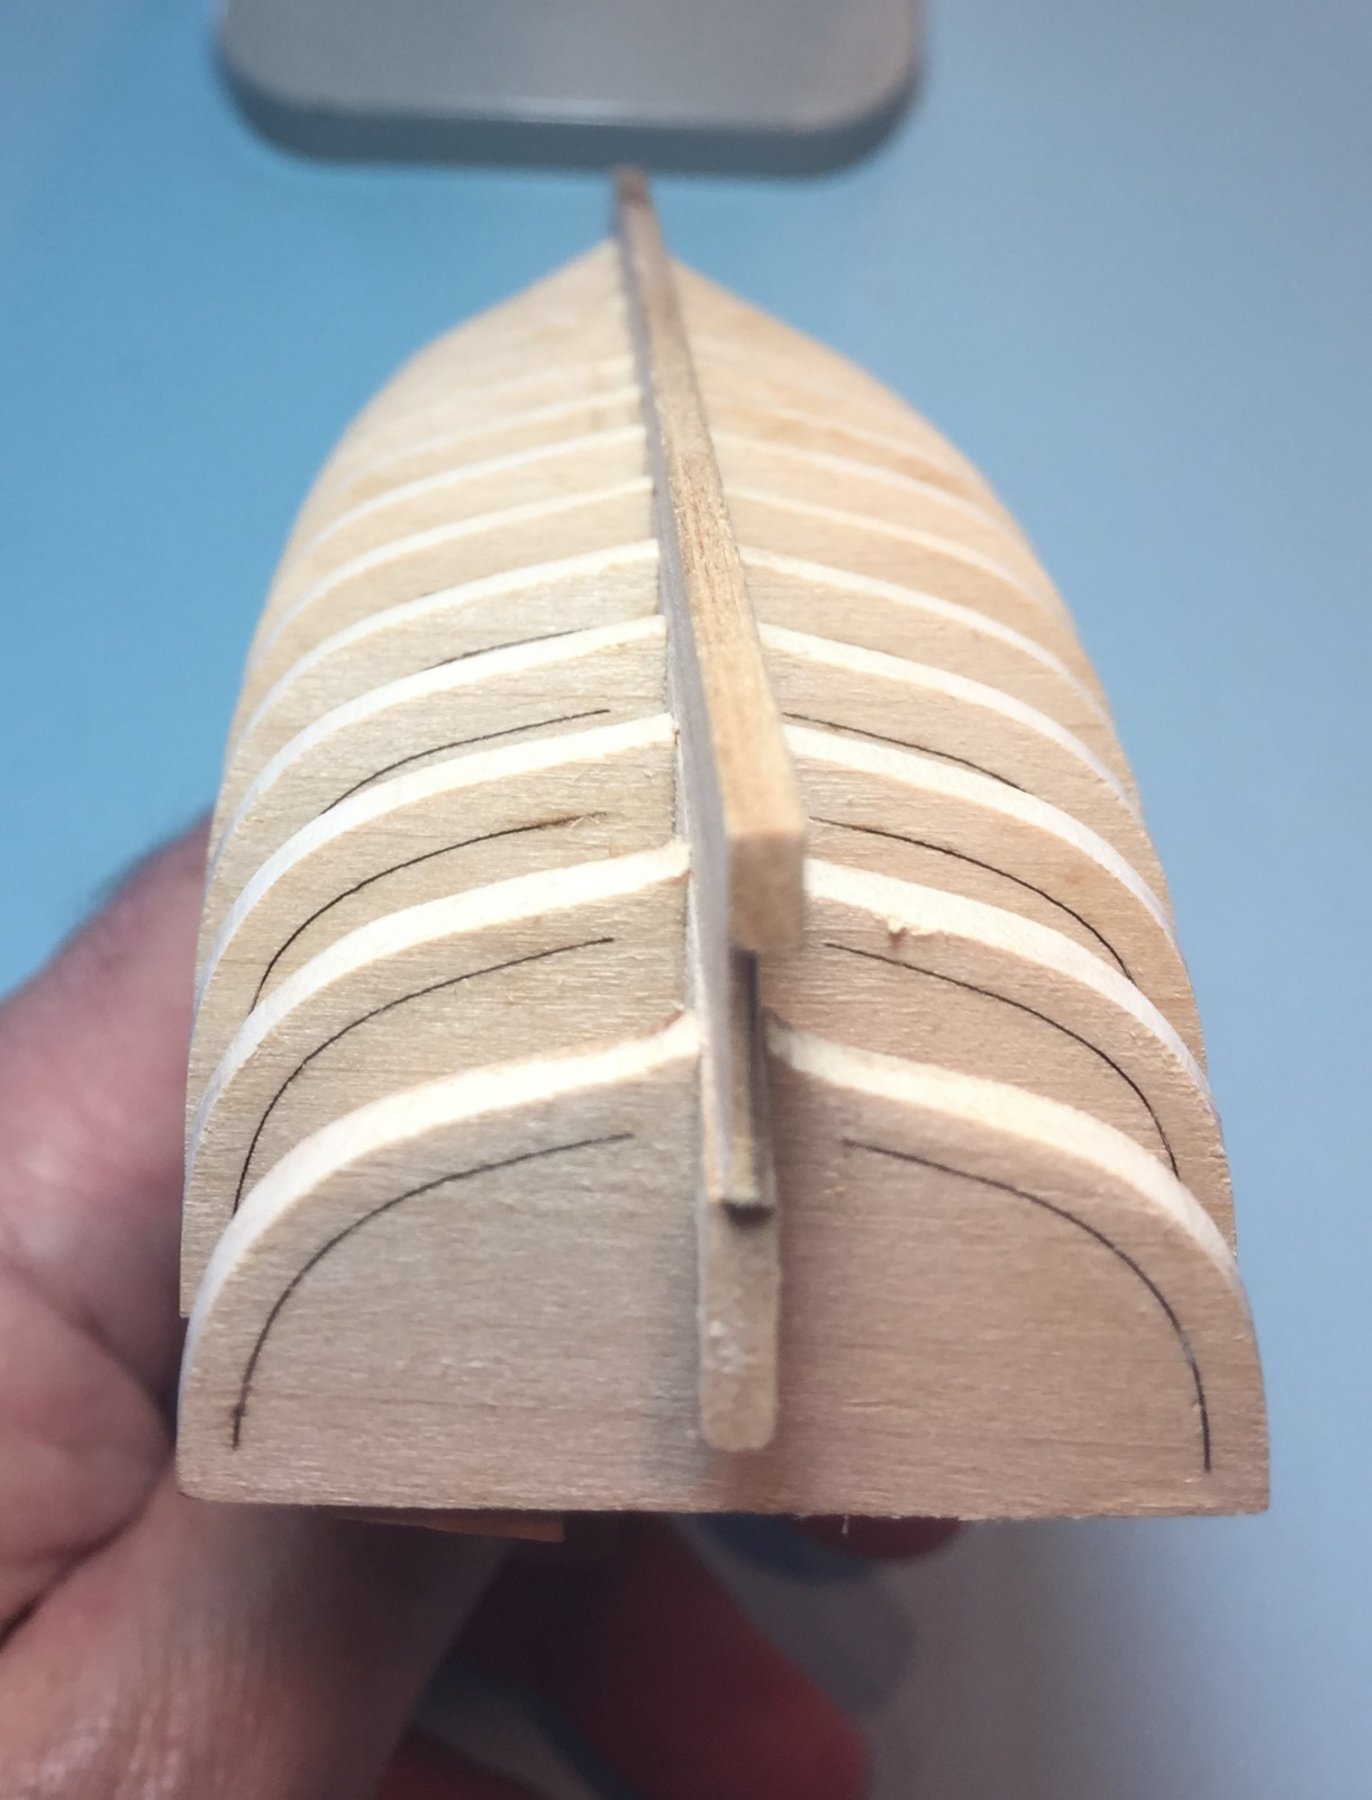
SYMMETRICAL HULL Eric; Thanks for your interest. Two of the bulkheads gave me more trouble that the other 14. The first bulkhead in the bow (H) and the fifth bulkhead from the bow (D). D is the one I described as pesky. Bulkhead H was a little more difficult for me because of the extreme angle of the bevel necessary to for the planking material to curve gently into the rabbet at the stem. As a result, I may have been too aggressive from time to time. During the fairing process the port and starboard of bulkhead H took on different profiles from time to time. They must have the same profile or both sides of the boat will not match or will not be symmetrical. It was therefore necessary to insure that bulkhead H was the same on each side. If I was heavy handed on one side, I had to show the same heavy hand on the other. I did it all by eye and with the planking batten. Pesky bulkhead D caused other issues. I could not get one side fair without what I though was much more effort than I expended on the other side of the boat. I had a similar problem with one of the bulkheads in the stern section, but not as pronounced. The other issue with this bulkhead is that I was only having problems with top of the bulkhead. Everything was fine for 80% of its surface. I went looking for reasons for my trouble here. I came up with a few possibilities. Perhaps: 1. The bulkhead was not seated properly on the keel and may have been high on one side and low on the other. 2. The bulkhead was not seated properly on the keel in that it was seated a hair too high. This however would not explain why I had the most trouble on one side. 3. I placed the bulkheads in the wrong order on the keel. I quickly eliminated this as the issue because I did not make this mistake. 4. The bulkhead was mislabeled in the kit. Remember, the numbers and letters are laser burned into the bulkhead, except in my kit bulkhead F was blank and I had to label it myself. Is this even a possibility? Maybe. Most of the adjacent bulkheads are really close in size to one another. Could this error occur at the plant when they do a new run of the model? I do not know. What I did not do was compare each bulkhead to the printed plans. I took it on faith that the bulkheads were labeled correctly. I should not have done this. I should have checked. Especially because one of my bulkheads was not labeled. I think I will add an edit above to tell my readers to take this step. In days of old (before laser cutting) when bulkheads were stamped from a ply sheet, bulkheads had issues of not being symmetrical and in some kits made from old stamps or worn out stamps, it was necessary to correct them. 5. Anyway, I devoted a lot of time to pesky bulkhead D and those two forward from it to obtain the fair line in the top 20% of the bulkhead. My efforts had to match on each side to keep the hull symmetrical to keep the lines of the hull. 6. In the end I decided that perhaps I was too aggressive in removing the char from this bulkhead on one side, causing my issues later. The boat must be symmetrical. I will not measure mine, nor will I make templates from the plans to do so. It looks good now.
-
Steve; TRANSOM TROUBLE So you noticed the transom was gone. It has been a here today gone tomorrow nightmare. Well, I was holding the model and adding the final touches to fairing it and I dropped it about 6 inches onto my work surface. The hull hit the table on the top edge of the transom and it popped right off. There was no damage to the model or the transom, except that the transom was no longer attached. I spent a lot of time filing it to fair it to the hull. During that process I had no issues. After I braced it, it did not move. Here is the plan to re-attach it. 1. I love White Glue. Both the stern and transom will clean up nicely. 2. I have ordered a replacement transom from Model Expo. They will replace any part. 3. When I receive it I will compare it to the transom that I made fair with the hull to see how much I really altered the shape of the part. 4. I will follow the instructions in the kit. Those instructions advise to fair the hull and then attach the transom and then fair the transom to the hull. Previously I attached the transom about half way through the fairing process because I was concerned about matching the bevels to the last 2 bulkheads and thought it would be easier to fair. I love second chances. White Glue and Model Expo make it possible.
-
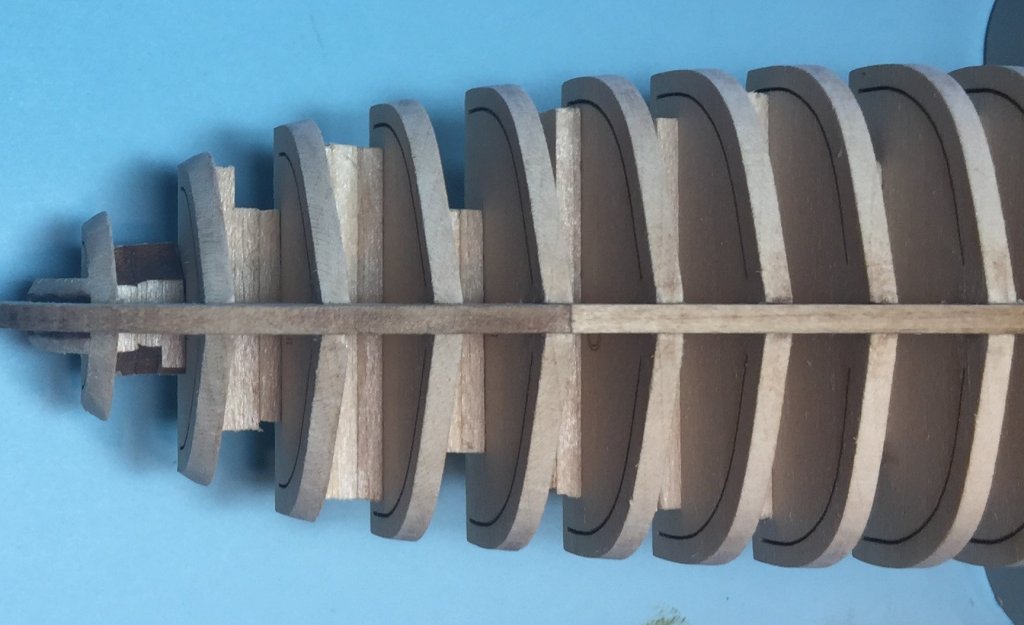
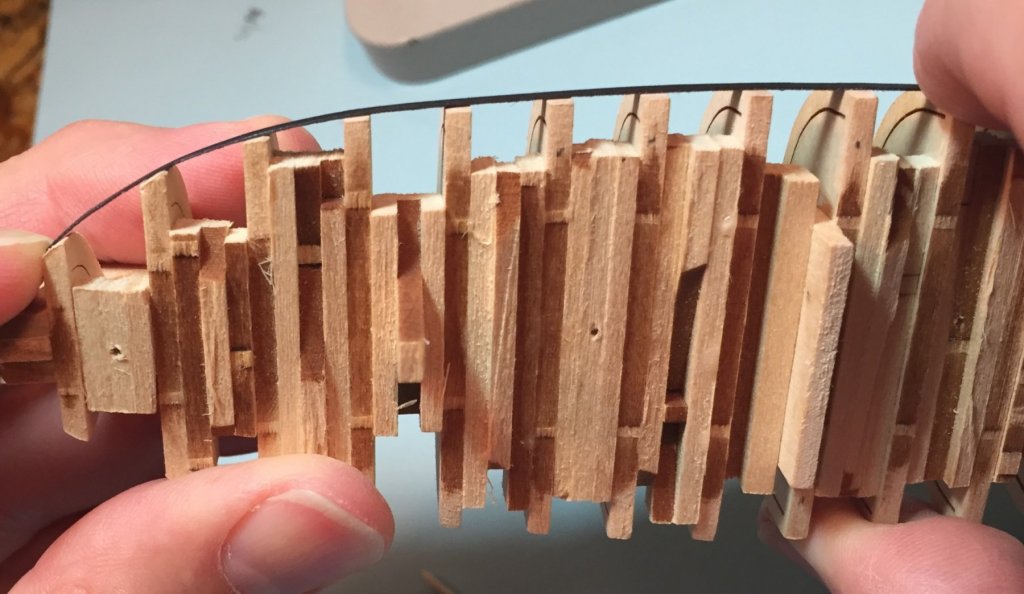
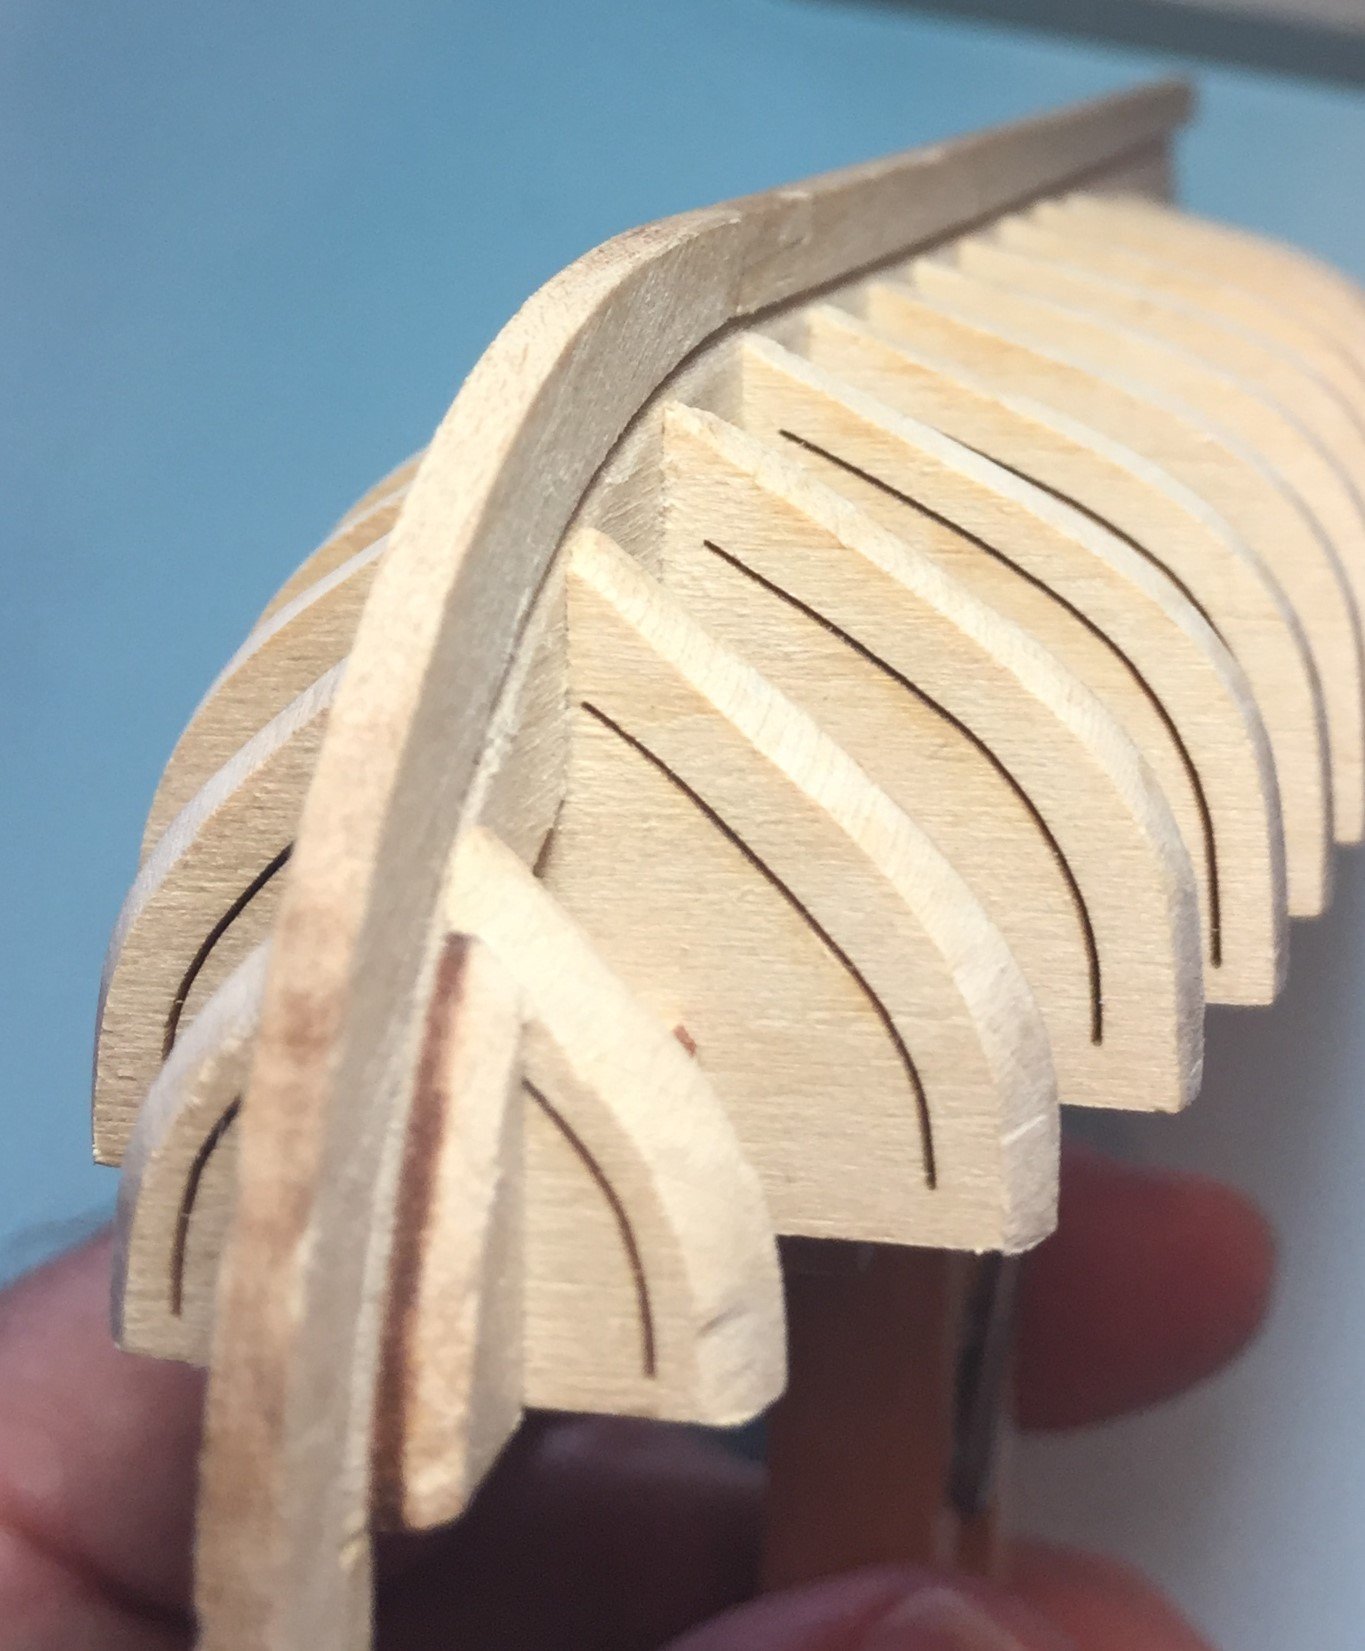
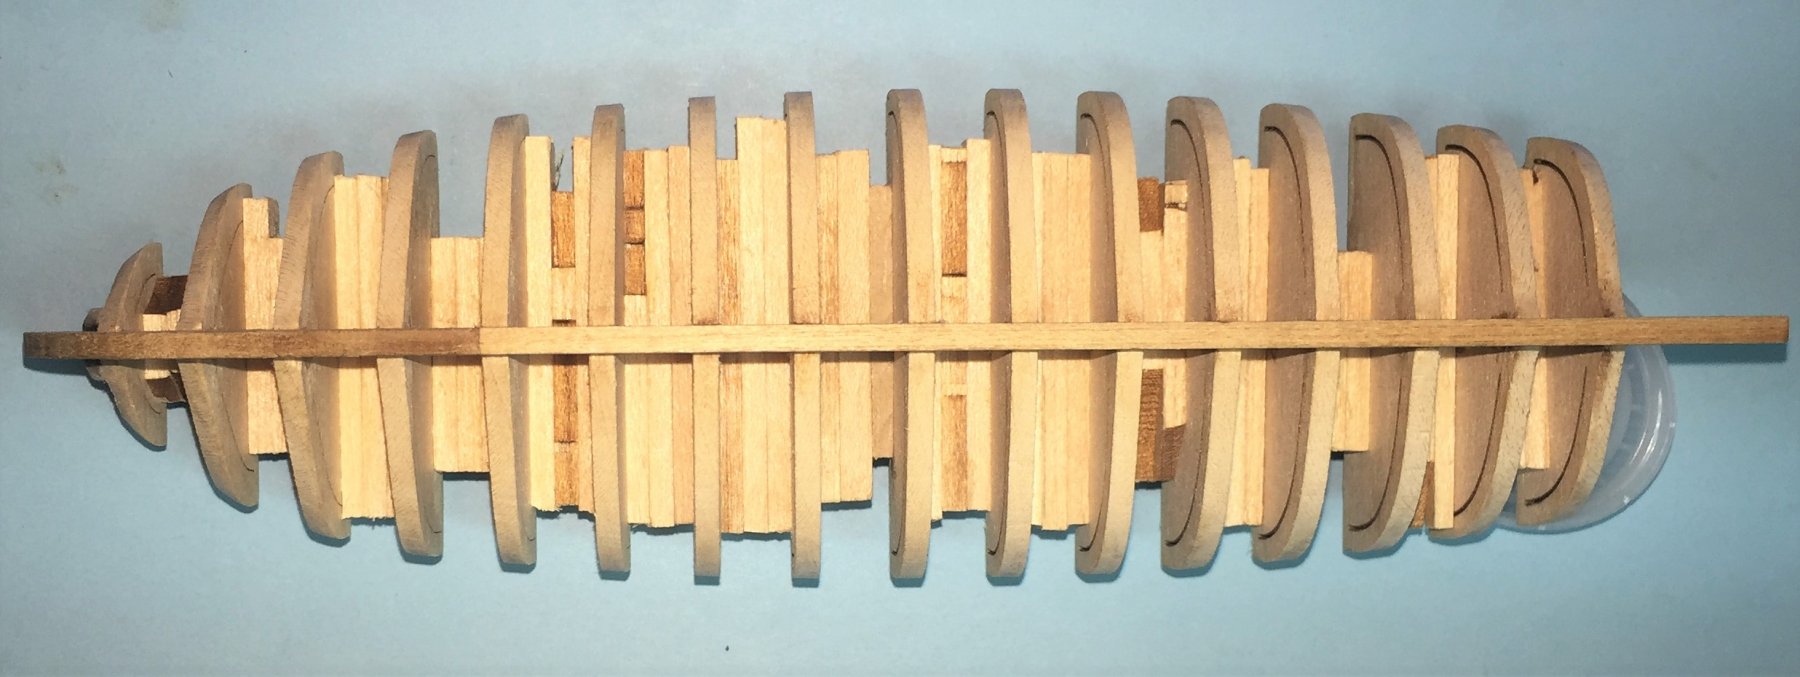
MY RESULTS WITH FAIRING HE LONG BOAT--CONCLUSION. I ran into some unexplained technical difficulties above with posting a lot of photos and could not complete my task above. So here it is continued. As I said above, trying to describe the process of fairing a hull is difficult and I think it much more of a show me kind of thing. Therefore, here are some photo's of my hull after the fairing process. Please compare them with the bulkheads that are not fair posted above.
.thumb.JPG.688eea84d2690368a2a4ac3cb5a7c6fd.JPG)

.thumb.JPG.47ccc140ce1d241b95e3936e4b185542.JPG)


-
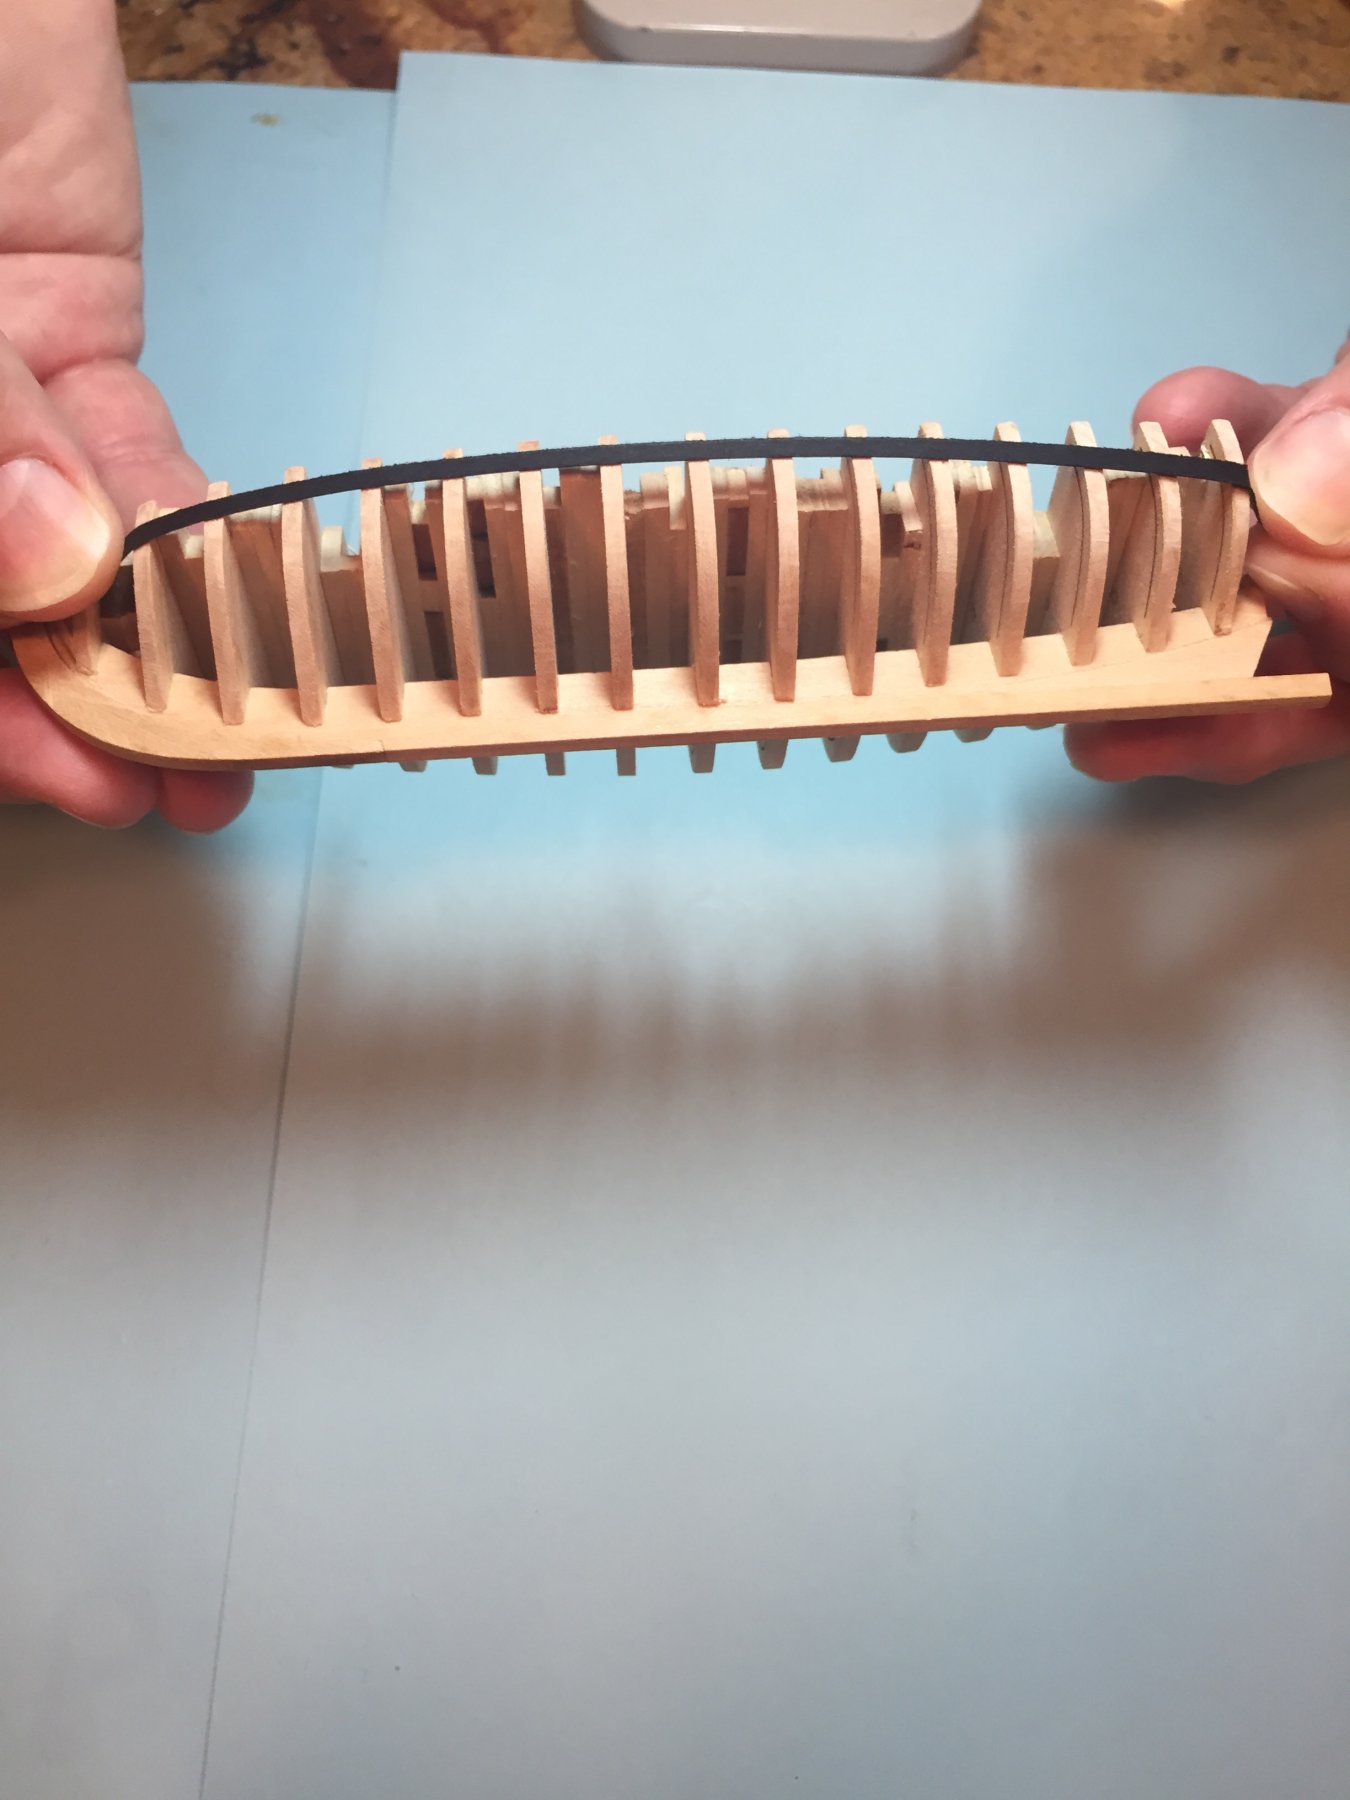
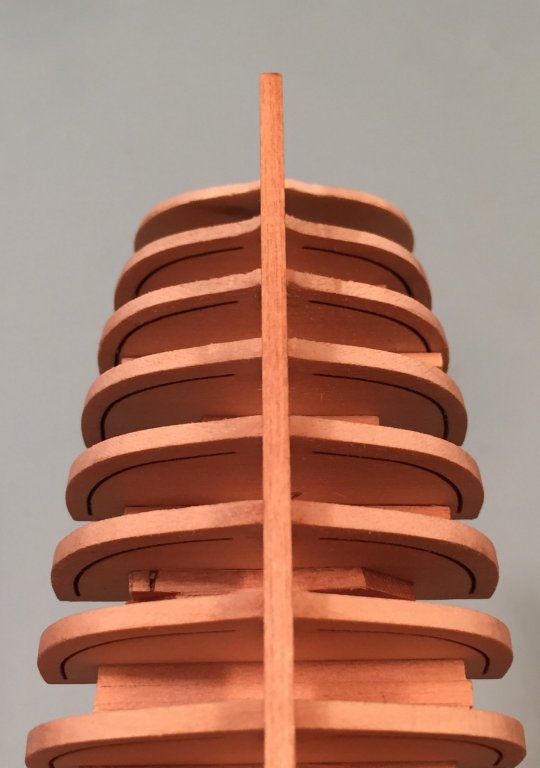
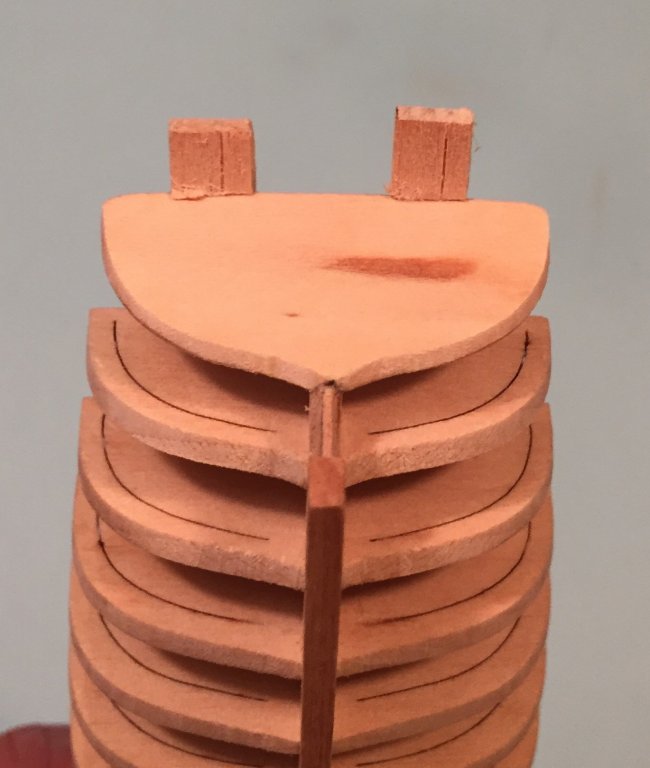
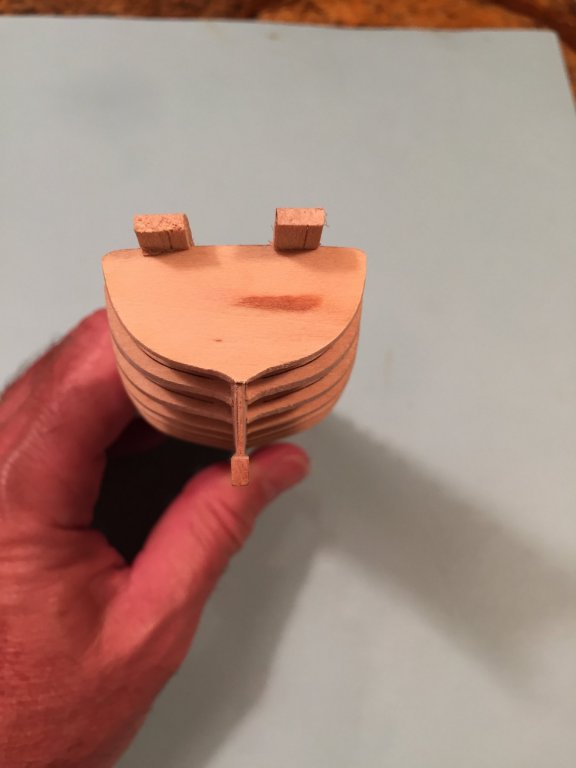
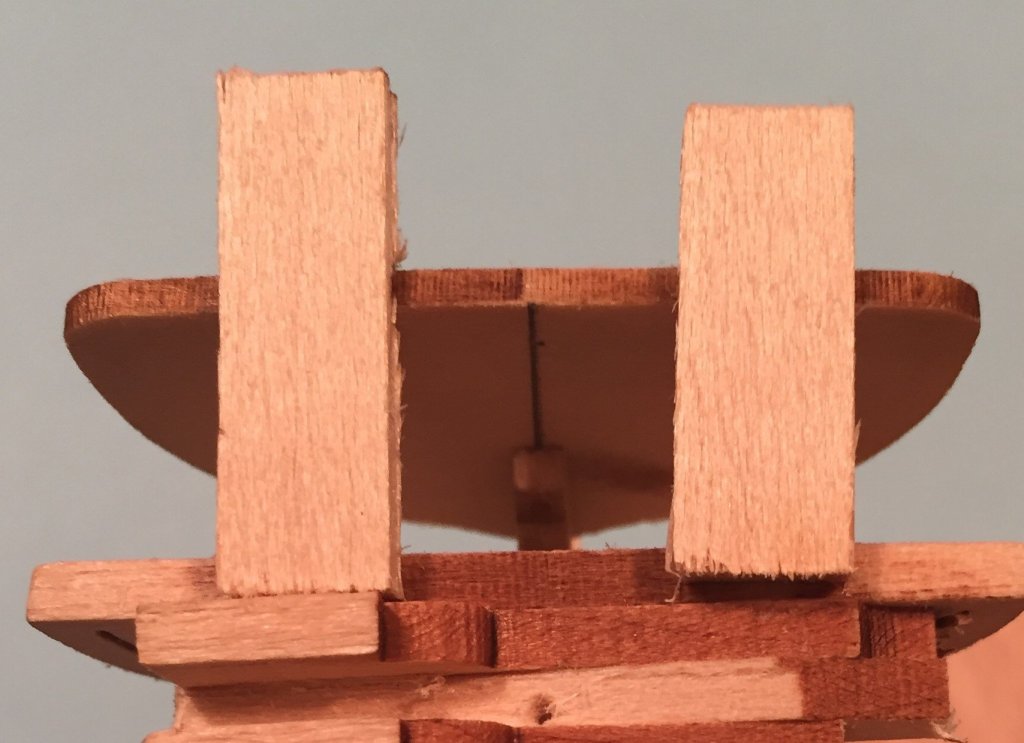
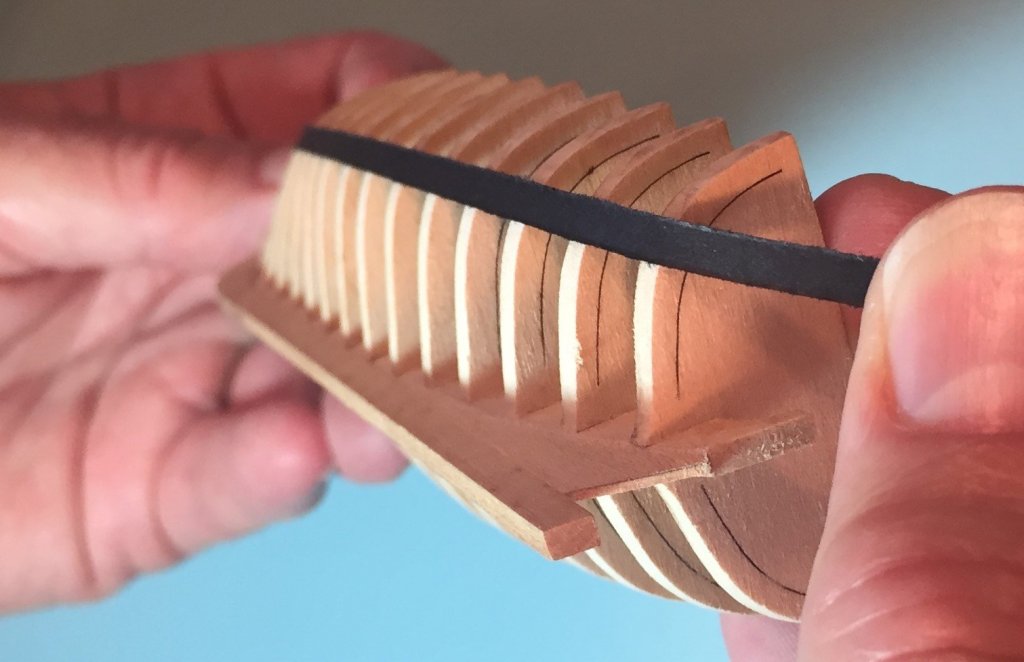
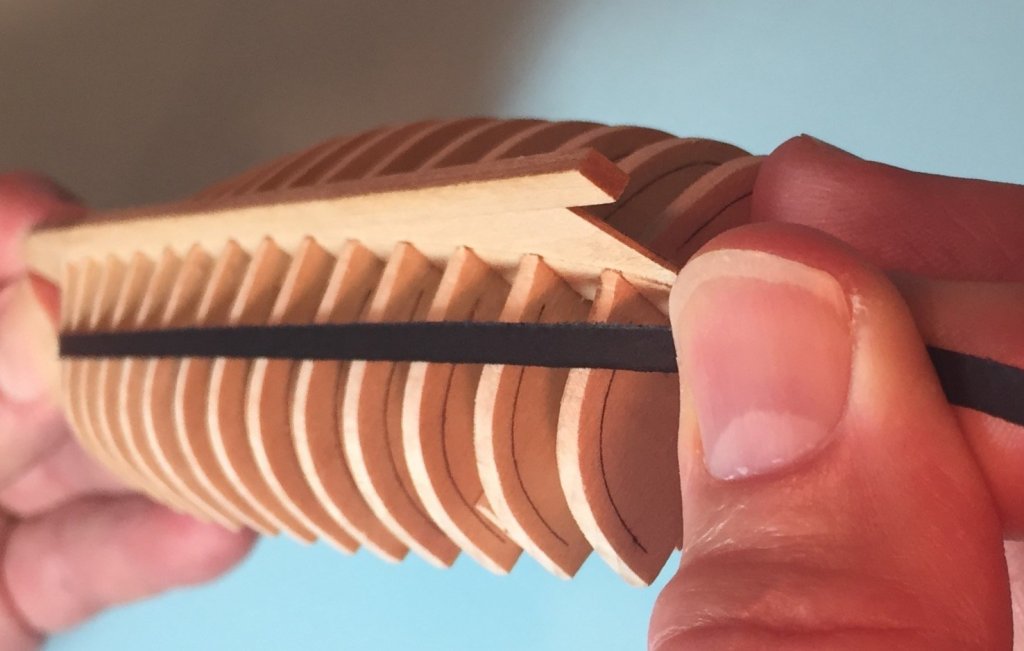
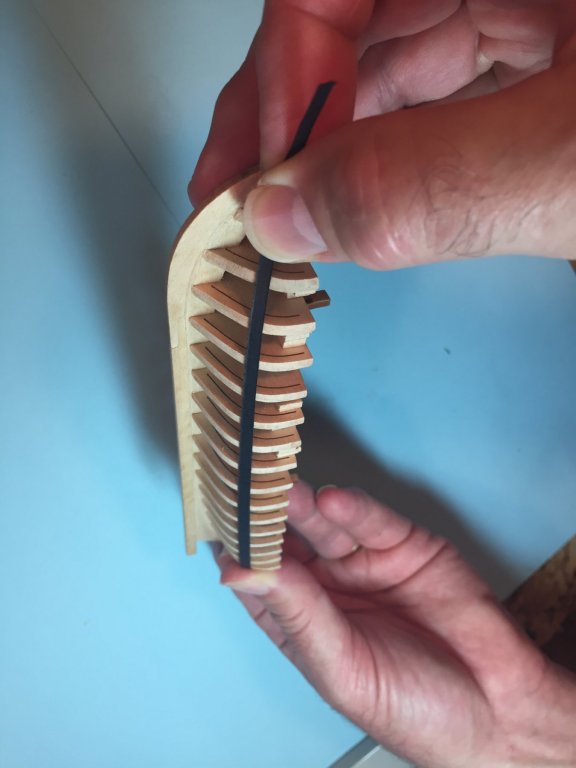
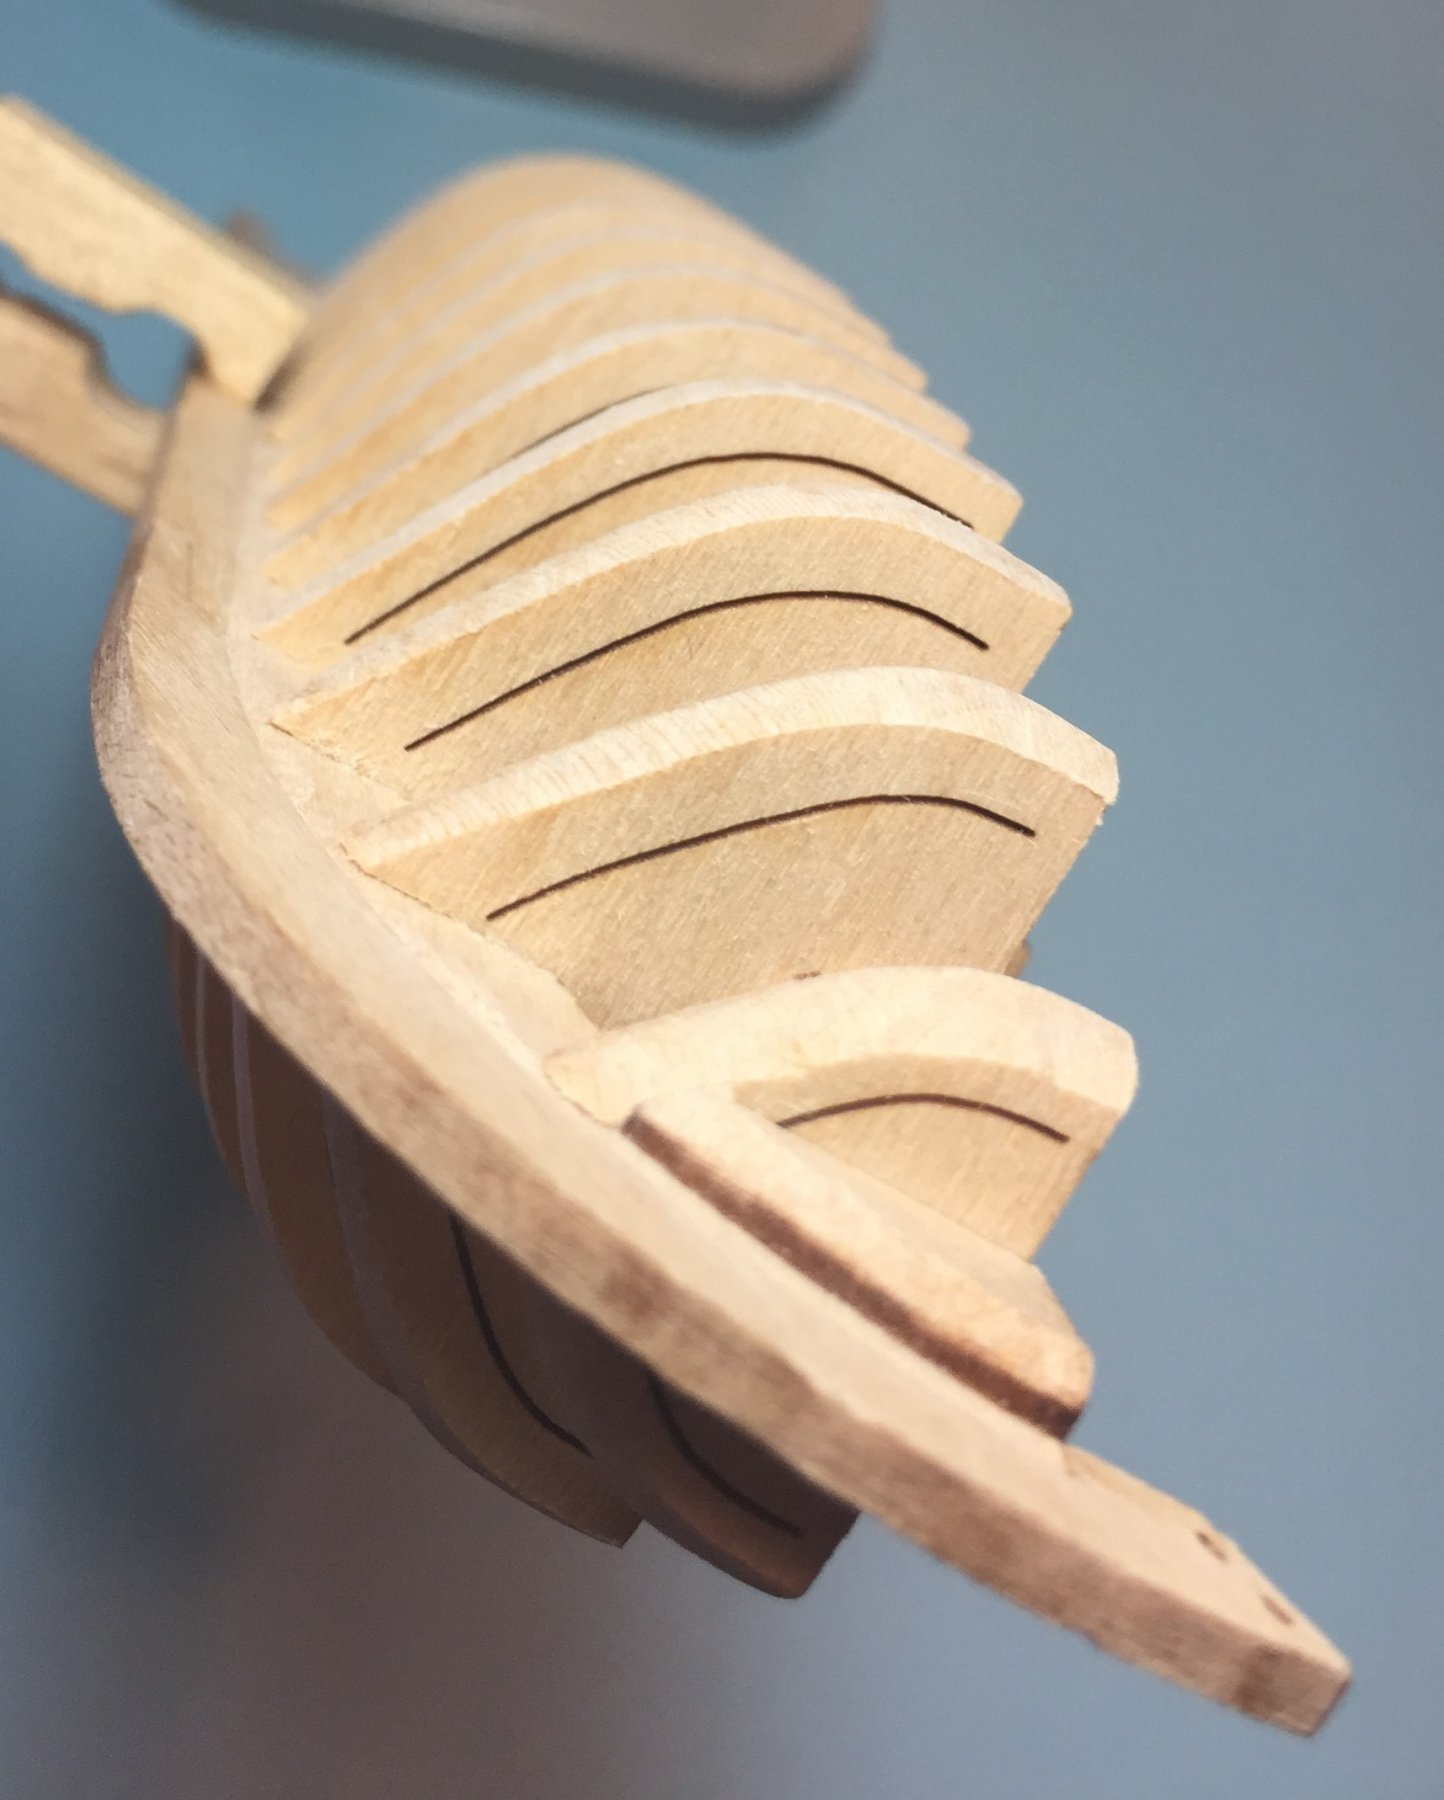
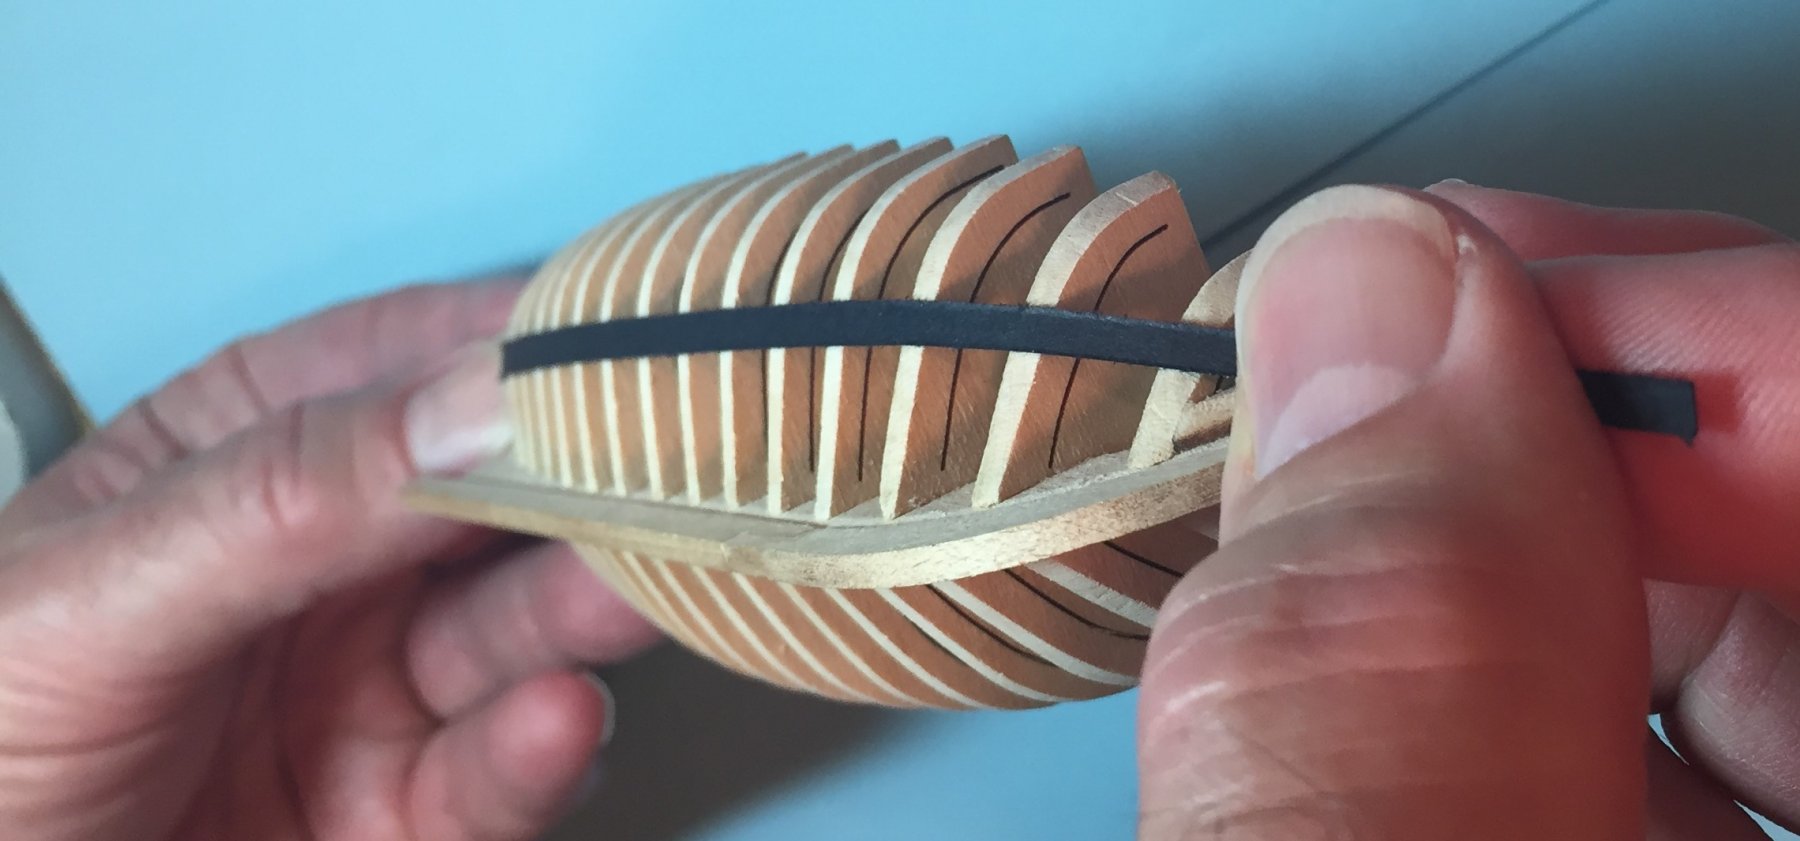
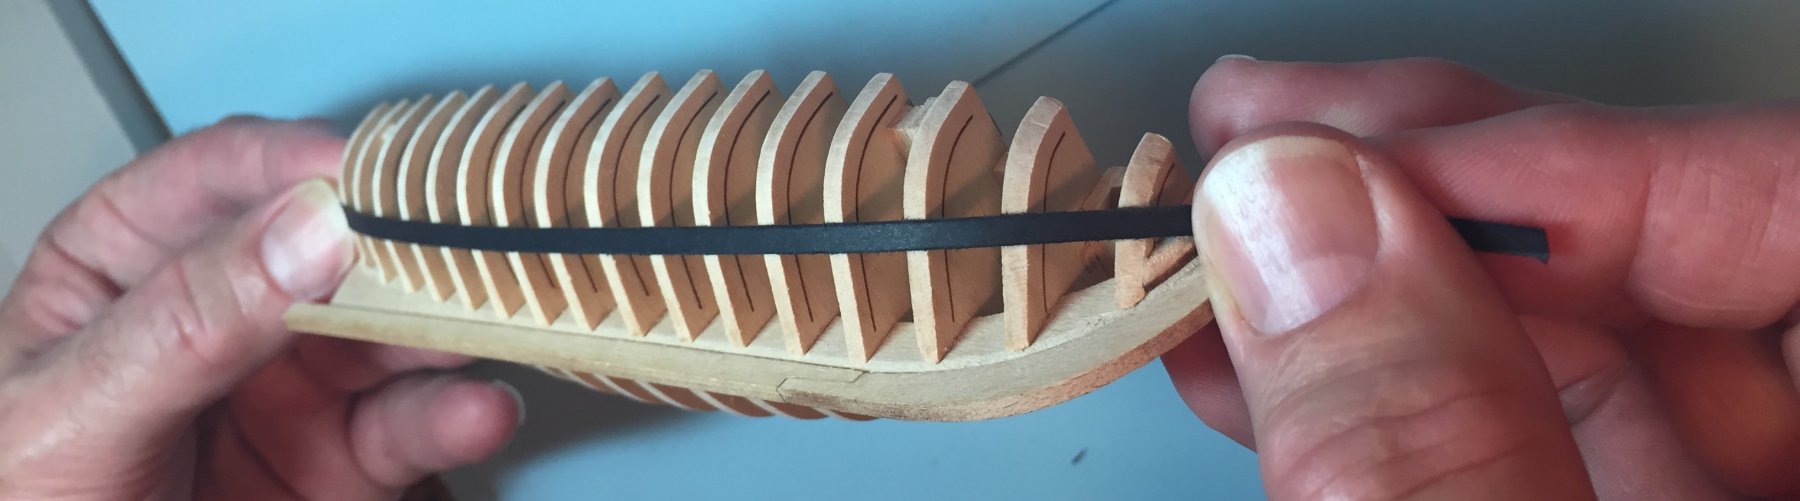
FAIRING THE LONG BOAT HULL--MY RESULT-- CONCLUSION Because the planking batten lacked the flexibility to lie down on the frames from bow to stern to check the fairness of the entire hull, near the end of my efforts I substituted a thin strip of black paper to check for humps and dips. Here are a series of photos to show this. A lot of photos, because its a show me kind of thing.


.thumb.JPG.d9706fabad5824b1f5ce010de91427be.JPG)

-
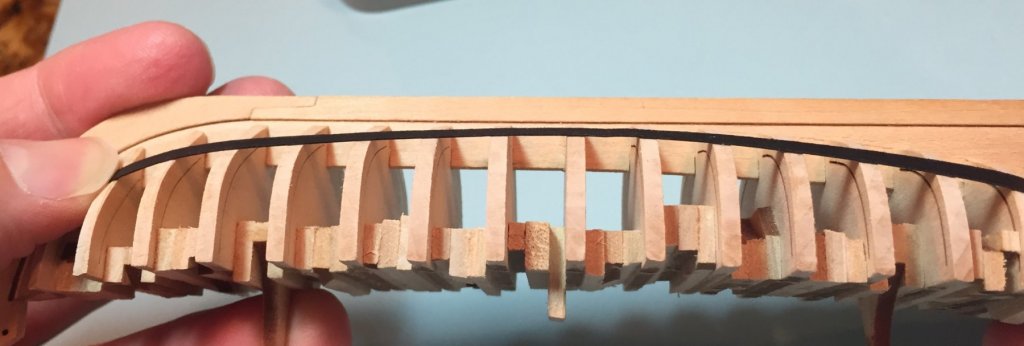
Steve Thanks for the photo info. The contrast between the model and the black table is stunning.
- 190 replies
-
- 2
-
-
- pinnace
- model shipways
- (and 1 more)
-
Steve A very pretty and elegant model. Well done. The photos of the finished model are exceptional. Would you care to tell us how you did it?
- 190 replies
-
- 1
-
-
- pinnace
- model shipways
- (and 1 more)


.JPG.fd85a1e0817c12958c9f5dcbe4b42a5e.JPG)
.JPG.ed258469f4a0dd2ca68bc40adf398c57.JPG)


.JPG.c25fb23040f63ecfa7955f6f6518e6b6.JPG)