Search the Community
Showing results for tags 'Card'.
-
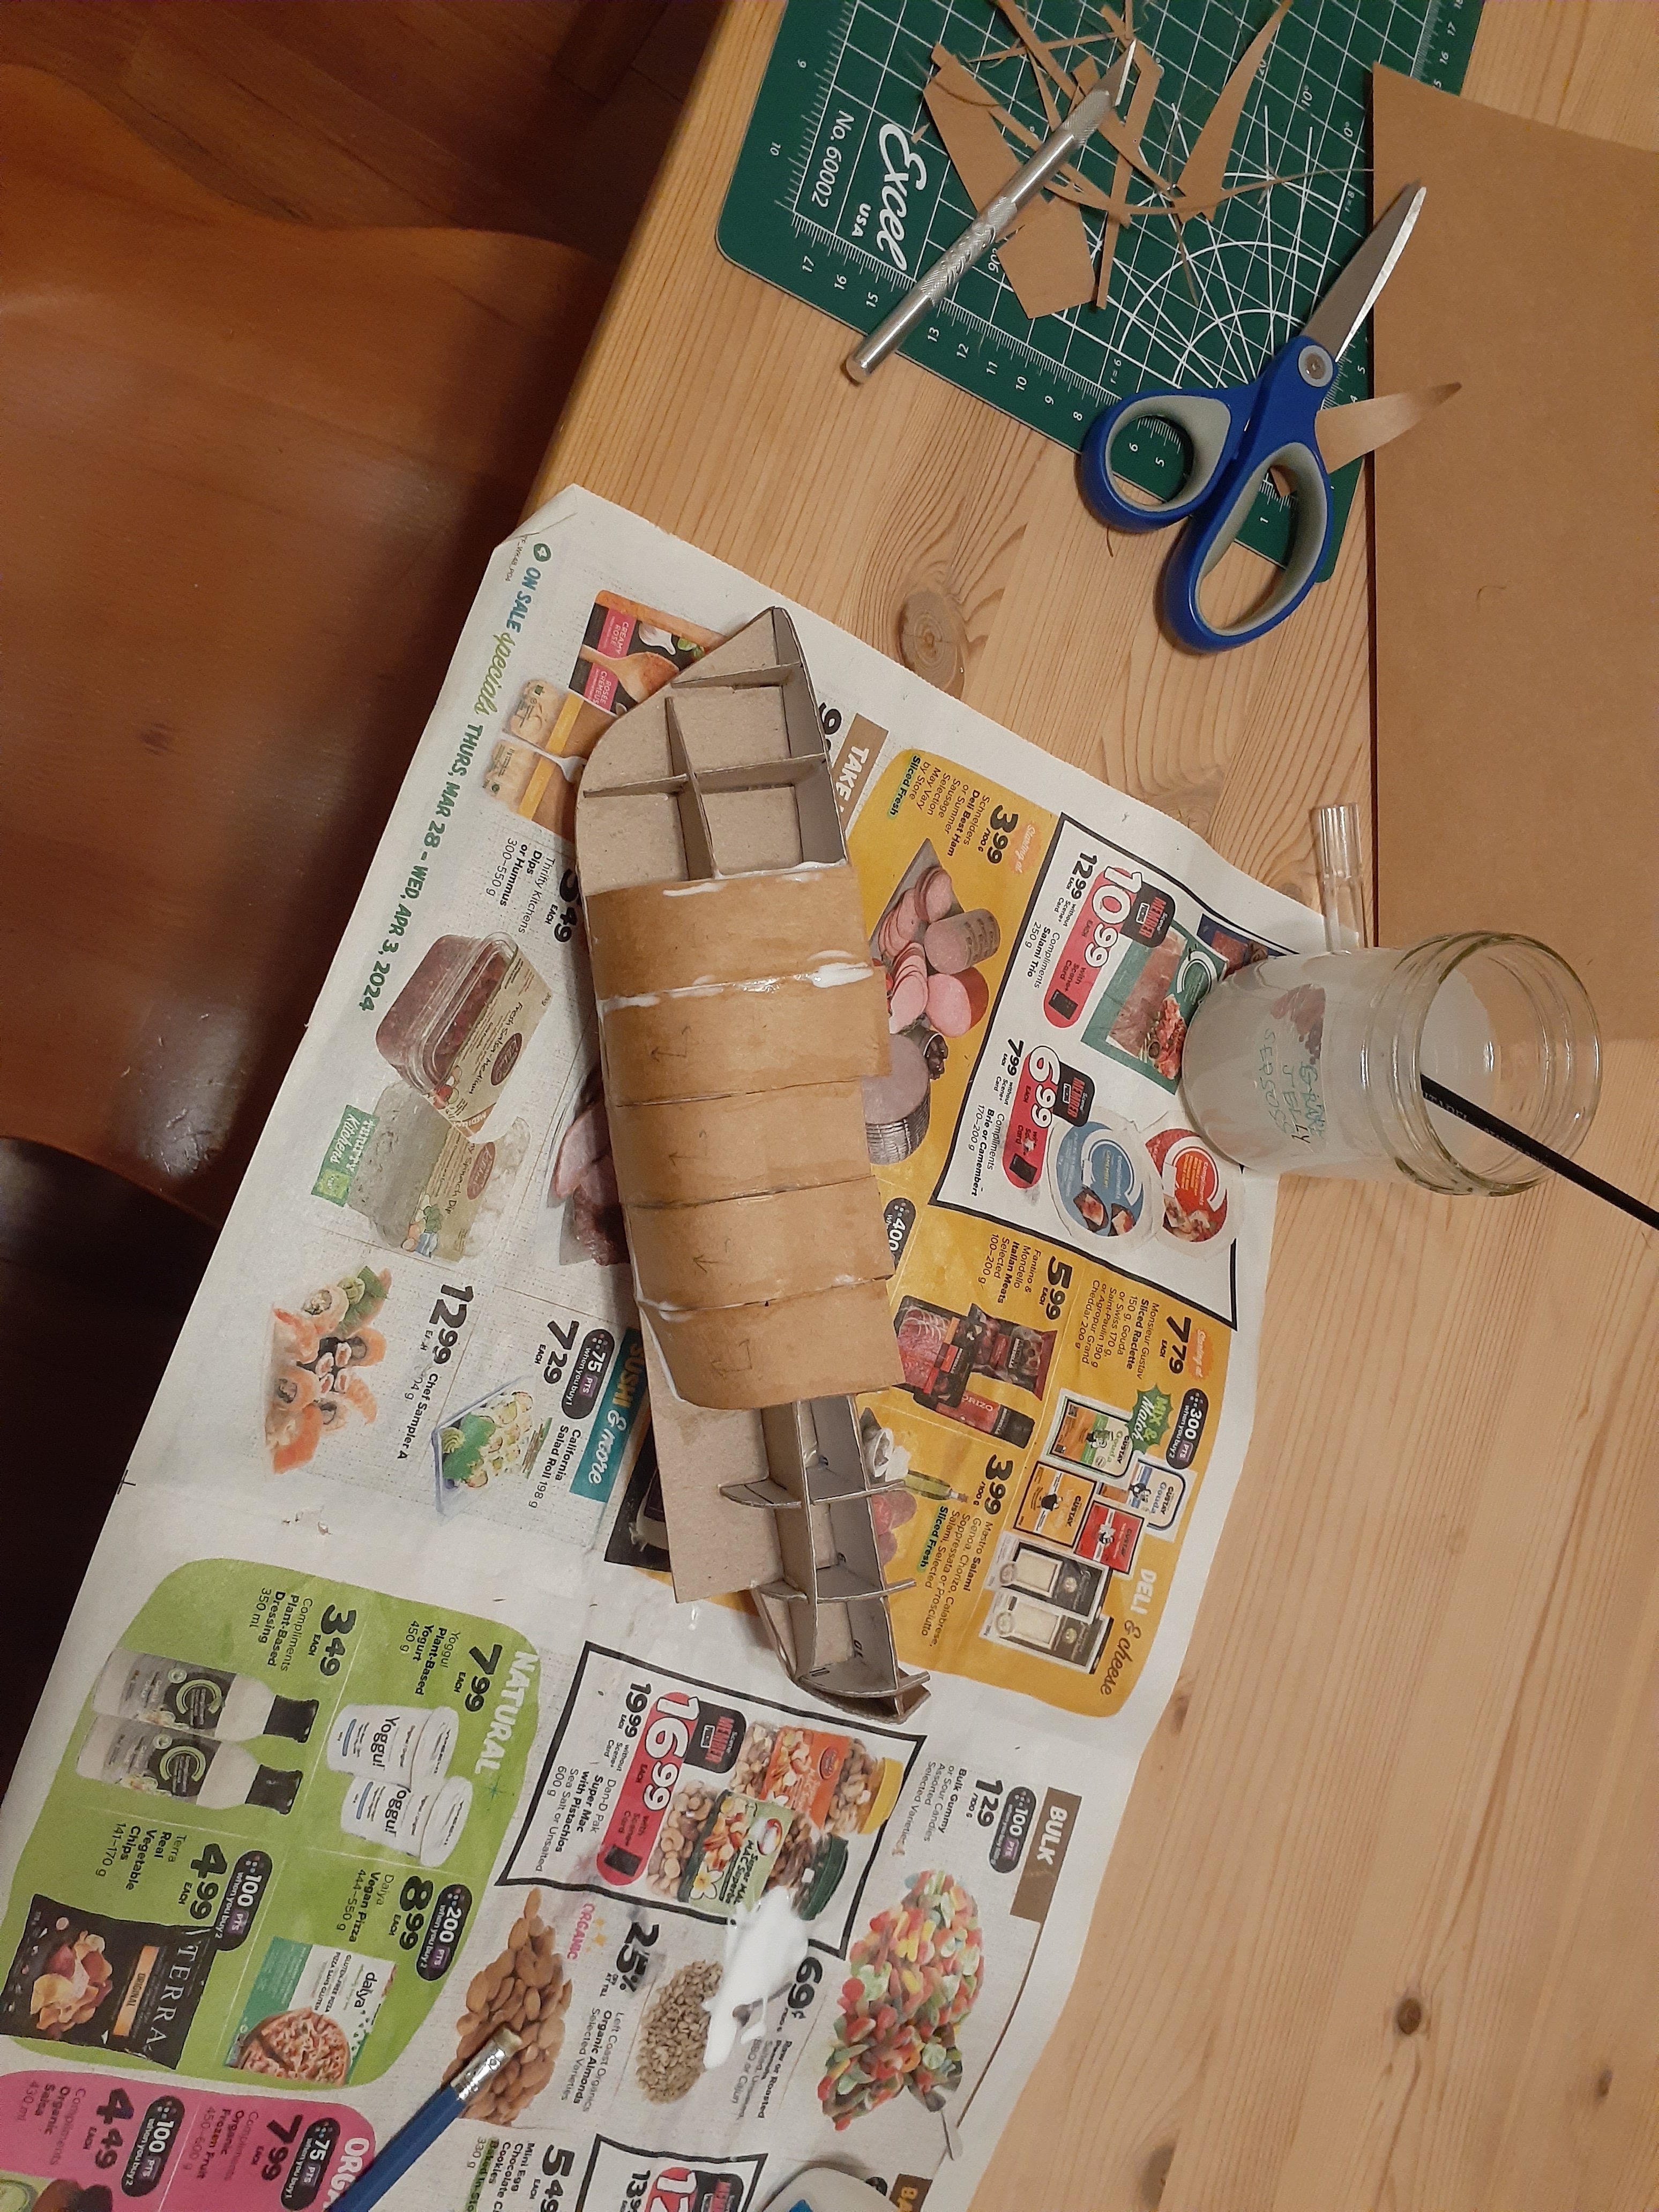
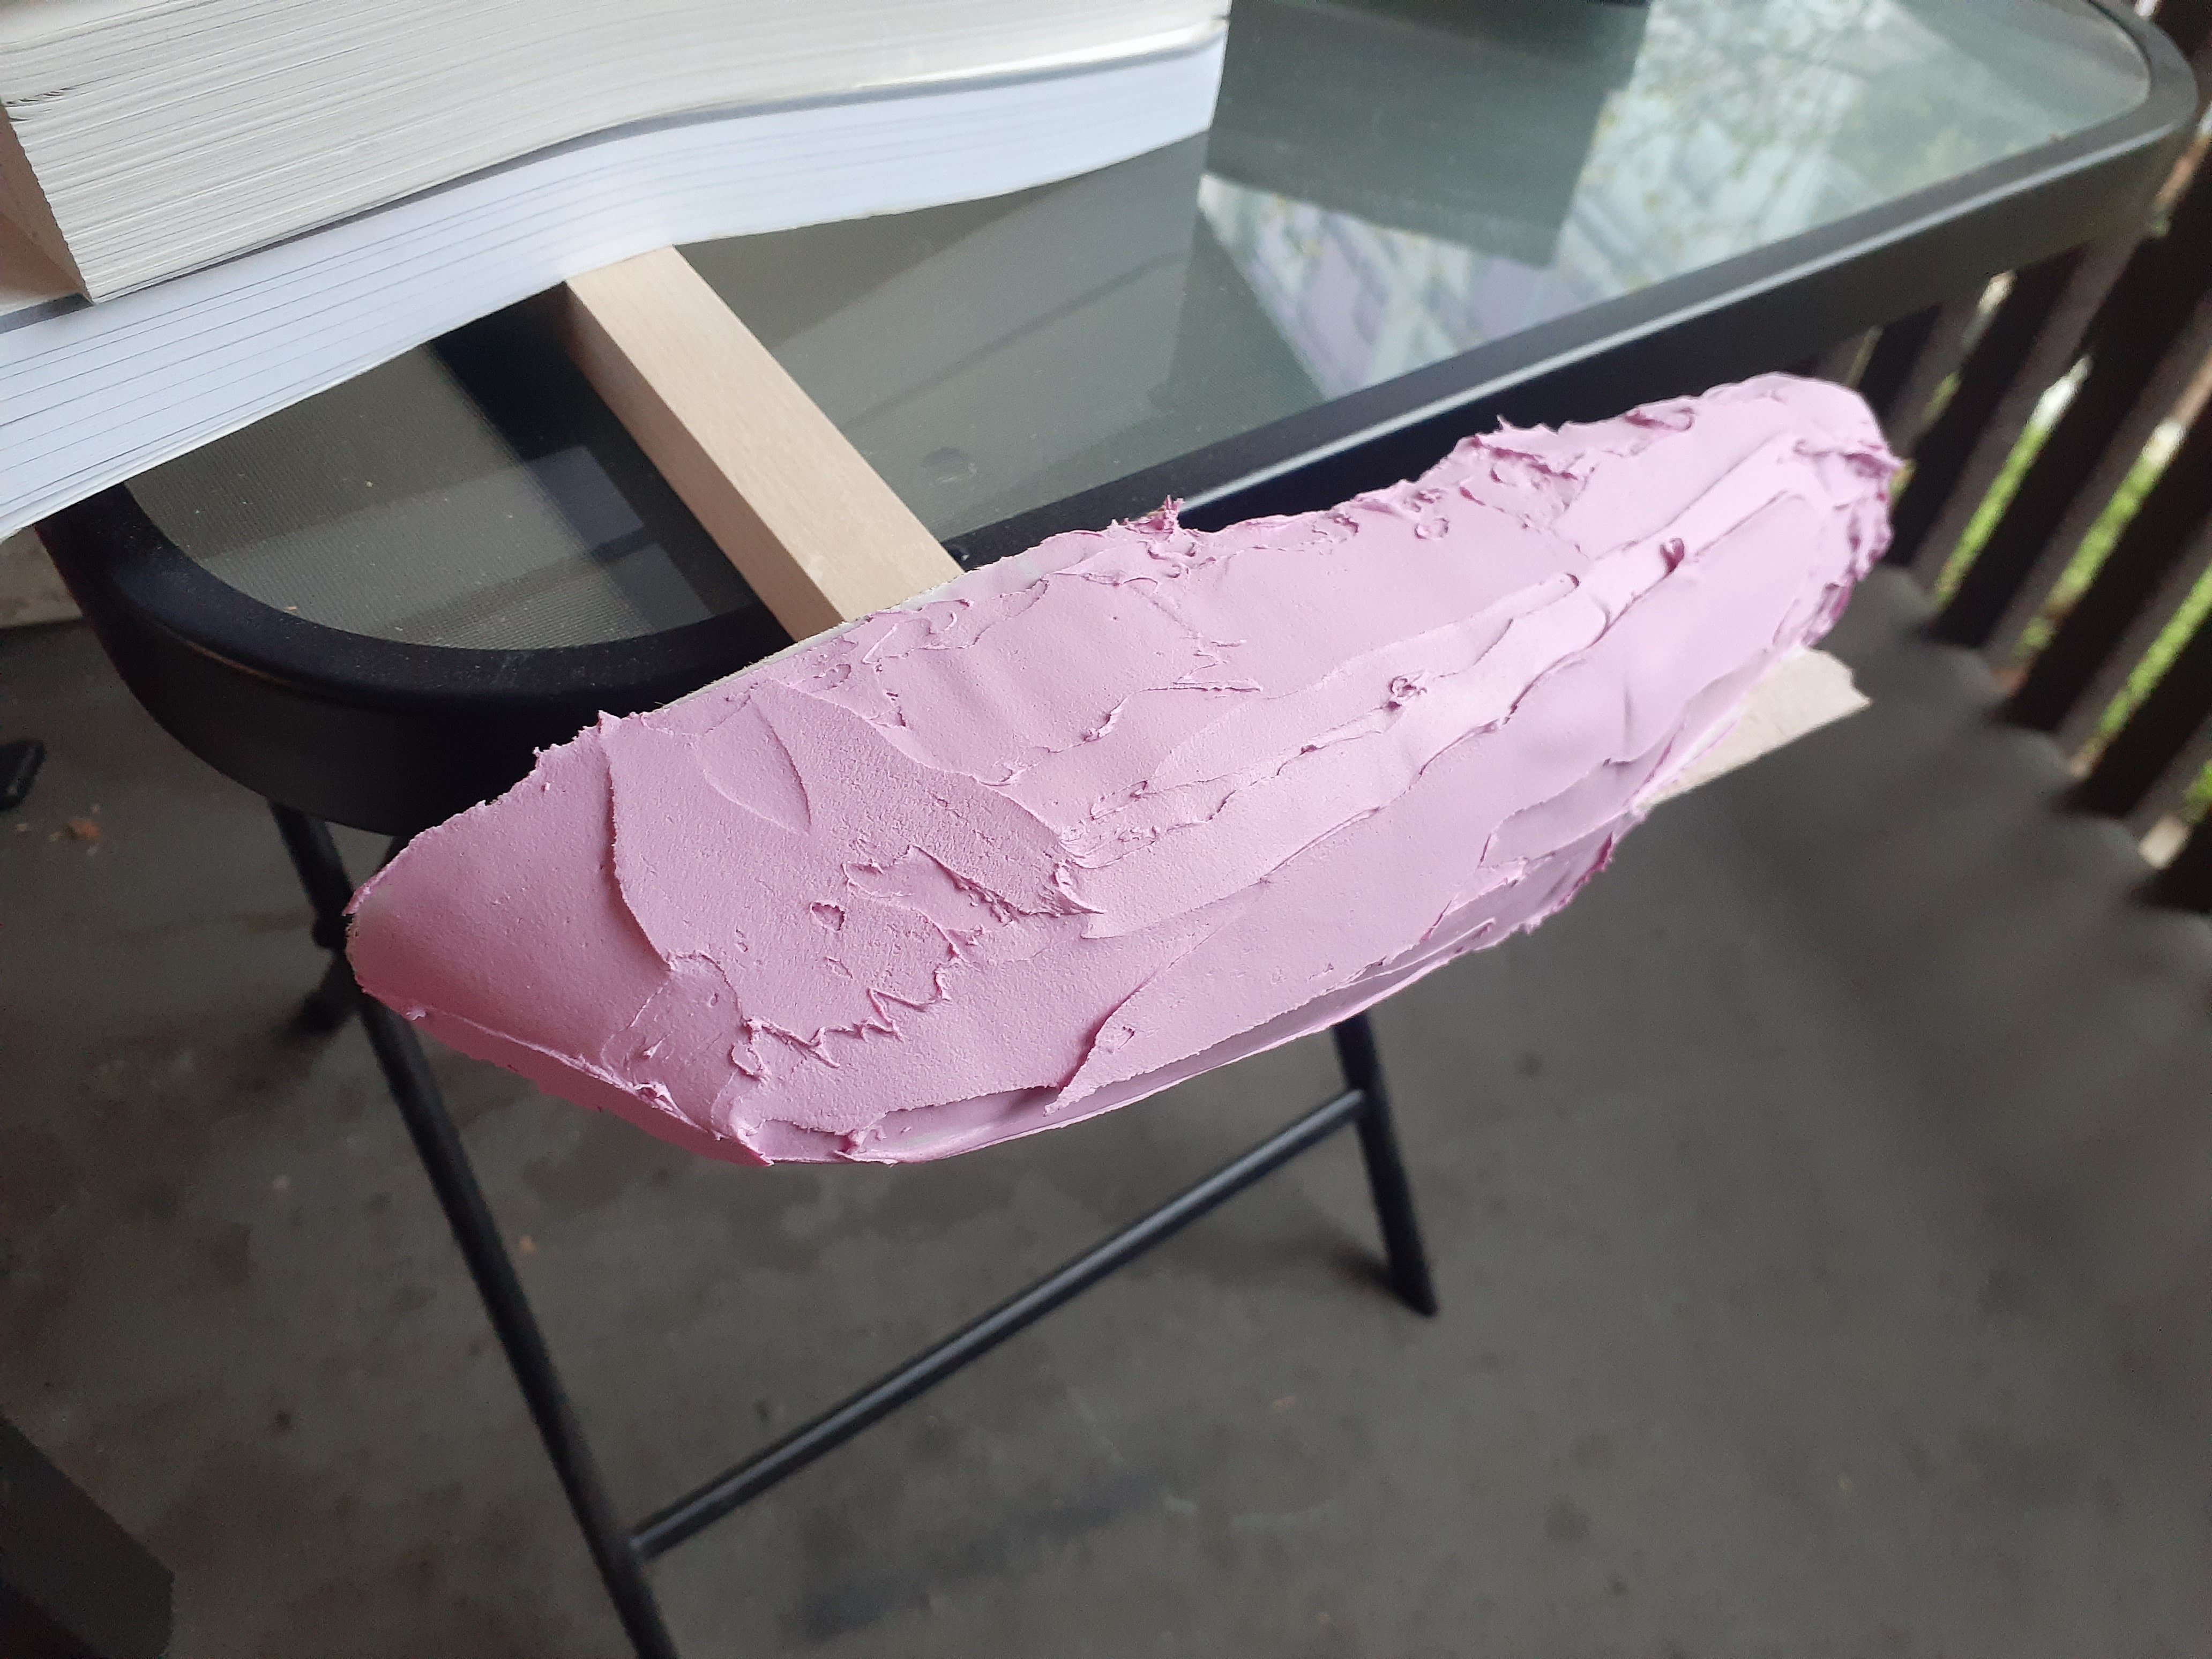
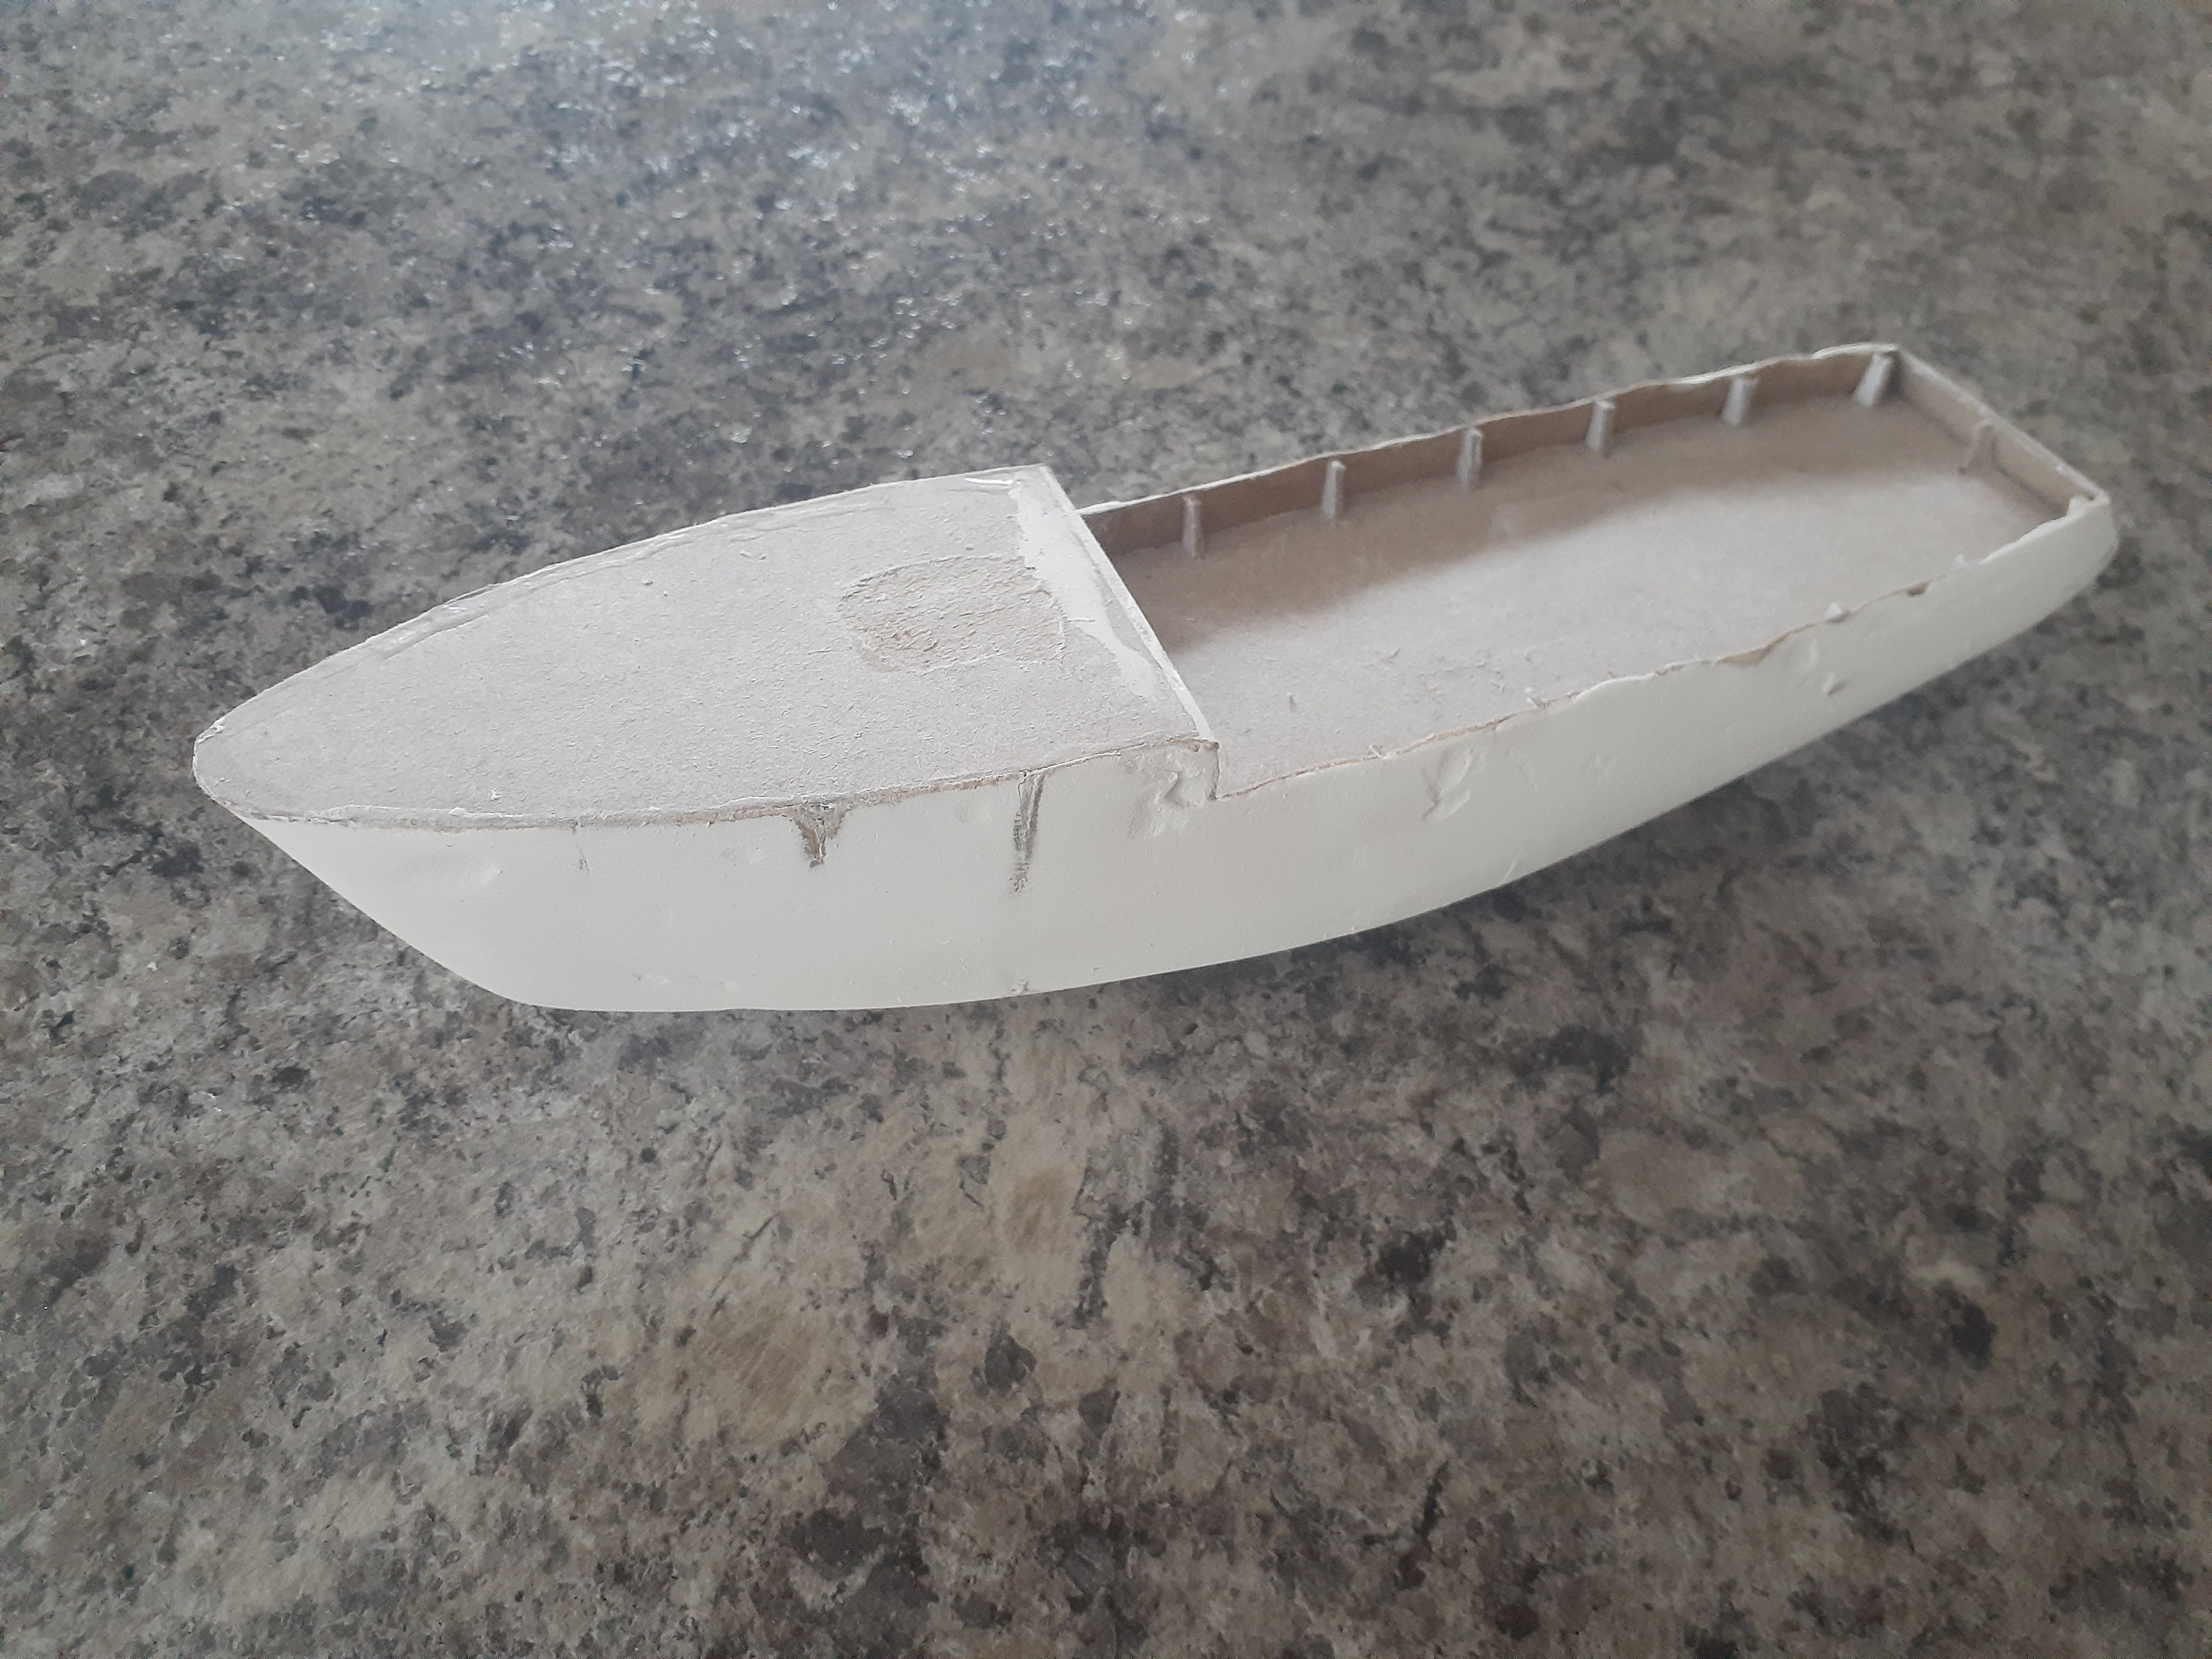
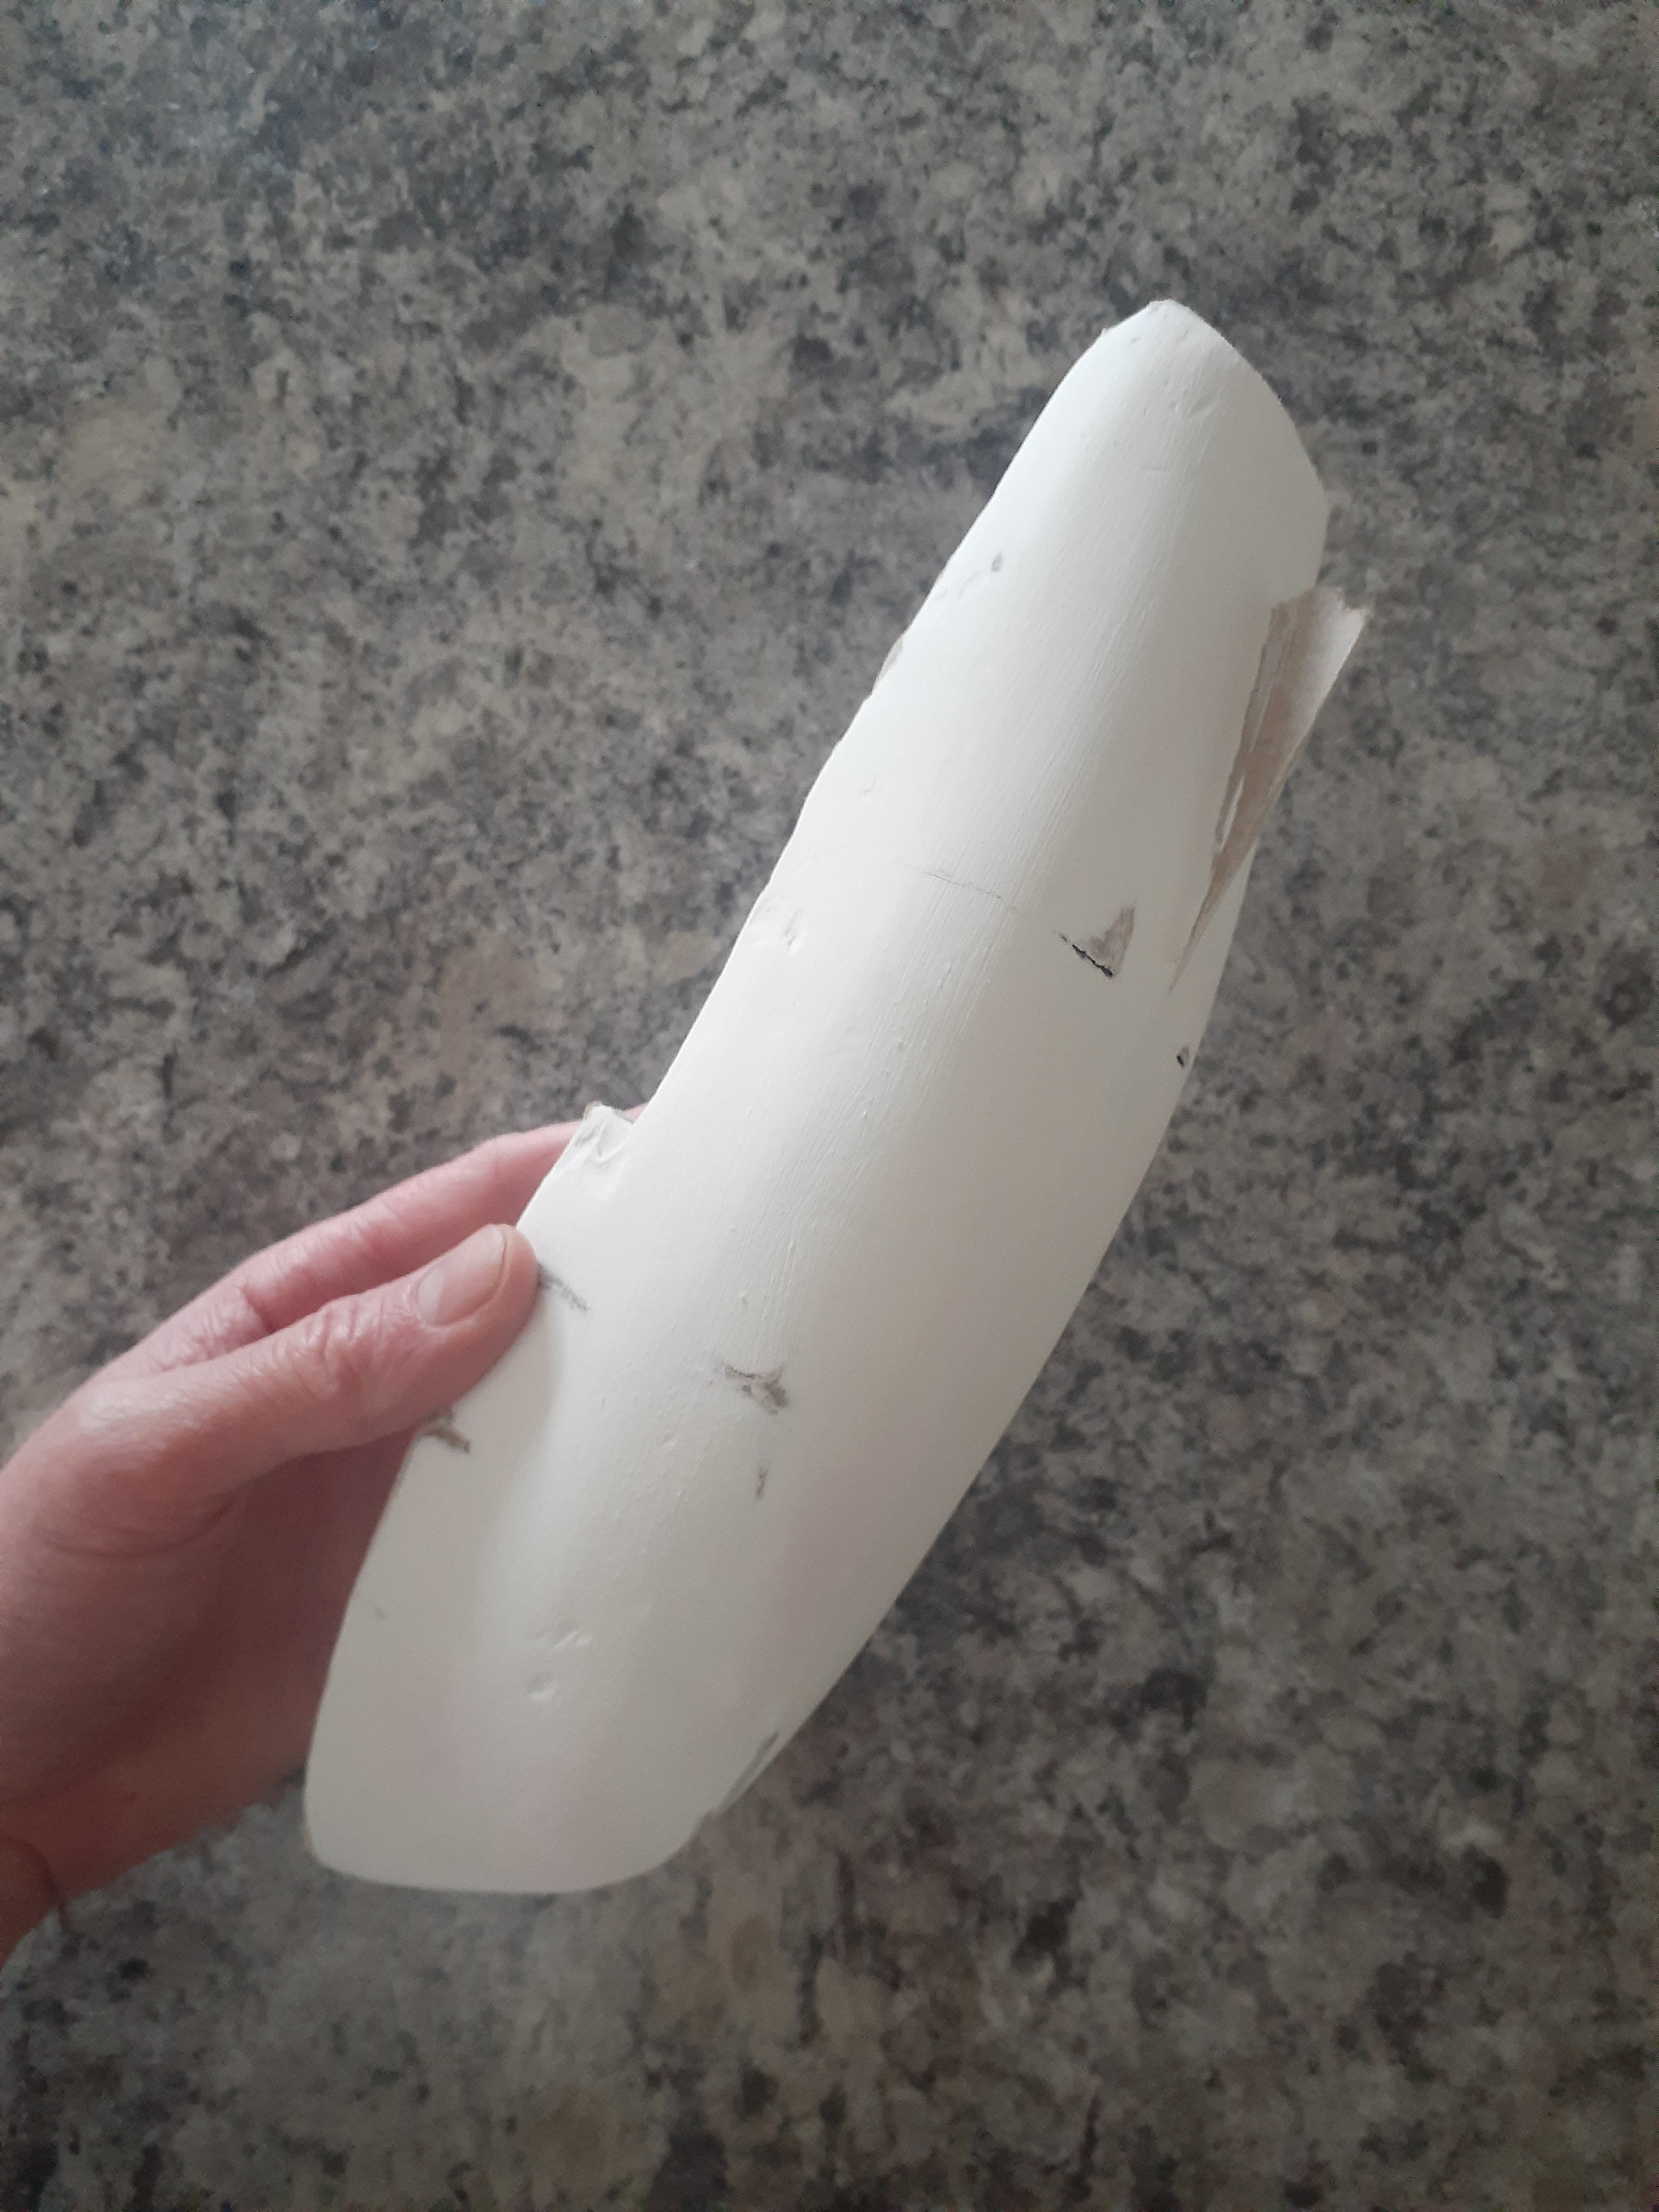
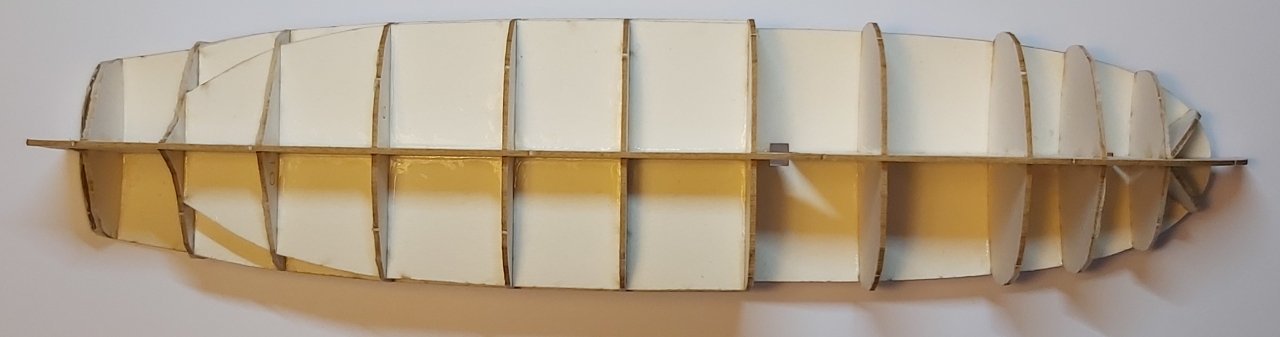
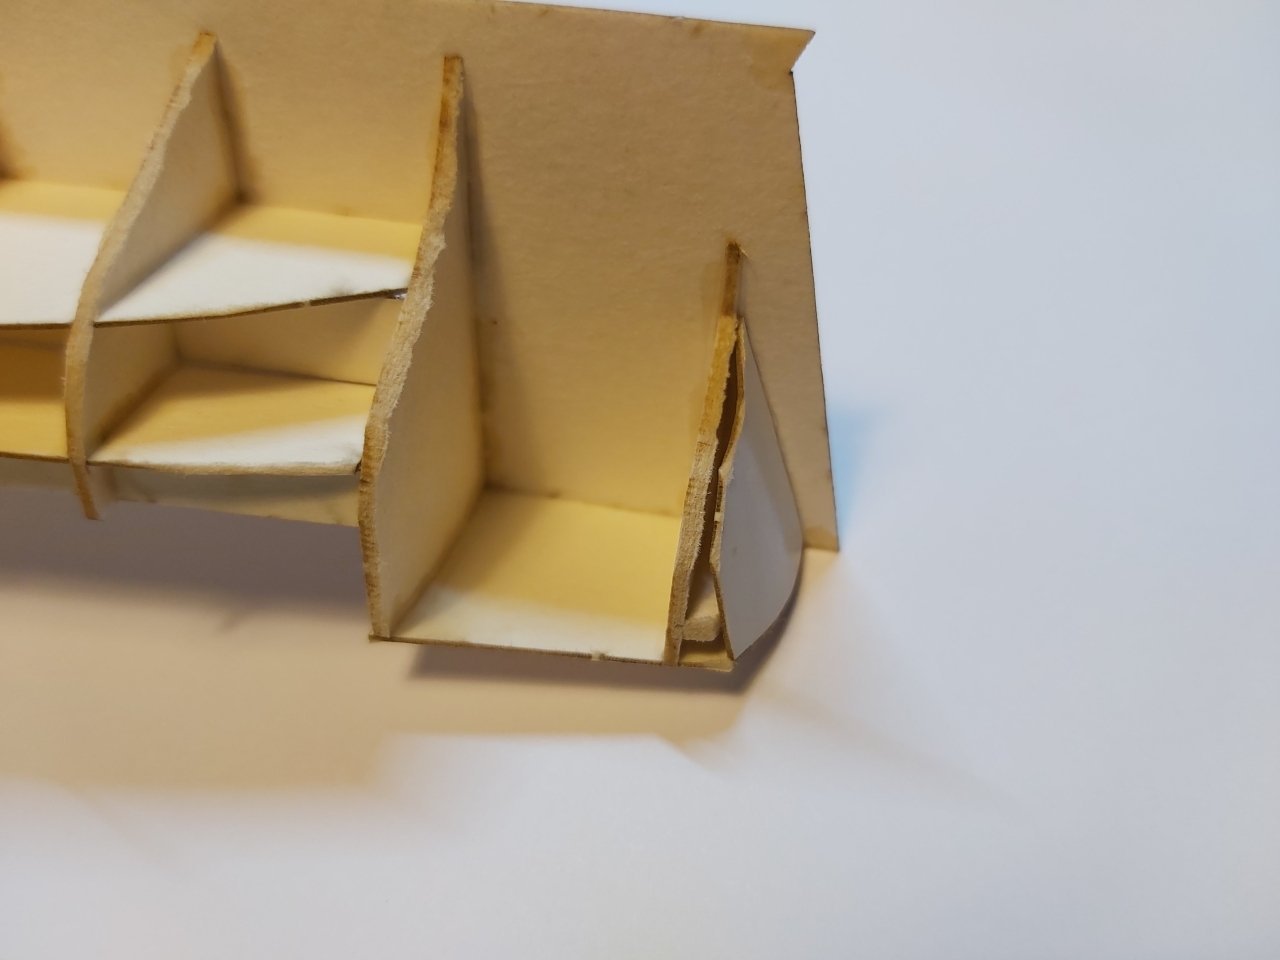
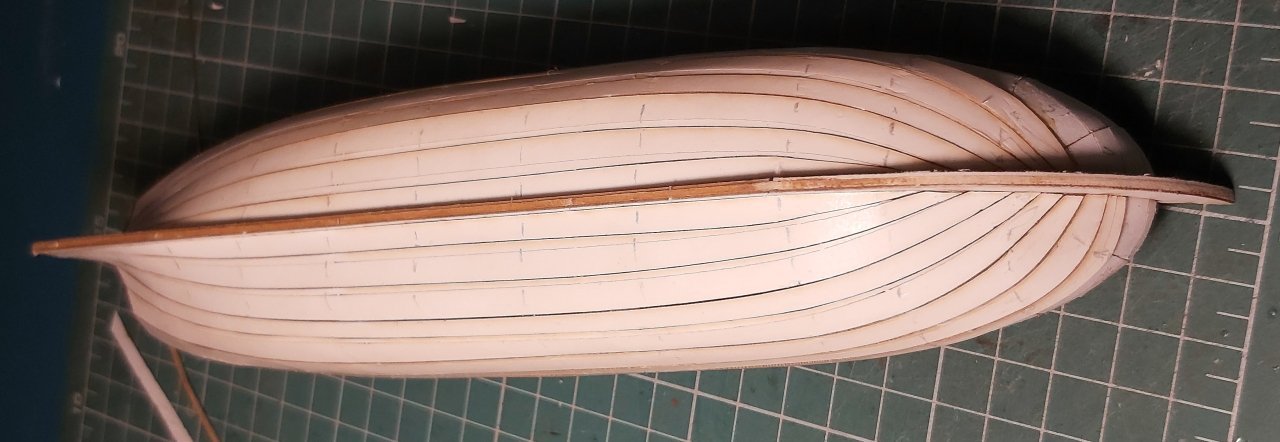
 Hello Model Ship Worlders! Having recently found some more free time in my schedule, I thought it might be time to start a new hobby. Being inspired by the impressive work of GrandpaPhil and Ab Hoving, I have decided to undertake a card model build. My aim isn't necessarily to create a perfect scale replica, but simply to learn more about ship modeling, have some fun and make something I'm proud of! I have chosen to follow some plans I found on http://www.freeshipplans.com for a Soviet shrimp trawler named "Krevetka". I have found very minimal information about this ship online, and only one photo. However, the simple hullform serves my purpose well, and the deck fittings should be an interesting kitbashing challenge! I've been working on this project for a few weeks so far. Here is the progress so far... Plans printed and backed with cereal boxes. As you can see, I mistakenly sliced off part of the keel... This was fixed when I double layered the cardboard. Crisis averted. First dry fit of the model! after this is when I decided to double the cardboard layers, as it wasn't as stiff as I liked. Gluing up the frame and bulkheads! I was going to reinforce the bulkheads with popsicle sticks, like on BH5, but decided it wasn't worth it and just laid the glue on in thick fillets. The plating process. I used thin cardstock instead of wood pulp board, as I couldn't find any in local stores. This seemed to work okay. However, by this stage I had made a few mistakes. My cuts for the frames and bulkheads weren't perfect, and I forgot to fair that out before I started plating, leaving some pretty pronounced ridges and bumps. In addition, my bulkheads weren't thick enough to glue the planks down properly, so I had to overlap them, leaving more ridges. Thankfully, putty covers many sins! Before applying putty, I did some fairing. Better late than never. I went through the cardboard in some places, but nothing major. First layer of filler applied! I used the same product recommended by GrandpaPhil in some of his builds, which seems to work great. The final update for this first post! The first sanding is complete. I'm quite happy with the progress so far. I have learned some lessons but haven't had any major obstacles. However, I have some questions on how best to proceed. The ship this model is based on has a metal hull. I'm considering a few options to achieve this look, and am wondering which one those who have gone before me would recommend. 1. My first thought is to simply continue applying the spackle I have and sand it down to a high grit. I'm concerned that it won't smooth out as nicely as I want, or that it will leave pockmarks like those shown in the pictures above. This is probably the easiest option for me, and I'll probably do a second layer regardless. 2. I have seen many impressive planking examples and tutorials, and its definitely a skill I'd like to learn. However, I'm not sure this method will give me the smooth look I'm looking for. 3. I have also thought about using a different product, something like Bondo, to fill the small pockmarks and achieve a smoother finish. However, if I can just use the spackle I have, that would be preferred. I am going to continue my research and have a think about this. In the meantime, I will start the superstructure and deck fittings, also out of cereal boxes! Sorry for the long post, I tried to keep it as condensed as possible. Thanks for reading and following along! I'm looking forward to posting further updates. David


- 14 replies
-
- 10
-

-
 I previously posted a review of this model kit back on January 4 th of this year. I took numerous photos of it during the process and have decided to post this build log for it. First, I'll give you a bit of its history and details of the actual ship. While there are no confirmed records of the date and place of construction it is generally assumed to be around 1710 since there are no records of its activities prior to that date. She was a three masted frigate of approximately 200 tons, that measured 103 feet long with a beam of 24.6 feet. Originally operated as a slave ship operated by René Montaudin, a leading slave trader of Nantes, until it was sold in 1713 in Peru. She was briefly operated by the French Navy in November 1716, but was sold by them for commerce five months later in France as a slaver once again. Then in November 1717 she was captured by Edward Teach (AKA Blackbeard the pirate) near the island of Saint Vincent in the West Indies.
- 3 replies
-
- 2
-
-
- Queen Annes Revenge
- CubicFun Toys
- (and 1 more)
-
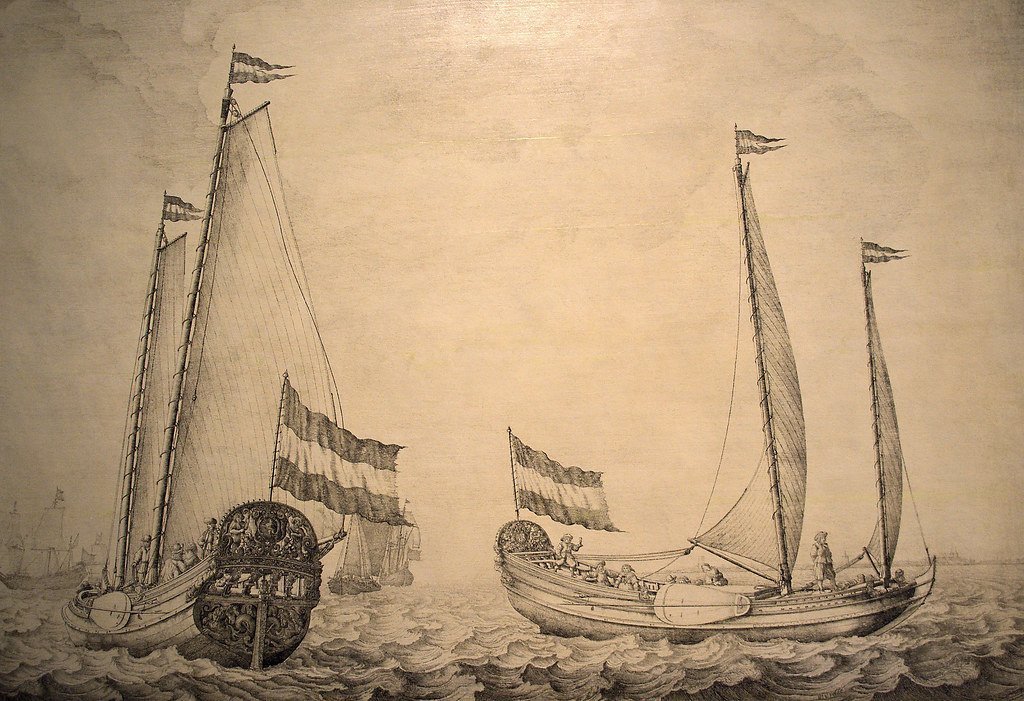
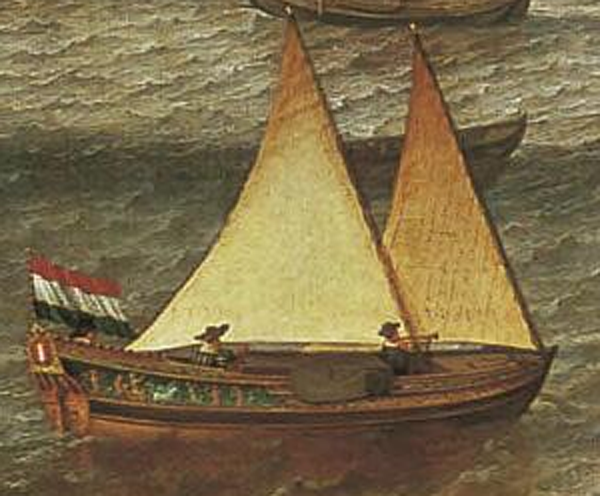
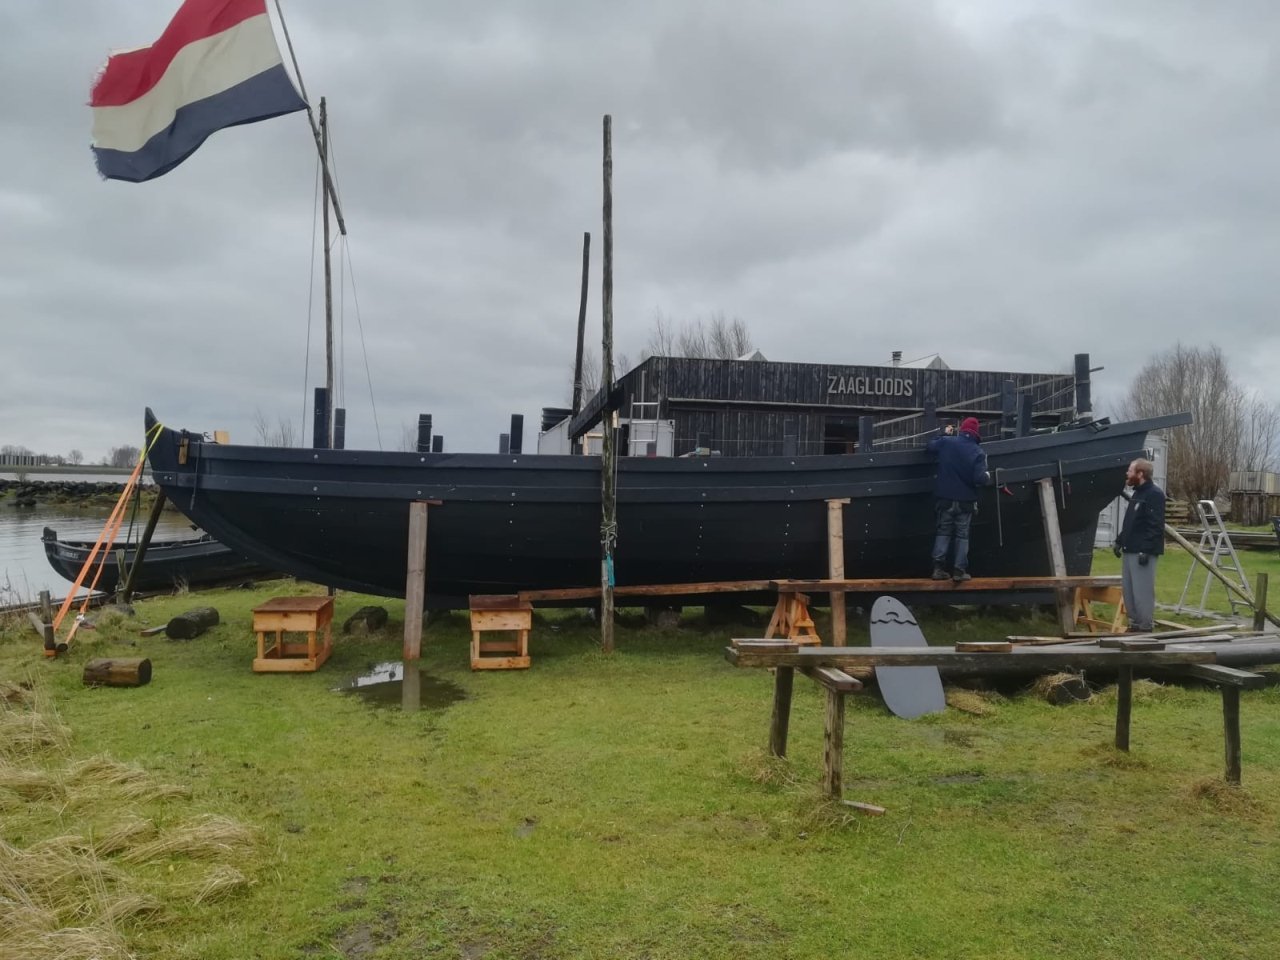
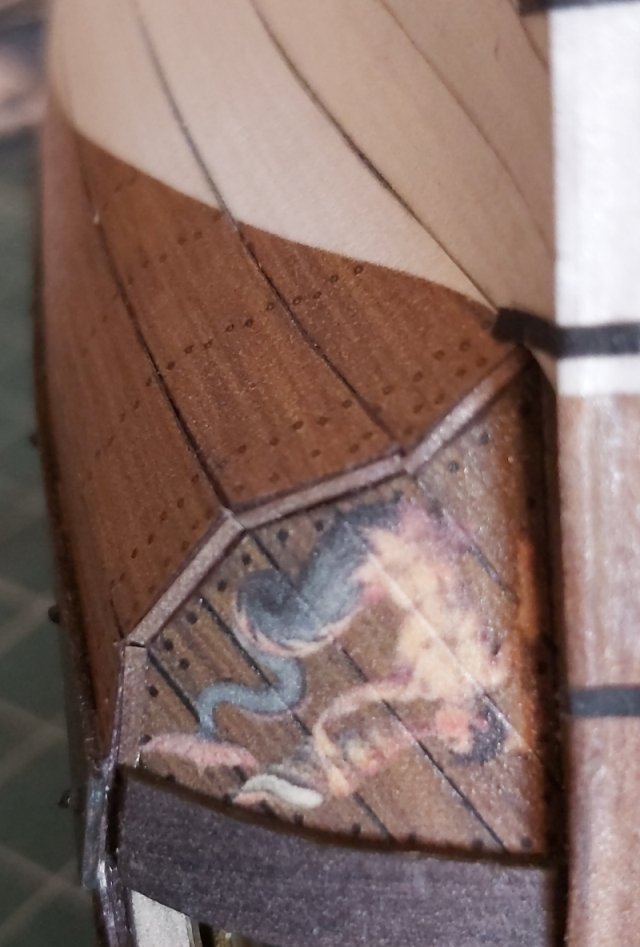
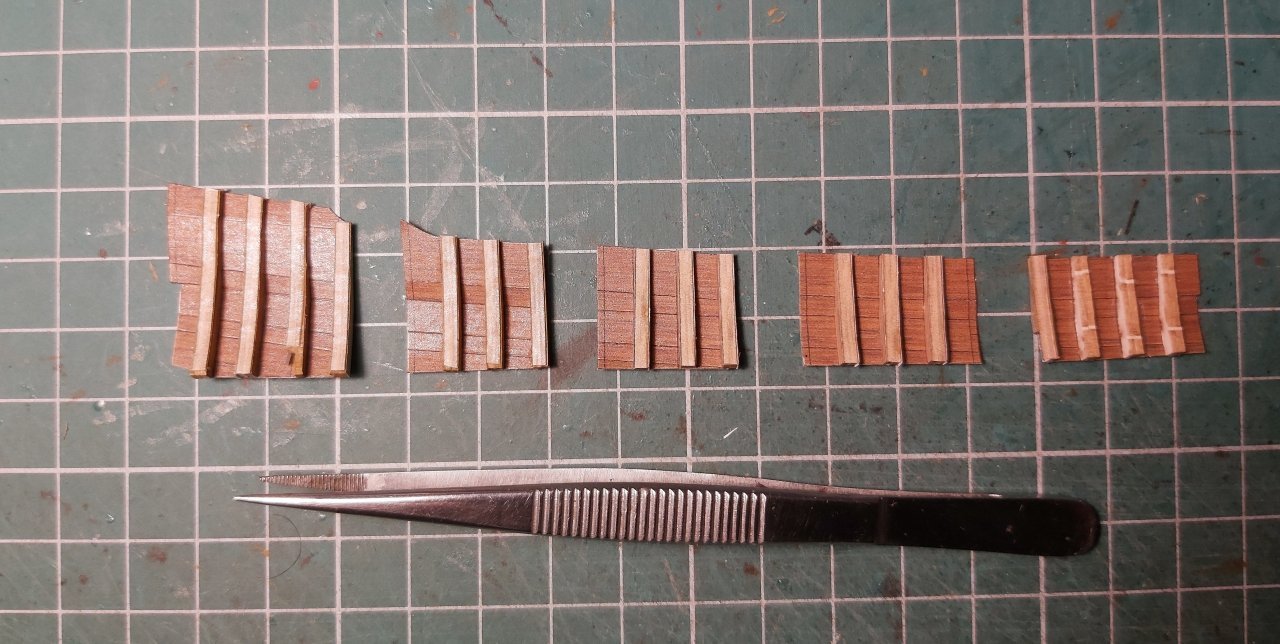
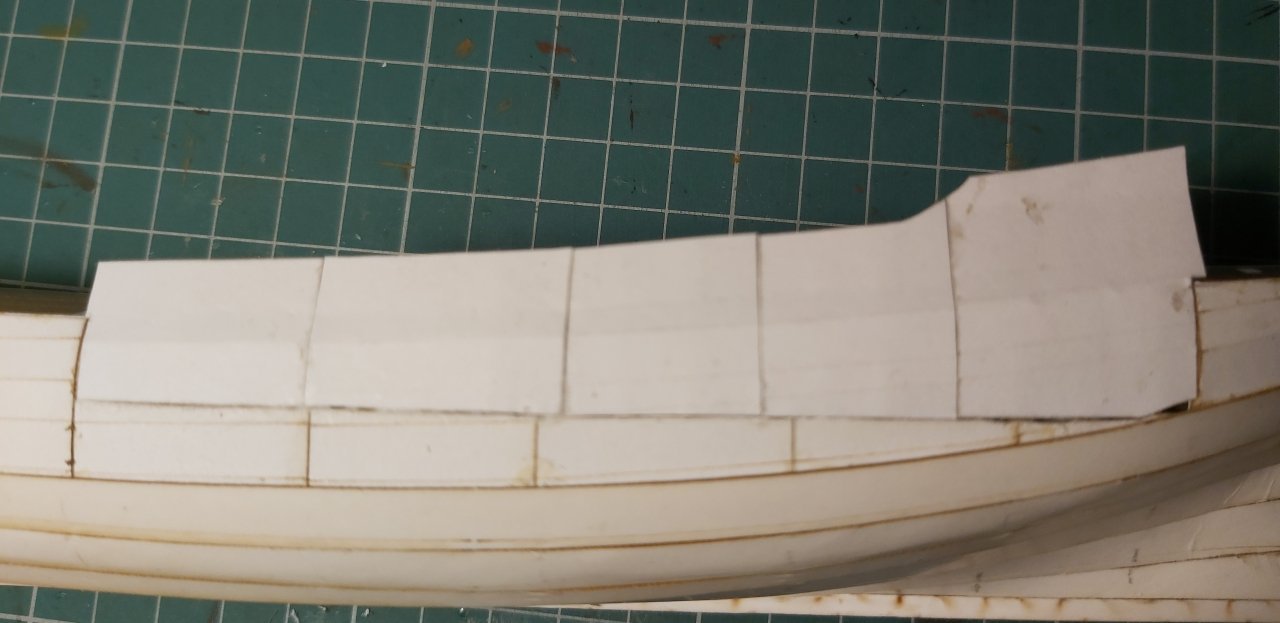
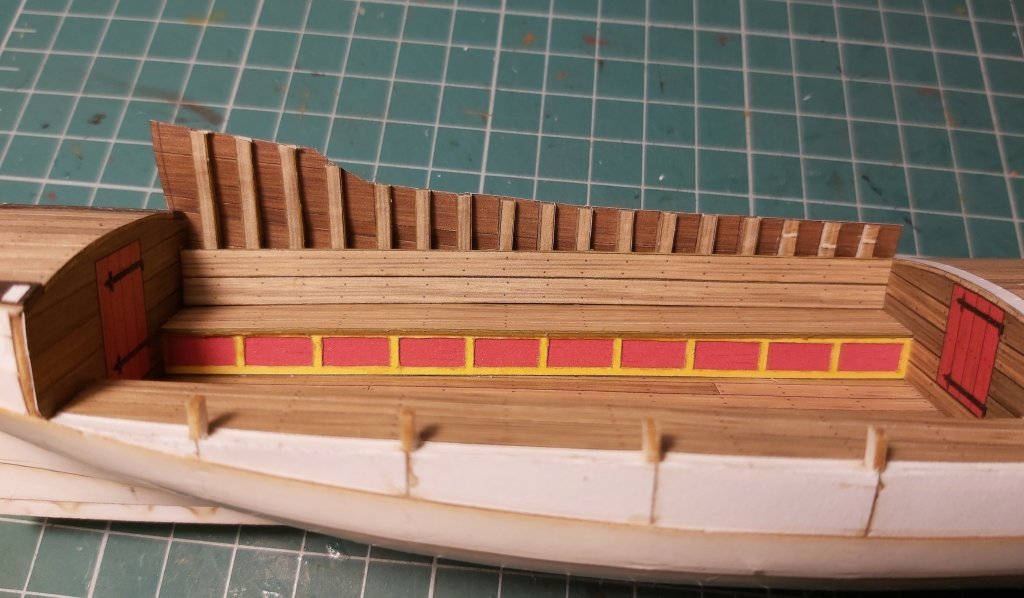
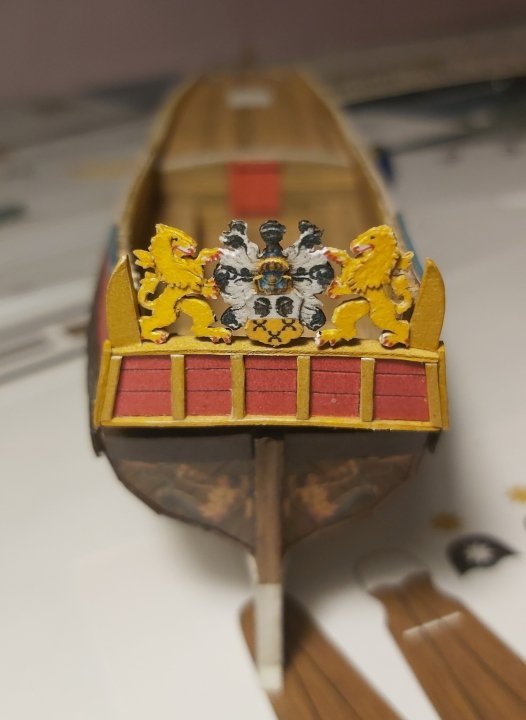
 Hello colleagues Many modeler friends said to me that it would be nice to assemble a cardboard sailing ship, but rigging is generally too difficult. Therefore, a few years ago I asked Ab Hoving for an idea for a simple model with the simplest possible rigging, and I didn't have to wait long (2-3 hours) when a precise and immediately three-dimensional design of a "recreational yacht" appeared on my computer. ", i.e. "Speeljacht". This design is very similar to the commercially available plans drawn by Cor Emke. [url]https://www.modelbouwtekeningen.nl/nvm-1006017-speeljacht-volgens-nicolaas-witsen-167.html[/url] Recreation on the water was probably not an invention of the Dutch, because in the tomb of Tutankhamun an image of the pharaoh fishing on the Nile was found, which can be considered entertainment on the water. However, until the 17th century, sailing ships of various types fulfilled basically only commercial and war functions or were used for work, such as fishing. It was only when the trade in Asia enabled merchants to build great fortunes that yachts for entertainment appeared. Maybe it was then that "yachting" appeared as a way of spending time with family, friends or for business purposes. Not only did people relax by sailing for pleasure, but such expeditions were accompanied by delicious feasts, including plenty of drinks. Nicolaes Witsen even mentions a "beer house" under the aft deck. In addition to romantic trips, owning such a yacht meant prestige and/or wealth - a bit like modern billionaires and oligarchs. The decorations were chic, but not flashy. The Netherlands was a Calvinist country, so one had to be modest. There was usually a family coat of arms on the stern. A similar model was developed in wood by Kalderstock. And for the inquisitive and curious: the Clean2Anywhere Foundation has been experimentally recycling plastic for several years, building replicas of small historical yachts from it, including this speel yacht. Link to one of the videos where you can see the construction of a speel yacht: [url]https://www.youtube.com/watch?v=eqrIHFulcZU&t=3s[/url] And how is my construction going? So quick and easy that I didn't take many photos, especially obvious stages like frame frames,... ...or "first - false planking" The retouched cardboard edges of decks has always "disgusted" me, so I experimented a bit and glued narrow strips on the visible edges, imitating the face of the boards. The stripe is 0.7 mm, my hand trembled a bit and it didn't turn out perfect, but I think it's a very good idea for the future. Since masking the edges like this has a future, I went ahead and played with the edges of the planks at the stern. There is also something to complain about, but that's my fault - I liked the idea itself. A large number of visible frames required tedious gluing and retouching, and initially I planned to glue them to the hull first and then continue covering them with the planks. Fortunately, before I started committing such stupidity, I changed my concept and built this component separately, finally gluing the finished one to the model. In total, in four stages: 2 amidships and 2 aft. The last layer of planks (in color) went very well, and of course the corrections were made on the edges that are covered with wales. This is how it turned out: Modest decorations (as I wrote at the beginning) will only be made of cardboard (no resin), so that the model is fully paper as standard. It was necessary to choose the coat of arms of some noble family. The final choice fell on the van Loon family, also because their "palace" still houses a popular museum.([url]https://www.museumvanloon.nl[/url]) That's it for now, only decorations, leeboards and very simple rigging remain. Regards Tomek
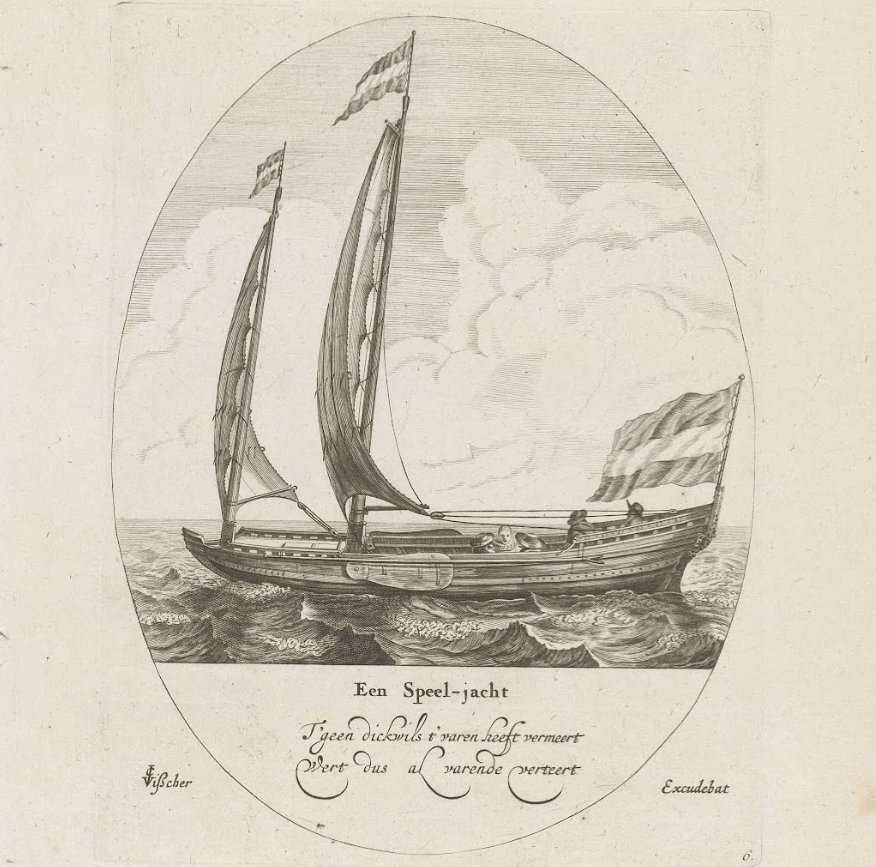


-
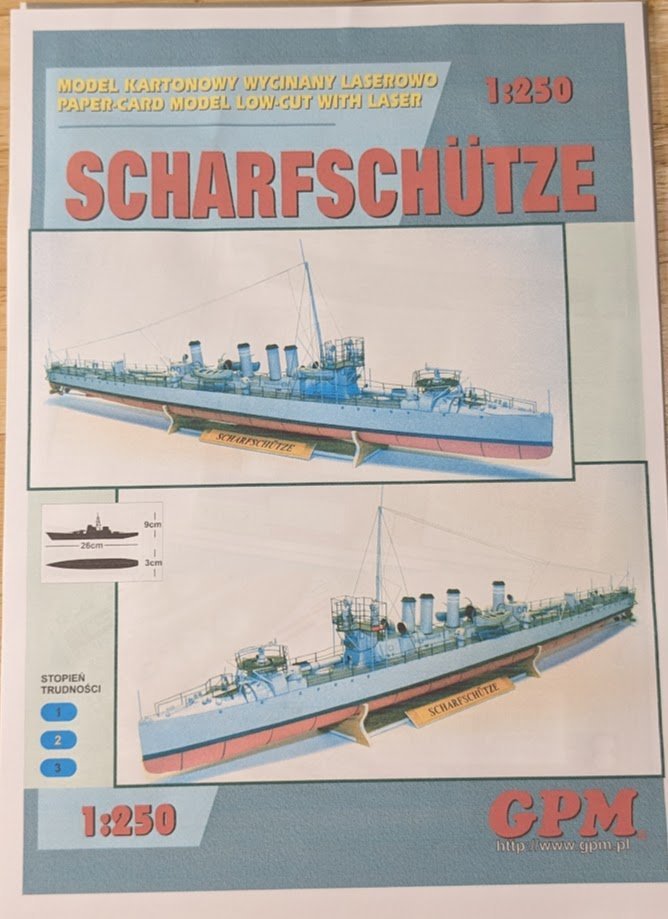
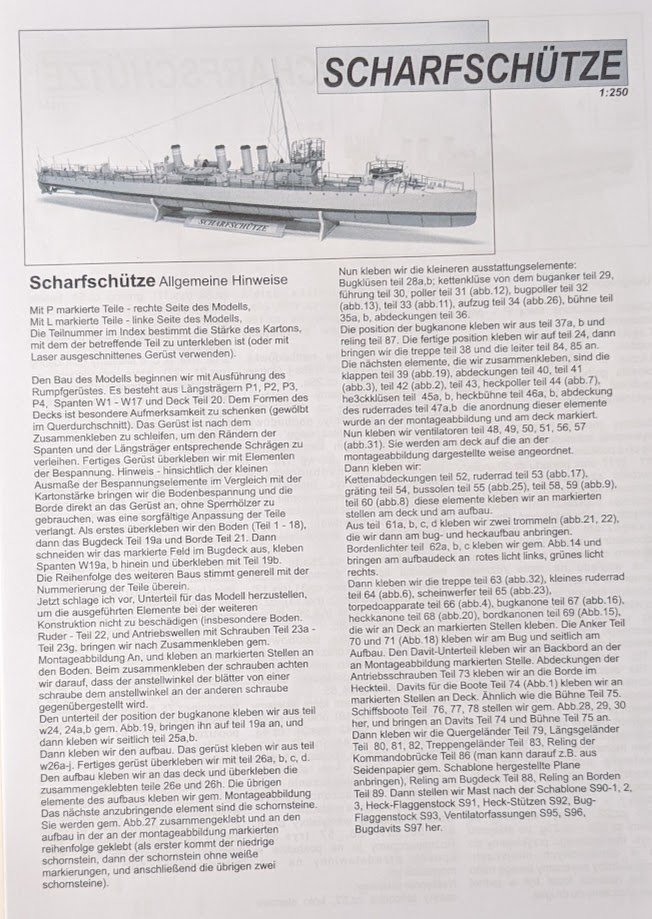
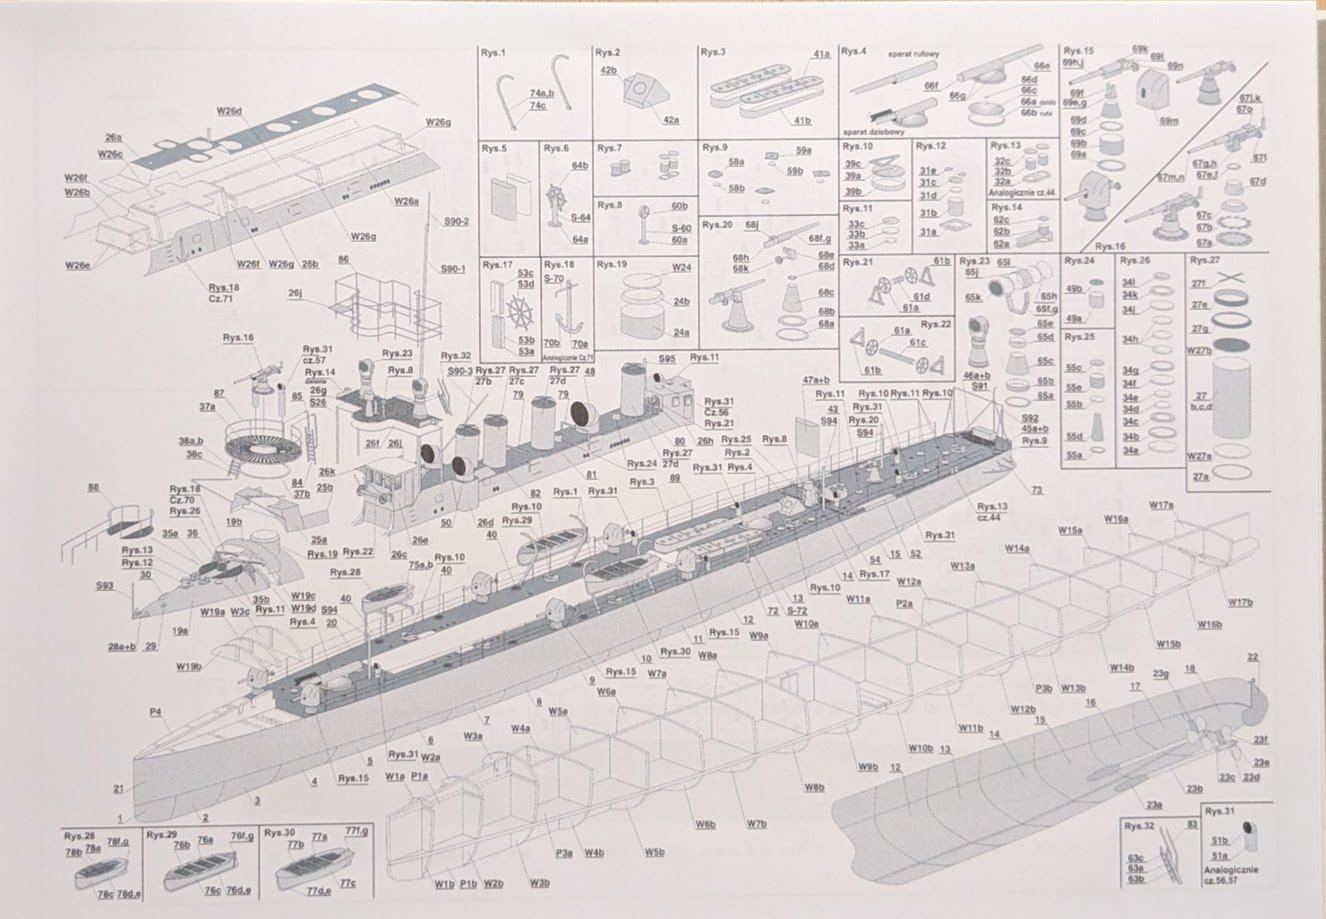
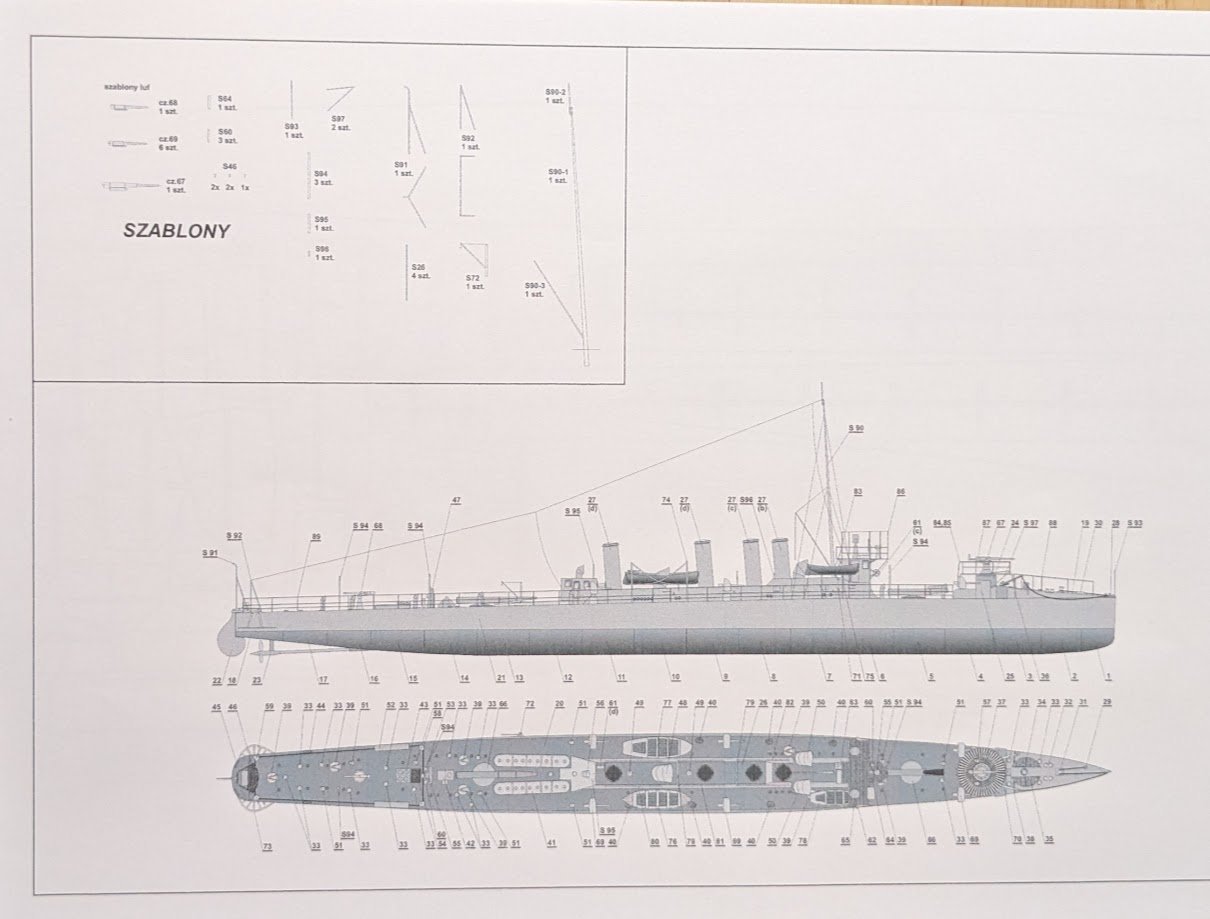
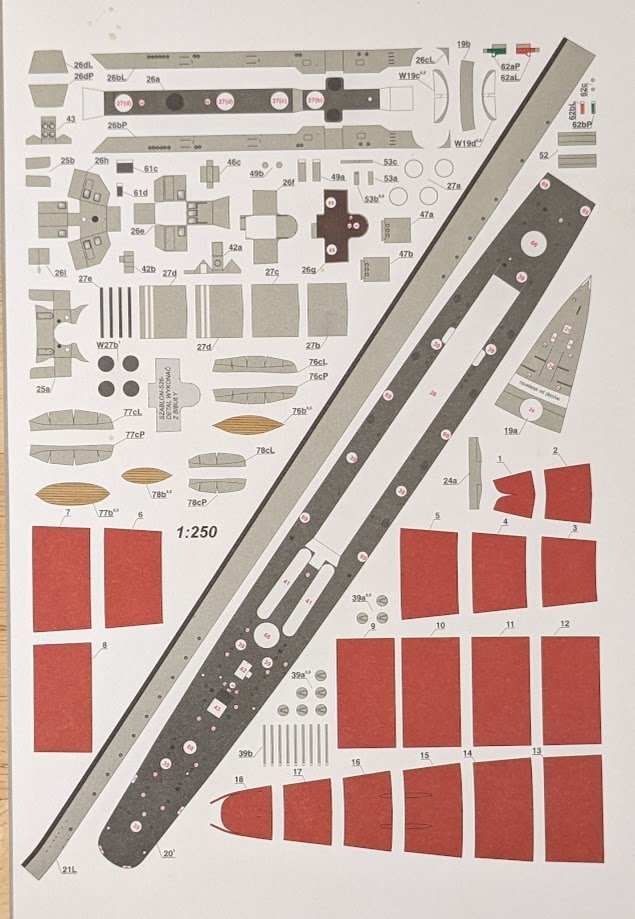
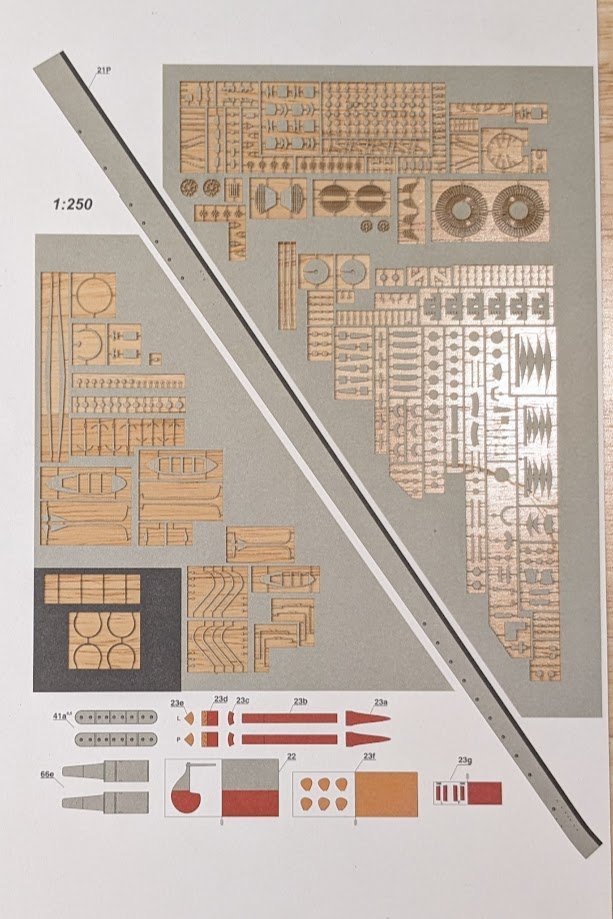
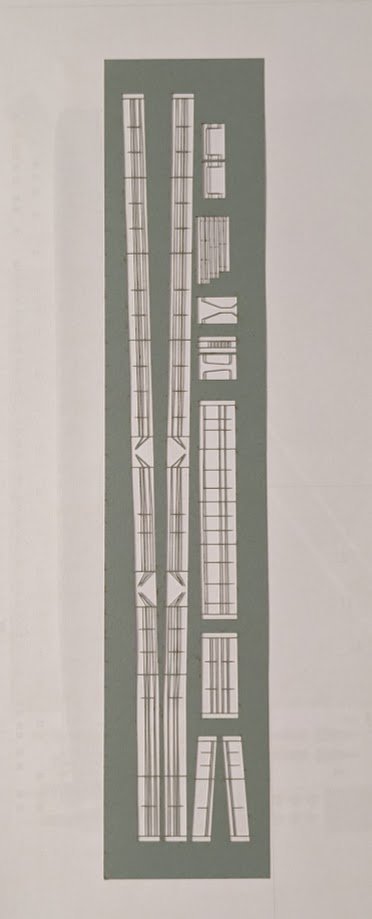
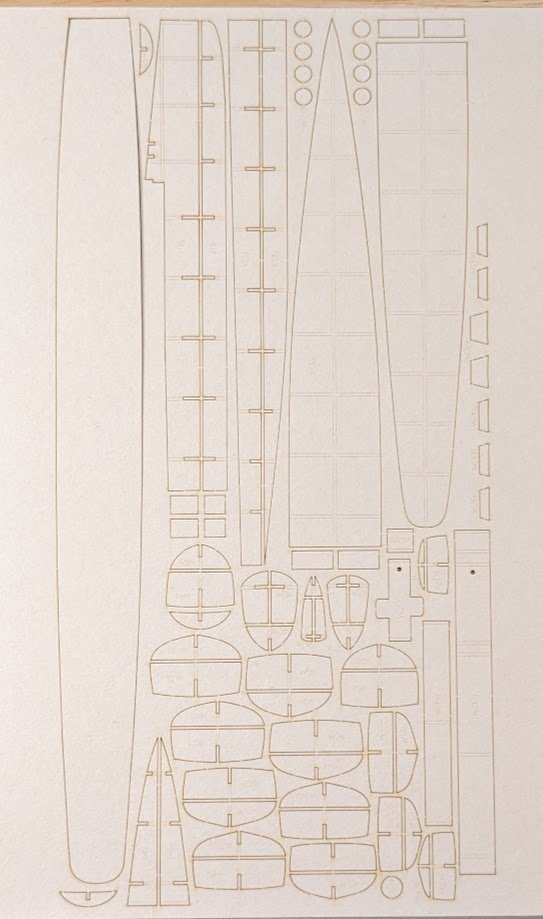
SMS Scharfschütze 1/250 available from GPM Hi, Gang! This will be a sort of quick-and-dirty review, since the kit is not a new release. Whenever I order stuff from Poland, I like to order the most stuff I can get for a particular shipping cost -- if I'm going to get a few items, I might as well get the most for my shipping buck. My most recent order from the Polish firm of GPM arrived today, consisting mostly of after-market canopies and wheels, but I was able to squeeze in a new card model as well. This one is SMS Scharfschütze (Sharpshooter), one of twelve Huszar-class destroyers built for the pre-WW1 Austro-Hungarian navy. The kit has been out for roughly a decade (there is no release date on the cover sheet), so I'm a little lucky that one was still available all these years later. It is available in either 1/200 or 1/250 scale. I chose 1/250, since pretty much all of my other card ship kits are in that scale. At that scale, the finished model will be 26 cm long -- a little more than ten inches. The kit has a number of interesting features. One is that it doesn't come in the usual booklet form, but instead is printed on individual sheets. A second unusual feature is that the designer's name is not given anywhere. However, the kit and its diagrams look remarkably similar in style to the V108 kit which served as the basis for the tutorial I posted in the card models section. That makes me suspect that Digital Navy's Roman Deytna may have designed the kit. Perhaps one of our august members can confirm that for me. One bit of good news with this kit is that it doesn't just come with Polish instructions. The bad news is that the only other language is German. I read German, so that's great for me, but perhaps not so great for the rest of you. Fear not, though, since the kit does include a sufficient number of diagrams to guide the builder to a finished model. Also, the model is not overly complex -- I think that anyone who has built V108 or any similarly simple kit, such as the ones available from Paper Shipwright, will be able to build this kit without too much difficulty. There are only two pages of printed parts, so the total parts count is low. Optional parts allow for the model to be built in either a full-hull or waterline configuration. The print quality is good. Here's where it gets a little more interesting. The kit is a "limited edition" offering -- a kind of deluxe kit that includes both laser-cut details and a laser-cut frames set. It costs only US$13.64, so it's a pretty darn good deal. One of the two pages of parts is laser-cut, which will save a lot of fiddly cutting, even if the laser-cut parts give a sense of being very delicate. Whether they will prove to be delicate during construction remains to be seen. A separate key for the laser-cut parts is provided. There is a separate laser-cut fret containing railings. The frames are cut from the standard "beer mat" used in Poland. At one time, metal gun barrels were also available, but they have been out of stock for quite a while. So, that's it in a nutshell. I think this is an intriguing kit, design-wise, and it depicts a very interesting and infrequently seen subject. The price is definitely a plus. Given my fondness for small warship projects, I may have to make room in the queue for this one sooner rather than later.
-
- 7
-
-
- GPM
- Scharfschuetze
- (and 1 more)
-
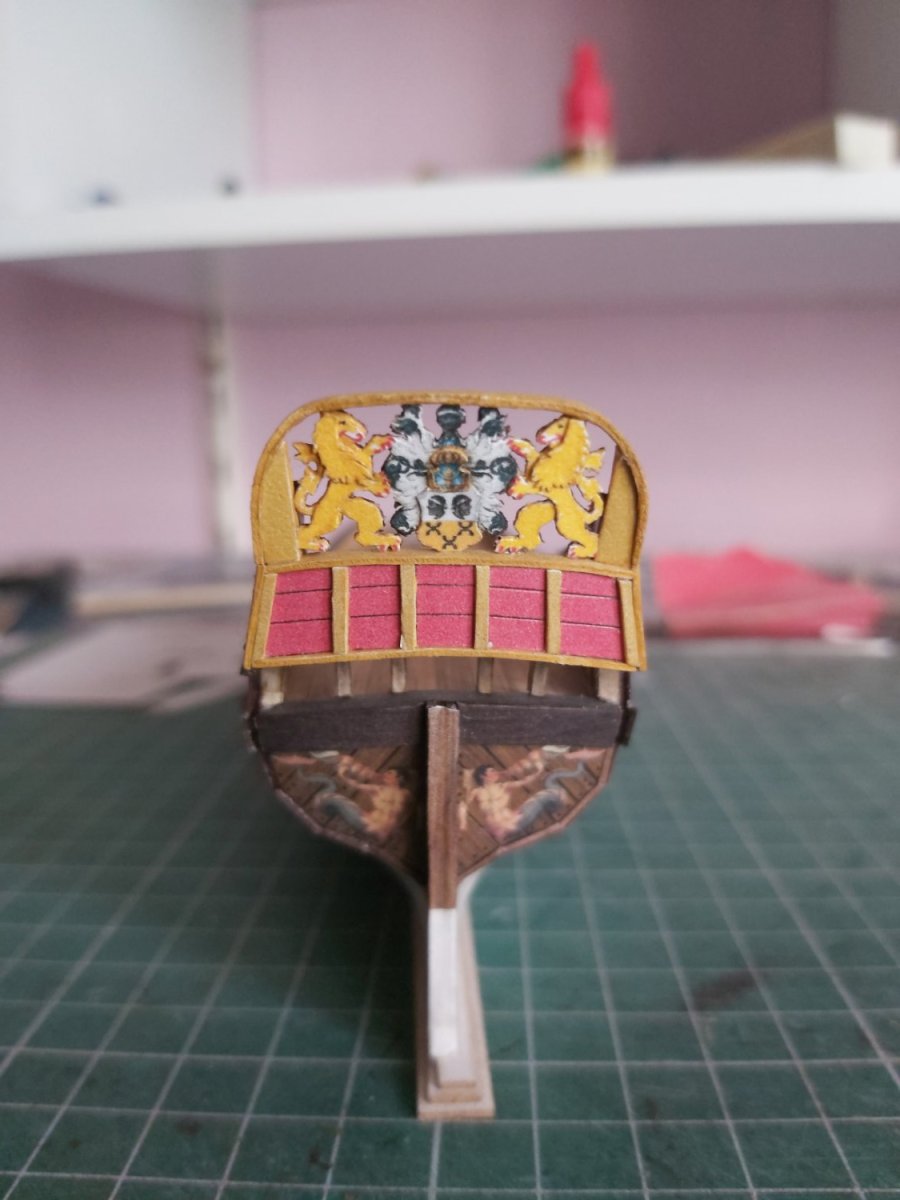
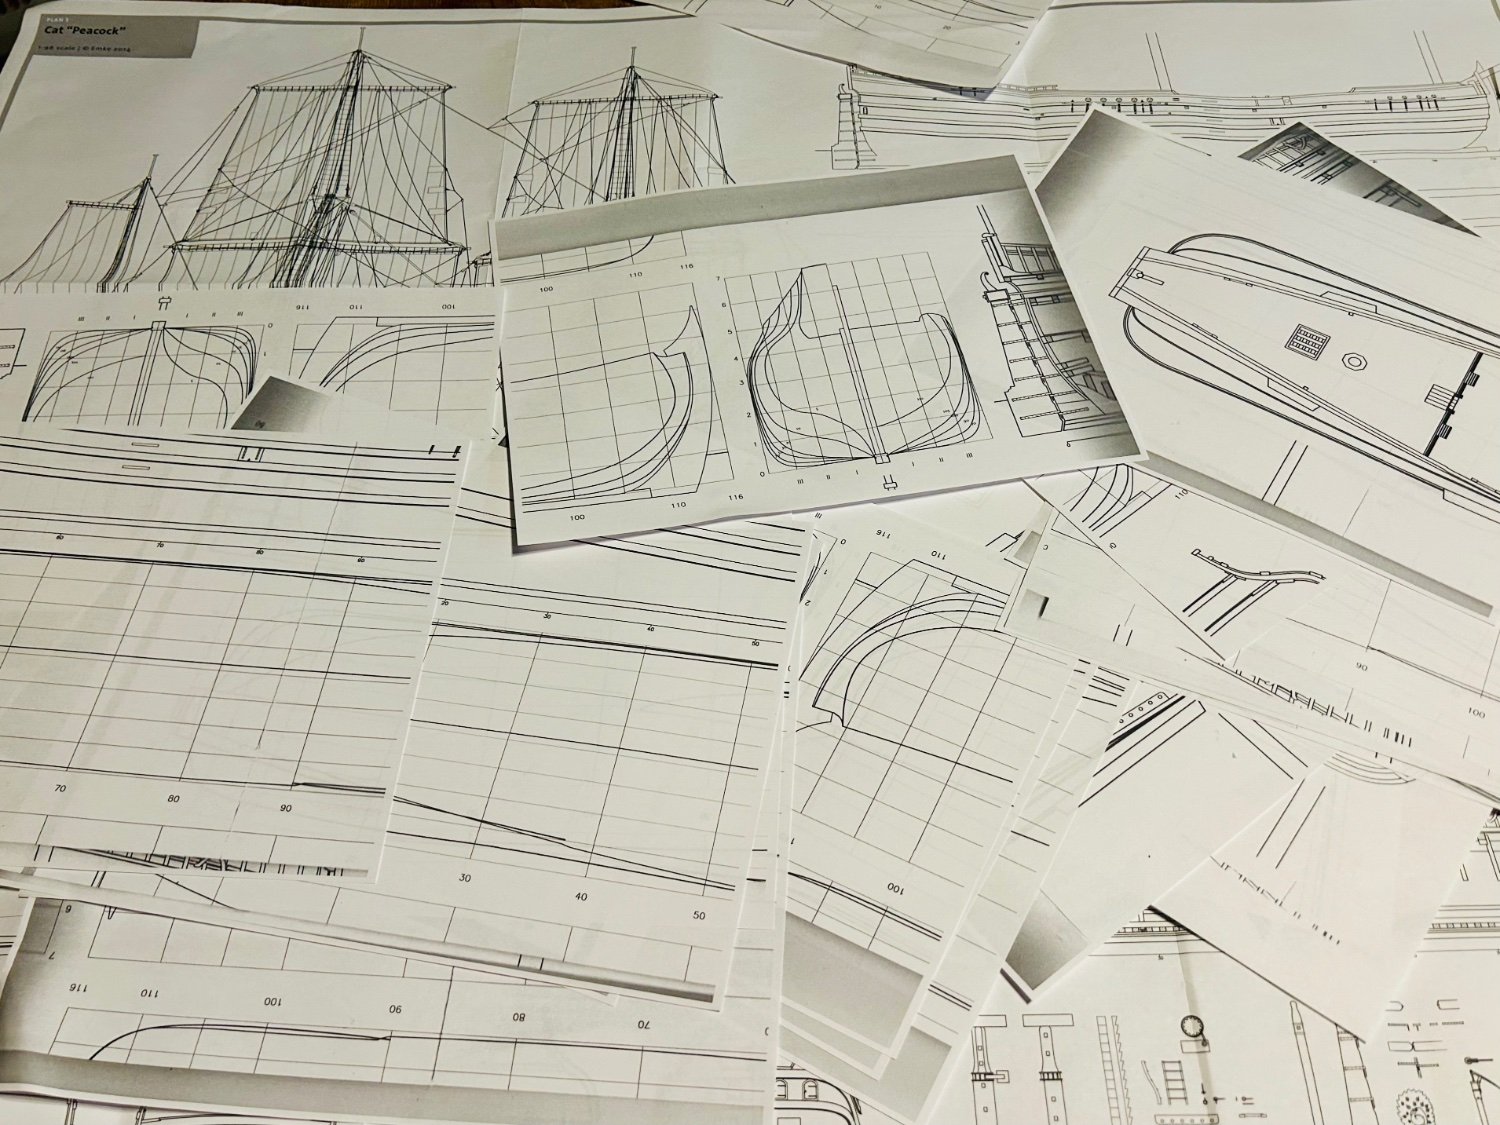
 My Admiral had me order myself Ab Hoving’s book “17th Century Dutch Merchant Ships” for Christmas this year, as part of wish list. It comes with plans for 10 different types of ships. The cat stuck out to me when I first read the book. Cats were a type of wooden trade ship that plied the Baltic Sea. They had very shallow draft and would never win a beauty contest. They kind of remind me of a 17th Century version of a Mack truck. I have taken the initial steps and scaled everything up to 1/64 scale from 1/96th scale. That random looking pile of paper will soon be the framework of a hull. I’m using a giant cardboard box that I got from something we bought as my starter material. It is corrugated, which is a nuisance to cut, but it works quite well.
-

kit review SMS Sleipner by Hamburger Modellbaubogen Verlag
ccoyle posted a topic in REVIEWS: Model kits
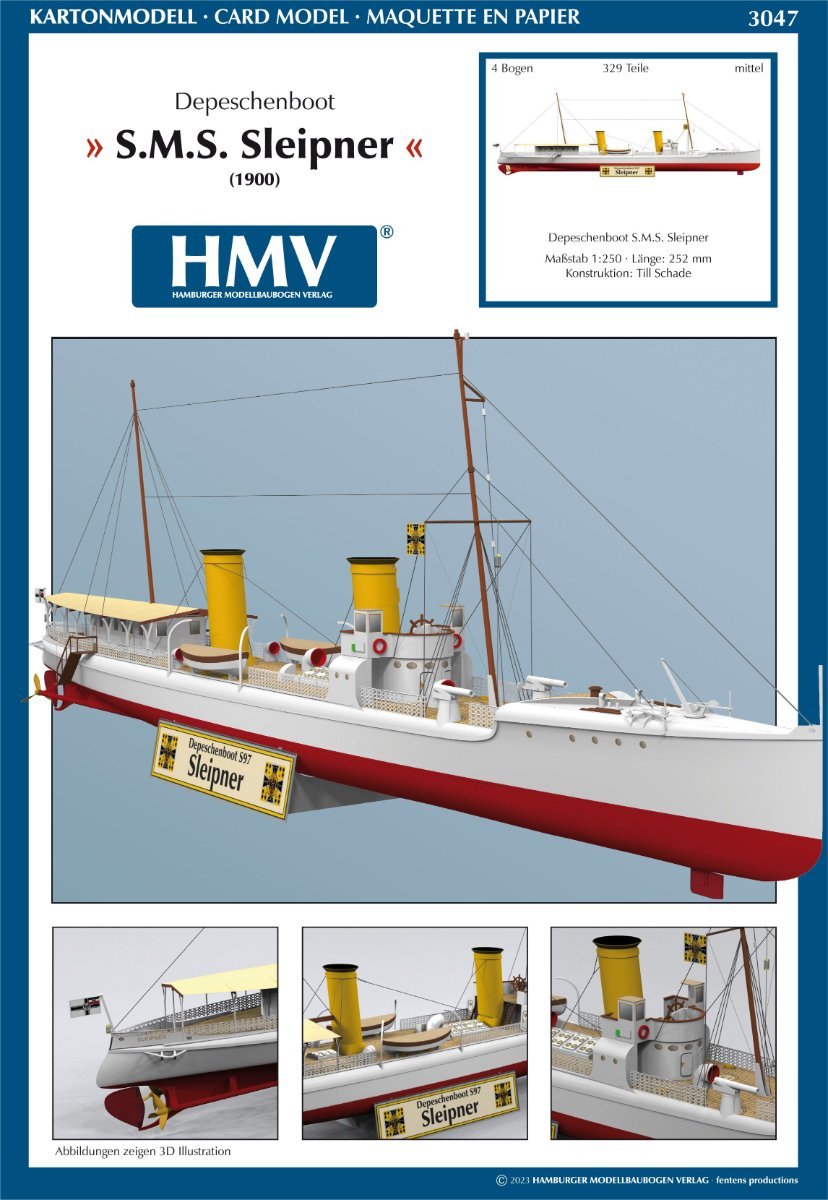
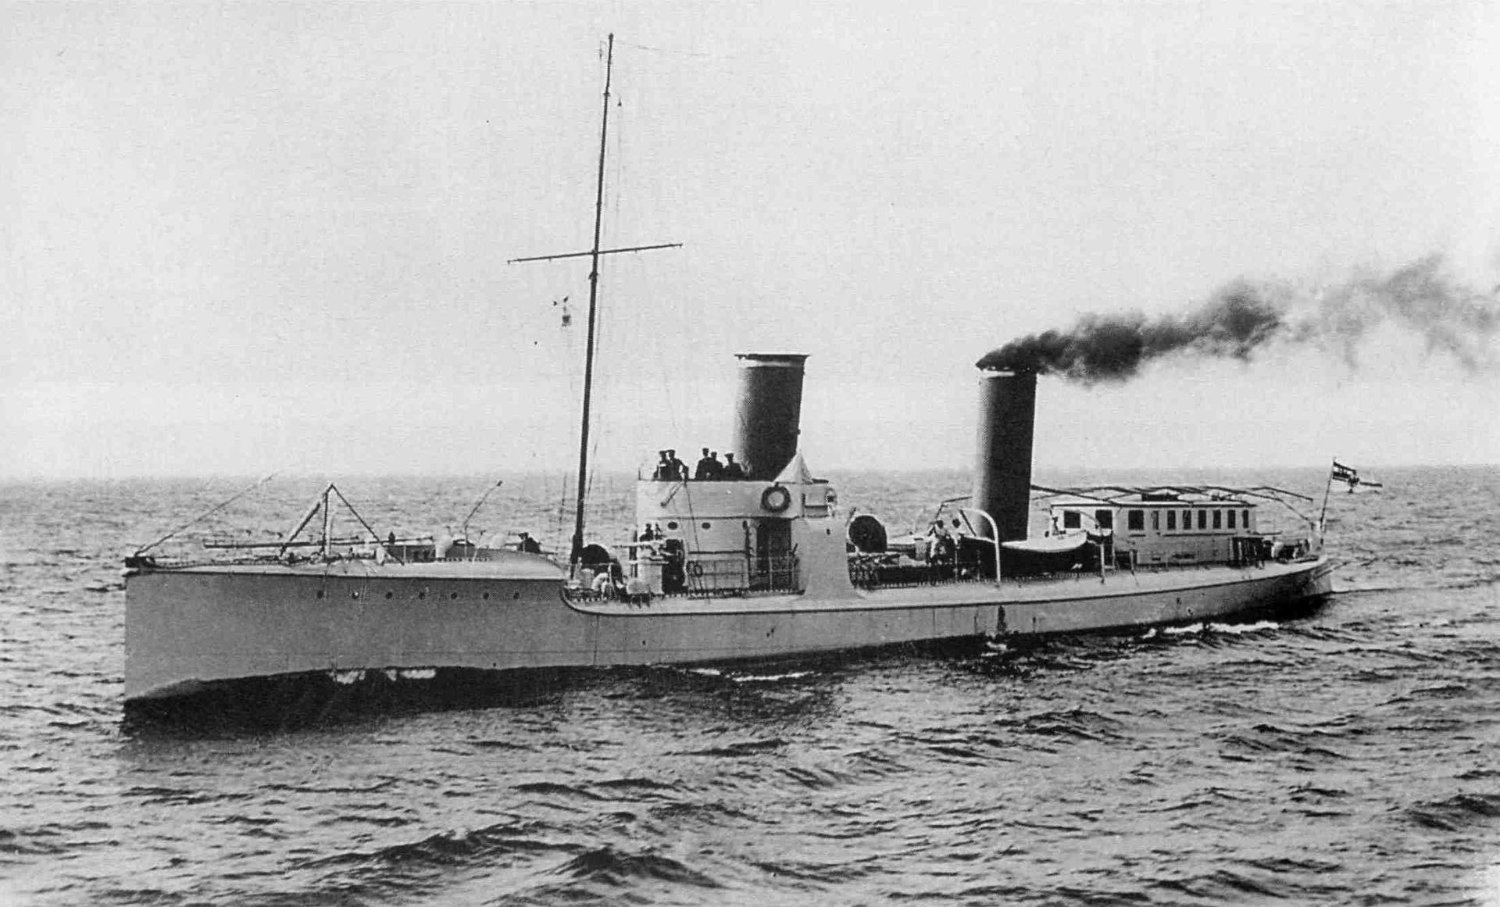
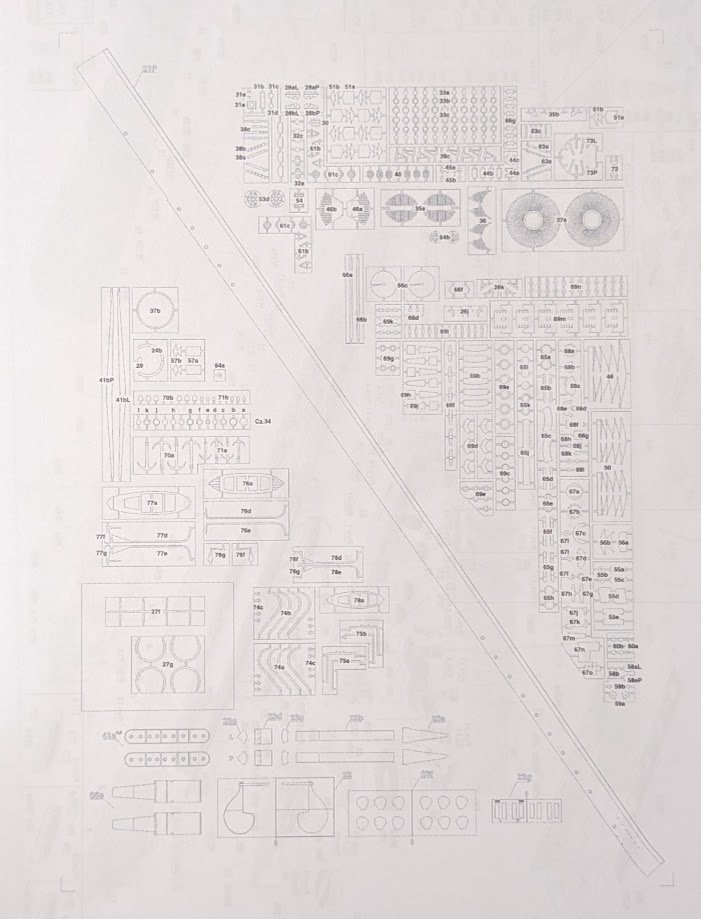
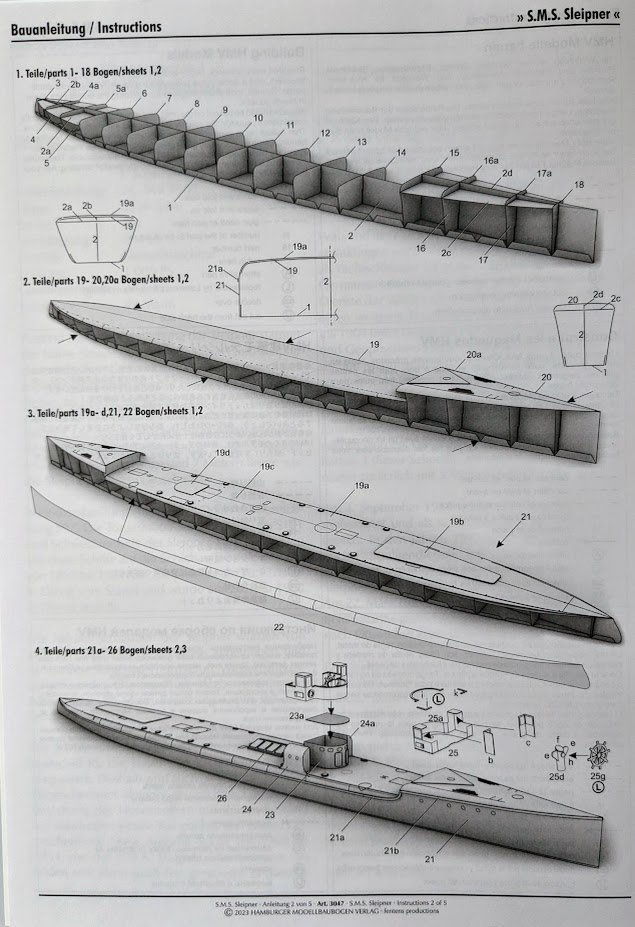
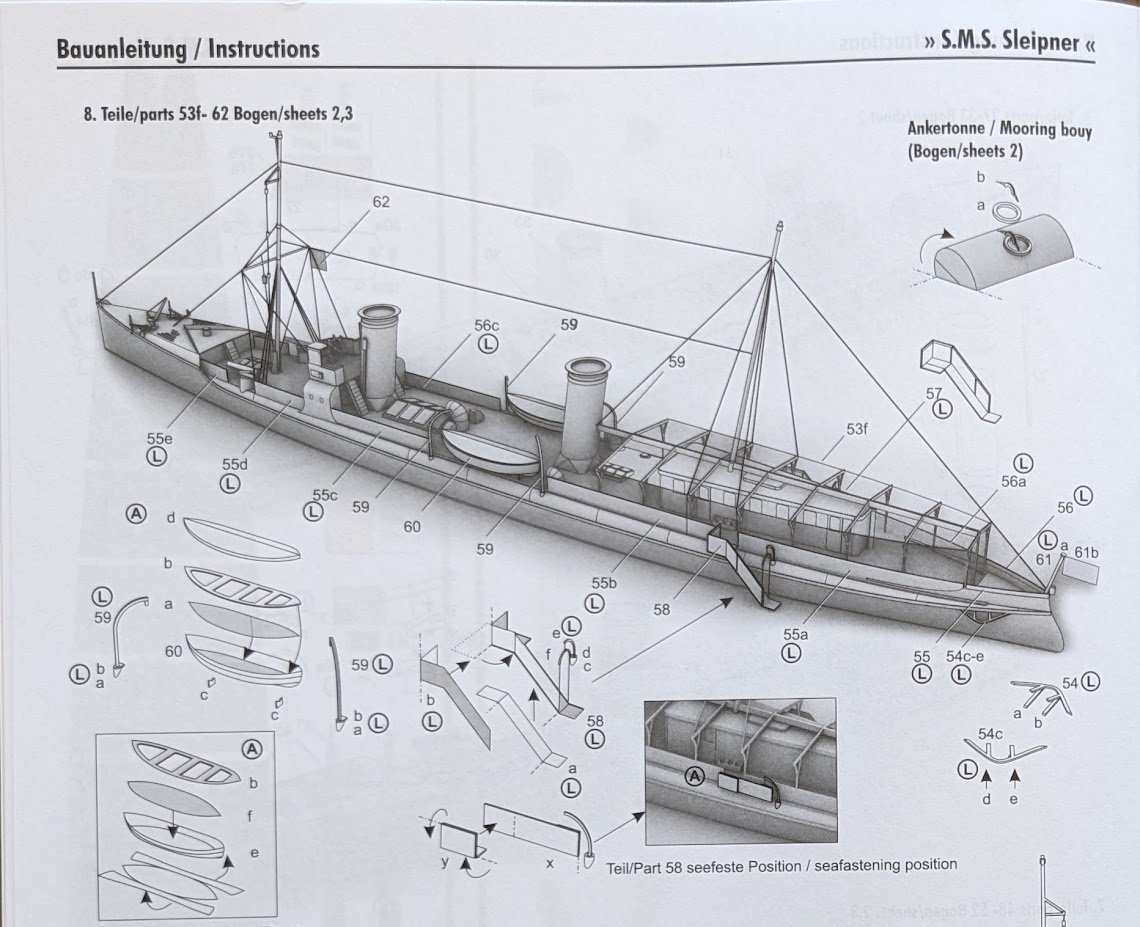
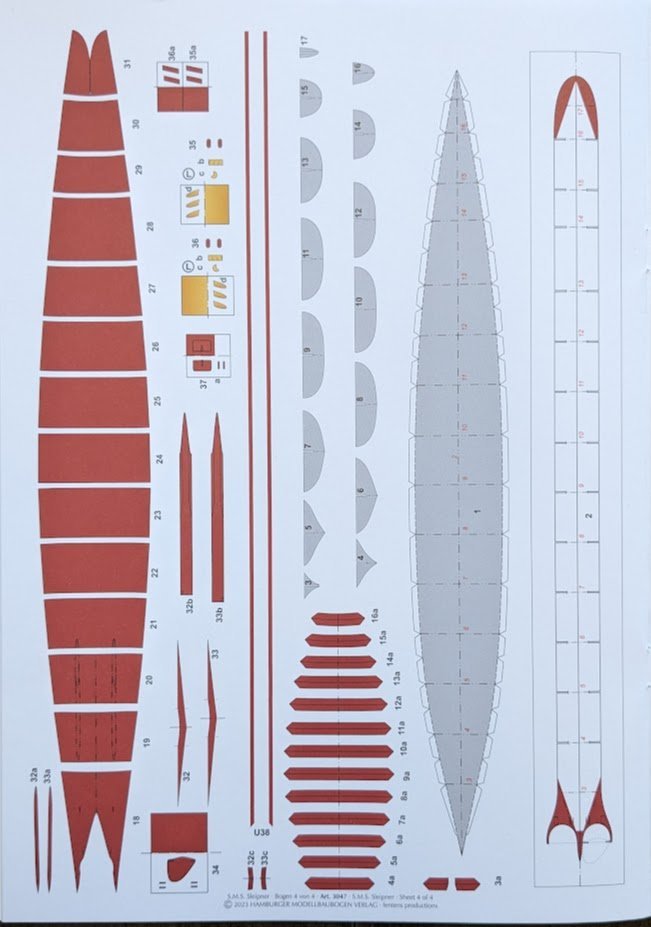
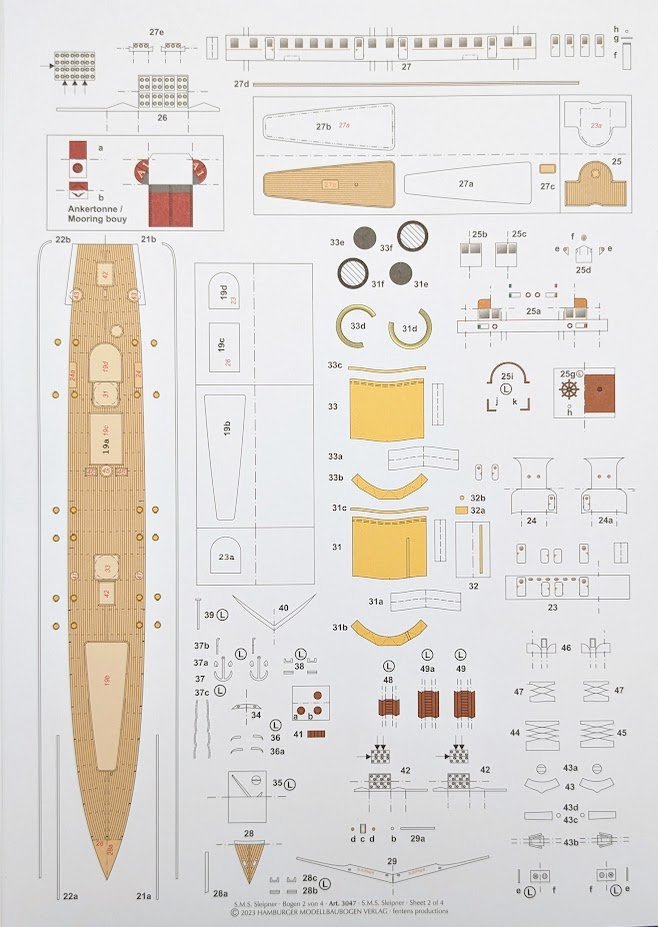
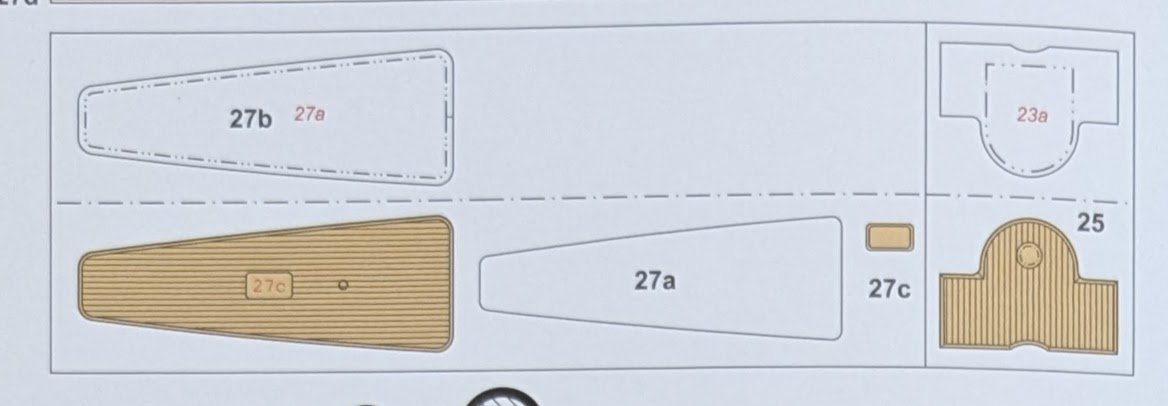
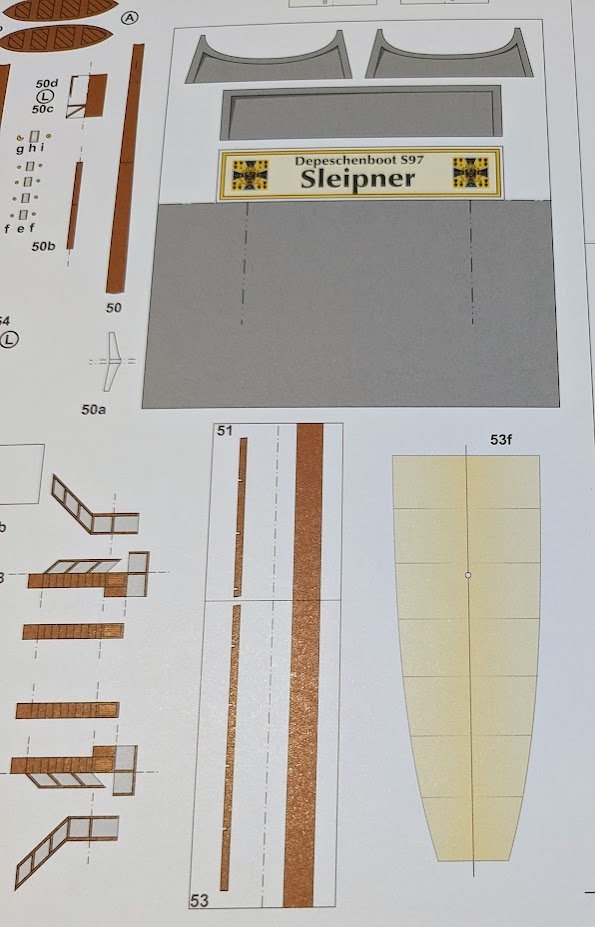
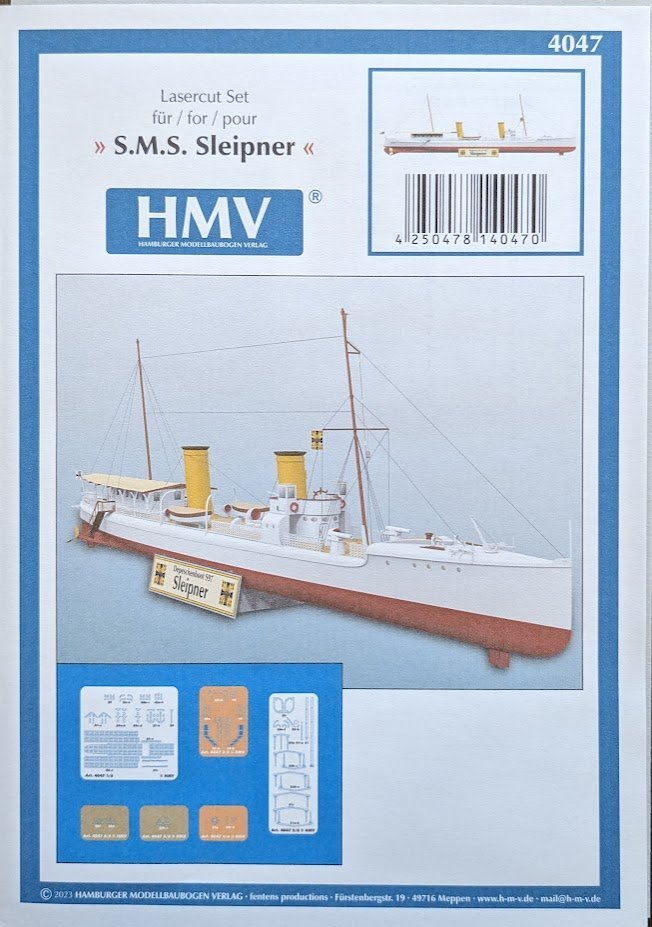
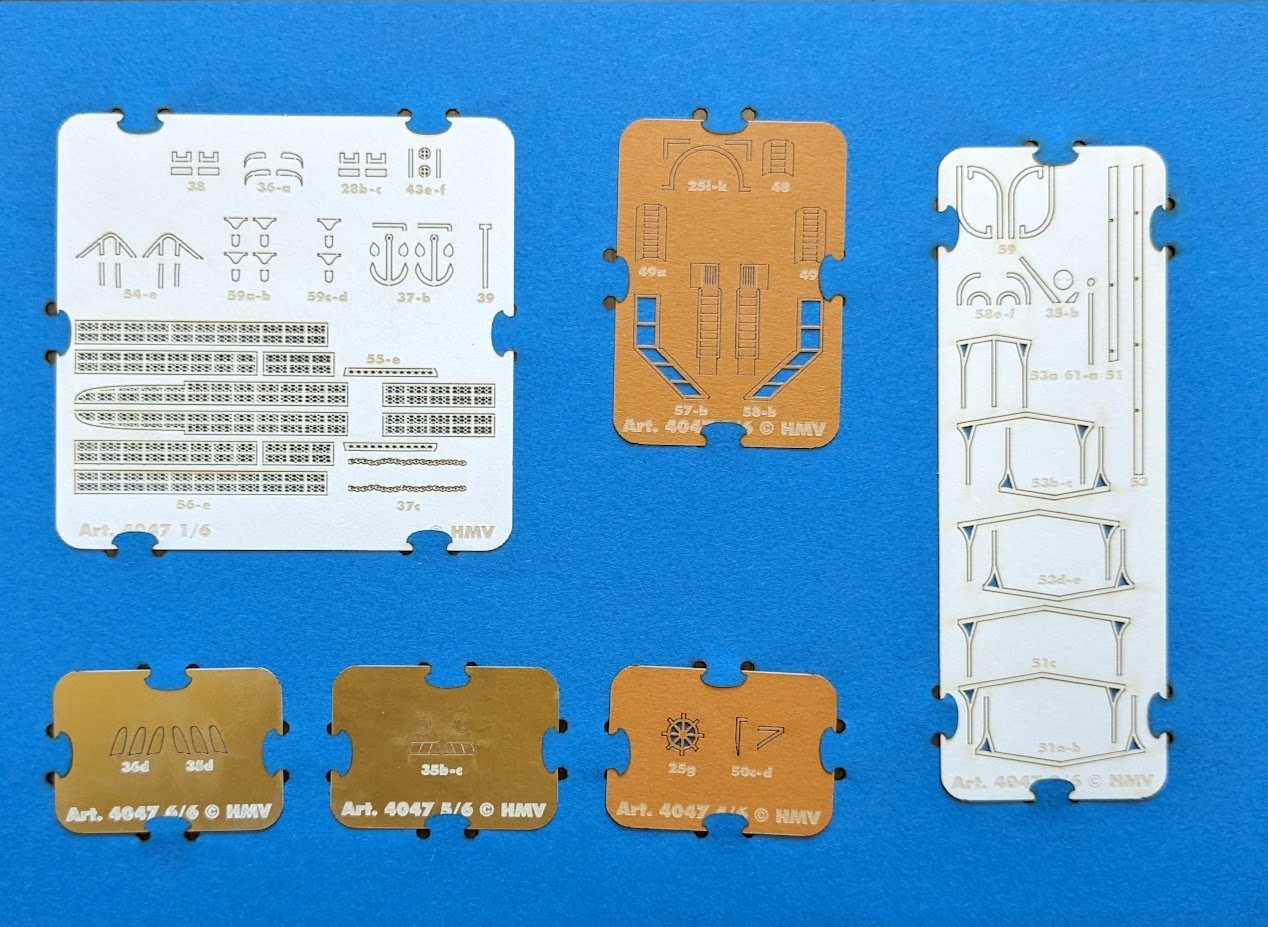
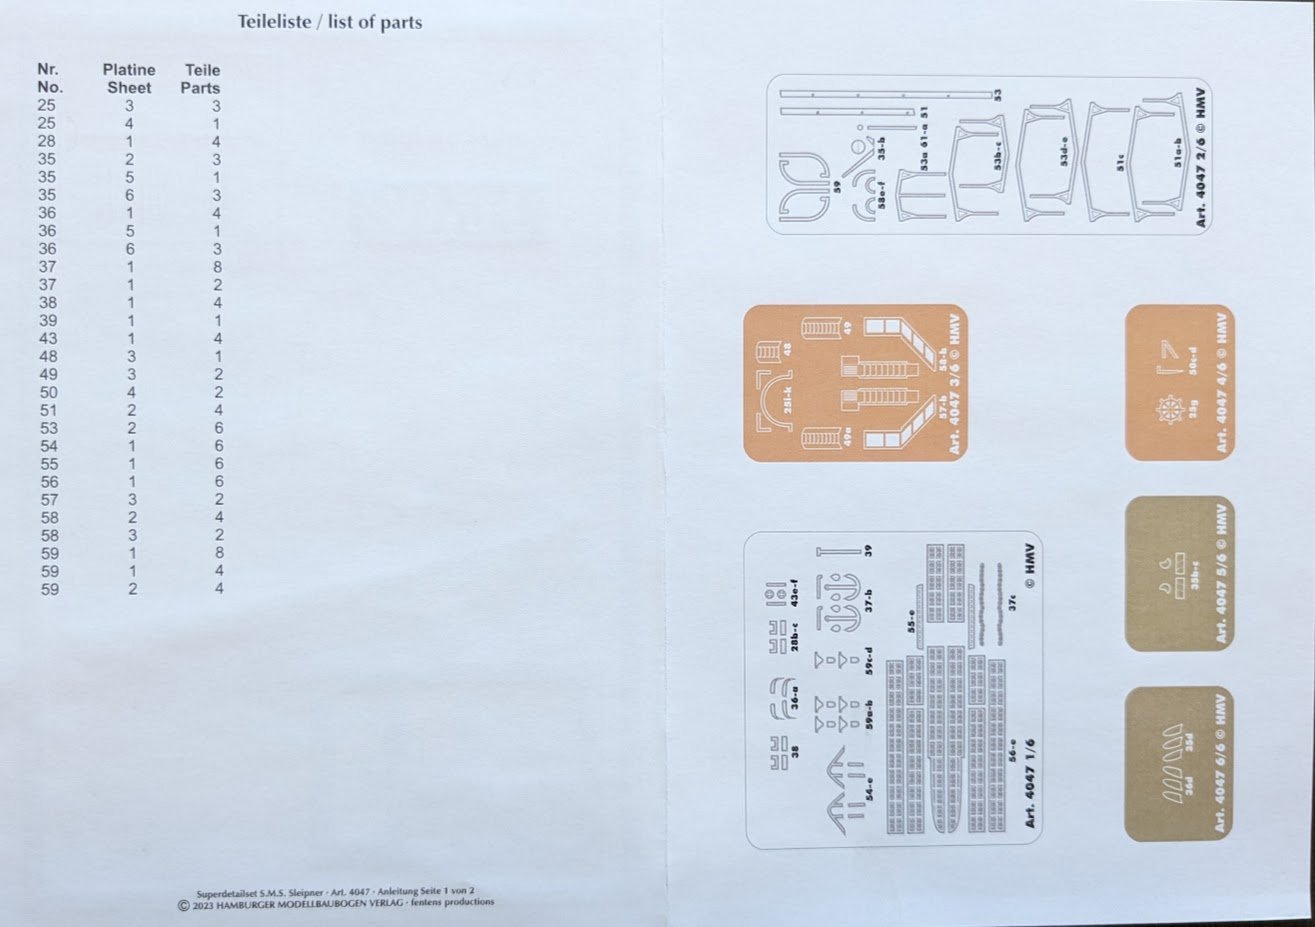
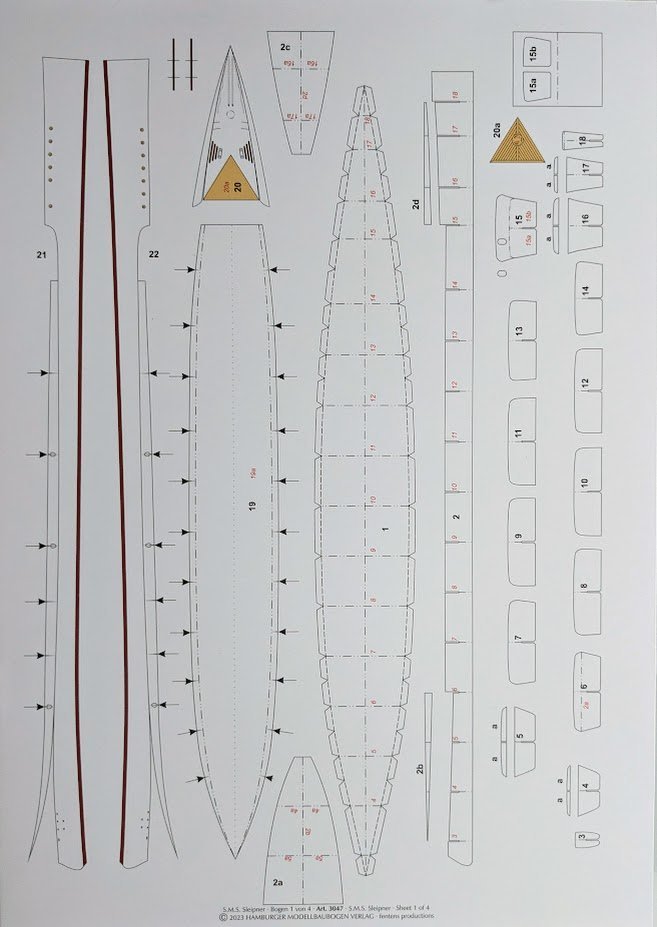
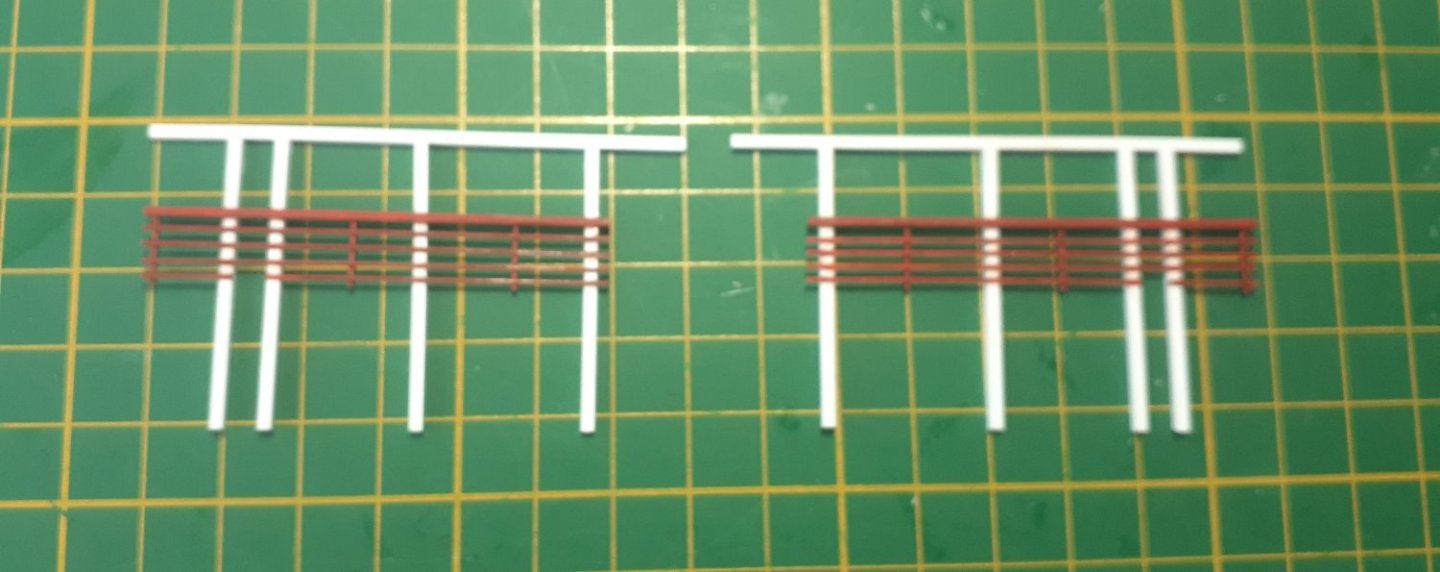
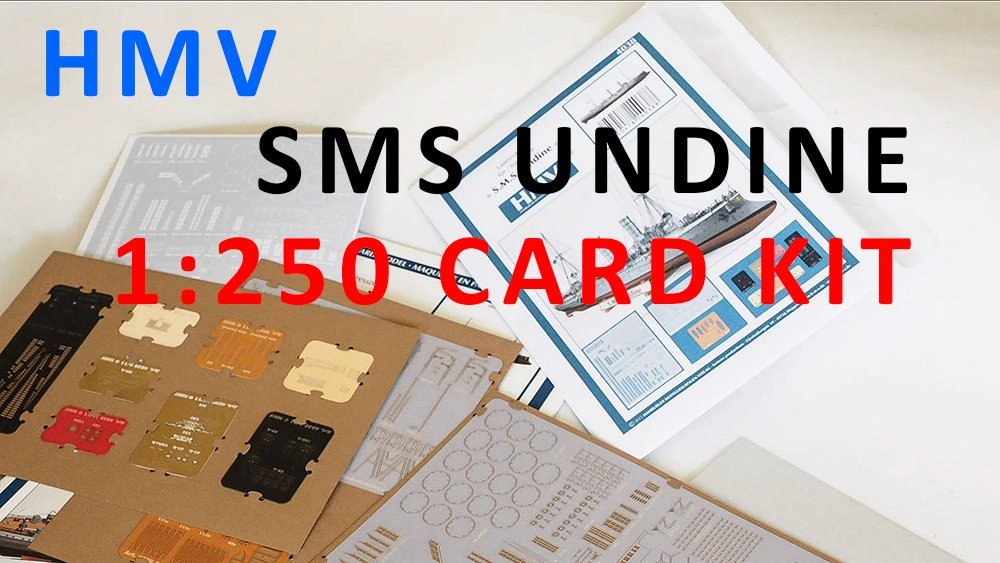
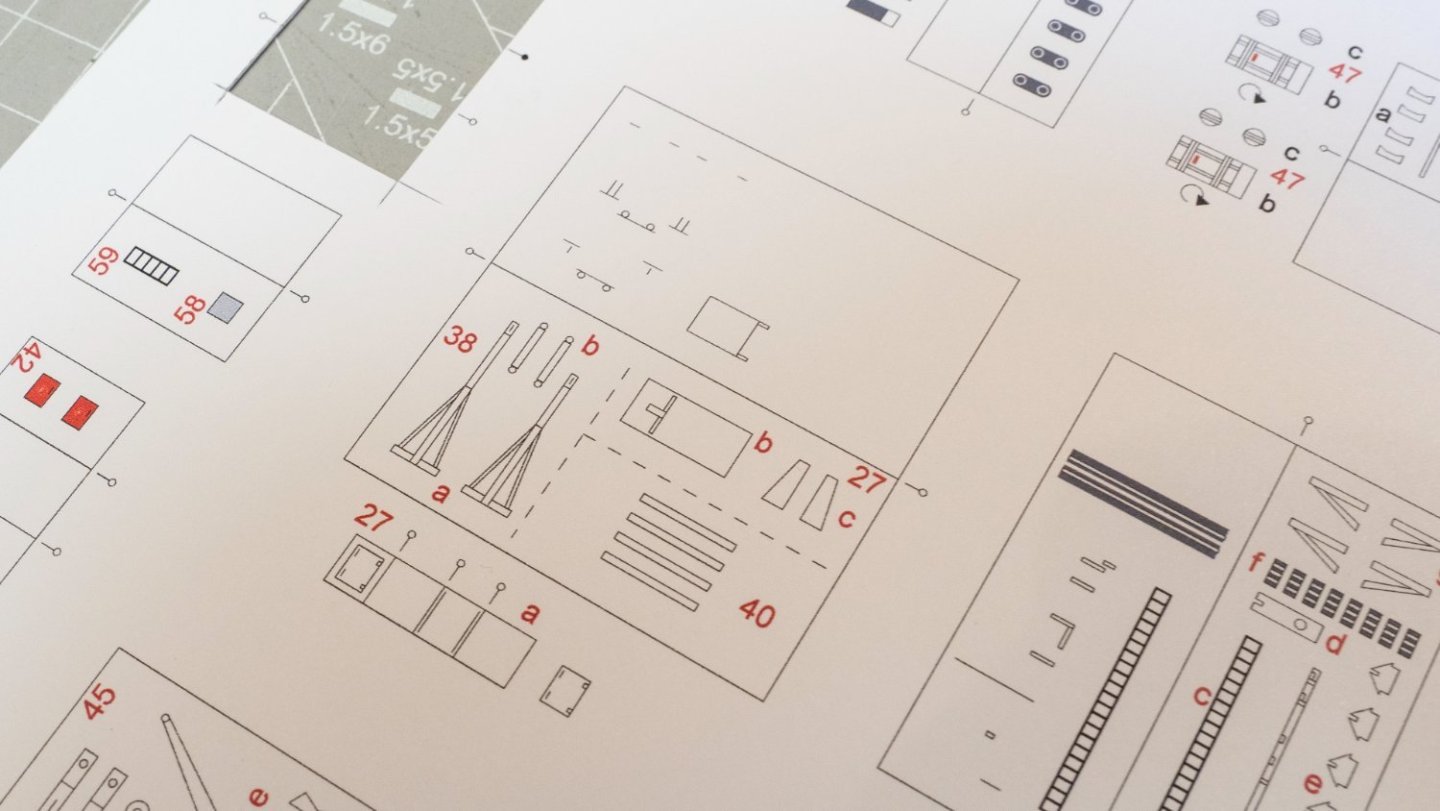
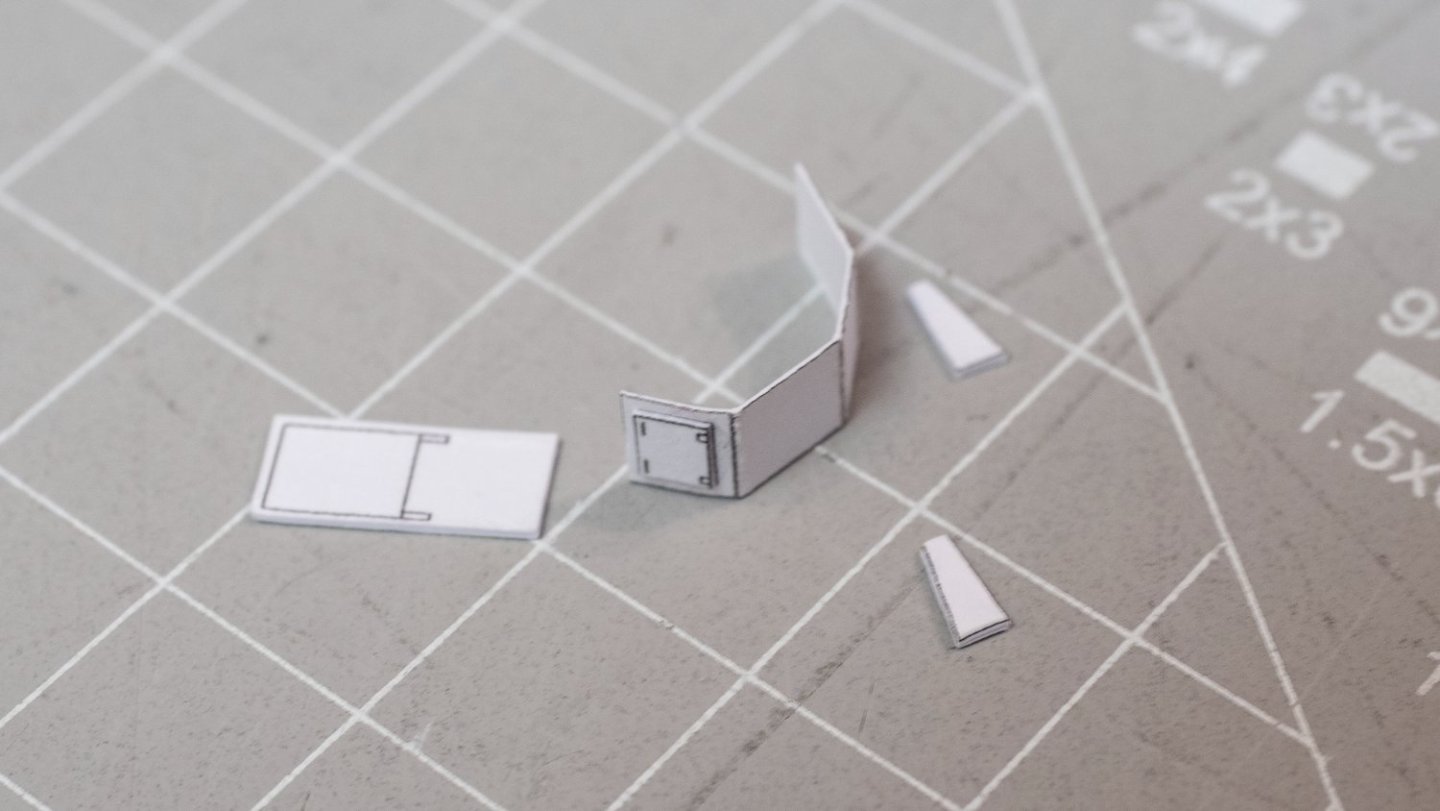
SMS Sleipner 1900 1:250 HMV Catalogue # 3047 Available from Fentens Papermodels for €13.99. All images by the author except where noted. Image courtesy of Fentens Papermodels History From the publisher’s website: “The name Sleipner comes from the eight-legged horse Sleipnir of the Nordic god Odin. The name of this extraordinary horse describes gliding on land, water and in the air. How fitting for an elegant dispatch boat like the Sleipner. The torpedo boat's maximum speed was around 26.5 knots, which was impressive at the time, and with a length of 61 meters and a width of 7 meters, the Sleipner was quite impressive. Image from Wikimedia Commons: https://upload.wikimedia.org/wikipedia/commons/7/79/SMS_S_97.jpg When commissioned, SMS Sleipner carried the designation S97. The torpedo boat destroyers S90 to S101 are sister ships of the Sleipner. All of these ships were built at the Schichau shipyard between 1898 and 1901. S97 Sleipner was launched in Elbing on December 16, 1899 and was put into service on May 28, 1900. Sleipner's two propellers were powered by two triple steam engines and Schichau-Thornycroft water-tube boilers were used. The maximum water displacement was 394t. The ship was supposed to have a crew of 49 men. The SMS Sleipner was intended from the start as an escort ship for the imperial yacht Hohenzollern. That's why we often talk about the imperial dispatch boat Sleipner. The usual accompaniment of the Hohenzollern when traveling consisted of at least one warship and a dispatch boat. This task was carried out from 1900 to 1914 by SMS Sleipner. Many pictures show Hohenzollern with Sleipner somewhere in the background. The Hohenzollern's journeys took Sleipner, among others, to Venice, to Alesund, and also to the Norwegian south coast. It happened that the emperor himself was on board SMS Sleipner and he used the ship for visits or events occasionally. During the Kieler Woche and similar sailing events the SMS Sleipner occasionally worked as a yacht tug for large sailing yachts such as Germania or Meteor. The dispatch boat also was applied to the service of science and on July 1, 1904, under the direction of the German meteorologist and geophysicist Hugo Hergesell and the French naval officer Sauerwein, it brought a kite probe to a height of 1,880 meters. The Sleipner's armament consisted of 2 rapid-fire cannons of caliber 5 cm, which were used as saluting guns. The torpedo boat sister ships had 3 of these rapid-fire cannons on board and were also equipped with 3 torpedo tubes. On September 4, 1914, the Sleipner was renamed T97 and used as a coastal defense ship. In 1917 and 1918 she also performed patrol duties and served as an escort ship. After the war, the former Sleipner served in the Reichsmarine for a short time. On March 22, 1921, T97 was struck from the register of the Reichsmarine and then sold to Düsseldorf for demolition on May 26, 1921.” The Kit HMV (Hamburger Modellbaubogen Verlag) have added another tempting kit to their lineup of high-quality card models in 1/250 scale. This time, the subject is one we don’t often see, if ever, in the card medium—a handsome dispatch boat from Europe’s Belle Époque. The cover of the kit (see above) features several digitally rendered views of SMS Sleipner. The ship’s sleek lines suggest that Sleipner was built for speed, as indeed she was, considering her torpedo boat heritage. But other visual cues hint at her more aristocratic and less-deadly purpose, such as her lack of armament, ornate railings, and awning-covered salon. The cover also informs us that the kit consists of 329 parts and has a difficulty rating of mittel (intermediate), suggesting that the kit is appropriate for anyone having a few card models already under their belt. At 252 mm in length, the finished model will not make huge demands on anyone’s limited display space. Let’s look inside the kit and see what you get! Instructions/Diagrams As is typical with HMV kits, there aren’t any written instructions other than a very brief overview consisting of a list of required tools, general tips for building card models, and a key for the various codes used in the diagrams. A circled letter ‘L’, for example, means that the indicated part can be replaced with a part from the optional laser-cut detail set. Fortunately for us, HMV’s diagrams are first-rate and cover all phases of construction. Parts Not all of HMV’s kits have full hulls, but this one does. The design gives the builder the choice of building either a full-hull or waterline model. The hull is designed with the usual HMV “egg crate” construction. Sleipner’s hull has noticeable turtle-back joints between the deck and hull sides, and this might be one of the trickier aspects of the model to pull off neatly. The printing is crisp, and the registration is flawless. Sleipner wears the white topsides and buff funnels of the peacetime German Imperial Navy. The design includes doubled elements (see part 27a below) that will make the proper location of superstructure features, such as the salon walls, much easier than was possible using the old folded-tabs method. Optional parts are included for adding depth to printed elements such as watertight doors. Nice additional touches include a stand and an optional sunshade. Laser-Cut Detail Set To help cope with some of the smaller and more delicate parts of the model, a set of laser-cut detail parts is available to purchase separately. The set consists of six frets in various colors, including metallicized card for the propellers. Particularly nice are the lattice-work railings. The part numbers for the set are laser-engraved on each fret, but—just in case—the set includes a list of all the parts in the set and a pictorial key. Conclusion For years now, card modelers have counted on HMV to publish new kits depicting attractive subjects that tend to be off the beaten path, with an emphasis on Germany’s rich maritime heritage. Sleipner slots into the HMV lineup very nicely. With high-quality graphics, clear construction diagrams, and the option to use laser-cut details, Sleipner should appeal to all fans of card model ships, from novice builders to seasoned veterans. Sincere thanks are due to Benjamin Fentens at Fentens Cardmodels (see link at top) for providing this example for review. Tell them you read about it at Model Ship World!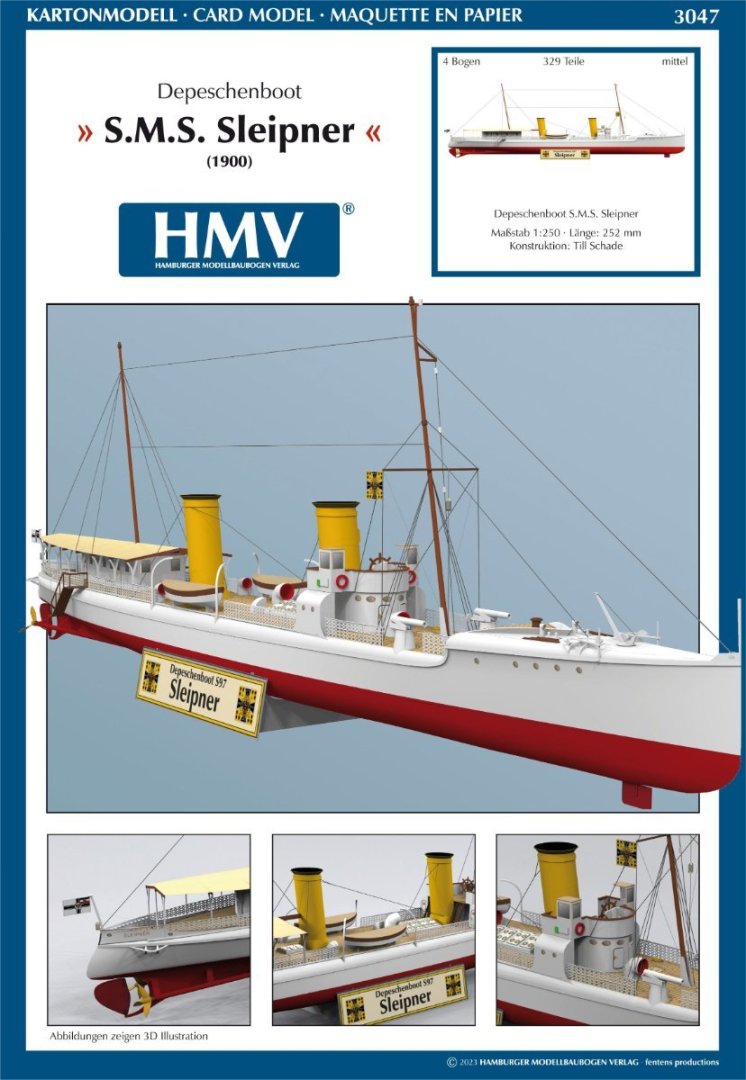


-
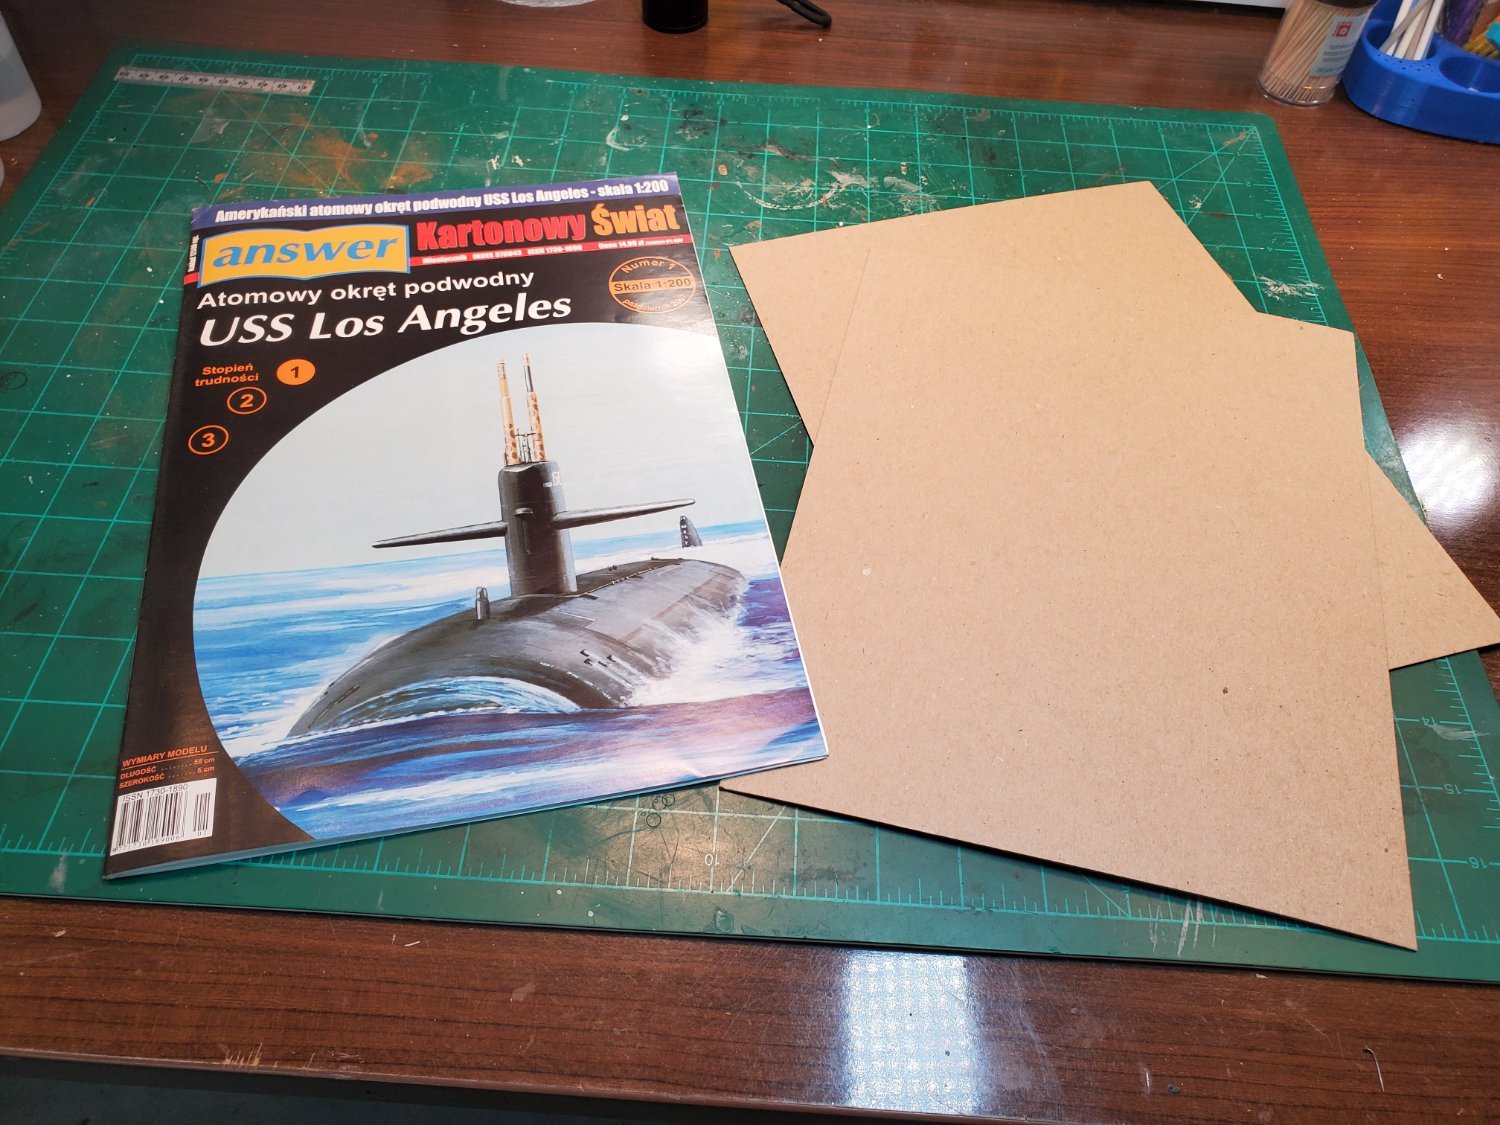
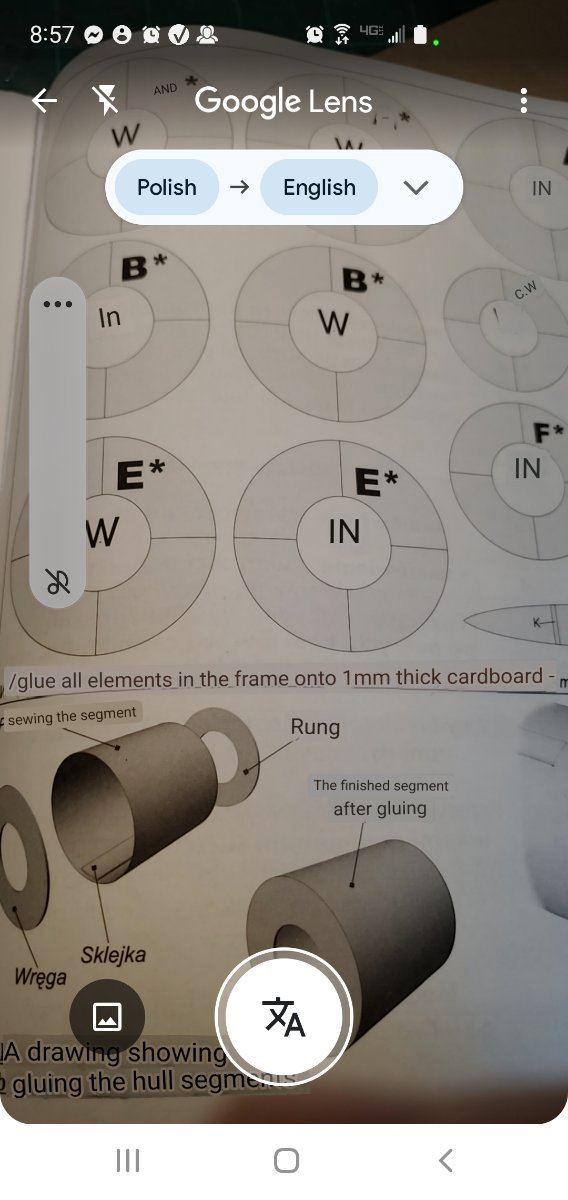
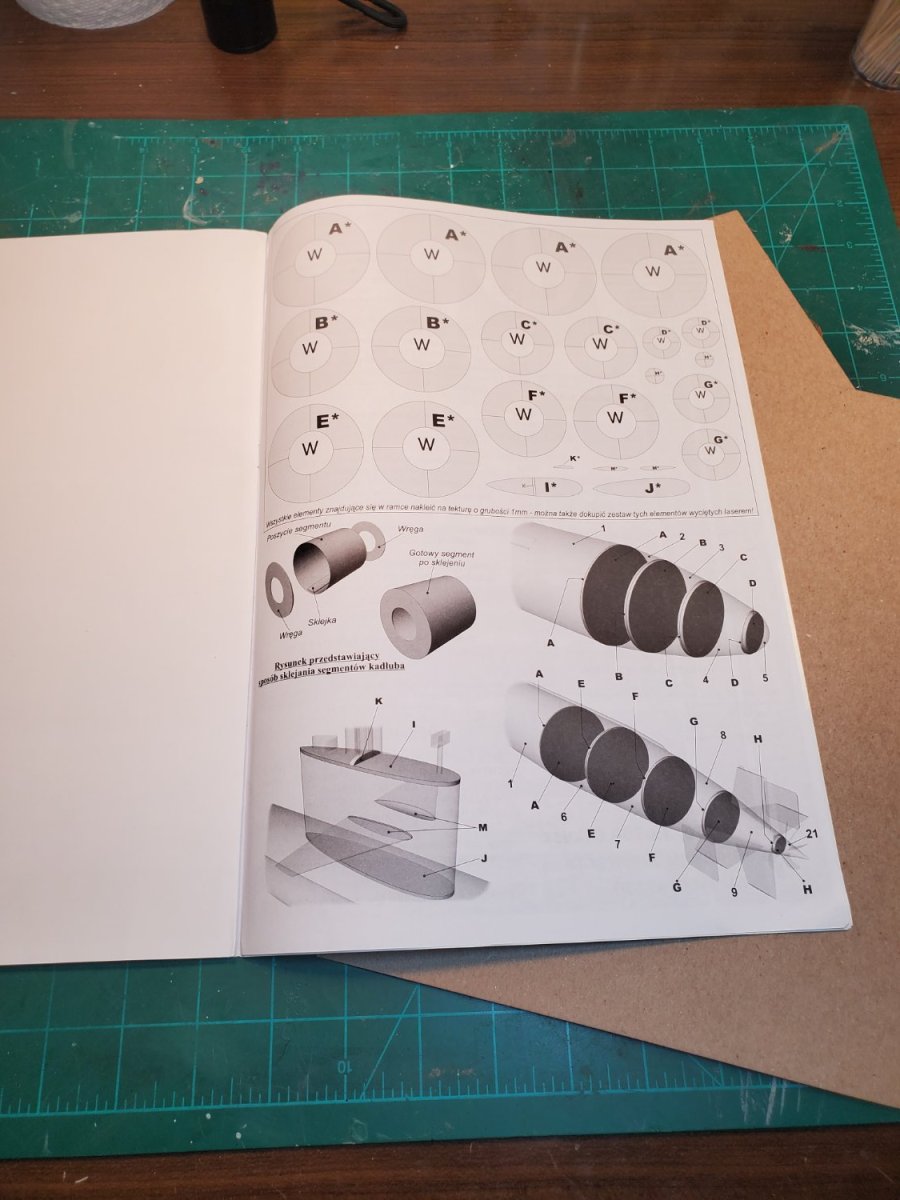
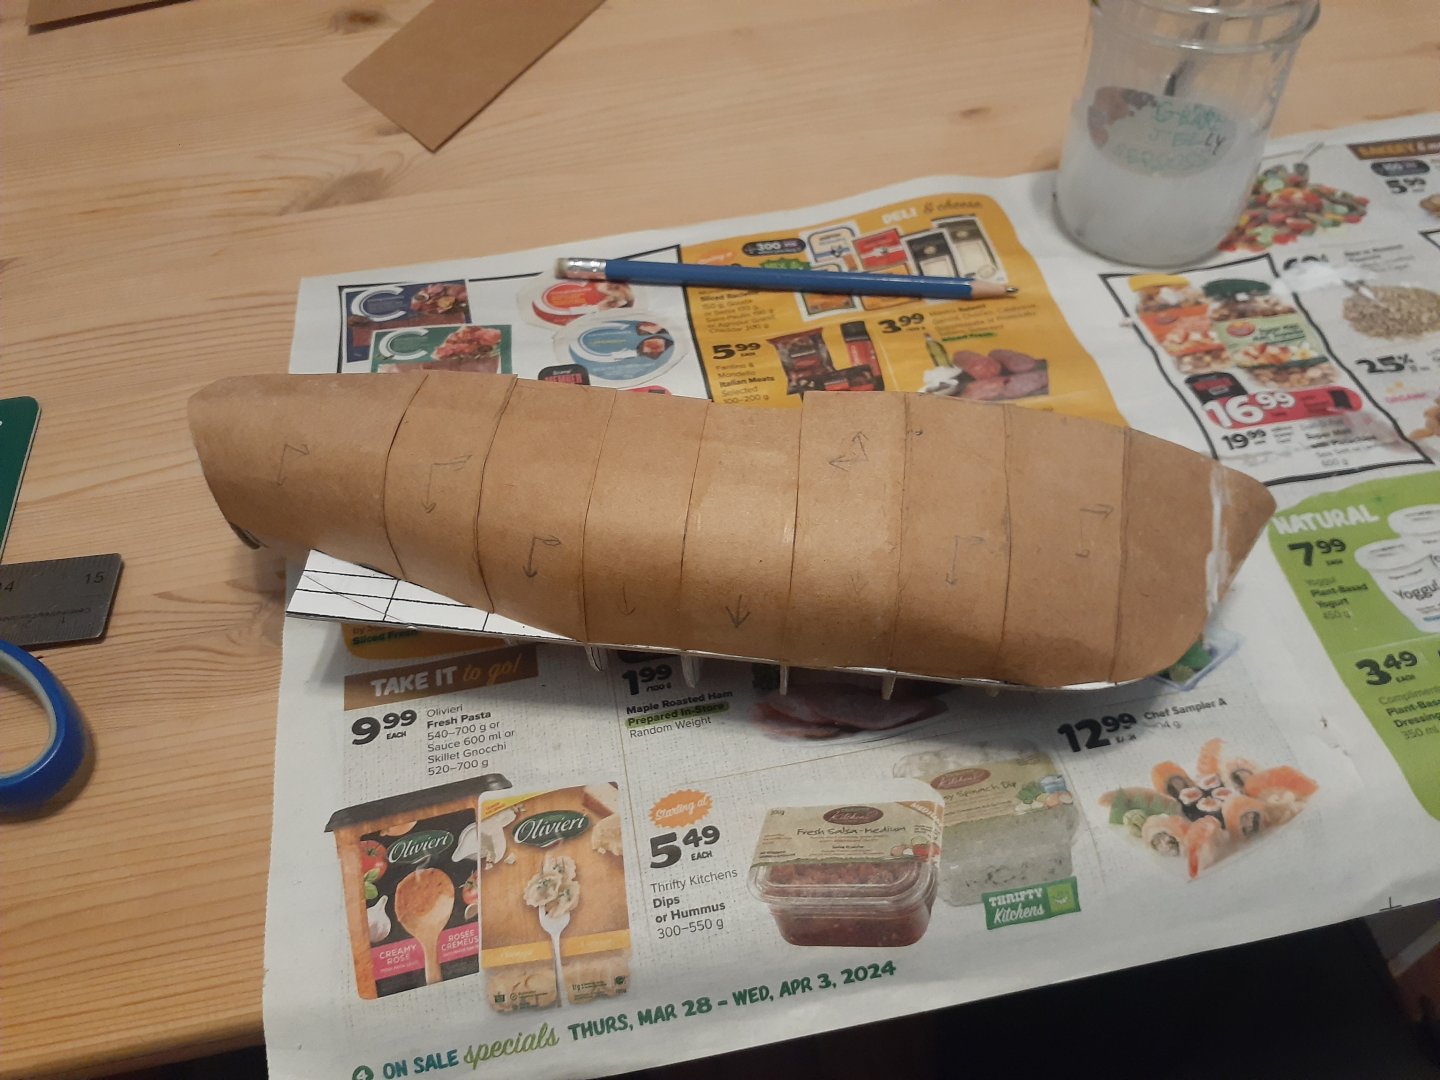
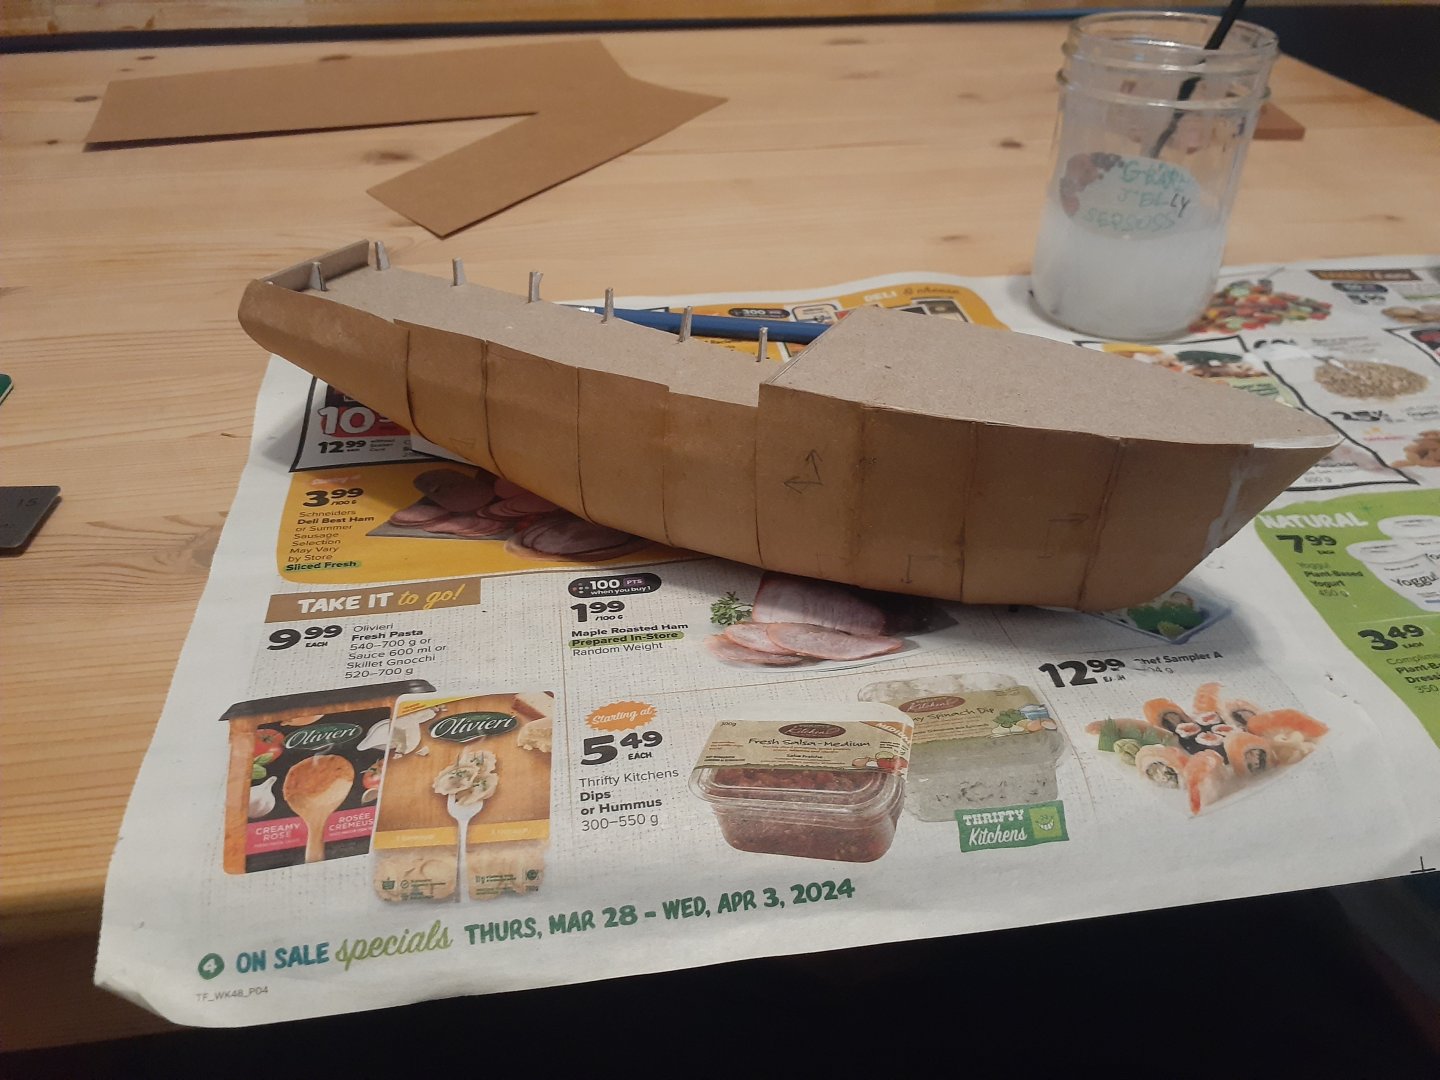
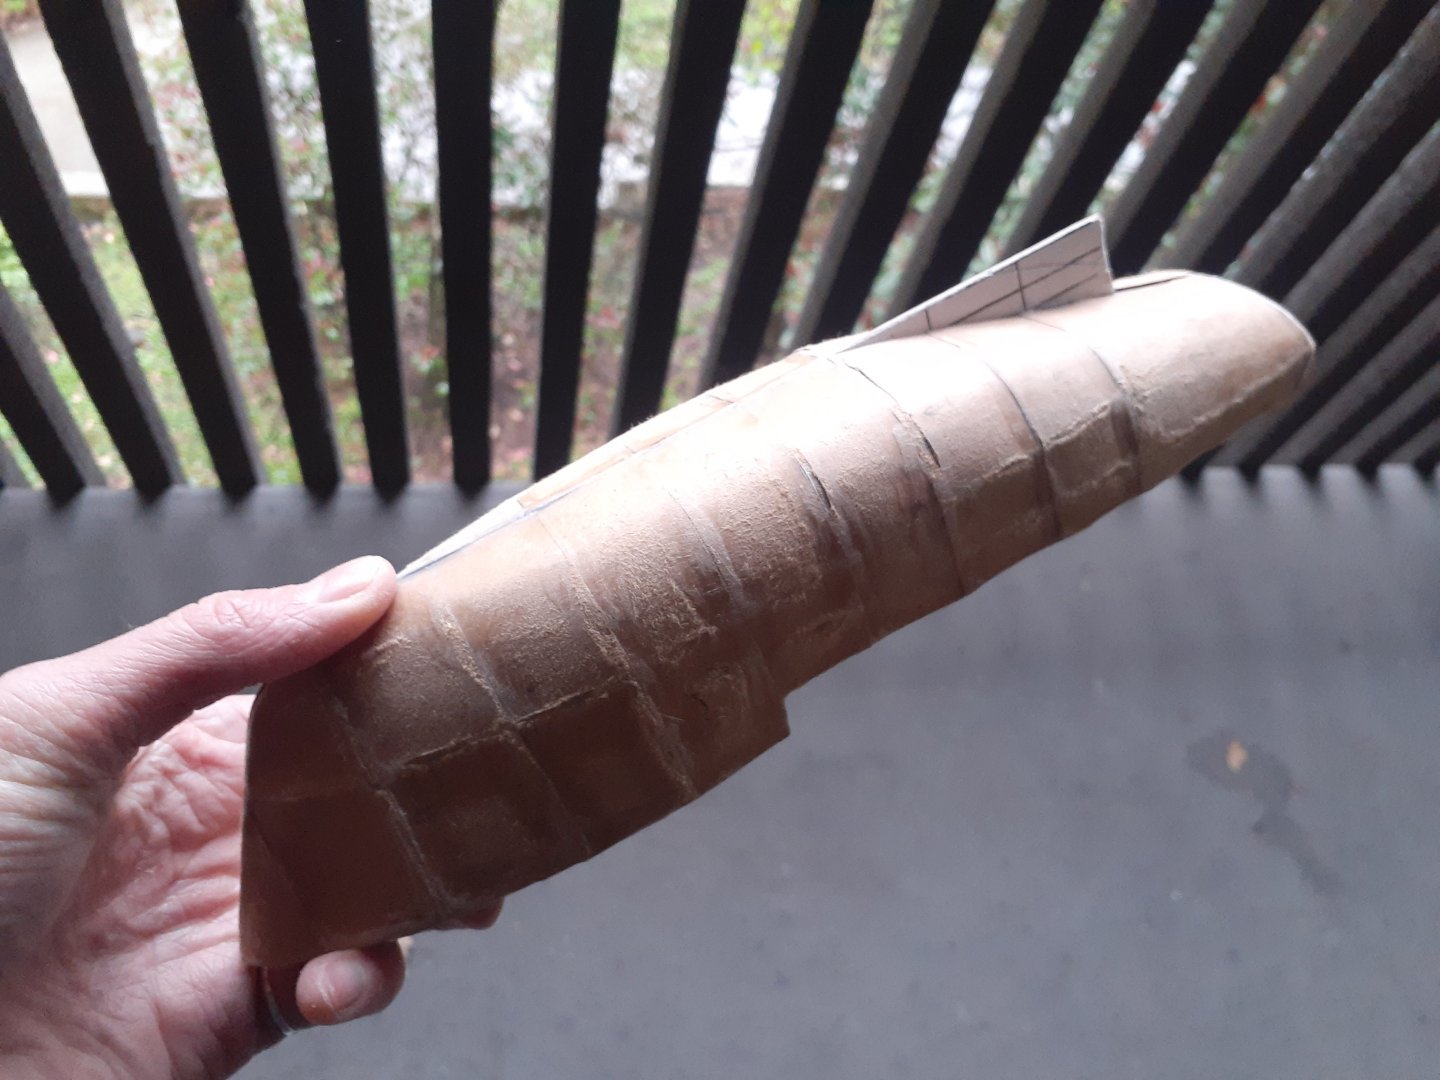
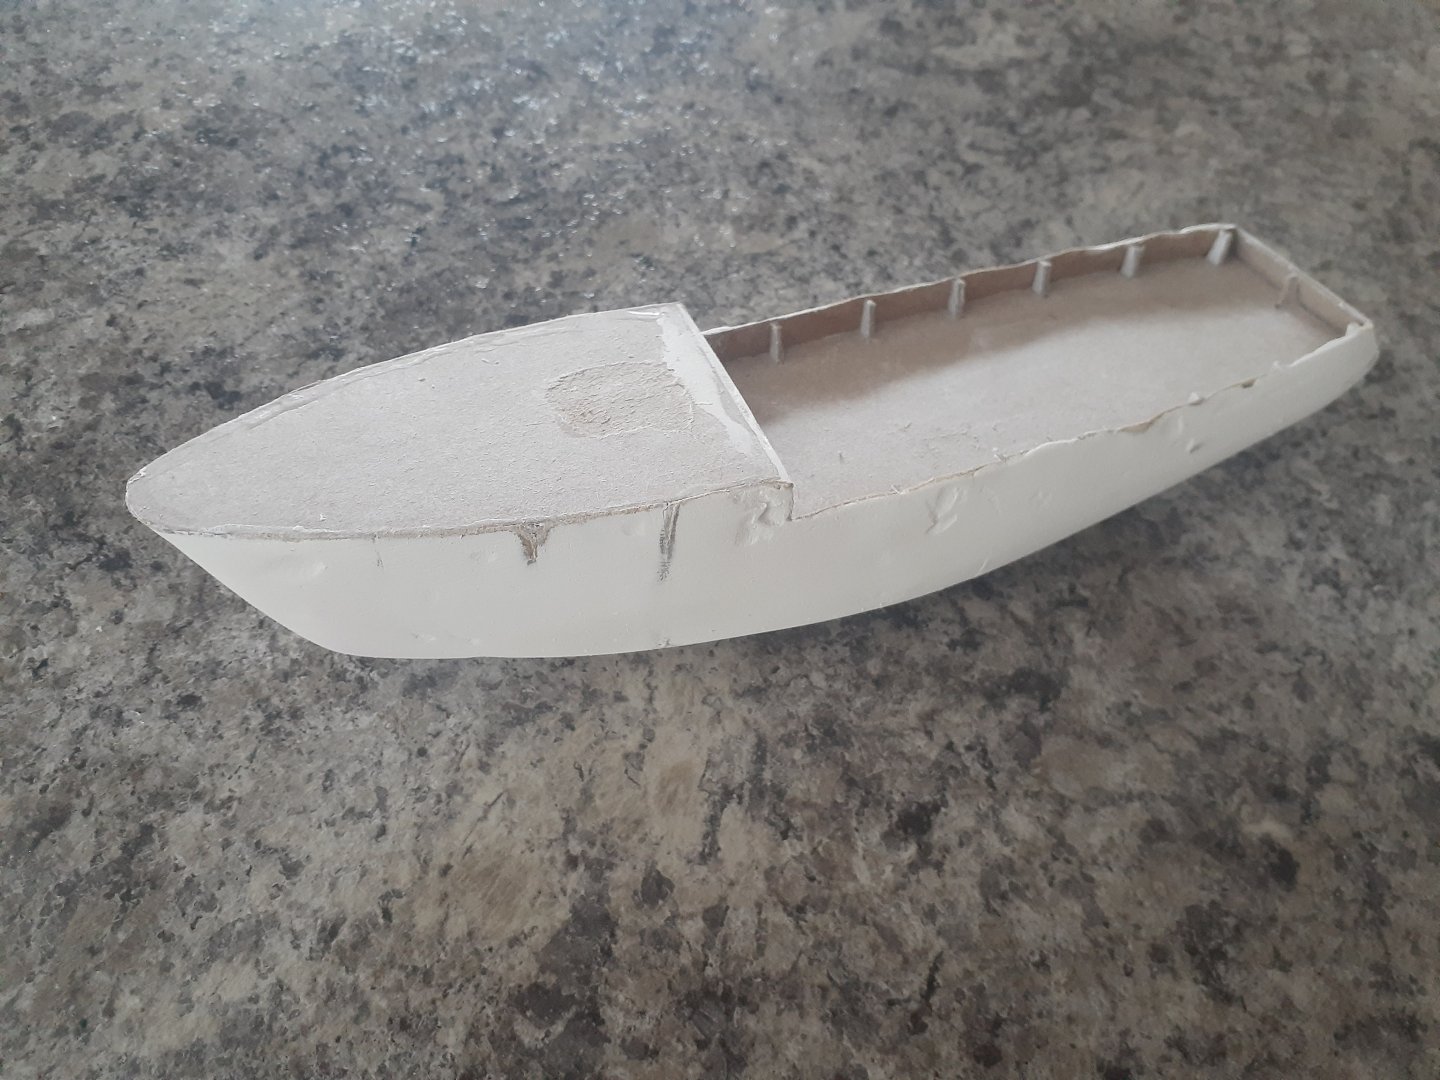
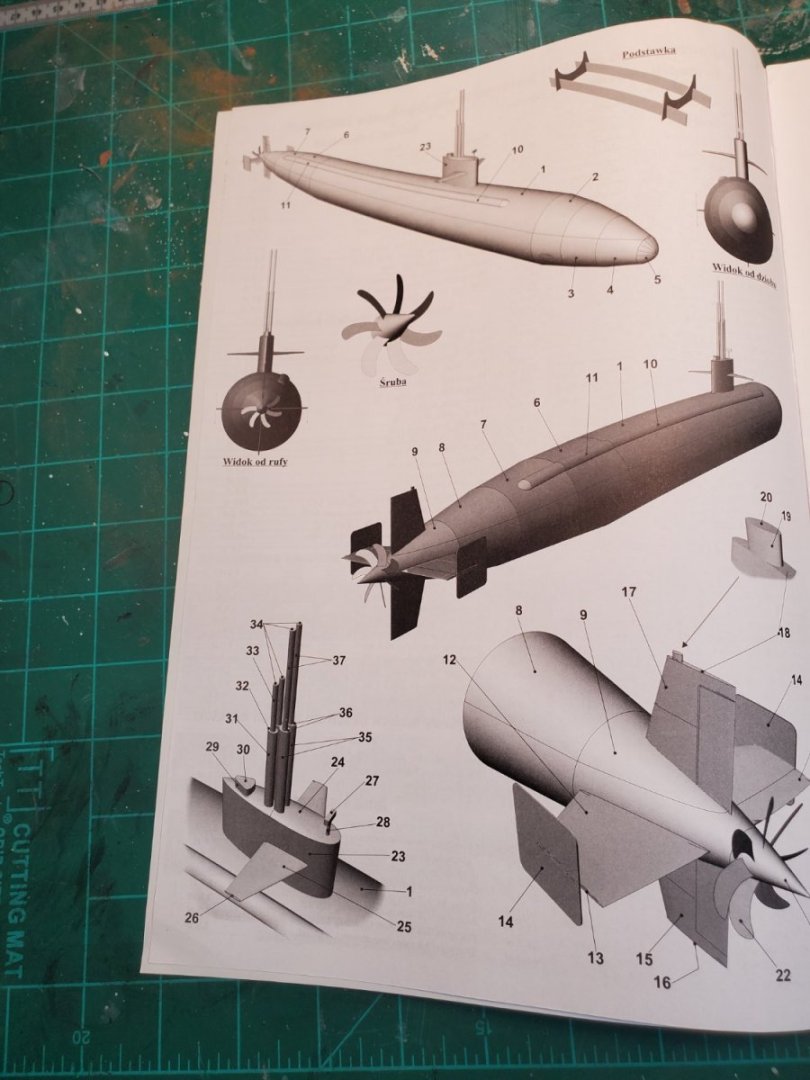
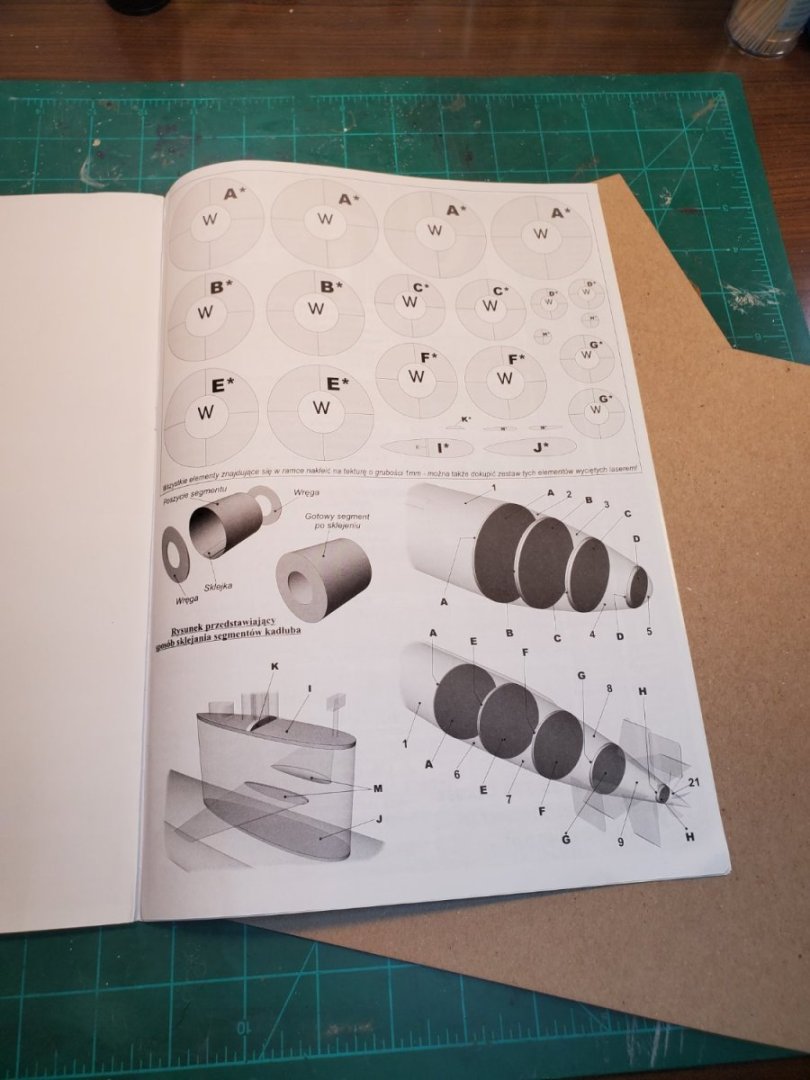
 First build log. I teach electrical engineering and a colleague who teaches mechanical engineering is a retired sub driver. Captain Paul Dinius skippered the USS Helena, SSN 725, during one of his tours. I thought I would make him a model of the type of submarine he was on. I looked for a reasonable sized card model. This is a model of the USS Los Angeles which was the first of the 688 class. The Helena was a Flight II version and had 12 vertical Tomahawk missile tubes. I may look at adding details for those if I can figure out an easy change. Here is the front cover with a couple sheets of 1mm thick (40 point) chipboard that will be used for section bulkheads. The text inside is all in Polish. Thank goodness for Google translate: Hover my Android's camera over the Polish instructions and Viola! English translation appear in real-time! I think I can figure out 'rung' should be 'ring'. 😃 Here we go!


-
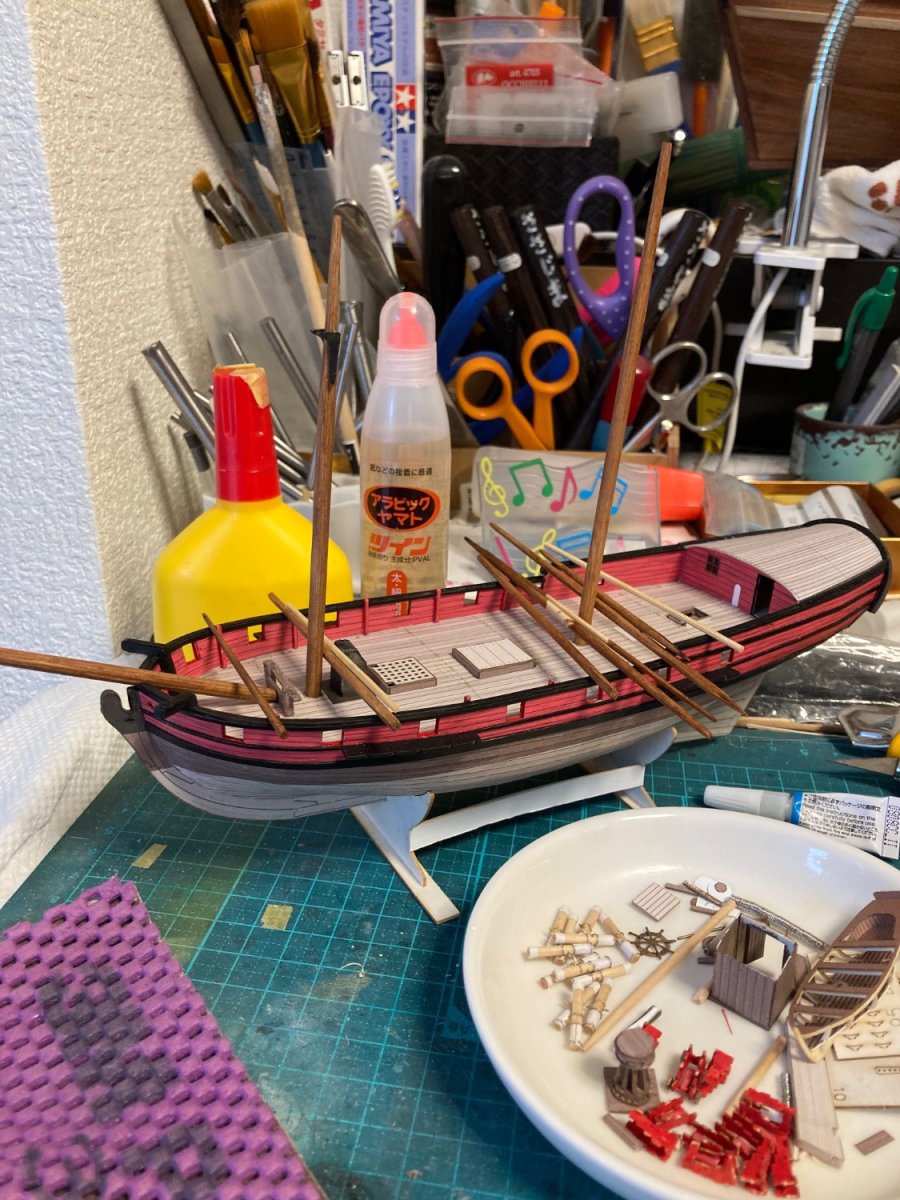
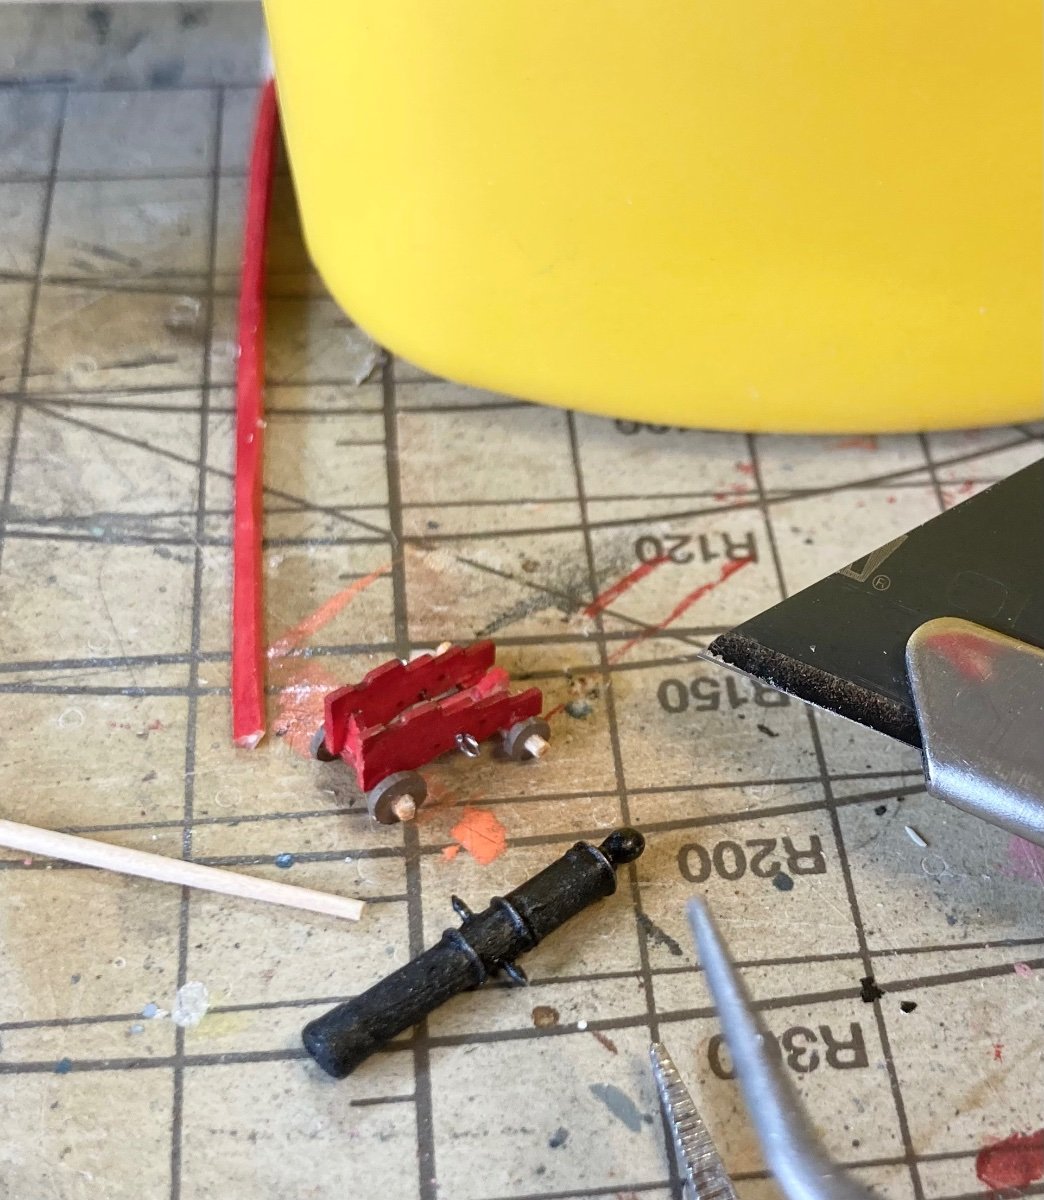
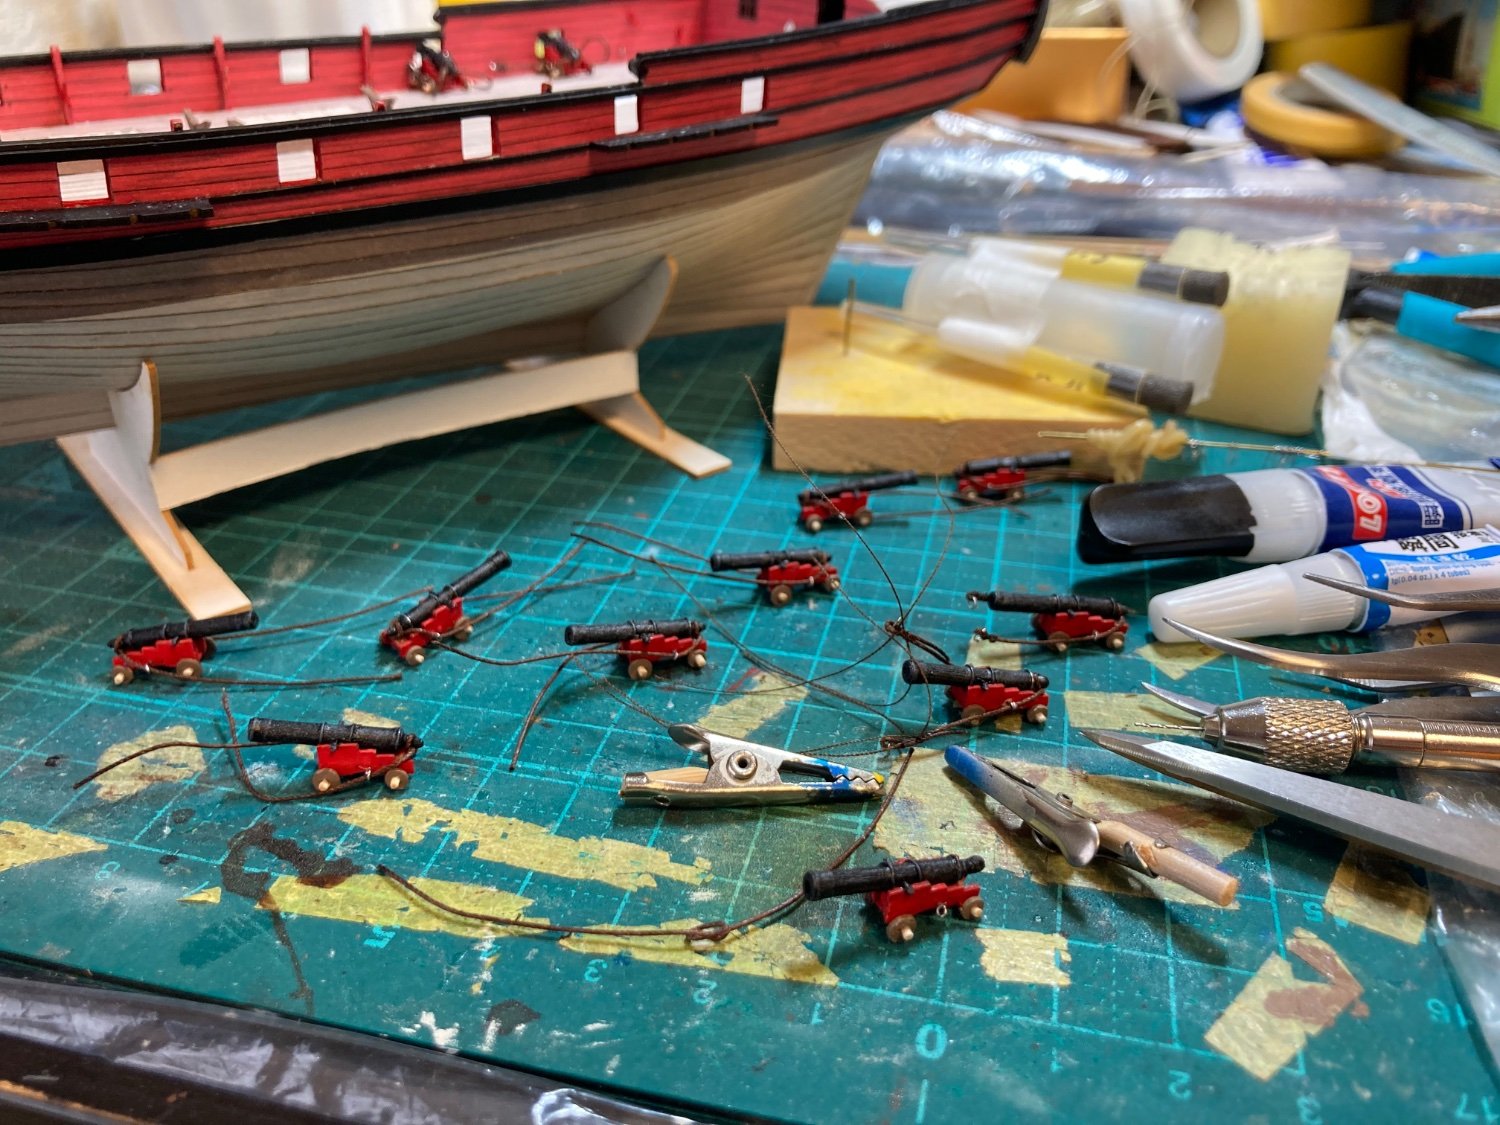
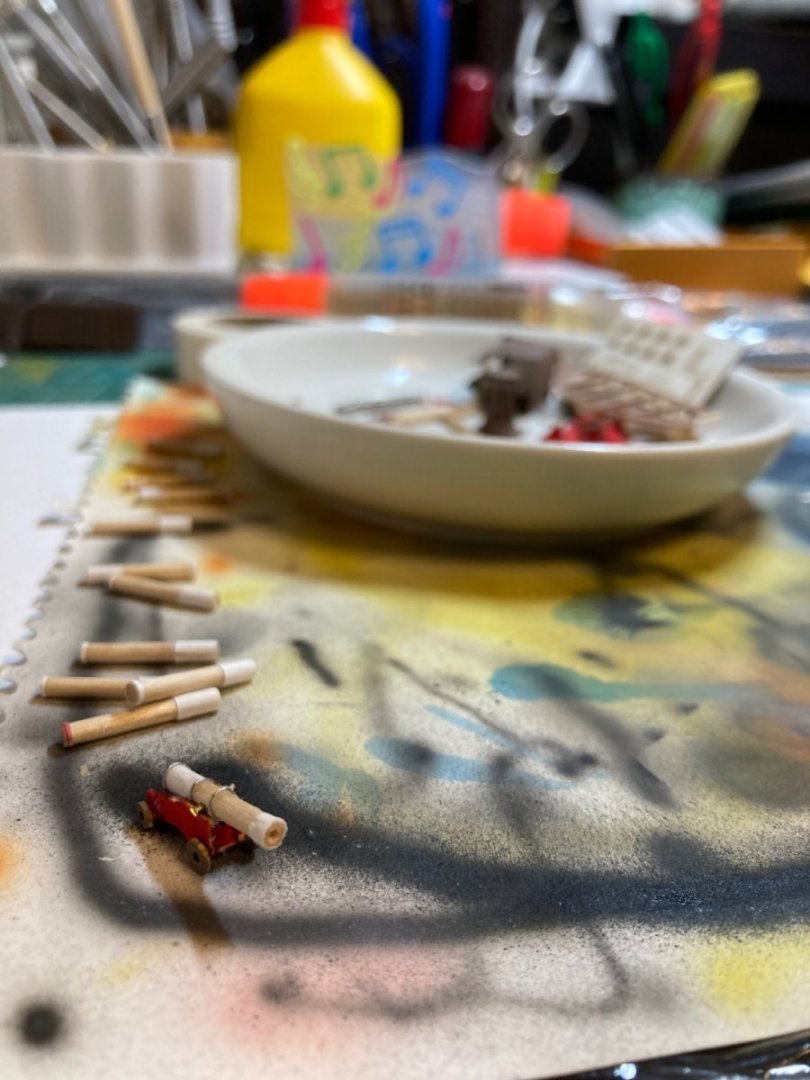
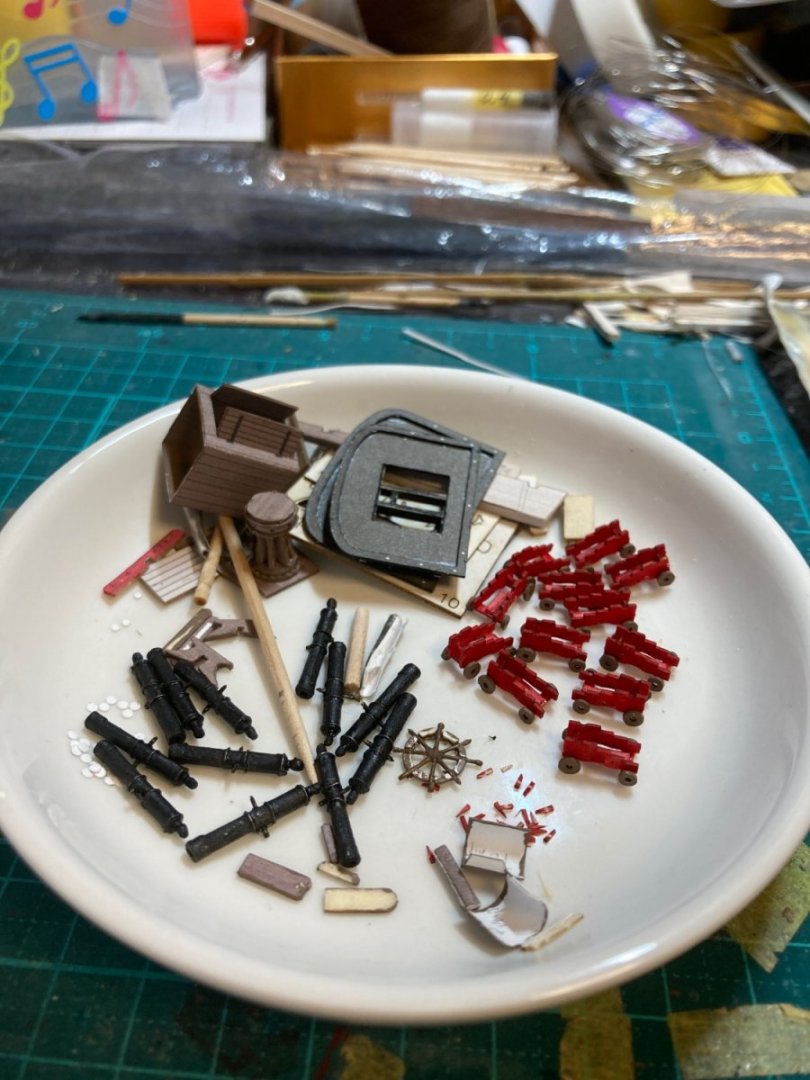
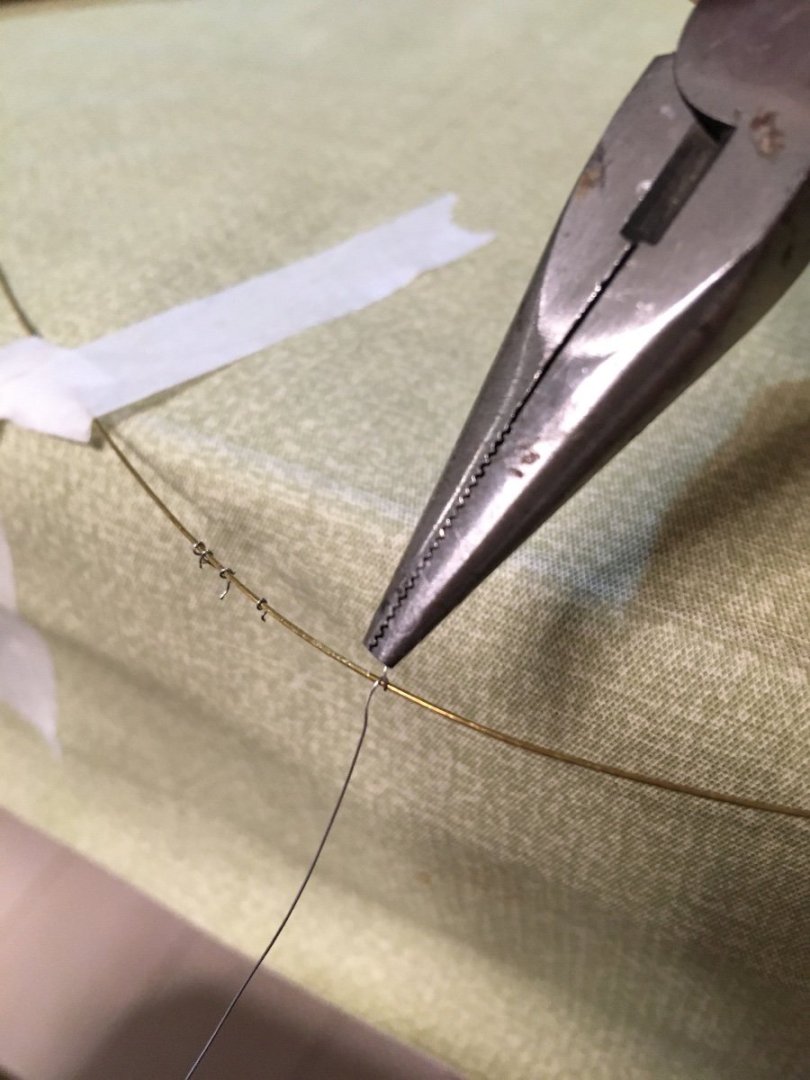
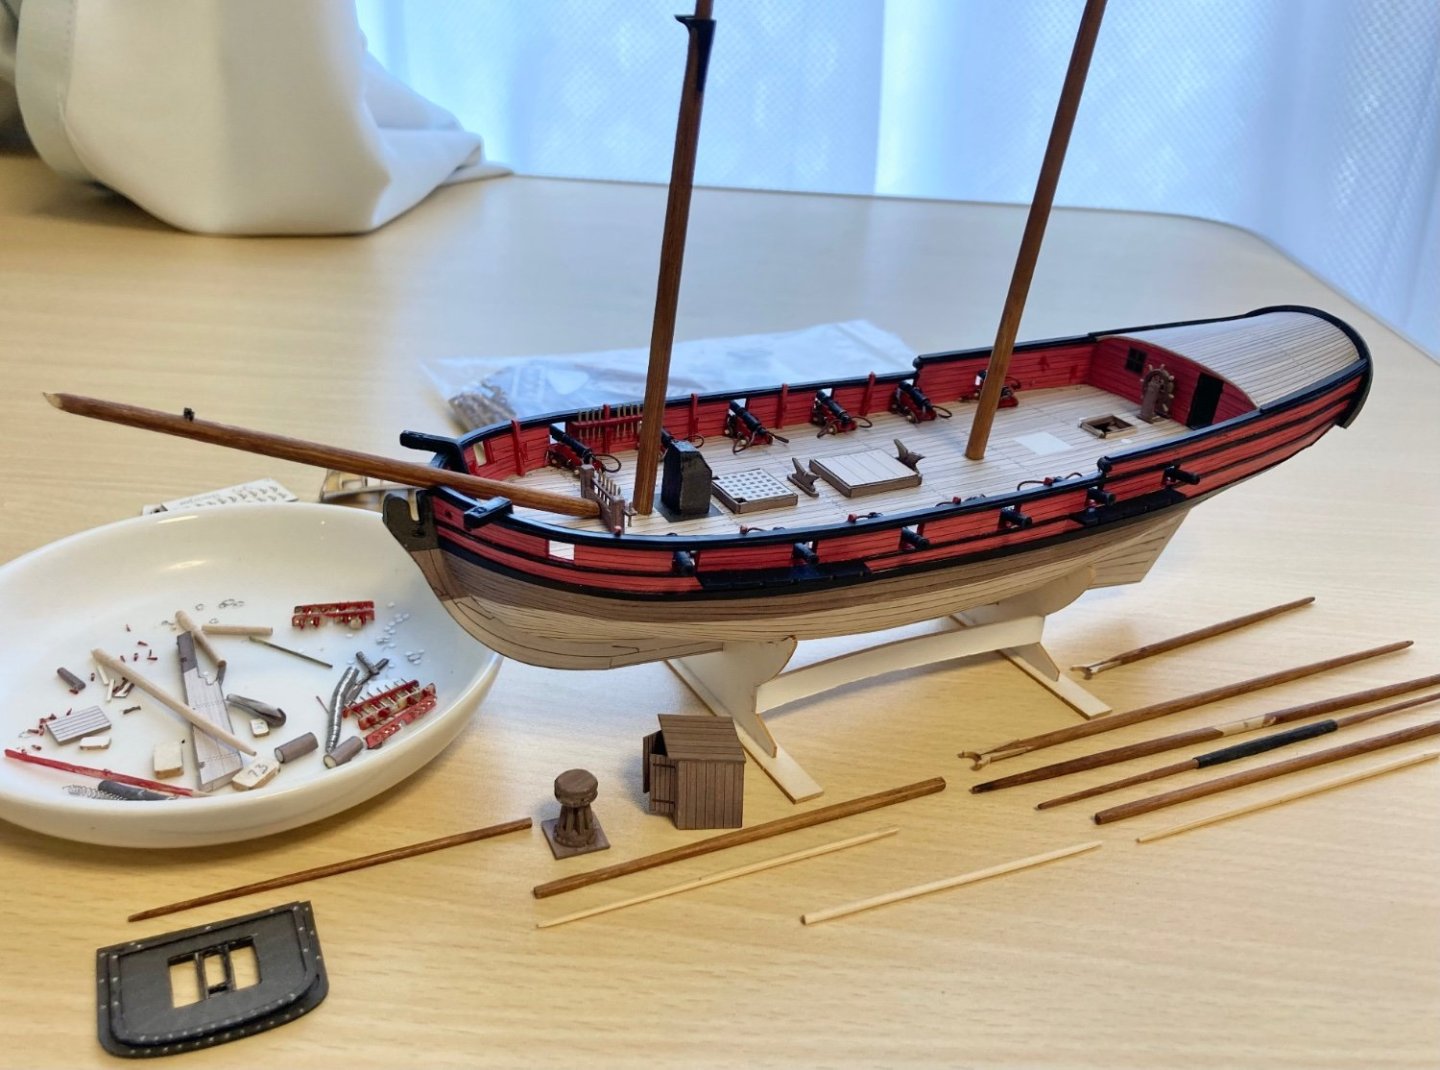
 As before, this will be a speedy project rather than quality work. This kit was released a year ago, and I bought it with full options, such as laser cut hulls and 3D printed blocks and canons. You should check out other project by Jsk.


- 16 replies
-
- 2
-
-
- Revenue Cutter
- Seahorse
- (and 2 more)
-
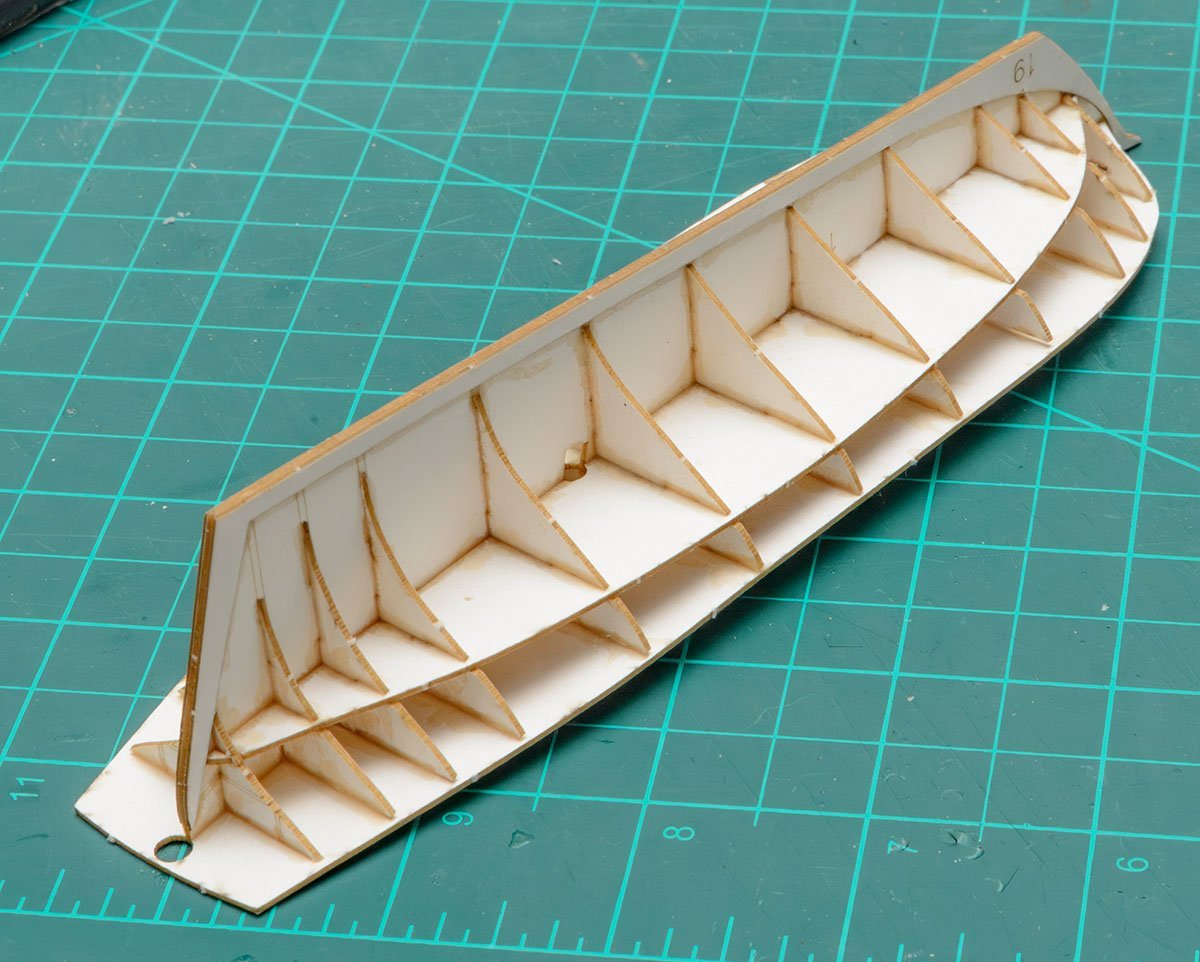
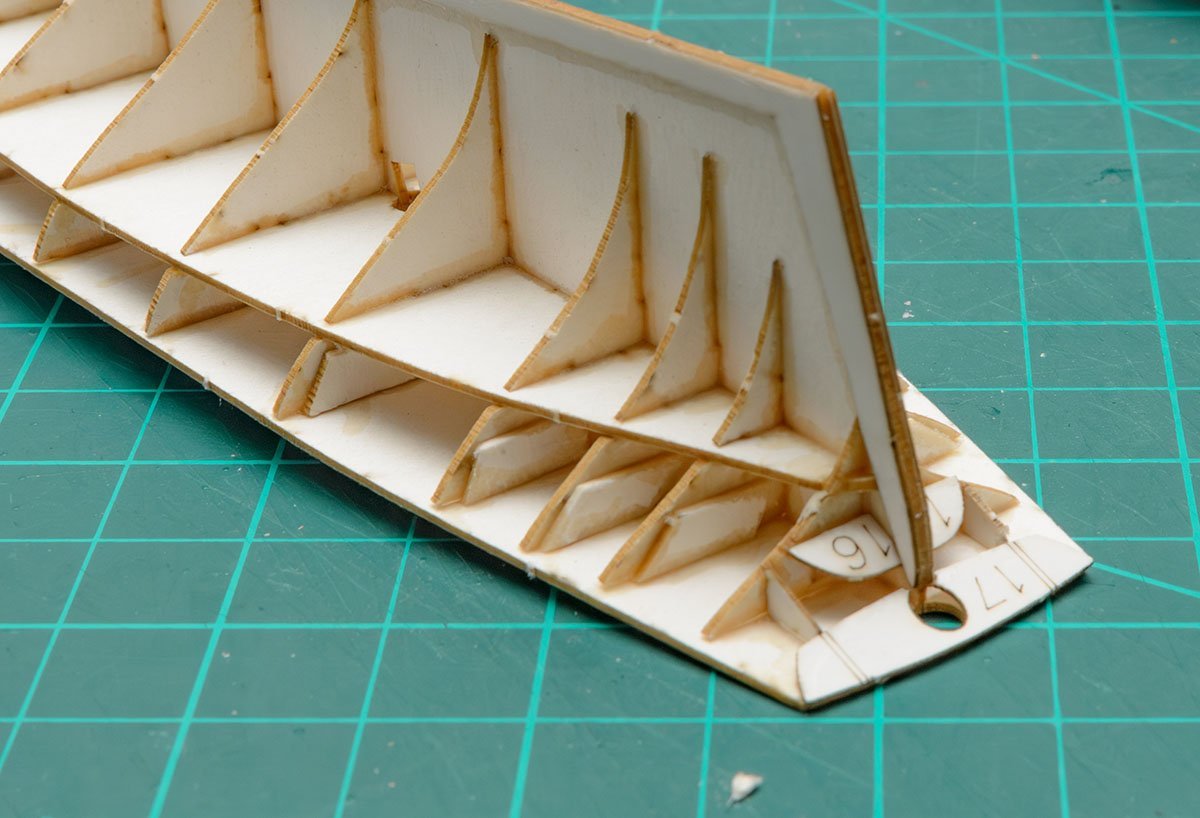
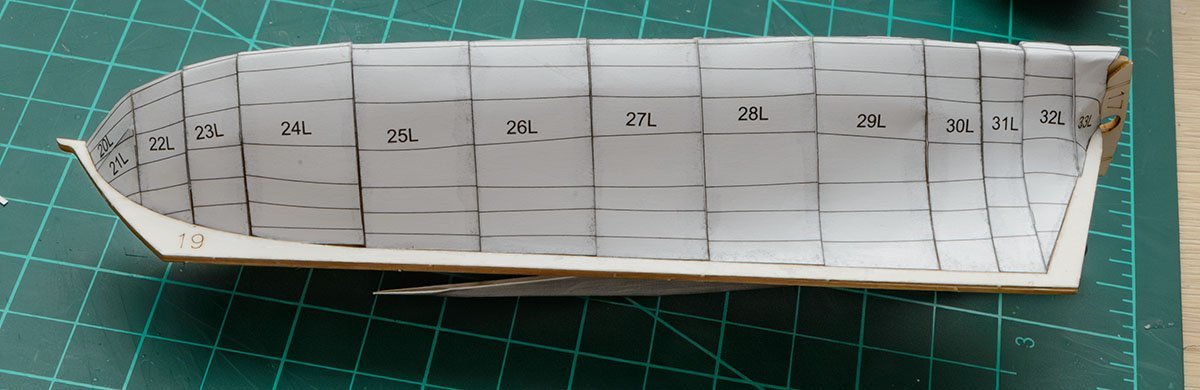
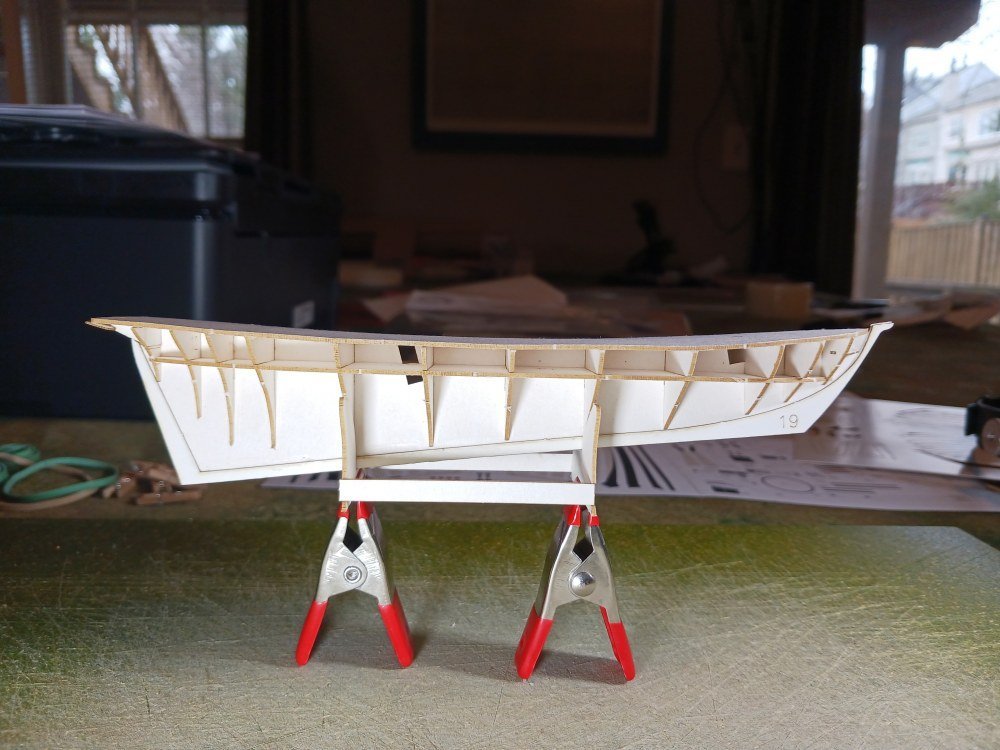
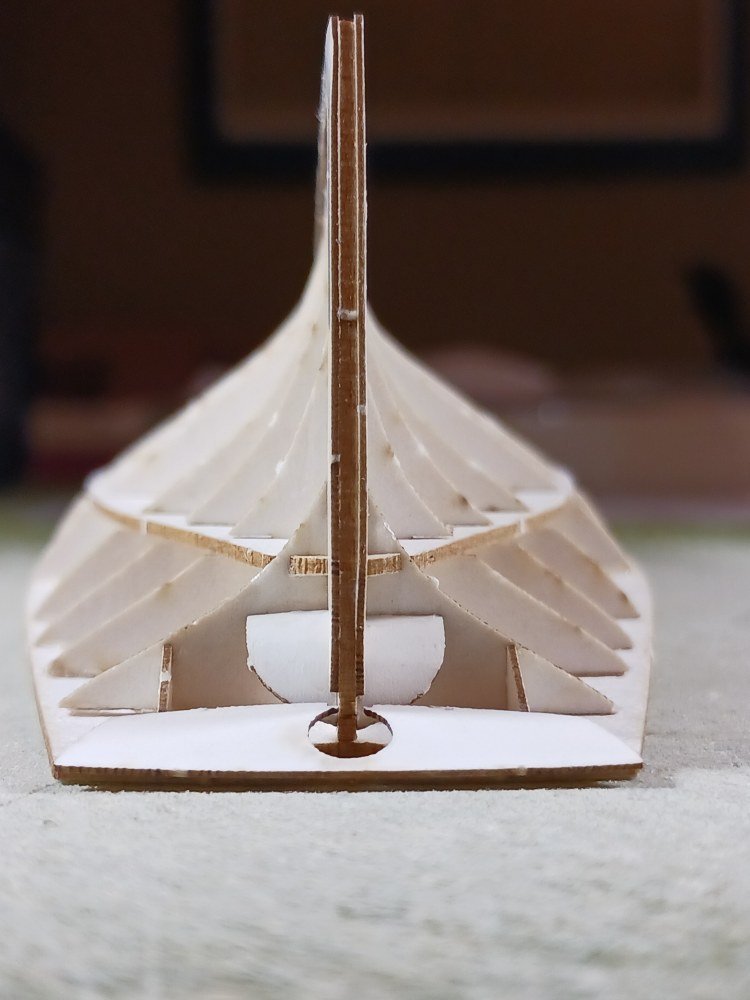
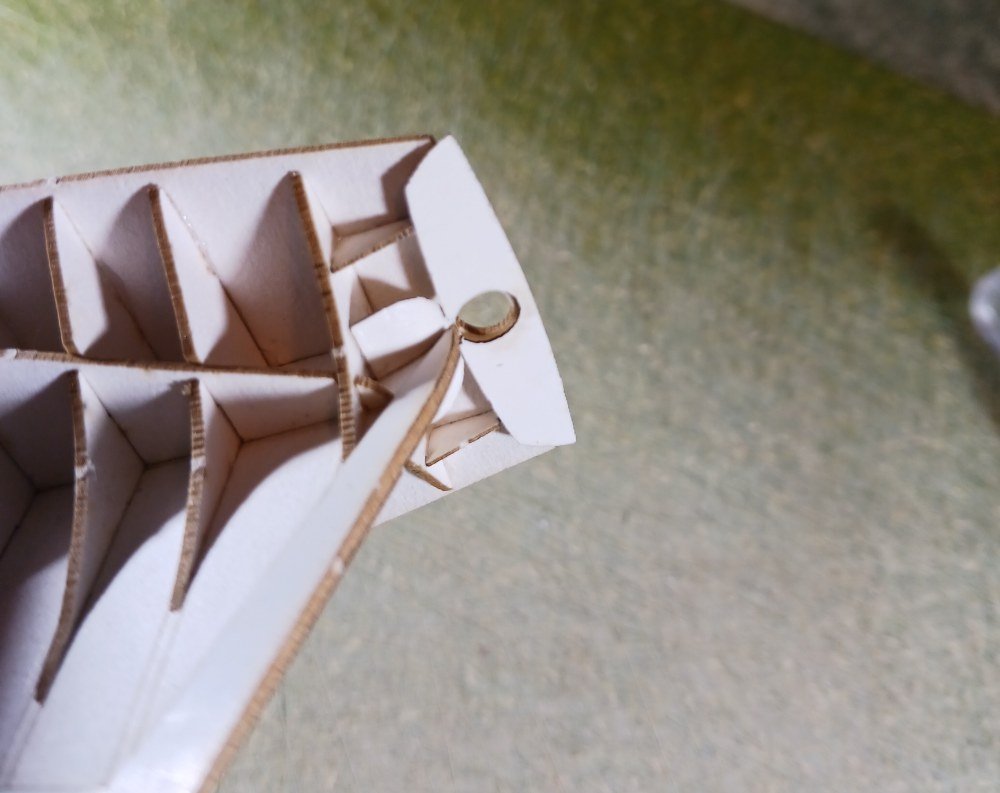
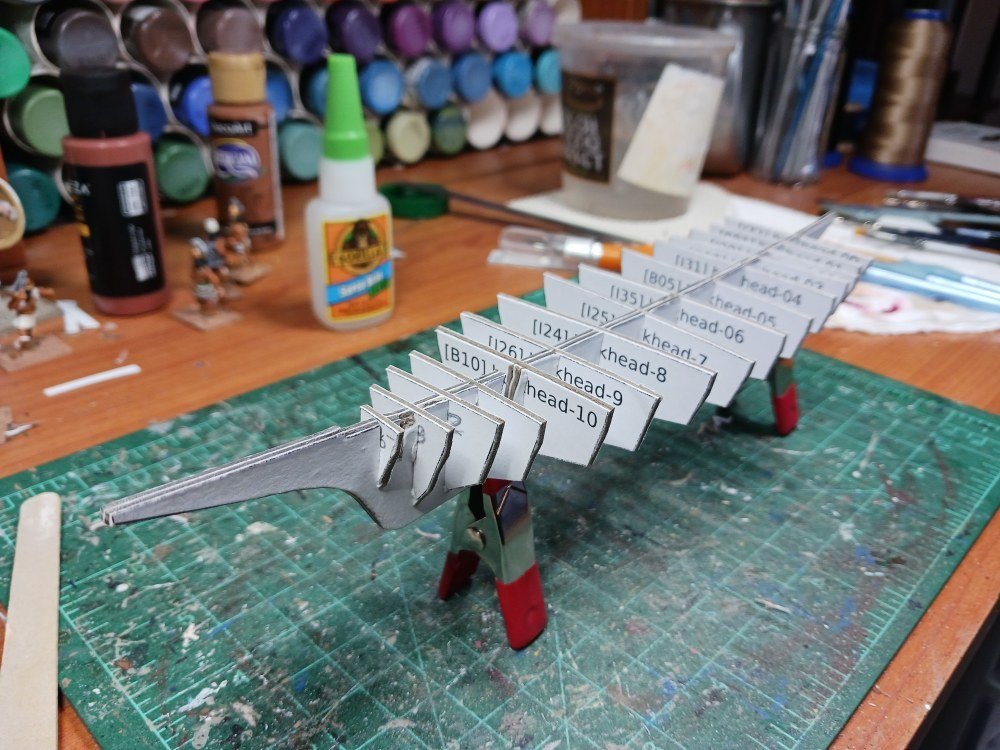
 I've been a bit frustrated with the scratch build skipjack so I decided to start one of the recently purchased Seahorse kits. I recently reviewed the kit here. What a pleasure. I've not progressed far--only through the first drawing--but this is so much more relaxing than home-grown! I'm only aware of one gaff on my part: I glued bulkhead 13 facing forward like all the rest. But 13 has some guide lines on it that should have been facing aft. Oh, well. I did notice one typographical error in the instructions. Part #16 is erroneously identified as 16a in the line drawing even though it is correctly identified in the shaded drawing right below. Not a big deal. I have to admit I'm not sure of the purpose of part 16. As far as I can tell they will be entirely covered. Maybe it will become clear later on. And maybe it's better that they are hidden. In the enlarged photo below I noticed that I did not get them symmetrical. (Might have helped if bulkhead 13 faced aft!) I actually didn't notice it until resizing the picture for this post. I only see out of my left eye, I wear glasses as well as a magnifying visor. Consequently, I have found that two layers of lenses and lack of binocular vision and depth perception often lead me to believe that things are straight and even when they actually are not. Must be why I'm drawn to hobbies that require visual acuity! I also think part #43/44 (the transom) is better attached in a later step. At this point the rake of the transom is unclear. Later on a couple of knees are installed which should hold the transom at the correct angle. I'll probably start attaching the first layer of the hull tomorrow. Looks kind of tricky so we'll see if I can keep my Zen going!
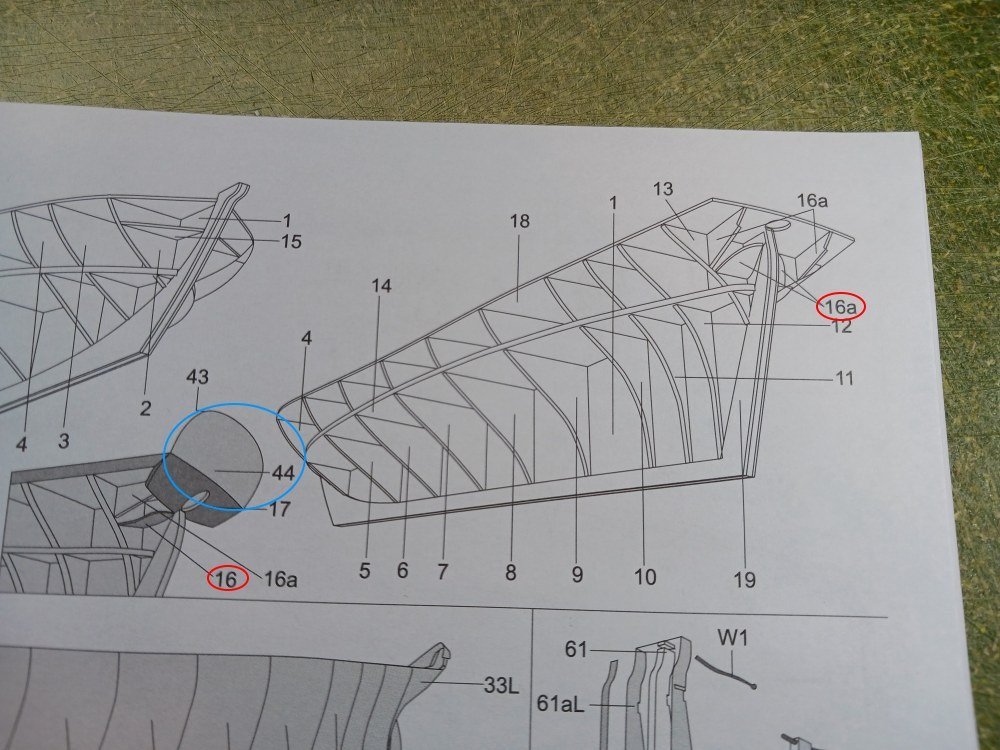
- 34 replies
-
- 4
-
-
- card
- Revenue Cutter
- (and 1 more)
-
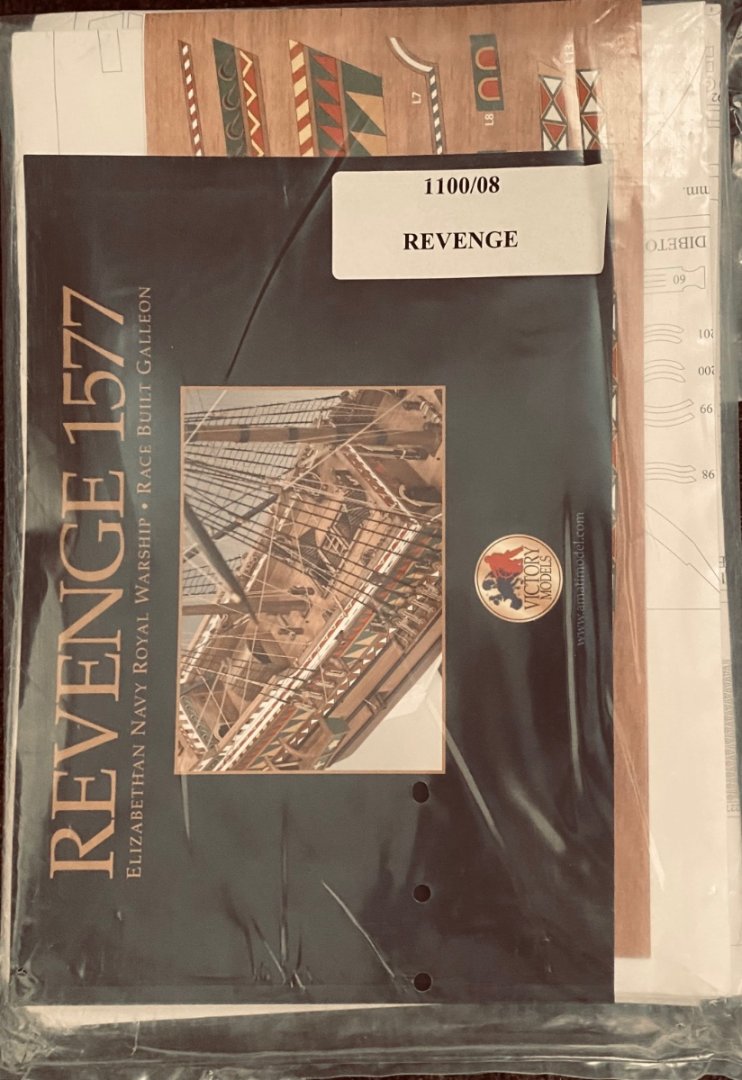
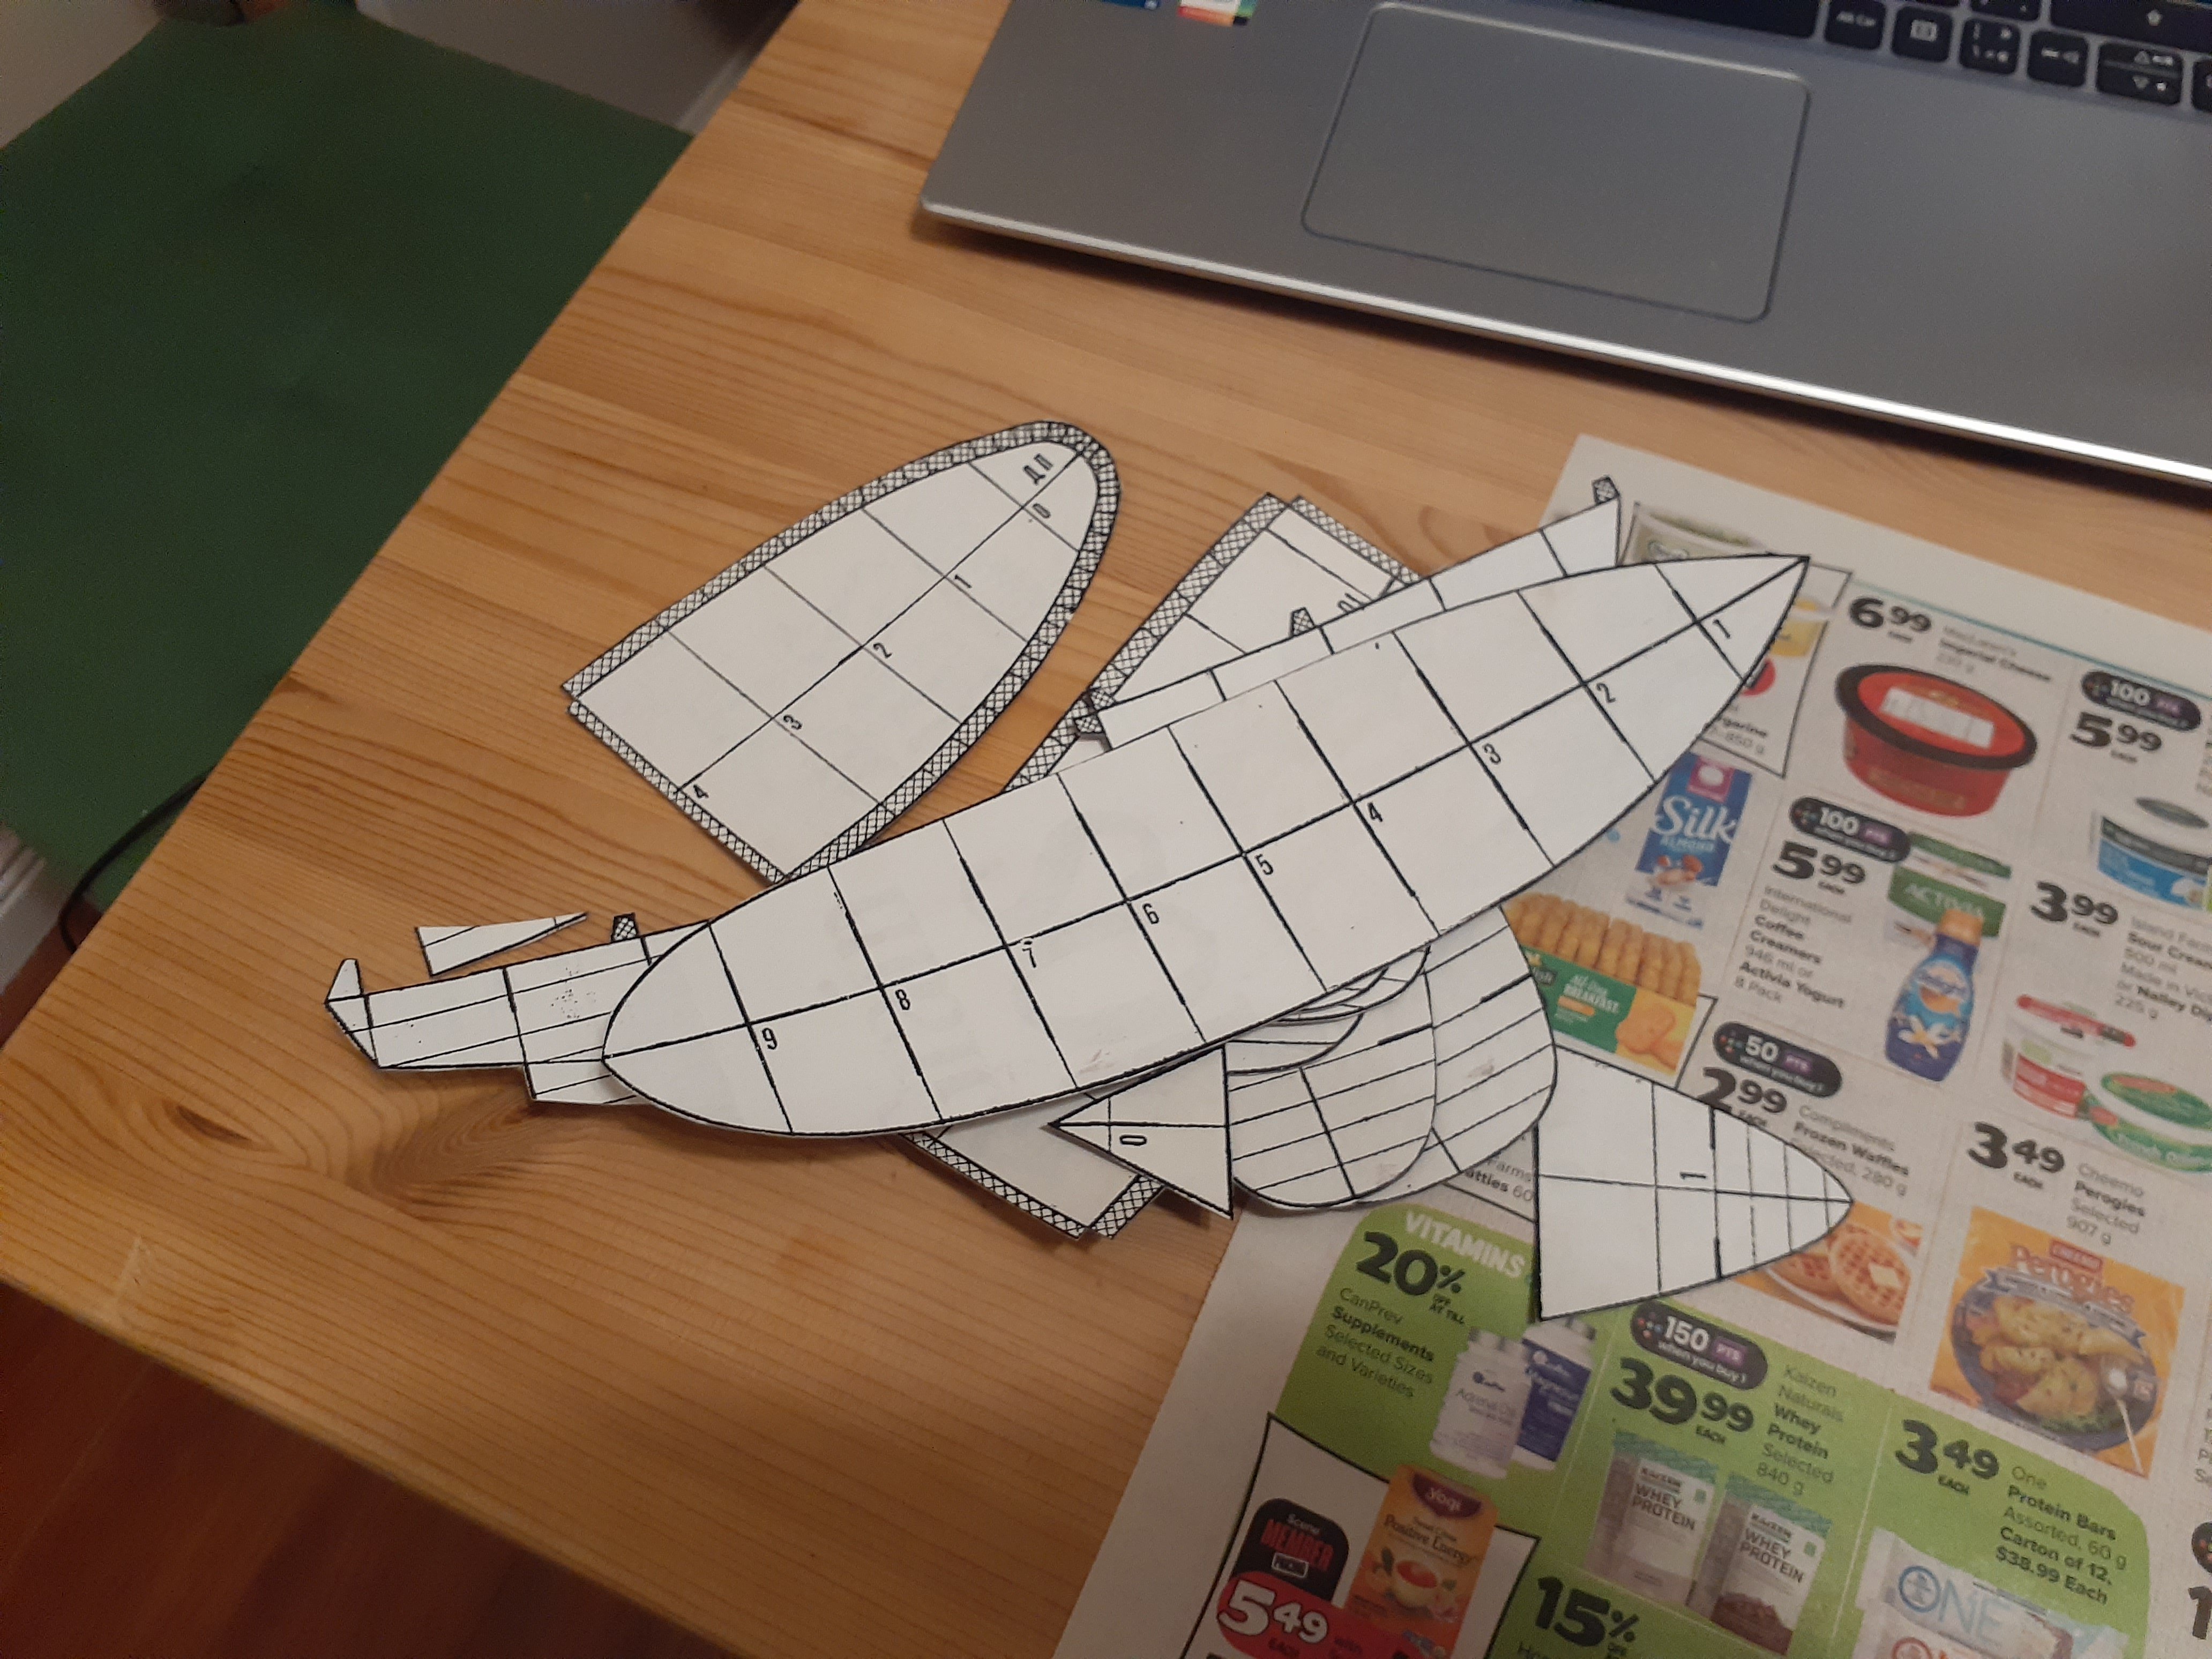
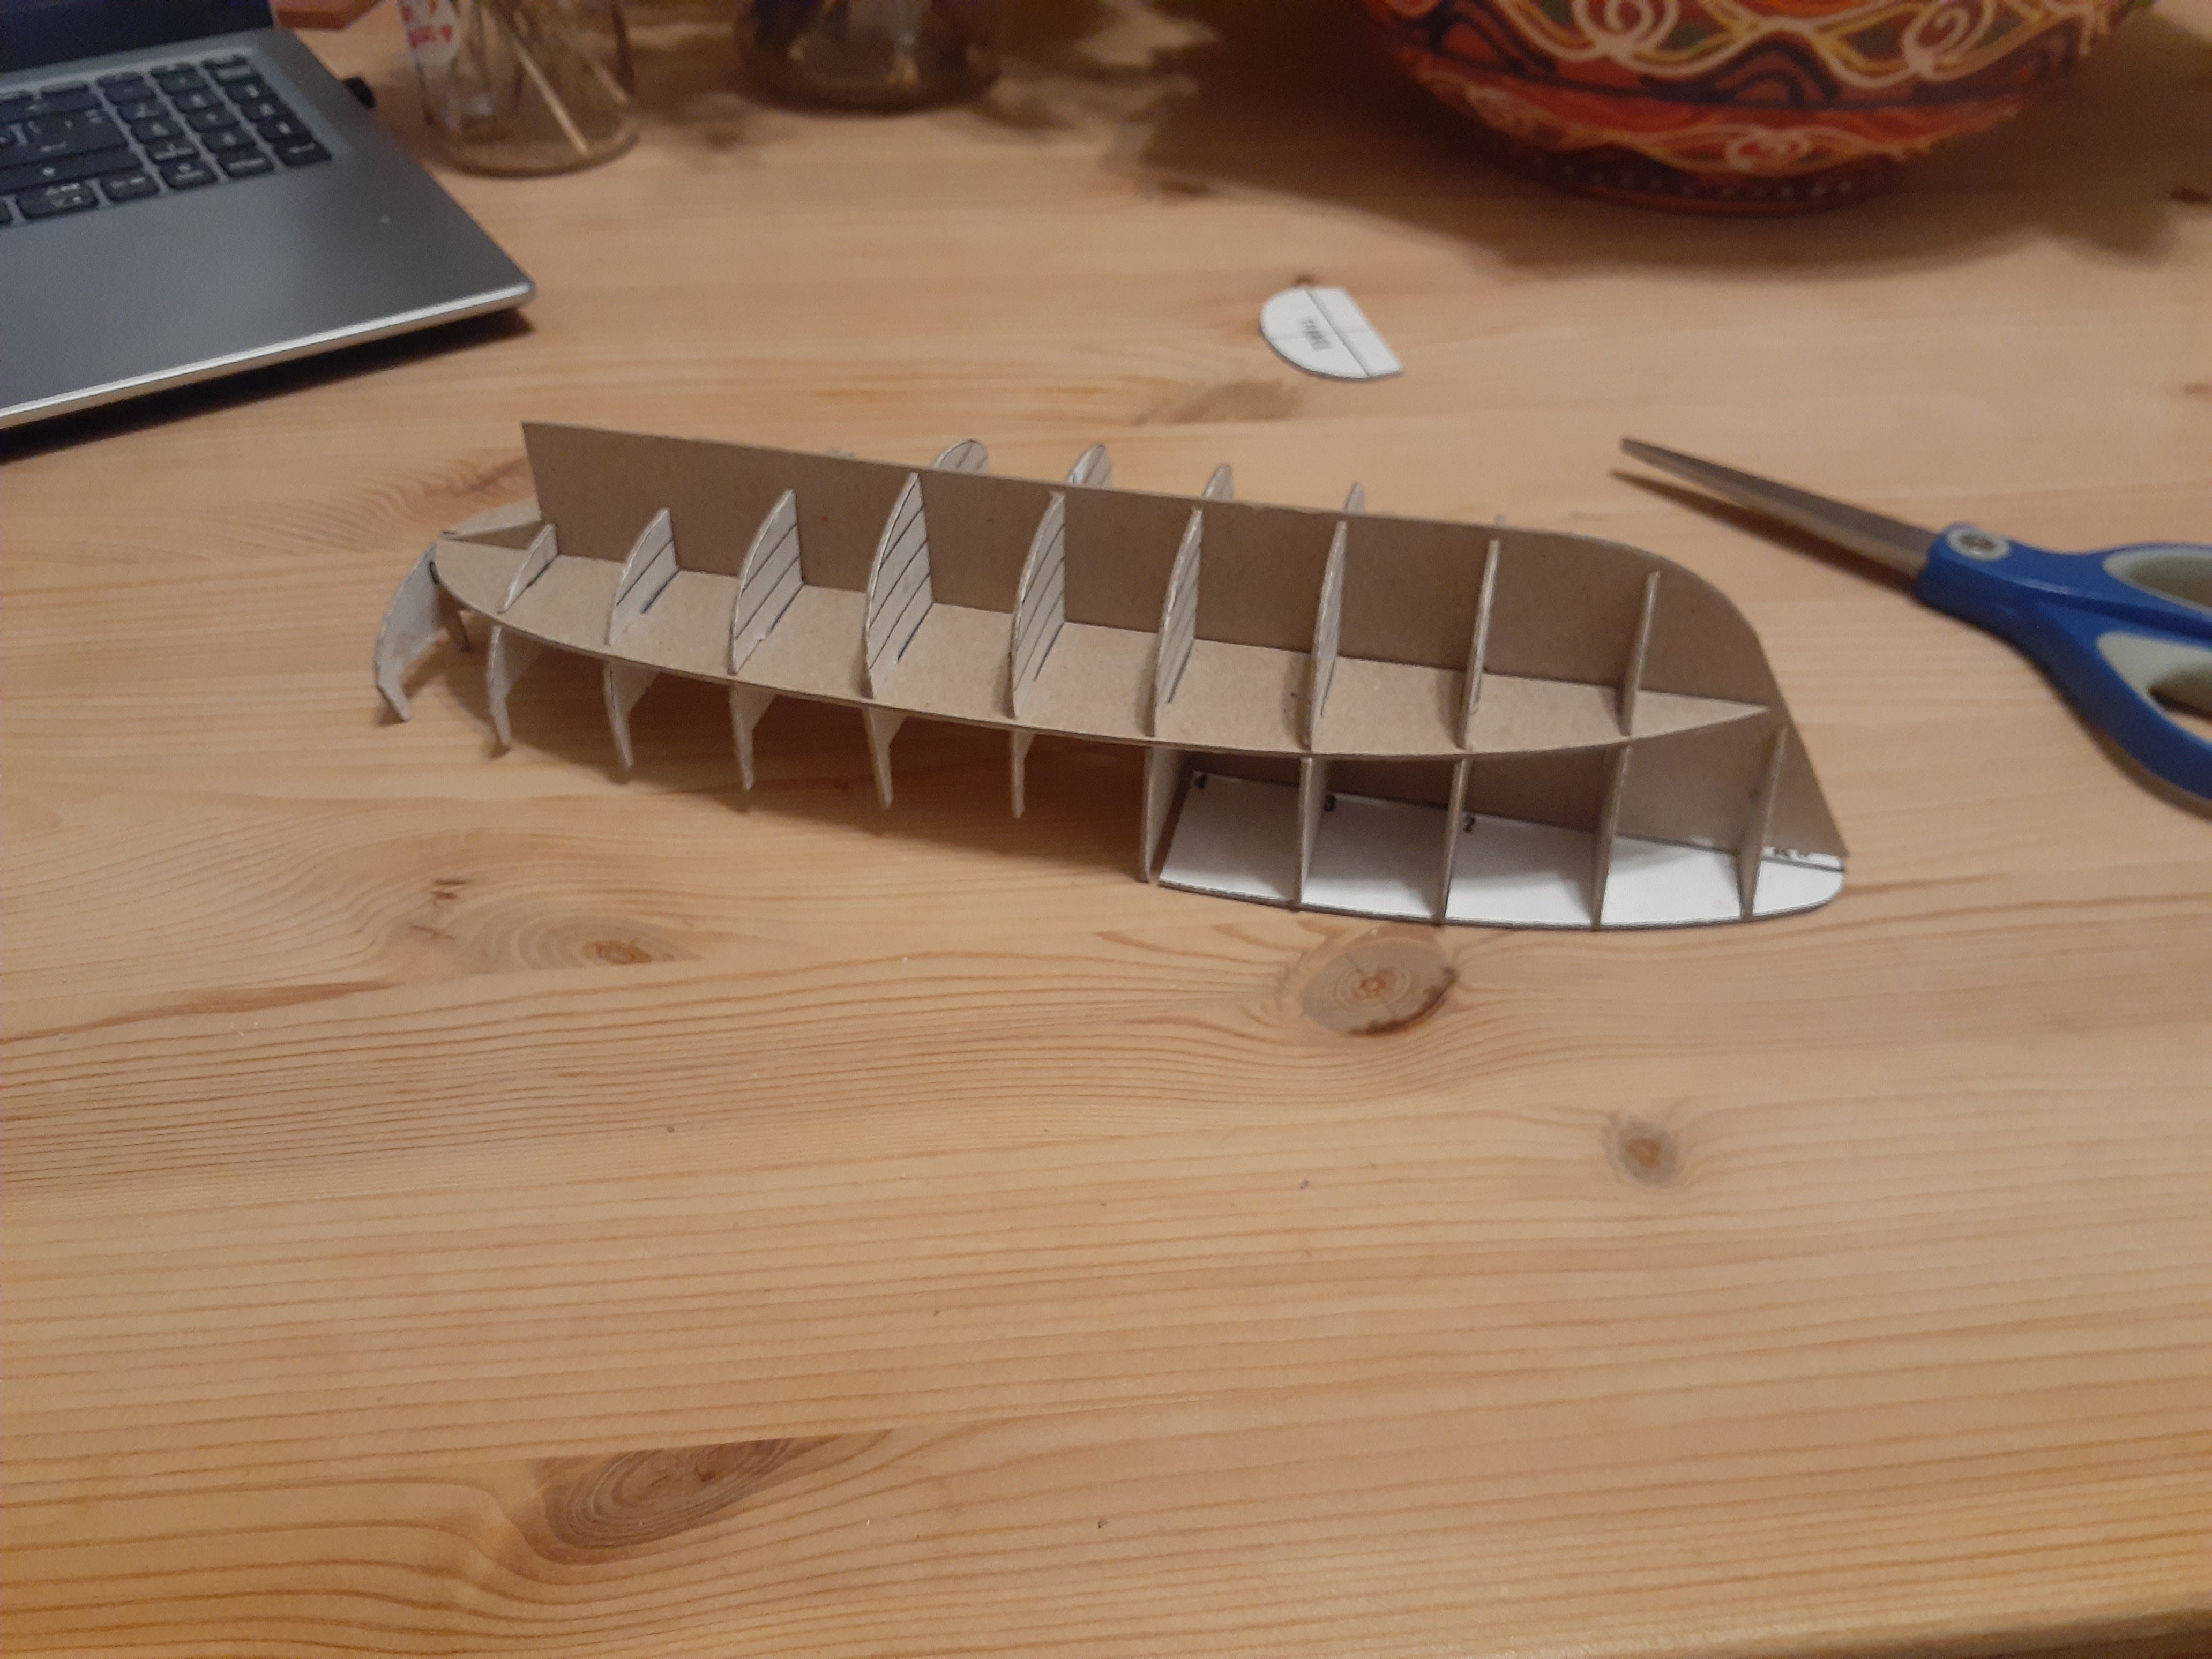
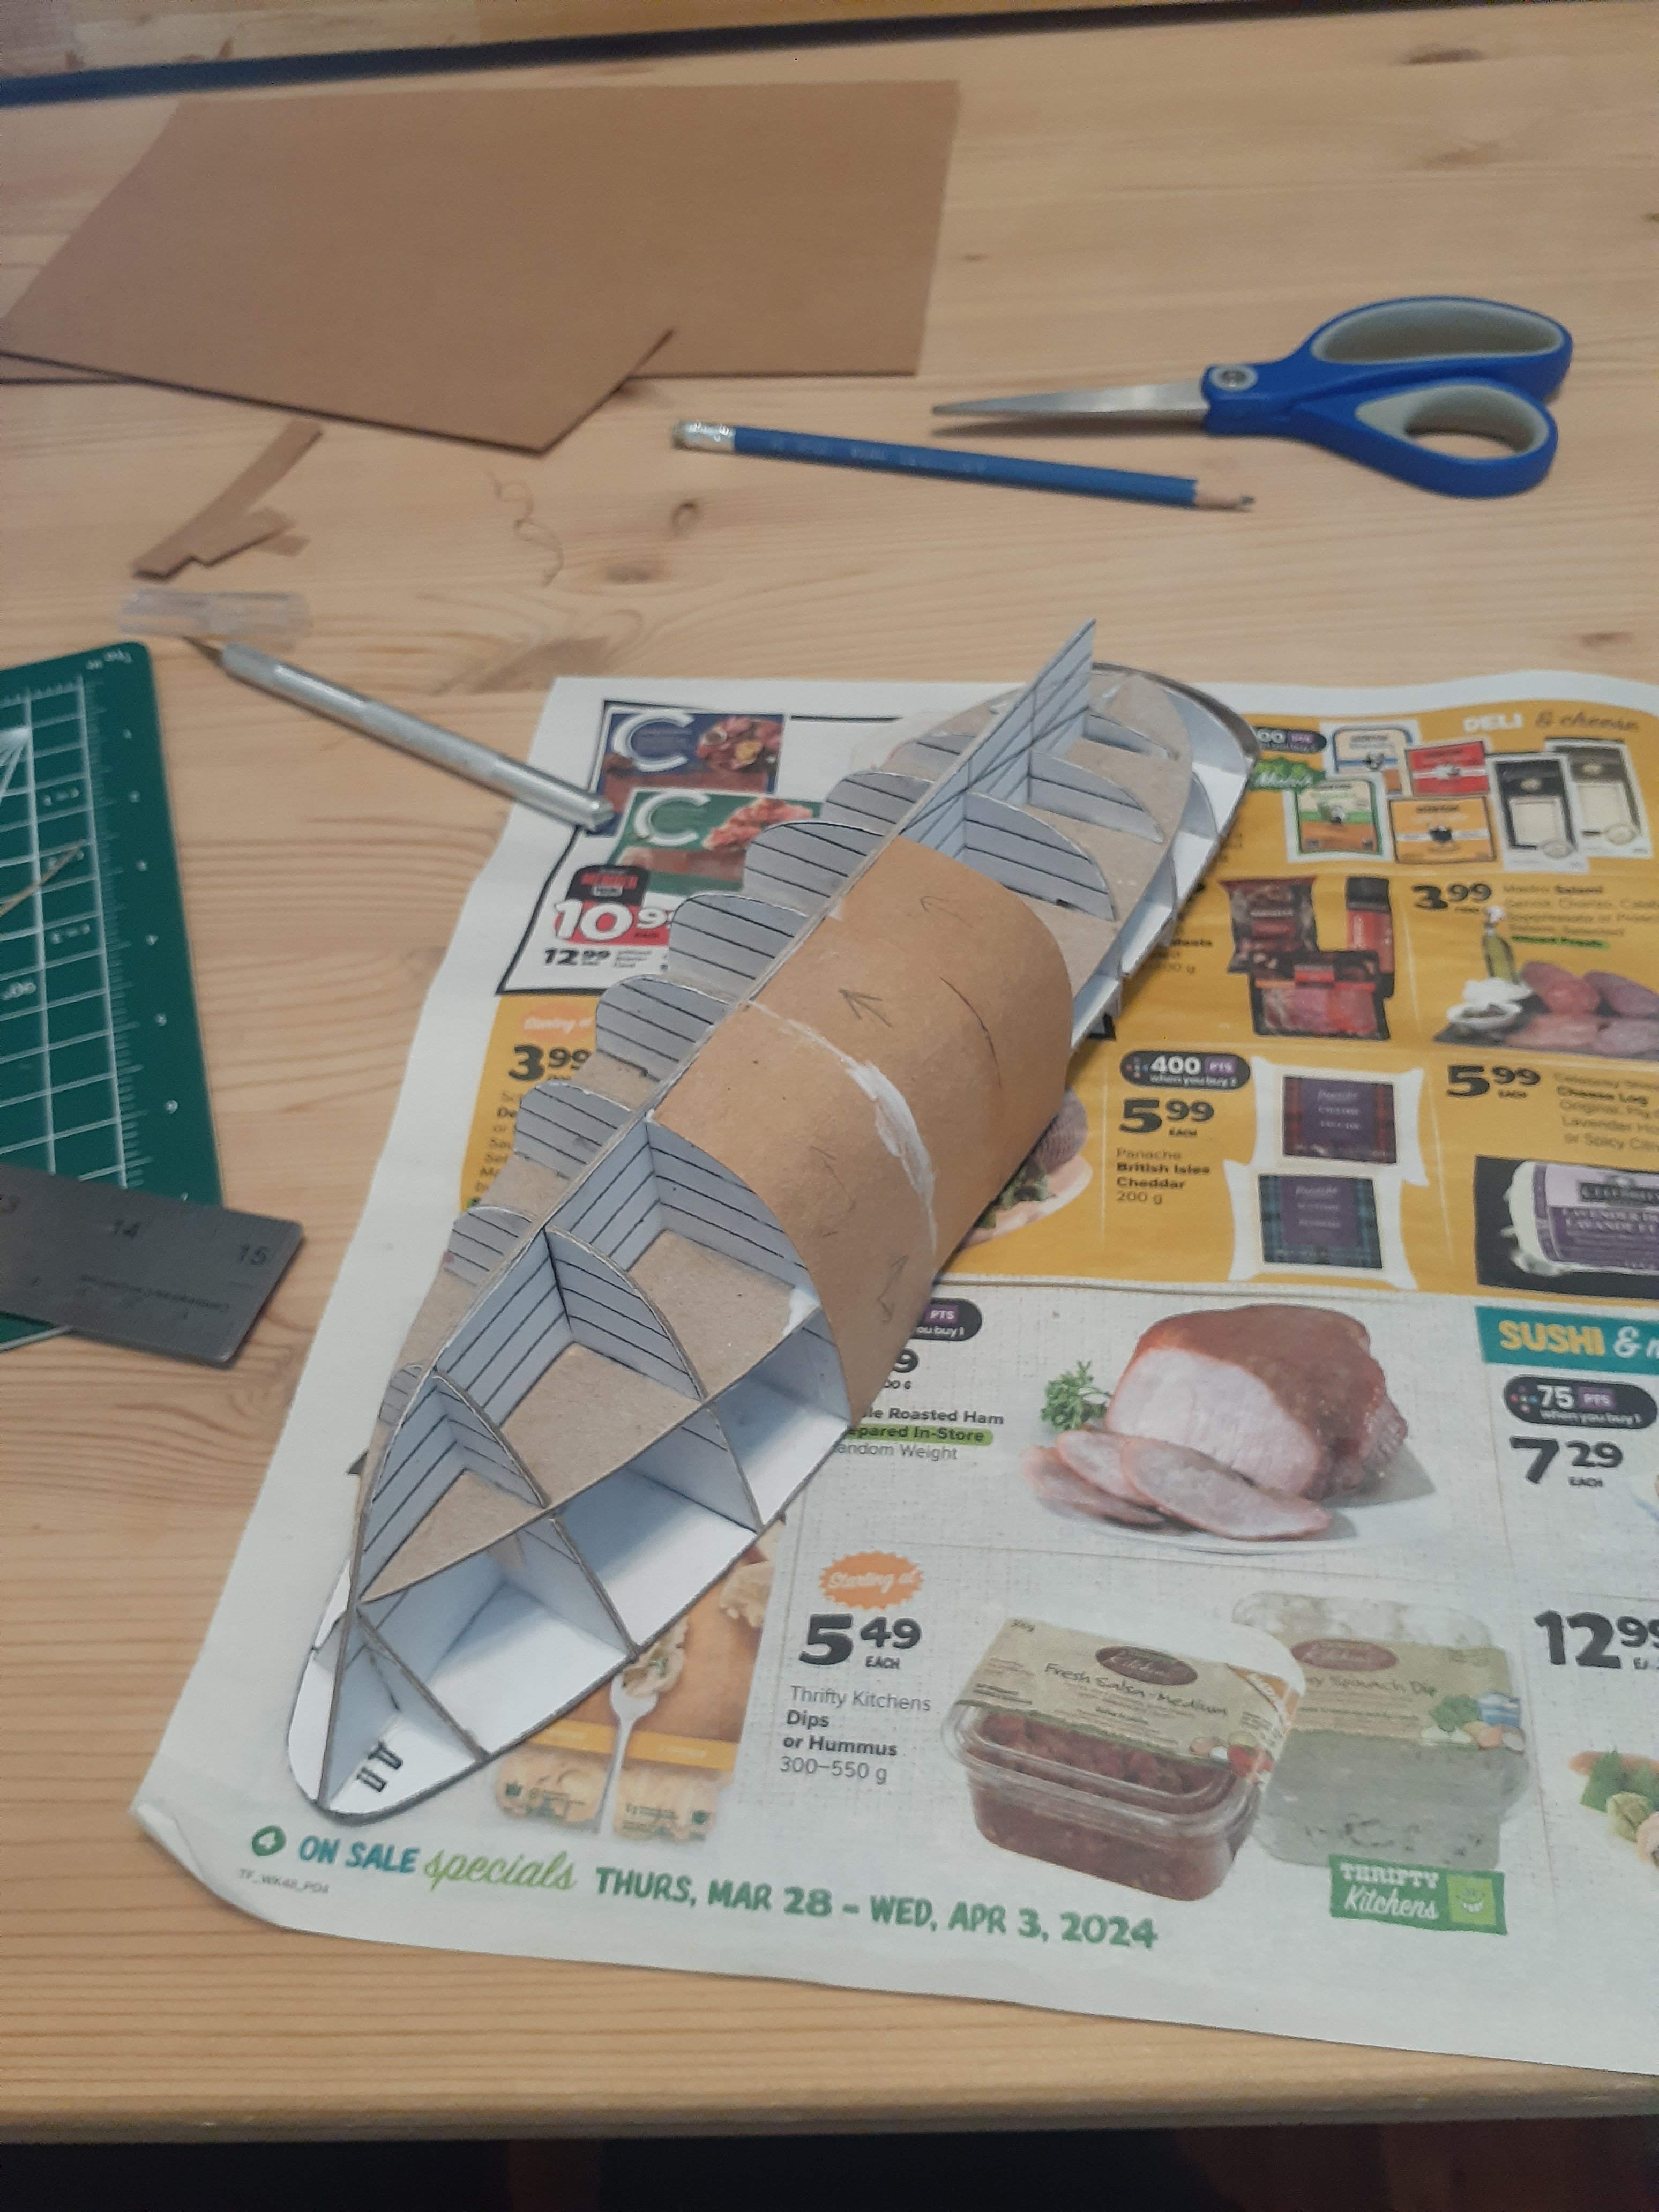
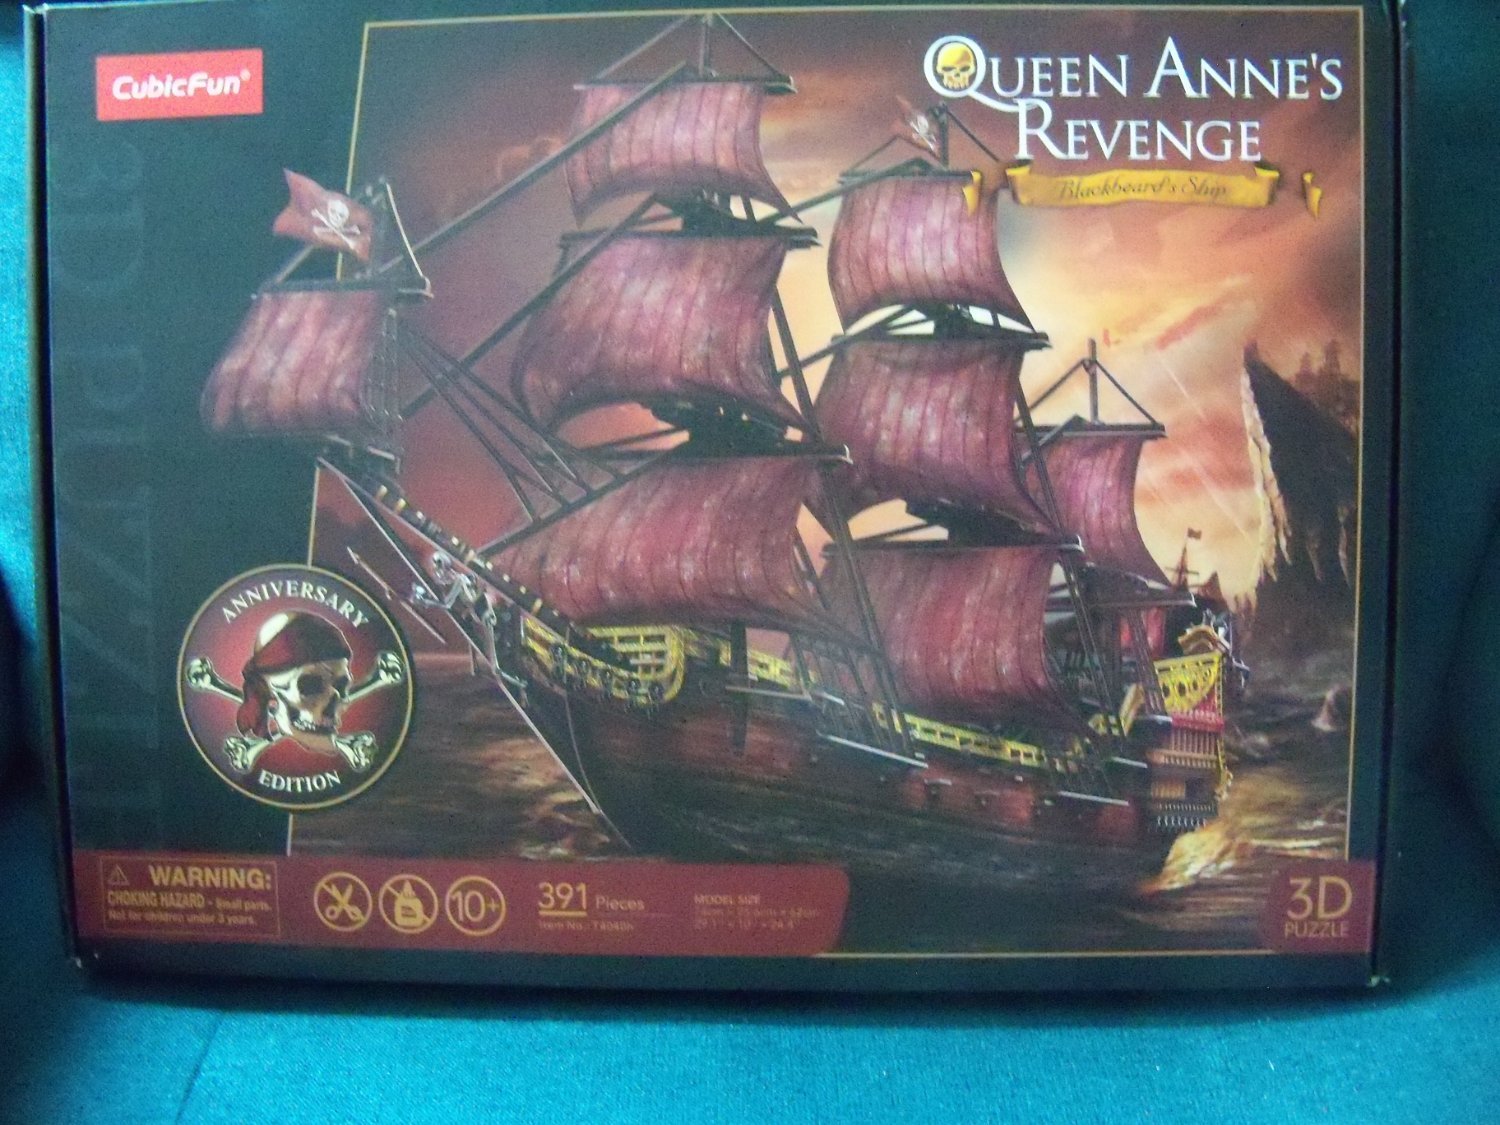
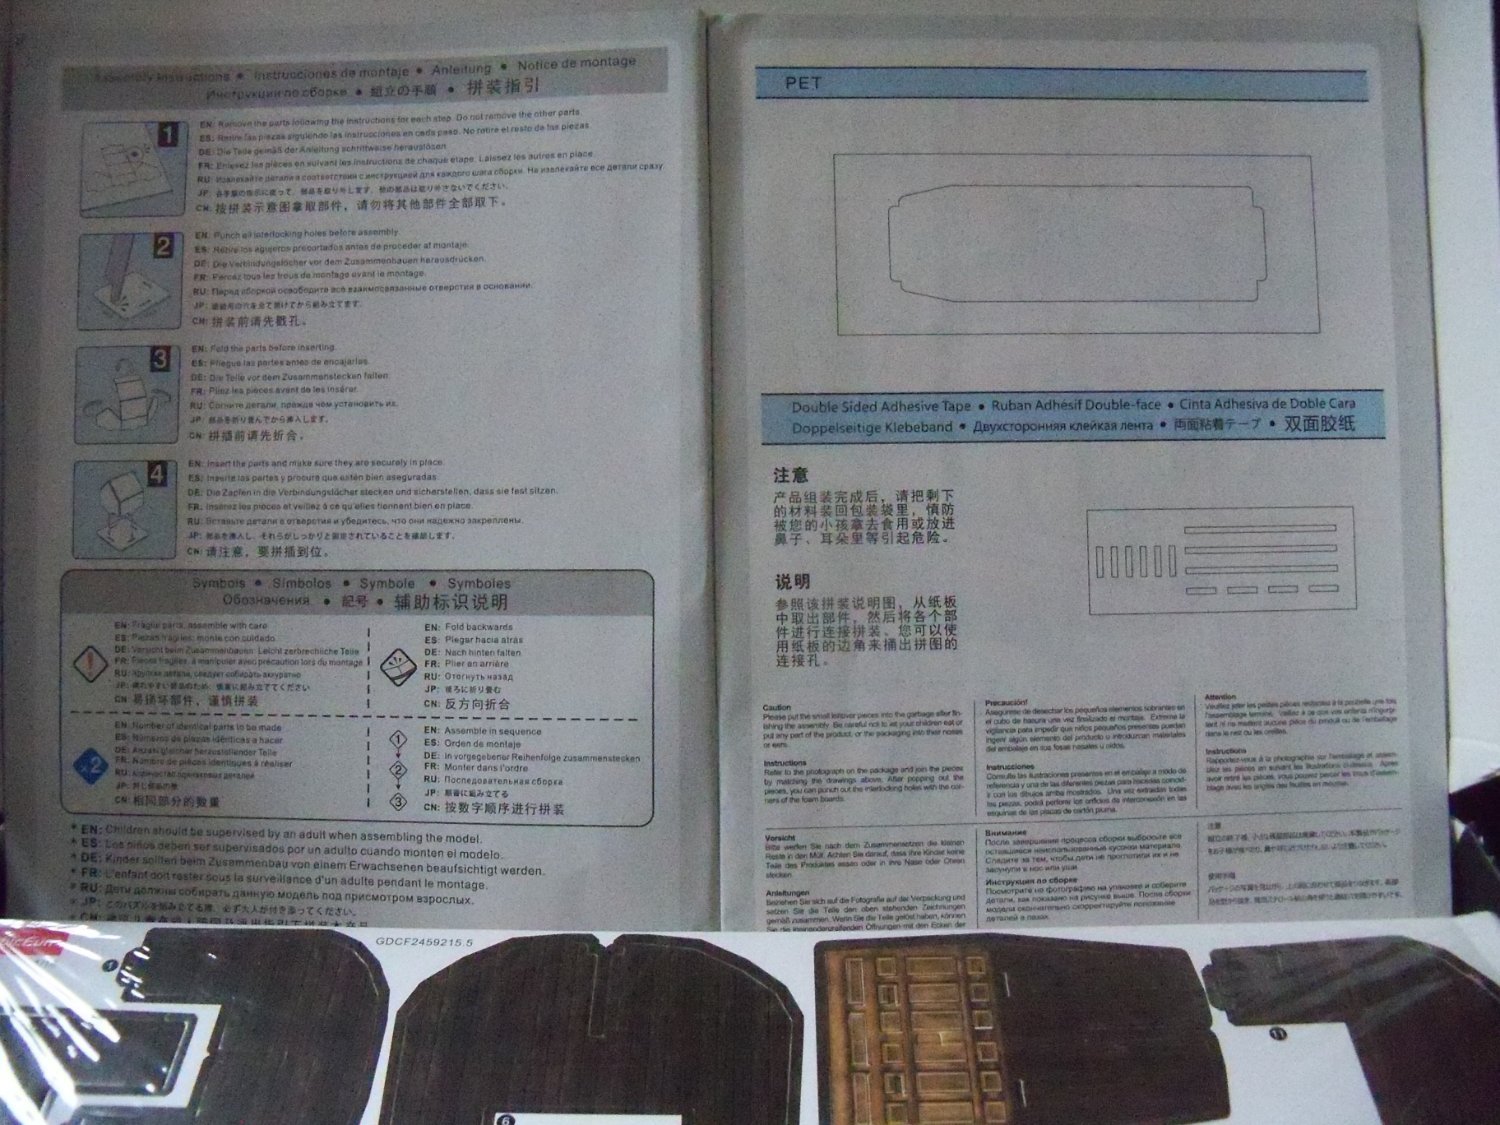
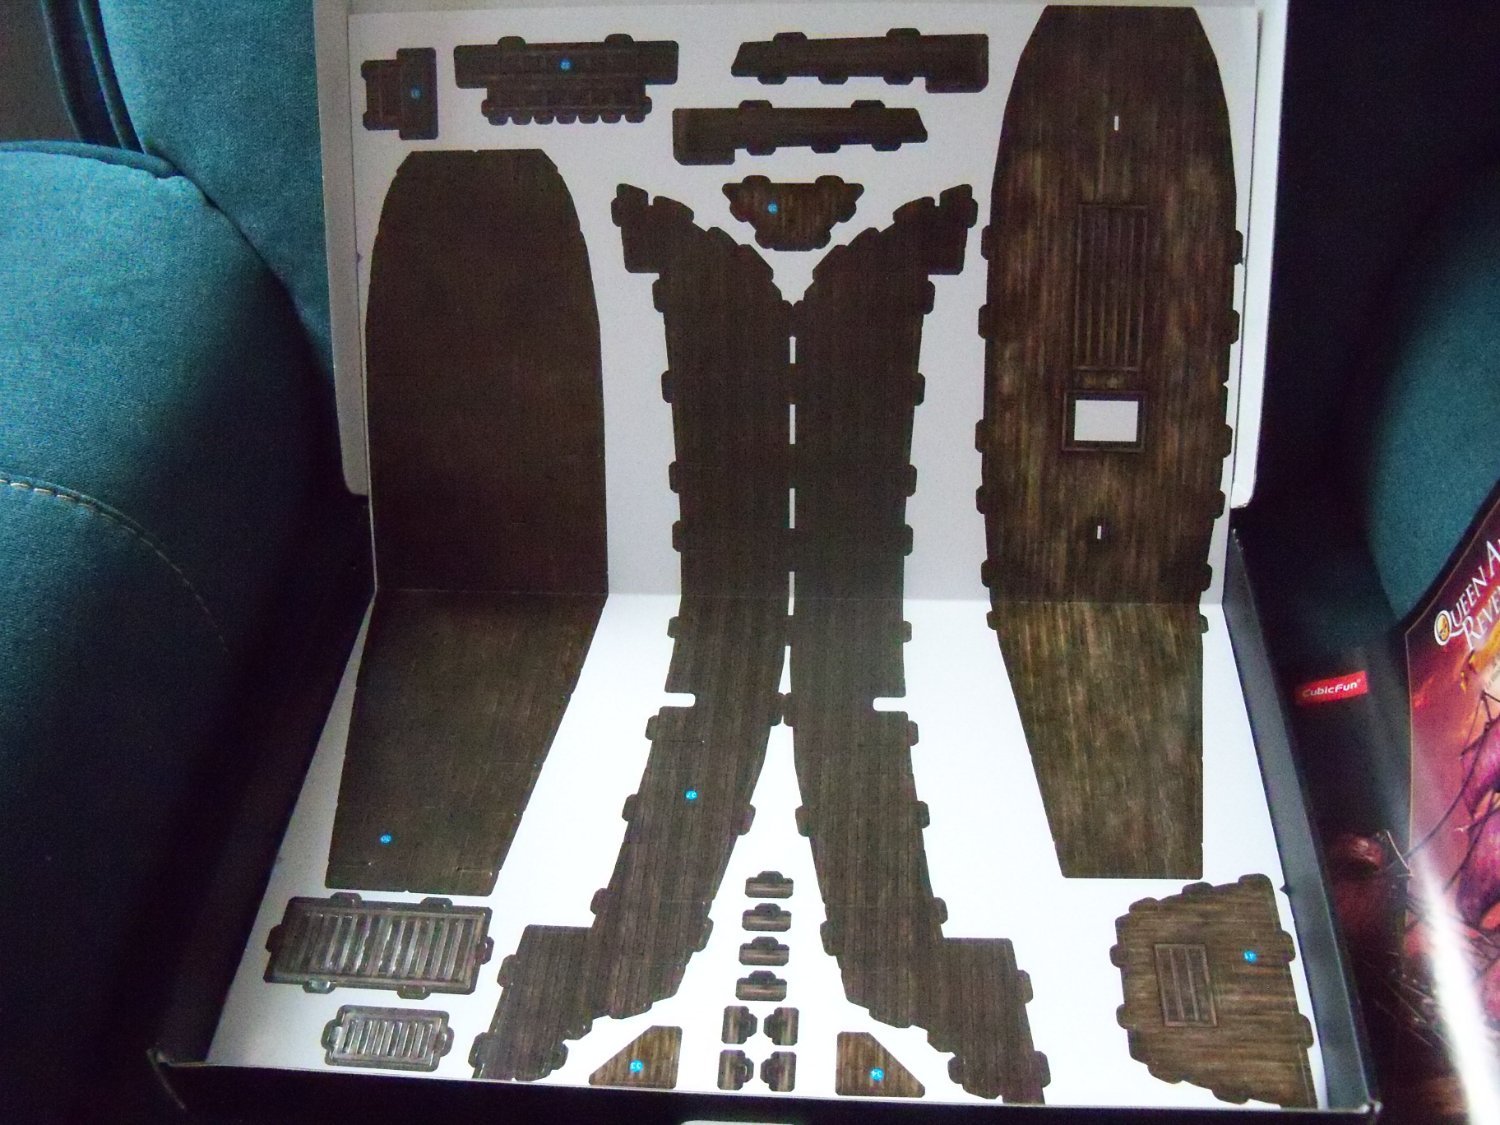
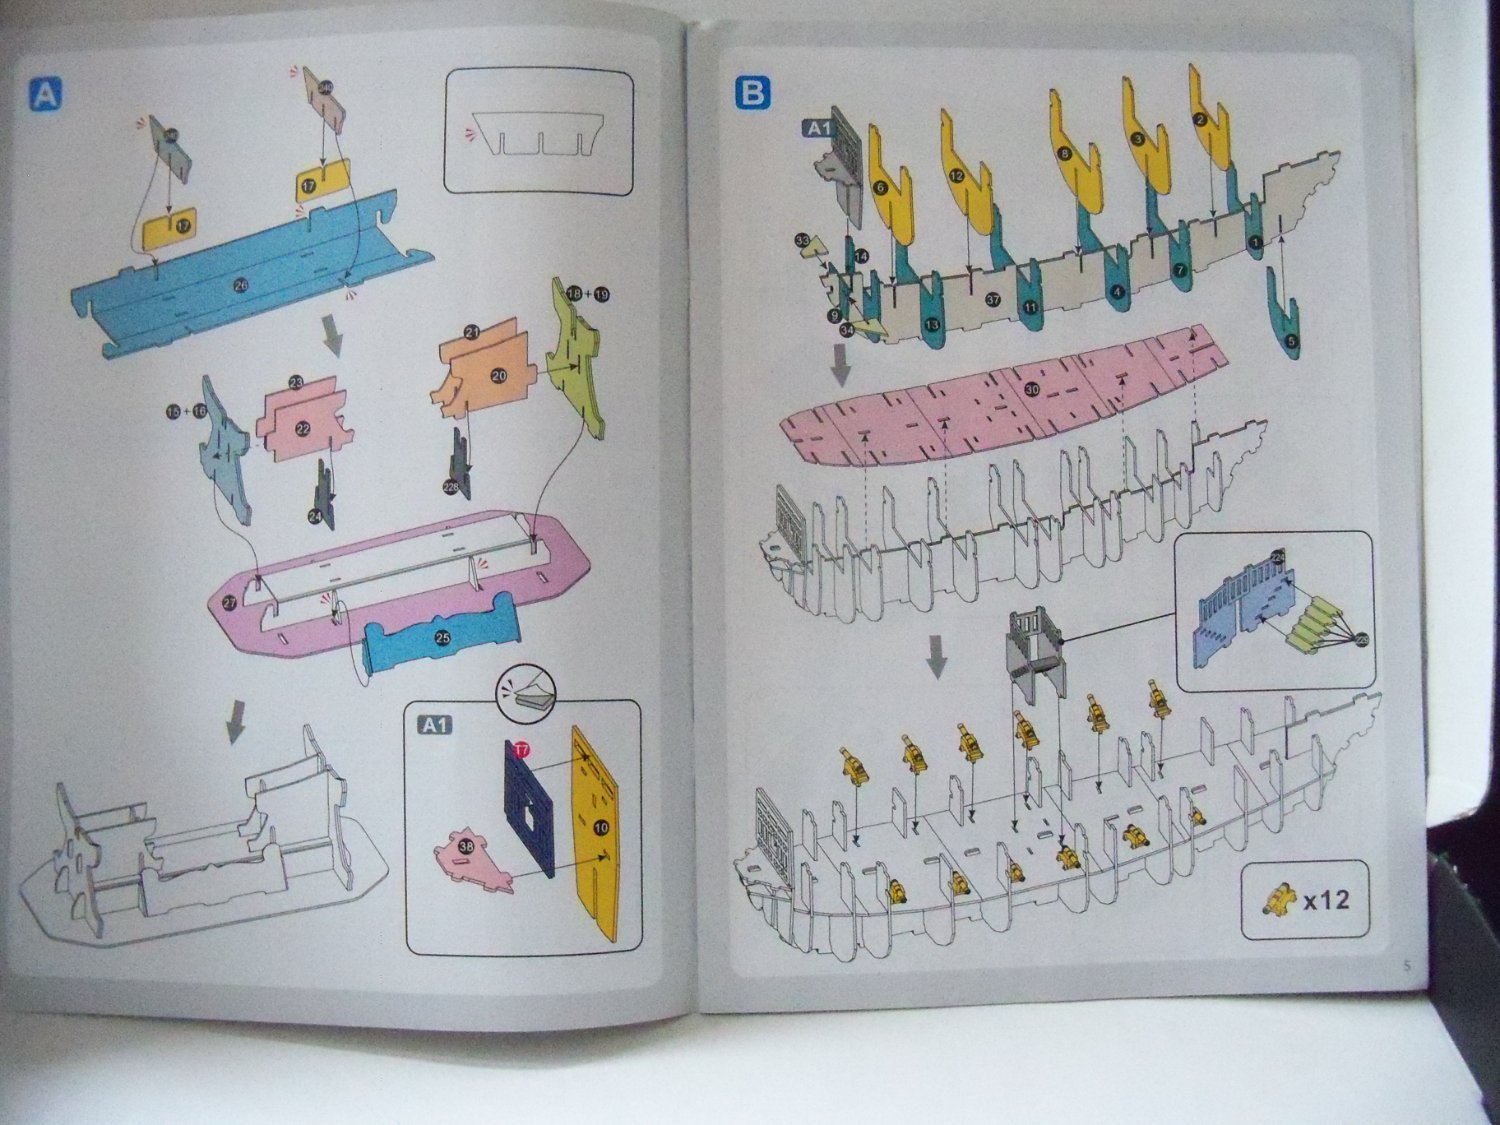
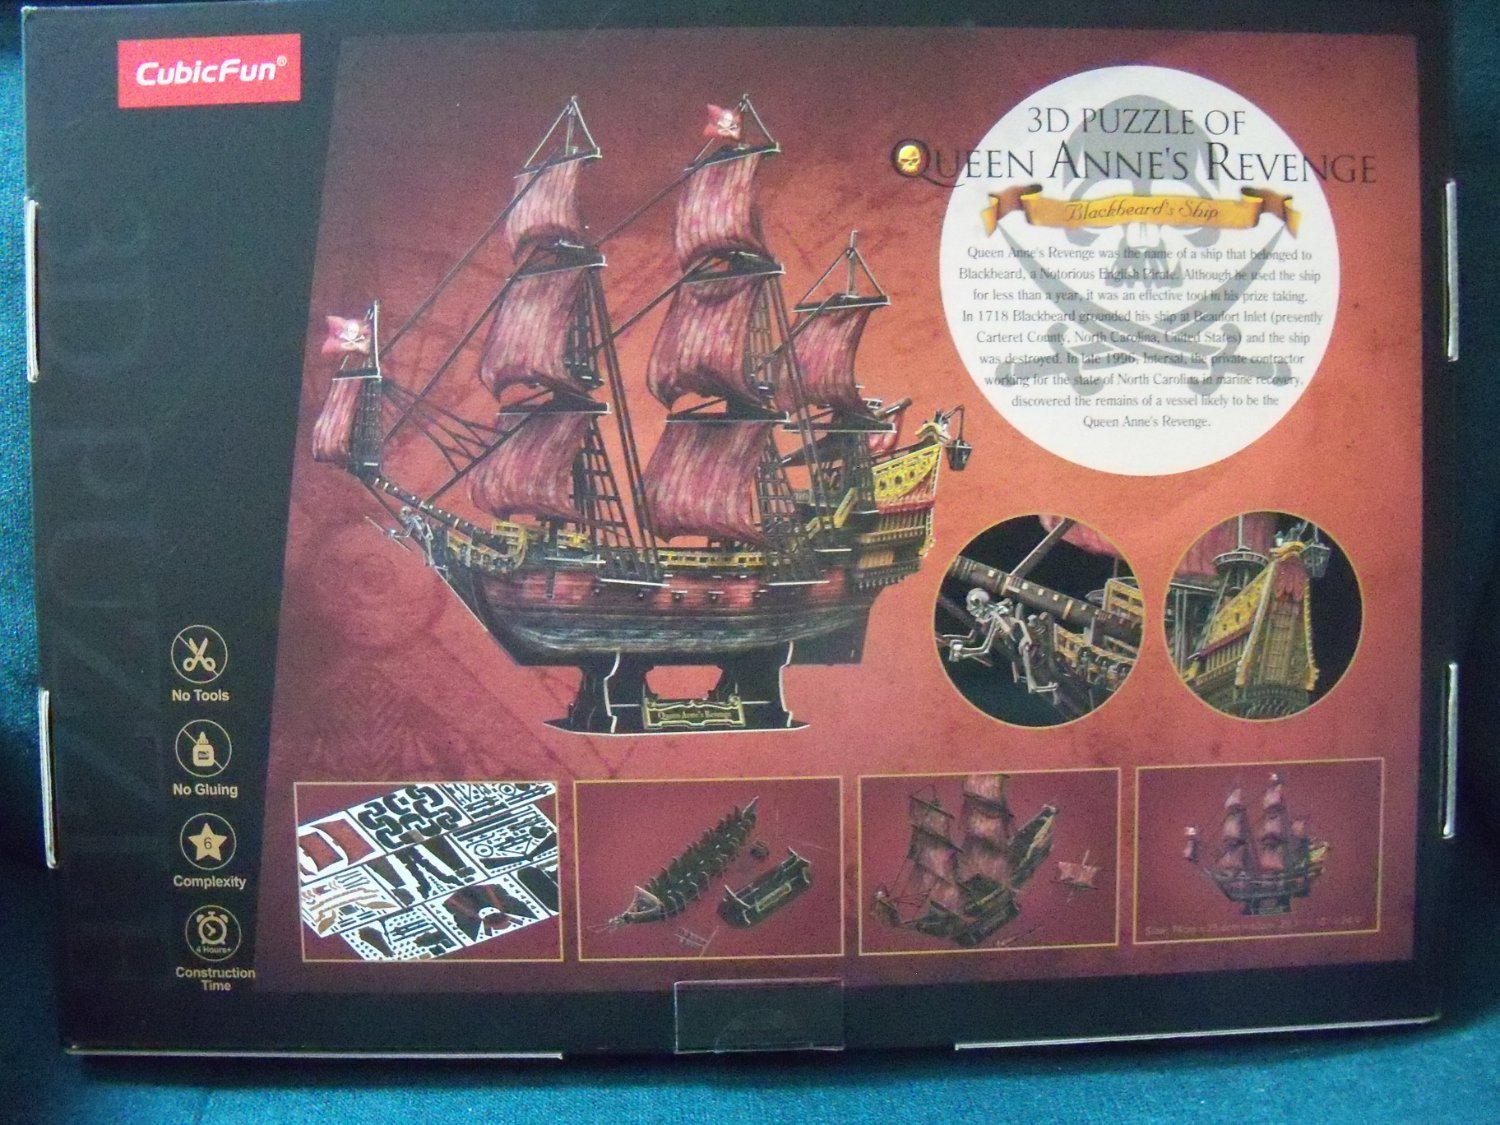
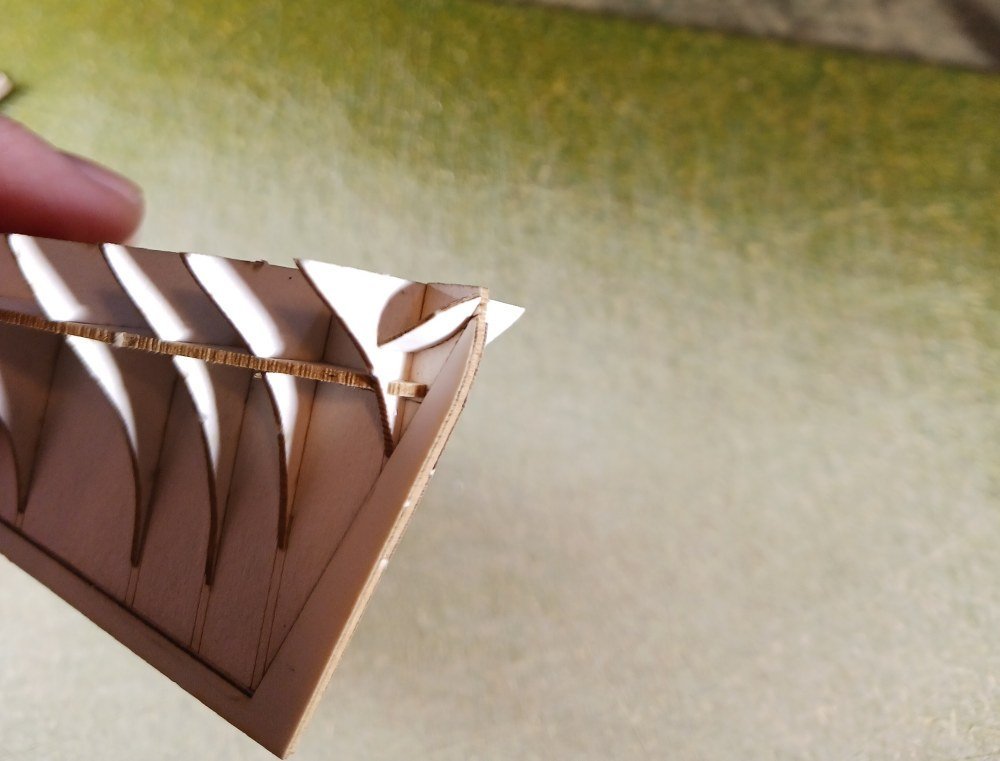
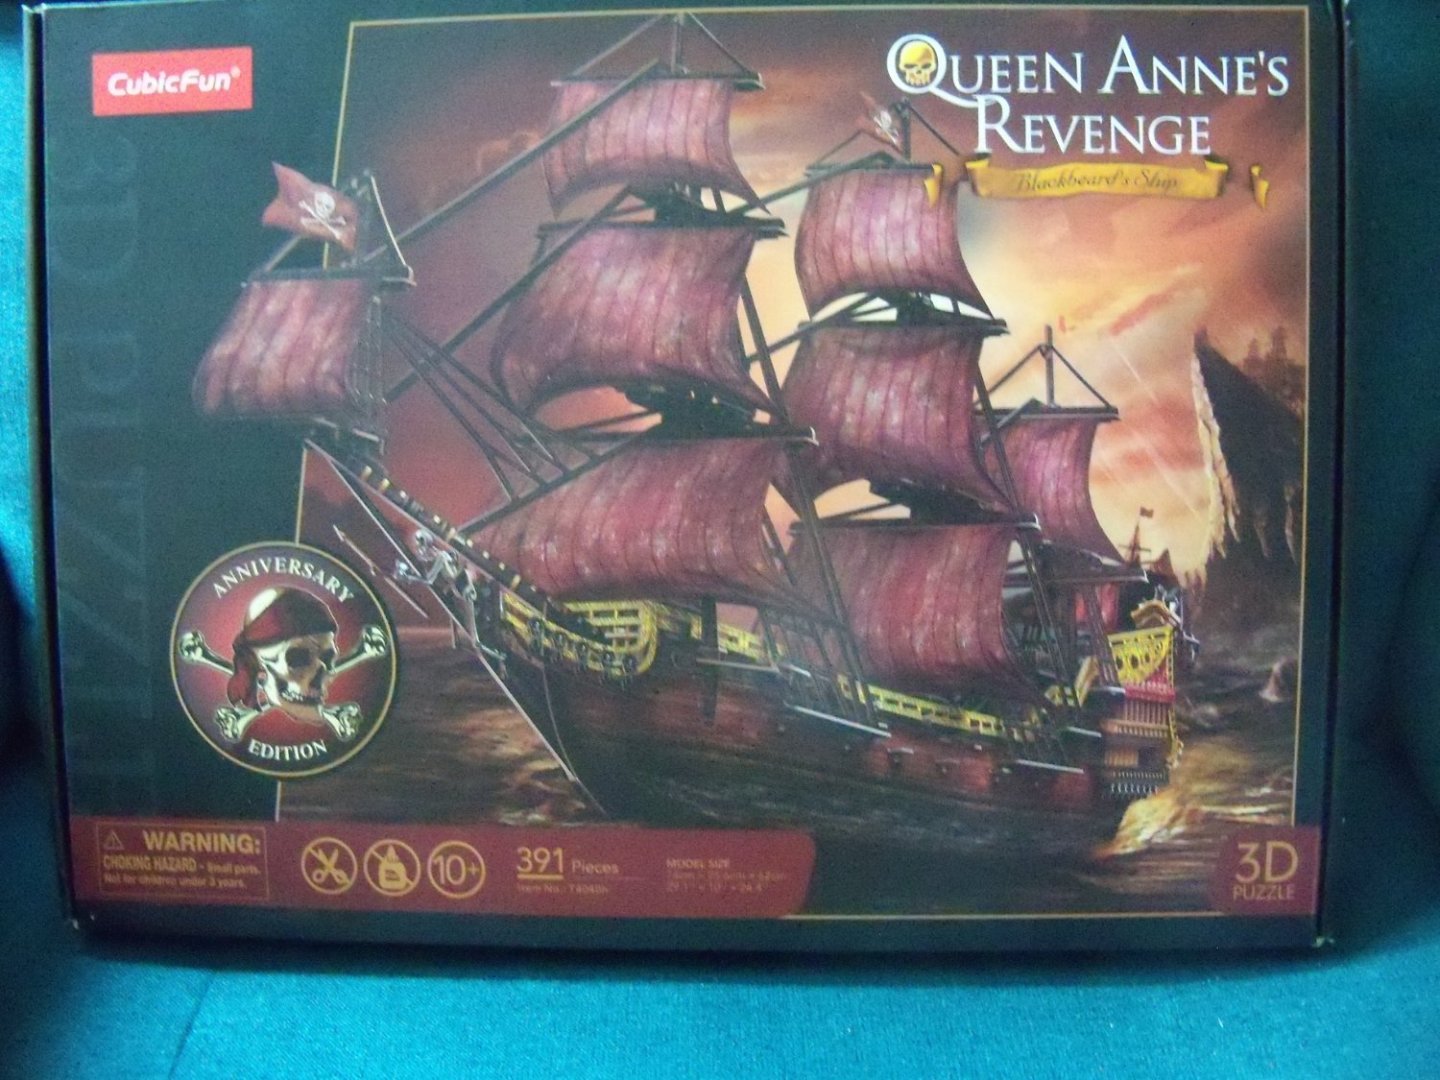
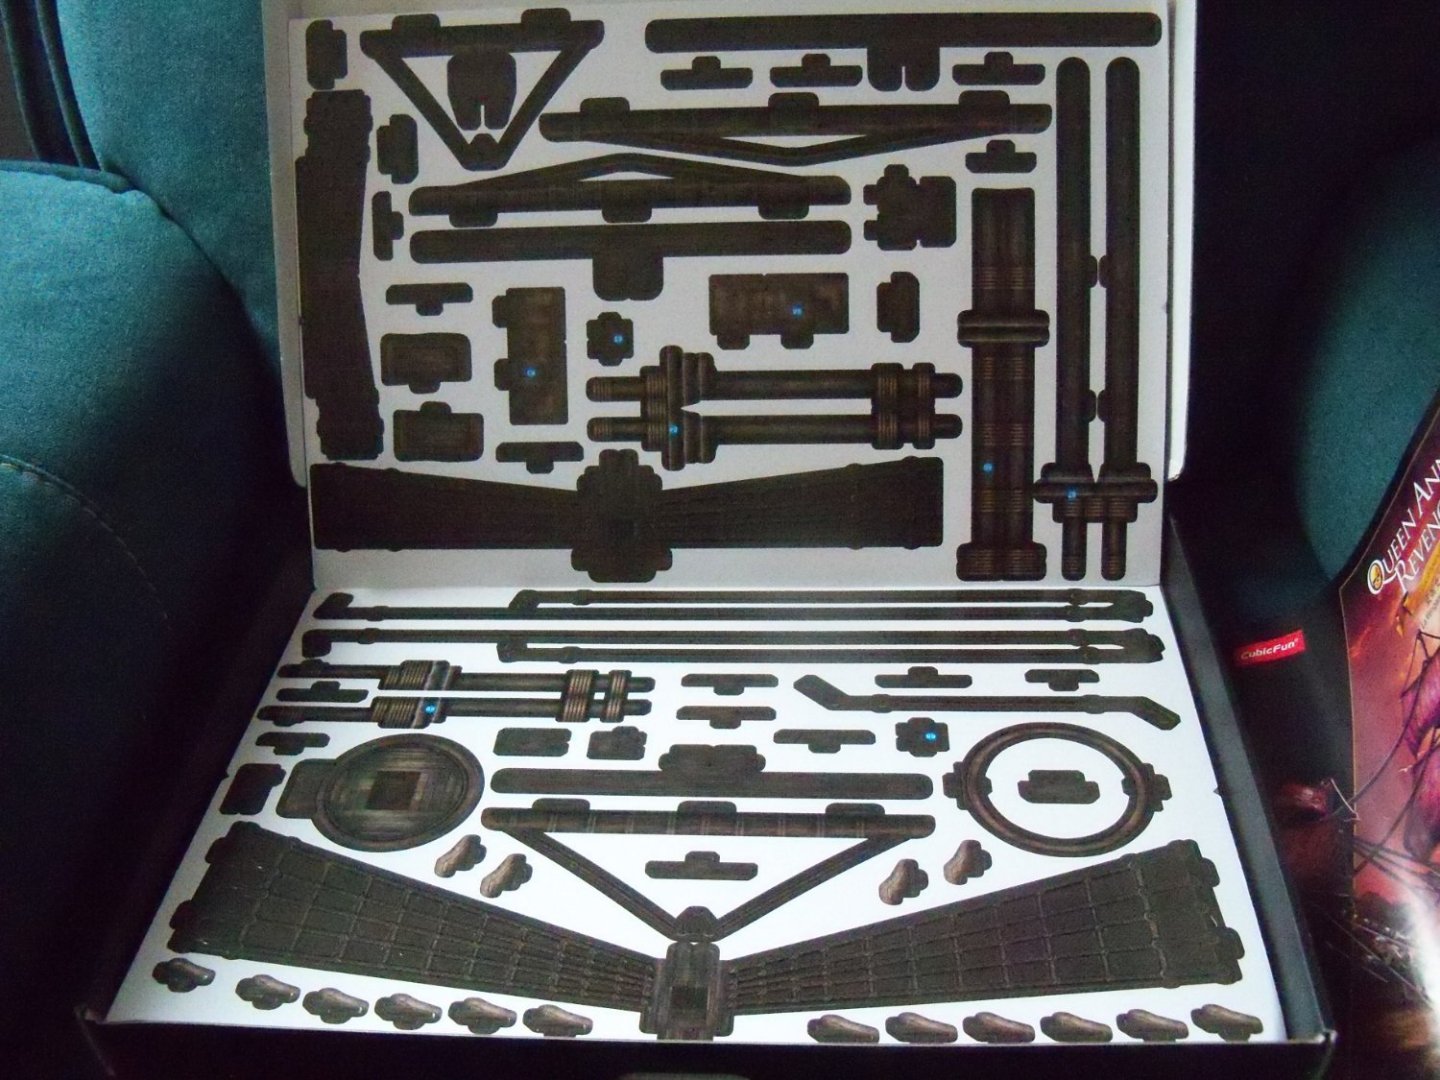
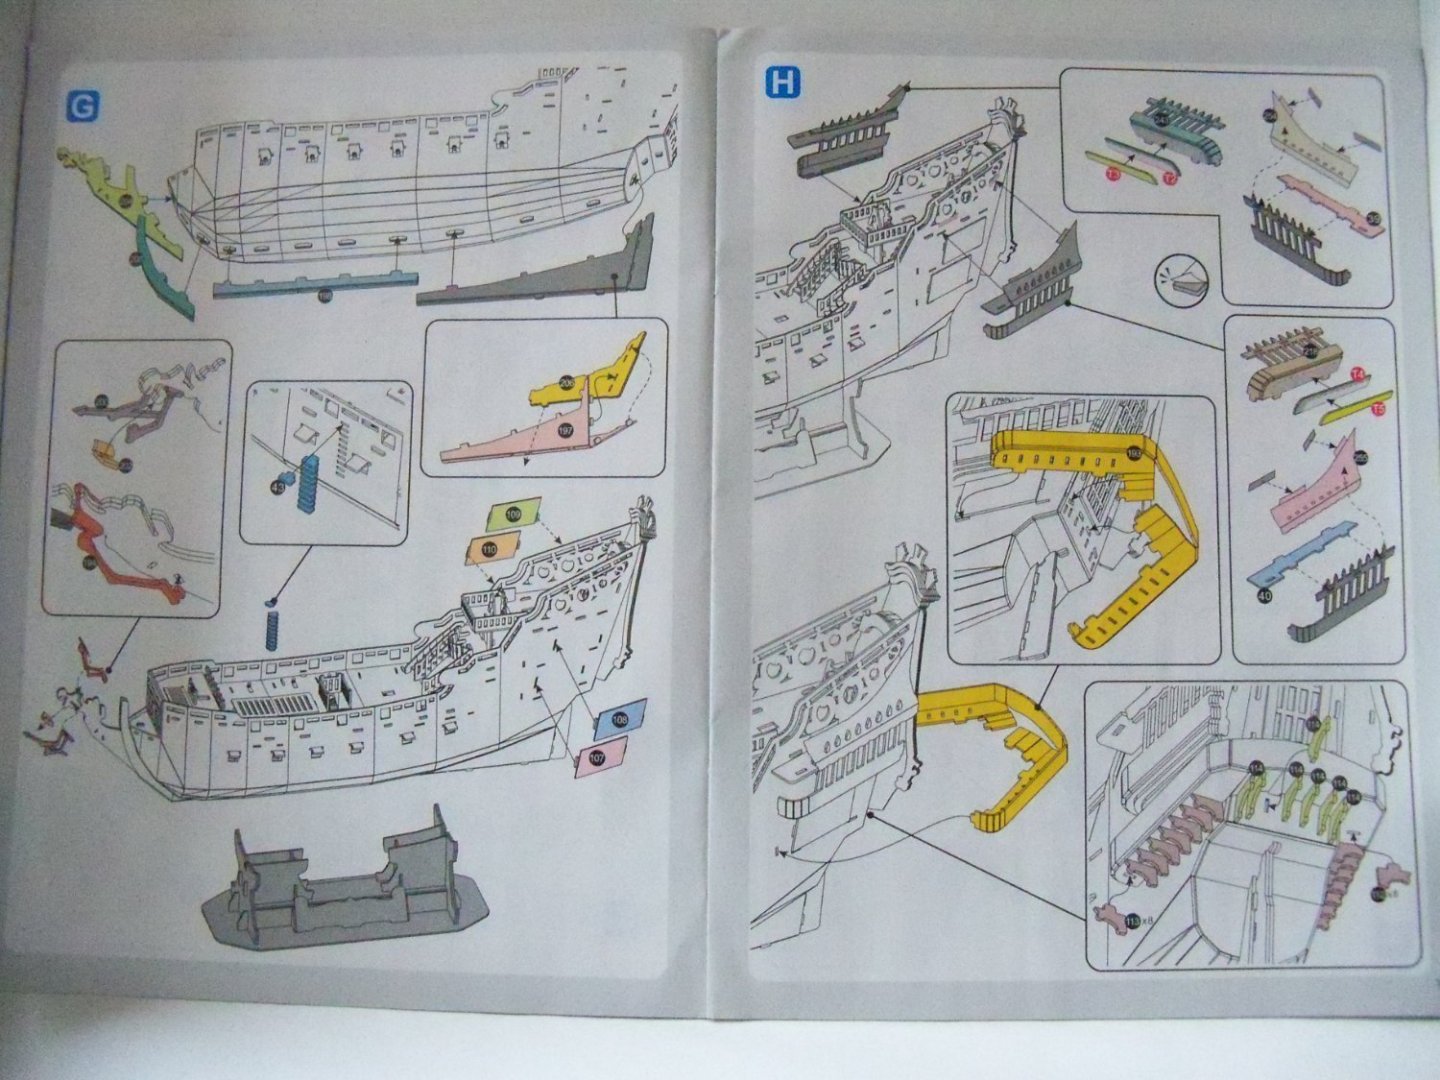
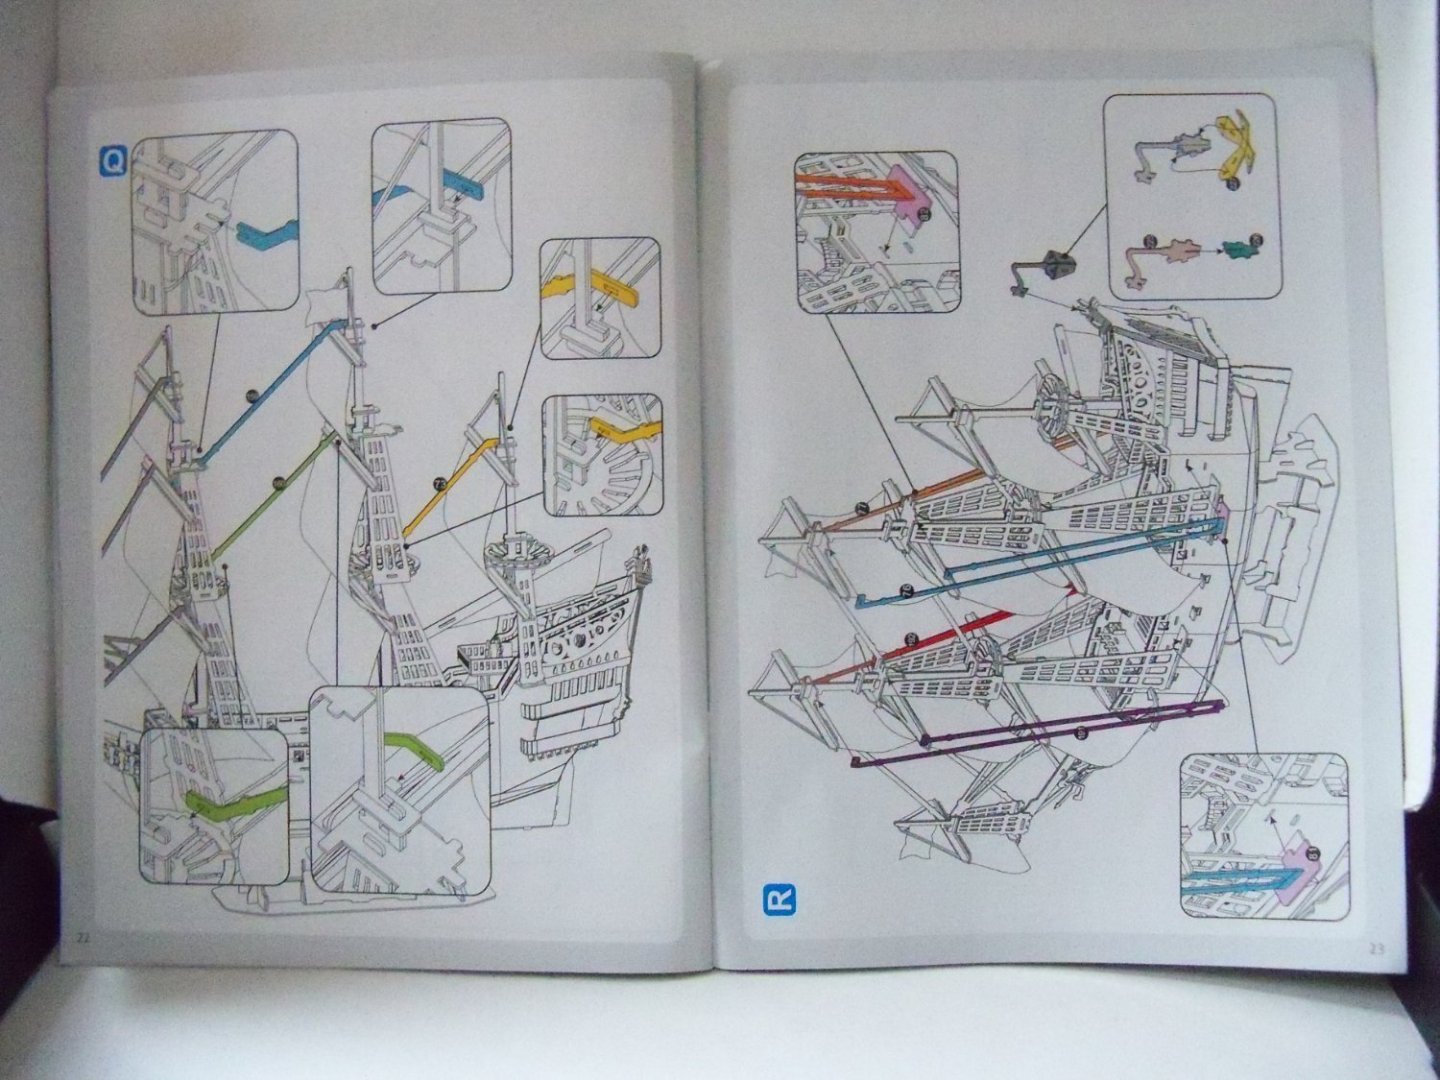
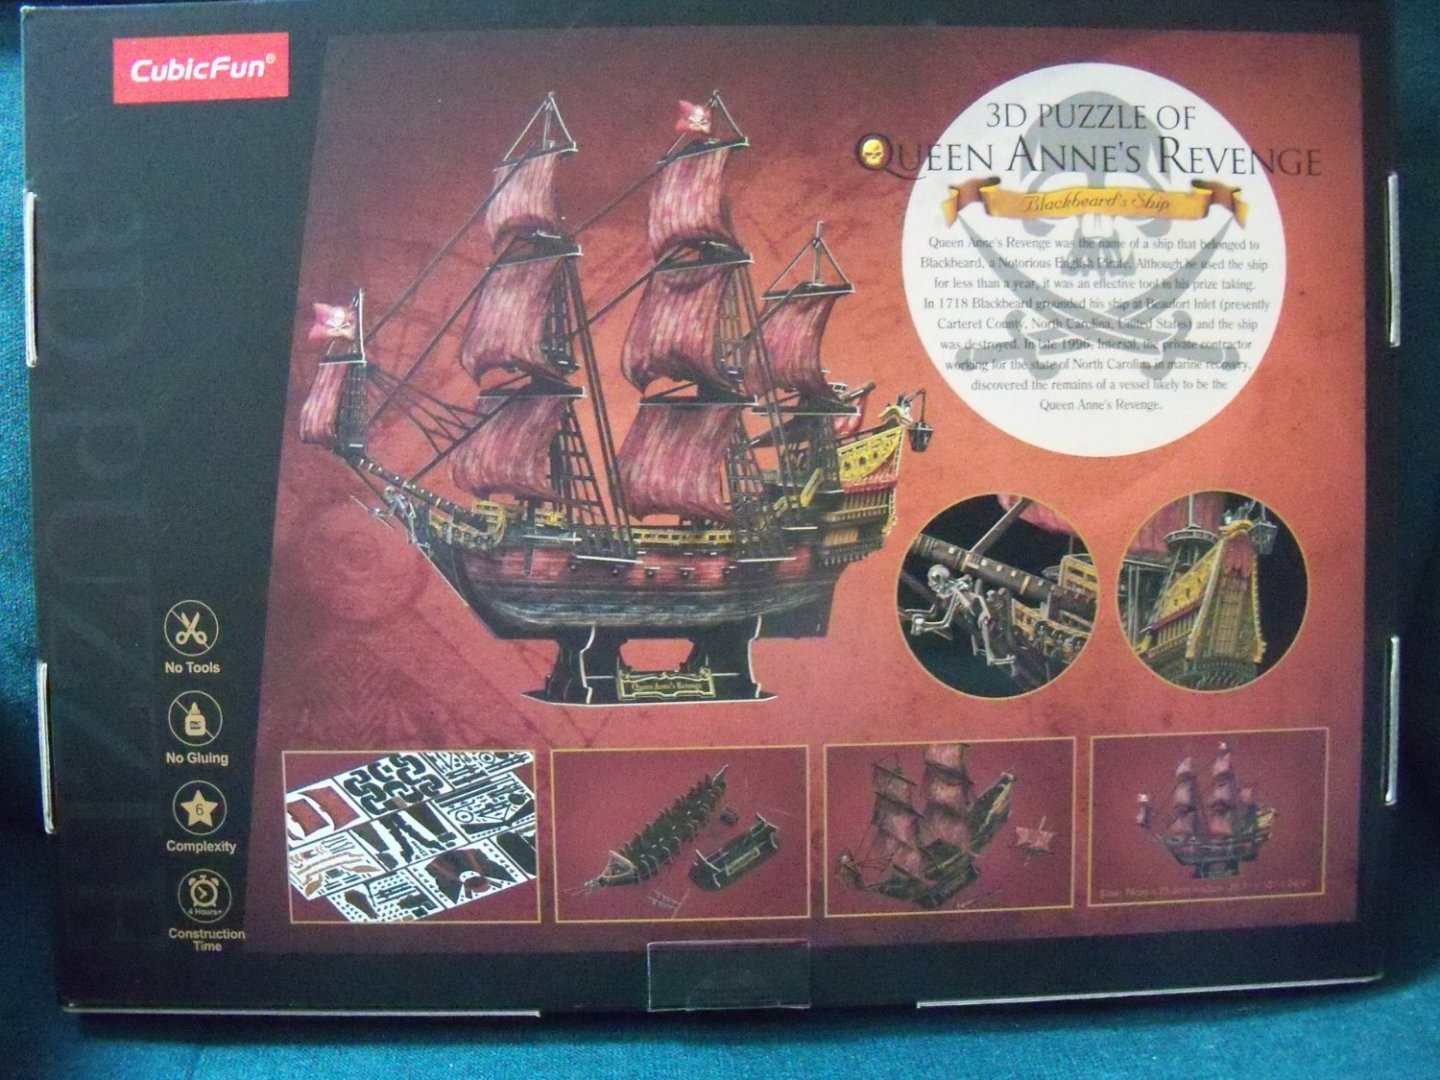
As my interest in jigsaw puzzles and ship modeling is well know by my friends and family, I was presented at X-Mas with this 3D model kit of Queen Anne’s Revenge (Blackbeard’s ship) by my wife's nephew and family. It’s more or less, a combination of my two interests in one box weighing in at a substantial 3 lb. 7 oz. While it is certainly not an accurately detailed rendition of the vessel, it will be my first entry into card models and I look forward to it’s assembly, which judging by the 23 page illustrated step by step instruction manual, (in 7 languages no less) should not be too difficult to complete. There are a total of 391 pieces including the display stand. The vast majority is printed on 15 sheets of 11” x 16.5” pre-punched sheets of 1mm card stock printed in color, but the sails are on 3 sheets of textured paper and there are 22 plastic canons, a small sheet of double sided tape, a card hole puncher, and small sheet of prefinished Mylar to represent stained glass on the rear of the ship. Although glue is not required for construction, obviously if you would like to keep it for display you might like to use some. No tools are required, other than the hole puncher that is included with the kit. It claims to be rated as a 6 in complexity, but not sure if that is out of 10 or what. I tend to believe that according to its estimated construction time of 4 hours it can’t be all that complicated. This kit is designed and manufactured by CubicFun Toys Industrial Co. Ltd out of Guangdong, China and is referred to as an anniversary edition, but I’m not sure if the company has produced an earlier model or if it refers to something else. While there is no indication of scale, the completed size of the model is listed at 29.1” X 10” X 24.4” (or 74cm X 25.6cm X 62cm). As this was a gift, I have no clue about its cost or if it’s a pirated copy of some other company’s product, but from what I can see, it is well produced and nicely packaged. While the model is admittedly more toy like, it is not pretending to be anything other than a 3D puzzle. Overall, I think that it seems to be a good introduction to card models especially for modeling fans that are inexperienced or just want to get their feet wet, so to speak.


-
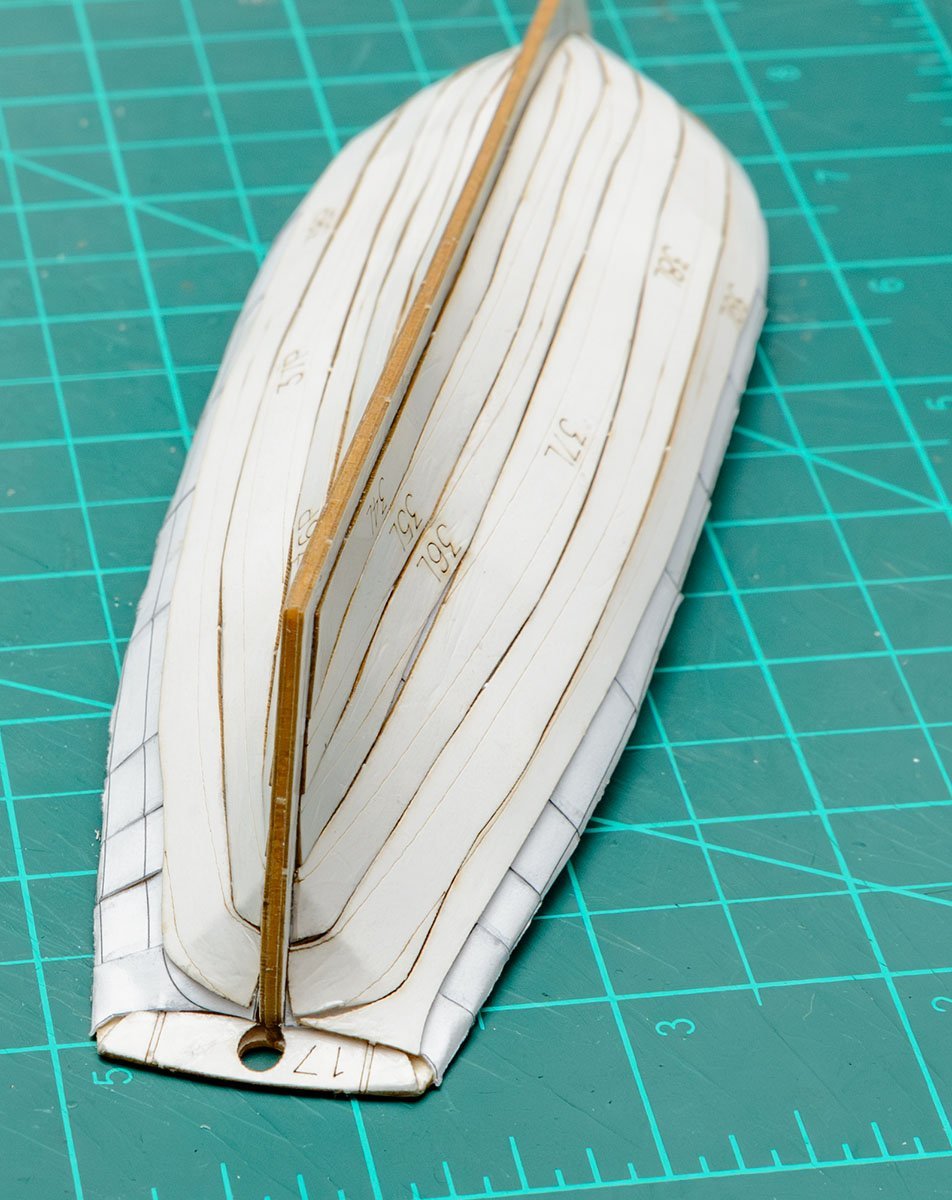
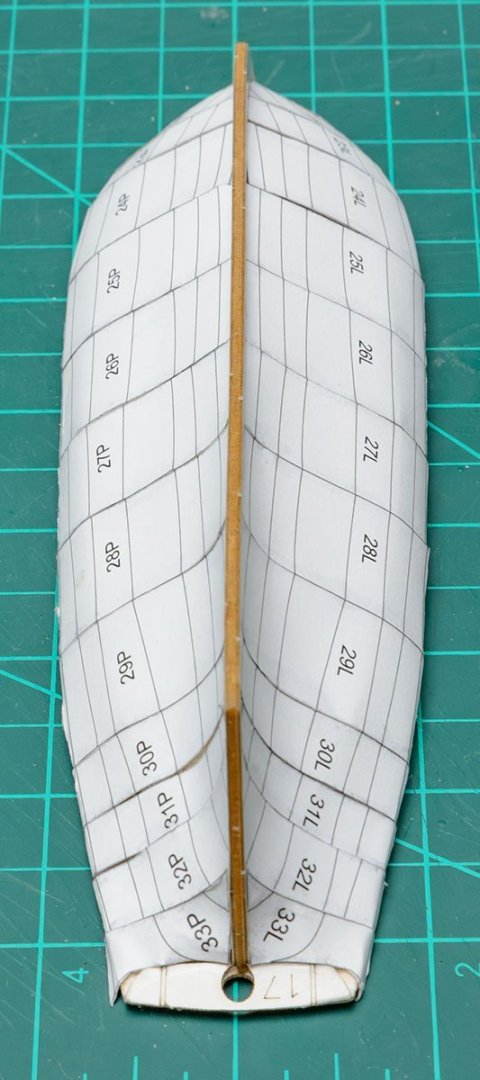
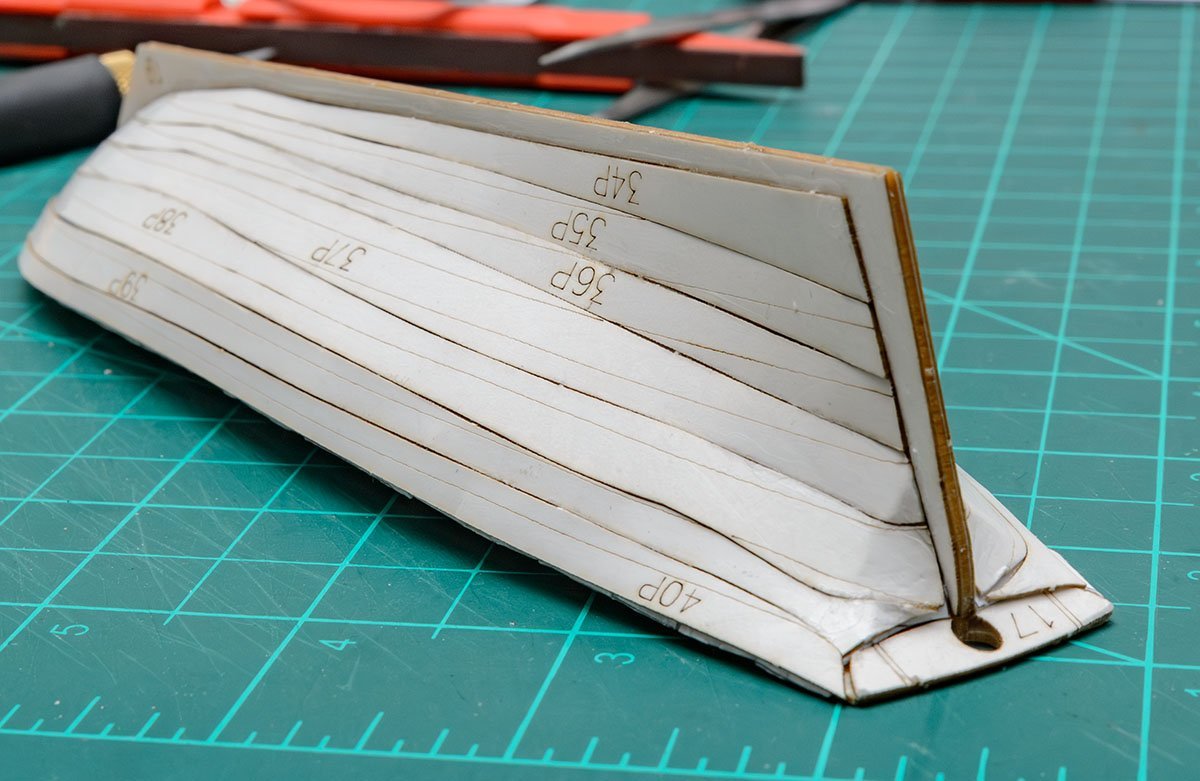
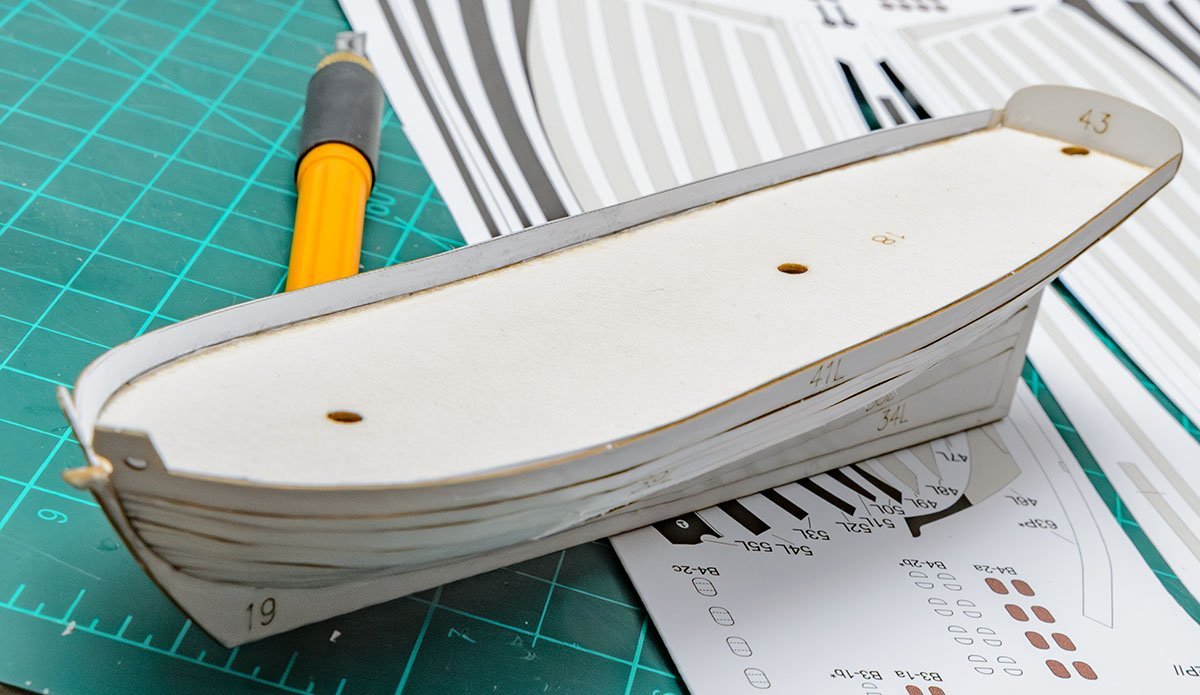
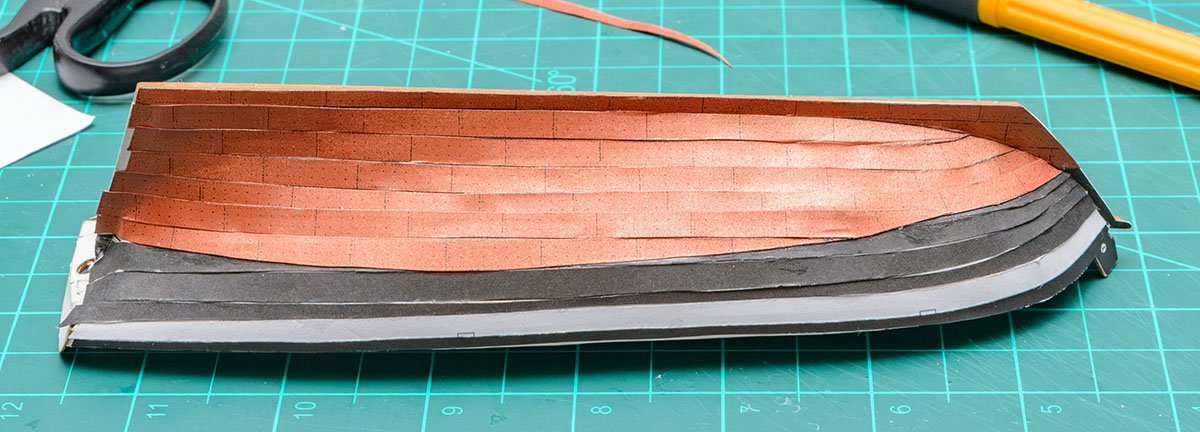
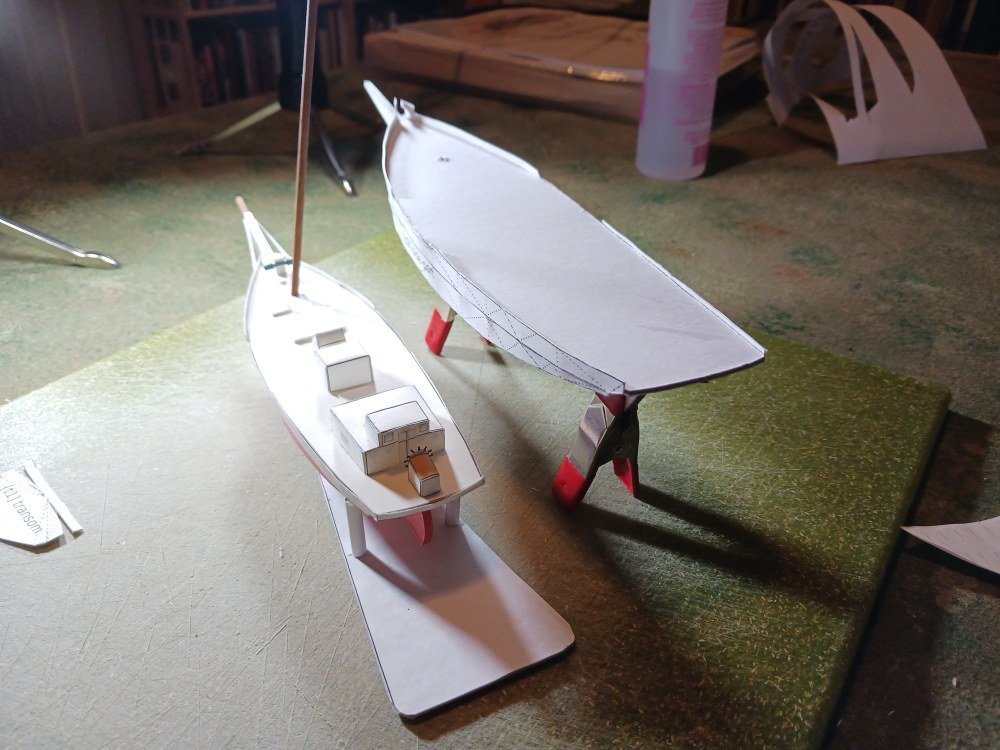
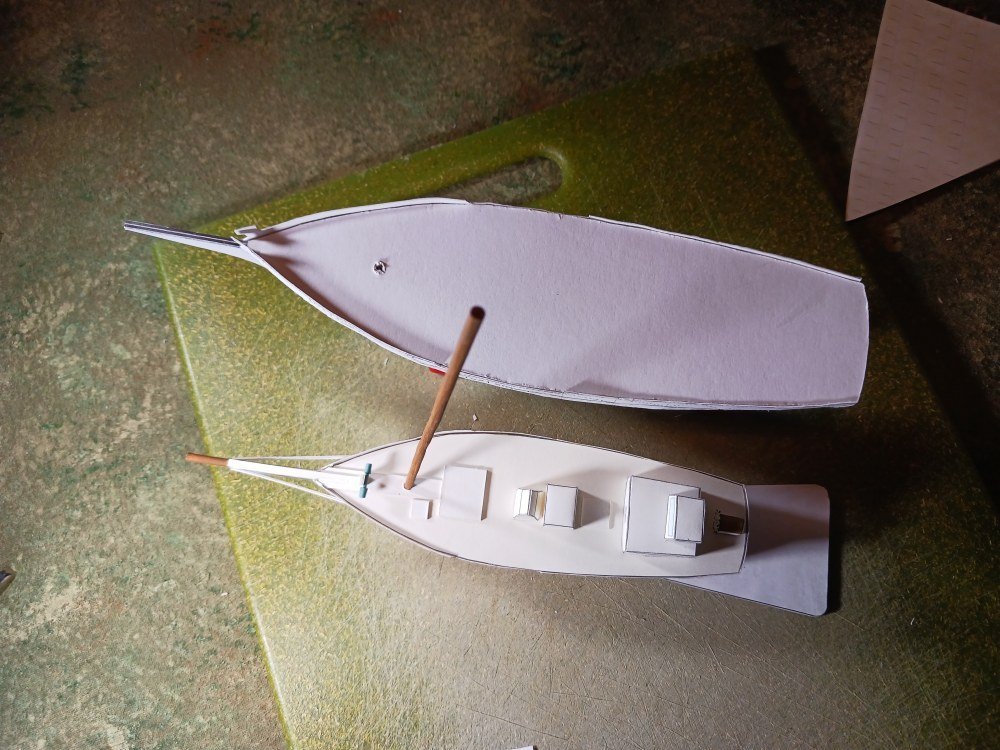
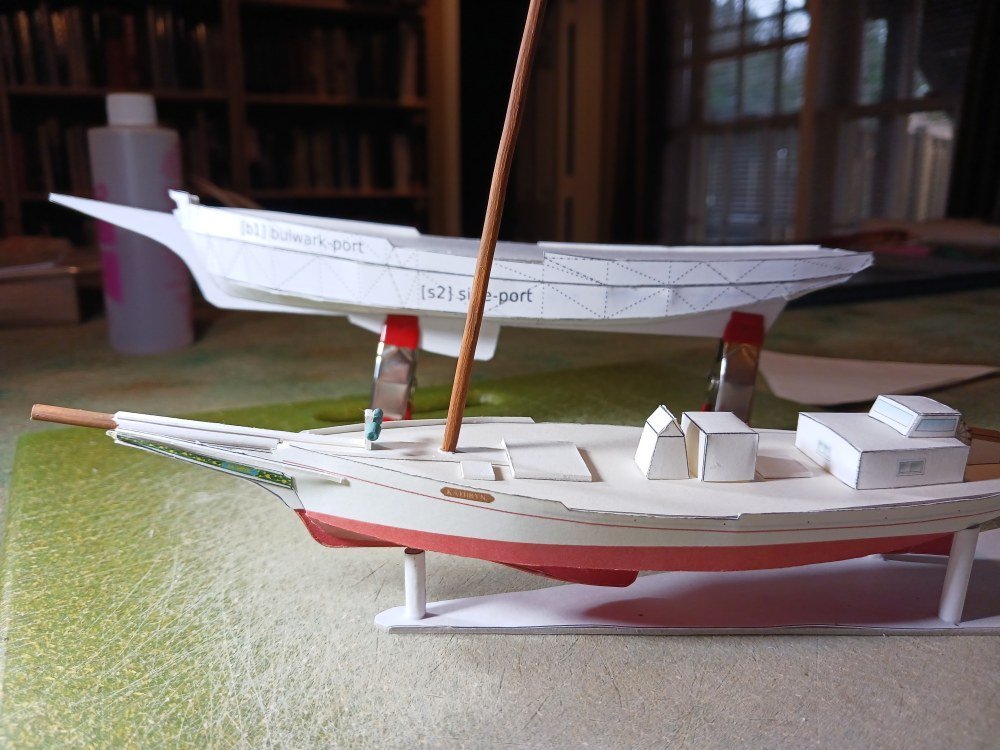
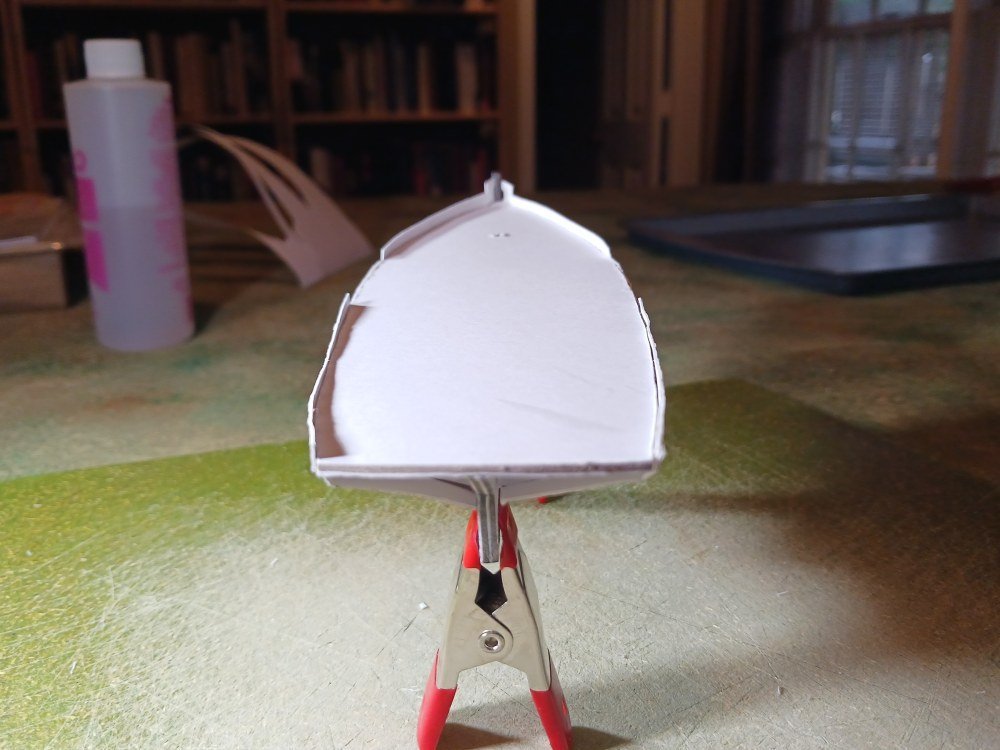
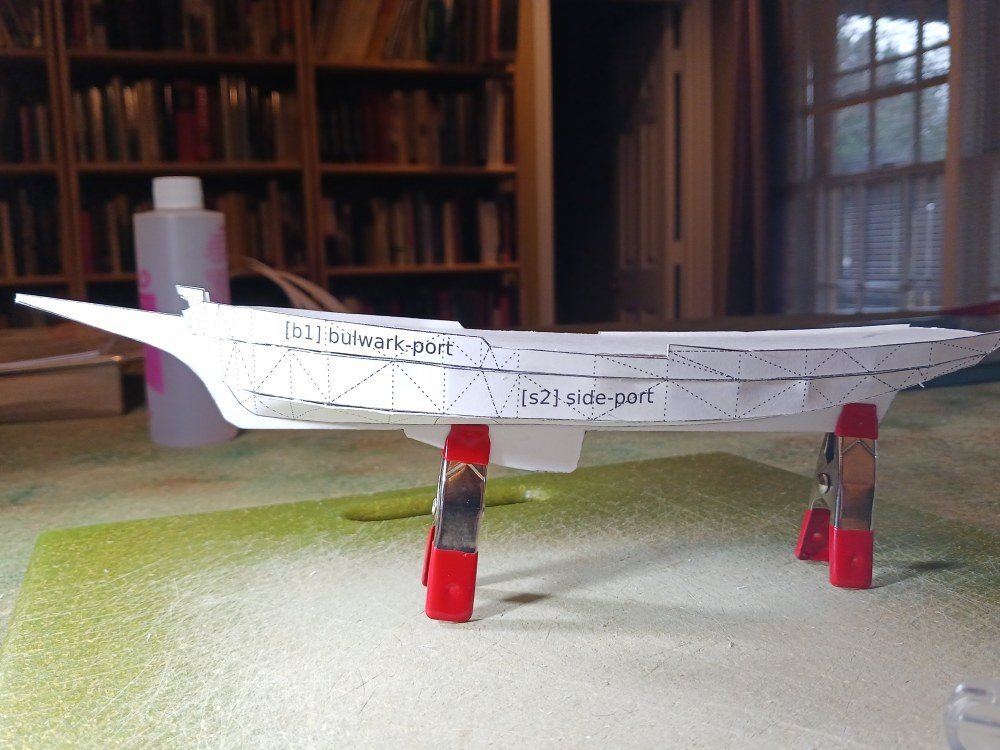
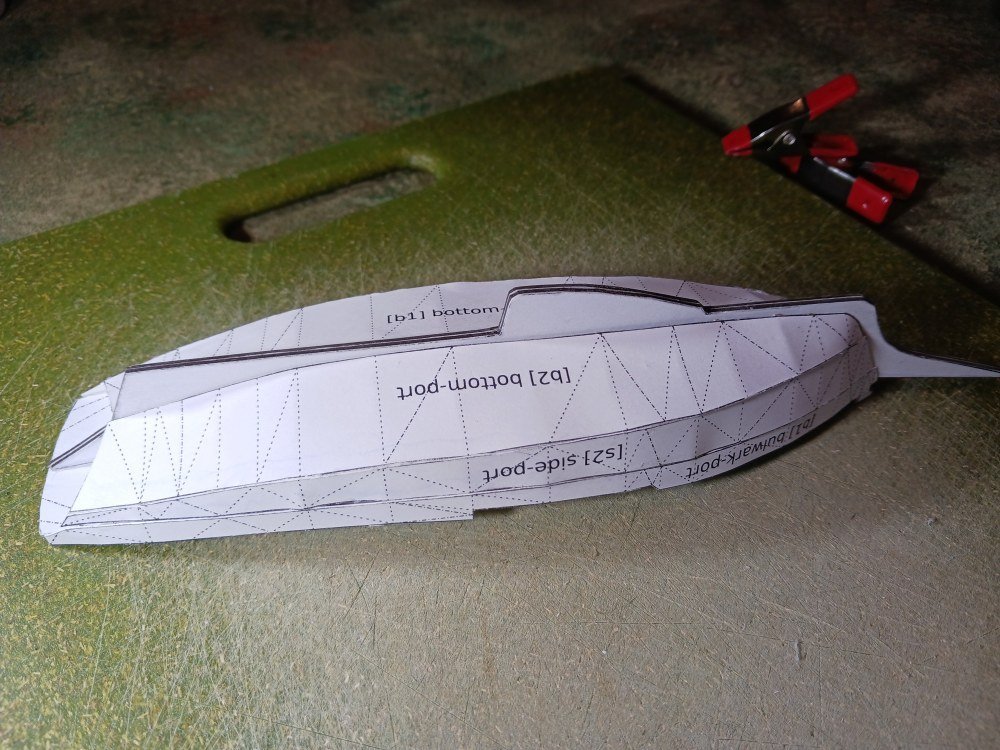
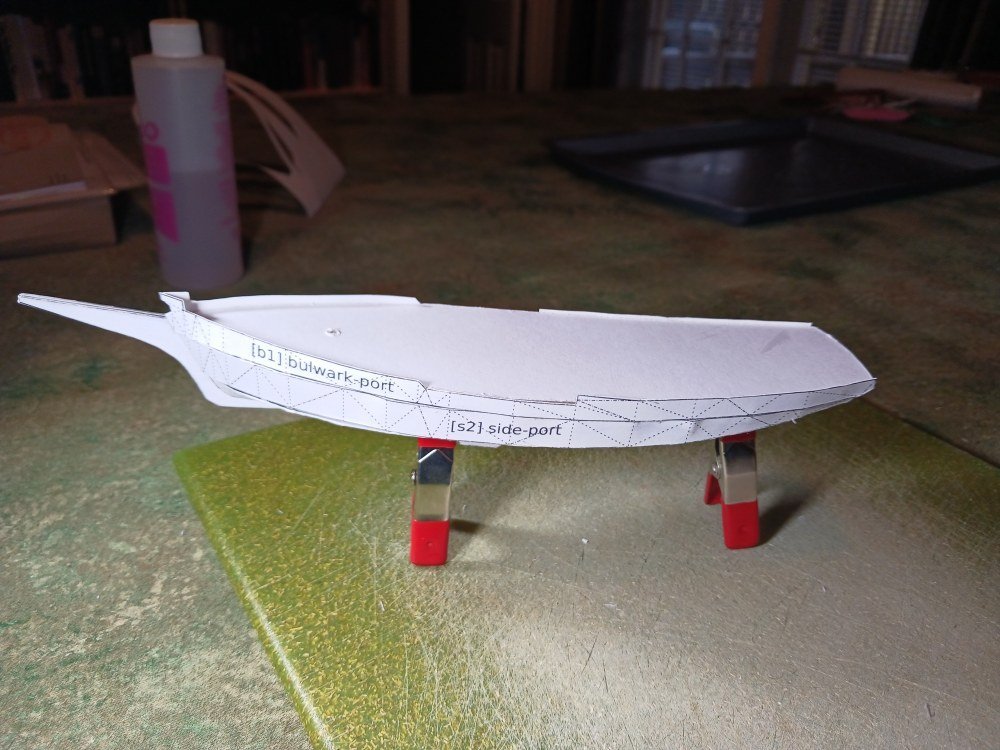
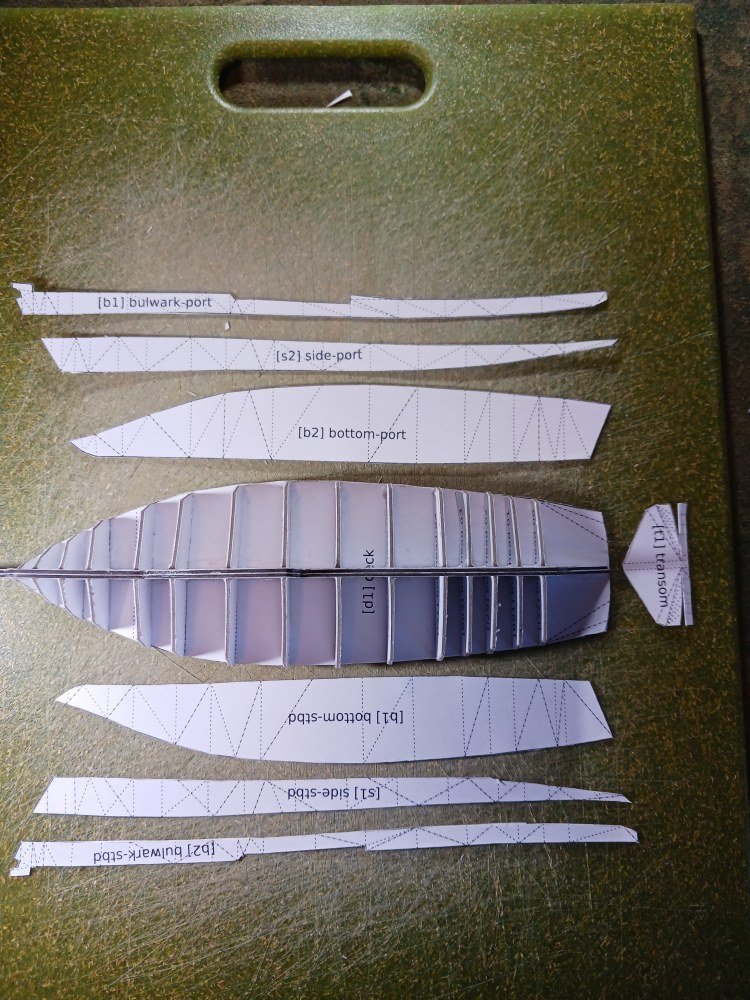
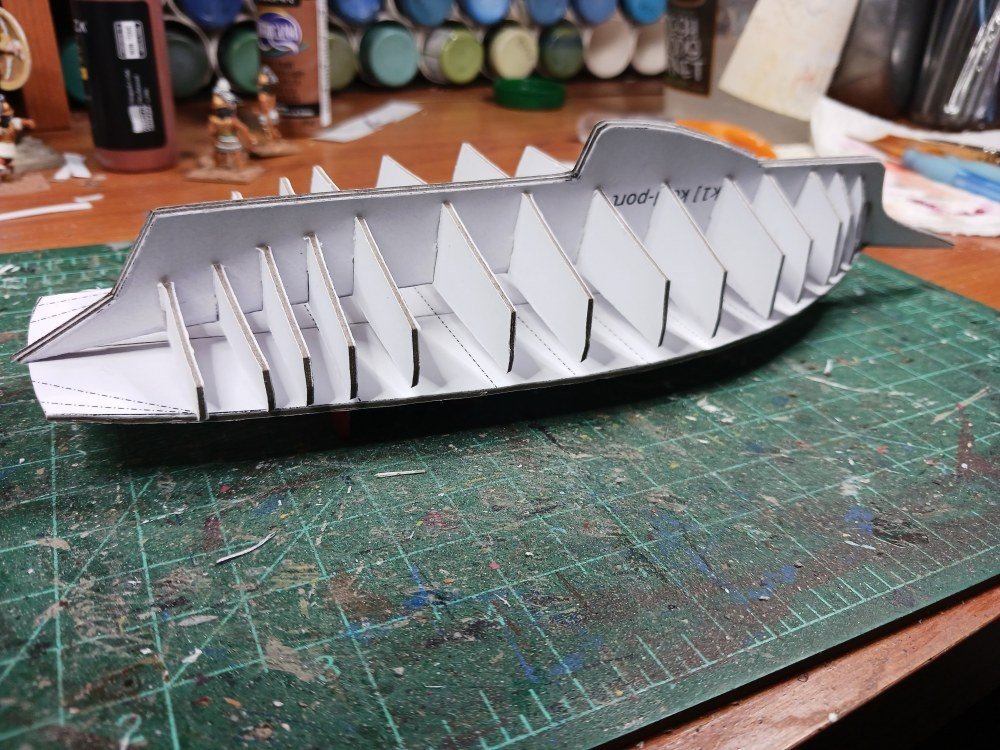
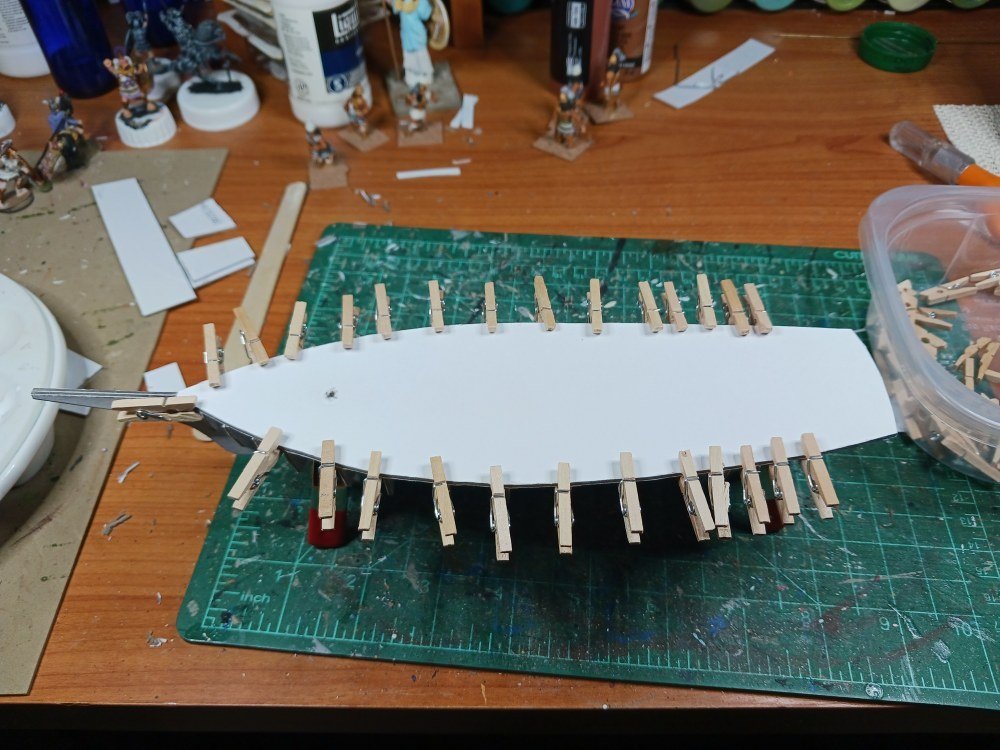
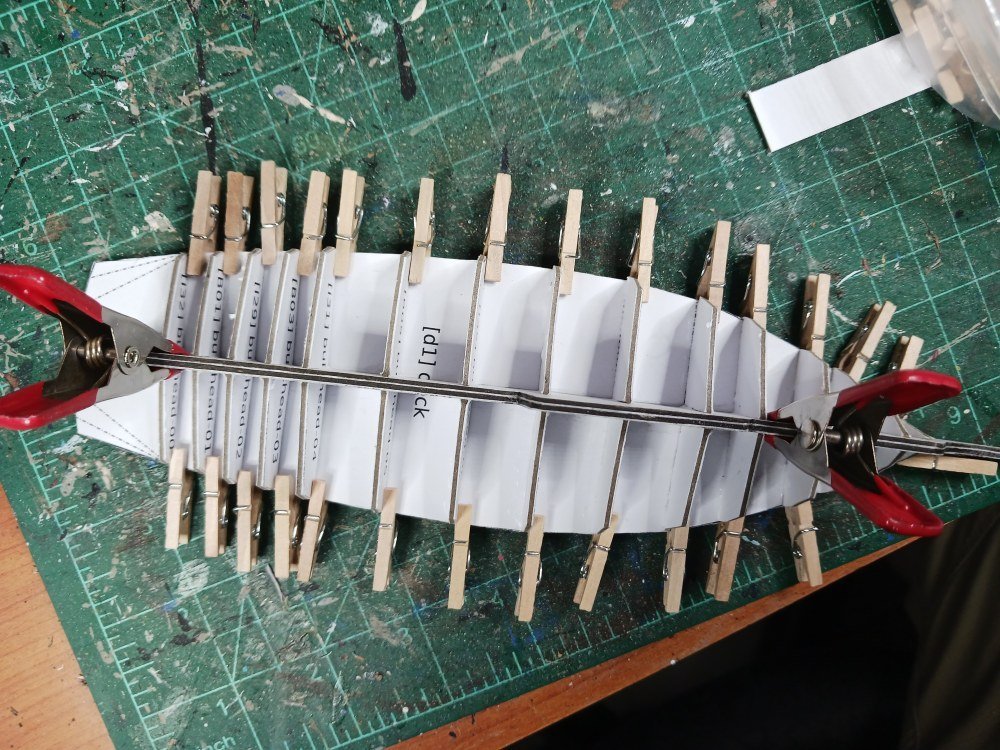
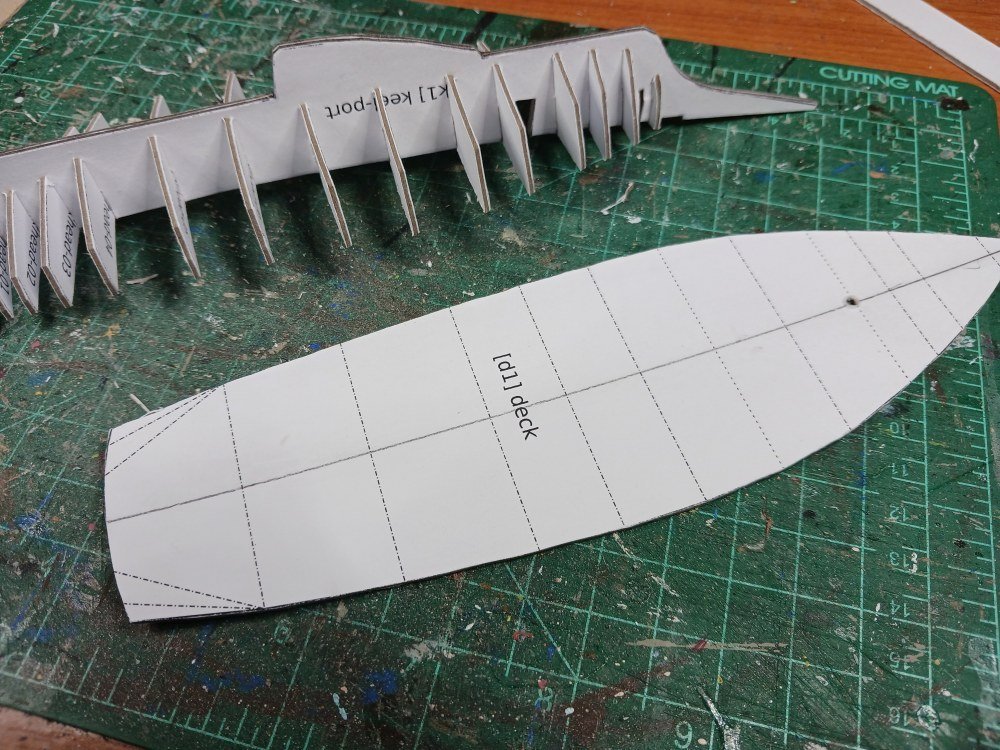
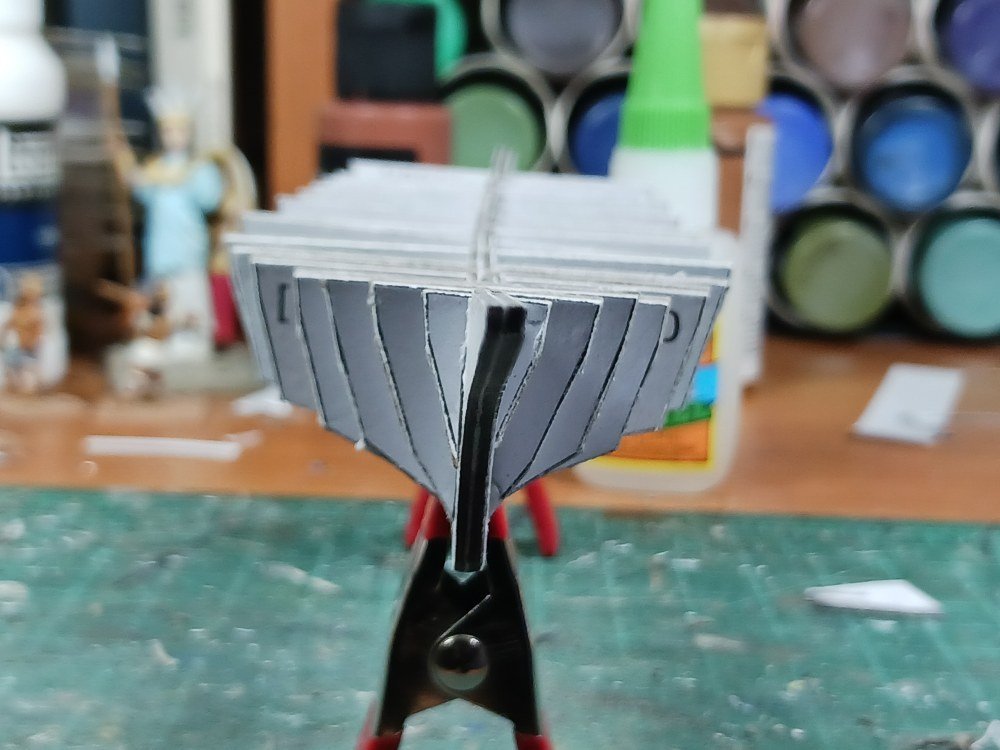
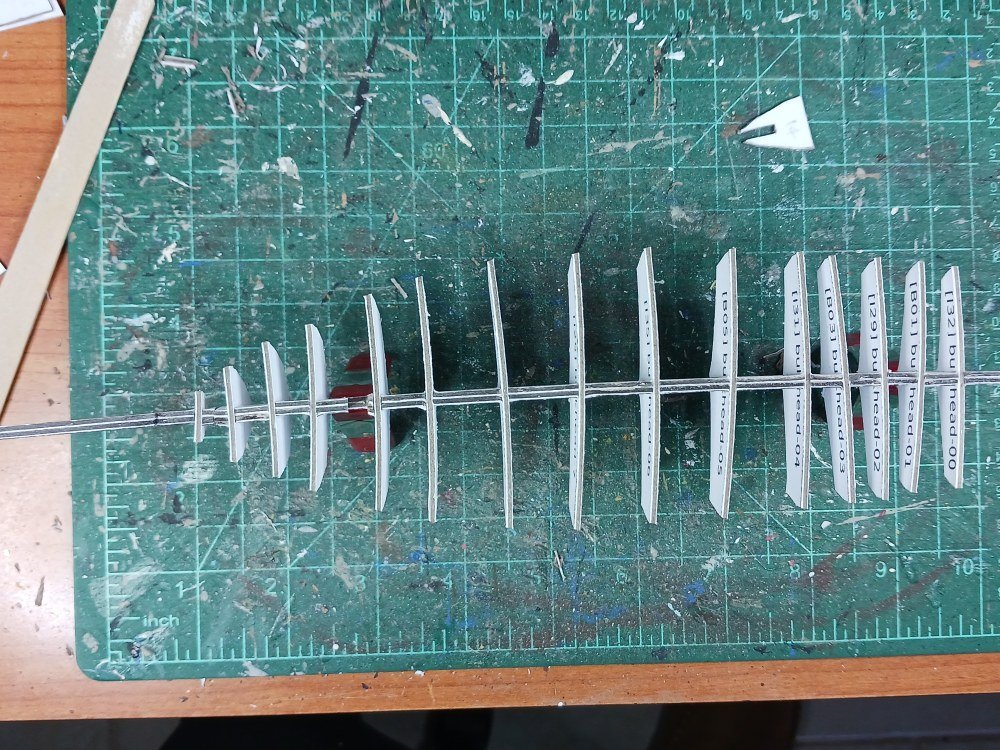
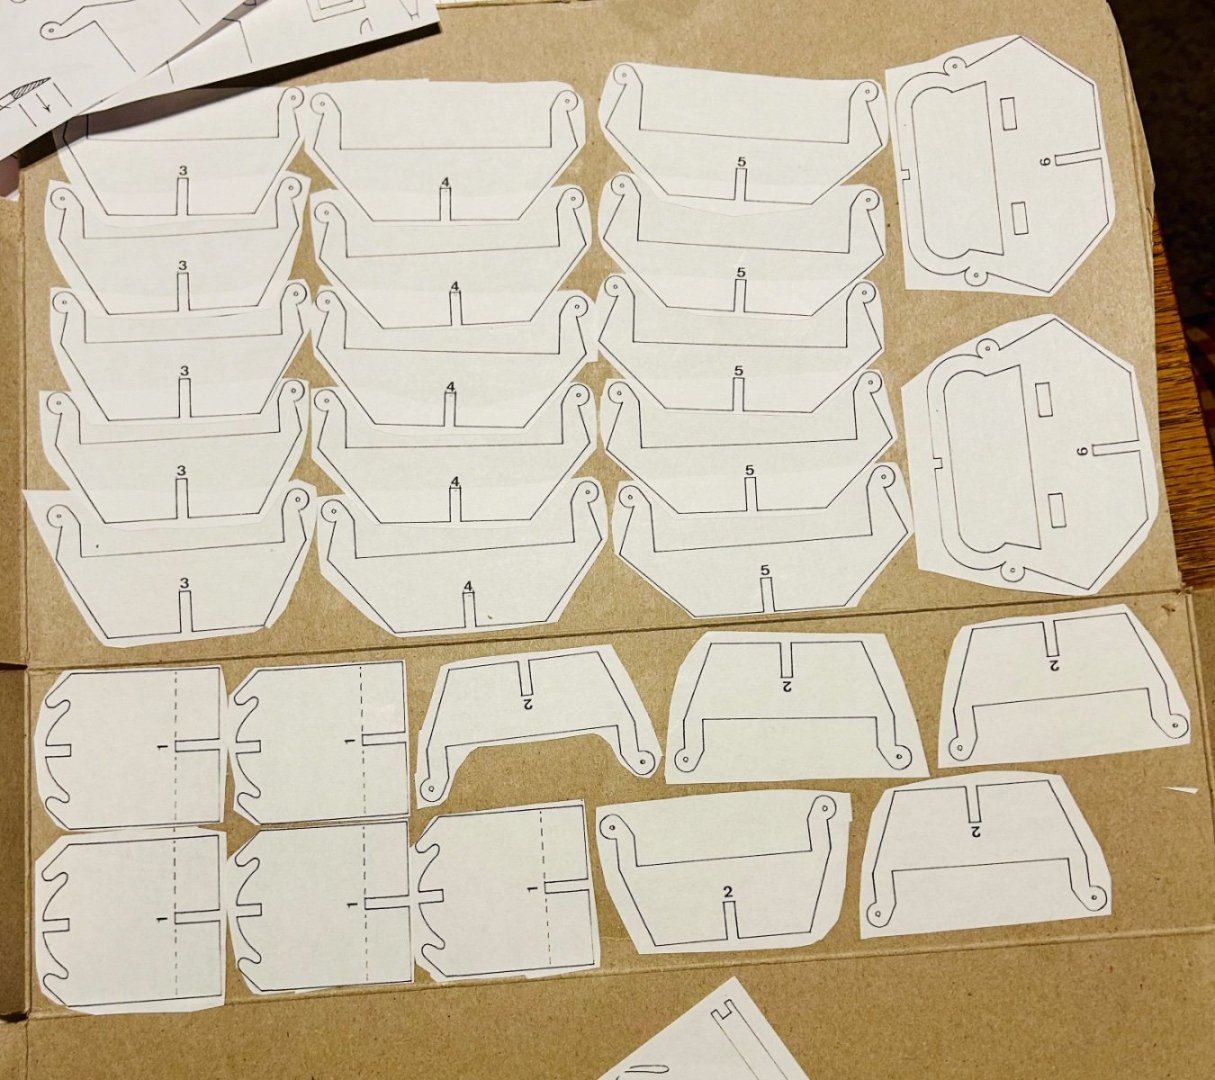
First, I’d like to wish you all a happy New Year. May Dame Fortune grant you peace, contentedness and many, many hours of happy modeling time! Now, a little back story: Kathryn and I have quite a lengthy relationship. Well, frankly I’ve been infatuated with her for years but she doesn’t know I exist. (But the story of my adolescence doesn't need to be retold here!) I started designing a card model of the skipjack Kathryn in 2016 based on the HAER papers available from the US Library of Congress (https://loc.gov/pictures/item/md1454/). I refer you to an old build log I did at PaperModelers.com: https://www.papermodelers.com/forum/design-threads/37710-1-100-scale-chesapeake-skipjack.html. Life happened, other hobbies took priority, and I drifted away from model building. Meanwhile, the unfinished Kathryn sat ignored on the mantel in my ‘man cave’. But I didn’t completely forget about my old flame. One of the competing hobbies is the open source flight simulator ‘Flight Gear’. Being a contrarian, I wanted to use it to simulate sail boats. So I enhanced the basic virtual model of Kathryn, ported her into Flight Gear and started (with the help of the Flight Gear forum members) to tinker with the configuration files in order to ‘sail’ the virtual seas. I called it ‘Float Gear’. I refer you to the Flight Gear forum if you’re interested in that unfinished journey: https://forum.flightgear.org/viewtopic.php?f=4&t=40606 Now that the worm has turned yet again and my interest in ship models has resurfaced I’d like to revisit the old girl yet again. One thing I want to accomplish is a larger scale. The original card model was at 1/100 scale—common enough for card models but a bit small for my eyesight these days. I wanted to go to 1/72 scale to match the Viking ship I recently finished. I also wanted to try out a different electronic workflow. I still enjoy using Wings3d (www.wings3d.com) to create virtual models and the original model is still valid. However, back in ’16 I wrote my own script to extract UV coordinates from the model and output them in SVG format in order to create the patterns for card modeling. UV mapping was (and remains) a tedious process in Wings3d. And, UV coordinates don’t necessarily reflect the true shape of the model’s surfaces. Let’s just say it was more work than it was worth. Making revisions was a nightmare. However, over the intervening 7 years other tools have become available. I recently came across a plug-in for Blender which ‘unrolls’ a 3d model. I want to explore that option and see if it really is usable for card modeling or if it is still too limited. So far, the signs are good. In future posts I intend to document how I’ve used Wings3d, Blender and Inkscape to design a card model of Kathryn. While I’m not entirely certain this experiment is going to work, I’m fairly convinced that—at least for a fairly simple model—the real challenge is going to be my rather limited modeling experience. But for now I’ve accomplished enough with a test build to show some progress. The pictures pick up after I’ve cut the longitudinal spine and various bulkheads out of 1mm chipboard. The keel/spine is then doubled to give a final thickness of 2mm. I have explored having these pieces laser cut by a third party but I finally decided I was putting the cart before the horse. I think I need to ensure the design is good before committing to that. After all, I want to make sure it's functional before going for efficiency and ease of construction. As mentioned elsewhere there was a fair amount of warping going on with the spine and the bulkheads. Nevertheless, I dry-fitted all the components in order to assess the situation. Puzzling this out it dawned on me that I had the locations of a number of the bulkheads and the spine marked on the deck piece. That was not intentional, it was just a by-product of the modeling/unrolling process. But I figured I could use those marks to ensure the straightness of the framework. Then I proceeded to cut out the various side pieces. Again, the dotted lines represent the triangles of the electronic model. But as I assembled the model I found that they provided reliable guides to aligning everything. Notice the bottle of isopropyl alcohol in the background. I had inadvertently skipped gluing the 'skin' to one of the bulwarks. This resulted in a bit of puckering since the side pieces do undergo a bit of twisting to make them fit. So... I had my first experience of using IPA to unglue things. Actually, it works pretty well. Poured a little IPA in my paint tray and used a cotton swab to apply it to the glue joints. After giving it a few moments to soak in I carefully started to separate the joins with a dental tool I keep in the hobby toolbox. I had to unglue four bulkheads to get to the puckered area. No harm done, though. The IPA did cause some of the printed ink to run slightly but it did not affect the paper at all. You can also notice that Kathryn suffers from 'hungry horse' syndrome. The smaller, 1/100 scale version didn't suffer like this. IIRC, the card I'm using for the skin is 67#. Maybe 90 or 110# would be better for this larger model. While the model in general is incredibly sturdy, the skin seems more flimsy than in the smaller model. I suppose this is due to the card having to span larger distances at 1/72 scale than it does at 1/100. You can really notice it along the sides of the hull from an end view. Here's a view of both the old 1/100 and the new 1/72 scale models for comparison. And finally a shot to compare sizes between the two models. I've not yet attached the transom and it appears that I've cut the deck about 1mm too long. But I think the next step is to lay on a second layer of skin to smooth out the starving nag look. I'm not sure if I need to apply some putty and a sanding stick to smooth out the inner skin or whether that would just be extra work with no significant benefit. My intent is to make the outer layer slightly longer than the first and to arrange them so that the seams between the top and middle pieces are staggered (probably at the waterline rather than higher up as they are in the first skin). The seam between the middle and bottom will of course still be located at the chine. A second skinning will also allow me to finish up the graphics. After that I'll deal with the transom. Well, that's how things sit for now.


-
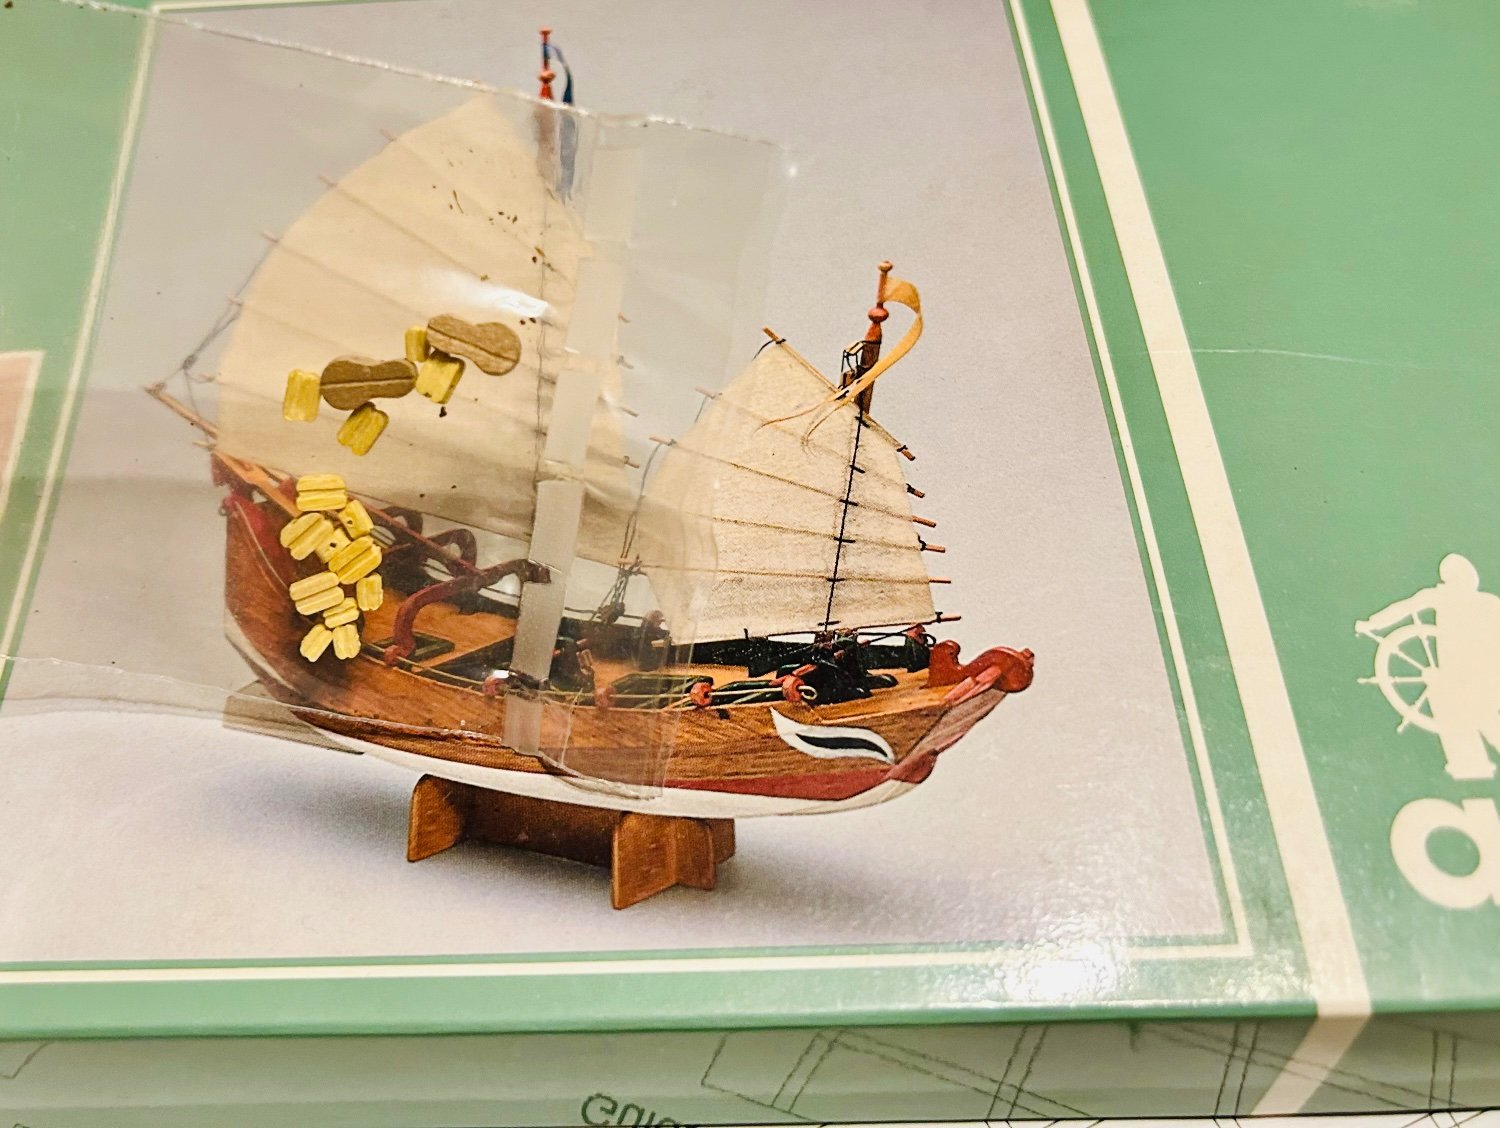
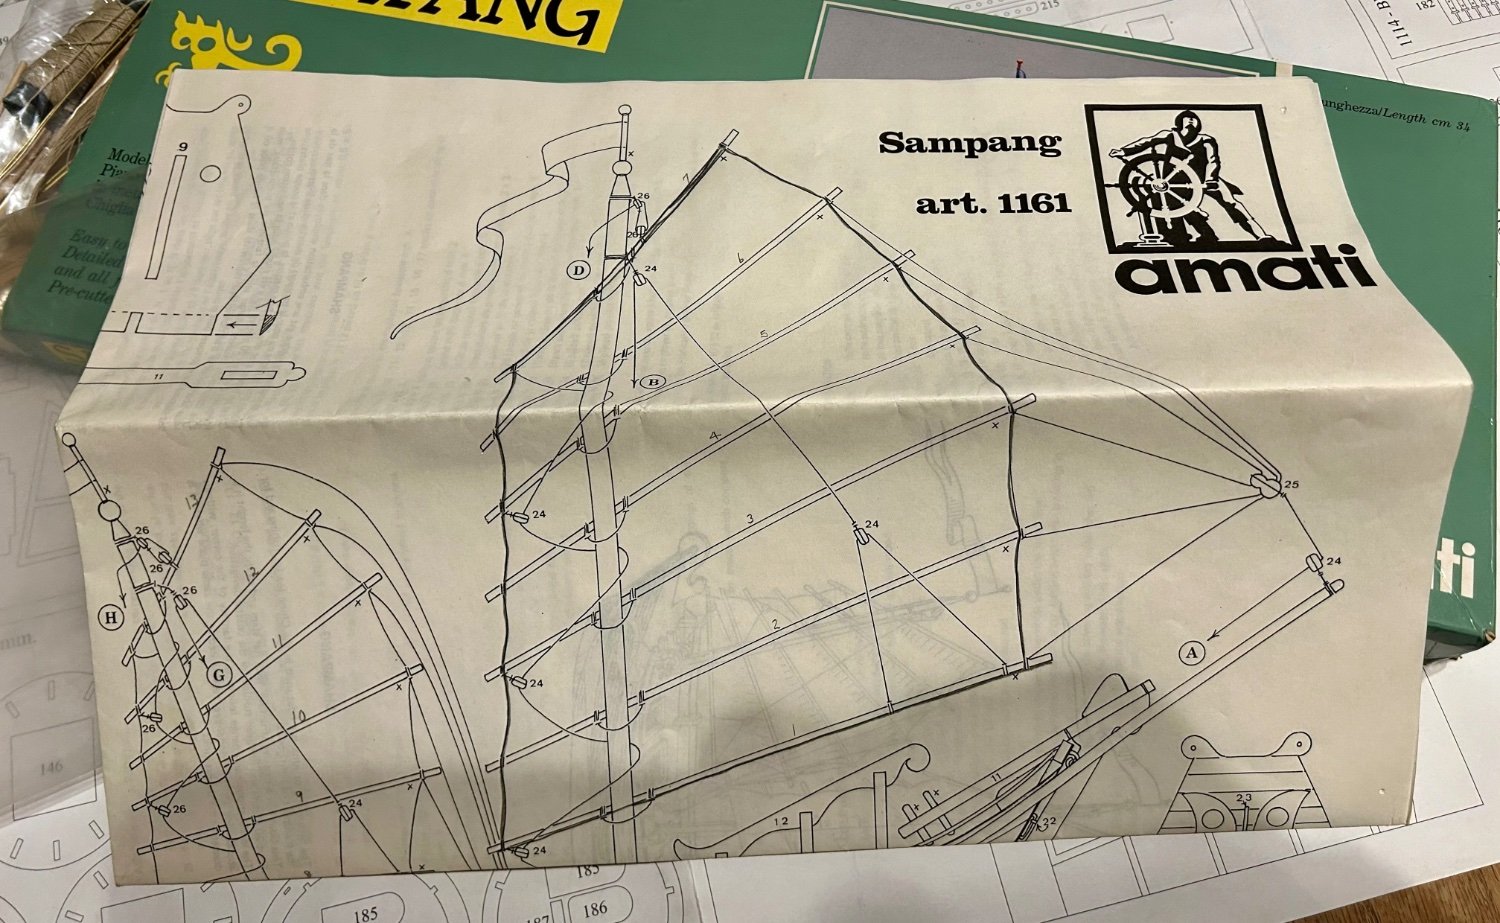
And now for something completely different! I usually like warships. However, this is an unusual subject that looks like a fairly quick and easy build. The Sampang/Sampan is a traditional boat originally of Chinese origin that is still utilized throughout Asia. I got an Amati Sampang kit off EBay that only had the rigging supplies and the plans. I paid $7.99 for it with free shipping. I decided to build it in card, because I like building in card. I am making it out of a couple of Honeycomb boxes which are about .6mm thick, and a couple of Little Debbie boxes which are .5 mm thick. Most of the pieces are 3mm thick so I copied the plans 5 times. I think there are under a hundred pieces to the entire model. This will be a fun quick build! Here is the start:


-
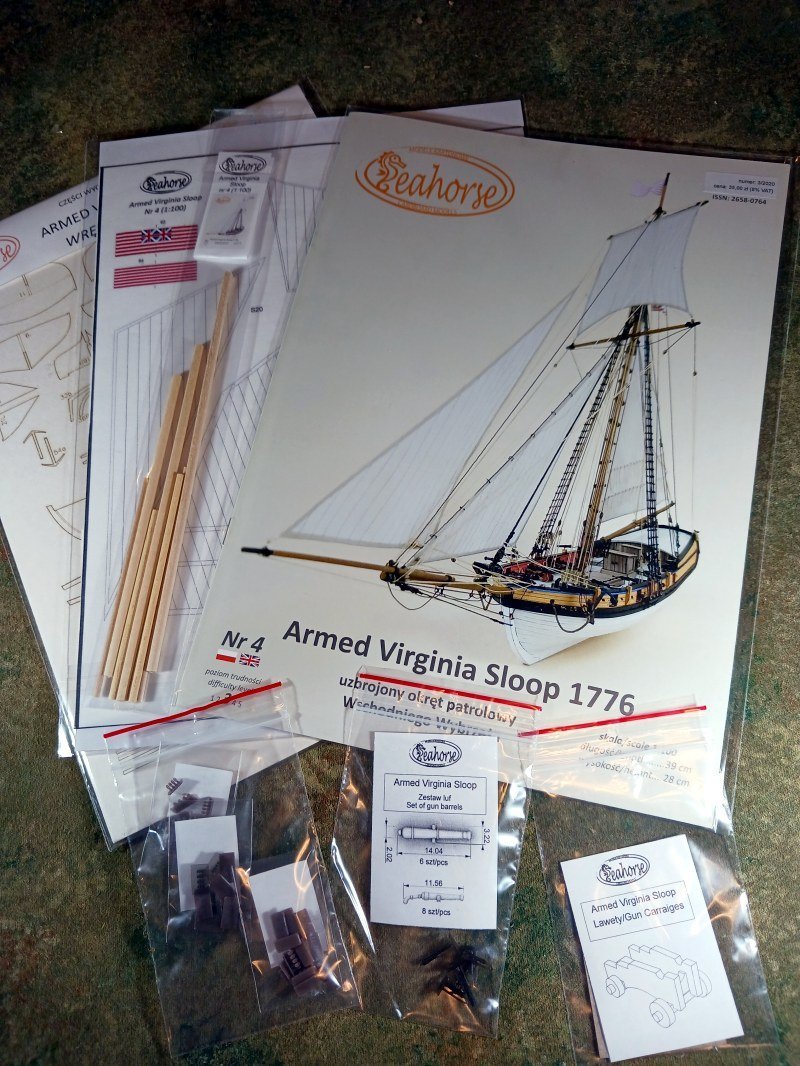
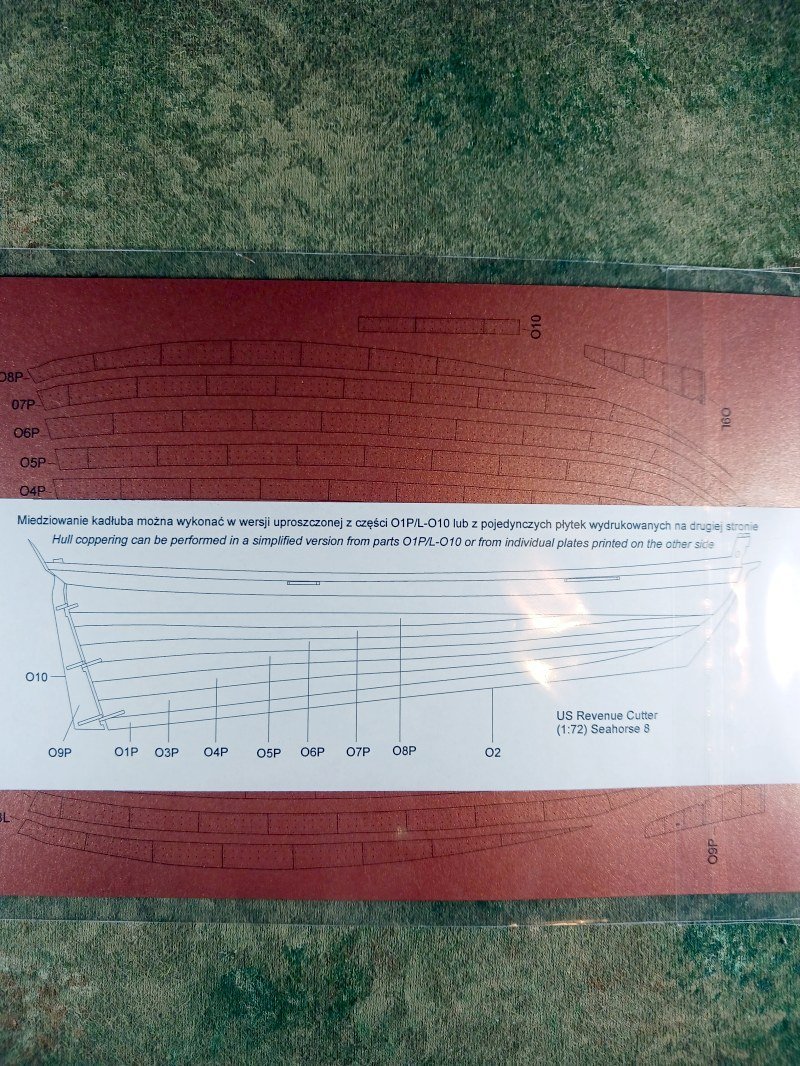
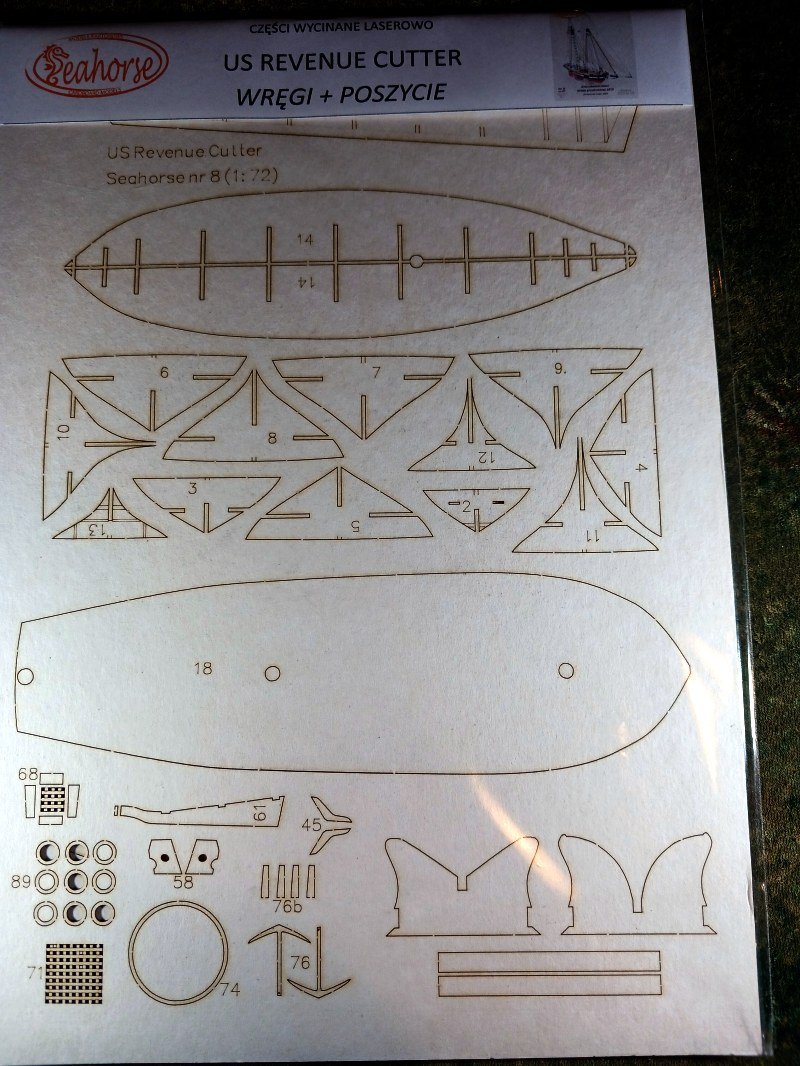
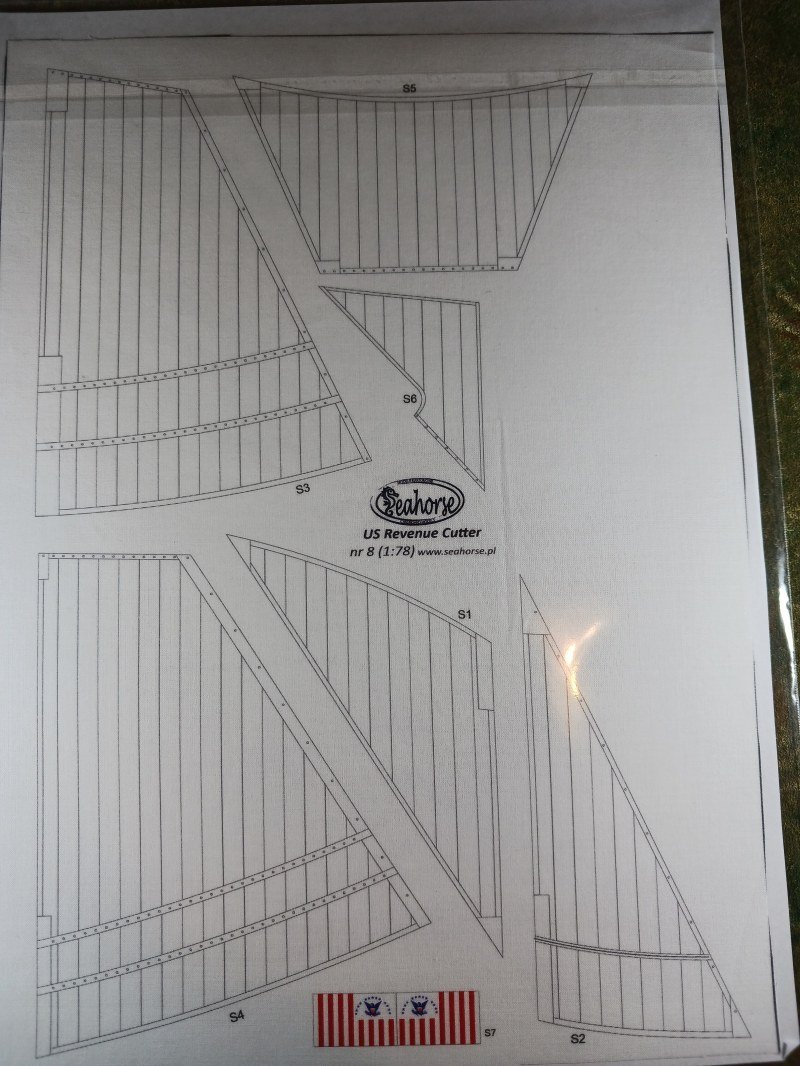
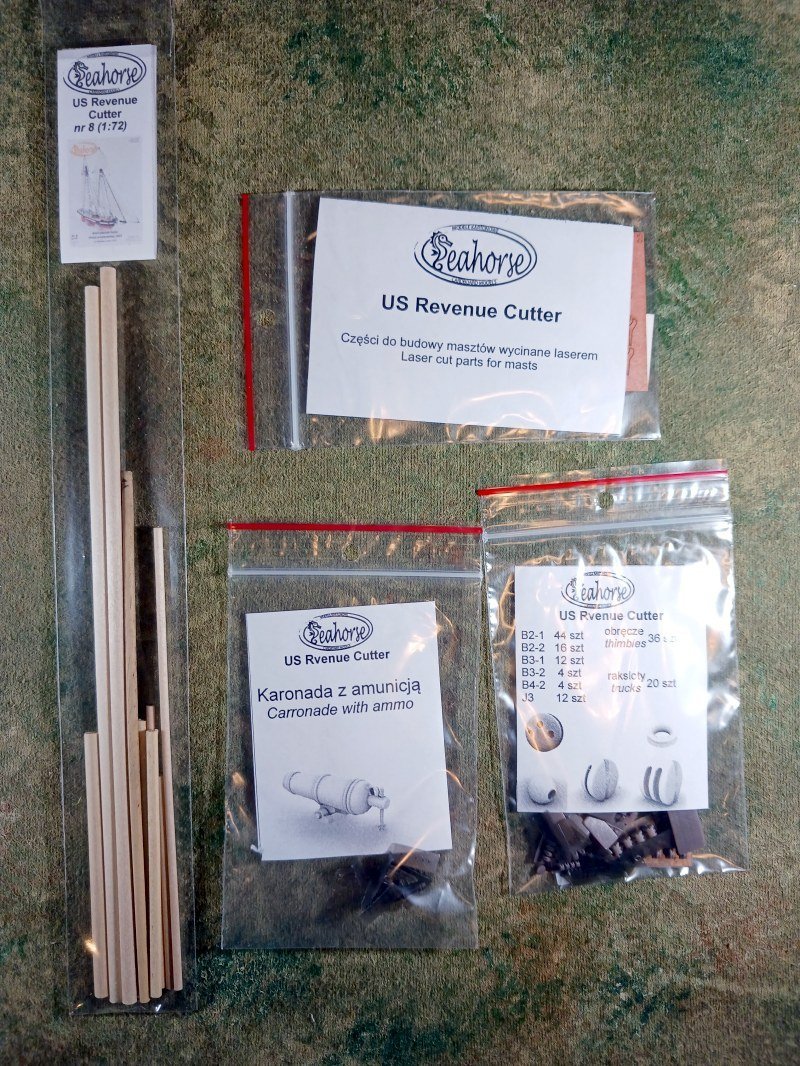
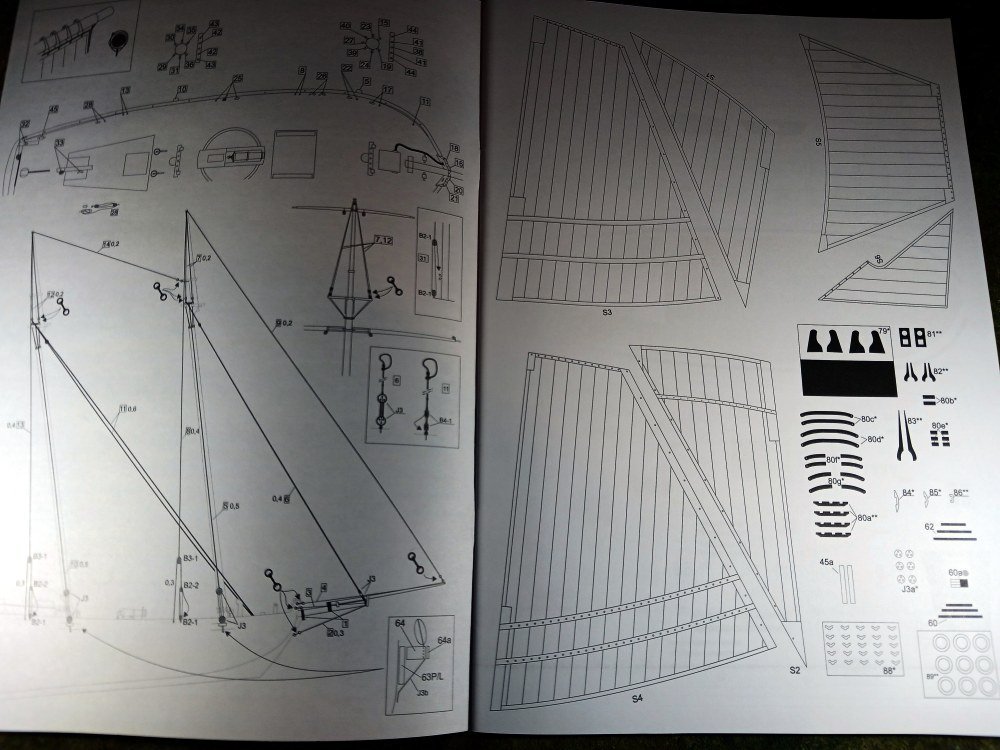
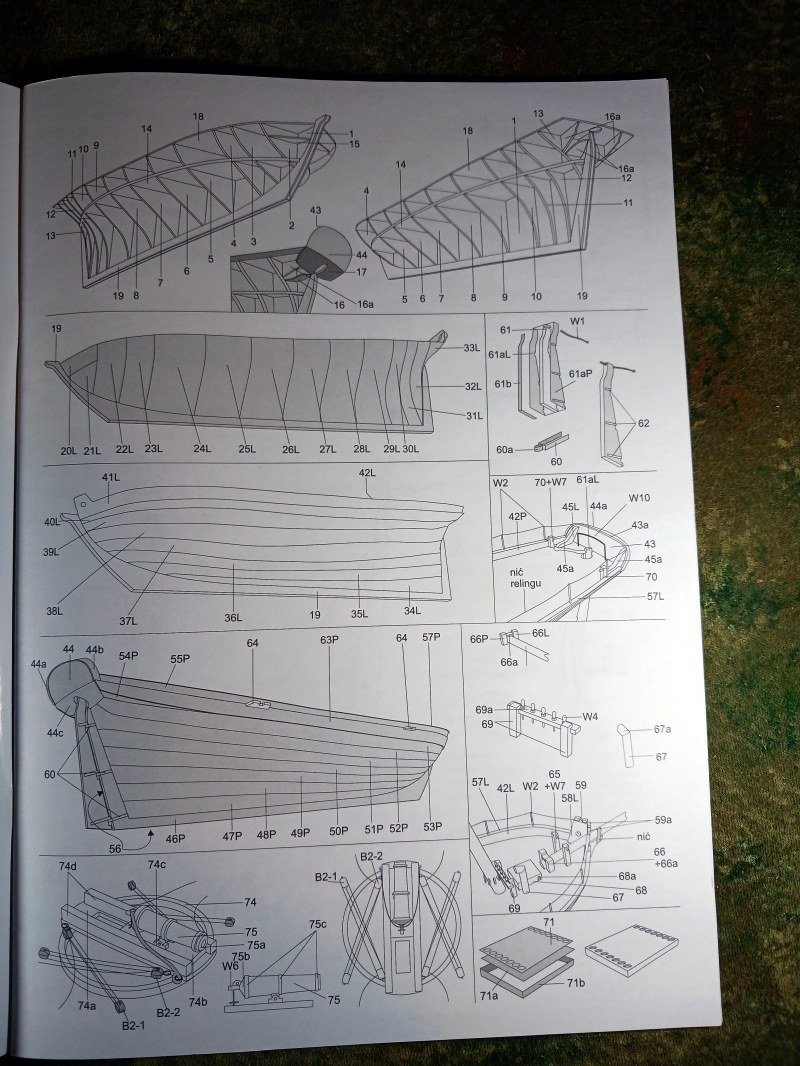
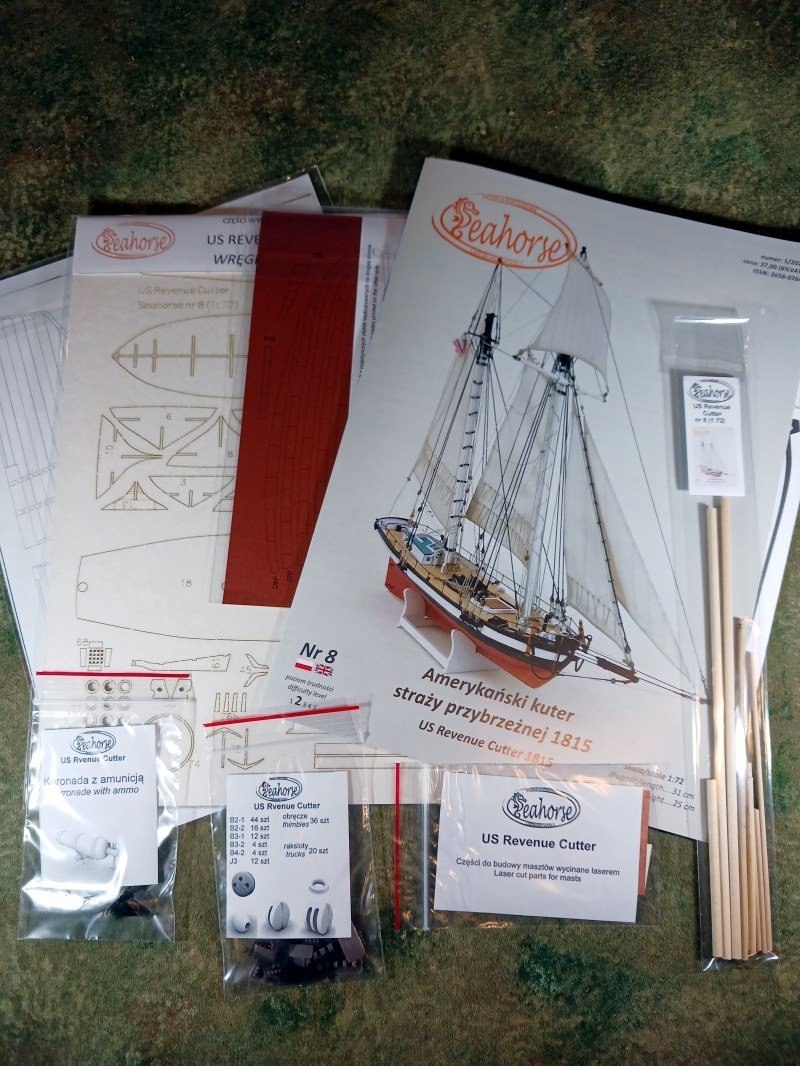
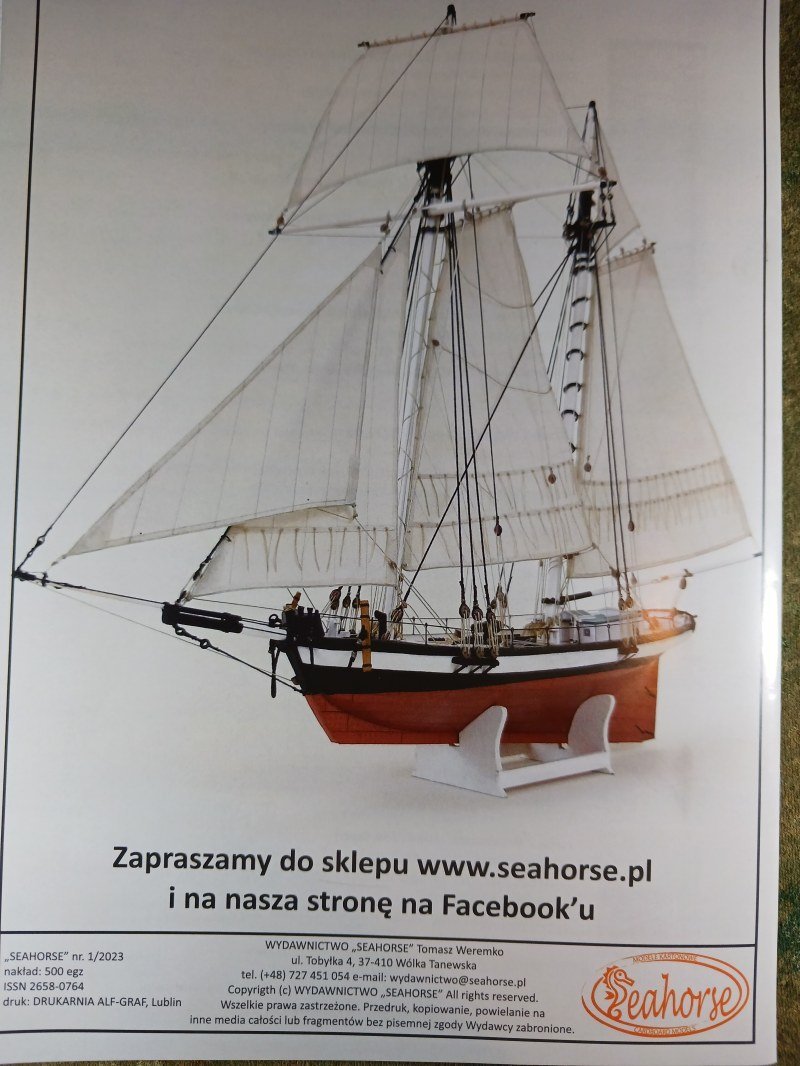
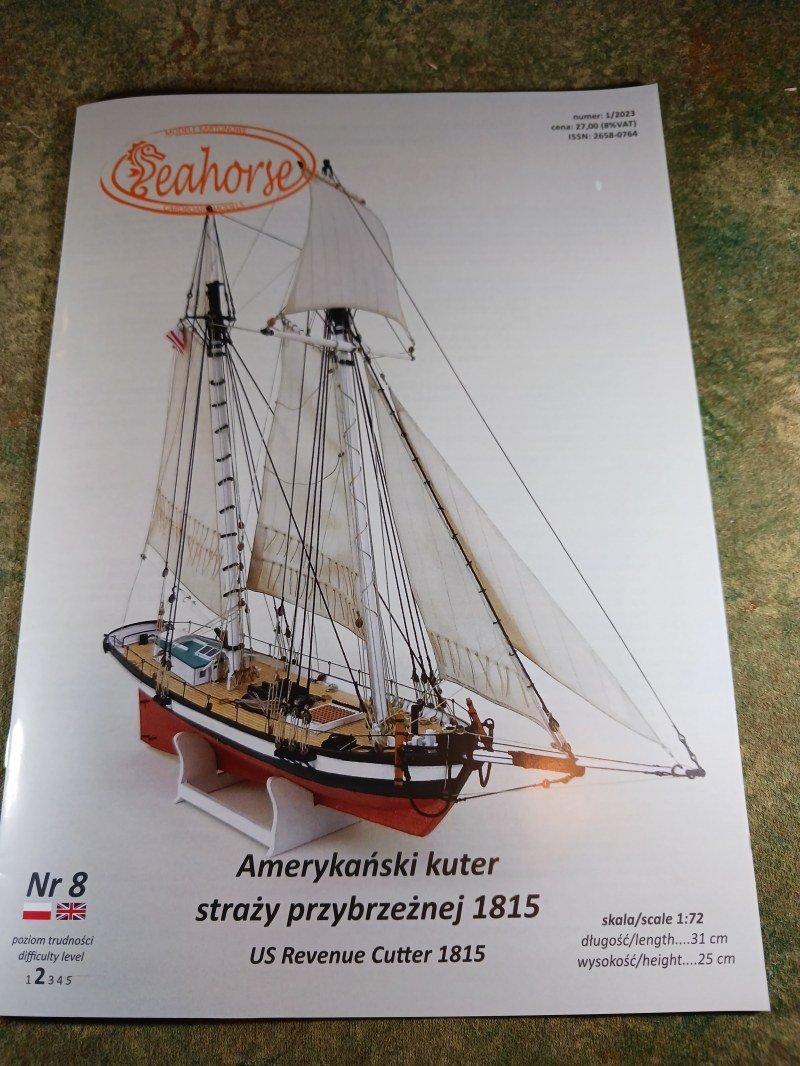
I once owned a rescue dog who needed a lot of behavioral work. So after some one-on-one sessions with a specialist we eventually graduated to attending obedience classes with others. I can’t say that we ever overcame all the issues (and I’m not sure who was training whom!) but I certainly learned the value of positive reinforcement. Consequently, since I have a tendency to be easily distracted and leave unfinished projects laying around, I wanted to reward myself for completing my first wooden ship model. While I enjoyed the wood model, my situation is perhaps not the best for them. Simply put, sanding wood makes too much dust for me to do in our living spaces and I really don’t have an interior space to do it. With the arrival of Winter sanding outside isn’t much of an option. So I’m putting off the next wood model until Spring and the return of good weather. So returning to my interest in card models I read up on the models produced by Tomasz Weremko, aka, Seahorse. Card models are certainly more apartment friendly than wood models and they are much more budget friendly. Level of detail, of course, is entirely in the hands of the builder and designer. While I’ve tinkered with designing and building my own card models, I’ve never actually built a commercially available kit. I still consider myself a novice builder and while I love the look of fully rigged ships I hesitate to commit to building one. I wanted something small, preferably in 1/72 scale to match my last model, and without too much rigging. I first decided that Searhorse’s Armed Virginia Sloop would fit the bill. However, its 1/100 scale means that some of the details are going to be quite challenging for my hand-eye coordination. I confirmed that by reading Clare Hess’ build log. (Mr. Hess’ log can be found here: https://shipmodeler.wordpress.com/2022/07/29/building-the-armed-virginia-sloop-paper-model-part-1/) But Seahorse also offers a US Revenue Cutter in 1/72 scale. In addition, according to Mr. Weremko’s complexity scale the cutter ranks as a ‘2’ as opposed to the sloop’s level of ‘3’. It ticks all the boxes! Did I mention the budget friendlyness of card models? I ordered both as full kits complete with laser cut parts, sails, dowels and (almost) all the necessary bits and bobs provided. Both kits and shipping from Poland came in at $72.00 USD. I ordered directly from the Seahorse web site on December 4th and eagerly awaited the arrival of the kits from Poland. After checking the tracking website daily (which stopped showing progress once the packages arrived in Los Angeles on the 9th) they arrived in my mailbox on December 16th. Mustering my dog-training discipline, I’ll save the sloop for later but I instantly opened the cutter package and reviewed the contents. As expected, there’s nothing disappointing about this kit. The basic model is presented as a saddle-stitched (e.g., stapled) booklet with full color photos of a finished model on front and rear covers. Ah, something to aspire to! There is, of course, a minimum of written text in both Polish and English comprising of a short history of the ship and ‘Basic Rules and Tools’ for construction. There are four pages of pictorial instructions, two pages of parts printed in black on white paper and two pages of parts printed in color on card. Now, in my set there was a second set of the card-printed parts inserted into the fold. I’m not sure if this was an oversight or if the second loose set was included because the printing of the first set (which is bound into the booklet) is a bit weak. Or, perhaps Seahorse can sense a ‘newbie’ and kindly included spares. Whatever the reason, intentional or not, it gives me a sense of security and a makes me think that Seahorse is a quality operation. (It’s also a bit unsettling that I joyfully anticipate looking at a centerfold of a model… ship!) There are a couple of hazards for neophytes. The first is that the required thickness of card for laminated parts is appended to the part number and is easily overlooked. The number is followed by ‘//’ or ‘*’ or ‘**’ to indicate 0.3, 0.5 or 1.0 mm card thickness. However, I think I’ve shielded myself from this potential error by purchasing the laser cut parts sheets. I’m also puzzled by this sentence in the instructions: “To avoid too many symbols, uncommon thickness of some parts should be matched to the width of the stripes covering its edges.” I can only assume that this refers to the keel which is considerably thicker than 1.0 mm and has a piece that runs along the bottom edge of the keel. That ‘edge’ piece appears to be about 4 mm wide so, therefore the keel should be laminated to that thickness. Now that I’ve typed that up it makes sense to me. I also see a couple parts with ‘W’ numbers which are not part of the printed sheets. I believe these need to be created from wire (which is mentioned in the ‘Basic Rules’). The templates for these parts are on the fourth page of instructions along with the mast and spar diagrams. The most numerous of these appear to be the rail stanchions surrounding the deck to prevent crew from falling overboard. My last observation is in regard to the copper sheathing below the waterline. It’s interesting that Seahorse has provided a simple solution and a detailed solution to the sheathing. On one side of the copper colored sheet the sheathing is designed as strips to cut and apply much like the hull planking. But if you flip the sheet over you find that it has been printed to represent the individual sheets of copper. So, depending up on your sense of fanaticism, er, level of detail, you have options. I like that. All said and done, I’m quite happy with my purchase. I’m not certain when I’ll get started on the cutter and the Virginia sloop is certainly farther down the line. (Maybe the sloop will be next Winter’s project.) At this point I’m still mustering my canine-induced self-discipline and working on resizing my skipjack design. But once I’ve hit the ‘proof-of-concept’ stage in that project it’s ‘game on!’ on the cutter. Pictures (or it didn't happen!):

-
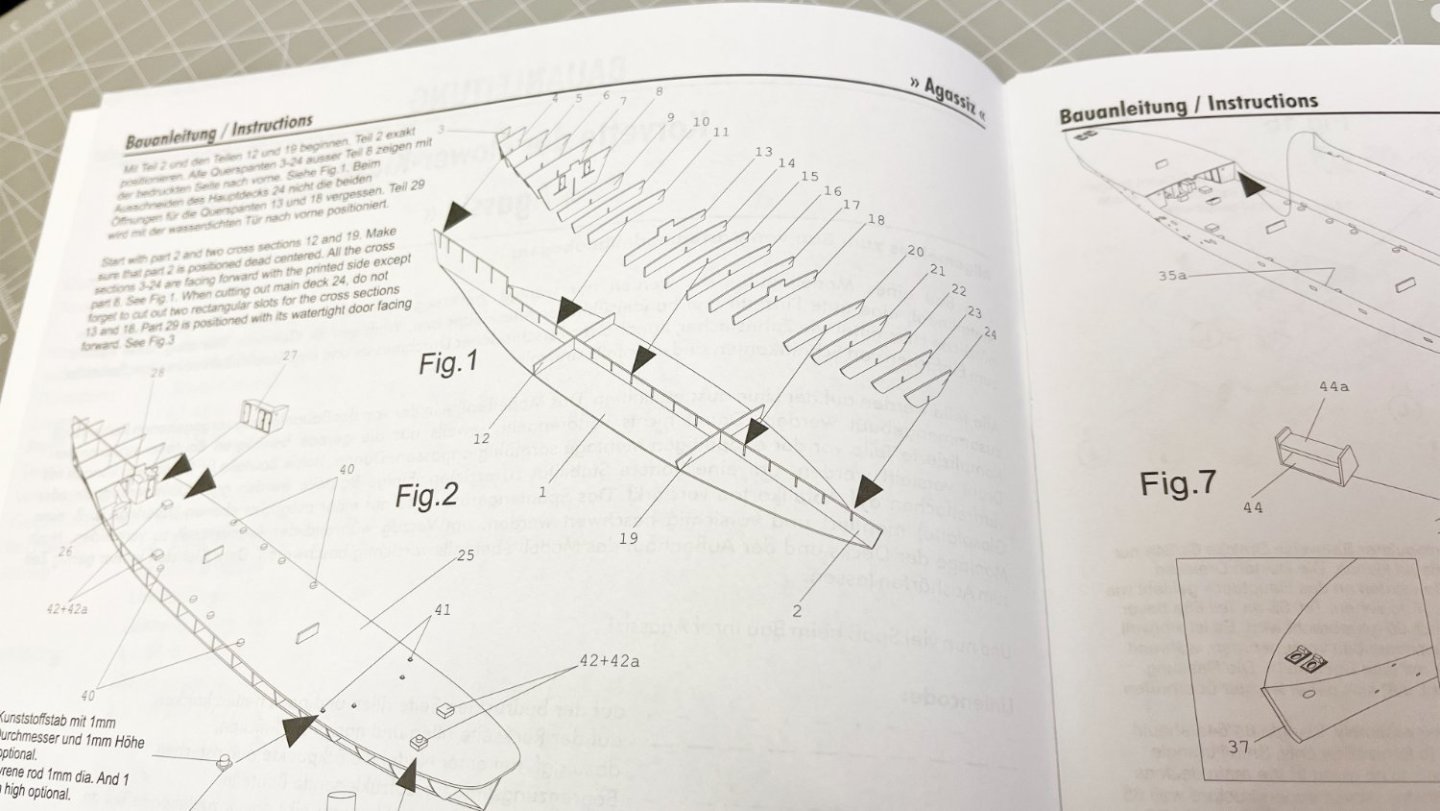
 Hello, I decide to start another card ship kit, this time for the HMV, the Flower Class HMCS Corvette Agassiz 1941. The kit is very detailed with many parts and add the Laser cut detail set from same company. So for start I cut the main parts for the cross sections, glued and left under some weight to straighten out.
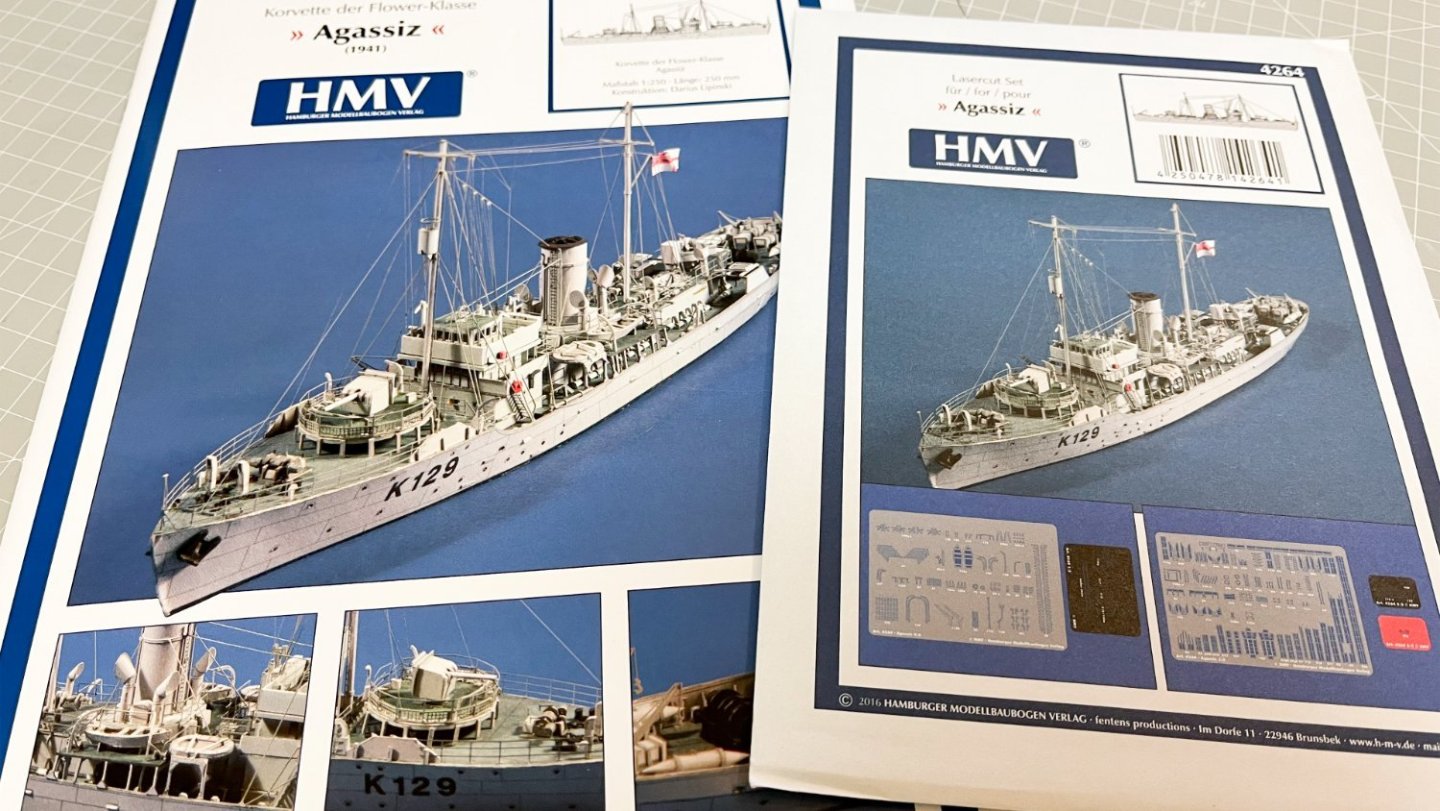

-
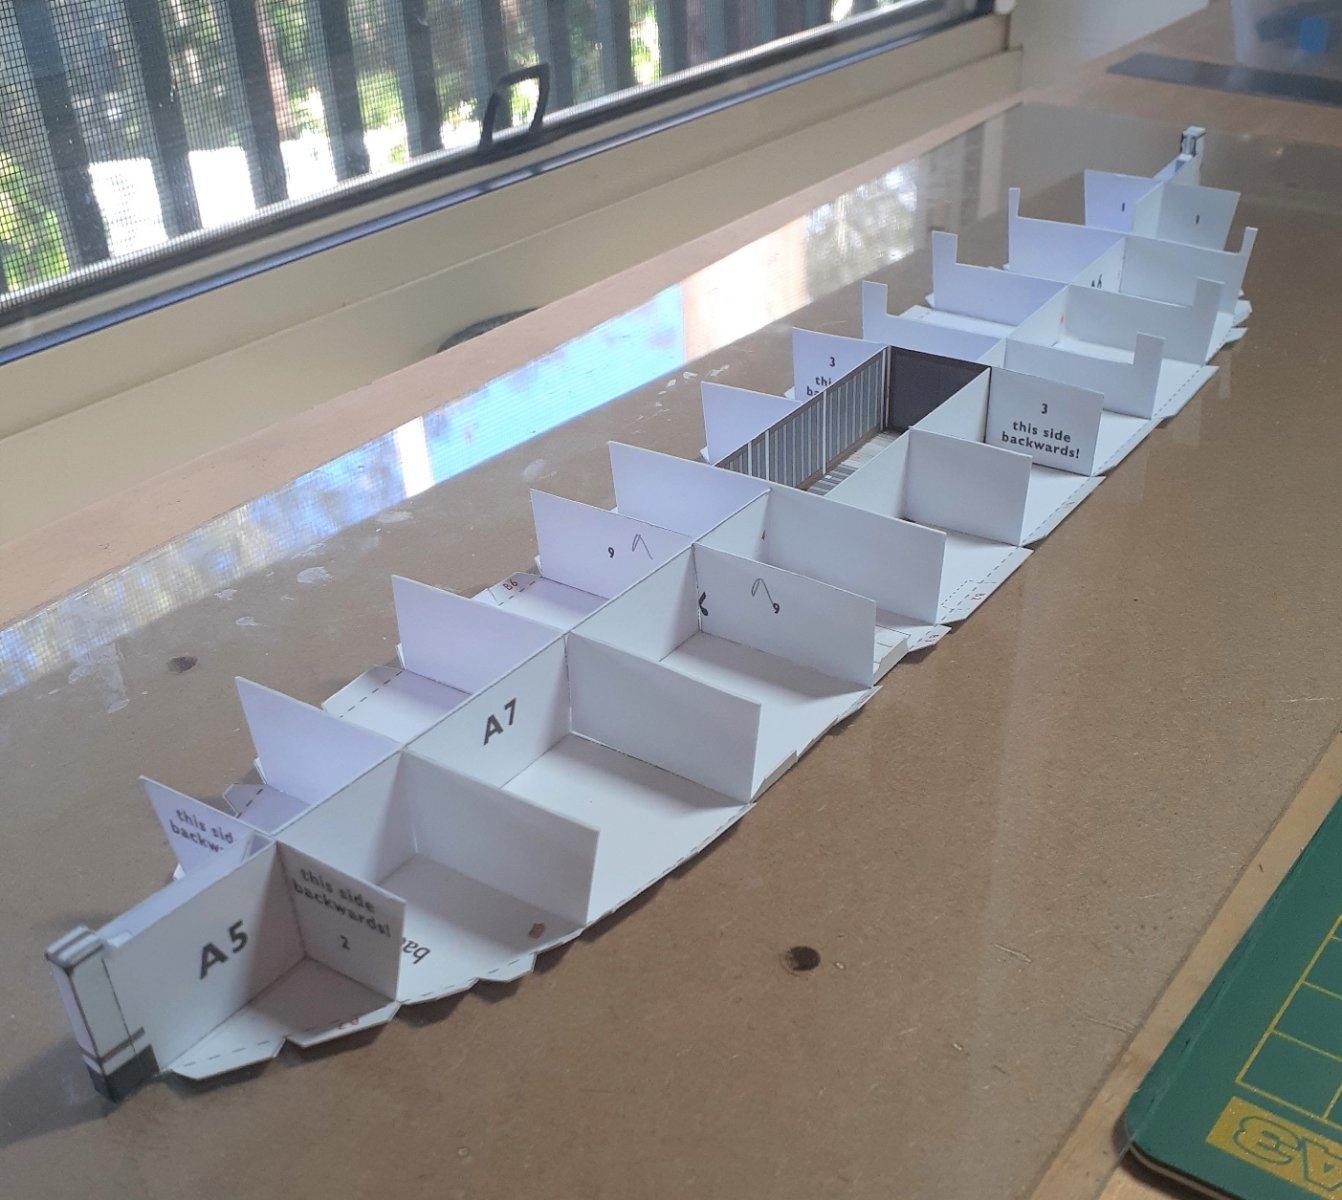
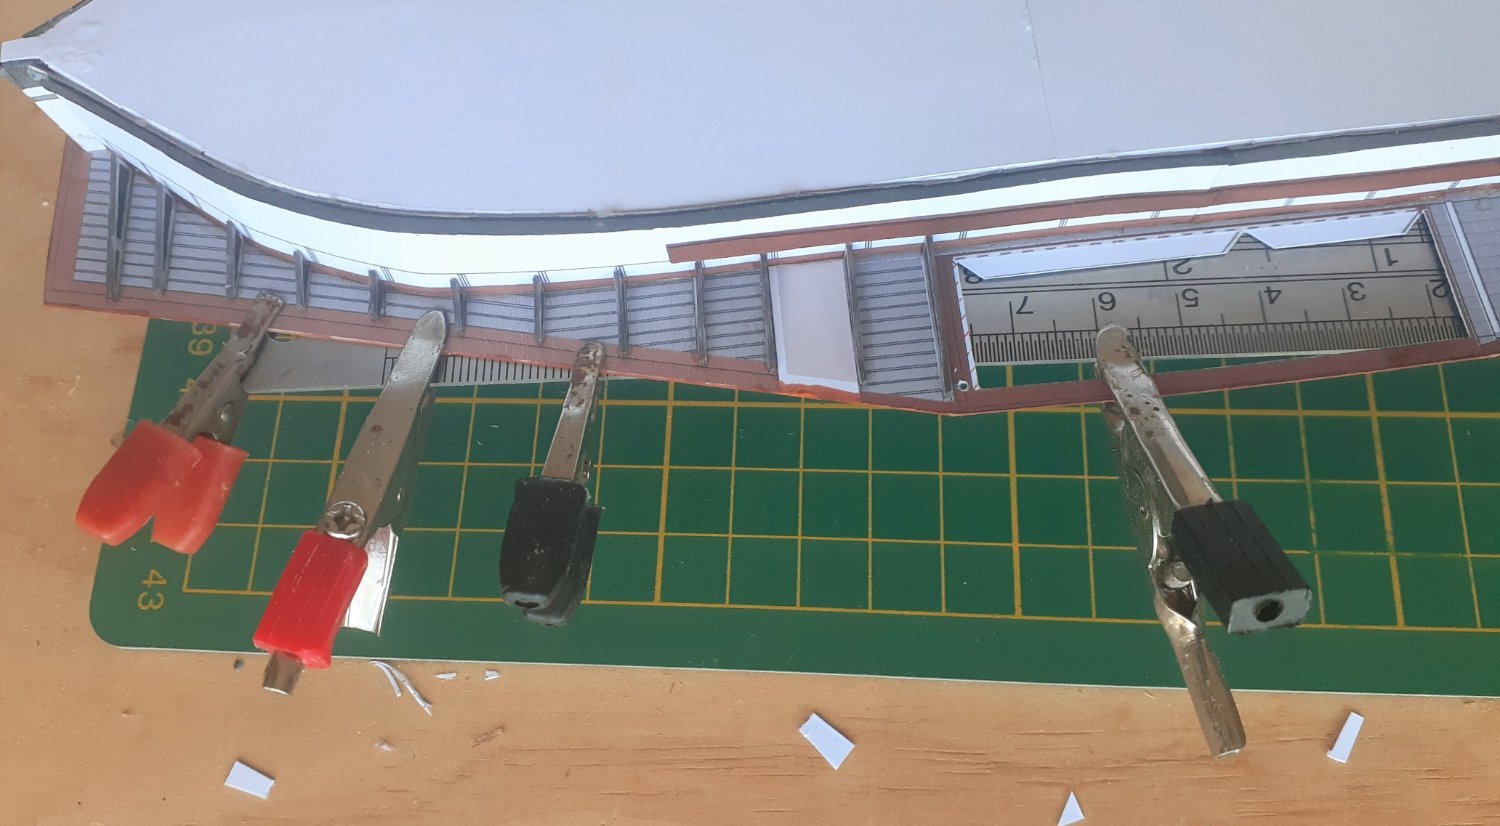
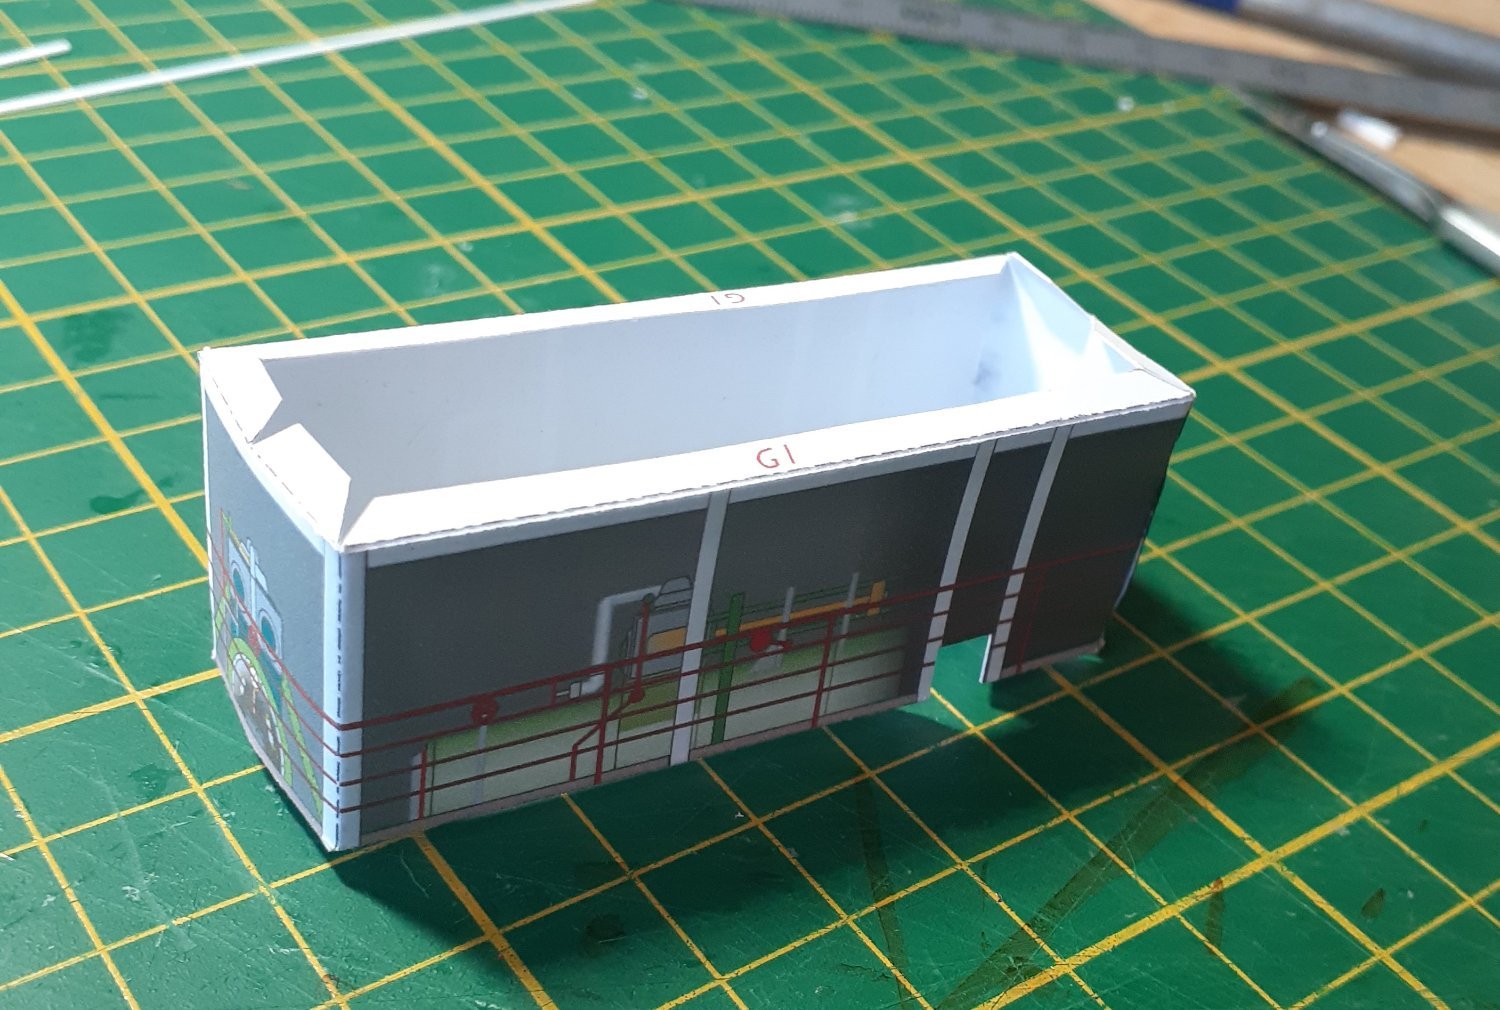
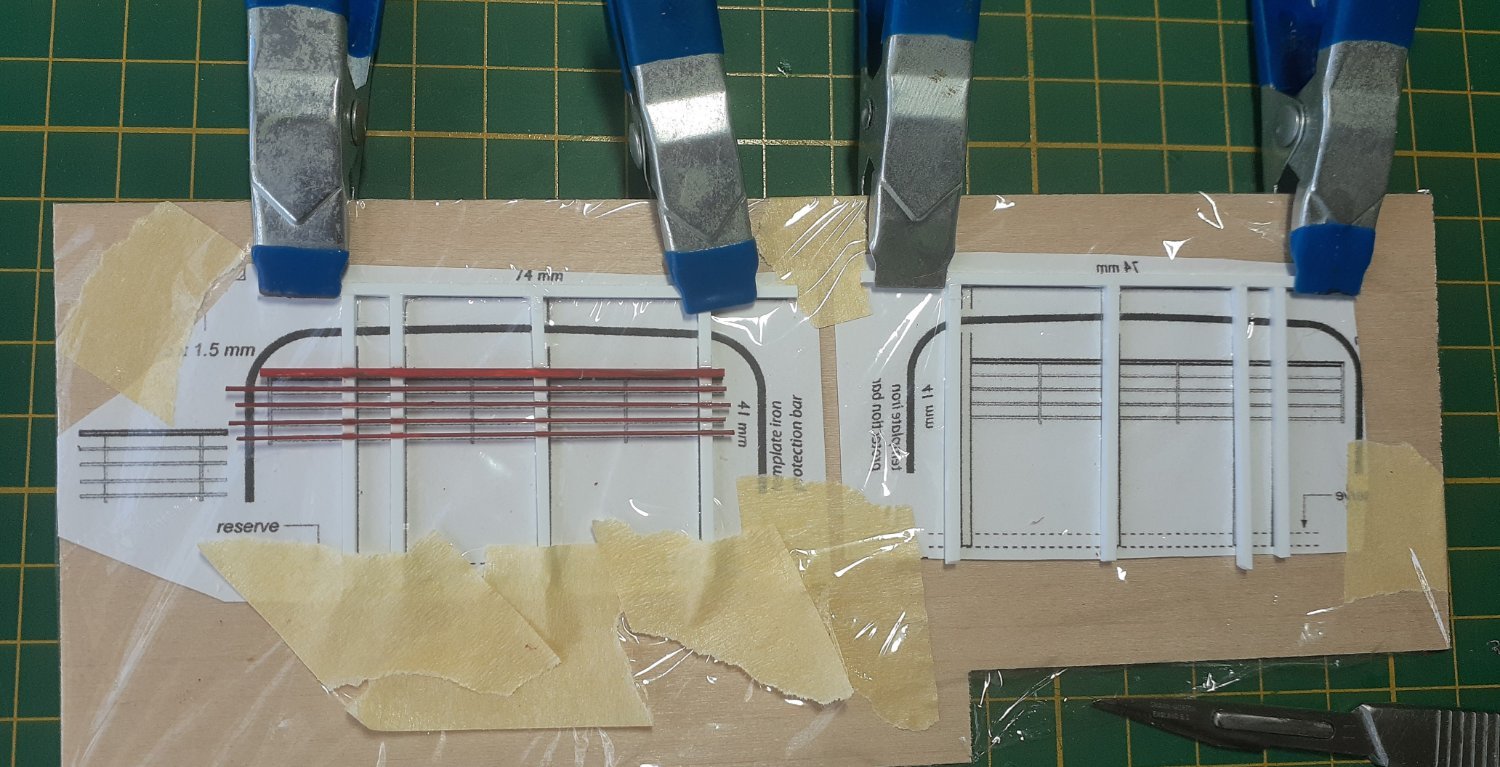
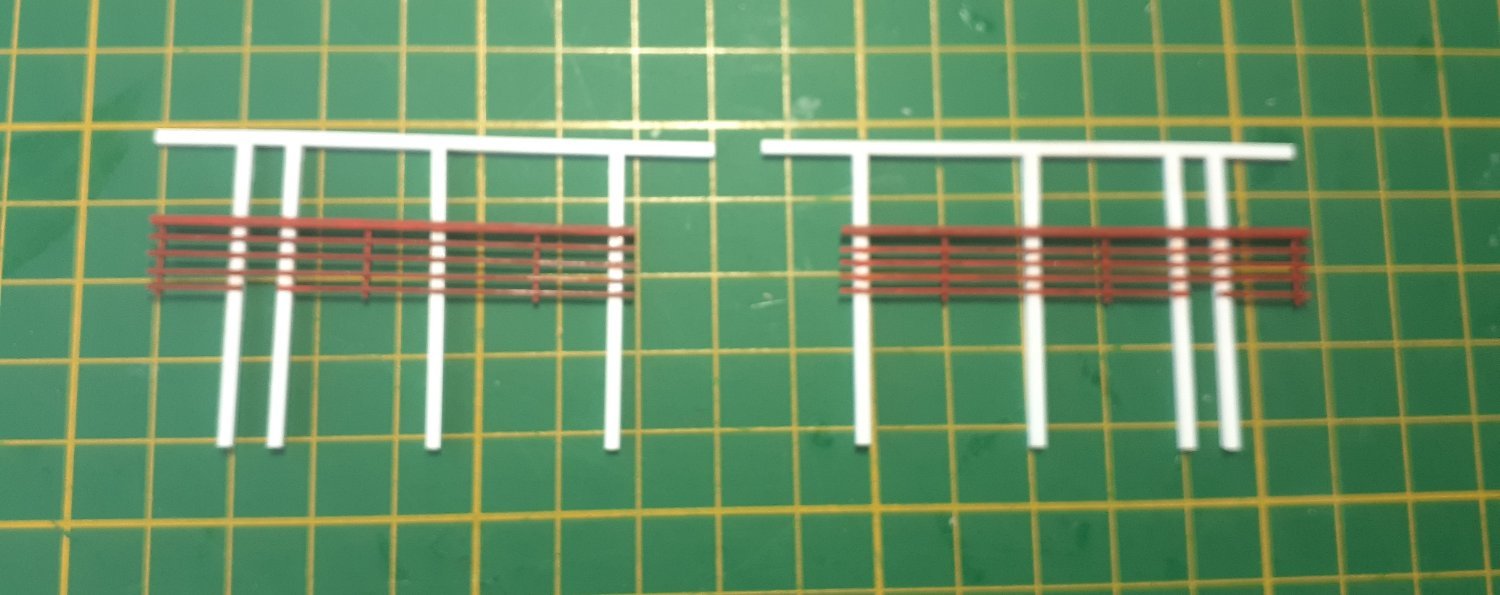
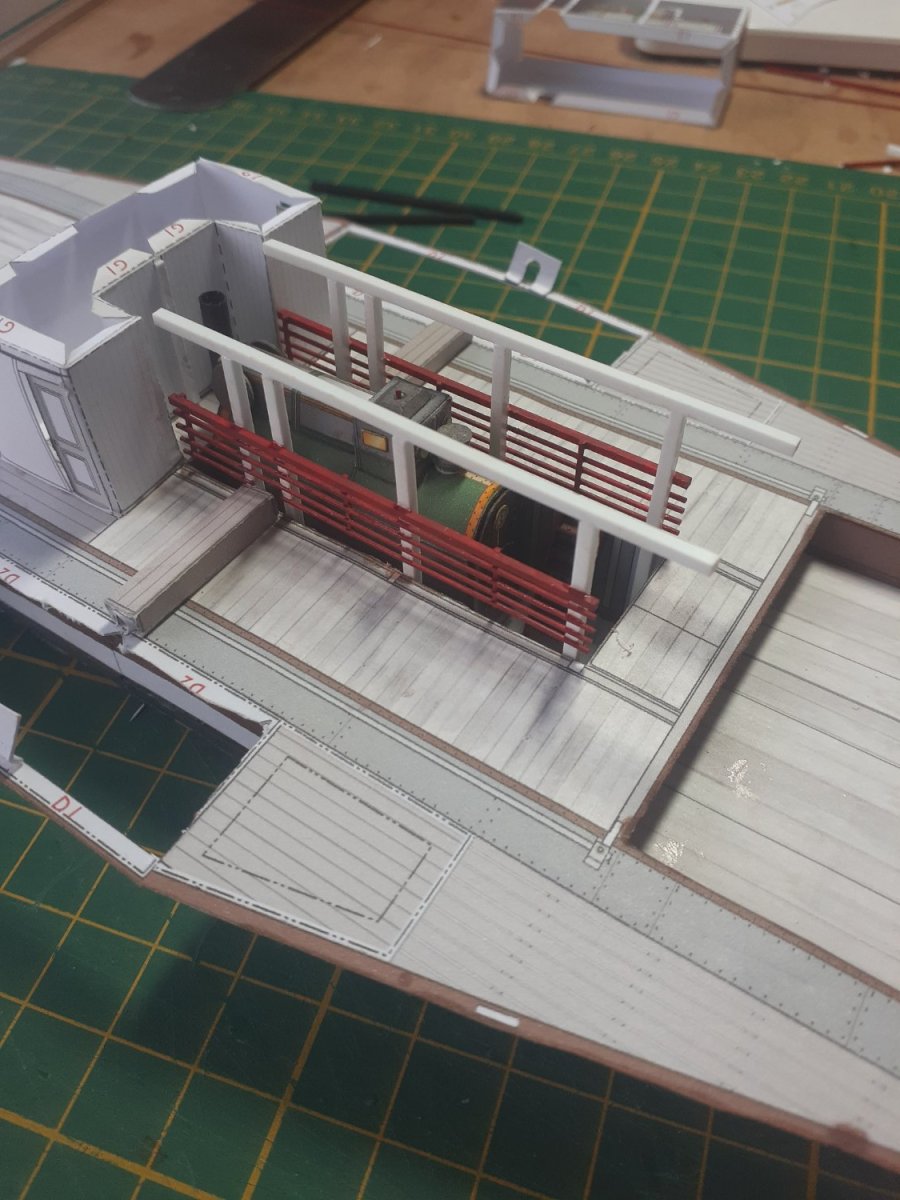
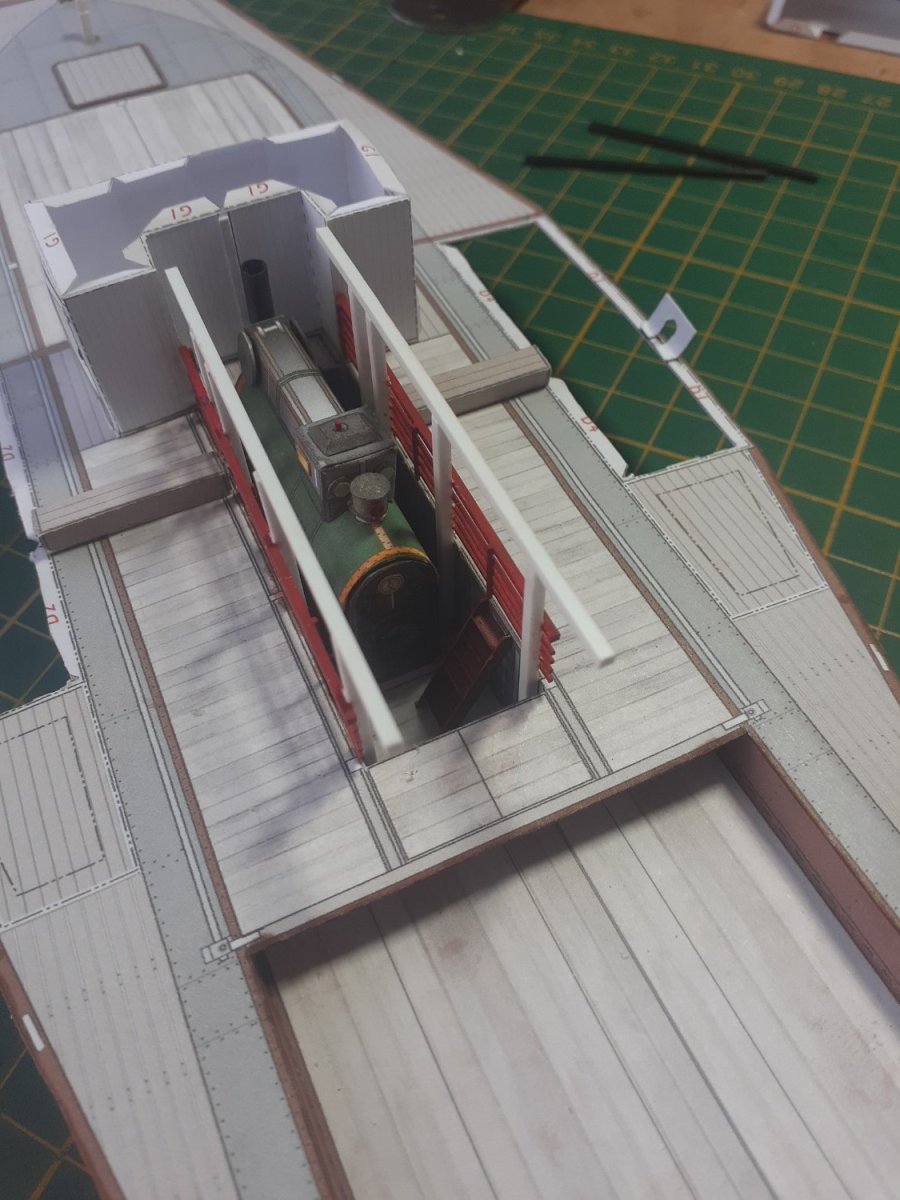
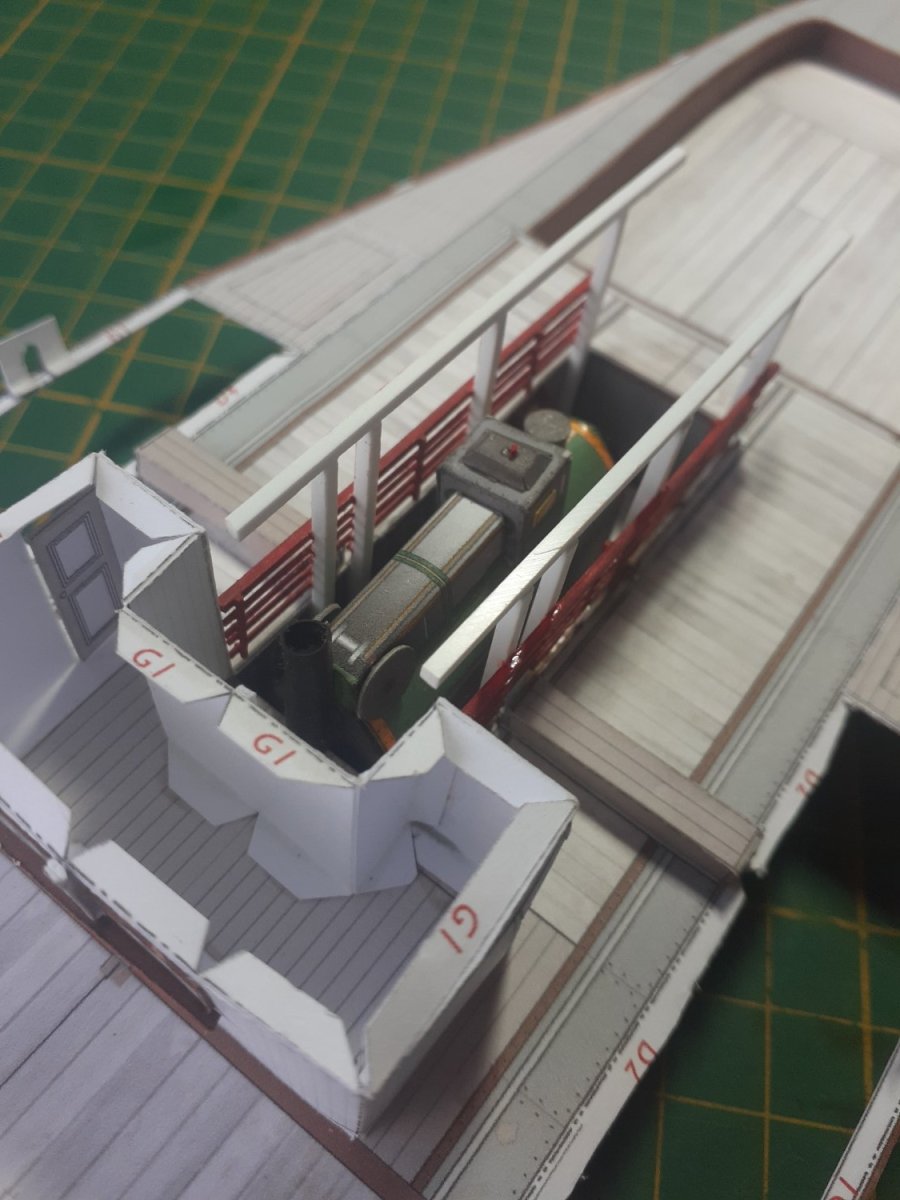
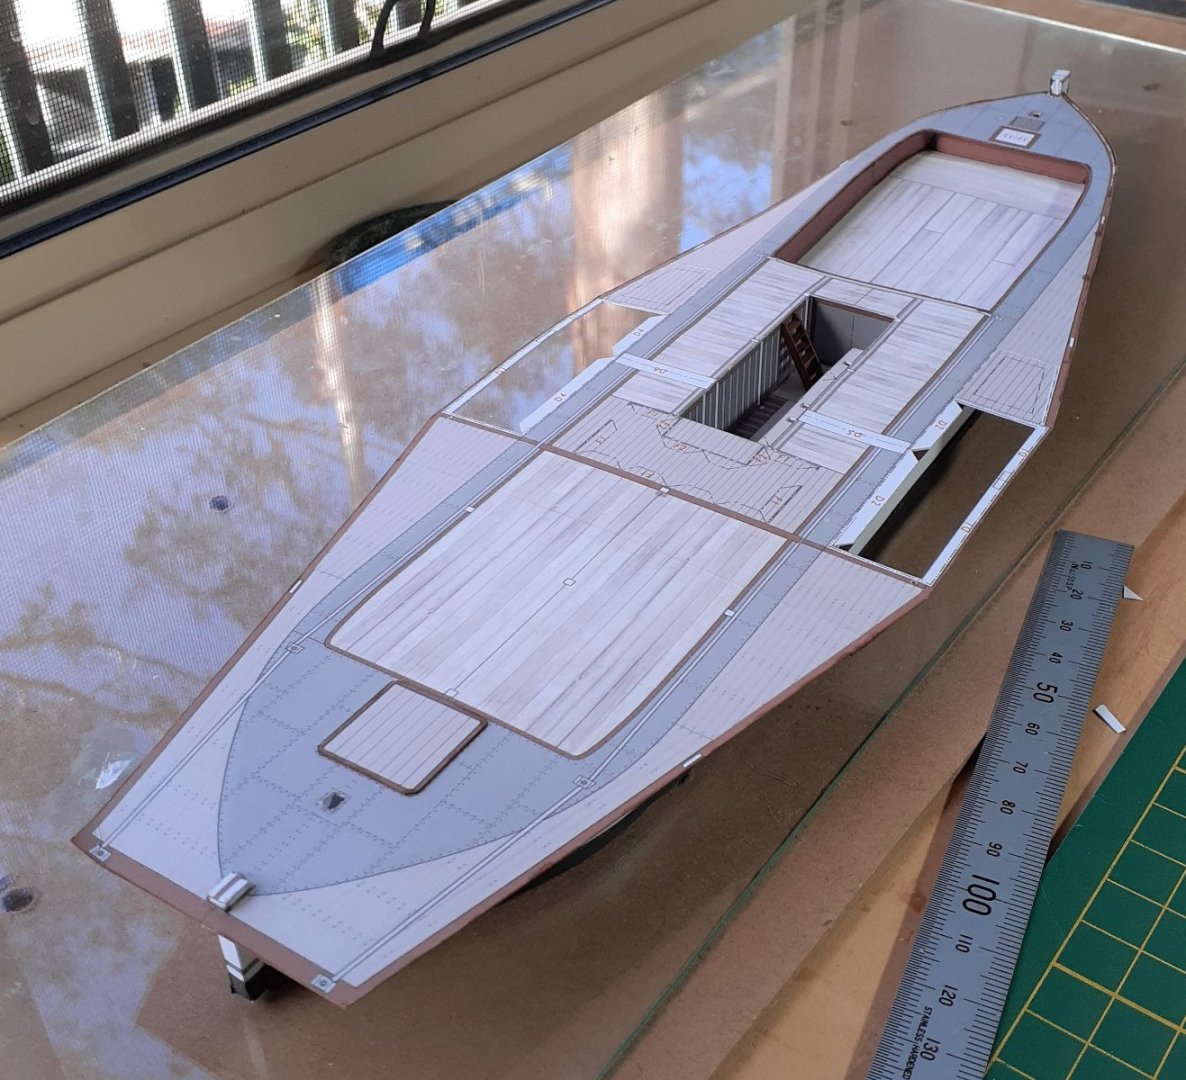
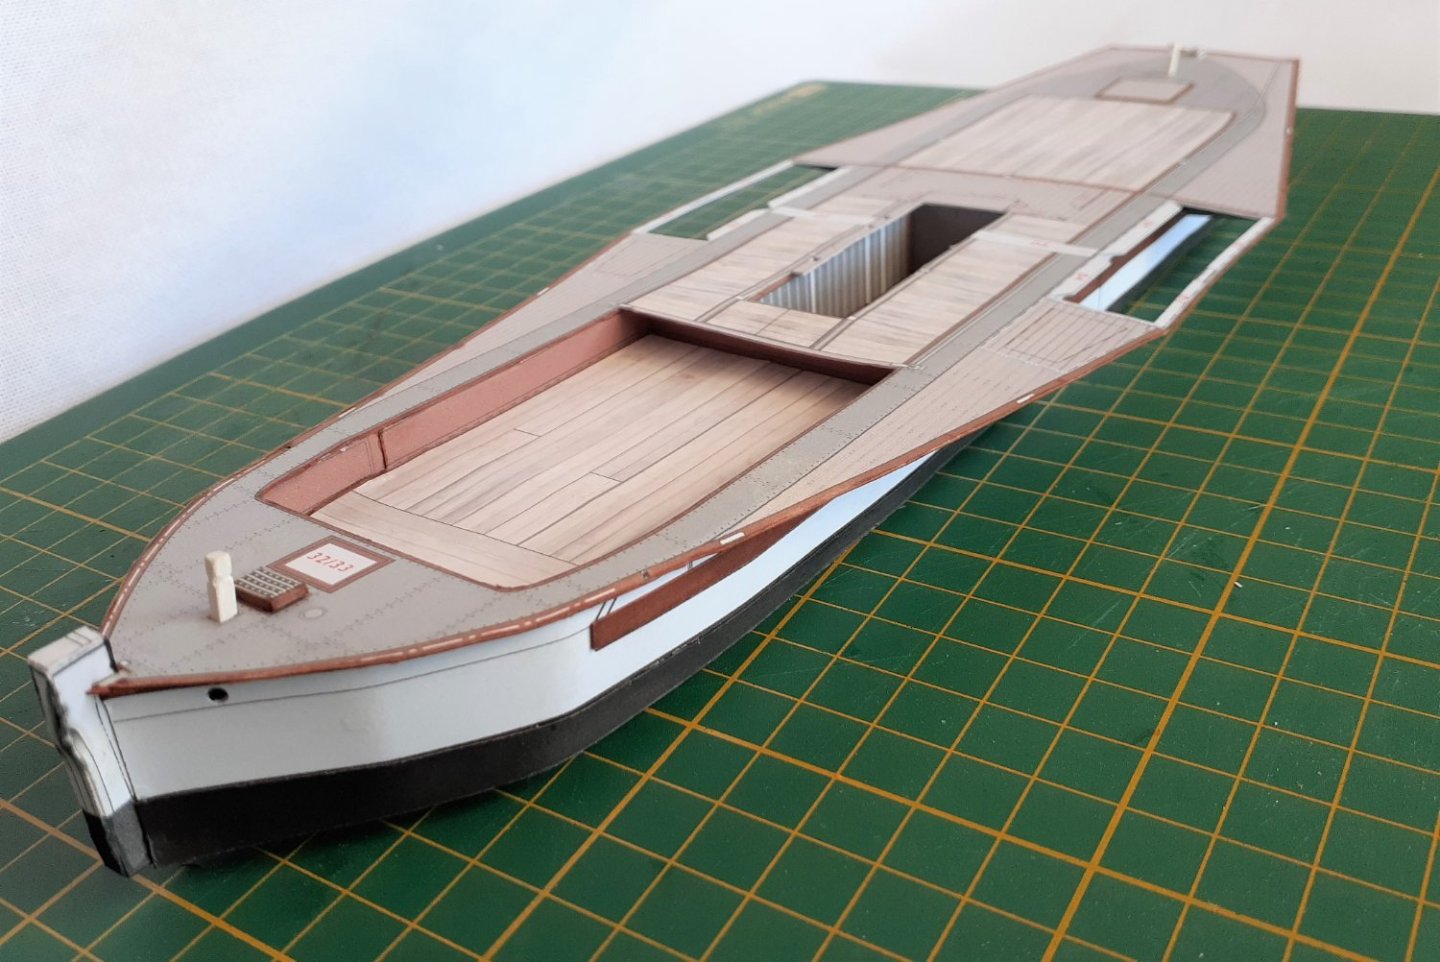
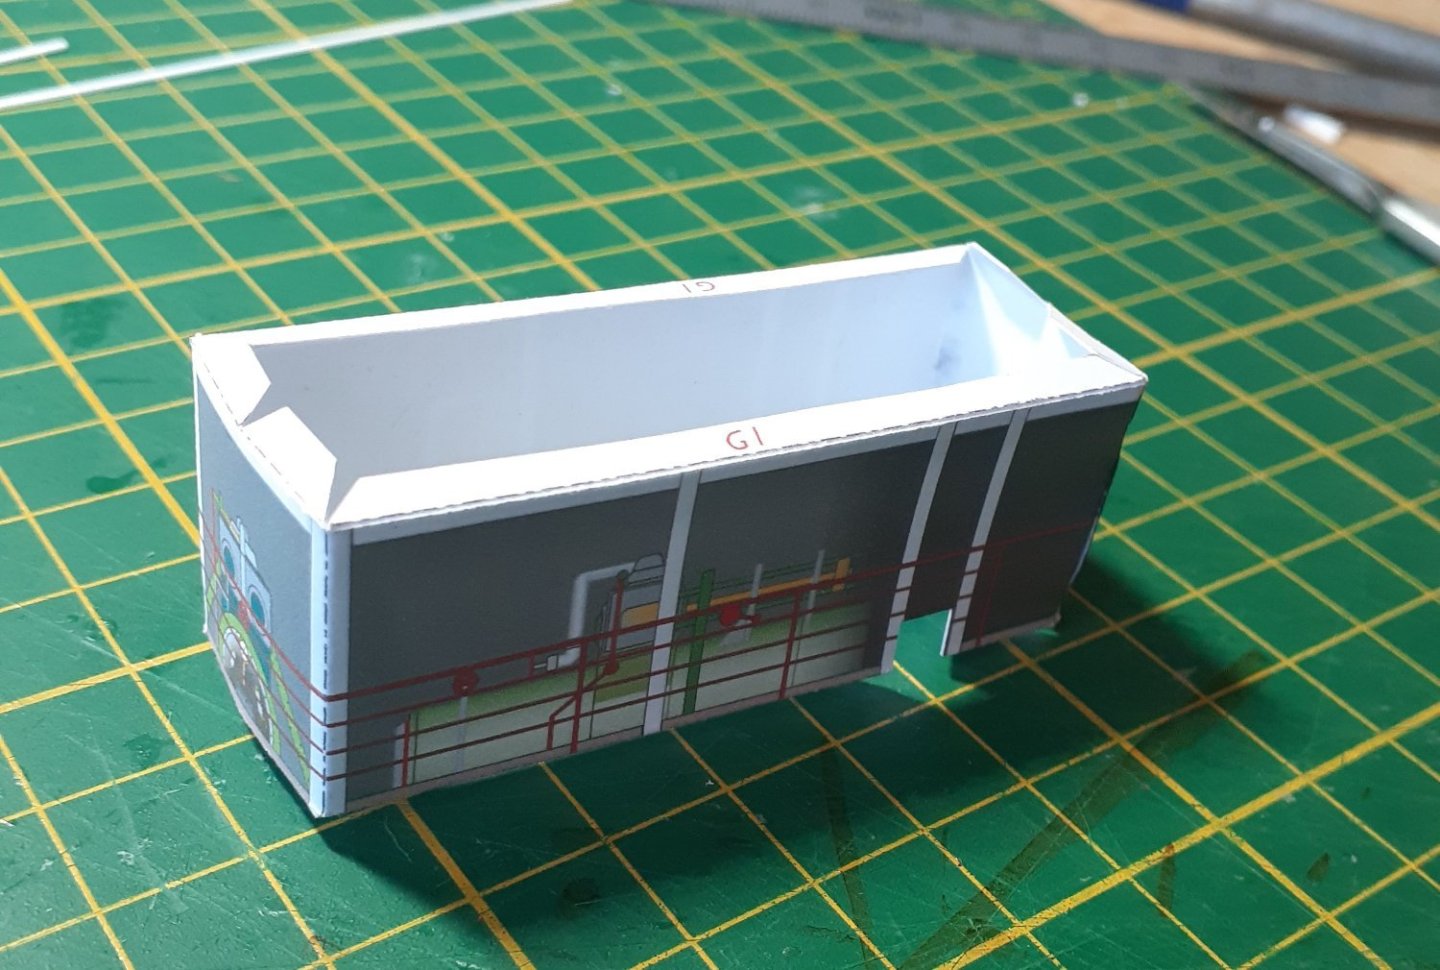
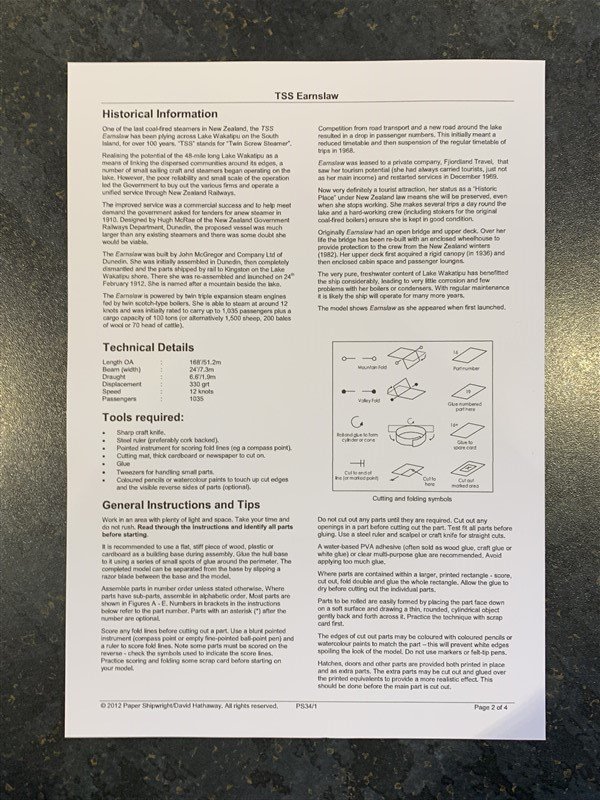
 The paddlesteamer Pevensey was built in 1910 at Moama on the Murray River (Australia), as the non-powered barge called Mascotte, but in 1911 the vessel was equipped with a steam engine and renamed Pevensey. This turned it into one of the largest towing boats on the Murray, and it itself was capable of carrying 120 tons of cargo. In 1932 she was almost destroyed by fire, was rebuilt in 1933-35, ran a regular cargo run in 1939, but was then made redundant and tied up at Mildura. In 1975 she was slipped at Moama and completely restored. A 1983 Australian TV series called "All the Rivers Run" starred her as the PS Philadelphia. The Pevensey is now based at Echuca and runs tourist trips along the Murray. The kit from World of Paperships (from the Netherlands) has two sheets of general information (with some photos), one sheet of diagrams, four sheets of English instructions, five sheets of printed parts (some sheets are printed on both sides) and one small sheet of lasercut parts. The sheet of diagrams is complex and in places difficult to follow, hopefully this won't cause problems later. The bottom of the hull was tacked to a sheet of glass to act as a building board for the initial stages of the build. Two dabs from a glue stick sufficed for this. The sides were glued to the frames and the rubbing strakes added (forgot to take photos at this stage) then the deck was fixed in place. A portion of the foredeck had been removed and a replacement glued lower down to represent a shallow cargo hold. A cutout was also made to allow for the engine space. There are triangular supports between the underside of the deck and the sides. To ensure that the deck did not develop any waviness, a small steel rule was clamped to the top of the deck (the hull was off the glass and upside down for this step) while the supports were glued in place. Many of the parts of the boat could be made either as a simple version or a detailed version. This photo shows the simple version of the engine and its surrounding safety railings, folded up from the provided card print. The detailed version has 40 parts... ....and is the one I built. Unfortunately, I've somehow lost/deleted the photos I took of the completed engine, standing alone. A template was provided to allow construction of the main framework that is around the engine space, and it, and the safety railings, were made from 0.5, 1.0 and 1.5 mm square styrene stock. The framework supports the base of the superstructure that will be above it, and so had to be carefully fitted so that it was flat, even and of the correct height. Temporary "scaffolding" of wood strips and folded card was put in place to achieve this. The engine, engine space and surrounding framework (the latter is not quite complete). There is a small crew cabin just aft of the engine space. Cheers
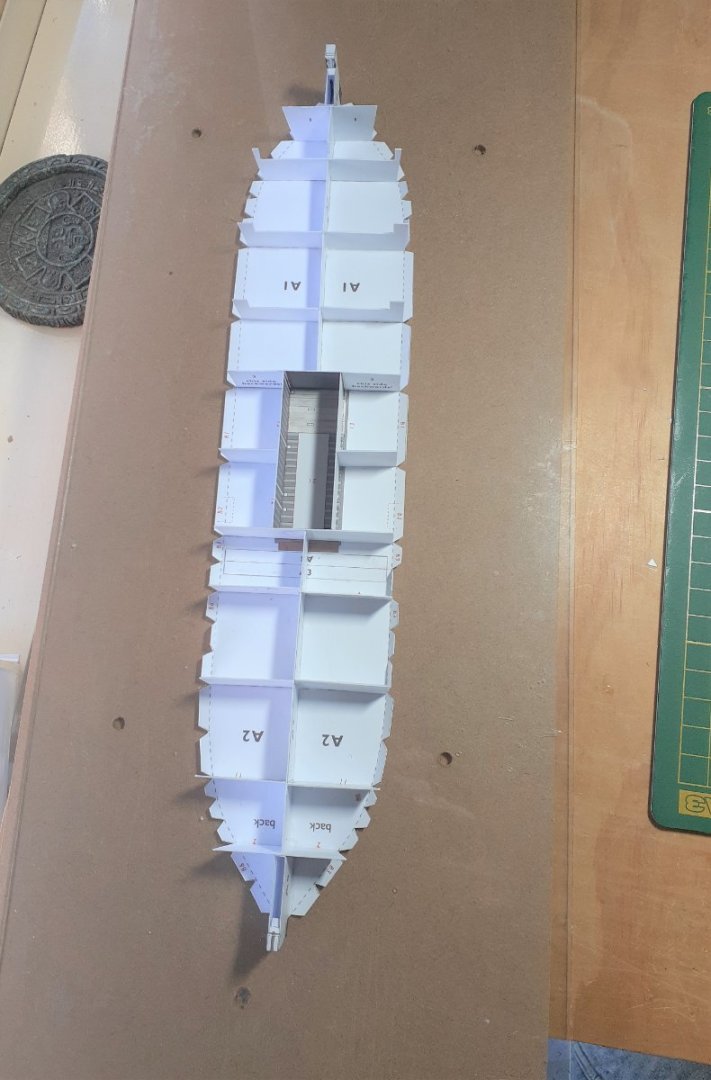


- 18 replies
-
- 7
-
-
- Pevensey
- World of Paperships
- (and 2 more)
-
Hi, Just made a short video of "unboxing" the card kit 1:250 HMV SMS UNDIN. Included in the and of the video also, the Lasercut set from the same company. A quick look in the kit and it seems very detailed. https://youtu.be/tPKftt8peZs
-
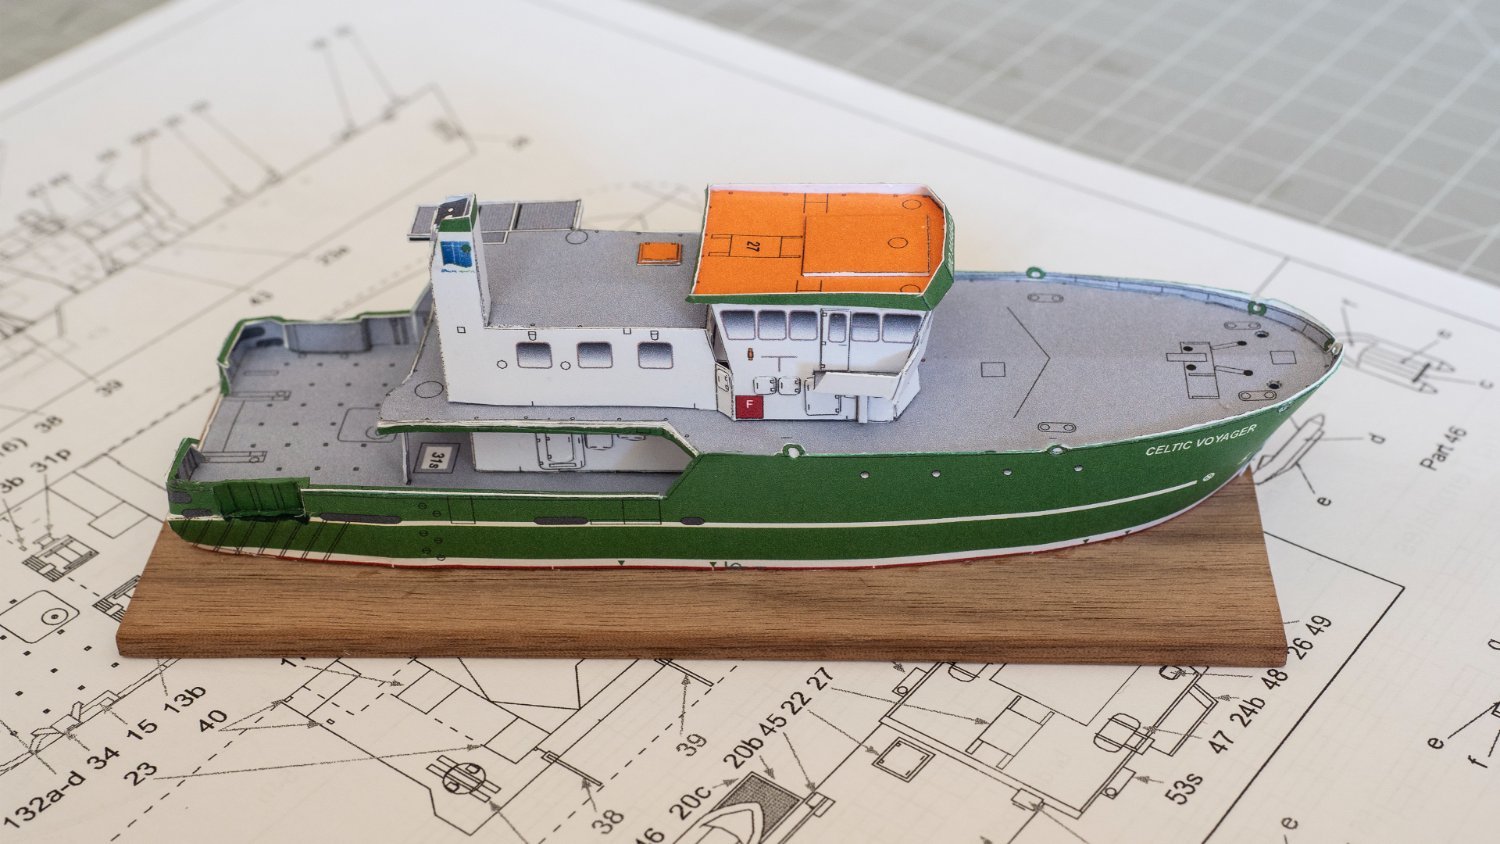
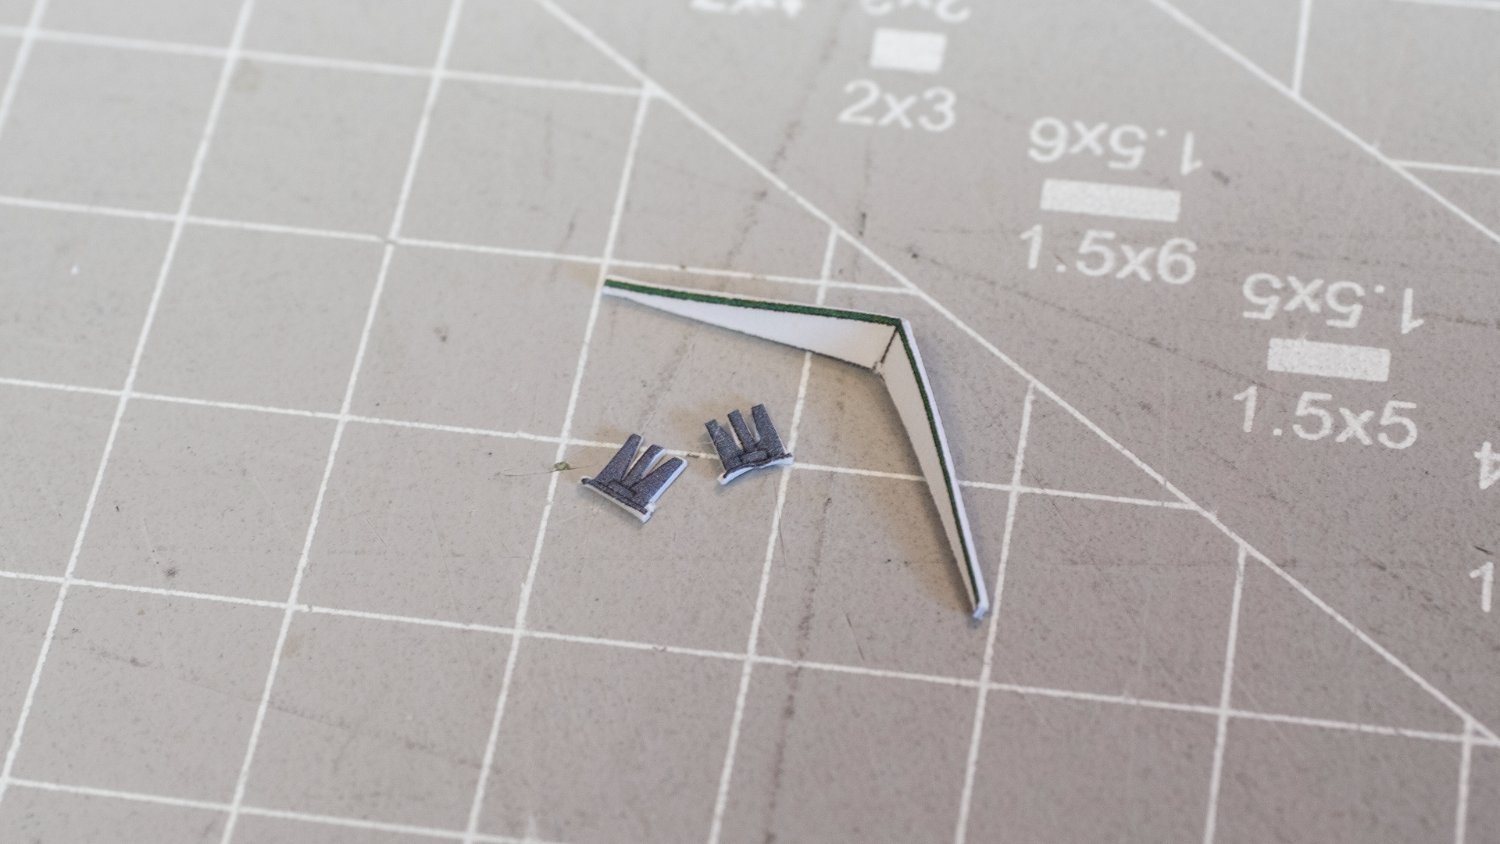
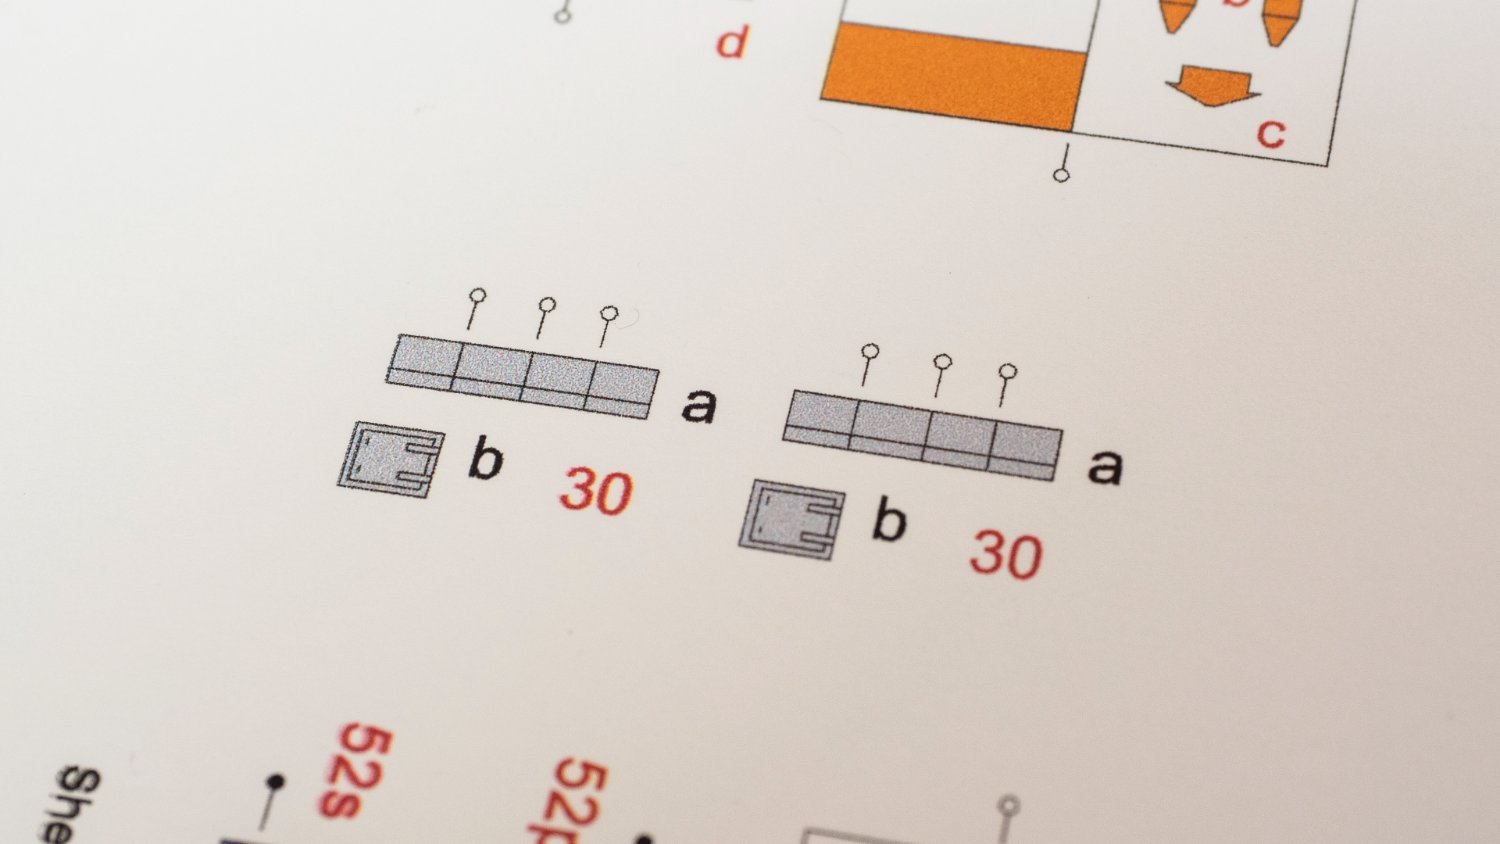
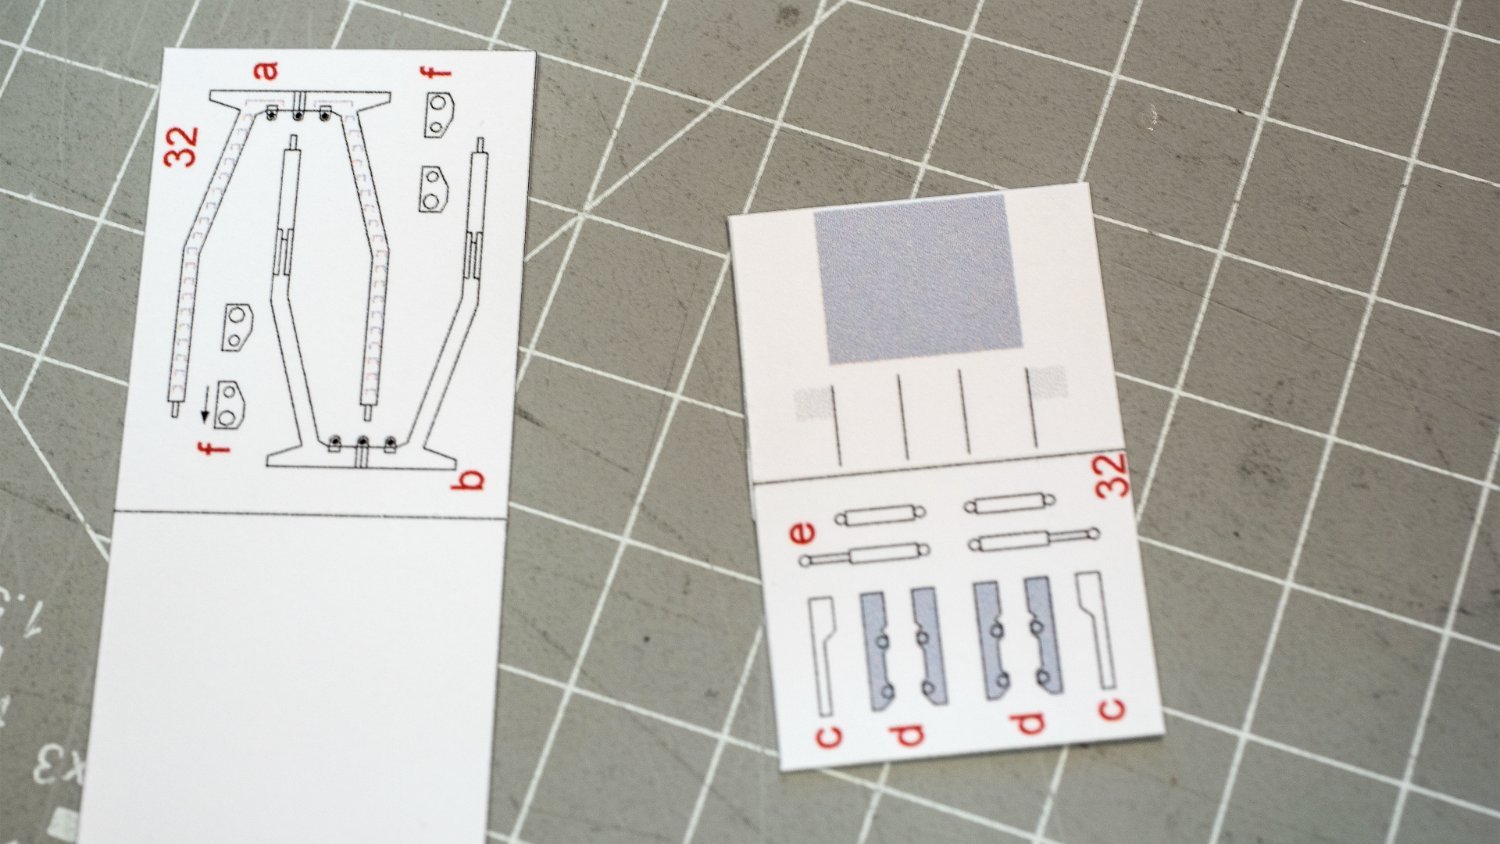
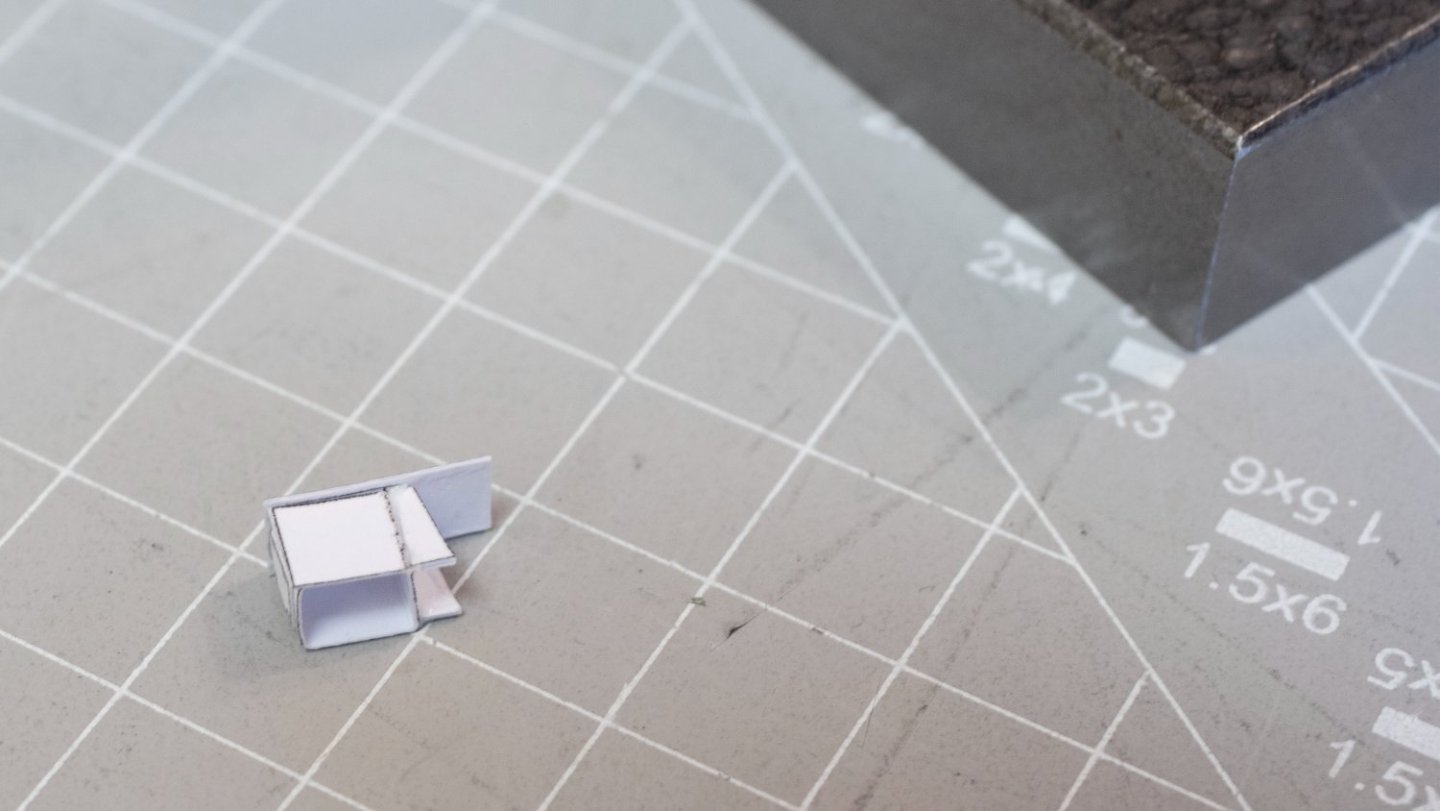
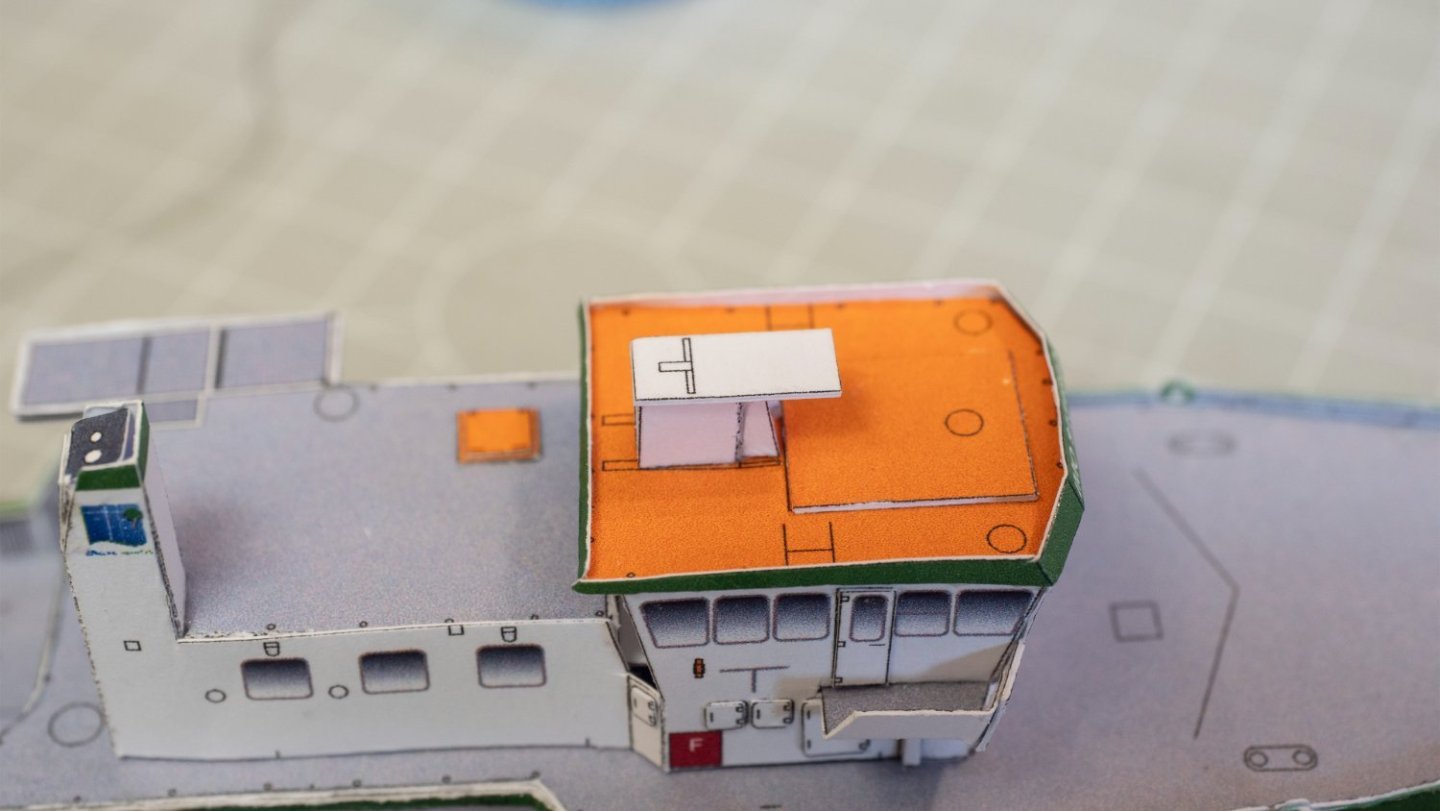
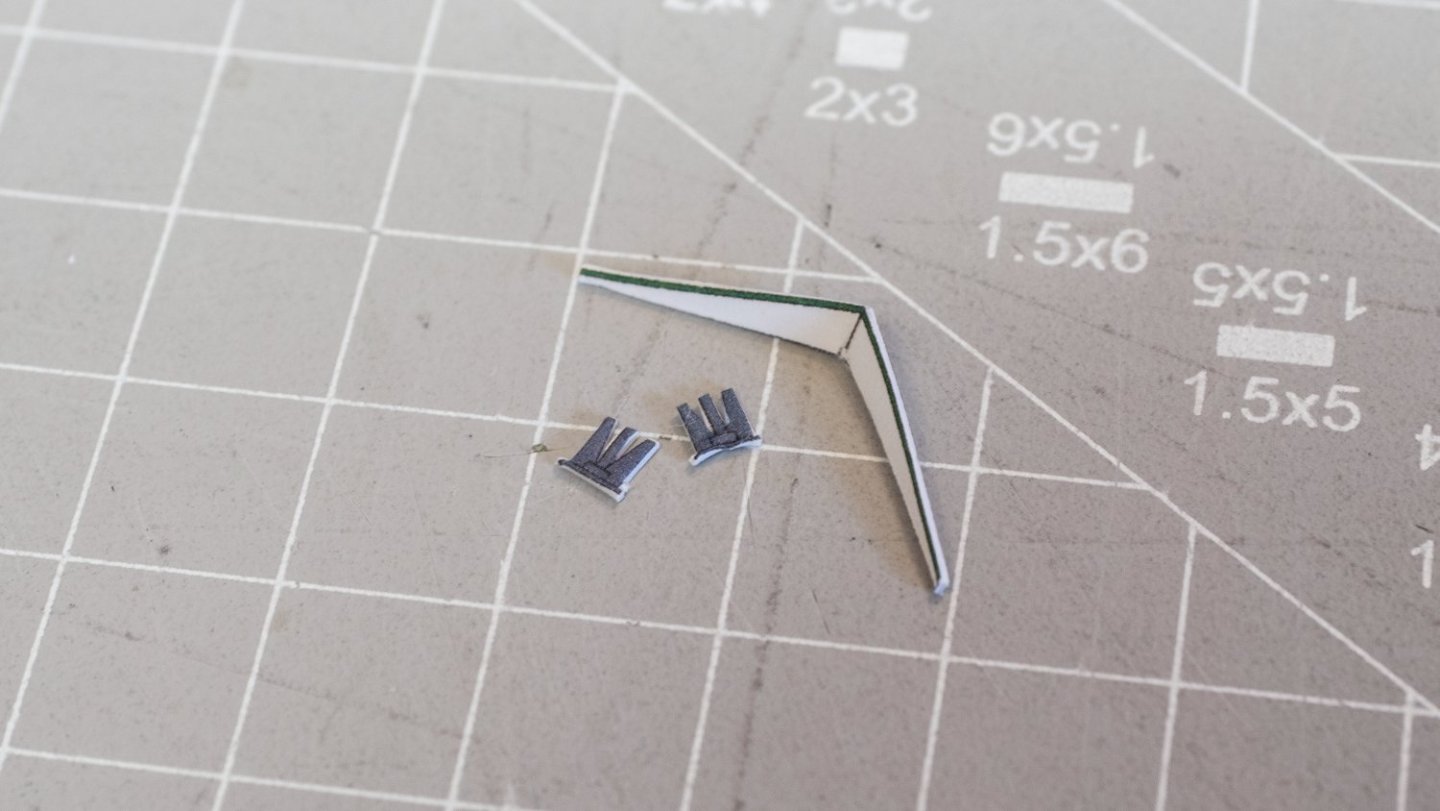
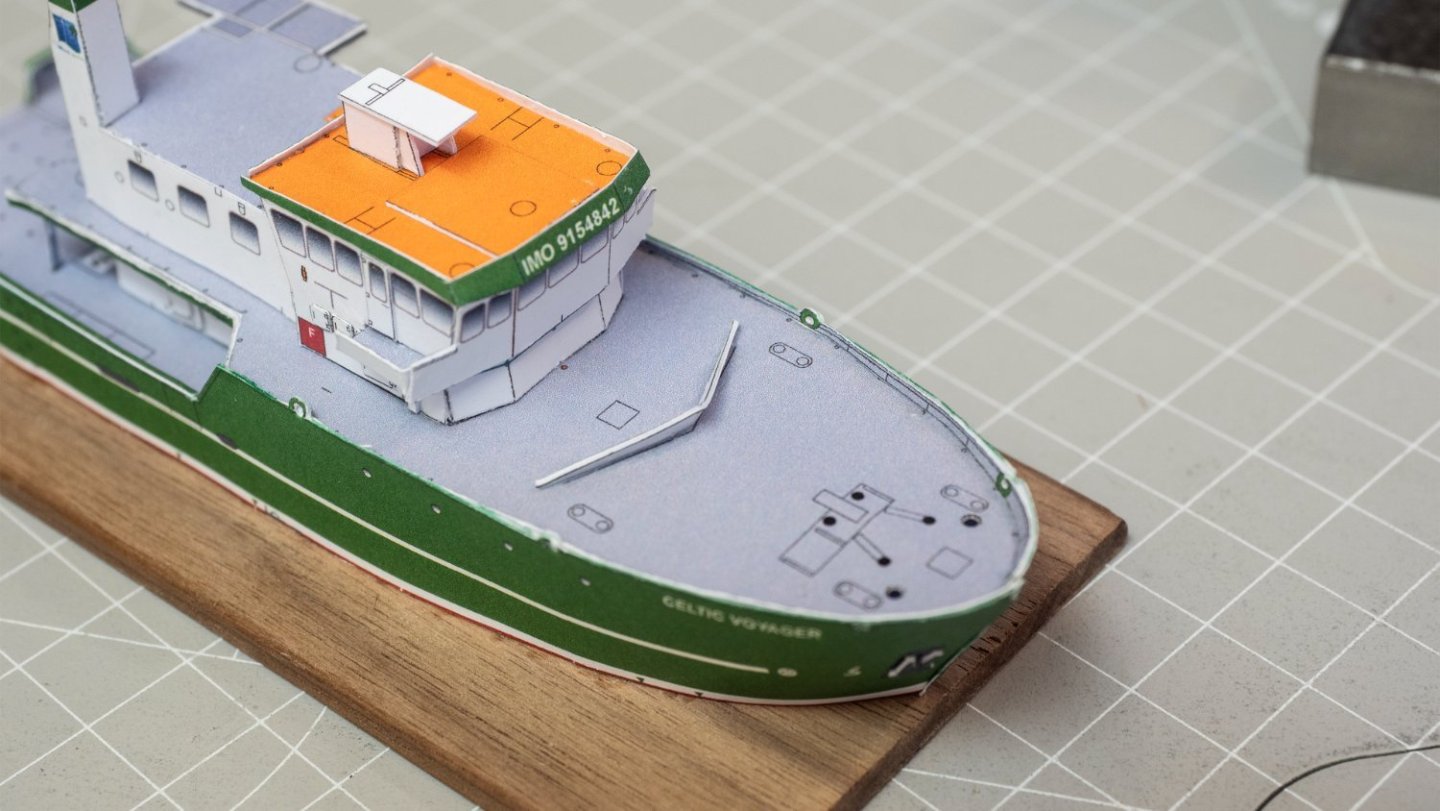
I started the project in the middle of another one and due to limited space I wanted to not have sandpapering and etc for a while. The kit is excellent and very cheap to start with paper models although not the easiest perhaps. In the photo below, the first 26 steps have been completed. In step 27 the mast base and radar platform was cut and glued in place. Next the anchors and breakwater was cut and glued in place. Assembled and glued in place the the escape two hatches Finally for today I prepared and double glued the pieces for the steps 32-23. To keep them straight I placed them under a heavy 2" angle plate.


- 26 replies
-
- 8
-
-
- Celtic Voyager
- Paper Shipwright
- (and 2 more)
-
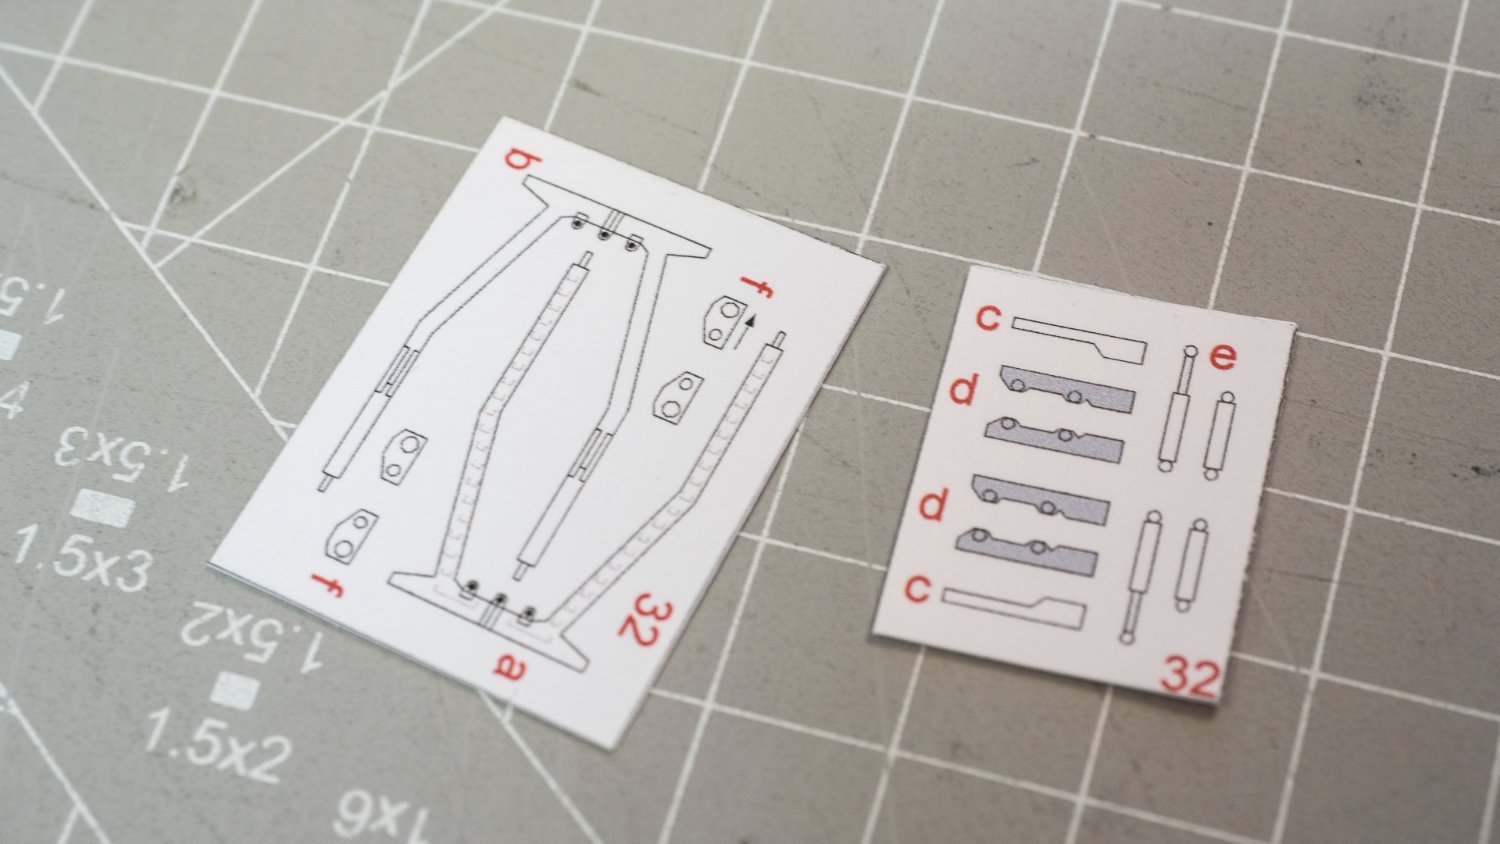
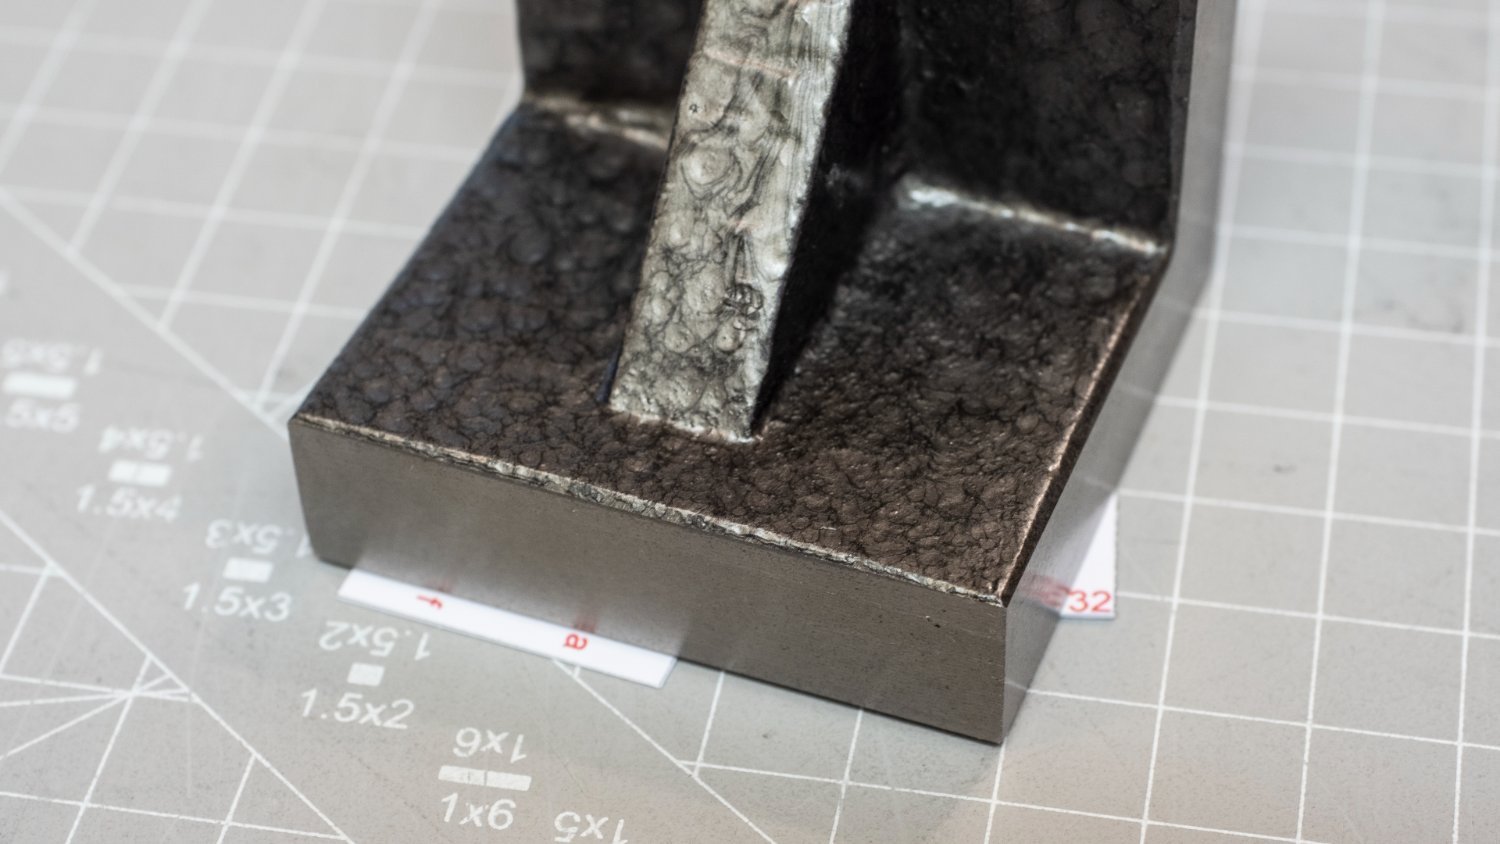
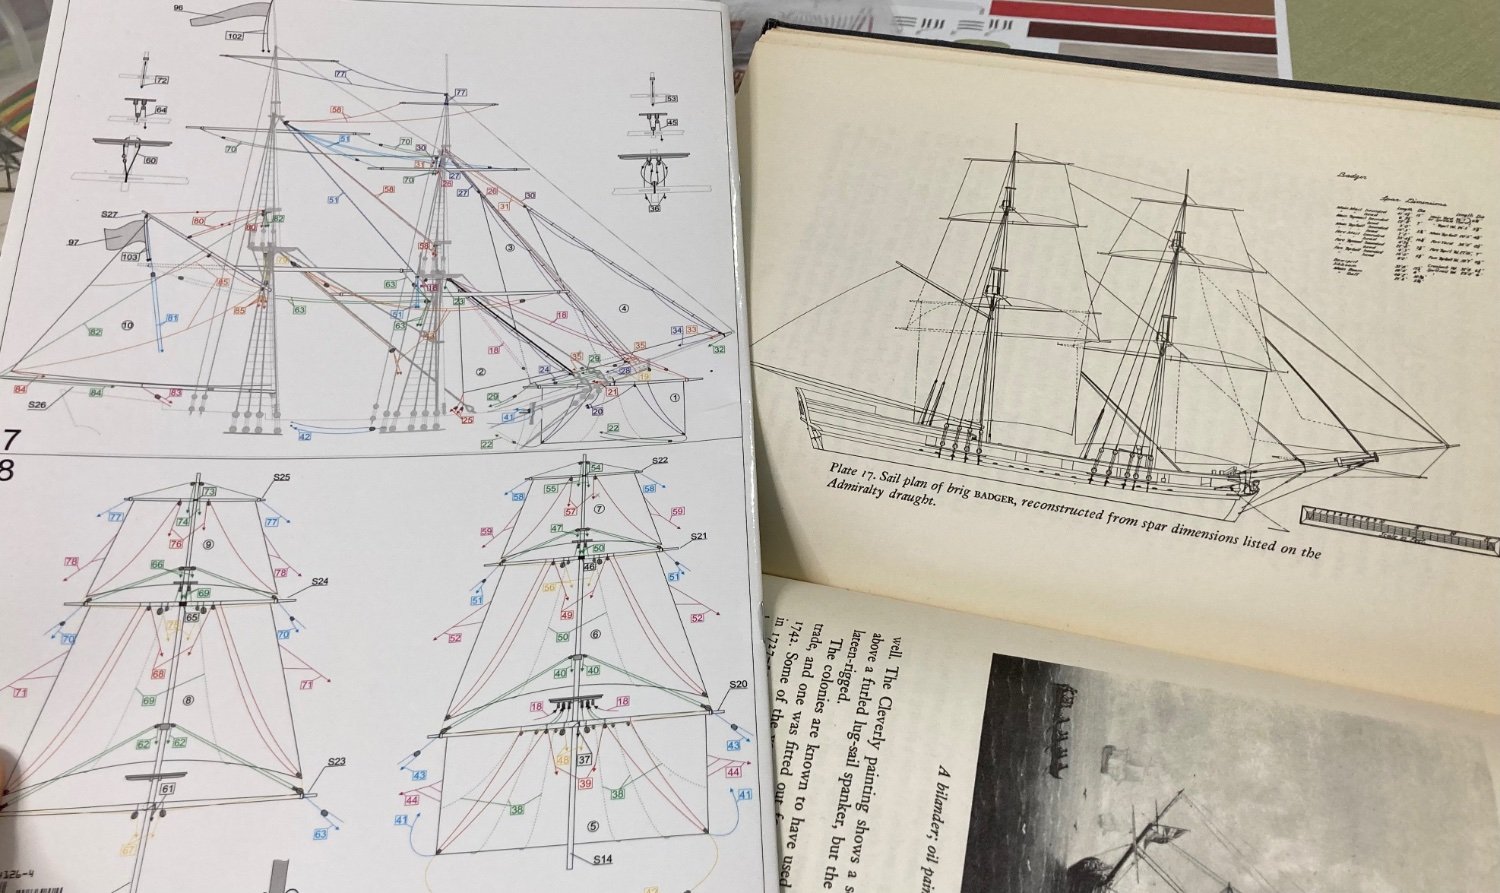
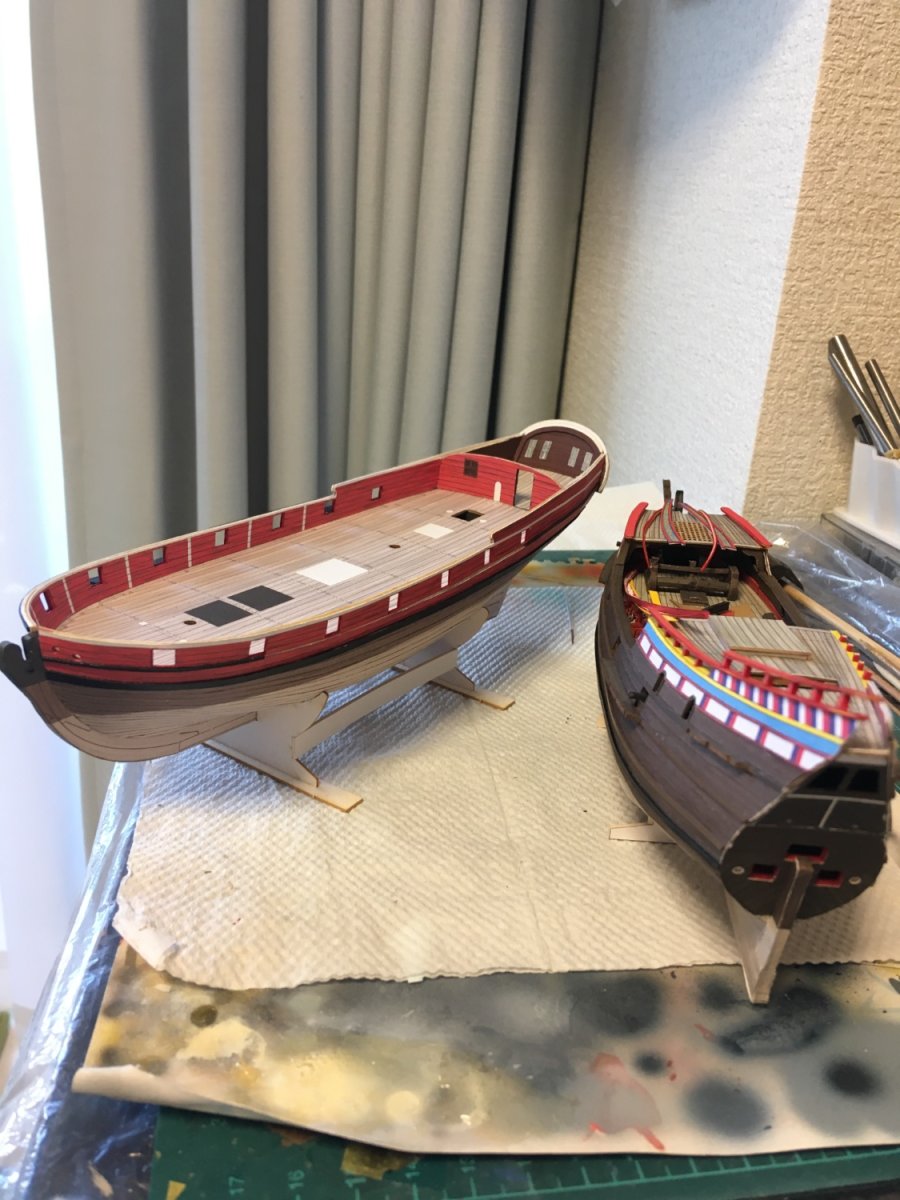
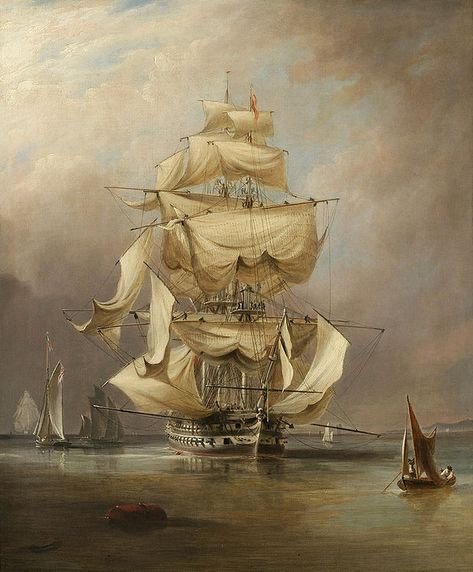
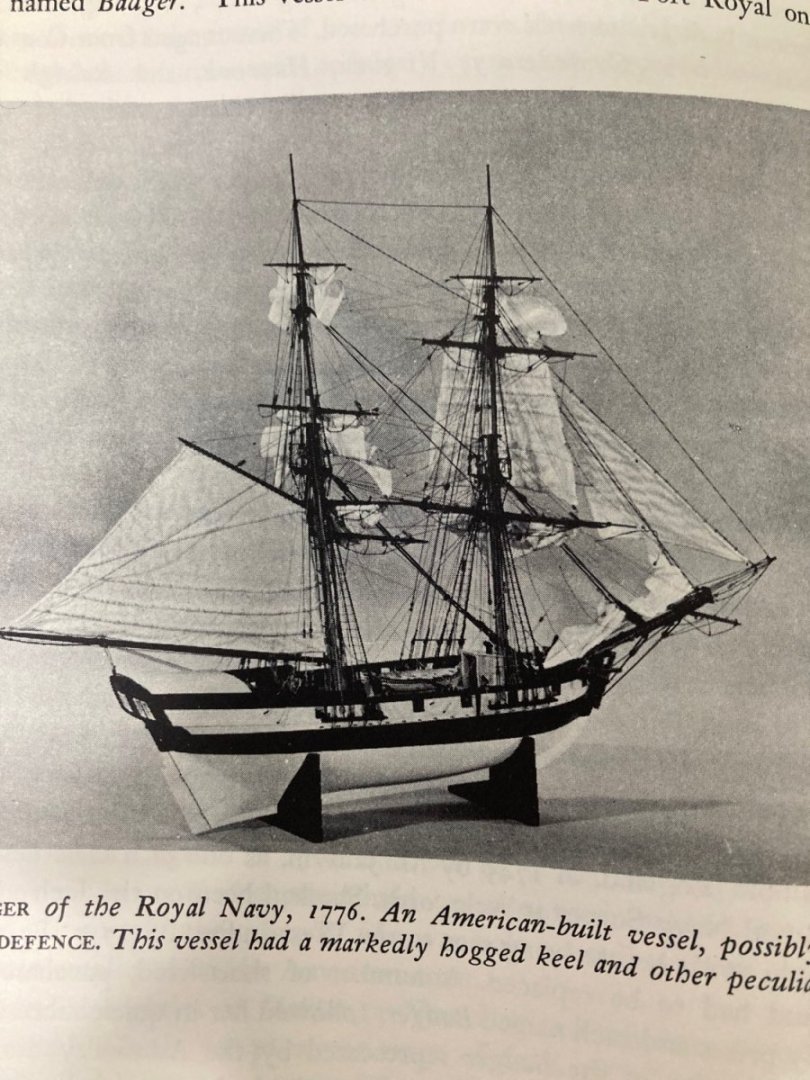
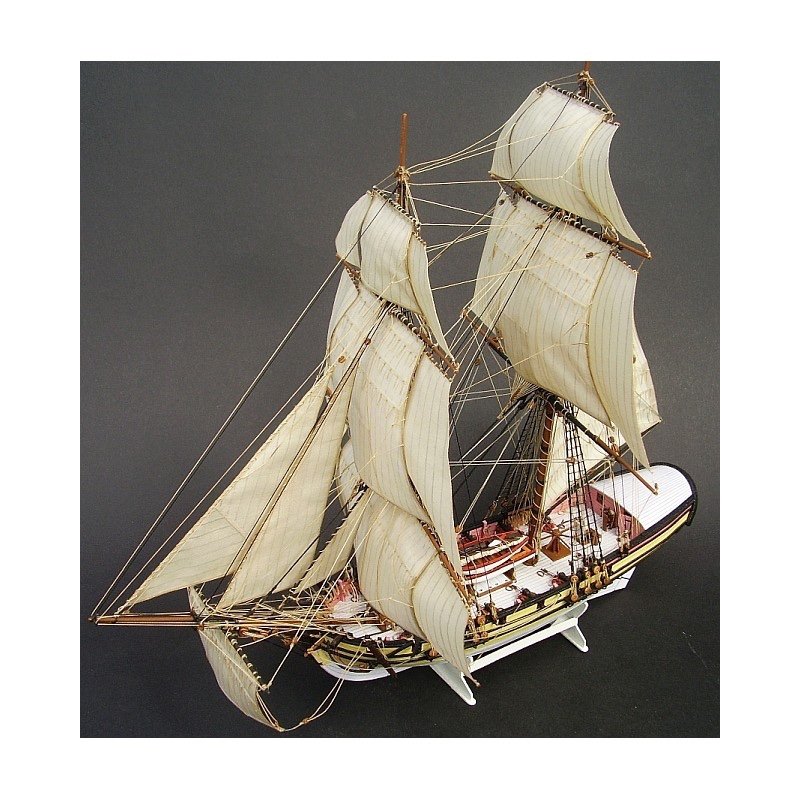
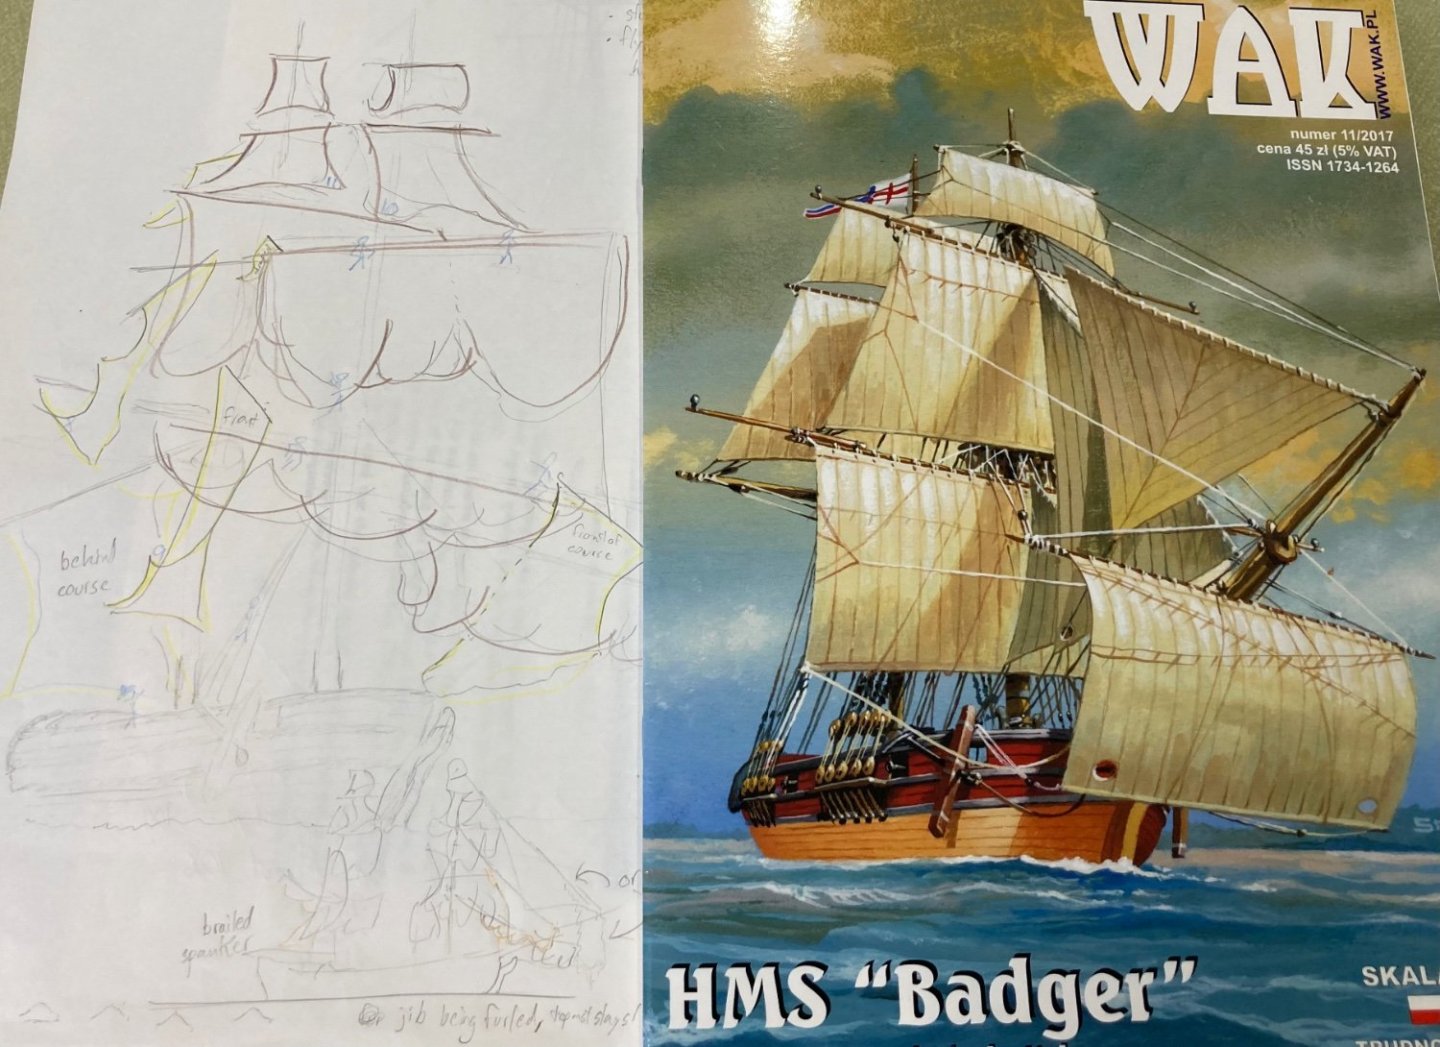
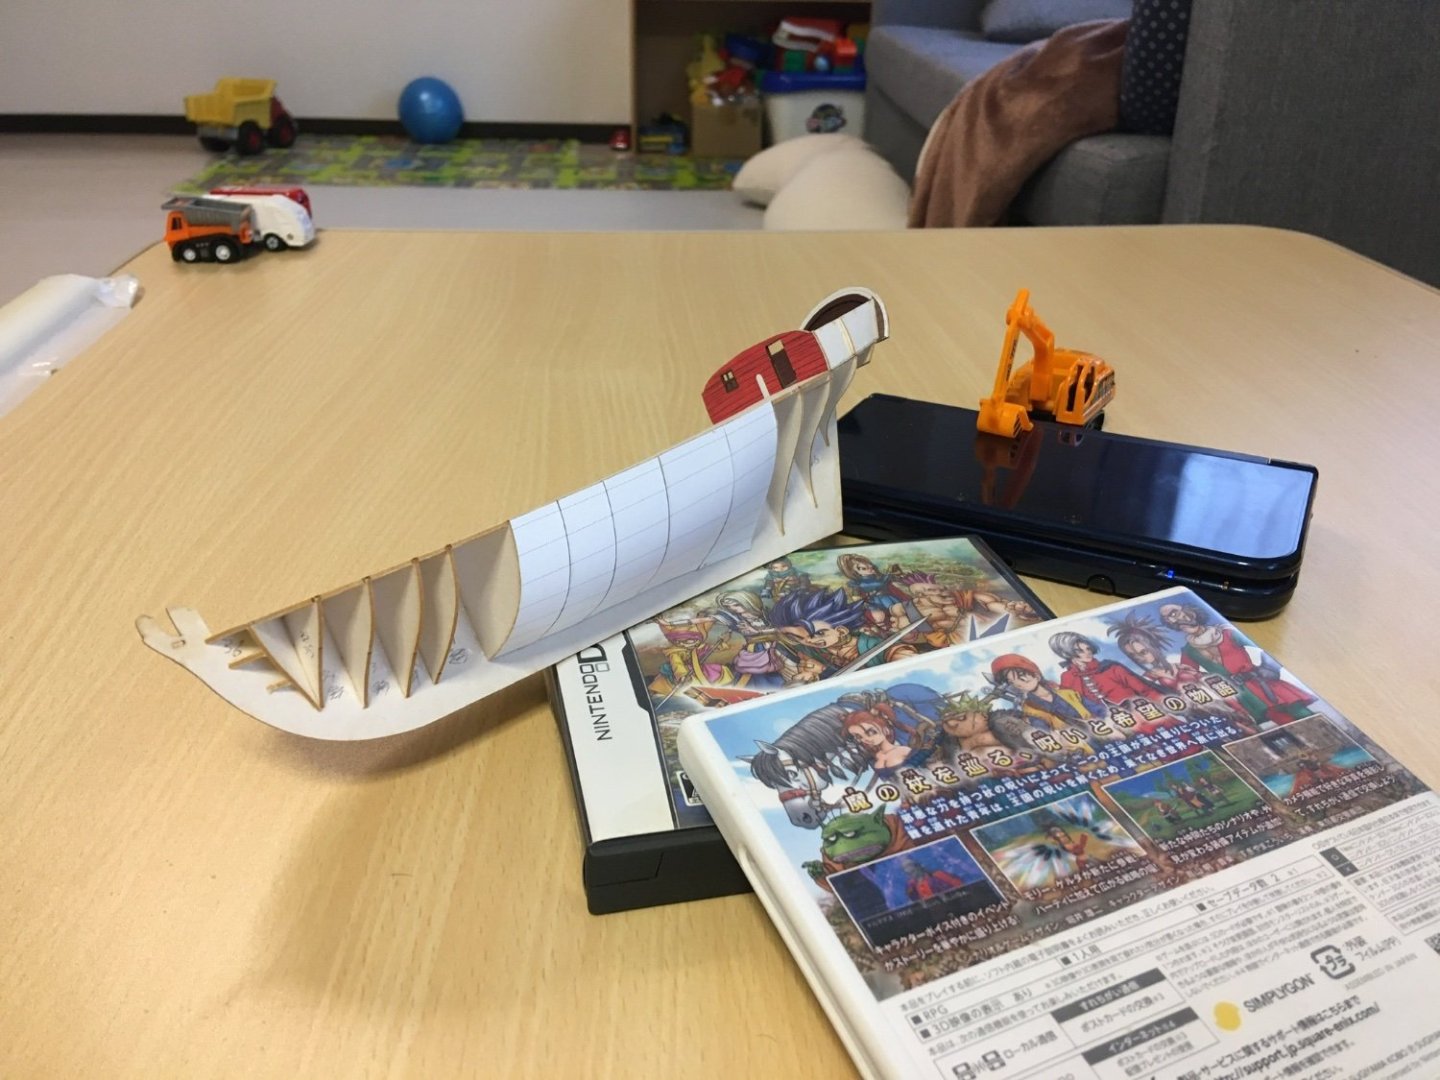
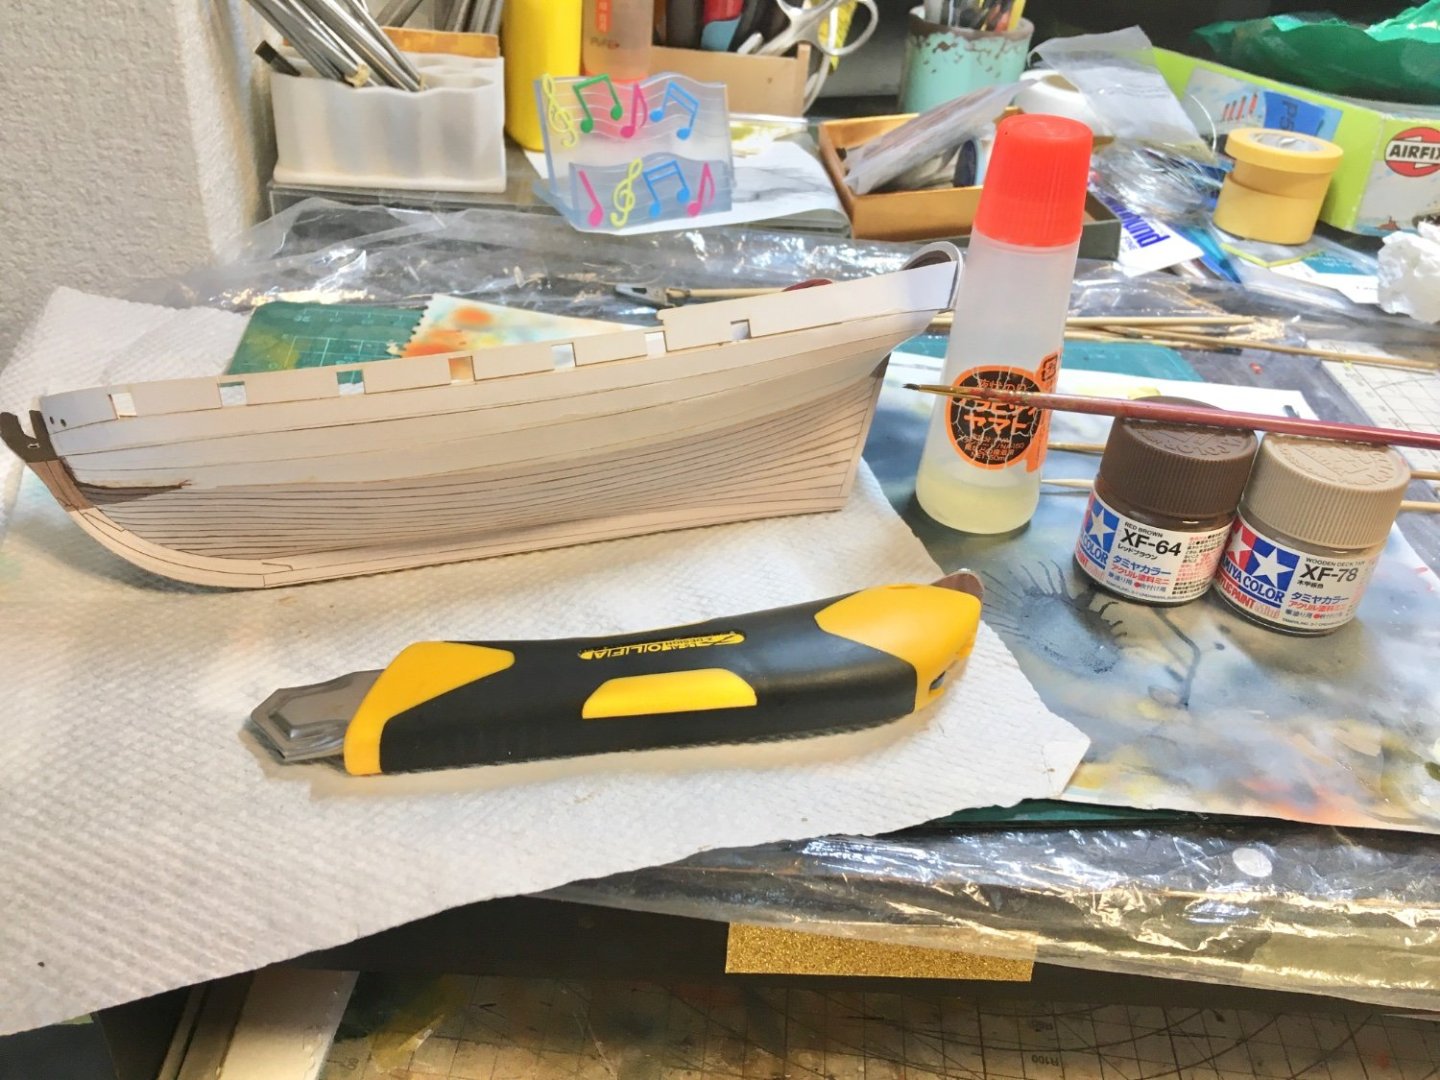
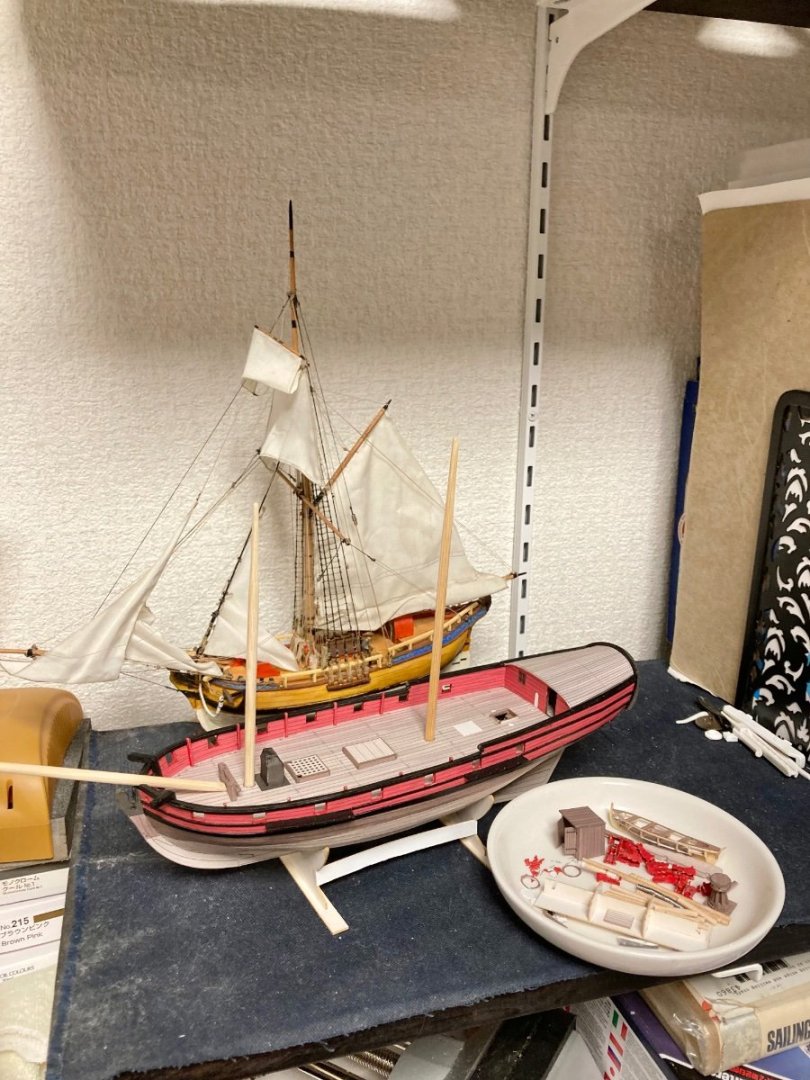
 Hello, Do you ever see a painting of a ship and become struck with the magic, serenity, or majesty of the scene and wish to try to create something similar in a model? I had picked up this kit of the Badger from Seahorse, intending to keep it around as a back-burner project with no clear start date in mind. Something to piece together as I mulled over problems on more important projects: Months before that, I had found floating around the internet a 19th c. painting by one Richard Brydges Beechey of a ship of the line taking in her sails (HMS Asia of Navarino fame- and look at those stu’n’s’ls coming in): I saw this painting and thought, “wow, that would be a magnificent effect to pull off some hypothetical day when one has room for a giant fully-rigged ship of the line in one’s house and has mastered scale sail manipulation, scale gravity, and patience!” Then, for better or worse I realized I didn’t have to wait for some hypothetical day and could give it a go with the Badger; it has enough sails with the addition of some royals (likely enough for an ambitious commander to rig up), it’s in the stash, and I need experience so might as well try. And now this is my main project. This is not how this year was supposed to go. Before going much further, I want to talk about the ship. There is a well-known Jotika kit as well as the fantastic Seahorse paper kit I’m building. Plans and log excerpts from the ship are available in Nelson’s Ships by Peter Goodwin, while background history and even more plans are available in Howard I. Chapelle’s The Search for Speed Under Sail. You may have heard this ship introduced as Horatio Nelson’s first command, however that is almost certainly not quite the case, as Chapelle records. The Badger in the admiralty draft (lines taken June 1777, Portsmouth)-and thus in all the models- was indeed an effective patrol sloop which quite impressed Vice Admiral Gayton on the Caribbean station, but by October she was in a sorry state and he indicated in November correspondence that he would have her replaced with another vessel he had purchased. Young Nelson took command of “Badger” essentially at the start of the new year (‘78) and the logs indicate a refit is taking place at that time. After this point new things are mentioned in the log not mentioned before- royals as well as a spritsail topsail set on multiple occasions. It is never mentioned in the log, but we can be confident that the ship was replaced and the winter was spent transferring everything useful over to the newly purchased brig, whose name was now Badger, and she simply inherited the log and navy register position of the previous Badger. I think this was a common enough practice in the history of the navy, especially when it had to maintain numbers despite high wear & tear on a foreign station. The takeaway is that we have no idea what young Horatio Nelson’s Badger looked like exactly. But we know in astonishing detail what Lieutenant Everitt’s Badger looked like! Chapelle’s data include spar dimensions from the admiralty draft and a sail plan, which indeed differs from the lovely Seahorse plans. The kit plans generally have spars a bit too long and masts a bit too tall (and the boom is too short and the gaff too long). Book vs kit- not to scale: Below is a detailed model shown in Chapelle’s book: The main mast is to have a spread yard for the foot of the topsail on a rope horse (as opposed to putting the gaff and boom on a separate pole) and an improvised flying main course on a slightly smaller crojack- held in place only by the halyard. This disparity in spar sizes presented a bit of a dilemma but I’m thinking I will stick with the dimensions from the kit, as this project is much more about stunsail art than historical accuracy, and the differences are not drastic. (Definitely has nothing to do with the fact that I had already enthusiastically prepared some spars and am too lazy to go back and redo it in this case..) Furthermore, I’m nervous the visual effect I want to achieve might not work as well with the slightly smaller top-hamper- this entire project being one giant visual experiment after all. {Intermission music}🎵 So about building the actual ship. I started sticking the hull together in January. Goes together like a charm. Buy the laser-cut parts. Stick the frame together. Cover with paper cutouts for stability. Do your longitudinal strakes with gel CA applied only to frame edges. Final planking with printed paper (but you must edge-paint everything appropriately on the outer layer). Then it was time to do the wales, various deck fittings, and engineer cannons using toothpick shafts, paper layering, wire bands, and a glue drop for the ball. I dry brushed the guns lightly with dark grey, but forgot to add touchholes… The kit includes paper wedges to roll cannons with, but I found this concept to be unworkable with either thick or thin paper for 1/100 four-pounders, thus toothpicks were butchered for my guns. I’ve also been assembling the laser-cut blocks, preparing the masts and larger spars, and starting to think about scrap experiments to try to finesse the clewed-up sails and dangling stunsails. I made a rough plan to relate the visual effect of the painting inspiration to the actual ship I’m building with its particular spar anatomy. And I’m taking bets as to how long you think this will take to finish The nice thing is that this time, I don’t have to engineer the entire rig and belaying scheme from guesswork and low-budget research. Seahorse has it all planned; I just need to make a few additions. Those will be: -Flying royals (needed for visual effect) -Flying main course (will look nice and it’s even correct) -Stunsail inhauls (needed to achieve the dangly stunsails- for some reason these lines are absent from the Seahorse drawings) Wish me luck! -Meriadoc
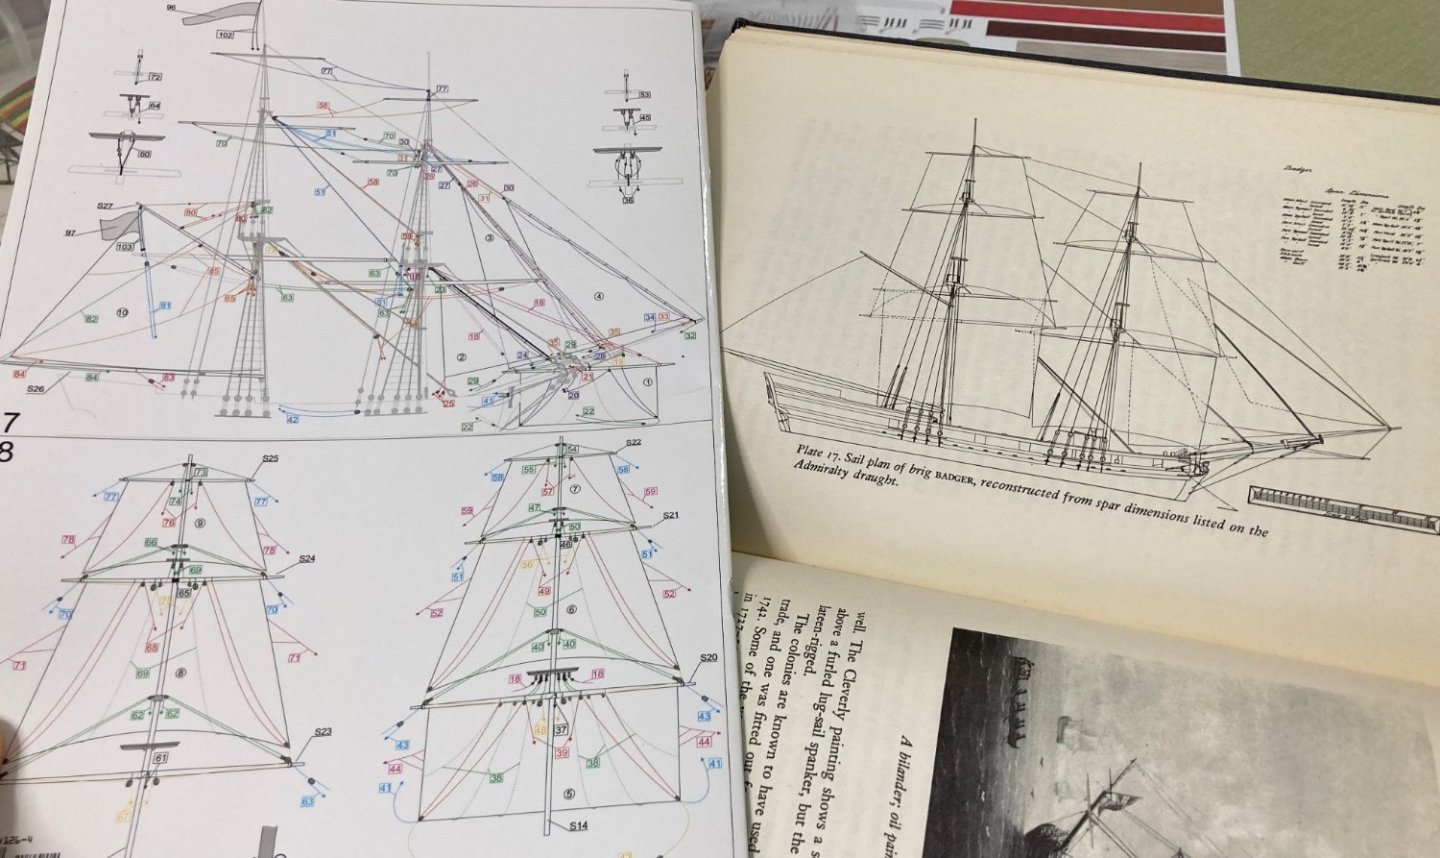


- 18 replies
-
- 10
-
-

-
 Introduction Ah, summer! When you live in a cold place (the centre of Canada) summer is the time to take advantage of the warm sun and, if you’re lucky like I am, to relax at your cottage. You would think that going to a secluded forest, being away from the bustle of city life, yard work and the lure of the internet you would have quality time with your modelling hobby. Not really. I found transporting a model and as many tools and materials as I anticipated needing an exercise in frustration. Inevitably I was missing something and there really wasn’t adequate space to set up a long-term work area. Until now. Several months ago I joined the Model Shipwrights of Niagara (MSON) and, as a member, I was able to attend a couple of online workshops this spring that featured card models. Veteran card modellers gave us invaluable advice and espoused the virtues of a hobby that was easy to transport, used very few small tools, and promised fun. Christopher Cooke, owner and proprietor of Marcle Models in the UK, presented an incredible range of models from several vendors. I had found my cottage hobby! Not long afterward I ordered the H.M.V. model of HMCS Agassiz - a flower-class corvette - plus the laser-cut accessory kit from Marcle Models. Mr. Cooke did inform me that there would be a delay because he did not stock this kit but it arrived as anticipated in perfect shape. So, on our next trip to the cottage I added a small satchel with the model, some Aleene’s glue and a few tools to our regular cargo. And now the build…
-
 After reading the review by @ccoyle about Paper Shipwright Card models:- I bought a few to have a dabble, so far I have I made Flamborough Lighthouse and the Puffer "Starlight" from their range. I wasn't thinking in terms of doing another until I had completed one or two other sadly neglected projects; my Caldercraft Bounty being the most neglected! 🤫, but a leak in the loft has turned the house a bit upside down and many items from the house have filled up the garage (my workshop). So while we dry out and await the builders to arrive, I can only build something small that fits in my mobile model station and a small card model fits the bill perfectly until I need to do re-decorating in the house! I won't go into the model too much as Chris has covered what you get in his review, but here are a few initial pictures of what you get.
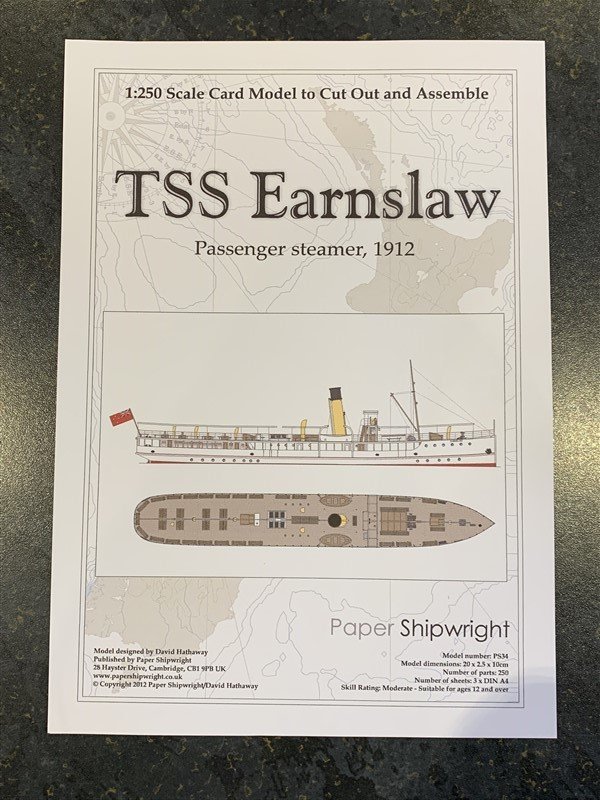
- 45 replies
-
- 8
-
-
- Earnslaw
- Paper Shipwright
- (and 2 more)
-
 Well started this build - not at all what I expected. Quite intriguing. Anyway dry fitted the keel and frames went together very nicely. Its all VERY SMALL !! I have obtained the card for the further parts (which I was a bit surprised wasnt in the kit )and awaiting the spray adhesive to laminate the card. I would have happily paid a bit more for a few sheets of card of the correct thickness without the faff of lamination. But its a much more interesting little project than I was expecting. Nice to discover something new !
- 8 replies
-
- 7
-
-
- Le Coureur
- Shipyard
- (and 1 more)
-
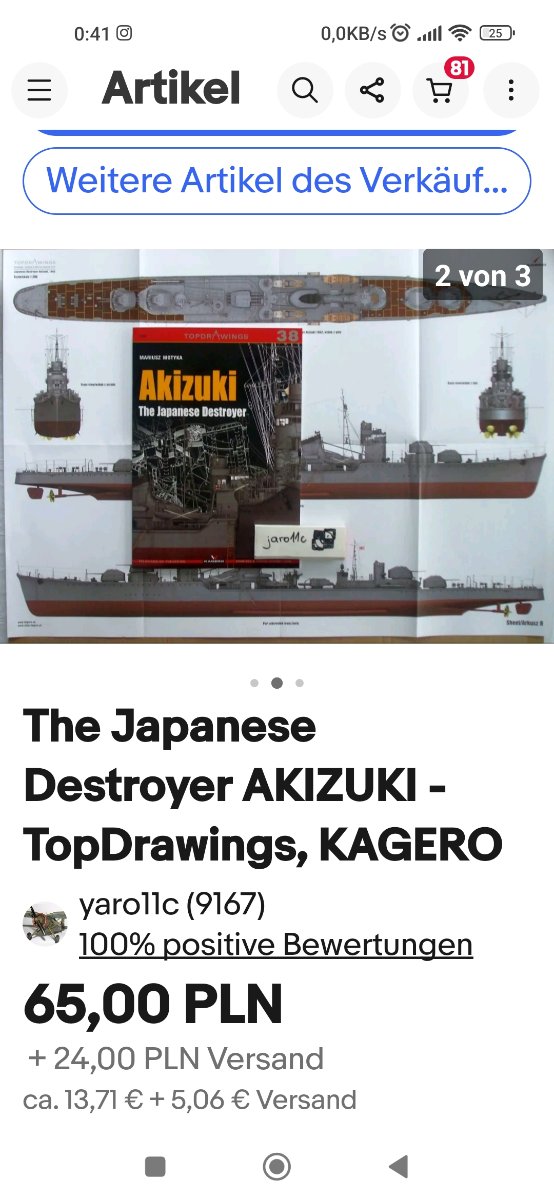
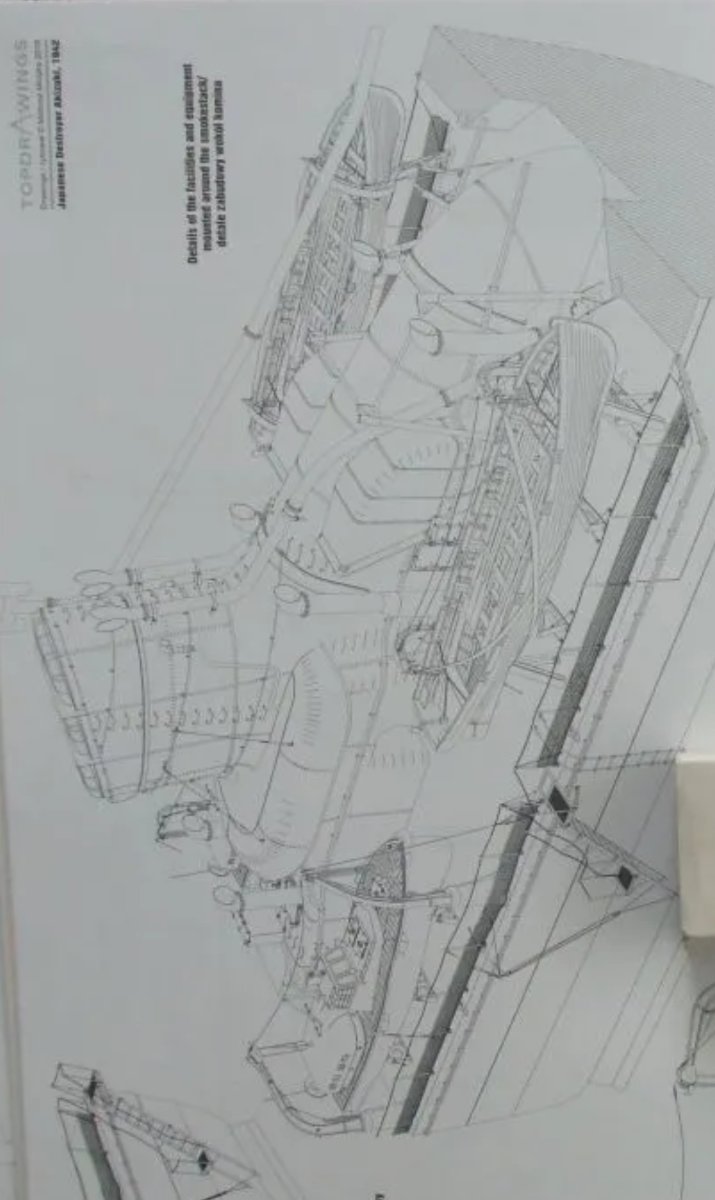
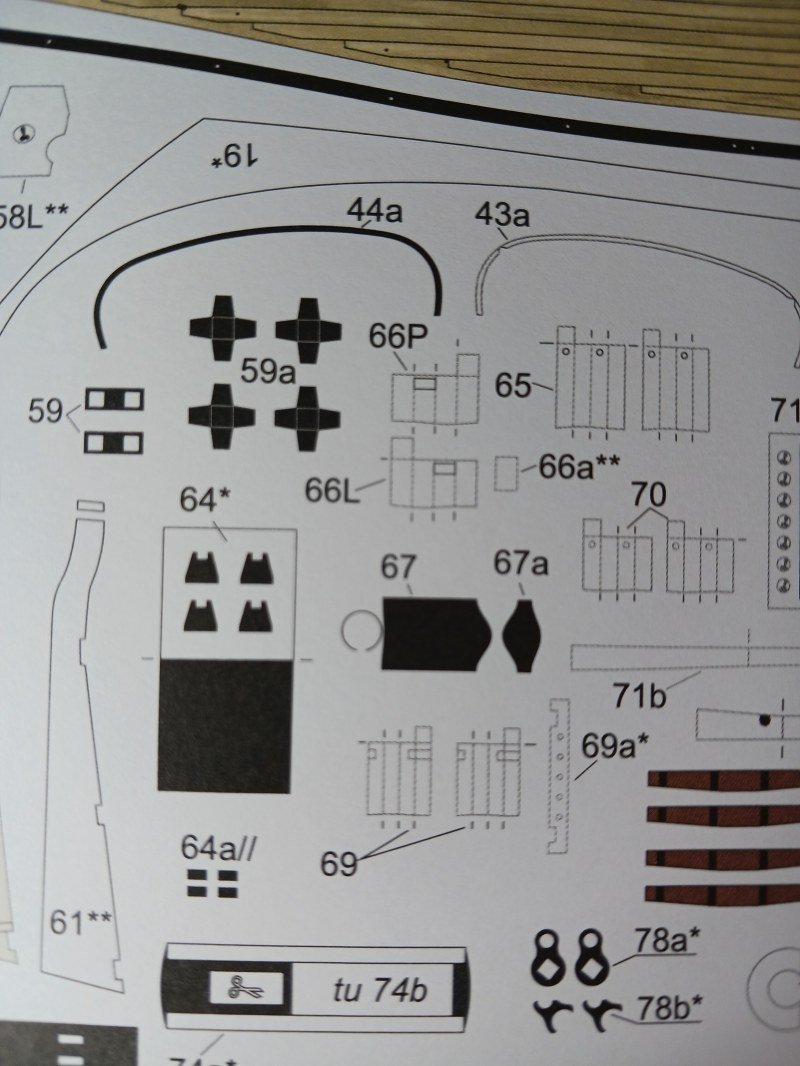
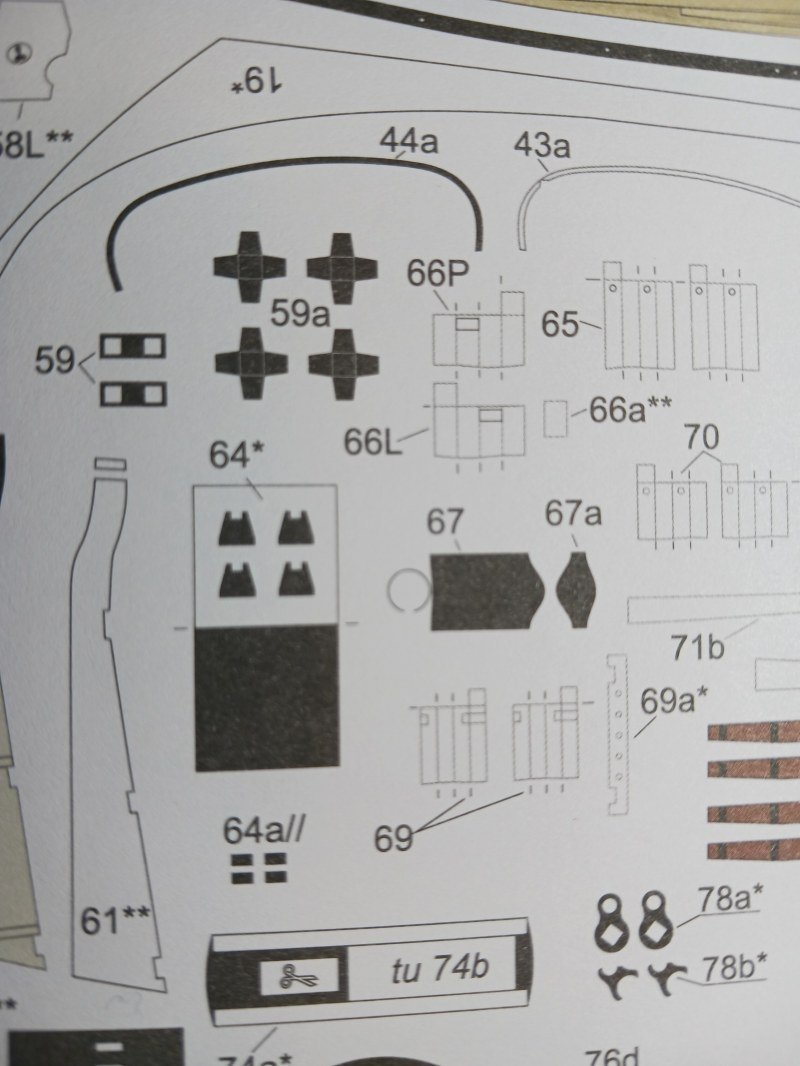
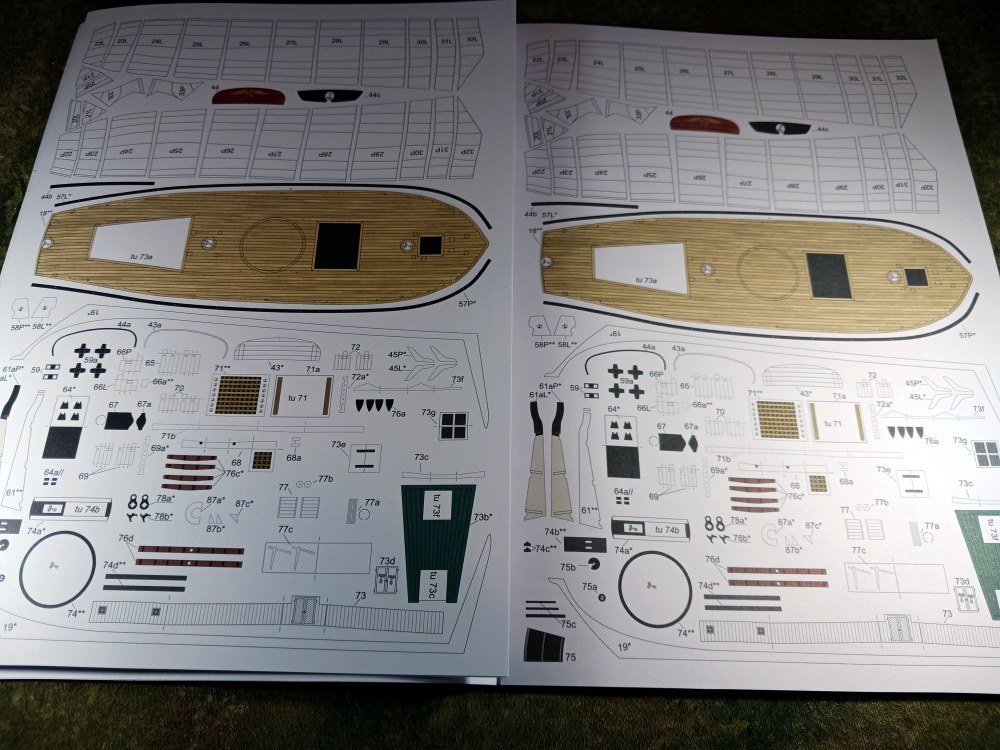
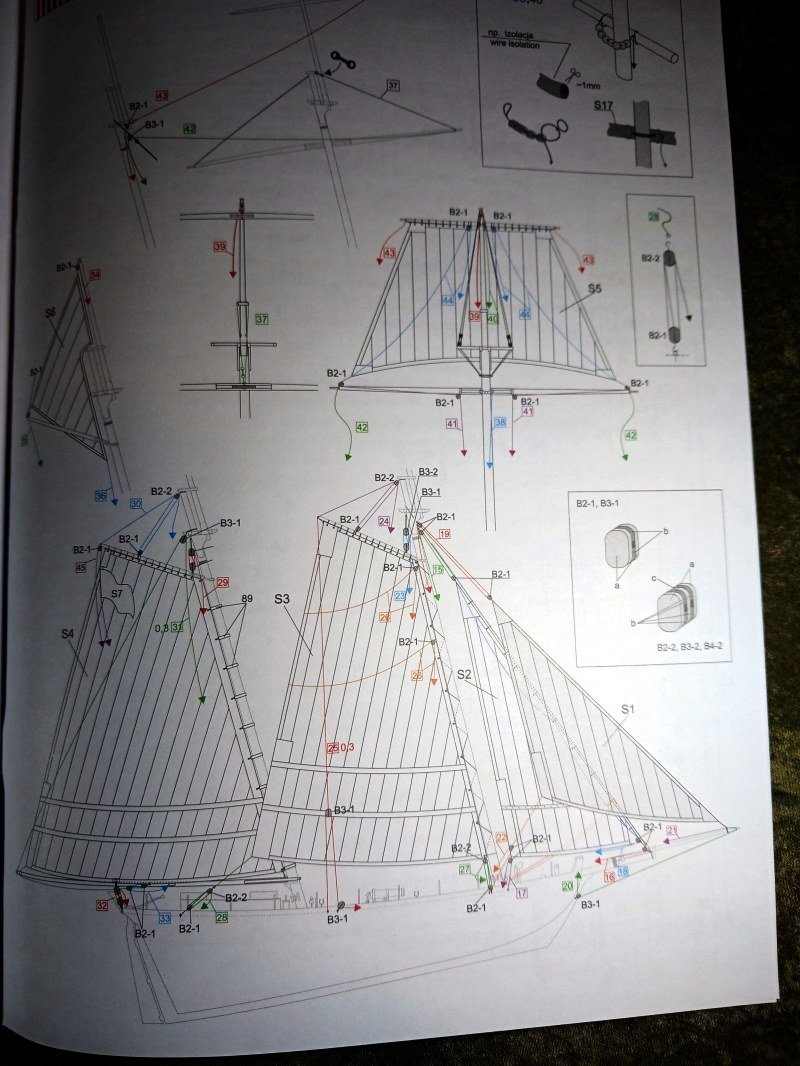
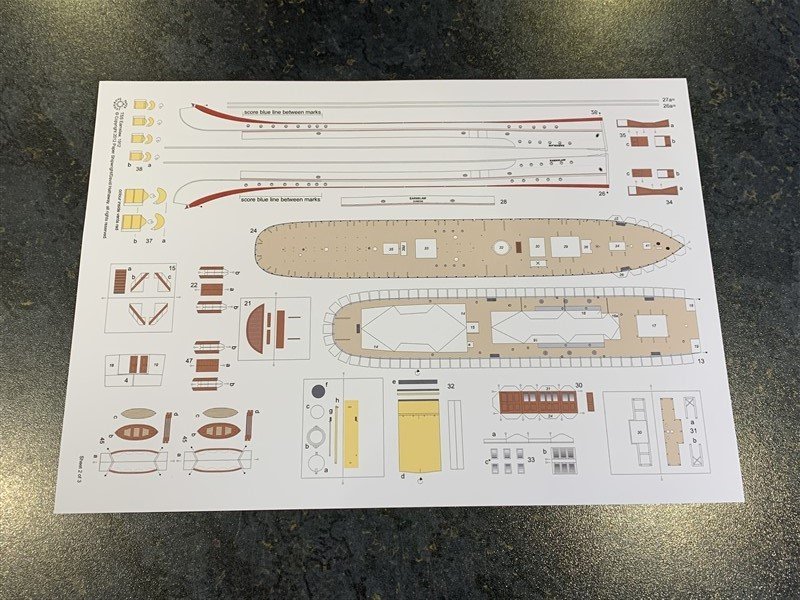
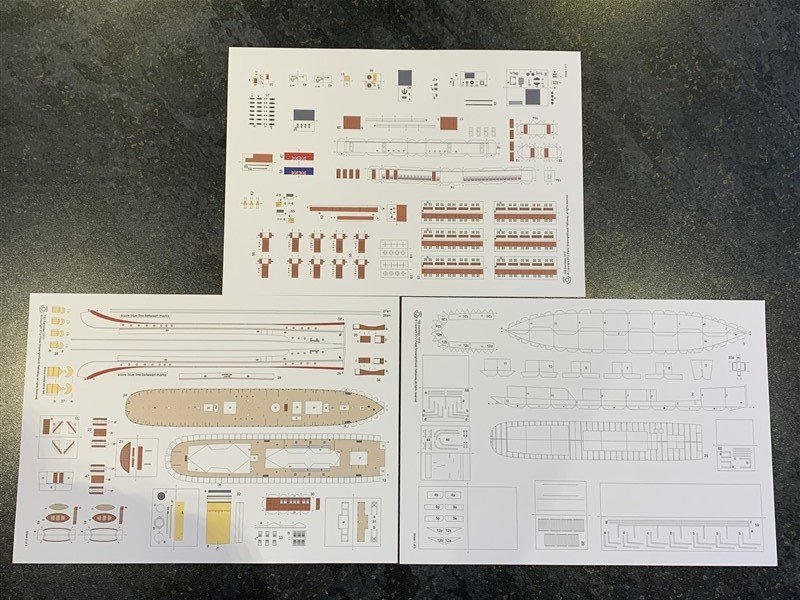
 Hello, I am back from illness and do look for a big but small project. I voted for the IJN destroyer AKIZUKI (Snowwind) published in Poland by Answer in the 1:200 scale also due to the nice shape of the lines of this type of destroyer: The difficulty in a medium range of two of three does give some hope to me that I could manage this kit. As I did find this booklet about her and could afford the price for some drawings of very nice and helpful detailling. That made it clear to me I will have to use superglue to hardning the paper, sanding the coloured surfaces, repainting it afterwards and die to this all the printed Details will have to be added in the right thickness and shape. Due to my last strokes I have to search for a bigger scale on a smaler project and so I found this quadro turret destroyer a nice idea. I struggeled hard with the 1:350 plastic kit but as these were/are nearly twice the price I murdered this temptation shortly after it's beginning dawn. THE PROTOTYPE The AKIZUKI class was equipped with twin 100mms barrels in four fully enclosed turrets and very firstly fitted with surface radar model "Go". These destroyers were planed and built to escort CVs so their guns were able to elevate up to 90° as a dual perpuse weapon and the number of torpedotubes was reduced to four. Their length of 134ms to fit the fourth turret on the hull made them very long drstroyers - close to a light cruiser's typical length. Very often these group leading destroyers were misjudged by USN-submarines as CLs due to their size and shape of the funnel. The missing catapult would have been the most obvious detail of destinguishing them safely. THE KITS There are two kits in the German market: an Answer and a nearly three times more expensive Avangard kit - both in 1:200 scale. The some 1100 parts Answer kit seem to be astonishing detailed - but with this Avangard kit it must be brutally more. So I ordered both kits (and additives) and do hope the best the Avangard kit will not force me to buy an electron microsope to get modelship built... THE PLAN I do think about a diorama in resin - an imaginable scene at anchor. So I could cut the under water part of the hull and the LC-parts down to less than an inch below the CWL. This will be enough hullred to be seen in the greenish resine, but I will avoid all the complexity of hull building, shafts, rudder, Propellers, and so on. The AKIZUKI by Avangard will be the second build and she may be used to show one of the six sisterships - slightly different in detail and rigging. So I do await these parcels from Poland to get started.
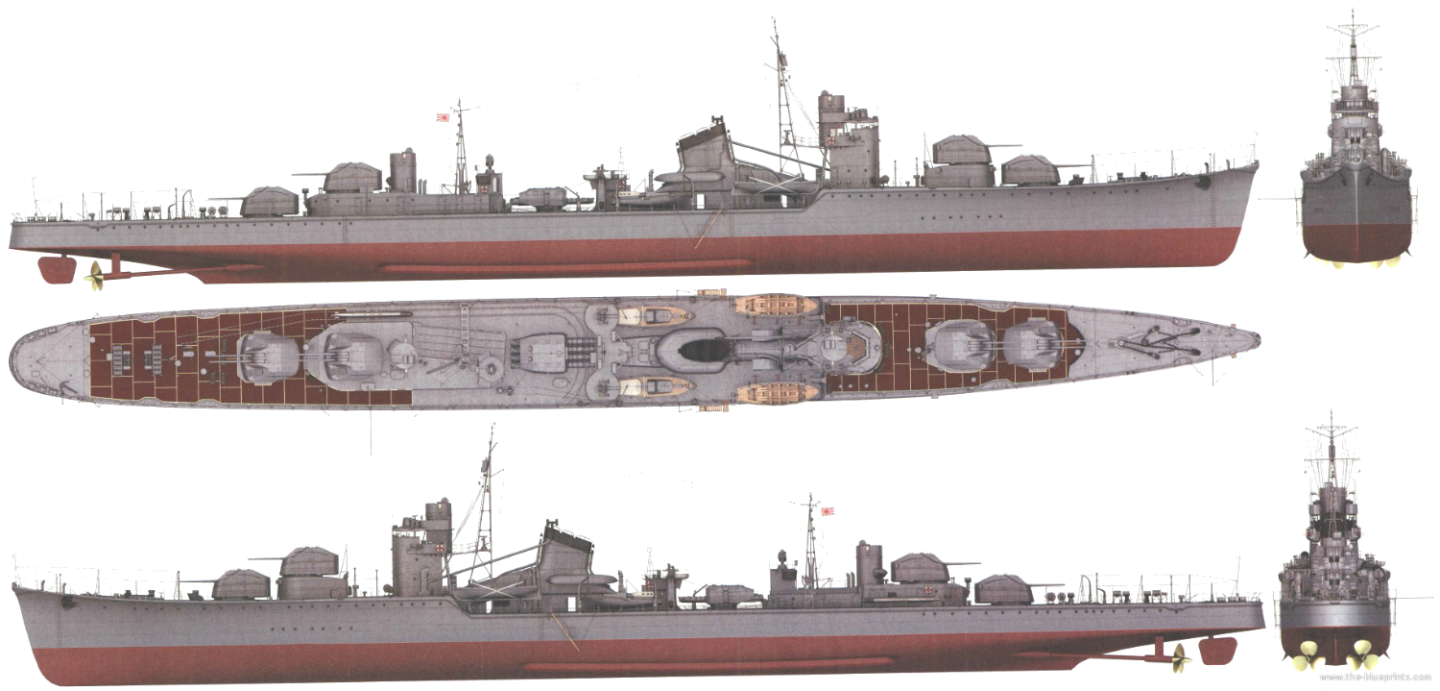
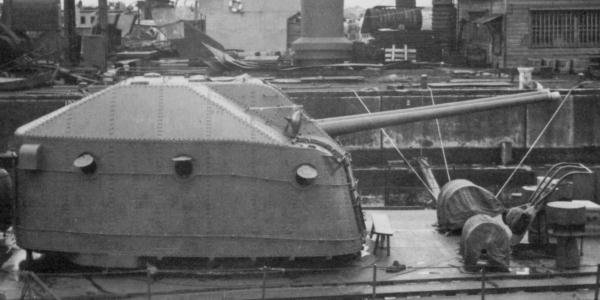
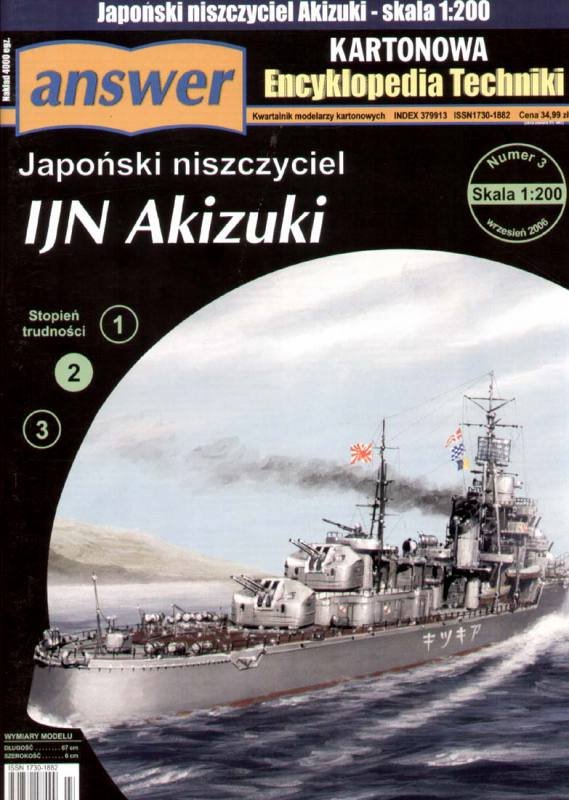

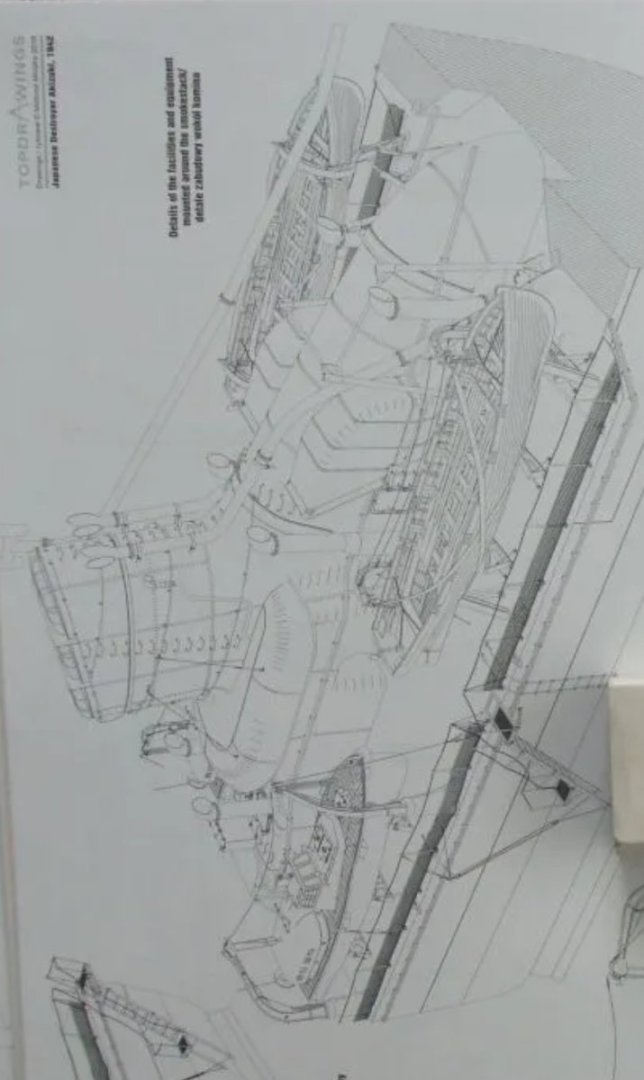
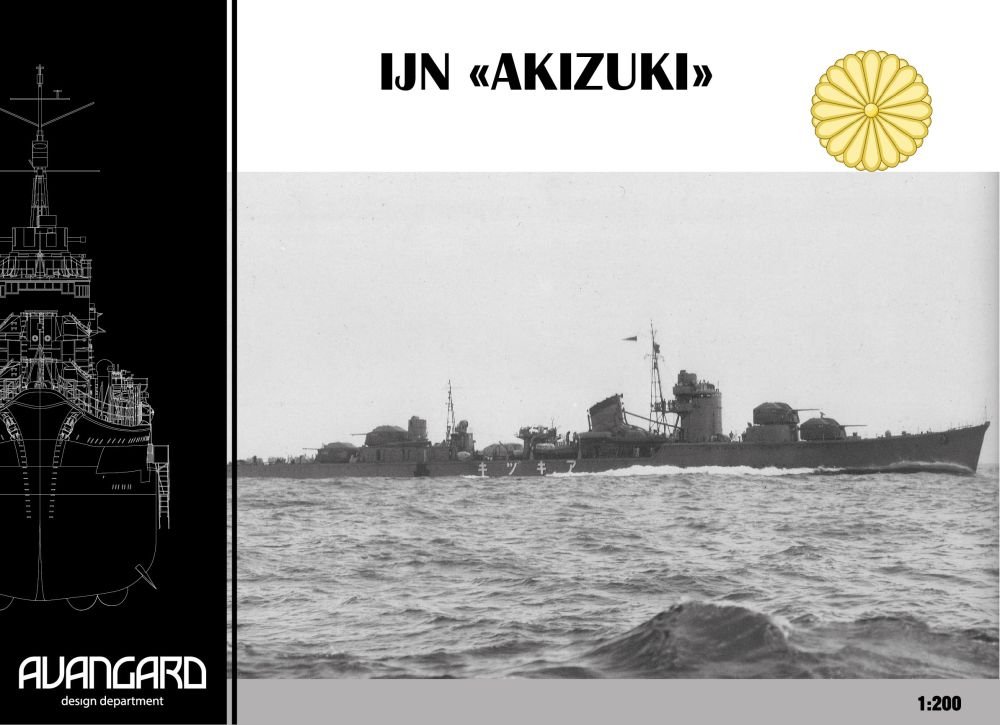
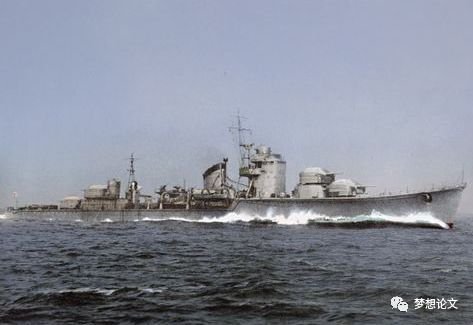
- 9 replies
-
- 7
-
-
- Japan
- Wind-Class
- (and 4 more)
-
Hello, This is my new side project and the second cardboard model kit. The Shipyard makes the top premium sailing ship cardboard model kits. I have some words for their unfriendly manual, but the quality is better than the wooden model kits I've built. If you don't mind painting wooden patterns on paper planks, this is probably the best kit for building high quality model at a low cost and in a short amount of time. By the way, this year I'm not talking much, unlike the last year, and am focusing on experiencing as much as possible. I found the latest Papegojan build log in 2013, but the pictures were unfortunately gone. This build log will be mostly photos. If you have question about a specific part, feel free to participate in my build log. https://alexey.baldin.space/?p=1 If you are looking for a better build log, this site will help. Kit's error 1 Kit's error 2 The manual is hard to decipher... Make sure everything is in line. My ship is twisted again. 😭 Tan color base The kit's paint had dried like a stone. Oil paint and an interdental brush. Winsor & Newton Liquin medium helps reduce drying time. Yellow Deep 3 : Brown Earth 1
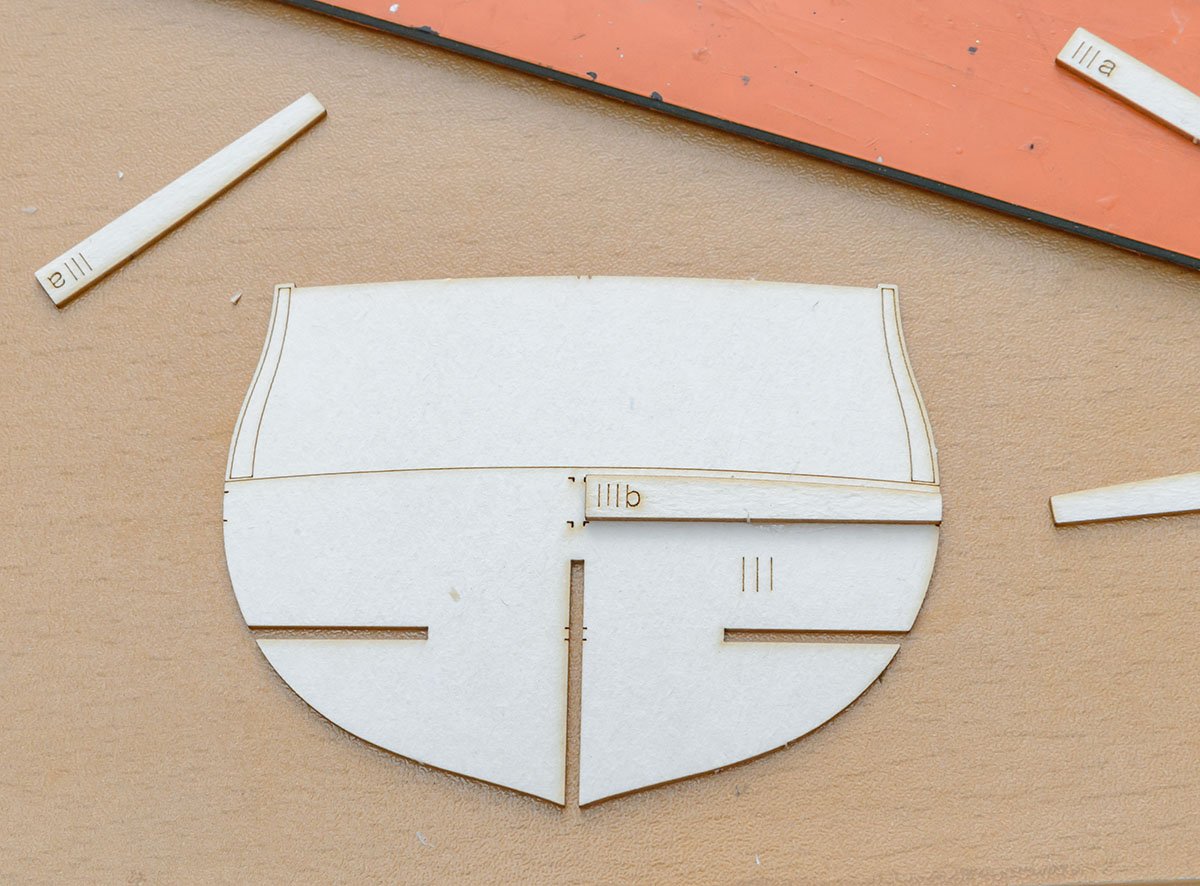
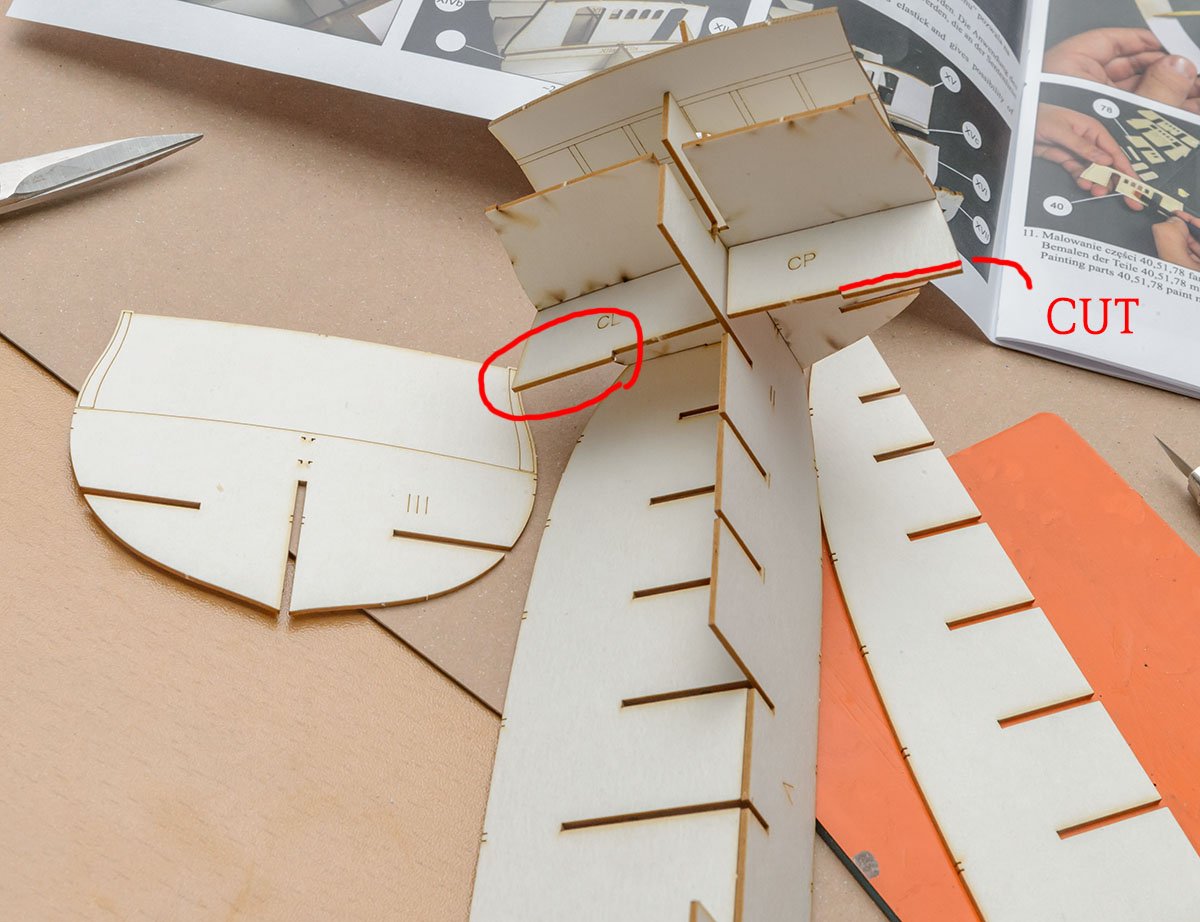
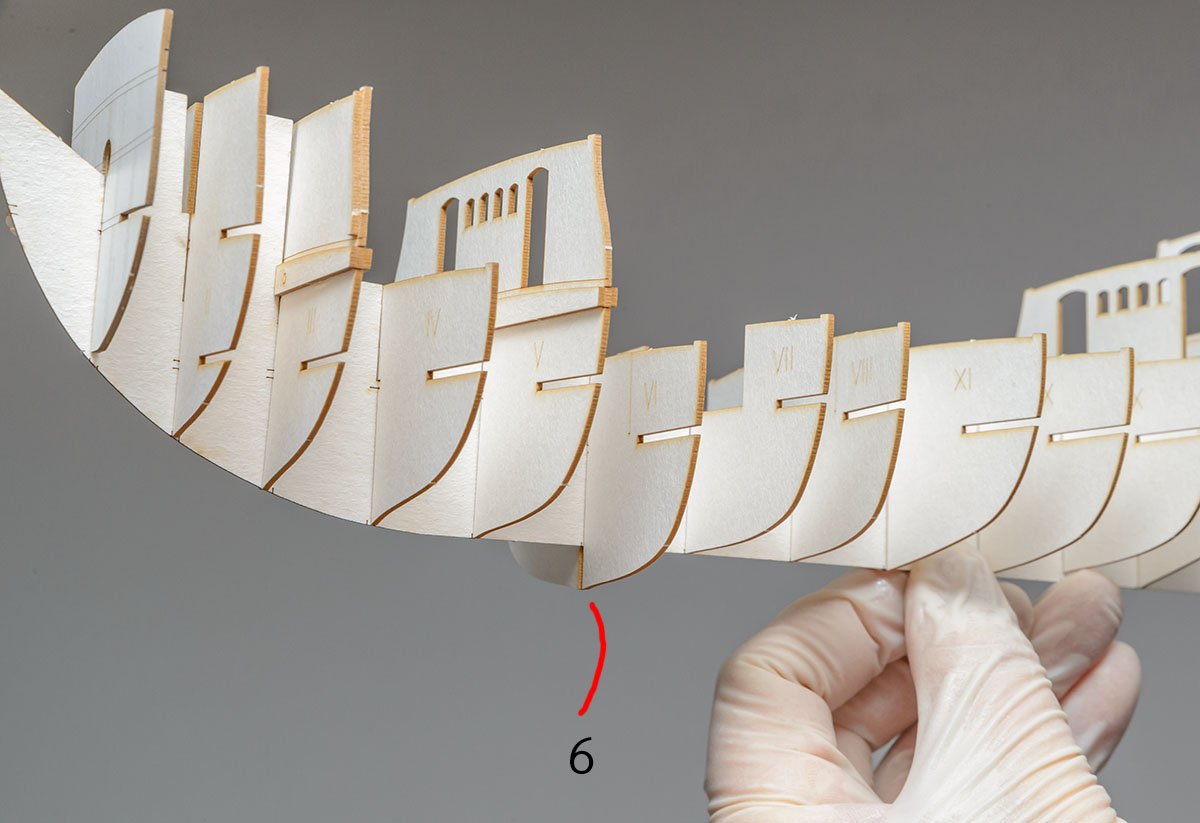
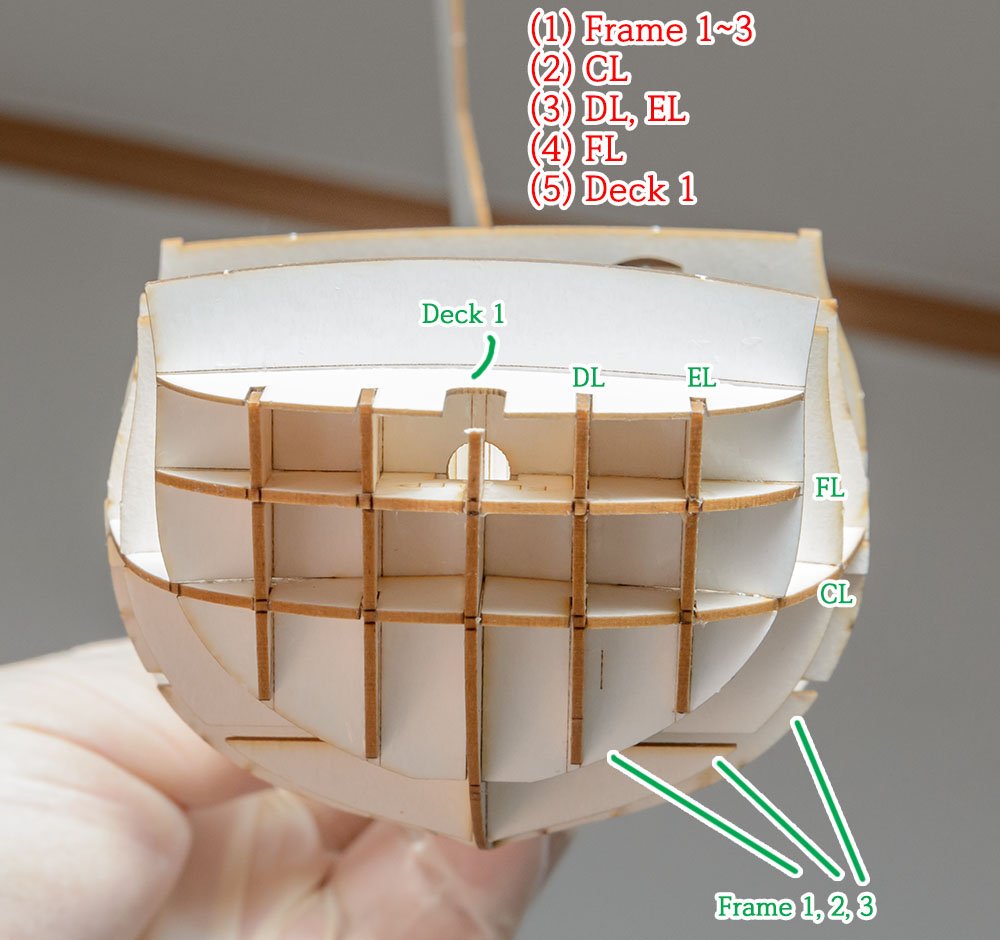
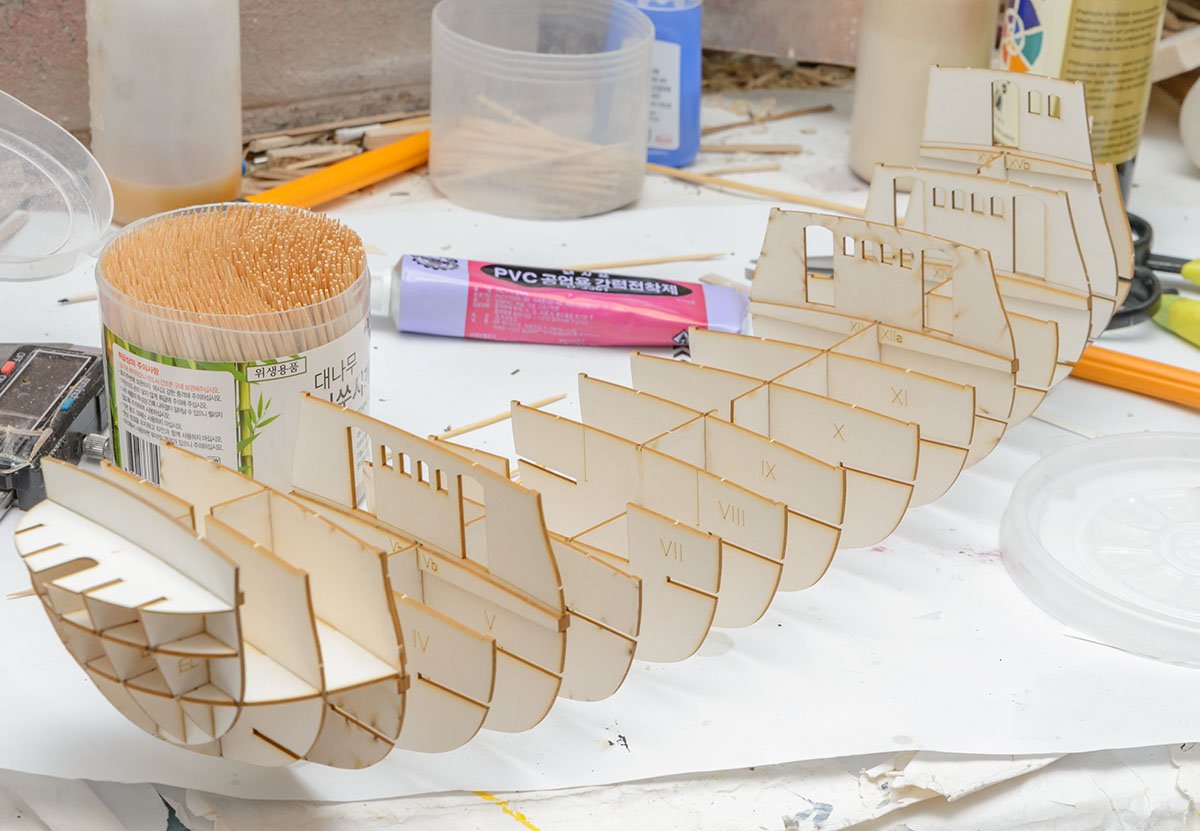
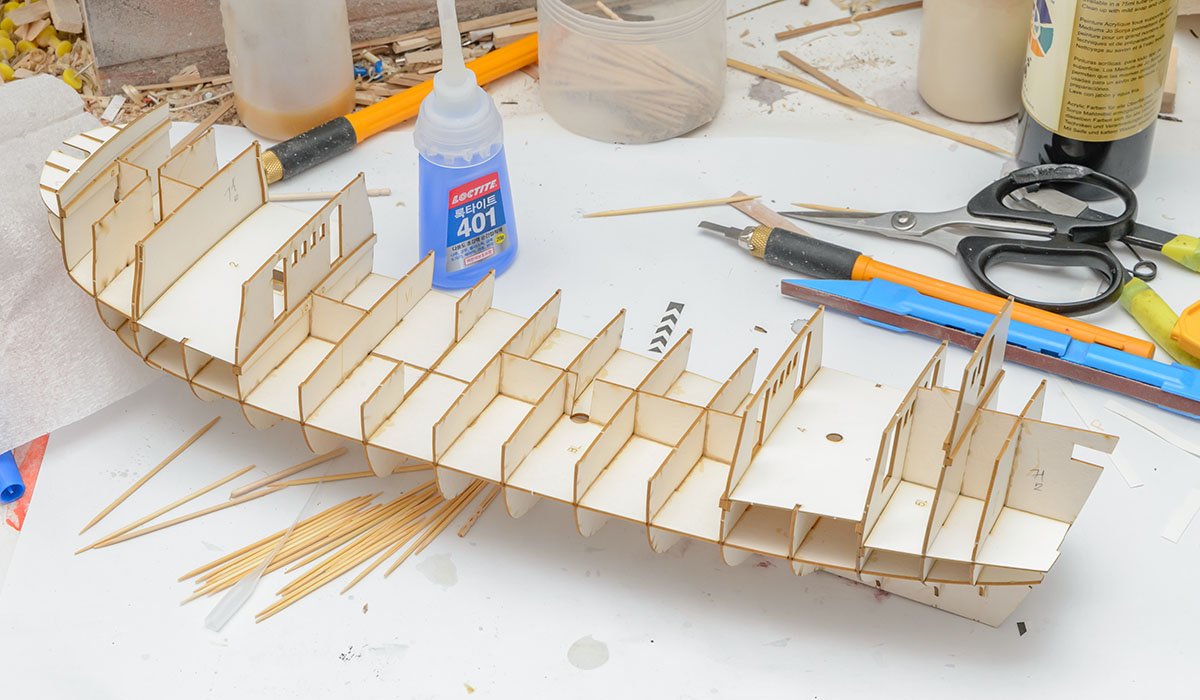
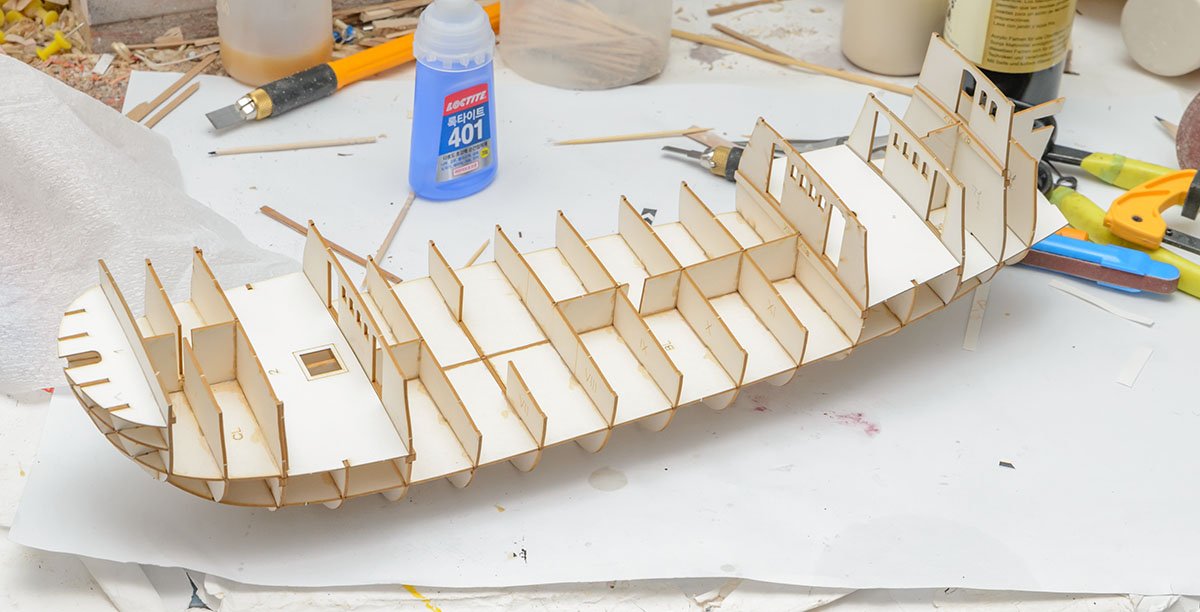
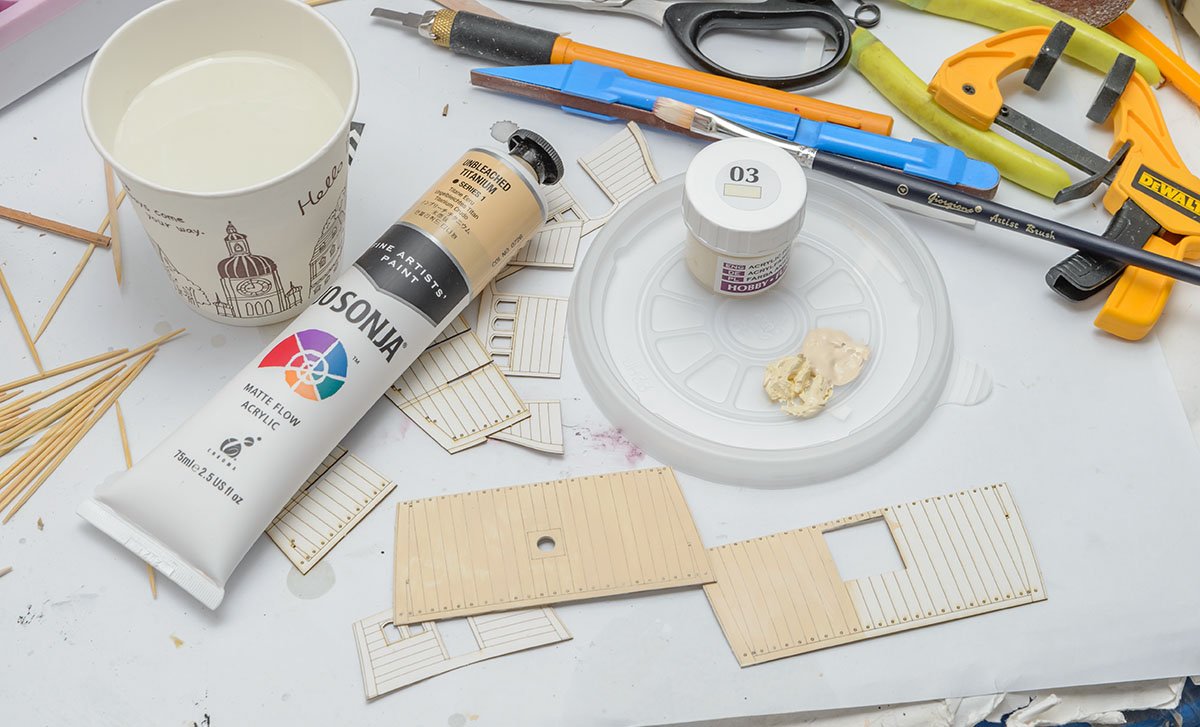
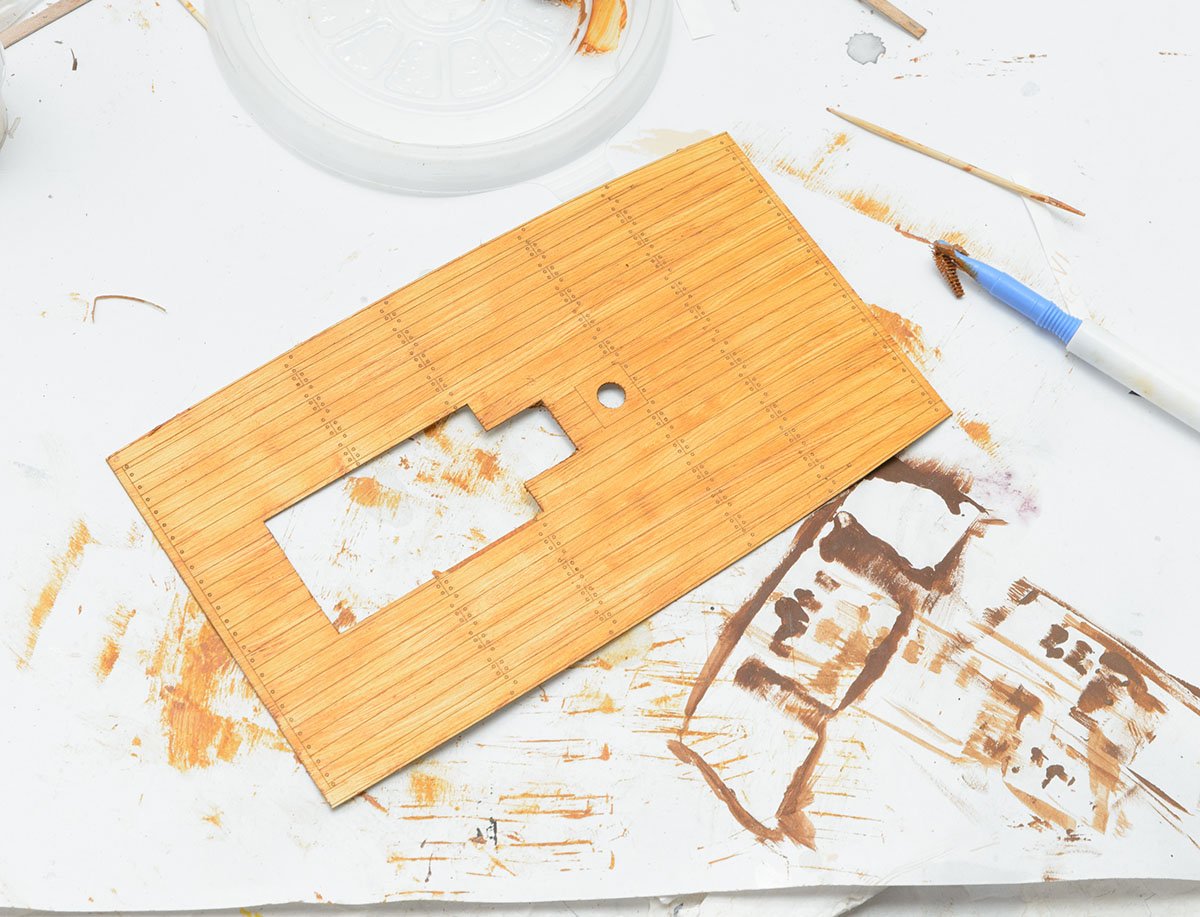
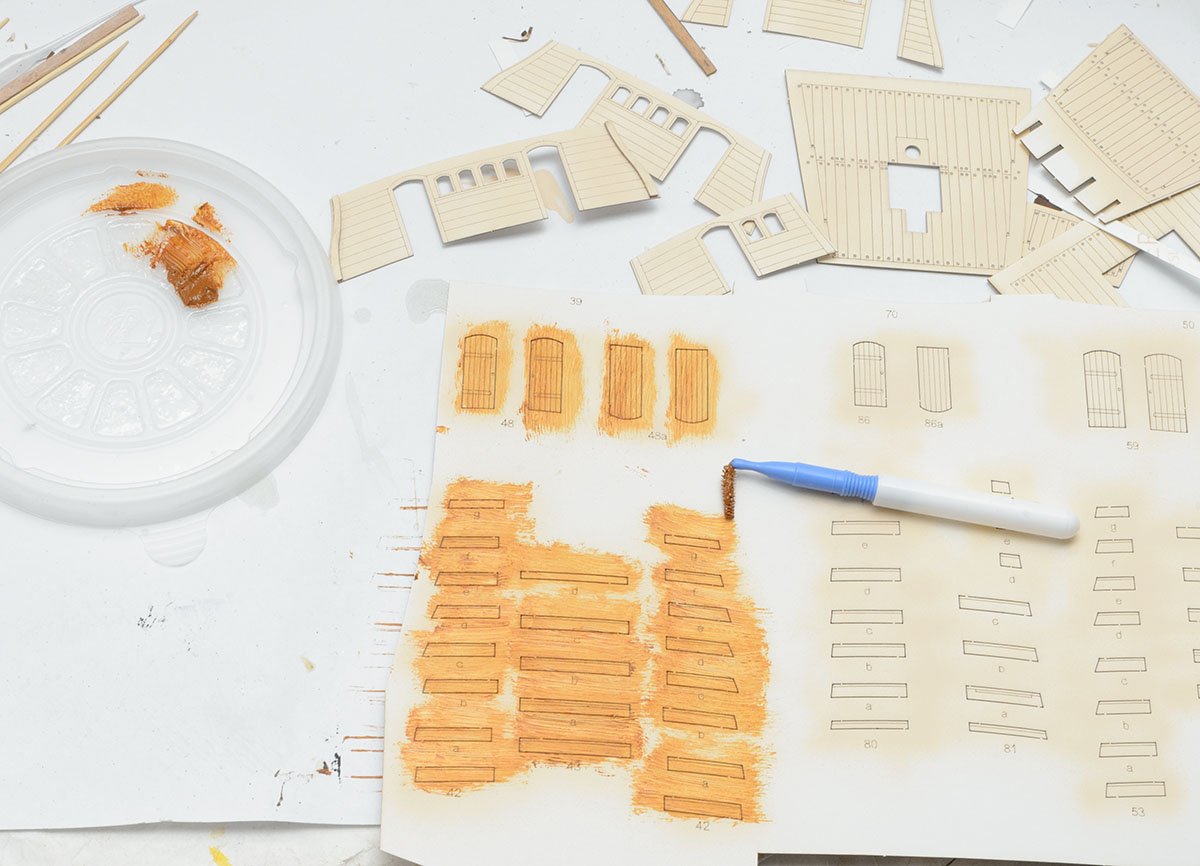
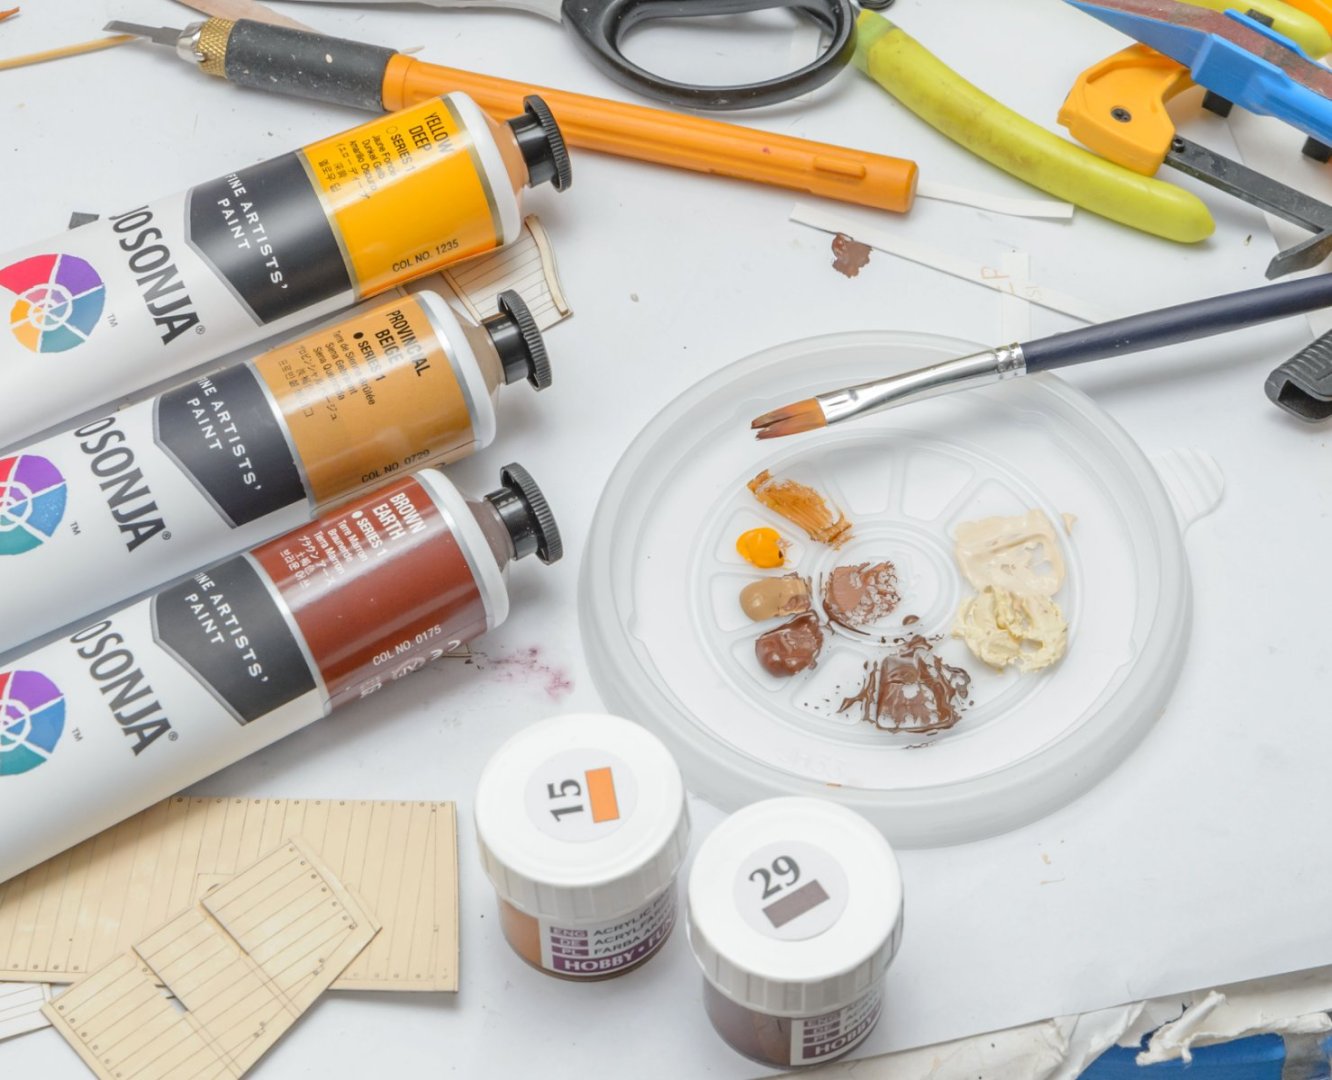
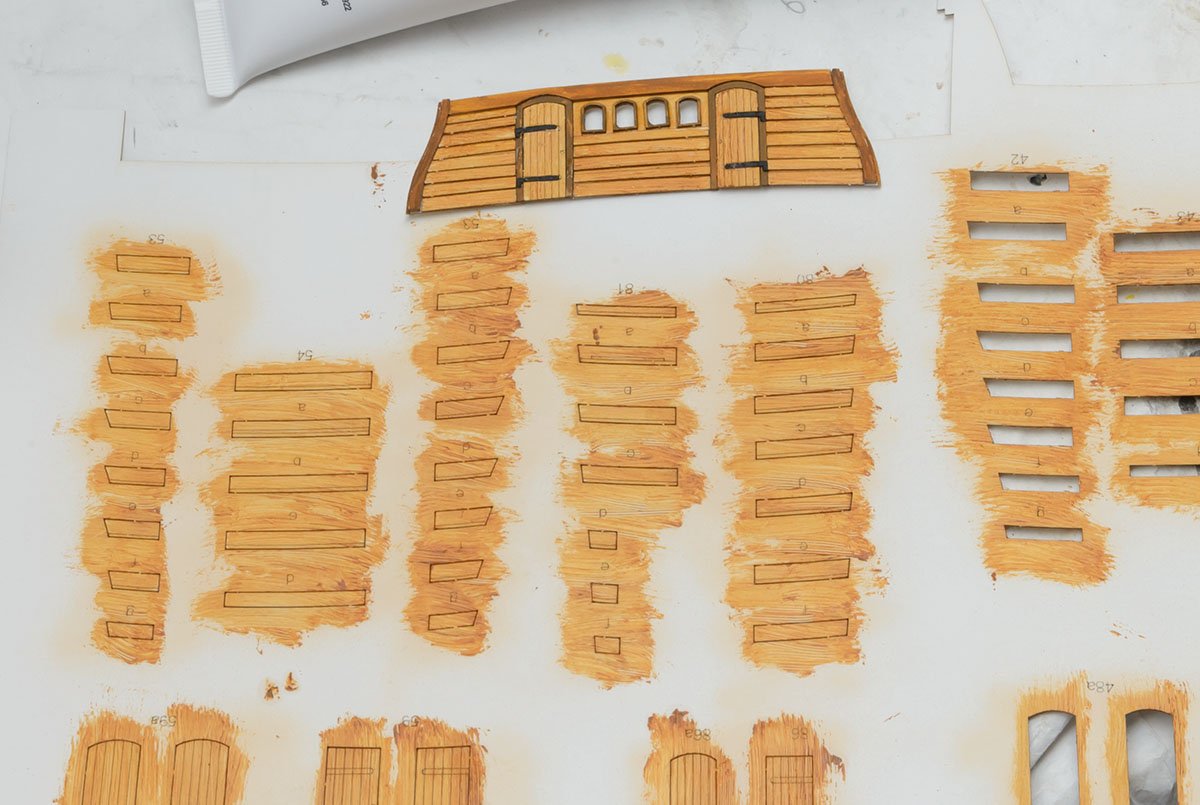
- 16 replies
-
- 13
-
-
 I am developing an interest in Great Lakes shipping, and I wanted a model of a Great Lakes freighter. I don’t have the funds right now for a full-on build, so I figured I’d look for something simple in card. I came across this kit from Lake Freighter Minis and figured it was worth a shot… It’s only a water-line model, and I’m sure it’s not 100% accurate, but I’m ok with that. LFM doesn’t specify a scale, so I did some quick calculations based on the stated model length and the real thing and came up with about 1:550. What I received was a nice envelope with thorough instructions and nicely printed sheets of fairly heavy card stock. We will see how this turns out!
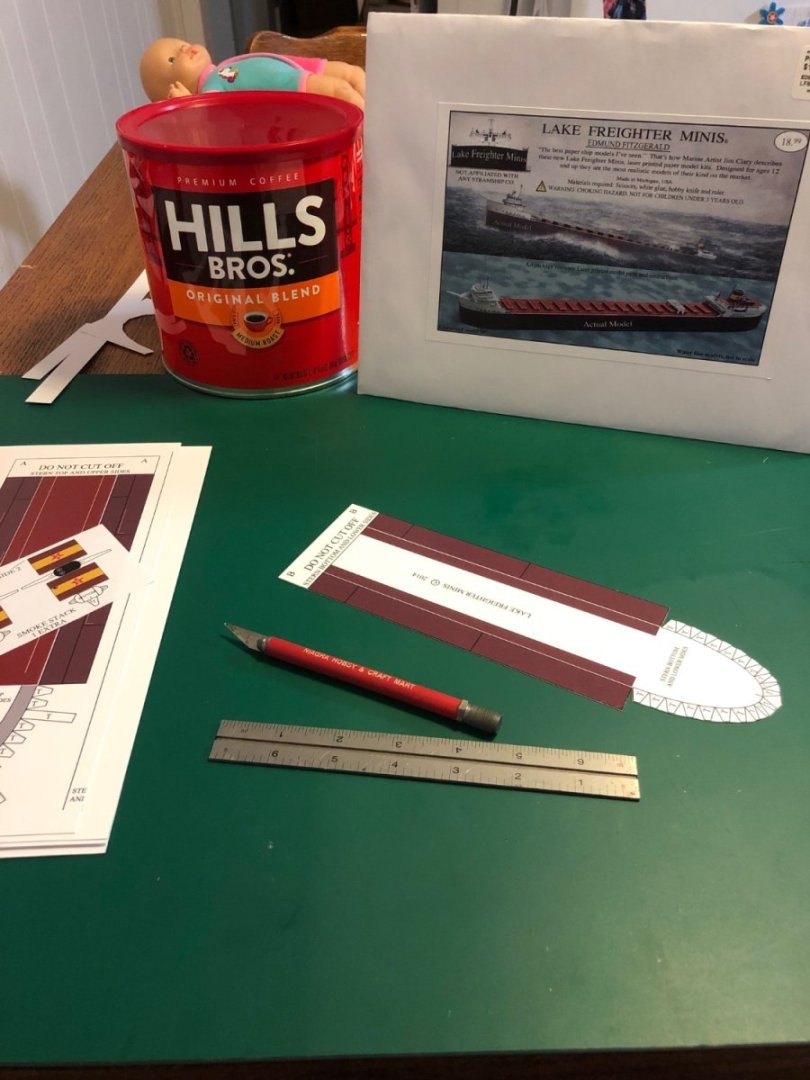
- 17 replies
-
- 8
-
-
- Edmund Fitzgerald
- Lake Freighter Minis
- (and 2 more)
-
I bought the Amati Victory Models plans set of the Revenge, a couple years back, from Cornwall Model Boats. They have been sitting in my closet for a while now and I would really like to use them. Chris Watton did a wonderful job of designing the kit for Amati. The plans are simply amazing. They beg to be used. I have a couple of Amazon boxes that are begging to be cut apart and turned into bulkheads and a keel. I have a bunch of giant Valentine’s cards that I bought in a wholesale lot last year. They are almost exactly 1mm thick. I have recently acquired a bunch of cereal boxes that are about .5mm thick. I also have a couple packs of poster board that are about .8mm thick. Lastly, I have bunch of wood grained contact paper that needs used while it is still self adhesive. I do have a couple other builds on hold at the moment. I’ll get to them eventually.