Search the Community
Showing results for tags 'endurance'.
Found 18 results
-
 Somewhat presumptuously, given the many Endurance build logs already on these boards, I have decided to add yet another one. This post will explain why. Within the next day or two I will add posts listing the research sources I have come across, and photos of some kit-bashing I am doing at the very beginning of the build. It seems to me that ship models can be placed on a continuum, with beautiful models at one end, and historically accurate, or at least realistic, ones at the other end. Built as instructed, OcCre models are toward the former end -- exposed brass, different kinds of unfinished wood, etc. My first model, 30+ years ago, was Artesania Latina’s Bluenose. Nothing on it is painted, and it has a variety of beautiful woods, and brass anchor chains. I’m proud of the work I did, and I admire the beautiful models of this style others have displayed on this great website. But since that first model, I have gravitated more toward the other end of the continuum, trying to build models that are at least credible reproductions of the real thing. Not better than the ones just described; just a different style. Doing so with this OcCre build will require some kit-bashing, and that is what I hope to devote most of this build log to. I also hope to be advised, informed and inspired by the comments of those who choose to follow me on this journey. And with a little luck, maybe I can return the favor.
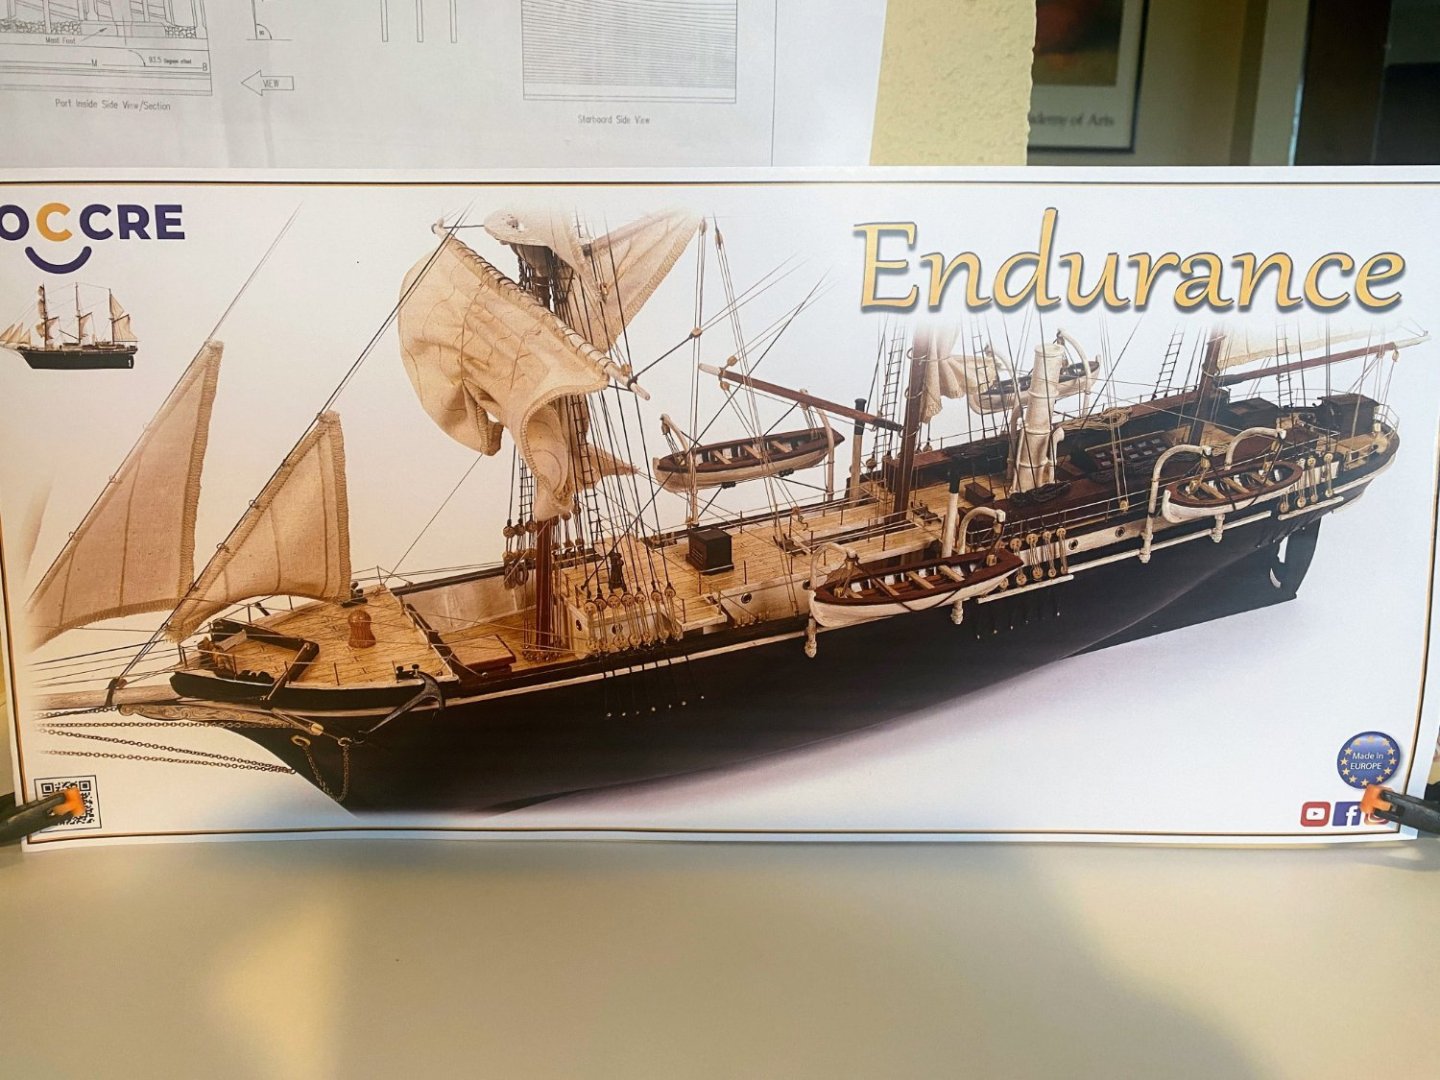
- 103 replies
-
- 5
-

-
- Endurance
- Shackleton
- (and 1 more)
-
 Hello MSW! This post serves as an introduction to yet another build log for the Endurance kit by Occre. First, a little about me: I started this wonderful hobby as a teenager and kept at it when I could as I was traveling all over for the US military. This made it difficult to set up a permanent workshop (or table as it were) so my first and second ships stayed on standby for most of this time, with small bursts of productivity here and there. Unfortunately, the San Fran in my signature was lost to rough handling by a shipping company (yay army movers!) many many years ago, when I got out of the military. The Newport is currently on my newly-setup work table and I have been making slow progress with it and will need to update that log soon. I've built a dinghy and a skipjack on the side, which I don't necessarily count as "wooden model ships" in the class these vessels are in. That being said this kit will be my 3rd model ship kit. Anyway, we're here to log my rendition of the famous Endurance. She needs absolutely no introduction, and I'm going to point anyone who wants more information to the numerous and great build logs from others, as they've done a remarkable job documenting the ship's beginnings in their logs. First thing is first, my kit is currently in the mail on its way to me. While waiting for the kit to arrive I have already read through every Endurance log on this website and will probably read them all again for good measure. While making my way through the logs I took note of every bash and scratch build people have done to make this model more historically accurate. I'm not going for 100% accuracy, but perhaps somewhere around 90% accurate, to the extent my modeling skills allow. There was great advice given to focus on a particular 'load out' as this ship seemed to change a little here, a little there over the course of her voyage. I am particular drawn to the very beginnings of being stuck in the floes, so I imagine I will gravitate towards this set-up. I don't have all of the details nailed down yet in my notes for this period of the voyage, but over the next few weeks as I work on the obvious structures, I'll continue research and make decisions as we go. Things I already plan on changing (so far): Under the forward deck will be open (I have a question on this at the end of this post). All belaying pins replaced with brass. Stanchions will be 3D brass with brass wire rod, soldered then painted white. 2-Blade brass prop (someone in another forum said it was 25mm. I could only find 30mm, so I hope it's not too big). Coal loading covers instead of the o1 stacks on the aft main (lower?) deck. Probably scratch capstan. Steering gear with chain (thread as backup). Anchor cats shaved down towards deck. Deck planks 2.9mm wide (for 8" planks). Portholes are too small, so either fill and drill new or drill bigger (and not using the brass inserts). I'm sure I'm missing something else but you get the idea. That sums up where I currently am at: the very beginning. I've always enjoyed curating a log on these forums and is why I keep coming back after so much time has passed. I appreciate anyone and everyone stopping by and offering suggestions, thoughts, concerns, and motivation. Please feel free to post any historical data you might have that's relevant to the ship's configuration as she entered the ice floes. I'd be eternally grateful! I have a few questions to start off with: - Area under the anchor deck. What was it used for? What did it look like? Are there any images that show this area? @Tomculb has a great interpretation of this at this post, and I'm inclined to do the same. - In this picture it appears the ritz has a chimney coming from the port forward side. Is that correct? If so, I'll be including it in my model. - Was the steering gear exposed when they first entered the ice floes? OcCre has it covered, but I want to model it. However, since I'm going for a particular time in her voyage, I'm not sure if it was covered in the beginning of the floes or not. Until next time! --------------------------------------------------------------- Edit 3/31/24 - Over the course of this project I have created a handful of .STL models that can be 3D printed which replaces some of the items in the kit. I'm editing this post and including a link so it can be found easier by anyone building this kit in the future. Click here.
 -
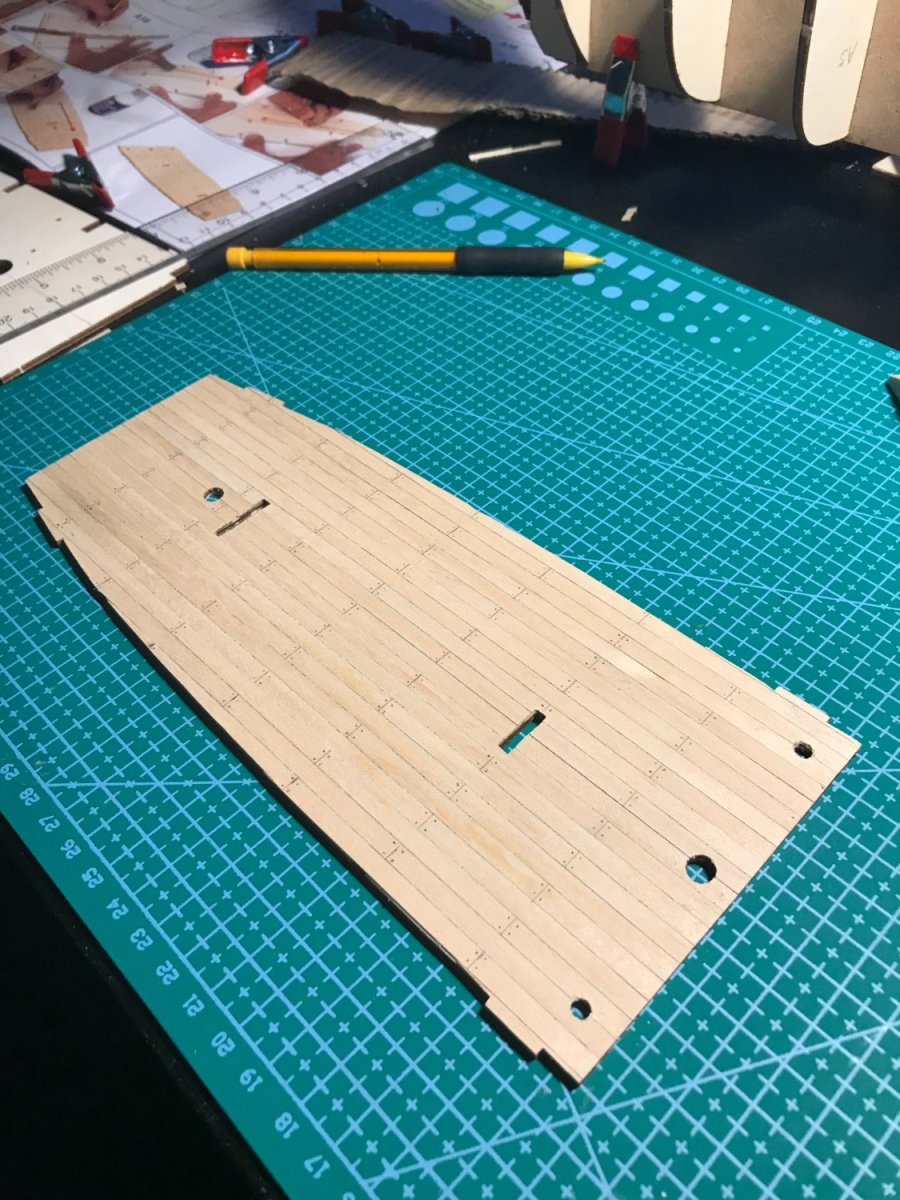
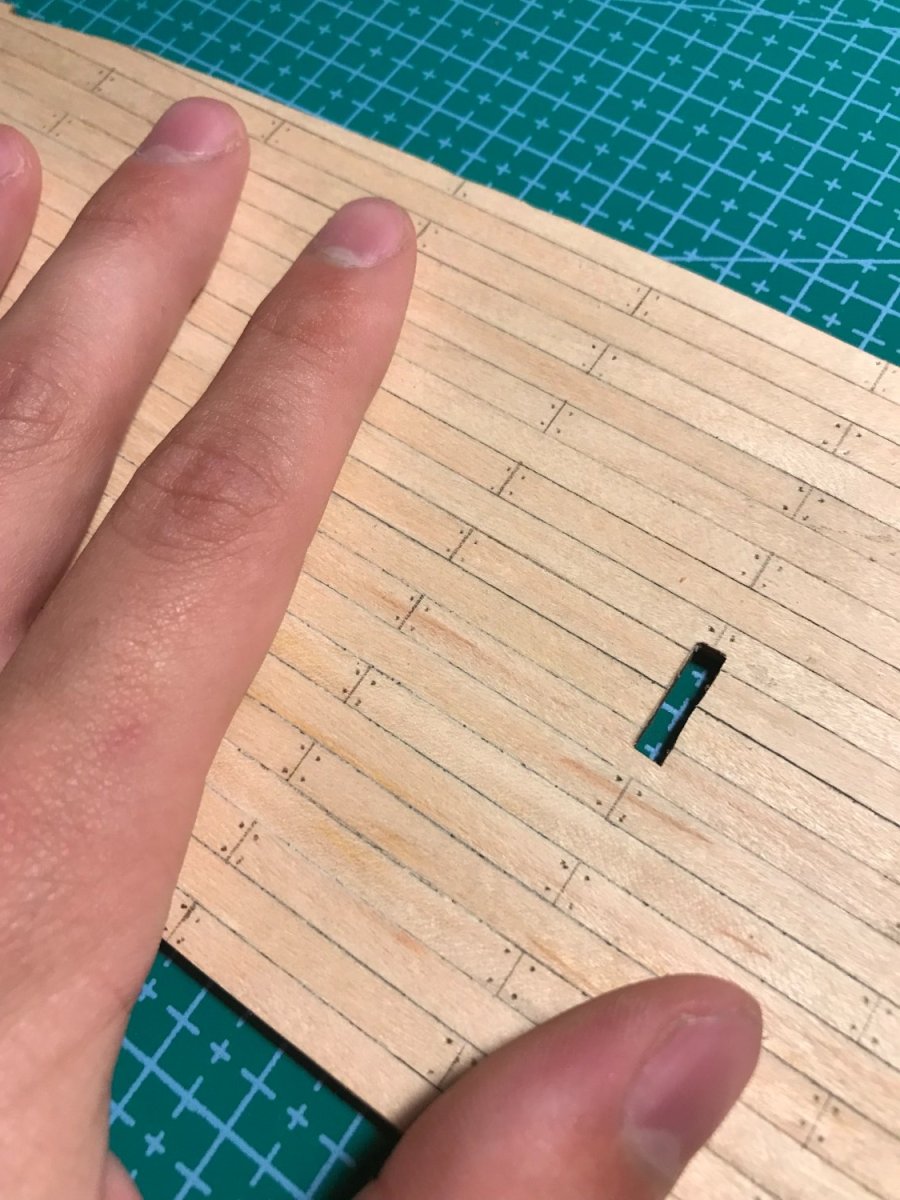
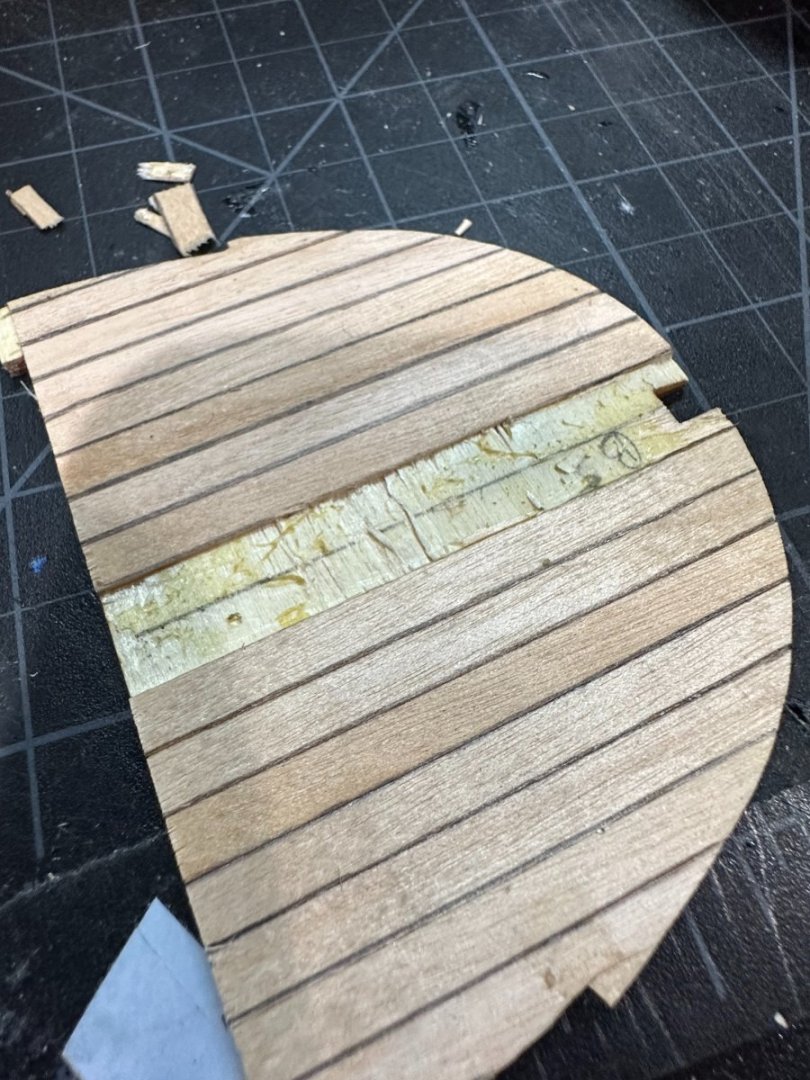
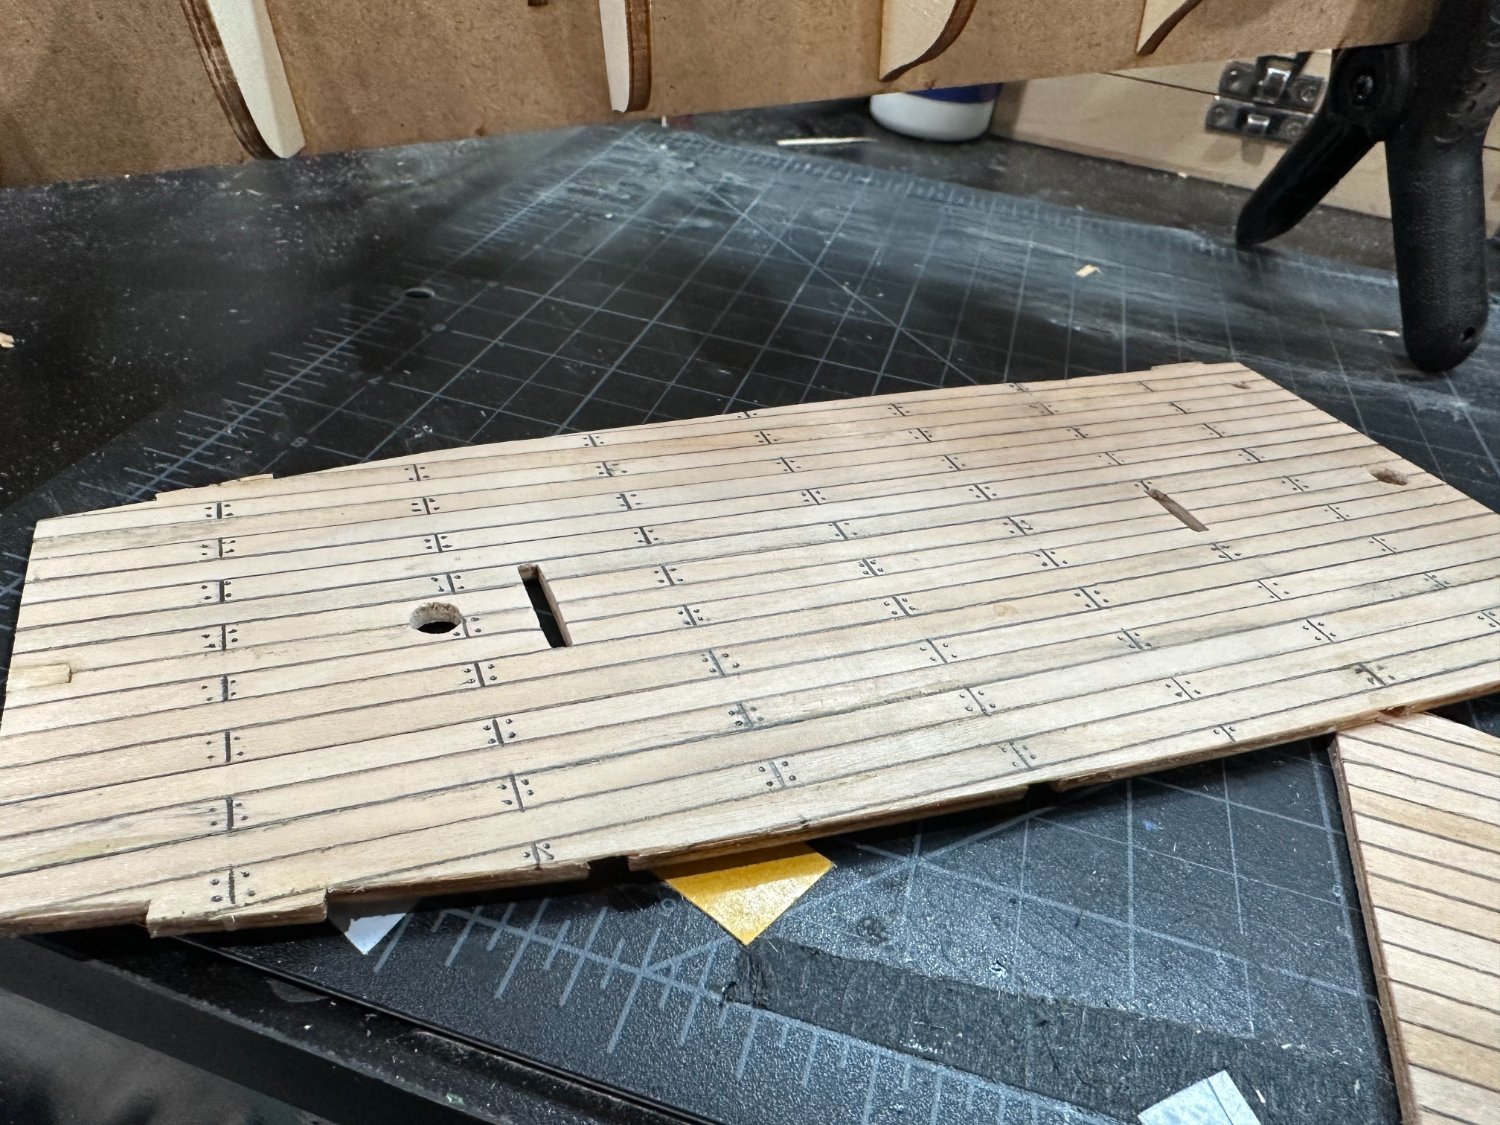
 Thought I’d start a build log (hopefully right location!). Im a total newbie and already getting lots of great help so thanks to you all. I’ve been fascinated by Shackleton and his crew my whole life - my father was a BAS member and has the honour of painting Shackleton grave monument on South Georgia so it’s in the blood! I’ve had a lot of fun doing the bulkheads and the deck so far. Mucked up a small bit of decking I lovingly cut off only to discover it had to remain. I think it will get covered but I’ve done an ok job of patching it… I think anyway!

-
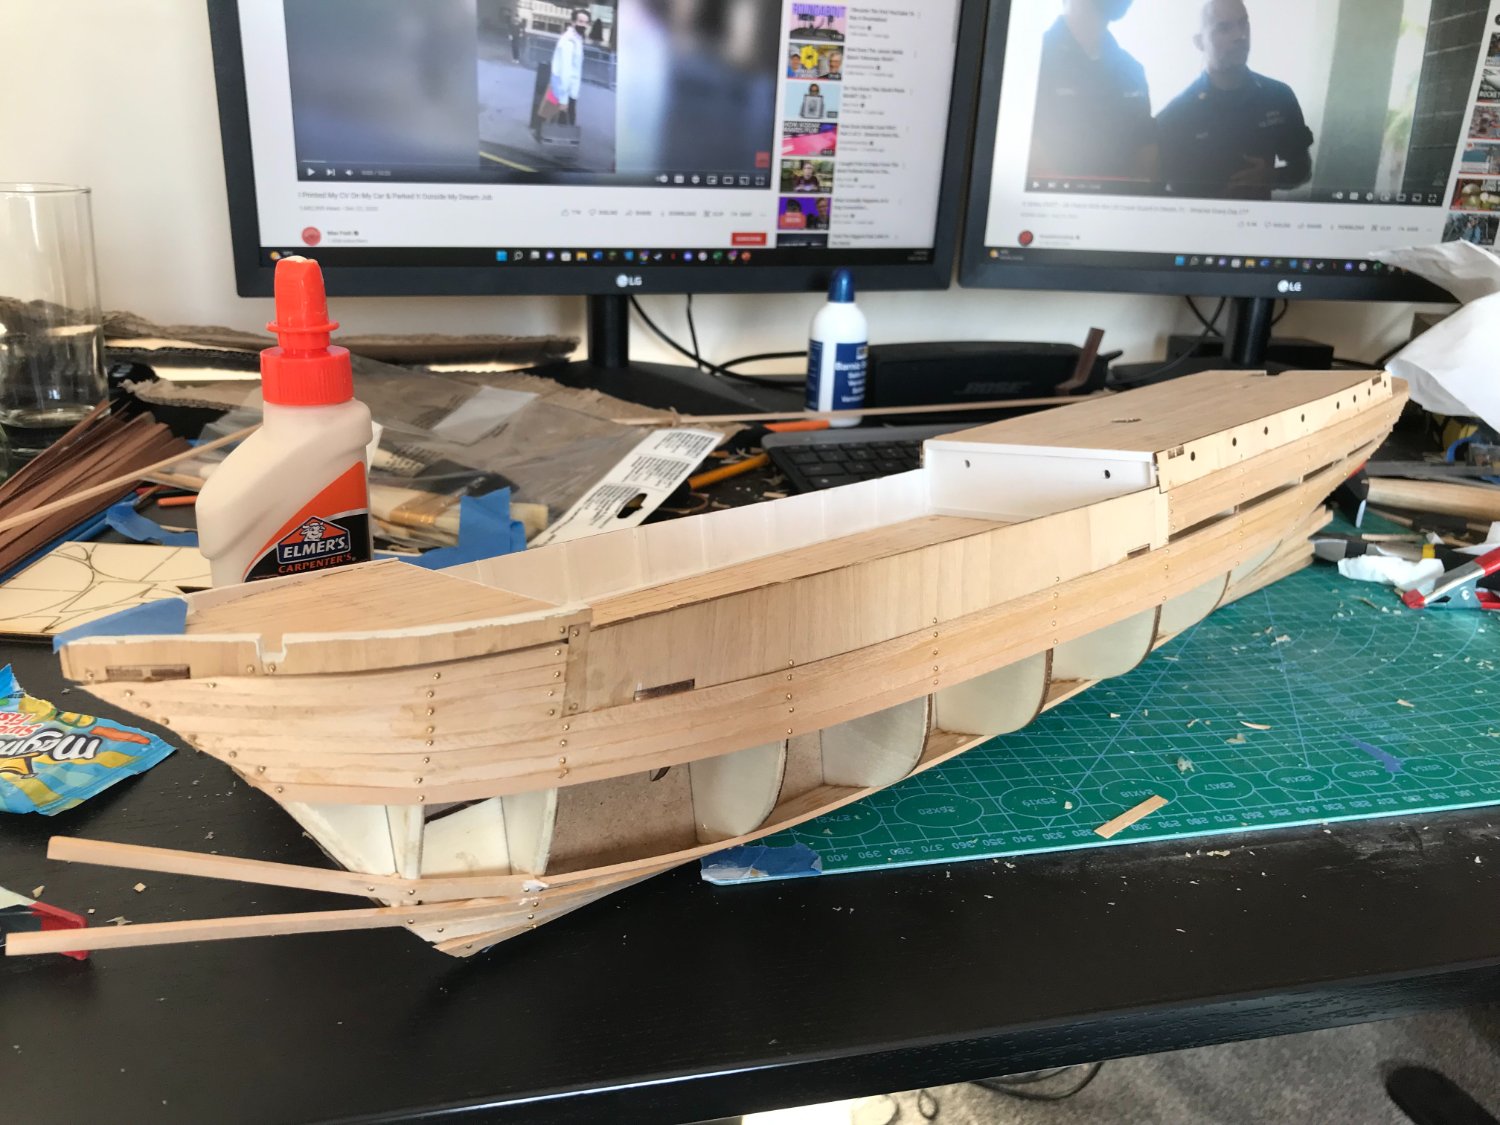
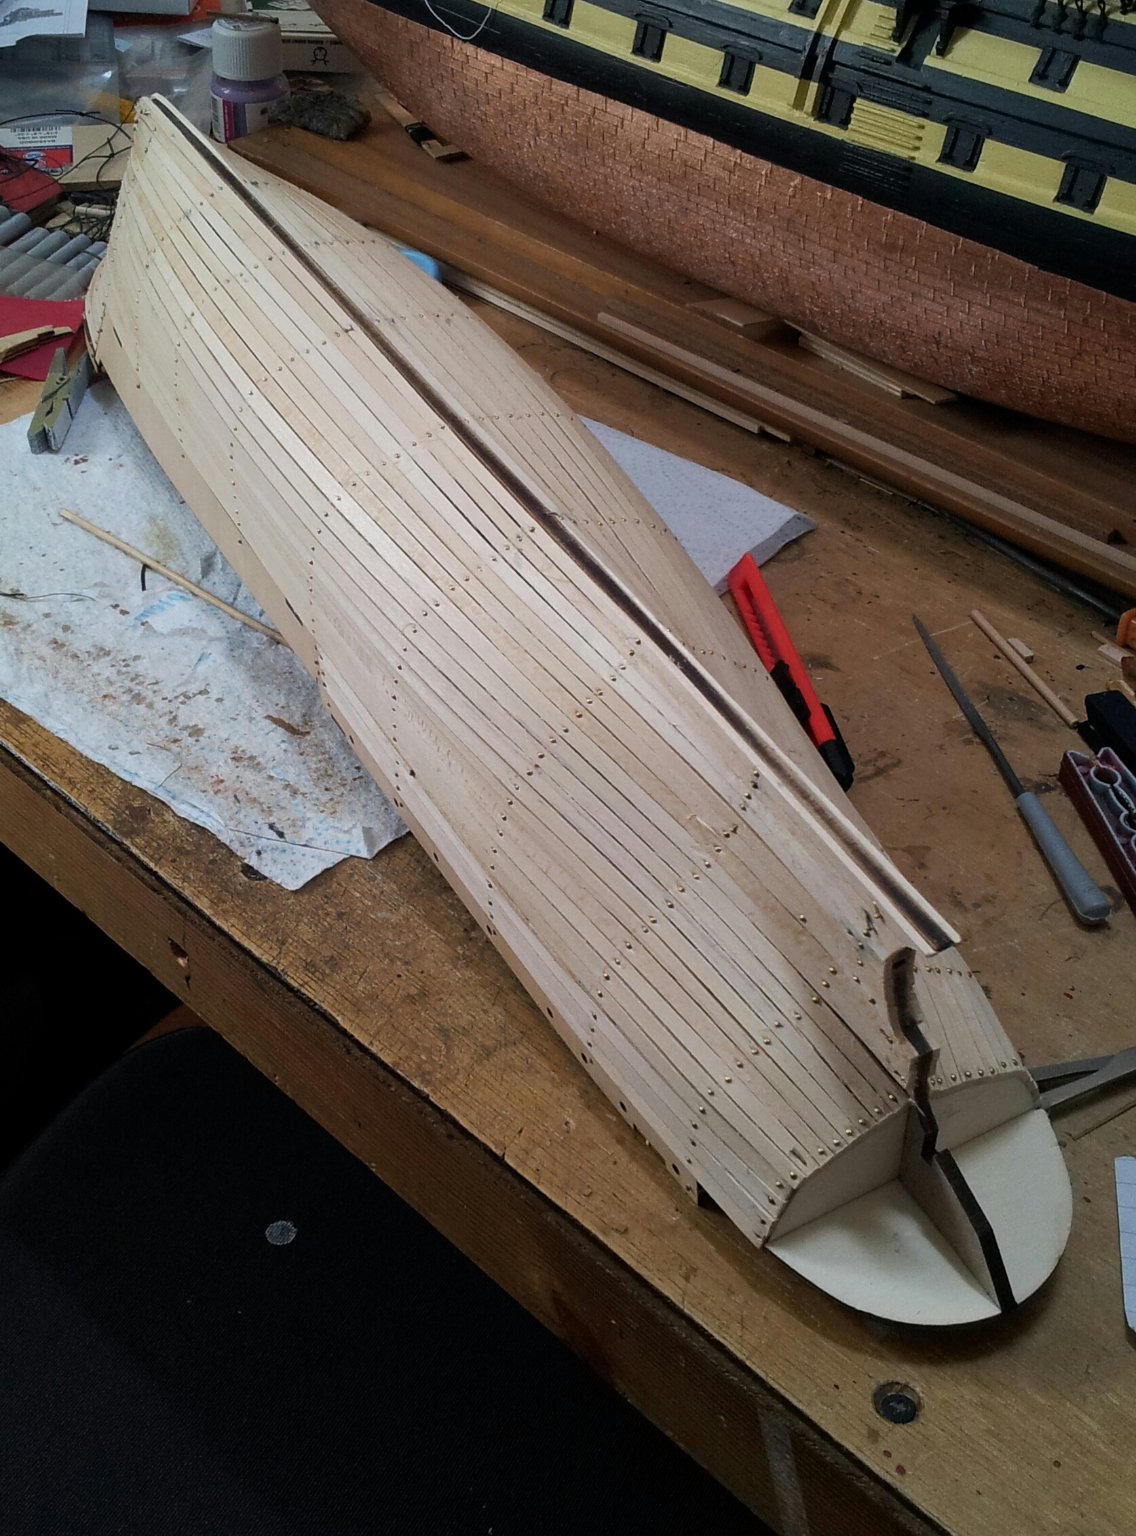
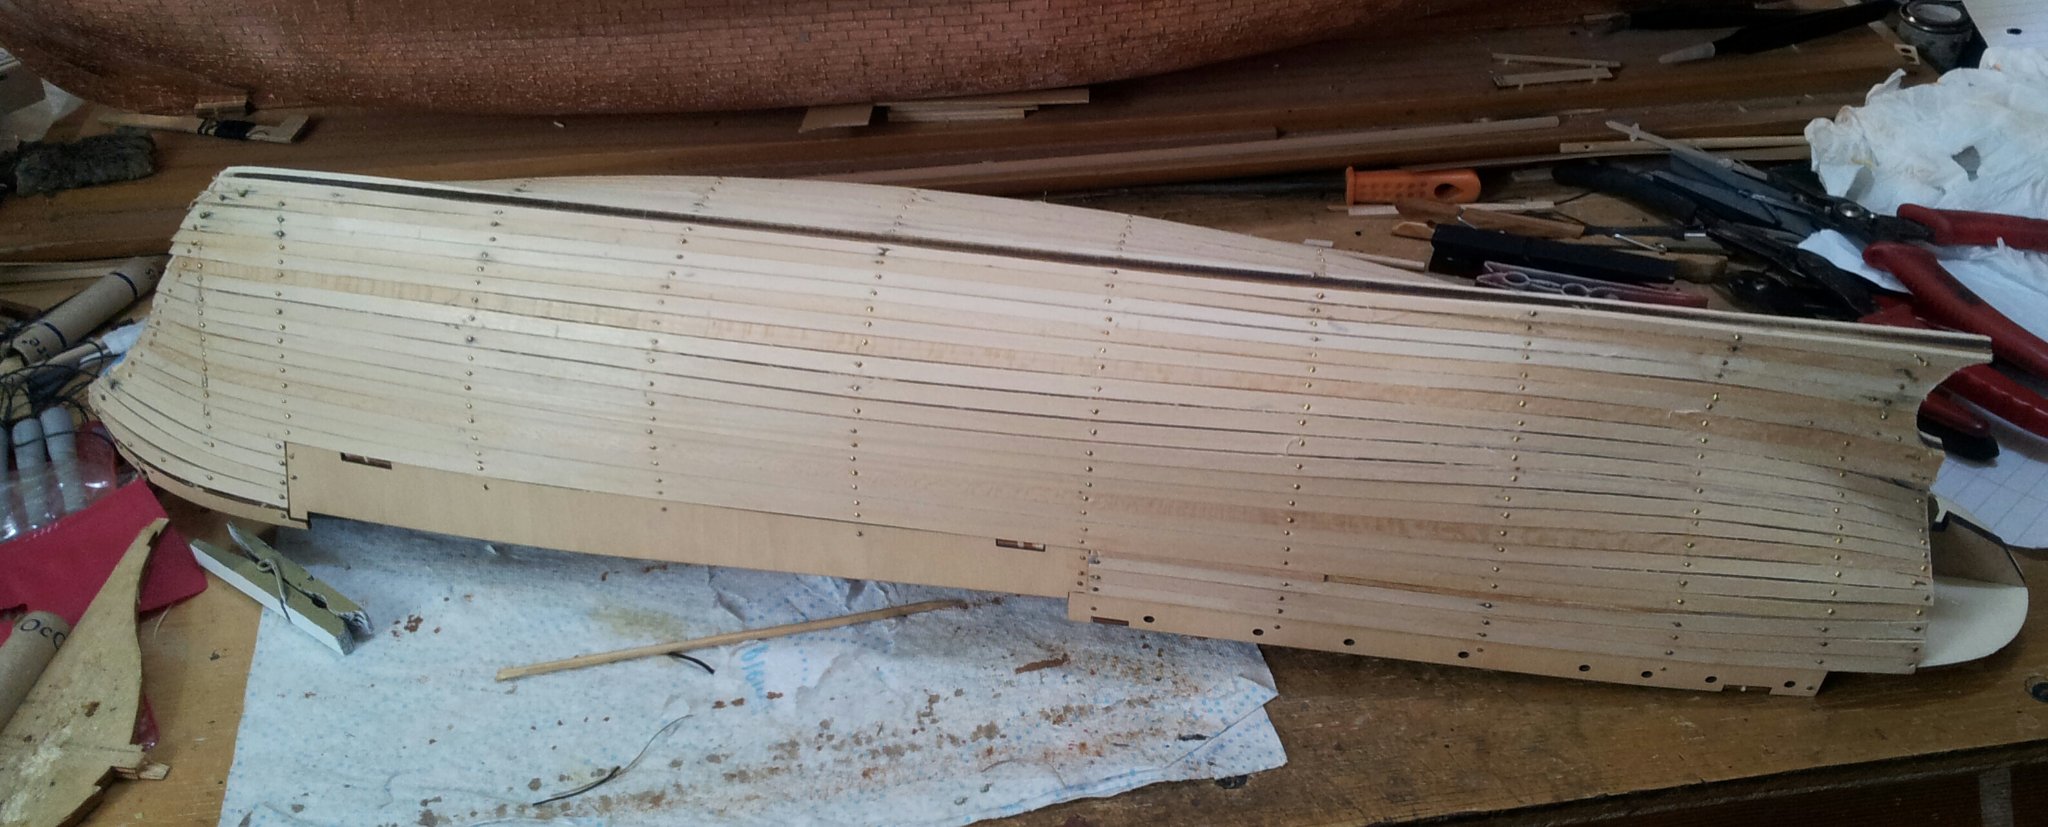
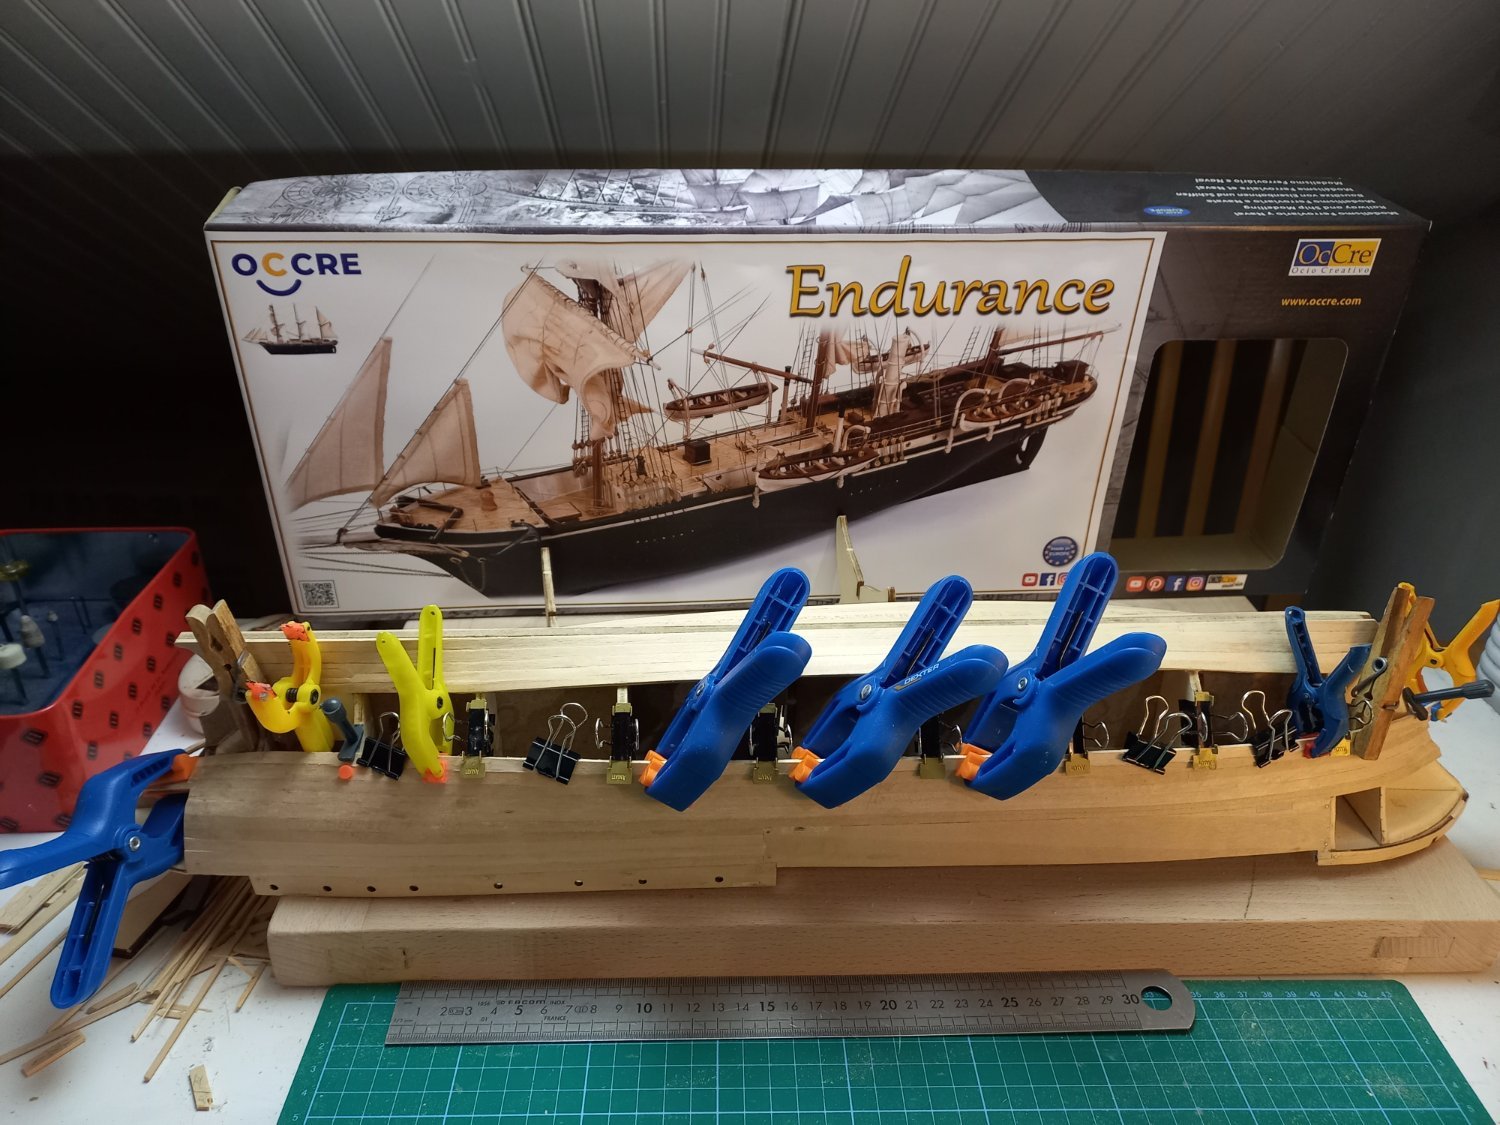
 while i am still working on my HMS Terror i could not resist buying/ starting this one. Have had an interest in Endurance since first reading about Shackletons exploits and seeing the footage of the ships destruction in the pack ice. There is an excellent review of the kit on this forum and as it mentions some upgrading will be needed to make it more accurate. so far have got her as far as the first planking stage (i planked from the midship ply former down tapering planks right from the start at the bow then planked upwards) . I must admit what a joy planking this hull after occres Terror! i also did not plank the decks yet as opposed to instructions , i will drill and dowel the decks formers in place and sand down before decking is added for extra strength in the hull. Keith
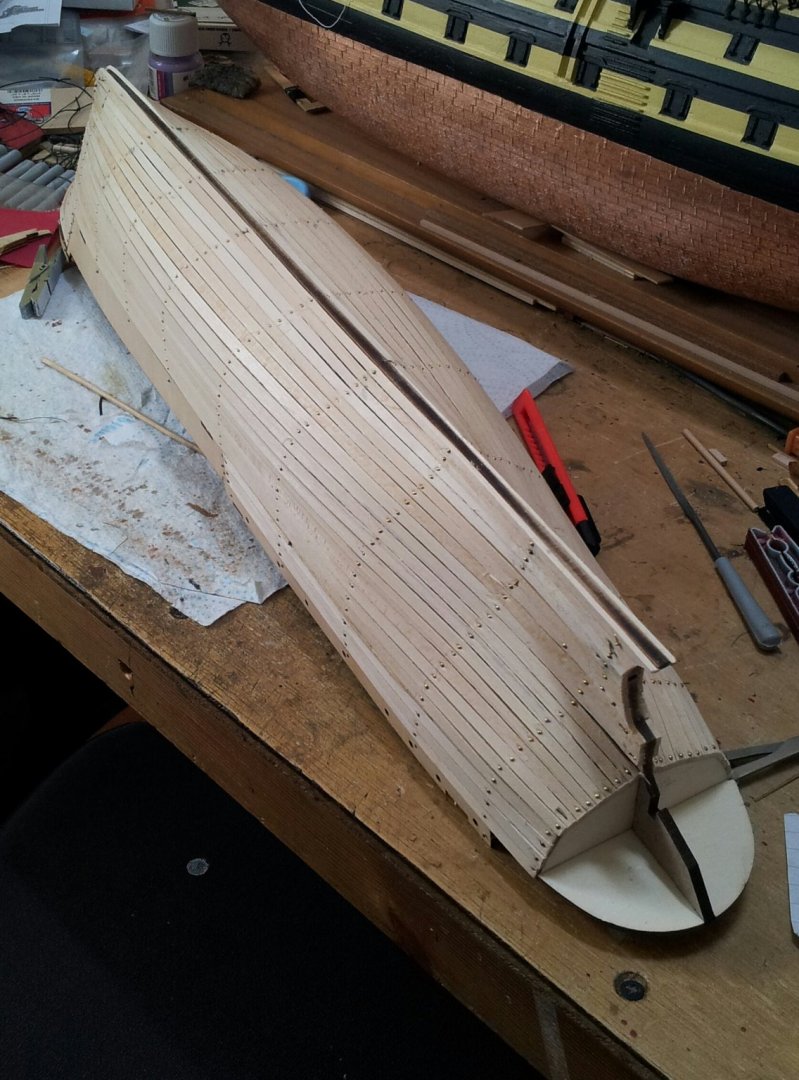


-
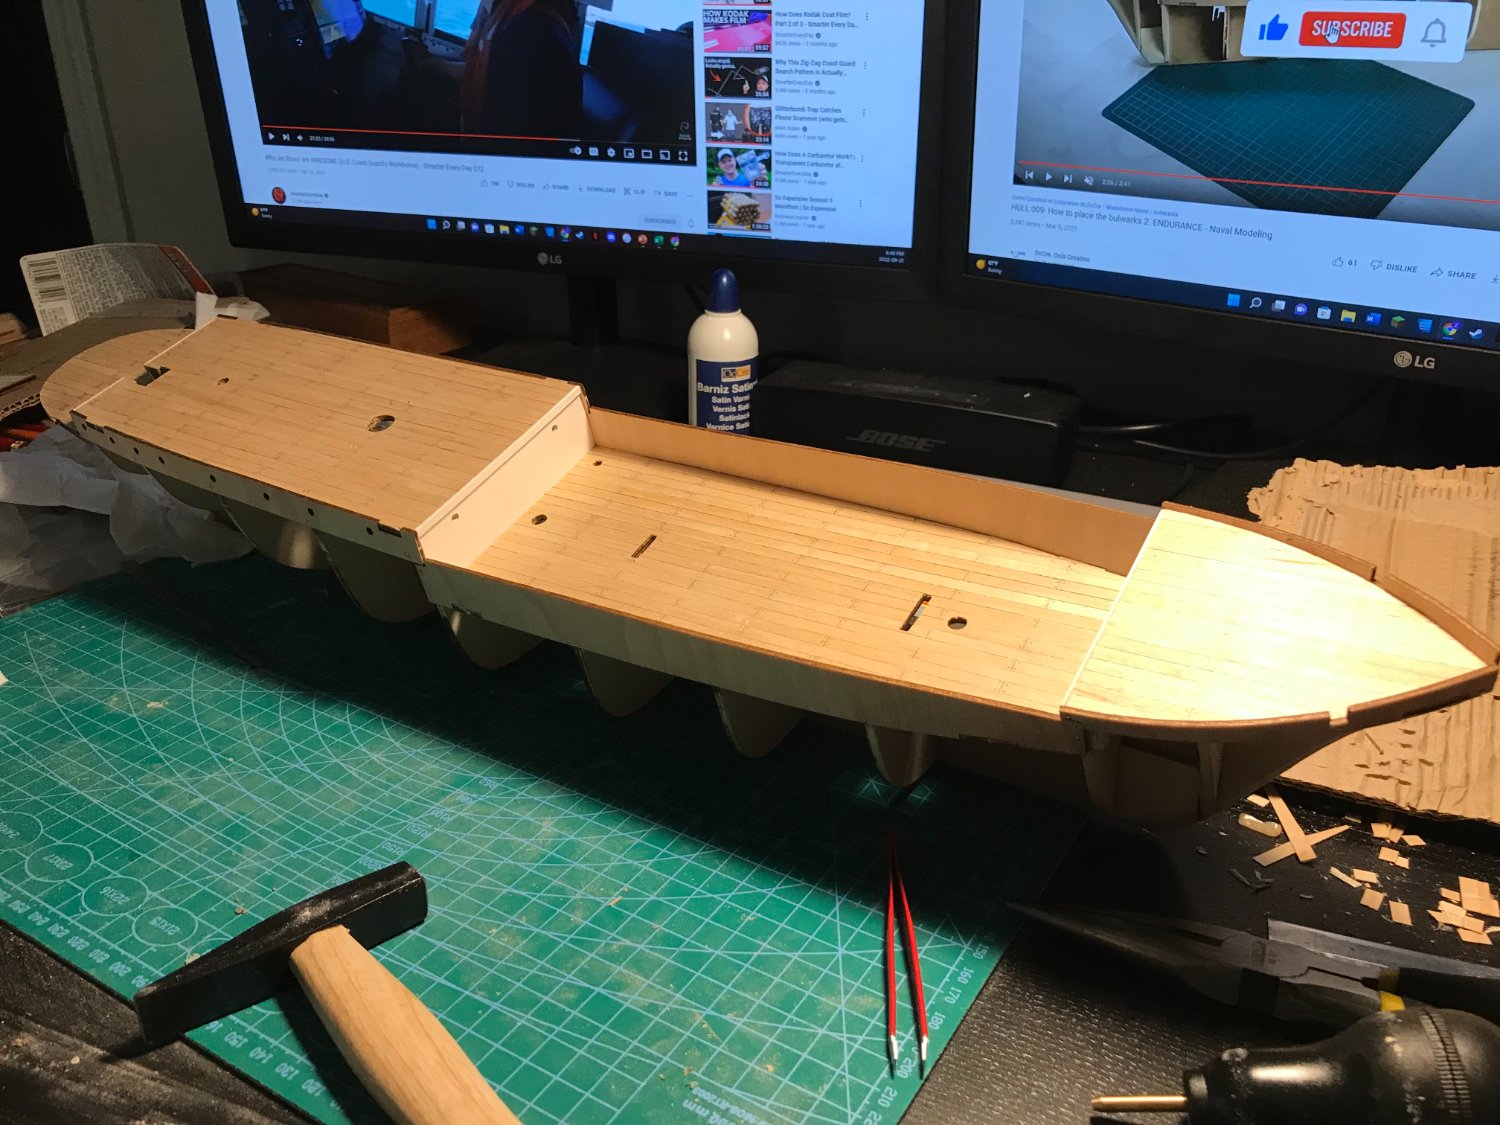
 Hey everyone! Longtime lurker, first time logger. Bought the Terror and Endurance a while back and now have the workbench clear for some building. I have been follwoing closely all the other finished and in-progress Endurance builds, all looking fantastic! I won't make every modification to make the model perfect, but will try adding what makes sense when I get to it. Would love to also experiment with some 3D printing of smaller parts and non-included bits to really bring the model to life. Been going back and forth between adding the ribs to the hull, and doing the decks while it's drying. I am using some cobblers glue for the decking and I was not expecting just how sticky and smelly it would be. Thankfully I have a covered fire escape out the back that I tranferred the gluing operation to. One thing I have done with all but one deck piece is cutting out the wrong bits. I had to replank 3 different areas because I'm just in the zone trimming the wood! Thankfully it just adds to the model, as I'm sure fixes were made along it's journey. I will try and update as I go, but I'm so bad at remembering to take photos. Will


-
 Having one finished model under my belt, I'm heading headlong into another, Endurance by OcCre. I may be biting off more than I can chew 😬. However, someone posted that an adventurous adult beginner could do this kit right out of the box (sorry if I didn't get the quote exact). I think I fit that description. I am further emboldened by all the masters who have made this and the tutorial videos from OcCre. Then there is this... I think it's a pretty ship and I really want to make it. This kit is so different from the Amati Viking Drakkar that I just finished. The materials feel like they are better in quality and the picture instructions are amazing. (Well, compared to the one sheet, poorly translated instructions from my previous build.) Everything is packaged so neatly and organized. I did a dry fit with the frames and the deck to make sure everything fit and now I'm diving in.

-
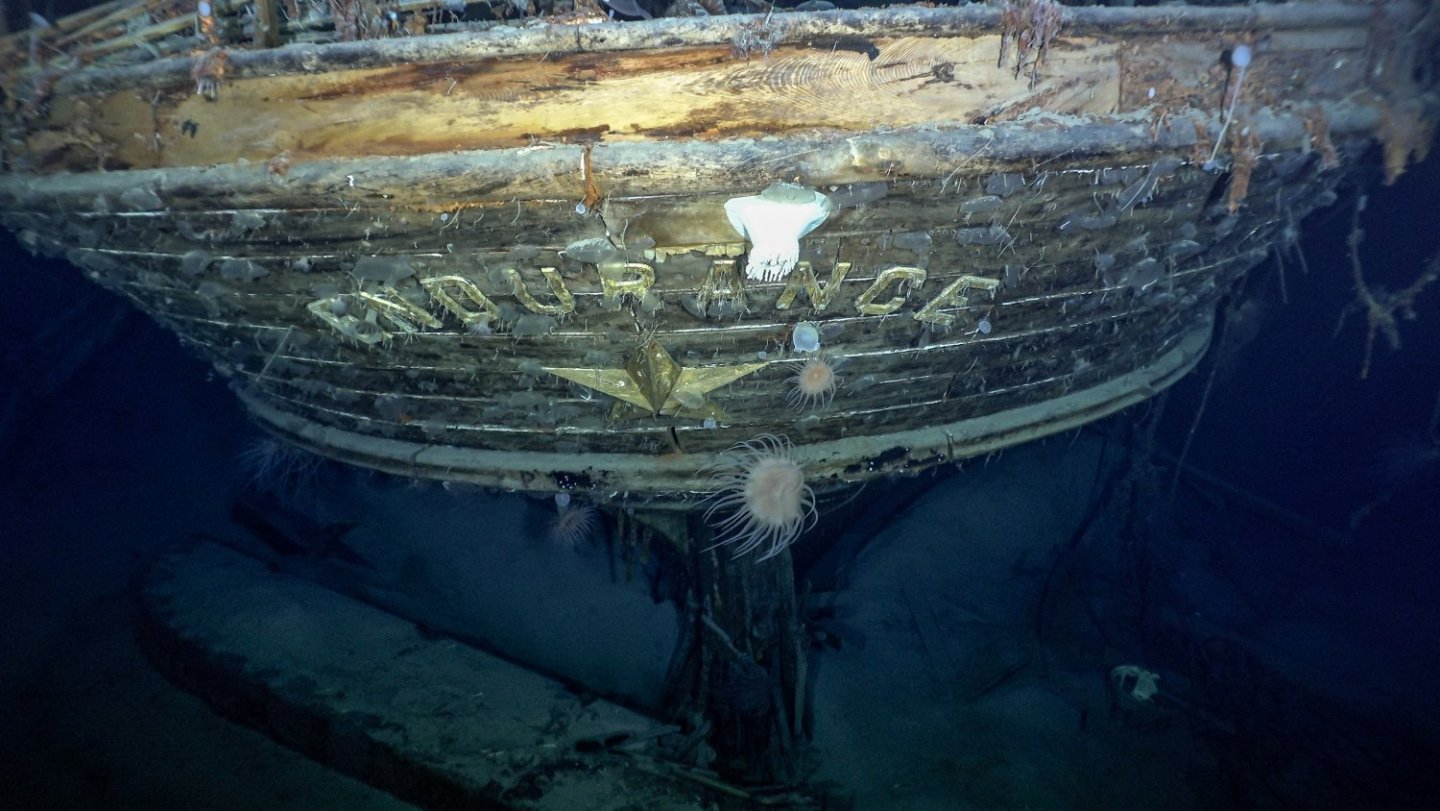
 Hello everyone, I'm not sure if there will be a lot of interest in another Endurance build as there are many very nice builds already. This will be my rendition. I have admired Ernest Shackleton's Antarctic Expedition for a long time. What he and his men were able to endure was truly amazing. With the recent discovery of the Endurance wreck, the story has become more interesting. I have purchased the kit from a local hobby shop. I am lucky to have a hobby shop close to me. I found that the contents of the box, in my opinion, are very good. All of the supplied wood is of good quality. The laser cutting is very crisp, photo etching very nice and fittings are of good quality. The supplied instructions are very good. The instructions include written instructions, pictorial steps and there are QR codes to scan that will take you to the corresponding YouTube video for that pictorial step. This will be my second build, so I still have lots to learn. From my first build, I learned that I need to spend more time thinking about the step I am going to take before I perform the step. I found it frustrating to perform a step and come back later only to discover I did it all wrong. I did a lot of "What Was I Thinking". I plan to do a lot enhancements to the kit along the way. I have been able to gather over fifty photographs of the ships and I feel the are a lot of corrections that can be made to the kit. Along the way, if anyone has any comment on a step that I did wrong or something I could do better, please let me know. I welcome all comments and information. Thanks Bill
 -
 Ever look online, see an ad with a model ship, and inadvertently went down a long rabbit trail and purchased a model kit of your favorite historical ship yet have no modelling experience whatsoever? No? Well, I did it twice... I am now in possession of OcCre's Endurance kit and their new Flying Dutchman model (it scares me not because of its cursed nature, but single planked hull). So this is my build log for the Endurance, which is already under way as I just found this forum a few weeks after starting the model, oops. All things considered I'm pretty sure I've made good progress so far, having laid the deck and done the first layer of planking on the hull. Now, it has come to my attention OcCre does not instruct you how to accurately lay your planks to match how it was done on a real historical vessel, which is something I need to learn before my single planked Flying Dutchman (please help), otherwise I'm not too concerned with the Endurance since it will just be painted. Not sure how much detail to talk about since I am a newb and knows nothing about ships except that they float, being from land locked Alberta Canada 850km away from the nearest ocean with a mountain range in-between. Also, any info on inaccuracies that can be fixed or aspects of the model kit that can be improved upon would be much appreciated.
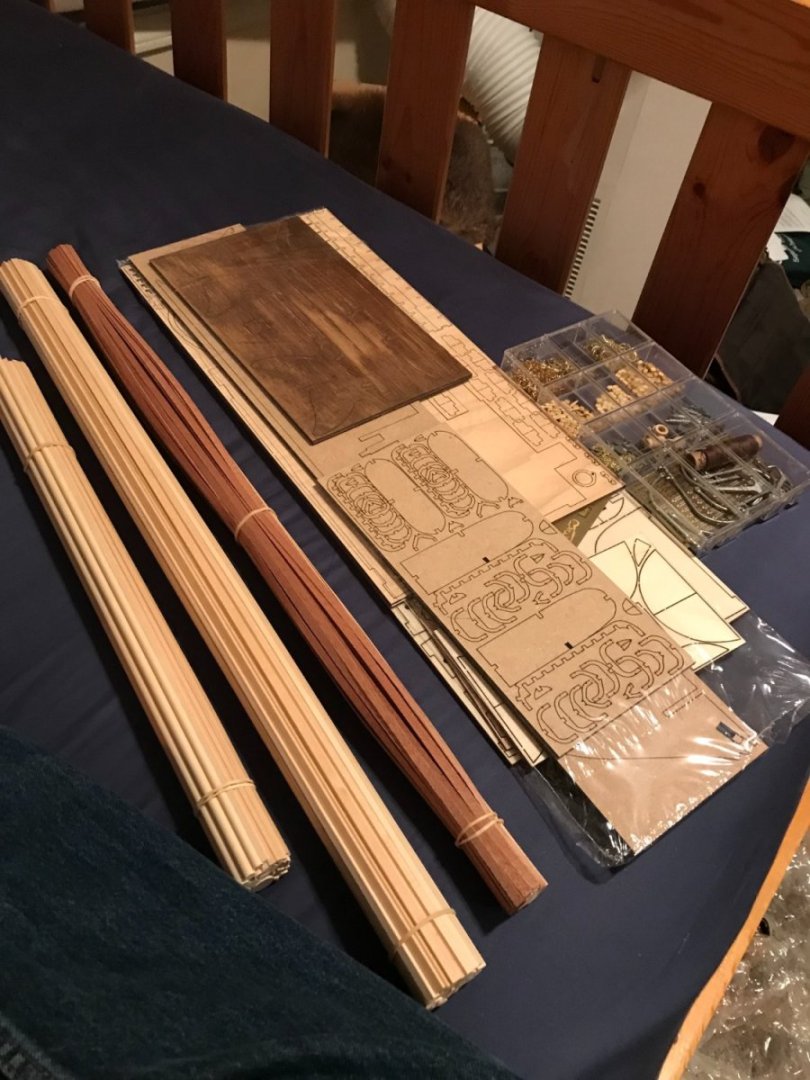


-
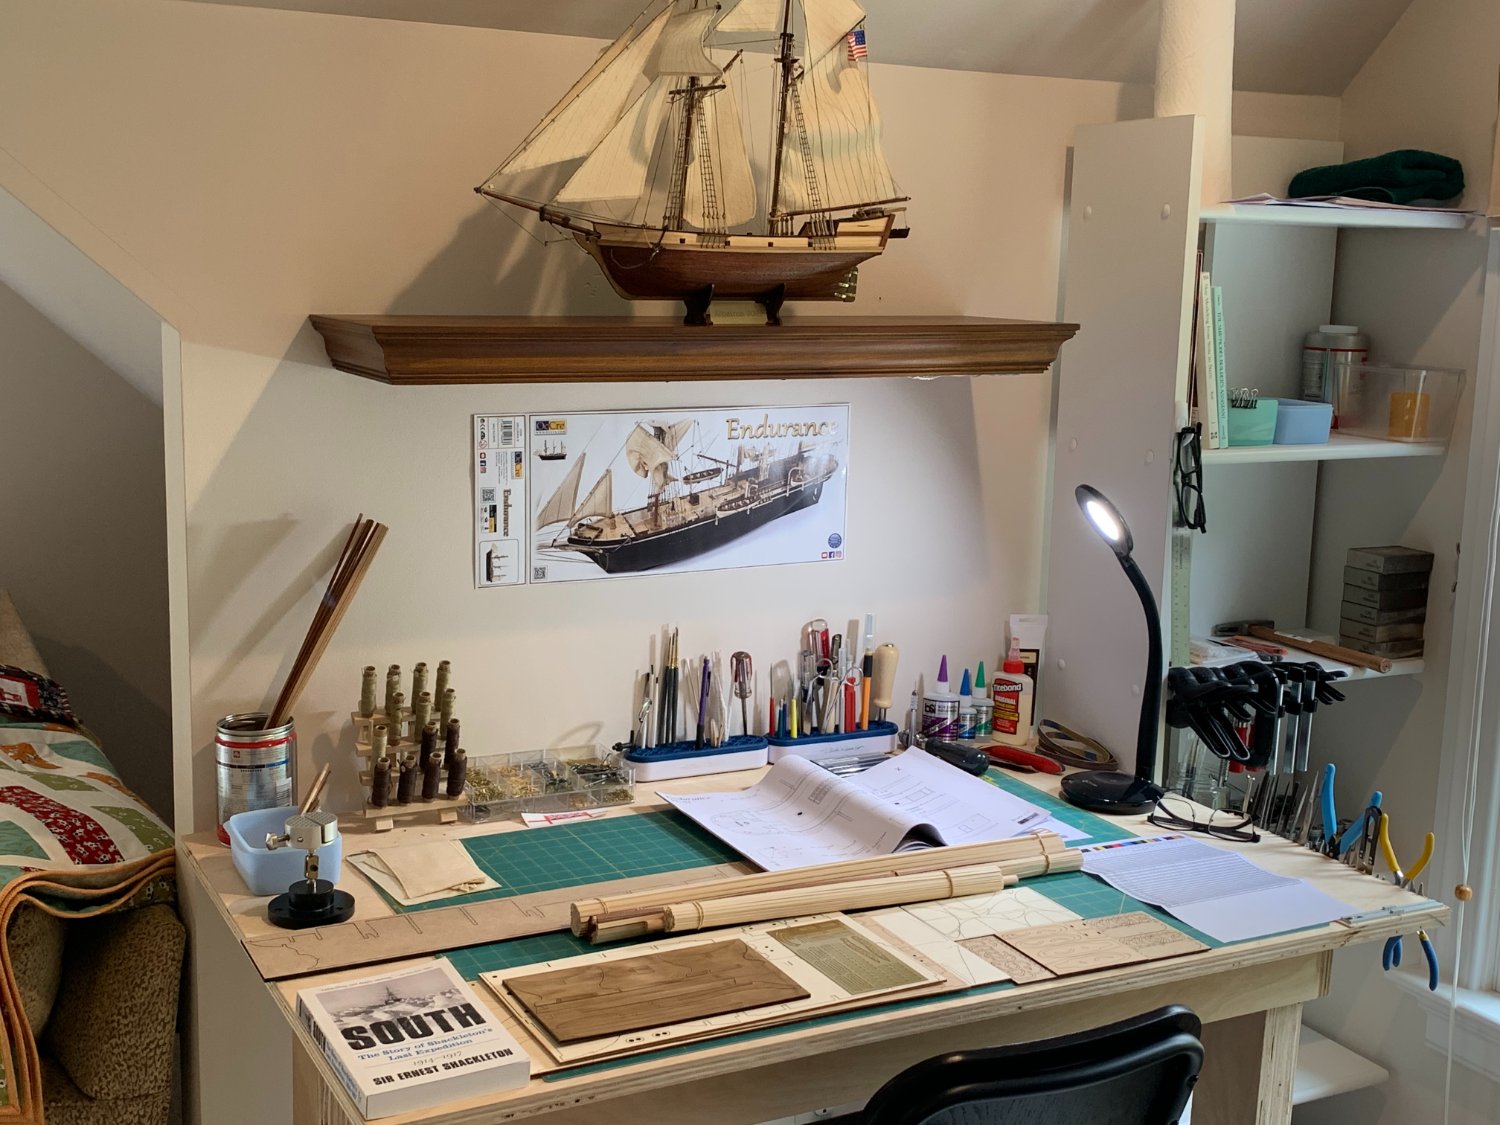
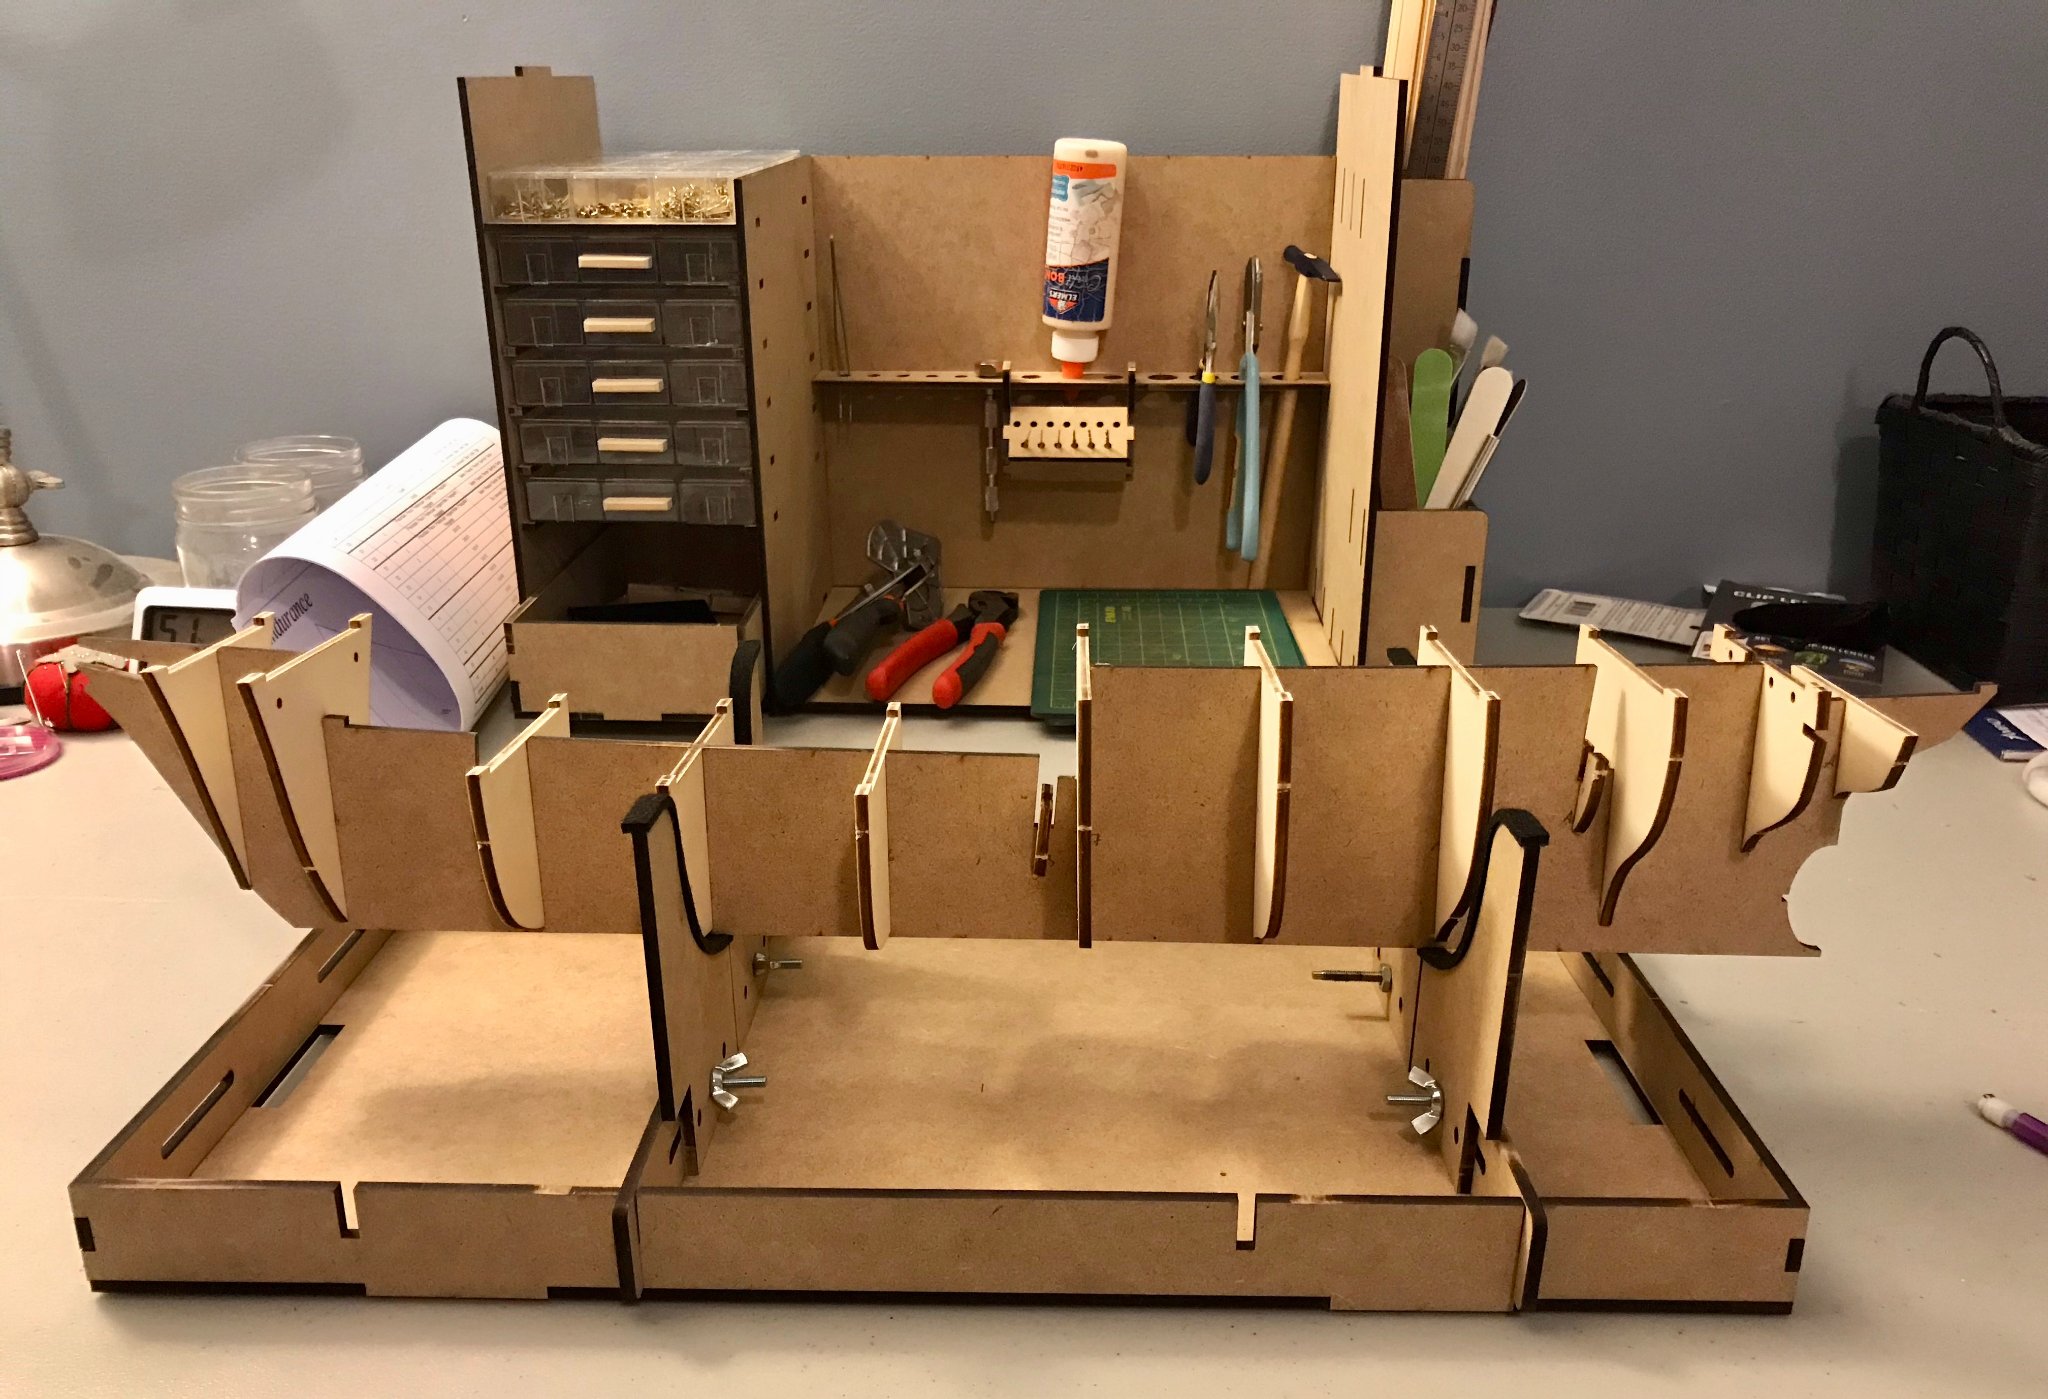
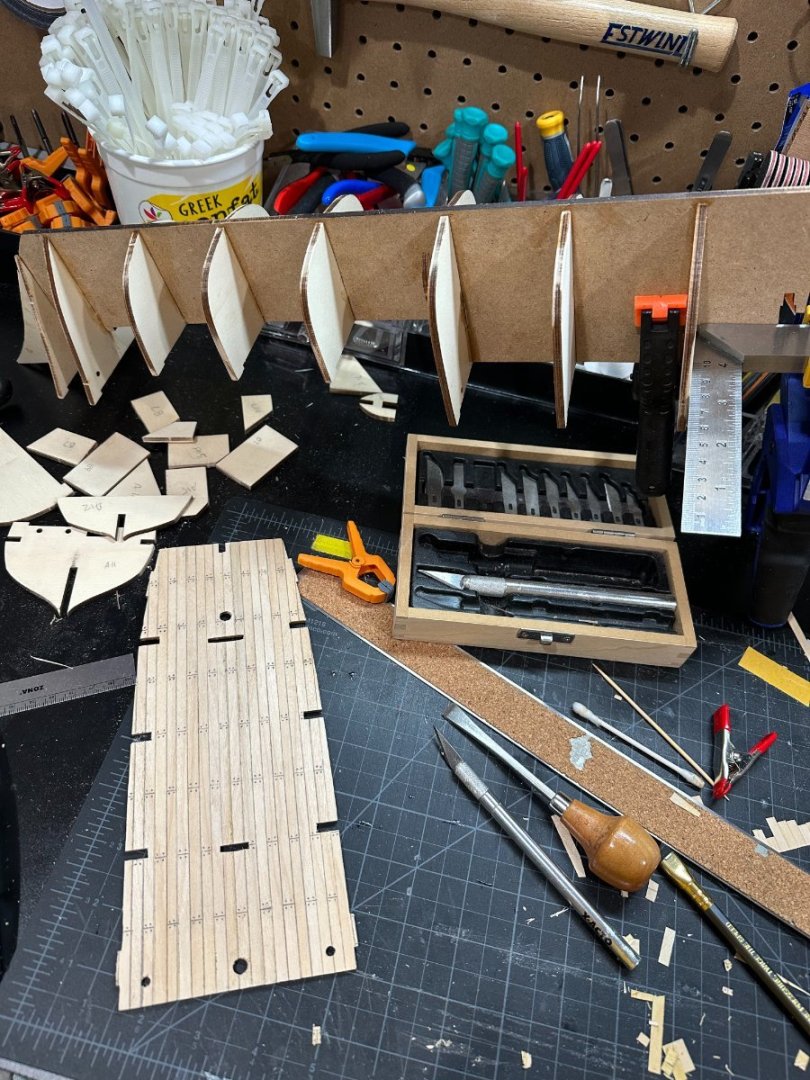
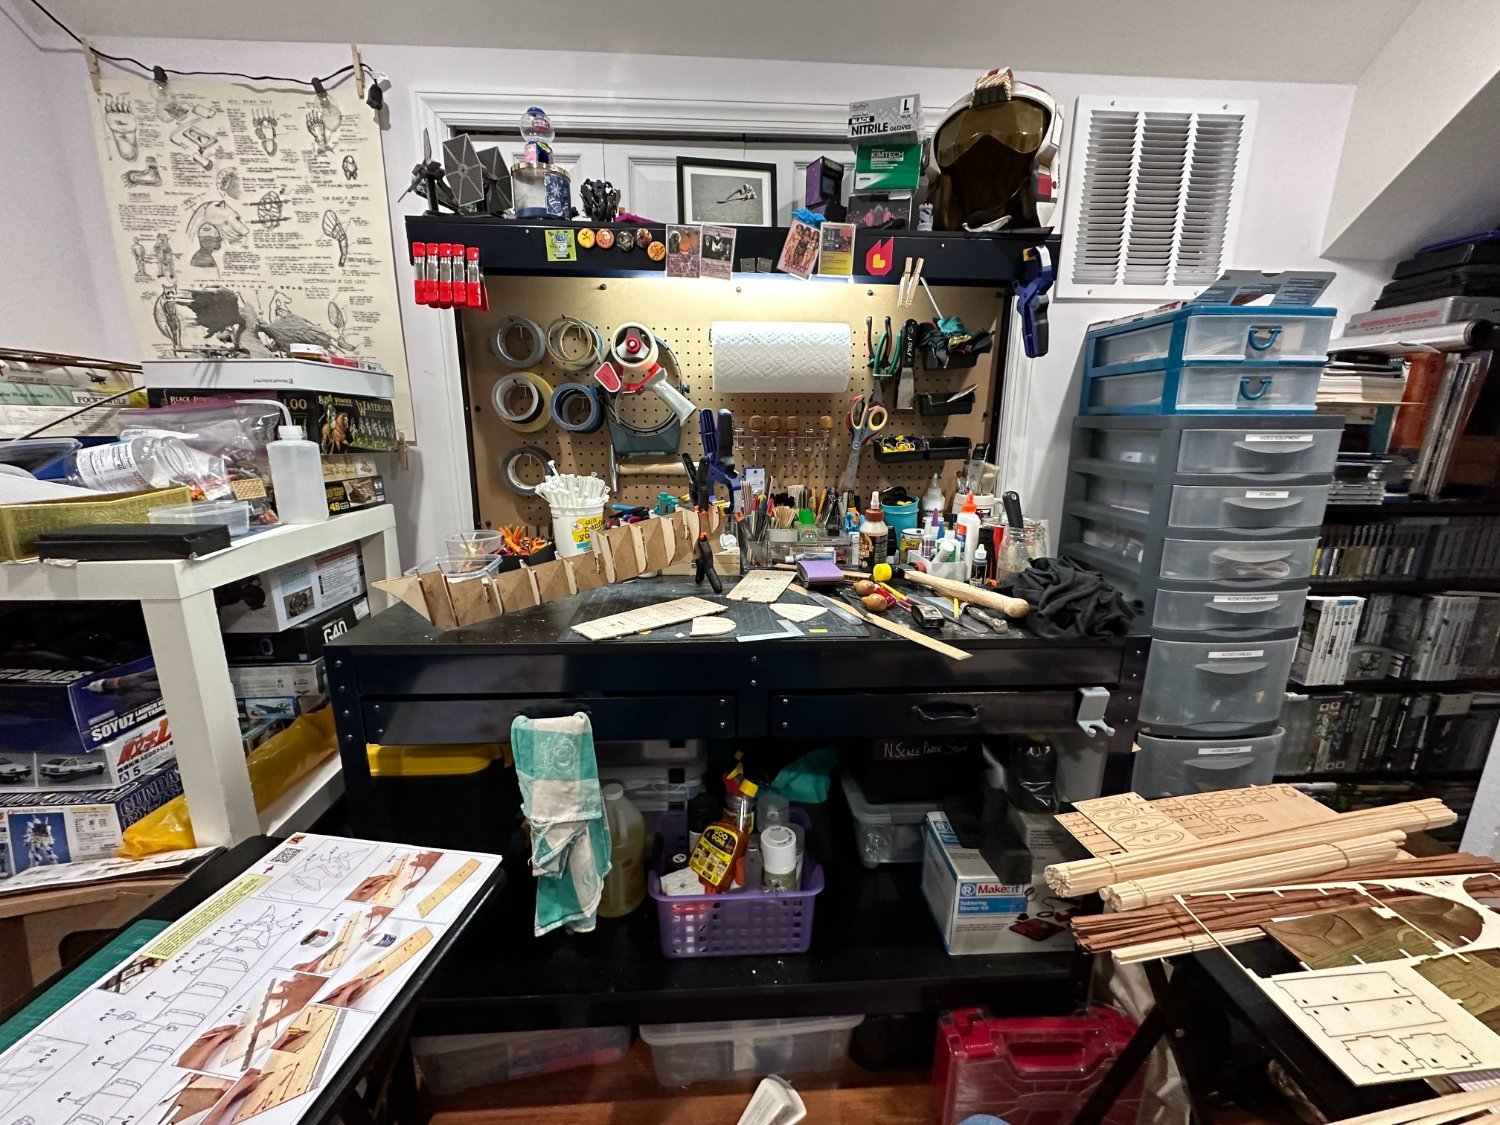
 Hello! By the insane chance of stars aligning my endurance model kit arrived at my doorstep last night and this morning I woke up to news of the REAL Endurance wreck being discovered! That must give me some kind of goodluck right? This will be my second attempt at a model ship, I purchased a kit for 20$ at an estate sale for a ship called the Dallas a while back. When I tried to build it all the planking strips were so brittle and old I ended up realizing I’d be better off starting with a newer fresher kit as my first real try. recently at work we had some extra scraps so I made myself a quick modeling table, I hope I don’t grow out of it too quickly and I’m excited to start!
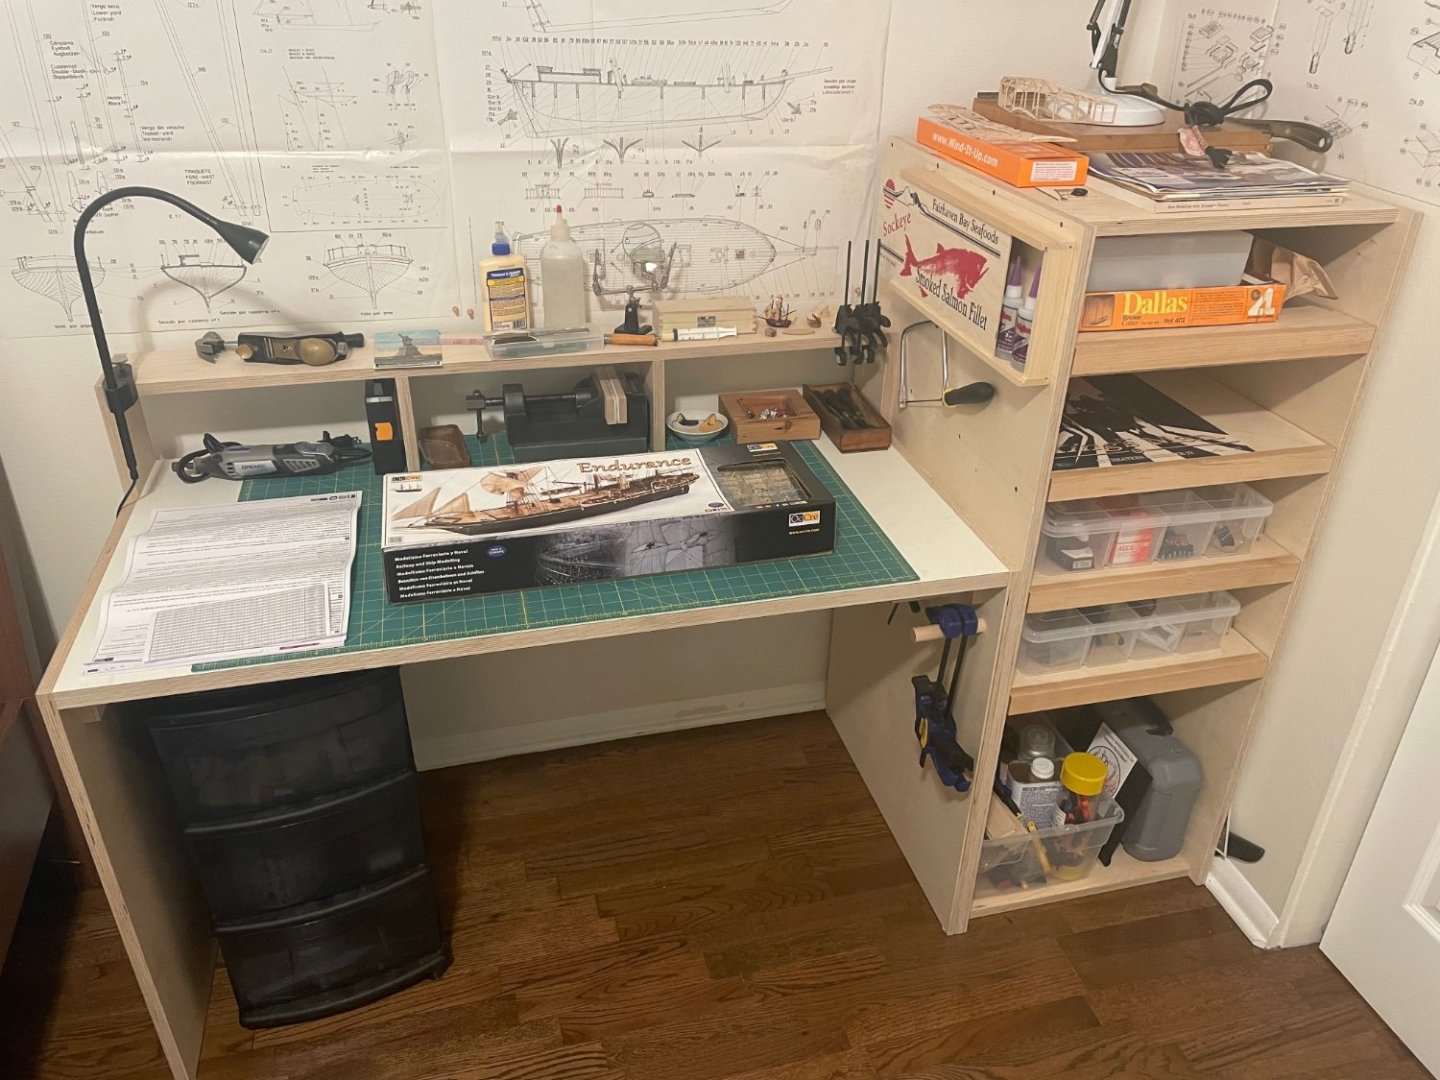

-
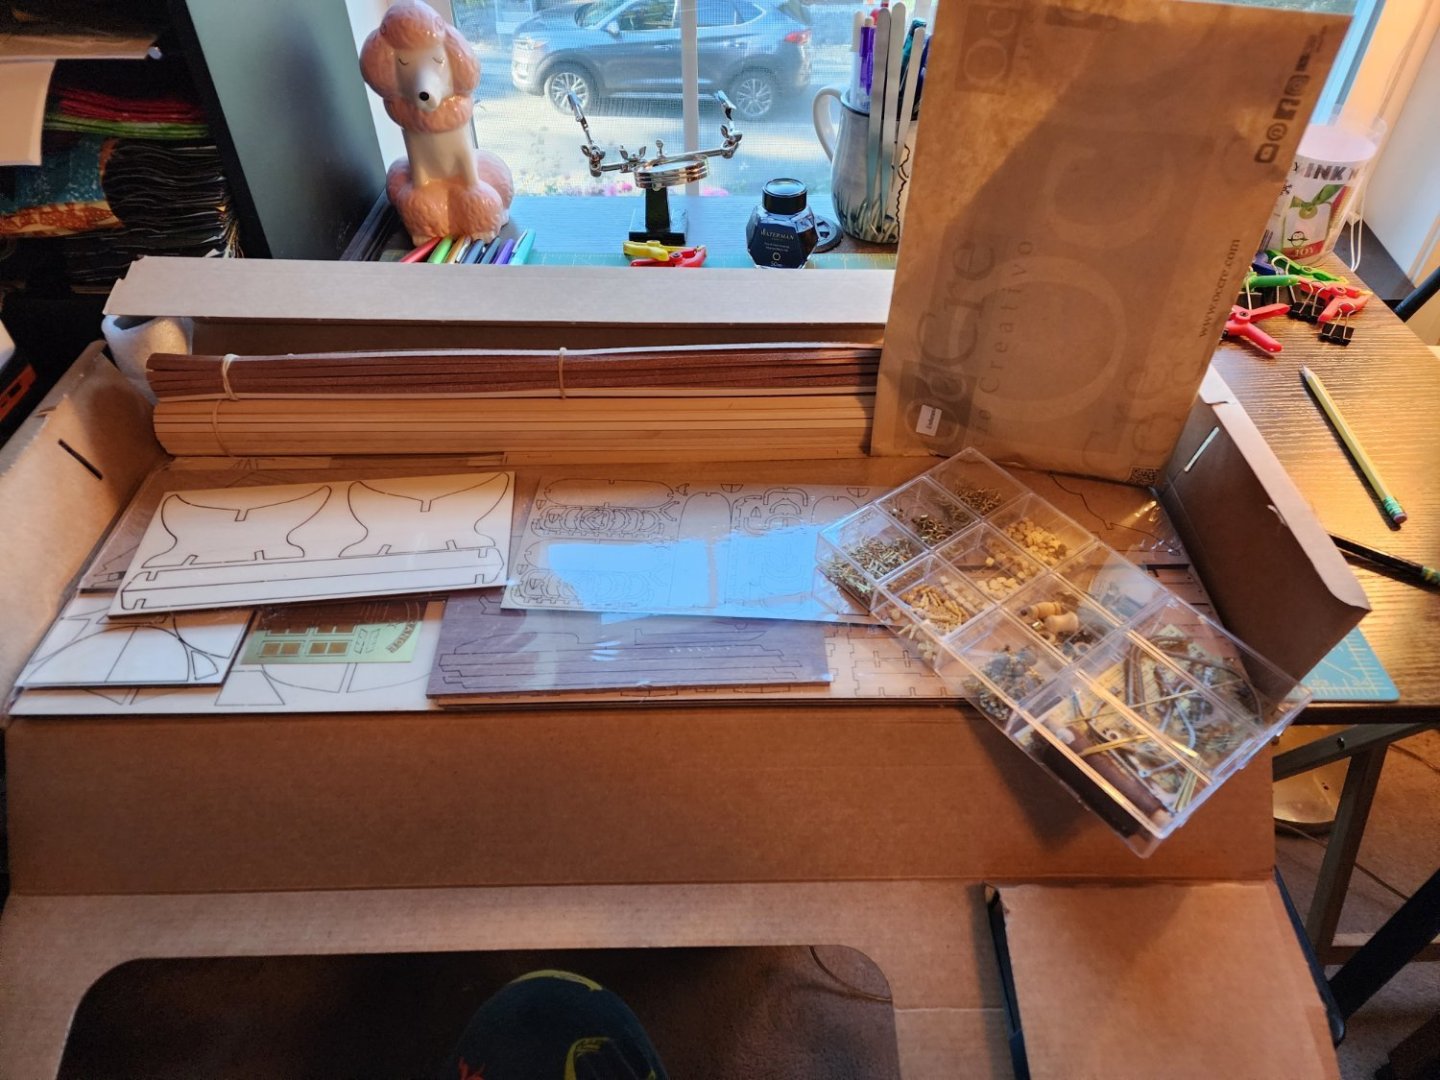
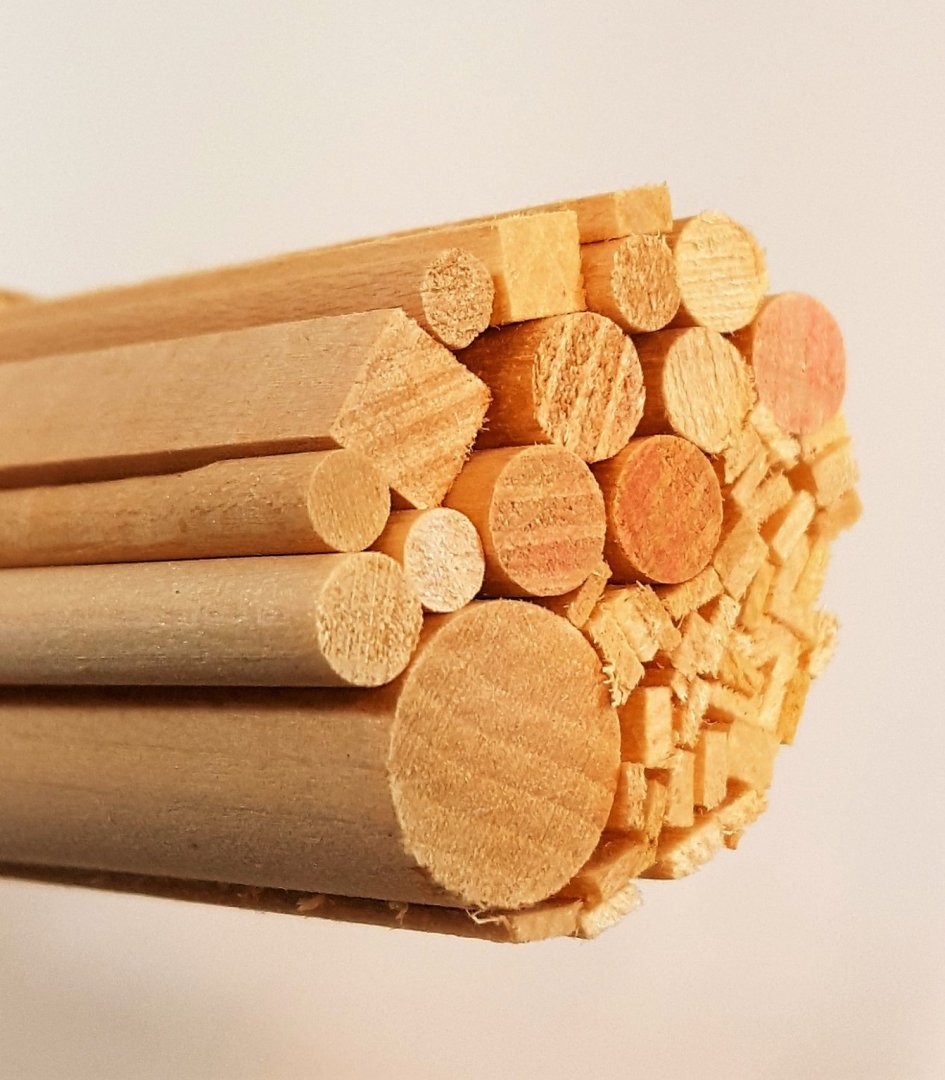
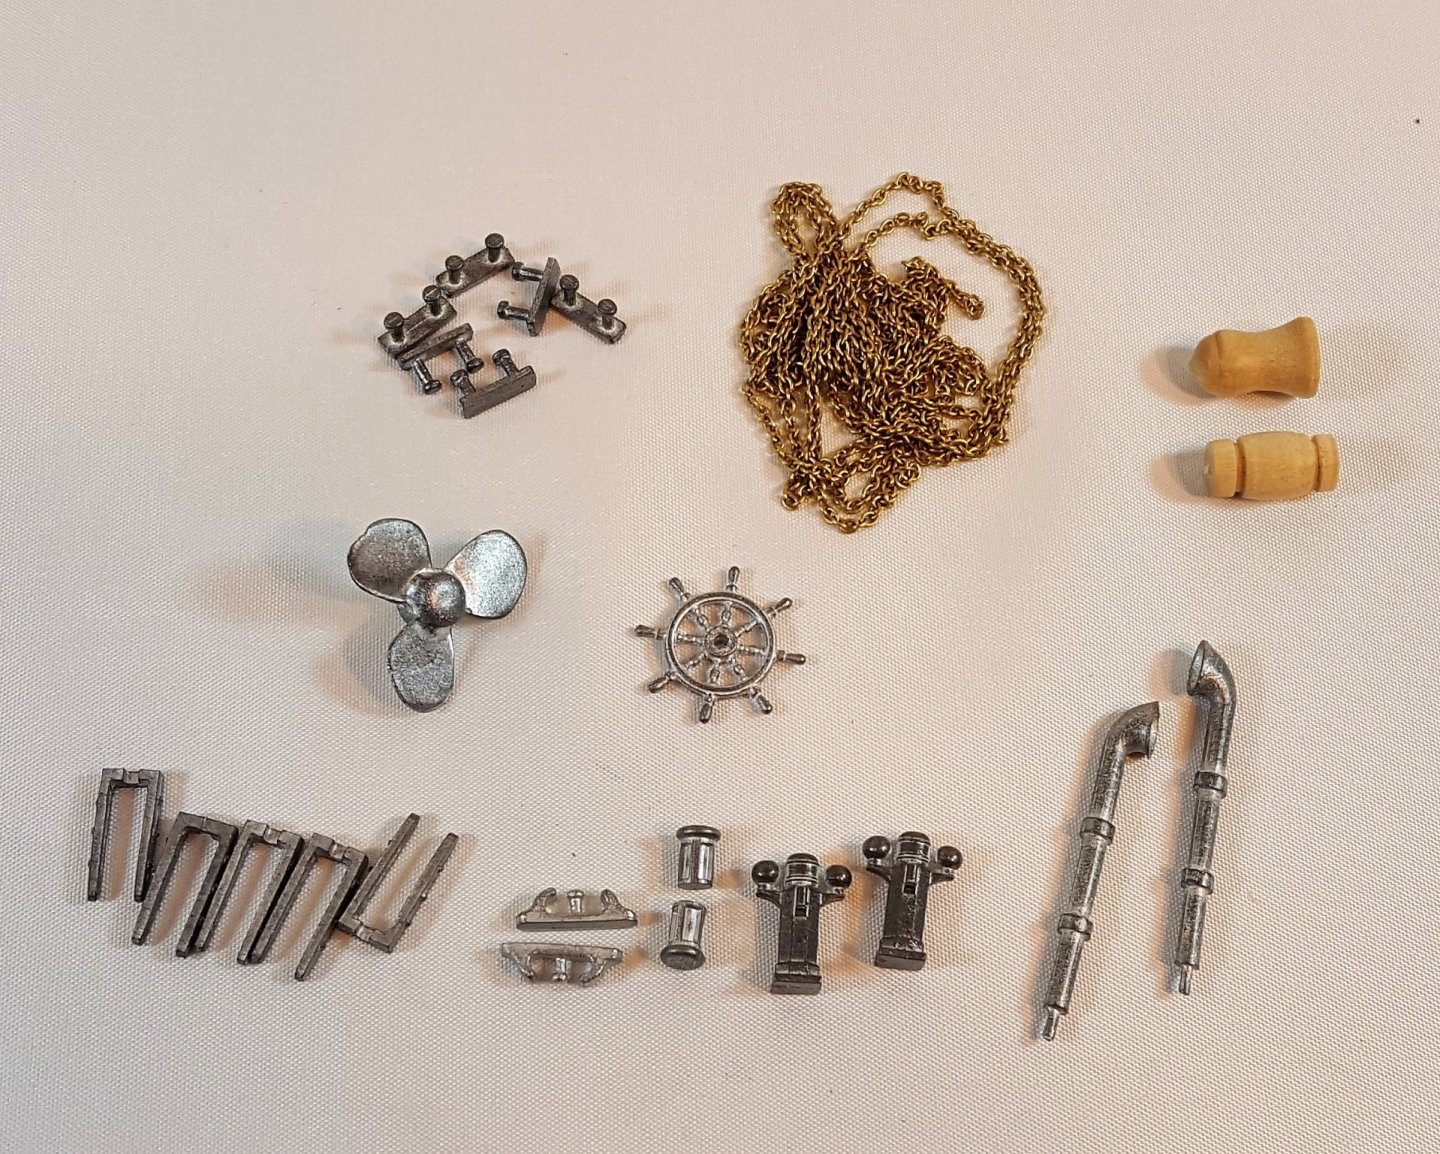
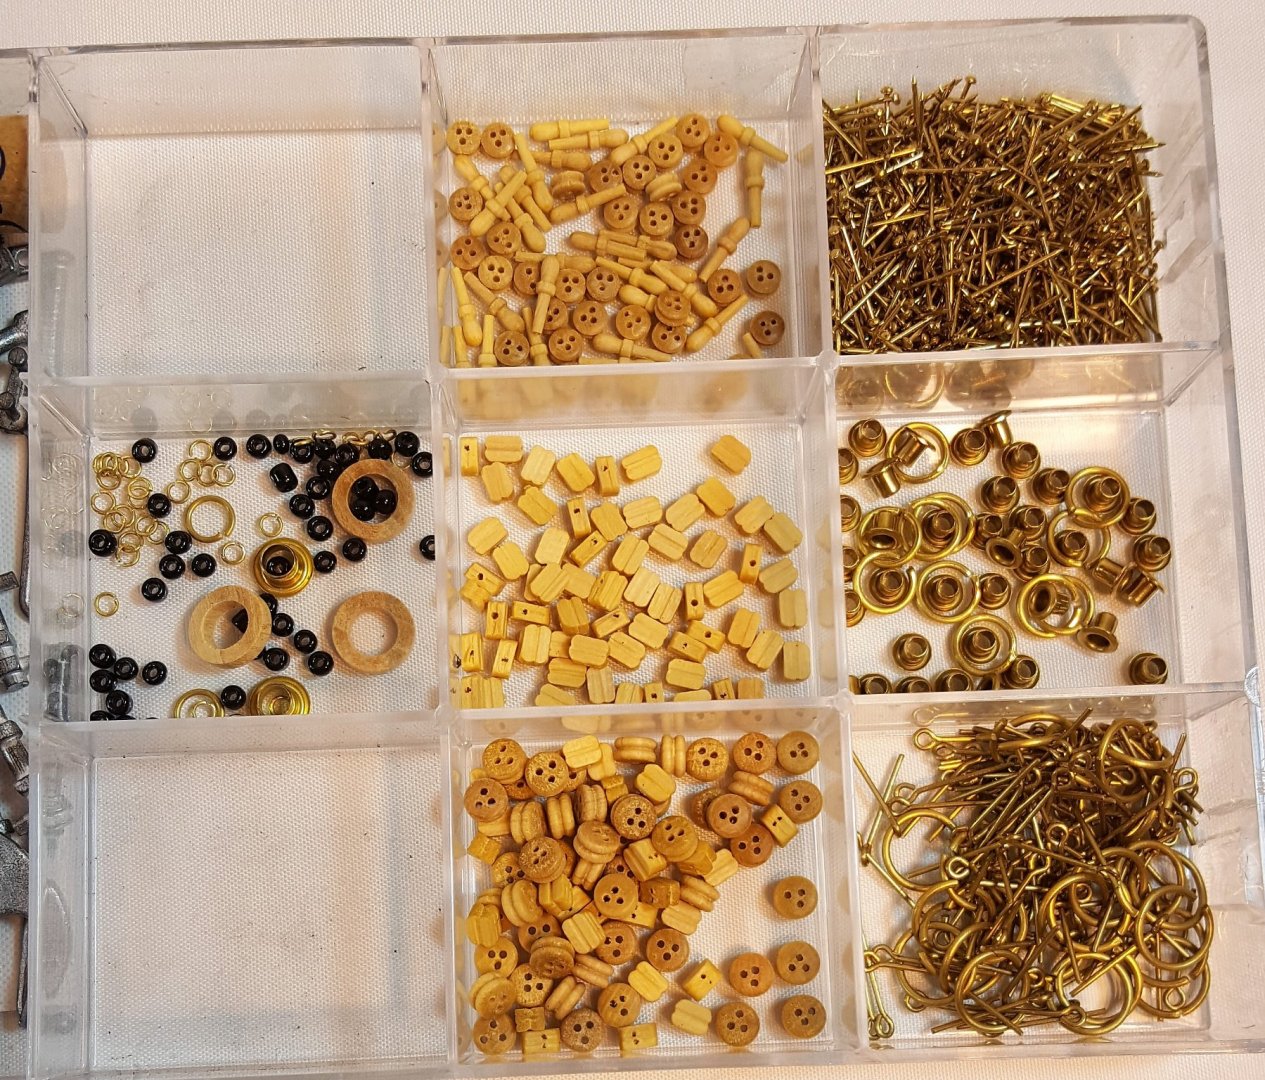
 Hey shipmates! I started my second build, the HMS Endurance by OcCre, after completing the Albatros. I learned so much from MSW the first go around, I'm excited about this ship and adding in some of the detail I learned about by posting and following other awesome builds. It was a couple of months after I finished the Albatros that I started the Endurance, so to slow-roll into my new build, I started with the boats just to get going again. Also, the metal boat supplied by OcCre for the Albatros was very uninspiring (I understand as the Albatros is a beginner build), so I really wanted to build some nice boats. I've finished the boats and am ready to move on to the ship. Summer is not the best ship-building time, as we end up spending a lot more time outside, but I've gotten some done and am looking forward to working on it more in the fall. Here are some pictures of the Endeavor unpacked and my progress with the boats. The builders on this forum were extremely helpful with my first build, so please offer pointers and recommendations when you see me about to screw something up. Thanks shipmates!


-
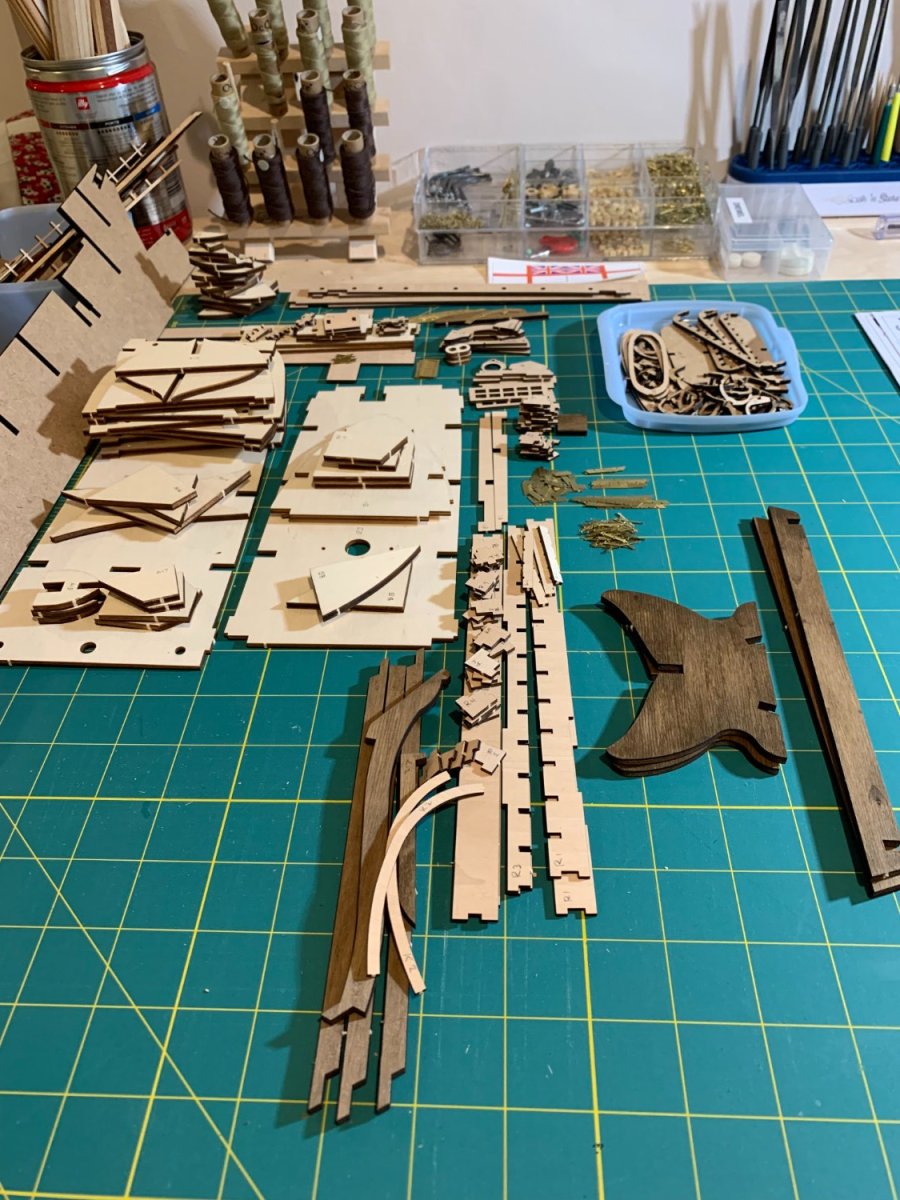
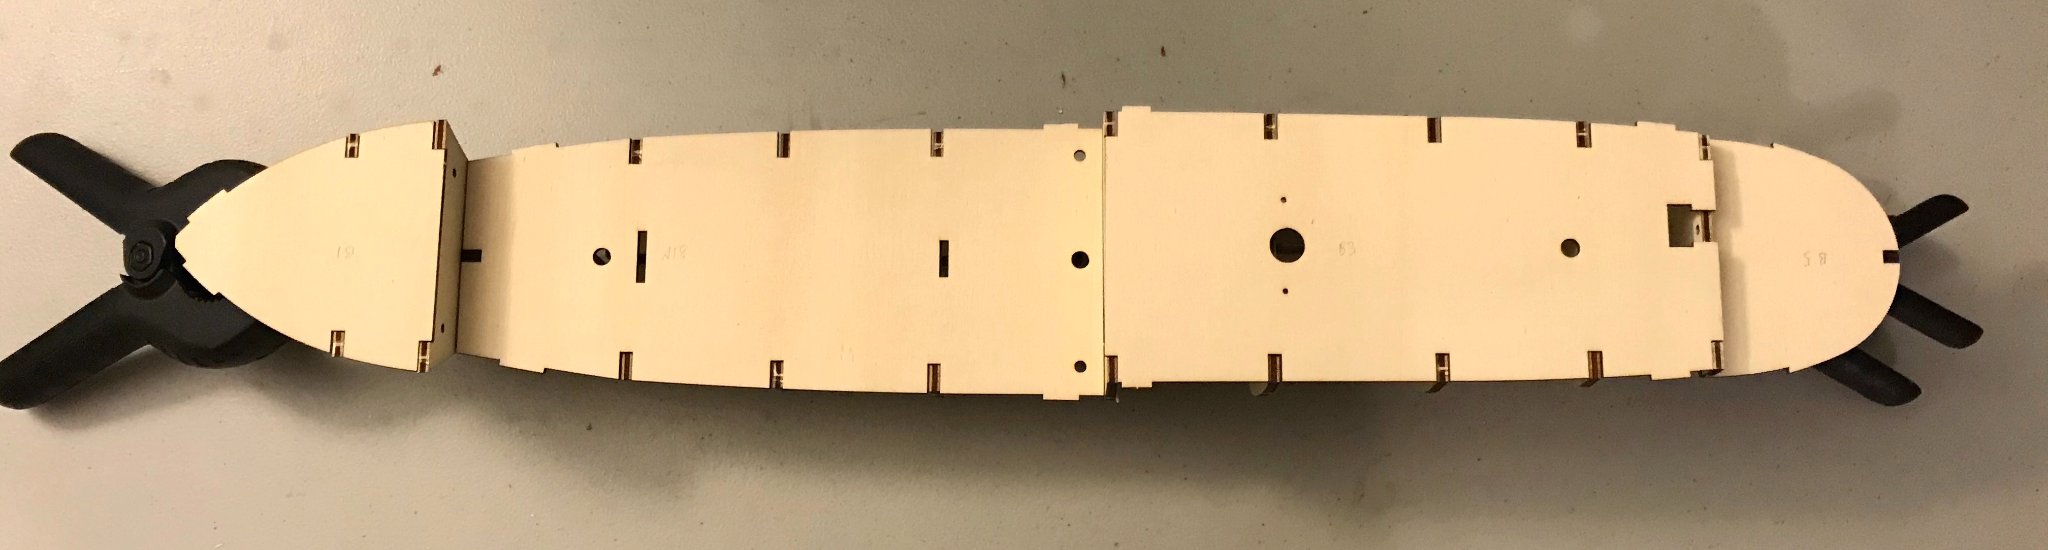
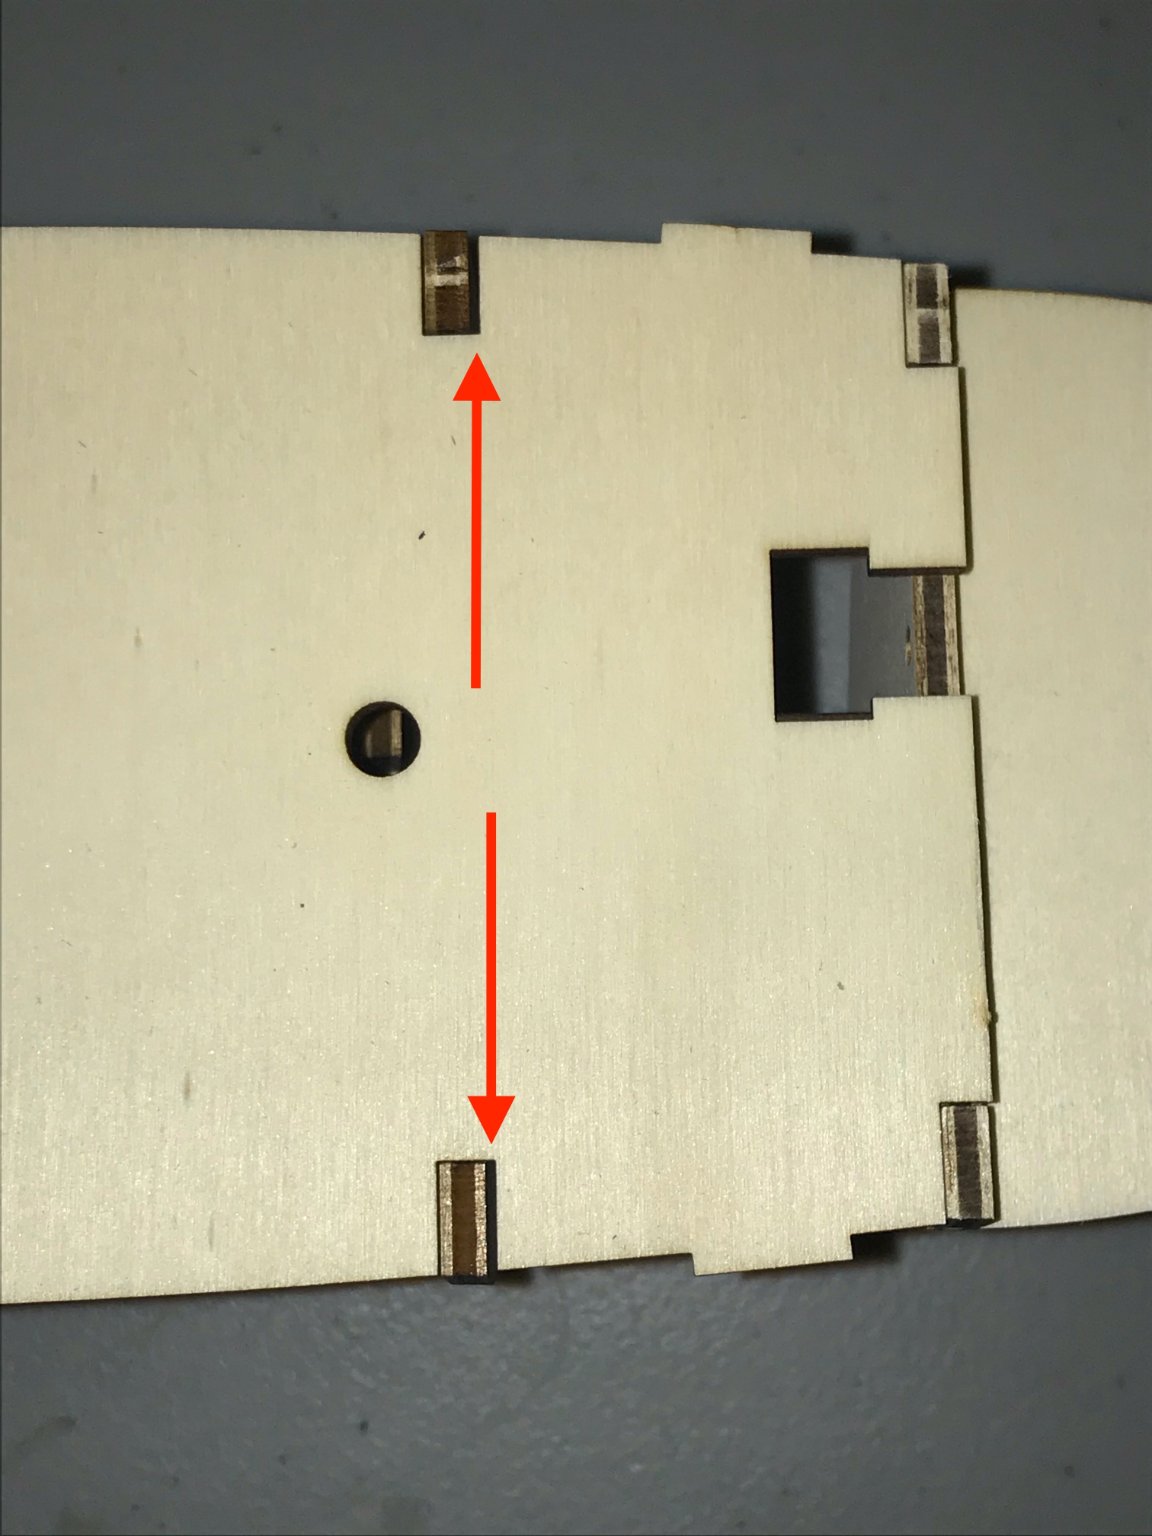
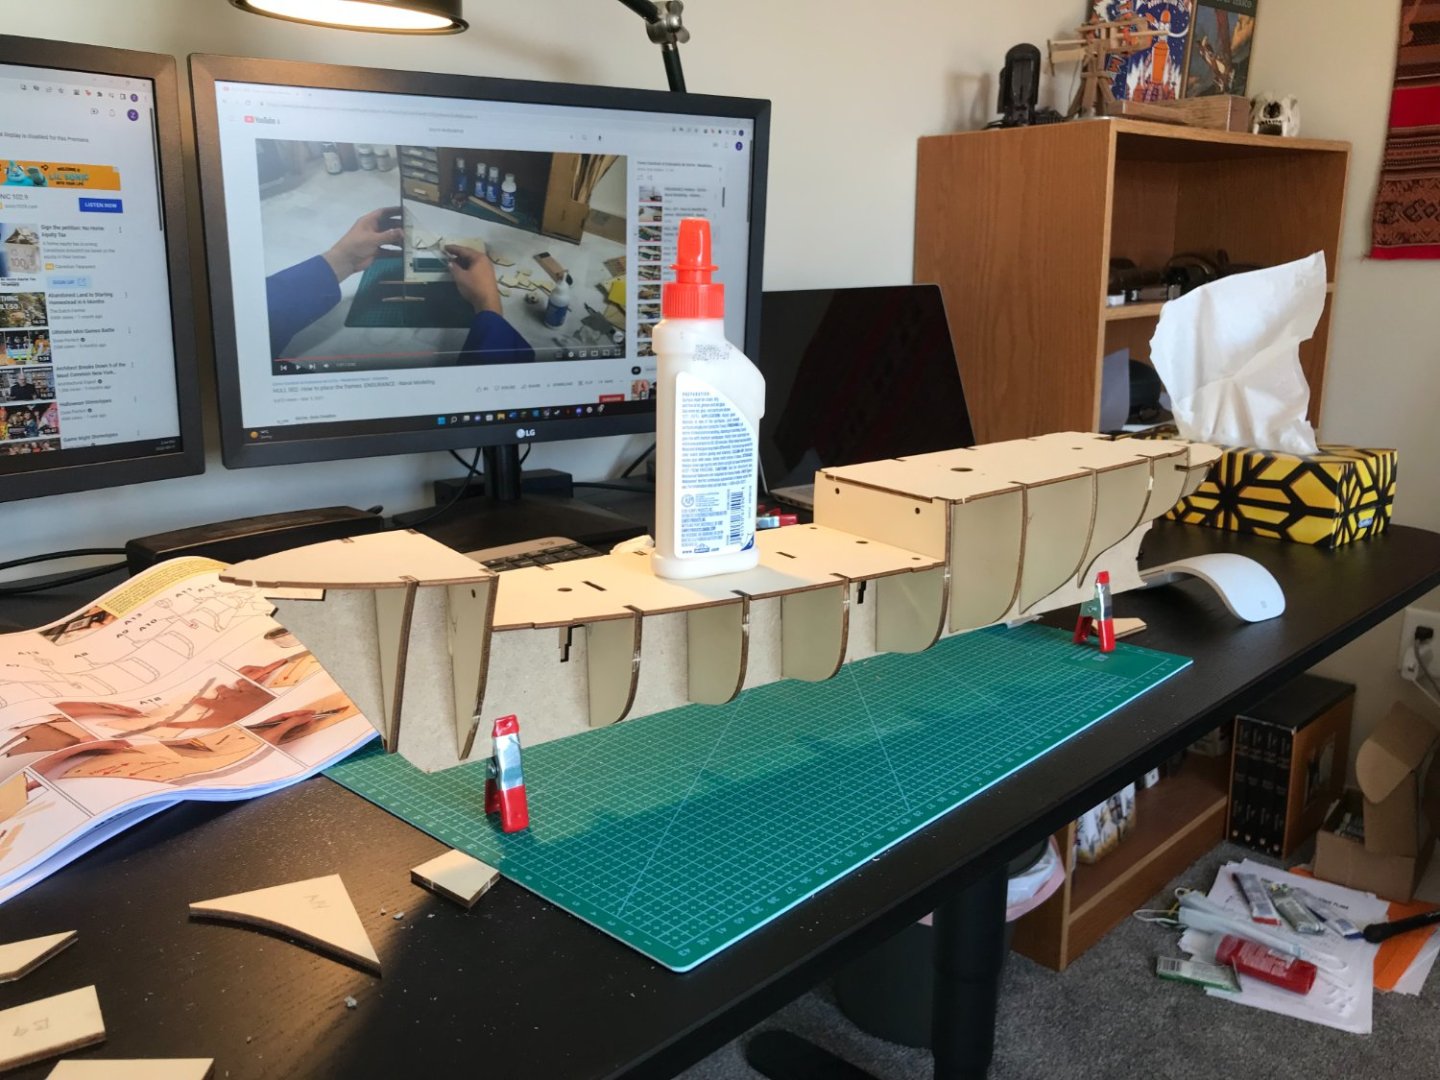
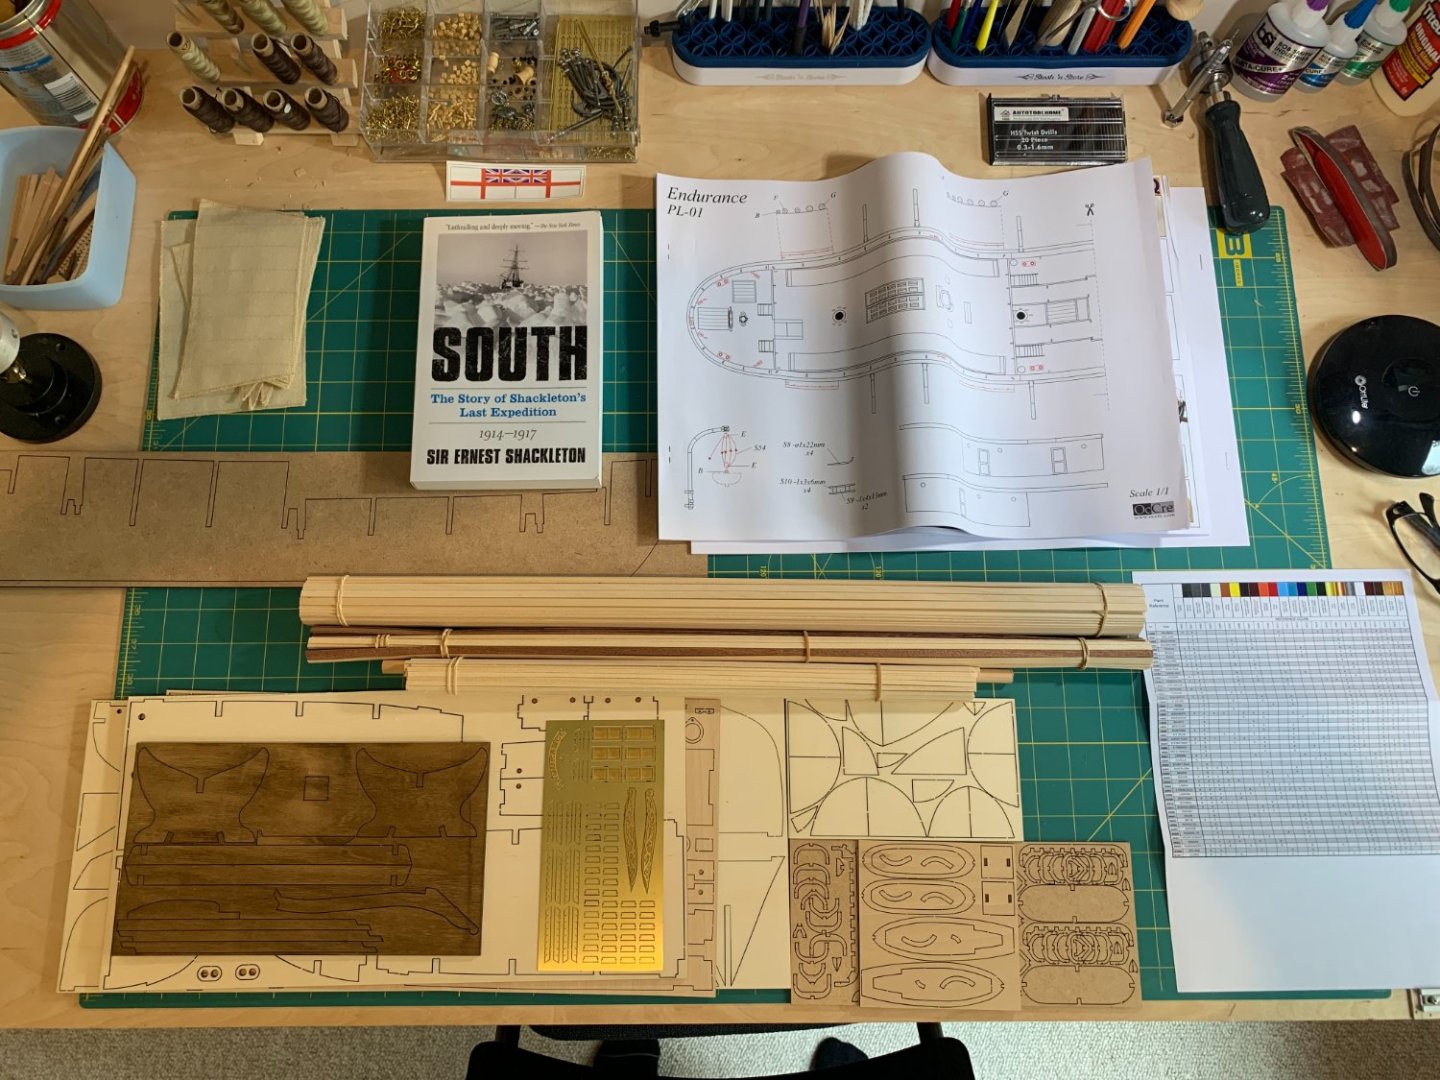
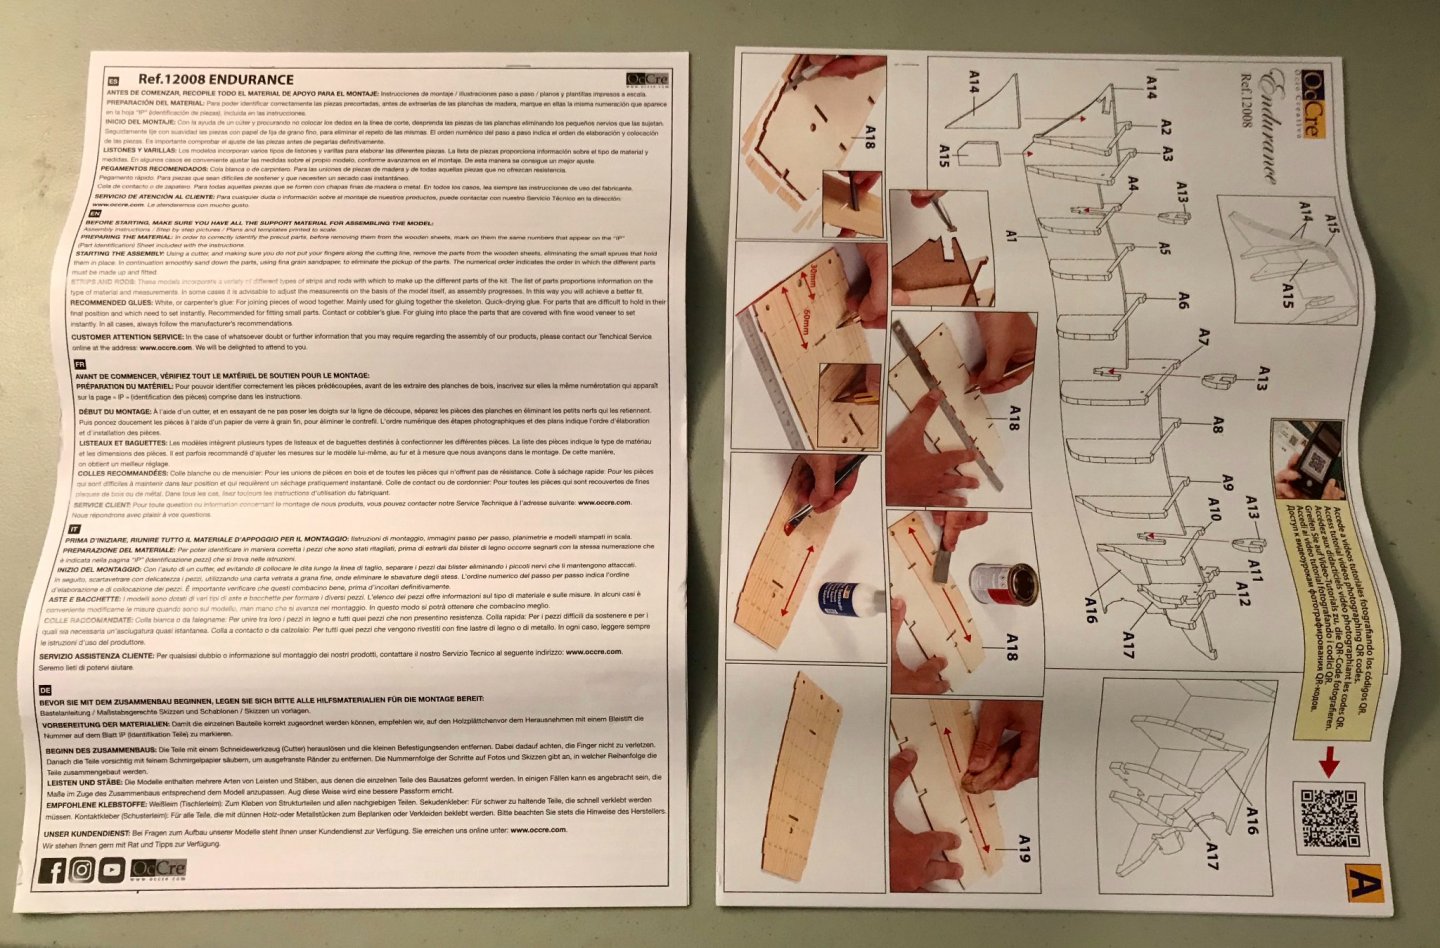
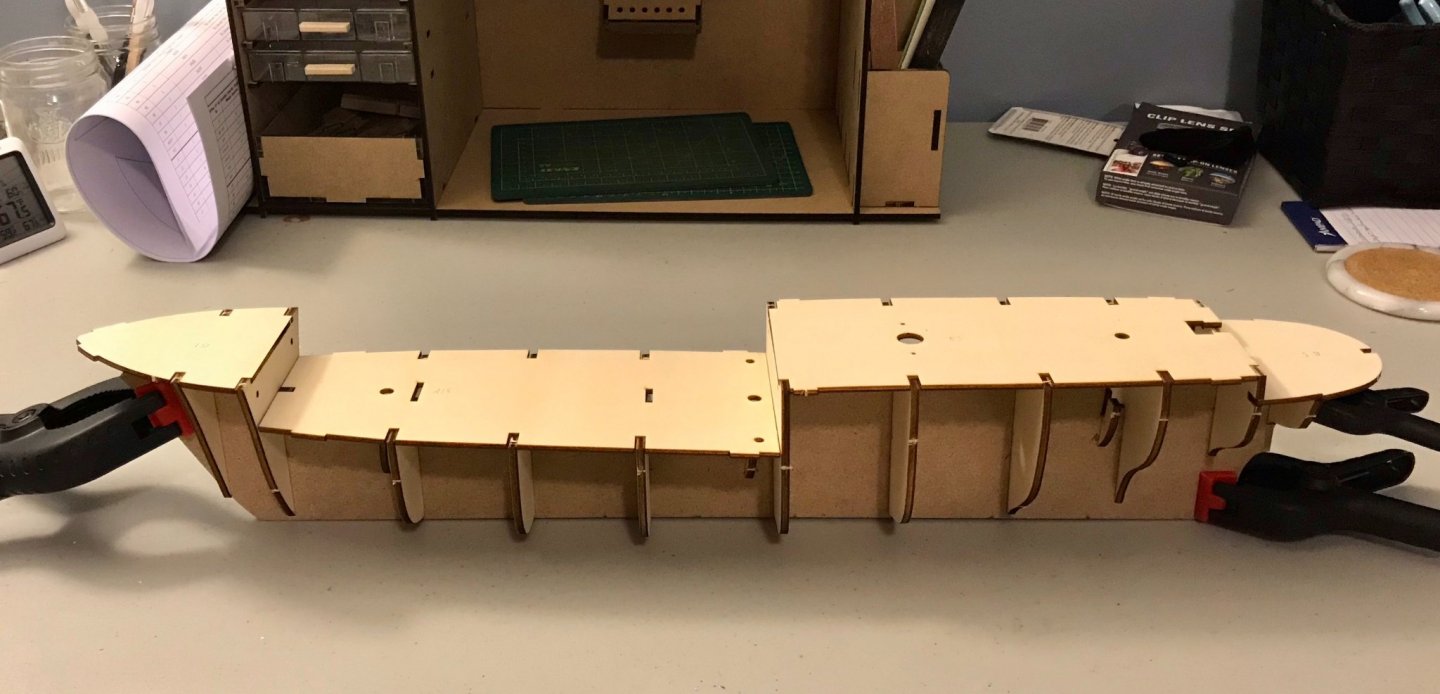
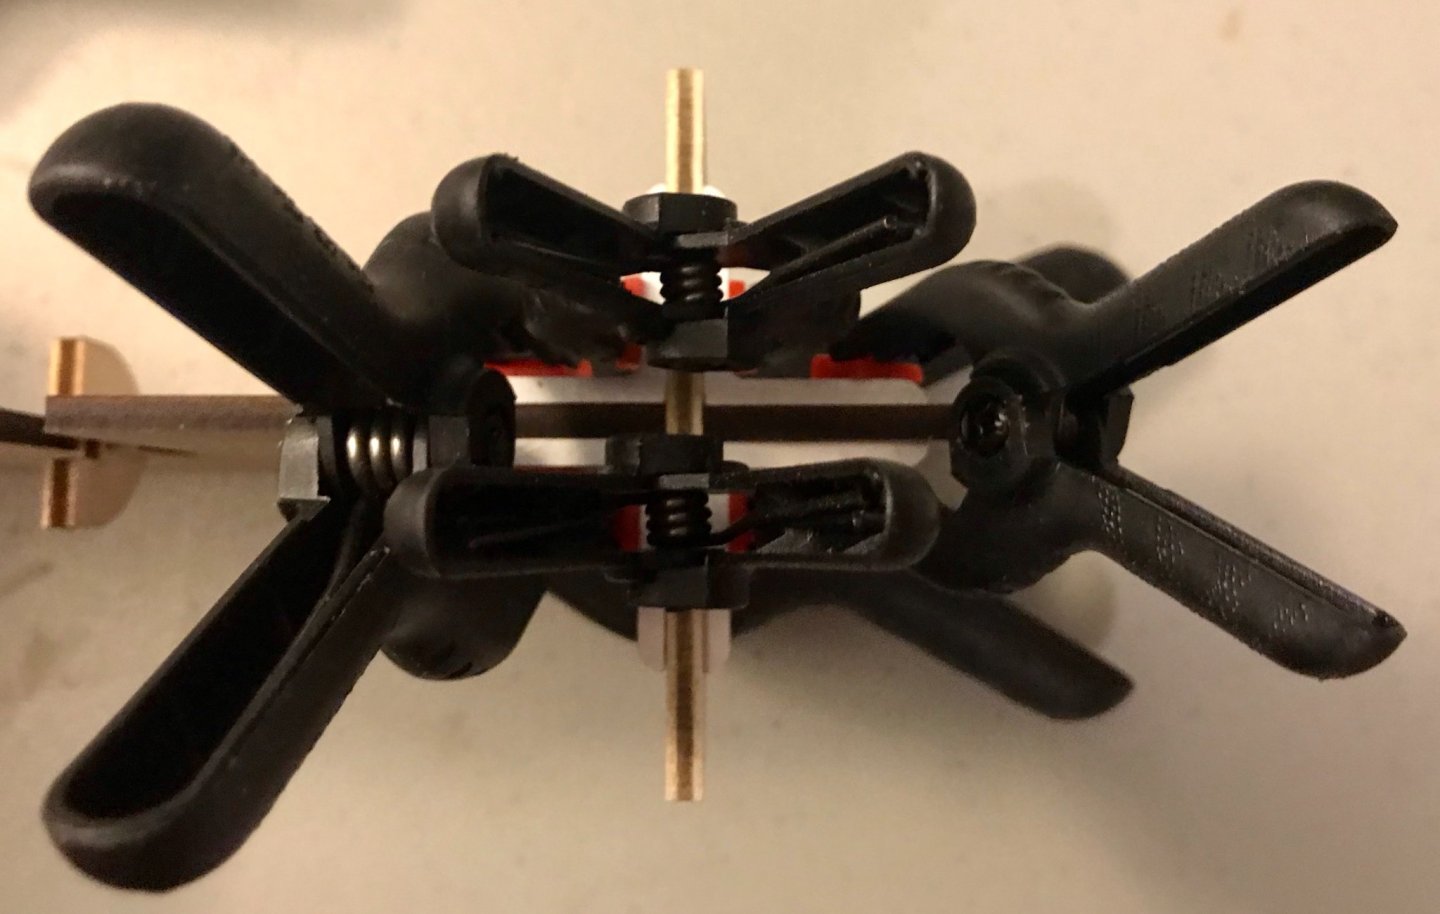
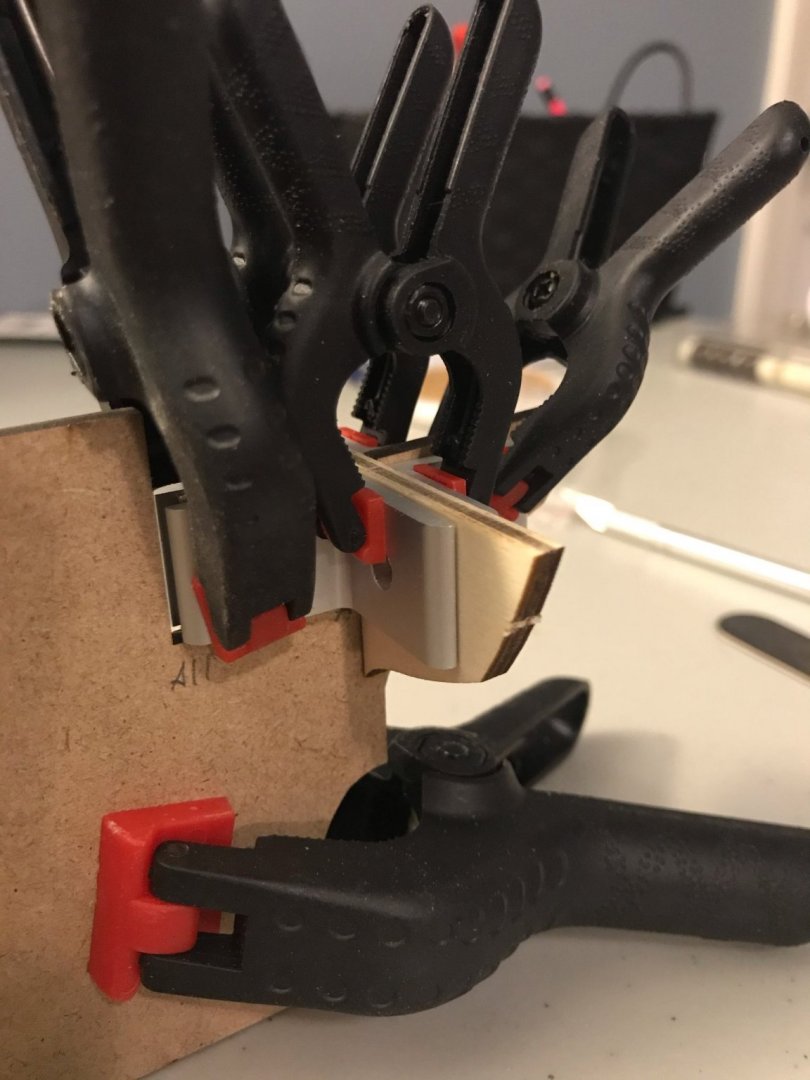
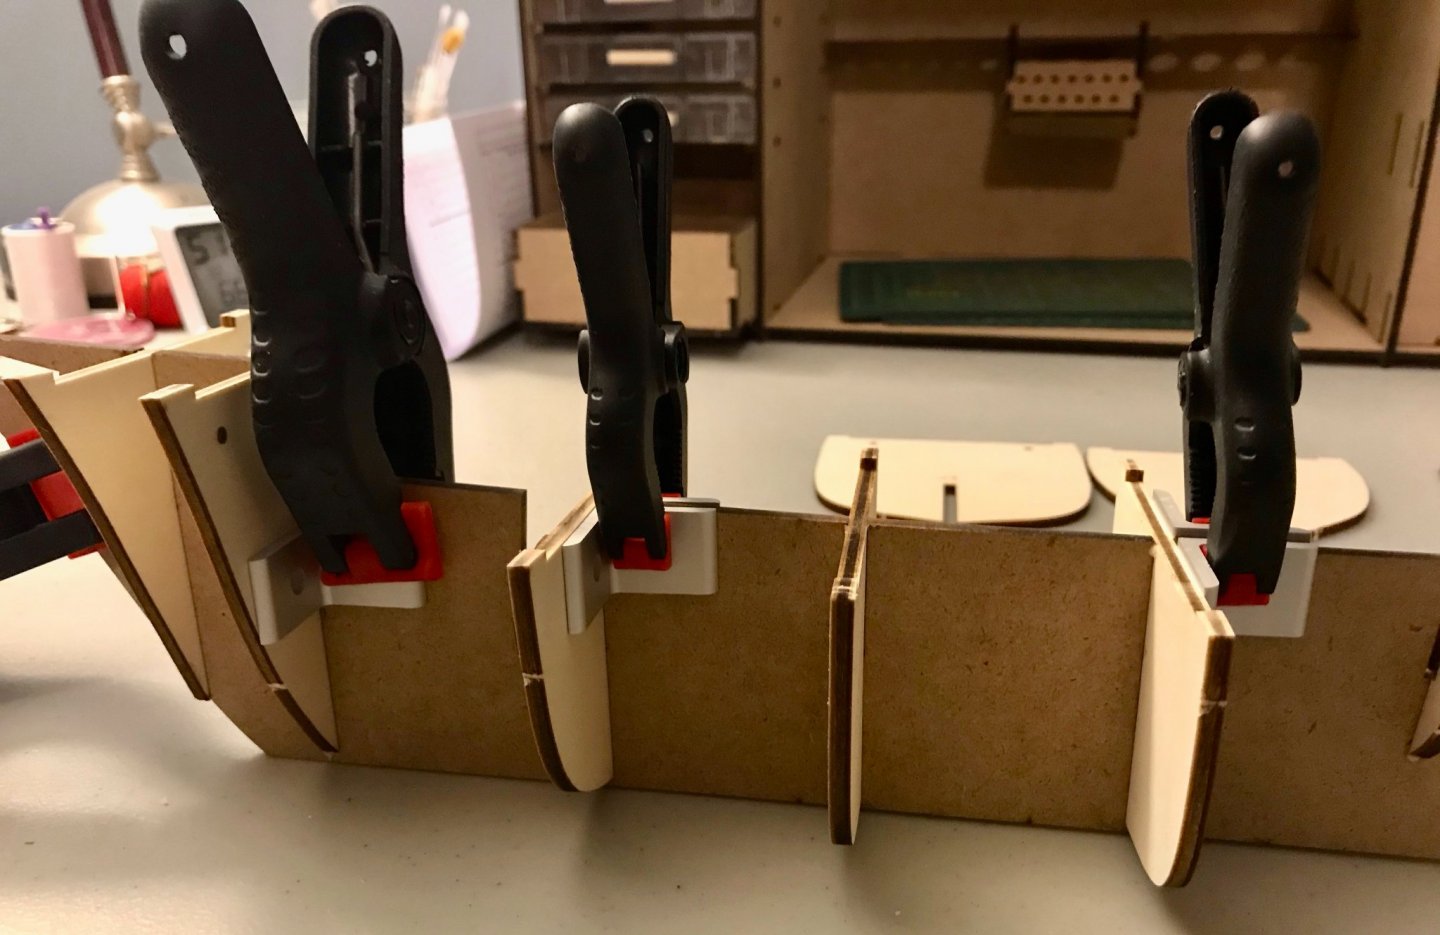
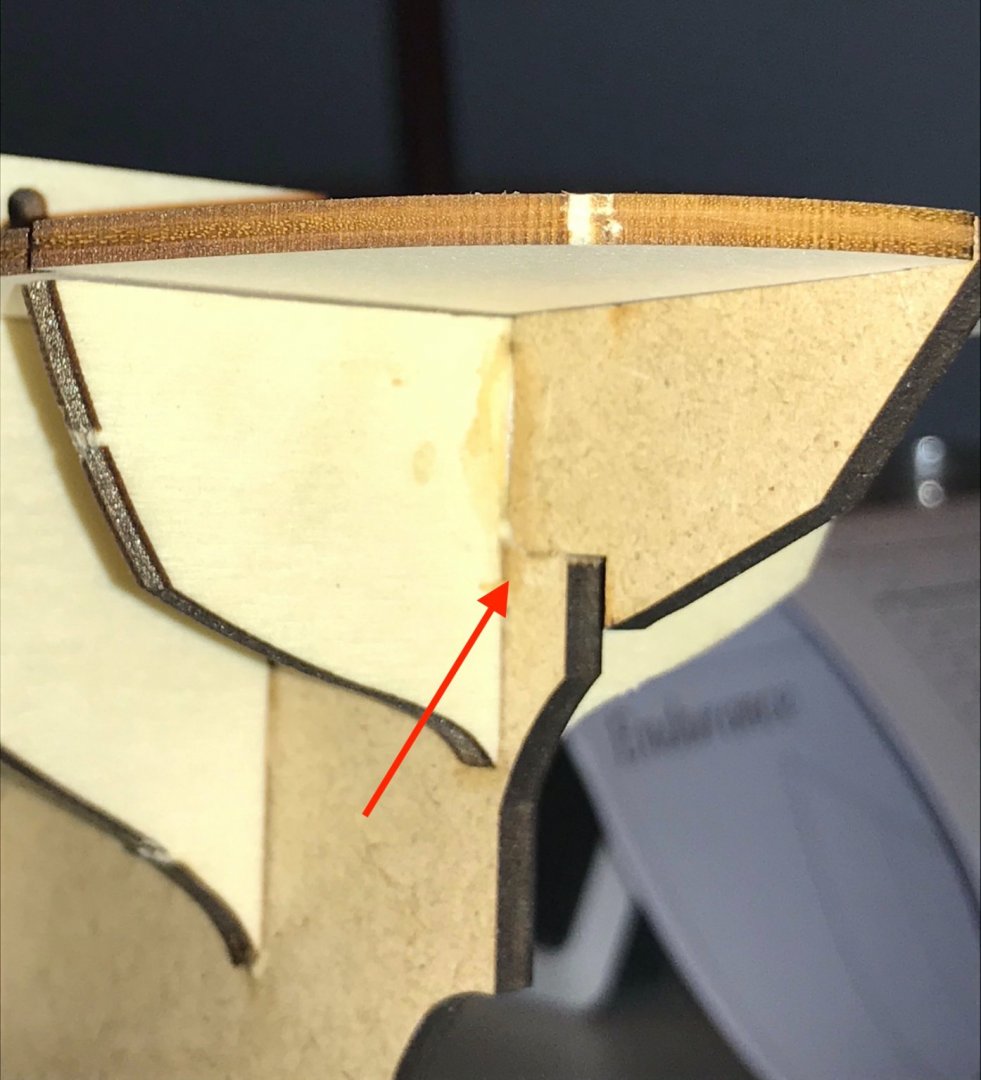
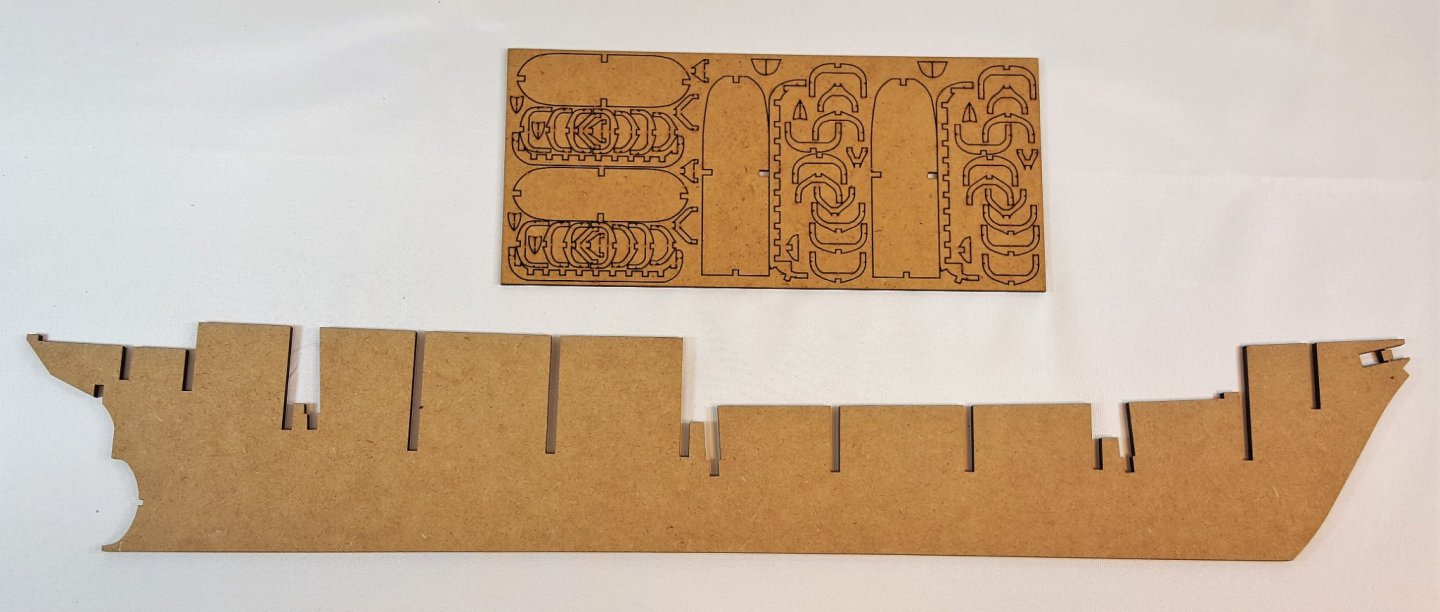
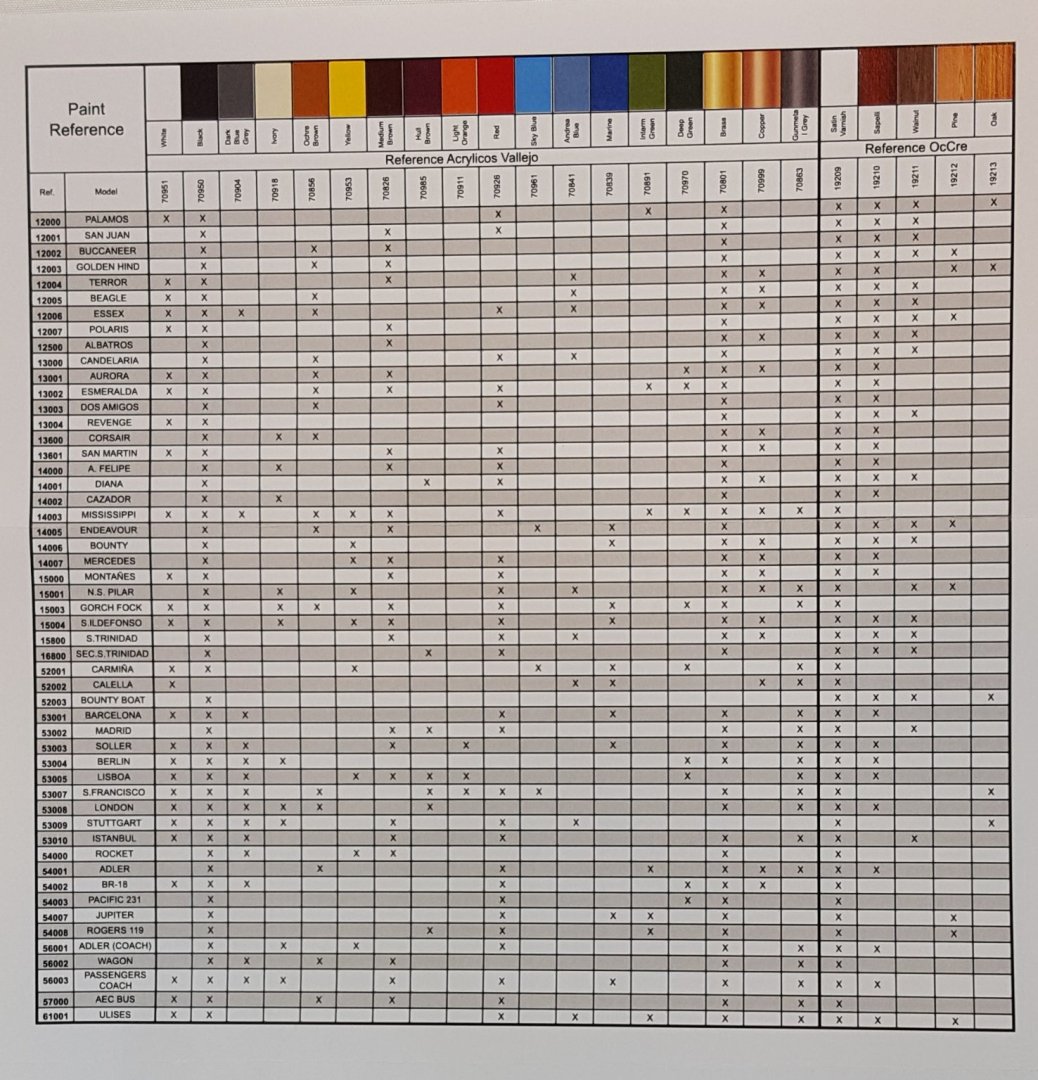
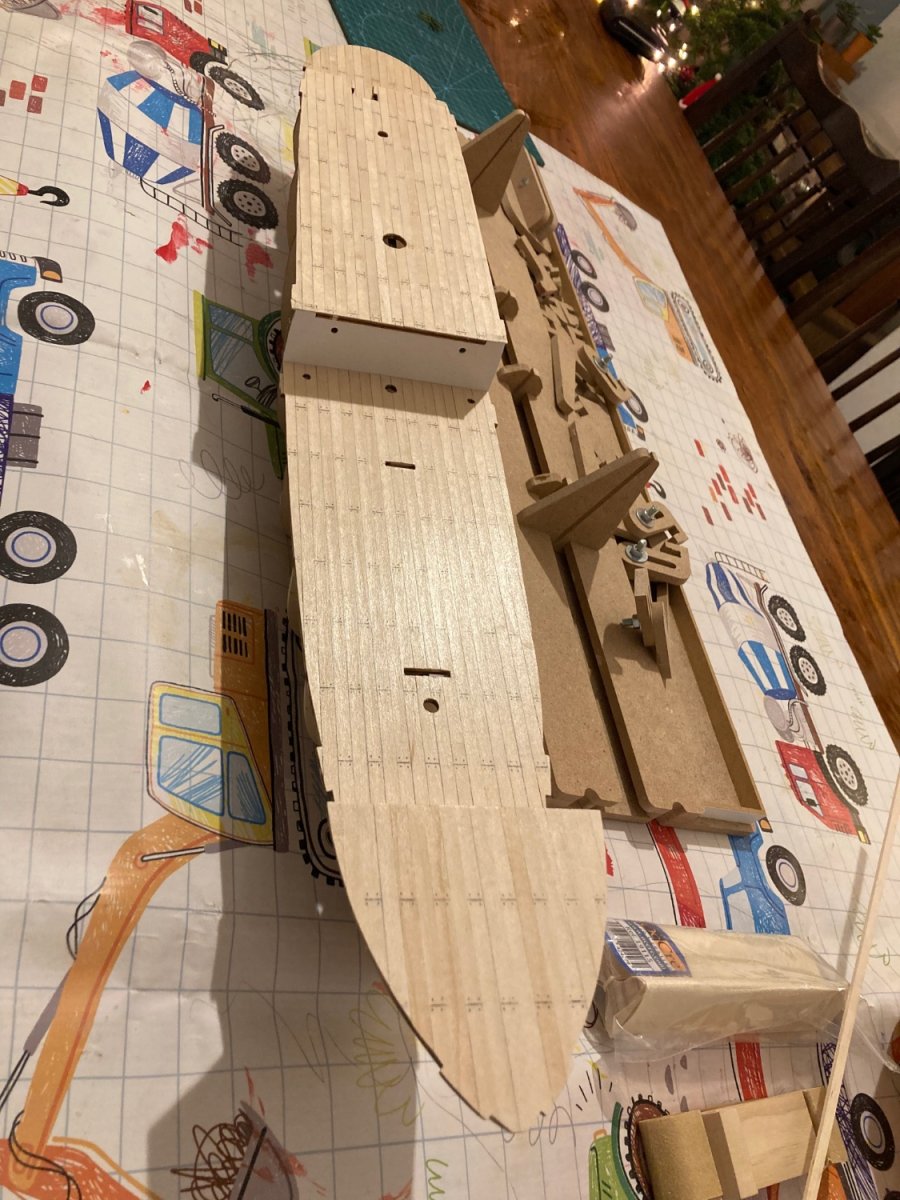
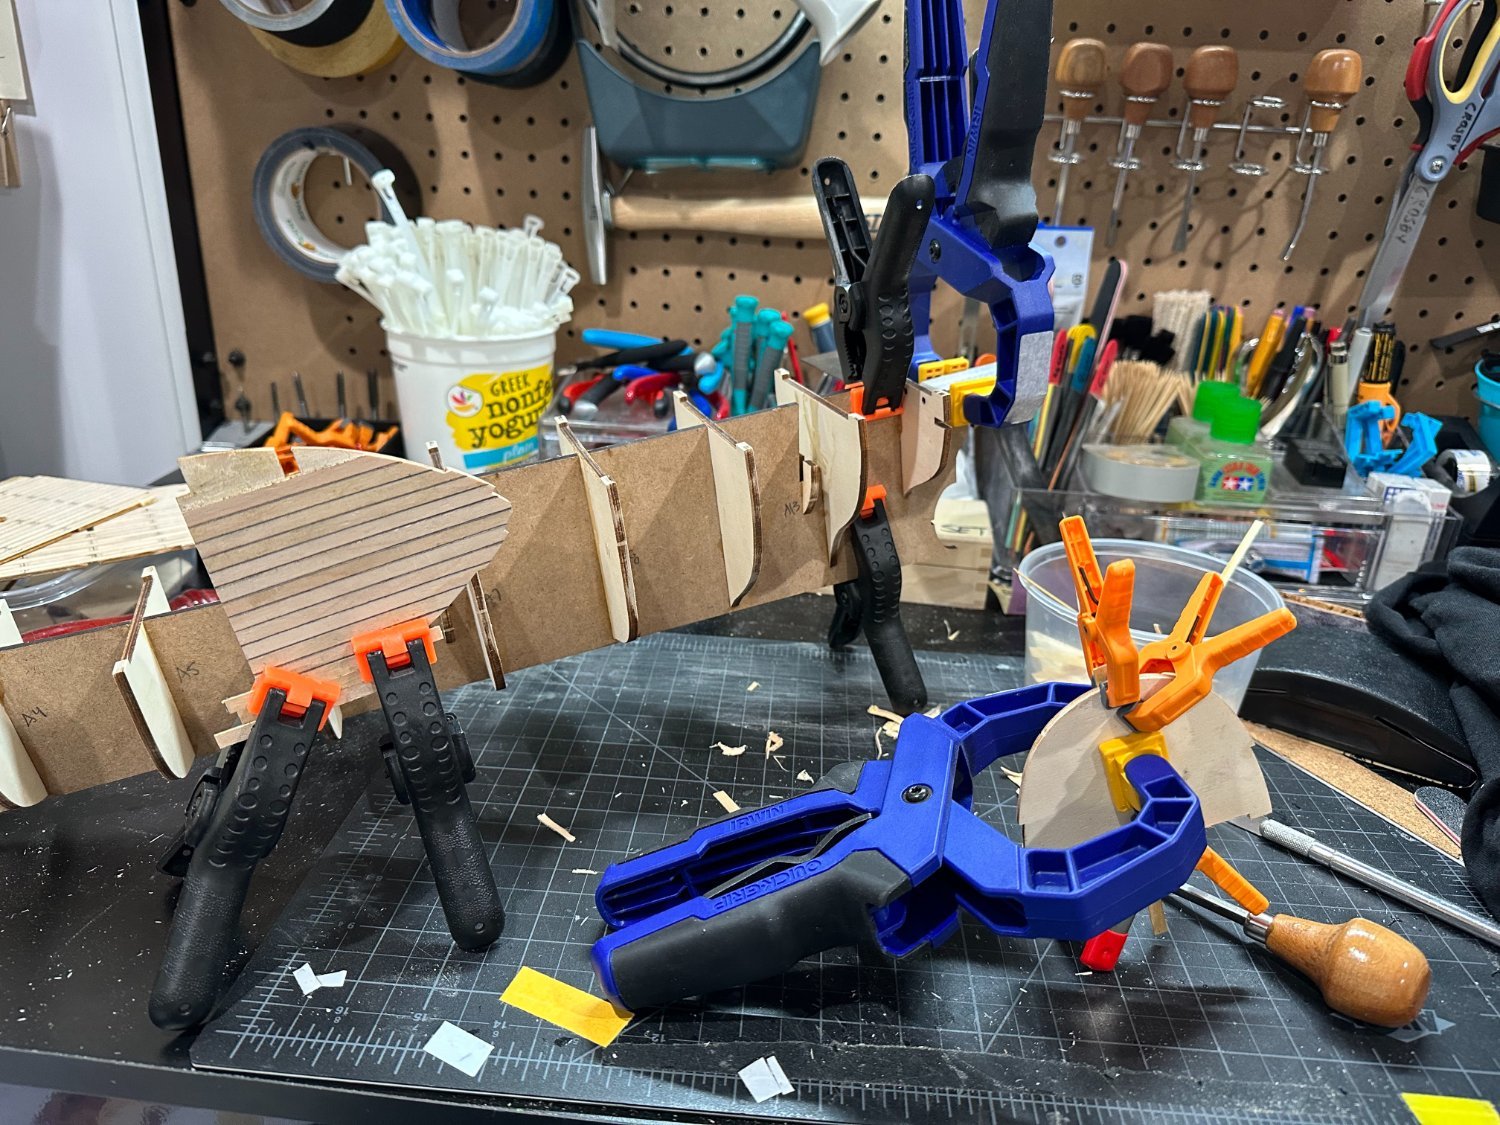
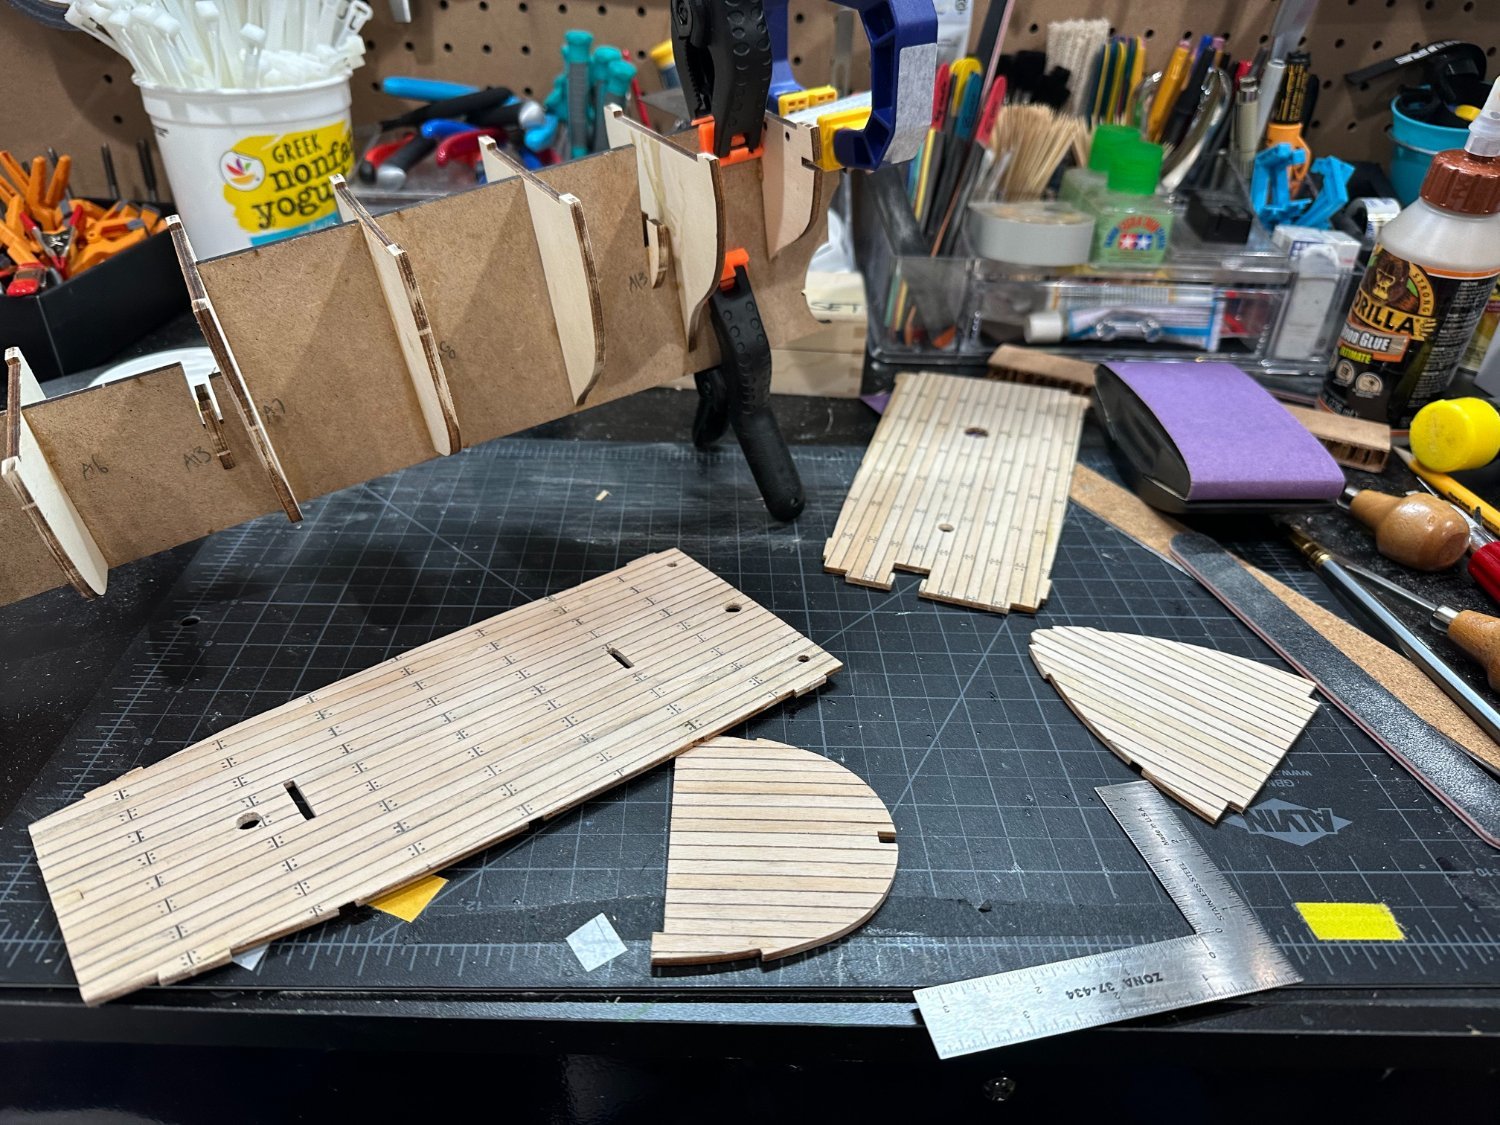
 If you've read my last build log, then you know I had a list of six ships that I was trying to decide between for my next project. You'll also know that the Endurance wasn't on that list. But, well, that's the way it goes sometimes. A little more birthday money rolled in than expected, along with some money from an Easter gig, and suddenly I had a bigger budget to consider. Then I discovered that OcCre had released the Endurance and that, even better, Ages of Sail had it on sale! And so here we are. The story of the Endurance is, of course, well known on this forum, so I don't see any need to rehash it here. But my story with the Endurance isn't. I've been fascinated by Shackleton's journey ever since high school, when I was fortunate to perform Tim Mahr's tone poem Endurance at All-State Band. (Here's a recording if you haven't heard the piece before.) While learning my part, I read Alfred Lansing's book and was hooked. Since ordering the kit, I've been re-reading Lansing's book, watching documentaries, and so on. I've been carefully poring over Frank Hurley's photos from the expedition (especially his color photos!). I've also been studiously watching the tutorial videos posted by OcCre, which are still being posted as I write this. Before deciding to purchase the kit, I also carefully read Chris Coyle's very helpful review of it. He writes near the end that "I believe this kit can be built by an intermediate builder, and it will undoubtedly produce a nice-looking model right out of the box." I hope I'll be proof of that, though I'm probably closer to an advanced beginner than an intermediate builder And now, on to what you're waiting for—lots of photos! Chris is a better judge than I am of the materials and he's also a better photographer, so I'll just refer you to his review to see the materials laid out. But to my eye things are generally pretty good, with two exceptions. First, there's a packaging issue. All of the plywood sheets and the false keel (made of MDF) come in a plastic-wrapped flatpack. But the false keel is clearly able to move around a bit, which puts it at risk for damage. The portion of it that extends behind the rudder broke off and even escaped from the plastic! Second, one of the sapele planks was broken (shown in the photo after I removed the rubber band around it). I don't think this will be a supply issue, but it was a little disappointing to see. Apart from those two issues, though, I'm pleased with what I'm looking at. The hardware, blocks, and deadeyes look much better than some of the other kits I've done. The instructions are only one page in each language, but it's a B3-sized page, so there's enough there to be of some help. The book of step-by-step color photos is also on B3 paper, so OcCre can really pack in a lot of detail. Coupled with their tutorial videos, it's entirely possible that I'm over-confident at this point, since they've made things so accessible. The only weak part of the instructions is that the paint guide lists recommended paint colors for all OcCre models...except the Endurance. The updated sheet is on their website, but hasn't made it into the boxes yet. And now, onto the ship itself. Today, my goal was to get the frames onto the false keel. After numbering the pieces and cutting them out, I dry fit the frames and decks. The laser is used a bit generously on some pieces, but the measurements are spot on. Everything slid right into place and fit as expected. The only exception is that there is a little extra space (.5mm or so) on the 9th frame; the red arrows in the third photo here are indicating those gaps. (The 10th frame is in backwards in that photo, so the companionway is blocked...oops!) After checking the fit I was ready to start gluing in the frames. I used corner brackets to make sure everything was square. Since I didn't have enough brackets for all the frames I worked in shifts, alternating frames. Frame #11 (piece A12) needed some extra attention, since I also had to repair the broken piece of the false keel. After a few failed attempts, I ended up securing the false keel, frame #11, and the broken piece using four corner brackets and four clamps. Although the scar looks a bit dramatic in this close-up, it feels smooth to the touch and the poopdeck fits perfectly at its various contact points. By the time I plank the stern, this will be heavily reinforced, so I'm not terribly worried. After the first work session, here are the false keel and frames. This was my first time using the corner brackets (a tip I'd picked up here on MSW), and I'm really pleased with how square and symmetrical everything is. There's a long ways to go, but I feel good about this first step.
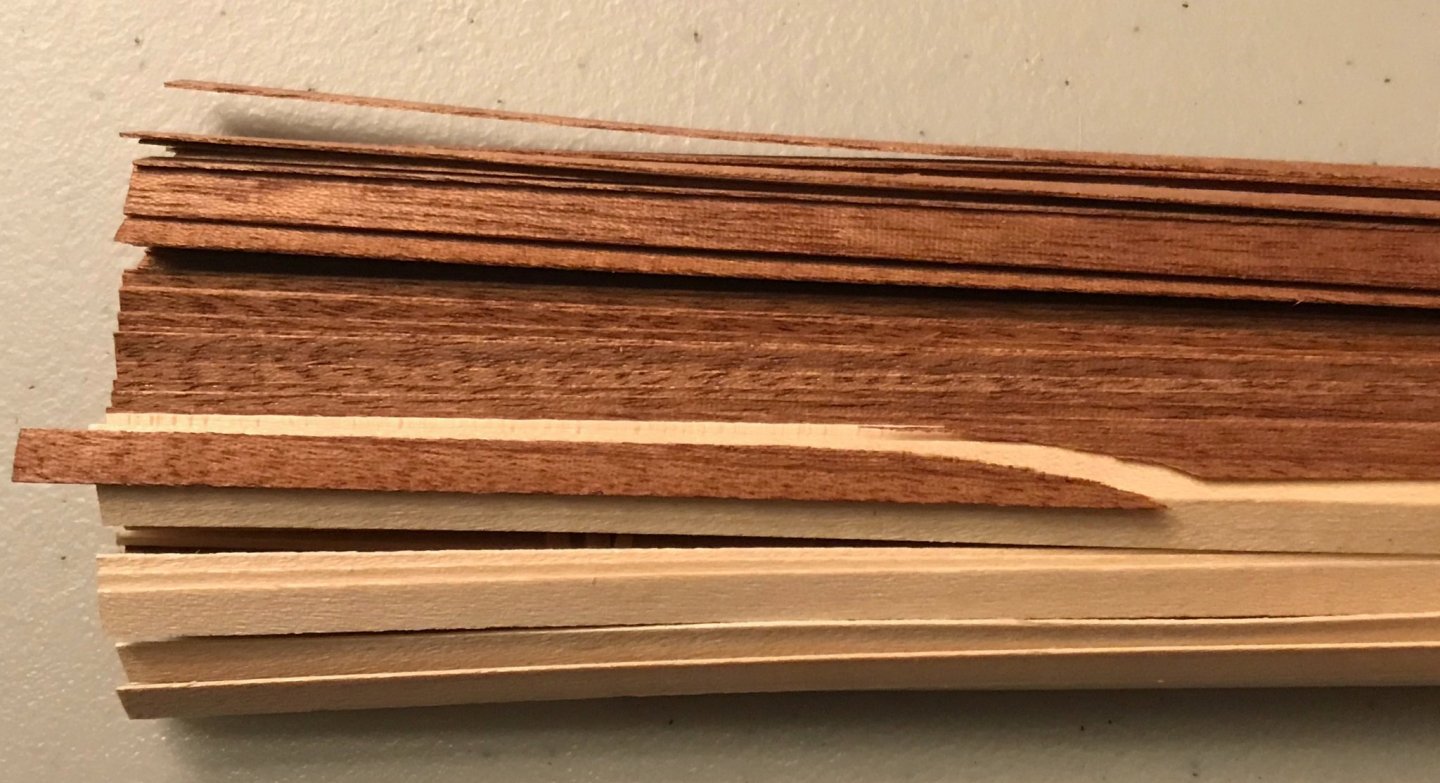


-
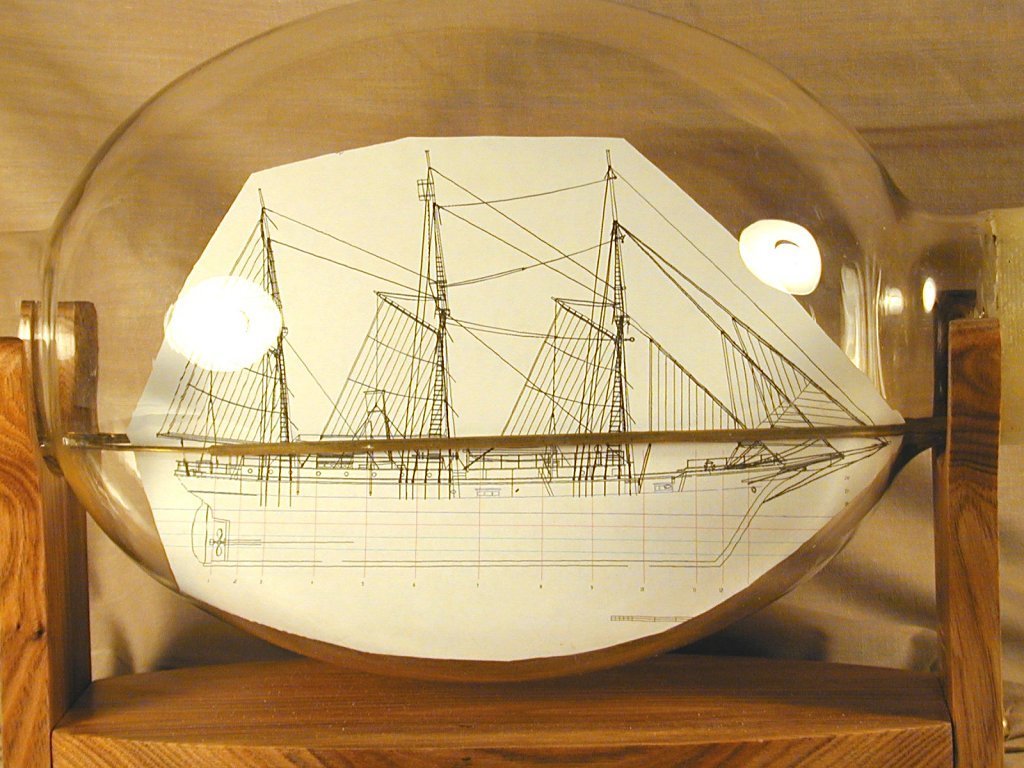
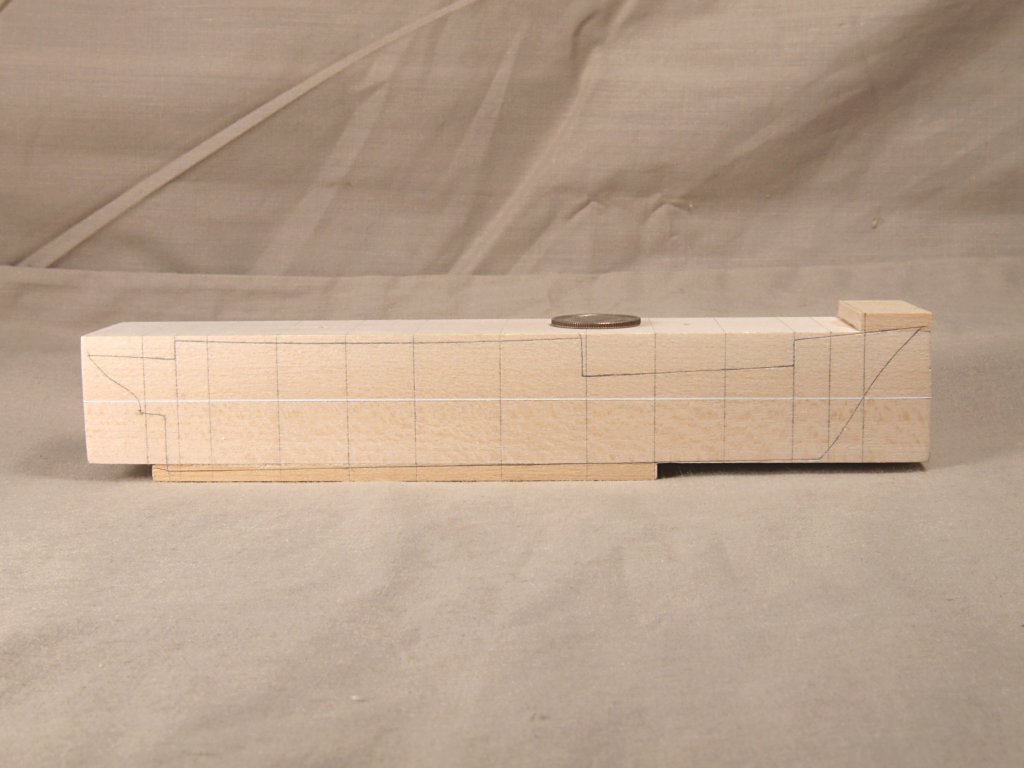
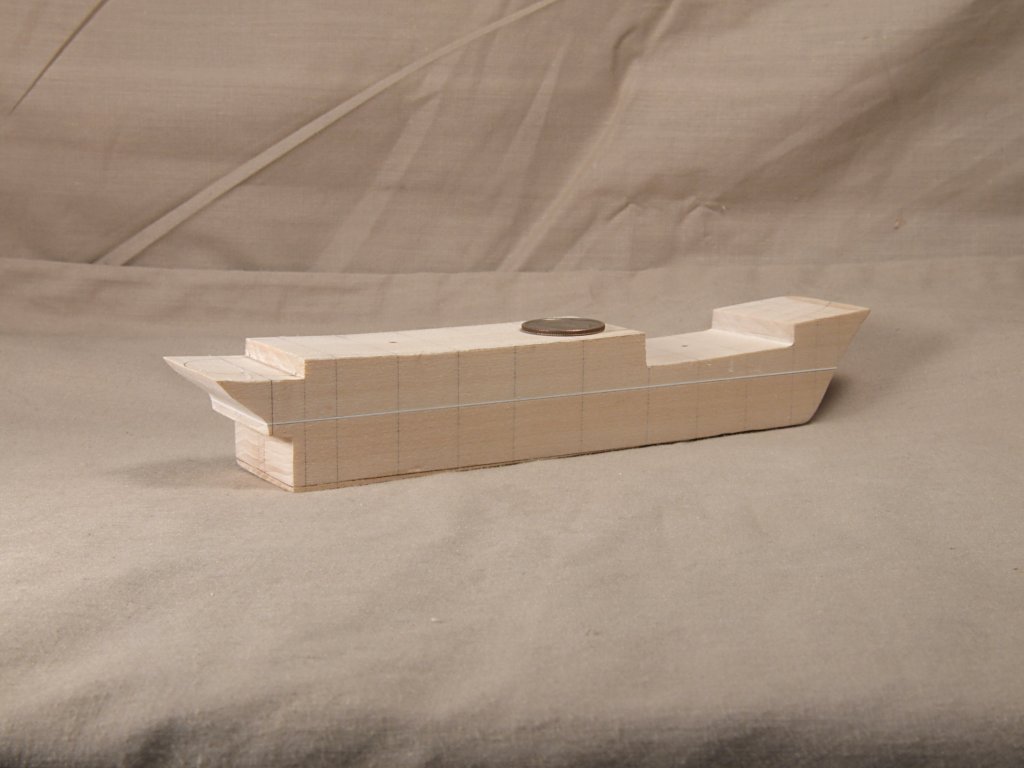
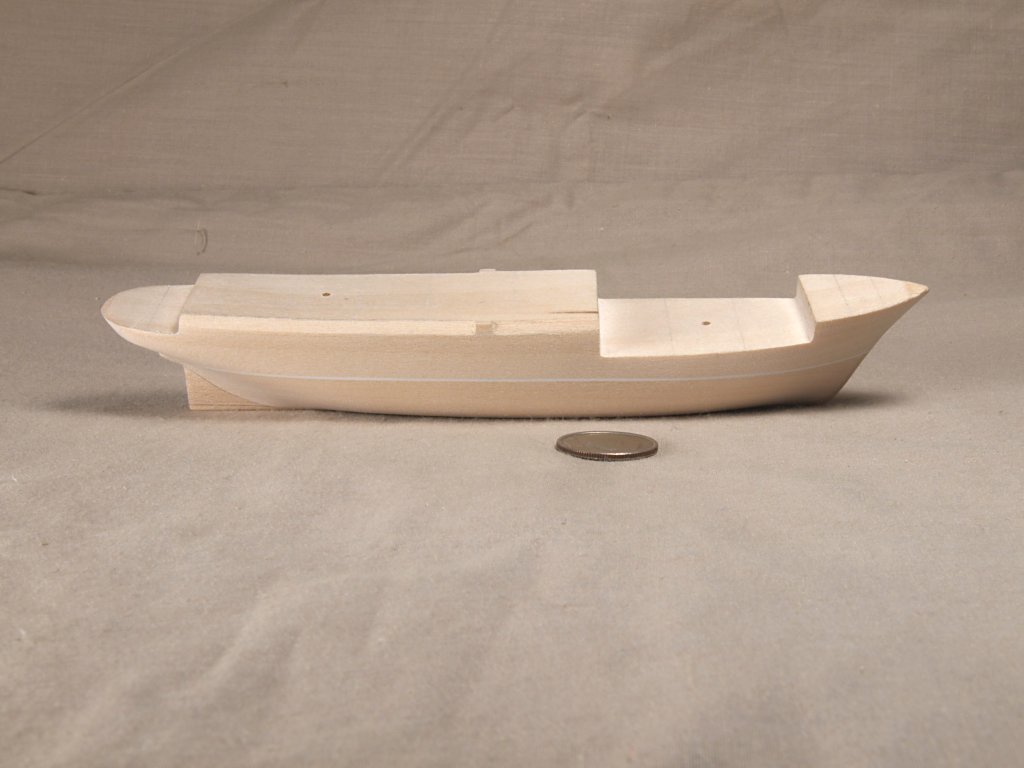
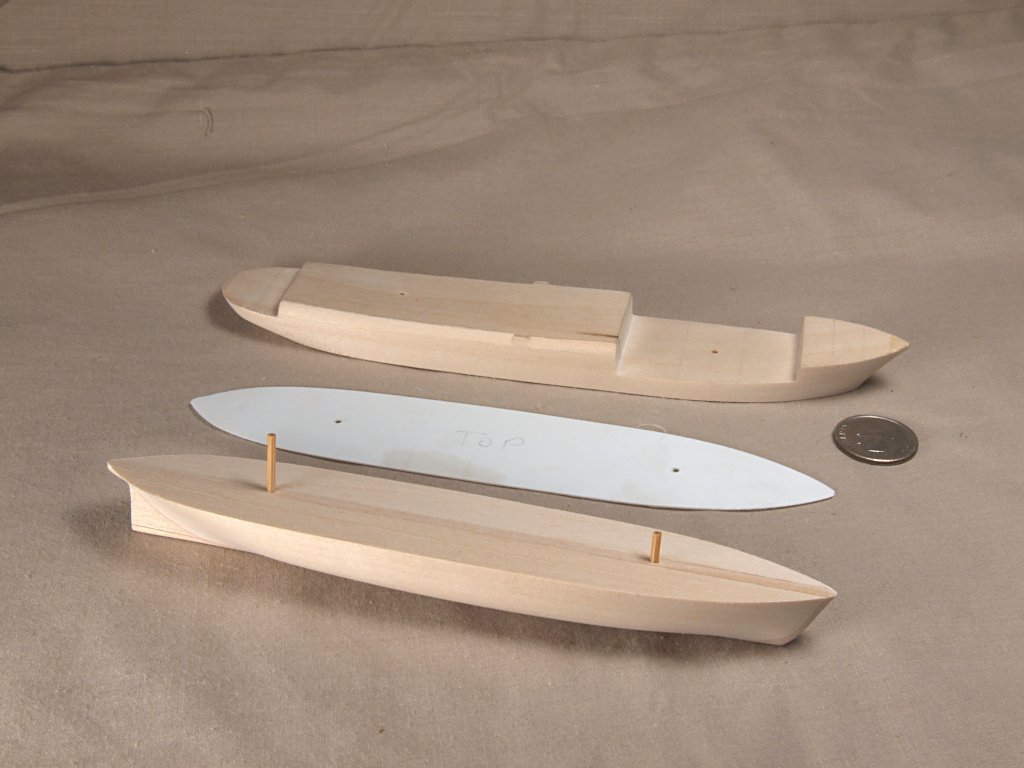
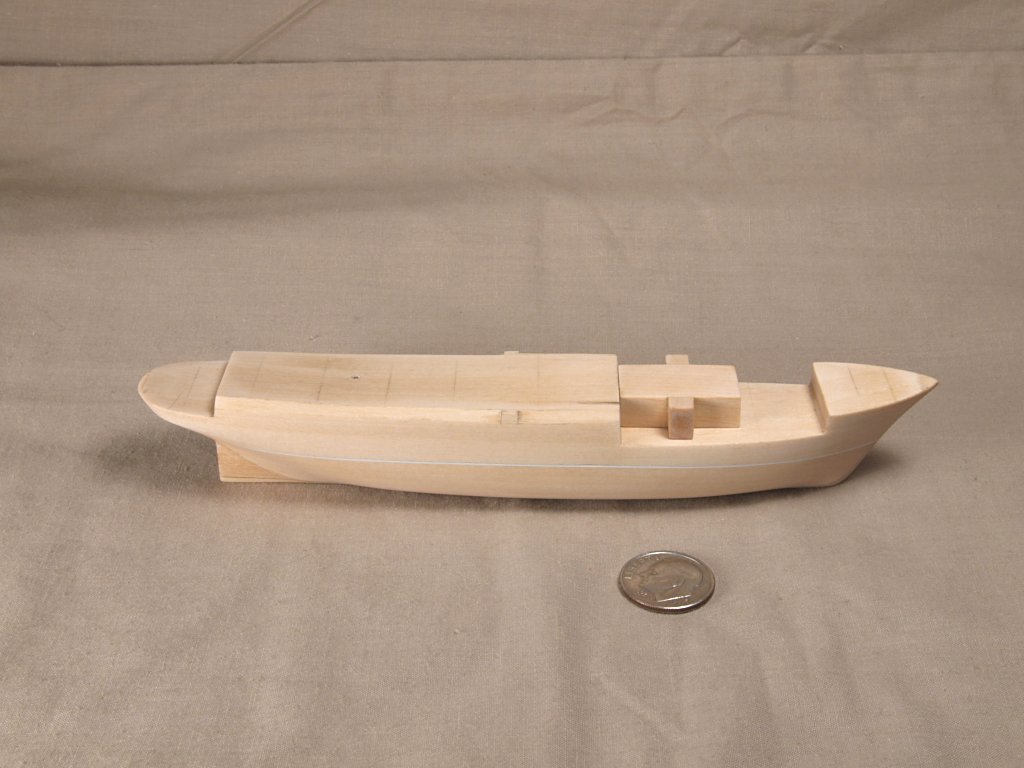
 This is a log of the building of Endurance I constructed around 2001. A previous series of models were done at 1:350 as ship in bottle models. The first photo shows one of those. Most of this build log will be photographs taken while building the larger model, which was put into a sodium vapor light bulb with the end cut off. I will be happy to answer any questions. Endurance History The Polar Wooden Screw Yacht “Polaris” was built at the Framnaes shipyard in Norway, possibly in 1899. The Polaris was a 300-ton wooden barquentine, and never sailed under her maiden name. She was 144 feet long, built of planks of oak, and Norwegian fir up to two and one-half feet thick, and sheathed in greenheart, a wood so tough that it cannot be worked by conventional means. Polaris was built at a time in history when much of the world’s attention was focused on exploration of polar regions, both Arctic and Antarctic, with many expeditions from various countries attempting to reach the North and South Poles. One of the early explorers during this Heroic Age of exploration was Ernest Shackleton. In 1914 Shackleton proposed an expedition to cross the Antarctic continent, his expedition would require two vessels, one to take the men, equipment and the sled dogs to the Antarctic continent, and one to take men and supplies to the opposite side of the continent where they were to lay supply caches. Polaris was the vessel Shackleton purchased for the outward voyage, with an ex-sealing vessel, “Aurora” being obtained as the second vessel. He changed the name of Polaris to “Endurance”, after his family motto: “Fortitudine Vincimus - by endurance we conquer”. After much preparation, Endurance left her dock in London on August 1, 1914. The exact same day war was declared between many European nations, and World War I was begun. Endurance had not yet left British waters when the mobilization orders were sent out, so Shackleton offered his crew and ship for the British government's wartime use. The Admiralty decided that his Imperial Trans-Antarctic Expedition should proceed. Endurance set sail from Plymouth on August 8, 1914 on her voyage into history. Endurance sailed to Buenos Aires to pick up crew members and sled dogs and then sailed to South Georgia on November 5, spent a month re-provisioning while at this station and left Grytviken’s Cumberland Bay on December 5, 1914. Endurance sailed only two days before encountering the first pack ice. Endurance worked it’s way through pack ice for two weeks, passing many large ice bergs along the way. The ice and weather conditions worsened from about January 24 onward, and at times the crew would debark and attempt to chisel pathways themselves. By January 27, 1915 the ship was stuck fast in the ice. The fierce southern winter weather was causing further concern for all, as gales blew the pack ice into moving walls of destruction. The crew watched helplessly as huge chunks of some of the pack ice were moved and shoved into amazingly high stacks. In some cases the buildup of pressure would accumulate for a length of time causing massive ice movements in very little time when the pressure was finally released. For those living aboard Endurance it must have appeared all too clear what the gallant ship’s fate was going to be. The terrible winter weather continued for many more months. Endurance, and it’s crew, received both a great relief, followed by the worst moment in the voyage so far around the 10th of October. At that time the ice started to break up, and a new lane opened up that everyone thought had a chance of being navigated. This breakup was followed however by a severe wind, which piled the pack ice up beneath Endurance and lifted her above the water. The gallant ship was then heeled over on her port side by 30 degrees, before righting again when the pressure reduced. On Sunday October 24th Endurance was severely struck in the stern by no less than three pressure ridges of ice. The ship was listed over to starboard 8 degrees, and the stern post nearly twisted out of the hull. The vessel started leaking badly, and the steam engine had to be kept running to keep the pumps working. At 4:00 p.m., October 27, Endurance received a heavy blow, which knocked it’s stern higher, and completely tore away the rudder and stern post, the keel was ripped out and the water poured in. Shackleton and his crew lived on the ice nearby the Endurance for nearly one month before the ship met it’s final end. This came for Endurance on the evening of November 21, 1915, when the vessel rose by the stern and then slid down into the water. The Imperial Trans-Antarctic Expedition ended with the loss of Endurance, though Shackleton and his entire crew survived and were rescued. Ship In Light Bulb Model of “Endurance - Construction Ship in light bulb models have certain construction differences from static display models. The first consideration for construction of such a model is that the model, or it’s individual parts, must fit through the neck of the light bulb. For the Endurance model the type of construction used by this builder required that the finished upper hull of the model, including all masts, yards sails and all rigging lines, be able to be collapsed small enough to pass through the bulb opening. The lower hull and model base are separate pieces, that can be passed through the neck of the bulb individually. The base is then glued to the inside glass surface, then the lower hull is glued to the model base, the upper hull is then glued to the lower hull. A laminate block of basswood is made up and used to carve the hull. The upper hull is a single piece of the wood, the lower hull is three separate pieces glued together. The lower hull has a thin piece of wood in the center, flanked by two wider pieces, making the whole as wide as the upper hull piece. The two hull parts are held together by drilling a pair of holes, and tightly fitting bamboo pegs into the holes. At the time of making up this “hull block sandwich”, a sheet of styrene plastic is placed between the upper and lower hulls, representing the waterline of the hull. The hull shape is then carved out of this sandwich of basswood and plastic, using the thin center strip of the lower hull for the keel location and to mark the locations of the cross sections from the body plan. The styrene sheet waterline is also used as a guide for the templates made from cutting out individual cross sections from multiple prints of the body plan. This method of hull construction also allows the hull to be separated to make painting of the hull of the model easier. An air brush was used to apply the paint, and a protective sealer coat, to the hull parts. The scale of the model is 1:400, so some of the smaller detail trim was simplified. In order to make the upper hull small enough to fit through the bulb opening, the superstructure must be built in such a way that it is able to be collapsed. In order to do this, the masts have hidden hinges built into them. This allows them to pivot backwards, lowering their tops and all the sails and yards attached to them. All the square sails, and yards, on the fore mast must be attached to the mast in such a way that they can rotate parallel to the mast along the length of the hull, so that they too will fit through the opening in the light bulb. The Endurance model’s hidden hinges are carved into the masts by making a lower piece that has a two pronged “forked” top that fits around a single center stem on the lower end of the upper mast piece. A simple drawn down bamboo pin is then inserted into a hole drilled through the center of the overlap, where the upper mast piece fits into the fork of the lower mast piece. This allows the masts to break at a point well above the deck of the model, which was critical with the cabin structure directly behind the fore mast. All the spars for the Endurance model were made from glued laminates of maple veneer. The resulting glued joint helps to strengthen the thinner spars, allowing the necessary rigging line holes to be drilled without splitting them. Pieces of veneers of maple are glued together, then strips are cut from them. The strips are then “spin-sanded” down to nearly their largest diameter, by chucking them into a Dremel moto-tool and using folded sandpaper pinched around the spinning mast blanks. Final sizing and shaping of the spars is done by hand sanding. Any necessary holes in a spar are drilled before the hand sanding, when the spars are a bit larger in diameter. This laminate structure for the masts made it much simpler to carve the necessary parts of the hidden hinges in them. Most of the rigging lines on the Endurance model are working, or control, lines that are used to bring the masts up into their raised positions. Control rigging lines are also used to pull all the sails, booms and gaffs into correct position after the masts are raised. Most of the control rigging lines are rigged and worked the same as the actual running rigging lines on the real vessel.. All control rigging lines run through holes in the bulwarks, a fife or pin rail, the bowsprit or some other spars, before finally passing through the hull at the deck or other location. The control lines pass through the hull into a hollowed area carved into the underside of the upper hull. This allows the lines to pass forward from their entry point and out through the hawse holes on either side of the bow. The model was assembled inside the light bulb, with the ends of all the control rigging lines left outside the bulb. Several rubber bands are then wrapped around the lines and the neck of the bulb. This keeps the lines taught after they are tightened to pull the various parts of the model into proper final position. At every accessible point that a control line passes through a spar, a rail or the deck of the hull, a tiny amount of glue is applied to hold the line in place, once the lines are taught. When all the glue had dried, the excess control rigging lines were cut off as close to the hawse holes as possible. The small amount of these lines that remained were stuffed back inside the hollowed area beneath the upper hull.
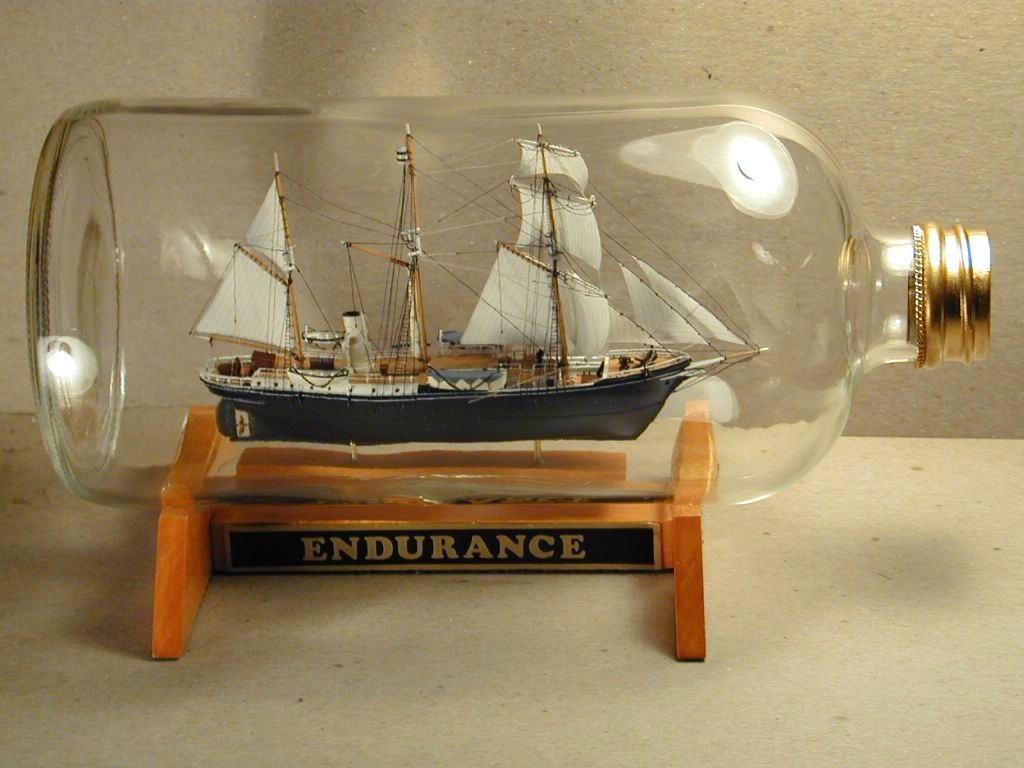
-
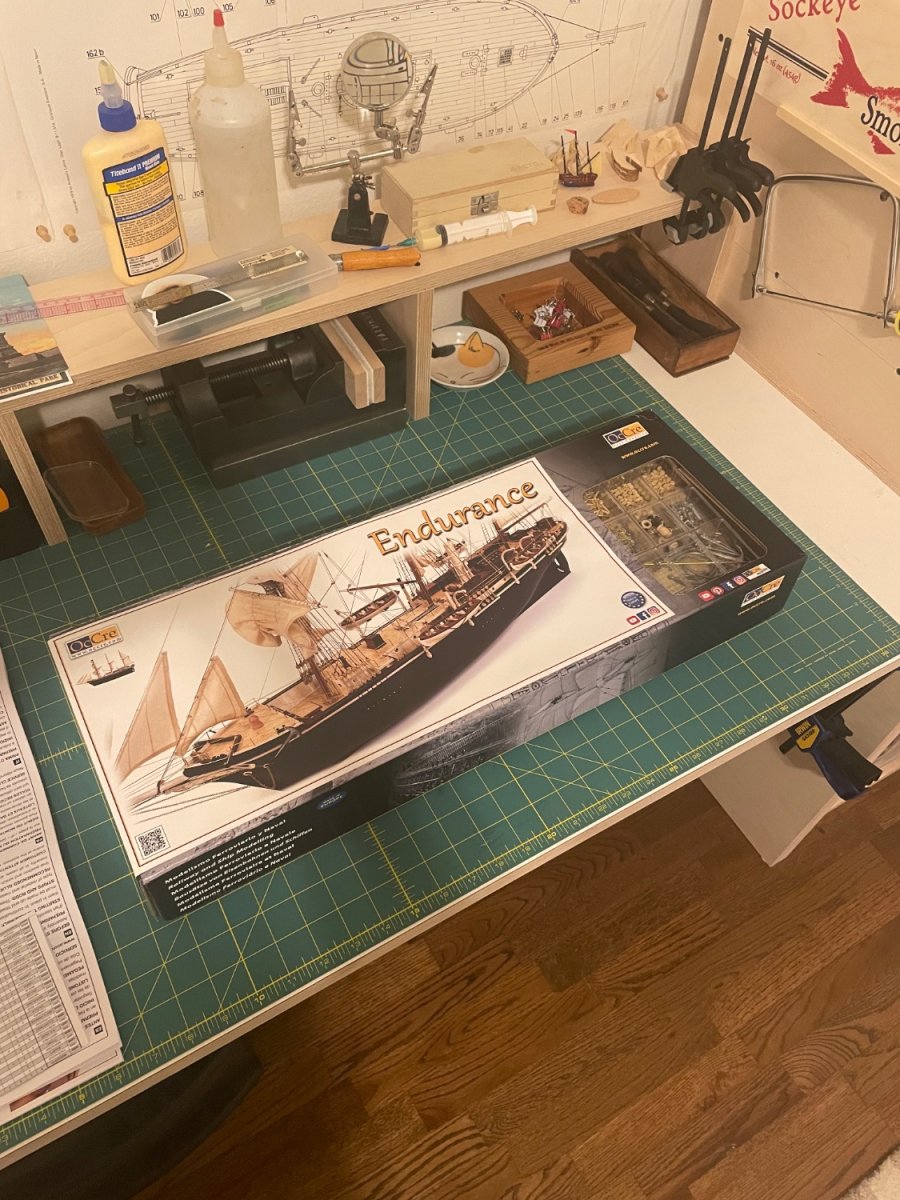
 Hello every one I joined awhile back but this is my first build thread here. I just received the kit today. I will start the build tomorrow and will post progress and pictures as I go, feel free to comment on any mistakes I make or ideas to make the build better.
 -
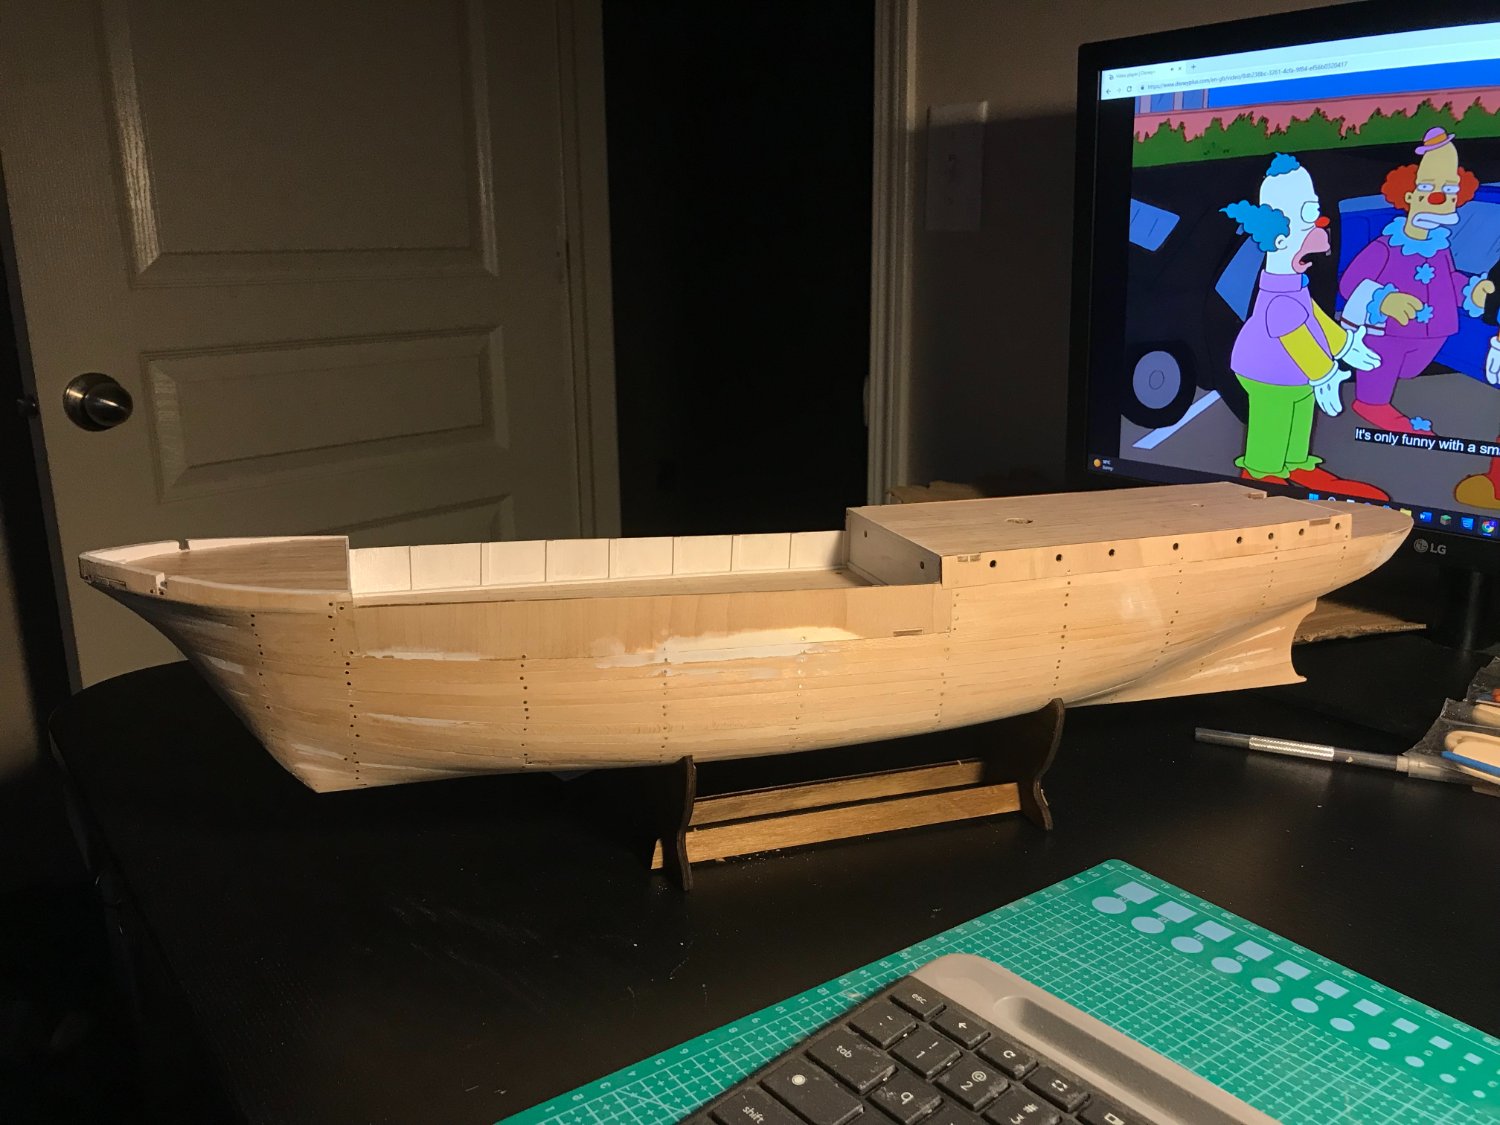
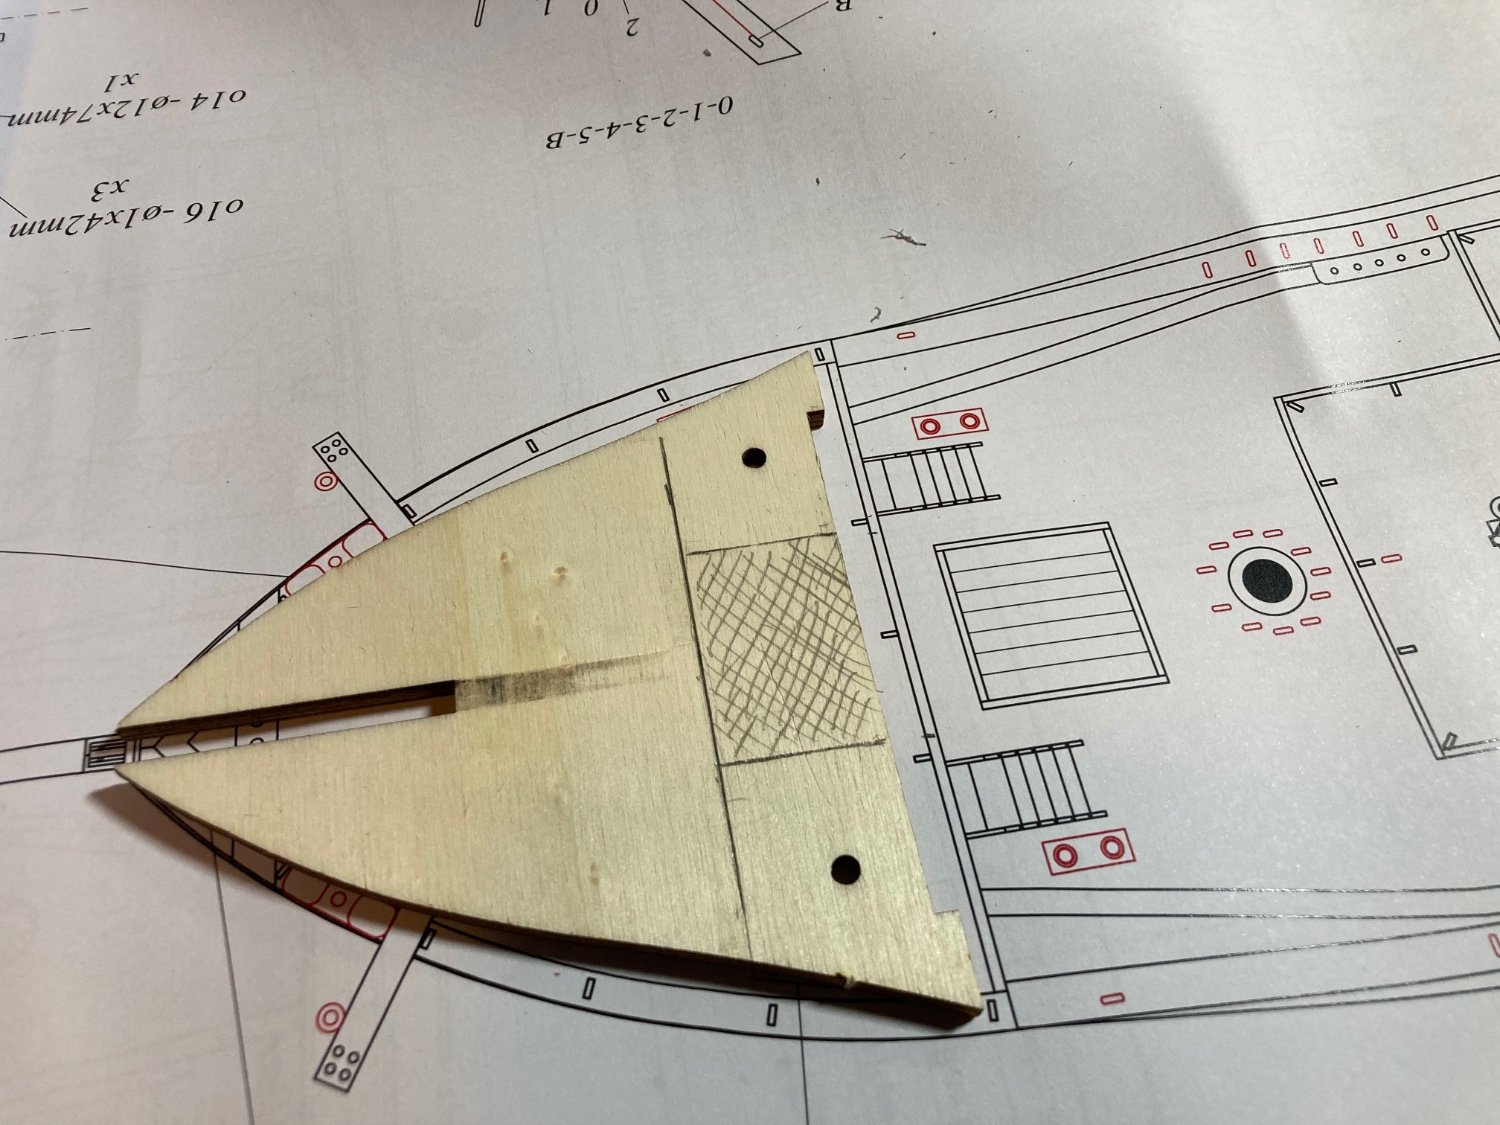
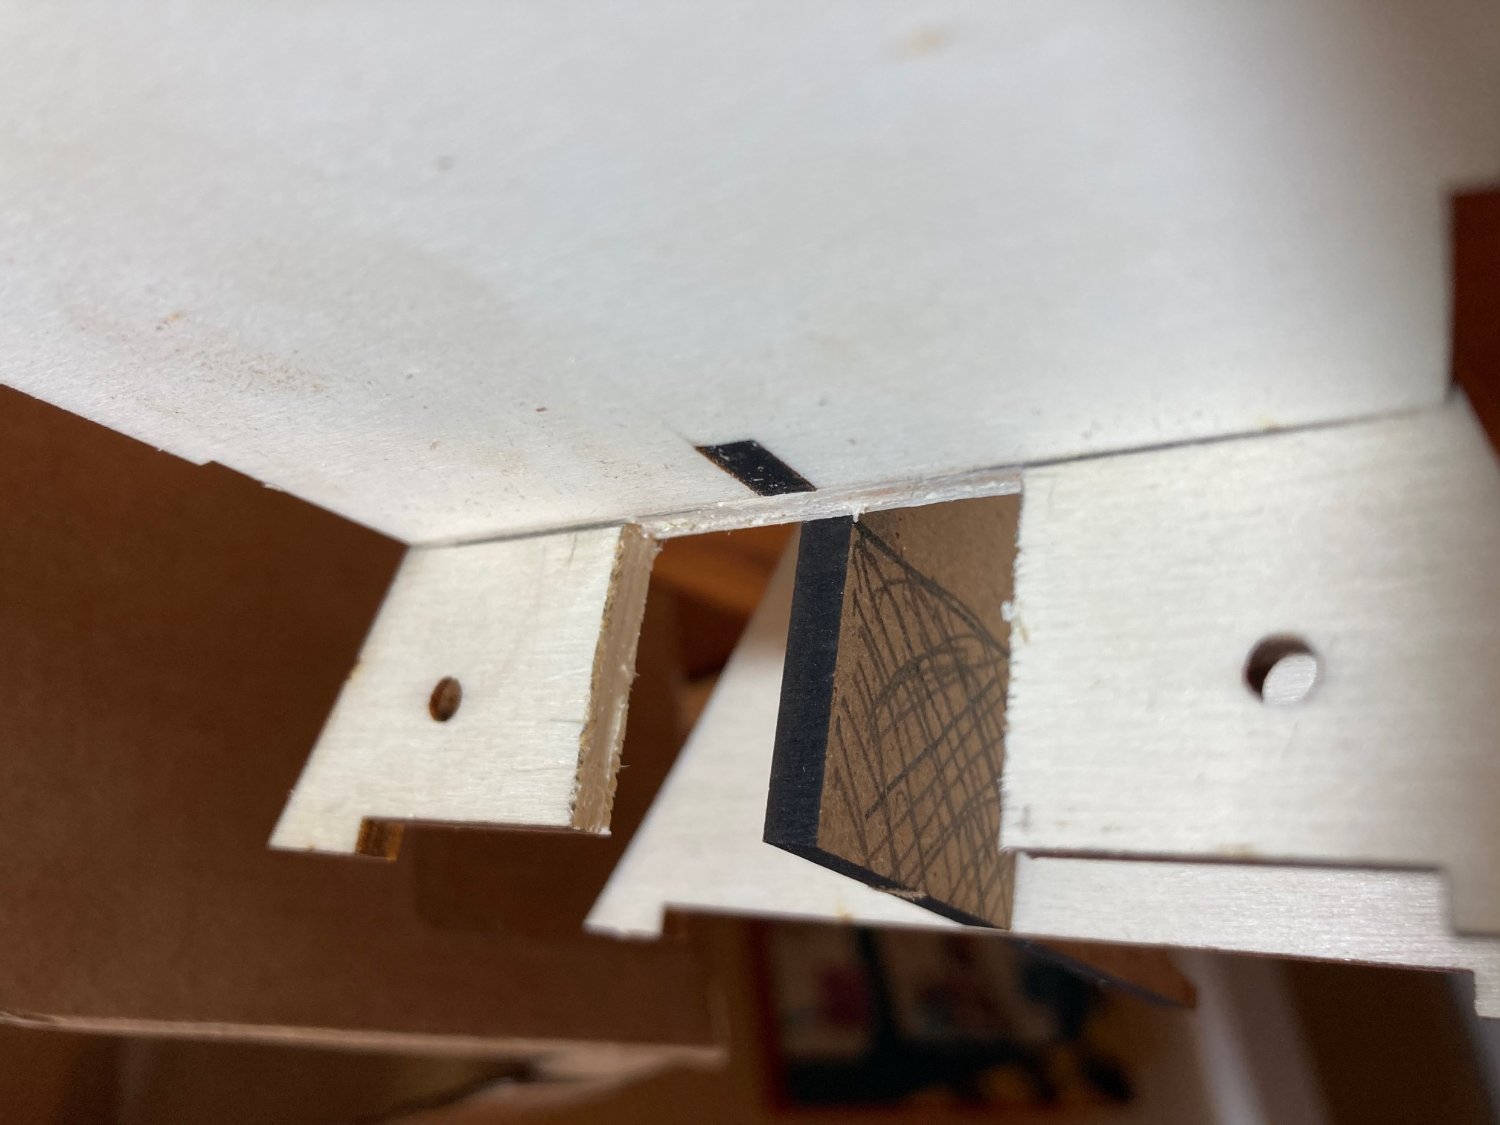
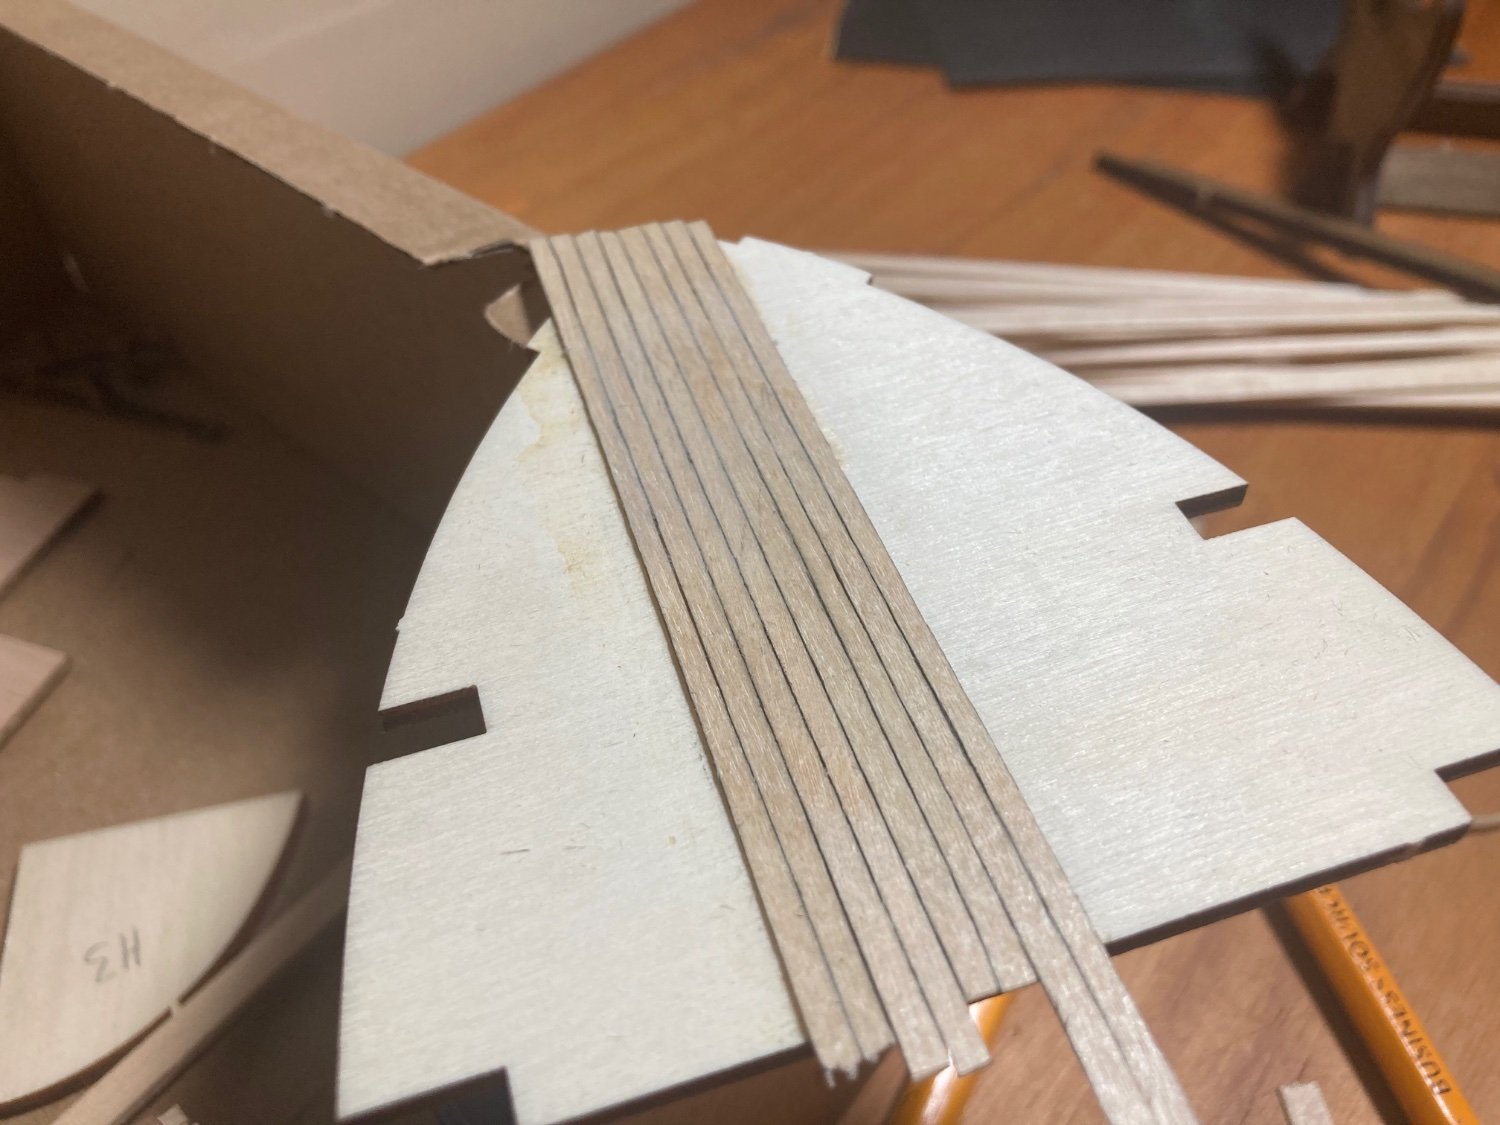
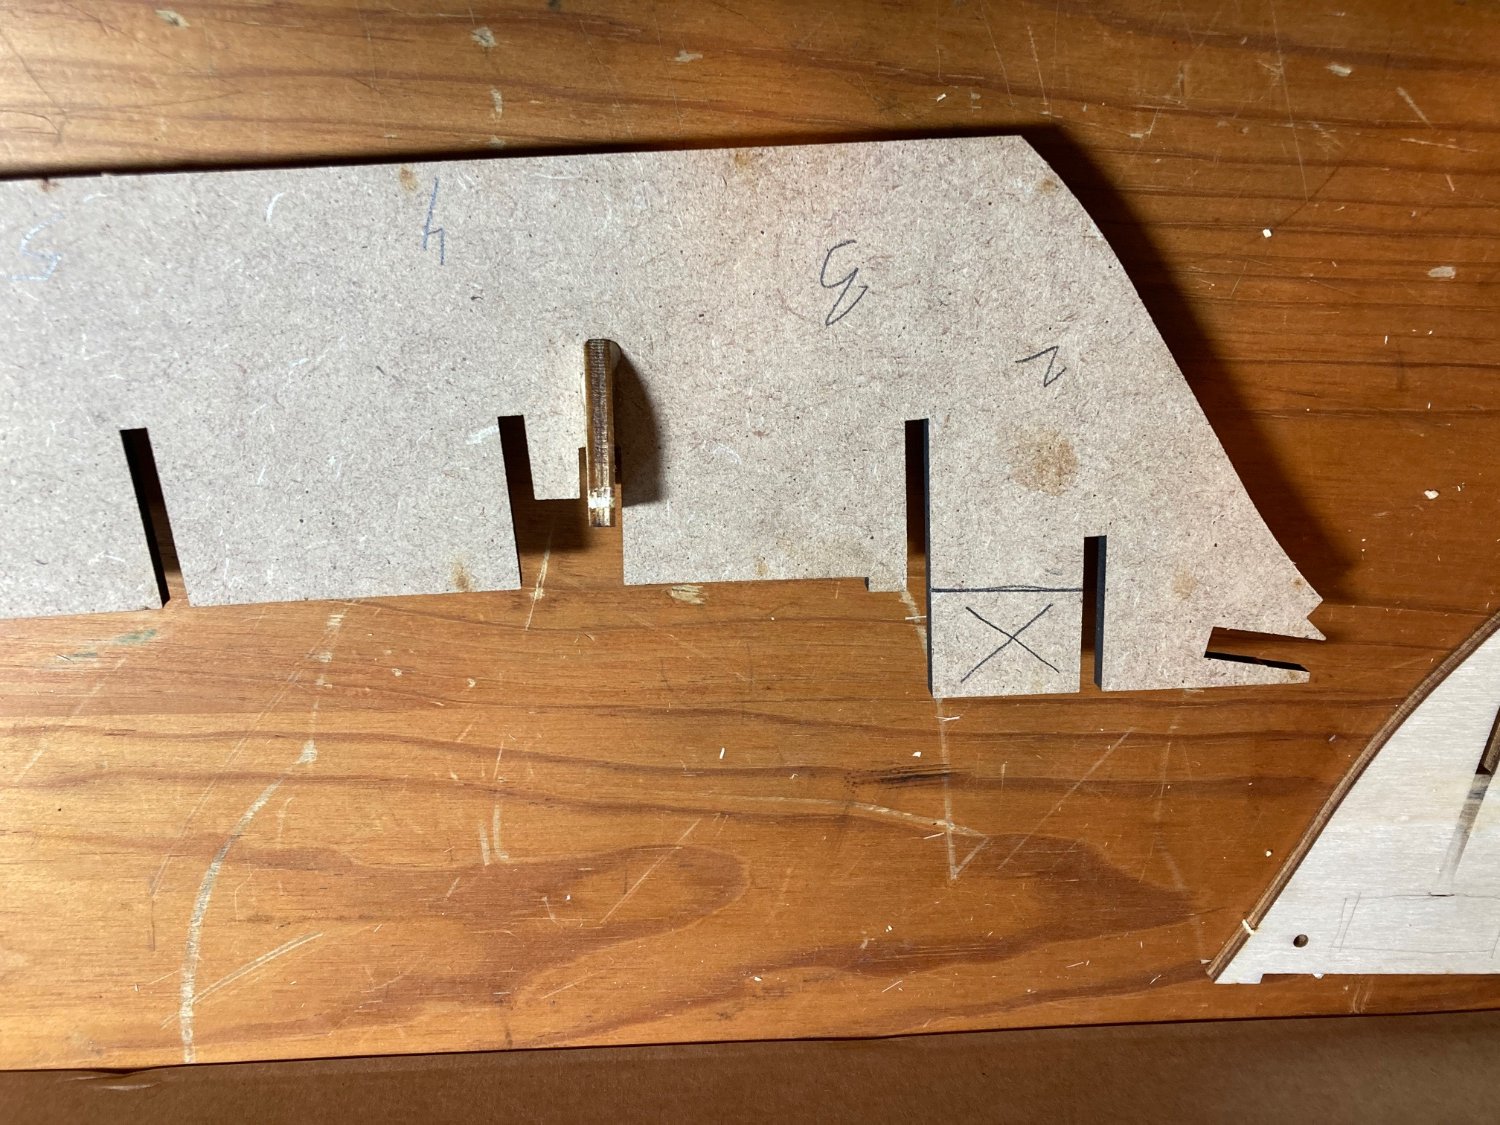
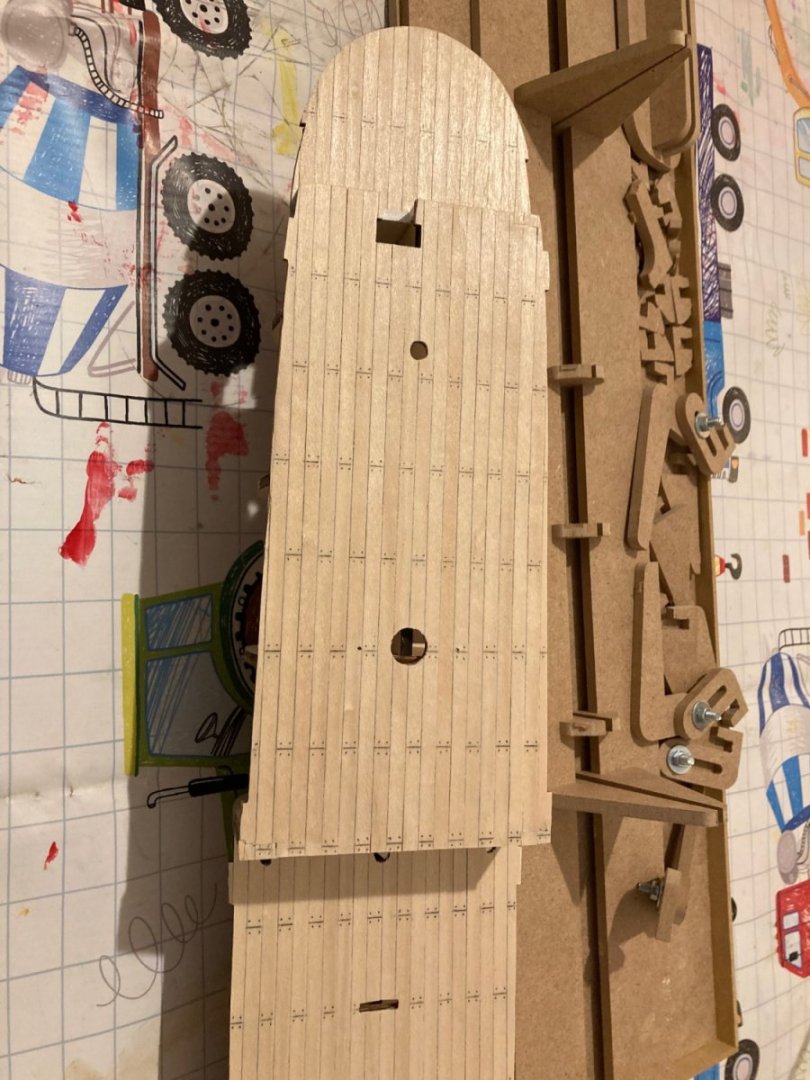
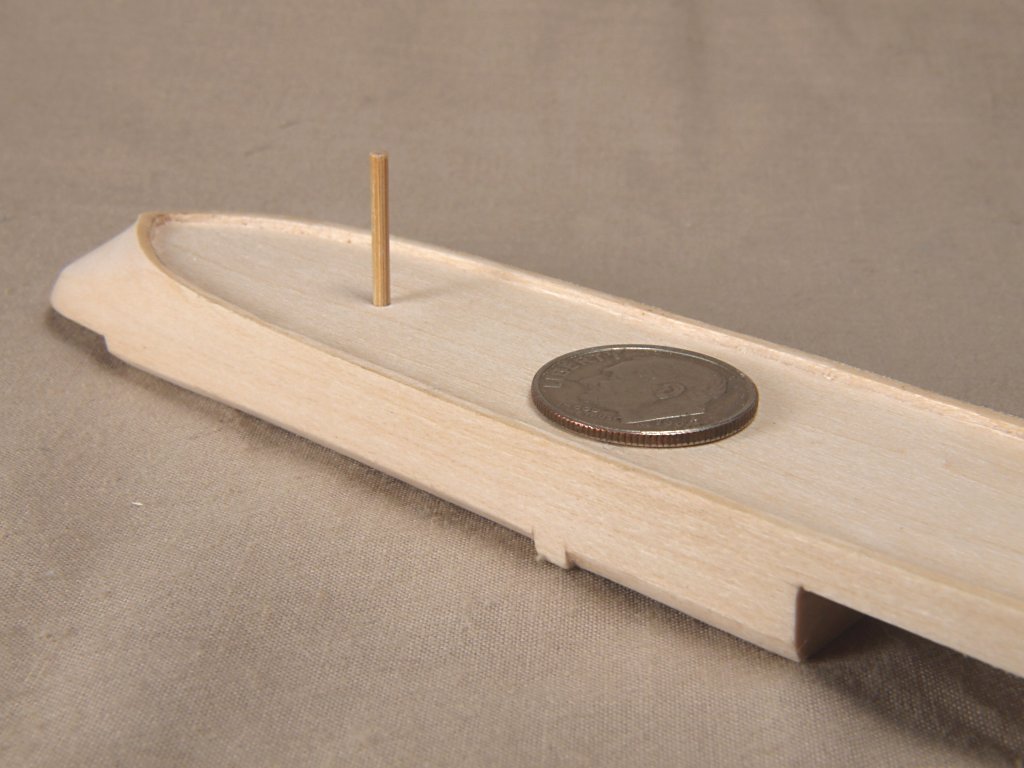
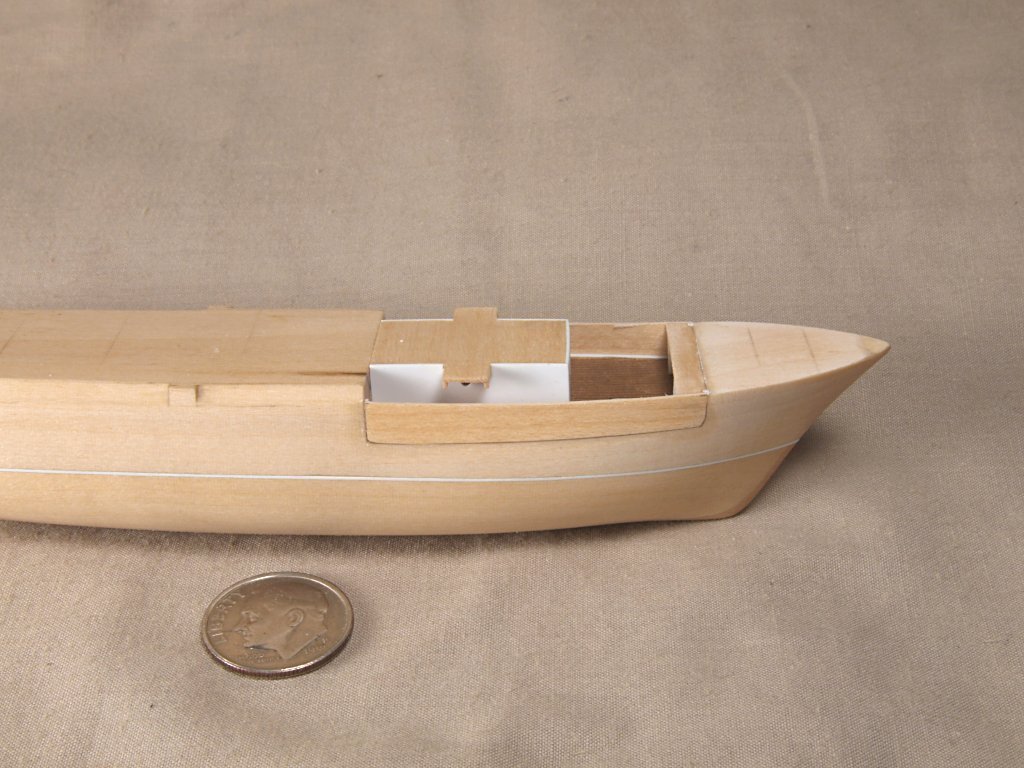
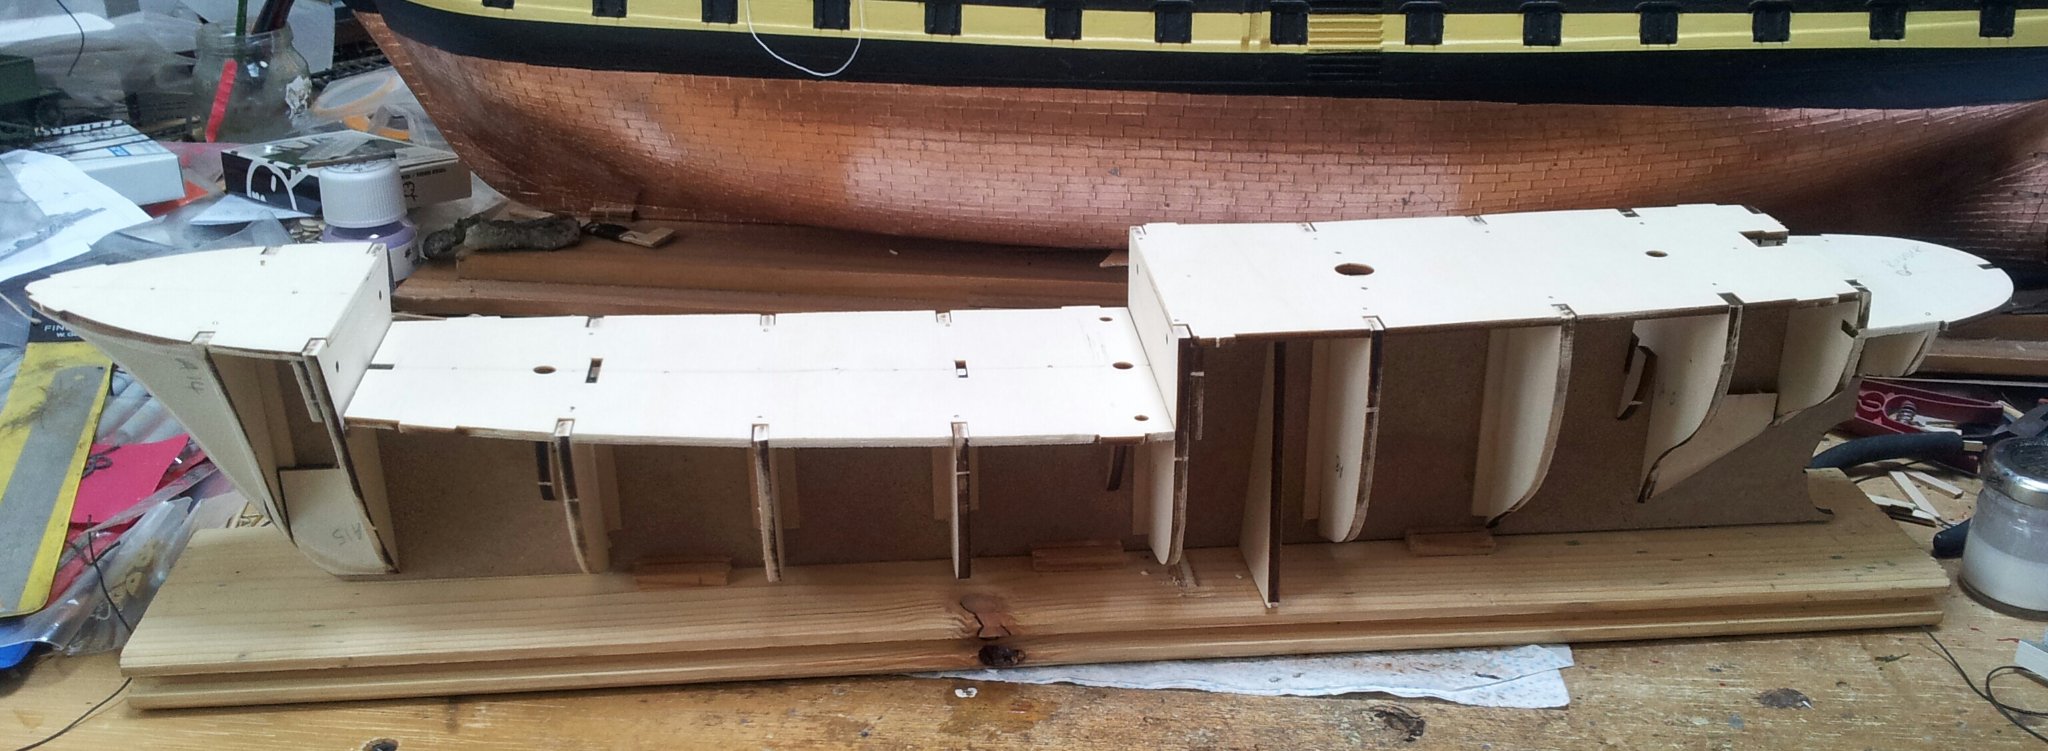
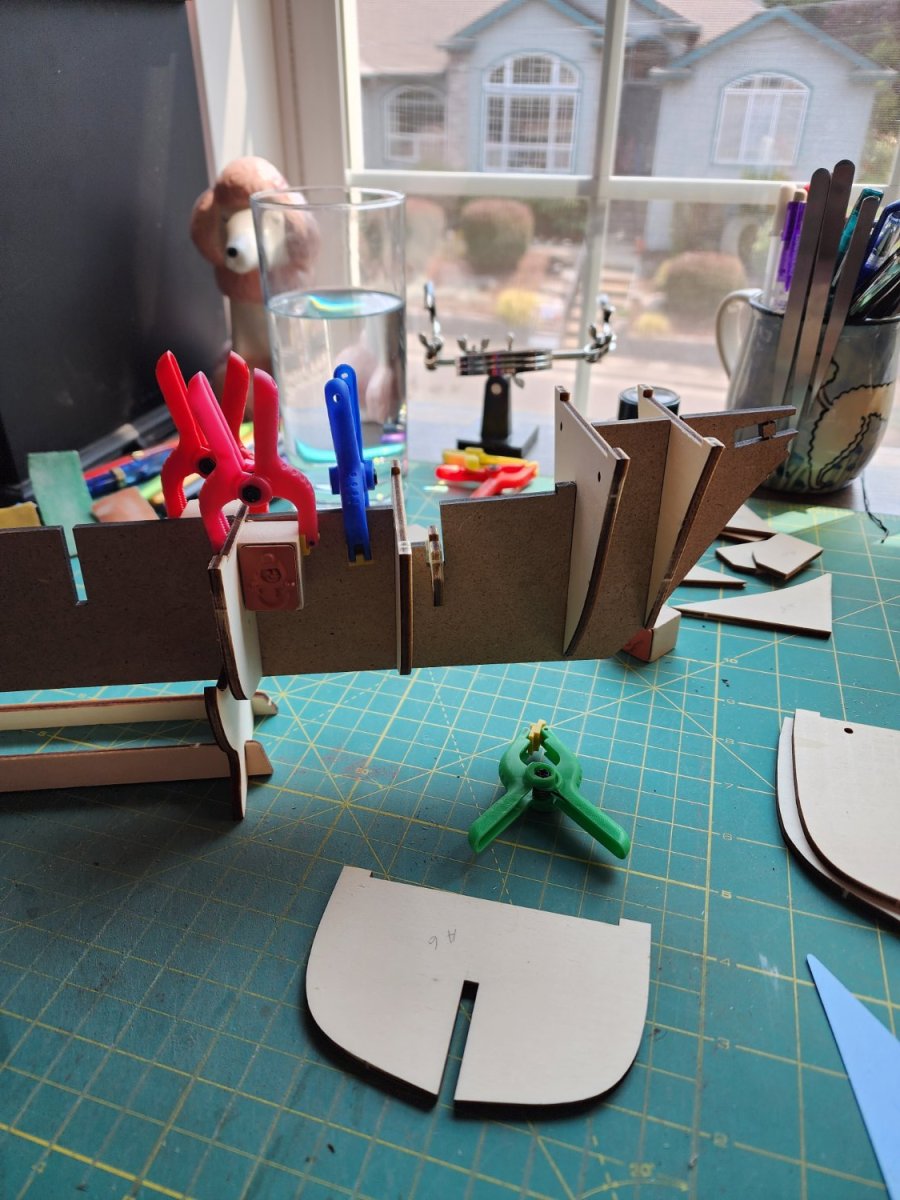
 Just started last week, but I’m waiting for my order of 3 mm planks. Been ripping some by hand to make scale planking and cabin siding. I also cut out the front bulkhead like in photos of Endurance. I’ll post photos of it when it’s done. Endurance plans show machinery inside under the deck.
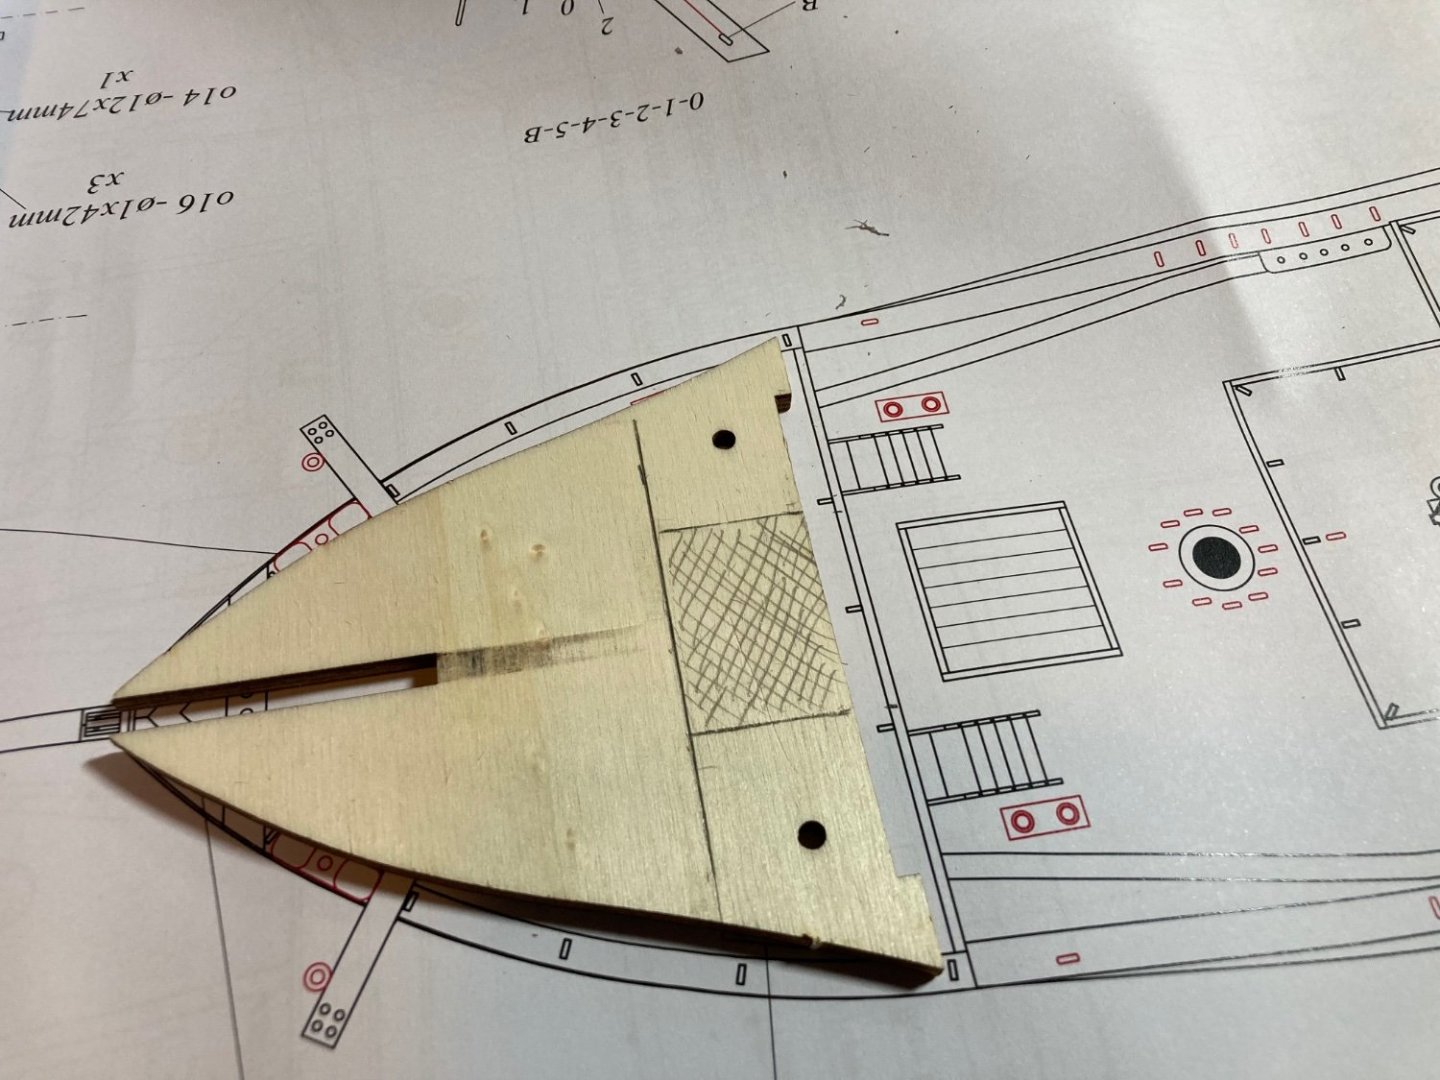


-
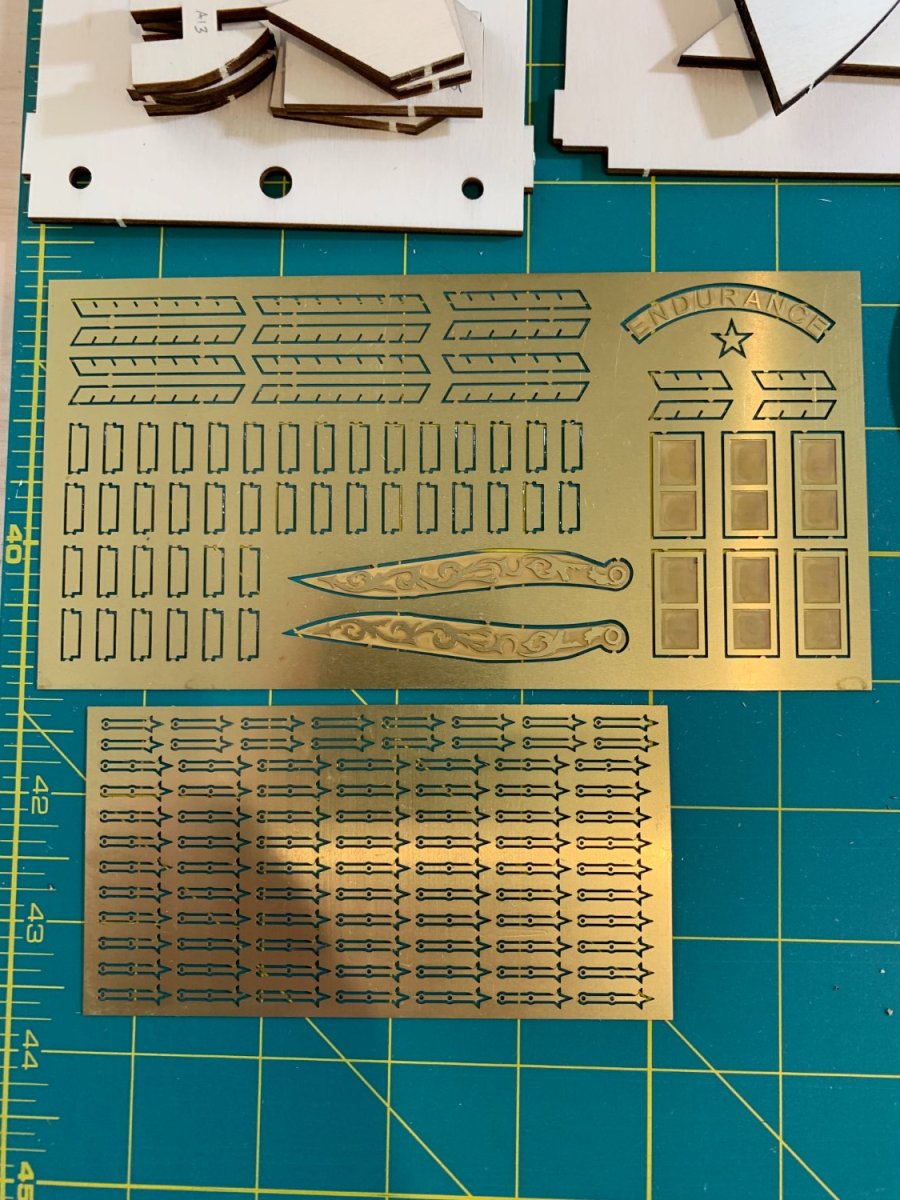
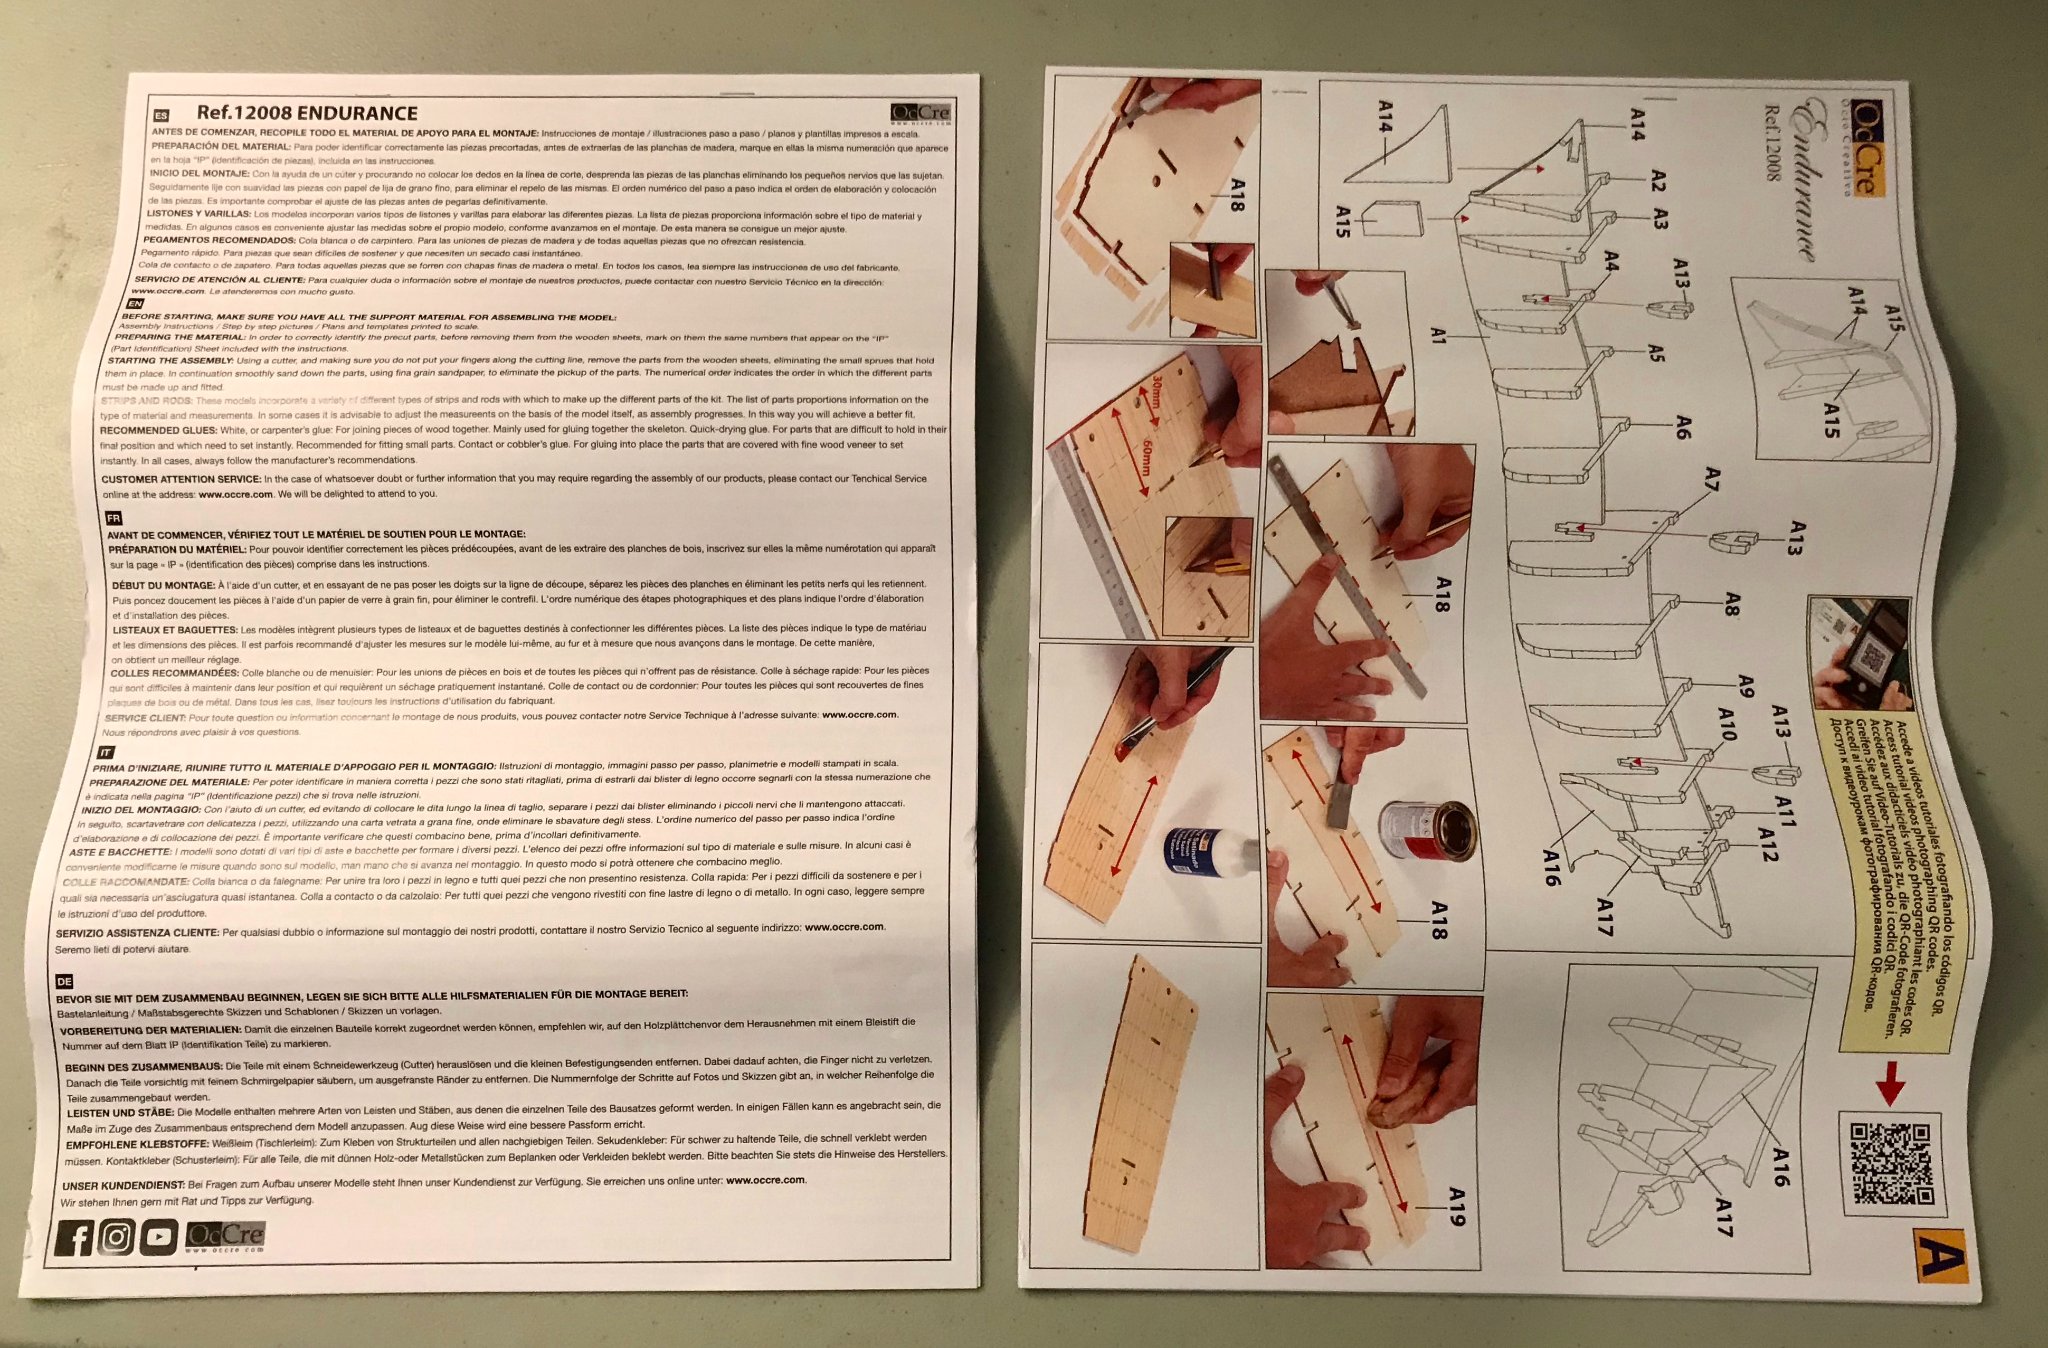
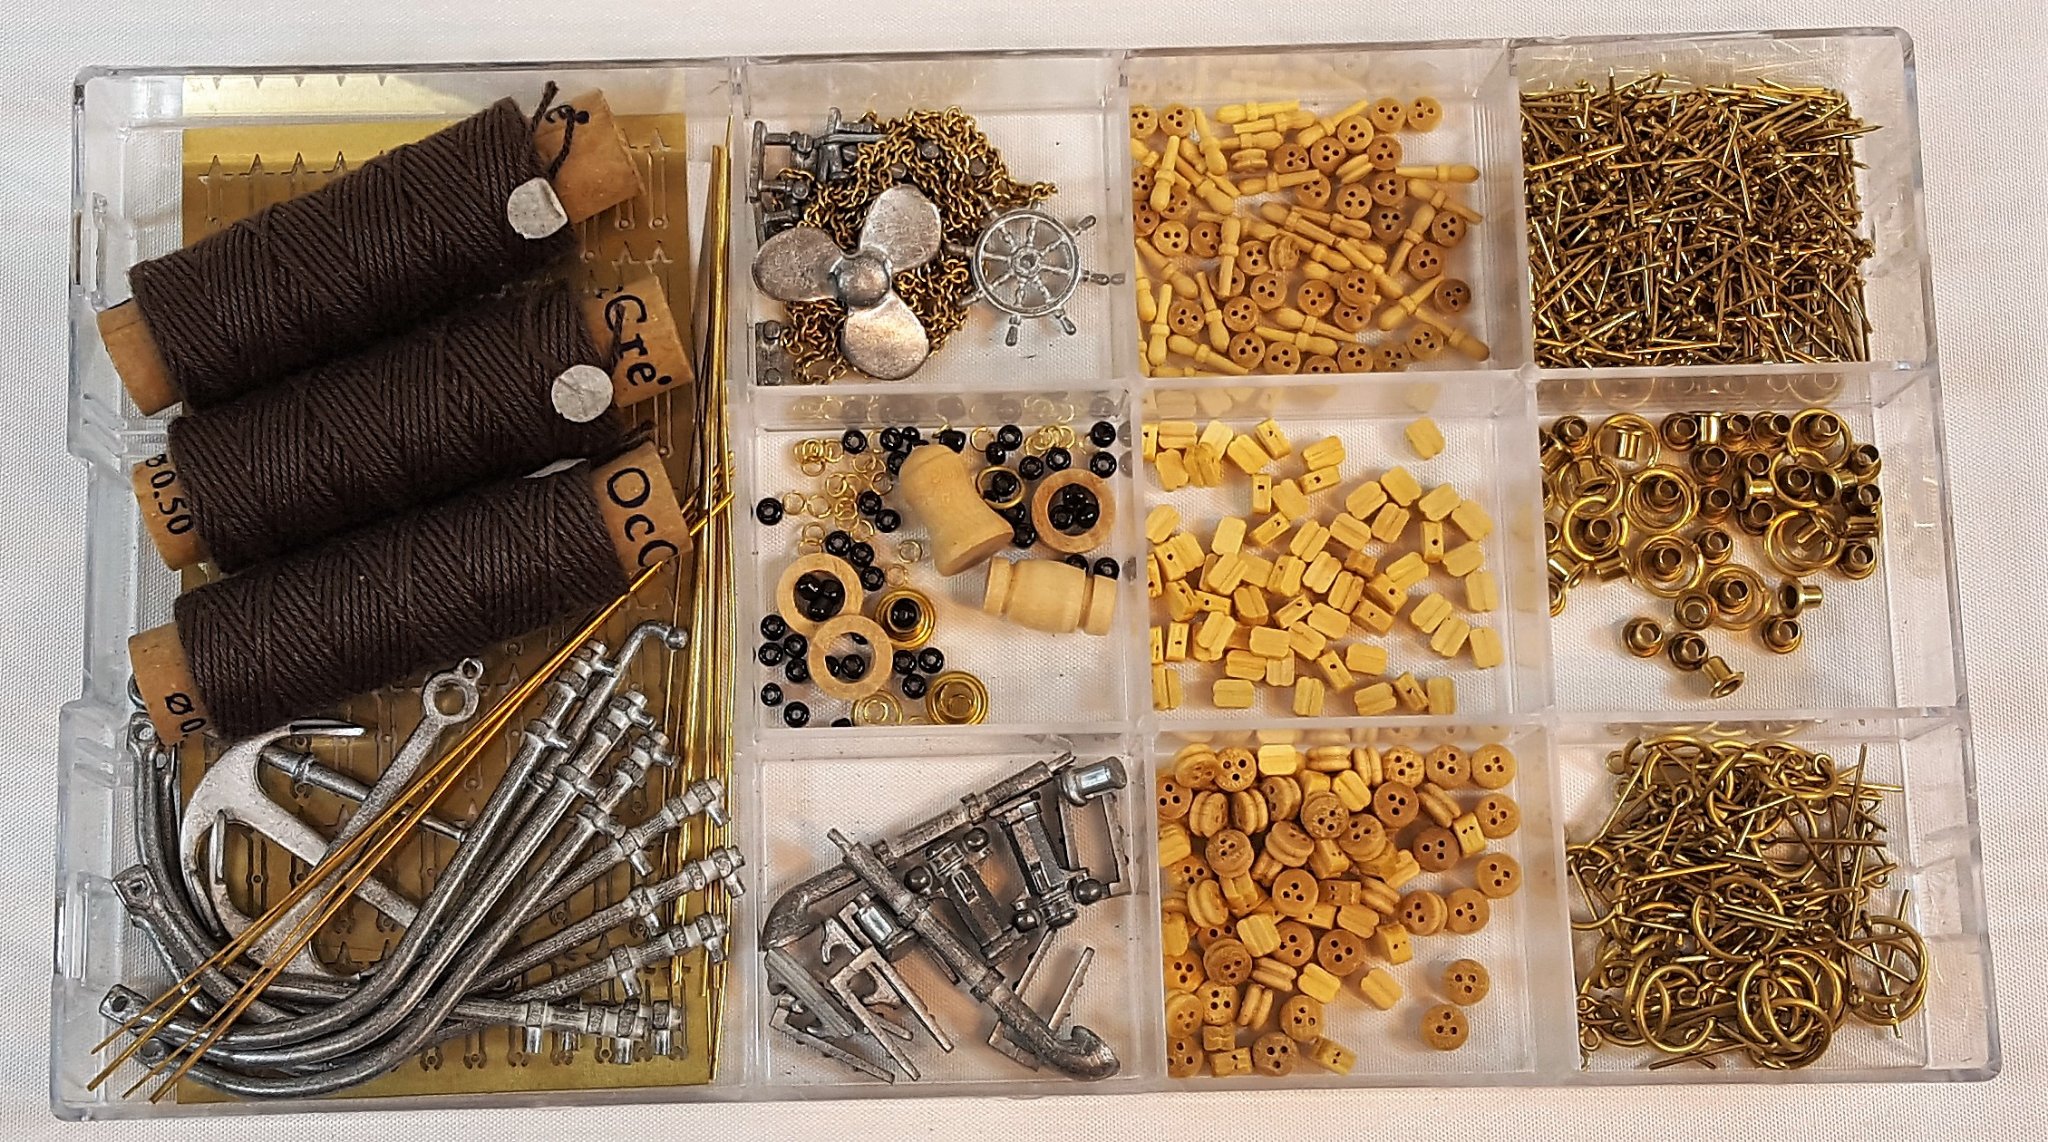
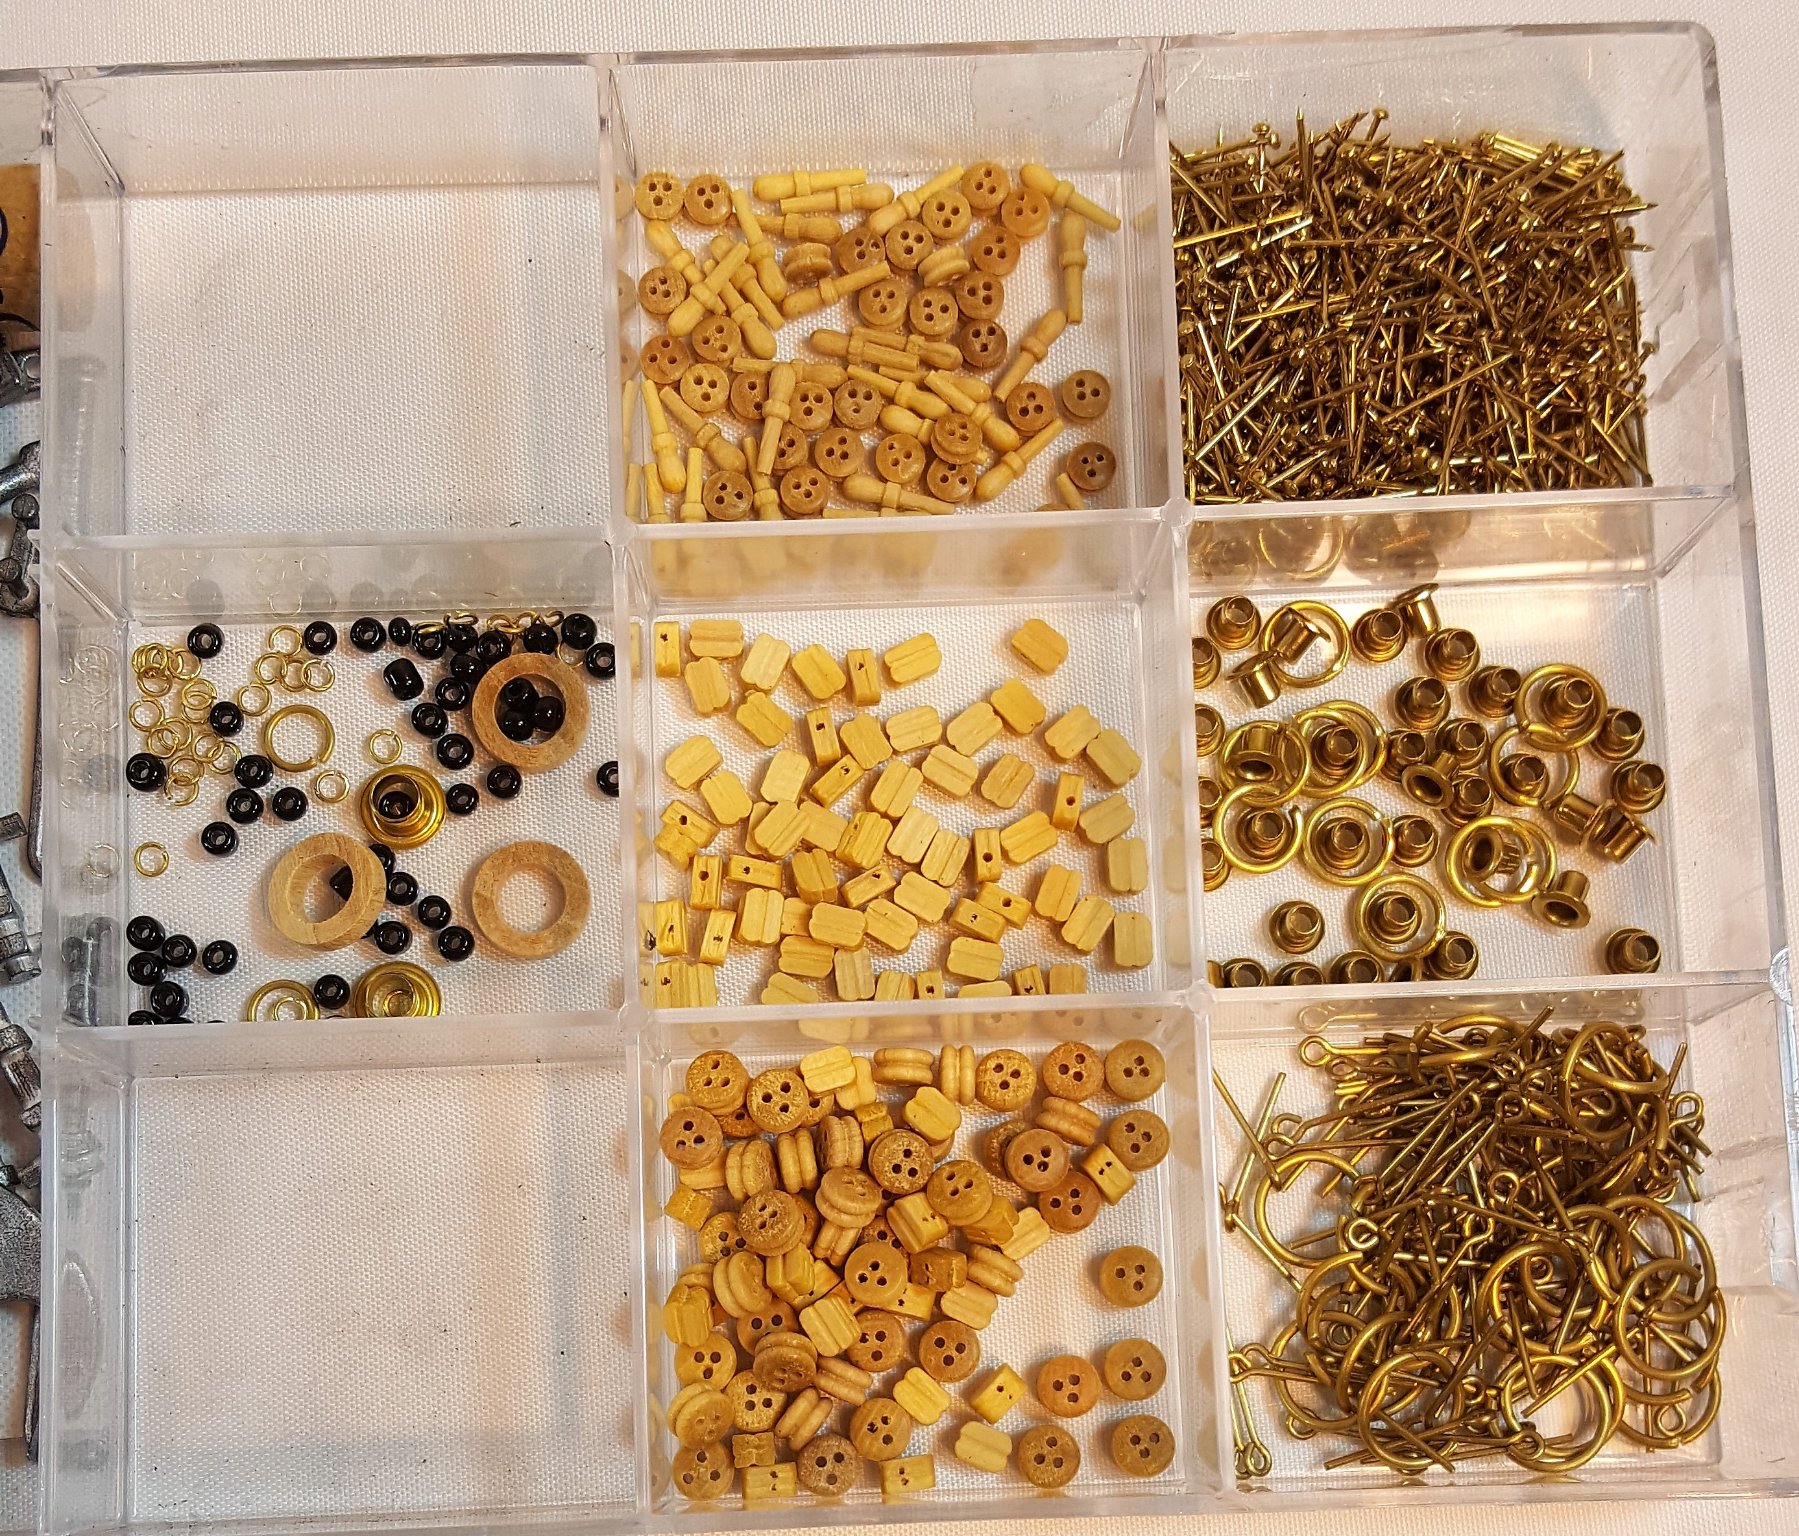
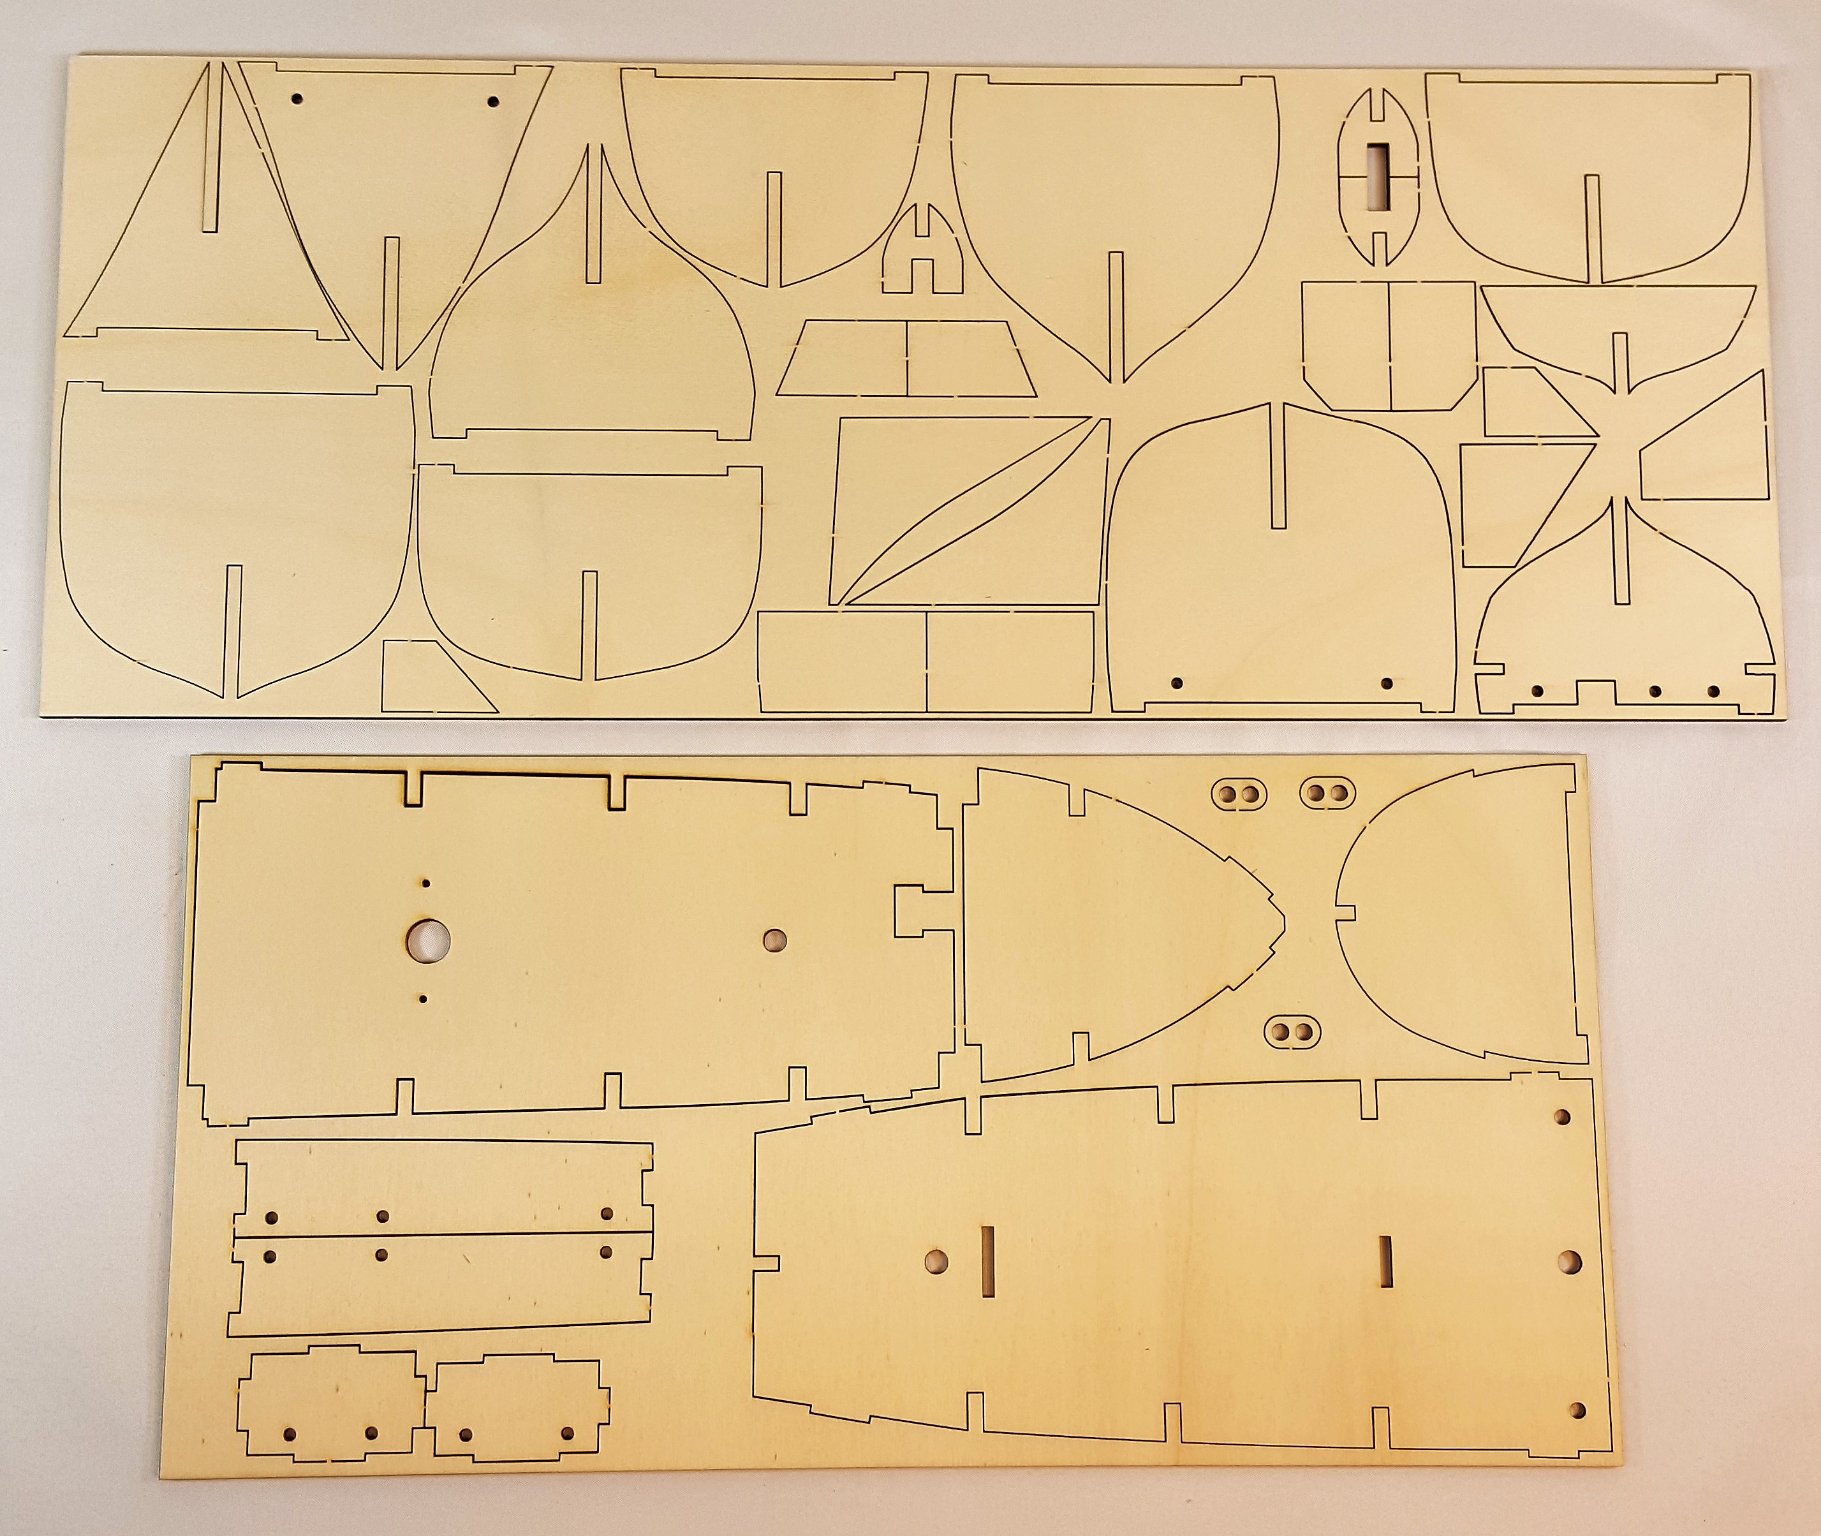
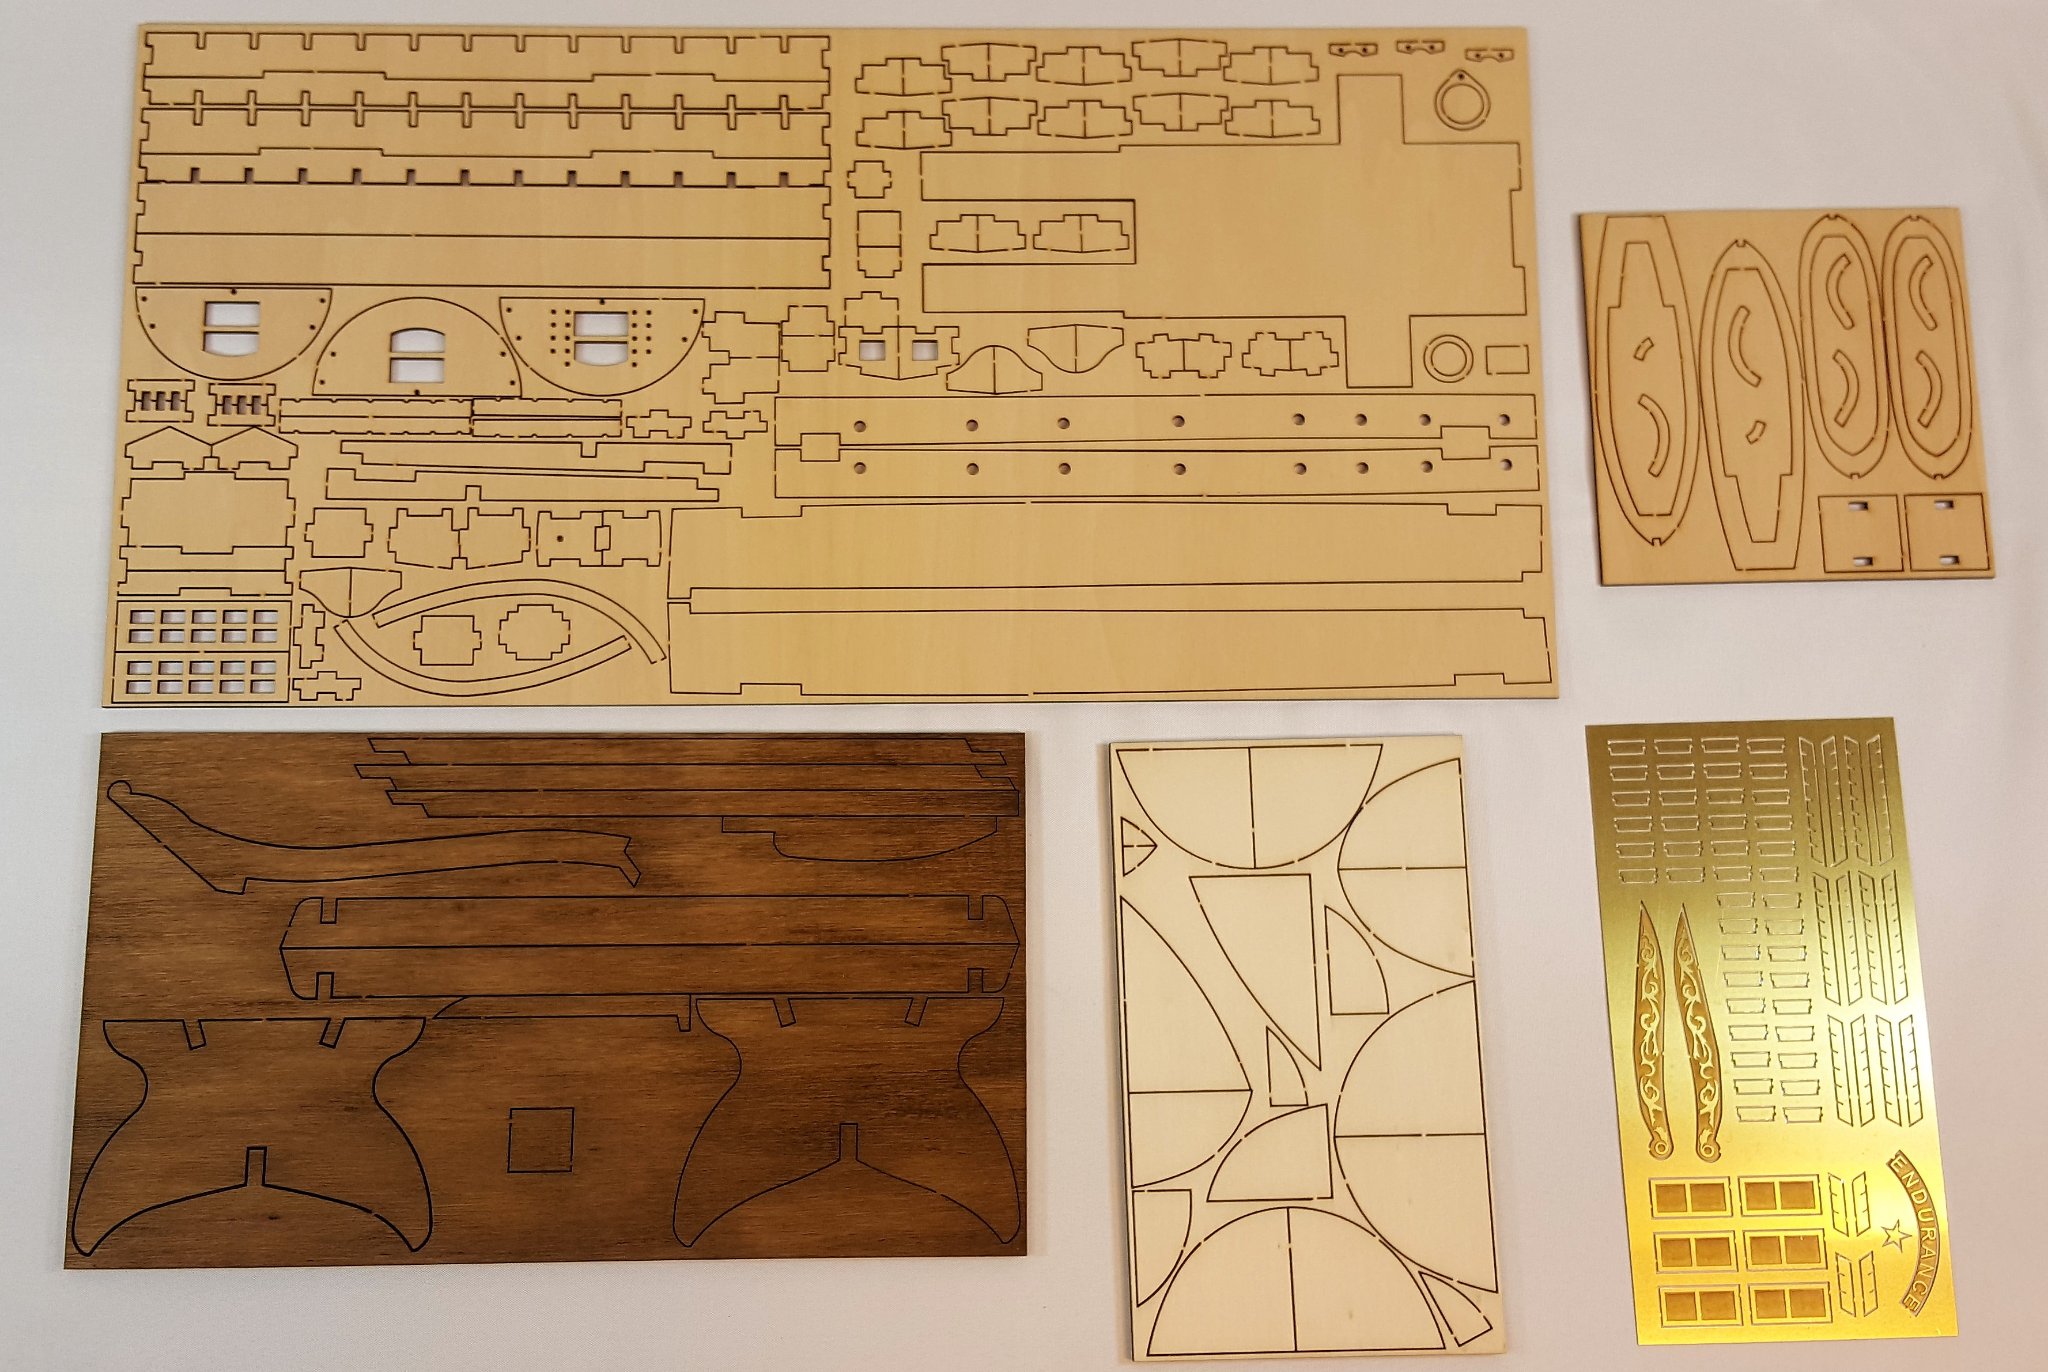
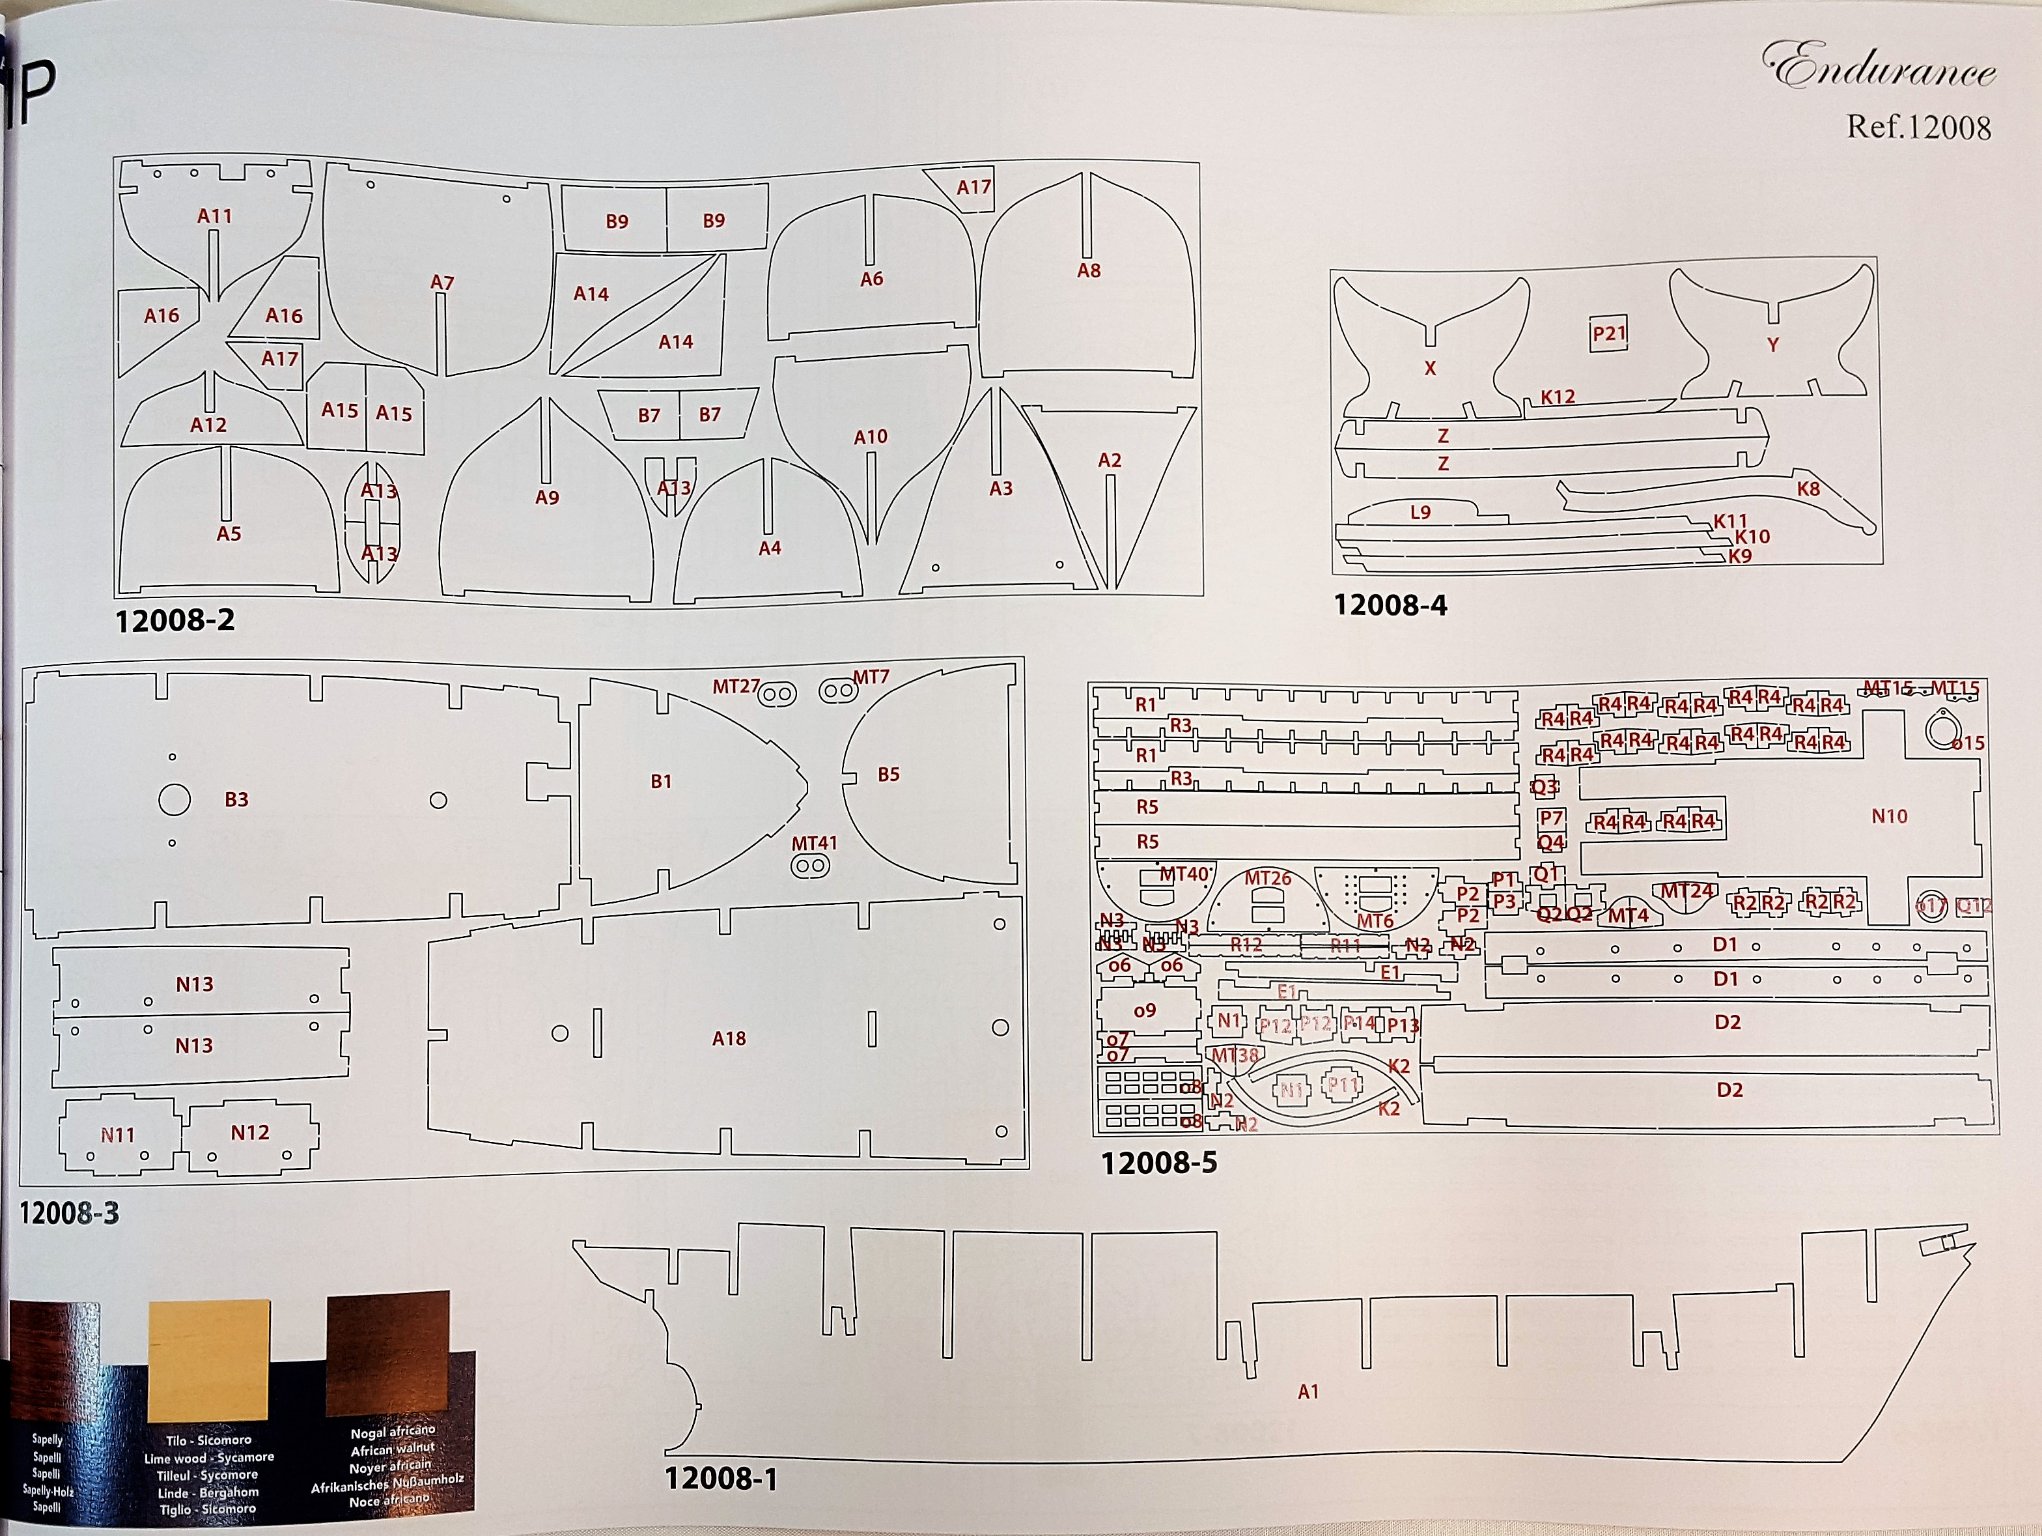
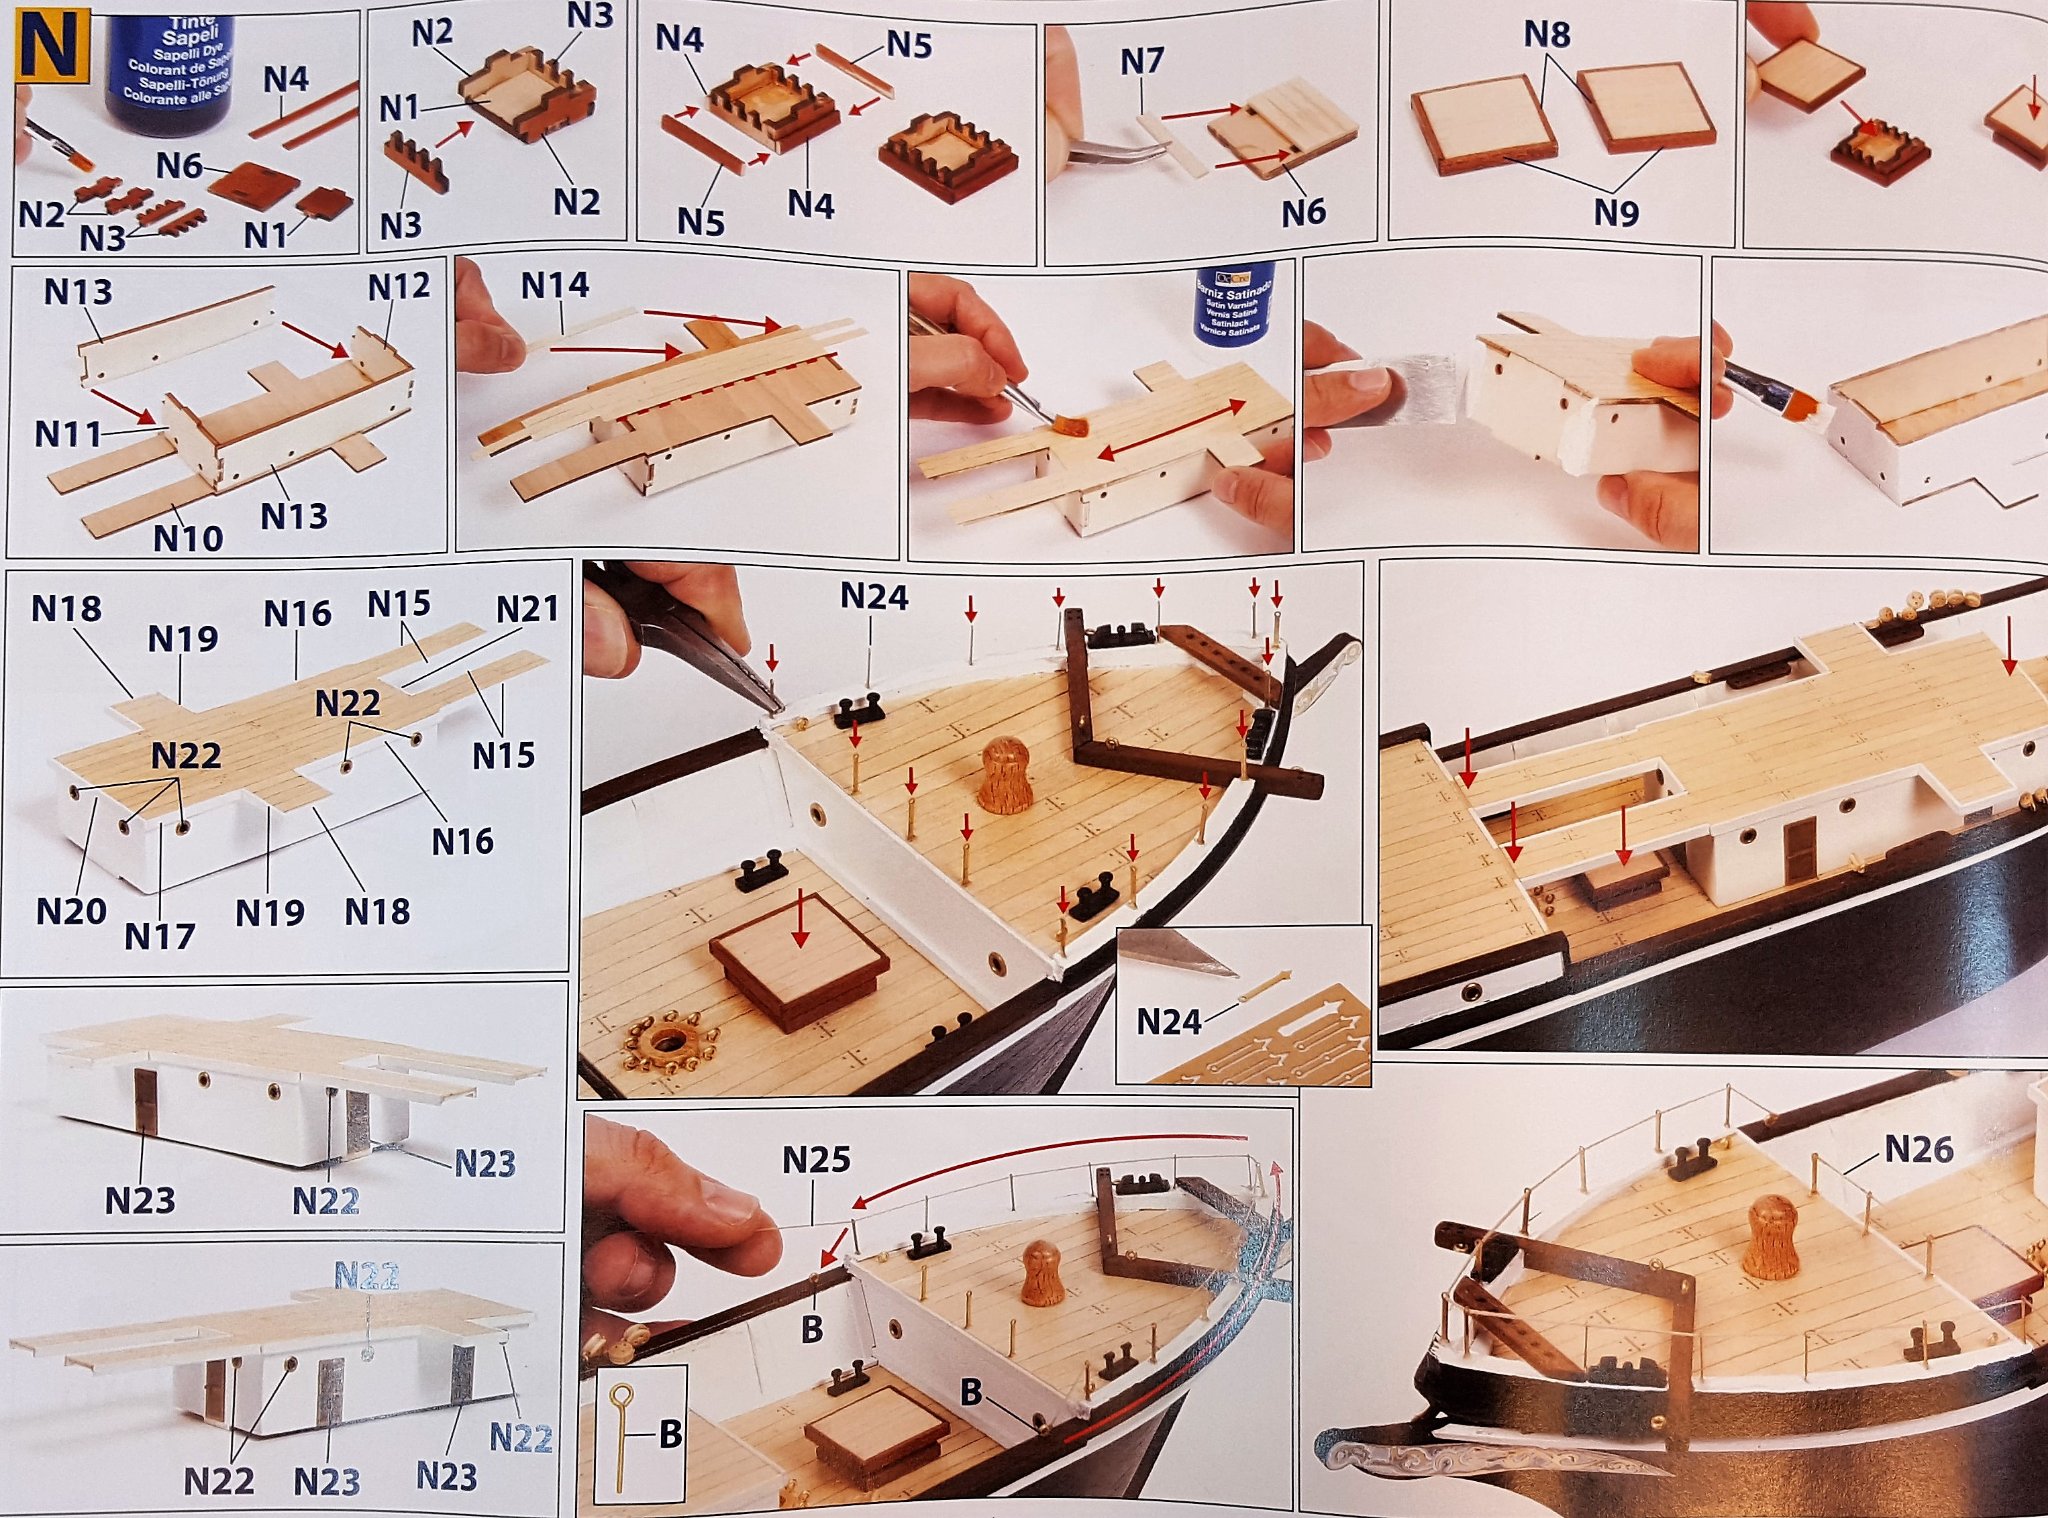
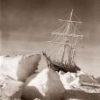
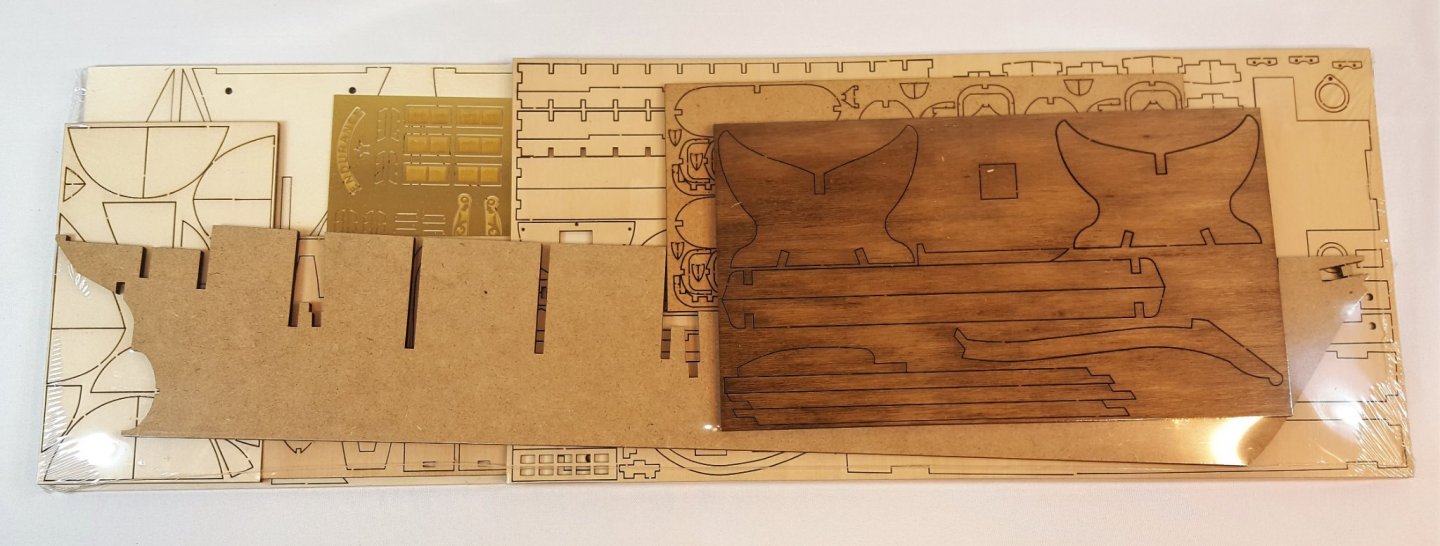
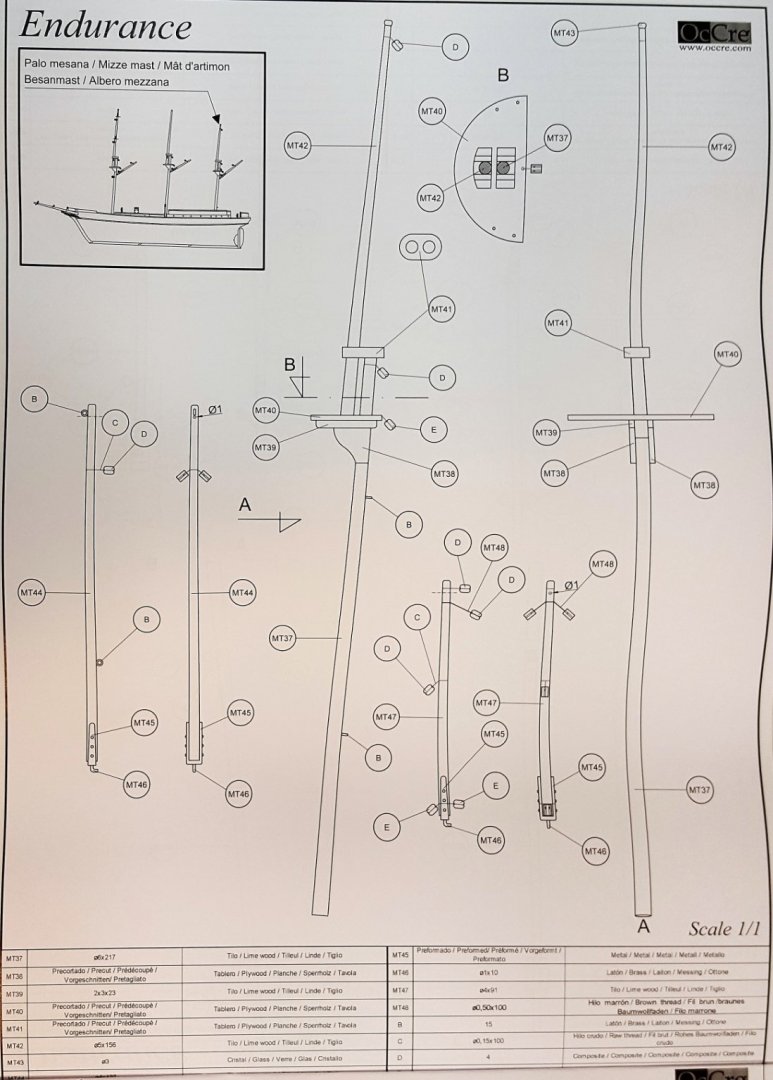
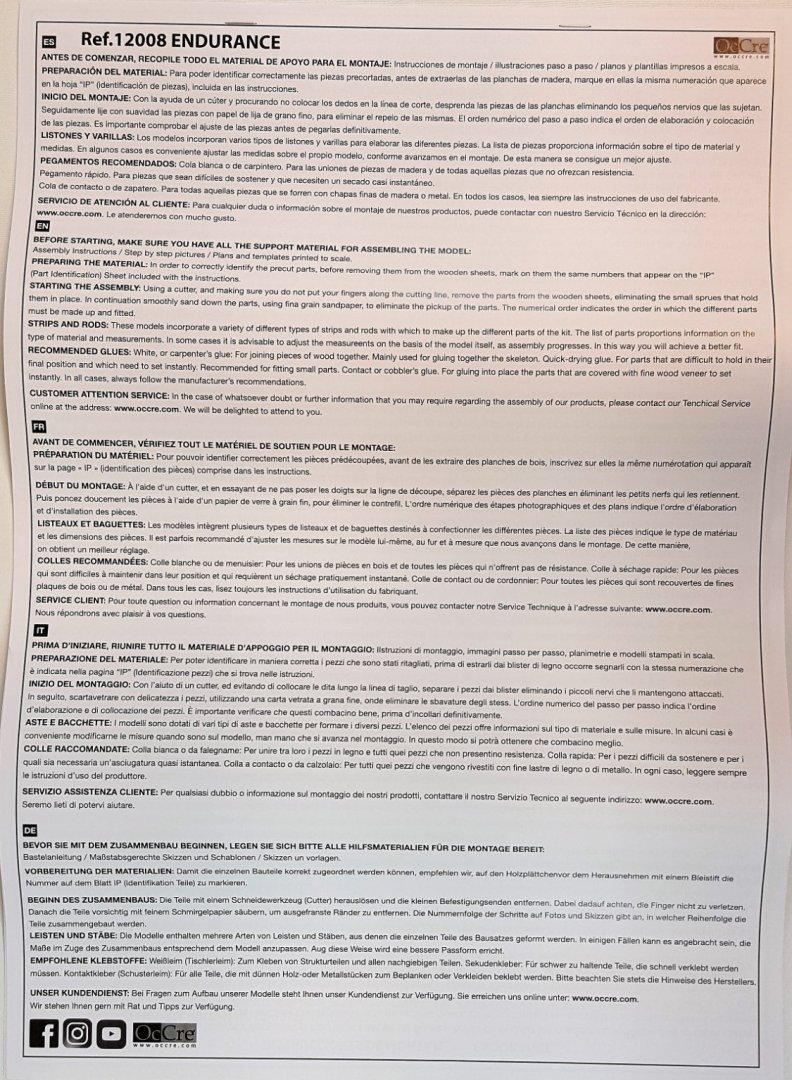
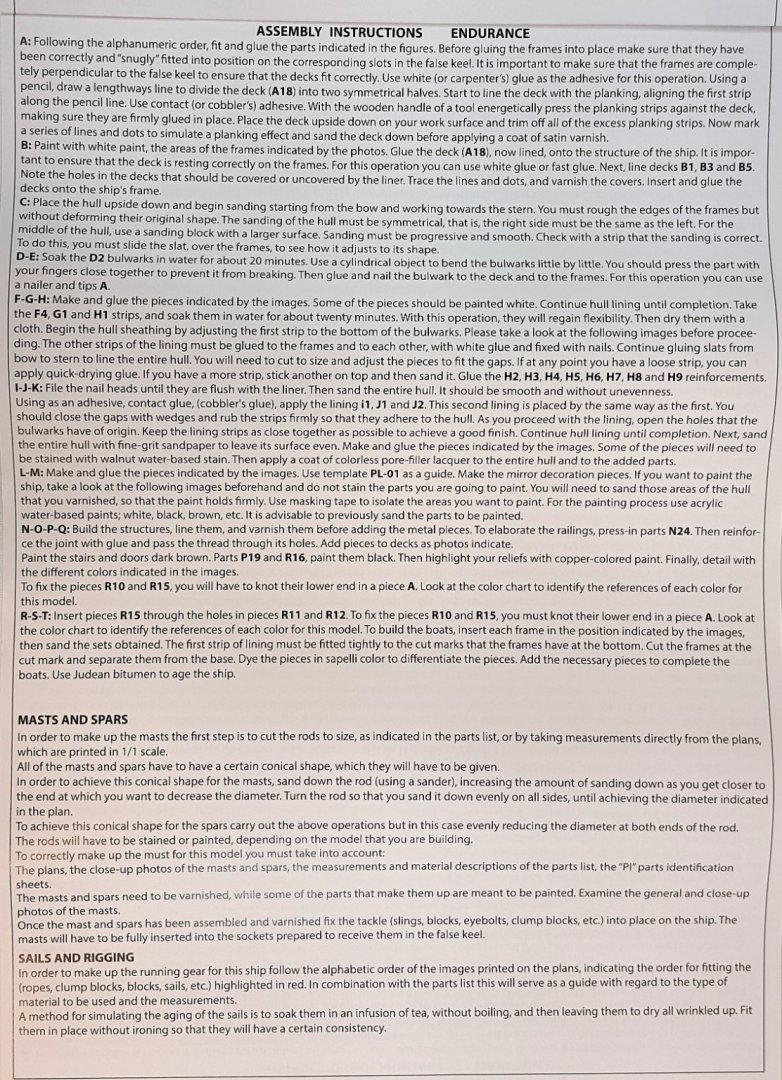
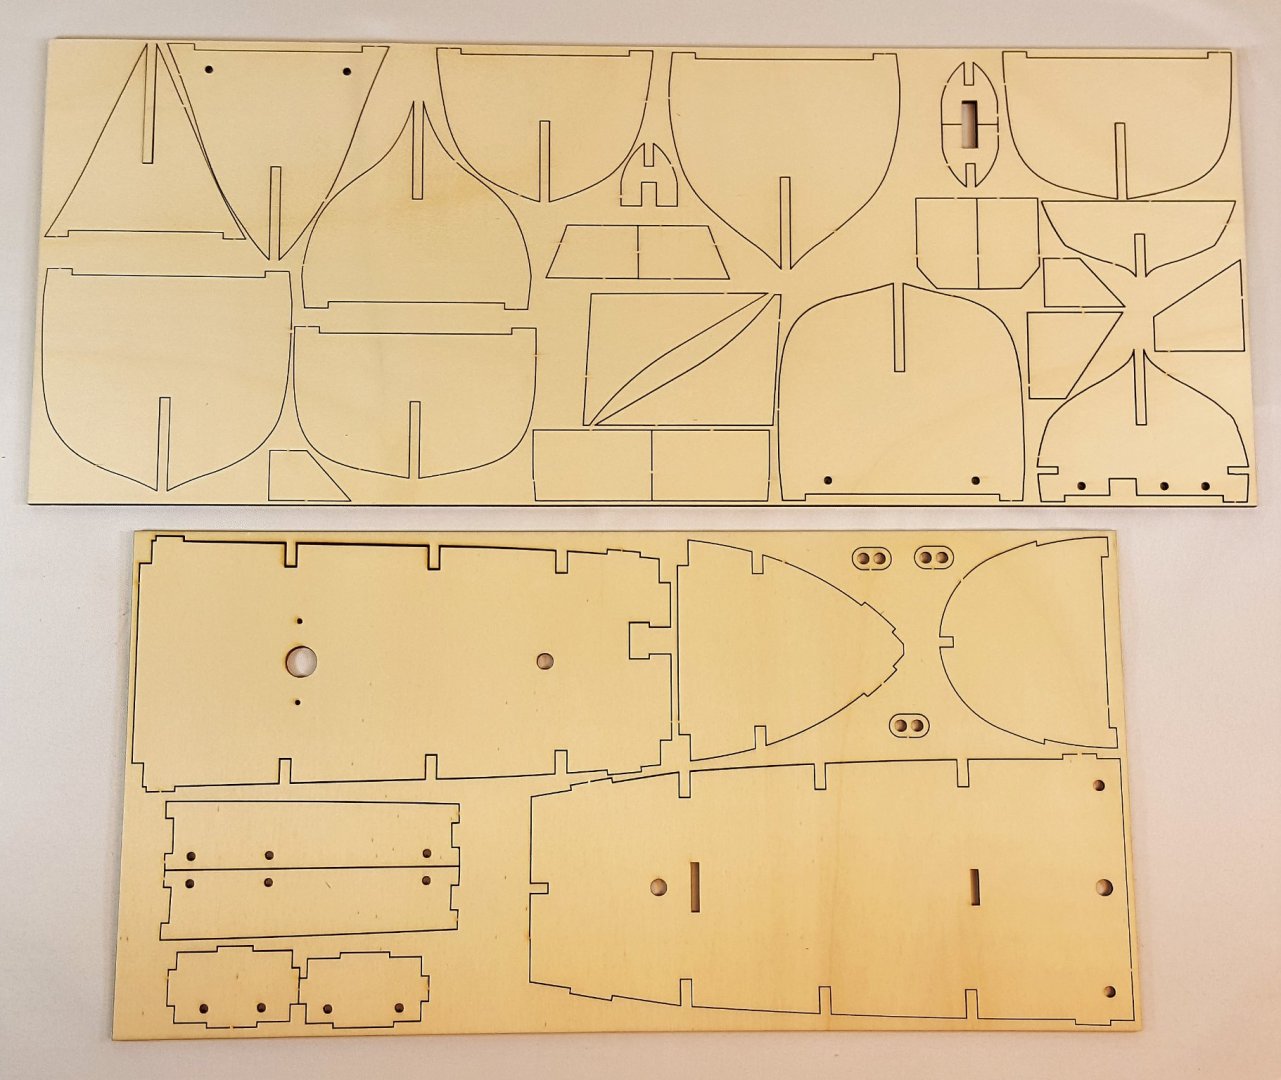
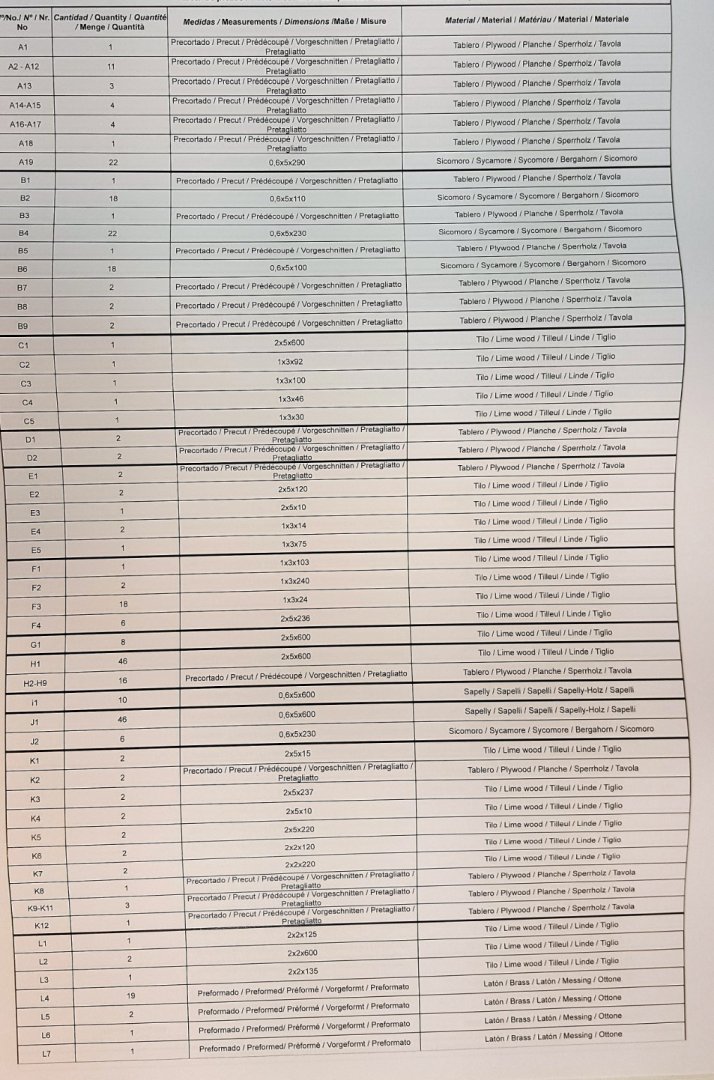
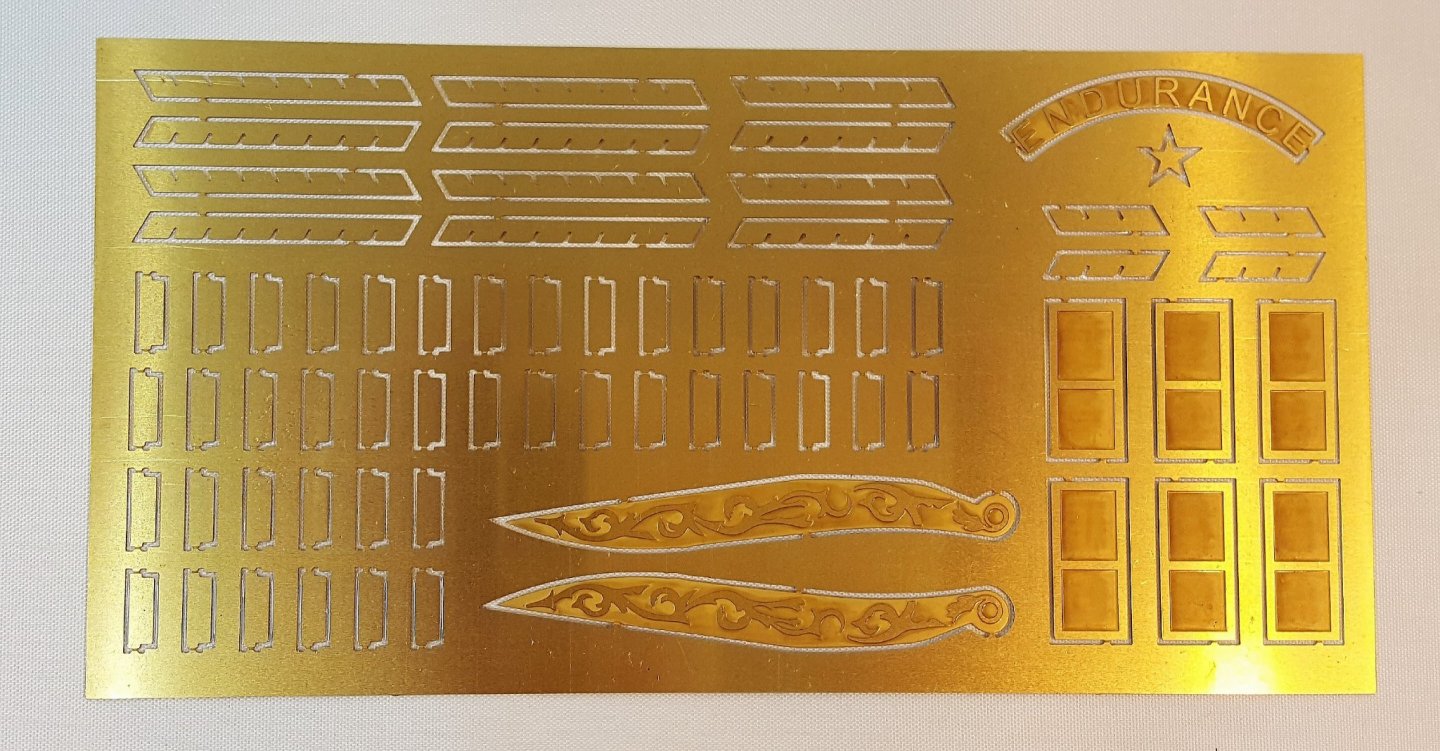
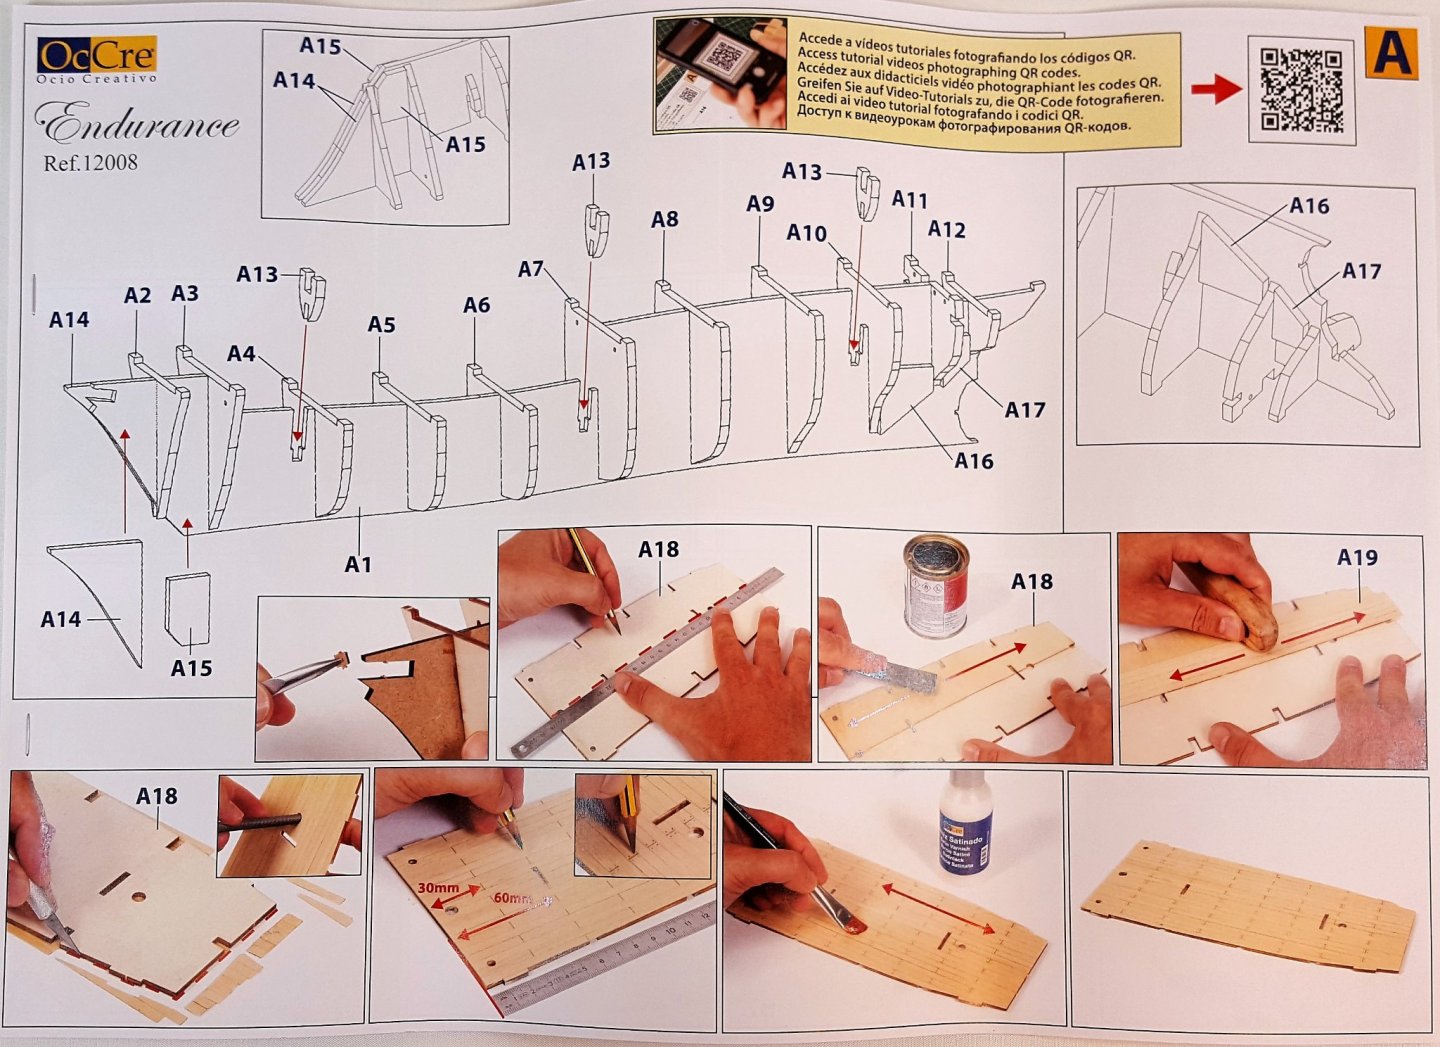
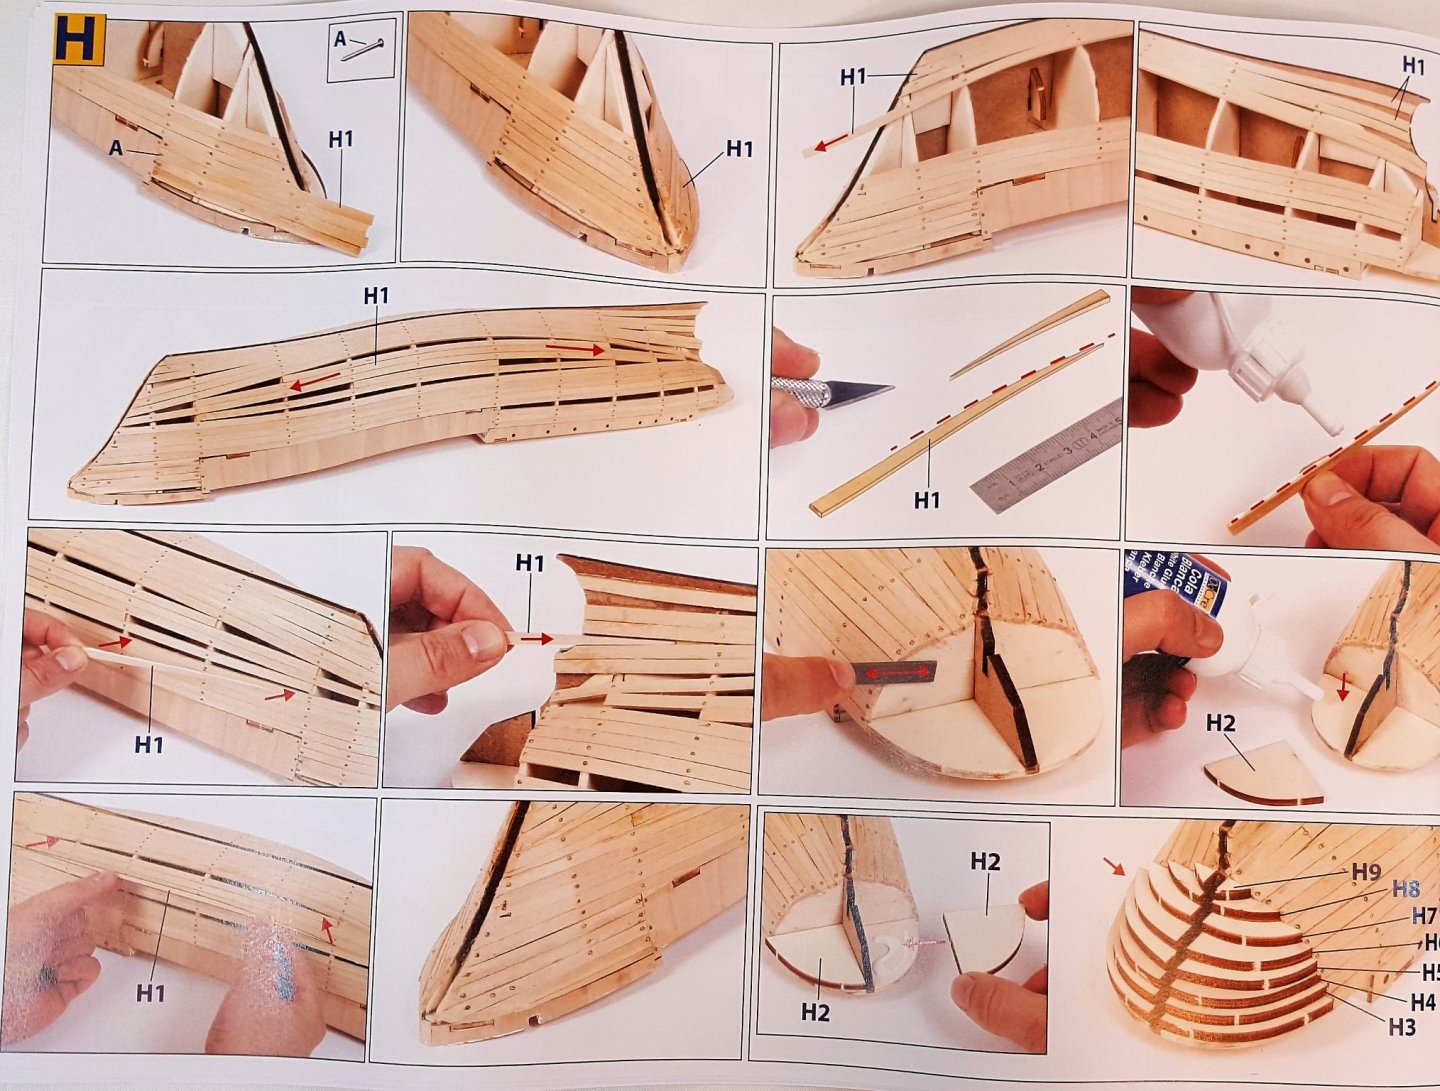
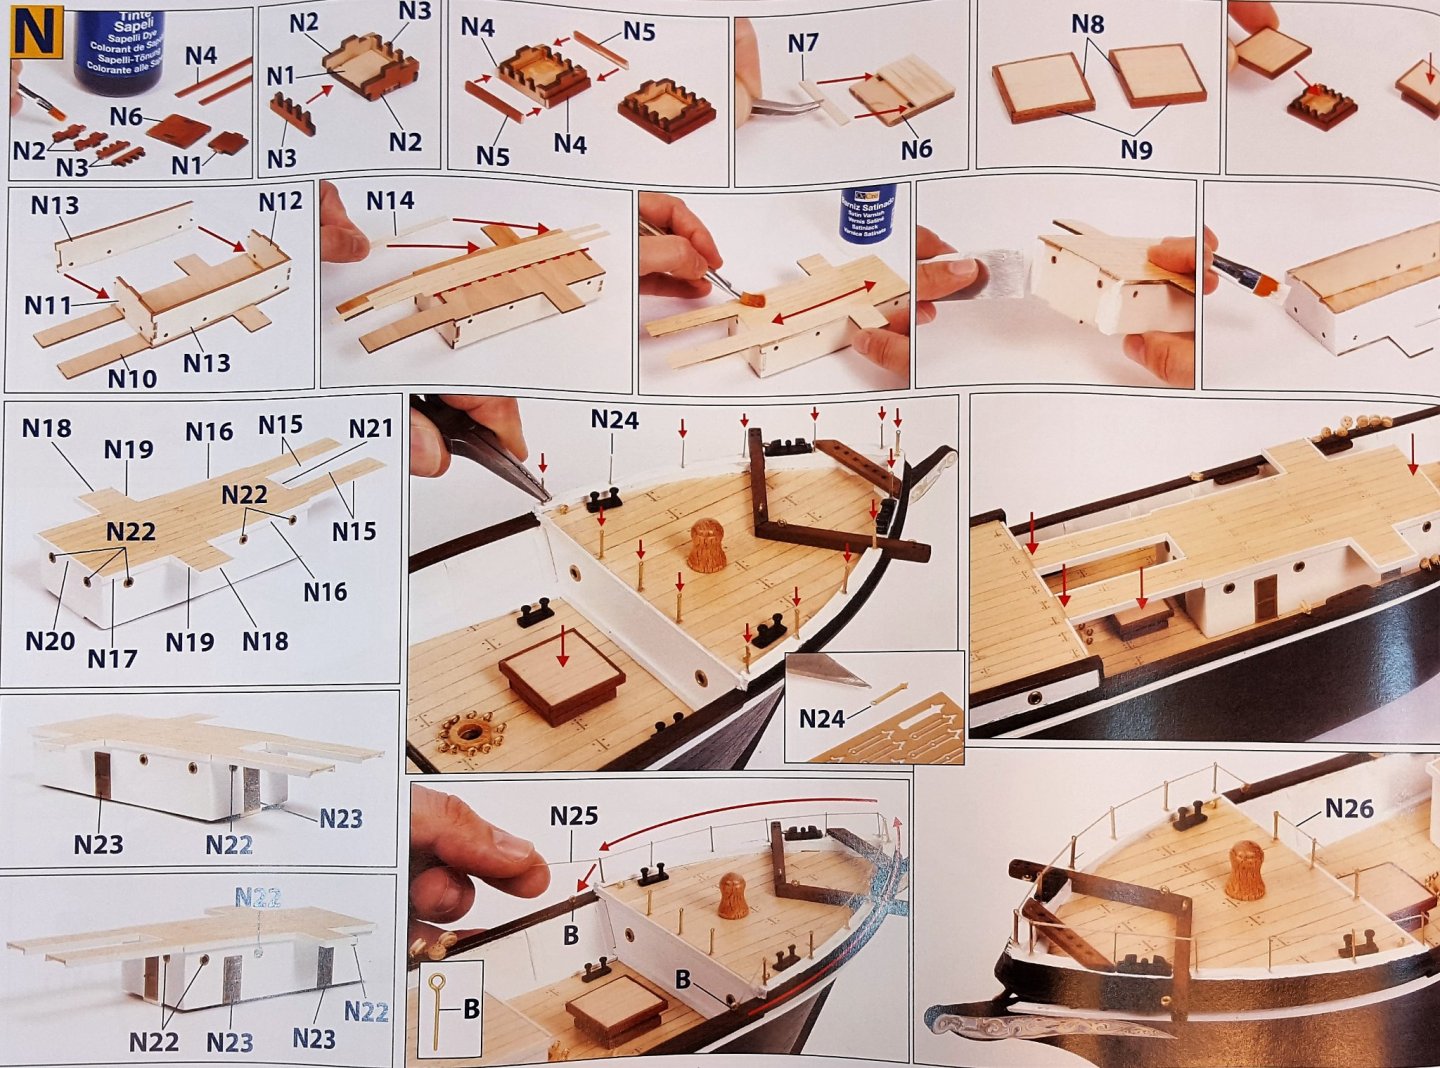
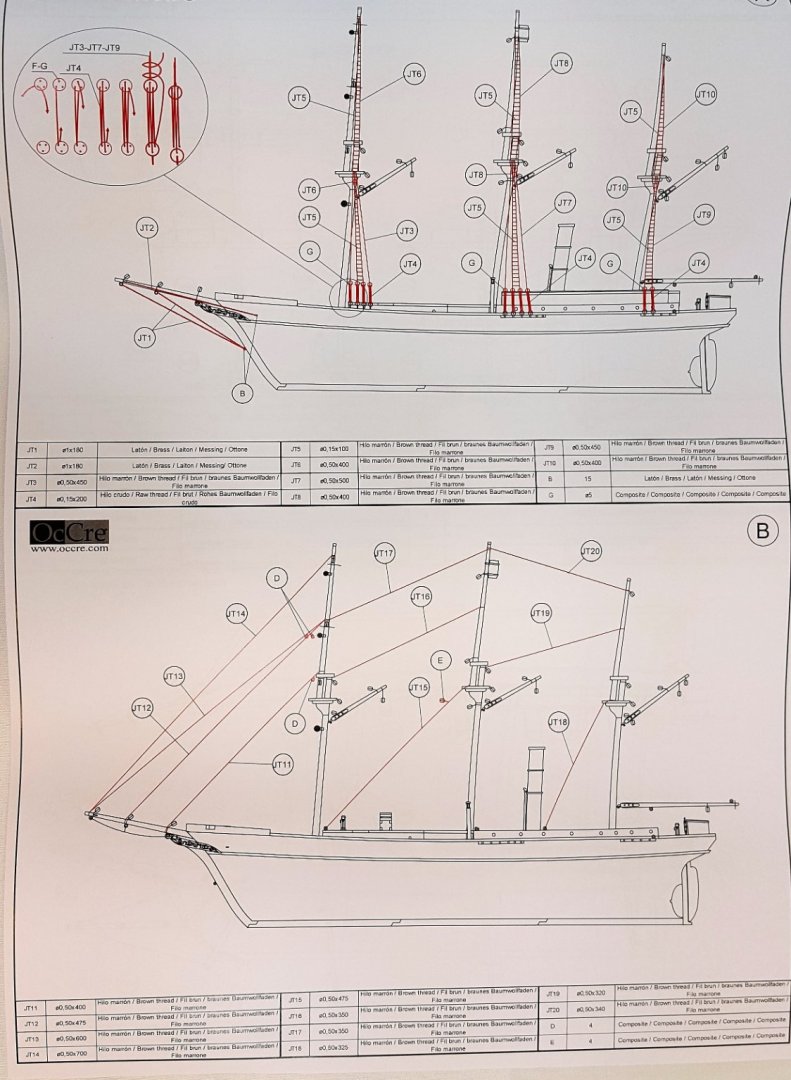
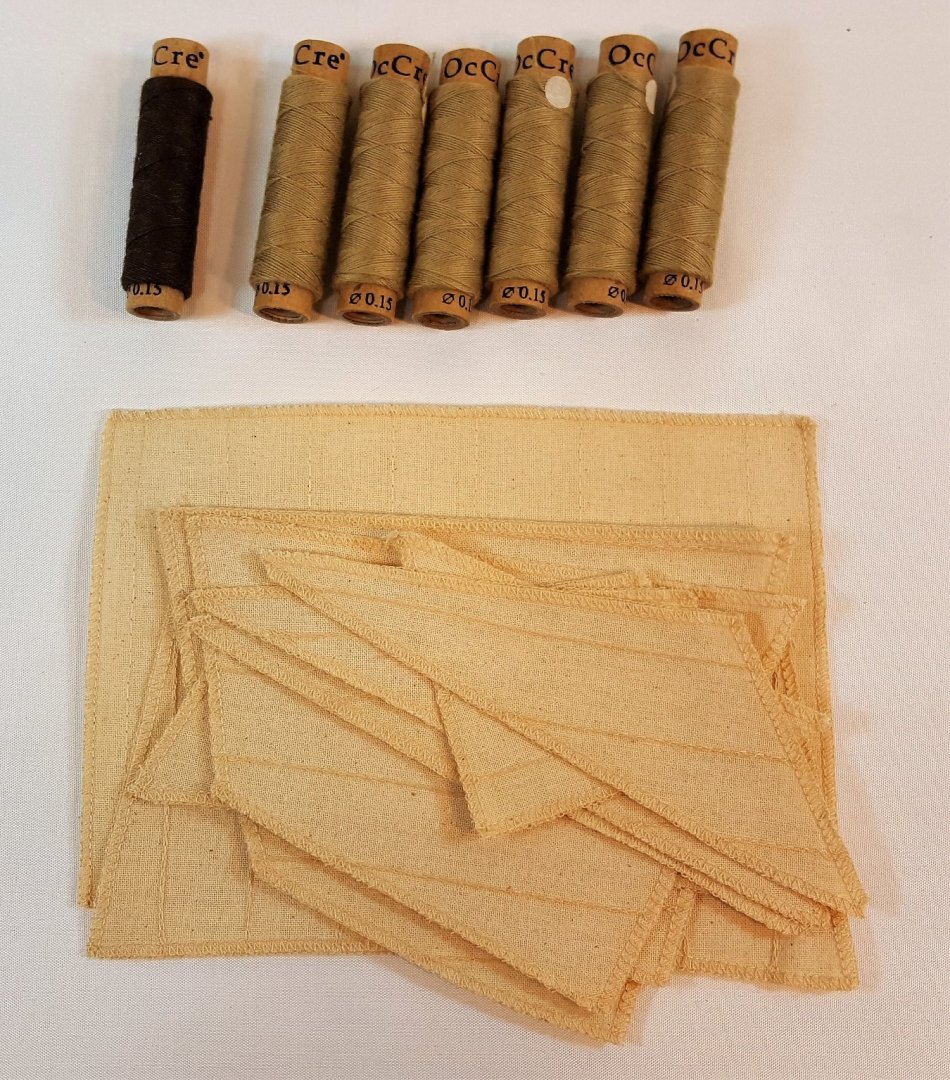
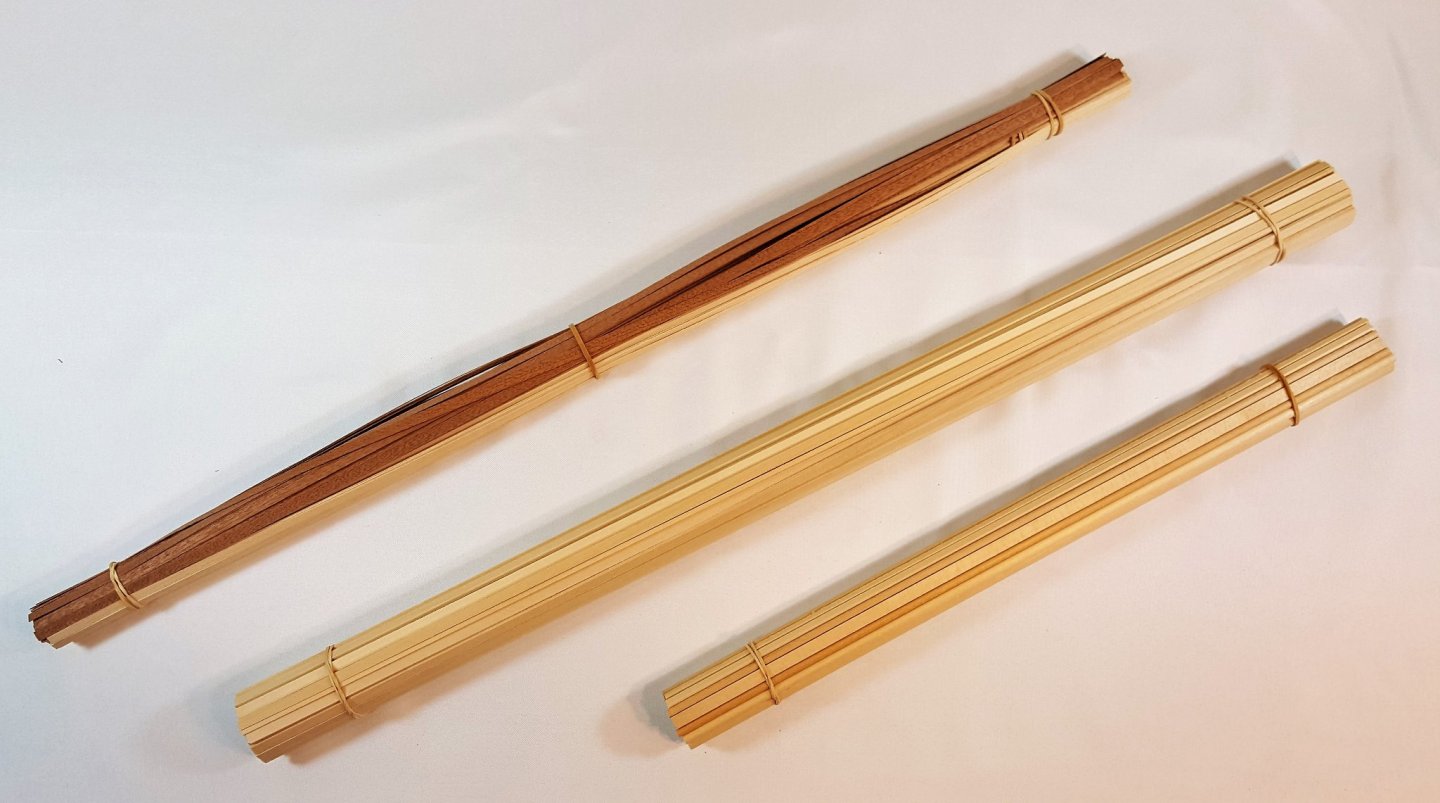
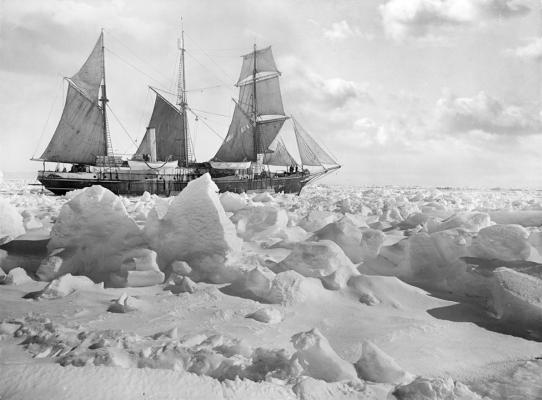
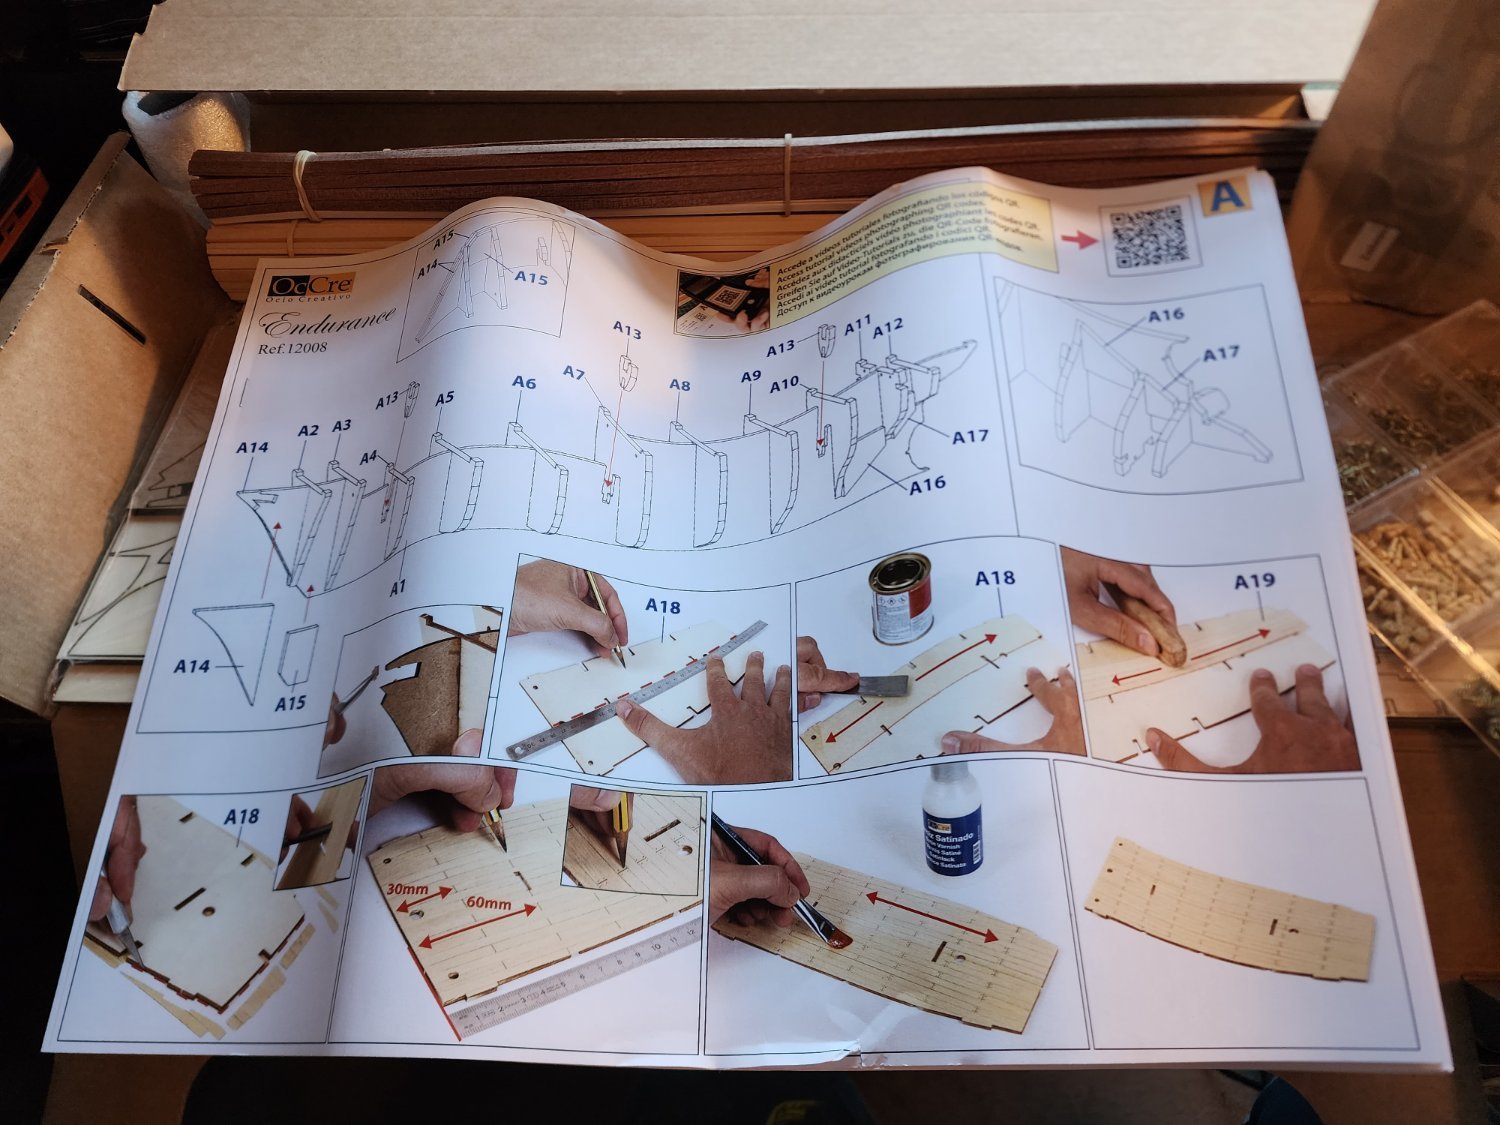
ENDURANCE by OcCre 1/70 scale MSRP €159.95 Image courtesy of OcCre All images by author except where noted. Sir Ernest Shackleton’s Endurance scarcely needs an introduction to nautical history enthusiasts. Launched in 1912, two years later she set sail for Antarctica with Shackleton and 27 others aboard for what was intended to be a transcontinental crossing of Antarctica via the South Pole. Instead, Endurance became stuck in pack ice in January of 1915 and eventually sank the following November. In April of 1916, Shackleton and several crew members set off for South Georgia in one of Endurance’s boats. They reached the island two weeks later and crossed a mountain range to reach the island’s whaling station. A rescue party was sent to fetch Shackleton’s remaining crew. Miraculously, everyone survived. Endurance trapped in the ice. Photo courtesy of Wikipedia (public domain). Over the years, this forum has seen numerous folks pine for a kit of Endurance, and now OcCre has responded. The kit is in 1/70 scale and carries an MSRP of €159.95, which in today’s market has to be considered a bargain. I was very interested in doing this review because of the striking look of the prototype model, the fame of the subject, and the fact that the ship is not a man-of-war (hence no tedious cannon to rig) and carries a barkentine rig, which is one of my favorites. Let’s dive in, shall we? First Impressions Endurance was shipped by FedEx Economy and made the trip from Spain to South Carolina in one week. I was a bit alarmed to see that the exterior shipping box had one corner completely stove in – it had obviously been dropped from some height and landed directly on that corner. Opening the box revealed that the kit had been shipped sans packing material, which is not the greatest way to do business, IMO. However, the kit box was not damaged during transit, despite the smashed corner. I’ve never built an OcCre kit before, nor even seen one in person, but I liked the look of the kit box, with a nice shot of the prototype model and a window through which one can see the fittings box. On closer inspection, I discovered that the “box art” is actually a printed sheet that is glued to a generic box cover. I suspect that this is why OcCre kits aren’t built to any standard scale; like the old “yellow box” kits from Model Shipways, OcCre kits are probably built to whatever scale will allow the kit to fit into a standard-sized box – 1/70 scale in this case. Opening the box revealed that although some of the contents could slide around a bit, they had been taped, shrink-wrapped, and compartmentalized in such a way that any potential for damage was really rather slight. Paper Stuff: Plans and Instructions Someone unfamiliar with OcCre might initially be alarmed upon reading the instructions – there essentially aren’t any, at least not in written form. Apart from a single paragraph about what to do before starting assembly, the written instructions consist of one sheet (in a choice of languages). (Apologies for the purplish tint -- I'm limited by the capabilities of my photography equipment.) But have no fear! What the kit lacks in written instructions, it more than makes up for in photo instructions. And in addition, OcCre provides a series of online video tutorials for the kit, which you can preview here. Let’s look at some examples from the photo instructions. BTW, the instructions, as well as the drawings, are bound with only a couple of staples. It’s not high-quality binding, but it does allow everything to easily be laid flat by simply removing the staples. Here you can see that the photo instructions are very detailed; no step is left uncovered. You can also see that the construction method is typical plank-on-bulkhead, but there are some nice touches. The deck is planked in such a way that small slots are left on the underside; these fit over the ears on each bulkhead, so that the entire structure is strengthened and locked in place. The directions for planking present a Mastini-like simplified method, which can be forgiven considering that the hull is intended to be painted. Of note on this sheet is the kit’s method for dealing with the ship’s round stern; it is built up bread-and-butter style and sanded to the correct shape. Apart from decking and planking, nearly all of the ship’s upper works are built from laser-cut parts, rather like a large jigsaw puzzle. I believe that this, along with the simple rig and lack of armament, makes the kit doable for an intermediate builder. A last shot of the hull instructions, mainly to show the construction of the chainplates, which, surprisingly, are made from brown rigging cord. Drawings The kit includes a complete set of 1:1 masting and spar drawings, as well as a 1:1 set of sail drawings. The instructions for rigging consist of a separate set of drawings. Fine points of mast and spar construction are covered, with different drawings depicting standing rigging, running rigging, and belaying plan. Finally, the paper bits include a parts list, a key to the parts billets, and a color code for use with Vallejo paints and OcCre stains. Parts The various parts billets come in a shrink-wrapped bundle and consist of parts cut from walnut, plywood, or MDF. All of the billets arrived perfectly flat, the wood is of good quality, and the laser-cutting is very well done, with fine, sharp lines and minimal reverse-side charring. The walnut sheet includes parts for a display cradle. The shrink-wrapped bundle includes an etched brass sheet that includes ladders, recessed door panels, trailboards, and ship’s name. Two bundles of good-quality strip wood and one of strip wood and dowels are included; the strips are nicely dimensioned and free of fuzzy edges, and the dowels are straight. Fittings A single, compartmented plastic box contains the fittings. The box was taped to prevent its contents from spilling during shipment. The largest compartment contains a fret of PE brass parts, three spools of 0.50 mm brown cord, various diameters of brass wire, a flag, a sheet of acetate for glazing windows, and cast metal davits, anchors, and stocks. The castings are free of flash. Other wood or metal fittings include cast metal bollards, fairleads, cowl vents, rudder hardware, binnacles, ship’s wheel, propeller, wood and metal capstan and windlass parts, and brass chain. Again, the castings are of good quality. The rest of the fittings box is filled with garden-variety wood and metal parts: blocks, deadeyes, mast hoops, belaying pins, eyebolts, nails, etc. Finally, a sealed envelope contains the remaining seven spools of rigging cord (one brown, six tan), which I was surprised to discover were all of the same diameter (0.15 mm), and a full suit of pre-sewn sails. The sails have the usual sort of heavy seam stitching typically found on such items. I don’t particularly like them and would probably opt to replace them, but for someone not inclined to put in that sort of effort, they will certainly suffice. Overall Impressions The new OcCre Endurance is not what one would call a great kit, but it is by no means a bad kit either. OcCre have economized here and there, as evidenced by such things as off-the-shelf fittings, providing only two diameters of rigging cord, and supplying less-than-convincing pre-sewn sails. Cost-cutting measures such as these succeed in making the kit affordable -- after all, top-end kits usually fetch top dollar – or Euro – don’t they? In other respects the kit is quite good, e.g. the thorough photo instructions, good quality wood, and excellent laser cutting. As I said earlier, I believe this kit can be built by an intermediate builder, and it will undoubtedly produce a nice-looking model right out of the box. However, with a bit of extra research and some kit-bashing, I have no doubt that the kit could form the basis for quite an excellent model. For the price and for the generally good quality (not to mention the unique subject), if not for the level of detail, the OcCre Endurance can be recommended to any interested builder. Image courtesy of OcCre Image courtesy of OcCre Thanks go to OcCre for sending out this review example. Endurance may be purchased directly from OcCre or from one of their regional distributors.


-
Hi all I am a sound and projector designer and I was wondering if anyone out there has a model of Shackelton's ship The Endurance? We are doing a theatrical show next March and I'm starting on ideas, one of the ideas is using Frank Hurleys pics, see attached pic (1 there are about 7 PNG images here, when projecting they are moving slowing) (2 Stuck in the Ice) The new idea is using shadows, but I need a replica or something close, or boat plans, or close up pics, or a 3D model, anything at this point as my research on the net is coming up short. Thanks for reading J The ship was launched on 17 December 1912 and was initially christened Polaris A brief synopsis on the story... After the race to the South Pole ended in December 1911 with Roald Amundsen's conquest, Shackleton turned his attention to the crossing of Antarctica from sea to sea, via the pole. To this end he made preparations for what became the Imperial Trans-Antarctic Expedition, 1914–17. Disaster struck this expedition when its ship, Endurance, became trapped in pack ice and was slowly crushed before the shore parties could be landed.

-
- 1
-
-
- Endurance
- Shackelton
- (and 3 more)
-
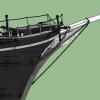
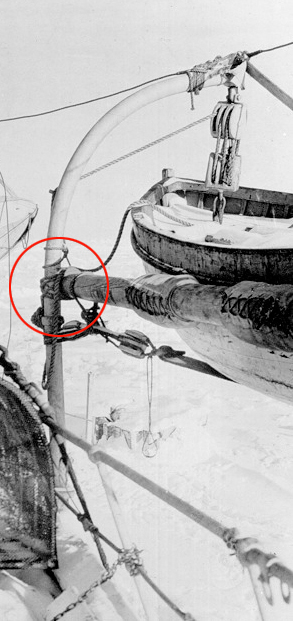
Any thoughts on the attachment of the strong back to the radial davits on the Endurance? This was the ship Shackleton used for the 1914 Antarctic expedition. Is it only lashed to the davit or is there a mechanical attachment? I can't make it out. I have a pic attached showing the area. Thanks, Terry PS Posted this in General Kit discussion in an old thread. Thought it may get an answer here. Thanks


.jpg.f50550dd3ce77a2d88aec5f32de44438.jpg)
.jpg.8e4371dbf4142057308df68abe603b1e.jpg)
.jpg.3f1385ea514487754fb8113fde782856.jpg)