Search the Community
Showing results for tags 'harvey'.
Found 16 results
-
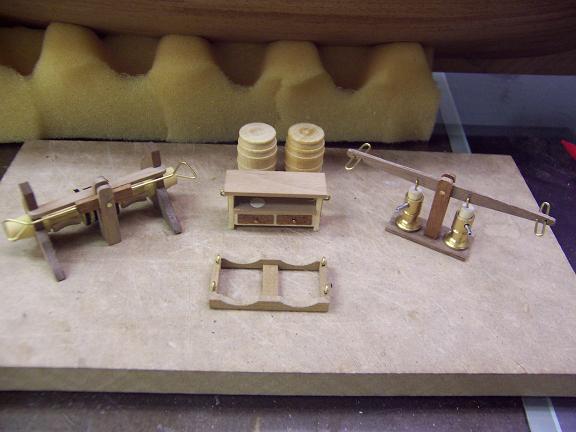
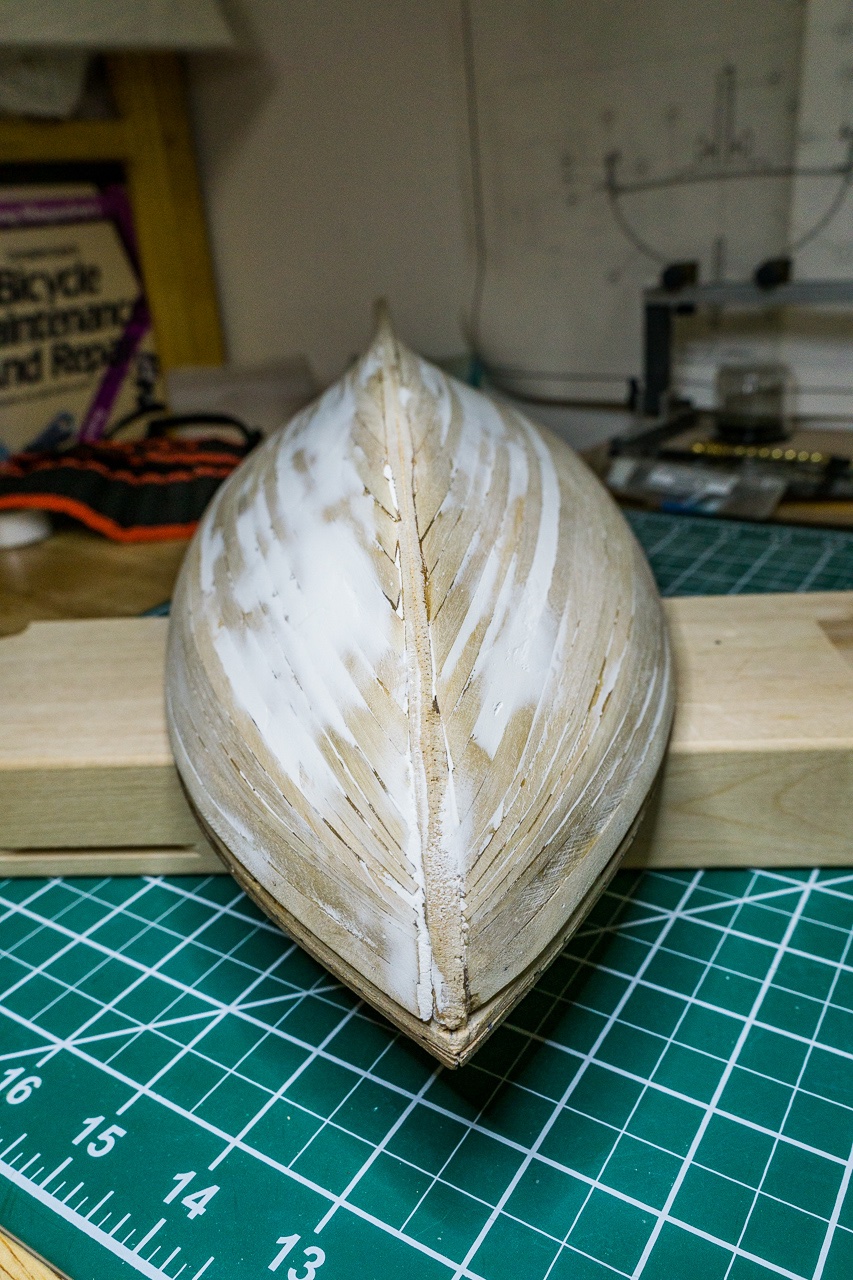
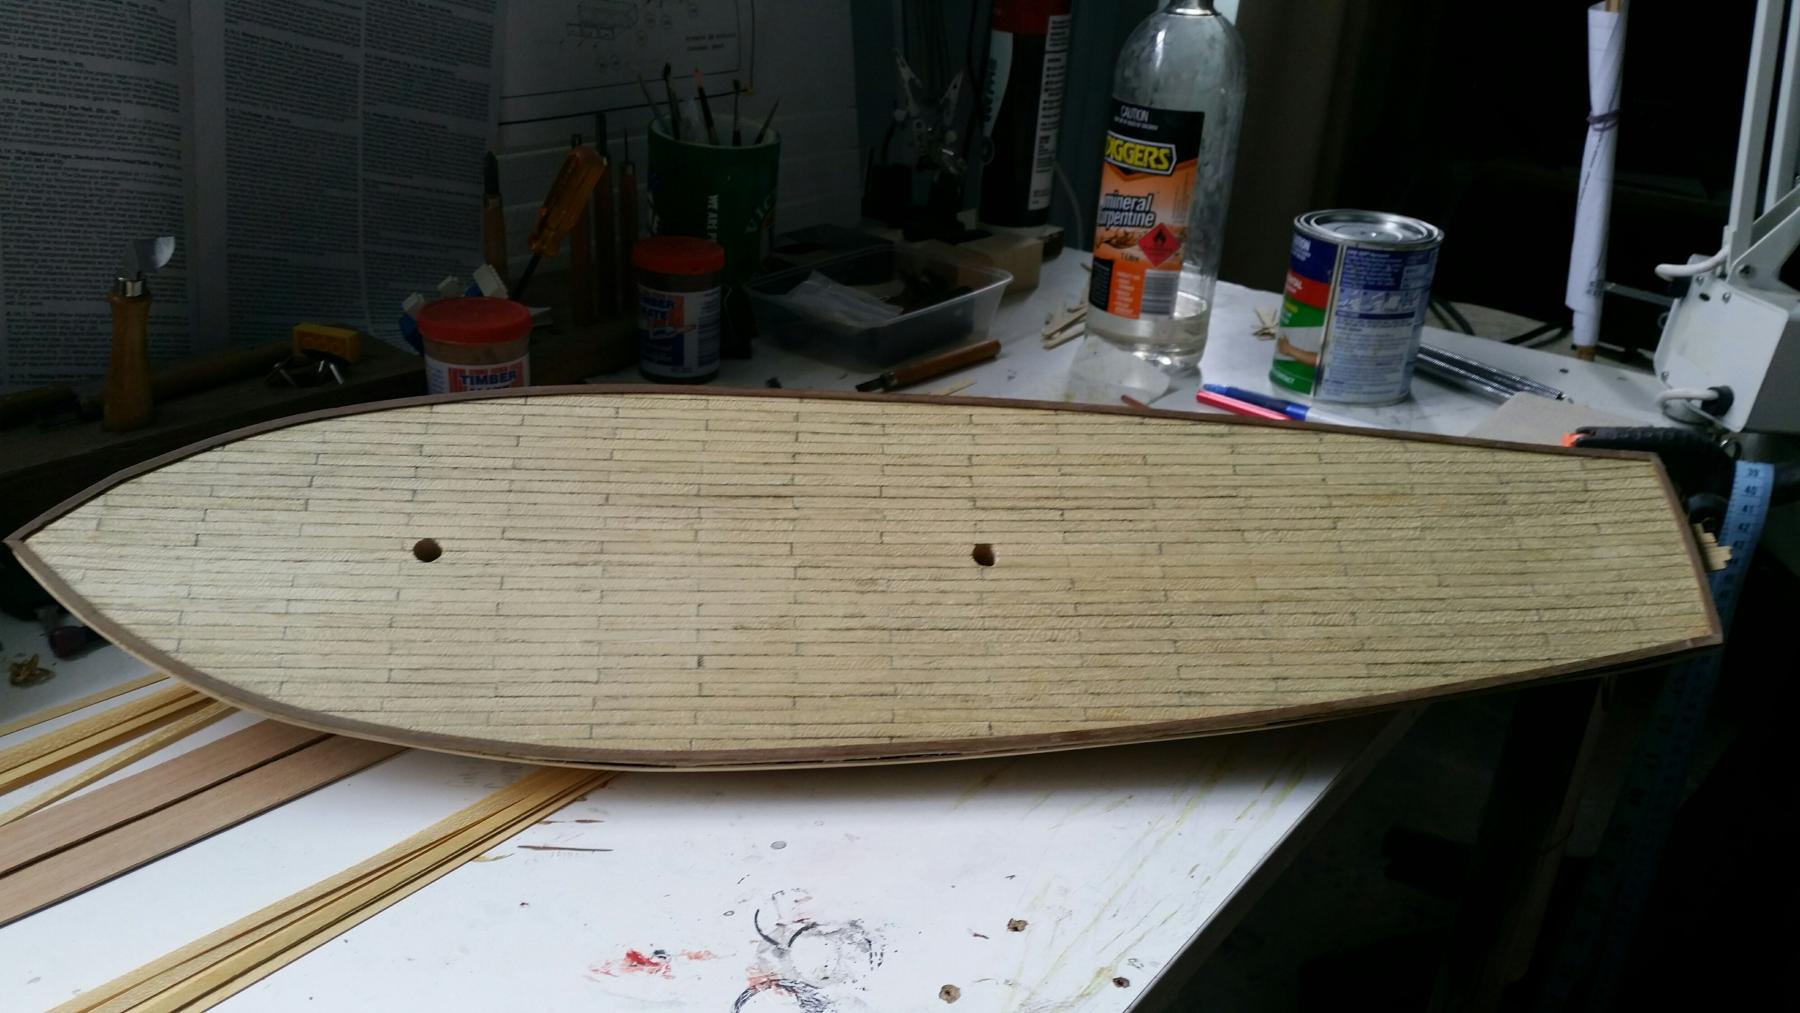
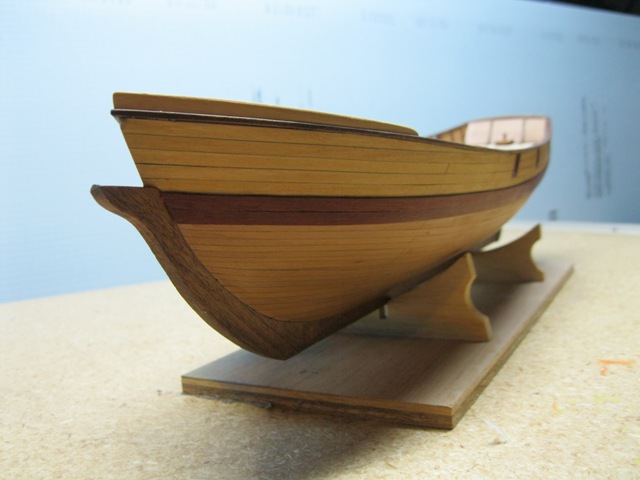
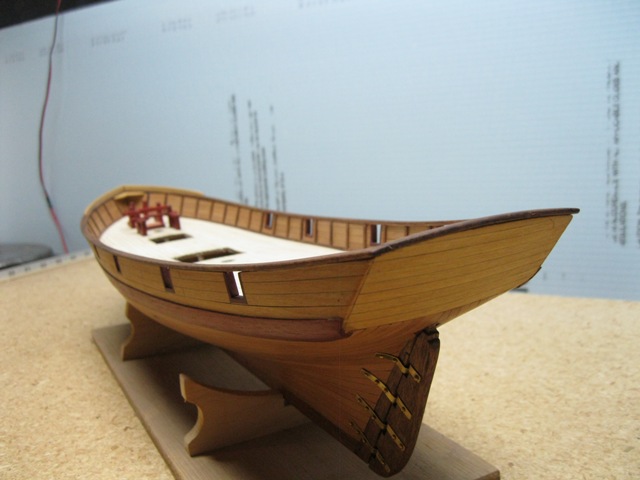
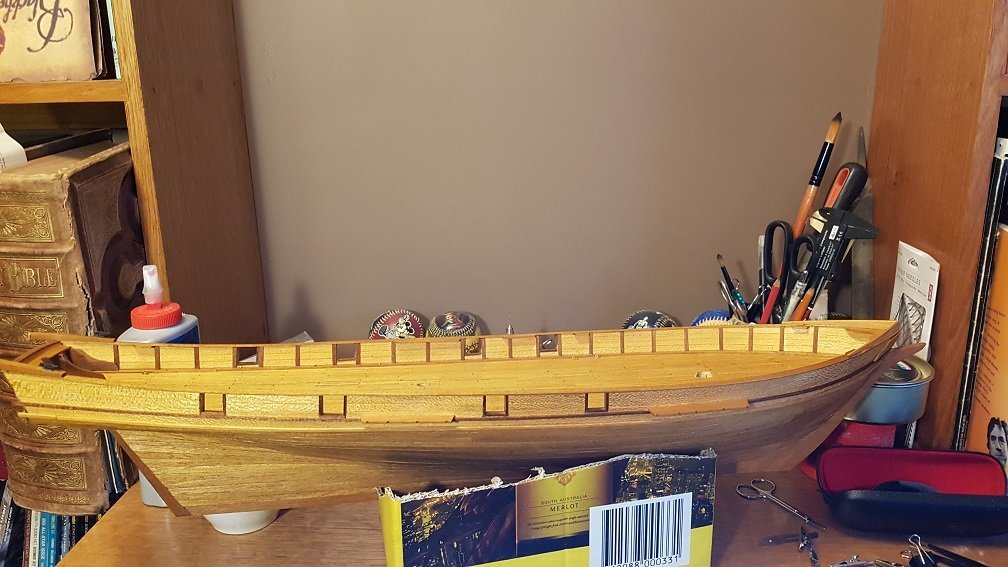
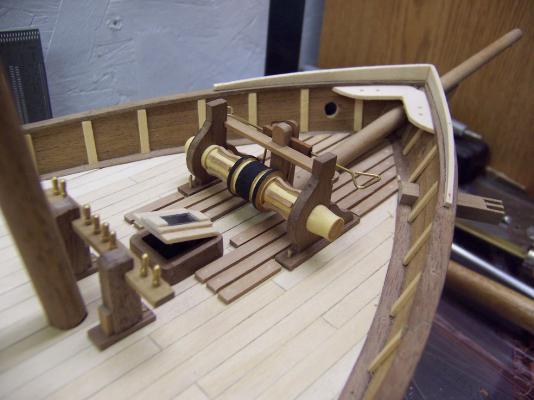
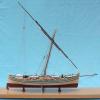
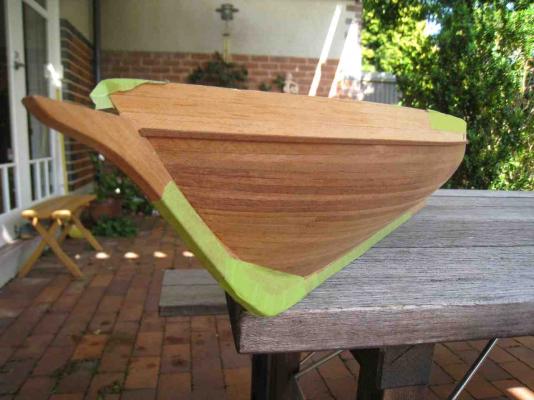
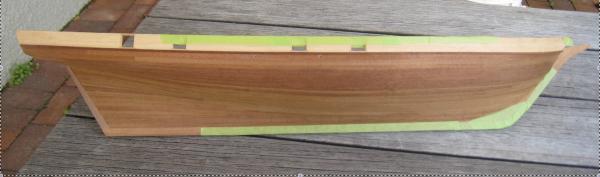
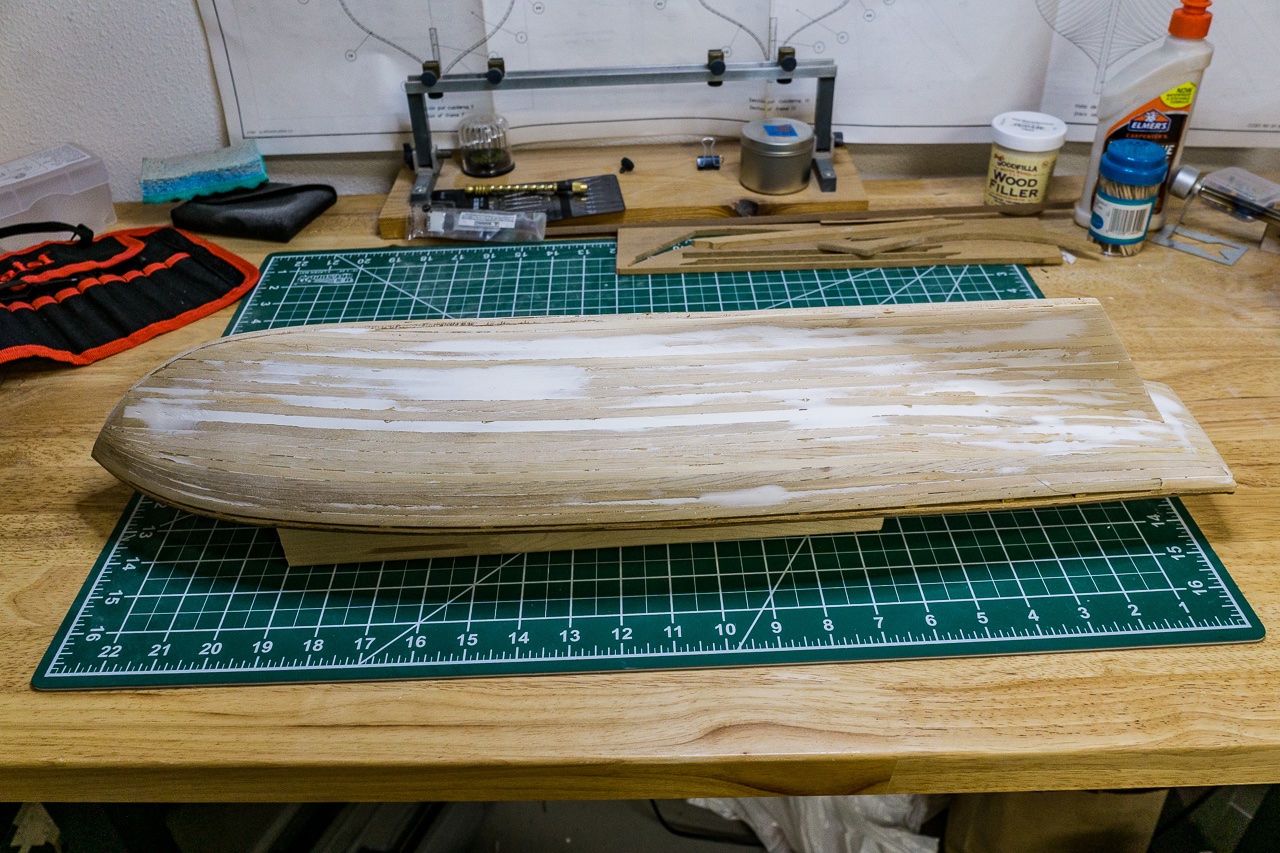
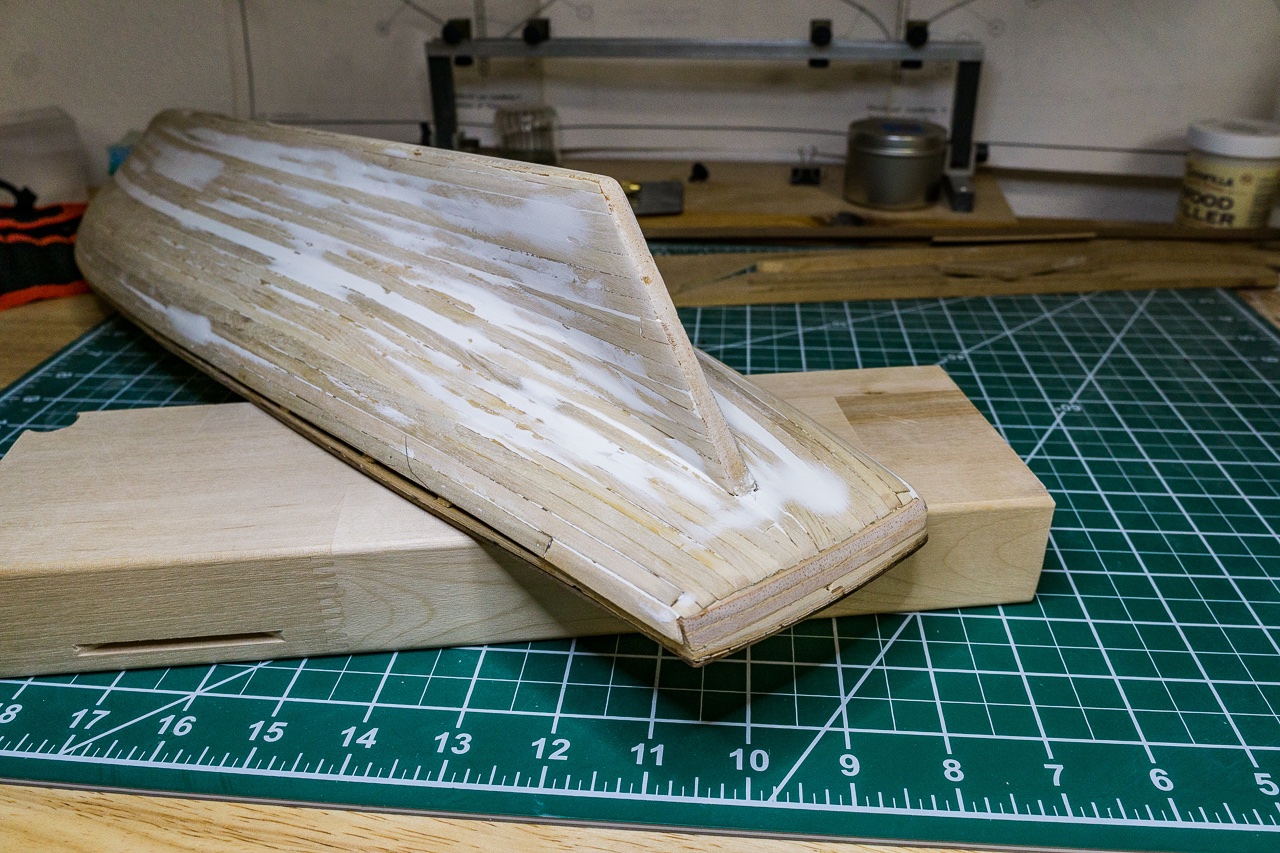
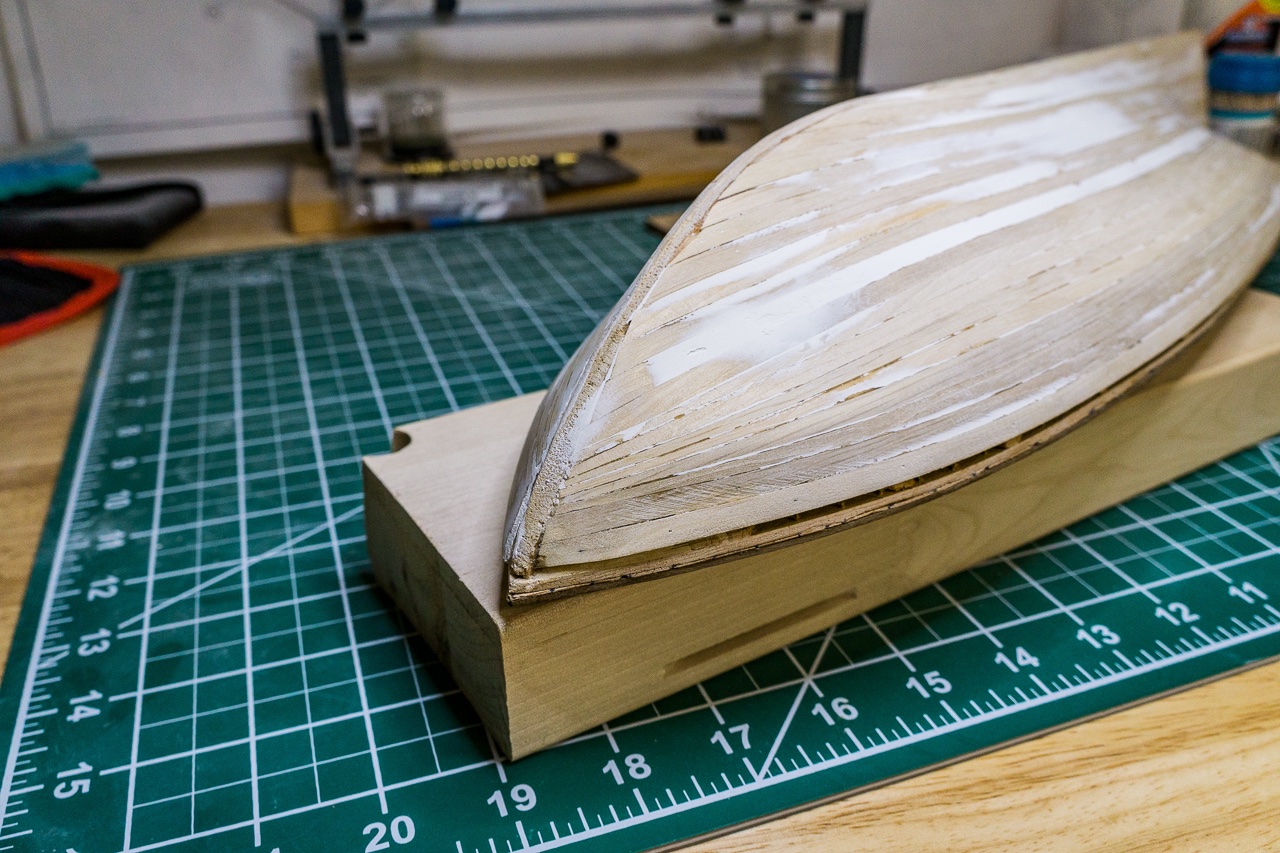
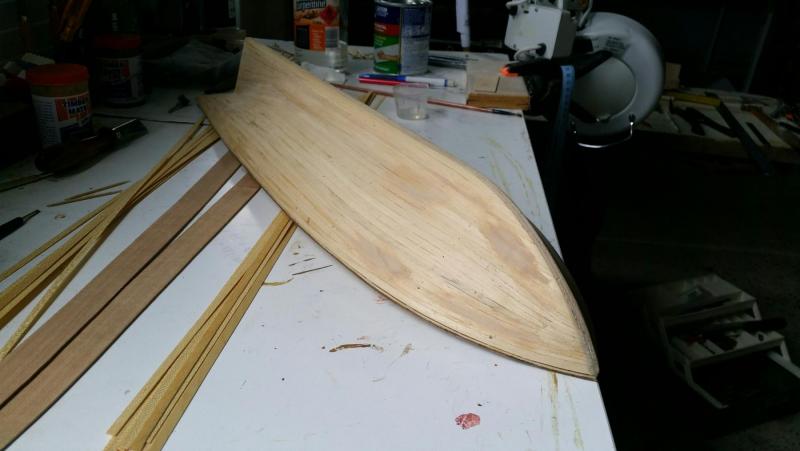
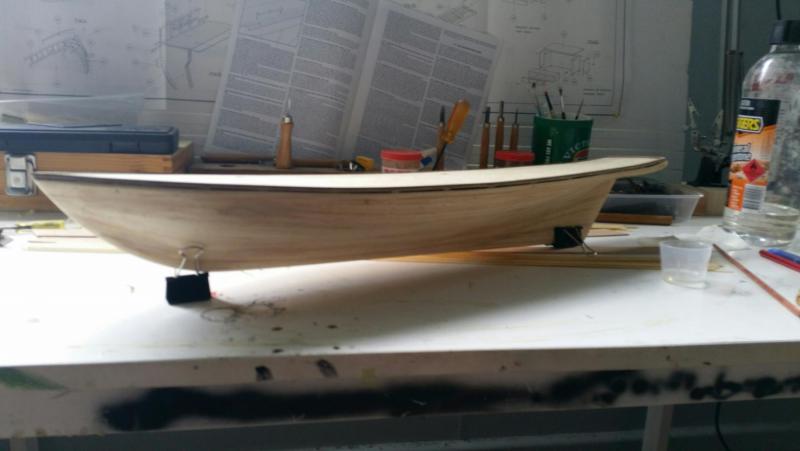
 I started this AL Kit of the Harvey about over 20 years ago. I put it aside to start another kit then never returned to finish her. She was my first attempt at ship modelling so I have made a number of mistakes. It is time to finish her off. She is not in bad condition - most of the pieces seem to be present with only a few broken bits. The Hull is fully planked, all of the deck structures are complete, the cannons are build (of course), and two of the masts are built along with most of the yards. I usually play audiobooks of Patrick O'Brian while in the ship yard so in honour of the great man I am going to call this Baltimore Clipper "The Ringle". I dusted off the hull, then added a coat of Tung Oil The masts and deck furniture are in good condition. It's surprising that not more was broken, but fortunately there is very little damage.
- 9 replies
-
- 4
-

-
- artesania latina
- harvey
- (and 1 more)
-
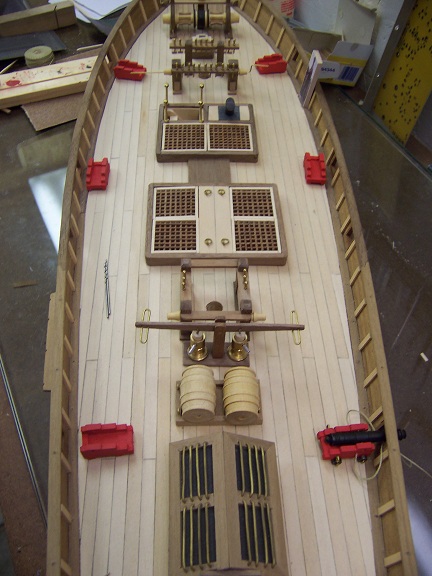
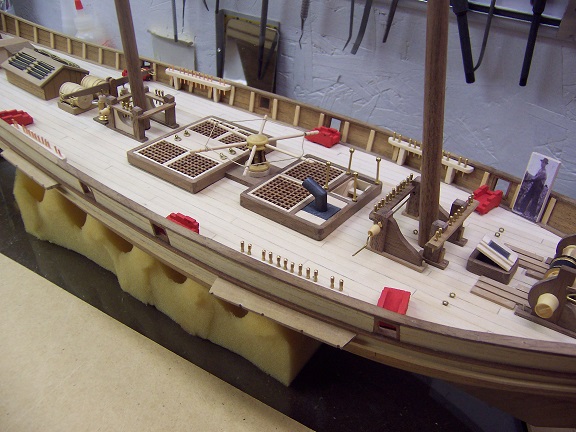
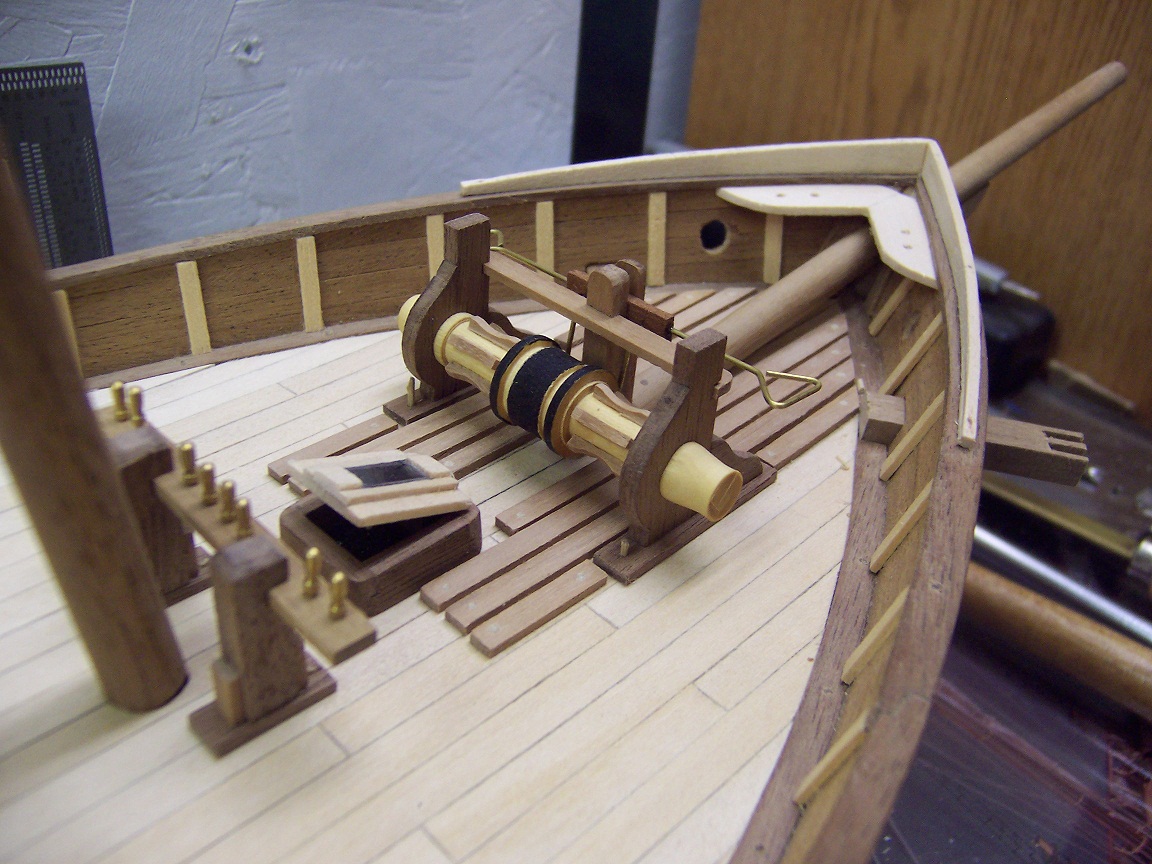
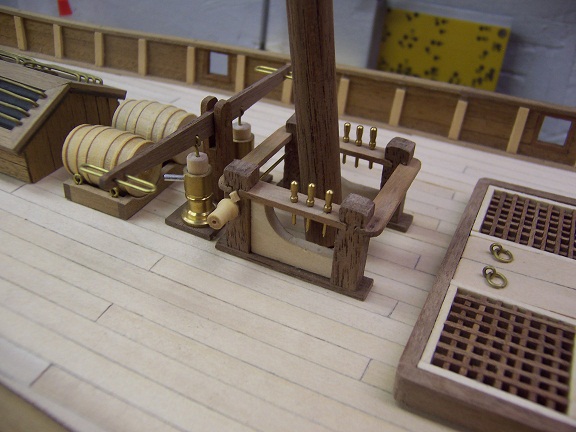
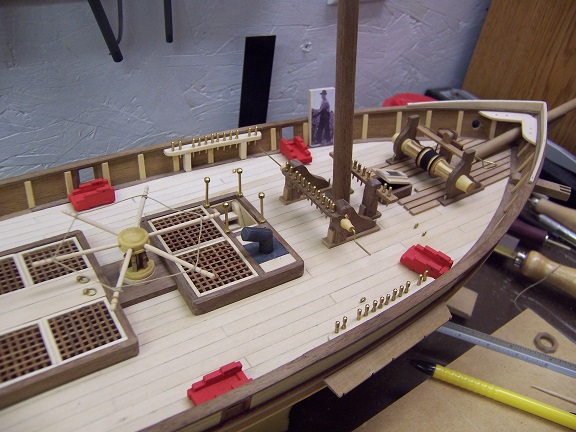
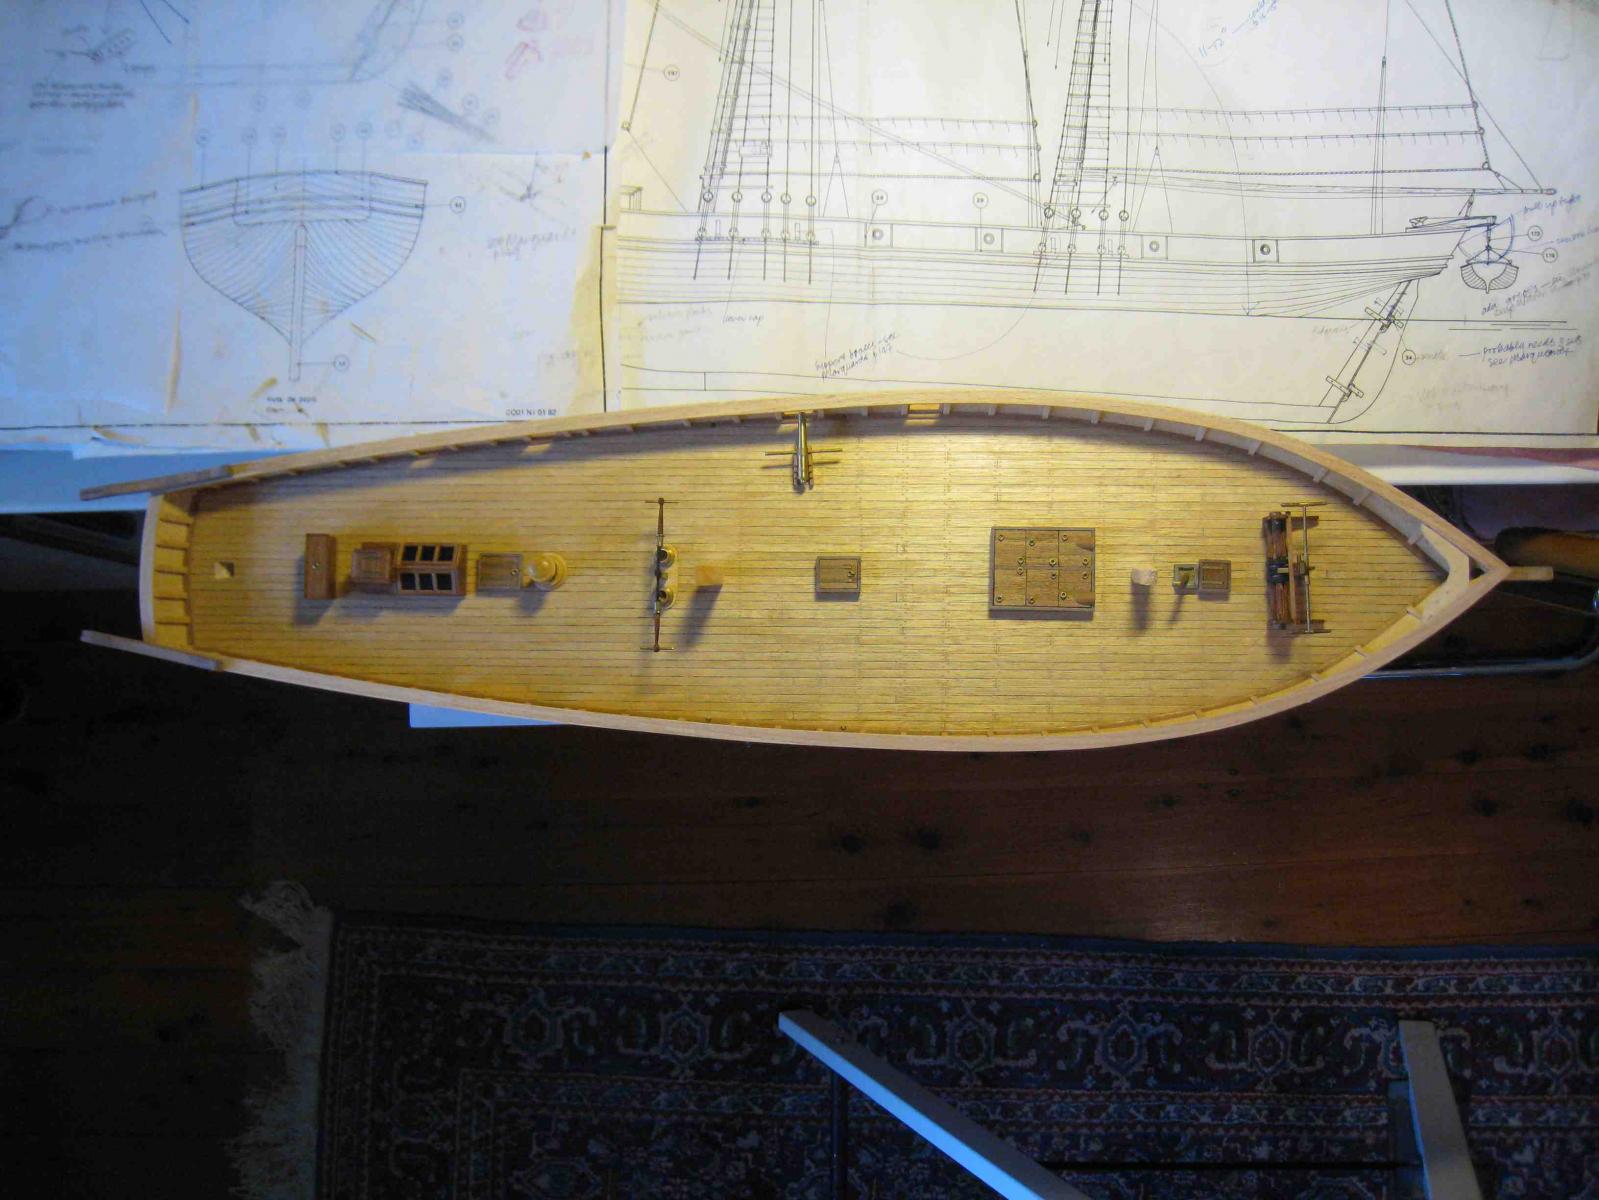
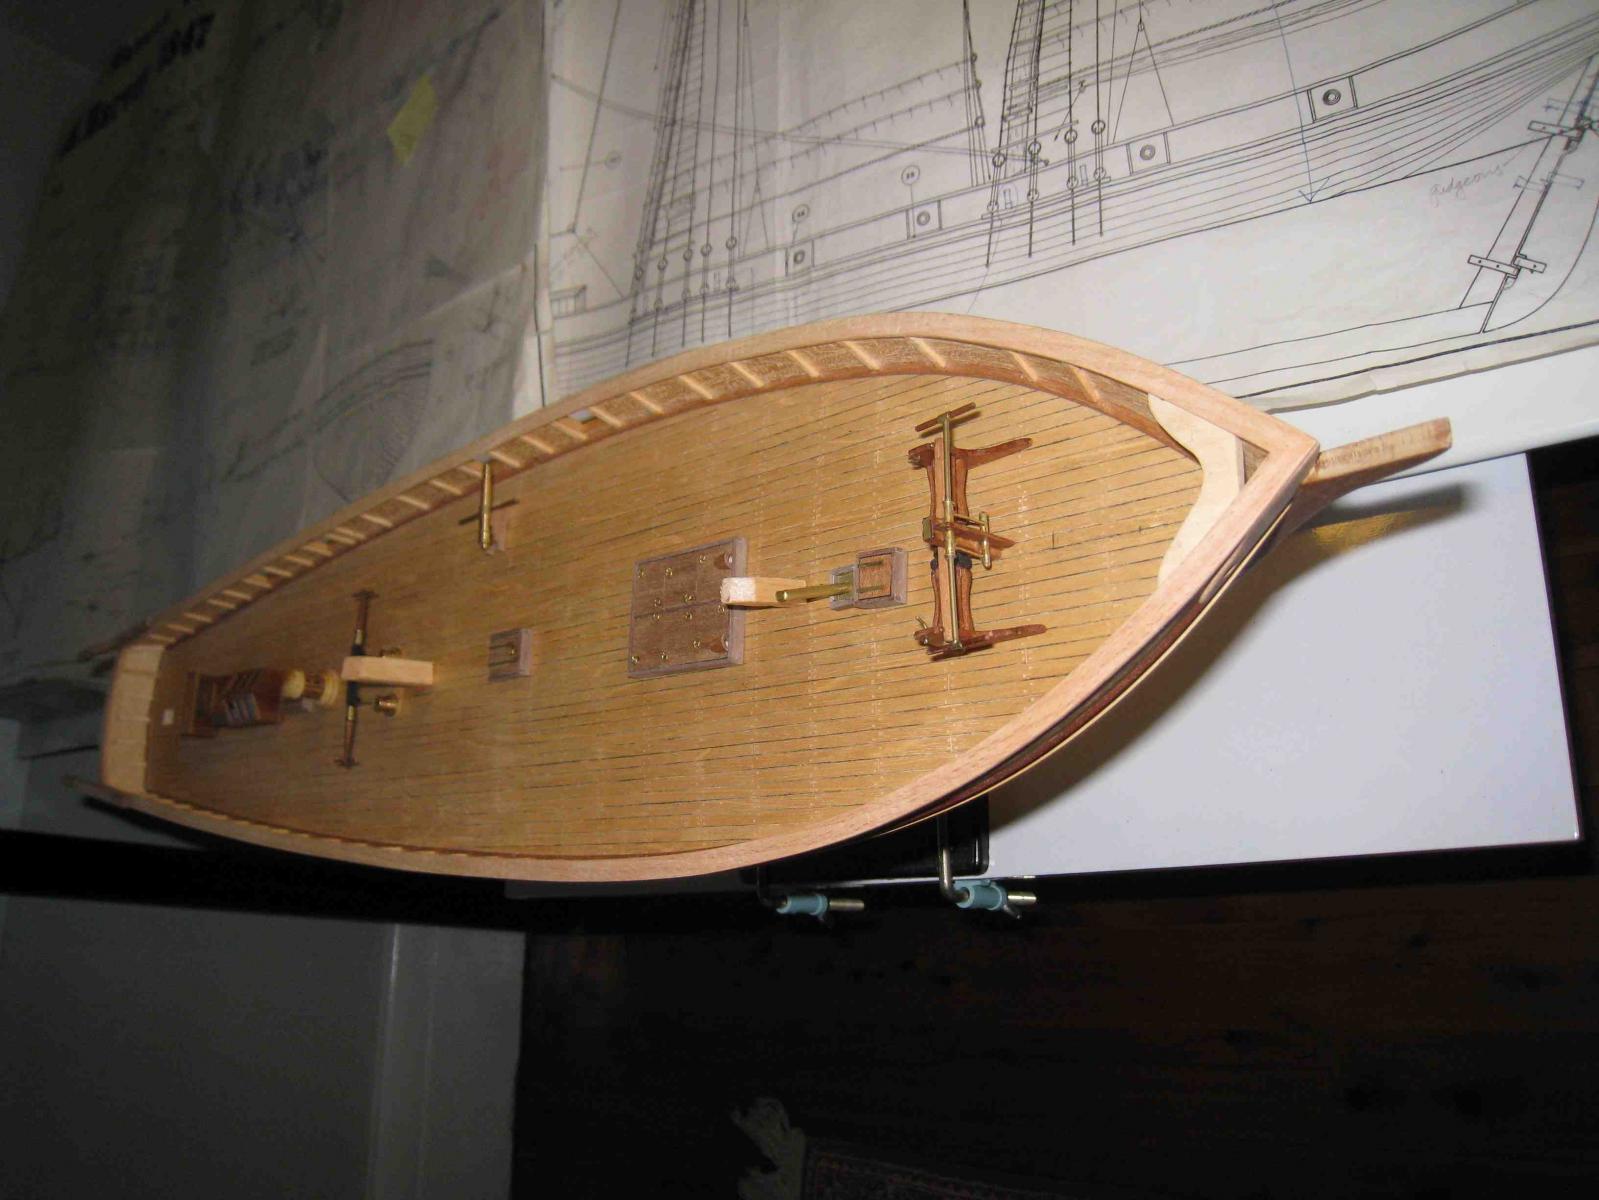
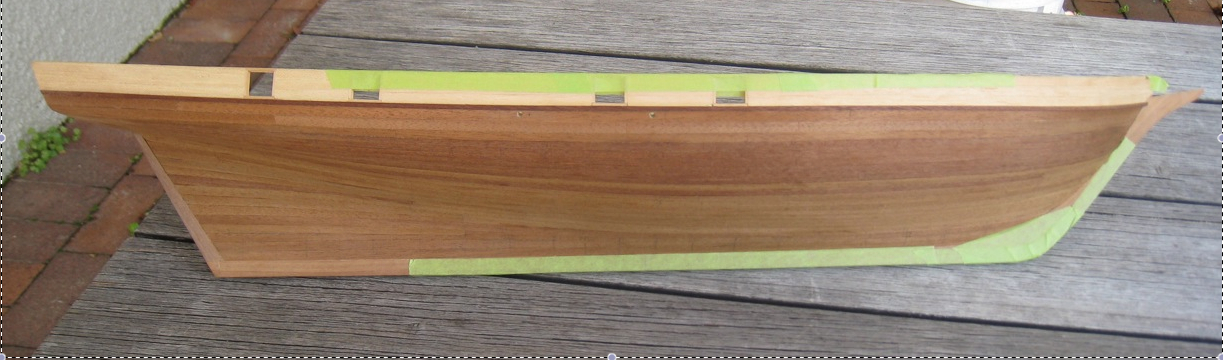
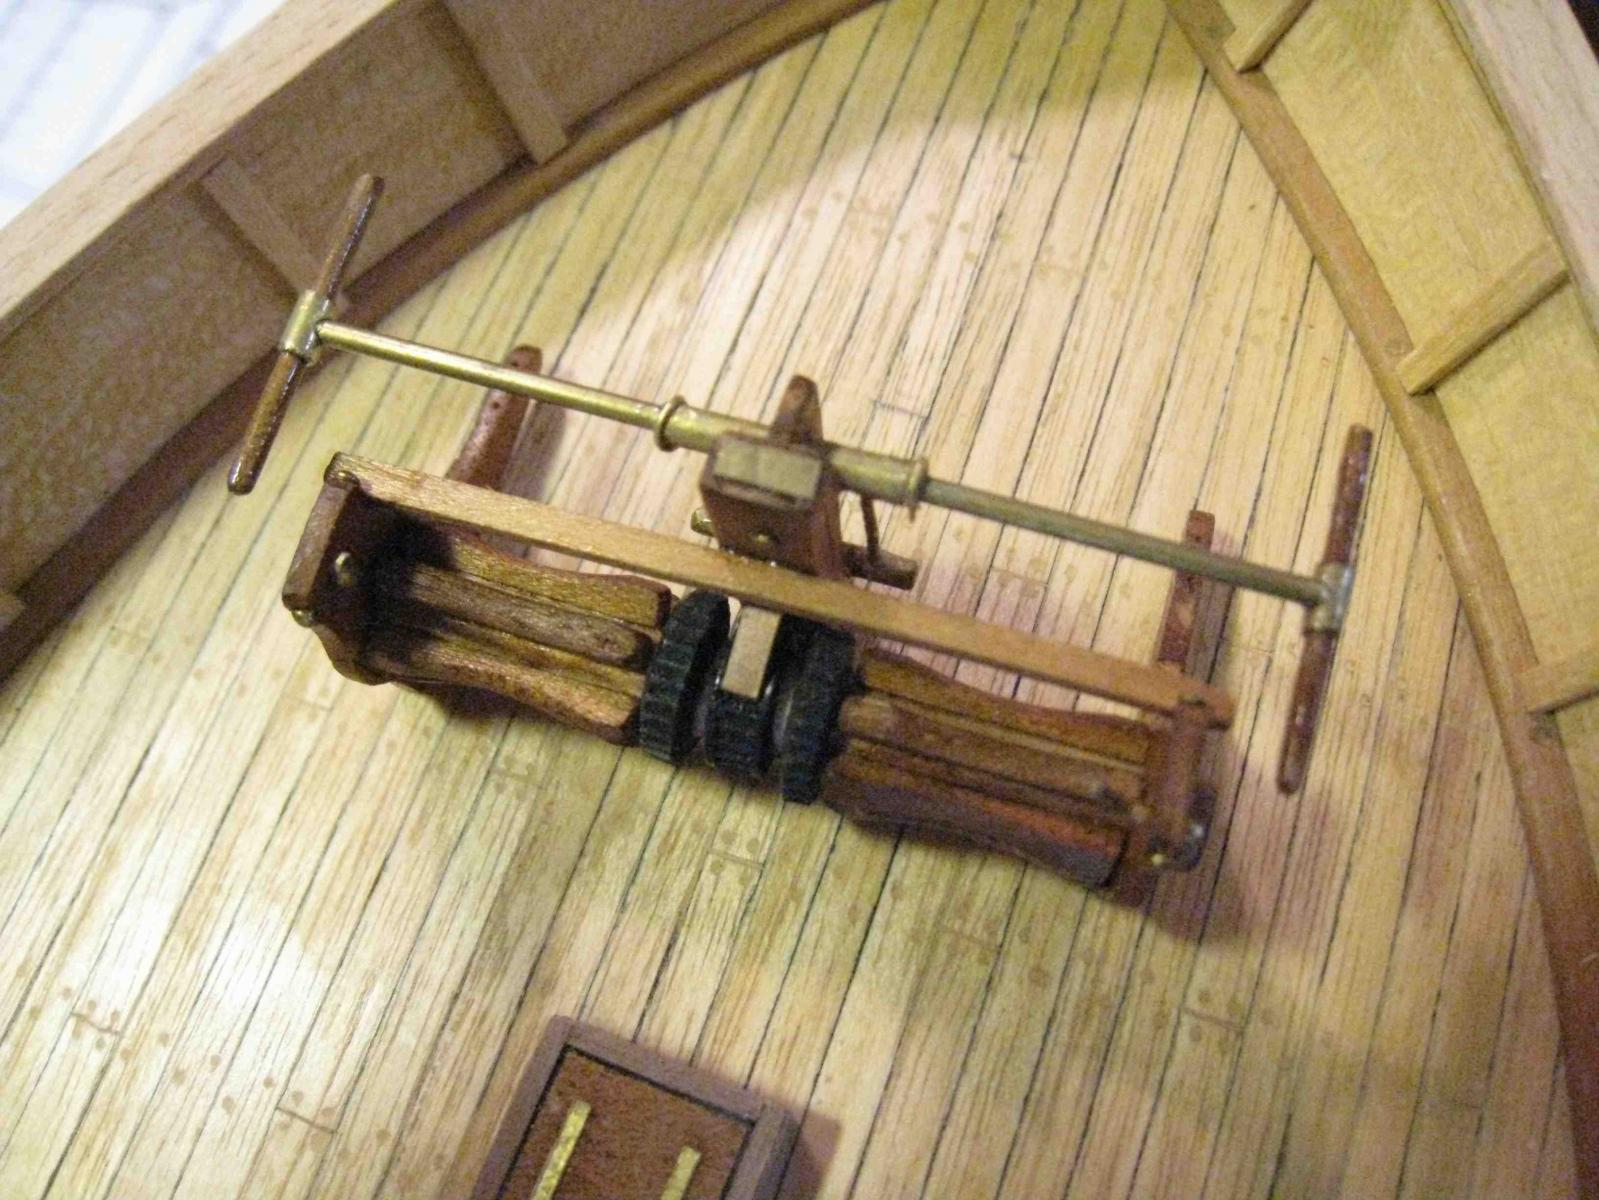
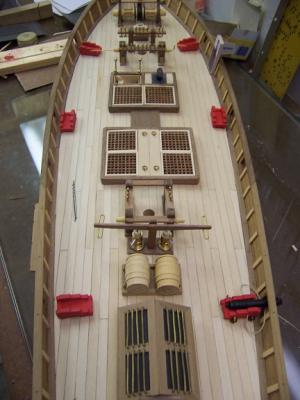
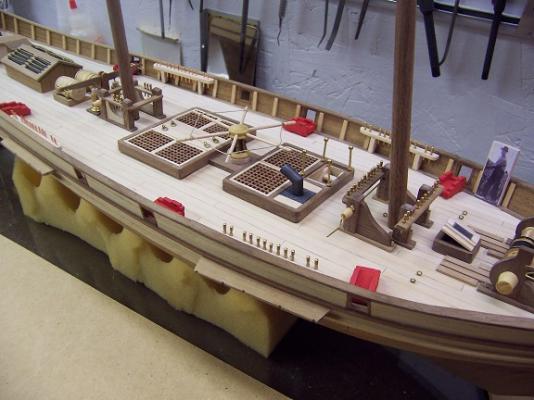
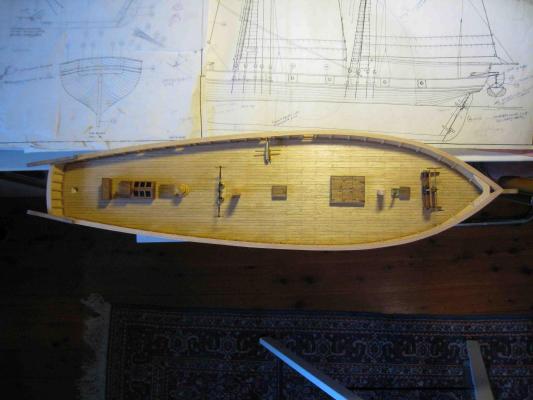
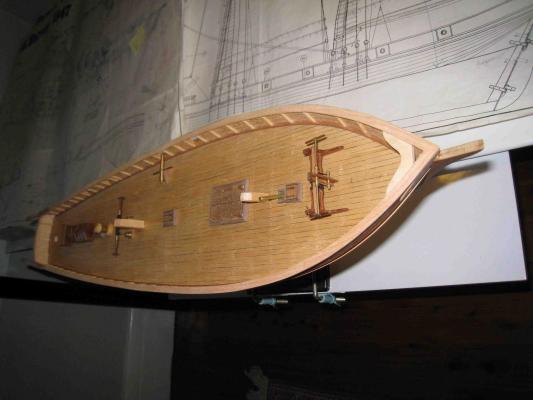
 This is my build of the Lady Anne (named after the wife – bonus points). If you squint real hard and tilt your head you may recognize the hull as the AL Harvey. Other than that it has been a whole lot of kit bashing. This model was given to me by someone who had just glued the bulkheads on and decided this just wasn’t the thing for him. Over time (as a break from the Druid) I have done a little bit here and a little there. I planked the hull as a standard model hull to demonstrate to someone else it wasn’t that hard, so there are planks that taper to points and no real attempt to mimic real practice. I had ‘assumed’ it would be built out of the box and continued in that direction. Then things started to get fuzzy. I knew that Harvey was a fictitious ship and things really started to bug me about how realistic it was. The deck furnishings especially just seemed haphazard and in some cases wrong. This is where I stepped out of the box and this fast build took a hard right into kit bashing. Over the years I had made a point of keeping pictures of ideas on real ships and models of things I really liked and I started to look at what I could add / substitute in this build. I started perusing books about clippers, especially ‘The American-Built Clipper Ship, 1850-1856’ by Crothers to look at deck arrangements used by Clippers (and believe it or not, I did find those outhouses shown on the Harvey. I don’t like them, but I found them). I cleared the decks (literally), made paper cutouts of potential deck furniture, and spent a lot of time pondering the imponderables. A big decision was to rig her as the Pride of Baltimore II was rigged, a true Baltimore Clipper. This defined the needed pinrails and deck tie downs required (as well as block counts which were a LOT more than the kit supplied). I moved the pumps aft to where they could actually do some good. The forward windlass was replaced with a windlass actually capable of bringing in an anchor. The capstan was moved to a position where it could actually be used, a below deck access was added and on, and on, and on. The last addition I added are cavels to allow easier docking. To retain its original heritage I created a 1:48th scale workman that I named sailor Harvey to verify heights as I proceeded. The deck currently has a configuration that I am happy with. The last original piece is the aft deckhouse and it just seems out of proportion for sailor Harvey to navigate through so that will probably be scrapped and an alternate built in its place. Oh, I retained the cannons since my son insists that cannons are cool and I couldn’t possibly take them off. I did, however, modify their locations, retain only six (continental breeched) and will probably have two of those stowed parallel to the bulkhead. As time allows I will post past pictures of the process I used to build various pieces and the rationale used for including them (which may just be I liked the look). I am really trying to focus on the Druid and get’r done, but this ship will be warming up. As usual, any comments are welcome. Mark


- 128 replies
-
- 11
-
-
- artesania latina
- Finished
- (and 2 more)
-
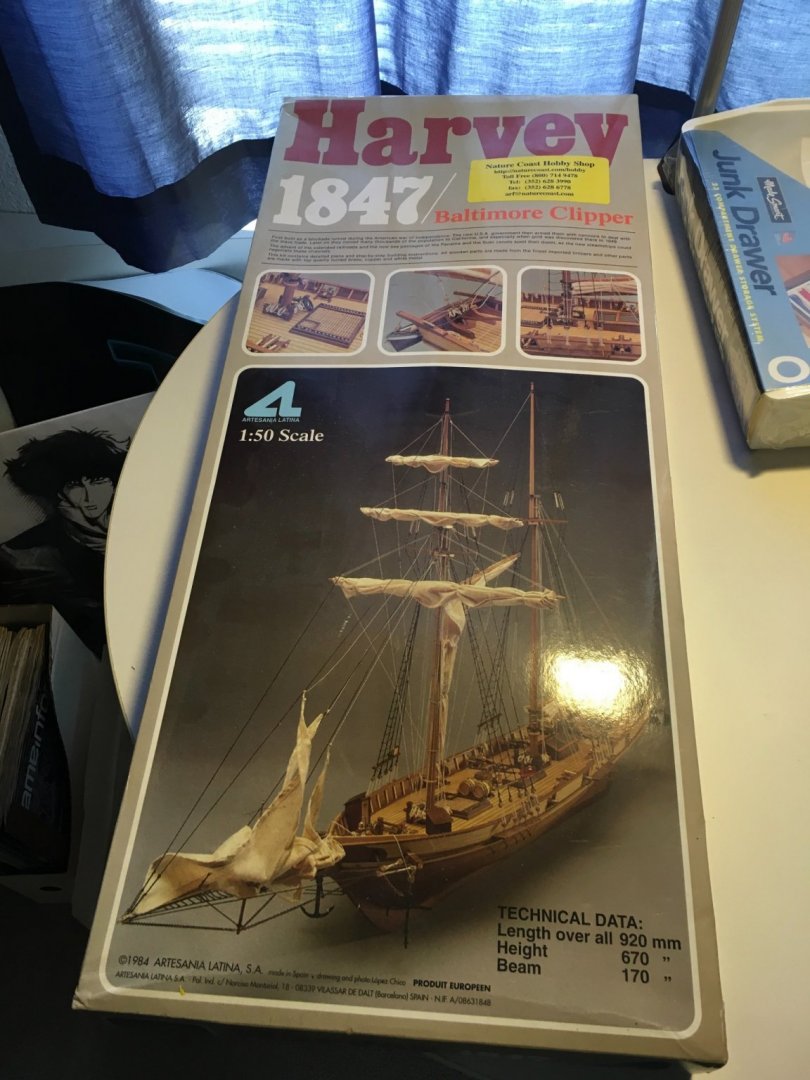
 My first build. I bought the kit probably more than 30 years ago. So, I’m a late starter... Copyright date on kit box is 1984. My oldest has left the nest, so I guess I have room for a workshop! Step 1: Clean the dust off box. Also, thanks to Blackie and others for sharing their exceptional quality work and providing an inspiration to get started. My plans for going forward on this build are as follows, in this order: 1. Learn how to build ship wooden models. 2. Build this model to the accuracy I choose in my noggin (this particular ship was never real, so accuracy exists only in the builder’s imagination, right?). 3. Have fun. 4. Share my progress.
-
 This kit is over 35 years old, is no longer available, and deserves to be assembled. This is my first ship kit--I have built some simpler scratch built ships, but figure a kit with detailed insturctions will help me develop experience with more complicated details such as the deck furnatire and rigging. Artesania Latina's Harvey is a fictitious ship representiative of the Baltamore Clippers. I have William L. Crothers' wonderful book, "The American-Built Clipper Ship" and love the sleek lines of these fast ships. I started, of course, with assembling the Hull strcture and ran into problems right away. The plywood used for the false keel and bulkheads is a 1/4" thick, but the slots used to slide the parts together were less than this; the bulkheads were an overly tight fit on the flase keel. I ended up using a rubber mallet to pound the first one into place. An assembly step requiring a hammer should have been a red flag, but I soldered on and forced the bulkhead into place. This of course warped the keel out of the straight. But, even though this was a test fit and no glue was used, I could not remove the bulkhead and ended up busting the keel in half. I repaired the keel in an equally brutish manner, widened all of the slots with a dremel, and gave assembly of the hull another go. This time I used a square to hold the bulkheads in position, and was pleased with the results.
- 36 replies
-
- 4
-
-
- Harvey
- Artesania Latina
- (and 1 more)
-
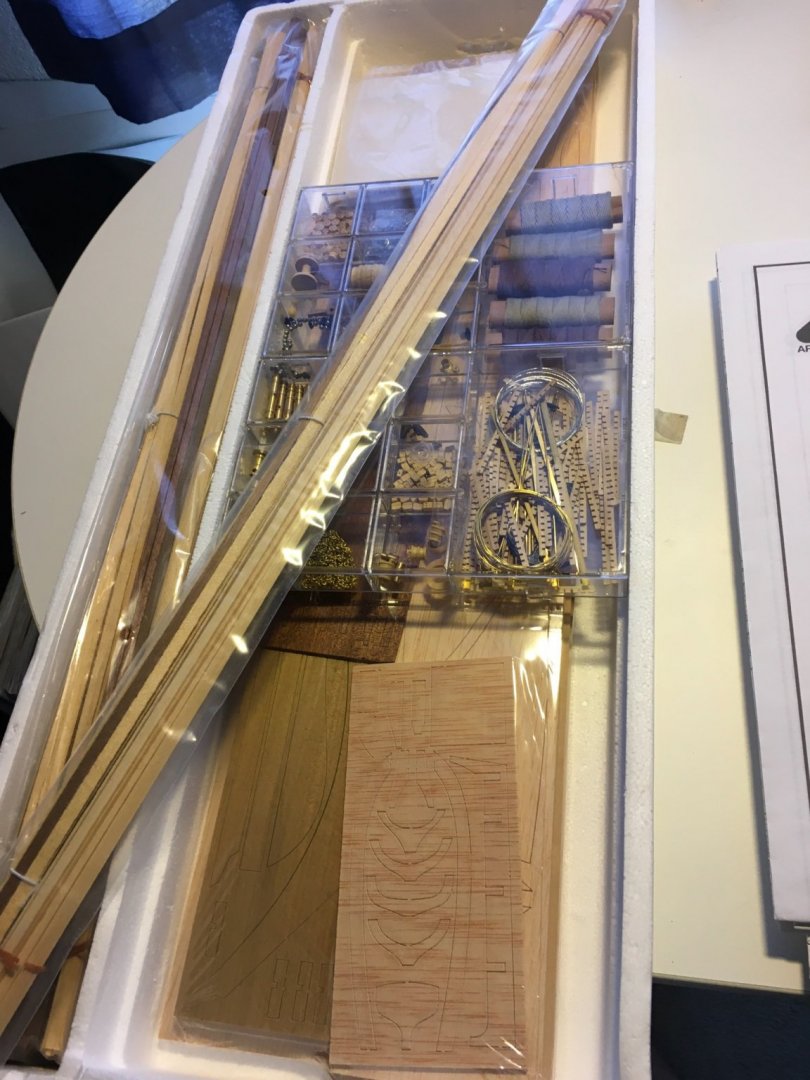
 This is the build log of my second model ship, the Harvey. I am really excited to be able to work on this ship as I am from the Baltimore region. This build log will probably take some time to complete as I am a new father, full time employee and also a part time student. Hopefully when this semester is over I will get some more time to work on this kit. I started this kit a while ago and really haven't gotten much done since my son was born. Things have died down a little and hopefully you all will not find my progress too painfully slow. A few notes on the kit: 1. The kit from AL has been sitting around collecting dust for a few years at my Moms house. I went to pick up some stuff one day and Accidentally spilled the entire contents out on the floor . I scooped up most of what I could find and took the kit home. I then spent the next 2 hours sorting all of the little pins, dead eye's, hooks, brass rings and so forth until I had the kit organized again. I am sure I am missing a few things. Hopefully I can salvage from other kits that have been collecting dust to complete this thing. 2. I was disappointed by the kit in that a lot of the deck hardware has been pre-assembled. I do not feel that this was an added benefit to the kit as the craftsman ship has left a lot to be desired. I am planning on rebuilding most of this stuff from scratch and I am hoping to turn a negative into a positive by gaining some small scratch build experience in this added task. 3. I have seen some artist renditions of the beautiful clipper ships of the 1800's and in particular have notice some additional sails fixed to outriggers on the yard arms (picture below). I was wondering if anyone has attempted to add something like this to a clipper, or any other vessel for that matter, and if they had some pointer for something like this it would be very much appreciated. 4. I have noticed in some builds that when sails are added it tends to cover up the rigging and some prefer to not add sails at all. I had an idea for this build to rig the vessel as if it is under way. Not just hang sails on it, but maybe try to adapt the rigging so that the ship is on a broad reach. I think this would add to the over all look of the ship fully rigged with sails. Has anyone tried this? Again, taking some ideas from pictures I seen. Thank you all for any input and tips, tricks that you may have.
 -
 I started this AL kit Harvey some 12 years after 2 other kit builds - Mercury and Panart Saint Lucia, a tartan. The build progressed very slowly and I abandoned it about 8 years ago due to work and other interests. Finally in mid last year I was able to get back to it and I finished the hull planking just before Christmas. However, about then I began a lot of research into Baltimore clippers and I realised that the Harvey kit is "not true to form". My version of the kit materials-wise does seem to be quite good compared to those that I have read about so perhaps the kit has deteriorated over the past decade. Anyway, I now see that the deck layout could not be as shown in the kit and I have decided to scratch build my deck fittings to a new layout and I have almost completed a scratch build of the jolly boat for the stern davits. The deck fittings are made but not attached and I am also building new cannon carriages about half the size of the kit parts - this is the correct size as far as I can determine using the same brass cannon in the kit which seem to be 4 pounders. I must admit that I have been a bit distracted by other things and doing some research on the rigging but hope to get going again now on the build. I welcome any comments.
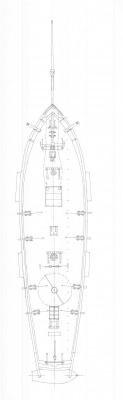

- 88 replies
-
- 15
-
-
- harvey
- artesania latina
- (and 1 more)
-
 Hello all! I've recently joined the NRG, and here's my first build log as I promised in my introduction. This is a kit I purchased back in 1993 at a hobby shop that was going out of business. I thought it would be a fun winter project. Well, all good plans, etc., but I started traveling extensively for work, and the kit took up residence in the garage. Eventually, I forgot about it. Fast forward to mid 2019, when we moved to Oregon. While unpacking the garage boxes, guess what I found. I pulled it out, looked it over, and decided to finally build it. I looked up some YouTube videos, and with my newfound encyclopedic ship modeling knowledge set to work. I managed to get the bulkheads on the former straight and perpendicular, then started fairing. I used a hull plank strip to check as I went. Sorry, no pictures of this, as I didn't discover this forum until a little later on. That's also when I discovered that I didn't really know much about building wooden model ships :^). I got the first layer of planking completed by soaking the planks overnight, then temporarily clamping one on each side to the bulkheads until they were dried. I then glued them in place with carpenter's glue. I tapered the planks at the stem as needed to fit, and added a couple of wedges at the stern to fill in gaps. I then used filler to smooth out the hull, and gave it an initial sanding.
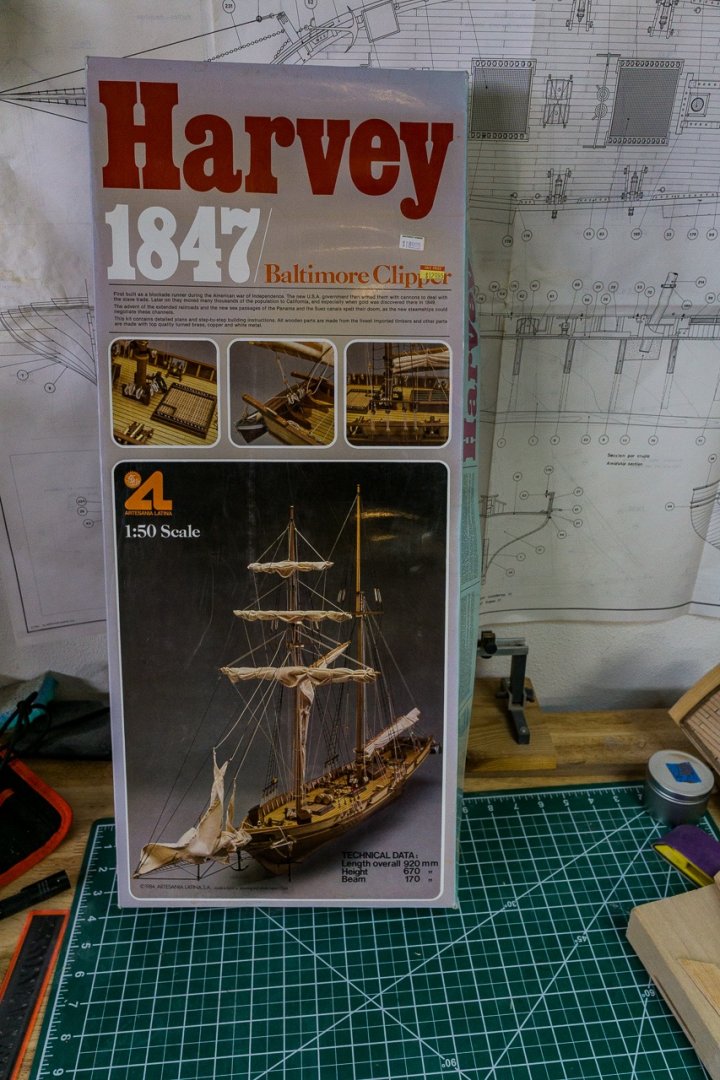

-
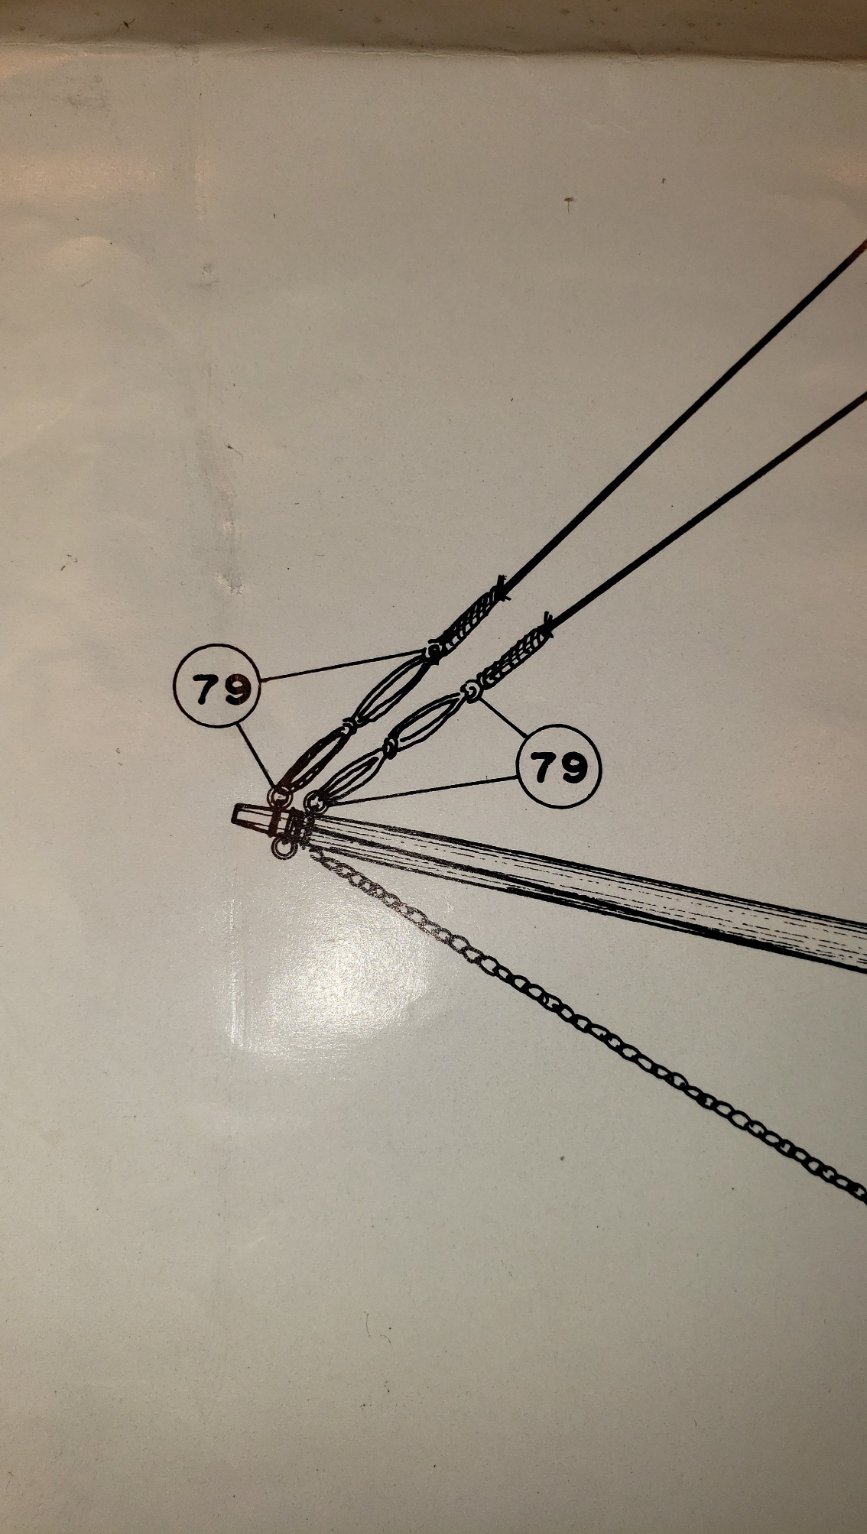
 I'm a new ship modeler and I've completed the Artesania Latina Harvey to the point where I'm ready to begin rigging the ship. The documentation that I have with my kit does not provide clear instructions for how to perform any of the rigging functions. I've found some very good rigging videos on YouTube and feel that I can stumble my way through completion of this project but I'm not clear on the following two items: 1.) Cats Head Rigging, the attached photo shows my current cats head configuration per the build plans. The build plans however do not show the rigging configuration for the anchor. The anchor chain was straight forward but the rigging from the cats head to a double block is not clear. Can someone provide a rigging diagram or photo of how this configuration should look? I've tried two different configurations and neither one appears to be correct. 2). The fixed rigging from the bowspirit to the top of the forward mast has an unusual configuration at the bowspirit. I can find any information on how to achieve this configuration without using some sort of block or deadeye to maintain the shape of the rigging where it connects to the bowspirit. I'd imagine that I can configure the rigging and then coat it with CA glue to maintain the shape but this does not seem correct to me. Any tips or ideas would be greatly appreciated.
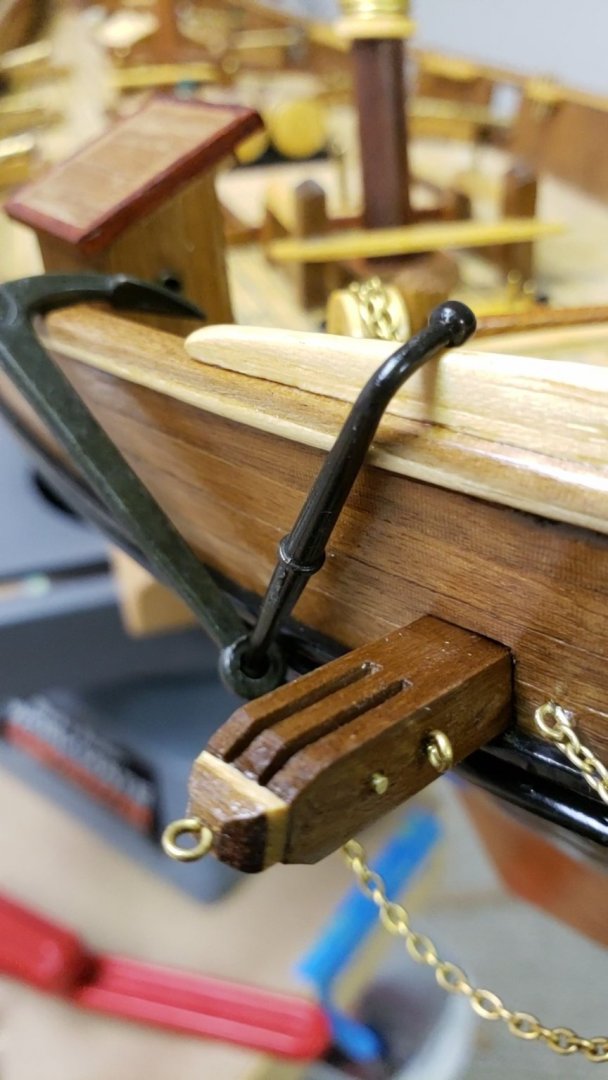

-
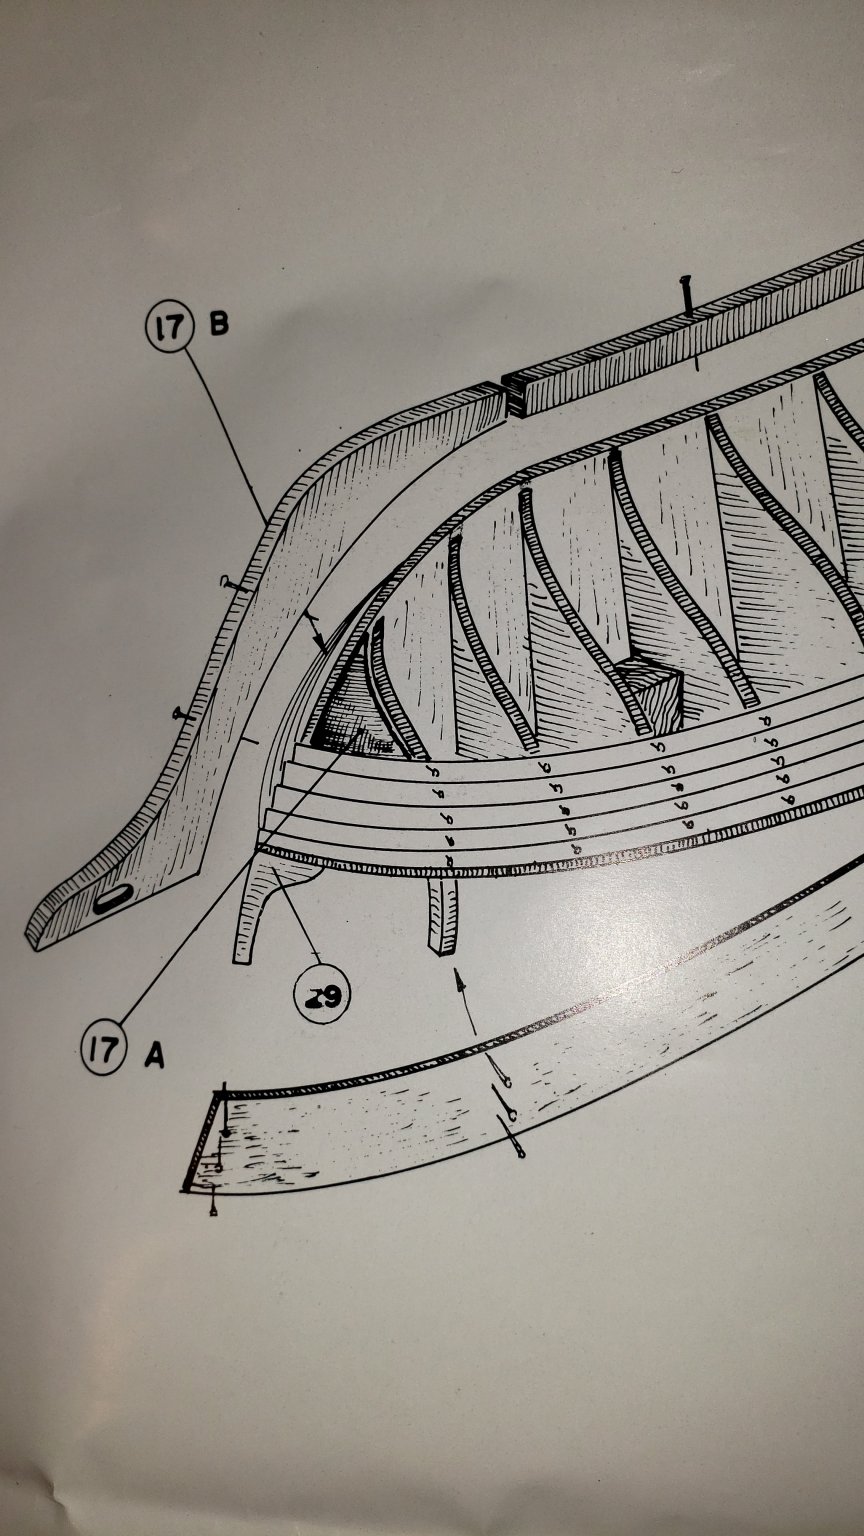
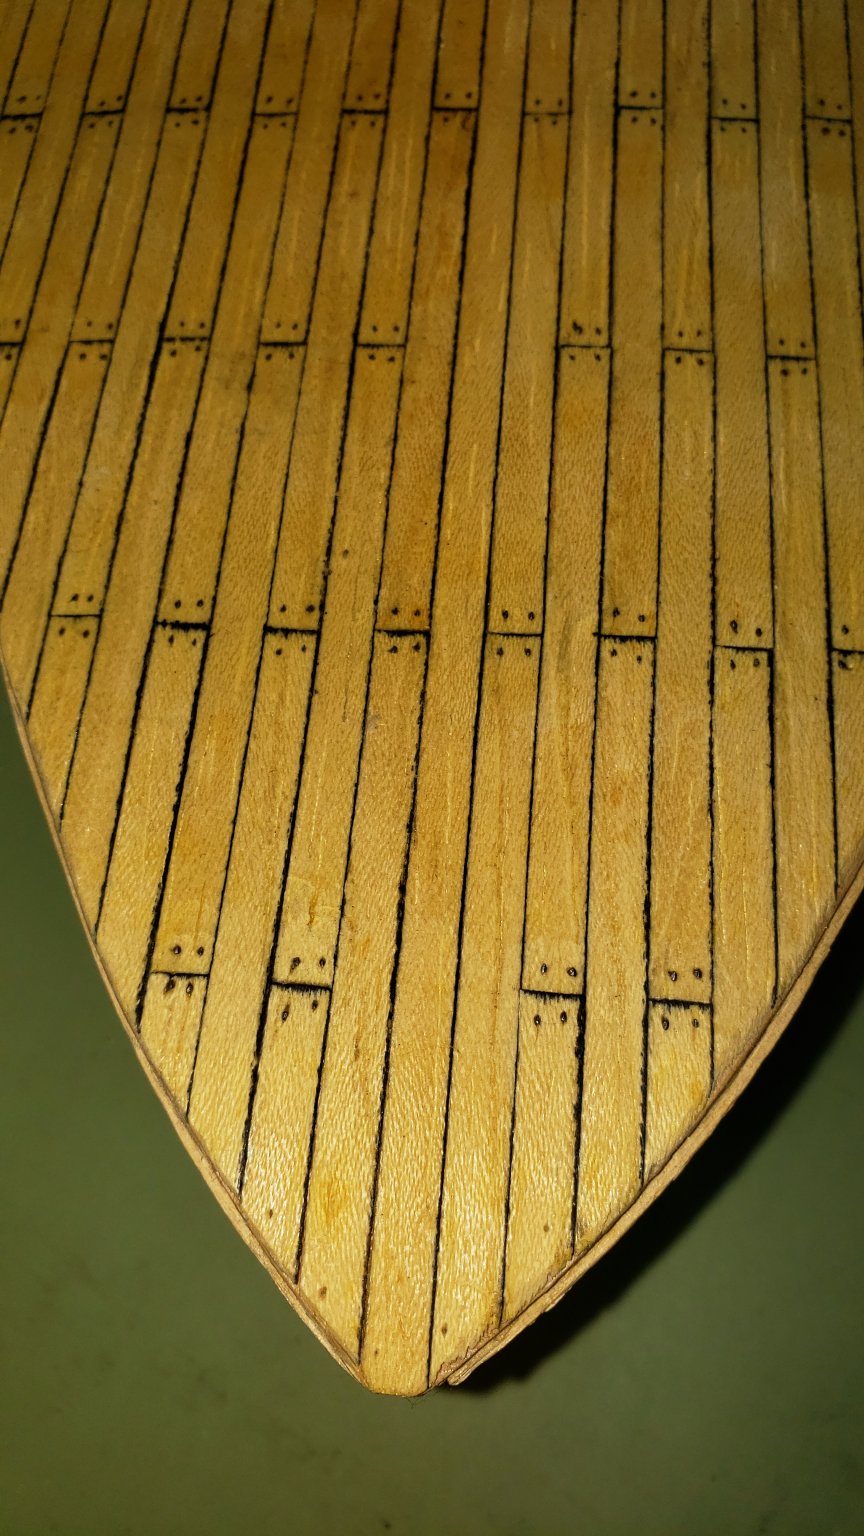
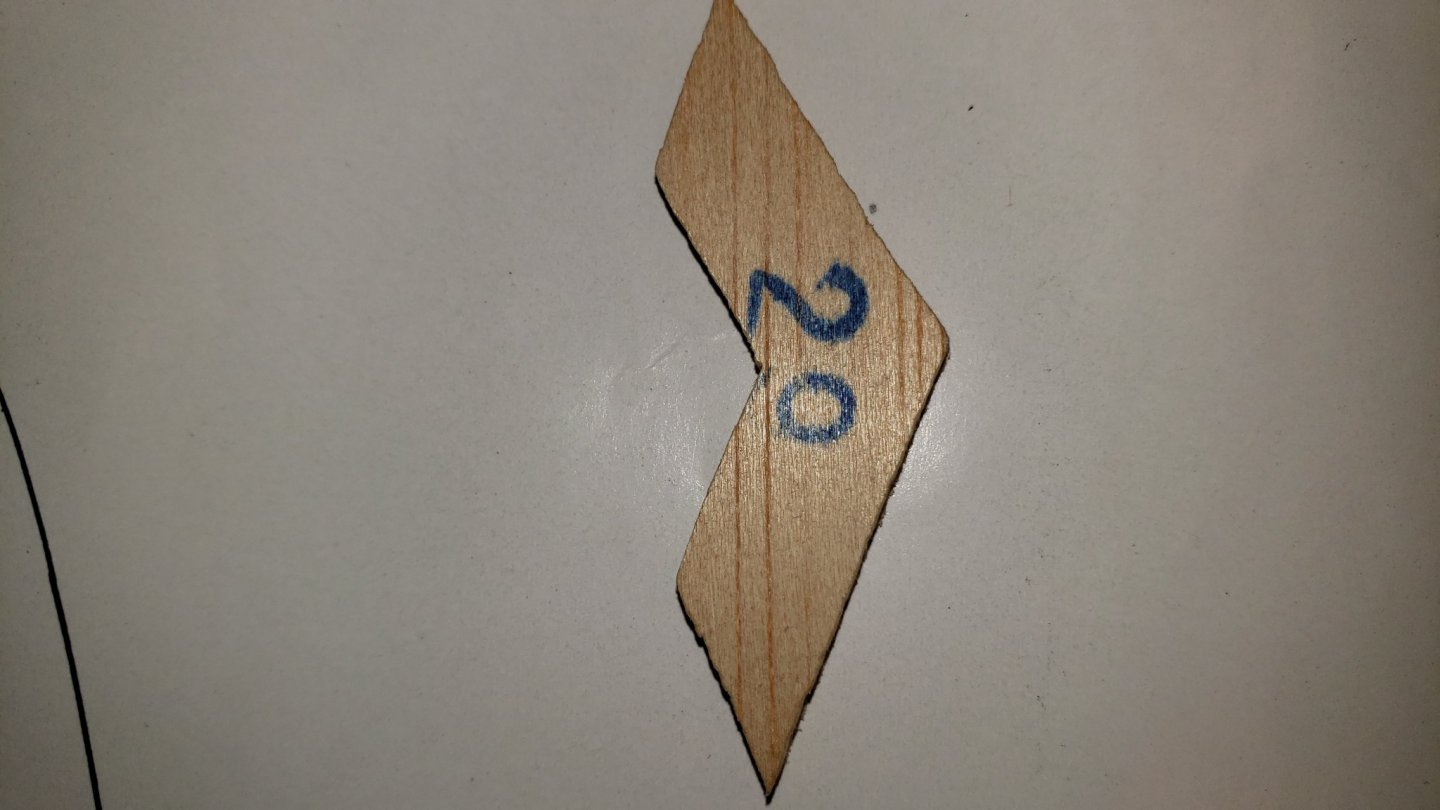
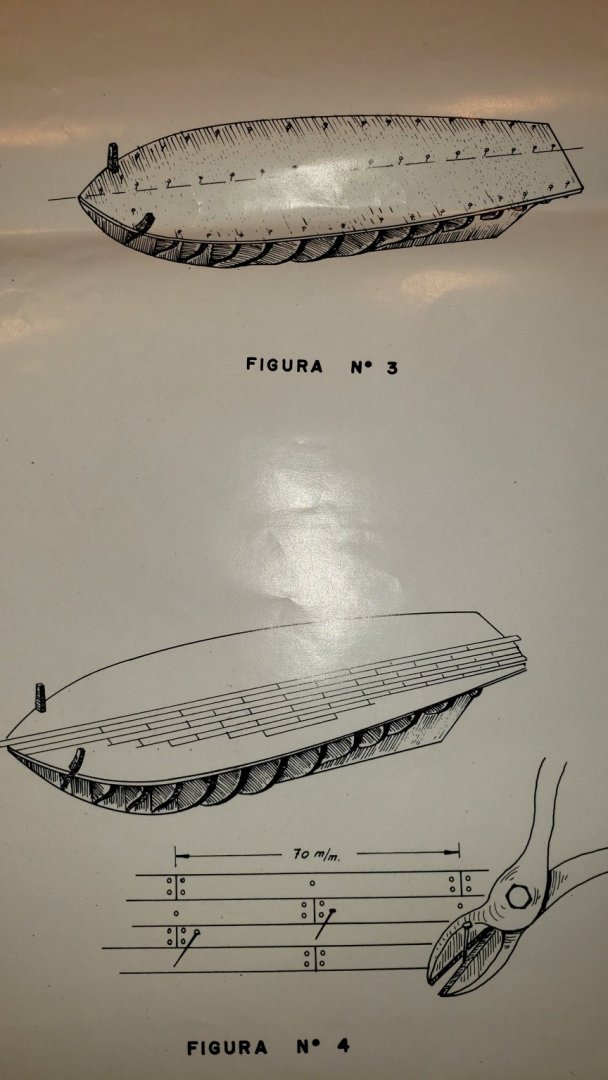
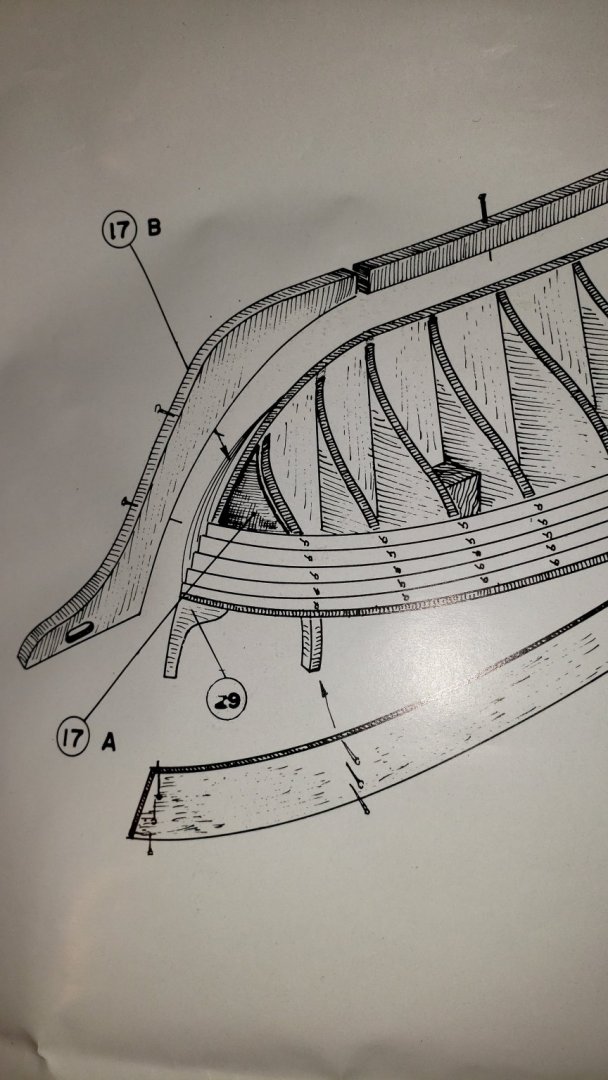
I'm in the process of constructing the Artesania Latina Harvey double planked hull box kit. This project was started back in the mid 1980's and then sat until my retirement. Following the written instructions the hull, false deck, hull shaping, first layer of hull planking, and deck planking have all been completed. I'm in the process of completing the deck rivits and was looking ahead to the next step. The instruction for the next step is as follows: "Take the two prow timber frame extensions (29), from the kit, smooth off with sandpaper and bond into position as shown in Figs, 3 and 4. I only have one part in the kit stamped with the number "29", not two. It's a small wooden flattened out "V" shape approximately W48mm x H10mm x 4mm thick. Based on the drawings (Instructions refer to Fig. 3 and 4) it appears that part #29 should have been glued to the hull framing timbers prior to installing the deck and hull planking. The only drawing that actually refers to part #29 is on Fig. 5. If the part #29 that I have in the kit is accurate I can fabricate another one (Part #29 was the only part that was stamped). My question is this: Are the prow timber frame extensions required to attach the bulwarks at the prow? Do I need to remove hull and deck planking to install the prow timber frame extensions to the hull framing timbers? Any suggested workarounds?

-
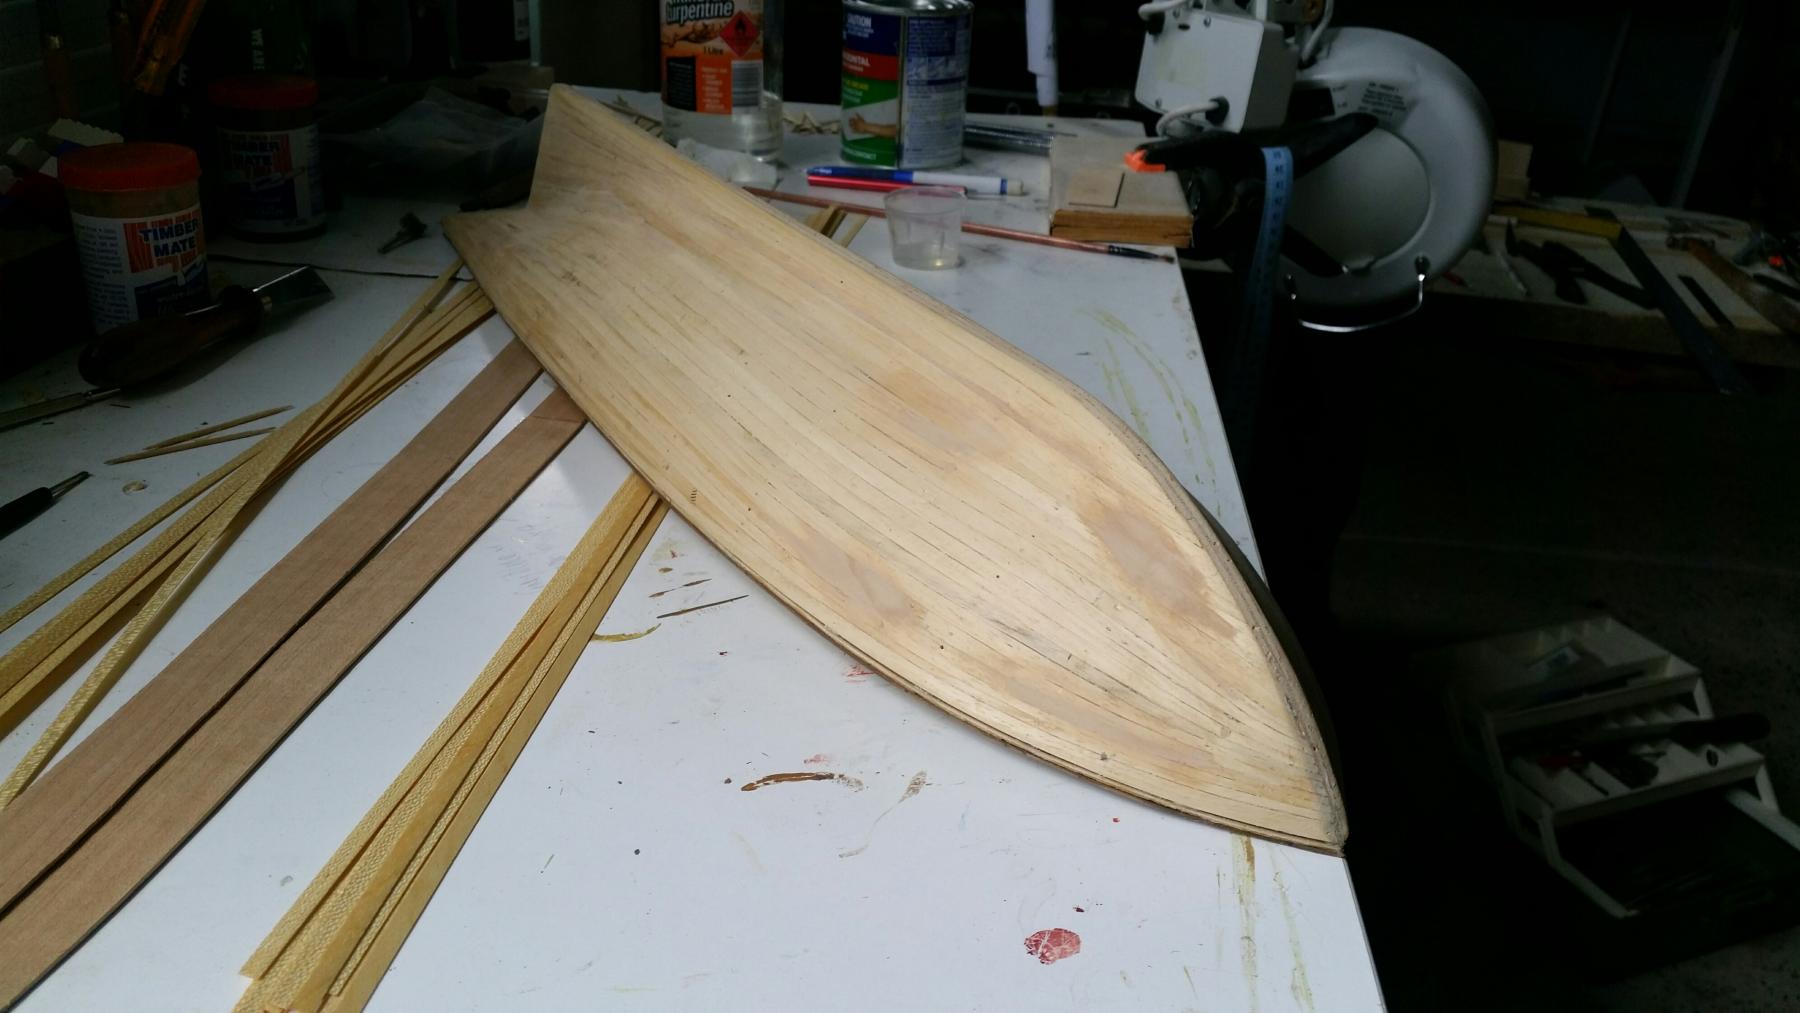
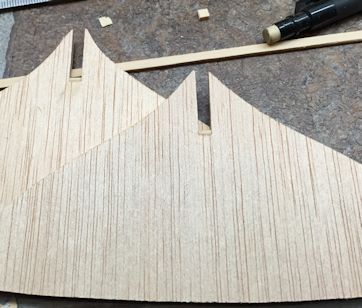
 A long time of no posting and several requests has made me to start the next Harvey project build log. This build has been going on for some time. Many changes and alterations has been done to the original parts, this due to material not measuring to the material list dimensions. This picture is the latest one some ten minutes old, before uploading. From this point I will go back to the start and explain what I have done as there are several changes, this in my best way. Have patience with me, as this kit will be kit bashed. not knowing the final physical outcome. This picture also shows partial of the pre-bending of walnut strips. As I am intending a single layer planking.If I fail I can go to double layer. By putting the paper clips on each bulkhead I can there-after put soaked strips through the holes and get the right bending. Some of the pictures from this build has appeared in other topics.
-
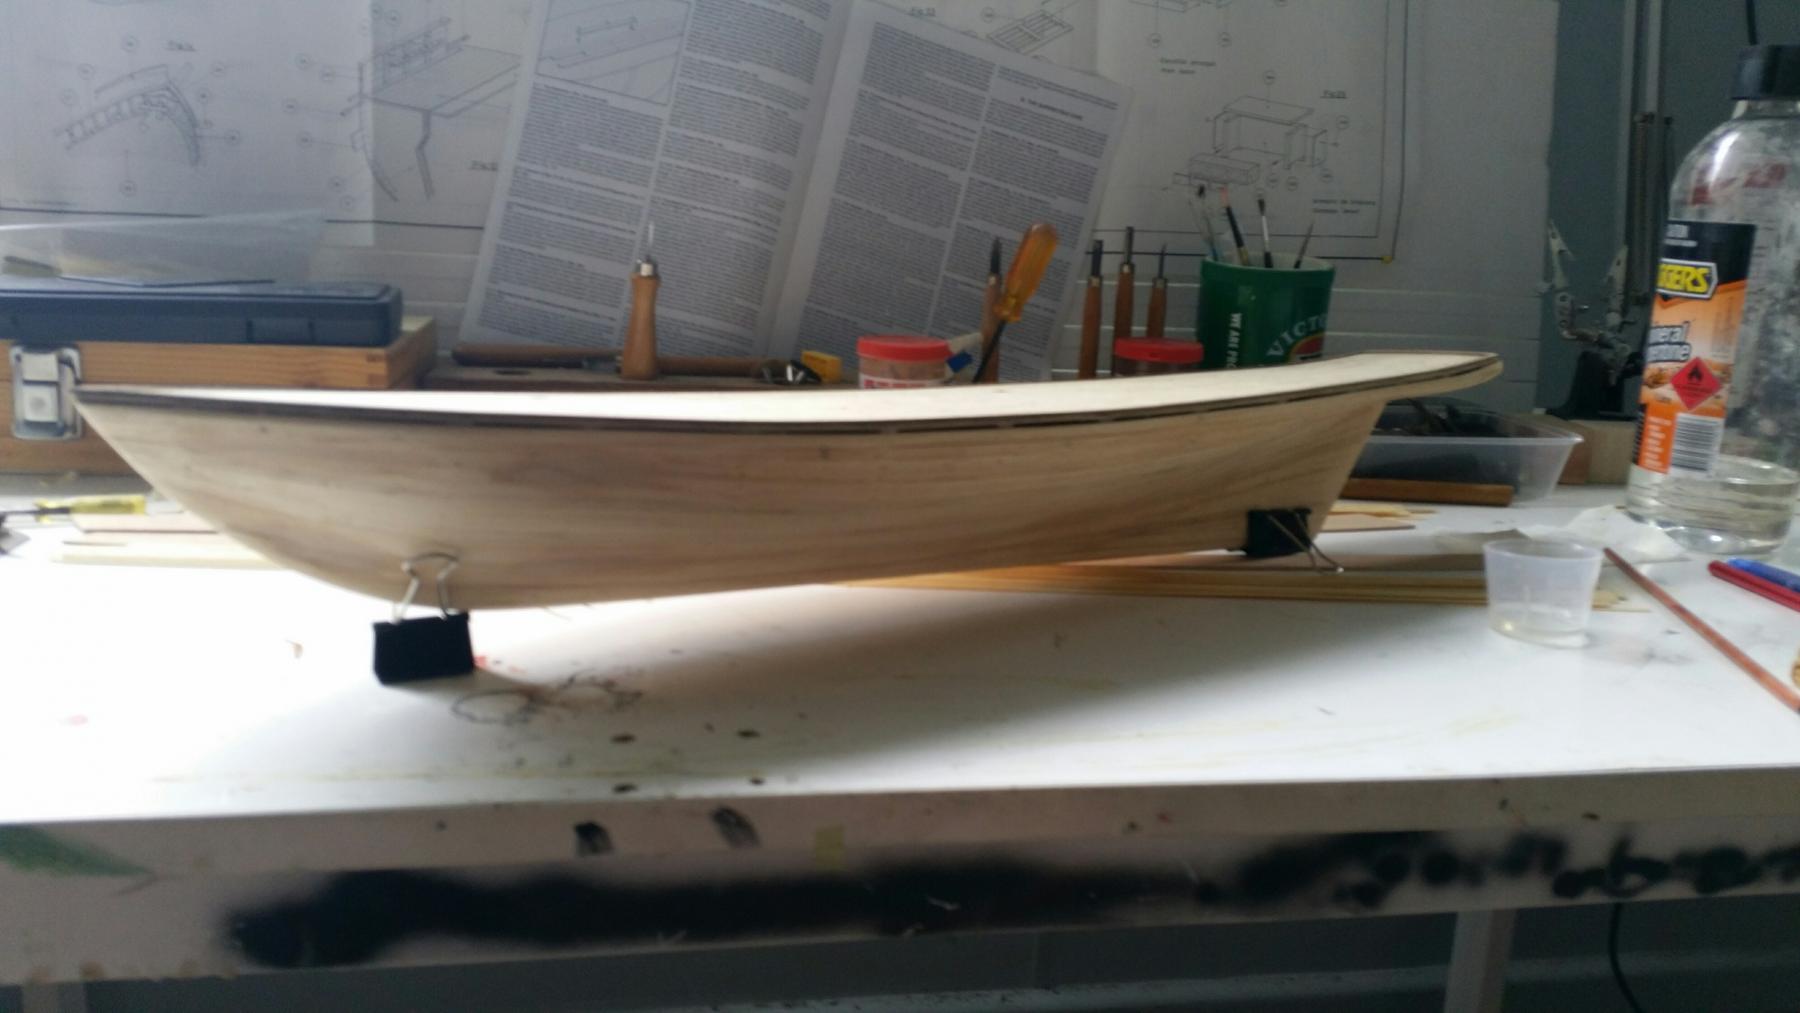
 So I recently picked up this kit at a swap sell meet at the Scale ACT modelling competition an have been cheerfully chugging away. As this is my first serious attempt in this medium of modelling strap yourselves in because I have heaps of questions. As you can see I've completed the first layer of hull planking and the deck. The plans call for the bulwarks to be planked and attached before commencing the second layer. So to my question.... As the bulwark is flat should I follow the curvature of the bulwark and assume the planks will come into a horizontal line as the bulwark is attached to the shape of the deck. Or should I run the planks horizontally on the flat bulwark and hope that they remain horizontal when attached to the deck. Cheers, Medic
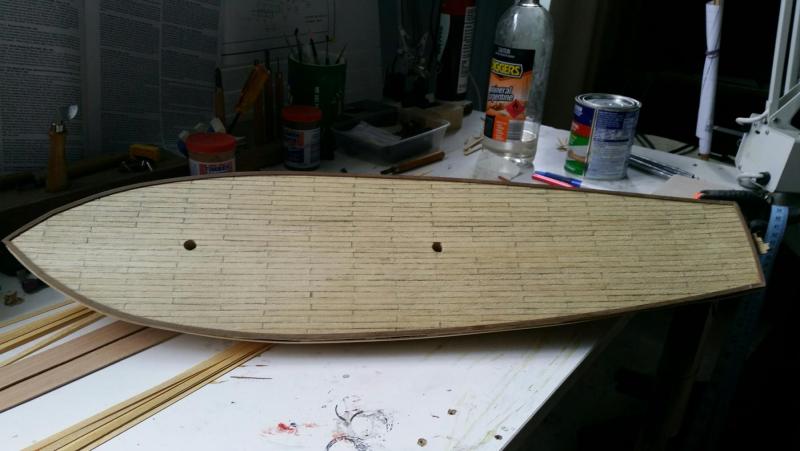
-
 Well I asked KruginMi to re post his Harvey kitbash as it inspired me to do one, and he did, he also asked if I was going to post a log so here it is. I bought the kit in a kind of online garage sale - it must be a new version as about the only thing I wanted to use is the bulkheads and metal work/fittings. The kit came with alot of stuff pre made which looks pretty shabby so I am taking free licence to do it the way I want..... besides I am not a real stickler for historical accuracy - I like the way the woods look together and I give most of my models away to people that wouldn't know or care about the accuracy but they seem to enjoy the models..... I have substituted the kit wood with Boxwood, Pear, Holly, Bloodwood, Redheart and Bubinga so far. I'm still trying to work out the deck layout - this is where I was awed by Krug's version and I am deciding how much of his ideas I want to borrow? currently the model is at this stage....
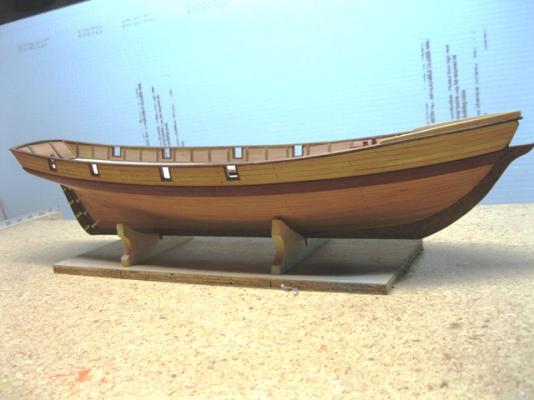


-
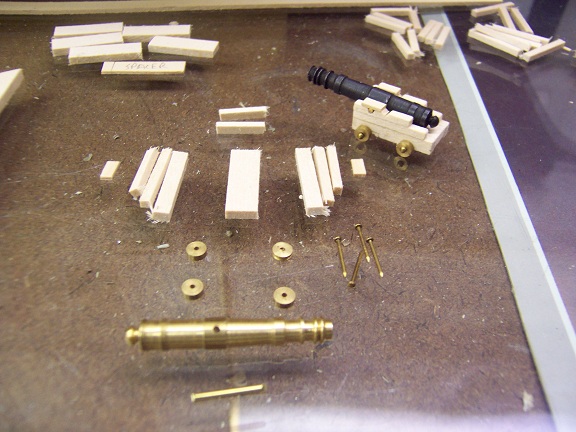
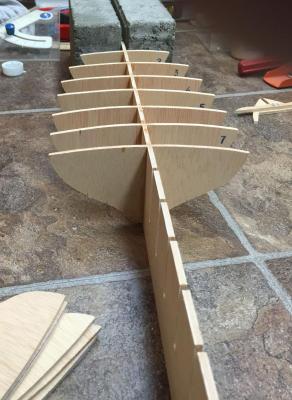
 Hello all; this is my first wooden ship build ever, I have the Artesania Latina Harvey in 1:50, I am going to build it and call it the Ringle as a companion to my next build, which will be the same companies HMS Surprise in 1:48. I have a couple of questions I would love to ask, firstly the "ships of Jack Aubrey" website lists the ringle as having 2 6 pound long guns and 8 12 pound carronades. The Harvey kit comes with 8 Cannons, no mention of the size but I believe I can pass 2 of them off as the 6 pounders. I will get the Carronades aftermarket, and they should be about 3/4"" length or 20 mm to represent 12 pounders in 1/48 from what I can find. Can anyone advise what position the 6 pound cannons would likely be placed at? I have skimmed the books again and don't find a reference to them, but would appreciate a knowledgeable opinion where a captain of that age would have placed them. Bow or stern chasers? Midships? Any help appreciated. I have started by setting the bulkheads into the keel in order, most of them were lower than the upper keel line. I glued a shim of wood in the crotch of the bulkhead opening ( sorry for the inelegant description, hope my nautical volcabulary improves as I go along) and then sanded them so the bulkheads were flush sitting. Tried to ensure they were square using a clamp and two small squares with the ruling edge removed. Found out then that the keel is not a smooth progression along the top of it, so some sanding will be needed. Here are a couple of images of what I have so far. Would greatly appreciate knowing if I have done anything wrong to this point. Is there a way to put the images in sequence with the text, or should I put the text and image as separate postings to keep them together? Thanks once again and it is a joy to have found this community and resource. Glen
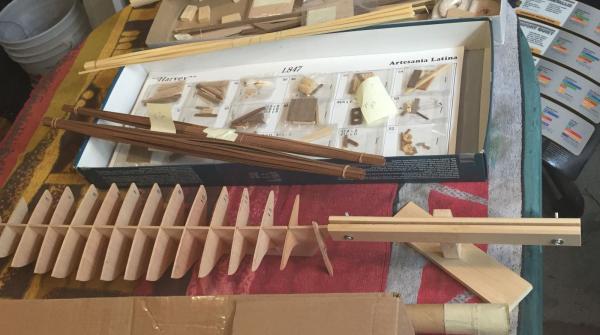
- 4 replies
-
- 2
-
-
- harvey
- artesania latina
- (and 1 more)
-
 About 25 years ago I bought this kit in a Hobby store in CA. It has been through 2 moves since and we are preparing to move again, and I will temporarily loose my shop. So I thought it was high time to finish something. Along the way I have lost a few pieces and picked up another copy of this kit off of ebay. Before the forum upgrade there were a couple build logs of this kit. Unfortunately I don't see them now. I became very discouraged when I relalized the significant errors in this kit. This is AL's version of the Baltimore Clipper. This is a period of US history in which I am very interested. Even the historical information is pure fantasy. But enough about the flaws. It is still an attractive model. There was also a build log here that really inspired me. It was a Kit bash of this kit and renamed the Lady Anne. This is what got me to restart. She will be the Lady Caroline (the admiral's name is Carol). So let us begin -
 -
I have been a member of msw for a little while and I tried to do a solid hull kit by mamoli on the H.M.S Bounty. I never finished it because I didn't have any of the proper modeling tools and because the parts were not cut correctly. I have since then learned a little more about ship modeling and am trying to get some new tools. I am also wondering what your thoughts are on the Artesania Latina 1847 Harvey? I know it has been discontinued but it was recommended in A book I got called Ship Modeling Simplified by Frank Mastini.
-
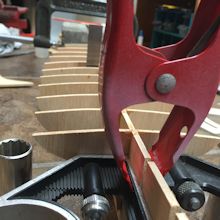
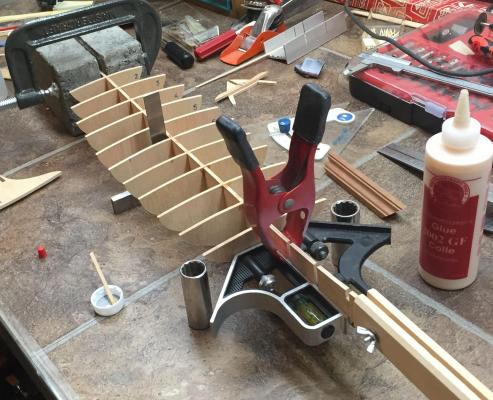
 First time builder, I picked up my Harvey Baltimore off Ebay very cheap, that not being the reason I bought it, I did a lot of looking around on MSW and the net, and a lot of the info pointed to the Harvey for being the ideal "Beginners" ship to build. I spent a lot of time watching Ebay until this one popped up and I managed to get a hold of it...Lucky Me...Lol!! I have probably spent about 16 hours on it so far, checking the fitment of parts and checking them over and over, a little filing & sanding here and there got me to the glueing of Bulkheads stage.... Looks a little bent, just the angle of the pic...He! He! Then onto the False Deck, Having read numerous threads here, I decided to go with the majority and not plank the deck just yet, incase of any mishaps or slips with nasty knives or files.... I have faired the Bulkheads and all is ready for the dreaded 1st layer planking, I will keep you posted on that.... Cheers Paul