Search the Community
Showing results for tags 'workbench'.
Found 4 results
-
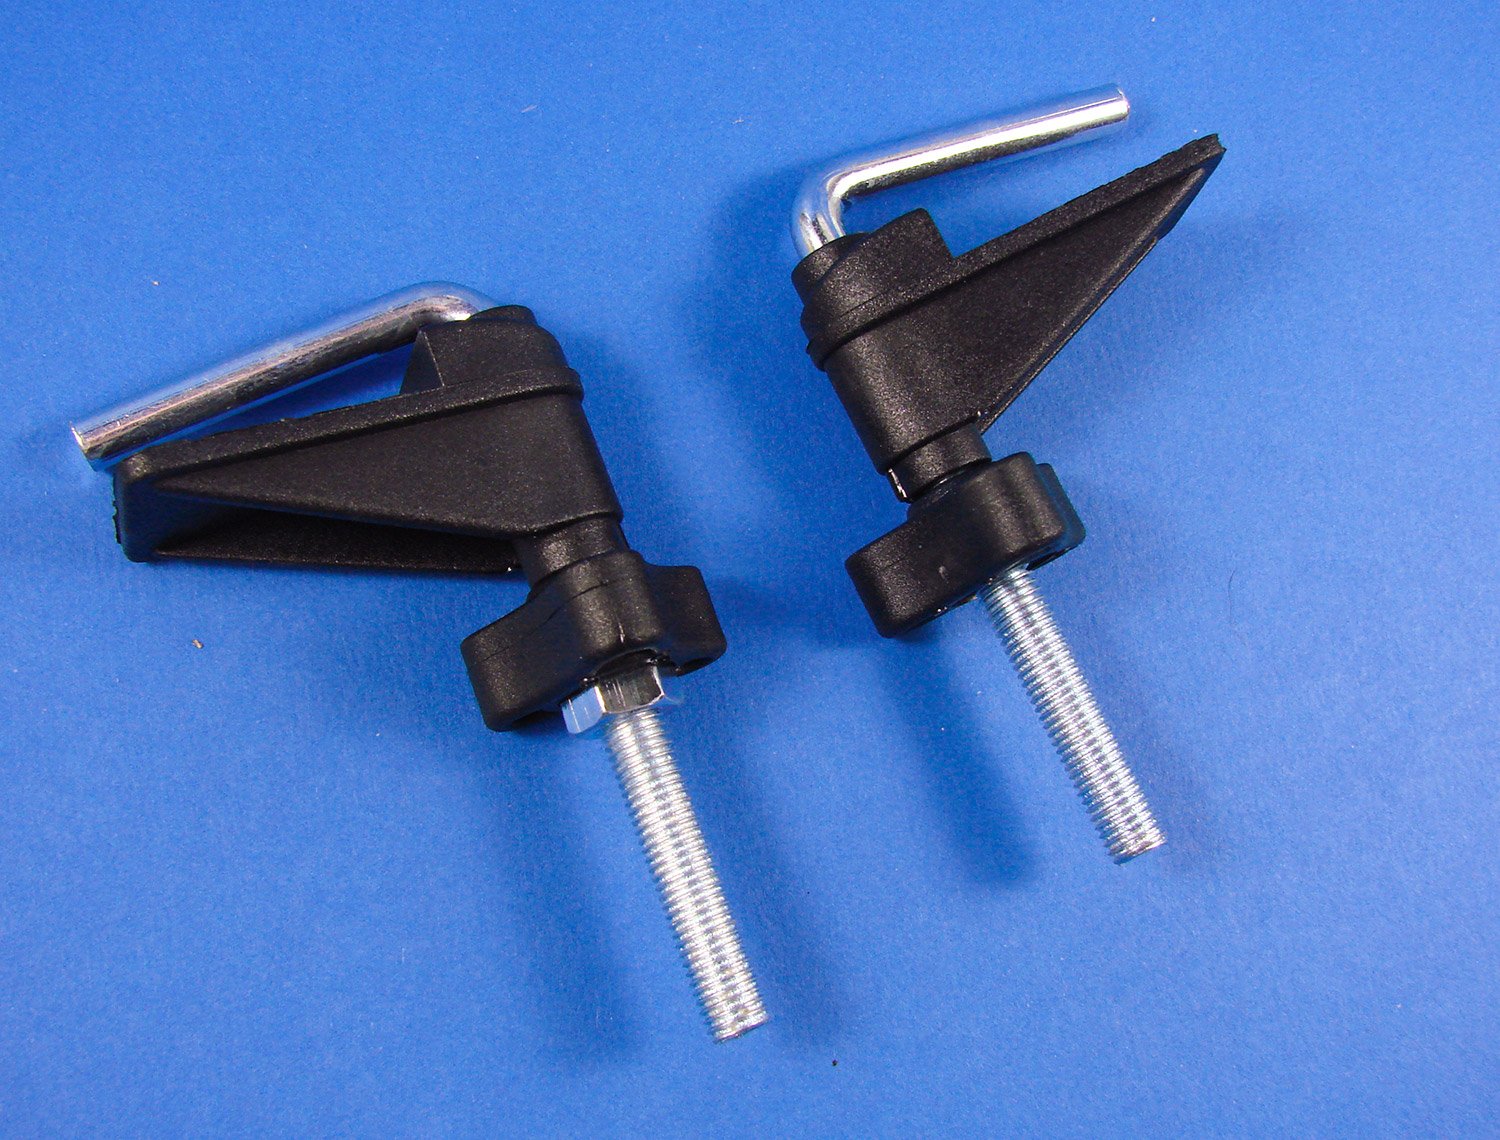
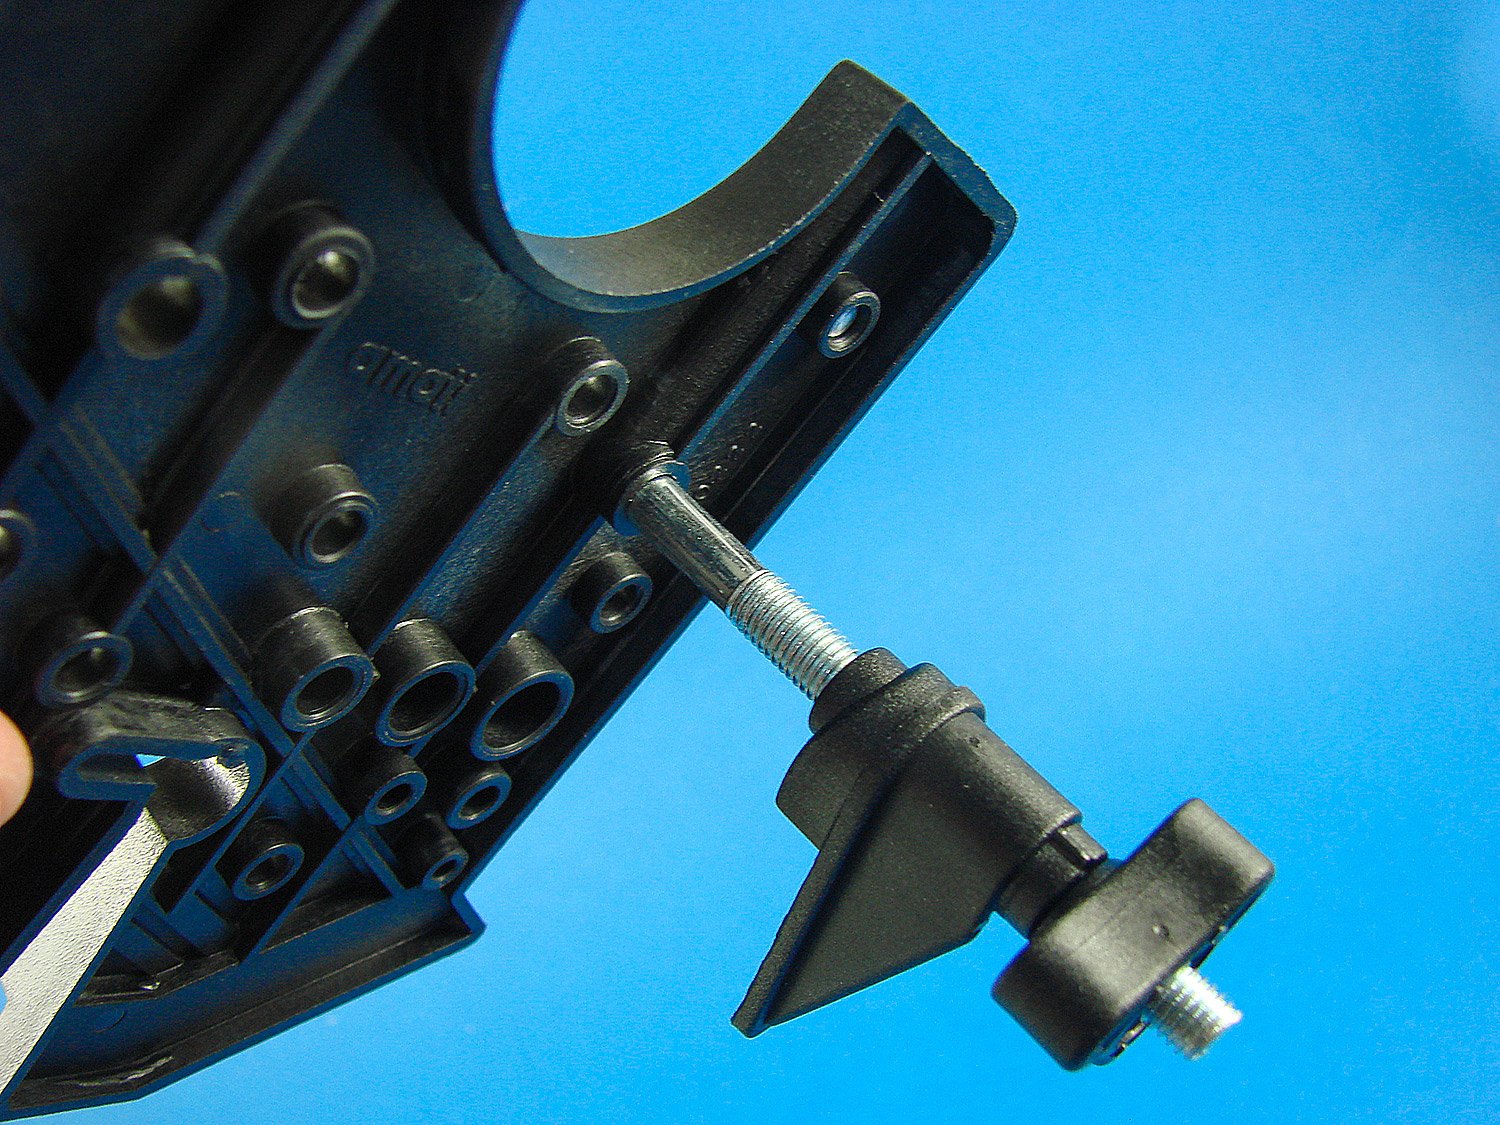
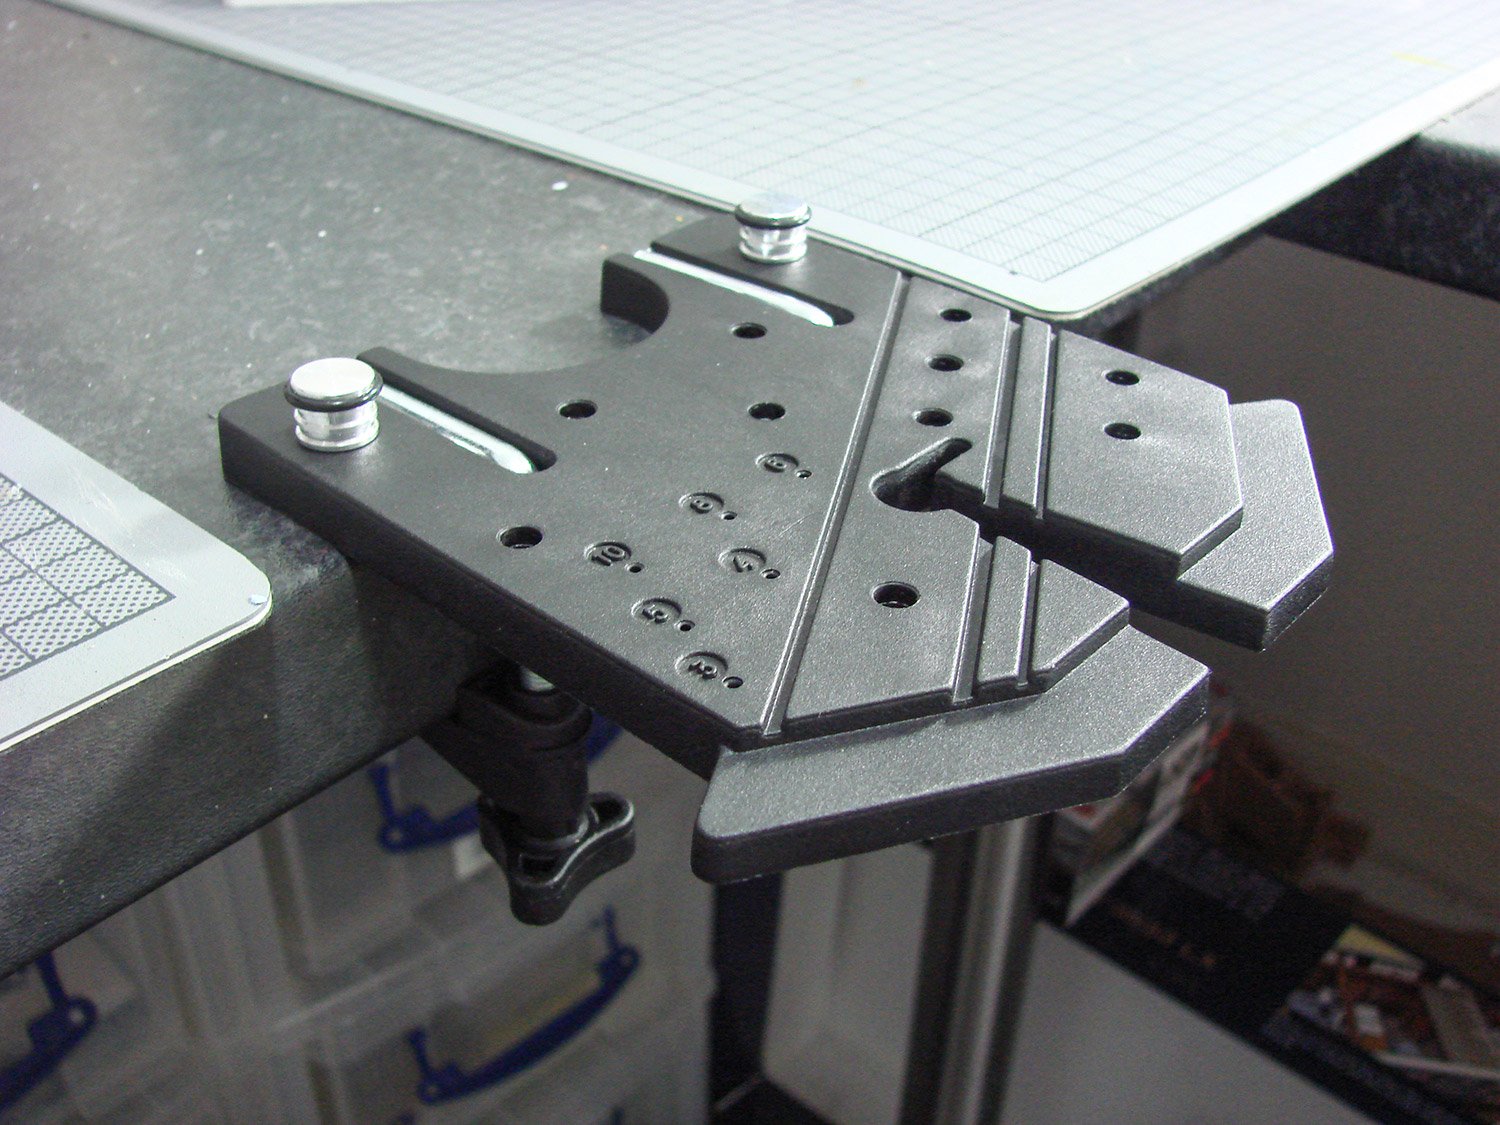
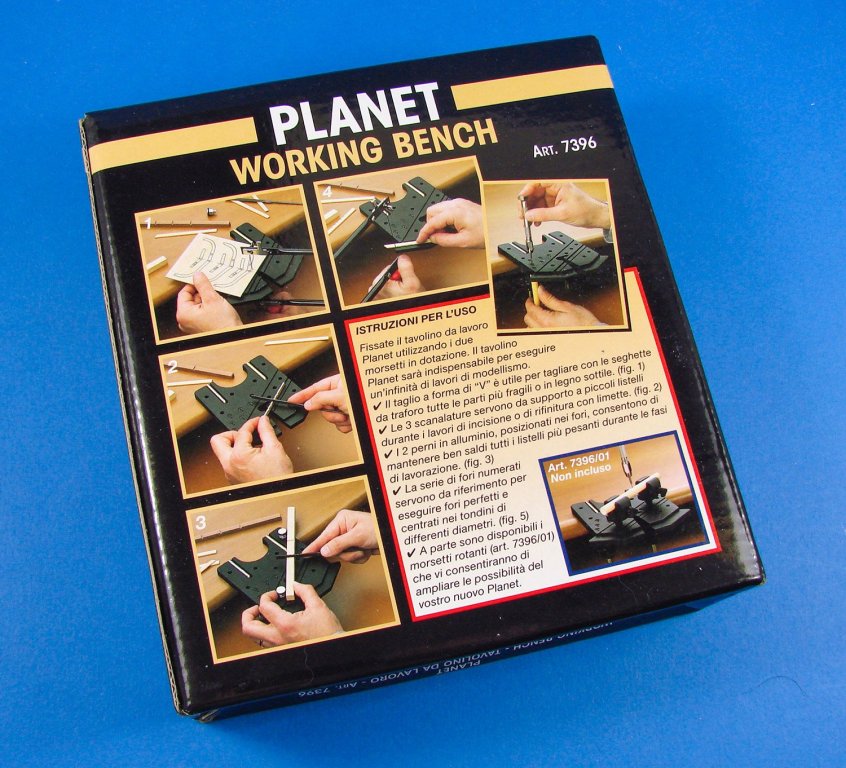
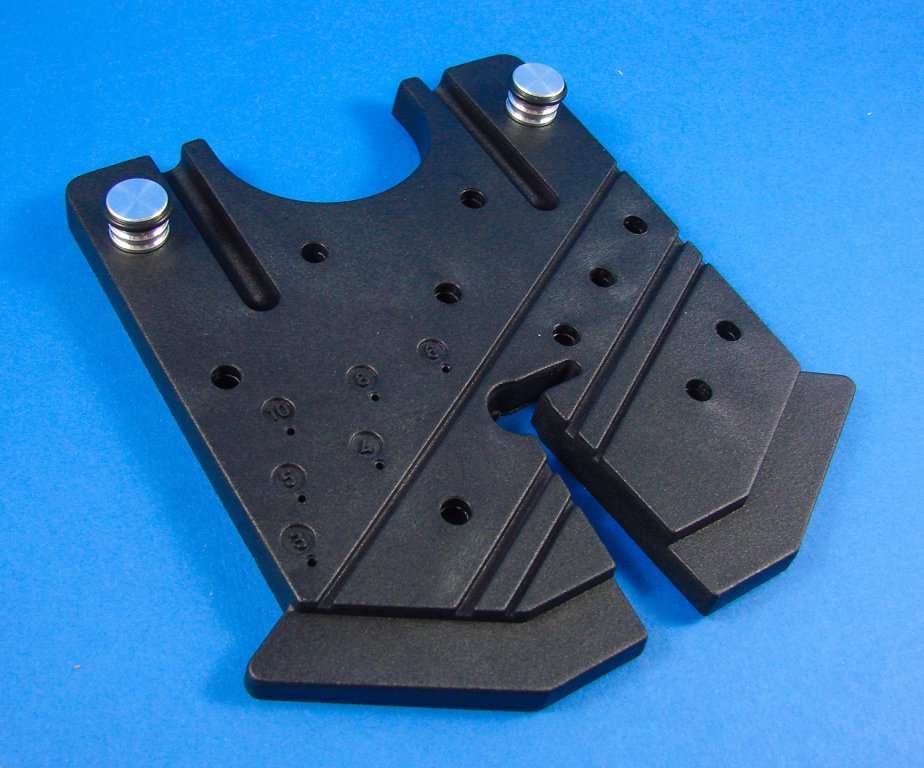
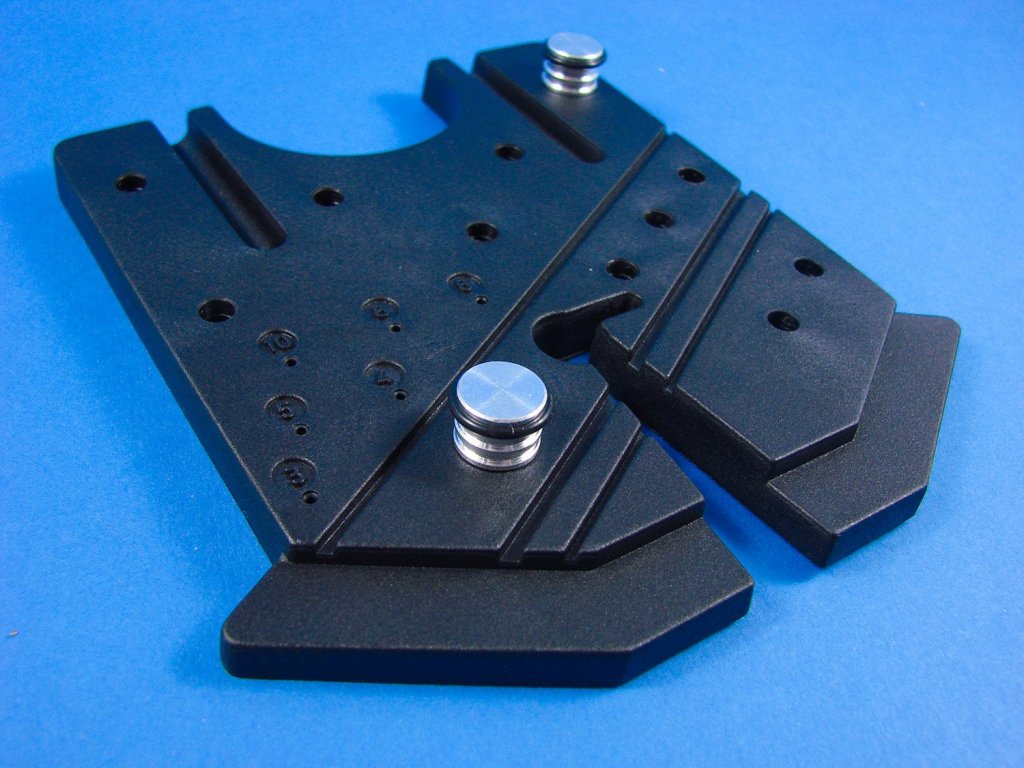
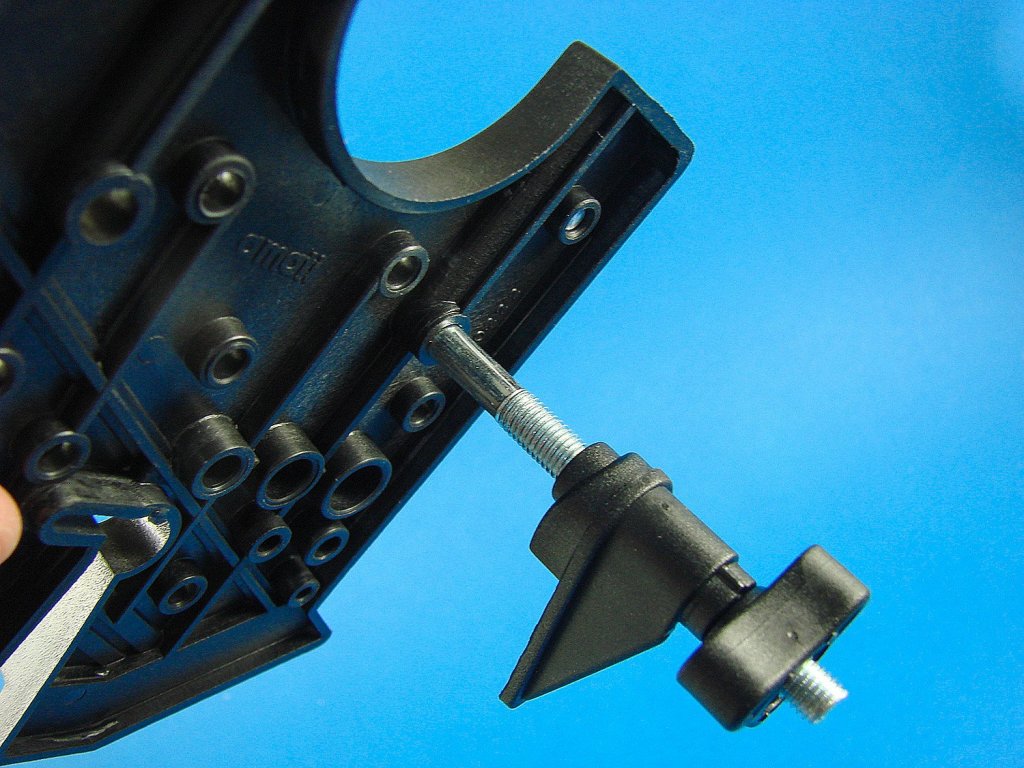
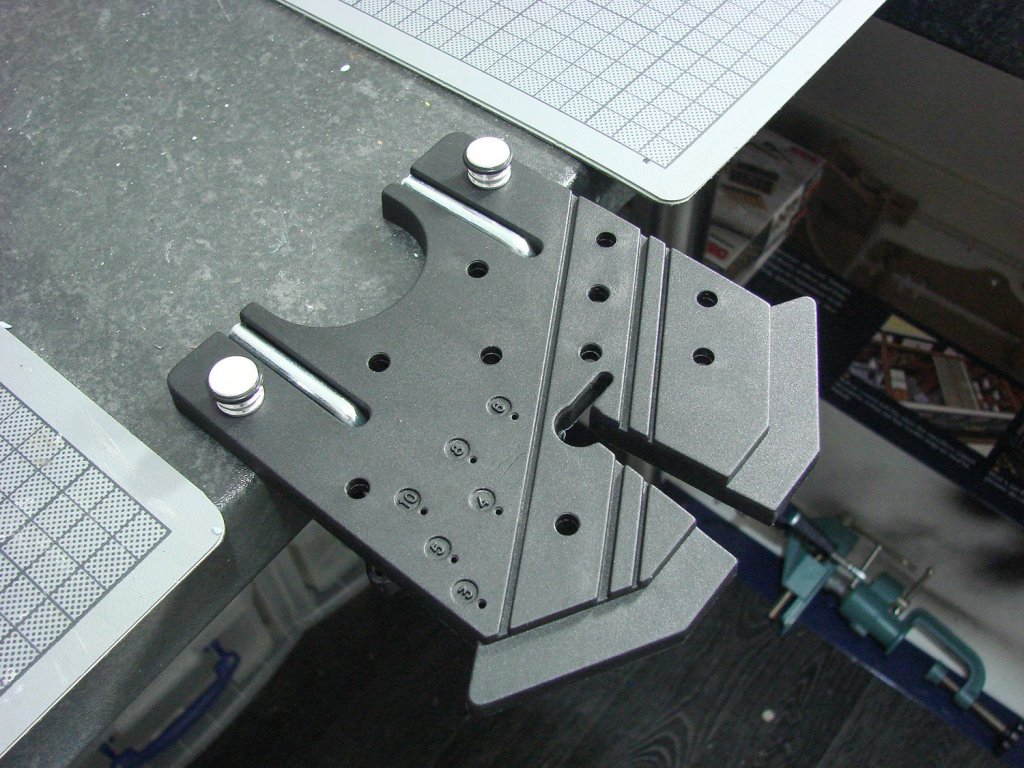
 Planet Working Bench Amati Catalogue # 7396 Available from Cornwall Model Boats for £10.58 Having worked in plastic modelling for a while now, where I’m having to remove casting blocks from larger components but doing that either on my cutting mat or between my fingers, a tool like this appears to be very useful. When it comes to ship modelling too, the ability to be able to lay some small timber sheet flat whilst you use a fine saw on smaller components, without sawing tracts into your worktop (ask me how I know!), definitely helps. Amati’s Planet Working Bench is a tool that is designed for work on small components and materials, helping you hold items whilst you saw, file and drill. Let’s take a closer look. Amati’s Planet tool is packed into an attractive, sturdy and glossy box with an image of the tool clamped to a desktop. The back of the box is a little more illustrative, with examples of how this tool can be used with your work. All writing is in Italian, but we can grasp what’s happening fairly easily. Although Amati are generally known for their wooden model ships etc. this tool can of course be used for other areas of modelling where basic tools such as saws, files, and drills, are used. Inside the box, two thick plastic sleeves contain the components. In the largest is the Planet Working Bench itself, complete with two small aluminium bollards plugged into it. These bollards have a rubber O-ring fitted to them to prevent the metal scuffing any delicate work that you will use with the tool. The main part is moulded from a very tough plastic that still does have a little give in it, but it certainly rigid enough for the tasks that it’s designed for. It also has various channels moulded within in as well as holes to reposition the bollards, and a series of small, numbered holes which I’ll come back to very soon. The front slot is there to help you cut into materials, without a risk of cutting into your actual workbench. Just be careful not to start sawing into the Planet itself. The second wallet contains the two clamps which will secure the Planet to the desk. These are formed from two angled, threaded rods onto which a locking nut and the part which forms the lower side of the clamping jaw. To fit these to the Planet, you insert them from the underside and lay the angled part of the metal rod in the moulded channels. Slacken the nut off and then fit to the edge of your workbench, securely tightening the nuts to lock everything in place. Now, those small numbered holes. These refer to a moulded sleeve in the underside of the Planet, into which you will fit a wooden dowel or metal rod into which you wish to drill a hole centrally within the diameter. The hole of course aligns with the dead centre of the sleeve into which you will plug the wood or metal rod. Conclusion This is a very handy little gadget for working on those small model parts, but sold as it is, the full potential of the tool isn’t realised. To really get your money’s worth from it, I really do advise that you also purchase the small clamps which are designed to plug into it. These is called the ‘hand vice’ on Amati’s catalogue page and contains one single unit. Better still, a couple of these would be immensely useful. The Planet itself is very reasonably prices, nicely constructed and is a cinch to fit to your bench. I’ve already started to use it whilst building my Amati Orient Express Sleeping Car. My sincere thanks to Amati for sending this tool out for review. To purchase directly, click the link at the top of this article.
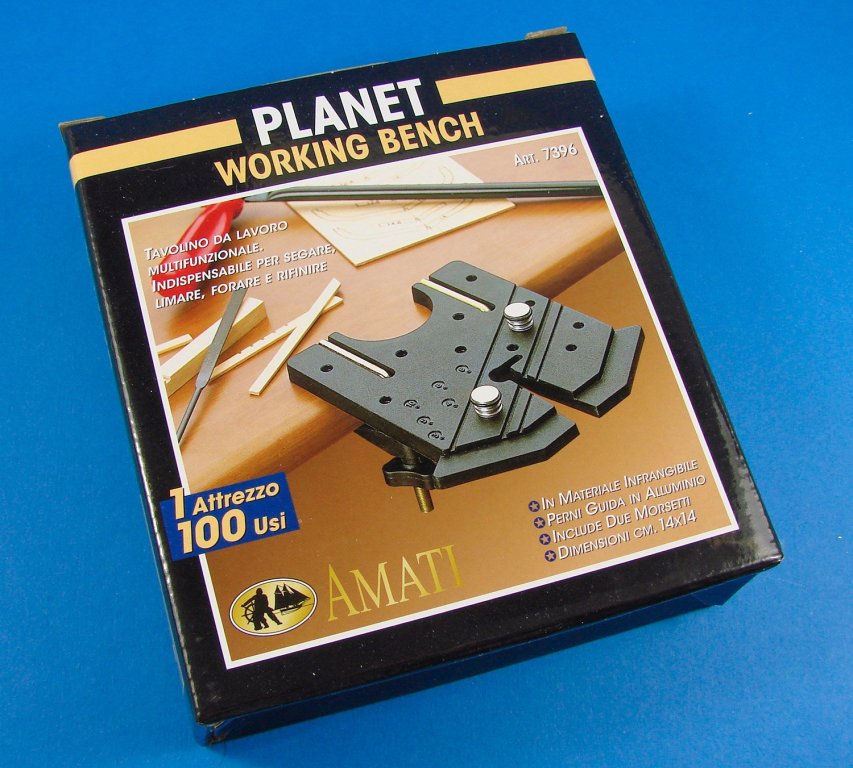


-
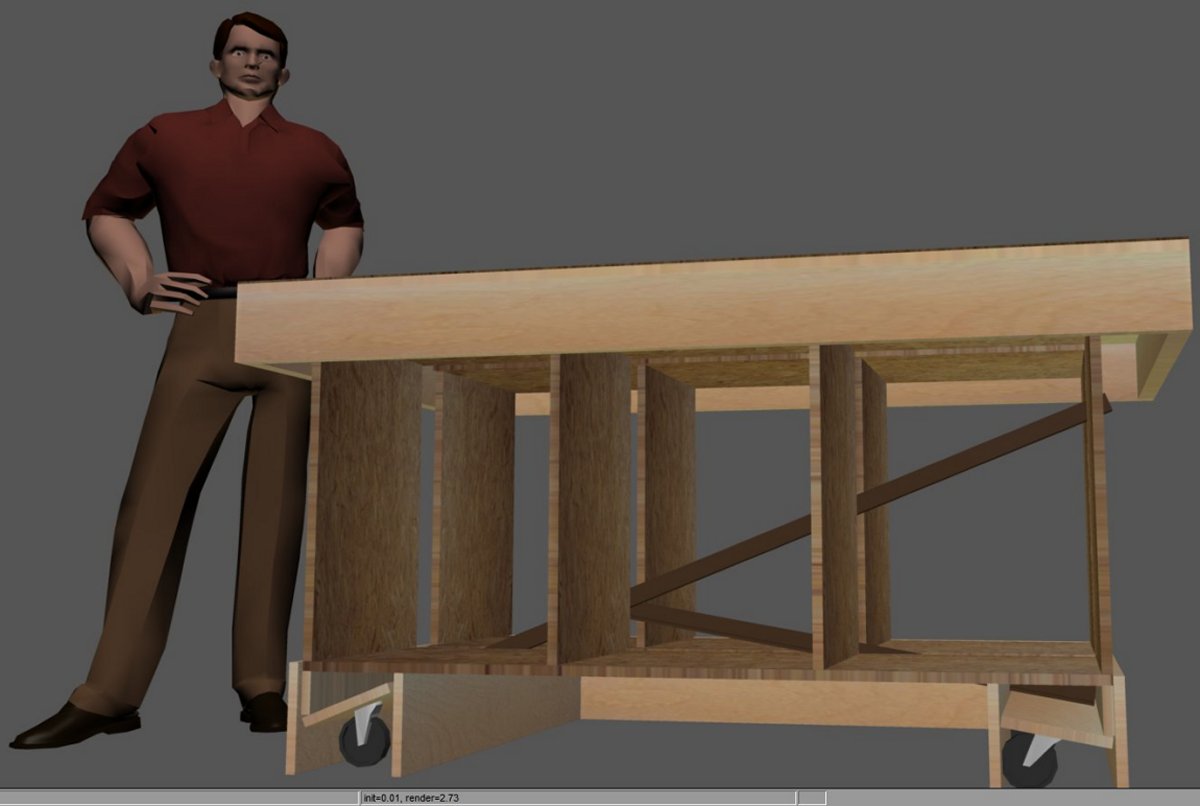
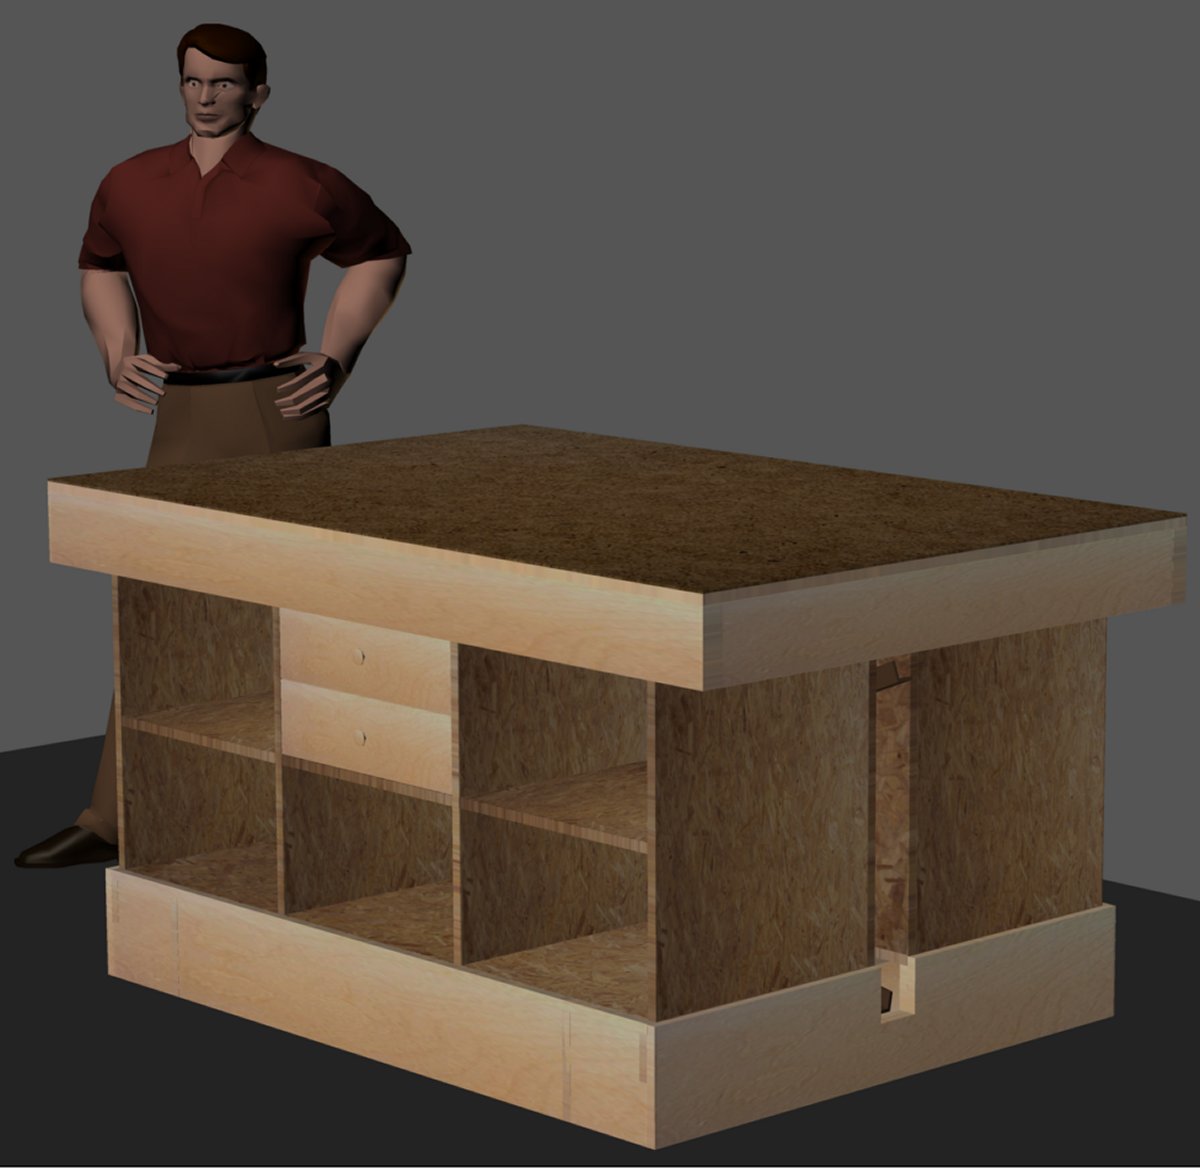
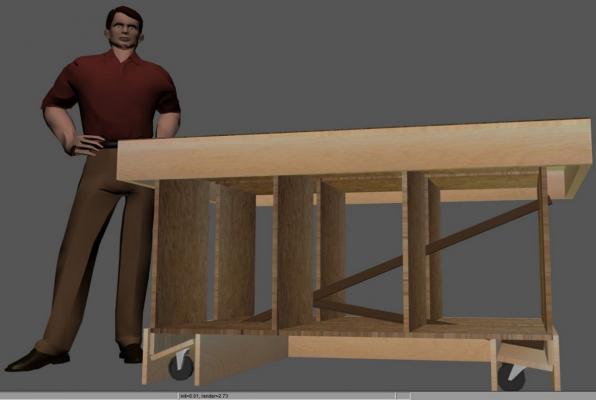
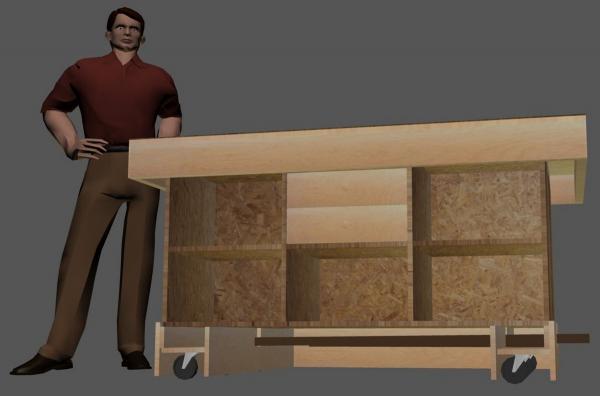
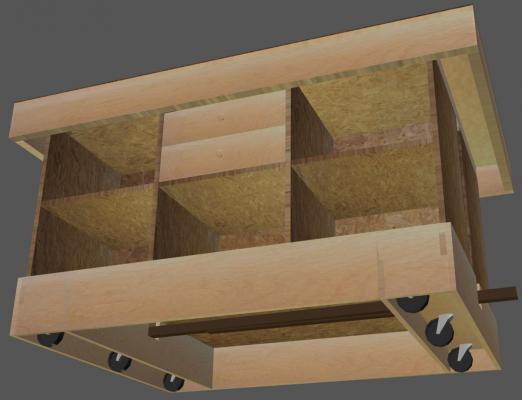
There's no heat or AC in my shop/garage, so over the winter nothing of substance got done and the garage served more as an extension to the refrigerator. With warmer weather here the focus is on getting the garage cleared up and usable as a shop. The bandsaw got casters, the tablesaw's casters got repaired, and small cabinet with a bunch of shallow drawers found at a thrift store was added for all my little tools. It requires moving a lot of stuff out onto the driveway to work on the shop and then it started to rain - a lot. During the monsoon I was playing around in my old 3D drawing program with an old idea for a 4 foot by 6 foot work-table on casters and I think I finally nailed a mechanism that will work. There's a lot of folks here that suffer from work-area space issues and a need tools and tables to be mobile - so I thought I'd share this with you. A lot of it was inspired by a fellow on YouTube and this video: Here's some images of the 3D model (drawn in free software called Anim8or) Please pardon Posin' Paul, he's just there for scale. With some internal bits removed so you can see; the brown arms are L iron from a bed frame. The 6 casters are mounted on a 3/4" thick white pine board and levered against a strip of wood. Lowering the end of the bed-frame sticking out of the right of the table, levers the wheels down and lifts the table an inch off the floor. No hinges are used saving $20 at least. The whole caster set-up will slide right out if you want to remove them for some reason. The top is 4' x 6' with hardboard (Masonite) work surface that can be replaced if it gets too gnarly. The body is basically two 5 foot by 21.5" boxes built of OSB (Oriented Strand Board) which is running about $12 for a 3/4" x 4' x 8' sheet. The caster levers operate in a 2" gap between the boxes making the body 45" wide and 60" long. A pair of drawers will go into one of the pigeon holes; a vice get mounted in one end, and electrical outlets will be installed on all four sides There will probably be hooks and such on the ends to hang things. The skirting around the base will have relief cut in (not show in pics) so the table will essentially have four feet to sit on; and the lever will have a latching system to hold it down in the deployed position. The height of the table is designed for it to also act as an out-feed table for my table-saw. Obviously a 4 x 6 table may be a bit much for some of you, but it's the caster set-up I'm mainly showing you here - which can be adapted to nearly any size bench or table, as shown in Carl's video above. When I get to building this beast, I'll add it to this thread.

-
 Hello, I ran across this article, and I thought it might be interesting to those who have limited space to work. As shown, it is meant to be clamped in a large workbench vise, but it could easily be altered for C-clamping to a table or desk top. https://books.google.com/books?id=UyYDAAAAMBAJ&lpg=PP1&pg=PA158#v=onepage&q&f=false It occurs to me that the persons who would find this most useful probably do not have the facilities or tools to make one. If that's so, then I could make this or a customized workboard for you in exchange for compensation for materials & labor. Please PM me if you're interested. And before I forget, here's a source for good quality tools and other items at reasonable prices: C.R. Hill of Berkeley MI. http://www.crhill.com/
 -
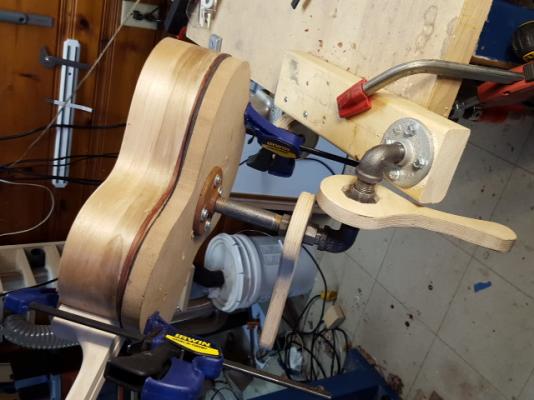
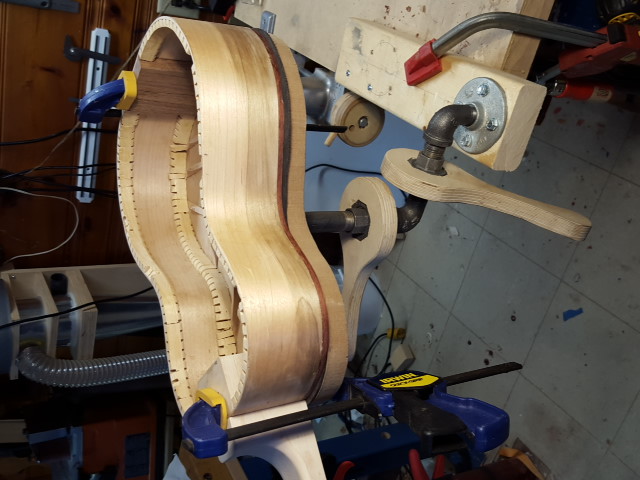
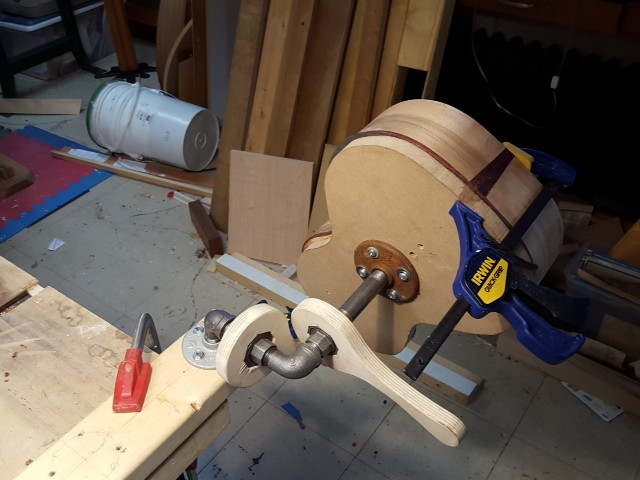
Hello, I wandered in through a space/time portalrfrom from another artisans' universe, but here's something that might be useful to shipbuilders (I'm sorry, you'll need to tilt your head to the left; I can't get the pics to cooperate clockwise.) I'm getting to an age where I like to position a workpiece so that is comfortable to work, for my eyes, hands, neck, and spine (It's Hell getting older!) So I made this Plumbers' Special positioning fixture from ~$25 of 1/2" pipe fittings and some scraps. It allows me to position a workpiece at a comfortable height and attitude. There are two floor flanges, two unions, and a few nipples. The captured service wrenches are made of baltic birch. I haven't decided how and where I will permanently mount this fixture, and so for now it's just screwed and clamped to the corner of my bench. Also, I suppose 3/4" or 1" pipe & fittings might be heftier, but I'm not chopping wood here. -- I'm doing fine work. >>>For model building, 3/8" pipe & fittings might be more suitable.<<< Obviously, your hull should be fixed to a mounting plate to prevent a shipwreck tragedy. I hope this is useful to you.