Spiff Posted May 20, 2013 Author Share #31 Posted May 20, 2013 Shes really starting to look like a ship now - have almost all the deck-fittings on, and think I only need the anchor-holders (whatever they are really called ) before I can varnish! Made a quick little jig to make even spacing between the 'steps' on the side of the hull. WackoWolf and GuntherMT 2 Quote ShaunCurrent build: Golden StarPrevious builds: Bounty Jolly boat Link to comment Share on other sites More sharing options...
Spiff Posted May 20, 2013 Author Share #32 Posted May 20, 2013 Just realized that after all my work on the windows I dont have proper pictures of them installed So here they are. They arent completely straight and perfect, but Im pretty happy with the result - when viewed from a few feet away they look quite good IMHO. GuntherMT and WackoWolf 2 Quote ShaunCurrent build: Golden StarPrevious builds: Bounty Jolly boat Link to comment Share on other sites More sharing options...
sparrow Posted June 27, 2013 Share #33 Posted June 27, 2013 Hi Shaun, I am sorry I haven't been watching your build as much as I wanted but I wanted to say that you are doing a good job on her! Keep it up! Best regards, Jan Quote Current build: Royal Caroline by Panart First completed build: Golden Star by Mantua Link to comment Share on other sites More sharing options...
trippwj Posted June 27, 2013 Share #34 Posted June 27, 2013 Looking very nice, Shaun. Quote WayneNeither should a ship rely on one small anchor, nor should life rest on a single hope.Epictetus Link to comment Share on other sites More sharing options...
Spiff Posted June 28, 2013 Author Share #35 Posted June 28, 2013 (edited) Thanks Jan and Wayne Havnt built so much recently, but have given it three layers of varnish, so now the hull is complete! Edited September 8, 2014 by Spiff Quote ShaunCurrent build: Golden StarPrevious builds: Bounty Jolly boat Link to comment Share on other sites More sharing options...
Spiff Posted June 28, 2013 Author Share #36 Posted June 28, 2013 (edited) Im guite happy with the results but from the right (or rather - wrong) angles there are stains, which I think must be from the wood-glue used to glue on the various strips on to the planking. Can be seen in this pic. Does anybody know how to avoid this? I have sanded a bit after glueing and scraped as much glue away as posible when glueing. Edited September 8, 2014 by Spiff Quote ShaunCurrent build: Golden StarPrevious builds: Bounty Jolly boat Link to comment Share on other sites More sharing options...
Spiff Posted September 8, 2014 Author Share #37 Posted September 8, 2014 Wow - its been over a year since my last post! can hardly belive that. Life happens! But I havent been COMPLETELY idle - have finished bowspit and just finished the main mast (but not fitted yet). Quote ShaunCurrent build: Golden StarPrevious builds: Bounty Jolly boat Link to comment Share on other sites More sharing options...
Spiff Posted November 19, 2014 Author Share #38 Posted November 19, 2014 (edited) I have now installed the masts, but as soon as I had done that I realized that there are some deadeyes that need to be attached to them. In the instructions that is done later, but it would have been a LOT easier to do before installing the masts. Just shows my inexperience and that I cant as yet determine the best sequence of doing things. I even have a book on how to do things, but that states to complete the masts with lots of the rigging before installing the masts - I dont know, that just seems very difficult to me for some reason. But I'll manage - just hope I dont snap a mast trying to drill holes in it. Also added the chains and deadeyes to the channels. It was rather tricky to twist the wire in both ends and end up with the right length, but got the hang of it after a few attempts. Found it easier to start with the small nail-end instead of the end with the deadye (which was how the instructions said to do it). Its not completely straight and perfect, but Im pretty happy with the result. I haven't yet added the thin strip of wood to cover the channel in the last picture. Edited November 19, 2014 by Spiff WackoWolf and thomaslambo 2 Quote ShaunCurrent build: Golden StarPrevious builds: Bounty Jolly boat Link to comment Share on other sites More sharing options...
Spiff Posted January 11, 2015 Author Share #39 Posted January 11, 2015 Used Bender's tips on how to seize blocks to deadeyes and yards (http://modelshipworld.com/index.php/topic/1056-tying-blocks-to-yards-or-masts/), and am quite happy with the results. I have then started on shrouds and ratlines. but even though I used a wire spacer they still didnt come out the same distance . Since the shrouds were already tied and glued I wont change it. But for the main mast I will just use the spacer for the first shroud and then do the rest by eye... Any tips on how to do this? The other side looks a bit better. GuntherMT 1 Quote ShaunCurrent build: Golden StarPrevious builds: Bounty Jolly boat Link to comment Share on other sites More sharing options...
Spiff Posted March 2, 2015 Author Share #40 Posted March 2, 2015 A couple of pictures of current status - finished the shrouds and ratlines and started on Stays. Couldnt get the ratlines completely straight and the lanyards and shrouds would sometimes twist - not sure how to avoid that. But all in all Im pretty happy with the result even if its not perfect - but hey - its my first ship this size... GuntherMT and thomaslambo 2 Quote ShaunCurrent build: Golden StarPrevious builds: Bounty Jolly boat Link to comment Share on other sites More sharing options...
thomaslambo Posted June 26, 2015 Share #41 Posted June 26, 2015 Hi Shaun, Really beautiful work.....looking forward to your next update Quote Boyd Current Build - HMS Bounty - Artesania Latina - Scale1:48 Link to comment Share on other sites More sharing options...
Spiff Posted March 19, 2017 Author Share #42 Posted March 19, 2017 Wow - its been two years since my last post! Well - have been busy moving across the pond and setting up a new workspace. But here are some pictures of progress - shes moving along slowly but nicely. This is status right now. Booms are still not attached. The yards with blocks. Starting on making sails now. Here im drawing in the sail and seams with pencil. Transfered the seam spacing using tape. And then put it in tea for 10 minutes. Right now its drying off. My plan is to have main sail set and probably the rest furled. Im using the thinnest cloth I could find, but now realizing paper might be better - but will give it a try with cloth. mtaylor 1 Quote ShaunCurrent build: Golden StarPrevious builds: Bounty Jolly boat Link to comment Share on other sites More sharing options...
Spiff Posted March 6, 2019 Author Share #43 Posted March 6, 2019 Not exactly a consistent builder or updater - but then again it seems Im keeping a two year gap between updates. Sincerely hope to be more frequent. I have done all the standing rigging (can see I need a photo of that) and have started on sails. I have been a bit intimidated of making sails - furled or set and all that but giving it a go. As I reported in last update I was doing a bit of a test run but was so happy with the first attempt that I am going to use that, and have made several more. This was the first attempt: These are the finished ones so far: I can see that the cloth is too thick and out of scale but think it will look pretty good. Might try (silk)paper for next model though. GrandpaPhil 1 Quote ShaunCurrent build: Golden StarPrevious builds: Bounty Jolly boat Link to comment Share on other sites More sharing options...
Spiff Posted March 6, 2019 Author Share #44 Posted March 6, 2019 I have a question for those who have done this thing before though. As I am soon to start adding the spars+sails and all the other running rigging - what is the best order to do it in? Start with the lower or upper sails and which mast first? I plan on having the main sail and mizzen sail set and the rest furled. GrandpaPhil 1 Quote ShaunCurrent build: Golden StarPrevious builds: Bounty Jolly boat Link to comment Share on other sites More sharing options...
GrandpaPhil Posted June 7, 2019 Share #45 Posted June 7, 2019 Bottom to top, front to back is the recommendation in Zu Monfeld’s Historic Ship Models. It has served me well. Quote Building: 1:64 HMS Revenge (Victory Models plans) 1:64 Cat Esther (17th Century Dutch Merchant Ships) On the building slip: 1:72 French Ironclad Magenta (original shipyard plans) On hold: 1:98 Mantua HMS Victory (kit bash), 1:96 Shipyard HMS Mercury Favorite finished builds: 1:60 Sampang Good Fortune (Amati plans), 1:200 Orel Ironclad Solferino, 1:72 Schooner Hannah (Hahn plans), 1:72 Privateer Prince de Neufchatel (Chapelle plans), Model Shipways Sultana, Heller La Reale, Encore USS Olympia Goal: Become better than I was yesterday "The hardest part is deciding to try." - me Link to comment Share on other sites More sharing options...
Spiff Posted June 11, 2019 Author Share #46 Posted June 11, 2019 Thanks GrandpaPhil. Still working on the sails so havent started mounting them yet. Quote ShaunCurrent build: Golden StarPrevious builds: Bounty Jolly boat Link to comment Share on other sites More sharing options...
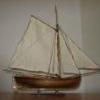
Spiff Posted October 28, 2021 Author Share #47 Posted October 28, 2021 I used very diluted white wood-glue which I painted on the sails and then shaped and tied them. Fairly happy with the outcome even though the cloth I used is much too thick really. Made a couple of the sails 'billowing' using things to weigh them down while the glue dried. Finished! after more than 9 years on-off building. Farily happy with the result even though I was getting frustrated with the plans/instructions as there were errors that I had not noticed earlier and were too late to try and fix. Wanted furled sails at the bow (Im not into all the names - sorry) but with the thick cloth Im using for sails I could not make them fit very well and thought it would be better without them. Also decided against the plasticy flag that came with the kit and the huge lanterns that were supposed to be at the stern - I felt like they were way out of scale and would just look silly. GrandpaPhil, Ian_Grant and ccoyle 3 Quote ShaunCurrent build: Golden StarPrevious builds: Bounty Jolly boat Link to comment Share on other sites More sharing options...
GrandpaPhil Posted November 23, 2021 Share #48 Posted November 23, 2021 Congratulations! Well done! Quote Building: 1:64 HMS Revenge (Victory Models plans) 1:64 Cat Esther (17th Century Dutch Merchant Ships) On the building slip: 1:72 French Ironclad Magenta (original shipyard plans) On hold: 1:98 Mantua HMS Victory (kit bash), 1:96 Shipyard HMS Mercury Favorite finished builds: 1:60 Sampang Good Fortune (Amati plans), 1:200 Orel Ironclad Solferino, 1:72 Schooner Hannah (Hahn plans), 1:72 Privateer Prince de Neufchatel (Chapelle plans), Model Shipways Sultana, Heller La Reale, Encore USS Olympia Goal: Become better than I was yesterday "The hardest part is deciding to try." - me Link to comment Share on other sites More sharing options...
ccoyle Posted November 23, 2021 Share #49 Posted November 23, 2021 Congratulations, Shaun! Hope you agree that the result is worth the years of perseverance! Quote Chris Coyle Greer, South Carolina When you have to shoot, shoot. Don't talk. - Tuco Current builds: Brigantine Phoenix, Hawker Hurricane Link to comment Share on other sites More sharing options...

Recommended Posts
Join the conversation
You can post now and register later. If you have an account, sign in now to post with your account.