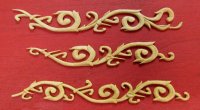
Chuck Posted February 17, 2017 Share #1 Posted February 17, 2017 I will be doing a demo at my local club as a follow up to the carving exercise we had. I will also create a photo essay of sorts here on MSW. I have already created the test mold for the live demo and made a few test copies....but will be making more molds of other elements. I will demonstrate one method for making simple one part molds for these flat carvings as it is something that comes in handy for ship modeling. Especially for things like gunport wreaths etc. So look for the demo to commence in about a week. I am just waiting on newer resin and rubber mold material to arrive in the mail. It has a short shelf life. Using old rubber mold materials is also not good because it could ruin your master. I will be trying a few brands so I can talk about and review each of them. I hope you will find this a useful addendum to the carving section as it is somewhat related. I hope its OK with you folks that I post here in this area. Below is the first mold....a master carving....and two cast copies. Casting thin parts is problematic but its what we do as ship modelers so lets give it a go. Chuck thibaultron, Heronguy, mtaylor and 24 others 27 Chuck Passaro - MSW Admin Sloop Speedwell - POF scratch Block Island Boat - POF scratch HMS Winchelsea - POB scratch build HM Cutter Cheerful - POB scratch build Royal Barge - POF scratch Medway Longboat- POF Scratch SYREN SHIP MODEL COMPANY Link to comment Share on other sites More sharing options...
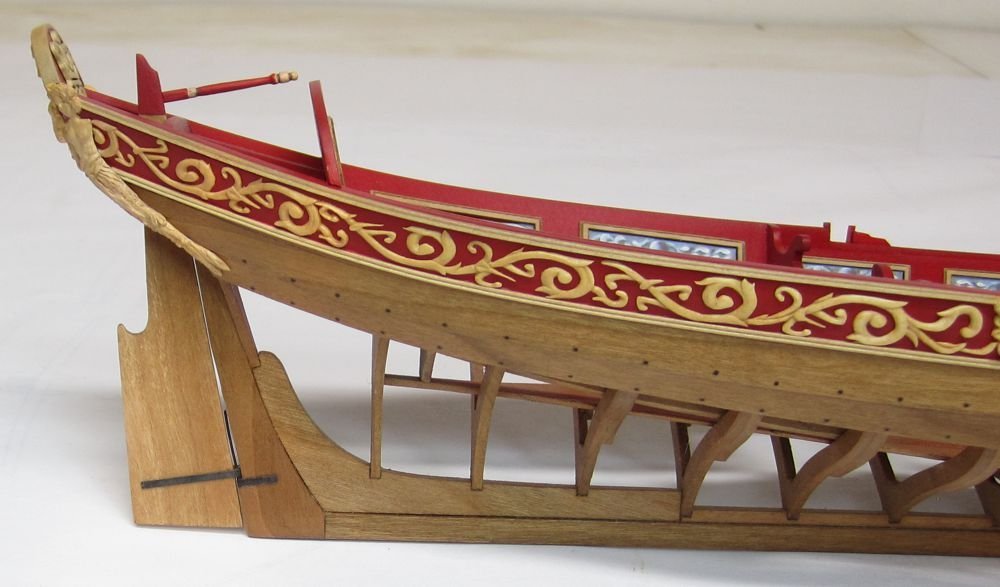
Chuck Posted February 18, 2017 Author Share #2 Posted February 18, 2017 THE MOLD BOX There are many ways to make a mold box. Some folks even use disposable plastic containers. Some make them out of wood. I prefer to use toy build blocks...LEGOS. This gives me more flexibility and I can reuse them to make any size mold box. Because you can remove the blocks one at a time after your mold cures it also makes removal of your mold easier in my opinion. CLAY ON THE BOTTOM In the photo below you can see the master already in position. Surrounding it is blue clay. This is the type of clay that never hardens. It stays soft and pliable. The clay is important for making both simple one piece molds like we are making and two or three piece molds which are more complicated. The clay is usually sold where you can buy the casting supplies. In this case it was from Micro Mark. PREPARING THE MASTER Some tutorials will instruct you to place the master in the clay directly. You would push the clay all around the part so no rubber from your pour will seep under it. This is OK for larger really simple parts....BUT In our case, the tiny intricate pieces (often made from thin fragile boxwood) would certainly break. If your clay isnt perfectly flat it would be problematic as well. That makes it more susceptible to breakage. If it doesnt break it will certainly flex and your mold will produce distorted castings. So I recommend that you adhere the piece to a flat section of wood. In this case a small piece of cherry painted red. Normally it wouldnt be painted but it wont have any effect on the mold making process because its acrylic paint. This gives you a great flat surface all around the master. As you can see in the photo above, the master is leveled in the clay and the clay is smoothed out all around it so no mold material will seep under it when you pour. Note that the master is also painted....not recommended but I really didnt want to carve another one....it did work out just fine in the end. It is also really important that you do your best to ensure the master is level in the mold box. You dont want it sloped one way or the other. This is important when you start pouring resin into the mold as you want the resin to flow properly into the mold. Remember that this is for simple pieces with a flat surface....once they master gets more complex you should think about the best orientation for the piece based on how the resin will sit in the finished mold. Hope that makes sense. BEFORE YOU POUR YOUR MOLD... The master and every surface of the mold box needs to be treated with a mold release. This is also readily available where you buy the casting materials. I am using what came from MM. It is shown in the photo above as well. Brush it onto all surfaces...but dont let it pool up anywhere. Just give the inside walls, the master and even the clay a light coating. It makes it much easier to remove the mold after it cures. This step is crucial when you make more complex two and three part molds. Some places recommend a spray on mold release but this is fine and you have more control brushing it on. Remember no puddles. MIX YOUR MOLD MATERIAL In my case I am using rubber mold material from MM. There are many varieties. Some are extra strength for longevity...tear resistant for masters with complex undercuts and small details...or heat resistant for making metal castings...the explanations are usually very clear on reputable supplier websites. In this case its just ordinary basic rubber mold material for resin casting. Unless you need to make hundreds of parts this is just fine. I have used the extra strength stuff though at times and it works well when you have to make 100 plus castings with small intricate features where the mold might tear. Most of the mold compounds available to you these days will be a two part 1 to 1 mixture. It is important that you stir the contents of both parts A and B before use and before you mix them together. Also make sure they are at room temperature. Too cold or too hot and it will affect the strength and longevity of the mold. It will also take longer to cure. I pour equal parts of A and B into separate plastic cups. They are clear plastic cups so you can see the level of material in each. You can see in the photo that one part is white and the other is blue. This is done on purpose so when you mix the two and stir it you can tell when they are thoroughly mixed. Pour them together in one plastic cup and stir (or fold) together. Try not to agitate it so bubbles form in the mixture. Easy and gentle stirring or folding. Once you see no streaks in the two colors and a uniform light blue color is achieved you are ready to pour. Most good compounds these day are self gassing. Meaning the trapped bubbles will dissipate after a few seconds. But if you were careful it wont be an issue. POURING THE MOLD When pouring the material into your mold box do it slowly at first. Either pour it into the lowest spot of the mold box or in our case, one of the corners of the mold box. Never pour directly on top of the master because you will trap air bubbles around certain areas and end up with a bad mold. Better to start in a corner of the mold box and let the material slowly FLOW around and over the master to ensure no air is trapped. This mold will usually take 5 hours to cure. BUT I always let it cure overnight. At room temperature !!!To de-mold...simply remove the lego blocks and carefully pull the mold away from your master. Try not to break the master if it is intricate. This is also why I prefer to mount the master on a sheet of wood because if it was directly on the clay it is more prone to breakage. STORING YOUR MOLDS Your molds wont last forever but one trick is to place them in a plastic zip-lock baggie and place them in your freezer. Otherwise they get dried out and weak over time....and it doesnt take long for it to happen. Just make sure the molds are room temperature or even warmed up before you use them again. The mold making parts A and B also have a very short shelf life. This can also be extended by storing them in a cold place. But anything of good quality will have a use-by date on it. The worst thing you can do is try to use old stuff you have laying around to make a mold.....it will be impossible to remove from your master and mold box if it doesnt set up and cure. Trust I have been there.....its a gooey, bloody mess. So better to get fresh stuff and use it sooner rather than later. Buy only what you need although its tough to buy less than 16 oz. containers. You can see the finished mold above ready to make some cast copies in resin....that next installment will come very soon. Hopefully I covered everything. Any questions???? Rach10199, Canute, Mirabell61 and 11 others 14 Chuck Passaro - MSW Admin Sloop Speedwell - POF scratch Block Island Boat - POF scratch HMS Winchelsea - POB scratch build HM Cutter Cheerful - POB scratch build Royal Barge - POF scratch Medway Longboat- POF Scratch SYREN SHIP MODEL COMPANY Link to comment Share on other sites More sharing options...
Chuck Posted February 18, 2017 Author Share #3 Posted February 18, 2017 John, I dont like those at all. You mean the clay instant mold stuff that you press the master into??? Our masters for ship model parts and decorations are VERY VERY fragile. They are also very intricate. If you want the smallest of details to transfer to your mold, stick with the poured type shown. Rather than use that stuff which will break or distort your master, Better control is achieved when you can isolate the master and pour the mold material over it so it seeps into all the small details...as it is less likely to damage the delicate masters. It replicates the small details and textures a lot better as well. That clay stuff wont replicate the details and wont work its way into the crevices etc. When you pull the master from the reusable putty the molds are almost always distorted. Especially if you have deeper cavities and undercuts. That is a cheaper type of mold intended for larger and less intricate masters than we deal with. If you have lots of small detailed texture or undercutting it is very hard to press that cheaper mold putty around your master so the mold replicates the most intricate of details. I know that it is a lot more expensive but in the long run its just plain better all around to stick with a pour type compounds of good quality. After spending many many hours carving and creating a master I really dont want to risk breaking it by saving a few bucks or a few minutes when making a mold. BLACK VIKING, Jack12477, Nirvana and 3 others 6 Chuck Passaro - MSW Admin Sloop Speedwell - POF scratch Block Island Boat - POF scratch HMS Winchelsea - POB scratch build HM Cutter Cheerful - POB scratch build Royal Barge - POF scratch Medway Longboat- POF Scratch SYREN SHIP MODEL COMPANY Link to comment Share on other sites More sharing options...
Chuck Posted February 18, 2017 Author Share #4 Posted February 18, 2017 Dont no why but it seems as though John removed his question....above. It was a question about that instant mold putty that you push your masters into. I think it was a good and important question so hopefully leaving the post above will still make sense. if not let me know and I will delete my response above. Here are those links to the instant mold stuff questioned....maybe you could use it to cast cannons but I dont trecommend it for delicate masters with lots of detail. https://www.amazon.c...ds=instant moldHere's a link to the YouTube video on the Blue Stuff: mtaylor, Nirvana, Canute and 2 others 5 Chuck Passaro - MSW Admin Sloop Speedwell - POF scratch Block Island Boat - POF scratch HMS Winchelsea - POB scratch build HM Cutter Cheerful - POB scratch build Royal Barge - POF scratch Medway Longboat- POF Scratch SYREN SHIP MODEL COMPANY Link to comment Share on other sites More sharing options...
jhearl Posted February 18, 2017 Share #5 Posted February 18, 2017 (edited) Chuck - I decided to send the question to you as a PM rather than turn your tutorial into a discussion. But since it seems OK with you, here's what I said in the original post: I recently watched a YouTube video about a product called Blue Stuff which allows you to press a mold material around a part. The material softens when heated and hardens when cooled. It is re-usable. It seems hard to find in the US, but there is a similar product called Instant Mold available from Amazon. A quick YouTube search will reveal many videos on both products. I certainly understand that it would not be appropriate for delicate parts like the one in your demo. However, I need to make 8 hawse hole covers for the 1:24 scale model I'm working on and the master will be anything but delicate! So it seems like the Instant Mold might be useful for more robust parts. As I mentioned, I have not tried it, so I can't say for sure. Cheers - John Edited February 18, 2017 by jhearl PeteB, WackoWolf, Nirvana and 4 others 7 http://modelboatyard.com Recently Completed: Chesapeake Bay Buyboat - F.D. Crockett Link to comment Share on other sites More sharing options...
Chuck Posted February 18, 2017 Author Share #6 Posted February 18, 2017 For something like that it might work out OK....its hard to say. But for sure, the traditional route would work. But give it a try. Oh and feel free to openly discus this topic here....lets present all of the info we can. I think thats always better. WackoWolf, thibaultron, Canute and 4 others 7 Chuck Passaro - MSW Admin Sloop Speedwell - POF scratch Block Island Boat - POF scratch HMS Winchelsea - POB scratch build HM Cutter Cheerful - POB scratch build Royal Barge - POF scratch Medway Longboat- POF Scratch SYREN SHIP MODEL COMPANY Link to comment Share on other sites More sharing options...
dvm27 Posted February 18, 2017 Share #7 Posted February 18, 2017 Chuck, I followed your link and watched some casting techniques. I found it fascinating that you can spray paint the mold before casting and the color will impart perfectly to the copy. Suspect it wouldn't work with gold leaf but iron objects like cannons, stove parts, etc could come out blackened and ready for use. mtaylor, Canute, thibaultron and 5 others 8 GregwebsiteAdmiralty Modelsmoderator Echo Cross-section buildAdmiralty Models Cross-section BuildFinished buildPegasus, 1776, cross-sectionCurrent buildSpeedwell, 1752 Link to comment Share on other sites More sharing options...
Chuck Posted February 18, 2017 Author Share #8 Posted February 18, 2017 That actually works quite well Greg. The finishes can vary however but yes I have used that technique. Its actually easier than using the dies that you mix with the resin before pouring. BUT for cannon and black items there are better alternatives. Several black resin and plastic products are available that cure black. http://www.reynoldsam.com/product/smooth-cast-onyx/ and http://www.alumilite.com/store/p/928-Alumilite-Regular-Black.aspx These work great for casting and afterwards you can use some weathering powders to really make them look like black metal. Here is a link with something like Greg was referring to about making parts look like metal...its a powder rather than a spray or liquid application. I have used these and it works well. For example...if you use the pewter powder with black resin it looks pretty awesome on a cannon casting. But you have to experiment. I prefer the powders. http://www.alumilite.com/store/p/1082-Alumidust-clone.aspx http://www.alumilite.com/store/p/953-Alumilite-Metallic-Powder.aspx The monogram for example which is usually shown on a barge gold leafed...would look rather nice with the casting made using the gold powder. Just for giggles I will order some so you guys can see how it works and looks on these cast carvings for the barge. They come out much cleaner than painting them. the downside is they remain on your mold somewhat and you have to have a dedicated mold for that finish....more mold prep before casting subsequent copies is needed to make sure the mold is free from left over powder that might clog small details and textures the next go-around. Nirvana, Jack12477, dvm27 and 8 others 11 Chuck Passaro - MSW Admin Sloop Speedwell - POF scratch Block Island Boat - POF scratch HMS Winchelsea - POB scratch build HM Cutter Cheerful - POB scratch build Royal Barge - POF scratch Medway Longboat- POF Scratch SYREN SHIP MODEL COMPANY Link to comment Share on other sites More sharing options...
Jaxboat Posted February 18, 2017 Share #9 Posted February 18, 2017 You can use a number of metal powders. Cast bronze decorative copies of famous statues are made that way. The metal powder do weaken the strength of molded part but look great. I have no idea what the mix ratio of resin to bronze powder is. Canute, Richard Griffith, thibaultron and 1 other 4 Link to comment Share on other sites More sharing options...
xken Posted February 23, 2017 Share #10 Posted February 23, 2017 Here is a great site that has great tutorials as well as any product you may need to cast anything. I have used their white casting resins in silicone molds that will duplicate a fingerprint in the mold. Really explore their site. https://www.smooth-on.com/ reklein, Chuck, Jack12477 and 4 others 7 Ken Current build: Maersk Detroit" Future builds: Mamoli HMS Victory 1:90 Completed builds: US Brig Niagara, Dirty Dozen, USS Constitution, 18th Century Armed Longboat https://modelshipworld.com/index.php?/topic/11935-uss-constitution-by-xken-model-shipways-scale-1768/ Link to comment Share on other sites More sharing options...
xken Posted February 23, 2017 Share #11 Posted February 23, 2017 Chuck, go to the smooth-on site, click Products; then Modelmaking; then Restoring an antique picture frame. There you can see the process of cold casting a part with 320 resin and gold powder mixed in to make a repair. This is one way to cast parts with metallic finish already in the part. They have various powders including bronze which could make duplicate cannon barrels or other bronze parts. Enjoy! Ken thibaultron, Canute, mtaylor and 1 other 4 Ken Current build: Maersk Detroit" Future builds: Mamoli HMS Victory 1:90 Completed builds: US Brig Niagara, Dirty Dozen, USS Constitution, 18th Century Armed Longboat https://modelshipworld.com/index.php?/topic/11935-uss-constitution-by-xken-model-shipways-scale-1768/ Link to comment Share on other sites More sharing options...
Chuck Posted February 23, 2017 Author Share #12 Posted February 23, 2017 Thanks Ken I am very familiar with smooth-on products. They are very good as well. The tutorials are really good to. Nirvana, thibaultron, Canute and 1 other 4 Chuck Passaro - MSW Admin Sloop Speedwell - POF scratch Block Island Boat - POF scratch HMS Winchelsea - POB scratch build HM Cutter Cheerful - POB scratch build Royal Barge - POF scratch Medway Longboat- POF Scratch SYREN SHIP MODEL COMPANY Link to comment Share on other sites More sharing options...
Chuck Posted February 24, 2017 Author Share #13 Posted February 24, 2017 Prepare your mold for pouring There are many ways to do this but let me write about how I was taught. Before you pour the resin in the mold, I usually dust it with talc or in this case baby powder. This gives the cast part a nice finish and prevents bubbles from forming along the molds surface. The bubbles will slide away to the surface or the back of the casting. I will brush off the excess talk and make sure there isnt any clumping in the detailed areas of the mold. The photo above shows the baby powder after I prepared the mold. Next to it is some Alumilite casting resin. There are many different types. This is their regular stuff. It has an open time after mixing it of 90 seconds and cures in about 15 minutes....usually....I will explain this more later. I also made some castings using the Micro-Mark resin which has an open time of 3 minutes but cures in 40 minutes after pouring it....normally. Both are the same as far as being a two part mixture 1 to 1. Equal parts of A and B. The Alumilite cures tan while the Micromark cures white. There are many other colors and many other open and cure times available. Just pick one that you are comfortable with and like after giving it a try. I will say that short open times before pouring are tough.....you do feel rushed. But then you will have to wait less time while it cures. In the photo below below you will see that I have poured equal parts into disposable plastic shot glasses. They are just 2 oz. Our parts are very thin and tiny and using larger containers is problematic and wasteful. I have a wood scrap strip to stir it up after mixing the two parts together. A few points or tips worth mentioning. Make sure it isnt very cold where you are working on this stuff. The resin should be room temperature. This is true of the mold you are pouring it into. Good at room temperature or even better yet....warmed up a little. It cuts down on the cure and demold time. If its winter and cold I might sit the mold on the radiator for a minute or two. I do gently stir both parts before pouring them into their sep. containers. Make sure you dont agitate them to form air bubbles. Pouring the resin Next I pour one part into the other shot glass. Stir it up well but again be careful not to form bubbles. Remember that I only have 90 seconds before it starts to really harden up. So you must work quickly and stir for 20 seconds and then pour into your mold. Pour is not the correct word....these decorations are just 1/32" thick or deep in the mold. The design has small thin 1/32" wide elements. You just cant pour it on top of the mold. You have to carefully drip it into the mold as best you can. You will no doubt over fill the mold. But then take a wooden scrap stick and squeegee the excess to one side so it is mot a huge puddle. The parts would be too thick otherwise and require lots of sanding and cleaning. The photo shows the resin poured.....note how I squeegeed the excess to the bottom. Also note the dark color in the mold. It will cure to a light tan. Also note in that same photo how the shot glass has already cured lighter and is hard. This is less than 2 minutes after mixing both parts together. You will also notice that the resin in the mold is not cured yet. You see, thinner parts like this will take substantially longer to cure than the larger volume in the shot glass. In fact, it took a full 40 minutes for these thin fragile castings to cure in the mold. This is true even though the resin is sold as a 15 minute cure. As ship model parts are so small and thin they will take much much longer than they advertise. The resin heats up when it cures and that is why warming the mold up before pouring will speed the process up somewhat. It is also why a cold mold and a cold resin will take a very very long time to cure. So you have less time to pour knowing this but will need to wait longer to de-mold small parts. Keep this mind when you are selecting which resin to buy. After 40 minutes.....see below Ready to remove the casting The resin is very hard to the touch with a toothpick....ready to de-mold. Forty minutes later. Flex the mold a bit and carefully pry and work the casting out. Now when the casting is released it will look messy because unless you are pouring a huge part, these little ones will over flow a bit. So looking at the photo below, you can see the two tan castings on the bottom row (Alumilite) and the two white ones above those (Micro-Mark) The first of each pair show how they look right out of the mold. The flashing and excess should be removed. I usually rub them on a flat surface over some medium fine sandpaper. This will at least take the majority away. It doesnt take long to do but imagine if I didnt squeegee the excess away after I initially poured the resin into the mold. The example next to those in each pair is after I cleaned it up. Above them both you will see the master which was painted gold leaf next to a dime to show the thickness and size. The ones shown below are the MicroMark resin along with the master..... Both brands of resin show great detail.....even fingerprints. I cant say that either is better than the other except that I enjoyed the longer open time of the Micro-Mark resin. But Alumilite has different resins with more open time as well. So does Smooth-on mentioned earlier in this topic by some members. Like the mold rubber, this resin will not keep long. It doesnt have a long shelf life so after 6-9 months test it in your mixing shot glasses without pouring it into a mold....just to see if it still cures. Keep it in a cool and dry place. Moisture is bad for resin.....put the caps on tight. MikeB4, Jack12477, Nirvana and 8 others 11 Chuck Passaro - MSW Admin Sloop Speedwell - POF scratch Block Island Boat - POF scratch HMS Winchelsea - POB scratch build HM Cutter Cheerful - POB scratch build Royal Barge - POF scratch Medway Longboat- POF Scratch SYREN SHIP MODEL COMPANY Link to comment Share on other sites More sharing options...
Nirvana Posted February 24, 2017 Share #14 Posted February 24, 2017 Chuck, How will the casting hold up once cured? How hard are they, because I wonder if this could be a substitute for Brittania metal that are provided in kits depending where the part is going? I am curious, as I like to try this out some day, when economy allows. mtaylor, Jack12477, Canute and 1 other 4 Please, visit our Facebook page! Respectfully Per aka Dr. Per@Therapy for Shipaholics Finished: T37, BB Marie Jeanne - located on a shelf in Sweden, 18th Century Longboat, Winchelsea Capstan Current: America by Constructo, Solö Ruff, USS Syren by MS, Bluenose by MS Viking funeral: Harley almost a Harvey Nautical Research Guild Member - 'Taint a hobby if you gotta hurry Link to comment Share on other sites More sharing options...
AntonyUK Posted February 24, 2017 Share #15 Posted February 24, 2017 Hi Chuck. Very nice toutorl on component casting. I've been casting parts for some time now and this toutorl is brilliant because it deals with very small and thin parts. Can you please add the relevant parts to the Articles Database to make it easer for people to find. The only thing I would add is to use the same box to support the mould while making your castings. Lego in your case. Thumbs-up on this one from me. Regards Antony. mtaylor, Jack12477, Canute and 2 others 5 Best advice ever given to me."If you don't know ..Just ask. Completed Mayflower Completed Fun build Tail boat Tailboat Completed Build Chinese Junk Chinese Pirate Junk Completed scratch built Korean Turtle ship 1/32 Turtle ship Completed Santa Lucia Sicilian Cargo Boat 1/30 scale Santa Lucia On hold. Bounty Occre 1/45 Completed HMS Victory by DeAgostini modelspace. DeAgostini Victory Cross Section Completed H.M.S. Victory X section by Coral. HMS Victory cross section Completed The Black Pearl fun build Black Queen Completed A large scale Victory cross section 1/36 Victory Cross Section Link to comment Share on other sites More sharing options...
Chuck Posted February 24, 2017 Author Share #16 Posted February 24, 2017 Thank you. The resin gets pretty rigid in larger pieces. The thin pieces are fairly rigid but have some flex if you want it to. For a day or so after de-molding....certainly for a few hours after they are somewhat flexible and can be bent to conform to some bend. But they will firm up. There are so many different kinds of resin that you can buy some that is extra rigid and some that are extra flexible. This stuff I used is just the regular stuff though. Chuck mtaylor, Canute, Jack12477 and 2 others 5 Chuck Passaro - MSW Admin Sloop Speedwell - POF scratch Block Island Boat - POF scratch HMS Winchelsea - POB scratch build HM Cutter Cheerful - POB scratch build Royal Barge - POF scratch Medway Longboat- POF Scratch SYREN SHIP MODEL COMPANY Link to comment Share on other sites More sharing options...
Chuck Posted February 24, 2017 Author Share #17 Posted February 24, 2017 Just an FYI, This tutorial was about making simple one piece molds for flat-ish small decorations on ship models. Like gun port wreaths etc. There are also more complex two and three part molds for making fully round parts like cannon or a figurehead. When time permits I will make a similar tutorial based on my experiences. I will also continue to try new material and brands. For example, as soon as my gold dust gets here I will try and make a gilded example of the monogram used in this experiment. I am just waiting for it to arrive in the mail. But everyone should add there experiences here for simple one piece molds so we can start compiling more content and info for everyone. We will try to bring everyone more tutorials like this for other things.....maybe soldering, or blackening, or very soon I will be sculpting additional decorations for the barge kit prototype from Sculpey and will create a similar topic about that. Chuck Jack12477, mtaylor, Nirvana and 3 others 6 Chuck Passaro - MSW Admin Sloop Speedwell - POF scratch Block Island Boat - POF scratch HMS Winchelsea - POB scratch build HM Cutter Cheerful - POB scratch build Royal Barge - POF scratch Medway Longboat- POF Scratch SYREN SHIP MODEL COMPANY Link to comment Share on other sites More sharing options...
thibaultron Posted February 24, 2017 Share #18 Posted February 24, 2017 Though written for metal casting, the following book will give you ideas on how to make molds for complex parts. Just use RTV rather than sand. http://www.hnsa.org/resources/manuals-documents/single-topic/foundry-manual/ The ultimate graduation test was making a saucer, and tea cup, with a spoon sitting in the cup as all a one piece casting, not assembled as separate parts. dvm27, Nirvana, Canute and 1 other 4 Ron Thibault Shipjack Carrie Price from Pyro kit, with upgraded detailing and history. Going From A 2D Drawing To A 3D Printed Part Tutorial Link to comment Share on other sites More sharing options...
Louie da fly Posted March 11, 2017 Share #19 Posted March 11, 2017 This is a very useful and worthwhile tutorial. I'm eagerly looking forward to the one on two-piece moulds. I've got 50 oarsmen to make and I've never tried moulding with rubber and resin. thibaultron, mtaylor and Canute 3 It's not really a ship model unless you've bled on it. CURRENT BUILDS Venetian merchant Ship from Basilica of San Marco Golden City - Ballarat paddlewheeler FINISHED Australian couta boat RMS Titanic HMVS Cerberus 11th century Byzantine dromon Winchelsea Nef - Late 13th century Mediaeval ship Henry Grace a Dieu - Rebuild of 1:200 model I started in 1967 https://modelshipworld.com/topic/36379-mistydeefer-by-louie-da-fly-finished-restoration-decor-yacht/#comment-1040663 Mistydeefer - restoration of decor model yacht Link to comment Share on other sites More sharing options...


Recommended Posts