AndrewW Posted April 13, 2017 Share #1 Posted April 13, 2017 This is my first attempt at a wooden ship build. I come from a background of plastic model aircraft, radio control aircraft (fabric over balsa) and recently a foray into plastic model ships (CVN-65). I got the bug for model wooden ships after discovering the work a mate of mine did while helping his father clean out his possessions after his untimely passing. I inherited a box of spare parts, cannons etc and could feel them calling to me. To be honest the thing that intrigued me most about wooden ship building was the rigging. I am a perfectionist. Just ask my wife. So I purchased a kit that would allow me to practice plank on frame hull building as well as rigging. I wanted a kit that wasn't too expensive in case I stuffed it up. I picked the Endeavour longboat because of 1. The ties to the history of the discovery and settlement of my country 2. It looks pretty 3. It has three masts so I figured more rigging to play with, even though I know there are lots of comments on other logs that the longboat would almost certainly not have had 3 sails! I should have started this build log a long time ago, and for that I apologise. I also should have taken more photos, but I will attach the ones I have. I have learnt a lot of things doing this build. I have made quite a few mistakes, although I believe I've recovered from most of them fairly well. I have an ulterior motive for posting this build log, I have a serious issue with the rigging which will be detailed in a future post, and I am hoping for some advice. Cheers, Andrew. Quote Current Build: Caldercraft HM Brig Supply Completed Builds: HMS Endeavour Longboat Link to comment Share on other sites More sharing options...
AndrewW Posted April 13, 2017 Author Share #2 Posted April 13, 2017 After much deliberation ... and I mean hours of staring at the contents of the box, the instructions, online articles and videos etc I decided it was time to bite the bullet and start to put the hull together: Here are some photos of the first row of planking going on: I soaked each plank in very hot water for 15 minutes, clamped it in place and let it dry overnight. The next day I was able to remove the clamps and glue with PVA as the plank retained its shape. Mistake 1: I did not smooth off the frames quite as well as I should have, being afraid to ruin something. Therefore some of the frames do not make "square" contact with all of the planks. Thankfully this does not show through as sharp creases in the planks. coxswain and Fright 2 Quote Current Build: Caldercraft HM Brig Supply Completed Builds: HMS Endeavour Longboat Link to comment Share on other sites More sharing options...
AndrewW Posted April 13, 2017 Author Share #3 Posted April 13, 2017 First layer of planking complete. I was feeling quite chuffed with myself. Time to start on the second layer. A few little rough spots, lots of swearing, but I was very happy with the results. Also dyed and then attached the rubbing strakes and gunwale covers. Mistake 2: I didn't follow the instructions and missed that I was supposed to install the keel before planking, so my keel sits on top of the planking an things don't quite line up as they are supposed to. Mistake 3: I followed the instructions and installed the gunwale covers .. should have left them off as they make it impossible to install the bases (bench seats) later. Fright and coxswain 2 Quote Current Build: Caldercraft HM Brig Supply Completed Builds: HMS Endeavour Longboat Link to comment Share on other sites More sharing options...
AndrewW Posted April 13, 2017 Author Share #4 Posted April 13, 2017 A couple of coats of matt varnish applied with a light rub down in between and things are starting to look really good, way better than I was hoping for: Fright and coxswain 2 Quote Current Build: Caldercraft HM Brig Supply Completed Builds: HMS Endeavour Longboat Link to comment Share on other sites More sharing options...
AndrewW Posted April 13, 2017 Author Share #5 Posted April 13, 2017 I don't have any in progress photos of the rest of the steps, I pretty much followed the instructions and did a LOT of head scratching when it came to the rigging. Also, I suffered the same problem with the rudder that everyone else seems to have in that it is too "long". I ended up trimming off the bottom of the rudder level with the keel and that worked pretty well. Was also missing the hinge pins from the kit so fashioned some replacements from toothpicks. I am pretty certain I have all the lines running to the right locations through the correct blocks etc, but I have a serious issue with the top booms on each of the two masts: Looks reasonable here (excuse the excess rigging hanging around, I have not tied off and trimmed some of it yet). These closeups also make the ropes look a lot fluffier/hairier than they do in real life ... need to investigate solutions to his before my next model though. coxswain 1 Quote Current Build: Caldercraft HM Brig Supply Completed Builds: HMS Endeavour Longboat Link to comment Share on other sites More sharing options...
AndrewW Posted April 13, 2017 Author Share #6 Posted April 13, 2017 And here is my problem that I am seeking help with. In the previous photos I had loops of thread holding the gaffs up so that the sails are nice and taught ... When I remove these loops of thread this happens on both sails Can anyone tell me why this is happening? To my engineers brain it doesn't appear that the running rigging is able to support the forward end of the gaff where it attaches to the mast. The only other idea I have is to glue the gaff in the proper location, but I really don't want to have to do that. Also, and probably not as importantly, the rear boom has rigging on both sides holding it in place, whereas the forward boom only has rigging on the port side, so there is no way of keeping tension in that piece of rigging as the boom just flops around. It feels to me like there should be rigging running off to the starboard side as well, but there is not enough blocks in the kit to do this and it doesn't appear in the instructions or photos: coxswain 1 Quote Current Build: Caldercraft HM Brig Supply Completed Builds: HMS Endeavour Longboat Link to comment Share on other sites More sharing options...
AndrewW Posted April 13, 2017 Author Share #7 Posted April 13, 2017 Without wanting to hide my problem that I'm hoping someone can help me with because I'm not quite done yet ... What have I learnt from this model? 1. These things can be frustrating but incredibly rewarding 2. I have learnt how to cover mistakes. Wood is so much more forgiving in that respect that plastic 3. Always do a full check of the kits contents when you first open it! 4. Don't rush the planking 5. I need to do some serious reading up on rigging, knots etc. I know my knots are wrong, I just had no idea what I was doing. 6. Use filler blocks between the frames, I actually don't know how I managed to get the planks to bend around the bow without them 7. Measure 6 times and cut once! A mini-review of the kit: 1. Lots of spares for almost everything (I almost cried when I snapped a rubbing strake, but they had several spares) 2. The rudder issue is well known 3. The rigging instructions are atrocious 4. I ran out of rigging thread, as does everyone else on this kit. Luckily I found spare in my mate's stuff because AL were happy to post me some, if I could provide them a copy of my receipt (er, yeah, right) 5. The instructions aren't terrible, but there is a lot of assumed knowledge. 6. A trap for new players is that in contrast to a lot of bigger kits, the first layer of planking is visible from inside the boat. So you really need to make sure you do a good job, otherwise any filling would be visible and look terrible. Overall, not a bad starter kit if you take your time and use the awesome resources available on this site. So what's next? I was initially thinking the Endeavour to go with the longboat ... but I am now looking at the Caldercraft Sherbourne due to better instructions, better components, only a single mast and yet more complex/authentic rigging. There is definitely a Bounty, Supply and Endeavour in my future though Nikiforos and coxswain 2 Quote Current Build: Caldercraft HM Brig Supply Completed Builds: HMS Endeavour Longboat Link to comment Share on other sites More sharing options...
Rick01 Posted April 13, 2017 Share #8 Posted April 13, 2017 Couple of points for you - did you read and of the previous builds here? I know I pointed out the problem with the gunwale covers when I did mine (chweck my signature for a link). The forward boom has a block and tackle that should be anchored down along the centre line of the boat - this fixes the "flopping around" problem. As to the hoisting of the gaff, I think that the model is missing a section of rigging - with cutters and larger ships there is a hoist which lifts from the yoke thus keeping everything neat. Solution is either scrap the sails and lower the gaffs, or install a hoist for each gaff. Got to agree about rigging plans - not the best for a beginner. AndrewW 1 Quote Completed builds:- HM Cutter Mermaid. HMS Endeavour's Longboat Topsail Schooner Enterprize Arab Dhow Sultan Link to comment Share on other sites More sharing options...
AndrewW Posted April 13, 2017 Author Share #9 Posted April 13, 2017 Thanks Rick. I did read a lot of build logs before I started, and yes I did read yours but I must have missed the bit about the gunwale covers. Thanks for the help on the block and tackle on the forward boom, I can see how moving that to the centre line will fix my problems there. Had a look at the instructions again and the drawing still looks like it is attached at the port side, but the centre obviously makes sense. As to the missing rigging, I agree it seems to me that it would require it, I am looking at your build log again now to plan a way forward. Perhaps I will indeed remove the sails and lower the gaffs ... it looks pretty good on yours Quote Current Build: Caldercraft HM Brig Supply Completed Builds: HMS Endeavour Longboat Link to comment Share on other sites More sharing options...
Rick01 Posted April 13, 2017 Share #10 Posted April 13, 2017 With my build I think I actually just referred to the step numbers and suggested that they should be reversed rather than saying don't do this first do that! With the furry rigging a bit of dilute PVA glue rubbed on it "with" the thread direction neatens it up. I re-rigged mine after those photos as I wasn't happy with the way the stays were anchored, I looked at Chuck's build of a longboat and used a similar method with deadeyes and hooks. AndrewW 1 Quote Completed builds:- HM Cutter Mermaid. HMS Endeavour's Longboat Topsail Schooner Enterprize Arab Dhow Sultan Link to comment Share on other sites More sharing options...
Rick01 Posted April 13, 2017 Share #11 Posted April 13, 2017 If you want to stick with an Australian theme then check out HM Cutter Mermaid. Not really a cheap kit and the accuracy is not hte greatest. However there are some sketches on-line done by the commander of her which allow for the kit to be amended quite easily. I didn't do a build log but there is a good one in the forum, plus I've got a number of posts in the rigging area which help. If you do go down that route I'm happy to talk you through the amendments I made. AndrewW 1 Quote Completed builds:- HM Cutter Mermaid. HMS Endeavour's Longboat Topsail Schooner Enterprize Arab Dhow Sultan Link to comment Share on other sites More sharing options...
Telp Posted April 13, 2017 Share #12 Posted April 13, 2017 Hi Andrew, the longboat is a great little project that does get you hitting the ground running, although small, she offers a bit of everything for sure. The cantering of the bottom gaff as mentioned is positioned as such by being secured to a block along the centre of the deck just below the gaff and is then rigged. the upper gaff issue is a pain, I worked around it by raising the gaff to it upper position on the mast, I held it in place with a small clamp and then tightened the rigging, I also placed a few drops of glue where the parell beads are, this did help keep it in place. as said, she is a tiny little lady but I felt it made working on her harder as everything is so small against man fingers. I did add some pics to my build log but if you need any of a particular area let me know. Atb AndrewW 1 Quote Current build: Caldercraft 1:64 HM Brig Supply Finished builds: HMS Endeavours longboat Link to comment Share on other sites More sharing options...
Paul Jarman Posted April 13, 2017 Share #13 Posted April 13, 2017 Hi Andrew, I think this is a great job for a first attempt at a wooden ship model, especially one so small. Rigging and knots is not my strong point, but I think yours look fine and will get better the more you build these kits. The kit I am building is large and a lot easier because the parts are of a decent size, I will however have to build 11 ships boats, all plank on frame. I practice with different knots using a good size piece of rope. I then drop the sizes once I have the knot worked out. Downsizing to different sizes of string, then to shoelaces, then on to cotton thread. Once I am down to the smaller size then I hit the problems. By doing this I have surprised myself at some of the knots I can tie. Look forward to seeing the next kit you choose. AndrewW 1 Quote In work Amati-rms-titanic-1912-1250 Unfinished kit Revell Container-ship-colombo-express Finished AL - King of the Mississippi AL-Sanson Link to comment Share on other sites More sharing options...
AndrewW Posted April 13, 2017 Author Share #14 Posted April 13, 2017 Thanks for the further information Rick. In the end I decided to ditch the sails and now she looks awfully like yours Telp, thanks for the information as well. I had considered gluing the parell beads, but it felt wrong. Happy with the solution of losing the sails though. I am very keen to hear how you are getting on with your HM Brig Supply as a second model? I am very keen on that model my heart says yes but my head says pick something with a single mast! Anyways, after a couple of hours of sail removal and re-rigging. She is complete. Done. Dusted. Only problem now is I have nothing to do ... time to make a decision on the next model. Sorry about the rubbish iPhone photos, will take better photos that do her justice tomorrow in the sunlight. Fright, Nikiforos and Telp 3 Quote Current Build: Caldercraft HM Brig Supply Completed Builds: HMS Endeavour Longboat Link to comment Share on other sites More sharing options...
AndrewW Posted April 13, 2017 Author Share #15 Posted April 13, 2017 8 minutes ago, Paul Jarman said: I think this is a great job for a first attempt at a wooden ship model, especially one so small. Rigging and knots is not my strong point, but I think yours look fine and will get better the more you build these kits. Thanks Paul, appreciated. Yes, tying knots on such a tiny model has stretched my fine motor skills and eyesight. Whilst I am a Scout Leader and not afraid of knots, I have never had to tie them using tweezers before! My one disappointment that only myself and experts on a forum like this will notices is that I have not used the proper knots, in most cases I just used a simple knot, added a dot of super glue and trimmed the end of the rope. I like your idea of practising with ever decreasing sized ropes. Once I get myself a good book on rigging I will be giving that a go. Quote Current Build: Caldercraft HM Brig Supply Completed Builds: HMS Endeavour Longboat Link to comment Share on other sites More sharing options...
Rick01 Posted April 13, 2017 Share #16 Posted April 13, 2017 I think you'll find that even the experts cheat and use a simple overhand knot at times. In fact some correct knots actually become disproportionately large when used on some of the finer lines. Suggestion for you - instead of superglue use a PVA it does make removing the line easier if/when you find you hate the look of a particular line! Quote Completed builds:- HM Cutter Mermaid. HMS Endeavour's Longboat Topsail Schooner Enterprize Arab Dhow Sultan Link to comment Share on other sites More sharing options...
AndrewW Posted April 13, 2017 Author Share #17 Posted April 13, 2017 I definitely won't be using superglue on knots on the next build, PVA all the way ... Although it is almost a good thing that this rigging is superglued as it removes the temptation to remove the rigging and do it "better". Quote Current Build: Caldercraft HM Brig Supply Completed Builds: HMS Endeavour Longboat Link to comment Share on other sites More sharing options...
S.Coleman Posted April 13, 2017 Share #18 Posted April 13, 2017 What a great job. This kit would certainly of helped you with getting an understanding of wooden ship building. I use beeswax on my rigging lines as it removes that fluffy fuzzy look. Good work. AndrewW 1 Quote Regards, Scott Current build: 1:75 Friesland, Mamoli Completed builds: 1:64 Rattlesnake, Mamoli - 1:64 HMS Bounty, Mamoli - 1:54 Adventure, Amati - 1:80 King of the Mississippi, AL 1:64 Blue Shadow, Mamoli - 1:64 Leida Dutch pleasure boat, Corel - 1:60 HMS President Mantra, Sergal Awaiting construction: 1:89 Hermione La Fayette AL - 1:48 Perserverance, Modelers shipyard Link to comment Share on other sites More sharing options...
Paul Jarman Posted April 13, 2017 Share #19 Posted April 13, 2017 Always a difficult choice, sails or no sails. Must say I like the look without as you can see the details better. Good advice with beeswax, I Use this myself, it also makes the tying better for the smaller knots. Quote In work Amati-rms-titanic-1912-1250 Unfinished kit Revell Container-ship-colombo-express Finished AL - King of the Mississippi AL-Sanson Link to comment Share on other sites More sharing options...
Telp Posted April 13, 2017 Share #20 Posted April 13, 2017 Hi Andrew, the supply is going ok at the moment, I am now on the rigging stage which is the bit I like, although I've made a few mistakes on the actual build I have gathered as much as possible on ways to rectify. my plan is to do a big ship at some point preferably HMS Aganemon, so what I am doing is building up as I go, so from one to two masts, then two to three, with a copper hull and more intricate bits as I go so that by the time I get to the large ship I would hopefully have gained enough skill sets to not worry on what's coming. the supply is a nice moderate build, there is plenty of space to rig things like the shrouds and dead eyes etc, but enough scope to up the understandings of things. If you don't fancy a two masted build how about something like HMS Pickle? Quote Current build: Caldercraft 1:64 HM Brig Supply Finished builds: HMS Endeavours longboat Link to comment Share on other sites More sharing options...
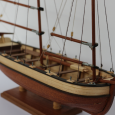
AndrewW Posted April 26, 2017 Author Share #21 Posted April 26, 2017 I realised I never came back with the final photos. Here they are, not the best but they turned out ok I think. Fright, ccoyle, Nikiforos and 1 other 4 Quote Current Build: Caldercraft HM Brig Supply Completed Builds: HMS Endeavour Longboat Link to comment Share on other sites More sharing options...

Recommended Posts
Join the conversation
You can post now and register later. If you have an account, sign in now to post with your account.